Showing 4145 items
matching tram 2
-
 Ballarat Tramway Museum
Slide - 35mm slide/s - set of 24, Noel Simons, 20/05/1971 12:00:00 AM
... tram 2... Gully Jobs Gully tram 2 tram 5 tram 19 tram 21 tram 25 tram 26 ...Set of 24 transparencies taken on 20/5/1971 on Kodak mounts. 1195.1 - Bendigo 19 arriving at Charing Cross en route to North Bendigo with Fountain Plaza and the City Family Hotel in the background. No. 19 has two roof ads for the SEC. -'Electricity better for cooking' and 'Everything's under control in my all electric kitchen' 1195.2 - as above, but standing at the Charing cross stop, with the Beehive Stores and other buildings along the east side of Pall Mall in the background. 1195.3 - No 21 ex Golden Square crossing View St. trackwork in front of No. 25 waiting to depart for Quarry Hill. No.21 has two roof ads (as for No.19 in 1195.1) and No.25 has one SEC roof ad and another. Ezywalkin sign in the background, and Fountain Plaza. 1195.4 - as for 1195.3, but after 21 has arrived and 25 left for Quarry Hill. Has Ezywalkin store and the Beehive store in the background. 1195.5 - No. 5 at the Eaglehawk terminus. Photo taken with a cannon in foreground looking along High St. Eaglehawk. Has shops on the west side of High St. in the background. 1195.6 - No. 5 at the Eaglehawk terminus, close up of the rear of the tram - note tow bar arrangement. Has destination of Quarry Hill. 1195.7-Nos.25 and 5 crossing at the Thorpe St. Loop, California Gully. No. 25 bound for Eaglehawk (has SEC Briquette and electric cooking roof ads) and 5 en route for Quarry Hill with a SEC and Cinzano roof ad. 1195.8 - as for 1195.7, but after trams have passed each other. Has Borough Auto Service building in the background. 1195.9 - No. 5 in Mt Korong Road, towards Bamard Street, photo taken after tram has passed photographer. 1195.10 - No. 30 at the Golden Square terminus with the Milk Bar on the right hand side of the photograph. 1195.11 - No. 30 inbound at Fire Station Loop, High St. Golden Square. Has old fire station in the background. Passengers are boarding the tramcar. 1195.12 - No. 30 in High St, bound for North Bendigo between Vine and Wattle Streets. 1195.13 - No. 5 bound for Eaglehawk waits at Iron Bark Gully Loop, at Hayes St. 1195.14 - No. 5 and No. 2 crossing at Iron Bark Gully Loop. 1195.15 - No. 5 bound for Eaglehawk leaving the Manchester Loop, Long gully. 1195.16 - No. 5 passing William Street, Long Gully en route to Eaglehawk. 1195.17 - No. 5 just before the California Gully Crossing Loop. 1195.18 - Nos. 5 and 26 crossing at California Gully crossing Loop. No. 5 heading to Eaglehawk, 26, Quarry Hill. 1195.19 - No. 5 in High St. Eaglehawk with Bob Moyle's Victoria Hotel and the TAB in the background. 1195.20 - No. 5 in High St. Eaglehawk approaching the terminus. Photo taken after the tram has passed the photographer. Has Foodland store and J. Best Fruit supply in the background, along with Eaglehawk Town Hall. 1195.21 - No. 5 at the Eaglehawk terminus, photo taken along seldom used track along High St. 1195.22 - as for 1195.22 - but at the very end of the track. 1195.23 - No. 5 en route for Quarry Hill climbs High St. Eaglehawk with the Victoria Hotel and Eaglehawk Town Hall in the background. 1195.24 - No. 5 and 25 crossing at Jobs Gully Loop. Note 25 has a black on white destination roll, while No. 5 has a white on black destination roll. Information written on in black ink and date stamped on purple ink. 1195.1 - "No. 19 arrives at Charing Cross Bendigo from Golden Square" 1195.2 - "No. 19 about to leave Charing Cross for North Bendigo" 1195.3 - "No. 25 awaiting departure for Quarry Hill, watches No. 21 arrive at Charring Cross from Golden Square" 1195.4 - "No. 21 on North Bendigo service and No. 25 on Quarry Hill run await departure at Charing Cross" 1195.5 - "No. 5 at Eaglehawk terminus" 1195.6 - "No. 5 at Eaglehawk terminus" 1195.7 - "Nos. 5 and 25 crossing at Thorpe St. Loop, California". 1195.8 - "Nos. 25 and 5 crossing Thorpe St. Loop, California Gully". 1195.9 - "No. 5 descending Mt Korong Rd. towards Bamard St." 1195.10 - "Birney car No. 30 at Golden Square terminus" 1195.11 - "Birney car No. 30 in High Street near Thistle Street (Fire Station Loop)" 1195.12 - "No. 30 in High St. between vine and Wattle Streets" 1195.13 - "No. 25 at Hayes Street Loop Iron Bark". 1195.14 - "Nos. 2 and 5 crossing at Hayes Street Loop Iron Bark" 1195.15 - "No. 5 at Manchester Loop opposite Havilah Road, Long Gully" 1195.16 - "No. 5 passing William Street, Long Gully". 1195.17 - "No. 5 at California Gully" 1195,18 - "Nos. 26 and 5 at Thorpe St. Loop, California Gully". 1195.19 - "No. 5 in High St. Eaglehawk". 1195.20 - "No. 5 approaching Eaglehawk terminus" 1195.21 - "No. 5 at Eaglehawk terminus" 1195.22 - "No. 5 at Eaglehawk terminus" 1195.23 - "No. 5 in High St. Eaglehawk" tramways, trams, bendigo, charing cross, eaglehawk, california gully, golden square, iron bark gully, jobs gully, tram 2, tram 5, tram 19, tram 21, tram 25, tram 26, tram 30 -
 Ballarat Tramway Museum
Slide - 35mm slide/s - set of 20, Noel Simons, 21/05/1971 12:00:00 AM
... tram 2... Tram Stops Golden Square tram 2 tram 5 tram 17 tram 21 tram 26 ...Set of 20 transparencies taken on 21/5/1971 on Kodak mounts. 1197.1 - Bendigo No. 5 en route to Eaglehawk at Creeth St Long Gully. Tram has a SEC roof ad and Cinzano roof ad. 1197.2 - No 5 approaching Needle Loop between Long Gully and California Gully. On left hand side is the City of Bendigo sign, indicating city boundary. 1197.3 - As for 1197.2 but actually entering loop. Photo taken after tram has passed photographer. 1197.4 - No. 26 bound for Eaglehawk descending the railway bridge near Eaglehawk, at Jobs Gully. 1197.5 - as for 1197.4, but after crossing bridge, now ascending a hill. Photo taken after tram has passed photographer. 1197.6 - No. 26 climbing High St. hill Eaglehawk, nearing end of Double track, bound for Quarry Hill. Shows centre of the road poles. 1197.7 - As for 1197.6, with tram entering single track section. Photo taken after tram has passed photographer. Has a BP service station in the background. 1197.8 - No. 26 (bound for Quarry Hill) crossing No. 17 (Eaglehawk) at Job's Gully Loop. 1197.9 - No. 17 climbing railway bridge at Job's Gully, en route to Eaglehawk. Photo taken after tram has passed photographer. 1197.10 - No.26 bound for Quarry Hill, leaving Long Gully Loop? Has the Creeth St. church in l197.l in the far background. Photo taken after tram has passed photographer. 1197.11 - Tramway Point work at the northern end of Long Gully Loop. 1197.12 - No. 17 en route for Quarry Hill turning into View St. from Bamard St. Tram has SEC roof ads "Everything fine in my all electric Kitchen' and 'Electric Cooking is Matchless'. 1197.13 - as for 1197.12, but tram has turned into View St and about to enter the double line track. Photo taken after tram has passed photographer. 1197.14 - No. 21 enters Nolan St after turning from MacRae St. en route to Bendigo. Note sign on its own post noting tram turns "Beware Tram Turns" and stop sign on adjacent pole "Trams stop on Request". No. 21 has two SEC roof ads. 1197.15 - No. 21 in Nolan St. after turning from Bridge St. (White Hills Road). Note signal light for Bridge St. loop on pole corner of street. Photo taken after tram has passed photographer. 1197.16 - No. 2 bound for Eaglehawk at unknown location. 1197.17 - Tram stop sign on a pole "CARS STOP BY REQUEST" 1197.18 - No. 5 in Carpenter St.? en route to Quarry Hill. 1197.19 - No. 28 has just arrive at Golden Square terminus, passengers are disembarking and the trolley pole is being turned. Golden Square Hotel in the background. 1197.20 - No. 28 at Golden Square terminus. Has a "Nothing beats Briquettes for hear roof ad. Information written on in black ink and date stamped on purple ink. 1197.1 - "No. 5 at Creeth St. Long Gully" 1197.2 - "No. 5 approaching Needle Loop between Long Gully and California Gully" 1197.3 - "No. 5 at Needle Loop between Long Gully and California Gully" 1197.4 - "No. 26 crossing railway bridge at Job's Gully near Eaglehawk" 1197.5 - "No. 26 just after crossing railway bridge at Job's Gully near Eaglehawk/ 1197.6 - "No. 26 in High St. Eaglehawk" 1197.7 - "No. 26 at end of double track in High St. Eaglehawk" 1197.8 - "Nos. 26 and 17 crossing at Job's Gully Loop" 1197.9 - "No. 17 crossing railway bridge at Job's Gully near Eaglehawk". 1197.10 - "No. 26 at Long Gully" 1197.11 - 'Northern end of points at Long Gully Loop". 1197.12 - "No. 17 turning into View St. from Bamard St. Bendigo". 1197.13 -'No. 17 at beginning of double track in View St. after leaving Bamard St. Bendigo. 1197.14 - "No. 21 enters Nolan St. from MacRae St. Bendigo." 1197.15 - "No. 21 in Nolan St. Bendigo just after leaving White Hills Road." 1197.16 - "No. 2" 1197.18 - "No. 5" 1197.19 - "Birney car No. 28 at Golden Square Terminus" 1197.20 "Birney car No. 28 at Golden Square Terminus" tramways, trams, bendigo, long gully, railway bridge, jobs gully, trackwork, nolan st, quarry hill, tram stops, golden square, tram 2, tram 5, tram 17, tram 21, tram 26, tram 28 -
 Ballarat Tramway Museum
Slide - 35mm slide/s - set of 32, Noel Simons, 25/02/1971 12:00:00 AM
... tram 2... Charing Cross Quarry Hill Trackwork tram 2 tram 5 tram 7 tram 21 ...Set of 31 transparencies taken on 25/2/1972 on Kodak mounts. 1201.1 - Bendigo No. 26 in Bond St. just after leaving Long Gully en route for Quarry Hill. Has Norris Supermarket in background. Has two SEC roof ads. 1201.2 - No. 26 climbing View St. from Charing Cross en route to Eaglehawk. Has ANZ bank and AMOCO service station in background. 1201.3 - as for 1201.3, but after tram has passed photographer. Has buildings west of Mackenzie St. in photograph. 1201.4 - Tram stop and centre of the road pole with two "CARS STOP BY REQUEST" signs mounted on pole at the corner of Mackenzie St. 1201.5 - same position as for 1201.3, but with No. 5 descending the street. 1201.6 - same position as for 1201.2, but with No. 5 descending the street. Photo taken after tram has passed photographer. 1201.7 - No. 7 in Nolan St. from across the park at Lake Weeroona. 1201.8 - No. 7 entering McCrae St from Nolan St. - distant view. Note "TRAM "sign on left hand side under tree and overhead in McCrae St. from former track that once was in this street. 1201.9 - No. 7 in High St. with Cathedral in background. Tram en route to North Bendigo. Note scaffolding around Cathedral main spire area. 1201.10 - No. 7 crossing Bendigo Creek bridge in High St. near Golden Square. Has a Caltex Service station in the background. 1201.11 - No. 7 at Golden Square terminus with Sunburst Fruit Juices and a Peters Ice cream delivery vans alongside. 1201.12 - as for 1201.11 but photo taken from behind tram, with the end of the rails in the photograph. 1201.13 - No. 7 and 21 in Pall Mall at Charing Cross with No. 5 in the background. Taken some distance away from the location. 1201.14 - No. 7 at Golden Square terminus, taken a short distance from the tram terminus. Shows Milk Bar on right hand side and the hotel on the left hand side. Taken from the south side of the roadway. 1201.15 - as from 1201.14 but taken from the north side of the roadway. 1201.16 - No 5 waiting at California Gully loop. Distant photo showing surrounds 1201.17 - No. 5 en route for Quarry Hill crossing No. 26 at California Gully. 1201.18 - No. 26 at Eaglehawk terminus with Eaglehawk Town Hall and Post Office in background. 1201.19 - No. 21 arriving at Charing Cross en route to North Bendigo. Has Alexandra Fountain in the background, ANZ bank RACV building, and other buildings on the north side of Pall Mall or Nolan St. 1201.20 - No. 26 en route for Quarry Hill at Charing Cross, with crew standing by front door. Has Colonial Mutual life building, Armstrong Tyre Service (Firestone) and a sign for Cohns Drinks in the background. 1201.21 - as for 1201.20 but with No. 5 en route to Eaglehawk now in photograph. 1201.22 - No. 26 at Quarry Hill terminus. 1201.23 - No. 26 at Quarry Hill terminus, view of front portion of tram only from a gate at the Bendigo cemetery. 1201.24 - Track at the end of the Quarry Hill line showing the point blades of the former "Y" terminus and the overhead for this. 1201.25 - No. 2 at the Quarry Hill terminus, looking along the former Trackwork. 1201.26 - as for 1201.25 1201.27 - number not used. 1201.28 - Golden Square terminus from some distance from the actual terminus, showing the Warning sign "TRAM" for motorists from the south. No. 7 at the terminus. 1201.29 - No. 7 passing through the Golden Square shopping centre. Numerous cars and pedestrians. Tram en route for North Bendigo. 1201.30 - No. 7 in High St. Golden Square, en route for North Bendigo. Photo taken after tram has passed photographer. 1201.31 - No. 7 in High St. just past Wattle St. with the Cathedral in the background. Tram has two SEC roof ads good side on photo, 'Everything's fine in my all electric kitchen' and 'Electrical cooking - clean, quick, economical'. 1201.32 - No. 7 in High St. nearing Wattle St. Has Cathedral in the background. Photo taken after tram has passed photographer.Information written on in black ink and date stamped on purple ink. 1201.1 - "No. 26 in Bond St just after leaving Long Gully" 1201.2 - "No. 26 climbing View St. from Charing Cross" 1201.3 - "No. 26 ascending View St. from Charing Cross (At Mackenzie St.)" 1201.4 - "View St. & Mackenzie St." 1201.5 - "No. 5 in View St. near Mackenzie St." 1201.6 - "No. 5 in View St. nearing Charing Cross." 1201.7 - "No. 7 in Nolan St. seen from Lake Weeroona Park." 1201.8 - "No. 7 entering McRae St. from Nolan St. Note "TRAM" warning sign on left. 1201.9 - "No. 7 in High St. passing Short St." 1201.10 - "No. 7 crossing Bendigo Creek bridge in High St. near Golden Square." 1201.11 - "No. 7 at Golden Square terminus" 1201.12 - "No. 7 at Golden Square terminus" 1201.13 - "No 7, 21 and 5 at Charing Cross" 1201.14 - "No. 7 at Golden Square terminus" 1201.15 - "No. 7 at Golden Square terminus" 1201.16 - "No 5 waiting at California Gully loop." 1201.17 - "Nos. 5 and 26 crossing at California Gully loop" 1201.18 - "No. 26 at Eaglehawk terminus" 1201.19 - "No. 21 arriving at Charing Cross from Golden Square" 1201.20 - "No. 26 at Charing Cross" 1201.21 - "Nos. 5 and 26 at Charing Cross." 1201.22 - "No. 26 at Quarry Hill terminus" 1201.23 - "No. 26 at Quarry Hill terminus seen through the gates of the Bendigo Cemetery." 1201.24 - "Quarry Hill terminus showing remains for former double track layout abandoned before 1964." 1201.25 - "No. 2 at Quarry Hill terminus" 1201.26 - "No. 2 at Quarry Hill terminus" 1201.28 - "The Southern approach to Golden Square with No. 7 standing at the terminus, "TRAM" warning sign on the left. 1201.29 - "No. 7 passing through Golden Square Shopping Centre" 1201.30 - "No. 7 in High St. Golden Square" 1201.31 - "No. 7 in High St. passing Wattle St." 1201.32 - "No. 7 in High St. nearing Wattle St."tramways, trams, bendigo, bond st., view st., nolan st., high st., eaglehawk, california gully, charing cross, quarry hill, trackwork, tram 2, tram 5, tram 7, tram 21, tram 26 -
 Ballarat Tramway Museum
Slide - 35mm slide/s - set of 8, Noel Simons, 25/02/1972 12:00:00 AM
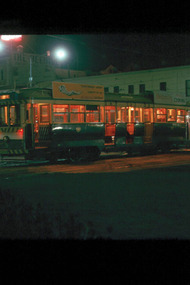
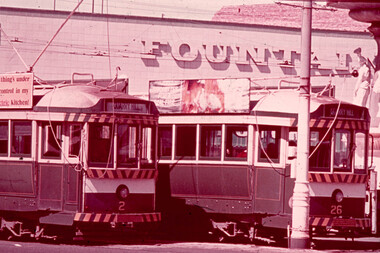
... tram 2... Photo Charing Cross Quarry Hill Mitchell St. tram 2 tram 5 tram ...Set of 8 transparencies taken on 25/02/72 on Kodak mounts. 1202.1 - Night photo of Bendigo 5 at Charing Cross, waiting to depart to Quarry Hill. Tram has two SEC roof ads. Has Ezywalkin and the Beehive buildings in the background. 1202.2 - as for 1202.1 1202.3 - as for 1202.1 but further back and 7 and 21 waiting for their runs as well in Pall Mall. 1202.4 - 5 and 2 at Charing Cross, night photo, looking along Mitchell St. with Fountain Plaza on right of photo and Ezywalkin store. 1202.5 - No. 2 at Charing cross, bound for Eaglehawk. Tram has two SEC ads. 1202.6 - No. 26 at Quarry Hill terminus with the cemetery in the background. Tram has two SEC roof ads. 1202.7 - No. 26 in Mitchell St. bound for Eaglehawk, at Wills St. with the Hopetoun Hotel in the background. 1202.8 - as for 1202.6Information written on in blue ink and date stamped on purple ink. 1202.1 - "No. 5 at Charing Cross" 1202.2 - "No 5. at Charing Cross" 1202.3 - "Nos. 7, 21 and 5 at Charing Cross" 1202.4 - "Nos. 5 and 2 at Charing Cross" 1202.5 - "No. 2 at Charing Cross" 1202.6 - "No. 26 at Quarry Hill" 1202.7 - "No. 26 in Mitchell St. opposite Wills St." 1202.8 - "No. 26 at Quarry Hill" tramways, trams, bendigo, night photo, charing cross, quarry hill, mitchell st., tram 2, tram 5, tram 7, tram 21, tram 26 -
 Ballarat Tramway Museum
Slide - 35mm slide/s - set of 19, Noel Simons, 26/02/1972 12:00:00 AM
... tram 2... Square tram 2 tram 5 tram 7 tram 26 Information written ...Set of 18 transparencies taken on 26/2/1972 on Kodak mounts. 1203.1 - Bendigo 5 at Eaglehawk terminus - with new traffic works. 1203.2 - No. 5 climbing the High St. hill Eaglehawk with the buildings on the east side in the photo. 1203.3 - No 2 descending the road over rail bridge at Job's Gully, heading for Quarry Hill. 1203.4 - as for 1202.3, but more side on. Tram has two SEC roof ads. 1203.5 - as for 1202.4 1203.6 - No. 26 entering Garden Gully Loop, Mt. Korong Road, Ironbark. Tram en route to Eaglehawk. Water column on right hand side of photograph. 1203.7 - No. 2 on the Eaglehawk route, Iron Bark area?, bound for Quarry Hill. 1203.8 - as for 1202.7, but photo taken after tram has past photographer. 1203.9 - No. 5 at Eaglehawk terminus, night photo. Tram has arrived at terminus, showing Quarry Hill, pole turned, but the tram lights have yet to be turned around. 1203.10 - as for 1202.9, but lights have been turned around. 1203.11 - No. 26 climbing the View St. Hill near the Commodore Hotel. Has Campbells Electrical Services building in the background. Photo taken after the tram has passed the photographer. 1203.12 - No. 7 end on photograph, at Golden Square, destination showing Golden Square - night photo. 1203.13 - number not used. 1203.14 - as for 1202.12, but partially side on, has a passenger looking out the tram. 1203.15 - as for 1202.12, but with hotel in the background. 1203.16 - No. 26 and 2 at Charing Cross, night photo. Tram 26 en route to Quarry Hill, 2 to Eaglehawk. 1203.17 - Interior photo of No. 26, at night. 1203.18 - No. 26 at the Quarry Hill terminus as night. 1203.19 - as for 1202.18, but central portion of the tramcar.Information written on in blue ink and date stamped on purple ink. 1203.1 - "No. 5 at Eaglehawk terminus" 1203.1 - "No. 5 in High St. Eaglehawk" 1203.3 - "No. 2" 1203.4 - "No. 2" 1203.5 - "No. 2" 1203.6 - "No. 26 at Garden Gully Loop Mt Korong Rd., Ironbark" 1203.7 - "No. 2" 1203.8 - "No. 2" 1203.9 - "No. 5 at Eaglehawk terminus" 1203.10 - "No. 5 at Eaglehawk terminus" 1203.11 - "No. 26 in View St. Near the Commodore Motel" 1203.12 - "No. 7 at Golden Square Terminus" 1203.14 - "No. 7 at Golden Square Terminus" 1203.15 - "No. 7 at Golden Square Terminus" 1203.16 - "Nos. 26 and 2 at Charing Cross" 1203.17 - "Interior of No. 26" 1203.18 - "No. 26 at the Quarry Hill terminus" 1203.19 - "No. 26 at the Quarry Hill terminus "tramways, trams, bendigo, eaglehawk, bridges, iron bark gully, night photo, quarry hill, golden square, tram 2, tram 5, tram 7, tram 26 -
 Ballarat Tramway Museum
Slide - 35mm slide/s - set of 25, Noel Simons, 26/02/1972 12:00:00 AM
... tram 2... tram 2 tram 5 tram 7 tram 21 tram 25 tram 26 Information ...Set of 25 transparencies taken on 26/2/1972 on Kodak mounts. 1204.1 - Bendigo No. 5 - just arrived at Manchester Loop near Havilah Road, Long Gully. Photo taken after tram has passed photographer. 1204.2 - No. 26 in Backhaus St. Long Gully passing William St, en route to Quarry Hill. Photo taken after tram has passed photographer. 1204.3 - No. 5 climbing the High St. Hill Eaglehawk, heading for Quarry Hill with the buildings on the West side of High St. in the background, including the Eaglehawk Town Hall. 1204.4 - as for 1204.3, but tram close up. 1204.5 - as for 1204.3, but after tram has passed photographer. 1204.6 - No. 5 at intersection of Mt Korong Road Ironbark and Calder Highway, with the AMPOL service 'station in the background. Photo taken after tram has passed photographer. 1204.7 - No. 26 en route to Quarry Hill shortly after leaving Needle Loop, passing William St., Long Gully. 1204.8 - No. 5 at California Gully Loop, picking up a passenger, with the shops at Long Gully in the background. Photo taken after tram has passed photographer. 1204.9 - No. 5 in Long Gully, en route to Quarry Hill. Photo taken after tram has passed photographer. 1204.10 - No. 2 at Eaglehawk terminus with the Eaglehawk Town Hall and Post Office in the background. Tram has two SEC roof ads. 1204.11 - No. 2 at Eaglehawk terminus, close up. 1204.12 - as for 1204.11, but through the park gates. 1204.13 - as for 1204.11, but with tram stop shelters in the foreground and buildings on the West side of High St in the background. 1204.14 - No. 2 in Mt. Korong Rd, midway between California Gully Loop and Needle Loop. Photo taken after tram has passed photographer. 1204.15 - No. 5 in Long Gully, en route to Quarry Hill. 1204.16 - as for 1204.15, but with trams departed loop. Has an ESSO service station in the background. 1204.17 - No. 26 leaves Charing Cross up View St.. Photo taken after tram has passed photographer. Has Armstrong Tyre Service, Cohns Drinks ad on a building and the T&G building in the background. Also Firestone ads on the tyre service building. 1204.18 - No. 5 waits at Charing Cross with the Alexandra Fountain in the background. Tram has two SEC roof ads, 'Everything s fine in my all electric kitchen' and 'Electricity Best for Cooking'. Has RACV, Colonial Mutual Life buildings in the background and the planting areas around Charing Cross gardens in the foreground. 1204.19 - No. 21 en route to North Bendigo arrives at Charing Cross, with passengers waiting to board. No. 5 in the background. In the background is the Fountain Gate Plaza building and the City Family Hotel. 1204.20 - as for 1204.19, but with No. 7 en route to Golden Square. 1204.21 - as for 1204.19, but closer up. 1204.22 - as for 1204.18 1204.23 - No. 25 in Nolan St. near the crossing of Bendigo Creek, running a special tram tour. 1204.24 - No. 25 on a special charter, in Weeroona Ave. at Cnr of Caledonia St. passing the Gas works. 1204.25 - Nos. 25 (showing Golden Square), 7 and 26 at Charing Cross. Has fountain in the background.Information written on in blue ink and date stamped on purple ink. 1204.1 - "No. 5 at Manchester Loop, near Havilah Rd. Long Gully." 1204.2 - "No. 26 in Backhaus St. Long Gully passing William St." 1204.3 - "No. 5 in High St. Eaglehawk." 1204.4 - "No. 5 in High St. Eaglehawk." 1204.5 - "No. 5 in High St. Eaglehawk." 1204.6 - "No. 5 in Mt. Korong Rd., Ironbark, passing Calder Highway Junctn." 1204.7 - "No. 26 shortly after leaving Needle Loop, passing William St., Long Gully. No. 5 cresting hill in distance." 1204.8 - "No. 5 at California Gully Loop." 1204.9 - "No. 5 in Long Gully" 1204.10 - "No. 2 at Eaglehawk terminus." 1204.11 - "No. 2 at Eaglehawk terminus." 1204.12 - "No. 2 at Eaglehawk terminus." 1204.13 - "No. 2 at Eaglehawk terminus." 1204.14 - "No. 2 in Mt. Korong Rd, midway between California Gully Loop and Needle Loop. 1204.15 - "Nos. 2 and 26 crossing at Long Gully." 1204.16 - "No. 26 leaves Long Gully loop for Eaglehawk as No. 2 pulls out of the far end towards Bendigo" 1204.17 - "No. 26 beginning the climb up View St. from Charing Cross." 1204.18 - "No. 5 at Charing Cross." 1204.19 - "No 21 arrives at Charing Cross from Golden Square while No. 5 awaits departure time for Eaglehawk." 1204.20 - "Nos. 7, 21, and 2 (behind which is No. 5) at Charing Cross." 1204.21 - "Nos. 7, 21, and 2 at Charing Cross." 1204.22 - "No. 5 at Charing Cross." 1204.23 - "No. 25 in Nolan St. near Bendigo creek crossing" 1204.24 - "No. 25 in Weeroona Ave. at cnr of Caledonia St." 1204.25 - "Nos. 25, 7, 26 and 2 (behind 26) at Charing Cross."tramways, trams, bendigo, eaglehawk, long gully, california gully, charing cross, north bendigo, tram 2, tram 5, tram 7, tram 21, tram 25, tram 26 -
 Ballarat Tramway Museum
Slide - 35mm slide/s - set of 12, Noel Simons, 28 Feb. 1972
... tram 2... Charing Cross High St View St. tram 2 tram 5 tram 6 tram 21 tram ...Set of 12 transparencies taken on 28/2/1972 on Kodak mounts. 1207.1 - Bendigo 26 and 2 at Charing Cross. 26 en route for Eaglehawk, 2 for Quarry Hill. Has the Colonial Mutual Life, Armstrong Tyre Service, and Australian Mutual Provident Society buildings and a Cohns Drinks ad. in the background. 1207.2 - as for 1207.1 but with Alexandra fountain in the foreground. 1207.3 - No. 2 in Mitchell St. heading for Quarry Hill. Photo taken after tram has passed photographer. Has buildings on either side of Mitchell St. in the background, including the Plaza Theatre. 1207.4 - No. 6 en route for Golden Square departing Charing Cross. Has the RACV and ANZ bank in the background. 1207.5 - No. 2 crossing Pall Mall to enter Charing Cross ex Quarry Hill, with the Fountain Plaza in the background. 1207.6 - No. 6 arriving Charing Cross ex Golden Square with No. 21 alongside. No. 21 has the SEC ad. 'Everything's fine in my all electric kitchen.' Has the City Family Hotel and the Fountain Plaza shopping centre in the background. 1207.7 - No. 5 at Charing Cross en route for Quarry Hill with No. 2 behind. No. 2 has two SEC roof ads, 'Everything s fine in my all electric kitchen' and 'Electricity best for cooking'. RACV building in the background. Tram crews are discussing the day in the front of the tram. 1207. 8 - No. 21 in High St. Bendigo with the Cathedral in the background. No. 21 has two SEC roof ads, 'Everything's fine in my all electric kitchen' and 'Electricity best for cooking'. 1207.9 - No. 6 in High St. Bendigo with the Cathedral in the background. 1207.10 - No. 6 in High St. Bendigo, just past Wattle St. Photo taken after the tram has passed the photographer from within the Highway Car Sales yard. 1207.11 - No. 26 bound for Eaglehawk at the end of the double track in View St., note signal contactors, tram stop and section signs mounted on pole. 1207.12 - No. 26 turning from View St. into Barnard St.Information written on in blue ink and date stamped on purple ink. 1207. 1- "Nos. 26 and 2 at Charing Cross." 1207.2 - "Nos. 26 and 2 at Charing Cross." 1207.3 - "No. 2 in Mitchell St. just after leaving Charing Cross." 1207.4 - "No.6 leaving Charing Cross for Golden Square." 1207.5 - "No. 2 arriving at Charing Cross from Quarry Hill." 1207.6 - "No. 21 waits at Charing Cross as No. 6 arrives from Golden Square." 1207.7 - "No 5 at Charing Cross with No. 2 lurking behind." 1207.8 - "No. 21 in High St. at cnr of Wattle St." 1207.9 - "No. 6 in High St. at cnr of Wattle St." 1207.10 - "No. 6 in High St. between Wattle and Vine Sts." 1207.11 - "No. 26 at end of double track in View St. near Barnard. St. 1207.12 - "No. 26 seen at dusk turning from View St. into Barnard St."tramways, trams, bendigo, charing cross, high st, view st., tram 2, tram 5, tram 6, tram 21, tram 26 -
 Ballarat Tramway Museum
Slide - 35mm slide/s set of 7, Noel Simons, 29 Feb. 1972
... tram 2... Charing Cross View St. Nolan St. tram 2 tram 7 tram 18 tram 26 ...Set of 7 transparencies taken on 29/2/1972 on Kodak mounts. 1208.1 - Bendigo 18 (en route to Quarry Hill) and 2 (Eaglehawk) in the early morning at Charing cross with the Alexandra fountain and the Fountain Plaza building in the background. 1208.2 - No. 2 descending View St. Photo taken after tram has passed the photographer. 1208.3 - as for 1208.2 at Mackenzie St. intersection 1208.4 - No. 26 ascending View St. with the ANZ bank, T& G in the background. 1208.5 - as for 1208.4, but at Mackenzie St. intersection. Photo taken after tram has passed the photographer. 1208.6 - No. 18 in View St. seen from the lookout tower in Rosalind Park. 1208.7 - No. 7 en route to North Bendigo in Nolan St. Photographed across the Centenary Oval.Information written on in blue ink and date stamped on purple ink. 1208.1 - "Nos. 18 and 2 in the early morning sun at Charing Cross." 1208.2 - "No. 2 descending View St. towards Charing Cross." 1208.3 - "No. 2 in View St. passing Mackenzie St." 1208.4 - "No. 26 in View St. just after leaving Charing Cross." 1208.5 - "No. 26 climbing View St. past Mackenzie St." 1208.6 - "No. 18 climbing View St. seen from lookout tower in Rosalind Park." 1208.7 - "No. 7 in Nolan St. heading towards North Bendigo. / Last picture of a Bendigo tram."tramways, trams, bendigo, charing cross, view st., nolan st., tram 2, tram 7, tram 18, tram 26 -
 Ballarat Tramway Museum
Photograph - Black & White Photograph/s - set of 7, 16/04/1972 12:00:00 AM
... tram 2.... tramways trams Bendigo Closure Eaglehawk tram 25 tram 2 tram 18 ...Yields information about the final day of the Bendigo tramways and some of the tramcars used.Set of seven black and white photographs of the day Bendigo Tramways closed 16-4-1972. Taken on Agfa paper. Has printing date of 18.8.72 stamped on rear. All have been used for display purposes. .1 - 25 leaving the depot .2 - 2 at Charing Cross, bound for Eaglehawk - has Ezywalkin Store in background. .3 - 18 crossing another tram at a loop on the Eaglehawk line. .4 - 28 at Charing Cross showing Special .5 - 26 inside depot, with Borough of Eaglehawk sign on the front bumper and bunting around the tram. .6 - 29 leaving the depot .7 - 26 in the final parade, with "Destination Eaglehawk" on a roof mounted advertisement board, with the Beehive building in the background and Coca Cola advertisement on top of the building. Photographer not known.3549.8 - has "photo No. 8" on rear and been marked out for publication. tramways, trams, bendigo, closure, eaglehawk, tram 25, tram 2, tram 18, tram 28, tram 26, tram 29 -
 Ballarat Tramway Museum
Photograph - Black & White Photograph/s, Jack Stranger, Jun. 1947
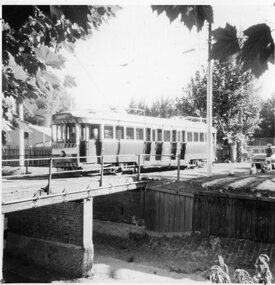
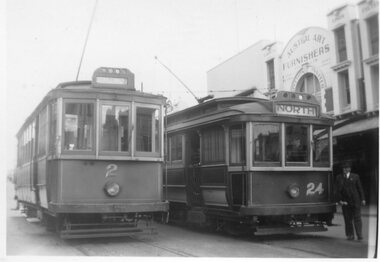
... tram 2... Moorabool St tram 2 tram 24 On rear in green ink "SEC Geelong Birney ...Yields information about the appearance of two of Geelong's tram in 1947.Black and white photograph of Geelong 2 - destination of Belmont and No. 24, destination North, in Moorabool St with the Austral Arts Furnishers store in the background. Photograph by Jack Strager June 1947.On rear in green ink "SEC Geelong Birney Nos. 2 (original stock) 24 (ex M&MTB ex HTT) / June 1947 J. Stanger photo."tramways, trams, geelong, moorabool st, tram 2, tram 24 -
 Ballarat Tramway Museum
Slide - 35mm slide/s, Bob Wilson, May. 1972
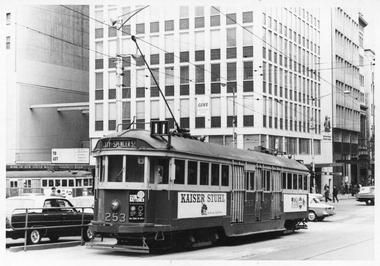
... tram 2... Charing Cross Bendigo tram 2 tram 26 Stamped on base of slide ...White cardboard mount, 35mm slide, from the Association of Railway Enthusiast's film strip titled "Provincial Tramway Film Strip" of Bendigo bogie tramcars Nos. 2 and 26 at Charing Cross, with the Fountain Plaza building in the background. Both trams have the destination of "Quarry Hill" No. 26 has the older type of destination roll and is fitted with a SEC Briquettes roof advertisement. The film strip notes (Reg. Item 2560), provided the following caption details: "The hub of the Bendigo system was at Charing Cross, where the "Quarry HILL" - "EAGLEHAWK "and "'GOLDEN SQUARE" - "NORTH BENDIGO" routes crossed at right angles. It was customary for trams for all four routes to meet at the CROSS. Here cars 2 & 26 (showing a wrong dest- -ination) meet by the fountain. -Mar '72 (Bob Wilson)" See image btm2580p.tif for high level scan of image. Stamped on base of slide "11789" and written in ink on top edge "No. 2 & 26 Charing Cross Bendigo"tramways, trams, are, film strip, charing cross, bendigo, tram 2, tram 26 -
 Ballarat Tramway Museum
Slide - 35mm slide/s, Travis Jeffrey, c1962
... tram 2... Eaglehawk Jobs Gully tram 2 tram 17 "BES 27" in pencil Agfa plastic ...Agfa plastic mount (blue base, white cover) with a photo of Bendigo 2, with destination of Eaglehawk, crossing No. 17 at Jobs Gull loop on the Eaglehawk line. No. 17 has destination of Quarry Hill. Has a Streets Ice cream and Whitehorse Whisky advertisements on the rear panel. Photo taken c1962."BES 27" in penciltramways, trams, bendigo, eaglehawk, jobs gully, tram 2, tram 17 -
 Ballarat Tramway Museum
Slide - 35mm slide/s, Travis Jeffrey, late 1960's or early 1970's
... tram 2... Depot Junction tram 2 tram 17 "BES 42" in pencil Agfa plastic ...Agfa plastic mount (blue base, white cover) with a photo of Bendigo Nos. 2 and 17 at the area of Depot Junction, swapping crews. No. 2 showing Eaglehawk and No. 17, Depot. Note differences in the destination blinds or rolls, white on black, or the later form, black on white. Photo taken late 1960's early 1970's from the window of another tram."BES 42" in penciltramways, trams, bendigo, crews, depot junction, tram 2, tram 17 -
 Ballarat Tramway Museum
Photograph - Digital image Set of 20, Dec. 1970
... tram 2... Controllers North Bendigo View St tram 29 tram 5 tram 24 tram 2 tram 3 ...Set of 20 digital images of Bendigo Tramways December 1970 by Stuart Lodington. .1 - Bendigo track gang renewing a joint, McCrae St, with welding truck alongside and Birney No. 29. .2 - No. 5 at Quarry Hill terminus? .3 - No. 24 at the depot .4 - No. 2 on the Quarry Hill line .5 - No. 5 approaching the Eaglehawk terminus .6 - No. 29? at the Golden Square Terminus with Bill Rodda's Golden Square hotel in the background. .7 - No. 3 inbound on the Quarry Hill line. .8 - trams crossing on the Eaglehawk line, through the window of one tram. .9 - side on view of a B23D controller in a bogie tram .10 - No. 5 at the Eaglehawk terminus .11 - No. 21 at No. 21 crossing on the Golden Square line. No. 29 showing special, No.21 - North Bendigo, Fire Station Loop? .12 - No. 29 and another tram - near work site? .13 - interior view from Birney looking at the front of another tram parked behind. .14 - No. 29, No. 6 crossing at .15 - No. 6, showing special at Charing Cross. .16 - No. 5 and another tram at North Bendigo on a Special .17 - No. 28 at Charing Cross .18 - No. 5 on Special at a Loop on the Eaglehawk line .19 - No. 28, and two other trams at the Myrtle St Loop .20 - No. 18 showing Quarry Hill and two other trams on View St.trams, tramways, bendigo, trackwork, mccrae st, depot, quarry hill, eaglehawk, golden square, controllers, north bendigo, view st, tram 29, tram 5, tram 24, tram 2, tram 3, tram 6, tram 28, tram 18 -
 Ballarat Tramway Museum
Album, State Electricity Commission of Victoria (SECV), "Ballarat Tramways undertaking - Pictorial Record of the fleet", 1958
... tram 2... Fleet tram 2 tram 18 ESCo tram 21 tram 22 tram 23 tram 26 tram ...Photo album - with a photograph and typed details of a selection of the various trams in the fleet. Based on the date of the tram car mileages as at 31-3-1958, compiled during 1958. Not known who compiled it, but could have been the Tramway Superintendent Mr Denmead from SEC or other parties photos. All photos are common to the collection except for the one of tram 36 in Wendouree Parade at depot junction. Has sheets for: ESCo 2 - Power station - item 698 ESCo 2 - Sturt St advertising Jago boots - item 1710 ESC0 18 - Sturt St - Suttons advert - item 2490 ESCo 21 - Sebastopol type at depot - item 3002 ESCo 23 - Sebastopol type at depot - item 5142 SEC 17 - at depot junction - item 1714 SEC 19 - at depot - item 4525 SEC 21 - at depot - item 4526 SEC 22 - at depot - item 1360i7 SEC 23 - Gold tram at depot - item 1707i1 SEC 26 - at depot - item 4529 SEC 29 - at depot - item 541i1 SEC 30 - at depot - item 1706 SEC 36 - at depot junction - similar to item 4527, added as 9119 SEC 40 - at depot - 1355i1 Bendigo - silver star starch - item 1890. Demonstrates the history of the SEC Ballarat fleet through a selection of photographs.Album - 22 paper leaves, bound with grey end papers and grey plascticised cover with leather finish. Album produced by New Star. Photos secured with photo corners, typed sheets glued onto the leaf.photo album, secv, tramcars, car fleet, tram 2, tram 18, esco, tram 21, tram 22, tram 23, tram 26, tram 29, tram 30, tram 36, tram 40 -
 Melbourne Tram Museum
Album - Photo Album, Brian Weedon, Tramway photos, 1970 to 1980's
... tram 2... Junction W7 class Buses SECV tram 27 tram 2 tram 8 tram 1026 tram 4 ...Photo Album - green card slip case containing heavy grey card covers front and rear, front protective page and 12 photo pages with adhesive surface and clear plastic sheet cover - on cardboard sheet bound by a heavy white comb binder marked "Photo Album" on the front inside cover. Each page has scanned to a pdf file. Page 1 - newspaper cutting and two photos of Ballarat No. 27 completing 1,000,000 miles. Item from "A Place in the Sun" written by Keith Dunstan. Photo of tram 27 by the Ballarat Courier. Date of Photo. 29/6/1968, taken prior to the TMSV Tour of that date. Black and white photograph of a group of the passengers on No. 27 during the celebration of the tram reaching 1,000,000 (million) miles in Ballarat. Glenys George, Brian Weedon, John Fitzsimons, Graeme Turnball, Paul Nicholson, Barry George and Kevin Clark. Page 2 - black and white photograph of Geelong Nos 2, 8, 4, 1 and another 4 wheel tramcar and a open cab motor bus photographed within the interior of Geelong depot, prior to 1924. From notes provided by David O'Neill, 12/2003, advises that bus driver is either Bill Hamaling or Charles Stafford. Gentlemen next to No. 8 could be Vic Phipps. Page 3 - Black and White photograph of Geelong No. 7 - c1912, soon after opening with driver, conductor and passengers. Shows the magnetic brake shoe. Page 4 - Black and White photograph of Geelong Cross bench tram No. 11 in Corio Tce, now Brougham St outside Marks Hotel. Tram has the destination of Newtown. Page 5 - Black and White photograph - T 180, showing "Pyrotechnic Fty" possibly on No. 9 Road at Malvern Depot Page 6 - Black and White photograph of L 105 prior to any modifications - see also Reg Item 2498 for another print. - ditto - interior view show off centre seats in the drop centre. Page 7 - Black and White photographs of W308 and W1 419 - - see also Reg Item 3422 for another print. Page 8 - Black and White photograph of W3 665 Page 9 - Black and White photograph of W4 670 - - see also Reg Item 3154 for another print. - ditto Interior view. Page 10 - Black and White photograph of SW6 850 with the dash canopy lighting - as built. - ditto Interior view - - see also Reg Item 674 and 3426 for another prints. Page 11 - not used. Page 12 - Black and White photographs of Y469 and X2 674 (This tram was later renumbered 680 - see page 30 of Destination City 5th Edition). - - see also Reg Item 3161 an d 3427 respectively for another prints. Page 13 - Black and White photographs of Y1 611 and an interior view - - see also Reg Item 3160 for another print. Page 14 - Set of 6 colour prints of Bendigo 28 decorated as the 1968 Myer Christmas tram, Birney 23 and 29. Page 15 - Set of 4 colour prints of Bendigo 3, 17, 6 and 17, Page 16 - Colour print of traffic and trams on Princes Bridge with Batman Ave terminus in the view. - Postcard of Swanston St looking south just north of Lonsdale St with W2 432 and another W2. See 3558.1 for a loose copy of the postcard - NuColorVue No. BP 1060-1 - titled on rear "A view towards the Shrine during peak traffic" Has signs advertising Penfolds Wines, Ansett-ANA, State Savings Bank and Foys. Page 17 - Set of two colour postcards - W2 405 and another tram southbound in St Kilda Road with the Prince Henry hospital in the background and Bourke St with W7 1026 and other trams in the view. Page 18 - Set of two photographs of W2's in Collins St at Spring St, with No. 512 in the view. Page 19 - View looking across the Gardens with two W2 class trams in Macarthur St. - W2 637 at corner of Collins and Exhibition St - see also Reg Item 1999 for another print. Page 20 - set of three colour photographs - W2 303 in bound on St Kilda Road, destination City, Route 4D, see also Reg Item 324 - W7 965 turning from Queens Road into St Kilda Road at St Kilda Junction. - W4 671 at South Melbourne Depot. Page 21 - not used Page 22 - MMTB Bus 702 Mark VI MMTB Freighter body and W7 1035 Page 23 - not used Page 24 - SEC coal locomotive 108 at night. Most photographs are MMTB Official. Listed 22-5-2019trams, tramways, melbourne, geelong, ballarat, bendigo, postcards, l class, interiors, new trams, mmtb, t class, w class, w1 class, w3 class, w4 class, sw6 class, y class, x2 class, princes bridge, batman ave, swanston st, st kilda rd, bourke st, collins st, macarthur st, st kilda junction, w7 class, buses, secv, tram 27, tram 2, tram 8, tram 1026, tram 4, tram 1, tram 11, tram 105, tram 308, tram 419, tram 665, tram 670, tram 850, tram 469, tram 674, tram 611, tram 23, tram 29, tram 17, tram 3, tram 6, tram 28, tram 405, tram 29, tram 432, tram 1017, tram 512, tram 303, tram 965, tram 671, tram 1035, tram 637 -
 Melbourne Tram Museum
Photograph - Black and White photograph, Ellen Butland, Set of 53 photos, 1974 and 1998
... tram 2... tram 1 tram 7 tram 3 tram 2 tram 5 tram 399 tram 217 tram 220 ...Set of 53 black and white photographs collected or taken by Ellen Butland - 1964 to 1975 For a listing of the prints see htd5720list.pdf. Word file and scanning by Gary Davey 5/2021 EB1 253 in Collins St, circa 1970 Ellen Butland.jpg EB2 349 on a tour in Dandenong Rd, circa 1975 Ellen Butland.jpg EB3 249 in William St, Center poles, demolition Menzies Hotel, c1970 Ellen Butland.jpg EB4 399 in Elizabeth St, TAA building in Franklin St. c1970 Ellen Butland.jpg EB5 410, 811, 397, 273, 526 Camberwell Depot, c1970 Ellen Butland.jpg EB6 388 & 852 in Riversdale Rd, c1967 Ellen Butland.jpg EB7 410 in Flinders St, c1970 Ellen Butland.jpg EB8 349 in Royal Park, c1973 Ellen Butland.jpg EB9 385 and AEC MK.VI bus in South Melbourne Depot, c1974 Ellen Butland.jpg EB10 606 in St Kilda Rd, c1973 Ellen Butland.jpg EB11 434 on a tour at South Melbourne Depot, c1974 Ellen Butand.jpg EB12 433 in Riversdale Rd, c1969 Ellen Butand.jpg EB13 418 in St Kida Rd, c1974 Ellen Butland.jpg EB14 432 & 273 in Camberwell Depot, c1968 Ellen Butland.jpg EB15 410, Cotham Rd Kew? c1968 Ellen Butland.jpg EB16 415 in Riversdale Rd, c1969 Ellen Butland.jpg EB17 418 in St Kilda Rd, c1968 Ellen Butand.jpg EB18 992 in Camberwell Depot, c1975 Ellen Butand.jpg EB19 983 in Bourke St, late 1968 Ellen Butland.jpg EB20 968 in Bourke St, late 1968 Ellen Butand.jpg EB21 9A Truck, c1969 Ellen Butland.jpg EB22 611at Batman Ave, c1964 Ellen Butland.jpg EB23 588 at South Melbourne Siding, c1968 Ellen Butland.jpg EB24 578 in Riversdale Rd, c1968 Ellen Butand.jpg EB25 507 at Camberwell Terminus, c1967 Ellen Butland.jpg EB26 674 in Swanston St, c1964 Ellen Butland.jpg EB27 681 on Route 56 in William St, c1969 Ellen Butland.jpg EB28 682 in Williamson Rd, c1971 Ellen Buckland.jpg EB29 772 in Elizabeth St, c1968 Ellen Butland.jpg EB30 776 on Route 69 Glenferrie Road at Henrietta St, c1968 Ellen Buckland.jpg EB31 786 at Footscray Terminus, c1972 Ellen Butland.jpg EB32 667 in Swanston St, c1958 Ellen Butland.jpg EB33 267 in St Kilda Rd, c1935 Ellen Butland.jpg EB34 900 and a L class at South Melbourne Depot, Jan 1975 Ellen Butland.jpg EB35 1003 in Spring St, c1965 Ellen Butland.jpg EB36 958 on Route 4, c1953 Ellen Butland.jpg EB37 1 and 7 in Victoria Parade, 1975 Ellen Butland.jpg EB38 3, 2 & 5 at Preston Workshops, 30-4-1975 Ellen Butland.jpg EB39 3 in Nicholson St, 30-4-1975 Ellen Butland.jpg EB40 3 in Queens Parade, 30-4-1975 Ellen Butland.jpg EB41 217 at Malvern Depot, 13-1-1974 Ellen Butland.jpg EB42 220 in Collins St, c1970 Ellen Butland.jpg EB43 225 in Swanston St, c1967 Ellen Butland.jpg EB44 233 in South Melbourne Per way yard, c1976 Ellen Butland.jpg EB45 242 in Brunswick Depot, c1968 Ellen Butland.jpg EB46 1007 in Bourke St, c1970 Ellen Butland.jpg EB47 1013 in Bourke St ,c1970 Ellen Butland.jpg EB48 1020 in LaTrobe St, c1969 Ellen Butland.jpg EB49 1025 in Collins St, c1969 Ellen Butland.jpg EB50 1037 in Collins St, c1970 Ellen Butland.jpg EB51 838 in South Melbourne Depot, c1975 Ellen Butland.jpg EB52 W2's and R10 recovery vehicle in Glenhuntly Depot, c1975 Ellen Butland.jpg EB53 1001 in Bourke St, c1970 Ellen Butland.jpgtrams, tramways, glenferrie road, collins st, dandenong rd, elizabeth st, st kilda rd, riversdale rd, batman ave, nicholson st, victoria parade, preston workshops, malvern depot, glenhuntly depot, camberwell depot, riversdale road, flinders st, tram 253, tram 606, tram 434, tram 433, tram 418, tram 432, tram 273, tram 410, tram 415, tram 418, tram 992, tram 983, tram 349, tram 968, tram 611, tram 588, tram 578, tram 507, tram 674, tram 681, tram 682, tram 772, tram 249, tram 776, tram 786, tram 667, tram 267, tram 900, tram 1003, tram 958, tram 1, tram 7, tram 3, tram 2, tram 5, tram 399, tram 217, tram 220, tram 225, tram 233, tram 242, tram 1007, tram 1013, tram 1020, tram 1025, tram 1037, tram 838, tram 1001, w2 class, w3 class, w4 class, w5 class, sw6 class, w6 class, w7 class, y1 class, x class, z1 class, tram 811, tram 397, tram 526, tram 385, tram 653, r10 vehicle, 9a truck, route 11, route 56, route 59, route 48, route 74, route 7, route 4, route 9a, route 9e, route 97 -
 Melbourne Tram Museum
Document - Report, Heritage Victoria, "Recommendation of the Executive Director and assessment of cultural heritage significance - Malvern Tram Depot - Amendment - 20/2/2020", Jan. 2020
... cultural heritage significance - Malvern Tram Depot - Amendment... - Malvern Tram Depot - Amendment - 20/2/2020" Details the history... - Malvern Tram Depot - Amendment - 20/2/2020" Document Report ...Digital copy of a 60 page report - ""Recommendation of the Executive Director and assessment of cultural heritage significance - Malvern Tram Depot - Amendment - 20/2/2020" Details the history and context of the location relevant to the development of the PMTT and MMTB systems route, the equipment contained within the building, includes all moveable objects within the building including documents. Has a detailed statement of cultural significance, proposed permit policy. The history includes details of the electrification of the Melbourne's tramways, the rotary converter equipment, its operation, architecture. Report includes photographs of the interior of the building. The last amendment was to include the items with the former Rotary Converter sub-station.trams, tramways, substation, malvern depot, rotary converters, heritage victoria, significance, coldblo road, transformer, power supply, electrical engineering, pmtt, mmtb -
 Ballarat Tramway Museum
Document - Form/s, List, State Electricity Commission of Victoria (SECV), "Tram times for Sunday 2-3-58", "Application for permission to exchange duties", 1958
... "Tram times for Sunday 2-3-58", "Application for permission... and the last trams, titled "Tram times for Sunday 2-3-58" Lists trams... to city and the last trams, titled "Tram times for Sunday 2-3-58 ...Demonstrates preparation of notes for tram operations and an actual use of the form used for change of shifts by crewsList - hand written sheet on the rear of the application form listing tram times from Lydiard St / Outer termini to city and the last trams, titled "Tram times for Sunday 2-3-58" Lists trams for Victoria St, Mt Pleasant, Sebastopol, Lydiard St North, Gardens via Sturt St West and Drummond North. Written in ink. Form - duplicated form S35 - "Application for permission to exchange duties", dated 19-2-58, for A Thompson (No. 63) to swap with C. Goldsmith (No. 39) on 22-2-58. Signed by both parties and authorised by the Traffic Inspector. Both in ink and pencil. Was attached to Reg Item 8027 trams, tramways, rosters, employees, forms, shifts, inspectors -
 Ballarat Tramway Museum
Photograph - Black & White - set of 2 - Ballarat Tram 31, Bob Lilburn, 1950's
... Black & White - set of 2 - Ballarat Tram 31... of Ballarat tram 31 during the 1950's. Yields information about ...Shows the appearance of Ballarat tram 31 during the 1950's.Yields information about the tram appearance during the 1950's prior to being fitted with dash canopy lighting.Black & White Photograph of Ballarat Tram 31 - pre 1960 .1 - At the Lydiard St North terminus .2 - Sturt St at the city terminus.Has notes re location and tram on the rear in ink.ballarat, sturt st, lydiard st north, tram 31, tramways, trams -
 Ballarat Tramway Museum
Photograph - ESCo Bendigo tram 9 - set of 2, Peter Duckett, c1945
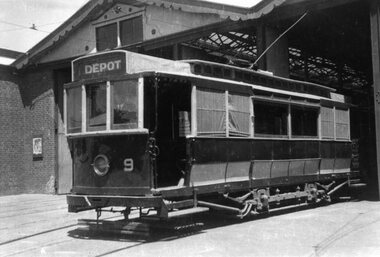
... ESCo Bendigo tram 9 - set of 2.... Photograph ESCo Bendigo tram 9 - set of 2 Peter Duckett ...Photograph of Bendigo ESCo No. 9, at the Depot, during the 1940's following "modernisation" scheme. Tram has the destination of "Depot". See page 28 of Destination Eaglehawk for the same photograph and page 30 for notes regarding the "modernisation", undertaken in 1945, but not liked by the Union and subsequently scrapped in 1947. See Reg Item 4341 and 9110 for photographs of the same tram before modernization Peter Duckett Collection. 4342.1 - Black and White print contained within the Wal Jack Bendigo and Geelong Album, see Reg Item 5003 for more details. Added 2/7/2013. See Destination Eaglehawk.Yields information about the appearance of Bendigo's ESCo bogie trams during the 1940's.Black and White photograph with notes on the rear.On the front, top left hand corner of the print "27" in ink within a circle. On rear, stamped in black ink "Photo supplied from P.W. Duckett Collection, All Rights Reserved, 69 Howitt Rd. Nth Caulfield 3161." In the bottom right hand corner, a "William F Scott" address label in the bottom left hand corner. 4342.1 - Bendigo - No. 9 as rebuilt @ bard. Mr. McNaught (Manager) at Master Controller.trams, tramways, bendigo, depot, secv, unions, esco, tram 9 -
 Melbourne Tram Museum
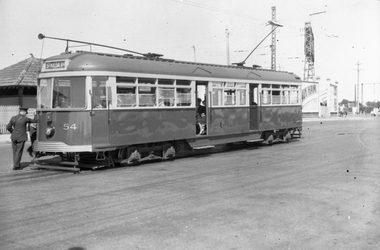
Negative - Set of 2 - VR TRam 54, Wal Jack, 30/12/1942
... Set of 2 - VR TRam 54.... Negative Set of 2 - VR TRam 54 Wal Jack ...Photo of Victorian Railways trams 54 at Brighton terminus. Head on photo of No. 54 included. Has the destination of St Kilda Rly. Photo in the Wal Jack Victorian Railways Album - dated 30-12-1942.Yields information about VR tram 54 and the Brighton Beach terminus.Set of two Black and white negatives.trams, tramways, victorian railways, vr trams, brighton, shelters, tram 54 -
 Ballarat Tramway Museum
Photograph - Black & White Photograph/s, early 1950's
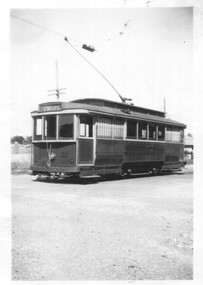
... tram 2... St Eaglehawk tram 2 Black and white photograph of Bendigo 2 ...Black and white photograph of Bendigo 2 leaving the Eaglehawk terminus on its way to Quarry Hill, late 1960's or early 1970's. In the view is the Town Hall Hotel - Melbourne bitter, J Best's milk bar and fruit shop advertising Cohn's Lemonade, Peters Ice cream, a Holden station wagon with Craven A Filter cigarettes, and Ashman's dry cleaning shop.trams, tramways, bendigo, high st, eaglehawk, tram 2 -
 Ballarat Tramway Museum
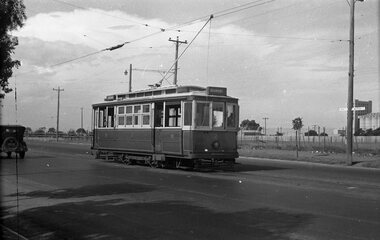
Negative, Wal Jack, early 1950's
... tram 2... tram 2 Negative and Digital images of the Wal Jack Geelong ...Negative and Digital images of the Wal Jack Geelong Negative file of Geelong 2 at the North terminus. Photo early 1950's.. trams, tramways, geelong, north, tram 2 -
 Ballarat Tramway Museum
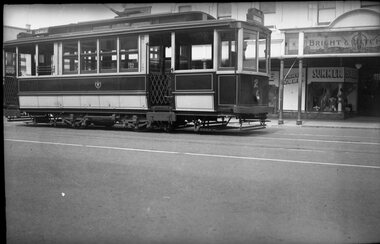
Photograph - Geelong 2 Moorabool St, Arthur Atkins, Oct. 1941
... tram 2... tramcar Geelong tram 2 Moorabool St Bright & Hitchcocks Print has ...Photograph shows Geelong 2 after it has been enclosed at the ends converting it to a one-man tram in 1935. The reference provides dates for this appearance. The tram is on display at the Ballarat Tramway Museum in the appearance prior to the change to the one-man version. In the background is the Bright and Hitchcocks store. Photo by Arthur Atkins Oct. 1941Yields information about Geelong 2 after its conversion to a one man tram and Bright & Hitchcocks store.Photograph print and negative in brown paper envelope.Print has "Geelong" in blue ink along the bottom edge.tramways, tramcar, geelong, tram 2, moorabool st, bright & hitchcocks -
 Ballarat Tramway Museum
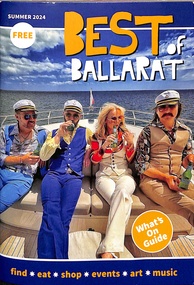
Book, Scott Bain, "Best of Ballarat", Nov. 2023
... tram 2... tram 2 Book - 52 pages, centre stapled, full colour, titled ...Gives details of events, locations, hotels, food etc - a What's on in Ballarat. Advertisement for BTM on page 24 features Geelong 2 in the New Museum. See page 24 for the BTM entry.Yields information about tourist attractions etc in Ballarat.Book - 52 pages, centre stapled, full colour, titled "Best of Ballarat", for Summer 2024. trams, tramways, ballarat, btm, events, hotels, tram 2 -
 Ballarat Tramway Museum
Photograph - ESCo cross bench tram No. 20 and ESCo 2, Wal Jack, c1910
... tram 2... tram No. 20 and ESCo 2 at the intersection of Sturt and Lydiard ...Photo of ESCo cross bench tram No. 20 and ESCo 2 at the intersection of Sturt and Lydiard Streets, with the Post Office, along with the Summerscales offices, Robbie Burns statue, Vita Studio, and George Payne Jewellers in the background. The conductor on the rear of No. 2 is holding the trolley rope, while the driver of No. 20 is watching the road closely. The conductor of the tram is reboarding or about to alight. No. 20 has the destination of Gardens via Convent. Other trams are in the background. Wal has dated the photograph about 1909. Note the point frog or pan in the overhead above No. 20 and in particular notes the type of destination box and that the tram is going to the Gardens via the Convent. See item 5132 for a copy negative and digital image.Yields information about the use of ESCo trams c1910 and the overhead.Black and white print on Kodak paper with notes on rear.See rear image.trams, tramways, esco, cross bench tram, sturt st, post office, lydiard st, tram 20, tram 2 -
 Ballarat Tramway Museum
Postcard, Biscay Greetings, Bourke St Melbourne
... tram 2... Melbourne Z class trams tram 2 Colour postcard with serrated edges ...Colour postcard with serrated edges of Bourke St. Melbourne from Parliament house with MMTB Z8 and about 6 W7's in photo, along with many motor vehicles. Also shown are the Safety Zones and stops. In image are buildings along either side of Bourke St., featuring the sign of the Salvation Army City Temple in the top left hand corner, Mittys, and a Kwikasair van by the outbound safety zone. Tram Z8 has destination of "CITY - SPENCER ST." and showing route 89. On rear of card is name of company "Biscay" and caption "New Z class tram in Bourke Street, Melbourne Victoria." and card number BG98 in dark brown ink, along with space for stamp and address. See Destination City re introduction of Z class trams (1975)trams, tramways, bourke st, melbourne, z class trams, tram 2 -
 Ballarat Tramway Museum
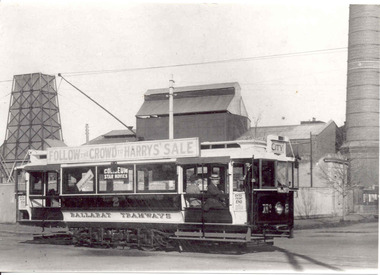
Photograph - Black & White Photograph/s and Digital Image, ESCo No. 2 passing Electric Supply Co. (ESCo) power station, c1913
... Tram 2... about the Power station and ESCo tram No. 2 and the appearance ...Black and white photographs of ESCo No. 2 passing Electric Supply Co. (ESCo) power station , Ripon St., near Wendouree Parade. No. 2 fitted with windscreens, has seats facing inwards and an ad on roof "Follow the Crowd to Harrys' Sale", Coliseum Star Movie ad in window. Power station features chimney, cooling tower and other buildings. Driver of No. 2 standing by doorway while photo taken. Yields information about the Power station and ESCo tram No. 2 and the appearance of both at the time.Series of black and white photographs some with notes on rear.trams, tramways, power station, wendouree parade, ripon st, esco , tram 2 -
 Ballarat Tramway Museum
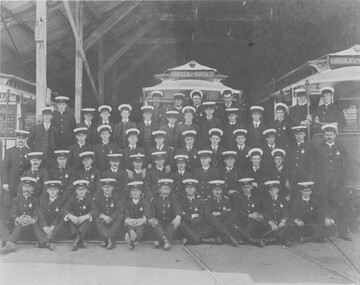
Photograph - Black and White photograph - laminated, Richardson, c1906
... tram 2... Employees Group Photo tram 17 tram 10 tram 2 Laminated Black ...Yields information about the early staff of the Electric Supply Co. of Victoria following the electrification of the tramways and their appearance.Laminated Black and white print from a copy negative of a group of ESCO employees (motormen conductors and pointsboys?) in front of the tram depot with tram cars 17, 10 and 2 behind. All wearing uniform hats, but not all wearing full uniform (no badges but wearing ties - possibly temporary or casual staff - c1906 - 51 people. Print from a copy negative (N13), made early 1997 for display purposes and laminated. Has four Velcro dots on rear. Trams have destination boards fitted to the tram above the roof. 2nd copy - unlaminated added 29/7/2007 from Alan Bradley 5/2007. See also related documents for Museum Vic information on their copy. See reg item 8497 for a block mounted version.trams, tramways, esco, employees, group photo, tram 17, tram 10, tram 2