Showing 150 items matching " route 21"
-
 8th/13th Victorian Mounted Rifles Regimental Collection
Badge - Identity disc Schleibs
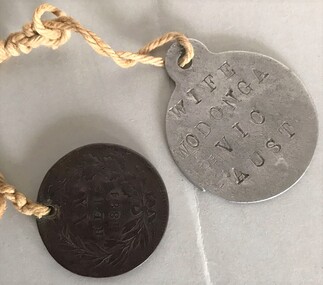
Frederick August Schleibs a 44 year old farmer of Wodonga enlisted in AIF 30 March 1916 and was allocated to 2nd Pioneer Battalion with regimental number 2972. En route to England he was hospitalised at Cape Town with injured knee. He was returned to Australia and discharged 27 October 1916. He reenlisted 21 February 1917 and sailed with 28th Reinforcements 8th Light Horse to Egypt. He returned to Australia following the war. Unusual to see a foreign coin used as an identity disc.Soldiers identify disc set connected by string; one aluminium and one a Portuguese 20 Reis coin. Both are stamped with information relating to 3383 Frederick Augustus Schleibs who served with 8th Australian Light Horse in World War One.On aluminium disc "A F Schleibs / 3383 / 8LH / CE", and on reverse "Wife / Wadonga / Vic / Aust". On coin "FAS / 3383 / CE"schleibs, light horse, 8th, world war one, wwi, aif, pioneer, wodonga -
 Ballarat Tramway Museum
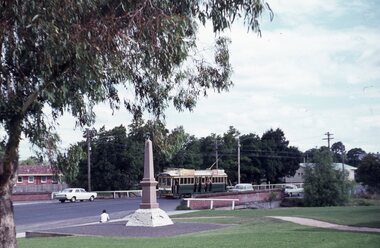
Photograph - Black & White Photograph/s - set of 5, Charles Craig, 1971
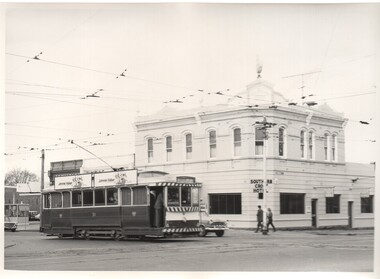
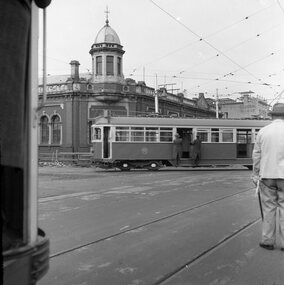
Yields information about the intersection of Sturt St and Drummond St and its use by trams in the period before the closure of the SEC system. Shows the Southern Cross Hotel.Set of five Black and White photographs of trams near the intersection of Sturt St and Drummond St South, Hospital Corner. All have the Southern Cross Hotel in the background .1 - No. 31 crosses Drummond St, Gardens via Sturt St West, with two Johnnie Walker Roof adverts. .2 - No. 40 turns from Drummond St South en route to Lydiard St North, while another bogie car waits. Both trams have an electric cooking roof advert. .3 - No. 17 crosses Sturt St with two bogie trams in the view - appears to have been taken before .2. Note the passengers getting off the tram on the south side. .4 - No. 21 turning into Drummond St south, with destination of Sebastopol. Tram has an electric cooking roof advert. .5 - No. 33 crosses Sturt St from Sebastopol while another tram waits at the Sturt St stop. Photo by Charles Craig - during 1971. trams, tramways, sturt st, hospital corner, drummond st sth, tram 31, tram 40, tram 17, tram 21, tram 33 -
 Ballarat Tramway Museum
Slide - 35mm slide/s, Keith Caldwell, c1963
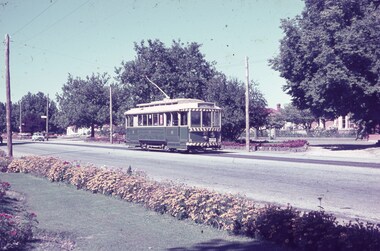
Yields information about 21 and the Victoria St route.Agfa colour slide, white cardboard mount, photo by Keith Caldwell undated, c1963. Tram 21 in bound in Victoria St showing the card beds on either side of there road. Tram has the destination of Gardens via Sturt St West and a Whitehorse Whiskey advert on the front panel. tramways, trams, victoria st, tram 21 -
 Ballarat Tramway Museum
Slide - 35mm slide/s - set of 2, Noel Simons, Nov. 1970
Set of 2 Kodak Ready-mount with slides made from the Association of Railway Enthusiast Provincial Tramways film strip. 1166.1 - No. 31 at the View Point terminus, corner of Wendouree Parade and Macarthur St., shows tram and section arrangements on poles. Also has SEC tramway shelter alongside stop. Tram has destination of "View Point" 1166.2 - No. 38 crossing Albert St. en route to Sebastopol.1166.1 - "No. 21 at View Point terminus. Line of left is that for cars on "Gardens via Drummond St. Nth" route." 1166.2 - "No. 38 crossing Albert St. near Sebastopol terminus" All have date stamp of "Nov. 1970" in blue ink. Writing in blue ink.tramways, trams, view point, wendouree parade, albert st, sebastopol, tram 21, tram 38 -
 Ballarat Tramway Museum
Slide - 35mm slide/s - set of 9, Noel Simons, Sept. 1971
Set of 9 Kodak Ready-mount with slides made from the Association of Railway Enthusiast Provincial Tramways film strip. Reference Item 2560 details the ARE Film Strip, and provide references to other slides. See also Reg. item 1164. 1174.9 on plain white mount. 1174.1 - Tram 40 North bound for Lydiard St. North at the Railway Gates, with the gates closed. Tram carrying a heavy load of passengers. Railway station building and car park in background. Taken from the signal box. 1174.2 - Tram 12 bound for Gardens, photographed across the median strip plantation near Dawson St. Image i2a - adjusted 9/2021 to remove colour cast. 1174.3 - Tram 43 in bound along Wendouree Parade near Barrett Ave, passing a former tram stop and with "Warning Oncoming Trams" sign mounted on an adjacent pole. See also Reg. item 1172.1 for a photo taken in May 1971. This photo taken after the closure of the Victoria St. line, as the tram stop has been painted out. 1174.4 - Looking along the track to Sebastopol terminus on the west side of Albert St. - telephoto shot showing bogie tram in the far distance. Shows the nature of the track, poles, tram stop frequency and in the fare distance the terminus. Also show the trees that used to be along this section of the track. 1174.5 - No. 42 showing "Special" in Macarthur St. approaching Drummond St. north. Photo taken from under the verandah of a shop on the south side of the street that were many years later to become the Tramcar Restaurant. Note metal fence to cemetery. 1174.6 - Nos. 21 (Sebastopol) crossing 14 (Lydiard St. Nth) at the loop between Sayle and Grey St. Photo taken looking south. 1174.7 - No. 12 bound for Mt Pleasant, in Bridge St. about to stop at the junction for the two routes. Telephoto photo looking west along Bridge St. with many cars in the photo. Very few people on the street itself. 1174.8 - No. 30 and 17 at the City Terminus, on the north side of Sturt St. Taken from the Post Office corner with the Town Hall in the background. 1174.9 - No. 39 inbound along Sturt St. West. with many cars on the road. Bus stop on a pole on the other side of the road.1174.1 - "No. 40 on Lydiard St. North service waits at the level crossing at Ballarat Railway Station." 1174.2 - "No. 12 bound for 'Gardens' seen across the centre plantation in Sturt St." 1174.3 - "Barrett Ave." 1174.4 - "The Sebastopol route near the terminus" 1174.6 - "Nos. 21 and 14 crossing at Sayle St. Loop on Sebastopol route" 1174.7 - "No. 12 at Eastern end of Bridge St." 1174.8 - "Nos. 30 and 17 in Sturt St. at Cnr of Lydiard St." 1174.9 - "No. 39 City bound from 'Gardens" in Sturt St. West" All have date stamp of "Sep 1971" in black ink. Writing in blue ink.tramways, trams, lydiard st. nth, railway crossing, sturt st, wendouree parade, sebastopol, macarthur st., bridge st., sturt st. west, tram 12, tram 14, tram 17, tram 21, tram 30, tram 39, tram 40, tram 42, tram 43 -
 Ballarat Tramway Museum
Slide - 35mm slide/s - set of 17, Noel Simons, 20/11/1962 12:00:00 AM
Set of 17 transparencies taken on 20/11/1962 on Kodak mounts. 1187.1 - Bendigo No. 2 at the Quarry Hill terminus, showing destination of Quarry Hill. Has Cohns Drinks and Streets Ice Cream ads on dash panel, a SEC 'electric cooking' roof ad and another roof ad. Shows the Y terminus at this location, but tram standing just before it. Overhead in position. 1187.2 - as above, but closer up. 1187.3 - as above, but from the north side, showing cemetery in the background. 1187.4 - Bendigo No.3 at Eaglehawk terminus. Tram showing destination of Quarry Hill. Has the various buildings at Eaglehawk in the background including the Foodland store. Has Streets Ice cream and White Horse Whiskey ads on the dash panel. 1187.5 - Bendigo No. 18 at Garden Gully crossing loop, in bound, with destination of Eaglehawk. Passengers waiting for an Eaglehawk tram at the stop. Has a white horse whiskey ad on dash panel and SEC roof ads. Conductor standing in doorway looking out. 1187.6 - Bendigo No. 7 inbound in Nolan St. at cnr of McCrae St. showing destination of Golden Square. Has Streets Ice cream ad on dash panel and a Castrol Roof ad. 1187.7 - Bendigo No. 19 at the North Bendigo terminus with railway level crossing in background. Tram has a Cohns Drinks ad and an SEC 'Electric Cooking' roof ad. 1187.8 - Bendigo No. 2 at the Quarry Hill terminus, looking back into Bendigo, showing destination of Eaglehawk. 1187.9 - Bendigo No. 21 in McCrae St, near Nolan St outbound for North Bendigo. Photo taken after tram has passed photographer. 1187.10 - Bendigo Nos. 4 and 26 at Charing Cross in View St. with fountain alongside and the Beehive, Ezywalkin Buildings in the background. No. 26 has a Sandhurst Milk and SEC 'Electric Cooking' roof ad. 1187.11 - close up of 22E maximum traction truck and folded footstep. 1187.12 - Bendigo No. 19 at Charing Cross terminus, after tram has passed photographer, showing destination of North Bendigo, with the Beehive building in the background and passengers boarding tram. 1187.13 - Bendigo No. 11, turning from View St. into Pall Mall, showing Special with the conductor holding point bar. Has the Beehive and Ezywalkin Buildings in the background. 1187.14 - No. 7 at Charing Cross terminus, in Pall Mall, bound for Golden Square. Has the Beehive and Ezywalkin buildings in the background and passengers waiting at the tram stop. 1187.15 - No. 18 at the Charing Cross terminus, bound for Eaglehawk. Has the Beehive and Ezywalkin buildings in the background and passengers waiting at the tram stop. Also has the 'Safety Zone' sign in the photograph. 1187.16 - No. 2 at Quarry Hill terminus, night or dusk photo. Tram showing destination of Depot. 1187.17 - No. 26 at Charing Cross, night photo. Tram has destination of Quarry Hill, but is on the line for Eaglehawk. Photo looks along Mitchell St. Also shows Safety Zone sign. Information written on in black ink and date stamped on purple ink. 1187.1 - "No. 2 at Quarry Hill terminus Bendigo" 1187.2 - "No. 2 at Quarry Hill terminus Bendigo" 1187.3 - "No. 2 at Quarry Hill terminus Bendigo" 1187.4 - "No. 3 at Eaglehawk terminus" 1187.5 - "No. 18 in Mt Korong Road, Long Gully at cnr of Havilah Road (Eaglehawk Route)" 1187.6 - "No. 7 in Nolan St. Bendigo, at Cnr of McCrae St., near lake Weeroona, (North Bendigo Route)' 1187.7 - "No. 19 at North Bendigo terminus" 1187.8 - "No. 2 at Quarry Hill terminus" 1187.9 - "No. 21 in McCrae St. Bendigo, near Nolan St. (North Bendigo Route) 1187.10 - "4 and 26 at Alexandra Fountain, Charing Cross Bendigo" 1187.11 - "Truck of Bogie Car, Bendigo Tramways" 1187.12 - "No. 19 in Pall Mall at Charing Cross, Bendigo" 1187.13 - "Birney car No. 11 entering Pall Mall from View St. at Charing Cross Bendigo" 1187.14 - "No. 7 in Pall Mall at Charing Cross, Bendigo" 1187.15 - "No. 18 at Alexandra Fountain, Charing Cross, Bendigo" 1187.16 - "No. 2 at Quarry Hill terminus, Bendigo" 1187.17 - "No. 26 at Alexandra Fountain, Charing Cross, Bendigo" tramways, trams, bendigo, quarry hill, eaglehawk, north bendigo, maximum traction, night photo, tram 2, tram 3, tram 4, tram 7, tram 11, tram 18, tram 19, tram 21, tram 26 -
 Ballarat Tramway Museum
Slide - 35mm slide/s, Noel Simons, 21/11/1962 12:00:00 AM
Set of 17 transparencies taken on 21/11/1962 on Kodak mounts. 1188.1 - Bendigo No. 11 at Depot Junction McCrae and Arnold St. with driver/conductor changing points. 1188.2 - Bendigo No. 4 at Charing Cross, side on photo, with City Club Hotel and Alexandra Fountain in the background. Tram has Castrol and SEC 'Electric Cooking' ads. 1188.3 - Bendigo No. 4 climbing View St. after tram has passed photographer. Tram has Streets Ice Cream and Cohns Soft Drinks ad on rear dash panel. In the background are the buildings in View St., including the Princess Theatre. Tram has destination of Eaglehawk. 1188.4 - Trams 2 and 4 crossing at the California Gully or Thorpe St Loop. 1188.5 - Bendigo 4 in Mt Korong Road. Tram inbound with destination of Quarry Hill, just leaving Garden Gully Loop. 1188.6 - Bendigo 4 and 17 crossing at the Hayes St. or Iron Bark Gully Loop. No. 17 bound for Eaglehawk, No. 4, Quarry Hill. 17 has two SEC roof ads and a white horse whiskey ad. 1188.7 - No. 17 bound for Eaglehawk, soon after leaving California Gully. Has large mullock heap in background. 1188.8 - Bendigo 2 and 17 crossing at the Thorpe St. or California Gully Loop. Has butchers shop in background. 1188.9 - Bendigo 17 at the Eaglehawk terminus. Has destination of Quarry Hill. In background is the hotel and shops at the terminus, showing ads for "Melbourne Bitter". Tram has two SEC 'Electric Cooking' ads. Driver and conductor about to assist two lady passengers with a pram and baby. 1188.10 - No. 17 at Eaglehawk terminus, awaiting departure. Has Eaglehawk Town Hall and Post Office in background. Tram has a Whitehorse Whiskey ad on the front dash panel. 1188.11 - No. 3 in High St. Eaglehawk, with destination of Eaglehawk. Has the shops on the south side of High St. in the background, including the Eaglehawk fish shop. Tram has two roof ads, one an SEC roof ad, and Cohns Drinks and Streets Ice cream ads on front dash panel. 1188.12 - as above, but after tram has passed photographer. Note the centre of the road poles. 1188.13 - No. 2 outbound for Eaglehawk at the intersection of Mt. Korong Road and the Calder Highway. Photo taken after the tram has passed the photographer. Has an Ampol service station in the background. 1188.14 - No. 11 leaving the Bendigo depot, crossing the bridge, with the Scrubber car in the background. 1188.15 - No. 21 at the North Bendigo terminus. Tram has destination of Golden Square and Cohns drink ad on front dash and two roof ads on side. 1188.16 - No. 11 on Golden Square route, in High St. at intersection with Old High St. 1188.17 - No. 11 at the Golden Square terminus, conductor turning the pole. Hotel on the left side of the photo. Note the road works barrier and red flag behind the tram. Slide has an end of roll mark on the right hand side of the image.Information written on in black ink and date stamped on purple ink. 1188.1 - "Birney car No. 11 in McCrae St. at Cnr of Arnold about to run into depot, Bendigo" 1188.2 - "No. 4 at Alexandra Fountain, Charing Cross Bendigo" 1188.3 - "No. 4 climbing the View St. Hill from Charing Cross, Bendigo (Eaglehawk Route)" 1188.4 - "No. 4 and 2 at Thorpe St. Loop, California Gully" 1188.5 - "No. 4 in Mt Korong Rd., Long Gully, Near Havilah Rd. (Bendigo) (Eaglehawk Route)" 1188.6 - "Nos. 17 and 4 crossing on Hayes St. Loop, Ironbark, Bendigo" 1188.7 - "No. 17 soon after leaving California Gully (Eaglehawk Route)" 1188.8 - "No.2 and 17 crossing on Thorpe St. Loop, California Gully (Eaglehawk Route)" 1188.9 - "No. 17 at Eaglehawk terminus" 1188.10 - "No. 17 at Eaglehawk terminus" 1188.11 - "No. 3 in High St. Eaglehawk" 1188.12 - "No. 3 nearing Eaglehawk terminus" 1188.13 - "No. 2 in Mt. Korong Rd., Ironbark. Calder highway on left (Eaglehawk route) 1188.14 - "Birney car No. 11 leaving Bendigo depot. Scrubber car at rear" 1188.15 - "No. 21 at North Bendigo Terminus" 1188.16 - "Birney car No. 11 in High St. Bendigo at intersection with Old High Street (Golden Square Route)" 1188.17 - "Birney Car No. 11 at Golden Square terminus, High St., Bendigo". tramways, trams, bendigo, depot junction, charing cross, view st., eaglehawk, north bendigo, golden square, tram 2, tram 3, tram 4, tram 11, tram 17, tram 21, tram scrubber -
 Ballarat Tramway Museum
Slide - 35mm slide/s - set of 4, Noel Simons, Apr. 1967
Set of 2 slides made from the Association of Railway Enthusiast Provincial Tramways film strip, possibly during April 1967. 1192.1 and 1192.3 mounted in Kodak Ready Mounts. The others in plain white mounts. Slides dated Dec. 1968. 1192.1 - No. 21 out bound to Golden Square in High St., between Wattle and Vine Streets. Photo taken after tram has passed photographer. Has a sign for "Reid's Furnituorium" in the background. 1192.2 - Bendigo No. 28 dressed up as Myers Christmas tram, passing the Post Office and Courts in Pall Mall. 1192.3 - Bendigo No. 23 at Needle Loop en route to Eaglehawk. Tram has two SEC roof ads, one "Electric Cooking" and the other "Everything fine in my all electric kitchen". 1192.4 - Bendigo scrubber parked at the end of the main depot lead, alongside the depot office buildings.Details in blue ink, date hand stamped in purple ink. 1192.1 - "No. 21 heads along High St for Golden Square between Wattle and Vine Streets." 1192.2 - "Birney No. 28 in Christmas Garb, traverses Pall Mall en route to North Bendigo". 1192.3 - "No. 23 at Needle Loop on its run to Eaglehawk". 1192.4 - "Scrubber car at Bendigo Depot".tramways, trams, north bendigo, bendigo, bridge st loop, depot, tram 21, tram 23, tram 28, tram scrubber -
 Ballarat Tramway Museum
Slide - 35mm slide/s - set of 24, Noel Simons, 20/05/1971 12:00:00 AM
Set of 24 transparencies taken on 20/5/1971 on Kodak mounts. 1195.1 - Bendigo 19 arriving at Charing Cross en route to North Bendigo with Fountain Plaza and the City Family Hotel in the background. No. 19 has two roof ads for the SEC. -'Electricity better for cooking' and 'Everything's under control in my all electric kitchen' 1195.2 - as above, but standing at the Charing cross stop, with the Beehive Stores and other buildings along the east side of Pall Mall in the background. 1195.3 - No 21 ex Golden Square crossing View St. trackwork in front of No. 25 waiting to depart for Quarry Hill. No.21 has two roof ads (as for No.19 in 1195.1) and No.25 has one SEC roof ad and another. Ezywalkin sign in the background, and Fountain Plaza. 1195.4 - as for 1195.3, but after 21 has arrived and 25 left for Quarry Hill. Has Ezywalkin store and the Beehive store in the background. 1195.5 - No. 5 at the Eaglehawk terminus. Photo taken with a cannon in foreground looking along High St. Eaglehawk. Has shops on the west side of High St. in the background. 1195.6 - No. 5 at the Eaglehawk terminus, close up of the rear of the tram - note tow bar arrangement. Has destination of Quarry Hill. 1195.7-Nos.25 and 5 crossing at the Thorpe St. Loop, California Gully. No. 25 bound for Eaglehawk (has SEC Briquette and electric cooking roof ads) and 5 en route for Quarry Hill with a SEC and Cinzano roof ad. 1195.8 - as for 1195.7, but after trams have passed each other. Has Borough Auto Service building in the background. 1195.9 - No. 5 in Mt Korong Road, towards Bamard Street, photo taken after tram has passed photographer. 1195.10 - No. 30 at the Golden Square terminus with the Milk Bar on the right hand side of the photograph. 1195.11 - No. 30 inbound at Fire Station Loop, High St. Golden Square. Has old fire station in the background. Passengers are boarding the tramcar. 1195.12 - No. 30 in High St, bound for North Bendigo between Vine and Wattle Streets. 1195.13 - No. 5 bound for Eaglehawk waits at Iron Bark Gully Loop, at Hayes St. 1195.14 - No. 5 and No. 2 crossing at Iron Bark Gully Loop. 1195.15 - No. 5 bound for Eaglehawk leaving the Manchester Loop, Long gully. 1195.16 - No. 5 passing William Street, Long Gully en route to Eaglehawk. 1195.17 - No. 5 just before the California Gully Crossing Loop. 1195.18 - Nos. 5 and 26 crossing at California Gully crossing Loop. No. 5 heading to Eaglehawk, 26, Quarry Hill. 1195.19 - No. 5 in High St. Eaglehawk with Bob Moyle's Victoria Hotel and the TAB in the background. 1195.20 - No. 5 in High St. Eaglehawk approaching the terminus. Photo taken after the tram has passed the photographer. Has Foodland store and J. Best Fruit supply in the background, along with Eaglehawk Town Hall. 1195.21 - No. 5 at the Eaglehawk terminus, photo taken along seldom used track along High St. 1195.22 - as for 1195.22 - but at the very end of the track. 1195.23 - No. 5 en route for Quarry Hill climbs High St. Eaglehawk with the Victoria Hotel and Eaglehawk Town Hall in the background. 1195.24 - No. 5 and 25 crossing at Jobs Gully Loop. Note 25 has a black on white destination roll, while No. 5 has a white on black destination roll. Information written on in black ink and date stamped on purple ink. 1195.1 - "No. 19 arrives at Charing Cross Bendigo from Golden Square" 1195.2 - "No. 19 about to leave Charing Cross for North Bendigo" 1195.3 - "No. 25 awaiting departure for Quarry Hill, watches No. 21 arrive at Charring Cross from Golden Square" 1195.4 - "No. 21 on North Bendigo service and No. 25 on Quarry Hill run await departure at Charing Cross" 1195.5 - "No. 5 at Eaglehawk terminus" 1195.6 - "No. 5 at Eaglehawk terminus" 1195.7 - "Nos. 5 and 25 crossing at Thorpe St. Loop, California". 1195.8 - "Nos. 25 and 5 crossing Thorpe St. Loop, California Gully". 1195.9 - "No. 5 descending Mt Korong Rd. towards Bamard St." 1195.10 - "Birney car No. 30 at Golden Square terminus" 1195.11 - "Birney car No. 30 in High Street near Thistle Street (Fire Station Loop)" 1195.12 - "No. 30 in High St. between vine and Wattle Streets" 1195.13 - "No. 25 at Hayes Street Loop Iron Bark". 1195.14 - "Nos. 2 and 5 crossing at Hayes Street Loop Iron Bark" 1195.15 - "No. 5 at Manchester Loop opposite Havilah Road, Long Gully" 1195.16 - "No. 5 passing William Street, Long Gully". 1195.17 - "No. 5 at California Gully" 1195,18 - "Nos. 26 and 5 at Thorpe St. Loop, California Gully". 1195.19 - "No. 5 in High St. Eaglehawk". 1195.20 - "No. 5 approaching Eaglehawk terminus" 1195.21 - "No. 5 at Eaglehawk terminus" 1195.22 - "No. 5 at Eaglehawk terminus" 1195.23 - "No. 5 in High St. Eaglehawk" tramways, trams, bendigo, charing cross, eaglehawk, california gully, golden square, iron bark gully, jobs gully, tram 2, tram 5, tram 19, tram 21, tram 25, tram 26, tram 30 -
 Ballarat Tramway Museum
Slide - 35mm slide/s - set of 20, Noel Simons, 21/05/1971 12:00:00 AM
Set of 20 transparencies taken on 21/5/1971 on Kodak mounts. 1197.1 - Bendigo No. 5 en route to Eaglehawk at Creeth St Long Gully. Tram has a SEC roof ad and Cinzano roof ad. 1197.2 - No 5 approaching Needle Loop between Long Gully and California Gully. On left hand side is the City of Bendigo sign, indicating city boundary. 1197.3 - As for 1197.2 but actually entering loop. Photo taken after tram has passed photographer. 1197.4 - No. 26 bound for Eaglehawk descending the railway bridge near Eaglehawk, at Jobs Gully. 1197.5 - as for 1197.4, but after crossing bridge, now ascending a hill. Photo taken after tram has passed photographer. 1197.6 - No. 26 climbing High St. hill Eaglehawk, nearing end of Double track, bound for Quarry Hill. Shows centre of the road poles. 1197.7 - As for 1197.6, with tram entering single track section. Photo taken after tram has passed photographer. Has a BP service station in the background. 1197.8 - No. 26 (bound for Quarry Hill) crossing No. 17 (Eaglehawk) at Job's Gully Loop. 1197.9 - No. 17 climbing railway bridge at Job's Gully, en route to Eaglehawk. Photo taken after tram has passed photographer. 1197.10 - No.26 bound for Quarry Hill, leaving Long Gully Loop? Has the Creeth St. church in l197.l in the far background. Photo taken after tram has passed photographer. 1197.11 - Tramway Point work at the northern end of Long Gully Loop. 1197.12 - No. 17 en route for Quarry Hill turning into View St. from Bamard St. Tram has SEC roof ads "Everything fine in my all electric Kitchen' and 'Electric Cooking is Matchless'. 1197.13 - as for 1197.12, but tram has turned into View St and about to enter the double line track. Photo taken after tram has passed photographer. 1197.14 - No. 21 enters Nolan St after turning from MacRae St. en route to Bendigo. Note sign on its own post noting tram turns "Beware Tram Turns" and stop sign on adjacent pole "Trams stop on Request". No. 21 has two SEC roof ads. 1197.15 - No. 21 in Nolan St. after turning from Bridge St. (White Hills Road). Note signal light for Bridge St. loop on pole corner of street. Photo taken after tram has passed photographer. 1197.16 - No. 2 bound for Eaglehawk at unknown location. 1197.17 - Tram stop sign on a pole "CARS STOP BY REQUEST" 1197.18 - No. 5 in Carpenter St.? en route to Quarry Hill. 1197.19 - No. 28 has just arrive at Golden Square terminus, passengers are disembarking and the trolley pole is being turned. Golden Square Hotel in the background. 1197.20 - No. 28 at Golden Square terminus. Has a "Nothing beats Briquettes for hear roof ad. Information written on in black ink and date stamped on purple ink. 1197.1 - "No. 5 at Creeth St. Long Gully" 1197.2 - "No. 5 approaching Needle Loop between Long Gully and California Gully" 1197.3 - "No. 5 at Needle Loop between Long Gully and California Gully" 1197.4 - "No. 26 crossing railway bridge at Job's Gully near Eaglehawk" 1197.5 - "No. 26 just after crossing railway bridge at Job's Gully near Eaglehawk/ 1197.6 - "No. 26 in High St. Eaglehawk" 1197.7 - "No. 26 at end of double track in High St. Eaglehawk" 1197.8 - "Nos. 26 and 17 crossing at Job's Gully Loop" 1197.9 - "No. 17 crossing railway bridge at Job's Gully near Eaglehawk". 1197.10 - "No. 26 at Long Gully" 1197.11 - 'Northern end of points at Long Gully Loop". 1197.12 - "No. 17 turning into View St. from Bamard St. Bendigo". 1197.13 -'No. 17 at beginning of double track in View St. after leaving Bamard St. Bendigo. 1197.14 - "No. 21 enters Nolan St. from MacRae St. Bendigo." 1197.15 - "No. 21 in Nolan St. Bendigo just after leaving White Hills Road." 1197.16 - "No. 2" 1197.18 - "No. 5" 1197.19 - "Birney car No. 28 at Golden Square Terminus" 1197.20 "Birney car No. 28 at Golden Square Terminus" tramways, trams, bendigo, long gully, railway bridge, jobs gully, trackwork, nolan st, quarry hill, tram stops, golden square, tram 2, tram 5, tram 17, tram 21, tram 26, tram 28 -
 Ballarat Tramway Museum
Slide - 35mm slide/s - set of 4, Noel Simons, 24/05/1971 12:00:00 AM
Set of 4 transparencies taken on 24/5/1971 on Kodak mounts. 1199.1 - No. 21 in High St. at junction with old High St., near Fire Station Loop. Tram has two SEC roof ads. 1199.2 - No. 21 in High St. between Shamrock and Thistle Sts. Photo taken after the tram has passed the photographer. 1199.3 - Photo of a green box containing timetables for the four Bendigo routes. Located at Charing Cross. 1199.4 - Bendigo No. 23 en route to Eaglehawk at Charing Cross, with two SEC roof ads 'Everything's fine in my all electric kitchen' and "Switch to electric cooking'. Has the Ezywalkin building and the Beehive building in the background. Information written on in black ink and date stamped on purple ink. 1199.1 - "No. 21 in High St. at junction with old High St., near Fire Station Loop." 1199.2 - "No. 21 in High St. between Shamrock and Thistle Sts." 1199.3 - "Bendigo Tramways timetable at Alexandra Fountain Charing Cross." 1199.4 - "No. 23 at Alexandra Fountain Charing Cross, Bendigo." tramways, trams, bendigo, timetables, charing cross, high st., tram 21, tram 23 -
 Ballarat Tramway Museum
Slide - 35mm slide/s - set of 13, Noel Simons, 24/05/1971 12:00:00 AM
Set of 13 transparencies taken on 24/5/1971 on Kodak mounts. 1200.1 - No. 7 en route to Golden Square turning from Bridge St. into Nolan St. Photo taken after tram has passed photographer. Tram has a briquettes roof ad. 1200.2 - No. 21 in McCrae St. just before Nolan St. Photo taken after tram has passed photographer. 1200.3 - No. 7 in Nolan St at corner with McCrae St. Passenger boarding tram at a tram stop. 1200.4 - No 7 turning from Nolan into McCrae St. with Golden Fleece service station in background. 1200.5 - No. 7 in Thunder St en route to North Bendigo. Photo taken after tram has passed photographer. 1200.6 - No. 5 en route to Eaglehawk just after leaving Needle Loop between Long Gully and California Gully. 1200.7 - No. 5 at the start of the double track in High St. Eaglehawk. 1200.8 - No. 5 at Eaglehawk terminus showing "Depot" with Leo A Hughes Photographer advertisement on building in background. 1200.9 - No. 5 at Eaglehawk terminus. Has two SEC roof ads 'Everything's fine in my all electric kitchen' and 'Electricity best for cooking'. 1200.10 - No. 5 at Eaglehawk terminus, with canon, war memorial outside Town Hall and Leo A Hughes Photographer advertisement on building in background. 1200.11 - No. 5 in McCrae St. about to enter Arnold St. and depot. Tram showing depot, has driver changing points. 1200.12 - No. 5 in Arnold St. Photo taken looking up the centre of the access track - shows the overhead at depot junction. 1200.13 - Depot entrance with signage at depot entrance and depot building in background.Information written on in black ink and date stamped on purple ink. 1200.1 - "No. 7 entering Nolan St. from Bridge St." 1200.2 -"No. 21 in McRae St. about to turn into Nolan St." 1200.3 - "No. 7 in Nolan St. at corner of McRae St." 1200.4 - "No. 7 turning from Nolan St. into McRae St." 1200.5 - "No. 7 in Thunder St. just after turning from Caledonia St." 1200.6 - "No. 5 just after leaving Needle Loop between Long Gully and California Gully. 1200.7 - "No. 5 in High St. Eaglehawk at start of double track." 1200.8 - "No. 5 at Eaglehawk terminus" 1200.9 - "No. 5 at Eaglehawk terminus" 1200.10 - "No. 5 at Eaglehawk terminus."\ 1200.11 - "No. 5 in McCrae St. about to enter Arnold St." 1200.12 - "No. 5 in Arnold St." 1200.13 - "Entrance to Bendigo Tram Depot, No. 5 running into shed."tramways, trams, bendigo, mccrae st, north bendigo, california gully, eaglehawk, depot, tram 5, tram 7, tram 21 -
 Ballarat Tramway Museum
Slide - 35mm slide/s - set of 32, Noel Simons, 25/02/1971 12:00:00 AM
Set of 31 transparencies taken on 25/2/1972 on Kodak mounts. 1201.1 - Bendigo No. 26 in Bond St. just after leaving Long Gully en route for Quarry Hill. Has Norris Supermarket in background. Has two SEC roof ads. 1201.2 - No. 26 climbing View St. from Charing Cross en route to Eaglehawk. Has ANZ bank and AMOCO service station in background. 1201.3 - as for 1201.3, but after tram has passed photographer. Has buildings west of Mackenzie St. in photograph. 1201.4 - Tram stop and centre of the road pole with two "CARS STOP BY REQUEST" signs mounted on pole at the corner of Mackenzie St. 1201.5 - same position as for 1201.3, but with No. 5 descending the street. 1201.6 - same position as for 1201.2, but with No. 5 descending the street. Photo taken after tram has passed photographer. 1201.7 - No. 7 in Nolan St. from across the park at Lake Weeroona. 1201.8 - No. 7 entering McCrae St from Nolan St. - distant view. Note "TRAM "sign on left hand side under tree and overhead in McCrae St. from former track that once was in this street. 1201.9 - No. 7 in High St. with Cathedral in background. Tram en route to North Bendigo. Note scaffolding around Cathedral main spire area. 1201.10 - No. 7 crossing Bendigo Creek bridge in High St. near Golden Square. Has a Caltex Service station in the background. 1201.11 - No. 7 at Golden Square terminus with Sunburst Fruit Juices and a Peters Ice cream delivery vans alongside. 1201.12 - as for 1201.11 but photo taken from behind tram, with the end of the rails in the photograph. 1201.13 - No. 7 and 21 in Pall Mall at Charing Cross with No. 5 in the background. Taken some distance away from the location. 1201.14 - No. 7 at Golden Square terminus, taken a short distance from the tram terminus. Shows Milk Bar on right hand side and the hotel on the left hand side. Taken from the south side of the roadway. 1201.15 - as from 1201.14 but taken from the north side of the roadway. 1201.16 - No 5 waiting at California Gully loop. Distant photo showing surrounds 1201.17 - No. 5 en route for Quarry Hill crossing No. 26 at California Gully. 1201.18 - No. 26 at Eaglehawk terminus with Eaglehawk Town Hall and Post Office in background. 1201.19 - No. 21 arriving at Charing Cross en route to North Bendigo. Has Alexandra Fountain in the background, ANZ bank RACV building, and other buildings on the north side of Pall Mall or Nolan St. 1201.20 - No. 26 en route for Quarry Hill at Charing Cross, with crew standing by front door. Has Colonial Mutual life building, Armstrong Tyre Service (Firestone) and a sign for Cohns Drinks in the background. 1201.21 - as for 1201.20 but with No. 5 en route to Eaglehawk now in photograph. 1201.22 - No. 26 at Quarry Hill terminus. 1201.23 - No. 26 at Quarry Hill terminus, view of front portion of tram only from a gate at the Bendigo cemetery. 1201.24 - Track at the end of the Quarry Hill line showing the point blades of the former "Y" terminus and the overhead for this. 1201.25 - No. 2 at the Quarry Hill terminus, looking along the former Trackwork. 1201.26 - as for 1201.25 1201.27 - number not used. 1201.28 - Golden Square terminus from some distance from the actual terminus, showing the Warning sign "TRAM" for motorists from the south. No. 7 at the terminus. 1201.29 - No. 7 passing through the Golden Square shopping centre. Numerous cars and pedestrians. Tram en route for North Bendigo. 1201.30 - No. 7 in High St. Golden Square, en route for North Bendigo. Photo taken after tram has passed photographer. 1201.31 - No. 7 in High St. just past Wattle St. with the Cathedral in the background. Tram has two SEC roof ads good side on photo, 'Everything's fine in my all electric kitchen' and 'Electrical cooking - clean, quick, economical'. 1201.32 - No. 7 in High St. nearing Wattle St. Has Cathedral in the background. Photo taken after tram has passed photographer.Information written on in black ink and date stamped on purple ink. 1201.1 - "No. 26 in Bond St just after leaving Long Gully" 1201.2 - "No. 26 climbing View St. from Charing Cross" 1201.3 - "No. 26 ascending View St. from Charing Cross (At Mackenzie St.)" 1201.4 - "View St. & Mackenzie St." 1201.5 - "No. 5 in View St. near Mackenzie St." 1201.6 - "No. 5 in View St. nearing Charing Cross." 1201.7 - "No. 7 in Nolan St. seen from Lake Weeroona Park." 1201.8 - "No. 7 entering McRae St. from Nolan St. Note "TRAM" warning sign on left. 1201.9 - "No. 7 in High St. passing Short St." 1201.10 - "No. 7 crossing Bendigo Creek bridge in High St. near Golden Square." 1201.11 - "No. 7 at Golden Square terminus" 1201.12 - "No. 7 at Golden Square terminus" 1201.13 - "No 7, 21 and 5 at Charing Cross" 1201.14 - "No. 7 at Golden Square terminus" 1201.15 - "No. 7 at Golden Square terminus" 1201.16 - "No 5 waiting at California Gully loop." 1201.17 - "Nos. 5 and 26 crossing at California Gully loop" 1201.18 - "No. 26 at Eaglehawk terminus" 1201.19 - "No. 21 arriving at Charing Cross from Golden Square" 1201.20 - "No. 26 at Charing Cross" 1201.21 - "Nos. 5 and 26 at Charing Cross." 1201.22 - "No. 26 at Quarry Hill terminus" 1201.23 - "No. 26 at Quarry Hill terminus seen through the gates of the Bendigo Cemetery." 1201.24 - "Quarry Hill terminus showing remains for former double track layout abandoned before 1964." 1201.25 - "No. 2 at Quarry Hill terminus" 1201.26 - "No. 2 at Quarry Hill terminus" 1201.28 - "The Southern approach to Golden Square with No. 7 standing at the terminus, "TRAM" warning sign on the left. 1201.29 - "No. 7 passing through Golden Square Shopping Centre" 1201.30 - "No. 7 in High St. Golden Square" 1201.31 - "No. 7 in High St. passing Wattle St." 1201.32 - "No. 7 in High St. nearing Wattle St."tramways, trams, bendigo, bond st., view st., nolan st., high st., eaglehawk, california gully, charing cross, quarry hill, trackwork, tram 2, tram 5, tram 7, tram 21, tram 26 -
 Ballarat Tramway Museum
Slide - 35mm slide/s - set of 23, Noel Simons, 26/02/1972 12:00:00 AM
Set of 23 transparencies taken on 26/2/1972 on Kodak mounts. 1205.1 - Bendigo No. 25 on a special tour at Fire Station Loop, en route to Golden Square. 1205.2 - No. 21 and 25 crossing at Fire Station Loop, note photographers on the ground. No. 21 bound for North Bendigo. 1205.3 - as for 1205.3, but with trams departing loop and fire station in the background. 1205.4 - No. 25 at Golden Square Hotel with 'Rodda's Golden Square Hotel' in the background. Tram on a special tour, but showing destination of North Bendigo. 1205.5 - as for 1205.4 - but showing special. Has the end of the track in the photograph. 1205.6 - Nos. 7 and 25 (on a special tour) crossing at Myrtle St. Loop. 1205.7 - No. 7 leaving Myrtle St. loop with the mine poppet head in the background. Photo taken after tram has passed photographer. (Print made of this slide 10/2001 for use in the Gold Gold Gold exhibition of 10/2001 - See Reg. item 1979. 1205.8 - No. 25 entering depot. Tram showing 'special'. Tennis court on right has players. Photo taken after tram has passed photographer. 1205.9 - No. 24 (showing 'special') and No. 20 (showing 'Long Gully') at Bendigo Depot. 1205.10 - No. 24 on a special charter, leaving Bendigo depot. Tram has two 'Johnnie Walker' roof ads. 1205.11 - Bendigo depot with 29, 25 and a bogie car inside the depot doors. 1205.12 - As for 1205.11, but with 28 and 29. 1205.13 - No. 24 standing at front entrance of Bendigo depot with No. 20 in the background. 1205.14 - No. 24 running out into McCrae St showing special, with conductor on front step. 1205.15 - No. 24 in Caledonia St. at corner of Thunder St with the Gasworks in the background. 1205.16 - No. 5 en route for Quarry Hill at Charing cross with No. 26 (en route for Eaglehawk) about to arrive. Has former crossover at this location in the foreground. Has the Ezywalkin building in the background. 1205.17 - No. 5 and 26 at Charing Cross, with the Alexandra Fountain in the foreground and the Beehive and Ezywalkin buildings in the background. No.26 has two SEC roof ads. 1205.18 - Charing Cross looking along Pall Mall with trams 7 and 21 and 26 in the picture. 1205.19 - Charing Cross, with 21 departing for Golden Square and No. 5 heading for Quarry Hill. Has the Ezywalkin and the Beehive buildings in the background. 1205.20 - as for 1205.19, but a few moments later. Adjacent pole has a "NO ROAD" letter in reflectors vertically. 1205.21 - Charing Cross with Nos. 25, 21, 26 and 7, looking south from Pall Mall end. 1205.22 - No. 24 crossing Mitchell St. en route for Golden Square, showing 'special' with the Beehive and Ezywalkin buildings in the background. 1205.23 - Charing Cross with Nos. 24, 21 and 7 in the photo and Fountain Plaza in the background. Print of 1205.7 - stored in box D1.Information written on in blue ink and date stamped on purple ink. 1205.1 - "No. 25 at Fire Station Loop High Street, Golden Square." 1205.2 - "Nos. 25 and 21 crossing at Fire Station Loop, near Golden Square." 1205.3 - "Nos. 25 and 21 crossing at Fire Station Loop, near Golden Square." 1205.4 - "No. 25 at Golden Square terminus." 1205.5 - "No. 25 at Golden Square terminus." 1205.6 - "Nos. 7 and 25 crossing at Myrtle St. Loop." 1205.7 - "No. 7 leaving Myrtle St. Loop." 1205.8 - "No 25, entering Bendigo Depot." 1205.9 - "Nos. 20 and 24 at Bendigo Depot." 1205.10 - "No. 24 at Bendigo Depot." 1205.11 - "Nos. 25 and 29 at Bendigo Depot." 1205.12 - "Birney cars 29 and 28 at Bendigo Depot." 1205.13 - "No. 24 (with 20 beyond) at Bendigo Depot." 1205.14 - "No. 24 entering McCrae St. from Arnold St." 1204.15 - "No. 24 in Caledonia St. at cnr of Thunder St." 1204.16 - "No. 5 waits at Charing Cross as No. 26 arrives from Quarry Hill. Note remains of crossover abandoned on relocation in 1965." 1204.17 - "Nos. 5 and 26 at Charing Cross." 1204.18 - "Nos. 26, 7 and 21 at Charing Cross (No. 5 just visible behind No. 26)." 1204.19 - "No. 21 leaves Charing Cross for Golden Square as No. 5 starts off for Quarry Hill." 1204.20 - "No. 21 swings onto the single track Golden Square line as No. 5 heads into Mitchell St. towards Quarry Hill." 1204.21 - "Nos. 25, 21 and 26 watch No. 7 arrive at Charing Cross from Golden Square." 1204.22 - "No. 24 at Charing Cross crossing Mitchell St." 1204.23 - "Nos. 24, 21 and 7 at Charing Cross."tramways, trams, bendigo, golden square, myrtle st., fire station, depot, charing cross, tram 5, tram 7, tram 20, tram 21, tram 24, tram 25, tram 28, tram 29 -
 Ballarat Tramway Museum
Slide - 35mm slide/s - set of 12, Noel Simons, 28 Feb. 1972
Set of 12 transparencies taken on 28/2/1972 on Kodak mounts. 1207.1 - Bendigo 26 and 2 at Charing Cross. 26 en route for Eaglehawk, 2 for Quarry Hill. Has the Colonial Mutual Life, Armstrong Tyre Service, and Australian Mutual Provident Society buildings and a Cohns Drinks ad. in the background. 1207.2 - as for 1207.1 but with Alexandra fountain in the foreground. 1207.3 - No. 2 in Mitchell St. heading for Quarry Hill. Photo taken after tram has passed photographer. Has buildings on either side of Mitchell St. in the background, including the Plaza Theatre. 1207.4 - No. 6 en route for Golden Square departing Charing Cross. Has the RACV and ANZ bank in the background. 1207.5 - No. 2 crossing Pall Mall to enter Charing Cross ex Quarry Hill, with the Fountain Plaza in the background. 1207.6 - No. 6 arriving Charing Cross ex Golden Square with No. 21 alongside. No. 21 has the SEC ad. 'Everything's fine in my all electric kitchen.' Has the City Family Hotel and the Fountain Plaza shopping centre in the background. 1207.7 - No. 5 at Charing Cross en route for Quarry Hill with No. 2 behind. No. 2 has two SEC roof ads, 'Everything s fine in my all electric kitchen' and 'Electricity best for cooking'. RACV building in the background. Tram crews are discussing the day in the front of the tram. 1207. 8 - No. 21 in High St. Bendigo with the Cathedral in the background. No. 21 has two SEC roof ads, 'Everything's fine in my all electric kitchen' and 'Electricity best for cooking'. 1207.9 - No. 6 in High St. Bendigo with the Cathedral in the background. 1207.10 - No. 6 in High St. Bendigo, just past Wattle St. Photo taken after the tram has passed the photographer from within the Highway Car Sales yard. 1207.11 - No. 26 bound for Eaglehawk at the end of the double track in View St., note signal contactors, tram stop and section signs mounted on pole. 1207.12 - No. 26 turning from View St. into Barnard St.Information written on in blue ink and date stamped on purple ink. 1207. 1- "Nos. 26 and 2 at Charing Cross." 1207.2 - "Nos. 26 and 2 at Charing Cross." 1207.3 - "No. 2 in Mitchell St. just after leaving Charing Cross." 1207.4 - "No.6 leaving Charing Cross for Golden Square." 1207.5 - "No. 2 arriving at Charing Cross from Quarry Hill." 1207.6 - "No. 21 waits at Charing Cross as No. 6 arrives from Golden Square." 1207.7 - "No 5 at Charing Cross with No. 2 lurking behind." 1207.8 - "No. 21 in High St. at cnr of Wattle St." 1207.9 - "No. 6 in High St. at cnr of Wattle St." 1207.10 - "No. 6 in High St. between Wattle and Vine Sts." 1207.11 - "No. 26 at end of double track in View St. near Barnard. St. 1207.12 - "No. 26 seen at dusk turning from View St. into Barnard St."tramways, trams, bendigo, charing cross, high st, view st., tram 2, tram 5, tram 6, tram 21, tram 26 -
 Ballarat Tramway Museum
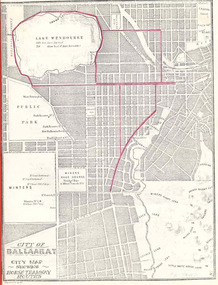
Book, City of Ballaarat, "Mayors Special Report Ballarat Tramways", Sep. 1971
Historically significant for at the time it demonstrated aspects of the evolution of Ballarat Tramways and yields information about the formation of the tramways, the Councils viewpoint and has a strong association with the Mayor of the time.Twenty two page book, produced by photocopying, side stapled and bound with a red plastic binding, titled "Mayor's Special Report Ballarat Tramways", dated 20 September 1971 for presentation to the City of Ballaarat Council Meeting 27 Sept. 1971 and signed by the Mayor, J.A.Chisholm. Note pages 18 and 19 have been reversed. Comprises: Page 1 - map (image 1829i1) - of Ballarat (Ballaarat) showing the horse tram routes in red (appear to have been drawn in with a red pencil). Note the Sebastopol route terminates at Rubicon St. Page 3 - letter to the City Councillors from the Mayor Page 4 - Outline of the "The Ballarat Tramway System" Pages 5 - 7 - Conditions for tendering the horse tram system within the City of Ballarat" Pages 8 - 11 - Specifications and Agreement for the Ballaarat Tramways (horse trams). pages 12 - 19 - Memorandum of Agreement with the British Insulated Wire Company (later ESCo) Page 20 - Copy of letter from the Secretary of the SEC to the Minister of Fuel and Power, dated 10 Sept. 1971 advising of the formal abandonment of the Ballarat and Bendigo tramway systems. Page 21 - five photos (image 1829i3) of trams in Ballarat, including the bogie tram decorated for the Queens visit, courtesy of Mr. L. J. Denmead, Tramways Superintendent. Page 22 - Plan (image 1829i2) of Ballarat Bus Services, showing route numbers, destinations and existing tramway routes. 3rd copy added 16/7/2010trams, tramways, city of ballaarat, mayor's reports, ballaarat tramway company, british insulated wire company, esco, bus services, sec -
 Ballarat Tramway Museum
Photograph - Black & White Photograph/s set of 19, Mar. 1972
Set of 19 black and white prints, all 89mm square of Bendigo trams, date machine printed on print is "Mar 1972". 981.1 - Tram 21 at North Bendigo terminus, with level crossing in background. Has destination "Golden Square" and two SEC roof ads. 981.2 - tram 2? at Eaglehawk, with destination "Depot", two SEC roof ads and "Leo A. Hughes Photographer" on side of building in background. 981.3 - tram 2? at Eaglehawk, side on view. 981.4 - tram 26 at Quarry Hill terminus looking back into city. 981.5 - tram 7 en route to North Bendigo at the site of the Bridge St. loop. Has a Peters Ice Cream truck and Sandhurst Fruit Juices truck on right side of photograph. 981.6 - tram 2 at Quarry Hill terminus. 981.7 - tram 2? at one of the loops on the Eaglehawk line, inbound? 981.8 - bogie tram at Charing Cross with fountain in background. Side on view looking south. 981.9 -trams 7 and 21 on Golden Square/North Bendigo line with bogie tram in background, at Charing Cross. Same as item 972. 981.10 - bogie tram at Charing Cross - has buildings in south west corner in background, including Colonial Mutual Life and an advertisement for the Herald newspaper. 981.11 - trams 25, 7 and two other trams at Charing Cross. 981.12 - trams 2 and 26 and three others at Charing Cross. 981.13 - tram 25 at Golden Square terminus, with Rodda's Golden Square Hotel in the background. Tram showing destination of "Nth Bendigo" 981.14 - tram 24, showing "Special" on depot access track. Has two Johnnie Walker roof ads on side. 981.15 - as above, but tram on bridge outside depot. 981.16 - trams 25 and 28 at depot 981.17 - tram 24 showing "Special" on depot access track with a single truck car in background. 981.18 - trams 2 and 26 at Charing Cross. Has advertisements for "Armstrong Tyre Service" and "Cohn's drinks" on buildings in background. 981.19 - Bendigo 2 at location?, about to enter a loop or double track section. Has hotel in background. On rear of each photo in the top left hand corner is a print number 1 to 19 in ink and location notes, generally "Bendigo"trams, tramways, charing cross, bendigo, golden square, quarry hill, tram 2, tram 21, tram 7, tram 24, tram 26 -
 Ballarat Tramway Museum
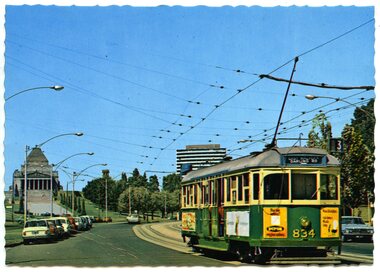
Postcard, Nu-color-vue or Nucolorvue Productions, MMTB tram No. SW5 834 southbound in St Kilda Road
Colour postcard with serrated edges of MMTB tram No. SW5 834 southbound in St Kilda Road with the Shine of Remberance in the background. Has as number of parked motor cars on either side of the road. Tram is showing destination of "East Malvern - Darling Road", route 3. Has ads on ends and side of tram, but out of focus. One is for "Dufor Engine Valves" Card by Nucolorvue. On rear of card printed in dark green ink is "MELBOURNE, VICTORIA/ St. Kilda Road with tram and Shine of Remembrance." Also wording for stamp location, copyright etc. On left hand edges is "ML 132", Set EW. Second copy added 21/07/2001. Card is ML 132 NCV1106 - a lot more sharper or in focus card, different colours.trams, tramways, melbourne, st kilda road -
 Ballarat Tramway Museum
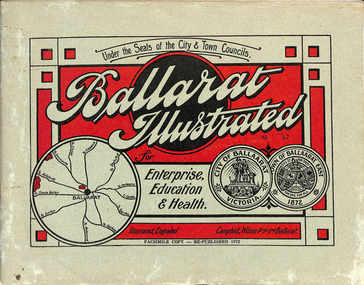
Book, "Ballarat Illustrated", 1972
Original c 1914 (see below), facsimile copy - re-published 1972. Original features photos of Ballarat City and Town, its buildings, parks and the various industries and organisations that were in Ballarat at the time of publication, including ESCo. Many photos features ESCo trams. Photos sepia toned. Has some red colour block printing on the front cover and rear, for Star Oil Engines. On inside back cover is a map with the places of interest and tram route map, marked in red. Pages are un-numbered. Original published by Ballarat East Town Council and Ballaarat City Council. On cover has number stamped in black in, "No. 87" (assume facsimile copy No.). Photos with publication show tram No. 21, built 1913 and ESCo photo page shows Mr. Pringle as Manager. Mr Pringle became manager in January 1911, As there is no photos of the "Avenue of Honour", or other mention of the first world war, assume original published about 1913 or 1914. Original shows Engravings and printing by "Campbell Wilson Prop Ltd, Ballarat". See Other Information as well for more listing details. High Resolution image added 31/8/2012 of i2 of ESCo page and i3 for Ballarat identies and sheet i4 extracted for Mr Pringle. PDF scan of full document added 21/5/2019 - see images btm633-1i.pdf and btm633-2i.pdf Notes on "Ballarat Illustrated" Reg. Item No. 733 From notes made by Neville Gower 12/1/1997 Cover: Inside front cover: Last paragraph, "Facilities for Travelling" - Electric trams serve all parts of Ballarat. Page 3: Street Scene, Municipal Town Hall, showing tram wiring Page 7: Street Scene, Lydiard St. North, intersection and tramway centre, with ESCo tram No. 21 in the bottom photo. Other photos features trams as well in Sturt St and Lydiard St. North. Page 9: Street Scene, Top photo of Sturt St. from Lydiard St. looking east, shows piles on right-hand side of road. Car parked by Post Office has a car registration number "9007". Bottom photo, an tram climbing hill, shows double trolley in the street, with early English type of pull offs. Page 13: Street Scenes and Historic Buildings: One of five photos, shows Victoria St. looking East, with tram track prominent in photo and how stone work was set up about the rails and overhead poles. Page 23: Street scene, Gardens North Entrance gates, shows details of gates near St. Aidans Drive. Note double trolley wire on poles, and style of insulators. No trams in photo, three ladies walking down the track. Page 37: Street Scene; Lydiard St views, top left hand photo, shows Railway station and railway gates with signal gantry and horse drawn vehicles. Tram tracks apparent. Bottom left hand photo shows Lydiard St. North, near Post Office, double track with centre poles - Single wire per track. Top right hand photo, showing Cemetery gates in background. Bottom right hand photo - from north end of Lydiard St. South, looking north, with an ESCo tram in background. Also has a parked car on left hand side. Page 45: Street Scenes - Bridge St; top photo at west end of Bridge St. with ESCo No. 11 with possibly double trolley wire in photo. Bottom photo at east end of Bridge St. with tram in background, shows junction. Double trolley heading out to Mt. Pleasant, single trolley for Victoria St. Page 45: Street Scenes - Bridge St; top photo at west end of Bridge St. with ESCo No. 11 with possibly double trolley wire in photo. Bottom photo at east end of Bridge St. with tram in background, shows junction. Double trolley heading out to Mt. Pleasant, single trolley for Victoria St. Page 61: Street Scenes and Historic Buildings - Public Institutions Ballarat - top left hand photo of the Hospital shows some tram track in foreground, with double trolley wire. Top right photo is of the Orphanage, the name of the tram terminus for many years. Page 68: Electric Supply Co. of Victoria's pages - top photo showing powerhouse in background, across the lake, can hardly see anything for the trees, except for the chimney. Bottom photos of the steam Turbo Generators and the switchboard. Gives Mr. P.J. Pringle as Chief Engineer and General Manager. He took over in Jan. 1911. Page 69: Ballarat East Views - features photo of Black Hill open cut, Ballarat East Railway Station, Ballarat Fire Station and "Victoria St. looking East", repeat of photo printed on page 12, but slightly darker. Image on system includes fire station and railway station, - Ballarat East. Page 78: Series of photos of various Ballarat VIP's of the era, fourth one in on top line features "P.J.Pringle, Electric Supply Co." Inside Back cover - map of Ballarat including tram lines and places of interest marked in red. Gives a detailed photographic presentation of Ballarat in 1914.80 page book with, in addition, light green card covers, titled "Ballarat Illustrated". Loose copy of page 9 and 10 held.trams, tramways, ballarat, local history, heritage buildings, esco -
 Ballarat Tramway Museum
Negative, Geoff Grant, 19/06/1955 12:00:00 AM
Negative No. N308 and black and white print made by a laser printer (stored in folder ) of the drivers cabin and destination box of W6 988 showing the "new type of carbon skid collector" on the trolley pole. This type of collector was to replace the trolley wheels used in Melbourne at the time. Was introduced into the Bourke St. route. Destination blind not fitted to box at time of photograph. Date of photo 19/6/1955. Negative scanned hi res and imaged updated 21/5/2020.trams, tramways, melbourne, bourke st., trolley poles, skid collector, tram w6 988 -
 Ballarat Tramway Museum
Negative, Geoff Grant, 19/06/1955 12:00:00 AM
Negative No. N317 and black and white print made by a laser printer (stored in folder ) of W7 1003 turning from Nicholson St. into Gertrude St. Fitzroy. Taken with part of another tram cabin in the foreground - assume 988. Geoff Grant's envelope notes state "1003 swinging round the curve into Gertrude St. This then took over the running honour of being the first tram over the Bourke St. route." Date of photograph 19/6/1955. Has the former cable winding house and signal box in the background - building used as the conductors school at the time? Negative scanned hi res and imaged updated 21/5/2020.trams, tramways, melbourne, nicholson st, bourke st., gertrude st., tram w7 1003 -
 Ballarat Tramway Museum
Newspaper, The Courier Ballarat, "Return of trams viable study", "New Push for Trams", "Taking tourism to the next level", "More tourists, more jobs expected", "Tram plan worthy of expected debate", 11/07/2002 12:00:00 AM
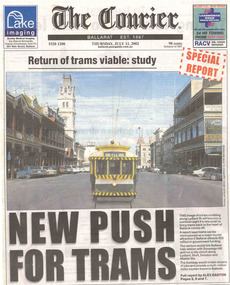
Set of three cuttings from The Courier, Ballarat dated Thursday 11/7/2002 regarding the reintroduction of trams to Ballarat. 2241.1 - Page 1 and 2 of The Courier, with page 1 titled "Return of trams viable study" and "New Push for Trams" as the commencement of a Special report showing a digitally constructed image of No. 13 in Lydiard St. North. Note the tram does not have a driver. Introduces reports by Alex Easton on pages 2, 6 and 7. On Page 2, titled "Taking tourism to the next level", has details of the Council viewpoints on the proposal, public consultation, a map of the route, and notes on the construction issues. Has a digital image of 13 crossing Sturt St. into Lydiard St. North. See images No. 1 to 3. 2241.2 - page 6 of The Courier, which joins with page 7 using the titled "More tourists, more jobs expected". Has Sections reviewing the study outcomes, benefits and a summary of the study. Page 6 has a photo of a passenger boarding No. 21, decorated as the Myers Christmas tram in Sturt St and a photo of Bridge St. in 1971 (very poor quality reproduction). See images No. 4 and 5. 2241.3 - page 7 of The Courier, has Sections detailing the history of Ballarat Trams, proposals for the City Tramway, costs, consultation, and comments from Peter Hiscock. Has a photo of Peter Hiscock and Mayor David Vendy in front of No. 13 at the BTM depot. See image No. 6. Also has a photo of Dianne Smith, Executive Director of Ballarat Tourism. On page 8, as part of The Courier's editorial Section, has comments on the proposals, titled "Tram plan worth of extended debate". Looks at the $20million cost. ballarat revival, editorial, ballarat city tramway, lydiard st. nth -
 Ballarat Tramway Museum
Photograph - Black & White Photograph/s, Geoff Grant, 19/06/1955 12:00:00 AM
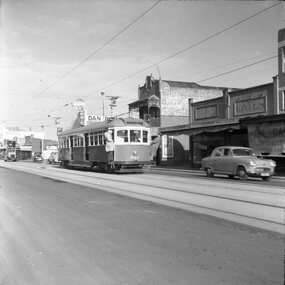
Black & White photo of M&MTB tram No, 988, just after testing a crossover in either Smith St. Fitzroy or High St. Preston, has "Dan Robinson Furniture" building in background. Tram does not have destination roll. Two people leaning out of front cabin. Taken 19/6/1955. Negative on file and scanned as 492i1 - print has been cropped. Negative scanned hi res and imaged updated 21/5/2020.On rear, in typed paper, "988 testing a crossover on the Bourke St. Route, 19 June 1955" and "Geoff Grant" stamp in btm rh corner.trams, tramways, melbourne, bourke st, commissioning , tram 988 -
 Ballarat Tramway Museum
Photograph - Black & White Photograph/s, Geoff Grant, 19/06/1955 12:00:00 AM
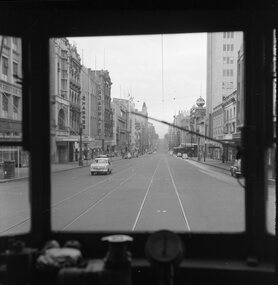
Black & white photo out of rear cabin of M&MTB tram No. 988, running "bang road" or wrong line in Bourke St. on Sunday, 19 June 1955 while testing overhead. Good view of Bourke St. buildings looking towards GPO. Some motor cars in the street. Negative No. 315 on file. Scanned image of negative btm497i1 shows a wider image than the print. Geoff Grant's notes on the envelope that contained the negative - says that this was the first tram to run on the Bourke St. route. Negative scanned at hi res 21/5/2020.On typed paper on rear "View out of the rear cabin of 988 as it came up Bourke St. on Sunday the 19 June 1955" and "Geoff Grant" stamp in btm rh corner.trams, tramways, melbourne, bourke st., commissioning , tram 988 -
 Ballarat Tramway Museum
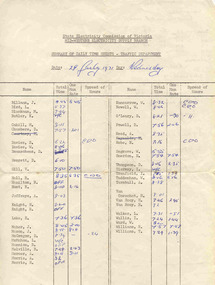
Document - Form/s, State Electricity Commission of Victoria (SECV), "Summary of daily time sheets - Traffic Department", 1971
Form used to record a summary of the working hours of crews, showing the total hours and the hours worked when one man operation. Gives a list of names at the time when the form prepared. Also used by Jerry? as a sheet of paper to write out the details of No. 9 run for Saturdays as a reference document and noted it was last time on the Victoria St route and recorded the tramcar number.Duplicated typed form, foolscap sheet, titled "Summary of daily time sheets - Traffic Department", giving name, total time, one man rate time, and spread of hours. Has a list of employee names in two columns. Dated 28/7/1971 - Wednesday On rear of sheets, Jerry? Van Rooy - has used the sheet to write out Saturday 9 run details. Has endorsed it - "My last Vic Run on 21/8/1971" - Conductor Jerry? Van Rooy - Car No. 17" Names on the sheet are: (in alphabetical order on the sheet) L Walker H Knight J Smerdon A Turnbull A Mercer R. Courtney W. Ward R. Williams A. Jeffreys D. McGregor D. Thomson I Willis D O'Leary J. Maher A. Morris D. Domaschenz R. G. Knight E Lake I. Tierney N Cahill N Reynolds W. Davies N. Hamilton L. McMahon J. Billman W. Nancarrow H. M. Van Oorschot W. Newell L. Bird D. Chambers H. Van Rooy H. Mannion N. Robe E. Van Rooy M. Blackman N. K. Alan - crossed out H. Hall J. Mason S. Davies W. F. Segrave N. D. Hunt K. Butler V. L. Gill R. K, Morris D. Everett T. Williams A. Reed B. Melville I. Trenfield Power - in pen W. Tuddenham Photocopy of sheet made.See above.trams, tramways, timetables, sec, ballarat, shifts, times -
 Ballarat Tramway Museum
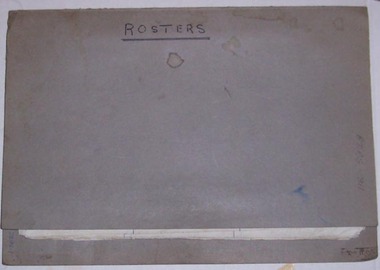
Document - Table Cards (Sheets), State Electricity Commission of Victoria (SECV), Rosters, Mar. 1970
3293.1 - Grey folder, with a two prong clip, marked ""Rosters both sides, containing a set of 29 sheets, typed on foolscap paper, giving the Weekdays, Saturday and Sunday tables or runs for the SEC Ballarat trams on the SEC Ballarat Tramway system until the period before closure. Gives details of 38 tables or runs, numbered from 1 Run to 38 Run. Each sheet headed "Weekday", three runs per sheet. Saturdays - 1 to 34, Sunday - 1 to 10. Each sheet has in the top right hand corner LJD/3/70. Time table operated until the commencement of closure of the system. All sheets imaged and are: Monday to Friday Runs 1- 3 4-6 7-9 10-12 13-15 16-18 19-21 22-24 25-28 29-30 31-33 34-36 37 and 38 Saturday Runs 1- 3 4-6 7-9 10-12 13-15 16-18 19-21 22-24 25-28 29-30 31-33 34 Sunday Runs 1- 3 4-6 7-9 10 Each run details where the driver/conductor would sign on, time, the trips, meal breaks, finish time and the total time of the shift. See also Reg Items 2984 - 2993 for table cards at the time of closure. 3293.2 - separate sheet in front of folder, was taped to folder, giving distance of the various routes within Ballarat - miles. Now loose within folder. Second copy of this sheet added 3-8-2006, BTPS Cat No. 611. - See image btm3293i31 for image file. Images of all sheets added 31/8/2012.On front of folder in black ink " BTPS 811" and on top of 3293.2 - "BTPS 611"trams, tramways, timetables, sec, ballarat, crews, routes -
 Ballarat Tramway Museum
Slide - 35mm slide/s, Ben Parle, 5/04/1958 12:00:00 AM
Kodachrome Transparency - 35mm slide - cardboard mount, with one side with red border and words "Kodachrome Transparency / Processed by Kodak" top and bottom. Photo taken by Ben Parle 5/4/1958. Has slide No. "14" stamped in red in top corner and date stamped on slide. Photo of the No. 41 and 21 on an AETA tour, Sturt St. at Drummond St., facing the wrong way on the Sturt St track. Would appear the trip has terminated in Sturt St and about to reverse to another route. Tram 41 has destination of Special and is carrying the AETA special car sign. For high resolution scan see btm2843h.tif"Sturt St / Drummond St" "-5 APR 1958"tramways, trams, sturt st, drummond st, aeta, tram 41, tram 21 -
 Ballarat Tramway Museum
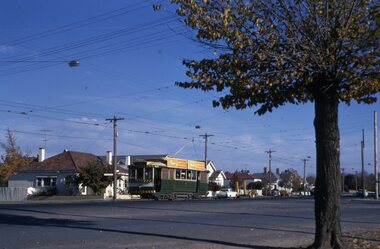
Photograph - Black & White Photograph/s, Wal Jack, 21/04/1962 12:00:00 AM
Yields information about Ballarat Trams and streetscapes late 1950's on the Mt Pleasant route and advertising of the period.Black and white print of Ballarat 18 and 37, at the Victoria Street terminus, photographed by Wal Jack, 21/4/1962. Two copies. Tram has advertisements for "The Age", Whites Florists, Lancashire's. Both trams are showing "Special" and have the AETA tour boards on the front of the tram. Photo print courtesy of Port Dock Railway Museum, now the National Railway Museum. See worksheet 4311 for letter and details of prints sent to Bill Scott, 19/10/2001. Any photo credit to mention NRM Collection.On rear of copy 1 "SEC Ballarat / 18 & 37 / Victoria / 21/4/62 2092 / Wal Jack" Copy 2 "DAC" in ink, bottom right hand corner.trams, tramways, victoria st, terminus, tram 18, tram 37 -
 Ballarat Tramway Museum
Slide - 35mm slide/s - set of 10, Eldon Hogan, mid 1960's to early 1970's
Set of 10 Agfa Plastic mounted slides - from the Eldon Hogan collection - possibly on an ARE Bendigo tours - mid 1960's (black destination rolls) and late 1960's or early 1970's. Scanned on the Canon scanner at the depot 15/12/1971 at the time of the installation of the scanner. .1 - No. 24 in bound along High St Bendigo with the discovery of gold monument in the foreground, Golden Sq route. .2 - ditto .3 - No. 26 outbound at the above location. .4 - No. 24 at the corner of Short St and High St, with the Technical college building? in the background. .5 - No. 26 at ditto, outbound for Golden Square. .6 - No. 24, High St Bendigo, with the Cathedral in the background. Tram has two Johnnie Walker Whiskey roof advertisements. .7 - Three trams, Pall Mall, Charing Cross, with the Beehive building in the background. Trams have SEC roof advertisement. .8 - ditto with Coca Cola ad on the Beehive building, turning around. .9 - No. 29 and a bogie tram at the Golden Square terminus with Billy Rodda's Golden Square Hotel in the background. Just past the tram is a large truck carrying boxes. .10 - Nos, 18, a bogie tram, 21 and 29 at the Quarry Hill terminus. tramways, trams, bendigo, tram 18, tram 24, tram 26, tram 21, tram 29 -
 Ballarat Tramway Museum
Slide - 35mm slide/s - set of 11, Eldon Hogan, mid 1960's to early 1970's
Set of 11 Agfa Plastic mounted slides - from the Eldon Hogan collection - featuring an ARE tour with Nos. 21, 29 and 25 to Bendigo, mid 1960's. Scanned on the Canon scanner at the depot 15/12/1971 at the time of the installation of the scanner. .1 - four trams at Charing Cross - includes 19 and 25. .2 - 21 and 25 at the depot junction. .3 - 21 and 29 Quarry Hill route? .4 - 29 ditto .5 - 24 at Golden Square terminus - photo taken from the city side - note all the little shops and buildings on the left hand side of the photograph. .6 - 29, 21 and 25 at Eaglehawk .7 - 29 - side on view - Eaglehawk line? .8 - ditto with 21 .9 - 29 - North Bendigo line? - side on view .10 - 29 and 21 - vacant paddocks - Eaglehawk line .11 - 29 crossing the railway overbridge, Eaglehawk line, in bound. Trams have SEC roof advertisements. tramways, trams, bendigo, eaglehawk, charing cross, golden square, tram 21, tram 29, tram 25, tram 19