Showing 328 items
matching view st. bendigo
-
 Ballarat Tramway Museum
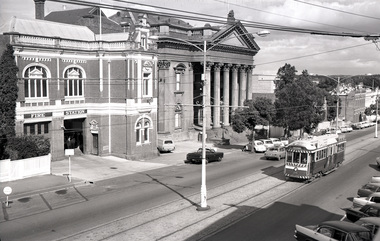
Slide - 35mm slide/s - set of 6, Noel Simons, 28 Feb. 1972
... in the background. 1206.3 - No. 5 in View St. Bendigo, with the Commodore... column in the background. 1206.3 - No. 5 in View St. Bendigo ...Set of 6 transparencies taken on 28/2/1972 on Kodak mounts. 1206.1 - Bendigo No. 5 at Hayes St. Loop, en route for Quarry Hill. 1206.2 - No. 5 at Garden Gully Loop, Mt. Korong road, Ironbark. en route to Quarry Hill. Note the water column in the background. 1206.3 - No. 5 in View St. Bendigo, with the Commodore Motel in the background. 1206.4 - No. 6 en route for Golden Square in Fire Station loop, with the fire station building in the background. Photo taken after tram has passed photographer. 1206.5 - No. 6 in High St., running through Golden Square Shopping Centre, en route for Golden Square. Photo taken after tram has passed photographer. 1206.6 - No. 6 arriving at Charing Cross, bound for North Bendigo, with the City Family Hotel, ANZ bank and the Cenotaph (war memorial) in the background.Information written on in blue ink and date stamped on purple ink. 1206.1 - "No. 5 at Hayes Loop, Ironbark." 1206.2 - "No. 5 at Garden Gully Loop, Mt. Korong road, Ironbark." 1206.3 - "No. 5 in View St. just after start of double track near Barnard St." 1206.4 - "No. 6 in High St. at Fire Station loop." 1206.5 - "No. 6 in High St. running through Golden Square shopping centre." 1206.6 - "No. 6 arriving at Charing Cross from Golden Square."tramways, trams, bendigo, hayes st. loop, garden gully loop, view st., golden square, charing cross, tram 5, tram 6 -
 Bendigo Historical Society Inc.
Document - CONNELLY, TATCHELL, DUNLOP COLLECTION: ACCOUNTS ESTATE OF ESTHER ISABELLE CANNING, 1893 - 1894
... . D. View St, Bendigo dated July 20th 1894. 7 - 1894... from Hinchcliffe Edwin, M. D. View St, Bendigo dated July 20th ...Document. Accounts Estate of Esther Isabelle Canning. 1 - 1894 - Ac from Mackay & Co, Bendigo Advertiser Office. 2 - 1893 - Ac from Transton Geo, Wholesale Tobacconist, Bath Buildings Bendigo. 3 - 1894 - City of Bendigo Rate Account to Gourlay, Mary Ann for property in High St. 4 - 1893 - Note from McKenzie Rosa stating she received from Canning two weeks wages from the Golden Age Hotel. Attached accounts from the Kent Brewery Co, Bendigo and Hunter Bros, MCCrae St Bendigo. 5 - 1894 - Receipt from Phoenix Fire Office of London, Victorian Branch. 60 Market Street Melbourne. Received from Storie H. Executors late E I Canning. 6 - 1894 - Account from Hinchcliffe Edwin, M. D. View St, Bendigo dated July 20th 1894. 7 - 1894 - Account from W Beebe & Son, Steam Granite, Marble & Stone Sawing Works. Mitchell St and Lyttleton Terrace for fixing headstone and re gilding old inscription etc. Dated Oct 1894. 8 - 1893 - Receipt from Phoenix Fire Office of London, Victorian Agency - Phoenix Chambers 52 Market St Melbourne dated Feb 2 and Feb 4 1893. 9 - 1894 - Ac from Hinchcliffe Edwin, M. D. View St Bendigo for professional attendance. Estate of the late Mrs Canning Golden Square, Golden Age Hotel, dated Jan 11th 1894 (document torn. 10 - Various receipts pinned together. 1893 - 1894 from City Brewery Company, High St, Bendigo, Ale and Porter Brewers Thros Canning, Golden Square. Also memorandum from Johnston & Illingworth?, City Brewery Co, Golden Square to solicitors requesting payment of accounts in the estate of the late Mrs Canning of Golden Square.cottage, miners, connelly, tatchell & dunlop, mackay & co, bendigo advertiser office, transton geo, city of bendigo, gourlay mary ann, mckenzie rosa, golden age hotel, kent brewery co, hunter bros, phoenix fire office of london, storie h, hinchcliffe edwin, w beebe & son -
 Bendigo Historical Society Inc.
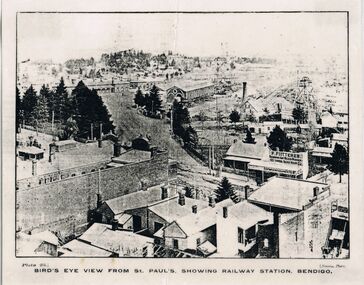
Photograph - DILLON-SHALLARD COLLECTION: RAILWAY STATION BENDIGO
... Photograph.Bird's eye view from St. Paul's. Showing Bendigo... Photograph.Bird's eye view from St. Paul's. Showing Bendigo Railway Station ...Photograph.Bird's eye view from St. Paul's. Showing Bendigo Railway Station. Mining chimney, B.Fiitterer bamboo art wicker worker shop on Mitchell Street, plus various buildings on Mitchell Street. -
 Bendigo Historical Society Inc.
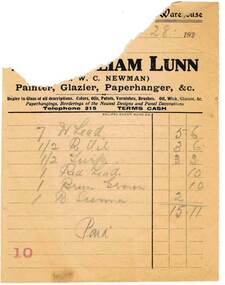
Document - BUSH COLLECTION: COLLECTION OF VARIOUS HOUSEHOLD RECEIPTS (BUSH FAMILY), 1928-1929
... 251 View St. Various services from Bendigo businesses: Lino... household receipts (Bush family) from 251 View St. Various services ...Collection of various household receipts (Bush family) from 251 View St. Various services from Bendigo businesses: Lino (from Beehive); plumbers ( W H Osborne); (William?) Lunn (? W C Newman) - painter, glazier, Paperhanger.person, individual, bush collection - personal, bendigo, bush collection, collection, business, retail, commerce -
 Bendigo Historical Society Inc.
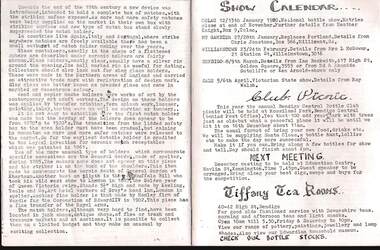
Document - JAMES LERK COLLECTION: BENDIGO CENTRAL BOTTLE CLUB NEWSLETTER
... High St, Bendigo - ''View our range of pottery, paintings... Tearooms 40-42 High St, Bendigo - ''View our range of pottery ...Bendigo Central Bottle Club Newsletter - James Lerk Collection Vol 5 No 2 (ca. Oct 1979). Ref to Tiffany Tearooms 40-42 High St, Bendigo - ''View our range of pottery, paintings, jewellery and lamp shades. Also view our Edwardian household museum''.tiffany tearooms -
 Bendigo Historical Society Inc.
Document - DONALD CLARKE COLLECTION: FRIEDRICH & BASSEMIR INVOICE
... Duffy Prop., Hygenic Vienna Bakery, 209 View St., & 226 Mitchell... Prop., Hygenic Vienna Bakery, 209 View St., & 226 Mitchell St ...Invoice dated 01/05/1956 purchased by Mrs D. W. Clark, Llanelly; for bread & freight from 3rd April to 27 April at cost of £1.07.06 from Friedrich & Bassemir. Friedrich & Bassemir, Owen Duffy Prop., Hygenic Vienna Bakery, 209 View St., & 226 Mitchell St. Bendigo. -
 Ballarat Tramway Museum
Photograph - Digital image, John Ward, 31/12/1971 12:00:00 AM
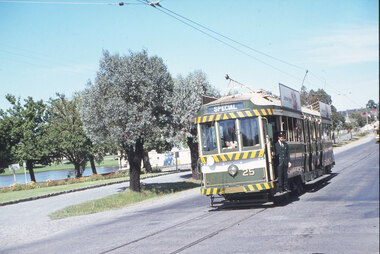
... title "004742 311271 71103-G SEC Vic Bogie tram 26 View St near... title "004742 311271 71103-G SEC Vic Bogie tram 26 View St near ...Digital image of the Bendigo 26 in Pall Mall passing the Bendigo Fire Station and the Court House. The tram has the destination of Eaglehawk. Photo by John Ward 31-12-1971 Slide title "004742 311271 71103-G SEC Vic Bogie tram 26 View St near Rowan St Bendigo Vic"trams, tramways, bendigo, pall mall, tram 26 -
 Bendigo Historical Society Inc.
Document - CONNELLY, TATCHELL, DUNLOP COLLECTION: ACCOUNTS ESTATE OF ESTHER ISABELL CANNING, 1893 -1894
... Merchants. 9 - 1894 - Ac from Forbes T, Surveyor, View St, Bendigo... Forbes T, Surveyor, View St, Bendigo. Subdivision of Allotment 5 ...Document. Accounts of Estate of Esther Isabelle Canning. 1 - 1894 - Account from Hinchcliffe Edwin, M. D., View Street Bendigo. 2 - 1894 - Account from Jones T R, Chemist & Druggist, Hargreaves Street, Sandhurst. 3 - 1894 - Ac. From William Bruce & Sons, B. B. Brewery, Bridge St. Bendigo, Brewers, Aerated Waters and Cordial Manufacturers, 2 April 1894. 4 - 1894 - Ac. From William Bruce & Sons, B. B. Brewery, Bridge St Bendigo, Brewers, Aerated Waters and Cordial Manufacturers. 1 March 1894. 5 - 1893 -Ac. From Burt, E Mrs, Nurse. 6 - 1894 - Receipt from Phoenix Fire Office of London, Victorian Branch, 60 Market St, Melbourne. Insurance from Fire for Property - Cottage, High St. 7 - 1893 - Receipt from Phoenix Fire Office of London, Victorian Branch, 60 Market St, Melbourne. Insurance from fire for property - Hotel, high St. 8 - 1894 - Ac from S. P. Co-Operative Co, Mitchell St, Bendigo, General Grocers, Tea and Provision Merchants. 9 - 1894 - Ac from Forbes T, Surveyor, View St, Bendigo. Subdivision of Allotment 5, Section 29A at Golden Square. 10 - 1893 - Ac from Mackay & Co, Bendigo Advertiser Office, Market Square, Bendigo. 11 - 1893 - Ac from Pritchard Geo, Aerated Water and Cordial Manufacturer, Arnold St Bendigo. 12 - 1893 - Receipt from McKenzie R C. 13 - 1894 - Ac from C H Hobson & Co, General Auctioneers, Bendigo Arcade Auction Rooms, Hargreaves St Bendigo.cottage, miners, connelly, tatchell & dunlop, hinchcliffe edwin, jones t r, william bruce & sons, b b brewery, burt e mrs, phoenix fire office of london, s p co-operative co, forbes t, mackay & co, bendigo advertiser office, pritchard geo, mckenzie r c, hobson c h -
 Bendigo Historical Society Inc.
Document - BENDIGO GAS COMPANY COLLECTION: DOCUMENTS RELATING TO SHARE TRANSFERS
... St Bendigo dated 28.2.1940 / declaration form stating... St Bendigo dated 28.2.1940 / declaration form stating ...BENDIGO GAS CO COLLECTION- Documents relating to Share Transfers /letter to The Manager of The Bendigo Gas Co. , on salmon coloured paper from Ngawi Gilles Dean , Romney , Billard Ave Waroonga September 1940, re change of surname / letter to Mrs Ngawi Gilles Dean , Romney , Billard Ave Waroonga 17 September 1940 from The Manger of The Bendigo Gas Co. , on salmon coloured paper re change of surname and the Estate of the Late John Locke Watson , England / letter to The Secretary of The Bendigo Gas Co from H.C. Collingwood & Co , Stock , Share and Investment Brokers , Melbourne , re late W. Millar / letter to The Comptroller of Stamps , Melbourne , from, Robert Batcheleder ? , View St Bendigo dated 28.2.1940 / declaration form stating that the transferee is not an enemy subject / Journal sheet 31 written in pencil relating to share transfers / Journal sheet written in ink relating to share transfers / document N0. 13419 dated 13.4.1937 from J.B.Were & Son Melbourne to 'The Secretary the Bendigo Gas Co handing over securities to be marked 'Scrip in Office' and returned. / document N0. 13423 dated 15.4.1937 from J.B.Were & Son Melbourne to 'The Secretary the Bendigo Gas Co handing over securities to be marked 'Scrip in Office' and returned. / document N0. 13425 dated 16.4.1937 from J.B.Were & Son Melbourne to 'The Secretary the Bendigo Gas Co handing over securities to be marked 'Scrip in Office' and returned. / document N0. 13444 dated 1.5.1937 from J.B.Were & Son Melbourne to 'The Secretary the Bendigo Gas Co handing over securities to be marked 'Scrip in Office' and returned. / document N0. 3467 dated 20.10.1948 from J.B.Were & Son Melbourne to 'The Secretary the Bendigo Gas Co requesting registration and a new scrip '.bendigo, business, bendigo gas company, bendigo gas co collection- ./ ngawi gilles dean , / the late john locke watson , england / h.c. collingwood & co , stock , share and investment brokers / j.b.were & son melbourne / -
 Ballarat Tramway Museum
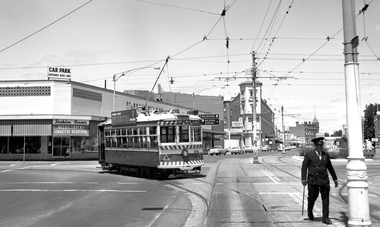
Photograph - Digital image, John Ward, 2/01/1972 12:00:00 AM
... at High St & View St Charing Cross Bendigo Vic"... of the Bendigo tram 29 turning from Pall Mall into Mitchell St ...Digital image of the Bendigo tram 29 turning from Pall Mall into Mitchell St with the destination of Railway Station. In the background is the Fountain Plaza, advertising Melba Frocks and Gidgette Boutique, the City Family Hotel, Park Lane chicken shop. In the foreground is the Inspector returning the point bar to its holder on a pole. Photo by John Ward 2-1-1972. Slide title "04771 020172 7210-F SECV Birney tram 29 Pall Mall to Mitchell St at High St & View St Charing Cross Bendigo Vic"trams, tramways, bendigo, pall mall, mitchell st, charing cross, tram 29 -
 Bendigo Historical Society Inc.
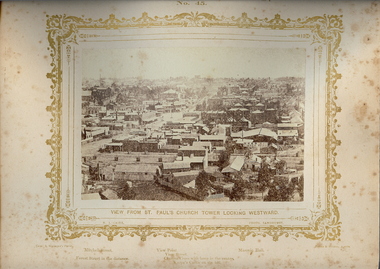
Photograph - VIEWS OF BENDIGO: LOOKING WEST FROM ST. PAUL'S CHURCH, 1875 copy,1970
... , 'Views of Bendigo|No.45.'. Below, 'View from St. Paul's church... westwards view over Bendigo from St. Pauls church tower. Inscription ...Sepia photo on cream board. Shows westwards view over Bendigo from St. Pauls church tower. Inscription: Above image, 'Views of Bendigo|No.45.'. Below, 'View from St. Paul's church tower looking Westward.', 'N.J.Caire Photo, Sandhurst'. Bottom, 'Casey & Wenborn's Print Forbes & Holmes, Agents',' Mitchell Street, Forest Street in the distance',' View Point, View Street, Charing Cross with lamp in the centre. Knipe's Castle on the hill'. On Back, RHSV stamp, Bendigo Branch '1959|70' Nicholas CaireN.J.Caireplace, bendigo, view west from st.pauls church, see: 'views of bendigo' by n.j.caire -
 Bendigo Historical Society Inc.
Document - CONNELLY, TATCHELL, DUNLOP COLLECTION: INDENTURE BETWEEN CURLETT AND FAIRCLOUGH
... formerly of View St., Sandhurst ( now called Bendigo ) but now... formerly of View St., Sandhurst ( now called Bendigo ) but now ...Legal document ( deed of covenant and extension of mortgage ) Written on front :Mr. Thomas Curlett to Messrs Faircough & Brown, dated 14 June 1892, Deed of Covenant, and extension of terms of mortgage'' Document gives details of indenture dated 14 June 1892, between Thomas Curlett of Tragowel, farmer, and William Fairclough formerly of View St., Sandhurst ( now called Bendigo ) but now of head office of the Bank of Victoria., and Gilbert Wilson Brown of Mathoura Road, Toorak, gentlemen. Typed on bottom of page 'Connelly & Tatchell, Bendigo' Brown one penny stamp at top left of the document .business, legal, connelly, tatchell & dunlop, thomas curlett, gilbert wilson brown, william fairclough, connelly, tatchell & dunlop -
 Bendigo Historical Society Inc.
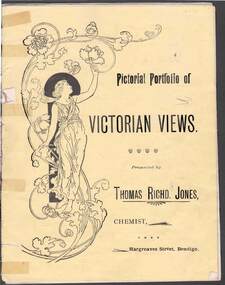
Document - PICTORIAL PORTFOLIO OF VICTORIAN VIEWS
... . View No 4. View from St Paul's Bendigo. View No 5. Unveiling.... A Giant Palm Bendigo. View No 4. View from St Paul's Bendigo. View ...Yellow covered nine page booklet containing 19th Century views of Bendigo and Ballarat presented by Thomas Richard Jones, Chemist of Hargreaves Street Bendigo. Art Noveau figure of woman on front cover. Inside cover features T R Jones Dispensing Chemist and Druggist printed beside man holding a horse. List of Veterinary products supplied by Jones. Farmer's requisites included Strychnine, Toxa, Phosphorus, Poisoined wheat, Bi-sulphide of Carbon. Egg preserving fluid and milk preserving powder Rennet and butter colouring along with Drenches and Cattle medicenes supplied. View No1. Moorabel Falls Ballarat. View No 2. Statues of Leda and Spring Ballarat. View No 3. A Giant Palm Bendigo. View No 4. View from St Paul's Bendigo. View No 5. Unveiling 'The first Public Statue' Bendigo P/Office in background. View No 6. Statue Presented to the City of Bendigo by Cr Harkness. [Reclining greek beside dog fighting lion] View No 7. 'On the Campaspe, near Bendigo. View No 8 The Pine Avenue, Rosalind Park. View No 9. Scenes on Lake Wendouree, Ballarat. View No 10. Statuary in The Botanical Gardens Ballarat. View No 11. Statues of Burns & Moore Ballarat. View No 12. Botanical Gardens, Ballarat. Inside back cover features list of T R Jones products. Outside back cover features advertisement for T R Jones Universal Corn Cure, and Jone's Compound Pectoral Balm.Printed by Periodicacls Publishing Co, 21 Elizabeth Street Melbourne.bendigo, parks and gardens, bendigo chemist and local views. -
 Ballarat Tramway Museum
Slide - 35mm slide/s - set of 20, Eldon Hogan, 22/05/1971 12:00:00 AM
... - No. 29 - side on view, North Bendigo line? Thunder St? .10... - No. 29 - side on view, North Bendigo line? Thunder St? .10 ...Set of 20 35mm Agfa colour blue and white plastic mount slide - featuring photos taken during an Association of Railway Enthusiasts Tour by Eldon Hogan. Folder had the date "22/5/1971" on it. Scanned on the Canon scanner at the depot 15/12/2005 at the time of the installation of the scanner. .1 - No. 25 in Nolan St with Lake Weeroona in the background. .2 - Three Birneys at the Depot junction, 30 and 29 with Conoles Hotel, McCrae St in the background. .3 - No. 5 in front of the Shamrock Hotel, Pall Mall .4 - No. 29 in front of the Shamrock Hotel with Stonemasons sign in the background. .5 - No. 18 ditto .6 - No. 30 and another Birney at the Quarry Hill terminus .7 - No. 24 southbound High St at the Violet St intersection with a "Mine Open" sign in the foreground and the Cathedral in the background. .8 - No. 19 at the Golden Square terminus, with the Golden Square Hotel in the background. .9 - No. 29 - side on view, North Bendigo line? Thunder St? .10 - No. 30 crossing the railway overbridge, inbound from Eaglehawk with a number of photographers in the foreground. .11 - No. 29? ditto .12 - No. 5 outbound - side on view, Thunder St, North Bendigo line? .13 - No. 29 and 30 at the intersection of High St and Brazier St with Church or School hall in the background. .14 - ditto .15 - ditto .16 - No. 25 and the two Birneys at the Eaglehawk terminus. .17 - No. 29 and two other trams at ditto .18 - No. 30 and 19 adjacent to the Lake View Hotel, McCrae St .19 - No. 5 and 25 crossing on the Eaglehawk Line, Ironbark? .20 - No. 29 at Quarry Hilltramways, trams, bendigo, lake weeroona, pall mall, golden square, eaglehawk, quarry hill, tram 25, tram 30, tram 29, tram 5, tram 18, tram 19, tram 24, tram 25 -
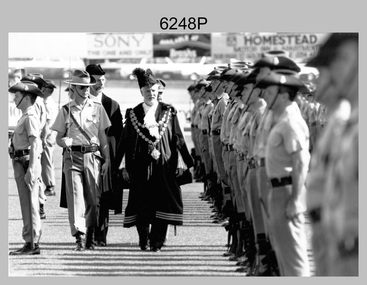 Bendigo Military Museum
Photograph - Army Survey Regiment Freedom of Entry Parade, Bendigo CBD, 1990
The Freedom of Entry to the City on the 26th of October 1990 was an honour first conferred by the Bendigo City Council to the Army Survey Regiment in 1970. This was the fifth time the unit exercised its freedom of marching into the city with swords drawn, bayonets fixed and drums beating. The honour is usually bestowed upon local regiments, in recognition of their dedicated service, and it is common for military units to periodically exercise their freedom by arranging a parade through the city. Led by the Regiment’s CO – LTCOL Rene van den Tol, the unit marched down View St in the CBD, along Pall Mall and up Gaol Rd to the Queen Elizabeth II Oval. The ceremonial parade followed with a march past the guests of honour, Mayor of Bendigo Councillor James Douglass and military dignitaries. The parade concluded after formal inspections of the troops. Regiment members were treated to a civic reception at the City Hall after the ceremony. The Regiment also exercised its Freedom of Entry with anniversary parades in 1977, 1980, 1985 and 1995.This black and white photograph of the Army Survey Regiment were taken on the occasion of the Freedom of Entry parade to the City of Bendigo on the 26th of October 1990. The photograph was printed on photographic paper and is part of the Army Survey Regiment’s Collection. The photograph was scanned at 300 dpi. .1) Photo, black & white, L to R: LT Simon Buckpitt, MAJ Bob McHenry, unidentified, Mayor James Douglass, unidentified staff officer (partially obscured), ranks of unidentified Army Svy Regt personnel.No personnel are identified.royal australian survey corps, rasvy, army survey regiment, army svy regt, fortuna, asr -
 Bendigo Military Museum
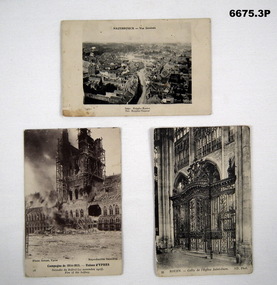
Postcard - POSTCARDS WW1, PHOTOGRAPHIC, C.1914 - 1918
Postcard photos of locations in Northern France relating to Battlefields in WW1.1. B & W photo of aerial view town of Hazebrouck at time of WW1. 2. B & W photo of ruins of Cathedral in Ypres from WW1 called "Fire of the Belfrey". 3. B & W photo of the gate of Saint Oven Church in Rouen Church.1. Headed "Hazebrouck - Vue Generale" - on back is filled in Letter to "Louie". 2. Titled Campagne De 1914-15 - Ruines D' Ypres - Fire of Belfrey. 3. Titled "Rouen - Grille De I'Eglise Saint-Oven (Gate of St Oven Church).passchendaele barracks trust, postcards, france, ww1 -
 Bendigo Military Museum
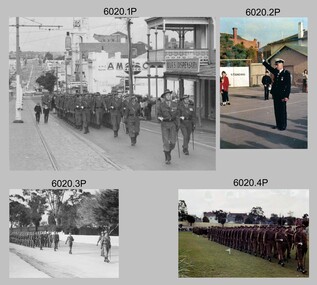
Photograph - AHQ Survey Regiment Freedom of Entry Parade, 1970
The Freedom of Entry to the City was an honour conferred by the Bendigo City Council to the AHQ Survey Regiment on the 20th of April 1970. The unit was granted for the first time the privilege of marching into the city with swords drawn, bayonets fixed and drums beating. The honour is usually bestowed upon local regiments, in recognition of their dedicated service, and it is common for military units to periodically exercise their freedom by arranging a parade through the city. The Freedom of Entry Parade occurred on the 14th of June 1970 led by the Regiment’s CO – LTCOL Bill Sprenger MID, MBE; the unit marched up View St in the CBD to the Queen Elizabeth II Oval. The ceremonial parade followed with a march past the guests of honour, Mayor of Bendigo Councillor Jeffrey and military dignitaries. The parade concluded after formal inspections of the troops. A ceremonial scroll was presented to the Bendigo City Council to the AHQ Survey Regiment citing the occasion and was proudly displayed in the entry foyer to Fortuna Villa up to October 2008. The Regiment continued to exercise its Freedom of Entry with anniversary parades in 1977, 1980, 1985, 1990 and 1995.These black and white and colour photographs of the AHQ Survey Regiment were taken on the occasion of the Freedom of Entry parade to the City of Bendigo on the 14th of June 1970. The photographs were printed on photographic paper and are part of the Army Survey Regiment’s Collection. The photographs were scanned at 300 dpi. .1) Photo, black & white, L to R: RSM WO1 John Hogan, CO LTCOL Bill Sprenger MID, MBE; and 2IC MAJ Frank Thorogood SB St J. .2) Photo, colour, unidentified Victorian police Superintendent .3) Photo, black & white, L to R: RSM WO1 John Hogan, 2IC MAJ Frank Thorogood SB St J. and CO LTCOL Bill Sprenger MID, MBE. .4) Photo, colour, unidentified personnel .5) Photo, colour, L to R: unidentified, COL COMDT BRIG Don Macdonald MID, unidentified, CO LTCOL Bill Sprenger MID, MBE; and Mayor - Councillor Jeffrey. .6) Photo, black & white, L to R: unidentified, COL COMDT BRIG Don Macdonald MID, unidentified, CO LTCOL Bill Sprenger MID, MBE; and Mayor - Councillor Jeffrey. .7) Photo, black & white, L to R: unidentified, Mayor Councillor Jeffrey, COL COMDT BRIG Don Macdonald MID, unidentified and CO LTCOL Bill Sprenger MID, MBE. .8) Photo, black & white, L to R: unidentified, COL COMDT BRIG Don Macdonald MID, unidentified, CO LTCOL Bill Sprenger MID, MBE; and Mayor - Councillor Jeffrey. royal australian survey corps, rasvy, fortuna, army survey regiment, army svy regt, asr -
 Bendigo Military Museum
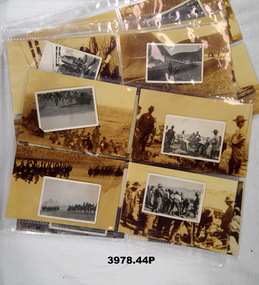
Photograph - PHOTOGRAPHS WW1, Originals: 1915
The photos in the collection relate to Thomas Robert JONES No 1982 AIF. Refer Reg No 1377 for his service details..1) - .22) Photos, black / white, showing men, training, the desert, Dardanelles, Turkish prisoners, leaving Egypt. .23) - .44) Enlargement copies of photos .1) - .22), sepia.Hand written on the rear in pen: .1) Housing parade on the desert Egypt, bugler band 6th Battalion. .2) Australian Field Artillery exercising horses near the pyramids. .3) Some of the buglers of the 6th Battalion with their identification disks as eyeglasses. .4) Serving out rations. .5) 6th Battalion having a short halt during a route march on the desert. .6) 18 Pounder Field Gun Australian Artillery. .7) 'Come to the Cook House Door' 6th Battalion AIF. .8) Lieut WATSON - Machine Gun being vaccinated by Lieut BALFE A Coy. Both these Officers are amongst the fallen. .9) 6th Battalion AIF preparing to leave Mena Camp for the Dardanelles. .10) A Turk captured on the morning of 25th April 1915 on board the troop ship Galeka. .11) Wounded alongside of hospital ship Galeka. .12) HMS Vengeance at the Dardanelles. .13) Hospital ship Sudan off Gaba Tepe. .14) Observation balloon off Cape Helles. .15) British Destroyer off Cape Helles. .16) Cape Helles, Dandanelles. .17) Turkish prisoners captured at the Suez _ _ _ Barracks, Cairo. .18) Turkish prisoners. .19) <> Guides near pyramids Mena. .20) Method of irrigation on the Nile, Egypt. .21) Going on leave into Cairo. .22) View of Cairo mosques in foreground taken from the Citadel. .23) - .44) On rear in stamp form: Dennis Major, 7 Bancroft St Bendigo Vic 3550. Tel & fax 03 544 2445 photography, military, ww1 -
 Bendigo Military Museum
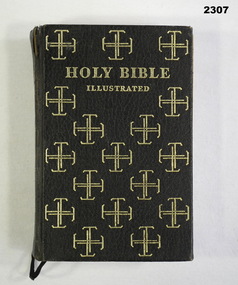
Book - HOLY BIBLE, Oxford University Press, C.1930’s
Card within Bible from E. PARKINSON, 10 Brooke Crt. Bendigo (M: 041429946620) stating: "Bert WATSON was I believe despatch rider (motorbike) for Sir Thomas BLAMEY carried this bible through WWII. (Was a certificate from View St. Church of Christ)" The Nominal roll shows an Albert Searle Watson No VX1315 enlisted in the 2nd AIF on 26.10.1939 aged 27 years. At discharge from the Army on 4.3.1946 he was serving in 2/8th Field Coy with the rank of Sapper. Brown leather covered bible. Paper, printed and illustrated with colour plates. Page edges gilded; 1152 pages, gilded cross motif on cover.“92 GINGELL ST CASTLEMAINE ALBERT SERLE WATSON A.I.F. ARMY Number VX1315 2/2n FLD COY. R.A.E. & 80 L.A.D. Workshops All Coth Div. A.I.F.”books - religion, religion - christian, bible -
 Federation University Historical Collection
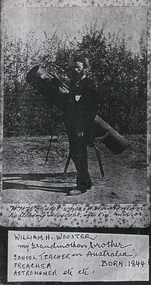
Photograph, William H. Wooster at the Ballarat Observatory, Mount Pleasant
An image of W.H. Wooster with telescope, and a page copy of his handwritten notes outlining his achievements.7707.2 "Notes Grandpa has lectured scores of times in the Sch. of Mines, sometimes for one of the Professors who was ill. Also Lectured in the City Fire Brigade, Ballarat E Fire Brigade, Barkley St Wesn chap., Lydiard St. Wes. Chapl, St Peter's Church of England, Mt Pleasant Wes. Chapl., Baptist Church; & many other places. Preached i the Neil St. Wes. Chapels at Brown Hill, the Gong, Ltl Bendigo, Golden Point, Macarthur St., Mnt Pleasant, the Bible Christian Chppl., and many others. Too photos of most of the places shown in these "Ballarat Views", and many others. And laid the Foundation of the fine Municipal Observatory, in a long series of "Astronomical" and other "Scientific Notes", published in the Ballarat Courier and Ballarat Star, & occasionally in another Newspaper, which roused much public interest in Astronomy. The present official astronomer, Mr John Brittain, is my pupil in Astronomy and Microscopy, and calls me his Father in Science. W.H. Wooster."w.h. wooster, ballarat observatory, microscope, microscopy, churched, preaching, lay preacher, ballarat school of mines, ballarat field naturalists club, observatory, telescope -
 Bendigo Historical Society Inc.
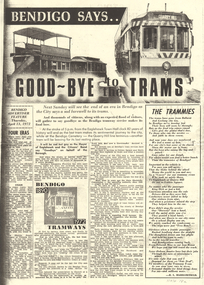
Newspaper - LONG GULLY HISTORY GROUP COLLECTION: BENDIGO SAYS GOOD-BYE TO THE TRAMS
Copy (2 pages) of a Bendigo Advertiser Feature dated Thursday, April 13, 1972 titled Bendigo Says. Good-bye to the Trams. Article contains photos of trams, a photo of a conductor assisting an elderly lady with a shopping jeep and a photo of trams and people at the Alexander Fountain. The article mentions Four Eras of Trams, a poem titled 'The Trammies' by R L Harrowfield, some men who worked on the trams and tasks they did, some accidents, local identities, and some of Tom Griffiths memories.bendigo, history, long gully history group, the long gully history group - bendigo says good-bye to the trams, the electric supply company of victoria, state electricity commission of victoria, cr d e elliott, the city council, bendigo trust, sandhurst and eaglehawk tramway company, bendigo tramway company, battery trams, steam trams, electric trams, r l harrowfield, tom griffiths, baby health centre, miss tavenor's sweet shop, needle mine, the robbie burns hotel, eaglehawk wine saloon, town hall hotel, hooley's dress fabrics, kevin anstee, bert knight, bendigo curtain service, graham o'donahoo, john henderson, the english electric traction company, princess theatre, upper reserve, five lions, hercules mine, needle loop (needle mine), jim collins, arch robinson's seat, st liborius church, virginia mine, upper reserve (qeo), bendigo tram history, gibson's, blum's, powney's, view point newsagency, city offices, hopetoun hotel, ?ob & dorothy mills' concern, gillies bros pty ltd -
 Bendigo Historical Society Inc.
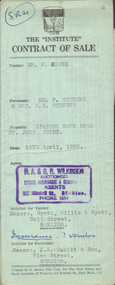
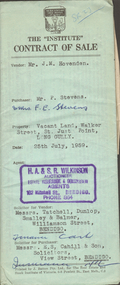
Document - H.A. & S.R. WILKINSON COLLECTION: CONTRACT OF SALE
Contract of sale dated 15th April, 1959 between Mr. F. Kupke (seller) and Mr. P. 7 Mrs. F.E. Stevens (buyers). Solicitor for vendor: Hyett, Willis & Hyett, Bull Street, Bendigo. Solicitor for purchaser: E.S. Cahill & Son, View Street, Bendigo. Property in Sparrow Hawk Road, St. Just Point being allotments 65 and 66 section L containing 15 acres, 17 perches and being land described in Crown grant volume 7615 folio 125, together with all buildings and erections thereon, also stainless steel sink and cupboards. Also State Rivers and Water Supply Authority to irrigate for 3 acres. Price 1,000 pounds.organization, business, h.a. & s.r wilkinson real estate -
 Bendigo Historical Society Inc.
Document - H.A & S.R. WILKINSON COLLECTION: CONTRACT OF SALE
Contract of sale dated 25th July, 1959 between Mr. J.M. Hovendon (seller) and Mr. P. & Mrs. F.E. Stevens (buyer). Solicitor for vendor: Messrs. Tatchell, Dunlop, Smalley & Balmer, Williamson Street, Bendigo. Solicitor for purchaser: Messrs. E.S. Cahill & Son, View Street, Bendigo. For vacant land, Walker Street, St. Just Point, Long Gully, being part of Crown allotment 429, section A at St. Just Point, Parish of Sandhurst, County of Bendigo land described in certificate of title volume 8046 folio 521. Price 180 pounds.organization, business, h.a. & s.r wilkinson real estate -
 Bendigo Historical Society Inc.
Newspaper - JENNY FOLEY COLLECTION: SCENIC, 11/11/2000
Bendigo Advertiser ''The way we were'' from Saturday November 11, 2000. Scenic: A view of East Bendigo from the top of the Masonic Hall in 1875. St. Paul's Church, Beehive Exchange and Stores, St.James' Hall and Warden's Court are all visible. The clip is in a folder.newspaper, bendigo advertiser, the way we were -
 Bendigo Historical Society Inc.
Newspaper - JENNY FOLEY COLLECTION: HISTORIC
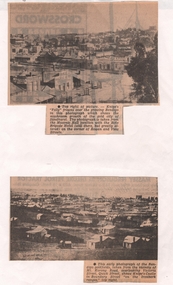
Bendigo Advertiser ''The way we were'' from 2000. Historic: The view over Bendigo in the early 1900s. The photo was taken looking north-west from St. Paul's Church tower. Visible is the Shamrock hotel, the fire brigade depot and bell tower, the County Court House and district jail. The clip is in a folder.newspaper, bendigo advertiser, the way we were -
 Bendigo Historical Society Inc.
Newspaper - NEWSPAPER CLIPPINGS EARLY PHOTOGRAPHS OF BENDIGO STREETSCAPE, Unknown
... BENDIGO Streetscape rowan & view st mt korong rd Two Black & White ...Two Black & White Early Photographs of Bendigo. (Photograph 1) Panorama is taken from the Masonic Hall location with the Rifle Brigade Hotel on the corner of Rowan and View Streets and Knipe's Folly in top right of image. (Photograph 2) An early photograph of the Bendigo Goldfields the suburb of Ironbark taken from the vicinity of Mt. Korong Road, overlooking Victoria Street and Quick Street. Image shows Knipe's Castle in Boundary Street ''on the Ironbark Ranges'' top right.bendigo, streetscape, rowan & view st, mt korong rd -
 Bendigo Historical Society Inc.
Document - STILWELLS RECEIPT, 31/12/1929
Stilwell's Receipt: green colour no. 1700 Date 31/12/29. Received from Mr S. A. Bush. 251 View St. Stilwell's by Cash. It has a mustard 2d Victorian Stamp Duty Stamp. Box 625business, retail, house furnishings, stilwell's. mr s. a. bush -
 Bendigo Historical Society Inc.
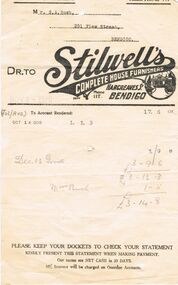
Document - STILWELLS STATEMENT, 1/11/1929
Stilwell's Statement: Monthly Statement Telephone 117. Cream paper with Mr S. A. Bush, 251 View Street Bendigo. Dr To Stilwell's Complete House Furnishers, Hargreaves St Bendigo. Underneath has a logo of a circle with a house. At the bottom it states the terms are Net Cash in 30 days. 10% Interest will be charged on Overdue Accounts. Dated Nov, 1st 1929. Box 625business, retail, house furnishings, mr s. a. bush. stilwell's complete house furnishers. -
 Bendigo Historical Society Inc.
Document - BADHAM COLLECTION: EXHIBITION LABELS X 15 - CARDBOARDS
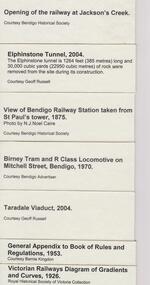
Exhibition labels x 15 - cardboards Railway Post Office stamps, 1865, and book 1951 - Courtesy Edna Westhead. Copy of 1887 Map of Railway Post Offices - Courtesy Edna Westhead Taken in 1921, Bendigo railway men celebrating 50 years since first train arrived in Bendigo in 1862 - Courtesy Bendigo Historical Society Book of Signals, 1949 - Courtesy Bernie Kingdon Book of Instruction Rolling Stock 1921, 1943 - Courtesy Bernie Kingdon Lost Property Book, 1886 - Courtesy Ross Rowley View of Bendigo Railway Station taken from St. Paul's tower, 1875 - Courtesy Bendigo Historical Society...document, memo, railway -
 Bendigo Historical Society Inc.
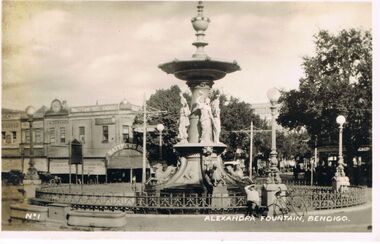
Photograph - VIEWS OF BENDIGO : NO. 1 : ALEXANDRA FOUNTAIN, BENDIGO : UNDATED, C1620/30's
Views of Bendigo. No. 1 of a series of sixteen black and white photographs of Bendigo. Nos. 6 and 7 in the series are missing. The label No. 1 is in the bottom left corner, Alexandra Fountain, Bendigo on the right. A business called Matthew Bros. is on the Mitchell St corner. Undated, but vintage cars suggest a date around the 1920s/30s??bendigo, streetscape, alexandra fountain, bendigo streetscape. views of bendigo. alexandra fountain.