Showing 98 items
matching golden square hotel
-
 Ballarat Tramway Museum
Slide - 35mm slide/s, Noel Simons, 21/11/1962 12:00:00 AM
Set of 17 transparencies taken on 21/11/1962 on Kodak mounts. 1188.1 - Bendigo No. 11 at Depot Junction McCrae and Arnold St. with driver/conductor changing points. 1188.2 - Bendigo No. 4 at Charing Cross, side on photo, with City Club Hotel and Alexandra Fountain in the background. Tram has Castrol and SEC 'Electric Cooking' ads. 1188.3 - Bendigo No. 4 climbing View St. after tram has passed photographer. Tram has Streets Ice Cream and Cohns Soft Drinks ad on rear dash panel. In the background are the buildings in View St., including the Princess Theatre. Tram has destination of Eaglehawk. 1188.4 - Trams 2 and 4 crossing at the California Gully or Thorpe St Loop. 1188.5 - Bendigo 4 in Mt Korong Road. Tram inbound with destination of Quarry Hill, just leaving Garden Gully Loop. 1188.6 - Bendigo 4 and 17 crossing at the Hayes St. or Iron Bark Gully Loop. No. 17 bound for Eaglehawk, No. 4, Quarry Hill. 17 has two SEC roof ads and a white horse whiskey ad. 1188.7 - No. 17 bound for Eaglehawk, soon after leaving California Gully. Has large mullock heap in background. 1188.8 - Bendigo 2 and 17 crossing at the Thorpe St. or California Gully Loop. Has butchers shop in background. 1188.9 - Bendigo 17 at the Eaglehawk terminus. Has destination of Quarry Hill. In background is the hotel and shops at the terminus, showing ads for "Melbourne Bitter". Tram has two SEC 'Electric Cooking' ads. Driver and conductor about to assist two lady passengers with a pram and baby. 1188.10 - No. 17 at Eaglehawk terminus, awaiting departure. Has Eaglehawk Town Hall and Post Office in background. Tram has a Whitehorse Whiskey ad on the front dash panel. 1188.11 - No. 3 in High St. Eaglehawk, with destination of Eaglehawk. Has the shops on the south side of High St. in the background, including the Eaglehawk fish shop. Tram has two roof ads, one an SEC roof ad, and Cohns Drinks and Streets Ice cream ads on front dash panel. 1188.12 - as above, but after tram has passed photographer. Note the centre of the road poles. 1188.13 - No. 2 outbound for Eaglehawk at the intersection of Mt. Korong Road and the Calder Highway. Photo taken after the tram has passed the photographer. Has an Ampol service station in the background. 1188.14 - No. 11 leaving the Bendigo depot, crossing the bridge, with the Scrubber car in the background. 1188.15 - No. 21 at the North Bendigo terminus. Tram has destination of Golden Square and Cohns drink ad on front dash and two roof ads on side. 1188.16 - No. 11 on Golden Square route, in High St. at intersection with Old High St. 1188.17 - No. 11 at the Golden Square terminus, conductor turning the pole. Hotel on the left side of the photo. Note the road works barrier and red flag behind the tram. Slide has an end of roll mark on the right hand side of the image.Information written on in black ink and date stamped on purple ink. 1188.1 - "Birney car No. 11 in McCrae St. at Cnr of Arnold about to run into depot, Bendigo" 1188.2 - "No. 4 at Alexandra Fountain, Charing Cross Bendigo" 1188.3 - "No. 4 climbing the View St. Hill from Charing Cross, Bendigo (Eaglehawk Route)" 1188.4 - "No. 4 and 2 at Thorpe St. Loop, California Gully" 1188.5 - "No. 4 in Mt Korong Rd., Long Gully, Near Havilah Rd. (Bendigo) (Eaglehawk Route)" 1188.6 - "Nos. 17 and 4 crossing on Hayes St. Loop, Ironbark, Bendigo" 1188.7 - "No. 17 soon after leaving California Gully (Eaglehawk Route)" 1188.8 - "No.2 and 17 crossing on Thorpe St. Loop, California Gully (Eaglehawk Route)" 1188.9 - "No. 17 at Eaglehawk terminus" 1188.10 - "No. 17 at Eaglehawk terminus" 1188.11 - "No. 3 in High St. Eaglehawk" 1188.12 - "No. 3 nearing Eaglehawk terminus" 1188.13 - "No. 2 in Mt. Korong Rd., Ironbark. Calder highway on left (Eaglehawk route) 1188.14 - "Birney car No. 11 leaving Bendigo depot. Scrubber car at rear" 1188.15 - "No. 21 at North Bendigo Terminus" 1188.16 - "Birney car No. 11 in High St. Bendigo at intersection with Old High Street (Golden Square Route)" 1188.17 - "Birney Car No. 11 at Golden Square terminus, High St., Bendigo". tramways, trams, bendigo, depot junction, charing cross, view st., eaglehawk, north bendigo, golden square, tram 2, tram 3, tram 4, tram 11, tram 17, tram 21, tram scrubber -
 Ballarat Tramway Museum
Slide - 35mm slide/s - set of 24, Noel Simons, 20/05/1971 12:00:00 AM
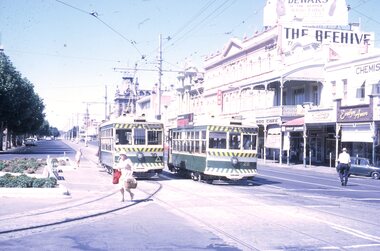
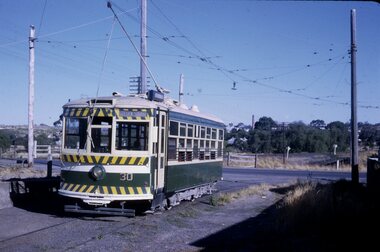
Set of 24 transparencies taken on 20/5/1971 on Kodak mounts. 1195.1 - Bendigo 19 arriving at Charing Cross en route to North Bendigo with Fountain Plaza and the City Family Hotel in the background. No. 19 has two roof ads for the SEC. -'Electricity better for cooking' and 'Everything's under control in my all electric kitchen' 1195.2 - as above, but standing at the Charing cross stop, with the Beehive Stores and other buildings along the east side of Pall Mall in the background. 1195.3 - No 21 ex Golden Square crossing View St. trackwork in front of No. 25 waiting to depart for Quarry Hill. No.21 has two roof ads (as for No.19 in 1195.1) and No.25 has one SEC roof ad and another. Ezywalkin sign in the background, and Fountain Plaza. 1195.4 - as for 1195.3, but after 21 has arrived and 25 left for Quarry Hill. Has Ezywalkin store and the Beehive store in the background. 1195.5 - No. 5 at the Eaglehawk terminus. Photo taken with a cannon in foreground looking along High St. Eaglehawk. Has shops on the west side of High St. in the background. 1195.6 - No. 5 at the Eaglehawk terminus, close up of the rear of the tram - note tow bar arrangement. Has destination of Quarry Hill. 1195.7-Nos.25 and 5 crossing at the Thorpe St. Loop, California Gully. No. 25 bound for Eaglehawk (has SEC Briquette and electric cooking roof ads) and 5 en route for Quarry Hill with a SEC and Cinzano roof ad. 1195.8 - as for 1195.7, but after trams have passed each other. Has Borough Auto Service building in the background. 1195.9 - No. 5 in Mt Korong Road, towards Bamard Street, photo taken after tram has passed photographer. 1195.10 - No. 30 at the Golden Square terminus with the Milk Bar on the right hand side of the photograph. 1195.11 - No. 30 inbound at Fire Station Loop, High St. Golden Square. Has old fire station in the background. Passengers are boarding the tramcar. 1195.12 - No. 30 in High St, bound for North Bendigo between Vine and Wattle Streets. 1195.13 - No. 5 bound for Eaglehawk waits at Iron Bark Gully Loop, at Hayes St. 1195.14 - No. 5 and No. 2 crossing at Iron Bark Gully Loop. 1195.15 - No. 5 bound for Eaglehawk leaving the Manchester Loop, Long gully. 1195.16 - No. 5 passing William Street, Long Gully en route to Eaglehawk. 1195.17 - No. 5 just before the California Gully Crossing Loop. 1195.18 - Nos. 5 and 26 crossing at California Gully crossing Loop. No. 5 heading to Eaglehawk, 26, Quarry Hill. 1195.19 - No. 5 in High St. Eaglehawk with Bob Moyle's Victoria Hotel and the TAB in the background. 1195.20 - No. 5 in High St. Eaglehawk approaching the terminus. Photo taken after the tram has passed the photographer. Has Foodland store and J. Best Fruit supply in the background, along with Eaglehawk Town Hall. 1195.21 - No. 5 at the Eaglehawk terminus, photo taken along seldom used track along High St. 1195.22 - as for 1195.22 - but at the very end of the track. 1195.23 - No. 5 en route for Quarry Hill climbs High St. Eaglehawk with the Victoria Hotel and Eaglehawk Town Hall in the background. 1195.24 - No. 5 and 25 crossing at Jobs Gully Loop. Note 25 has a black on white destination roll, while No. 5 has a white on black destination roll. Information written on in black ink and date stamped on purple ink. 1195.1 - "No. 19 arrives at Charing Cross Bendigo from Golden Square" 1195.2 - "No. 19 about to leave Charing Cross for North Bendigo" 1195.3 - "No. 25 awaiting departure for Quarry Hill, watches No. 21 arrive at Charring Cross from Golden Square" 1195.4 - "No. 21 on North Bendigo service and No. 25 on Quarry Hill run await departure at Charing Cross" 1195.5 - "No. 5 at Eaglehawk terminus" 1195.6 - "No. 5 at Eaglehawk terminus" 1195.7 - "Nos. 5 and 25 crossing at Thorpe St. Loop, California". 1195.8 - "Nos. 25 and 5 crossing Thorpe St. Loop, California Gully". 1195.9 - "No. 5 descending Mt Korong Rd. towards Bamard St." 1195.10 - "Birney car No. 30 at Golden Square terminus" 1195.11 - "Birney car No. 30 in High Street near Thistle Street (Fire Station Loop)" 1195.12 - "No. 30 in High St. between vine and Wattle Streets" 1195.13 - "No. 25 at Hayes Street Loop Iron Bark". 1195.14 - "Nos. 2 and 5 crossing at Hayes Street Loop Iron Bark" 1195.15 - "No. 5 at Manchester Loop opposite Havilah Road, Long Gully" 1195.16 - "No. 5 passing William Street, Long Gully". 1195.17 - "No. 5 at California Gully" 1195,18 - "Nos. 26 and 5 at Thorpe St. Loop, California Gully". 1195.19 - "No. 5 in High St. Eaglehawk". 1195.20 - "No. 5 approaching Eaglehawk terminus" 1195.21 - "No. 5 at Eaglehawk terminus" 1195.22 - "No. 5 at Eaglehawk terminus" 1195.23 - "No. 5 in High St. Eaglehawk" tramways, trams, bendigo, charing cross, eaglehawk, california gully, golden square, iron bark gully, jobs gully, tram 2, tram 5, tram 19, tram 21, tram 25, tram 26, tram 30 -
 Ballarat Tramway Museum
Slide - 35mm slide/s - set of 32, Noel Simons, 25/02/1971 12:00:00 AM
Set of 31 transparencies taken on 25/2/1972 on Kodak mounts. 1201.1 - Bendigo No. 26 in Bond St. just after leaving Long Gully en route for Quarry Hill. Has Norris Supermarket in background. Has two SEC roof ads. 1201.2 - No. 26 climbing View St. from Charing Cross en route to Eaglehawk. Has ANZ bank and AMOCO service station in background. 1201.3 - as for 1201.3, but after tram has passed photographer. Has buildings west of Mackenzie St. in photograph. 1201.4 - Tram stop and centre of the road pole with two "CARS STOP BY REQUEST" signs mounted on pole at the corner of Mackenzie St. 1201.5 - same position as for 1201.3, but with No. 5 descending the street. 1201.6 - same position as for 1201.2, but with No. 5 descending the street. Photo taken after tram has passed photographer. 1201.7 - No. 7 in Nolan St. from across the park at Lake Weeroona. 1201.8 - No. 7 entering McCrae St from Nolan St. - distant view. Note "TRAM "sign on left hand side under tree and overhead in McCrae St. from former track that once was in this street. 1201.9 - No. 7 in High St. with Cathedral in background. Tram en route to North Bendigo. Note scaffolding around Cathedral main spire area. 1201.10 - No. 7 crossing Bendigo Creek bridge in High St. near Golden Square. Has a Caltex Service station in the background. 1201.11 - No. 7 at Golden Square terminus with Sunburst Fruit Juices and a Peters Ice cream delivery vans alongside. 1201.12 - as for 1201.11 but photo taken from behind tram, with the end of the rails in the photograph. 1201.13 - No. 7 and 21 in Pall Mall at Charing Cross with No. 5 in the background. Taken some distance away from the location. 1201.14 - No. 7 at Golden Square terminus, taken a short distance from the tram terminus. Shows Milk Bar on right hand side and the hotel on the left hand side. Taken from the south side of the roadway. 1201.15 - as from 1201.14 but taken from the north side of the roadway. 1201.16 - No 5 waiting at California Gully loop. Distant photo showing surrounds 1201.17 - No. 5 en route for Quarry Hill crossing No. 26 at California Gully. 1201.18 - No. 26 at Eaglehawk terminus with Eaglehawk Town Hall and Post Office in background. 1201.19 - No. 21 arriving at Charing Cross en route to North Bendigo. Has Alexandra Fountain in the background, ANZ bank RACV building, and other buildings on the north side of Pall Mall or Nolan St. 1201.20 - No. 26 en route for Quarry Hill at Charing Cross, with crew standing by front door. Has Colonial Mutual life building, Armstrong Tyre Service (Firestone) and a sign for Cohns Drinks in the background. 1201.21 - as for 1201.20 but with No. 5 en route to Eaglehawk now in photograph. 1201.22 - No. 26 at Quarry Hill terminus. 1201.23 - No. 26 at Quarry Hill terminus, view of front portion of tram only from a gate at the Bendigo cemetery. 1201.24 - Track at the end of the Quarry Hill line showing the point blades of the former "Y" terminus and the overhead for this. 1201.25 - No. 2 at the Quarry Hill terminus, looking along the former Trackwork. 1201.26 - as for 1201.25 1201.27 - number not used. 1201.28 - Golden Square terminus from some distance from the actual terminus, showing the Warning sign "TRAM" for motorists from the south. No. 7 at the terminus. 1201.29 - No. 7 passing through the Golden Square shopping centre. Numerous cars and pedestrians. Tram en route for North Bendigo. 1201.30 - No. 7 in High St. Golden Square, en route for North Bendigo. Photo taken after tram has passed photographer. 1201.31 - No. 7 in High St. just past Wattle St. with the Cathedral in the background. Tram has two SEC roof ads good side on photo, 'Everything's fine in my all electric kitchen' and 'Electrical cooking - clean, quick, economical'. 1201.32 - No. 7 in High St. nearing Wattle St. Has Cathedral in the background. Photo taken after tram has passed photographer.Information written on in black ink and date stamped on purple ink. 1201.1 - "No. 26 in Bond St just after leaving Long Gully" 1201.2 - "No. 26 climbing View St. from Charing Cross" 1201.3 - "No. 26 ascending View St. from Charing Cross (At Mackenzie St.)" 1201.4 - "View St. & Mackenzie St." 1201.5 - "No. 5 in View St. near Mackenzie St." 1201.6 - "No. 5 in View St. nearing Charing Cross." 1201.7 - "No. 7 in Nolan St. seen from Lake Weeroona Park." 1201.8 - "No. 7 entering McRae St. from Nolan St. Note "TRAM" warning sign on left. 1201.9 - "No. 7 in High St. passing Short St." 1201.10 - "No. 7 crossing Bendigo Creek bridge in High St. near Golden Square." 1201.11 - "No. 7 at Golden Square terminus" 1201.12 - "No. 7 at Golden Square terminus" 1201.13 - "No 7, 21 and 5 at Charing Cross" 1201.14 - "No. 7 at Golden Square terminus" 1201.15 - "No. 7 at Golden Square terminus" 1201.16 - "No 5 waiting at California Gully loop." 1201.17 - "Nos. 5 and 26 crossing at California Gully loop" 1201.18 - "No. 26 at Eaglehawk terminus" 1201.19 - "No. 21 arriving at Charing Cross from Golden Square" 1201.20 - "No. 26 at Charing Cross" 1201.21 - "Nos. 5 and 26 at Charing Cross." 1201.22 - "No. 26 at Quarry Hill terminus" 1201.23 - "No. 26 at Quarry Hill terminus seen through the gates of the Bendigo Cemetery." 1201.24 - "Quarry Hill terminus showing remains for former double track layout abandoned before 1964." 1201.25 - "No. 2 at Quarry Hill terminus" 1201.26 - "No. 2 at Quarry Hill terminus" 1201.28 - "The Southern approach to Golden Square with No. 7 standing at the terminus, "TRAM" warning sign on the left. 1201.29 - "No. 7 passing through Golden Square Shopping Centre" 1201.30 - "No. 7 in High St. Golden Square" 1201.31 - "No. 7 in High St. passing Wattle St." 1201.32 - "No. 7 in High St. nearing Wattle St."tramways, trams, bendigo, bond st., view st., nolan st., high st., eaglehawk, california gully, charing cross, quarry hill, trackwork, tram 2, tram 5, tram 7, tram 21, tram 26 -
 Ballarat Tramway Museum
Slide - 35mm slide/s - set of 19, Noel Simons, 26/02/1972 12:00:00 AM
Set of 18 transparencies taken on 26/2/1972 on Kodak mounts. 1203.1 - Bendigo 5 at Eaglehawk terminus - with new traffic works. 1203.2 - No. 5 climbing the High St. hill Eaglehawk with the buildings on the east side in the photo. 1203.3 - No 2 descending the road over rail bridge at Job's Gully, heading for Quarry Hill. 1203.4 - as for 1202.3, but more side on. Tram has two SEC roof ads. 1203.5 - as for 1202.4 1203.6 - No. 26 entering Garden Gully Loop, Mt. Korong Road, Ironbark. Tram en route to Eaglehawk. Water column on right hand side of photograph. 1203.7 - No. 2 on the Eaglehawk route, Iron Bark area?, bound for Quarry Hill. 1203.8 - as for 1202.7, but photo taken after tram has past photographer. 1203.9 - No. 5 at Eaglehawk terminus, night photo. Tram has arrived at terminus, showing Quarry Hill, pole turned, but the tram lights have yet to be turned around. 1203.10 - as for 1202.9, but lights have been turned around. 1203.11 - No. 26 climbing the View St. Hill near the Commodore Hotel. Has Campbells Electrical Services building in the background. Photo taken after the tram has passed the photographer. 1203.12 - No. 7 end on photograph, at Golden Square, destination showing Golden Square - night photo. 1203.13 - number not used. 1203.14 - as for 1202.12, but partially side on, has a passenger looking out the tram. 1203.15 - as for 1202.12, but with hotel in the background. 1203.16 - No. 26 and 2 at Charing Cross, night photo. Tram 26 en route to Quarry Hill, 2 to Eaglehawk. 1203.17 - Interior photo of No. 26, at night. 1203.18 - No. 26 at the Quarry Hill terminus as night. 1203.19 - as for 1202.18, but central portion of the tramcar.Information written on in blue ink and date stamped on purple ink. 1203.1 - "No. 5 at Eaglehawk terminus" 1203.1 - "No. 5 in High St. Eaglehawk" 1203.3 - "No. 2" 1203.4 - "No. 2" 1203.5 - "No. 2" 1203.6 - "No. 26 at Garden Gully Loop Mt Korong Rd., Ironbark" 1203.7 - "No. 2" 1203.8 - "No. 2" 1203.9 - "No. 5 at Eaglehawk terminus" 1203.10 - "No. 5 at Eaglehawk terminus" 1203.11 - "No. 26 in View St. Near the Commodore Motel" 1203.12 - "No. 7 at Golden Square Terminus" 1203.14 - "No. 7 at Golden Square Terminus" 1203.15 - "No. 7 at Golden Square Terminus" 1203.16 - "Nos. 26 and 2 at Charing Cross" 1203.17 - "Interior of No. 26" 1203.18 - "No. 26 at the Quarry Hill terminus" 1203.19 - "No. 26 at the Quarry Hill terminus "tramways, trams, bendigo, eaglehawk, bridges, iron bark gully, night photo, quarry hill, golden square, tram 2, tram 5, tram 7, tram 26 -
 Ballarat Tramway Museum
Slide - 35mm slide/s - set of 25, Noel Simons, 26/02/1972 12:00:00 AM
Set of 25 transparencies taken on 26/2/1972 on Kodak mounts. 1204.1 - Bendigo No. 5 - just arrived at Manchester Loop near Havilah Road, Long Gully. Photo taken after tram has passed photographer. 1204.2 - No. 26 in Backhaus St. Long Gully passing William St, en route to Quarry Hill. Photo taken after tram has passed photographer. 1204.3 - No. 5 climbing the High St. Hill Eaglehawk, heading for Quarry Hill with the buildings on the West side of High St. in the background, including the Eaglehawk Town Hall. 1204.4 - as for 1204.3, but tram close up. 1204.5 - as for 1204.3, but after tram has passed photographer. 1204.6 - No. 5 at intersection of Mt Korong Road Ironbark and Calder Highway, with the AMPOL service 'station in the background. Photo taken after tram has passed photographer. 1204.7 - No. 26 en route to Quarry Hill shortly after leaving Needle Loop, passing William St., Long Gully. 1204.8 - No. 5 at California Gully Loop, picking up a passenger, with the shops at Long Gully in the background. Photo taken after tram has passed photographer. 1204.9 - No. 5 in Long Gully, en route to Quarry Hill. Photo taken after tram has passed photographer. 1204.10 - No. 2 at Eaglehawk terminus with the Eaglehawk Town Hall and Post Office in the background. Tram has two SEC roof ads. 1204.11 - No. 2 at Eaglehawk terminus, close up. 1204.12 - as for 1204.11, but through the park gates. 1204.13 - as for 1204.11, but with tram stop shelters in the foreground and buildings on the West side of High St in the background. 1204.14 - No. 2 in Mt. Korong Rd, midway between California Gully Loop and Needle Loop. Photo taken after tram has passed photographer. 1204.15 - No. 5 in Long Gully, en route to Quarry Hill. 1204.16 - as for 1204.15, but with trams departed loop. Has an ESSO service station in the background. 1204.17 - No. 26 leaves Charing Cross up View St.. Photo taken after tram has passed photographer. Has Armstrong Tyre Service, Cohns Drinks ad on a building and the T&G building in the background. Also Firestone ads on the tyre service building. 1204.18 - No. 5 waits at Charing Cross with the Alexandra Fountain in the background. Tram has two SEC roof ads, 'Everything s fine in my all electric kitchen' and 'Electricity Best for Cooking'. Has RACV, Colonial Mutual Life buildings in the background and the planting areas around Charing Cross gardens in the foreground. 1204.19 - No. 21 en route to North Bendigo arrives at Charing Cross, with passengers waiting to board. No. 5 in the background. In the background is the Fountain Gate Plaza building and the City Family Hotel. 1204.20 - as for 1204.19, but with No. 7 en route to Golden Square. 1204.21 - as for 1204.19, but closer up. 1204.22 - as for 1204.18 1204.23 - No. 25 in Nolan St. near the crossing of Bendigo Creek, running a special tram tour. 1204.24 - No. 25 on a special charter, in Weeroona Ave. at Cnr of Caledonia St. passing the Gas works. 1204.25 - Nos. 25 (showing Golden Square), 7 and 26 at Charing Cross. Has fountain in the background.Information written on in blue ink and date stamped on purple ink. 1204.1 - "No. 5 at Manchester Loop, near Havilah Rd. Long Gully." 1204.2 - "No. 26 in Backhaus St. Long Gully passing William St." 1204.3 - "No. 5 in High St. Eaglehawk." 1204.4 - "No. 5 in High St. Eaglehawk." 1204.5 - "No. 5 in High St. Eaglehawk." 1204.6 - "No. 5 in Mt. Korong Rd., Ironbark, passing Calder Highway Junctn." 1204.7 - "No. 26 shortly after leaving Needle Loop, passing William St., Long Gully. No. 5 cresting hill in distance." 1204.8 - "No. 5 at California Gully Loop." 1204.9 - "No. 5 in Long Gully" 1204.10 - "No. 2 at Eaglehawk terminus." 1204.11 - "No. 2 at Eaglehawk terminus." 1204.12 - "No. 2 at Eaglehawk terminus." 1204.13 - "No. 2 at Eaglehawk terminus." 1204.14 - "No. 2 in Mt. Korong Rd, midway between California Gully Loop and Needle Loop. 1204.15 - "Nos. 2 and 26 crossing at Long Gully." 1204.16 - "No. 26 leaves Long Gully loop for Eaglehawk as No. 2 pulls out of the far end towards Bendigo" 1204.17 - "No. 26 beginning the climb up View St. from Charing Cross." 1204.18 - "No. 5 at Charing Cross." 1204.19 - "No 21 arrives at Charing Cross from Golden Square while No. 5 awaits departure time for Eaglehawk." 1204.20 - "Nos. 7, 21, and 2 (behind which is No. 5) at Charing Cross." 1204.21 - "Nos. 7, 21, and 2 at Charing Cross." 1204.22 - "No. 5 at Charing Cross." 1204.23 - "No. 25 in Nolan St. near Bendigo creek crossing" 1204.24 - "No. 25 in Weeroona Ave. at cnr of Caledonia St." 1204.25 - "Nos. 25, 7, 26 and 2 (behind 26) at Charing Cross."tramways, trams, bendigo, eaglehawk, long gully, california gully, charing cross, north bendigo, tram 2, tram 5, tram 7, tram 21, tram 25, tram 26 -
 Ballarat Tramway Museum
Slide - 35mm slide/s - set of 6, Noel Simons, 28 Feb. 1972
Set of 6 transparencies taken on 28/2/1972 on Kodak mounts. 1206.1 - Bendigo No. 5 at Hayes St. Loop, en route for Quarry Hill. 1206.2 - No. 5 at Garden Gully Loop, Mt. Korong road, Ironbark. en route to Quarry Hill. Note the water column in the background. 1206.3 - No. 5 in View St. Bendigo, with the Commodore Motel in the background. 1206.4 - No. 6 en route for Golden Square in Fire Station loop, with the fire station building in the background. Photo taken after tram has passed photographer. 1206.5 - No. 6 in High St., running through Golden Square Shopping Centre, en route for Golden Square. Photo taken after tram has passed photographer. 1206.6 - No. 6 arriving at Charing Cross, bound for North Bendigo, with the City Family Hotel, ANZ bank and the Cenotaph (war memorial) in the background.Information written on in blue ink and date stamped on purple ink. 1206.1 - "No. 5 at Hayes Loop, Ironbark." 1206.2 - "No. 5 at Garden Gully Loop, Mt. Korong road, Ironbark." 1206.3 - "No. 5 in View St. just after start of double track near Barnard St." 1206.4 - "No. 6 in High St. at Fire Station loop." 1206.5 - "No. 6 in High St. running through Golden Square shopping centre." 1206.6 - "No. 6 arriving at Charing Cross from Golden Square."tramways, trams, bendigo, hayes st. loop, garden gully loop, view st., golden square, charing cross, tram 5, tram 6 -
 Ballarat Tramway Museum
Slide - 35mm slide/s - set of 12, Noel Simons, 28 Feb. 1972
Set of 12 transparencies taken on 28/2/1972 on Kodak mounts. 1207.1 - Bendigo 26 and 2 at Charing Cross. 26 en route for Eaglehawk, 2 for Quarry Hill. Has the Colonial Mutual Life, Armstrong Tyre Service, and Australian Mutual Provident Society buildings and a Cohns Drinks ad. in the background. 1207.2 - as for 1207.1 but with Alexandra fountain in the foreground. 1207.3 - No. 2 in Mitchell St. heading for Quarry Hill. Photo taken after tram has passed photographer. Has buildings on either side of Mitchell St. in the background, including the Plaza Theatre. 1207.4 - No. 6 en route for Golden Square departing Charing Cross. Has the RACV and ANZ bank in the background. 1207.5 - No. 2 crossing Pall Mall to enter Charing Cross ex Quarry Hill, with the Fountain Plaza in the background. 1207.6 - No. 6 arriving Charing Cross ex Golden Square with No. 21 alongside. No. 21 has the SEC ad. 'Everything's fine in my all electric kitchen.' Has the City Family Hotel and the Fountain Plaza shopping centre in the background. 1207.7 - No. 5 at Charing Cross en route for Quarry Hill with No. 2 behind. No. 2 has two SEC roof ads, 'Everything s fine in my all electric kitchen' and 'Electricity best for cooking'. RACV building in the background. Tram crews are discussing the day in the front of the tram. 1207. 8 - No. 21 in High St. Bendigo with the Cathedral in the background. No. 21 has two SEC roof ads, 'Everything's fine in my all electric kitchen' and 'Electricity best for cooking'. 1207.9 - No. 6 in High St. Bendigo with the Cathedral in the background. 1207.10 - No. 6 in High St. Bendigo, just past Wattle St. Photo taken after the tram has passed the photographer from within the Highway Car Sales yard. 1207.11 - No. 26 bound for Eaglehawk at the end of the double track in View St., note signal contactors, tram stop and section signs mounted on pole. 1207.12 - No. 26 turning from View St. into Barnard St.Information written on in blue ink and date stamped on purple ink. 1207. 1- "Nos. 26 and 2 at Charing Cross." 1207.2 - "Nos. 26 and 2 at Charing Cross." 1207.3 - "No. 2 in Mitchell St. just after leaving Charing Cross." 1207.4 - "No.6 leaving Charing Cross for Golden Square." 1207.5 - "No. 2 arriving at Charing Cross from Quarry Hill." 1207.6 - "No. 21 waits at Charing Cross as No. 6 arrives from Golden Square." 1207.7 - "No 5 at Charing Cross with No. 2 lurking behind." 1207.8 - "No. 21 in High St. at cnr of Wattle St." 1207.9 - "No. 6 in High St. at cnr of Wattle St." 1207.10 - "No. 6 in High St. between Wattle and Vine Sts." 1207.11 - "No. 26 at end of double track in View St. near Barnard. St. 1207.12 - "No. 26 seen at dusk turning from View St. into Barnard St."tramways, trams, bendigo, charing cross, high st, view st., tram 2, tram 5, tram 6, tram 21, tram 26 -
 Ballarat Tramway Museum
Slide - 35mm slide/s set of 7, Noel Simons, 1972
Set of 7 transparencies undated on PAKON mounts - appear to be early 1970's. 1212.1 - No. 18 about to enter the Long Gully loop with ESSO service station on the right hand side. 1212.2 - No. 6 in Mitchell Street bound for Charing Cross. Tram has destination of "Rly Station". Has buildings on the east side of Mitchell St. in the background. 1212.3 - No. 7 (North Bendigo) and 29 (Golden Square) crossing. Actual location? 1212.4 - "No 6 showing 'SPECIAL' at Eaglehawk terminus. Has the Foodland store and Fruit shop in the background. 1212.5 - No. 19 at Eaglehawk terminus, on the extension to the normal Eaglehawk terminus. Tram has showing 'Eaglehawk'. Tram has two SEC roof ads. 1212.6 - No. 25 and another Bogie car at Quarry Hill terminus on last day. 1212.7 - No. 18 and 29 at Quarry Hill terminus. No.. 18 showing 'Quarry Hill' - has two SEC roof ads 'Electric Cooking - Matchless' and 'Everything's fine in my all electric kitchen' and No. 29 has a briquettes roof ad.Information typed onto a white label stuck on the slide. 1212.1 - "No. 18 at Long Gully" 1212.2 - "No. 6 in Mitchell Street." 1212.3 - "7 and 29 Lake View Hotel" 1212.4 - "No. 6 at Eaglehawk" 1212.5 - "No. 19 at Eaglehawk Term." 1212.6 - "Last cars Quarry Hill." 1212.7 - "18 & 29 Quarry Hill"tramways, trams, bendigo, long gully, mitchell st., eaglehawk, quarry hill, last tram, tram 6, tram 7, tram 18, tram 19, tram 25, tram 29 -
 Ballarat Tramway Museum
Photograph - Colour Photograph/s, 21/11/1962 12:00:00 AM
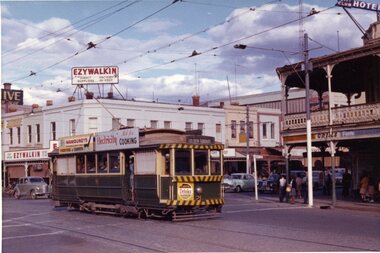
Colour print of Bendigo SECV Bendigo tram 21, leaving Charing Cross for Golden Square. On Kodacolor paper with a Kodak red ink stamp on rear. Tram has dash canopy lights, but no large white strip under the drivers windows. Tram has a good load of passengers on it, with all blinds drawn, showing destination "Golden Square". Fitted with roof ads "Electricity best for Cooking" and an ad Mamouneys - Furniture and Carpets. A Cohn's drinks ad is on the front dash panel. Photo has the Ezywalkin store in background and the City Club Hotel in the right hand side of the photo. Photo dated 21.11.1962.On rear top left hand corner "21 / 21.11.62" in very wavy handwriting, typical of an aged person.charing cross, bendigo, golden square, tram 21 -
 Ballarat Tramway Museum
Photograph - Black & White Photograph/s, early 1960's
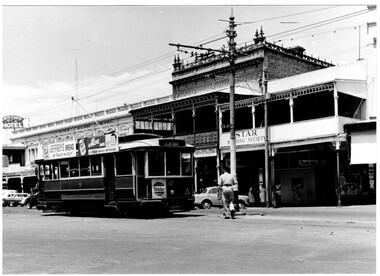
Black and White print of Bendigo SECV Bendigo tram 18 at Charing Cross terminus for the Eaglehawk route with a single truck car crossing behind heading for Golden Square. Trams have dash canopy lights, but no large white strip under the drivers windows. Photo not dated but appears to be at during early 1960's. Tram 18 has White Horse Whiskey ad on front dash panel, SEC Roof ad "Electricity best for Cooking" and a "CASTROL" ad, and showing destination of "Eaglehawk". Single truck car has SEC roof ad "You'll Cook better electrically" and a roof ad for "B.J. Osborn Plumbing Service" ad. Has City Club Hotel and Plaza Theatre buildings in background. Single truck could be No. 20, based on roof ads, see 986.trams, tramways, charing cross, bendigo, tram 18, tram 20 -
 Ballarat Tramway Museum
Slide - 35mm slide/s - set of 4, Peter Moses, Jan. 1969
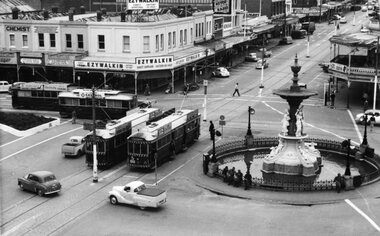
Set of four colour slides taken at Charing Cross Bendigo, Jan. 1969. .1 - Trams 30 and 28 travelling to North Bendigo and Golden Square respectively. Has the Beehive building in the background, along with W.M.I. Jones Chemist, Evelyn Amor shop, Dewars Whiskey rooftop advertisement. 28 has a SEC Briquettes roof advertisement. .2 - As above but with the front or bogie tram in the photo. Also has A. G. Treloar Optician's shop. Kodak cardboard mount slide, taken by Peter Moses, Jan. 1969. .3 - Close up photo of Birney No. 30, with 28 in the background. .4 - No. 28 leaving for Golden Square with the Plaza building, the Cenotaph, and the City Family Hotel in the background. Kodak cardboard mount slide, taken by Peter Moses, Jan. 1969.On the rear of all the slides "P. Moses" in black ink .1 - "Bendigo Charing Cross" and in red ink "19" .2 - "Bendigo three trams / Charing Cross" and in red ink "21" .3 - "Bendigo" and in red ink "23" .4 - "Bendigo Charing Cross" and in red ink "14". tramways, trams, bendigo, tram 28, tram 30 -
 Ballarat Tramway Museum
Slide - 35mm slide/s - set of 3, Peter Moses, Jan. 1969
Set of two colour slides taken at the North Bendigo terminus and another in Pall Mall, Bendigo, Jan. 1969. .1 - No. 30 at North Bendigo terminus - has destination "Golden Square" .2 - Interior view of Birney tram with crew members numbers 22, 29 and three seated passengers. .3 - View of Pall Mall looking north from the tram stop - has the Shamrock Hotel in the distance and other buildings on the east side of the street, including a 3BO (Bendigo radio) sign. Kodak cardboard mount slide, taken by Peter Moses, Jan. 1969.On the rear of all the slides "P. Moses" in black ink .1 -"Bendigo / North Bendigo terminus" in blue ink, and in red ink “12” .2 - " Jan 1969 Bendigo / Inside Brill car" in blue ink .3 - "Bendigo Pall Mall" in black ink and in red ink “7”.tramways, trams, bendigo, north bendigo, birney, tram crews, pall mall, tram 30 -
 Ballarat Tramway Museum
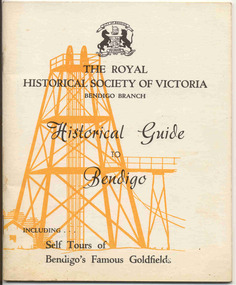
Book, Royal Historical Society of Vic - Bendigo Branch, "Historical Guide to Bendigo", 1968
Yields information about the appearance of SEC single truck trams during 1938. Has a strong association with Wal Jack.Book - 200gsm card cover - two colours, 36 pages off white paper printed with text and 8 pages of black and white photos printed onto gloss paper, centre stapled titled "Historical Guide to Bendigo". Published by the Royal Historical Society of Victoria Bendigo Branch, 1968. Contents: Derivation of the name of Bendigo, historical facts. mining guide, post offices, early Bendigo Hotels, Bendigo Tramways, Eaglehawk, the Lonely Grave. Has photos on the Battery Tram, Steam Tram and ESCo No. 2, Pall Mall, various mines, Golden Square and the Lonely Grave. Bendigo Tram item written by H. Biggs.On page 3 in black ink "Ballarat Tramway Preservation Society, Catalogue No. 119"trams, tramways, bendigo, eaglehawk, mining, post office -
 Ballarat Tramway Museum
Slide - 35mm slide/s, Travis Jeffrey, late 1960's or early 1970's
Agfa plastic mount (blue base, white cover) with a photo of Bendigo scrubber tram at the end of the double track in High St., heading out for Golden Square Photo taken late 1960's early 1970's. Photo has the City Family Hotel in the background."BES 34" in penciltramways, trams, bendigo, high st, scrubber tram, scrubber -
 Ballarat Tramway Museum
Slide - 35mm slide/s, Travis Jeffrey, late 1960's or early 1970's
Agfa plastic mount (blue base, white cover) with a photo of Bendigo No. 19 in Pall Mall, nearing Charing Cross. Tram has the destination of Golden Square Photo taken late 1960's early 1970's. Photo has the Beehive, the Shamrock Hotel in the background. Radio station 3BO can be seen on the Beehive building. No. 19 has two SEC roof advertisements. Note the point bar on the pole on the right hand side of the photograph."BES 35" in penciltramways, trams, bendigo, pall mall, beehive building, tram 19 -
 Ballarat Tramway Museum
Slide - 35mm slide/s - set of 3, Travis Jeffrey, late 1960's or early 1970's
Series of three Agfa plastic mount (blue base, white cover) of photos of Bendigo No. 29 on the Golden Square - North Bendigo route. Photo taken late 1960's early 1970's from the window of another tram. The tram has a SEC Briquettes roof advertisement fitted. 2655.1 - No. 29 leaving Charing Cross for Golden Square with 26 in the background. 2655.2 - No. 29 north bound in Pall Mall with Stonemasons Supermarket and the Stoneman's Shamrock Hotel in the background. 2655.3 - No. 29 leaving a Myrtle St loop, in High St?, with Hardies Fibrolite Pipes yard in the background."BES 49", "50", "51" in pencil.tramways, trams, bendigo, golden square, pall mall, charing cross, high st, tram 29 -
 Ballarat Tramway Museum
Photograph - Digital image Set of 20, 1971-72
Set of 20 digital images of Bendigo Tramways, 1972 at or before closure while on a tram tour by Stuart Lodington. .1 - No. 7 at Golden Square terminus .2 - ditto .3 - No. 26 in bound on the Eaglehawk line with a crossing loop behind. .4 - Birney crossing the bridge by the tram depot. .5 - No. 29 running a special on the Eaglehawk line with a HBA billboard in the background. .6 - No. 29 with a driver walking in front of the tram at the above location. .7 - No. 29 on the Eaglehawk line .8 - ditto waiting for a tram at Manchester Loop with poppet head in the background. .9 - No. 29 on the Eaglehawk line .10 - Eaglehawk Town Hall at night. .11 - No. 7 at the depot junction in McCrae St, with Golden Square destination. .12 - No. 29 with the Camp Hotel Eaglehawk in the background. Also a Newsagent with The Sun, The Bendigo Advertiser and The Age signs on the building, High St .13 - No. 29 Mt Korong Rd, with the railway overbridge in the background. .14 - interior photo of Birney tram roof .15 - interior view of controls of Birney at Eaglehawk .16 - No. 29 outbound at the Depot Junction McCrae St. .17 - No. 18 at the Eaglehawk terminus .18 - close up view of No. 29 front. .19 - No. 29 in Nolan St, crossing the bridge, outbound. .20 - No. 18 at the Eaglehawk terminus with the Eaglehawk Town Hall, Post Office in the background. Has a circus banner on the side.trams, tramways, bendigo, eaglehawk, quarry hill, golden square, depot, mccrae st, nolan st, tram 7, tram 26, tram 29, tram 18 -
 Ballarat Tramway Museum
Photograph - Black & White Photograph/s, Chris Wurr, early 1970's
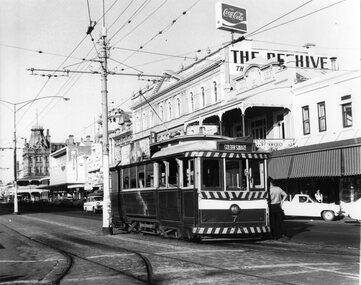
Yields information about the appearance of Bendigo Birney trams early 1970's and the McCrae St area.Black and White Photograph of Bendigo No. 7, in Pall Mall, at Charing Cross, with the destination of Golden Square. An inspector is leaning against the front door of the tram. Has in the background, The Beehive building, Coca Cola advertisement, Myers store and Stoneman's Shamrock Hotel. Photo Chris Wurr, early 1970's. "Photo by Chris Wurr" stamped on the rear.trams, tramways, bendigo, charing cross, pall mall, tram 7 -
 Ballarat Tramway Museum
Photograph - Colour Print, Glen Mills, 22/12/1971 12:00:00 AM
Colour photograph of 19, inbound in Pall Mall with Stoneman's Shamrock Hotel in the background. Tram has two SEC roof advertisements and destination of Golden Square. Photo by Glen Mills, ex a slide, printed on Fujifilm, Pictropaper. Dated 22.12.1971On rear in pencil "Glen G Mills / Bendigo 22.12.71 / A 4218 (slide)"trams, tramways, bendigo, pall mall, tram 19 -
 Ballarat Tramway Museum
Photograph - Black & White, Bendigo 12 leaving Charing Cross, late 1950's
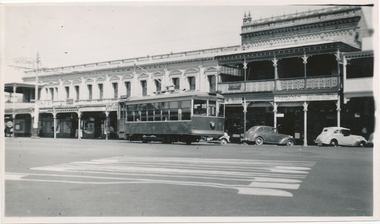
Black and White photograph, of Bendigo12 with destination of Golden Square, leaving Charing Cross in High St, during the mid to late 1950's. Tram has roof adverts for Jeffreys Bread, Alva Jams and a Cohn's Drink ad on the front drivers panel. In the background are the City Club Hotel and Start Building Society buildings. Printed on Fujichrome paper. Two copies held."TMSV Sales" stamp on rear. On rear of in ink 'HTT1 = MM107 = BED 19, Renumbered 12"trams, tramways, bendigo, charing cross, high st, tram 12 -
 Ballarat Tramway Museum
Photograph - Black & White Photograph/s, Wal Jack, 3/01/1954 12:00:00 AM
Black and White print contained within the Wal Jack Bendigo and Geelong Album, see Reg Item 5003 for more details. Photo of Bendigo Birney No.28 in High St Bendigo, 3-1-1954, Photo Wal Jack. Has in the background the City Club Hotel, Desmond's Radio Parts and a Ice cream shop and Marshalls Fruit Shop Printed on Ilford Paper. See image i2 for rear of photograph. See image i3 for hi res scan of negative On the rear in black ink "SEC Bendigo Birney 28 to Golden Square, High St Bendigo, 3-1-54", in the top left hand corner, the Wal Jack copyright stamp but with no number written in.trams, tramways, bendigo, high st, birney, tram 28 -
 Bendigo Historical Society Inc.
Photograph - BENDIGO HOTEL COLLECTION: GOLDEN VINE HOTEL, MYRTLE STREET, GOLDEN SQUARE
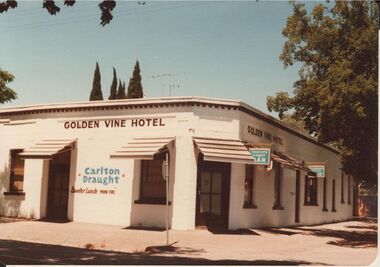
... BENDIGO HOTEL COLLECTION: GOLDEN VINE HOTEL, MYRTLE STREET... BENDIGO Hotel golden vine hotel Colour photograph: Golden Vine ...Colour photograph: Golden Vine Hotel, Myrtle Street, Bendigo,single storey building painted white, no verandah, patterned pediment on top. White awnings over doors and windows. Could be early 1970's image?bendigo, hotel, golden vine hotel -
 Bendigo Historical Society Inc.
Slide - Images by Arthur Pulfer, 1957-1970
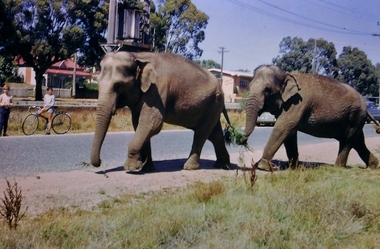
ROSEVIEW 407 High Street, Golden Square Bendigo "Roseview" was designed by Godfrey Eathorne and constructed in 1939. It is one of the few Streamline Moderne houses in the Central Goldfields region, and was one of the earliest constructed in the Bendigo region. It is an outstanding example of this style of housing. It resembles an ocean liner, and reflects the emphasis on the streamlining of methods of transportation. It utilizes both flat and curved surfaces and has little external ornamentation. The use of materials such as rounded glass windows and metal window and door frames reflects an innovative approach to construction consistent with the style. "Roseview" was constructed on a large scale, with large and spacious rooms. It reflects the prominent social status and wealth of the original owner, together with the desire for a building in 'the latest' style which was sure to attract attention and prominence in the region. It has been maintained largely in original condition. CARALULUP HOTEL 'The Sun' dated January 17, 1941 on the back. It states that 'The licence of Caralulup Hotel, near Talbot, has been surrendered, thus severing an 80 year association with the district' State Library of Victoria TOLMER GOLD ESCORT ROUTE The gold rush in New South Wales and Victoria left few able miners in South Australia. Bad economic conditions saw more than 15,000 men leave the Kapunda and Burra mines by the end of 1851. Alexander Tolmer, Commissioner of Police in 1852 proposed that the gold won by South Australians should be brought back to South Australia under an escort consisting of only a few men. In March a Gold Escort was on its way back to Adelaide with almost 6,000 ounces of gold for the vaults of the Treasury Building. After this successful trip Tolmer led two other escorts before handing over his duties. A total of eighteen gold escorts were made, the last one during November and December 1853 when Inspector Wyndham was in charge. You’ll find Gold Escort Route Monuments between Meningie, Coonalpyn and Tintinara.Many images from by Arthur Pulfer copied to slides. Twenty Slides of Bendigo: Bullen's Circus Bendigo February 1966 "Roseview", Pethard's Home at 407 High Street, Golden Square, Bendigo. 25th March 1957. House is possibly on the Midland Highway Epsom, Bendigo - 8 April 1955 Kangaroo Flat Bus Lines mini bus The Big Tree Sedgwick Road March 1972 The old Golden Gully Hotel Diamond Hill Road, Bendigo The old Lockup Eaglehawk Bendigo September 1967 Market Gardens - possibly North Bendigo North Deborah Mine photo taken from Breen Street 1958 Laying the track to get the engine into the park, looking down Mitchell Street Bendigo Engine R766 in the Victorian Railways Institute Park Railway Place Bendigo On the Methodist Church Steps Arnold street Bendigo Miner's Hut at Moliagul Basket Lunch - White Hills Botanical Gardens - St johns 100 year celebrations White Hills Swimming Pool February 1970 White Hills Botanical Gardens Bendigo Bendigo Show Parade 1958 The Arrival of the Cobb and Co Coach in Bendigo September 1963 history, bendigo, james lerk collection, golden square high school, dragon loong, white hill botanical gardens, 407 high street bendigo, r766 engine, bullens circus, caralulup, moligual, bendigo show, tolmer's gold route, kangaroo flat bus lines, eaglehawk lockup, arnold street methodist church, elephants -
 Bendigo Historical Society Inc.
Photograph - GOLDEN SQUARE LAUREL STREET P.S. COLLECTION: MOTHER'S CLUB, 1950's
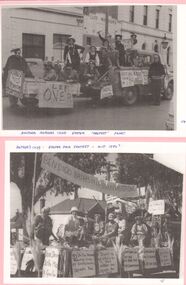
Two photographs a,b, laminated upon pink cardboard illustrating Easter Fair Floats. [a] Float based upon utility towing trailer in Mitchell St in front of Cliff Morrisons with Hopetown Hotel on right. Numerous placards displayed by adults and children riding on float. Handwritten caption below reads 'Another Mother's Club Easter ' PROTEST' Float. [b] Float carrying fancy dress adults based upon truck tray displaying numerous placards relating to Bendigo Baths protest. Handwritten caption above reads 'Mother's Club- Easter Fair Protest - Mid 1950's.bendigo, institutions, golden square primary school -
 Bendigo Historical Society Inc.
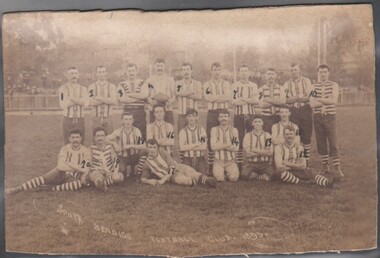
Photograph - South Bendigo Football Club
... Hotel in Golden Square. They won their first premiership in 1899.... Bendigo club was formed at a meeting at the Union Hotel in Golden ...South Bendigo football club was formed in 1893 when it joined the Bendigo Football Association that had been formed in 1880. South Bendigo club was formed at a meeting at the Union Hotel in Golden Square. They won their first premiership in 1899.Sepia printed photograph. South Bendigo Football Club photo 1895, 20 players. players names unknown. 16 players in vertical stripes Guernsey and four wear horizontal stripped Guernsey; with striped socks.1895 footballers and attire, bendigo operatic society presentation march 1964 -
 Ballarat Tramway Museum
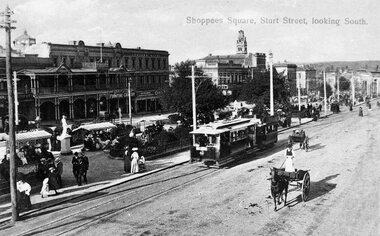
Photograph - Black & White copy photograph, "Shoppees Square Sturt Street looking South"
The photograph used in a postcard appears to be taken from the hotel balcony (Golden City) on the corner of Sturt and Dawson Streets, looking northeast. The tram is towing a former horse-drawn tram shortly after opening as no roof destination boxes on the tramcar in Sturt St. Many people promenading in the median strip with covered awnings over the seats, indicating summertime with two horse-drawn vehicles adjacent to the tram, one going either way in Surt St. south side, indicating traffic arrangements at the time. Has a Furniture Crockery store, Lesters Hotel and George Crocker Draper Hotel. Yields infomation about Sturt St and Shoppees Square c1905Black and white print with negative (N149) of an ESCo tram hauling a trailer.ballarat, tramcars, esco, sturt st, shoppee's square, trailers, horse trams, dawson st -
 Ballarat Tramway Museum
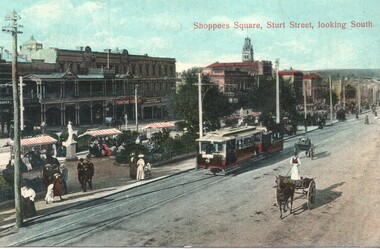
Postcard, "Shoppees Square Sturt Street looking South"
The photograph used in a postcard appears to be taken from the hotel balcony (Golden City) on the corner of Sturt and Dawson Streets, looking northeast. The tram is towing a former horse-drawn tram shortly after opening as no roof destination boxes on the tramcar in Sturt St. Many people promenading in the median strip with covered awnings over the seats, indicating summertime with two horse-drawn vehicles adjacent to the tram, one going either way in Surt St. south side, indicating traffic arrangements at the time. Has a Furniture Crockery store, Lesters Hotel and George Crocker Draper Hotel. Yields infomation about Sturt St and Shoppees Square c1905Postcard - coloured - Sturt St, card printed in Germany and number B377 10, with light brown ruled lines on rear.On rear is a letter to a lady in Adelaide with a 1d Victorian stampballarat, tramcars, esco, sturt st, shoppee's square, trailers, horse trams, dawson st -
 Melton City Libraries
Map, Streets of Melton, 1963
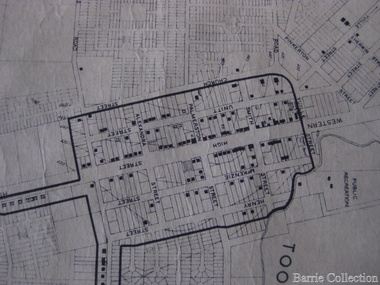
MELTON’S STREETS Heritage Week 2014 What’s in a Name? Alphabetical List Aboriginal place names, Early Family Names and landowners, Agricultural, Shop and Commercial premises, Places and Events Melton & District Historical Society Street Naming Project 1972 – c 1998 Suburb Name – KURUNJANG - Kirkton, 1972, Brookfield, West, 1988 Melton and Town Centre - A joint collaboration with the Shire of Melton and Subdivision Developers ARNOLD Court – Family house - Arnolds Creek ALKEMADE Drive Family – Lime kilns Coimadia ALEXANDRA Street 1902 – Corination of King Edward VII and Queen Alexandra AVIATOR Place Event, location of plane crash – Jimmy Melrose 1936 Adina ?Annibee - Anniba? Agricultural Avon court .. .. BAKERY Square - Location of Jongebloed shop, bakehouse and stables BALUK Place Aboriginal BARLEYCORN Place Agricultural BILLING Place Name of Jimmy Melrose Uncle Noel Pemberton Billing BLACKWOOD Drive - Alexander Blackwood 1860c Registrar BARRIES Road C. E. Barrie “Darlingsford” farmer 1911, chaff mill owner BROOKLYN Road Staughton family residence. 1875 – Dismantled c 193? CAHILL Drive Family - Glenville Dairy CAMERON Court Family Canopus Place ? CANALLAN Drive Early Surveyor CAMPBELL Court Aviation – Melrose passenger 6th July 1936 CARBERRY Drive Michael, early landowner family CAREW Court Edward and Michael. Royal Hotel. Vera (Carew) Forran Singer - Opera CASEY Court Family CASHIN Court Family CHEVIOT Court Agriculture, breed of sheep CHESNEY Road was re named ( Minns Road being duplicated c 1973) CHRISTINA Crescent Christina McPherson, daughter of James and Mary Mary McPherson. Died 1955 aged 85 years COLLYER Close a deleted street (parallel to Yuille) re-used CORRIEDALE Road Breed of sheep CORR Court Teacher at first school, landowner CROXTON Court Name of the Hornbuckle and Knox family home DALEY Court - William Daley and family 1865 Bootmaker High Street DARLINGSFORD Boulevard - Name of early homestead Thomas B Darling 1853 DJERRIWARRH Court - Parish County of Bourke - very early map. DODEMAIDE Place Early land owners - Melton Football Team had 6 brothers playing c 1924 DONALD Court McPherson family 6 generations in Melton in 1936 DOUGAL Court DUNCAN Court .. .. DUNVEGAN Circuit Home of the McPherson family, castle Isle of Skye Name of bluestone house Smith Street (now at Willows) EMIL Court Jongebloed family EXELL Avenue Farming family Melton Sth- Closer Settlement 1907 EXFORD Road Exe former name of the Werribee river FARMER Court Name of early postmistress FERRIS Road John Ferris Farmer HANNAH Close First name of Hannah Watts – midwife HAYBALE Place Agricultural HELDER Court Early surveyor J Helder Wedge map HEWSON Street Winston Hewson Shire Engineer – check title c 1960 HENRY Street Township map c 1860 HESTON Street Heston Phoenix – C.J. Melrose plane HILDEGARDE Court Jimmy Melrose’s mothers name HOMESTEAD Close HORNBUCKLE Cres Farmers. Three members of family - Shire Presidents HURLEY Street Farmers IAIN Court Descendent of James and Mary McPherson JAMES MELROSE Drive Name appears on 2013 Melton information map JANG Place KURUN – jang KIRKTON Drive Name of the McPherson family home Toolern Vale Road KIRWIN Street Michael early landowners (deleted for freeway construction) KILPATRICKS Road Deleted when Barries Road was extended across Station Rd KOROROIT Court Early map, Parish of Kororoit. Creek name KNOX Circuit Family – Hornbuckle “Croxton Park” KURRUNJANG Drive Aboriginal name for people of the red earth – Suburb name Lara Place ? LLOYD Court Garage owners High Street. Laura lived to 100 years D 1955 LUBY Court John Luby – Crown Grant Land Title LITTLE Court MANNING Avenue Richard, hotel owner 1891 MARGARET Drive McPherson family McDONALD Street Melton South family name McKENZIE Street Township c1860 MORROW Street Early name MOWBRAY Crescent Name of English Melton, popularly believed origin of Melton MYERS Court Early setters c 1866 Crown Grant Land Title NIMMO Street Early name NIXON Street Name submitted by Mary nee Nixon Collins c1985 OLDERSHAW Road Early builder PALMERSTON Street Early township map c 1860 PEART Court Early name PENNYROYAL Avenue Plant growing by the creek. Early name used for the Toolern Toolam Creek PINKERTON Street Family name and early street map PINNACLE Crescent Agricultural - type of wheat PHOENIX Circuit C.J. Melrose Phoenix Heston Plane 2013 map PRATT Family PRIOR Court PYKE Place Brothers – early settlement 1838 RADFORD Court Land owners and business operators. Former Royal Hotel Grocer High Street demolished 1970 RAGLAN Court Hotel 19th century Lord Raglan RALEIGHS Road Oliver Reierson family (Norweigen) Shopkeeper – Dressmakers RIDDELL Drive (misspelt Riddle) Resident and land owner RODERICK Road McPherson family – a re occurring name ROLLAND Court Jones family ROSS Court Daniel. Landowner. Agnes Ross music teacher RUSSELL Court Robert. Early land surveyor of Melton 1853 RYAN Court Family early landowner. Member of the 1862 Road Board SHEBLER Place Augustus early Melton resident – Golden Fleece Hotel SHEEPFOLD Court Farming SHERWIN Court Sherwin Street earliest Township map– became Golf course SMITH Street Early township map. STRATHULLOH Circuit Strathtulloh Homestead. STAUGHTON Street Family – LARGE land owners Strachan ? SWANEY Court Marie Swaney earlier resident of Strathtulloh. SUTHERLAND Family name TOOLERN Street TOOLAM – TOOLERN Creek TULLIDGE St Road marked on 1861 map UNITT Street Early Township c 1860 WALLACE Square Cr Jack Wallace 5 terms as President 46 years unopposed WATTS Court Hannah Watts – midwife, cottage hospital WALSINGHAM Name of house of Minns family. From Walsingham Norfolk England WESTLEY Place Name of Jimmy Melrose Percival Gull Plane WESTLAKE Drive Early resident WHICKHAM Street Family Name Melton South WILSON Road Albert, Melton South YUILLE Street William Cross, early landowner, Rockbank run Zoomed in section of Melton Streets including Church and High Streetlandscapes of significance -
 Melton City Libraries
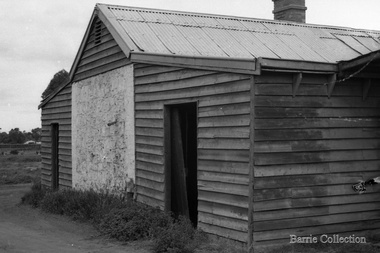
Photograph, Jongebloed Bakehouse, c.1973
Bakery Square was the location of Jongebloed shop, bakehouse and stables Bakehouse owned by Gottfried Jongebloed and Auguste Shebler. Auguste Shebler came to Melton in the early 1950’s and in 1857 built a store on the corner of High and Smith Streets. Mr Shebler was the Postmaster, and Paymaster for thee Government, who sent a batch of 400 to 500 immigrants to clear trees and fallen timber off the Ballarat Road; the wages being 5/- per day, and oversees 10/- per day. In 1865, Mr Shebler built the Golden Fleece Hotel on the present site and, although many alterations have taken place, most of the main walls still belong to the original building. He built a store some 100 yards west along High Street, and added to it a bakers’s business; then he built a butcher’s shop and leased it to the late Mr G McKenzie. Gorrfried Jongebloed was born in 1857 and came to Melton in 1887 as a Captain in the Mercantile Marine. In 1888 he married Marie Antionette, second daughter of Mr Shebler, and took over the bakery and green grocers business. Ten children were born to the family- Gerhard, Annette, Gorrfried (dec 1937), Emil, (dec 1947), Nicholas, Julius, Theckla, Augustus, Marie and Margarethe, - who settled in various parts of Victoria and are, in the bakery businesses. Mr and Mrs Jongebloed, sen., carried on the businesses in Melton until 1926, when one of their sons Emil, took over. Mr Jongebloed, sen., died in 1930 at the age of 73 years; and his wife living until 8th Oct., 1946, when she died at the age of 80 years. After the sudden death of Emil, in Jan., at the age if 49 years, the business had been conducted up to the present time by two sons “Pat” and Bryan. 1962 Express September local identities -
 Melton City Libraries
Photograph, "Dunvegan”, Unknown
Dunvegan built in 1875, it was situated at rear of the Golden Fleece Hotel. Mary McCrimmon McPherson came from the family who were hereditary Pipers to the McLeods of Dunvegan Castle, Isle of Skye (also of Isle of Mull, Argyll) . At aged 70 years after the death of her husband, Mary and her family came to Australia in 1851. They took up residence in 1852 on the Toolern Road, Melton. Son James married Mary McInnes in 1859. They named another residence occupied by other family in Smith Street, Dunvegan. It was relocated to the Willows Park at the creation of Bakery Square. Edna Barrie participated in the restoration and reconstruction of Dunvegan.House on Smith Street, Meltonlocal architecture