Showing 103 items matching "hand mirrors"
-
 Flagstaff Hill Maritime Museum and Village
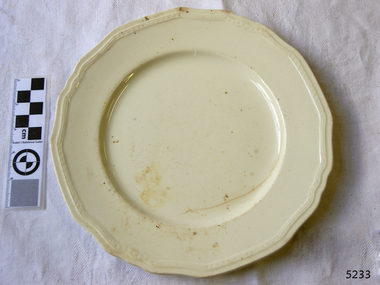
Domestic object - Plate, Alfred Meakin
... mirror black is a good example – it mixes really well with many glazes because it fluxes them – causes them to melt faster. It will also bring out many beautiful colours in the glazes because it’s black colouring most definitely comes from manganese dioxide! Glaze chemistry is a whole subject on it’s own! We use commercial Mayco glazes on purpose – for their huge range of colour possibilities, stability, cool interactions, artistic freedom with the ability to easily brush the glazes on and ease of use. We currently have almost 50 glazes on hand...mirror black is a good example – it mixes really well with many glazes because it fluxes them – causes them to melt faster. It will also bring out many beautiful colours in the glazes because it’s black colouring most definitely comes from manganese dioxide! Glaze chemistry is a whole subject on it’s own! We use commercial Mayco glazes on purpose – for their huge range of colour possibilities, stability, cool interactions, artistic freedom with the ability to easily brush the glazes on and ease of use. We currently have almost 50 glazes on hand ...The Process of Making Pottery Decorating, Firing, Glazing, Making, Technical There is a rhythm and flow to clay. It can’t be done all at once! Even the making process! It can take weeks to get everything done, especially if you can only work on your pottery once a week! Even though we have three hour classes, it’s often just not enough time! Here is an overview of some of the processes so you have a bit more grasp on some of the technical stuff! Step One – Design There are SO many ideas out there for making stuff in clay! From delicate porcelain jewellery, through to heavy sculptural work and everything in between. Deciding your direction is sometimes not that easy – when you first start, try everything, you will naturally gravitate to the style that you enjoy! The options and variations are endless and can get a wee bit overwhelming too! Check in with me before you start to ensure your ideas will work, what order you might do things, how you could achieve the look you are seeking and any other technical data required! Step Two – Making Clay is thixotropic. This means that as you work with it, the clay first gets sloppier and wetter, before is begins to dry in the atmosphere. For most things, you simply can’t do all parts of the project at once. An example of work order might look like: Get last weeks work out from the shelves Prepare clay for today’s work – roll your clay, prepare balls for throwing, make the first stage of a pinch pot) Clean up last week’s work and put it on the shelf for bisque firing Check that you have any glazing to do – and do enough of it that you will have time to finish your main project Do the next step of your next project – there might be a further step that can’t be complete immediately, in that case, wrap your work well and put onto the shelves. Letting your work rest for a while can really help keep your work clean and professional looking. Many things require bagging under plastic to keep it ready for work the next week – put your name on the outside of the bag so you can find your work easily. We have stickers and markers. Consider how you want to decorate your work – coloured slip can be applied at a fairly wet stage (remembering that it will make your work even wetter!). Trying to apply slip to dry clay won’t work! If you want to do sgraffito – you will need to keep the work leather hard (a state of dryness where you can still work the clay with a little effort and a little water and care). Step Three – Drying Most of the time your work can go into the rack uncovered to let it dry out for the following week. If you want to continue forming or shaping you will need to double bag your work – put your work on a suitable sized bat and put the bat in a bag so the base of the bag is under the bat, then put another bag over the top of the work and tuck the top of the bag under the bat. If you want to trim (or turn) your thrown work the following week, it should also be double bagged. If your work is large, delicate, or of uneven thicknesses, you should lightly cover your work for drying. When considering the drying process, bare in mind the weather, humidity and wind! The hotter and dryer, the faster things dry and work can dry unevenly in the shelves – this can lead to cracking – another time to lightly cover your work for drying. Step Four – Trimming and Cleaning Up Your work is dry! It is called greenware now and it is at it’s most fragile! Handle everything with two hands. I often refer to soft hands – keep everything gentle and with your fingers spread as much as possible. Try to not pick up things like plates too much, and always with both hands! Before your work can be bisque fired it should be “cleaned up”. You work won’t go into the kiln if it has sharp edges – when glazed, sharp edges turn into razor blades! Use a piece of fly wire to rub the work all over – this will scratch a little so be light handed. Use a knife or metal kidney to scrape any areas that require a bit more dynamic treatment than the fly wire offers! Finally, a very light wipe over with a slightly damp sponge can help soften and soothe all of your edges and dags! Trimming thrown work: If you are planning to trim (or turn) your thrown work (and you should be), make sure you bag it well – your work should be leather hard to almost dry for easiest trimming. Use this step to finish the work completely – use a metal kidney to polish the surface, or a slightly damp sponge to give a freshly thrown look. Wipe the sponge around the rim after trimming, and check the inside of the pot for dags! Trimming slip cast work: Usually I will trim the rims of your work on the wheel the following day to make that stage easier, however you will still need to check your work for lumps and bumps. Last but not least – check that your name is still clearly on the bottom of your work. Step Five – Bisque Firing When the work is completely dry it can go into the bisque kiln. The bisque kiln is fired to 1000°C. This process burns off the water in the clay as well as some of the chemically bound water. The structure of the clay is not altered that much at this temperature. Inside the bisque kiln, the work is stacked a little, small bowl inside a larger bowl and onto a heavy plate. Smaller items like decorations or drink coasters might get stacked several high. Consideration is paid to the weight of the stack and shape of the work. A bisque kiln can fire about one and a half times the amount of work that the glaze kiln can fire. The firing takes about 10 hours to complete the cycle and about two days to cool down. Once it has been emptied the work is placed in the glaze room ready for you to decorate! Step Six – Glazing Decorating your work with colour can be a lot of fun – and time consuming! There are three main options for surface treatment at this stage: Oxide Washes Underglazes Glazes Washes and underglazes do not “glaze” the work – It will still need a layer of glaze to fully seal the clay (washes don’t need glaze on surfaces not designed for food or liquid as they can gloss up a little on their own). Underglazes are stable colourants that turn out pretty much how they look in the jar. They can be mixed with each other to form other colours and can be used like water colours to paint onto your work. Mostly they should have a clear glaze on top to seal them. Oxides are a different species – the pink oxide (cobalt) wash turns out bright blue for instance. They don’t always need a glaze on top, and some glazes can change the colour of the wash! The glazes need no other “glaze” on top! Be careful of unknown glaze interactions – you can put any combination of glaze in a bowl or on a plate, but only a single glaze on the outside of any vertical surface! Glazes are a chemical reaction under heat. We don’t know the exact chemicals in the Mayco glazes we use. I can guess by the way they interact with each other, however, on the whole, you need to test every idea you have, and not run the test on a vertical surface! Simply put, glaze is a layer of glass like substance that bonds with the clay underneath. Clay is made of silica, alumina and water. Glaze is made of mostly silica. Silica has a melting point of 1700°C and we fire to 1240°C. The silica requires a “flux” to help it melt at the lower temperature. Fluxes can be all sorts of chemicals – a common one is calcium – calcium has a melting point of 2500°C, however, together they both melt at a much lower temperature! Colourants are metal oxides like cobalt (blue), chrome (green through black), copper (green, blue, even red!), manganese (black, purple and pink) iron (red brown), etc. Different chemicals in the glaze can have dramatic effects. for example, barium carbonate (which we don’t use) turns manganese bright pink! Other elements can turn manganese dioxide brown, blue, purple and reddish brown. Manganese dioxide is a flux in and of itself as well. So, glazes that get their black and purple colours, often interact with other glazes and RUN! Our mirror black is a good example – it mixes really well with many glazes because it fluxes them – causes them to melt faster. It will also bring out many beautiful colours in the glazes because it’s black colouring most definitely comes from manganese dioxide! Glaze chemistry is a whole subject on it’s own! We use commercial Mayco glazes on purpose – for their huge range of colour possibilities, stability, cool interactions, artistic freedom with the ability to easily brush the glazes on and ease of use. We currently have almost 50 glazes on hand! A major project is to test the interactions of all glazes with each other. That is 2,500 test tiles!!!! I’m going to make the wall behind the wheels the feature wall of pretty colours! Step Seven – Glaze (Gloss or sometimes called “Glost”) Firing Most of the time this is the final stage of making your creation (but not always!) The glaze kiln goes to 1240°C. This is called cone 6, or midrange. It is the low end of stoneware temperatures. Stoneware clays and glazes are typically fired at cone 8 – 10, that is 1260 – 1290°C. The energy requirement to go from 1240°C to 1280°C is almost a 30% more! Our clay is formulated to vitrify (mature, turn “glass-like”) at 1240°, as are our glazes. A glaze kiln take around 12 hours to reach temperature and two to three days to cool down. Sometimes a third firing process is required – this is for decoration that is added to work after the glaze firing. For example – adding precious metals and lustres. this firing temperature is usually around 600 – 800°C depending upon the techniques being used. There are many students interested in gold and silver trims – we will be doing this third type of firing soon! After firing your work will be in the student finished work shelves. Remember to pay for it before you head out the door! There is a small extra charge for using porcelain clay (it’s more than twice the price of regular clay), and for any third firing process! Once your work has been fired it can not turn back into clay for millennia – so don’t fire it if you don’t like it! Put it in the bucket for recycling. https://firebirdstudios.com.au/the-process-of-making-pottery/Ceramics have evolved over thousands of years.Earthenware dessert plate, cream colour. Made by Alfred Meakin, England. Backstamped ‘Alfred Meakin England’. flagstaff hill, warrnambool, shipwrecked-coast, flagstaff-hill, flagstaff-hill-maritime-museum, maritime-museum, shipwreck-coast, flagstaff-hill-maritime-village, alfred meakin, ceramics, earthenware, kitchenware -
 Flagstaff Hill Maritime Museum and Village
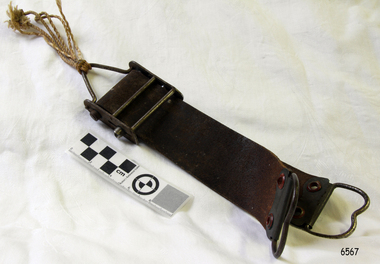
Razor Strop
... mirror finish. Some strops, such as this one in our Collection, are designed to be used while hanging from a nail or peg, while others are hand held. ...mirror finish. Some strops, such as this one in our Collection, are designed to be used while hanging from a nail or peg, while others are hand held. ...This razor strop is made like a leather strap. ABOUT STROPS Straight razors and cut throat razors were the major tools for shaving before the safety razor was invented in the 1880’s and even today specialty shaving shops still sell the straight razors. Along with the razor, the process of shaving would commonly involve lathering up shaving soap using a shaving brush with boar bristles. Men could own several razors and rotate them through the week and some shops sold the razors in a set, a razor for each day of the week. Straight razors could require stropping more than once during the shaving of a heavy beard, and stropping would also be performed at the end of each shave. Honing would only be performed two or three times a year, preserving the blade’s edge. A lot of skill was needed to hone and strop the blades of these early razors and the methods to do so were a large part of the curriculum in Barber colleges. The razor would be sharpened on a grinding wheel then honed on sharpening stone and finally finished using a strop. Straight edge razors would usually be sold unfinished and that process would be completed by the customer. A razor strop, usually made from leather, thick canvas or light timber, would be used to straighten and polish the straight razor for shaving. Strops could also be used to polish other blades such as knives, small metal tools and chisels. Sometimes an abrasive polishing compound is also used to give a mirror finish. Some strops, such as this one in our Collection, are designed to be used while hanging from a nail or peg, while others are hand held. To use the strop draw the spine of the blade down along the strop with the blade following, without putting any pressure on the blade. At the end of the stroke, rotate the blade over its spine then draw the spine along the strop again so that the edge moves away from the top. The finer grade of leather strap is used to give the final finish. Double Swing Razor Strop. Use for honing razors.flagstaff hill, warrnambool, shipwrecked-coast, flagstaff-hill, flagstaff-hill-maritime-museum, maritime-museum, shipwreck-coast, flagstaff-hill-maritime-village, strop, swing razor strop, barber's equipment, shaving equipment, personal accessory -
 City of Moorabbin Historical Society (Operating the Box Cottage Museum)
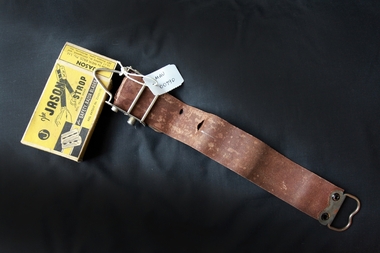
Personal Effects, leather strop 'Jason', c1940
... hand-held paddle. Various abrasive compounds may be applied to the strop to aid in polishing the blade while stropping to obtain a mirror-like finish. ...hand-held paddle. Various abrasive compounds may be applied to the strop to aid in polishing the blade while stropping to obtain a mirror-like finish. ...A razor strop (or razor strap) is a flexible strip of leather or canvas used to straighten and polish the blade of a straight razor, a knife, or a woodworking tool like a chisel. Unlike honing or sharpening a blade, in which a whetstone removes metal bent out of alignment from the blade's edge, stropping the blade re-aligns the indentations without removing any material. The strop may be a hanging strop or a hand-held paddle. Various abrasive compounds may be applied to the strop to aid in polishing the blade while stropping to obtain a mirror-like finish. The properties of the compound applied will alter the polishing result. Jeweller's rouge is a very fine abrasive compound. The green Chromium(III) oxide compound is most often used as an abrasive compound. Sprays containing diamond particles are another option. Stropping is primarily done with straight razors, used for shaving, as these are the thinnest blades in everyday use, and require stropping at each use, due to the thinness of the blade Two points are key to stropping: Draw the blade spine-first along the strop. By contrast, honing is done edge-first. When you turn the blade at the end of a stroke, turn it over the spine, so the edge moves away from the strop and faces you, and the spine rests on the strop. This preserves the edge – if the blade is turned over with the edge against the strop, this will roll the blade edge, defeating the purpose of stropping As the use of safety razors increased in popularity this 'Jason' strop prolonged the life of each razor blade thus making them economical.A leather 'Jason' strop, for sharpening safety shaving razor blades, with box. Top of Box: J / The JASON / STROP/ Reg. Trade Mark / for SAFETY RAZOR BLADES / Reg. Patent No. 25435/35 ; Back : How to operate the JASON STROP ( instructions) Side: JASON / Razor Strop Dressing / A keen smooth blade will always be assured by the / occasional use of JASON RAZOR STROP DRESSING/ Side: FIFTY SHAVES WITH ONE BLADE ! / by using - JASON and JASON / Razor Blade Strop Razor Blade Dressing. End: JASON / Made by MEIK BROS. Pty. Ltd. / 15-17 Bedford St., Collingwood, and / 287 Flinders Lane, Melbourne, Vic. End: JASON / SAFETY RAZOR BLADE STROP.safety razors, the jason strop, shaving equipment, personal effects, strops, meik bros pty ltd, gillette, collingwood melbourne -
 Glenelg Shire Council Cultural Collection
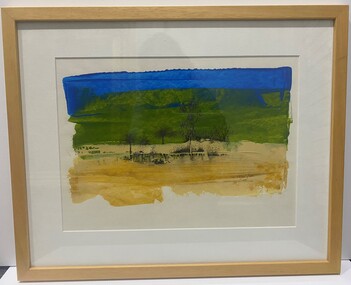
Artwork, other - Painting, Roger Hoe, Bush water, unknown
... Hand painted signature bottom right quadrant: Roger Hoe Mixed media on heavy card, from top to bottom thick streaks of blue, green and yellow, with a thicker glossier deep cream paint layered over the meeting point of the yellow and green. Centred very detailed in metallic flecked black and charcoal images of a bank of tree's, shrubbery and grasses with a mirrored ...Wining piece of the Best Local Artist - any medium of the Rotary Club of Portland Inc 35th Portland Art Show 2017. Judged by Barbara McManus. Judges Comments: There is an interesting contrast in the boldness and simplicity of the subject. Worthy of close inspection as there is more to this than at first appearance.Mixed media on heavy card, from top to bottom thick streaks of blue, green and yellow, with a thicker glossier deep cream paint layered over the meeting point of the yellow and green. Centred very detailed in metallic flecked black and charcoal images of a bank of tree's, shrubbery and grasses with a mirrored water reflection. Framed in a honey toned timber frame, bordered with a bevel cut white matt board. Hand painted signature bottom right quadrant: Roger Hoe -
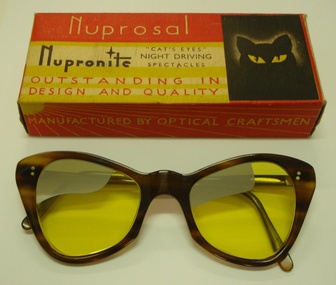 The Cyril Kett Optometry Museum
Spectacles, Nupro, 1950 (estimated)
... Price added by hand '2 pound 17/6' Boxed Nupronite night driving spectacles. Yellow flat plano glass lenses with silver mirror finish in wearer's upper right field of each lens (to minimise glare of oncoming lights). ...These night driving spectacles are in a shape of frame fashionable for ladies in the 1950's. The position of the lens silvering shows that these are designed for use in right hand drive cars. These were an expensive item in their day. Their excellent condition and original cardboard box suggest that they may be unsold new old stock.No other example of these Nupronite night driving spectacles is known in any Australian collection.Boxed Nupronite night driving spectacles. Yellow flat plano glass lenses with silver mirror finish in wearer's upper right field of each lens (to minimise glare of oncoming lights). Tortoise-shell look cat's eye frame. In original cardboard box.On box:'Nuprosal/ Nupronite/ "CAT'S EYES" NIGHT DRIVING SPECTACLES OUTSTANDING IN DESIGN AND QUALITY/ MANUFACTURED BY OPTICAL CRAFTSMEN/ MADE IN ENGLAND BY NUPRO LONDON/ MODEL:CAT'S EYES/ LENSES:SUPER/ COLOUR:AUTUMN LEAF'. Price added by hand '2 pound 17/6'spectacles, glare, night driving, eye protection -
 Flagstaff Hill Maritime Museum and Village
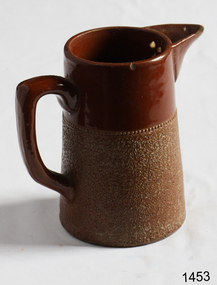
Domestic object - Jug
... mirror black is a good example – it mixes really well with many glazes because it fluxes them – causes them to melt faster. It will also bring out many beautiful colours in the glazes because it’s black colouring most definitely comes from manganese dioxide! Glaze chemistry is a whole subject on it’s own! We use commercial Mayco glazes on purpose – for their huge range of colour possibilities, stability, cool interactions, artistic freedom with the ability to easily brush the glazes on and ease of use. We currently have almost 50 glazes on hand...mirror black is a good example – it mixes really well with many glazes because it fluxes them – causes them to melt faster. It will also bring out many beautiful colours in the glazes because it’s black colouring most definitely comes from manganese dioxide! Glaze chemistry is a whole subject on it’s own! We use commercial Mayco glazes on purpose – for their huge range of colour possibilities, stability, cool interactions, artistic freedom with the ability to easily brush the glazes on and ease of use. We currently have almost 50 glazes on hand ...The Process of Making Pottery Decorating, Firing, Glazing, Making, Technical There is a rhythm and flow to clay. It can’t be done all at once! Even the making process! It can take weeks to get everything done, especially if you can only work on your pottery once a week! Even though we have three hour classes, it’s often just not enough time! Here is an overview of some of the processes so you have a bit more grasp on some of the technical stuff! Step One – Design There are SO many ideas out there for making stuff in clay! From delicate porcelain jewellery, through to heavy sculptural work and everything in between. Deciding your direction is sometimes not that easy – when you first start, try everything, you will naturally gravitate to the style that you enjoy! The options and variations are endless and can get a wee bit overwhelming too! Check in with me before you start to ensure your ideas will work, what order you might do things, how you could achieve the look you are seeking and any other technical data required! Step Two – Making Clay is thixotropic. This means that as you work with it, the clay first gets sloppier and wetter, before is begins to dry in the atmosphere. For most things, you simply can’t do all parts of the project at once. An example of work order might look like: Get last weeks work out from the shelves Prepare clay for today’s work – roll your clay, prepare balls for throwing, make the first stage of a pinch pot) Clean up last week’s work and put it on the shelf for bisque firing Check that you have any glazing to do – and do enough of it that you will have time to finish your main project Do the next step of your next project – there might be a further step that can’t be complete immediately, in that case, wrap your work well and put onto the shelves. Letting your work rest for a while can really help keep your work clean and professional looking. Many things require bagging under plastic to keep it ready for work the next week – put your name on the outside of the bag so you can find your work easily. We have stickers and markers. Consider how you want to decorate your work – coloured slip can be applied at a fairly wet stage (remembering that it will make your work even wetter!). Trying to apply slip to dry clay won’t work! If you want to do sgraffito – you will need to keep the work leather hard (a state of dryness where you can still work the clay with a little effort and a little water and care). Step Three – Drying Most of the time your work can go into the rack uncovered to let it dry out for the following week. If you want to continue forming or shaping you will need to double bag your work – put your work on a suitable sized bat and put the bat in a bag so the base of the bag is under the bat, then put another bag over the top of the work and tuck the top of the bag under the bat. If you want to trim (or turn) your thrown work the following week, it should also be double bagged. If your work is large, delicate, or of uneven thicknesses, you should lightly cover your work for drying. When considering the drying process, bare in mind the weather, humidity and wind! The hotter and dryer, the faster things dry and work can dry unevenly in the shelves – this can lead to cracking – another time to lightly cover your work for drying. Step Four – Trimming and Cleaning Up Your work is dry! It is called greenware now and it is at it’s most fragile! Handle everything with two hands. I often refer to soft hands – keep everything gentle and with your fingers spread as much as possible. Try to not pick up things like plates too much, and always with both hands! Before your work can be bisque fired it should be “cleaned up”. You work won’t go into the kiln if it has sharp edges – when glazed, sharp edges turn into razor blades! Use a piece of fly wire to rub the work all over – this will scratch a little so be light handed. Use a knife or metal kidney to scrape any areas that require a bit more dynamic treatment than the fly wire offers! Finally, a very light wipe over with a slightly damp sponge can help soften and soothe all of your edges and dags! Trimming thrown work: If you are planning to trim (or turn) your thrown work (and you should be), make sure you bag it well – your work should be leather hard to almost dry for easiest trimming. Use this step to finish the work completely – use a metal kidney to polish the surface, or a slightly damp sponge to give a freshly thrown look. Wipe the sponge around the rim after trimming, and check the inside of the pot for dags! Trimming slip cast work: Usually I will trim the rims of your work on the wheel the following day to make that stage easier, however you will still need to check your work for lumps and bumps. Last but not least – check that your name is still clearly on the bottom of your work. Step Five – Bisque Firing When the work is completely dry it can go into the bisque kiln. The bisque kiln is fired to 1000°C. This process burns off the water in the clay as well as some of the chemically bound water. The structure of the clay is not altered that much at this temperature. Inside the bisque kiln, the work is stacked a little, small bowl inside a larger bowl and onto a heavy plate. Smaller items like decorations or drink coasters might get stacked several high. Consideration is paid to the weight of the stack and shape of the work. A bisque kiln can fire about one and a half times the amount of work that the glaze kiln can fire. The firing takes about 10 hours to complete the cycle and about two days to cool down. Once it has been emptied the work is placed in the glaze room ready for you to decorate! Step Six – Glazing Decorating your work with colour can be a lot of fun – and time consuming! There are three main options for surface treatment at this stage: Oxide Washes Underglazes Glazes Washes and underglazes do not “glaze” the work – It will still need a layer of glaze to fully seal the clay (washes don’t need glaze on surfaces not designed for food or liquid as they can gloss up a little on their own). Underglazes are stable colourants that turn out pretty much how they look in the jar. They can be mixed with each other to form other colours and can be used like water colours to paint onto your work. Mostly they should have a clear glaze on top to seal them. Oxides are a different species – the pink oxide (cobalt) wash turns out bright blue for instance. They don’t always need a glaze on top, and some glazes can change the colour of the wash! The glazes need no other “glaze” on top! Be careful of unknown glaze interactions – you can put any combination of glaze in a bowl or on a plate, but only a single glaze on the outside of any vertical surface! Glazes are a chemical reaction under heat. We don’t know the exact chemicals in the Mayco glazes we use. I can guess by the way they interact with each other, however, on the whole, you need to test every idea you have, and not run the test on a vertical surface! Simply put, glaze is a layer of glass like substance that bonds with the clay underneath. Clay is made of silica, alumina and water. Glaze is made of mostly silica. Silica has a melting point of 1700°C and we fire to 1240°C. The silica requires a “flux” to help it melt at the lower temperature. Fluxes can be all sorts of chemicals – a common one is calcium – calcium has a melting point of 2500°C, however, together they both melt at a much lower temperature! Colourants are metal oxides like cobalt (blue), chrome (green through black), copper (green, blue, even red!), manganese (black, purple and pink) iron (red brown), etc. Different chemicals in the glaze can have dramatic effects. for example, barium carbonate (which we don’t use) turns manganese bright pink! Other elements can turn manganese dioxide brown, blue, purple and reddish brown. Manganese dioxide is a flux in and of itself as well. So, glazes that get their black and purple colours, often interact with other glazes and RUN! Our mirror black is a good example – it mixes really well with many glazes because it fluxes them – causes them to melt faster. It will also bring out many beautiful colours in the glazes because it’s black colouring most definitely comes from manganese dioxide! Glaze chemistry is a whole subject on it’s own! We use commercial Mayco glazes on purpose – for their huge range of colour possibilities, stability, cool interactions, artistic freedom with the ability to easily brush the glazes on and ease of use. We currently have almost 50 glazes on hand! A major project is to test the interactions of all glazes with each other. That is 2,500 test tiles!!!! I’m going to make the wall behind the wheels the feature wall of pretty colours! Step Seven – Glaze (Gloss or sometimes called “Glost”) Firing Most of the time this is the final stage of making your creation (but not always!) The glaze kiln goes to 1240°C. This is called cone 6, or midrange. It is the low end of stoneware temperatures. Stoneware clays and glazes are typically fired at cone 8 – 10, that is 1260 – 1290°C. The energy requirement to go from 1240°C to 1280°C is almost a 30% more! Our clay is formulated to vitrify (mature, turn “glass-like”) at 1240°, as are our glazes. A glaze kiln take around 12 hours to reach temperature and two to three days to cool down. Sometimes a third firing process is required – this is for decoration that is added to work after the glaze firing. For example – adding precious metals and lustres. this firing temperature is usually around 600 – 800°C depending upon the techniques being used. There are many students interested in gold and silver trims – we will be doing this third type of firing soon! After firing your work will be in the student finished work shelves. Remember to pay for it before you head out the door! There is a small extra charge for using porcelain clay (it’s more than twice the price of regular clay), and for any third firing process! Once your work has been fired it can not turn back into clay for millennia – so don’t fire it if you don’t like it! Put it in the bucket for recycling. https://firebirdstudios.com.au/the-process-of-making-pottery/The form of the jug has been in use for many centuries.Stoneware jug. Two tone brown glaze with pierced lip behind spout. Spout chipped.None.flagstaff hill, warrnambool, shipwrecked-coast, flagstaff-hill, flagstaff-hill-maritime-museum, maritime-museum, shipwreck-coast, flagstaff-hill-maritime-village, jug, ceramic jug -
 Flagstaff Hill Maritime Museum and Village
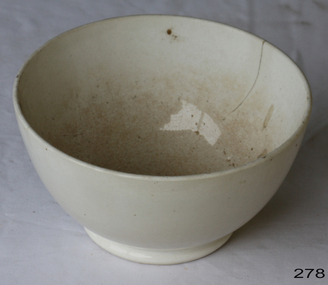
Domestic object - Bowl, Late 19th or early 20th Century
... mirror black is a good example – it mixes really well with many glazes because it fluxes them – causes them to melt faster. It will also bring out many beautiful colours in the glazes because it’s black colouring most definitely comes from manganese dioxide! Glaze chemistry is a whole subject on it’s own! We use commercial Mayco glazes on purpose – for their huge range of colour possibilities, stability, cool interactions, artistic freedom with the ability to easily brush the glazes on and ease of use. We currently have almost 50 glazes on hand...mirror black is a good example – it mixes really well with many glazes because it fluxes them – causes them to melt faster. It will also bring out many beautiful colours in the glazes because it’s black colouring most definitely comes from manganese dioxide! Glaze chemistry is a whole subject on it’s own! We use commercial Mayco glazes on purpose – for their huge range of colour possibilities, stability, cool interactions, artistic freedom with the ability to easily brush the glazes on and ease of use. We currently have almost 50 glazes on hand ...The Process of Making Pottery Decorating, Firing, Glazing, Making, Technical There is a rhythm and flow to clay. It can’t be done all at once! Even the making process! It can take weeks to get everything done, especially if you can only work on your pottery once a week! Even though we have three hour classes, it’s often just not enough time! Here is an overview of some of the processes so you have a bit more grasp on some of the technical stuff! Step One – Design There are SO many ideas out there for making stuff in clay! From delicate porcelain jewellery, through to heavy sculptural work and everything in between. Deciding your direction is sometimes not that easy – when you first start, try everything, you will naturally gravitate to the style that you enjoy! The options and variations are endless and can get a wee bit overwhelming too! Check in with me before you start to ensure your ideas will work, what order you might do things, how you could achieve the look you are seeking and any other technical data required! Step Two – Making Clay is thixotropic. This means that as you work with it, the clay first gets sloppier and wetter, before is begins to dry in the atmosphere. For most things, you simply can’t do all parts of the project at once. An example of work order might look like: Get last weeks work out from the shelves Prepare clay for today’s work – roll your clay, prepare balls for throwing, make the first stage of a pinch pot) Clean up last week’s work and put it on the shelf for bisque firing Check that you have any glazing to do – and do enough of it that you will have time to finish your main project Do the next step of your next project – there might be a further step that can’t be complete immediately, in that case, wrap your work well and put onto the shelves. Letting your work rest for a while can really help keep your work clean and professional looking. Many things require bagging under plastic to keep it ready for work the next week – put your name on the outside of the bag so you can find your work easily. We have stickers and markers. Consider how you want to decorate your work – coloured slip can be applied at a fairly wet stage (remembering that it will make your work even wetter!). Trying to apply slip to dry clay won’t work! If you want to do sgraffito – you will need to keep the work leather hard (a state of dryness where you can still work the clay with a little effort and a little water and care). Step Three – Drying Most of the time your work can go into the rack uncovered to let it dry out for the following week. If you want to continue forming or shaping you will need to double bag your work – put your work on a suitable sized bat and put the bat in a bag so the base of the bag is under the bat, then put another bag over the top of the work and tuck the top of the bag under the bat. If you want to trim (or turn) your thrown work the following week, it should also be double bagged. If your work is large, delicate, or of uneven thicknesses, you should lightly cover your work for drying. When considering the drying process, bare in mind the weather, humidity and wind! The hotter and dryer, the faster things dry and work can dry unevenly in the shelves – this can lead to cracking – another time to lightly cover your work for drying. Step Four – Trimming and Cleaning Up Your work is dry! It is called greenware now and it is at it’s most fragile! Handle everything with two hands. I often refer to soft hands – keep everything gentle and with your fingers spread as much as possible. Try to not pick up things like plates too much, and always with both hands! Before your work can be bisque fired it should be “cleaned up”. You work won’t go into the kiln if it has sharp edges – when glazed, sharp edges turn into razor blades! Use a piece of fly wire to rub the work all over – this will scratch a little so be light handed. Use a knife or metal kidney to scrape any areas that require a bit more dynamic treatment than the fly wire offers! Finally, a very light wipe over with a slightly damp sponge can help soften and soothe all of your edges and dags! Trimming thrown work: If you are planning to trim (or turn) your thrown work (and you should be), make sure you bag it well – your work should be leather hard to almost dry for easiest trimming. Use this step to finish the work completely – use a metal kidney to polish the surface, or a slightly damp sponge to give a freshly thrown look. Wipe the sponge around the rim after trimming, and check the inside of the pot for dags! Trimming slip cast work: Usually I will trim the rims of your work on the wheel the following day to make that stage easier, however you will still need to check your work for lumps and bumps. Last but not least – check that your name is still clearly on the bottom of your work. Step Five – Bisque Firing When the work is completely dry it can go into the bisque kiln. The bisque kiln is fired to 1000°C. This process burns off the water in the clay as well as some of the chemically bound water. The structure of the clay is not altered that much at this temperature. Inside the bisque kiln, the work is stacked a little, small bowl inside a larger bowl and onto a heavy plate. Smaller items like decorations or drink coasters might get stacked several high. Consideration is paid to the weight of the stack and shape of the work. A bisque kiln can fire about one and a half times the amount of work that the glaze kiln can fire. The firing takes about 10 hours to complete the cycle and about two days to cool down. Once it has been emptied the work is placed in the glaze room ready for you to decorate! Step Six – Glazing Decorating your work with colour can be a lot of fun – and time consuming! There are three main options for surface treatment at this stage: Oxide Washes Underglazes Glazes Washes and underglazes do not “glaze” the work – It will still need a layer of glaze to fully seal the clay (washes don’t need glaze on surfaces not designed for food or liquid as they can gloss up a little on their own). Underglazes are stable colourants that turn out pretty much how they look in the jar. They can be mixed with each other to form other colours and can be used like water colours to paint onto your work. Mostly they should have a clear glaze on top to seal them. Oxides are a different species – the pink oxide (cobalt) wash turns out bright blue for instance. They don’t always need a glaze on top, and some glazes can change the colour of the wash! The glazes need no other “glaze” on top! Be careful of unknown glaze interactions – you can put any combination of glaze in a bowl or on a plate, but only a single glaze on the outside of any vertical surface! Glazes are a chemical reaction under heat. We don’t know the exact chemicals in the Mayco glazes we use. I can guess by the way they interact with each other, however, on the whole, you need to test every idea you have, and not run the test on a vertical surface! Simply put, glaze is a layer of glass like substance that bonds with the clay underneath. Clay is made of silica, alumina and water. Glaze is made of mostly silica. Silica has a melting point of 1700°C and we fire to 1240°C. The silica requires a “flux” to help it melt at the lower temperature. Fluxes can be all sorts of chemicals – a common one is calcium – calcium has a melting point of 2500°C, however, together they both melt at a much lower temperature! Colourants are metal oxides like cobalt (blue), chrome (green through black), copper (green, blue, even red!), manganese (black, purple and pink) iron (red brown), etc. Different chemicals in the glaze can have dramatic effects. for example, barium carbonate (which we don’t use) turns manganese bright pink! Other elements can turn manganese dioxide brown, blue, purple and reddish brown. Manganese dioxide is a flux in and of itself as well. So, glazes that get their black and purple colours, often interact with other glazes and RUN! Our mirror black is a good example – it mixes really well with many glazes because it fluxes them – causes them to melt faster. It will also bring out many beautiful colours in the glazes because it’s black colouring most definitely comes from manganese dioxide! Glaze chemistry is a whole subject on it’s own! We use commercial Mayco glazes on purpose – for their huge range of colour possibilities, stability, cool interactions, artistic freedom with the ability to easily brush the glazes on and ease of use. We currently have almost 50 glazes on hand! A major project is to test the interactions of all glazes with each other. That is 2,500 test tiles!!!! I’m going to make the wall behind the wheels the feature wall of pretty colours! Step Seven – Glaze (Gloss or sometimes called “Glost”) Firing Most of the time this is the final stage of making your creation (but not always!) The glaze kiln goes to 1240°C. This is called cone 6, or midrange. It is the low end of stoneware temperatures. Stoneware clays and glazes are typically fired at cone 8 – 10, that is 1260 – 1290°C. The energy requirement to go from 1240°C to 1280°C is almost a 30% more! Our clay is formulated to vitrify (mature, turn “glass-like”) at 1240°, as are our glazes. A glaze kiln take around 12 hours to reach temperature and two to three days to cool down. Sometimes a third firing process is required – this is for decoration that is added to work after the glaze firing. For example – adding precious metals and lustres. this firing temperature is usually around 600 – 800°C depending upon the techniques being used. There are many students interested in gold and silver trims – we will be doing this third type of firing soon! After firing your work will be in the student finished work shelves. Remember to pay for it before you head out the door! There is a small extra charge for using porcelain clay (it’s more than twice the price of regular clay), and for any third firing process! Once your work has been fired it can not turn back into clay for millennia – so don’t fire it if you don’t like it! Put it in the bucket for recycling. https://firebirdstudios.com.au/the-process-of-making-pottery/ The bowl is an example of kitchenware used in the 19th century and still in use today.Bowl white ceramic. Crack on side. Badly stained.Backstamp very faint and unable to be read.flagstaff hill, warrnambool, shipwrecked-coast, flagstaff-hill, flagstaff-hill-maritime-museum, maritime-museum, shipwreck-coast, flagstaff-hill-maritime-village, mixing bowl, food preparation, kitchen equipment, ceramic -
 Flagstaff Hill Maritime Museum and Village
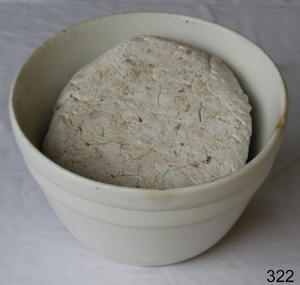
Domestic object - Bowl
... mirror black is a good example – it mixes really well with many glazes because it fluxes them – causes them to melt faster. It will also bring out many beautiful colours in the glazes because it’s black colouring most definitely comes from manganese dioxide! Glaze chemistry is a whole subject on it’s own! We use commercial Mayco glazes on purpose – for their huge range of colour possibilities, stability, cool interactions, artistic freedom with the ability to easily brush the glazes on and ease of use. We currently have almost 50 glazes on hand...mirror black is a good example – it mixes really well with many glazes because it fluxes them – causes them to melt faster. It will also bring out many beautiful colours in the glazes because it’s black colouring most definitely comes from manganese dioxide! Glaze chemistry is a whole subject on it’s own! We use commercial Mayco glazes on purpose – for their huge range of colour possibilities, stability, cool interactions, artistic freedom with the ability to easily brush the glazes on and ease of use. We currently have almost 50 glazes on hand ...The Process of Making Pottery Decorating, Firing, Glazing, Making, Technical There is a rhythm and flow to clay. It can’t be done all at once! Even the making process! It can take weeks to get everything done, especially if you can only work on your pottery once a week! Even though we have three hour classes, it’s often just not enough time! Here is an overview of some of the processes so you have a bit more grasp on some of the technical stuff! Step One – Design There are SO many ideas out there for making stuff in clay! From delicate porcelain jewellery, through to heavy sculptural work and everything in between. Deciding your direction is sometimes not that easy – when you first start, try everything, you will naturally gravitate to the style that you enjoy! The options and variations are endless and can get a wee bit overwhelming too! Check in with me before you start to ensure your ideas will work, what order you might do things, how you could achieve the look you are seeking and any other technical data required! Step Two – Making Clay is thixotropic. This means that as you work with it, the clay first gets sloppier and wetter, before is begins to dry in the atmosphere. For most things, you simply can’t do all parts of the project at once. An example of work order might look like: Get last weeks work out from the shelves Prepare clay for today’s work – roll your clay, prepare balls for throwing, make the first stage of a pinch pot) Clean up last week’s work and put it on the shelf for bisque firing Check that you have any glazing to do – and do enough of it that you will have time to finish your main project Do the next step of your next project – there might be a further step that can’t be complete immediately, in that case, wrap your work well and put onto the shelves. Letting your work rest for a while can really help keep your work clean and professional looking. Many things require bagging under plastic to keep it ready for work the next week – put your name on the outside of the bag so you can find your work easily. We have stickers and markers. Consider how you want to decorate your work – coloured slip can be applied at a fairly wet stage (remembering that it will make your work even wetter!). Trying to apply slip to dry clay won’t work! If you want to do sgraffito – you will need to keep the work leather hard (a state of dryness where you can still work the clay with a little effort and a little water and care). Step Three – Drying Most of the time your work can go into the rack uncovered to let it dry out for the following week. If you want to continue forming or shaping you will need to double bag your work – put your work on a suitable sized bat and put the bat in a bag so the base of the bag is under the bat, then put another bag over the top of the work and tuck the top of the bag under the bat. If you want to trim (or turn) your thrown work the following week, it should also be double bagged. If your work is large, delicate, or of uneven thicknesses, you should lightly cover your work for drying. When considering the drying process, bare in mind the weather, humidity and wind! The hotter and dryer, the faster things dry and work can dry unevenly in the shelves – this can lead to cracking – another time to lightly cover your work for drying. Step Four – Trimming and Cleaning Up Your work is dry! It is called greenware now and it is at it’s most fragile! Handle everything with two hands. I often refer to soft hands – keep everything gentle and with your fingers spread as much as possible. Try to not pick up things like plates too much, and always with both hands! Before your work can be bisque fired it should be “cleaned up”. You work won’t go into the kiln if it has sharp edges – when glazed, sharp edges turn into razor blades! Use a piece of fly wire to rub the work all over – this will scratch a little so be light handed. Use a knife or metal kidney to scrape any areas that require a bit more dynamic treatment than the fly wire offers! Finally, a very light wipe over with a slightly damp sponge can help soften and soothe all of your edges and dags! Trimming thrown work: If you are planning to trim (or turn) your thrown work (and you should be), make sure you bag it well – your work should be leather hard to almost dry for easiest trimming. Use this step to finish the work completely – use a metal kidney to polish the surface, or a slightly damp sponge to give a freshly thrown look. Wipe the sponge around the rim after trimming, and check the inside of the pot for dags! Trimming slip cast work: Usually I will trim the rims of your work on the wheel the following day to make that stage easier, however you will still need to check your work for lumps and bumps. Last but not least – check that your name is still clearly on the bottom of your work. Step Five – Bisque Firing When the work is completely dry it can go into the bisque kiln. The bisque kiln is fired to 1000°C. This process burns off the water in the clay as well as some of the chemically bound water. The structure of the clay is not altered that much at this temperature. Inside the bisque kiln, the work is stacked a little, small bowl inside a larger bowl and onto a heavy plate. Smaller items like decorations or drink coasters might get stacked several high. Consideration is paid to the weight of the stack and shape of the work. A bisque kiln can fire about one and a half times the amount of work that the glaze kiln can fire. The firing takes about 10 hours to complete the cycle and about two days to cool down. Once it has been emptied the work is placed in the glaze room ready for you to decorate! Step Six – Glazing Decorating your work with colour can be a lot of fun – and time consuming! There are three main options for surface treatment at this stage: Oxide Washes Underglazes Glazes Washes and underglazes do not “glaze” the work – It will still need a layer of glaze to fully seal the clay (washes don’t need glaze on surfaces not designed for food or liquid as they can gloss up a little on their own). Underglazes are stable colourants that turn out pretty much how they look in the jar. They can be mixed with each other to form other colours and can be used like water colours to paint onto your work. Mostly they should have a clear glaze on top to seal them. Oxides are a different species – the pink oxide (cobalt) wash turns out bright blue for instance. They don’t always need a glaze on top, and some glazes can change the colour of the wash! The glazes need no other “glaze” on top! Be careful of unknown glaze interactions – you can put any combination of glaze in a bowl or on a plate, but only a single glaze on the outside of any vertical surface! Glazes are a chemical reaction under heat. We don’t know the exact chemicals in the Mayco glazes we use. I can guess by the way they interact with each other, however, on the whole, you need to test every idea you have, and not run the test on a vertical surface! Simply put, glaze is a layer of glass like substance that bonds with the clay underneath. Clay is made of silica, alumina and water. Glaze is made of mostly silica. Silica has a melting point of 1700°C and we fire to 1240°C. The silica requires a “flux” to help it melt at the lower temperature. Fluxes can be all sorts of chemicals – a common one is calcium – calcium has a melting point of 2500°C, however, together they both melt at a much lower temperature! Colourants are metal oxides like cobalt (blue), chrome (green through black), copper (green, blue, even red!), manganese (black, purple and pink) iron (red brown), etc. Different chemicals in the glaze can have dramatic effects. for example, barium carbonate (which we don’t use) turns manganese bright pink! Other elements can turn manganese dioxide brown, blue, purple and reddish brown. Manganese dioxide is a flux in and of itself as well. So, glazes that get their black and purple colours, often interact with other glazes and RUN! Our mirror black is a good example – it mixes really well with many glazes because it fluxes them – causes them to melt faster. It will also bring out many beautiful colours in the glazes because it’s black colouring most definitely comes from manganese dioxide! Glaze chemistry is a whole subject on it’s own! We use commercial Mayco glazes on purpose – for their huge range of colour possibilities, stability, cool interactions, artistic freedom with the ability to easily brush the glazes on and ease of use. We currently have almost 50 glazes on hand! A major project is to test the interactions of all glazes with each other. That is 2,500 test tiles!!!! I’m going to make the wall behind the wheels the feature wall of pretty colours! Step Seven – Glaze (Gloss or sometimes called “Glost”) Firing Most of the time this is the final stage of making your creation (but not always!) The glaze kiln goes to 1240°C. This is called cone 6, or midrange. It is the low end of stoneware temperatures. Stoneware clays and glazes are typically fired at cone 8 – 10, that is 1260 – 1290°C. The energy requirement to go from 1240°C to 1280°C is almost a 30% more! Our clay is formulated to vitrify (mature, turn “glass-like”) at 1240°, as are our glazes. A glaze kiln take around 12 hours to reach temperature and two to three days to cool down. Sometimes a third firing process is required – this is for decoration that is added to work after the glaze firing. For example – adding precious metals and lustres. this firing temperature is usually around 600 – 800°C depending upon the techniques being used. There are many students interested in gold and silver trims – we will be doing this third type of firing soon! After firing your work will be in the student finished work shelves. Remember to pay for it before you head out the door! There is a small extra charge for using porcelain clay (it’s more than twice the price of regular clay), and for any third firing process! Once your work has been fired it can not turn back into clay for millennia – so don’t fire it if you don’t like it! Put it in the bucket for recycling. https://firebirdstudios.com.au/the-process-of-making-pottery/ This bowl is an example of kitchenware used in the 19th century and still in use today.Bowl white ceramic plain that has two sets of edging around lip. Inside bowl has plaster designed to look like cooking mixture.flagstaff hill, warrnambool, shipwrecked-coast, flagstaff-hill, flagstaff-hill-maritime-museum, maritime-museum, shipwreck-coast, flagstaff-hill-maritime-village, kitchen equipment, ceramic -
 Flagstaff Hill Maritime Museum and Village
Domestic object - Bowl, J & G Meakin, Late 19th or early 20th Century
... mirror black is a good example – it mixes really well with many glazes because it fluxes them – causes them to melt faster. It will also bring out many beautiful colours in the glazes because it’s black colouring most definitely comes from manganese dioxide! Glaze chemistry is a whole subject on it’s own! We use commercial Mayco glazes on purpose – for their huge range of colour possibilities, stability, cool interactions, artistic freedom with the ability to easily brush the glazes on and ease of use. We currently have almost 50 glazes on hand...mirror black is a good example – it mixes really well with many glazes because it fluxes them – causes them to melt faster. It will also bring out many beautiful colours in the glazes because it’s black colouring most definitely comes from manganese dioxide! Glaze chemistry is a whole subject on it’s own! We use commercial Mayco glazes on purpose – for their huge range of colour possibilities, stability, cool interactions, artistic freedom with the ability to easily brush the glazes on and ease of use. We currently have almost 50 glazes on hand ...The Process of Making Pottery Decorating, Firing, Glazing, Making, Technical There is a rhythm and flow to clay. It can’t be done all at once! Even the making process! It can take weeks to get everything done, especially if you can only work on your pottery once a week! Even though we have three hour classes, it’s often just not enough time! Here is an overview of some of the processes so you have a bit more grasp on some of the technical stuff! Step One – Design There are SO many ideas out there for making stuff in clay! From delicate porcelain jewellery, through to heavy sculptural work and everything in between. Deciding your direction is sometimes not that easy – when you first start, try everything, you will naturally gravitate to the style that you enjoy! The options and variations are endless and can get a wee bit overwhelming too! Check in with me before you start to ensure your ideas will work, what order you might do things, how you could achieve the look you are seeking and any other technical data required! Step Two – Making Clay is thixotropic. This means that as you work with it, the clay first gets sloppier and wetter, before is begins to dry in the atmosphere. For most things, you simply can’t do all parts of the project at once. An example of work order might look like: Get last weeks work out from the shelves Prepare clay for today’s work – roll your clay, prepare balls for throwing, make the first stage of a pinch pot) Clean up last week’s work and put it on the shelf for bisque firing Check that you have any glazing to do – and do enough of it that you will have time to finish your main project Do the next step of your next project – there might be a further step that can’t be complete immediately, in that case, wrap your work well and put onto the shelves. Letting your work rest for a while can really help keep your work clean and professional looking. Many things require bagging under plastic to keep it ready for work the next week – put your name on the outside of the bag so you can find your work easily. We have stickers and markers. Consider how you want to decorate your work – coloured slip can be applied at a fairly wet stage (remembering that it will make your work even wetter!). Trying to apply slip to dry clay won’t work! If you want to do sgraffito – you will need to keep the work leather hard (a state of dryness where you can still work the clay with a little effort and a little water and care). Step Three – Drying Most of the time your work can go into the rack uncovered to let it dry out for the following week. If you want to continue forming or shaping you will need to double bag your work – put your work on a suitable sized bat and put the bat in a bag so the base of the bag is under the bat, then put another bag over the top of the work and tuck the top of the bag under the bat. If you want to trim (or turn) your thrown work the following week, it should also be double bagged. If your work is large, delicate, or of uneven thicknesses, you should lightly cover your work for drying. When considering the drying process, bare in mind the weather, humidity and wind! The hotter and dryer, the faster things dry and work can dry unevenly in the shelves – this can lead to cracking – another time to lightly cover your work for drying. Step Four – Trimming and Cleaning Up Your work is dry! It is called greenware now and it is at it’s most fragile! Handle everything with two hands. I often refer to soft hands – keep everything gentle and with your fingers spread as much as possible. Try to not pick up things like plates too much, and always with both hands! Before your work can be bisque fired it should be “cleaned up”. You work won’t go into the kiln if it has sharp edges – when glazed, sharp edges turn into razor blades! Use a piece of fly wire to rub the work all over – this will scratch a little so be light handed. Use a knife or metal kidney to scrape any areas that require a bit more dynamic treatment than the fly wire offers! Finally, a very light wipe over with a slightly damp sponge can help soften and soothe all of your edges and dags! Trimming thrown work: If you are planning to trim (or turn) your thrown work (and you should be), make sure you bag it well – your work should be leather hard to almost dry for easiest trimming. Use this step to finish the work completely – use a metal kidney to polish the surface, or a slightly damp sponge to give a freshly thrown look. Wipe the sponge around the rim after trimming, and check the inside of the pot for dags! Trimming slip cast work: Usually I will trim the rims of your work on the wheel the following day to make that stage easier, however you will still need to check your work for lumps and bumps. Last but not least – check that your name is still clearly on the bottom of your work. Step Five – Bisque Firing When the work is completely dry it can go into the bisque kiln. The bisque kiln is fired to 1000°C. This process burns off the water in the clay as well as some of the chemically bound water. The structure of the clay is not altered that much at this temperature. Inside the bisque kiln, the work is stacked a little, small bowl inside a larger bowl and onto a heavy plate. Smaller items like decorations or drink coasters might get stacked several high. Consideration is paid to the weight of the stack and shape of the work. A bisque kiln can fire about one and a half times the amount of work that the glaze kiln can fire. The firing takes about 10 hours to complete the cycle and about two days to cool down. Once it has been emptied the work is placed in the glaze room ready for you to decorate! Step Six – Glazing Decorating your work with colour can be a lot of fun – and time consuming! There are three main options for surface treatment at this stage: Oxide Washes Underglazes Glazes Washes and underglazes do not “glaze” the work – It will still need a layer of glaze to fully seal the clay (washes don’t need glaze on surfaces not designed for food or liquid as they can gloss up a little on their own). Underglazes are stable colourants that turn out pretty much how they look in the jar. They can be mixed with each other to form other colours and can be used like water colours to paint onto your work. Mostly they should have a clear glaze on top to seal them. Oxides are a different species – the pink oxide (cobalt) wash turns out bright blue for instance. They don’t always need a glaze on top, and some glazes can change the colour of the wash! The glazes need no other “glaze” on top! Be careful of unknown glaze interactions – you can put any combination of glaze in a bowl or on a plate, but only a single glaze on the outside of any vertical surface! Glazes are a chemical reaction under heat. We don’t know the exact chemicals in the Mayco glazes we use. I can guess by the way they interact with each other, however, on the whole, you need to test every idea you have, and not run the test on a vertical surface! Simply put, glaze is a layer of glass like substance that bonds with the clay underneath. Clay is made of silica, alumina and water. Glaze is made of mostly silica. Silica has a melting point of 1700°C and we fire to 1240°C. The silica requires a “flux” to help it melt at the lower temperature. Fluxes can be all sorts of chemicals – a common one is calcium – calcium has a melting point of 2500°C, however, together they both melt at a much lower temperature! Colourants are metal oxides like cobalt (blue), chrome (green through black), copper (green, blue, even red!), manganese (black, purple and pink) iron (red brown), etc. Different chemicals in the glaze can have dramatic effects. for example, barium carbonate (which we don’t use) turns manganese bright pink! Other elements can turn manganese dioxide brown, blue, purple and reddish brown. Manganese dioxide is a flux in and of itself as well. So, glazes that get their black and purple colours, often interact with other glazes and RUN! Our mirror black is a good example – it mixes really well with many glazes because it fluxes them – causes them to melt faster. It will also bring out many beautiful colours in the glazes because it’s black colouring most definitely comes from manganese dioxide! Glaze chemistry is a whole subject on it’s own! We use commercial Mayco glazes on purpose – for their huge range of colour possibilities, stability, cool interactions, artistic freedom with the ability to easily brush the glazes on and ease of use. We currently have almost 50 glazes on hand! A major project is to test the interactions of all glazes with each other. That is 2,500 test tiles!!!! I’m going to make the wall behind the wheels the feature wall of pretty colours! Step Seven – Glaze (Gloss or sometimes called “Glost”) Firing Most of the time this is the final stage of making your creation (but not always!) The glaze kiln goes to 1240°C. This is called cone 6, or midrange. It is the low end of stoneware temperatures. Stoneware clays and glazes are typically fired at cone 8 – 10, that is 1260 – 1290°C. The energy requirement to go from 1240°C to 1280°C is almost a 30% more! Our clay is formulated to vitrify (mature, turn “glass-like”) at 1240°, as are our glazes. A glaze kiln take around 12 hours to reach temperature and two to three days to cool down. Sometimes a third firing process is required – this is for decoration that is added to work after the glaze firing. For example – adding precious metals and lustres. this firing temperature is usually around 600 – 800°C depending upon the techniques being used. There are many students interested in gold and silver trims – we will be doing this third type of firing soon! After firing your work will be in the student finished work shelves. Remember to pay for it before you head out the door! There is a small extra charge for using porcelain clay (it’s more than twice the price of regular clay), and for any third firing process! Once your work has been fired it can not turn back into clay for millennia – so don’t fire it if you don’t like it! Put it in the bucket for recycling. https://firebirdstudios.com.au/the-process-of-making-pottery/This bowl was made by renowned pottery company J & G Meakin of England. The firm was established in the mid-1800's. The bowl is an example of kitchenware used in the 19th century and still in use today.Bowl; white ceramic, round and tapering inwards towards base. Made by J and G Meakin England.On base, 'Ironstone China Reg SOL 391413' with symbolflagstaff hill, flagstaff hill maritime museum and village, warrnambool, maritime museum, maritime village, great ocean road, shipwreck coast, mixing bowl, food preparation, j & g meakin, pottery, stoke-on-trent, kitchen equipment, ceramic -
 Federation University Historical Collection
Object, Citizen Watch Co. Ltd, Hand Held Television - small backlight unit, 1986
... mirror. With the change to digital signals this unit would not work without a settop box. Hand ...CITIZEN 06TA: One of the most common Handheld-TVs with a "Solar Projection System" - A mirror reflects the picture from the LCD for viewing. Shown with and without the optional backlight-unit 92TA. 65 mm passive matrix LCD (European versions: 130 * 160 = 20,800 dots, US version: 146 * 160 = 23,360 dots), 190 grams with 4 AAA-size batteries. (http://www.guenthoer.de/e-mini.htm) Small grey analogue television. When the unit is open the image is reflected by a mirror. With the change to digital signals this unit would not work without a settop box. Serial No. 8C6 88053\model No 06TA-OG DC 6V - 0.3W Batt. Supp: 15v x 4 -
 Ballarat Tramway Museum
Document, State Electricity Commission of Victoria (SECV), "Tram 34 Damaged (Claimable)"
... mirror, woodwork and paint damage, and two small steps taken off. It is not possible to determine the date of the accident from item 9155. Would have to work through the tram depot diaries. Yields information about an accident to tram 34. SECV Ballarat accidents tram 34 In red ink "AR/74 B22010/636" Hand ...Handwritten note about accident damage to tram 34 - damage to step board, motorman's step, staunchion, broken mirror, woodwork and paint damage, and two small steps taken off. It is not possible to determine the date of the accident from item 9155. Would have to work through the tram depot diaries.Yields information about an accident to tram 34.Hand written note on the back of a SEC roster sheet.In red ink "AR/74 B22010/636"secv, ballarat, accidents, tram 34 -
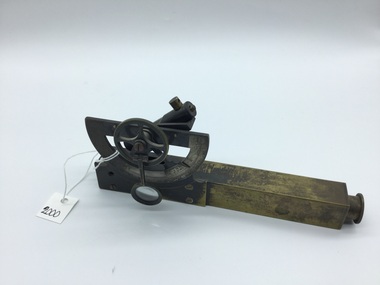 Myrtleford and District Historical Society
Inclinometer, Early 20th Century
... hand wheel. The height to be determined is sighted through the instrument eyepiece and the bubble tube is tilted until the bubble, viewed in the mirror inside the sighting tube, is brought level with the graticule sighted at the top of the subject object. ...hand wheel. The height to be determined is sighted through the instrument eyepiece and the bubble tube is tilted until the bubble, viewed in the mirror inside the sighting tube, is brought level with the graticule sighted at the top of the subject object. ...Provenance not clear. Leather case has 'MMBW' inscribed in black pen, indicating an association with Melbourne Metropolitan Board of Works. Item has been in the possession of Terry McCormack since 1972Hand held brass pocket inclonometer level, circa 1920. Leather case for safe storage. Semi circular graduated dial with 90 degree vernier scale with a small (20mm) magnifying glass to aid reading the vernier scale. Above the body, mounted at the rear of the graduated dial, is a spirit level tube which is tilted by finger movement to the milled hand wheel. The height to be determined is sighted through the instrument eyepiece and the bubble tube is tilted until the bubble, viewed in the mirror inside the sighting tube, is brought level with the graticule sighted at the top of the subject object. An angle is thus obtained and by measuring the distance on the ground to the object, trigonometry can be applied to determine the height of the object.Herga & Co. BRISBANE. Made in England -
 Ballarat Tramway Museum
Photograph - B&W print of donated negative - set of 2, John Webster, 1955
... Ballarat Tramway Museum South Gardens Reserve Wendouree Parade Ballarat Ballarat goldfields Yields information about Geelong Depot and tramcar No. 5 and its repainting with zebra stripes in 1955 tramways trams Geelong Tramcars tram 5 On left hand side of the negatives in ink is "EI 9" and "EI 10" Two Black and white digital print from scan of a donated negative showing Geelong No. 5 in the depot after it was repainted with strips. Also fitted with mirrors ...Yields information about Geelong Depot and tramcar No. 5 and its repainting with zebra stripes in 1955Two Black and white digital print from scan of a donated negative showing Geelong No. 5 in the depot after it was repainted with strips. Also fitted with mirrors. Shows the coupling arrangements. Photo by John Webster, 1955. See page 44 of Destination Eaglehawk for details. Black and White prints made from scan of negative. Original Negative stored with Negatives. Negative scanned at hi res 2/6/2020 and image updated.On left hand side of the negatives in ink is "EI 9" and "EI 10"tramways, trams, geelong, tramcars, tram 5 -
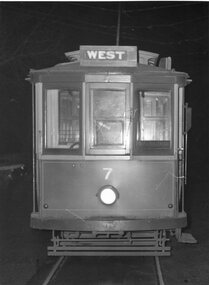
 Ballarat Tramway Museum
Photograph - SECV Geelong 1 turning out of Ryrie St, Wal Jack, 3/01/1945
... mirrors are yet to be fitted. Photo by Wal Jack. See also Reg Item 4395 for another copy of this photograph used by W. F. Scott. Printed on Ilford Paper. i1 - scan of print in the album i2 - rear of image i3 - scan of negative at 3200dpi added 27/6/2020. Yields information about Geelong tram No. 1 Trams tramways Geelong Ryrie St tram 1 On the rear in blue ink "SEC Geelong No. 1 to East, turning out of Ryrie St into Garden St 3rd January 1945" with Wal Jack copyright stamp in the top right hand corner and the number "T318" written in. ...Black and White print contained within the Wal Jack Bendigo and Geelong Album, see Reg Item 5003 for more details. Photo of Geelong No. 1 turning out of Ryrie St into Garden St 3rd January 1945, with destination of East. Tram has a green background pay-as-you-enter sign, windscreen wipers and mirrors are yet to be fitted. Photo by Wal Jack. See also Reg Item 4395 for another copy of this photograph used by W. F. Scott. Printed on Ilford Paper. i1 - scan of print in the album i2 - rear of image i3 - scan of negative at 3200dpi added 27/6/2020. Yields information about Geelong tram No. 1Black and white print and associated negative.On the rear in blue ink "SEC Geelong No. 1 to East, turning out of Ryrie St into Garden St 3rd January 1945" with Wal Jack copyright stamp in the top right hand corner and the number "T318" written in.trams, tramways, geelong, ryrie st, tram 1 -
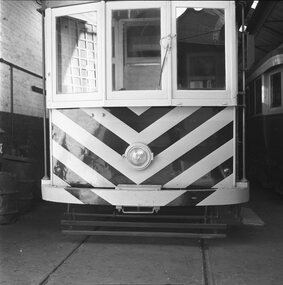
 Ballarat Tramway Museum
Photograph - Black & White Photograph/s - set of 3, W.C. Meyer and Photographer, 1955
... . - tram No. 4 1872i4 - close up of the mirror and light on the roof - right hand side of i2. Note all lights illuminated in the night photo. .... - tram No. 4 1872i4 - close up of the mirror and light on the roof - right hand side of i2. Note all lights illuminated in the night photo. ...Set of three photographs of Geelong single trams, one of the same type of tram (No. 7) prior to fitting with marker lights and No. 4 after fitting with marker lights, one during daylight and one at night. Three photographs taken by W.C. Meyer, Photographer, 333 Myers St. East Geelong, Phone 3289. Photo of one end of the tram only. Note top marker lights, not repeated on any other cars shown in photographs in Destination Eaglehawk. Shows as well, arrangements for tow bars, mirror and handrails. 1872.1 - Before fitting with additional lights, at night with 'flash' - showing destination 'West' - tram No. 7 1872.2 - after fitting with lights and stripes, during daylight - showing destination 'CITY' - tram No. 4 1872.3 - ditto at night, showing destination of 'CITY'. - tram No. 4 1872i4 - close up of the mirror and light on the roof - right hand side of i2. Note all lights illuminated in the night photo. Destination Eaglehawk, page 44, notes tram 4 as being fitted with dash canopy lighting and zebra stripes in 1955. No mention of No. 7 being so fitted. For date of photograph, assumed early 1955 at this time (14/11/2001) See Destination EaglehawkAll stamped with black ink stamp " W.C. Meyer, Photographer, 333 Myers St. East Geelong, Phone 3289" and on rear of photos in dark blue ink, handwriting, 1872.1 - Night - with 'flash' photo. 1872.2 - Daylight 1872.3 - Night - with 'flash' photo. This tram has supplementary lights trams, tramways, geelong, dash canopy lights, lights, mirrors, tram 7, tram 4 -
 City of Melbourne Libraries
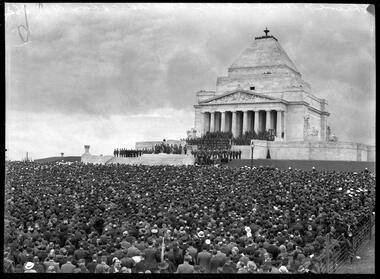
Photograph, Bull, Hugh Jones, 1897-1993, Shrine and multitude afield at opening dedication, Shrine of Remembrance
... In the same coverage, The Argus noted: “Women, unconscious probably of the fact that they were resorting to the principle of the periscope of the days of the war which had brought this vast assemblage together, turned their backs upon the scene the better to view it by looking into mirrors held high in one hand.” FRC Featured in "Newsworthy: Melbourne in photographs 1933-1936" exhibition at East Melbourne Library, October to December 2023. ...In the same coverage, The Argus noted: “Women, unconscious probably of the fact that they were resorting to the principle of the periscope of the days of the war which had brought this vast assemblage together, turned their backs upon the scene the better to view it by looking into mirrors held high in one hand.” FRC Featured in "Newsworthy: Melbourne in photographs 1933-1936" exhibition at East Melbourne Library, October to December 2023. ...On Armistice Day, 11 November 1934, an estimated third of Melbourne’s population, assembled for the Dedication Ceremony of the Shrine of Remembrance by Prince Henry, Duke of Gloucester. Featured in "Newsworthy: Melbourne in photographs 1933-1936" exhibition at East Melbourne Library, October to December 2023 Photographer notations on slide: "Shrine and multitude afield B62" Description: “Shrine and multitude afield” On Armistice Day, 11 November 1934, an estimated third of Melbourne’s population, assembled for the Dedication Ceremony of the Shrine of Remembrance by Prince Henry, Duke of Gloucester. The Argus reported the following day: “10,000 Pigeons Released. With whirring wings, 10,000 pigeons rose above the Shrine like a huge puff of smoke when they were released from the second balcony at 11.43am, after the ceremony of dedication. The pigeons had come from all parts of the metropolitan area and from places as far away as Shepparton, Broadford, and Trentham. They hovered above the Shrine for a moment or two, taking their bearings, and then flew away toward their homes. A boy at Burnley reported later that one of his pigeons had returned and entered its box two minutes after the liberation. The pigeons were assembled in metropolitan clubrooms of the Victorian Homing Pigeon Association on Saturday night, and transported in 75 panniers to the Shrine, carried up stairways, and placed in readiness on the balcony. A man remained in charge of them all night. In the early hours of the morning he had a busy time covering the panniers with a tarpaulin to protect the birds from the rain.” In the foreground can be seen three women standing with their backs to the Shrine, looking upwards. In the same coverage, The Argus noted: “Women, unconscious probably of the fact that they were resorting to the principle of the periscope of the days of the war which had brought this vast assemblage together, turned their backs upon the scene the better to view it by looking into mirrors held high in one hand.” FRC Featured in "Newsworthy: Melbourne in photographs 1933-1936" exhibition at East Melbourne Library, October to December 2023. Exhibition caption by project volunteer, Fiona Collyer. References: President Roosevelt's Tribute (1934, November 13). The Advertiser (Adelaide, SA : 1931 - 1954), p. 16. Retrieved November 8, 2024, from http://nla.gov.au/nla.news-article35018382 Here, There and Everywhere (1934, November 12). The Sun News-Pictorial (Melbourne, Vic. : 1922 - 1954; 1956), p. 7. Retrieved June 19, 2024, from http://nla.gov.au/nla.news-article277075769 DAY OF SOLEMNITY (1934, November 12). The Argus (Melbourne, Vic. : 1848 - 1957), p. 9. Retrieved November 8, 2024, from http://nla.gov.au/nla.news-article10992864Photographer notations on slide: "Shrine and multitude afield B62".shrine of remembrance, 1930-1939, ceremonies, world war 1, pigeons -
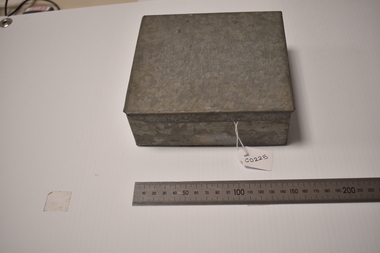 Tatura Irrigation & Wartime Camps Museum
Box - Tin, 1940 - 1946
... Hand made in camp. Corners soldered. Mirror in box (see C0226)...Hand made in camp. Corners soldered. Mirror in box (see C0226) Box - Tin Fritz Muller ...Made and used by POW in camp 13Tin box with detached lid used to store bathroom requisites. Hand made in camp. Corners soldered. Mirror in box (see C0226)camp 13, murchison, tin box, hygiene, pow -
 City of Ballarat
Artwork, other - Public Artwork - Temporary, George Goodnow, Mirror Maze by George Goodnow
... hand-drawn and digital processes) to adjust existing architecture, illuminating how spaces reflect, orientate and hold bodies. Recent work explores feelings of disorientation, binaries and queerness within suburban and urban landscapes. The artwork is of aesthetic significance to the people of Ballarat painted wall Mirror ...“The artwork speaks to the historical architecture of this area, while exploring the idea of changing understanding of space. Space is bent, bulged and repeated, in this painting, like a mirror maze. In this way, it will inspire playfulness, curiosity and thought, by transforming the way we observe, move through and engage with public space”Artist George Goodnow has installed their artwork on the Annex Wall in Alfred Deakin Place from 30th November 2021 - 1 November 2022. George is a multidisciplinary artist and curator currently living in Naarm (Melbourne). Their work for the Annexe Wall will feature a fictional architectural arrangement of the Police Lane site. George utilises painting (designed through hand-drawn and digital processes) to adjust existing architecture, illuminating how spaces reflect, orientate and hold bodies. Recent work explores feelings of disorientation, binaries and queerness within suburban and urban landscapes. painted wall -
Cobram Historical Society Inc
Large oval hand held mirror
... Large oval hand held mirror....Cobram Historical Society Inc Old School Punt Road Cobram the-murray Large oval yellow Bakelite mirror some loss of baking silver. Large oval hand held mirror. ...Large oval yellow Bakelite mirror some loss of baking silver. -
 National Wool Museum
Clothing - Dress, 1979
... hands and feet of the garment. In these bands is a wavy pattern of silver and black lines. There are multiple thick and thin lines of both the silver and black colours mirroring each other as the pattern stretches around the garment. ...hands and feet of the garment. In these bands is a wavy pattern of silver and black lines. There are multiple thick and thin lines of both the silver and black colours mirroring each other as the pattern stretches around the garment. ...This dress was created by Jean Inglis for a competition of garments hosted by the Geelong Handweavers and Spinners Guild at a ski weekend in 1979. It was entered in the ‘evening wear’ category of hand spun and knitted garments. The Warp was commercially brought 2/24 wool. The Weft was hand spun black Corriedale wool. This wool was brought at a sale in Geelong and was hand dyed and spun by Jean. The patter is a ‘Ripple’ variation of a ‘Crackle’ weave completed on Jean’s own Dobby Loom (pictured). Long black dress stretching from the feet, reaching up to a hood at the neckline and down to the hands in the sleeve. The dress is black with a glossy silver pattern in the form of a band around the hood, hands and feet of the garment. In these bands is a wavy pattern of silver and black lines. There are multiple thick and thin lines of both the silver and black colours mirroring each other as the pattern stretches around the garment. wool, weaving, hand spun, corriedale -
 Federation University Art Collection
Sculpture - Artwork, 'The More Bones the Better' by Yhonnie Scarce, 2016
... mirror, Scarce reflects and exposes the tragedies of Australia’s colonisation. She applies the technical rigours of traditional glass blowing techniques in an innovative and unconventional manner. In particular Scarce uses glass to explore the lives and histories of Aboriginal Australians. Hand...mirror, Scarce reflects and exposes the tragedies of Australia’s colonisation. She applies the technical rigours of traditional glass blowing techniques in an innovative and unconventional manner. In particular Scarce uses glass to explore the lives and histories of Aboriginal Australians. Hand ...Yhonnie SCARCE (1973- ) Born Woomera, South Australia Language group: Kokatha, Southern desert region and Nukunu, Spencer region Yhonnie Scarce works predominantly in glass. She majored in glass withing a Bachelor of Visual Arts (Honours) course at the South Australian School of Art, Adelaide, and holds a Master of Fine Arts from Monash University. One of the first contemporary Australian artists to explore the political and aesthetic power of glass, Scarce describes her work as ‘politically motivated and emotionally driven’. Scarce’s work often references the on-going effects of colonisation on Aboriginal people, In particular her research focus has explored the impact of the removal and relocation of Aboriginal people from their homelands and the forcible removal of Aboriginal children from their families. (https://thisisnofantasy.com/artist/yhonnie-scarce/, accessed 10 September 2018)Artist's Statement 'The More Bones the Better', 2016 Yhonnie Scarce was born in Woomera, SA and belongs to the Kokatha and Nukunu peoples. Scarce embraces a non traditional approach to glass blowing using glass as more than a mere material, acting as a lens and a mirror, Scarce reflects and exposes the tragedies of Australia’s colonisation. She applies the technical rigours of traditional glass blowing techniques in an innovative and unconventional manner. In particular Scarce uses glass to explore the lives and histories of Aboriginal Australians. Hand blown glass is shaped, engraved, painted and smashed to create indigenous fruits and vegetables such as bush bananas, bush plums and long yams symbolic of her peoples culture and traditions. With their elongated, torso-like shapes, they even evoke human bodies. Akin to a gatherer of bush food Scarce creates glass-gatherings of the persecuted. The repetition of brittle ambiguous bodies collected for experimentation and examination conjures the relentless impact of colonisation and the litany of abuses suffered by Aboriginal people. Within her research Scarce encountered a variety of ethnographic studies examining the use of scientific interventions amongst Indigenous cultures. These include Government sanctioned illegal drug testing of children in orphanages and other dubious medical practices amongst indigenous prison inmates. This work metaphorically looks at these situations and poses questions of what might have gone on in such a laboratory. The judge of the 2017 Guirguis New Art Prize (GNAP), Simon Maidment, Senior Curator, Contemporary Art, National Gallery of Victoria said; “The winning work by Yhonnie Scarce captures the sensitivity to materials she displays throughout her artistic practice. The blown and shattered glass elements are a delicate contrast to the shocking and little discussed histories of Aboriginal exploitation and abuse in the name of science in Australia. Engaging this topic, this work is haunting, in the same way those lived and documented experiences continue to haunt the collective unconscious of this country. Yhonnie Scarce’s work, The More Bones the Better 2016, I believe makes an important contribution to the Collection of Federation University Australia and will engage and move diverse audiences with its technical accomplishment, beauty and message. Yhonnie Scarce was born in Woomera SA and belongs to the Kokatha and Nukunu peoples. Scarce embraces a non-traditional approach to glass blowing using her medium as more than a mere material. Applying the technical rigours of traditional glass blowing in an innovative and unconventional manner, Scarce’s glass objects act as a lens and a mirror to reflect and expose the tragedies of Australia’s colonisation and, in particular, explore the lives and histories of Aboriginal Australians. Hand-blown glass is shaped, engraved, painted and smashed to represent indigenous fruits and vegetables such as bush bananas, bush plums and long yams, symbolic of Scarce’s people’s culture and traditions. While these elongated shapes on the one hand represent fruit and vegetables, gathered and grouped as in the gathering of bush food, Scarce’s torso-like bodies and forms are glass ‘gatherings’ representative of the gathering of people. Here, the many brittle bodies act as a metaphor for the collection, experimentation and examinations undertaken by government authorities on Aboriginal communities researched by Scarce. Exposing a variety of ethnographic studies, examining the use of scientific interventions on Indigenous cultures, Scarce also revealed Government sanctioned illegal drug testing of children in orphanages and other dubious medical practices undertaken on indigenous prison inmates. Scarce’s gatherings also reflect the impact of colonisation and the relentless conjuring and litany of abuses suffered by Aboriginal people. The More Bones the Better metaphorically looks at these situations and poses questions of what was undertaken and investigated in these laboratories. guirguis new art prize, yhonnie scarce, glass, aboriginal -
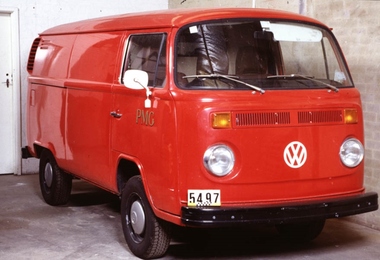 National Communication Museum
Vehicle - Van, Volkswagen, 1972
... It is not, however, in working order or in good condition; the body carries several areas of rust, rubber seals have suffered plasticiser migration, a mirror is missing and there are marks from use. The hand lettered “P.M.G.” inscription is indicative of a Postmaster General fleet vehicle, as is the red colour of the vehicle paint. ...This van was used in Western Australia by linesmen and for mail pickup between 1972 and 1991. When transferred to the collection, it was the very last surviving vehicle of its type owned by the company. Despite its age, the van is in excellent condition having been reconditioned in 1987.This Volkswagen Transporter, 2nd generation, is commonly known as a kombi van; named as such after the German word Kombinationskraftwagen, meaning multi-purpose vehicle. This van is believed to have been used by linesmen and for mail collection from 1972 to 1991 in Western Australia, before being donated to the, then, Telstra Collection. Conflicting accounts from John Moynihan, PMG Engineer and author, suggest the van was used by cable jointers from the 1960s. Owing to this unclear use, the van’s historical significance is low though provenance from the Postmaster General’s Department to Telecom, then Telstra, is established. In 1987, the vehicle was extensively reconditioned and some original parts were presumably replaced. It is not, however, in working order or in good condition; the body carries several areas of rust, rubber seals have suffered plasticiser migration, a mirror is missing and there are marks from use. The hand lettered “P.M.G.” inscription is indicative of a Postmaster General fleet vehicle, as is the red colour of the vehicle paint. Though it is in poor condition, the van’s aesthetic style is of some significance. The van is representative of the type of Volkswagen vehicle used by the Postmaster General’s Department and other private businesses and government branches of the era. The vehicle may, therefore, carry social significance for those that lived in this era, where their communication service provider travelled in a Volkswagen van. Indeed, Volkswagen vans were used into the Telecom era, as evidenced by an image (6681153) in the National Archives of Australia collection. While many of these vehicles may exist today, there are few to no examples which survive in museum collections. In 1966, the Post Office (Postmaster General’s Department) had the largest fleet in Australia, totalling nearly 11,000 vehicles (The Canberra Times, 29 September 1966, p. 34). Though in the late 1960s Volkswagen vehicles accounted for just over 500 of these vehicles, with the remainder represented by Ford, General Motors, Chrysler, and others, the multi-purpose nature of the van is significant as a metaphor for the multi-directional services of the Postmaster General’s Department. Archival images show a variety of models and adaptations including roof racks, bull bar and door configurations. Its conflicted history of use may in fact attest to the vehicles variety of application in the duties of the Postmaster General‘s Department.Red Volkswagen Kombi van with stencilled gold lettering on doors. Scratches on bumpers indicate duck-egg blue undercoat. Single sliding door on left side of vehicle body with secondary opening at rear with horizontally divided doors. Mirror missing on right front. Western Australia registration sticker in front windscreen..1: "PMG" .2: "ROYAL" .3-.4 "PMG" .5-.6: "MAIL" .7,.8: "ER" .9: "C OF A / ZEH 622"transport, kombi van, linesman van, postal van, postmaster general’s department -
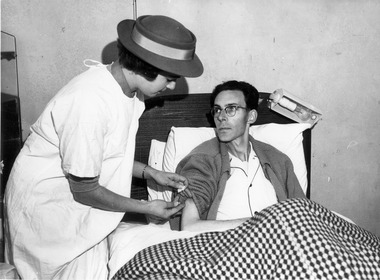 Royal District Nursing Service (now known as Bolton Clarke)
Photograph - Photograph, black and white, c.1956
... She has a glass syringe resting in her right hand with her thumb and forefinger resting against the lower glass and metal section of the syringe; part of the metal needle is seen, the rest is inserted in the mans upper arm. On the far left of the photograph part of a dressing table mirror...She has a glass syringe resting in her right hand with her thumb and forefinger resting against the lower glass and metal section of the syringe; part of the metal needle is seen, the rest is inserted in the mans upper arm. On the far left of the photograph part of a dressing table mirror ...This photograph is taken in the bedroom of the man's home in the suburbs of Melbourne. It depicts one of the types of nursing care given by Melbourne District Nursing Society (MDNS) Sisters in the community. The Sister is visiting the man's home and is administering an injection which has been ordered by a doctor. Glass syringes were used by the Society until the mid 1960s and were re sterilized for future use. After this time plastic disposable syringes were used.The Trained nurses of the Melbourne District Nursing Society (MDNS), later known as Royal District Nursing Service (RDNS), visited patients in their home and gave best practice care in many fields of nursing and to people of many cultures throughout its 130 years of expansion. Initial visits not only assessed the specific nursing situation but the situation as a whole. Their patients ranged in age from babes, children, adults to the elderly and referrals were taken from Hospitals, General Practitioners and allied Health facilities. Some of the care provided was: – Post-Natal care given to mother and babe, Wound Care following various types of surgery, accidents, burns, cancer, leg ulcers etc. Supervising and teaching Diabetic Care, including teaching and supervising people with Diabetes to administer their own Insulin, and administering Insulin to those unable to give their own injections. Administering other injections and setting up weekly medication boxes. The Sisters performed Catheterizations on adults suffering from conditions such as Quadriplegia, Paraplegia, Multiple Sclerosis (MS), Motor Neurone Disease (MND) and Guillan-Barre Syndrome, and when required at school on children for e.g. those with Spina Bifida. The Sisters visited those requiring Cystic Fibrosis support and care; those requiring Haemo-Oncology care, including visiting children at school; those requiring Home Enteral Feeding care, and those requiring IV therapy at home and home Dialysis. Palliative Care was given including pain relief with the use of syringe drivers, personal care as needed, and advice and support to both patient and family. RDNS provided Stoma management to those needing Urostomy, Ileostomy and Colostomy care and those requiring Continence care. HIV/AIDS nursing care was provided; visits to Homeless Persons were made. Personal care was given to patients ranging in age and with varying mobility problems, such as those with MS, MND, Guillan-Barre Syndrome, Quadriplegia, Paraplegia, Acquired Brain Injury, following a Cerebrovascular Accident (Stroke), those with severe Arthritis and those with a form of Dementia. When necessary the elderly were assisted with personal care and advice given on safety factors with the use of hand rails, bath or shower seats, and hand showers. Rehabilitation with an aim towards independence remained at the forefront of the Sister’s minds and when possible using aids and instruction on safe techniques enabled the person to become fully independent. All care included giving advice and support to the patient and their Carers. The Sisters liaised with the persons Doctor, Hospital and allied Health personal when necessary.On the left of this black and white photograph, is a Melbourne District Nursing Society Sister who is standing side-on and leaning slightly forward as she administers an injection into the right upper arm of a gentleman to her right who is sitting up in bed resting against two white covered pillows. The male patient has short dark hair; is wearing glasses, and is looking up at the Sister. He is wearing a thick grey cardigan over a pale colour pyjama top which has dark piping; the lower part of his body is covered by a dark and light coloured check bed cover. The bed has a solid wooden headrest with a bed lamp attached to its upper right. The Sister who is wearing her uniform grey brimmed hat over her dark short hair, is wearing a white gown over her grey uniform, the collar of which is seen. Three fingers of her left hand are holding back the pushed up sleeve of the man's cardigan and she is holding a white swab between her thumb and first finger. She has a glass syringe resting in her right hand with her thumb and forefinger resting against the lower glass and metal section of the syringe; part of the metal needle is seen, the rest is inserted in the mans upper arm. On the far left of the photograph part of a dressing table mirror can be seen.' Rough Proof' Latrobe Studios Ref No. 59134-8melbourne district nursing service, mdns, royal district nursing service, rdns, rdns - injection -
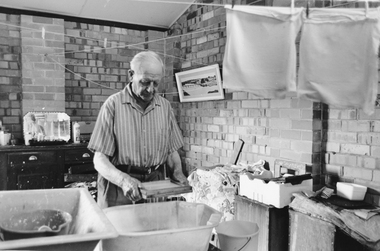 Stawell Historical Society Inc
Photograph, Grampians Community Health Centre photo of Rev David Fotheringham
... Background is brickwork, mirror on top of cupboard, painting on right hand wall and clothes line. ...Background is brickwork, mirror on top of cupboard, painting on right hand wall and clothes line. ...B/W copy from Grampians Community Health Centre Book Rev Fotheringham is wearing striped shirt and trousers with a belt. Holding a frame over a tub. Background is brickwork, mirror on top of cupboard, painting on right hand wall and clothes line. In foreground two pillow slips hanging onclothes line. Tea chests with items on top. -
 Geelong Gallery
Sculpture - Moonlight becomes you (silver fox), WEAVER, Louise, 2019
... ) fox: hand crocheted cotton, lamb�s wool synthetic yarns and reflective tape over high density foam, papier mache, wire, mirrored acrylic, cotton fabric and synthetic fabrics, synthetic polymer emulsion and glass beads; 2 5) various fibres; 6) base: enamel gloss paint on fibreglass...Geelong Gallery 55 Little Malop Street Geelong geelong-and-the-bellarine-peninsula ) fox: hand crocheted cotton, lamb�s wool synthetic yarns and reflective tape over high density foam, papier mache, wire, mirrored acrylic, cotton fabric and synthetic fabrics, synthetic polymer emulsion and glass beads; 2 5) various fibres; 6) base: enamel gloss paint on fibreglass Sculpture Moonlight becomes you (silver fox) WEAVER, Louise ...) fox: hand crocheted cotton, lamb�s wool synthetic yarns and reflective tape over high density foam, papier mache, wire, mirrored acrylic, cotton fabric and synthetic fabrics, synthetic polymer emulsion and glass beads; 2 5) various fibres; 6) base: enamel gloss paint on fibreglass -
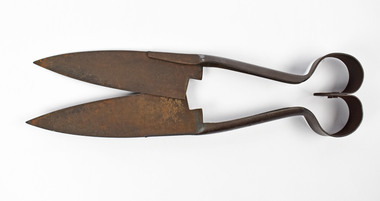 National Wool Museum
Shears, 1900-1980
... The shears are 14" N.1 Combination UTS hand shears made in Sheffield, England. Mirrored. Lettering: MADE IN ENGLAND / COMBINATION / UTS / SHEFFIELD / N. 1 A pair of metal blade shears. ...Shears belong to donor's father Maurice Dalton who was foreman of the show floor of the Dennys Lascekkes building until his retirement after 34 years at the building. Maurice used the shears in his work as a wool classer in rural Victoria and New South Wales. The shears are 14" N.1 Combination UTS hand shears made in Sheffield, England.A pair of metal blade shears. The blade is engraved with 'MADE IN ENGLAND / COMBINATION / U.T.S. / SHEFFIELD / N.1'. The ends of the two symmetrical grips loop around on themselves where they are riveted together to form a spring action.Mirrored. Lettering: MADE IN ENGLAND / COMBINATION / UTS / SHEFFIELD / N. 1 -
 Royal District Nursing Service (now known as Bolton Clarke)
Photograph - Photograph, black and white, 09 05 1967
... A typewriter is on the left hand side of the desk and a black telephone can be seen on a shelf adjacent to the desk, A framed rectangular mirror can be seen on the left hand side wall. ...A typewriter is on the left hand side of the desk and a black telephone can be seen on a shelf adjacent to the desk, A framed rectangular mirror can be seen on the left hand side wall. ...This Sister is working at the Control Centre at RDNS Headquarters, 452 St. Kilda Road, Melbourne where she is receiving a phone call which she will transfer to the appropriate staff member in Headquarters, or if appropriate pass the message onto an RDNS Centre to take action. Central Control was based in the Royal District Nursing Service (RDNS), Headquarters and the Sister working there took and directed all incoming telephone calls to persons in Headquarters or to the appropriate RDNS Centre. Each Centre contacted the Control Sister each morning for any messages received over night. She remained in contact with each RDNS Centre during the day, and in contact with Evening staff after each Centre was closed at 6 p.m. Evening staff contacted Central Control after completing their evening visits, and book work, so the Sister in Central Control knew they were safe and had completed their shift before leaving the RDNS premises. Of a weekend, when reduced staff numbers were working, the same procedure was carried out by the Sister working in each Center's office. In the centre of this black and white photograph is a Royal District Nursing Service, (RDNS), Sister, who wears glasses and has short curly hair, is wearing a watch on her left wrist and is wearing her grey short sleeved uniform with an RDNS cotton badge applied to the top of the sleeve. She is sitting behind a desk and is holding a telephone to her right ear; she has a pen in her left hand and is ready to write in an open white paged book. A typewriter is on the left hand side of the desk and a black telephone can be seen on a shelf adjacent to the desk, A framed rectangular mirror can be seen on the left hand side wall. A shelf, with several books on the left hand side, can be seen attached to the upper part of the wall behind the Sister. Below this a large chart is on the wall and a wooden shelf below itPhotographers Stamp. 'Quote No. GE 14rdns, royal district nursing service, rdns administration -
 Royal District Nursing Service (now known as Bolton Clarke)
Photograph - Photograph, black and white, Barry Sutton, 17.10.1973
... hands on the left and right sides of the safety belt across Mr. Stevenson's lap. The belt is attached to either side of the wheelchair. Sr. McHugh has straight blonde hair; only part of her face can be seen as she looks at Mr. Stevenson. She is wearing a white gown over her uniform. In the left background is part of a brick fireplace with wood mantelpiece. A patterned plate and dark items are on the left of the mantelpiece and flowers are seen on the right. Above this, part of a square mirror...hands on the left and right sides of the safety belt across Mr. Stevenson's lap. The belt is attached to either side of the wheelchair. Sr. McHugh has straight blonde hair; only part of her face can be seen as she looks at Mr. Stevenson. She is wearing a white gown over her uniform. In the left background is part of a brick fireplace with wood mantelpiece. A patterned plate and dark items are on the left of the mantelpiece and flowers are seen on the right. Above this, part of a square mirror ...RDNS Sr. Clare McHugh is attending Mr. Stevenson in his home to give him nursing care. She is about to fasten the wheelchair safety belt across Mr. Stevenson's lap to ensure he does not fall out of the wheelchair. The Trained nurses (Nurses) of the Melbourne District Nursing Society (MDNS), later known as Royal District Nursing Service (RDNS), visited patients in their home and gave best practice care in many fields of nursing, and to people of many cultures, throughout its 130 years of expansion. Initial visits not only assessed the specific nursing situation but the situation as a whole. The RDNS Trained nurses (Sisters) visited patients from many different cultural backgrounds, and Education was given to their Sisters to assist them when speaking with the patients and giving them care. Their patients ranged in age from babes, children, adults to the elderly and referrals were taken from Hospitals, General Practitioners and allied Health facilities. Some of the care the Sisters provided is as follows: – Post-Natal care given to mother and babe, Wound Care following various types of surgery, accidents, burns, cancer, leg ulcers etc. Supervising and teaching Diabetic Care, including teaching and supervising people with Diabetes to administer their own Insulin, and administering Insulin to those unable to give their own injections. Administering other injections and setting up weekly medication boxes. The Sisters performed Catheterizations on adults suffering from conditions such as Quadriplegia, Paraplegia, Multiple Sclerosis (MS), Motor Neurone Disease (MND) and Guillan-Barre Syndrome, and when required at school on children for e.g. those with Spina Bifida. The Sisters visited those requiring Cystic Fibrosis support and care; those requiring Haemo-Oncology care, including visiting children at school; those requiring Home Enteral Feeding care, and those requiring IV therapy at home and home Dialysis. Palliative Care was given including pain relief with the use of syringe drivers, personal care as needed, and advice and support to both patient and family. The Sisters provided Stoma management to those needing Urostomy, Ileostomy and Colostomy care and those requiring Continence care. HIV/AIDS nursing care was provided; visits to Homeless Persons were made. Personal care was given to patients ranging in age and with varying mobility problems, such as Amputees, those with MS, MND, Guillan-Barre Syndrome, Poliomyelitis, Quadriplegia, Paraplegia, Acquired Brain Injury, to those following a Cerebrovascular Accident (Stroke), those with severe Arthritis and those with a form of Dementia. When necessary the elderly were assisted with personal care and advice given on safety factors with the use of hand rails, bath or shower seats, and hand showers. Rehabilitation with an aim towards independence remained at the forefront of the Sister’s minds and when possible using aids and instruction on safe techniques enabled the person to become fully independent. All care included giving advice and support to the patient and their Carers. The Sisters liaised with the persons Doctor, Hospital and allied Health personal when necessary. In the centre of this black and white photograph is Mr. Stevenson, an elderly gentleman, who has balding light hair; is wearing dark rimmed glasses, and is wearing a black cardigan over a grey shirt. A small amount of his grey trousers can be seen. He is sitting in a wheelchair and is looking at the camera. He has a light coloured small blanket tucked under and over the stumps of his above the knee amputated legs. Standing behind his chair, and slightly to his left, is a lady who is wearing glasses; has wavy light grey hair and is wearing a dark grey cardigan over her light coloured patterned frock. Her right hand is seen holding the handle of the wheelchair, and she is looking down at Mr. Stevenson. To the right is Sister Clare McHugh of Royal District Nursing Service (RDNS), who is slightly bent as she has her hands on the left and right sides of the safety belt across Mr. Stevenson's lap. The belt is attached to either side of the wheelchair. Sr. McHugh has straight blonde hair; only part of her face can be seen as she looks at Mr. Stevenson. She is wearing a white gown over her uniform. In the left background is part of a brick fireplace with wood mantelpiece. A patterned plate and dark items are on the left of the mantelpiece and flowers are seen on the right. Above this, part of a square mirror can be seen. To the right, part of a lounge chair is seen and behind this, an open check curtain and part of a voile curtain is seen. The floor is covered with a light and dark patterned carpet.Barry Sutton LW 6 Namesroyal district nursing service, rdns, rdns nursing care, rdns physiotherapy, sister clare mchugh, mr stevenson -
 Parks Victoria - Point Hicks Lightstation
Lamp, Aldis
... Smaller hand held versions like the Point Hicks example have a concave mirror that is tilted to focus the light into pulse signals via a trigger. ...Smaller hand held versions like the Point Hicks example have a concave mirror that is tilted to focus the light into pulse signals via a trigger. ...This portable, hand held visual signalling lamp was used for optical communication via Morse code. It comprises the metal encased Aldis lamp with electrical cord and its associated green-painted, hinged wooden carrying case, which has a metal clasp and leather hand grip. Larger versions of these lamps are fixed on ships or pedestals and have shutters on the front that are opened and closed to transmit signals. Smaller hand held versions like the Point Hicks example have a concave mirror that is tilted to focus the light into pulse signals via a trigger. The lamps were pioneered by the British navy in the late nineteenth century and continue to be used to the present day.317 Details on the Point Hicks lamp include a serial number and other information. Another Aldis lamp and case remaining at Cape Nelson Lightstation dates to 1960 and has the initials of the Department of Transport, which at that time incorporated the Commonwealth Lighthouse Service. Wilsons Promontory also has an Aldis lamp and case that dates from around the same year. A lamp formerly at Cape Schanck has disappeared. The Aldis lamp and associated case at Point Hicks has first level contributory significance for its historic values and provenance to the lightstation. PHLS0007.1 Hand held signal light. Painted metal trigger with attached black electrical leads with battery terminals at end. Inscriptions on metal of lantern. PHLS0007.2 Hinged lid, wooden box painted army green to house signal light. Metal plate with inscription on front of box.PHLS0007.1 "D^D / LANTERN PORTABLE SIGNALLING / ADMIRALITY No 5110D / SERIAL No 5482 YEAR 943 / AMALGAMATED WIRELESS / A ASA LTD / 9792-100" •PHLS0007.2 "20 K4 transporting lantern / admirality pattern no 91108" -
 Melbourne Legacy
Document - Eulogy, A tribute to Legatee Frank Doolan
... mirrors . For this he was awarded the British Empire Medal. He was involved in the purchase of Legacy House in 1955 and also in the Lone Pine project in 1964. In a final story the speaker mentions Frank acquired a race horse called Tamwill from the estate of a mate. It gave him great pleasure for years and poignantly died the day before Frank passed away. The card sent as a thank you from the family includes hand...mirrors . For this he was awarded the British Empire Medal. He was involved in the purchase of Legacy House in 1955 and also in the Lone Pine project in 1964. In a final story the speaker mentions Frank acquired a race horse called Tamwill from the estate of a mate. It gave him great pleasure for years and poignantly died the day before Frank passed away. The card sent as a thank you from the family includes hand ...Information on the life of Legatee Frank Doolan from the memorial service held for him in 1988. Legatee Doolan was a very active Legatee, starting within the first year of Legacy when he was nominated by Bill Laver and Charles Copp in 1924. While he never sought 'office but he was always there - in the background - able and willing to actively serve'. In World War 1 he enlisted in November 1917 and served with 1st Division Signal Company and in France. After Armistice he attended a course for young AIF surveyors at the British Ordnance Headquarters at South Hampton. Famously it was Frank that proposed that the spirit of Legacy is service to the widows and children. "Here it received its soul. The thoughts transmitted to the Board by this quiet man." He was part of the Legacy team who worked enthusiastically for the establishment of the Shrine. It was his technical skill as a surveyor that enabled the ray of light to shine on the Stone of Remembrance at 11 am on 11th November. Also to solve the complication of daylight saving by positioning two mirrors . For this he was awarded the British Empire Medal. He was involved in the purchase of Legacy House in 1955 and also in the Lone Pine project in 1964. In a final story the speaker mentions Frank acquired a race horse called Tamwill from the estate of a mate. It gave him great pleasure for years and poignantly died the day before Frank passed away. The card sent as a thank you from the family includes hand written text to Wendy (Faulkner, staff member at Legacy) from Geoff Doolan, son of legatee Frank Doolan. The information was part of an album of past presidents from 1965 to 1989. The folder included biographical details and obituaries, eulogies and death notices of prominent Legatees. The items have been catalogued separately.Part of the collection of material held by Melbourne Legacy on Legatee Frank Doolan a prominent member of Legacy. The information was collected to record the lives of prominent legatees in a folder.Typed A4 document x 5 pages of the life of Legatee Frank Doolan. Pus a memorial card from the family.eulogy, frank doolan, ray of light, shrine of remembrance, lone pine