Showing 81 items
matching mccrae street bendigo
-
 Bendigo Historical Society Inc.
Newspaper - JENNY FOLEY COLLECTION: GUN SHOP
Bendigo Advertiser "The way we were" from 1999. Gun shop: John Rea, practical gunmaker, locksmith and importer in McCrae Street, nextto the Black Swan Hotel established 1865.newspaper, bendigo advertiser, the way we were -
 Bendigo Historical Society Inc.
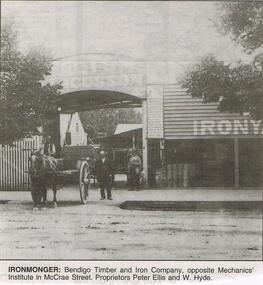
Newspaper - JENNY FOLEY COLLECTION: IRONMONGER
Bendigo Advertiser "The way we were" from 1999. Ironmonger: Bendigo Timber and Iron Company, opposite Mechanics Institute in McCrae Street. Proprietors Peter Ellis and W. Hydenewspaper, bendigo advertiser, the way we were -
 Bendigo Historical Society Inc.
Document - CONNELLY, TATCHELL, DUNLOP COLLECTION: MORTGAGE DOCUMENT ALBION THOMAS MILLER TO THOMAS LUXTON
Mortgage document and associated letters- mortgage dated 11th. January, 1889, number 3103. Mr. A.T. Miller to Mr. Thomas Luxton. Draft Mortgage to secure 500 pounds and interest. Mortgage crown grant allotment 16 Sec 97C Sandhurst delivered to Luxton 25/1/89. Albion Thomas Miller, McCrae Street, Sandhurst, was a produce dealer.cottage, miners, albion thomas miller, thomas luxton, mortgage, produce dealer, sandhurst. -
 Bendigo Historical Society Inc.
Document - CONNELLY, TATCHELL, DUNLOP COLLECTION: ACCOUNTS ESTATE OF ESTHER ISABELLE CANNING, 1893 - 1894
Document. Accounts Estate of Esther Isabelle Canning. 1 - 1894 - Ac from Mackay & Co, Bendigo Advertiser Office. 2 - 1893 - Ac from Transton Geo, Wholesale Tobacconist, Bath Buildings Bendigo. 3 - 1894 - City of Bendigo Rate Account to Gourlay, Mary Ann for property in High St. 4 - 1893 - Note from McKenzie Rosa stating she received from Canning two weeks wages from the Golden Age Hotel. Attached accounts from the Kent Brewery Co, Bendigo and Hunter Bros, MCCrae St Bendigo. 5 - 1894 - Receipt from Phoenix Fire Office of London, Victorian Branch. 60 Market Street Melbourne. Received from Storie H. Executors late E I Canning. 6 - 1894 - Account from Hinchcliffe Edwin, M. D. View St, Bendigo dated July 20th 1894. 7 - 1894 - Account from W Beebe & Son, Steam Granite, Marble & Stone Sawing Works. Mitchell St and Lyttleton Terrace for fixing headstone and re gilding old inscription etc. Dated Oct 1894. 8 - 1893 - Receipt from Phoenix Fire Office of London, Victorian Agency - Phoenix Chambers 52 Market St Melbourne dated Feb 2 and Feb 4 1893. 9 - 1894 - Ac from Hinchcliffe Edwin, M. D. View St Bendigo for professional attendance. Estate of the late Mrs Canning Golden Square, Golden Age Hotel, dated Jan 11th 1894 (document torn. 10 - Various receipts pinned together. 1893 - 1894 from City Brewery Company, High St, Bendigo, Ale and Porter Brewers Thros Canning, Golden Square. Also memorandum from Johnston & Illingworth?, City Brewery Co, Golden Square to solicitors requesting payment of accounts in the estate of the late Mrs Canning of Golden Square.cottage, miners, connelly, tatchell & dunlop, mackay & co, bendigo advertiser office, transton geo, city of bendigo, gourlay mary ann, mckenzie rosa, golden age hotel, kent brewery co, hunter bros, phoenix fire office of london, storie h, hinchcliffe edwin, w beebe & son -
 Bendigo Historical Society Inc.
Newspaper - NEWSPAPER ARTICLE 'BENDIGO'S CRADLE OF LEARNING '
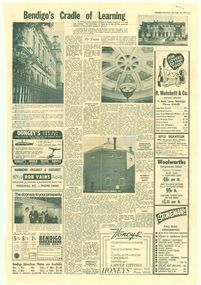
Bendigo Advertiser Sat 18.9.1971 Newspaper Article 'Bendigo's Cradle of Learning '-The Mechanics institute in McCrae St. / Prints of the photos used for the article and 3 negatives - 1) 1971 photo of the front school of Mines (+ Negative) / 2) Glass dome & chandelier of octagonal library ceiling (+ neg) / 3) The Mech Institute - late 1800's /4) Another ceiling photo / 5) back of octagonal library neg. 7509a Newspaper Article 7509b Glass Glober and Chandelair 7509c Glass Dome 7509d Front of School of Mines 7509e Another photo of the front of School of Mines 7509f School of Mines Library back viewnewspaper, bendigo advertiser, various articles -
 Ballarat Tramway Museum
Slide - 35mm slide/s - set of 17, Noel Simons, 20/11/1962 12:00:00 AM
Set of 17 transparencies taken on 20/11/1962 on Kodak mounts. 1187.1 - Bendigo No. 2 at the Quarry Hill terminus, showing destination of Quarry Hill. Has Cohns Drinks and Streets Ice Cream ads on dash panel, a SEC 'electric cooking' roof ad and another roof ad. Shows the Y terminus at this location, but tram standing just before it. Overhead in position. 1187.2 - as above, but closer up. 1187.3 - as above, but from the north side, showing cemetery in the background. 1187.4 - Bendigo No.3 at Eaglehawk terminus. Tram showing destination of Quarry Hill. Has the various buildings at Eaglehawk in the background including the Foodland store. Has Streets Ice cream and White Horse Whiskey ads on the dash panel. 1187.5 - Bendigo No. 18 at Garden Gully crossing loop, in bound, with destination of Eaglehawk. Passengers waiting for an Eaglehawk tram at the stop. Has a white horse whiskey ad on dash panel and SEC roof ads. Conductor standing in doorway looking out. 1187.6 - Bendigo No. 7 inbound in Nolan St. at cnr of McCrae St. showing destination of Golden Square. Has Streets Ice cream ad on dash panel and a Castrol Roof ad. 1187.7 - Bendigo No. 19 at the North Bendigo terminus with railway level crossing in background. Tram has a Cohns Drinks ad and an SEC 'Electric Cooking' roof ad. 1187.8 - Bendigo No. 2 at the Quarry Hill terminus, looking back into Bendigo, showing destination of Eaglehawk. 1187.9 - Bendigo No. 21 in McCrae St, near Nolan St outbound for North Bendigo. Photo taken after tram has passed photographer. 1187.10 - Bendigo Nos. 4 and 26 at Charing Cross in View St. with fountain alongside and the Beehive, Ezywalkin Buildings in the background. No. 26 has a Sandhurst Milk and SEC 'Electric Cooking' roof ad. 1187.11 - close up of 22E maximum traction truck and folded footstep. 1187.12 - Bendigo No. 19 at Charing Cross terminus, after tram has passed photographer, showing destination of North Bendigo, with the Beehive building in the background and passengers boarding tram. 1187.13 - Bendigo No. 11, turning from View St. into Pall Mall, showing Special with the conductor holding point bar. Has the Beehive and Ezywalkin Buildings in the background. 1187.14 - No. 7 at Charing Cross terminus, in Pall Mall, bound for Golden Square. Has the Beehive and Ezywalkin buildings in the background and passengers waiting at the tram stop. 1187.15 - No. 18 at the Charing Cross terminus, bound for Eaglehawk. Has the Beehive and Ezywalkin buildings in the background and passengers waiting at the tram stop. Also has the 'Safety Zone' sign in the photograph. 1187.16 - No. 2 at Quarry Hill terminus, night or dusk photo. Tram showing destination of Depot. 1187.17 - No. 26 at Charing Cross, night photo. Tram has destination of Quarry Hill, but is on the line for Eaglehawk. Photo looks along Mitchell St. Also shows Safety Zone sign. Information written on in black ink and date stamped on purple ink. 1187.1 - "No. 2 at Quarry Hill terminus Bendigo" 1187.2 - "No. 2 at Quarry Hill terminus Bendigo" 1187.3 - "No. 2 at Quarry Hill terminus Bendigo" 1187.4 - "No. 3 at Eaglehawk terminus" 1187.5 - "No. 18 in Mt Korong Road, Long Gully at cnr of Havilah Road (Eaglehawk Route)" 1187.6 - "No. 7 in Nolan St. Bendigo, at Cnr of McCrae St., near lake Weeroona, (North Bendigo Route)' 1187.7 - "No. 19 at North Bendigo terminus" 1187.8 - "No. 2 at Quarry Hill terminus" 1187.9 - "No. 21 in McCrae St. Bendigo, near Nolan St. (North Bendigo Route) 1187.10 - "4 and 26 at Alexandra Fountain, Charing Cross Bendigo" 1187.11 - "Truck of Bogie Car, Bendigo Tramways" 1187.12 - "No. 19 in Pall Mall at Charing Cross, Bendigo" 1187.13 - "Birney car No. 11 entering Pall Mall from View St. at Charing Cross Bendigo" 1187.14 - "No. 7 in Pall Mall at Charing Cross, Bendigo" 1187.15 - "No. 18 at Alexandra Fountain, Charing Cross, Bendigo" 1187.16 - "No. 2 at Quarry Hill terminus, Bendigo" 1187.17 - "No. 26 at Alexandra Fountain, Charing Cross, Bendigo" tramways, trams, bendigo, quarry hill, eaglehawk, north bendigo, maximum traction, night photo, tram 2, tram 3, tram 4, tram 7, tram 11, tram 18, tram 19, tram 21, tram 26 -
 Ballarat Tramway Museum
Slide - 35mm slide/s, Noel Simons, 21/11/1962 12:00:00 AM
Set of 17 transparencies taken on 21/11/1962 on Kodak mounts. 1188.1 - Bendigo No. 11 at Depot Junction McCrae and Arnold St. with driver/conductor changing points. 1188.2 - Bendigo No. 4 at Charing Cross, side on photo, with City Club Hotel and Alexandra Fountain in the background. Tram has Castrol and SEC 'Electric Cooking' ads. 1188.3 - Bendigo No. 4 climbing View St. after tram has passed photographer. Tram has Streets Ice Cream and Cohns Soft Drinks ad on rear dash panel. In the background are the buildings in View St., including the Princess Theatre. Tram has destination of Eaglehawk. 1188.4 - Trams 2 and 4 crossing at the California Gully or Thorpe St Loop. 1188.5 - Bendigo 4 in Mt Korong Road. Tram inbound with destination of Quarry Hill, just leaving Garden Gully Loop. 1188.6 - Bendigo 4 and 17 crossing at the Hayes St. or Iron Bark Gully Loop. No. 17 bound for Eaglehawk, No. 4, Quarry Hill. 17 has two SEC roof ads and a white horse whiskey ad. 1188.7 - No. 17 bound for Eaglehawk, soon after leaving California Gully. Has large mullock heap in background. 1188.8 - Bendigo 2 and 17 crossing at the Thorpe St. or California Gully Loop. Has butchers shop in background. 1188.9 - Bendigo 17 at the Eaglehawk terminus. Has destination of Quarry Hill. In background is the hotel and shops at the terminus, showing ads for "Melbourne Bitter". Tram has two SEC 'Electric Cooking' ads. Driver and conductor about to assist two lady passengers with a pram and baby. 1188.10 - No. 17 at Eaglehawk terminus, awaiting departure. Has Eaglehawk Town Hall and Post Office in background. Tram has a Whitehorse Whiskey ad on the front dash panel. 1188.11 - No. 3 in High St. Eaglehawk, with destination of Eaglehawk. Has the shops on the south side of High St. in the background, including the Eaglehawk fish shop. Tram has two roof ads, one an SEC roof ad, and Cohns Drinks and Streets Ice cream ads on front dash panel. 1188.12 - as above, but after tram has passed photographer. Note the centre of the road poles. 1188.13 - No. 2 outbound for Eaglehawk at the intersection of Mt. Korong Road and the Calder Highway. Photo taken after the tram has passed the photographer. Has an Ampol service station in the background. 1188.14 - No. 11 leaving the Bendigo depot, crossing the bridge, with the Scrubber car in the background. 1188.15 - No. 21 at the North Bendigo terminus. Tram has destination of Golden Square and Cohns drink ad on front dash and two roof ads on side. 1188.16 - No. 11 on Golden Square route, in High St. at intersection with Old High St. 1188.17 - No. 11 at the Golden Square terminus, conductor turning the pole. Hotel on the left side of the photo. Note the road works barrier and red flag behind the tram. Slide has an end of roll mark on the right hand side of the image.Information written on in black ink and date stamped on purple ink. 1188.1 - "Birney car No. 11 in McCrae St. at Cnr of Arnold about to run into depot, Bendigo" 1188.2 - "No. 4 at Alexandra Fountain, Charing Cross Bendigo" 1188.3 - "No. 4 climbing the View St. Hill from Charing Cross, Bendigo (Eaglehawk Route)" 1188.4 - "No. 4 and 2 at Thorpe St. Loop, California Gully" 1188.5 - "No. 4 in Mt Korong Rd., Long Gully, Near Havilah Rd. (Bendigo) (Eaglehawk Route)" 1188.6 - "Nos. 17 and 4 crossing on Hayes St. Loop, Ironbark, Bendigo" 1188.7 - "No. 17 soon after leaving California Gully (Eaglehawk Route)" 1188.8 - "No.2 and 17 crossing on Thorpe St. Loop, California Gully (Eaglehawk Route)" 1188.9 - "No. 17 at Eaglehawk terminus" 1188.10 - "No. 17 at Eaglehawk terminus" 1188.11 - "No. 3 in High St. Eaglehawk" 1188.12 - "No. 3 nearing Eaglehawk terminus" 1188.13 - "No. 2 in Mt. Korong Rd., Ironbark. Calder highway on left (Eaglehawk route) 1188.14 - "Birney car No. 11 leaving Bendigo depot. Scrubber car at rear" 1188.15 - "No. 21 at North Bendigo Terminus" 1188.16 - "Birney car No. 11 in High St. Bendigo at intersection with Old High Street (Golden Square Route)" 1188.17 - "Birney Car No. 11 at Golden Square terminus, High St., Bendigo". tramways, trams, bendigo, depot junction, charing cross, view st., eaglehawk, north bendigo, golden square, tram 2, tram 3, tram 4, tram 11, tram 17, tram 21, tram scrubber -
 Ballarat Tramway Museum
Slide - 35mm slide/s - set of 32, Noel Simons, 25/02/1971 12:00:00 AM
Set of 31 transparencies taken on 25/2/1972 on Kodak mounts. 1201.1 - Bendigo No. 26 in Bond St. just after leaving Long Gully en route for Quarry Hill. Has Norris Supermarket in background. Has two SEC roof ads. 1201.2 - No. 26 climbing View St. from Charing Cross en route to Eaglehawk. Has ANZ bank and AMOCO service station in background. 1201.3 - as for 1201.3, but after tram has passed photographer. Has buildings west of Mackenzie St. in photograph. 1201.4 - Tram stop and centre of the road pole with two "CARS STOP BY REQUEST" signs mounted on pole at the corner of Mackenzie St. 1201.5 - same position as for 1201.3, but with No. 5 descending the street. 1201.6 - same position as for 1201.2, but with No. 5 descending the street. Photo taken after tram has passed photographer. 1201.7 - No. 7 in Nolan St. from across the park at Lake Weeroona. 1201.8 - No. 7 entering McCrae St from Nolan St. - distant view. Note "TRAM "sign on left hand side under tree and overhead in McCrae St. from former track that once was in this street. 1201.9 - No. 7 in High St. with Cathedral in background. Tram en route to North Bendigo. Note scaffolding around Cathedral main spire area. 1201.10 - No. 7 crossing Bendigo Creek bridge in High St. near Golden Square. Has a Caltex Service station in the background. 1201.11 - No. 7 at Golden Square terminus with Sunburst Fruit Juices and a Peters Ice cream delivery vans alongside. 1201.12 - as for 1201.11 but photo taken from behind tram, with the end of the rails in the photograph. 1201.13 - No. 7 and 21 in Pall Mall at Charing Cross with No. 5 in the background. Taken some distance away from the location. 1201.14 - No. 7 at Golden Square terminus, taken a short distance from the tram terminus. Shows Milk Bar on right hand side and the hotel on the left hand side. Taken from the south side of the roadway. 1201.15 - as from 1201.14 but taken from the north side of the roadway. 1201.16 - No 5 waiting at California Gully loop. Distant photo showing surrounds 1201.17 - No. 5 en route for Quarry Hill crossing No. 26 at California Gully. 1201.18 - No. 26 at Eaglehawk terminus with Eaglehawk Town Hall and Post Office in background. 1201.19 - No. 21 arriving at Charing Cross en route to North Bendigo. Has Alexandra Fountain in the background, ANZ bank RACV building, and other buildings on the north side of Pall Mall or Nolan St. 1201.20 - No. 26 en route for Quarry Hill at Charing Cross, with crew standing by front door. Has Colonial Mutual life building, Armstrong Tyre Service (Firestone) and a sign for Cohns Drinks in the background. 1201.21 - as for 1201.20 but with No. 5 en route to Eaglehawk now in photograph. 1201.22 - No. 26 at Quarry Hill terminus. 1201.23 - No. 26 at Quarry Hill terminus, view of front portion of tram only from a gate at the Bendigo cemetery. 1201.24 - Track at the end of the Quarry Hill line showing the point blades of the former "Y" terminus and the overhead for this. 1201.25 - No. 2 at the Quarry Hill terminus, looking along the former Trackwork. 1201.26 - as for 1201.25 1201.27 - number not used. 1201.28 - Golden Square terminus from some distance from the actual terminus, showing the Warning sign "TRAM" for motorists from the south. No. 7 at the terminus. 1201.29 - No. 7 passing through the Golden Square shopping centre. Numerous cars and pedestrians. Tram en route for North Bendigo. 1201.30 - No. 7 in High St. Golden Square, en route for North Bendigo. Photo taken after tram has passed photographer. 1201.31 - No. 7 in High St. just past Wattle St. with the Cathedral in the background. Tram has two SEC roof ads good side on photo, 'Everything's fine in my all electric kitchen' and 'Electrical cooking - clean, quick, economical'. 1201.32 - No. 7 in High St. nearing Wattle St. Has Cathedral in the background. Photo taken after tram has passed photographer.Information written on in black ink and date stamped on purple ink. 1201.1 - "No. 26 in Bond St just after leaving Long Gully" 1201.2 - "No. 26 climbing View St. from Charing Cross" 1201.3 - "No. 26 ascending View St. from Charing Cross (At Mackenzie St.)" 1201.4 - "View St. & Mackenzie St." 1201.5 - "No. 5 in View St. near Mackenzie St." 1201.6 - "No. 5 in View St. nearing Charing Cross." 1201.7 - "No. 7 in Nolan St. seen from Lake Weeroona Park." 1201.8 - "No. 7 entering McRae St. from Nolan St. Note "TRAM" warning sign on left. 1201.9 - "No. 7 in High St. passing Short St." 1201.10 - "No. 7 crossing Bendigo Creek bridge in High St. near Golden Square." 1201.11 - "No. 7 at Golden Square terminus" 1201.12 - "No. 7 at Golden Square terminus" 1201.13 - "No 7, 21 and 5 at Charing Cross" 1201.14 - "No. 7 at Golden Square terminus" 1201.15 - "No. 7 at Golden Square terminus" 1201.16 - "No 5 waiting at California Gully loop." 1201.17 - "Nos. 5 and 26 crossing at California Gully loop" 1201.18 - "No. 26 at Eaglehawk terminus" 1201.19 - "No. 21 arriving at Charing Cross from Golden Square" 1201.20 - "No. 26 at Charing Cross" 1201.21 - "Nos. 5 and 26 at Charing Cross." 1201.22 - "No. 26 at Quarry Hill terminus" 1201.23 - "No. 26 at Quarry Hill terminus seen through the gates of the Bendigo Cemetery." 1201.24 - "Quarry Hill terminus showing remains for former double track layout abandoned before 1964." 1201.25 - "No. 2 at Quarry Hill terminus" 1201.26 - "No. 2 at Quarry Hill terminus" 1201.28 - "The Southern approach to Golden Square with No. 7 standing at the terminus, "TRAM" warning sign on the left. 1201.29 - "No. 7 passing through Golden Square Shopping Centre" 1201.30 - "No. 7 in High St. Golden Square" 1201.31 - "No. 7 in High St. passing Wattle St." 1201.32 - "No. 7 in High St. nearing Wattle St."tramways, trams, bendigo, bond st., view st., nolan st., high st., eaglehawk, california gully, charing cross, quarry hill, trackwork, tram 2, tram 5, tram 7, tram 21, tram 26 -
 Bendigo Historical Society Inc.
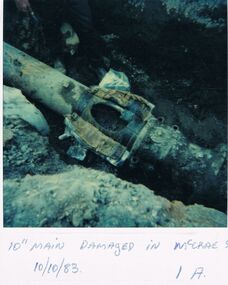
Photograph - CASTLEMAINE GAS COMPANY COLLECTION: PHOTO MAIN PIPE, 10/10/1983
10'' Main Pipe Damaged in McCrae Street 10/10/1983Polaroidorganisation, industry, gas and fuel, 10'' main pipe damaged in mccrae street 10/10/1983 -
 Bendigo Historical Society Inc.
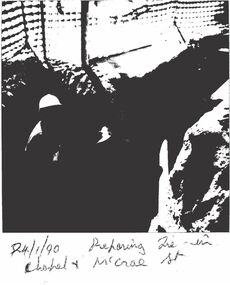
Photograph - CASTLEMAINE GAS COMPANY COLLECTION: PHOTO CHAPEL STREET, 24/01/1990
Preparing Tie in Chapel and McCrae Streets - 24/01/1990Polaroidorganisation, industry, gas and fuel -
 Bendigo Historical Society Inc.
Document - The Mechanics Institute and Its Successors - Technical Education in Bendigo, 2/11/2023
The Mechanics Institute movement began in Scotland in the early 1800's with the goal of providing classes for the working classes. In 1854 a group was formed in Bendigo to establish a Mechanics Institute. By 1856 the first permanent building was established in McCrae Street and included a free library. Initially it provided classes in drawing, arithmetic and book-keeping. The MI supported the establishment of a School of Design in 1871. A separate School of Mines began classes in 1873 initially using the MI building. In 1904 the School of Mines took over the MI including the library and developed further into what is now Bendigo TAFE.A 5 page document on the history of modern technical education and the Bendigo Mechanics Institutebendigo mechanical insitute, history, bendigo tafe -
 Bendigo Historical Society Inc.
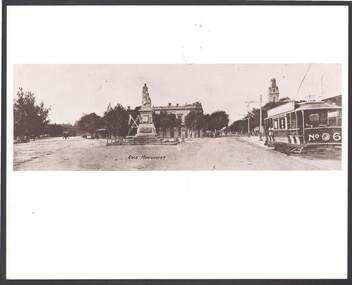
Photograph - JOHN JONES COLLECTION: GOLD MONUMENT
Photo with a brown tinge of the Gold Monument next to the Black Swan Hotel in McCrae Street. Street surface looks like gravel. There are horse drawn vehicles in the picture and on the right side of the photo is a tram with No. 6 painted on the back. Behind the statue is a poppet leg structure and a row of trees around the Hotel.bendigo, streetscape, general street views, john jones collection - gold monument, black swan hotel -
 Bendigo Historical Society Inc.
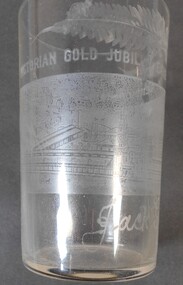
Memorabilia - Victorian Gold Jubilee Glass
The Victorian Gold Jubilee Exhibition, held at Bendigo from 13 November 1901 to 14 May 1902. The courts were numbered from one, or had titles like “Machinery”, “Agricultural”, “Naval & Military Court” and “Art”. The female visitors to the Exhibition were able to view exhibits deemed suitable for the fairer sex and located within their own “Women’s Court”. There were exhibits such as “Parasols & Umbrellas”, cotton and haberdashery from Manchester and Staffordshire, “Corsets & Embroideries” from Paris. The most valuable exhibits were mining machinery such as Taylor Horsfield’s £850 “Air Compressor & Rock Borer”. “Bohemian Glassware” brought down from Sydney was valued at £600. The profits from this Exhibition were used to fund the sculpture known as the Gold Monument, which still gazes along Pall Mall (from the McCrae Street end). The Exhibition’s Cash Book shows payments, which totalled £1160, were made to then up and coming sculptor C.D.Richardson. Recently a City of Greater Bendigo staff member used both these volumes to write a detailed report about this monument, for Heritage Victoria.Etched Drinking Glass to commemorate Victorian Gold Jubilee Exhibition Bendigo 1901-2 Decorated with a scene of Bendigo and fern fronds.Victorian Gold Jubilee Exhibition Bendigo 1901-2 Jack Gordonvictorian gold jubilee exhibition bendigo, 1901-2, jack gordon, bendigo -
 Bendigo Historical Society Inc.
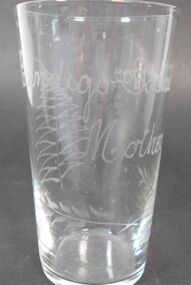
Memorabilia - Bendigo Exhibition Glass
The Victorian Gold Jubilee Exhibition, held at Bendigo from 13 November 1901 to 14 May 1902. The courts were numbered from one, or had titles like “Machinery”, “Agricultural”, “Naval & Military Court” and “Art”. The female visitors to the Exhibition were able to view exhibits deemed suitable for the fairer sex and located within their own “Women’s Court”. There were exhibits such as “Parasols & Umbrellas”, cotton and haberdashery from Manchester and Staffordshire, “Corsets & Embroideries” from Paris. The most valuable exhibits were mining machinery such as Taylor Horsfield’s £850 “Air Compressor & Rock Borer”. “Bohemian Glassware” brought down from Sydney was valued at £600. The profits from this Exhibition were used to fund the sculpture known as the Gold Monument, which still gazes along Pall Mall (from the McCrae Street end). The Exhibition’s Cash Book shows payments, which totalled £1160, were made to then up and coming sculptor C.D.Richardson. Recently a City of Greater Bendigo staff member used both these volumes to write a detailed report about this monument, for Heritage Victoria.Etched drinking glass. Bendigo Exhibition 1902 - Mother - Etched on front - Fern frond etched on back.Mother 1902, etched glass, bendigo exhibition 1902 -
 Bendigo Historical Society Inc.
Newspaper - JENNY FOLEY COLLECTION: SMILES
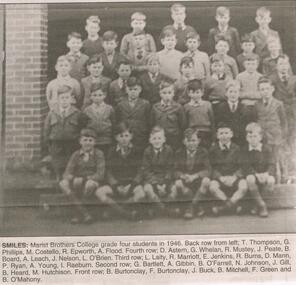
The Marist Brothers arrived in Bendigo in 1893 and began classes for boys in makeshift classrooms at St Killians. By the next year they had moved to a permanent school in McCrae Street. In 1983 Marist amalgamated with St Mary's to form a co-educational school, "Catholic College.Bendigo Advertiser ''The way we were'' from 2003. Smiles: Marist Brothers College grade four students in 1946. Back row from left: T. Thompson, G. Phillips, M. Costello, R. Epworth, A. Flood. Fourth row: D. Astern, G. Whelan, R. Mustey, J. Peate, B. Board, A. Leach, J. Nelson, L. O'Brien. Third row: L. Laity, R. Marriott, E. Jenkins, R. Burns, D. Mann, P. Ryan, A. Young, I. Raeburn. Second row: G. Bartlett, A. Gibbin, B. O'Farrell, N. Johnson, J. Gill, B. Heard, M. Hutchinson. Front row: B. Burtonclay, F Burtonclay, J. Buck, B. Mitchell, F. Green and B. O'Mahony. The clip is in a folder.newspaper, bendigo advertiser, the way we were -
 Bendigo Historical Society Inc.
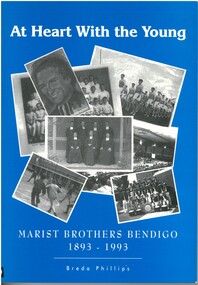
Book - AT HEART WITH THE YOUNG - MARIST BROTHERS BENDIGO 1893 - 1993, 1993
The Marist Brothers arrived in Bendigo in 1893 and began classes for boys in makeshift classrooms at St Killians. By the next year they had moved to a permanent school in McCrae Street. In 1983 Marist amalgamated with St Mary's to form a co-educational school, "Catholic College.Softcover book. Blue with white printing on cover and assorted black and white photographs of school groups and teachers. Contains 159 pages with contents and a listing of all Marist Brothers who were at the Bendigo campus, black and white photos and commentary summarising the history of the Marist Brothers in Bendigo.Breda Phillipseducation, bendigo, la trobe university bendigo campus -
 Bendigo Historical Society Inc.
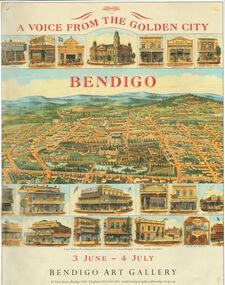
Document - BENDIGO ART GALLERY A VOICE FROM THE GOLDEN CITY EXHIBITION 2001, 1877
Chromolithograph Sandhurst in detail 1877 by Francis Williams Niven. View Point icons including George S. Bissett Draper, Clothing & Millinery, Manning & Co. Drapers, Milliners and Tailors; Pall Mall icons Bent Photographers, W. Lunn Painter and Decorator, J.B. Edwards Watchmakers, John Ingram Hatter and Lyceum Mutual Store & Co; High Street icons T.J. Connelly & Co. Ironmongers; McCrae Street icons Rea & Co Locksmiths and Gun Makers; Williamson Street icons Albert Bush Groicer and Tea Merchant; Bridge Street icons Cohn Brothers Soft Drink and Confectionery; Mitchell Street icons, MA Palk & Co Mourning Attire.Francis Williams Niven, Sandhurst.bendigo, history, mid to late 19th century bendigo -
 Bendigo Historical Society Inc.
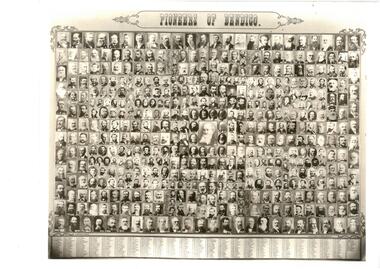
Photograph - PIONEERS OF BENDIGO
BHS CollectionPhoto of Pioneers of Bendigo (copy or original). Men's photos are numbered with corresponding name on bottom of image. A large photograph was issued from the studio of Mr. H. Hanson, of McCrae street, to the order of Mr. R. Walker of Melbourne. The original Photograph is owned by Sandhurst Trustees Bendigo. It has six additional photographs attached. There are 472 photographs of pioneers of Bendigo. The earliest of these arrived in 1851 and most of them by 1860. The great majority, however, were pioneers from 1851 to 1856. Many hundreds of other pioneers during this period are not included in the picture.bendigo, history, pioneers of bendigo -
 Bendigo Historical Society Inc.
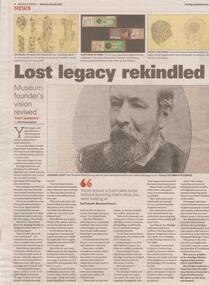
Newspaper - The Case for a Museum at Bendigo TAFE, Sat May 08 2021
Paul Howard MacGillivray was an international scientist who called Bendigo home. Bendigo historians are buiding the case to turn the McCrae Street's heritage listed TAFE building into a museum.Bendigo Weekly Story entitled 'Lost legacy rekindled' - one page article and four photos on the work of Paul Howard MacGillivray.school of mines, potential for museum, bendigo tafe, paul howard macgillivray -
 Bendigo Historical Society Inc.
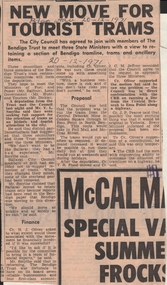
Newspaper - BENDIGO ADVERTISER DECEMBER 20, 1971 NEWSPAPER ARTICLE ''NEW MOVE FOR TOURIST TRAMS'', 20/12/1971
... in North Bendigo taking in Pall Mall and McCrae Streets. Newspaper ...BENDIGO ADVERTISER DECEMBER 20, 1971, NEWSPAPER ARTICLE ''NEW MOVE FOR TOURIST TRAMS''. (Local Ministers:) Minister of Fuel and Power Mr. Balfour, Local Government Minister Mr. Hunt, Minister for Tourism Mr. Dickie. Councilors T.R. Flood, J.C.M. Jeffrey, N.J. Oliver, J.P. Pearce, Mr. V.L. Smythe. Proposal of the time run tourist trams from Central Deborah Mine through to Emu Point in North Bendigo taking in Pall Mall and McCrae Streets.bendigo, newspapers, bendigo advertiser tourist trams -
 Bendigo Historical Society Inc.
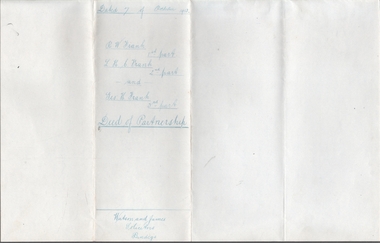
Legal record - FRANK BROS - Grocers, Watson, James & Rogers, Rogers Collection, 07.10.1913
In the early 1980s the firm of Watson, James & Rogers merged with the partnership of Every & Every and became the iconic “Rogers & Every” as known today. The firm is still located on Bull Street. https://rogersevery.com.au/about/1. Deed of Partnership 2. Certificate of Registration 3. Registration of fire arms letter Grocers trading as Frank Bros. 59 McCrae St. Bendigo FRANK, Robert William FRANK, Louis Henry Christian FRANK, George HansenSignaturesfrank bros., grocers