Showing 1293 items
matching museum construction
-
 The Beechworth Burke Museum
Textile - Banner, c1872
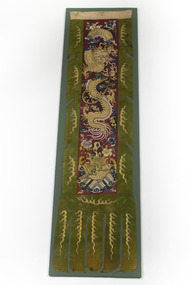
This banner was one of five banners gifted to the Beechworth Chinese community in recognition of their support of the Hospital and Benevolent Asylum in 1875, from the Carnival Committee. These banners had been purchased in China by a social envoy from Beechworth then presented to the Chinese community during the Beechworth Fine Arts Exhibition in May of that same year, by Donald Fiddes, President of the Ovens District Hospital. The Burke Museum's Chinese Collection presents the history of Chinese settlement in Beechworth from 1856 and its involvement in local community affairs in the second half of the 19th century. In settling in the area they formed their own community with distinctive Chinese cultural traditions, forming their own 'camps' with laid out streets, housing a Temple, Chinese Theatre and restaurants, hotels, stores, gambling houses and dwellings. Members of the Chinese community took an active interest in town affairs and were generous donors to the appeal to build the Ovens District Hospital in 1856/7. The vibrant colours and dynamic graphics of the silk embroidered Chinese banners were a highlight of Beechworth Charitable processions that took place in the main street. Two of the Chinese banners were conserved for the Burke Museum in 2006 by Carol Campbell of Phoenix Conservation Services with funding from Victoria’s Heritage Grants. In 2015, with the enormous support of the Copland Foundation and fundraising activities by the Friends of the Bur Museum Committee, conservation of the third banner was undertaken by Artlab Australia in Adelaide. The banners display traditional Chinese textile techniques and are visually beautiful and very rare and are considered of local and national significance, with the potential to be deemed internationally significant.Multi panelled banner with embroidery and applied design motifs on front. The front panels have been constructed using strips of various weaves and colours of silk that have been embroidered or had a design applied prior to the overall construction of the piece. The embroidery is predominantly gold work with both plyed and floss silk threads. beechworth, burke museum, chinese, benevolent asylum, ovens district hospital, beechworth carnival processions, carnival, processions, beechworth chinese community, beechworth fine arts exhibition, donald fiddes -
 The Beechworth Burke Museum
Geological specimen - Dolomite
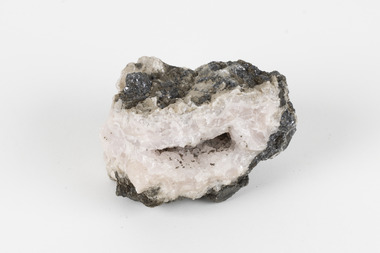
Dolomite is a mineral, calcium magnesium carbonate, with the chemical formula CaMg(CO3)2. It is a principle component of various rock types sometimes also referred to as dolomite, including dolostone, dolomitic marble and dolomitic limestone (according to the composition of each type). Dolomite rock is found in sedimentary basins throughout the world, comprising approximately 2% of the Earth's crust. It is formed when lime mud or limestone encounters groundwater containing magnesium. Dolomite can contain elements such as lead, zinc and copper. Dolomite and limestone are used in various construction, landscaping and agricultural processes. This specimen was donated to the Burke Museum in 1868 by Alfred Selwyn as part of the Geological Survey of Victoria. It was donated to the Museum in 1868. Victoria and other regions of Australia were surveyed for sites of potential mineral wealth throughout the 19th Century. The identification of sites containing valuable commodities such as gold, iron ore and gemstones in a locality had the potential to shape the development and history of communities and industries in the area. The discovery of gold in Victoria, for instance, had a significant influence on the development of the area now known as 'the goldfields', including Beechworth; the city of Melbourne and Victoria as a whole. Dolomite and limestone are mined at several locations in Victoria, including sites in the North-East of the state in Bindi and Limestone Creek. There are notable dolomite deposits in most Australian states. The dolomitised form of the mineral tends to come from older limestone deposits, formed during the palaeozoic era in marine settings, so this specimen may have come from a deposit located along a coastline in Victoria or another state. The specimen is significant as an example of surveying activity undertaken to assess and direct the development of the mineral resource industries in Victoria and Australia, as well as the movement to expand human knowledge of earth sciences such as mineralogy and geology in the nineteenth century. This specimen is part of a larger collection of geological and mineral specimens collected from around Australia (and some parts of the world) and donated to the Burke Museum between 1868-1880. A large percentage of these specimens were collected in Victoria as part of the Geological Survey of Victoria that begun in 1852 (in response to the Gold Rush) to study and map the geology of Victoria. Collecting geological specimens was an important part of mapping and understanding the scientific makeup of the earth. Many of these specimens were sent to research and collecting organisations across Australia, including the Burke Museum, to educate and encourage further study.Hand-sized piece of pale pink dolomite (calcium magnesium carbonate) with dark grey rim and hollowed centre. geological specimen, geology, geology collection, burke museum, beechworth, dolomite, mineralogy, geological survey, alfred selwyn, limestone, calcium magnesium carbonate -
 The Beechworth Burke Museum
Photograph - Lantern Slide, c1900
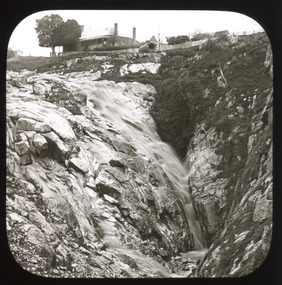
This image shows the gorge adjacent to Beechworth in approximately 1900. Although the exact location of the photograph is yet to be determined, the present-day Beechworth Gorge Walk includes views of the Cascades at the point at which Spring Creek flows into the valley on the level below. Gold-sluicing techniques in use in the town during periods of active gold extraction may have altered the landscape since the photograph was taken, however. In the 1850s a mill was built at the top of the Spring Creek falls by Russian-born Louis Chevalier, brother of artist Nicholas Chevalier. The mill supplied the town with lumber that supported the town's initial construction boom. Lantern slides, sometimes called 'magic lantern' slides, are glass plates on which an image has been secured for the purpose of projection. Glass slides were etched or hand-painted for this purpose from the Eighteenth Century but the process became more popular and accessible to the public with the development of photographic-emulsion slides used with a 'Magic Lantern' device in the mid-Nineteenth Century. Photographic lantern slides comprise a double-negative emulsion layer (forming a positive image) between thin glass plates that are bound together. A number of processes existed to form and bind the emulsion layer to the base plate, including the albumen, wet plate collodion, gelatine dry plate and woodburytype techniques. Lantern slides and magic lantern technologies are seen as foundational precursors to the development of modern photography and film-making techniques.This glass slide is significant because it provides insight into Beechworth's built environment and natural landscape in the early Twentieth Century, around the time of Australia's Federation. It is also an example of an early photographic and film-making technology in use in regional Victoria in the time period.Thin translucent sheet of glass with a square image printed on the front and framed in a black backing. It is held together by metals strips to secure the edges of the slide.burke museum, beechworth, lantern slide, slide, glass slide, plate, burke museum collection, photograph, monochrome, indigo shire, north-east victoria, spring creek falls, beechworth gorge, louis chevalier, nicholas chevalier, lumber industry, timber industry, 1850s, construction, building, mill, mills, waterfall -
 Orbost & District Historical Society
book, The Bridge, 1930's
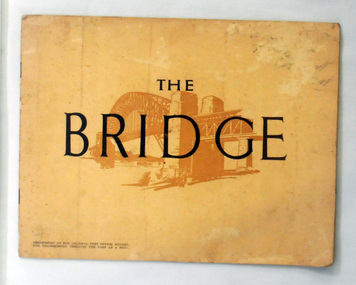
This book was written by Dr J. J. C. Bradfield, (John Job Crew), 1867-1943. Dr JJC Bradfield was a visionary Australian engineer who worked with enormous energy and vision to build the infrastructure which he foresaw that Sydney would need as it grew. As early as 1903 Bradfield was making the case for the Sydney Harbour Bridge, in his presidential address as President of the Sydney University Engineering Society. Bradfield’s proposal — at that stage for a cantilever bridge between Dawes Point and Milsons Point — won the committee’s support and they recommended it be accepted. However, the First World War put a stop to these plans. While a bill to authorise the project passed the lower house of the NSW parliament in 1916, it failed to pass the upper house, on the grounds that funds should not be diverted from the war effort. With the war over, in 1922 the Sydney Harbour Bridge Act was passed by the NSW Parliament. The Sydney Harbour Bridge was officially opened in 1932 after Museum and St James railway stations were built. This book was written from the story broadcast by Dr. J.J.C. Bradfield. This item is a useful reference tool.A staple soft cover 16 pp booklet with a buff coloured cover. It has a sketch of the Sydney Harbour Bridge behind the title "The Bridge" in dark brown print. It contains information and photographs of the history and construction of Sydney Harbour Bridge.sydney-harbour-bridge bradfield-dr-j-j-c -
 The Beechworth Burke Museum
Photograph - Photograph - Reproduction, ca. 1900
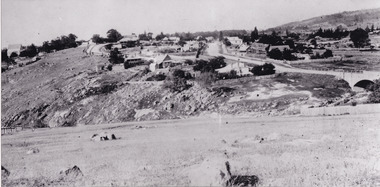
This image shows the approach to Beechworth from the south-west via the Newtown Bridge. Numerous early buildings line the road as it bifurcates to become Ford and High Streets on the ridge above Spring Creek and Newtown Falls. The sloping, rocky terrain and water course along the gorge show evidence of the intense mining activity that occurred at the site. The Ovens Gold Rush at Beechworth started when gold was found at Spring Creek in February 1852, prompting an influx of miners from around the world. The population grew over 20,000 by 1857. While the earliest mining at Beechworth was similar to that in other Victorian goldfields like Ballarat and Bendigo, Beechworth is notable for its use of hydraulic sluicing as a major method of removing wash-dirt. Hydraulic sluicing employs high pressure jets of water to blast away large areas of earth and wash it down to be run through a sluice box. Gold gets caught in the sluice and the remaining slurry is washed away. This method of mining is extremely effective but causes significant environmental impacts and damage to waterways. Large water quantities were required for large-scale sluicing, and the long water races and deep tailraces that were constructed in the Beechworth area in the nineteenth century are nonetheless considered feats of engineering. The site in the photograph is associated with the Rocky Mountain Mining Company who constructed an eight hundred meter tunnel under the township between 1876-1880 to reduce water levels at Spring Creek, which had been subject to diversions since the earliest days of alluvial mining. Over four million ounces of gold (115 tones) were found at Beechworth between 1852 and 1868, and the wealth from the gold rushes built Beechworth and the nationally significant buildings that remain standing today.This image shows the early development of the Beechworth township above Spring Creek, where gold was discovered in 1852. Evidence of hydraulic sluicing, a uniquely predominant method at Beechworth, and water-works engineering are present in the landscape. By the 1870s, alluvial gold deposits were depleted and increasingly complex engineering was required so deeper shafts could reach bedrock. This image is significant for understanding changes to the landscape and the evolution of mining methods and engineering practices related to the extensive construction, manipulation and management of water networks. The shift from smaller scale alluvial mining to larger company dominance in the mining industry has implications for understanding wider social, economic, political and industrial changes in the region of Beechworth and within the context of the Victorian Gold Rush more broadly. A black and white rectangular reproduction photograph printed on photographic paper. burke museum, beechworth museum, beechworth, gold fields, gold rush, victorian gold rush, hydraulic sluicing, rocky mountain mining company, spring creek, netwown falls, mining tunnels, water races, tailraces, colonial australia, australian gold rushes, mining technology, beechworth historic district, indigo gold trail, migration, indigo shire, gold mining, gold mining history -
 The Beechworth Burke Museum
Photograph - Photograph - Reproduction
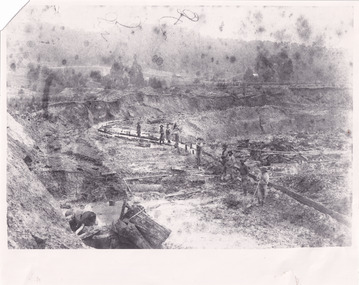
This photograph depicts mining operations within the Beechworth area, in an unidentified valley where sluicing was utilised as a method for extracting gold from the environment. After gold was discovered in the region in 1851, sluicing became a characteristic of gold mining in the region - "Ovens miners carved intricate networks of races" throughout the region - involved the diversion of water in many channels, or water races, which contained inbuilt 'ripple devices' designed to trap gold for later extraction. By 1871, 900 miles of water races had been cut into the Beechworth Mining District. As suggested by the numerous figures involved in labouring along the water race, sluicing was a source of considerable employment within the region. This image is of important historical significance for its ability to convey information about sluicing and the methods used to find gold in the 1850s, and provides clues as to how sluicing and the widespread construction of water ranges changed the environment of the region. This image is important for current research into the history of the Ovens region in Victoria, which played such a prominent role in the early Australian gold mining industry. Therefore, this image has the capacity to be beneficial for research into society and the motivations of those living and working in this region during this period and therefore, has social significance. The Beechworth Burke Museum has additional images relating to gold sluicing and and the mining activities in the area more generally, which can be analysed and studied alongside images like this one.A black and white rectangular photograph printed on matte photographic paperbeechworth, mining, miners, labour, water race, sluicing -
 The Beechworth Burke Museum
Photograph, 1920-1950
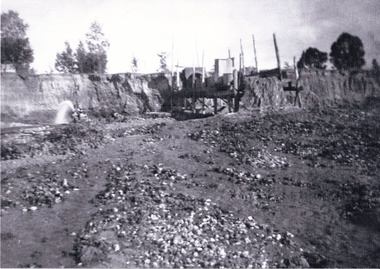
This image taken between 1920-1930 depicts open-cut hydraulic sluicing at the Three Mile Mine, located about five kilometres south of Beechworth. Alluvial, or surface, mining began on this site in the 1850s, but was soon replaced by hydraulic sluicing methods. By the start of 1880 it is estimated that nine hundred miles of water races had been cut though soil and rock in the Beechworth district. Hydraulic sluicing employs high pressure jets of water to blast away large areas of earth and wash it down to be run through a sluice box. Gold gets caught in the sluice and the remaining slurry is washed away. Large water quantities were required for hydraulic sluicing, and the long water races and deep tailraces that were constructed were considered great engineering feats. This method of mining is extremely effective, but causes significant environmental damage and impacts to waterways and agricultural operations. Miners at Beechworth built extensive networks of races and dams to secure reliable supplies of water on a scale far greater than elsewhere in Victoria. By the 1880s Beechworth's water barons continued to hold more than half of all the water right licences on issue and undertook sluicing operations on a massive scale. The manipulation of surface and ground water via race networks was well planned and recorded in detail by local mining surveyors. The maps that were created, combined with modern geo-spatial technologies, provide a vital key in understanding the great lengths to which miners went to capture and control critical water resources. Today, Three Mile mine is called Baarmutha. The Three Mile Mine was unproductive until 1865 when John Pund and three other miners secured a fifteen year license and constructed a water race from Upper Nine Mile Creek to Three Mile Creek. In the early twentieth century Pund & Co. averaged over one thousand ounces of gold per year from the mine. After Pund's death in 1915, GSG Amalgamated Co operated the site, continuing sluicing until 1950. This image of hydraulic sluicing methods shows the extent of water-works engineering in the landscape. This photograph has historic and research potential for understanding changes to the landscape, the evolution of mining methods, and the extensive construction, manipulation and management of water networks in the Beechworth district. Black and white rectangular photograph on matte paperReverse: 7597-1 / Sluice Mining / Copied from original on loan from Webb (Qld) / Donated Nov 2009 / Baarmutha Three Mile Mine c1920-1950 / Managed by the Plain Bros then Parkinsons / Current Location is: Beechworth Animal Shelter / used for Baarmuthaburke museum, beechworth museum, beechworth, gold fields, gold rush, victorian gold rush, hydraulic sluicing, spring creek, netwown falls, mining tunnels, water races, tailraces, gold ming history, colonial australia, australian gold rushes, mining technology, beechworth historic district, indigo gold trail, indigo shire, john pund, water manipulation, water engineering, three mile creek, three mile mine, water race, large-scale mining methods, historical mining construction, alluvial mining, mining environmental impacts, baarmutha, water barons -
 The Beechworth Burke Museum
Photograph - Photograph Reproduction, 1998
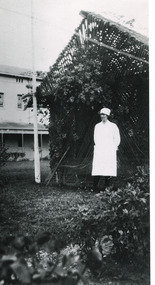
The photograph, created in 1998, is a copy of the original one, depicting a nurse in uniform at the Mental Hospital in Beechworth, with a fern house behind her. In the background, the two-storey building is in view, along with the covered walkway. The institution had to operate with serious shortage of female nurses for long periods of time. During the 1880s, small houses (cottages) were built to offer accommodation for the nurses living in the hospital and in 1937 began the construction of a nurses` hostel. In 1962 the upper level of the Nurses` Home was converted into a Nurses` Training School. The Mayday Hills Hospital was constructed between 1864 and 1867, with buildings created in a number of periods. It formally opened on 24 October 1867 and, along with the Ovens Hospital and the Benevolent Asylum, made Beechworth a prominent social welfare centre in Victoria. The need for an institution of this kind was arisen due to the increased number of people with mental disturbances (induced by the harsh living conditions on the goldfields) and the remoteness of the district from Melbourne. The two-storey buildings, designed in Italianate style, and the three-storey towers at the front, were influenced by the asylum at Colney Hatch in England. Large masses of granite were excavated for its foundation and around 250 workmen were employed for its construction. The building, divided into six sections, was comprised of dormitories, doctors` rooms and plenty ancillary rooms and facilities, such as laundries, reading rooms, a concert hall and cooking areas. The site was chosen for its panoramic view of the countryside, the hilltop atmosphere and the native fauna, all contributing to the cure of patients. The Hospital was originally named the “Ovens Lunatic Asylum” but, during the centenary celebrations in 1967, the name was officially changed to “Mayday Hills Hospital”, showing the gradual shift in the perception and understanding of mental health conditions over the last decades. The Hospital lies on the traditional land of the Kulin Nation.This photograph is historically significant as it provides an insight into the everyday life of staff living within the walls of the Mayday Hills Hospital. It also offers important information about the location and the exterior of the Hospital and contributes to the understanding of the district`s development and its importance to the course of Victoria`s history.Black and white rectangular photograph printed on paper unframed.Reverse: 3445/mental hospital, beechworth, fern house, female nurses, nurses` home, nurses` training school, nurses` hostel, mayday hills hospital, ovens hospital, colney hatch, two-storey buildings, italianate style, benevolent asylum, ovens lunatic asylum, kulin nation, workmen, covered walkway, granite, hilltop atmosphere, mental health -
 The Beechworth Burke Museum
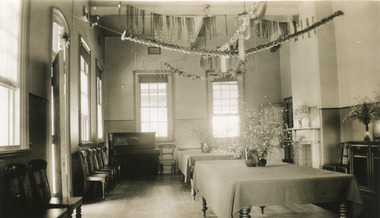
Photograph, L. Maher, 1936
Mayday Hills Mental Hospital was originally constructed in 1864 under the name of the Beechworth Lunatic Asylum. It was built for locals in need of help who were kept in the local gaol. In its first decade, the residents of the hospital were used as menial labourers but over time, as mental healthcare progressed, were cared for in more nuanced ways. This site became a training hospital for nurses in the 1960's. Eventually, mental health patients were moved to other care facilities and Mayday Hills was operating as a geriatric care facility. It was closed in 1995, after which the buildings and their grounds were purchased to La Trobe University to be used as a campus. The university sold the site in 2011 to private ownership. The image depicts an interior room which is presumed to be a dining or common room. This space has been decorated for Christmas.Mayday Hills Mental Hospital is a historically significant site for many factors. It is representative of healthcare practice in nineteenth century Victoria. It contains rare examples of construction and architecture. It is also significant for aesthetic and technical reasons. Black and white rectangular photograph printed on photographic paperObverse: PRINTED BY/ L.MAHER/ BEECHWORTH/ 1997.2702mayday, mayday hills hospital, mayday hills, mayday hills mental asylum, beechworth lunatic asylum, lunatic asylum, beechworth, gaol, beechworth hospital for the insane, beechworth mental hospital, mental hospital, hospital, nurse, nurses quarters, la trobe university, training facility, christmas, christmas party -
 The Beechworth Burke Museum
Photograph, 1880 - 1900
Mayday Hills Mental Hospital was originally constructed in 1864 under the name of the Beechworth Lunatic Asylum. It was built for locals in need of help who were kept in the local gaol. In its first decade, the residents of the hospital were used as menial labourers but over time, as mental healthcare progressed, were cared for in more nuanced ways. This site became a training hospital for nurses in the 1960's. Eventually, mental health patients were moved to other care facilities and Mayday Hills was operating as a geriatric care facility. It was closed in 1995, after which the buildings and their grounds were purchased to La Trobe University to be used as a campus. The university sold the site in 2011 to private ownership. This image depicts people enjoying the grounds and gardens.Mayday Hills Mental Hospital is a historically significant site for many factors. It is representative of healthcare practice in nineteenth century Victoria. It contains rare examples of construction and architecture. It is also significant for aesthetic and technical reasons.Black and white photograph printed on matte photographic paperReverse: at the Beechworth Lunatic Asylum/ (wade)/ do not copy - copy for Burke Museum/ for collection only only/ BMM 8326mayday, mayday hills hospital, mayday hills, mayday hills mental asylum, beechworth asylum, beechworth lunatic asylum, beechworth mental hospital, beechworth institution, healthcare, mental health, nurses quarters, nurses, gaol, garden, garden party -
 The Beechworth Burke Museum
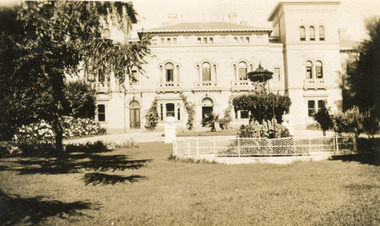
Photograph, 1930
Mayday Hills Mental Hospital was originally constructed in 1864 under the name of the Beechworth Lunatic Asylum. It was built for locals in need of help who were kept in the local gaol. In its first decade, the residents of the hospital were used as menial labourers but over time, as mental healthcare progressed, were cared for in more nuanced ways. This site became a training hospital for nurses in the 1960's. Eventually, mental health patients were moved to other care facilities and Mayday Hills was operating as a geriatric care facility. It was closed in 1995, after which the buildings and their grounds were purchased to La Trobe University to be used as a campus. The university sold the site in 2011 to private ownership. This image depicts the front facade of the building and a portion of the gardens, including a fountain. Mayday Hills Mental Hospital is a historically significant site for many factors. It is representative of healthcare practice in nineteenth century Victoria. It contains rare examples of construction and architecture. It is also significant for aesthetic and technical reasons.Black and white photograph printed on matte photographic paperReverse: Mental Hospital/ Beechworth Lunatic Asylum/ Xmas 1930/ 8190 VELOX (Watermark)mayday, mayday hills hospital, mayday hills, mayday hills mental asylum, beechworth, beechworth asylum, beechworth lunatic asylum, beechworth hospital for the insane, garden, gardens & parks, architecture, historic victorian architecture, healthcare, health, fountain, la trobe university -
 The Beechworth Burke Museum
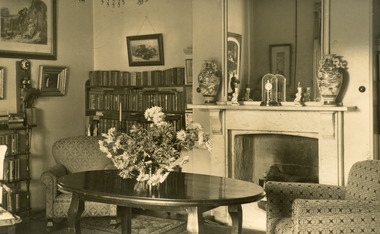
Postcard, Eda P Beckmann, c1935
Mayday Hills Mental Hospital was originally constructed in 1864 under the name of the Beechworth Lunatic Asylum. It was built for locals in need of help who were kept in the local gaol. In its first decade, the residents of the hospital were used as menial labourers but over time, as mental healthcare progressed, were cared for in more nuanced ways. This site became a training hospital for nurses in the 1960's. Eventually, mental health patients were moved to other care facilities and Mayday Hills was operating as a geriatric care facility. It was closed in 1995, after which the buildings and their grounds were purchased to La Trobe University to be used as a campus. The university sold the site in 2011 to private ownership. This postcard depicts an interior room which is presumed to be a living or reception room. It is filled with period furnishings. Mayday Hills Mental Hospital is a historically significant site for many factors. It is representative of healthcare practice in nineteenth century Victoria. It contains rare examples of construction and architecture. It is also significant for aesthetic and technical reasons.Black and white postcard printed on matte cardReverse: 11.5.35/ Miss Peach/ Best wishes/ from/ P. Beckman mayday, mayday hills hospital, mayday hills, mayday hills mental asylum, mayday hills mental hospital, beechworth, beechworth asylum, beechworth hospital for the insane, beechworth lunatic asylum, lunatic asylum, healthcare, health, living in country towns, living room, furniture, interior -
 The Beechworth Burke Museum
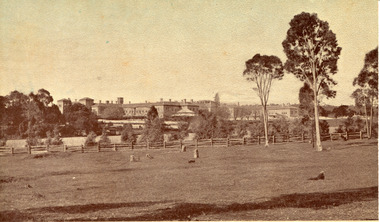
Postcard, c1910
Mayday Hills Mental Hospital was originally constructed in 1864 under the name of the Beechworth Lunatic Asylum. It was built for locals in need of help who were kept in the local gaol. In its first decade, the residents of the hospital were used as menial labourers but over time, as mental healthcare progressed, were cared for in more nuanced ways. This site became a training hospital for nurses in the 1960's. Eventually, mental health patients were moved to other care facilities and Mayday Hills was operating as a geriatric care facility. It was closed in 1995, after which the buildings and their grounds were purchased to La Trobe University to be used as a campus. The university sold the site in 2011 to private ownership. This postcard depicts the Mayday Hills Mental Hospital (Titled as 'Asylum for insane') from a distance and includes the surrounding grounds and farmlands.Mayday Hills Mental Hospital is a historically significant site for many factors. It is representative of healthcare practice in nineteenth century Victoria. It contains rare examples of construction and architecture. It is also significant for aesthetic and technical reasons.Sepia tone postcard printed on matte cardObverse: Beautiful Beechworth (Vic.) 1880 ft. above Sea Level - General View of Asylum for Insane/ Copyright F. Foxcroft Reverse: 1997.2459/ Post Card/ THIS SPACE MAY BE USED FOR CORRESPONDENCE/ THIS SPACE FOR NAME AND ADDRESSmayday, mayday hills hospital, mayday hills, mayday hills mental asylum, mayday hills mental hospital, beechworth, beechworth asylum, beechworth hospital for the insane, beechworth lunatic asylum, beechworth mental hospital, healthcare, health, rural australia, farm, architecture, historic victorian architecture, classical architecture -
 Flagstaff Hill Maritime Museum and Village
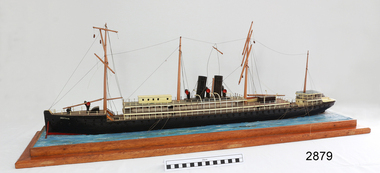
Craft - Ship Model, S.S. Orotava
This is a ship model of the SS Orotava, a British Screw Steamship built at Barrow-in-Furness, county of Lancashire, by the Naval Construction and Armaments Company (NC & A Co.) in 1889. Her gross tonnage was 5552.10 tons, length 430 feet, breadth 49.3 feet and depth 34.2 feet. She was built for Pacific Steam Navigation Company (of 31, James Street, Liverpool) and used as a passenger liner. She was launched 1889 and made 2 voyages for the Pacific Steam Navigation Company in 1889. Then under her new management of the Orient Line, she made her first sailing 6th June 1890 from Liverpool to Australia via Suez. During the Boer War (1889 – 1903) she served as a troop ship but apart from this she remained in the Orient Line’s Australia service until 1906. On 14th December 1896 the Orotava sunk at Trilbury Docks after being serviced on her return from Australia, becoming unstable and taking in water. Five men lost their lives. The ship was then raised to dry dock and repaired for service again and an investigation launched into the cause of the sinking. Between 1901 – 1906 the name ‘Orient-Pacific Steam Line’ was used due to the close ties between the Pacific and the Orient lines. In 1906 the Pacific Steam Line Australian service was taken over by the Royal Mail Steam Packet Co. and the alliance between them and the Orient Line was dissolved in 1909. Orotava was then used in the West Indies service of the Royal Mail Line In World War 1 (Dec 1914 – June 1916) she served as HMS OROTAVA, an armed merchant cruiser. She was broken up in 1919. Ship model of SS Orotava, 4 masts, 2 funnels, British passenger liner, launched in 1889.No case. Mounted on timber base. (some rigging broken, lifeboat now a separate piece)."OROTAVA" painted in white on each side of the bow. 'OROTAVA / LONDON" painted in white on the stern.flagstaff hill, warrnambool, shipwrecked-coast, flagstaff-hill, flagstaff-hill-maritime-museum, maritime-museum, shipwreck-coast, flagstaff-hill-maritime-village, ship model, ss orotava, naval construction and armaments co., n c & a co., pacific steam navigaiton company, passenger liner, orient line, orient-pacific steam line, royal mail line, hms orotava -
 Flagstaff Hill Maritime Museum and Village
Equipment - Platform Scales
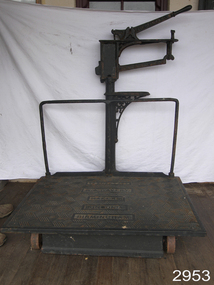
Large platform scales such as these ones made by W. & T. Avery were used for weighing goods for trading and passengers' luggage. They would be used in places such as railway stations, shipping ports, customs offices and ticketing offices. Often fees would be charged to customers according to the weight of their goods and luggage. Items would be placed onto the large horizontal platform then weights would be added to the weighing bar until the bar leveled to being horizontal. The weights would be added together and the total of the weights would be used for the final figure. These scales were made in Birmingham, England, by the British company, W and T Avery. The company had its origins in the early 1700s but only became known as W and T Avery when the brothers William and Thomas Avery inherited the scale-making business from a relative, Joseph Balden, on his death in 1813. By 1885 they had three factories and In 1895, the company acquired James Watt & Co and two years later had moved to the 25-acre Soho Foundry site in Smethwick, Birmingham where James Watt had manufactured steam engines. When the last Avery family member died in 1918, the company employed over 3,000 people and had businesses all over the world. Following the highly successful introduction of the first digital retail scale in 1971, the company was taken over by the GEC Group in 1979. The business was subsequently acquired by the American company, Weigh-Tronix, in 2000 which had already acquired a competitor, Salter. The Avery name continues today in the company known as Avery Weigh-Tronix.An item that was used at the turn of the century as train platform scales or for weighing agricultural products. Made by a company that pioneered weighing equipment with offices all over the world. With many examples of this scale in museums throughout the world. Platform scales with wheels. Large cast iron, scales painted black, weight capacity to 7 CWT (hundred weight). Weight beam has markers "0. 5. 10. 15. 20. 25". Platform scale loose weight type with relieving handle; cast iron construction, fluted columns with integral weight stand, the two wheels are fitted to base at front of platform; there is a graduated steelyard 0-14bs with pear-shaped poise. Weight carrier is missing.Pressed into cast iron arm on scale, one side "W. & T. AVERY", opposite side "BIRMINGHAM", and into the platform "TO WEIGH 7 CWT, W. & T. AVERY, MAKERS, LONDON & BIRMINGHAM" flagstaff hill, warrnambool, shipwrecked-coast, flagstaff-hill, flagstaff-hill-maritime-museum, maritime-museum, shipwreck-coast, flagstaff-hill-maritime-village, measuring scales, weighing scales, weighing instrument, fees for goods, fees for luggage, ticket office -
 Flagstaff Hill Maritime Museum and Village
Photograph, circa 1888
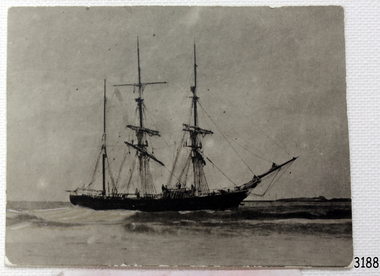
This photograph was taken close to the time of the wreck of the "Edinburgh Castle". The “Edinburgh Castle”, three-masted iron barque, was built in Glasgow, Scotland, in 1863 by J.G. Lawrie. She was 53.7 meters long and weighed 627 tons. She was owned by shipping company T Skinner and Co and registered at Liverpool, England. She sailed from 1863 to 1885 along the trade route between Scotland, China, and Singapore. In 1887 the Master, Captain J.B. Darling, sailed the “Edinburgh Castle” for its new owners Gifford & Nicholson from London to Warrnambool. Her cargo was 4,900 casks of cement for the construction of the new Warrnambool Breakwater. Over the three month journey, the ship met with rough weather and even a hurricane. On January 15th 1888 the “Edinburgh Castle” approached Lady Bay where a welcoming crowd gathered. The Port’s relief Harbour Master, Pilot Carless took over to complete the docking. As he tried to guide her, the Lighthouse Keeper signalled that the ship was too close to shore. The pilot continued on his course, causing her to ‘miss stays’ (make an incorrect tack). The crew dropped anchors and tried to lighten the load by throwing some of the casks of cement overboard but this was to no avail, and she drifted sideways in calm waters, lodging in the sand. A distress signal was sent to the coastal steamer “Julia Percy”, which spent several hours trying to pull the stranded ship away, but it would not budge. Those involved hoped to re-float the ship but efforts to save the vessel were useless. The captain and some crew stayed on board. When the weather became rough the rocket crew brought its lifesaving gear to the shore, ready to launch a line to the ship. The three men on board sent those onshore a message in a bottle to assure the on-lookers that they were quite comfortable to stay aboard. After a night of bad weather, the crew were glad to accept the rocket crew’s help and were in turn safely hauled to shore in a breeches buoy. The ship broke up quickly. Very little of the cargo could be saved. A week later all that could be seen of her was the bow and some of the stern. The beach was littered with wreckage, including cement cask fragments, for weeks. Ironically, on the morning after the ship ran aground, the very same “Edinburgh Castle” was offered for sale at an auction in Melbourne, billed as “a sound ship with all the fittings and in the best order.” The sale was completed before they heard the news that the ship was totally wrecked! Over the decades the shifting sands concealed the wreck of “Edinburgh Castle”. However, in October 1985 two local divers, Peter Ronald and Colin Goodall discovered her near the Hopkins River mouth. Peter said in his book ‘Exploring Shipwrecks of Western Victoria’, “In the midst of this sand-cloud I could clearly see row after row of neatly stacked barrels”. He remarked, “I am privileged to have had at least a glimpse of one of Warrnambool's most significant wrecks.” Some 15 – 17 ships are believed to have sunk in Lady Bay, but only two have been discovered on the seafloor; the “Edinburgh Castle” and the “La Bella”. Both wrecks are popular diving sites and are preserved as significant historical marine and marine archaeological sites. The sailing ship “Edinburgh Castle” is of local and state and national significance. It is one of the only two shipwrecks discovered in Lady Bay, Warrnambool, out of the 15-17 shipwrecks in the bay. The “Edinburgh Castle” is significant for being one of the largest vessels lost in the bay. The significance of the wreck of the “Edinburgh Castle” was recognised by being listed on the Victorian Heritage Database VHR S209. She was declared an Historic Shipwreck on 17th January 1989 under the Commonwealth Historic Shipwrecks Act (1976). The “Edinburgh Castle” wreck is also significant for the connection of its cargo with the building of the Warrnambool Breakwater, also listed on the Victorian Heritage Database VHR H2024. The “Edinburgh Castle” is included as one of the shipwrecks in Heritage Victoria’s Historic Shipwreck Trail on Victoria’s West Coast. Black and white photograph of the iron barque 'Edinburgh Castle' on breaking waves, land in the background. The ship was stranded and wrecked in Lady Bay, Warrnambool, on January 15th 1888. Figures are standing on deck. The masts are free from sails.flagstaff hill, warrnambool, shipwrecked-coast, flagstaff-hill, flagstaff-hill-maritime-museum, maritime-museum, shipwreck-coast, flagstaff-hill-maritime-village, great ocean road, edinburgh castle barque 1863, edinburgh castle shipwreck 1888, shipwreck 15-05-1888, glasgow ship, jg lawrie, t skinner and co, liverpool ship register, captain j.b. darling, gifford & nicholson, cement casks, cement barrels, warrnambool breakwater construction, breaches buoy, rocket crew, rocket launcher, lifesaving equipment, warrnambool harbour, lady bay warrnambool, ship pilot carless, lady bay shipwreck, peter ronald, colin goodall, lady bay diving site, marine archaeology, victorian heritage register, vhr s209 -
 Flagstaff Hill Maritime Museum and Village
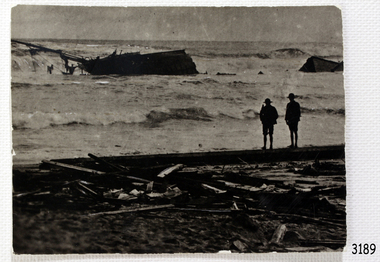
Photograph - Photograph of Edinburgh Castle' stranded and wrecked at Lady Bay, circa 1888
This photograph was taken close to the time of the wreck of the "Edinburgh Castle". The “Edinburgh Castle”, three-masted iron barque, was built in Glasgow, Scotland, in 1863 by J.G. Lawrie. She was 53.7 meters long and weighed 627 tons. She was owned by shipping company T Skinner and Co and registered at Liverpool, England. She sailed from 1863 to 1885 along the trade route between Scotland, China, and Singapore. In 1887 the Master, Captain J.B. Darling, sailed the “Edinburgh Castle” for its new owners Gifford & Nicholson from London to Warrnambool. Her cargo was 4,900 casks of cement for the construction of the new Warrnambool Breakwater. Over the three month journey, the ship met with rough weather and even a hurricane. On January 15th 1888 the “Edinburgh Castle” approached Lady Bay where a welcoming crowd gathered. The Port’s relief Harbour Master, Pilot Carless took over to complete the docking. As he tried to guide her, the Lighthouse Keeper signalled that the ship was too close to shore. The pilot continued on his course, causing her to ‘miss stays’ (make an incorrect tack). The crew dropped anchors and tried to lighten the load by throwing some of the casks of cement overboard but this was to no avail, and she drifted sideways in calm waters, lodging in the sand. A distress signal was sent to the coastal steamer “Julia Percy”, which spent several hours trying to pull the stranded ship away, but it would not budge. Those involved hoped to re-float the ship but efforts to save the vessel were useless. The captain and some crew stayed on board. When the weather became rough the rocket crew brought its lifesaving gear to the shore, ready to launch a line to the ship. The three men on board sent those onshore a message in a bottle to assure the on-lookers that they were quite comfortable to stay aboard. After a night of bad weather, the crew were glad to accept the rocket crew’s help and were in turn safely hauled to shore in a breeches buoy. The ship broke up quickly. Very little of the cargo could be saved. A week later all that could be seen of her was the bow and some of the stern. The beach was littered with wreckage, including cement cask fragments, for weeks. Ironically, on the morning after the ship ran aground, the very same “Edinburgh Castle” was offered for sale at an auction in Melbourne, billed as “a sound ship with all the fittings and in the best order.” The sale was completed before they heard the news that the ship was totally wrecked! Over the decades the shifting sands concealed the wreck of “Edinburgh Castle”. However, in October 1985 two local divers, Peter Ronald and Colin Goodall discovered her near the Hopkins River mouth. Peter said in his book ‘Exploring Shipwrecks of Western Victoria’, “In the midst of this sand-cloud I could clearly see row after row of neatly stacked barrels”. He remarked, “I am privileged to have had at least a glimpse of one of Warrnambool's most significant wrecks.” Some 15 – 17 ships are believed to have sunk in Lady Bay, but only two have been discovered on the seafloor; the “Edinburgh Castle” and the “La Bella”. Both wrecks are popular diving sites and are preserved as significant historical marine and marine archaeological sites. The sailing ship “Edinburgh Castle” is of local and state and national significance. It is one of the only two shipwrecks discovered in Lady Bay, Warrnambool, out of the 15-17 shipwrecks in the bay. The “Edinburgh Castle” is significant for being one of the largest vessels lost in the bay. The significance of the wreck of the “Edinburgh Castle” was recognised by being listed on the Victorian Heritage Database VHR S209. She was declared an Historic Shipwreck on 17th January 1989 under the Commonwealth Historic Shipwrecks Act (1976). The “Edinburgh Castle” wreck is also significant for the connection of its cargo with the building of the Warrnambool Breakwater, also listed on the Victorian Heritage Database VHR H2024. The “Edinburgh Castle” is included as one of the shipwrecks in Heritage Victoria’s Historic Shipwreck Trail on Victoria’s West Coast. Black and white photograph of the iron barque 'Edinburgh Castle' stranded and wrecked at Lady Bay, Warrnambool, on January 15th 1888. The photograph shows wreckage along the shore and two standing figures looking on.flagstaff hill, warrnambool, shipwrecked-coast, flagstaff-hill, flagstaff-hill-maritime-museum, maritime-museum, shipwreck-coast, flagstaff-hill-maritime-village, great ocean road, edinburgh castle barque 1863, edinburgh castle shipwreck 1888, shipwreck 15-05-1888, glasgow ship, jg lawrie, t skinner and co, liverpool ship register, captain j.b. darling, gifford & nicholson, cement casks, cement barrels, warrnambool breakwater construction, breaches buoy, rocket crew, rocket launcher, lifesaving equipment, warrnambool harbour, lady bay warrnambool, ship pilot carless, lady bay shipwreck, peter ronald, colin goodall, lady bay diving site, marine archaeology, victorian heritage register, vhr s209 -
 Flagstaff Hill Maritime Museum and Village
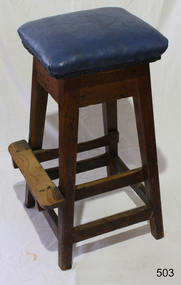
Furniture - Stool, 20th century
Medical stool, strong wooden construction, with four legs and wooden foot rest. Seat is padded. Stool is handmade.flagstaff hill, warrnambool, maritime museum, maritime village, medical furniture, office furniture, stool -
 Flagstaff Hill Maritime Museum and Village
Glass
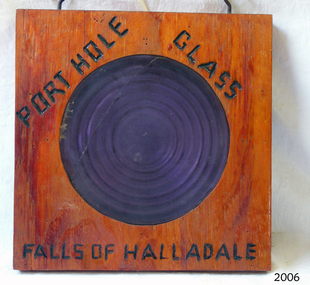
Falls of Halladale The Falls of Halladale was a four-masted sailing ship built-in 1886 in Glasgow, Scotland, for the long-distance cargo trade and was mostly used for Pacific grain trade. She had a sturdy construction built to carry maximum cargo and able to maintain full sail in heavy gales, one of the last of the ‘windjammers’ that sailed the Trade Route. She was one of the first vessels to include fore and aft lifting bridges, which kept the crew safe and dry in as they moved around the decks in stormy conditions. She was owned by Wright, Breakenridge & Co of Glasgow and was one of several Falls Line ships, all of which were named after waterfalls in Scotland. On 4th August 1908, with new sails, 29 crew, and 2800 tons of cargo, the Falls of Halladale left New York, bound for Melbourne and Sydney via the Cape of Good Hope. The cargo on board was valued at £35,000 and included 56,763 tiles of American slate roofing tiles, 5,673 coils of barbed wire, 600 stoves, 500 sewing machines, 6,500 gallons of oil, 14,400 gallons of benzene, plumbing iron, 117 cases of crockery and glassware and many other manufactured items. The Falls of Halladale had been at sail for 102 days when, at 3 am on the of 14th November 1908, under full sail in calm seas with a six knots breeze behind and misleading fog along the coast, the great vessel rose upon an ocean swell and settled on top of a submerged reef near Peterborough on south-west Victoria’s coast. The ship was jammed on the rocks and began filling with water. The crew launched the two lifeboats and all 29 crew landed safely on the beach over 4 miles away at the Bay of Islands. The postmistress at Peterborough, who kept a watch for vessels in distress, saw the stranding and sent out an alert to the local people. A rescue party went to the aid of the sailors and the Port Campbell rocket crew was dispatched, but the crew had all managed to reach shore safely by the time help arrived. The ship stayed in full sail on the rocky shelf for nearly two months, attracting hundreds of sightseers who watched her slowly disintegrate until the pounding seas and dynamiting by salvagers finally broke her back, and her remains disappeared back into deeper water. The valuable cargo was largely lost, despite two salvage attempts in 1908-09 and 1910. Further salvage operations were made from 1974-1986, during which time 22,000 slate tiles were recovered with the help of 14 oil drums to float them, plus personal artefacts, ship fittings, reams of paper and other items (a list of items held at Flagstaff Hill Maritime Village is included below). The Court of Marine Inquiry in Melbourne ruled that the foundering of the ship was entirely due to Captain David Wood Thomson’s navigational error, not too technical failure of the Clyde-built ship. The shipwreck is a popular site for divers, about 300m offshore and in 3 – 15m of water. Some of the original cargo can be seen at the site, including pieces of roof slate and coils of barbed wire. The Falls of Halladale shipwreck is listed on the Victorian Heritage Register (No. S255). She was one of the last ships to sail the Trade Routes. She is one of the first vessels to have fore and aft lifting bridges. She is an example of the remains of an International Cargo Ship and also represents aspects of Victoria’s shipping industry. The wreck is protected as a Historic Shipwreck under the Commonwealth Historic Shipwrecks Act (1976).Porthole glass secured in wood, with a crack in the glass. Writing on wood "porthole Glass Falls of Halladale."Burnt into the wood are the words "porthole Glass Falls of Halladale."falls of halladale, wright, breakenridge & co of glasgow, californian blue roof slate, warrnambool, shipwrecked-coast, flagstaff-hill, flagstaff-hill-maritime-museum, maritime-museum, shipwreck-coast, flagstaff-hill-maritime-village, shipwrecked-artefact, porthole glass -
 Flagstaff Hill Maritime Museum and Village
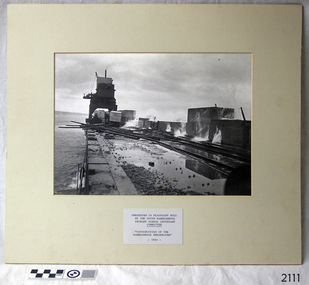
Photograph
Photograph of the construction the Warrnambool breakwater . flagstaff hill, warrnambool, shipwrecked-coast, flagstaff-hill, flagstaff-hill-maritime-museum, maritime-museum, shipwreck-coast, flagstaff-hill-maritime-village -
 Flagstaff Hill Maritime Museum and Village
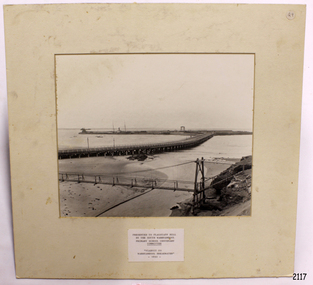
Photograph - Coastal Scene, Warrnambool South Primary School Centenary Committee, Viaduct to Warrnambool Breakwater - 1890, 1977
The local photograph shows the original footbridge across the Merri River near its mouth, the Viaduct road and the Warrnambool Breakwater with the Titan crane on it. The breakwater's construction was completed in 1890, the year this photograph was taken. The Viaduct has since been filled in to prevent water passing through the pylons, and the footbridge has been replaced. The photograph was presented to Flagstaff Hill on the centenary of South Warrnambool Primary School, 1877 to 1977, by the school's Warrnambool South Primary School Centenary Committee. The centenary was celebrated during August 12-13-14. The school was decommissioned in the 1990s.The photograph is locally significant for recording the completion of the Warrnambool Breakwater, for showing the original design of the Viaduct and for a clear view of the original footbridge across the Merri River. It also records the date of the presentation of the photograph celebrates the centenary of the 1877 to 1977 Warrnambool Sough Primary School.Photograph, black and white, mounted onto cardboard with a pasted-on label below the photograph. It shows the Merri River footbridge, the Viaduct, the Warrnambool Breakwater with the Titan crane, and the Port of Warrnambool. The label has an inscription. The photograph was taken in 1890 and was presented to Flagstaff Hill by the South Warrnambool Primary School's Centenary Committee ca. 1977. The photograph was taken in 1890 and was presented to Flagstaff Hill Maritime Museum by the South Warrnambool Primary School Centenary Committee in the Centenary year of the South Warrnambool Primary School;1977.Typed onto the label: "PRESENTED TO FLAGSTAFF HILL / BY THE SOUTH WARRNAMBOOL / PRIMARY SCHOOL CENTENARY / COMMITTEE / "VIADUCT TO / WARRNAMBOOL BREAKWATER" / - 1890 - "warrnambool, shipwreck coast, flagstaff hill, flagstaff hill maritime museum, flagstaff hill maritime village, warrnambool breakwater, viaduct, viaduct road, merri river bridge, merri footbridge, original merri foodtridge, titan crane, warrnambool south primary school, warrnambool south primary school centenary commitee, centenary committee, 1890, 1877, 1877-1977, lady bay, port of warrnambool -
 Flagstaff Hill Maritime Museum and Village
Photograph
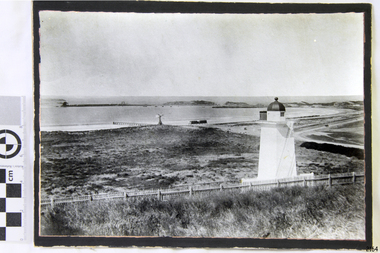
Photograph of Port of Warrnambool lower lighthouse, with breakwater construction and beach light-becon in background.flagstaff hill, warrnambool, shipwrecked-coast, flagstaff-hill, flagstaff-hill-maritime-museum, maritime-museum, shipwreck-coast, flagstaff-hill-maritime-village, port of warrnambool, lower light -
 Flagstaff Hill Maritime Museum and Village
Document - Navigation Chart, Admiralty Office, Lady Bay and Warrnambool Harbour, 03/04/1871
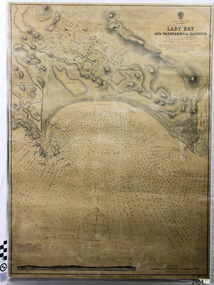
This Chart titled “Lady Bay and Warrnambool Harbour” was surveyed by Nav. Lieut. H.J. Stanley, of Britain's Royal Navy, in 1870 and printed in April 1871. The chart was made before the Warrnambool Breakwater was built (construction had begun in 1874 and was completed in 1890). The chart includes Directions for entering Lady Bay, Warrnambool Harbour. These are "Vessels entering Warrnambool Harbour must bring the Red Light in sight and steer in with it in line with the upper white Light bearing North, until the Green Light on the Jetty is opened, when steer towards it and anchor. The best anchorage is in 2 ¼ fms [fathoms)] of water, about a cable from ledge off Breakwater rock. Or where convenient, according to draught of water, only endeavouring to anchor as close as possible to Breakwater rock. It is not safe to enter or leave the Harbour in south westerly or Southerly gales.” This chart is significant for its strong connection to the maritime history of Warrnambool Harbour and Lady Bay, and eventually to the Warrnambool Breakwater. The Warrnambool Breakwater is registered as a place of significance on the Victorian Heritage Database (VHR H2024). A copy of the same chart was used to plan several submissions for future changes to the jetty and breakwater. The chart is a historical record of structures existing in 1870; the Warrnambool Jetties, Lady Bay, the leading lights (lighthouses), streets, roads, bridges and many buildings. It also shows the lay of the land and seabed.Canvas chart of Australia, South Coast, Victoria Title: Lady Bay and Warrnambool Harbour Surveyed by Nav. Lieut. H.J. Stanley, R.N., 1870. Magnet Variation, 1870 Published April 3, 1871, by the Admiralty, London. Directions for vessels entering Warrnambool Harbour are printed on the chart. The chart has a lacquer or seal over it.Top of chart has logo "HYDROGRAPHER OFFICE" "Price Eighteen Pence". "Engraved by Edward Weller" Along bottom of Chart: “London… Published at the Admiralty, 3rd April 1871, under the Superintendence of Rear Admiral G.H. Richards, F.R.S. Hydrographer, Corrections July 71” Bottom of chart “Australia South Coast Victoria Lady Bay and Warrnambool Harbour. 2494”flagstaff hill, warrnambool, chart of lady bay warrnambool 1870, warrnambool harbour, cartography, navigation, warrnambool breakwater, 1871, australia – south coast / victoria, lady bay, 1870, nav. lieut. h.j. stanley, r.n, directions for entering warrnambool harbour, hydrographer office, rear admiral g.h. richards, edward weller, port of warrnambool, flagstaff hill maritime museum & village, maritime museum, maritime village, shipwreck coast, map, chart, navigation chart, admiralty chart, breakwater, jetty, pier, vhr h2024 -
 Flagstaff Hill Maritime Museum and Village
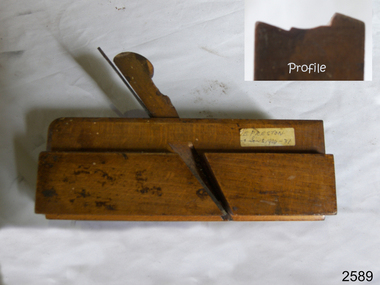
Tool - Wood moulding Plane, Edward Preston & Sons, Early 20th century
By the end of the nineteenth century, the firm of Edward Preston & Sons was founded in 1825, becoming one of England's leading makers of hand tools and in many ways a British counterpart to America's "Stanley" for its wide range of quality utilitarian tools at affordable prices. Edward Preston Sr. (1798–1883) was first listed as a plane-maker at 77 Lichfield Street in the Birmingham Directory of 1833, but later listings and advertisements assert that the business was started in 1825. Preston is likewise recorded as a plane-maker living with his family in Lichfield Street in the 1841 census, at which time his younger son Edward was 6 years old. Around 1850, his son Edward left school to join his father's business and is recorded in the 1851 census as a plane-maker at his father's address. He appears to have been quite a talented and resourceful young man, as he had later been able to start up his own "wood and brass spirit level manufacturing business at 97½ Lichfield Street by 1864. By 1866, Edward Jnr had added planes, routers, joiners, coach, gun, cabinet, and carpenters tools to his line, and the following year he moved his shop from his father's address and relocated to 26 Newton Street, before moving again to much larger premises at 22–24 Whittall Street. This location became known as the Whittall Works and later was the office and factory of Edward Preston & Sons, Ltd. In 1889 Edward Preston Jnr and his three sons were brought into the firm and the name was changed to Edward Preston & Sons, becoming Edward Preston & Sons Ltd on incorporation in 1898. Part of the firm's output was a healthy line of malleable and gun-metal planes and patent adjustable iron smoothers, shoulder planes, bull-nose, and block planes - a range that was expanded in later years. The 1901 catalog shows several styles of planes that were unique to the Preston brand, along with the usual styles which had already been set by other makers. The death of Edward Preston Jnr was reported in the Lichfield Mercury of 26 September 1913. "Mr. Preston was decided of an innovative turn of mind," the newspaper wrote, "as many of the machines in use at his works, as well as of the tools produced were the invention of himself and his three sons, who now manage the business." The report noted that at the time of his death, the business was carried on at Whittall Works, Cheston Street, Aston, Birmingham. Falling on hard times, the firm of Edward Preston & Sons was sold to the Birmingham firm of John Rabone & Sons in 1932, and shortly thereafter manufacturing rights to some of the Preston range of planes were sold to the Sheffield firm of C. & J. Hampton, who would later merge with the Record Tool Company. Some of the Preston planes were directly added to the Record line by the Hampton firm, while others were modified or discontinued altogether. Generally, all Preston wooden planes are stamped on the front of the plane, the shape, size, and character type of the stamp indicating the age of the plane. On some metal planes, all the parts were stamped with a number or symbol during manufacture. This number was used to re-assemble the parts following a batch process. Not all Preston tools are trade-marked clearly. Early shoulder, rebate, chariot planes, and chamfer rebates commonly appear without trademarks but may have assembly numbers. The "E P" trade-mark was already in use by 1882. The trade-mark "Preston" also appears on some later tools that were manufactured in Sheffield, England. These are generally smoothing planes and appear modern and very similar in construction to other modern manufacturers' planes.The item gives a snapshot of one of England's premier tool manufacturing companies at a time when significant industrial changes were occurring in manufacturing and business structures in the World that were beginning to affect social changes.Ogee moulding Plane Maker E Preston & Sons sticker with date 1904 -1931flagstaff hill, warrnambool, shipwrecked-coast, flagstaff-hill, flagstaff-hill-maritime-museum, maritime-museum, shipwreck-coast, flagstaff-hill-maritime-village -
 Flagstaff Hill Maritime Museum and Village
Book, American Machinist
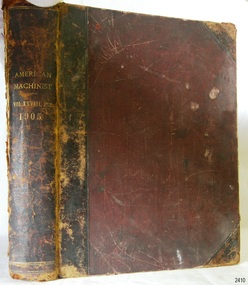
American Machinist Volume XXVIII - part two Issued Weekly A practical journal of machine construction Publisher: The American Machinist Company Date: 1905 flagstaff hill, warrnambool, shipwrecked-coast, flagstaff-hill, flagstaff-hill-maritime-museum, maritime-museum, shipwreck-coast, flagstaff-hill-maritime-village, book, american machinist -
 Flagstaff Hill Maritime Museum and Village
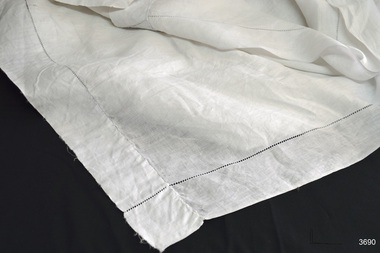
Textile - Tablecloth, late 19th century
The linen tablecloth has been hand worked using satin stitch embroidery and drawn thread work. This tablecloth is one of many 19th century items of furniture, linen and crockery donated to Flagstaff Hill Maritime Village by, Vera and Aurelin Giles. The items are associated with the Giles Family and are known as the “Giles Collection”. Most of the items in this Collection are in the Lighthouse Keeper’s Cottage at Flagstaff Hill. The majority came from the simple home of Vera’s Giles’ parents, Henry Giles and his wife Mary Jane (nee Freckleton), whose photographs are in the parlour. They married in 1880. Henry Giles was born at Tower Hill, Victoria in 1858 and worked as a labourer on the construction of the Warrnambool Breakwater. His wife, Mary Jane, was born in 1860 at Cooramook. She attended Mailor’s Flat State School, and later worked there as a student teacher, before (as family legend has it) she became a governess at “Injemira” where her grandfather, Francis Freckleton, owned the land. The Giles family of six, some of whom were born at Mailor’s Flat and the younger at Purnim West, lived at “The Maam”, Wangoom before moving to New South Wales in 1895, where Henry built bridges for about 7 years. Henry died in 1933 and Mary Jane died in 1940. The Giles family collection has social significance at a local level, because it illustrates the level of material support the Warrnambool community gave to Flagstaff Hill when the Museum was established.Tablecloth, white linen, part of the Giles Collection. Large white rectangular tablecloth, hand embroidered using white thread. Floral design in satin stitch and drawn threadwork. Cloth has additional white cloth iron-on label.Iron-on label, hand written in black pen "LHK B22". flagstaff hill, warrnambool, shipwrecked coast, flagstaff hill maritime museum, maritime museum, shipwreck coast, flagstaff hill maritime village, great ocean road, giles family, cooramook, 19th century linen, 19th century household goods, 19th century handcraft, 19th century manchester, 19th century table linen, 19th century tablecloth, giles family collection, 19th century household linen, warrnambool breakwater construction -
 Flagstaff Hill Maritime Museum and Village
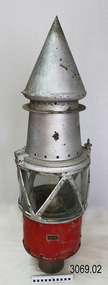
Functional object - Marine Navigation Light, Early 20th century
Breakwater navigation lights are placed at the end of the breakwaters to warn incoming vessels of the end of the structure, as a marine safety measure. The subject item was such a light believed to have been placed at the end of Warrnambool's breakwater around 1915 when it was extended. The light had remained in place for many years until it was probably removed when the structure was undergoing rock armouring repairs to the end of the breakwater in 1975. The light had been placed in a council storage shed probably from the time when the structure was undergoing these repairs in 1975. In 2014 the light was removed from the storage shed and donated to Flagstaff Hill museum. History: Warrnambool breakwater plans were drawn up by 1874 and approval was given for preliminary construction work to start but when the money ran out, the works stopped. With a number of quick changes of government the “Warrnambool” breakwater project was kicked from one Victorian state government to another. Then finally in 1879, the eminent British harbour engineer Sir John Coode was asked to design a breakwater. His first design was for a 1800 feet long structure but that was scaled back to 900 feet and construction finally began in 1884. This structure was attributed in causing major siltation of Lady bay, as a consequence the breakwater was again extended in 1915. In 1975, the rock armouring at the end of the breakwater was added but by 1979 another impact study was calling for the breakwater to be removed altogether. The Heritage Council Victoria, regard the Warrnambool breakwater is of historical significance to the state as one of the most important maritime engineering projects that was undertaken in Victoria during the late nineteenth century. The light is also as part of this structure regarded as a significant item of historical interest.Marker light or navigation light. Round light stand with conical top piece (2 separate pieces). Metal base painted red, clear glass middle section enclosed by metal frame, metal cone shaped top section painted silver. Electrical wiring can be seen inside centre section. Pole that light would have been on to elevate it is missing.Has metal plate screwed onto side of base engraved "23". flagstaff hill, warrnambool, shipreck coast, flagstaff hill maritime museum, maritime museum, great ocean road, warrnambool breakwater, marker light, naviagtion light, breakwater navigation light -
 Flagstaff Hill Maritime Museum and Village
Functional object - Ship's Wheel, 1871 or earlier
The ship building company E. & A. Sewall, from Bath, Maine, USA, built many ships that had wheels with the same decorative, starburst pattern on them as this particular wheel segment, including the Eric the Red. The wheel was manufactured by their local Bath foundry, Geo. Moulton & Co. and sold to the Sewall yard for $100, according to the construction accounts of the vessel. Eric the Red was a wooden, three masted clipper ship. She had 1,580 tons register and was the largest full-rigged ship built at Bath, Maine, USA in 1871. She was built and registered by Arthur Sewall, later to become the partnership E. & A. Sewall, and was the 51st ship built by this company. The annually-published List of Merchant Vessels of the U.S. shows that Bath was still the home port of Eric the Red in 1880. The vessel was named after the Viking discoverer, Eric the Red, who was the first European to reach the shores of North America (in 980AD). The ship Eric the Red at first traded in coal between America and Britain, and later traded in guano nitrates from South America. In 1879 she was re-metalled and was in first class condition. On 10th June 1880 (some records say 12th June) Eric the Red departed New York for Melbourne and then Sydney. She had been commissioned by American trade representatives to carry a special cargo of 500 exhibits (1400 tons) - about a quarter to a third of America’s total exhibits - from America for the U.S.A. pavilion at Melbourne’s first International Exhibition. The exhibits included furniture, ironmongery, wines, chemicals, dental and surgical instruments, paper, cages, bronze lamp trimmings, axles, stamped ware, astronomical and time globes, samples of corn and the choicest of leaf tobacco. Other general cargo included merchandise such as cases of kerosene and turpentine, brooms, Bristol's Sarsaparilla, Wheeler and Wilson sewing machines, Wheeler’s thresher machine, axe handles and tools, cases of silver plate, toys, pianos and organs, carriages and Yankee notions. The Eric the Red left New York under the command of Captain Z. Allen (or some records say Captain Jacques Allen) and 24 other crew including the owner’s son third mate Ned Sewall. There were 2 saloon passengers also. On 4th September 1880 the ship had been sailing for an uneventful 85 days and the voyage was almost at its end. Eric the Red approached Cape Otway in a moderate north-west wind and hazy and overcast atmosphere. Around 1:30am Captain Allen sighted the Cape Otway light and was keeping the ship 5-6 miles offshore to stay clear of the hazardous Otway Reef. However he had badly misjudged his position. The ship hit the Otway Reef about 2 miles out to sea, south west of the Cape Otway light station. Captain Allen ordered the wheel to be put ‘hard up’ thinking that she might float off the reef. A heavy sea knocked the man away from the wheel, broke the wheel ropes and carried away the rudder. The sea swamped the lifeboats, the mizzenmast fell, with all of its rigging, then the mainmast fell and the ship broke in two. Some said that the passenger Vaughan, who was travelling for his health and not very strong, was washed overboard and never seen again. The ship started breaking up. The forward house came adrift with three of the crew on it as well as a longboat, which the men succeeded in launching and keeping afloat by continually bailing with their sea boots. The captain, the third mate (the owner’s son) and others clung to the mizzenmast in the sea. Then the owner’s son was washed away off the mast. Within 10 minutes the rest of the ship was in pieces, completely wrecked, with cargo and wreckage floating in the sea. The captain encouraged the second mate to swim with him to the deckhouse where there were other crew but the second mate wouldn’t go with him. Eventually the Captain made it to the deckhouse and the men pulled him up. At about 4:30am the group of men on the deckhouse saw the lights of a steamer and called for help. At the same time they noticed the second mate and the other man had drifted nearby, still on the spur, and pulled them both onto the wreck. The coastal steamer Dawn was returning to Warrnambool from Melbourne, its sailing time different to its usual schedule. Cries were heard coming from out of the darkness. Captain Jones sent out two life boats, and fired off rockets and blue lights to illuminate the area. They picked up the three survivors who were in the long boat from Eric the Red. Two men were picked up out of the water, one being the owner’s son who was clinging to floating kerosene boxes. At daylight the Dawn then rescued the 18 men from the floating portion of the deckhouse, which had drifted about 4 miles from where they’d struck the reef. Shortly after the rescue the deckhouse drifted onto breakers and was thrown onto rocks at Point Franklin, about 2 miles east of Cape Otway. Captain Jones had signalled to Cape Otway lighthouse the number of the Eric the Red and later signalled that there was a wreck at Otway Reef but there was no response from the lighthouse. The captain and crew of the Dawn spent several more hours searching unsuccessfully for more survivors, even going back as far as Apollo Bay. On board the Dawn the exhausted men received care and attention to their needs and wants, including much needed clothing. Captain Allen was amongst the 23 battered and injured men who were rescued and later taken to Warrnambool for care. Warrnambool’s mayor and town clerk offered them all hospitality, the three badly injured men going to the hospital and others to the Olive Branch Hotel, then on to Melbourne. Captain Allen’s leg injury prevented him from going ashore so he and three other men travelled on the Dawn to Portland. They were met by the mayor who also treated them all with great kindness. Captain Allen took the train back to Melbourne then returned to America. Those saved were Captain Z. Allen (or Jacques Allen), J. Darcy chief mate, James F. Lawrence second mate, Ned Sewall third mate and owner’s son, John French the cook, C. Nelson sail maker, Clarence W. New passenger, and the able seamen Dickenson, J. Black, Denis White, C. Herbert, C. Thompson, A. Brooks, D. Wilson, J. Ellis, Q. Thompson, C. Newman, W. Paul, J. Davis, M. Horenleng, J. Ogduff, T. W. Drew, R. Richardson. Four men had lost their lives; three of them were crew (Gus Dahlgreen ship’s carpenter, H. Ackman steward, who drowned in his cabin, and George Silver seaman) and one a passenger (J. B. Vaughan). The body of one of them had been found washed up at Cape Otway and was later buried in the lighthouse cemetery; another body was seen on an inaccessible ledge. Twelve months later the second mate James F. Lawrence, from Nova Scotia, passed away in the Warrnambool district; an obituary was displayed in the local paper. The captain and crew of the Dawn were recognised by the United States Government in July 1881 for their humane efforts and bravery, being thanked and presented with substantial monetary rewards, medals and gifts. Neither the ship, nor its cargo, was insured. The ship was worth about £15,000 and the cargo was reportedly worth £40,000; only about £2,000 worth had been recovered. Cargo and wreckage washed up at Apollo Bay, Peterborough, Port Campbell, Western Port and according to some reports, even as far away as the beaches of New Zealand. The day after the wreck the government steam ship Pharos was sent from Queenscliff to clear the shipping lanes of debris that could be a danger to ships. The large midship deckhouse of the ship was found floating in a calm sea near Henty Reef. Items such as an American chair, a ladder and a nest of boxes were all on top of the deckhouse. As it was so large and could cause danger to passing ships, Captain Payne had the deckhouse towed towards the shore just beyond Apollo Bay. Between Apollo Bay and Blanket Bay the captain and crew of Pharos collected Wheeler and Wilson sewing machines, nests of boxes, bottles of Bristol’s sarsaparilla, pieces of common American chairs, axe handles, a Wheelers’ Patent thresher and a sailor’s trunk with the words “A. James” on the front. A ship’s flag-board bearing the words “Eric the Red” was found on the deckhouse; finally those on board the Pharos had the name of the wrecked vessel. During this operation Pharos came across the government steamer Victoria and also a steamer S.S. Otway, both of which were picking up flotsam and wreckage. A whole side of the hull and three large pieces of the other side of the hull, with some of the copper sheathing stripped off, had floated on to Point Franklin. Some of the vessels yards and portions of her masts were on shore. The pieces of canvas attached to the yards and masts confirmed that the vessel had been under sail. The beach there was piled with debris several feet high. There were many cases of Diamond Oil kerosene, labelled R. W. Cameron and Company, New York. There were also many large planks of red pine, portions of a small white boat and a large, well-used oar. Other items found ashore included sewing machines (some consigned to ‘Long and Co.”) and notions, axe and scythe handles, hay forks, wooden pegs, rolls of wire (some branded “T.S” and Co, Melbourne”), kegs of nails branded “A.T. and Co.” from the factory of A. Field and Son, Taunton, Massachusetts, croquet balls and mallets, buggy fittings, rat traps, perfumery, cutlery and Douay Bibles, clocks, bicycles, chairs, a fly wheel, a cooking stove, timber, boxes, pianos, organs and a ladder. (Wooden clothes pegs drifted in for many years). There seemed to be no personal luggage or clothing. The Pharos encountered a long line, about one and a half miles, of floating wreckage about 10 miles off land, south east of Cape Otway, and in some places about 40 feet wide. It seemed that more than half of it was from Eric the Red. The ship’s crew rescued 3 cases that were for the Melbourne Exhibition and other items from amongst the debris. There were also chairs, doors, musical instruments, washing boards, nests of trunks and fly catchers floating in the sea. Most of the goods were saturated and smelt of kerosene. A section of the hull lies buried in the sand at Parker River Beach. An anchor with chain is embedded in the rocks east of Point Franklin and a second anchor, thought to be from Eric the Red, is on display at the Cape Otway light station. (There is a photograph of a life belt on the verandah of Rivernook Guest House in Princetown with the words “ERIC THE RED / BOSTON”. This is rather a mystery as the ship was registered in Bath, Maine, USA.) Parts of the ship are on display at Bimbi Park Caravan Park and at Apollo Bay Museum. Flagstaff Hill Maritime Village also has part of the helm (steering wheel), a carved wooden sword (said to be the only remaining portion of the ship’s figurehead; further research is currently being carried out), a door, a metal rod, samples of wood and a medal for bravery. Much of the wreckage was recovered by the local residents before police and other authorities arrived at the scene. Looters went to great effort to salvage goods, being lowered down the high cliff faces to areas with little or no beach to collect items from the wreckage, their mates above watching out for dangerous waves. A Tasmanian newspaper reports on a court case in Stawell, Victoria, noting a man who was caught 2 months later selling tobacco from the wreckage of Eric the Red. Some of the silverware is still treasured by descendants of Mr Mackenzie who was given these items by officials for his help in securing the cargo. The gifts included silver coffee and tea pots, half a dozen silver serviette rings and two sewing machines. The wreck and cargo were sold to a Melbourne man who salvaged a quantity of high quality tobacco and dental and surgical instruments. Timbers from the ship were salvaged and used in the construction of houses and sheds around Apollo Bay, including a guest house, Milford House (since burnt down in bushfires), which had furniture, fittings and timber on the dining room floor from the ship. A 39.7 foot long trading ketch, the Apollo, was also built from its timbers by Mr Burgess in 1883 and subsequently used in Tasmanian waters. It was the first attempt at ship building in Apollo bay. In 1881 a red light was installed about 300 feet above sea level at the base of the Cape Otway lighthouse to warn ships when they were too close to shore; It would not be visible unless a ship came within 3 miles from it. This has proved to be an effective warning. The State Library of Victoria has a lithograph in its collection depicting the steamer Dawn and the shipwrecked men, titled. "Wreck of the ship Eric the Red, Cape Otway: rescue of the crew by the Dawn". “The Eric the Red is historically significant as one of Victoria's major 19th century shipwrecks. (Heritage Victoria Eric the Red; HV ID 239) The wreck led to the provision of an additional warning light placed below the Cape Otway lighthouse to alert mariners to the location of Otway Reef. The site is archaeologically significant for its remains of a large and varied cargo and ship's fittings being scattered over a wide area. The site is recreationally and aesthetically significant as it is one of the few sites along this coast where tourists can visit identifiable remains of a large wooden shipwreck, and for its location set against the background of Cape Otway, Bass Strait, and the Cape Otway lighthouse.“ (Victorian Heritage Database Registration Number S239, Official Number 8745 USA) Segment of a ship's wheel, or helm, from the wreck of the sailing ship Eric the Red. The wheel part is an arc shape from the outer rim of the wheel and is made up of three layers of timber. The centre layer is a dark, dense timber and is wider than the two outer layers, which are less dense and lighter in colour. The wheel segment has a vertically symmetrical, decorative copper plate inlaid on the front. The plate has a starburst pattern; six stars decorate it, each at a point where there is a metal fitting going through the three layers of timber to the rear side of the wheel. On the rear each of the six fittings has an individual copper star around it. The edges of the helm are rounded and bevelled, polished to a shine in a dark stain. Around each of the stars, front and back, the wood is a lighter colour, as though the metal in that area being polished frequently. The length of the segment suggests that it has probably come from a wheel or helm that had ten spokes. (Ref: F.H.M.M. 16th March 1994, 239.6.610.3.7. Artefact Reg No ER/1.)flagstaff hill, warrnambool, shipwrecked-coast, flagstaff-hill, flagstaff-hill-maritime-museum, maritime-museum, shipwreck-coast, flagstaff-hill-maritime-village, ship's-wheel, eric-the-red, helm, shei's wheel, ship's steering wheel -
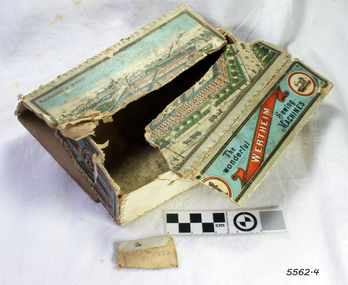 Flagstaff Hill Maritime Museum and Village
Container - Box, Joseph Wertheim, ca. 1891
This Wertheim Sewing Machine accessory box was donated with twelve accessories, the instruction book and the receipt for the purchase of a Wertheim sewing machine. the box's construction includes a coloured printed label and strong stitching on the joins of the edges. The receipt was written on July 23rd 1891 by the Wertheim distributor in Melbourne, Hugo Wertheim. His business was the Wertheim Sewing Machine and Hapsburg Piano Depot, trading at 173 Williams Street, Melbourne. The purchaser was Mrs Burrowes from Burrumbeet, Victoria, a district northwest of Ballarat. She paid £6-6 (six pounds and six shillings) in cash. The receipt was signed by H. Wertheim and the other signatory looks like John A. Cherry. Hugo Wertheim (1854-1919) was an agent for his father’s cousin Joseph Wertheim, a well-established sewing machine manufacturer in Germany. He was born in Lispenhausen, Germany, and migrated to Melbourne in October 1875, where he opened a merchandising business at 39 Flinders Lane East. He returned to Germany in 1885 to marry Joseph Wertheim's daughter Sophie Emilie. The couple came back to Melbourne, and Hugo quickly established a substantial business selling sewing machines, bicycles, pianos and other mechanical devices, under brands such as Wertheim, Electra, Planet, Griffin and Hapsburg. He exhibited at agricultural shows and in 1901 at the Pan American Exposition, Buffalo, United States of America. One of his staff was O. C. Beale, who later set up his own piano business in New South Wales. Hugo continued to own 25 per cent of one of Beale's companies, which became Wertheim's Queensland business. In 1908 Hugo Wertheim opened a piano factory in Richmond, Melbourne, aiming to produce 2000 pianos and player pianos a year, predominantly using Australian materials. In laying the foundation stone, Prime Minister Alfred Deakin observed that “few men with such opportunities for a life of ease would have embarked on such an enterprise” Hugo died of chronic hepatitis in 1919 at his home in South Yarra. His eldest son, Herbert Joseph (1886-1972), continued the business. The piano factory closed in 1935, becoming a Heinz food processing plant and in 1955, GTV Channel 9 studios and offices. The Wertheim Sewing Machine Company – Joseph Wertheim (1804–1899) founded the company in 1868 in Frankfurt, Germany. At this time Joseph was the Frankfurt city delegate for the Democratic Party. At its height, the Wertheim factory employed approximately 650 workers. The company used a trademark of a dwarf holding a hammer which is known to have been used until at least 1925, however in 1909 a Star of David was also registered. In 1870 a Wertheim subsidiary was formed in Barcelona, Spain. The business imported and sold complete machines, including the English Jones machine. Locals began calling the sewing machines “las rapidas”, and the business became known as “las casa de las rapidas”. In 1915 production began of a totally manufactured Spanish Wertheim machine. Wertheim in Germany continued manufacturing machines until 1932 when the Wertheim family fled to Spain. Despite converting to Christianity from Judaism, they feared the political unrest in Germany during that time. Wertheim Spain became Rapida SA and was then the sole manufacturer of the Wertheim machines. The factory was managed by Karl Wertheim under the alias Carlos Vallin. The box is part of a donation that connected to domestic life in 1891 during the Victorian era. It is significant for connecting the Melbourne distributor of Wertheim sewing machines, Hugo Wertheim, to Victoria’s northwest district where the purchaser lived. It is also significant for connecting the Melbourne distributor to the importing of goods from the well-known German manufacturer of early domestic sewing machines, Joseph Wertheim.Cardboard box, rectangular, with coloured printed labels. The top of the box has a city scene on it, depicting buildings, factories and figures. Made by Wertheim Sewing Machine Co. of Germany. The Box has been sewn around the edges. There is a handwritten pencil inscription on one of the sides (difficult to decipher)."Manufactured in Germany" "WERTHEIM" "The Wonderful Sewing Machines" Handwritten "Ste - - - B - - - - Wbool"flagstaff hill, flagstaff hill maritime museum and village, warrnambool, maritime museum, maritime village, great ocean road, shipwreck coast, wertheim, sewing machine, victorian era, sewing machine accessories, sewing machine instructions, wertheim instruction book, wertheim sewing machine and hapsburg piano depot, 23-7-1891, £6 6/-, mrs burrowes, burrumbeet, h. wertheim, wertheim sewing machines, hand-stitched box, accessory box, domestic machines, dressmaking, home industry, fashion -
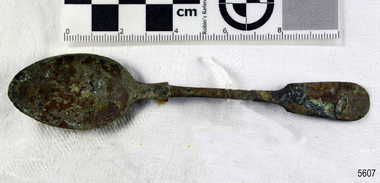 Flagstaff Hill Maritime Museum and Village
Spoon, circa 1878
This tea spoon is from the wreck of the LOCH ARD, a Loch Line ship of 1,693 tons which sailed from Gravesend, London, on 2 March 1878 with 17 passengers and a crew of 36 under Captain George Gibbs. “The intention was to discharge cargo in Melbourne, before returning to London via the Horn with wool and wheat”. Instead, on 1 June 1878, after 90 days at sea, she struck the sandstone cliffs of Mutton Bird Island on the south west coast of Victoria, and sank with the loss of 52 lives and all her cargo. The manifest of the LOCH ARD listed an array of manufactured goods and bulk metals being exported to the Colony of Victoria, with a declared value of £53,700. (202 bills of lading show an actual invoice value of £68, 456, with insurance underwriting to £30,000 of all cargo). Included in the manifest is the item of “Tin hardware & cutlery £7,530”. This teaspoon is one of 482 similar items of electro-plated cutlery from the LOCH ARD site, comprising spoons and forks of various sizes but all sharing the same general shape or design and metallic composition. 49 of these pieces display a legible makers’ mark — the initials “W” and “P” placed within a raised diamond outline, which is in turn contained within a sunken crown shape — identifying the manufacturer as William Page & Co of Birmingham. An electroplater’s makers’ marks, unlike sterling silver hallmarks, are not consistent identifiers of quality or date and place of manufacture. A similar line of five impressions was usually made to impress the consumer with an implication of industry standards, but what each one actually signified was not regulated and so they varied according to the whim of the individual foundry. In this case, the maker’s marks are often obscured by sedimentary accretion or removed by corrosion after a century of submersion in the ocean. However sufficient detail has survived to indicate that these samples of electro-plated cutlery probably originated from the same consignment in the LOCH ARD’s cargo. The following descriptions of maker’s marks are drawn from 255 tea spoons, 125 dessert spoons, and 99 table forks. These marks are clearly visible in 66 instances, while the same sequence of general outlines, or depression shapes, is discernible in another 166 examples. 1. A recessed Crown containing a raised Diamond outline and the initials “W” and “P” (the recognised trademark of William Page & Co) 2. An impressed Ellipse containing a raised, pivoted, Triangle in its lower part and bearing a Resurrection Cross on its upper section (a possible dissenting church symbol reflecting religious affiliation); OR a rounded Square impression containing a raised, ‘lazy’, letter “B” (possibly mimicking sterling silver hallmark signifying city of manufacture i.e. Birmingham) 3. An impressed rounded Square filled with a raised Maltese Cross (the base metal composite of nickel silver was also known as ‘German silver’ after its Berlin inventors in 1823) 4. A recessed Circle containing a Crab or Scarab Beetle image; OR a recessed Circle containing a rotated ‘fleur de lys’ or ‘fasces’ design 5. A depressed Diamond shape enclosing a large raised letter “R” and a small raised letter “D” (mimicking the U.K. Patent Office stamp which abbreviated the term ‘registered’ to “RD”, but also included date and class of patent) Suggested trade names for William Page & Co’s particular blend of brass plating are ‘roman silver’ or ‘silverite’. This copper alloy polishes to a lustrous gold when new, discolouring to a murky grey with greenish hue when neglected. HISTORY OF THE LOCH ARD The LOCH ARD belonged to the famous Loch Line which sailed many ships from England to Australia. Built in Glasgow by Barclay, Curdle and Co. in 1873, the LOCH ARD was a three-masted square rigged iron sailing ship. The ship measured 262ft 7" (79.87m) in length, 38ft (11.58m) in width, 23ft (7m) in depth and had a gross tonnage of 1693 tons. The LOCH ARD's main mast measured a massive 150ft (45.7m) in height. LOCH ARD made three trips to Australia and one trip to Calcutta before its final voyage. LOCH ARD left England on March 2, 1878, under the command of Captain Gibbs, a newly married, 29 year old. She was bound for Melbourne with a crew of 37, plus 17 passengers and a load of cargo. The general cargo reflected the affluence of Melbourne at the time. On board were straw hats, umbrella, perfumes, clay pipes, pianos, clocks, confectionary, linen and candles, as well as a heavier load of railway irons, cement, lead and copper. There were items included that intended for display in the Melbourne International Exhibition in 1880. The voyage to Port Phillip was long but uneventful. At 3am on June 1, 1878, Captain Gibbs was expecting to see land and the passengers were becoming excited as they prepared to view their new homeland in the early morning. But LOCH ARD was running into a fog which greatly reduced visibility. Captain Gibbs was becoming anxious as there was no sign of land or the Cape Otway lighthouse. At 4am the fog lifted. A man aloft announced that he could see breakers. The sheer cliffs of Victoria's west coast came into view, and Captain Gibbs realised that the ship was much closer to them than expected. He ordered as much sail to be set as time would permit and then attempted to steer the vessel out to sea. On coming head on into the wind, the ship lost momentum, the sails fell limp and LOCH ARD's bow swung back. Gibbs then ordered the anchors to be released in an attempt to hold its position. The anchors sank some 50 fathoms - but did not hold. By this time LOCH ARD was among the breakers and the tall cliffs of Mutton Bird Island rose behind the ship. Just half a mile from the coast, the ship's bow was suddenly pulled around by the anchor. The captain tried to tack out to sea, but the ship struck a reef at the base of Mutton Bird Island, near Port Campbell. Waves broke over the ship and the top deck was loosened from the hull. The masts and rigging came crashing down knocking passengers and crew overboard. When a lifeboat was finally launched, it crashed into the side of LOCH ARD and capsized. Tom Pearce, who had launched the boat, managed to cling to its overturned hull and shelter beneath it. He drifted out to sea and then on the flood tide came into what is now known as LOCH ARD Gorge. He swam to shore, bruised and dazed, and found a cave in which to shelter. Some of the crew stayed below deck to shelter from the falling rigging but drowned when the ship slipped off the reef into deeper water. Eva Carmichael had raced onto deck to find out what was happening only to be confronted by towering cliffs looming above the stricken ship. In all the chaos, Captain Gibbs grabbed Eva and said, "If you are saved Eva, let my dear wife know that I died like a sailor". That was the last Eva Carmichael saw of the captain. She was swept off the ship by a huge wave. Eva saw Tom Pearce on a small rocky beach and yelled to attract his attention. He dived in and swam to the exhausted woman and dragged her to shore. He took her to the cave and broke open case of brandy which had washed up on the beach. He opened a bottle to revive the unconscious woman. A few hours later Tom scaled a cliff in search of help. He followed hoof prints and came by chance upon two men from nearby Glenample Station three and a half miles away. In a state of exhaustion, he told the men of the tragedy. Tom returned to the gorge while the two men rode back to the station to get help. By the time they reached LOCH ARD Gorge, it was cold and dark. The two shipwreck survivors were taken to Glenample Station to recover. Eva stayed at the station for six weeks before returning to Ireland, this time by steamship. In Melbourne, Tom Pearce received a hero's welcome. He was presented with the first gold medal of the Royal Humane Society of Victoria and a £1000 cheque from the Victorian Government. Concerts were performed to honour the young man's bravery and to raise money for those who lost family in the LOCH ARD disaster. Of the 54 crew members and passengers on board, only two survived: the apprentice, Tom Pearce and the young woman passenger, Eva Carmichael, who lost all of her family in the tragedy. Ten days after the LOCH ARD tragedy, salvage rights to the wreck were sold at auction for £2,120. Cargo valued at £3,000 was salvaged and placed on the beach, but most washed back into the sea when another storm developed. The wreck of LOCH ARD still lies at the base of Mutton Bird Island. Much of the cargo has now been salvaged and some was washed up into what is now known as LOCH ARD Gorge. Cargo and artefacts have also been illegally salvaged over many years before protective legislation was introduced. One of the most unlikely pieces of cargo to have survived the shipwreck was a Minton porcelain peacock - one of only nine in the world. The peacock was destined for the Melbourne International Exhibition in 1880. It had been well packed, which gave it adequate protection during the violent storm. Today, the Minton peacock can be seen at the Flagstaff Hill Maritime Museum in Warrnambool. From Australia's most dramatic shipwreck it has now become Australia's most valuable shipwreck artefact and is one of very few 'objects' on the Victorian State Heritage Register. The LOCH ARD shipwreck is of State significance – Victorian Heritage Register S 417. Flagstaff Hill’s collection of artefacts from LOCH ARD is significant for being one of the largest collections of artefacts from this shipwreck in Victoria. It is significant for its association with the shipwreck, which is on the Victorian Heritage Register (VHR S417). The collection is significant because of the relationship between the objects, as together they have a high potential to interpret the story of the LOCH ARD. The LOCH ARD collection is archaeologically significant as the remains of a large international passenger and cargo ship. The LOCH ARD collection is historically significant for representing aspects of Victoria’s shipping history and its potential to interpret sub-theme 1.5 of Victoria’s Framework of Historical Themes (living with natural processes). The collection is also historically significant for its association with the LOCH ARD, which was one of the worst and best known shipwrecks in Victoria’s history. An unrestored tea spoon from the wreck of the LOCH ARD. The spoon's design is of a flattened fiddle-back handle, a thin stem or shank, a flared collar, and an elongated bowl. The spoon's construction is of an outer surface of brass-like copper alloy electroplated onto a core base metal of 'nickel silver'. 20% of the plate remains with traces of verdigris. No makers marks are visible.flagstaff hill, warrnambool, shipwrecked coast, flagstaff hill maritime museum, maritime museum, shipwreck coast, flagstaff hill maritime village, great ocean road, loch line, loch ard, captain gibbs, eva carmichael, tom pearce, glenample station, mutton bird island, loch ard gorge, electroplated cutlery, loch ard shipwreck, nickel silver, william page & co, birmingham, brass plating, makers marks