Showing 1098 items matching "lights"
-
 Ballarat Tramway Museum
Photograph - Black & White Photograph/s, Oct. 1939
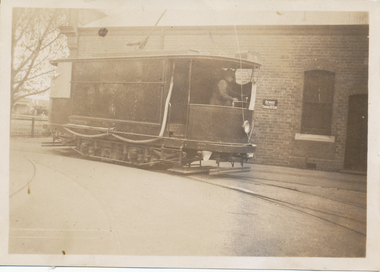
Black and White print contained within the Wal Jack Bendigo and Geelong Album, see Reg Item 5003 for more details. Photo of Bendigo sprinkler or scrubber tram just inside the depot gates, October 1939. Shows the curtains around one side of the tram, hose lines and lights underneath the ends of the tram. Printed on Velox paper. i1 - scan of print in the album i2 - rear of image i3 - scan of negative at 3200dpi added 6/6/2020.On the rear in blue ink "Bendigo Brush Water Tram built by Brush Engineering Co. England"trams, tramways, bendigo, sprinkler tram, scrubber tram, depot, sprinkler, scrubber -
 Ballarat Tramway Museum
Photograph - Black & White Photograph/s, Oct. 1939
Black and White print contained within the Wal Jack Bendigo and Geelong Album, see Reg Item 5003 for more details. Photo of Bendigo sprinkler or scrubber tram just inside the depot October 1939. Shows the curtains around one side of the tram, hose lines and lights underneath the ends of the tram. Printed on Velox paper with a Kodak Print stamp. i1 - scan of print in the album i2 - rear of image i3 - scan of negative at 3200dpi added 6/6/2020.On the rear in pencil the number "35"trams, tramways, bendigo, sprinkler tram, scrubber tram, sprinkler, scrubber -
 Ballarat Tramway Museum
Slide - 35mm slide/s, 1968
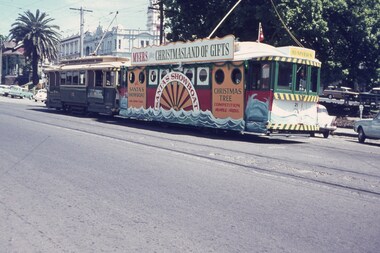
Trams 12 and 21 as Myer's Christmas tram in City Loop. Photographed from south side of Sturt St. looking towards Post Office. Trams have both been fitted with lights, and have large white strip on front dash. Tram 21 has been made up as 'Santa's Showboat' and has red ensign flag on roof. Photo taken during the 1968 Christmas season. See Date advised by Alan Bradley, 15/3/03Niltramways, trams, santa tram, myers, decorated trams, city loop, tram 12, tram 21 -
 Ballarat Tramway Museum
Slide - 35mm slide/s, Keith Kings, 7/01/1961 12:00:00 AM
Bendigo No. 6 arriving at Charing Cross ex North Bendigo, with 'Golden Square' destination. Tram has all blinds down, fitted with briquettes ad on front dash, has had bumper and top of roof painted with safety stripes, and under front window small white stripe has been painted, no lights as yet. On a centre of road pole, on a sign is 'ALL CARS STOP HERE'. Photo taken 7-1-1961. Photo by Keith Kings.Stamped on 'K.S.Kings etc' and in blue ink 'K(k)(329), 1/250,. f5.6, 7/1/61, Bendigo No. 6, ex Ballarat 25, at Charing Cross, in Pall Mall.'tramways, trams, bendigo, charing cross, pall mall, north bendigo, tram 6 -
 Melbourne Tram Museum
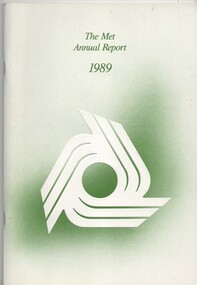
Administrative record - Annual Report/s, Metropolitan Transit Authority (MTA), "Metropolitan Transit Authority of Victoria Annual Report - 1988/89", 1989
Annual Report - 64 pages + card covers, printed on slightly textured paper. with the MTA logo imprinted on the front cover. Has a table of contents. Dated 31/10/1989, with letter to the Minister Jim Kennan, from the Chairman John King. Managing director Kevin Shea, Board members - include Greg Rodgers representing the Union. Includes a review of the organisation, Light rail vehicles and lines, Met Plan, new bus services and priority for trams at traffic lights.trams, tramways, annual reports, the met, public transport, mta, personnel, avm, funding, buses, light rail, metplan -
 Melbourne Tram Museum
Newspaper, The Age, "Late trams to go before flow”, 26 Feb 2019
Newspaper clippings titled: "Late trams to go before flow” - the Age, Tues 26 Feb, 2019. Trial of new GPS technology on trams on route 75 which will trigger an early switch of traffic lights from red to green. This will enable late-running trams to proceed through the intersection. Information from the GPS systems will be sent to a central traffic control centre to change light sequence and prioritise late-running trams. Trial will run between March and May 2019.trams, tramways, route 75, toorak rd, burwood highway, traffic control, traffic lights, testing, trials -
 Melbourne Tram Museum
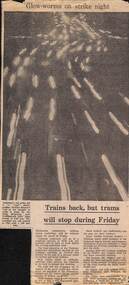
Newspaper, The Age, "Glow-worms on strike night", "Trains back but trams will stop during Friday", c1974
Newspaper clipping from The Age, c1974 titled "Glow-worms on strike night" with the sub-title of "Trains back but trams will stop during Friday". Has a photo of motor vehicle lights in Kingsway near McRobertson Girls High School, showing the traffic snaking along the road during the train strike. Notes that trams will not be running on Friday, when a stop work meeting will be held. Quotes the premium Mr. Hamer about the strikes. Item not dated.. Photo by Michael Rayner of The Age.trams, tramways, unions, kingsway, strike, night photo -
 Melbourne Tram Museum
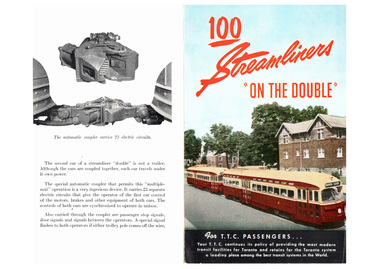
Pamphlet, Toronto Transit Commission, "100 Streamliners 'On the Double' ", c1947
Four page pamphlet, with colour photos titled "100 Streamliners 'On the Double' " promoting the forthcoming launch of coupled PCC cars for the Toronto Transit System, c1947. Cover shows a coupled set, interior views, trams passing through a set of traffic lights and the couplers. Promotes the use of these cars and their forthcoming use on the Bloor - Danforth route. This route was replaced by a subway mid 1960's. See https://en.wikipedia.org/wiki/Presidents%27_Conference_Committee_(Toronto_streetcar) - accessed 28-2-2019.trams, tramways, pcc, transport equipment, tramcars, canada, toronto -
 Melbourne Tram Museum
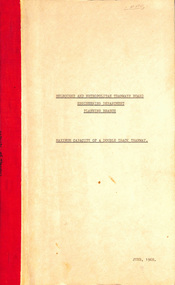
Document - Report, Melbourne & Metropolitan Tramways Board (MMTB), "MMTB Planning Branch - Maximum Capacity of a Double Track Tramway", Jun. 1968
Report - 9 foolscap sheets - titled "MMTB Planning Branch - Maximum Capacity of a Double Track Tramway", dated June 1968 looking at the capacity of Swanston St in peak hours compared to an underground tramway with bogie or articulated trams. Compares different types of trams - SW6 to PCC, headways, time intervals, size of tram stops, traffic lights and comments. 2nd copy - original document - card covers, red binding on the left hand side - with three diagrams,2nd copy has "Lees" in top right corner.trams, tramways, mmtb, tram stops, swanston st, tramcar design, tramcar operations, traffic lights -
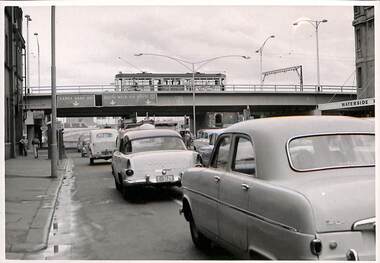 Melbourne Tram Museum
Photograph - Set of 6 Black & White Photograph/s, 1959 to 1960
Set of 6 photographs of the Flinders St flyover over Kings St, soon after opening with tramcars and motor vehicles on the streets and bridge. Has the Waterside Hotel on the right side of the photographs. Has the pedestrian crossing traffic lights in the views. Don Storey's tramway history notes - http://www.classicaustraliantv.com/Gunzel.htm accessed 23/6/2019 notes that for 1959 - Temporary track on a new flyover in Flinders Street at King Street was brought into use; the permanent track was completed on June 26, 1960.Photos were contained within an envelope marked "Secretary Head Office MMTB (616 Lt Collins St) and "Please do not fold.trams, tramways, king st, flinders st, bridges, traffic lights -
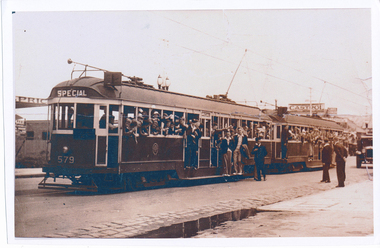 Melbourne Tram Museum
Photograph - Digital Image, School Annual picnic special trams using W2 579, c1935
Digital Image of the Coburg Baptist Sunday School Annual picnic special trams using W2 579 and another W2, both appearing still in chocolate colour scheme. An posed newspaper or photograph with crews watching traffic. Location - unknown, has a Castrol sign in the background and decorative street lights above the first tram. The donor advised that the photo is reportedly taken in 1935 and was enroute to Wattle Park. The photo on file has better definition than that shown in the image.trams, tramways, special trams, coburg, tram 579 -
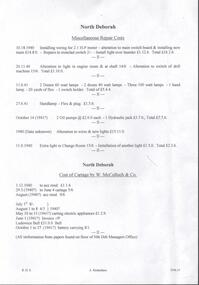 Bendigo Historical Society Inc.
Document - NORTH DEBORAH GOLD MINING CO N. L. - NORTH DEBORAH MISCELLANEOUS REPAIR COSTS
Three small, blue handwritten pages of costs of repairs, with typed copies of same, listing some stores and cost of cartage by W. McCulloch & Co. Dates 1940 - 41. Most of the repairs/installation are electrical, including installation of extra lights, installing wiring for 2.1 H P motor and alteration to main switchboard. Stores include globes, lamps and a hydraulic jack. Note at the bottom: All information from papers found on floor of North Deborah Managers Office. Albert Richardson Collection. document, gold, north deborah gold mining co n. l., north deborah gold mining co n. l., north deborah miscellaneous repair costs, w mcculloch & co, ludowice bell -
 Mission to Seafarers Victoria
Magazine (Item) - Newsletter, The Victoria Missions to Seamen, Jottings From Our Log, 1906-1937
Likely to be the idea of Reverend Alfred Gurney Goldsmith, and first published in January 1906 (missing), the newsletter was issued quarterly (printed generally in January, Easter, Midwinter and Michaelmas) but became annual from 1932. 110 Jottings were printed from January 1905 till October 1937; although there was an error in the numbering or a special edition number 88. And unfortunately a few issues are missing The Mission holds a photograph of this publication being packed in calico by the members of the 'Ladies Harbour Lights Guild' for distribution to branches and supporters.Published for some 30 years by the Victorian Missions to Seamen issued to supporters the series contributes to the history of the organisation. Although incomplete, the set is a likely to be the only one remaining. It is a key cross reference supplying many details and dates of ships, crew members, supporters, committee members, chaplains and LHLG, activities in both Melbourne, Port Phillip and other States where Missions were gradually established and information not able to be included in Annual Reports. It is an invaluable source of images. Some of photographs published are still in the missions heritage collection.newsletter, victorian seamen's mission, melbourne misson to seamen, jottings from our log, lhlg, ladies harbour lights guild, alfred gurney goldsmith -
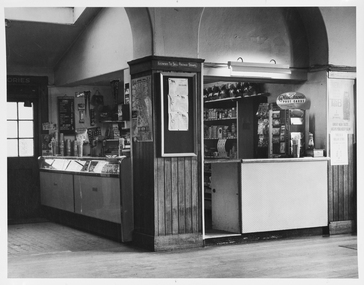 Mission to Seafarers Victoria
Photograph - Photograph, Black and white, Melbourne Harbour Trust, c. 1963
The canteen is part of the Mission to Seafarers building that has catered to visiting seafarers since 1917. The canteen is operated by the Flying Angel Club, which offered services to seafarers including food, drink and souvenirs from the canteen and events held in the main hall which invloved the use of the canteen. The Ladies Harbor Lights Guild also used the canteen facilities for functions and fundraisers held at the Mission to Seafarers. One of the flyer in Chinese helps dating the photograph between 1963-66 when Padre Wong was chaplain at the Mission.Historical record of the Mission to Seafarers canteen post-1963. This is an example of the contemporaneous use of the canteen as primarily a supply shop and in a comparative fashion reveals some of the overall changes at the Mission.A white-bordered, black and white photograph of the Mission to Seafarers Canteen. From the left hand side of the photograph the image portrays an external doorway with six glass windows, emitting light from behind. This leads to the dipslay cabinet and bench of the canteen which is reflecting light from the windowed door. Central to the image is a pillar which is three-quarters wood paling starting from the floor, of which a map is displayed on one edge and a notice board on the remaining visible edge of the pillar. A bench is visible to the right side of the pillar and the far right side of the photograph, posters are hung on the wall. Purple stamp on central back of photograph. "Melbourne Harbor/Trust Photograph/Negative No......." photograph, canteen, tab, koalas, blackboard, archway, pennant, licensed-to-sell-postage-stamps, mission to seamen, mission to seafarers, melbourne, flying angel club, map, bar, milkshake machine, display case, fluorescent light, notice board, wains coting, postcards, milkshake, beverage, plastichrome, matches, razors, gillette, straw, melbourne harbour trust, melbourne harbor trust, donation tin, lighthouse -
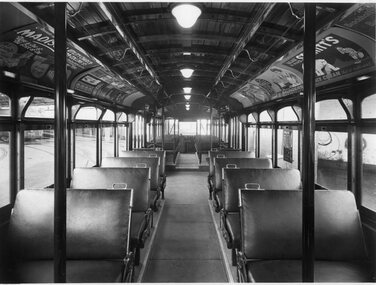 Ballarat Tramway Museum
Photograph - Y1 class tram interior, Sutcliffe Pty Ltd, early 1930's
Black and white photograph of the interior a Y1 class tram car, photographed at Camberwell Depot. Shows arrangements of seats, lights with covers and roof ads. A number of roof ads and window posters in the tram - of tram in service. Part of tram 550 in background. On rear is Sutcliffe stamp, and Gordon and Gotch stamp with date July 10. Has "Sutcliffe Pty. Ltd. Photographers Cromwell buildings 366a Bourke St. Melbourne" stamp in purple on back of photo. Destination City, 4th Edition and 5th edition.Yields information about the interior of a Y1 class tramcar.Black and white photograph with details on rear.On rear in pencil is "Return to F. Shennen" with arrow pointing to Gordon and Gotch stamp. "Interior Y1". The Sutcliffe stamp has two pencil crosses through it.trams, tramways, mmtb, y1 class, interiors -
 Ballarat Tramway Museum
Document - Log book, Diary, State Electricity Commission of Victoria (SECV), Ballarat Depot workshop, 1961
Lists for each weekday, the work done on each tram, who was on leave, and events or failures, derailments - shown in red ink, motormen examined, Notes during June the completion of the work to install the dash canopy lights. Related item diaries: 8280 - 1960 8281 - 1961 8282 - 1962 8283 - 1964 8284 - 1965 8285 - 1966 8286 - 1967 8286A - 1968 8287 - 1969 8288 - individual sheets for each tram 8289 - 1970 8290 - Monthly reports from May 1965 to August 1971Yields information about the Ballarat Workshop activities, tramcars maintained and events.Printed and bound book - Collins Australian Diary No. 324 for 1961 - two pages per week, ruled with date and holiday information.ballarat, tramcars, workshop records, workshops, maintenance, dash canopy lights -
 Mission to Seafarers Victoria
Photograph, c. 12 April 1930
From Record (Emerald Hill, Vic. : 1881 - 1954), Saturday 12 April 1930, page 3 "On Wednesday, at the 24th meeting of the Victorian Mission to Seamen. Archbishop Head welcomed a new chaplain, the Rev. F. L. Oliver, formerly of Newcastle. Mrs. Oliver was also welcomed. The old executive was re-elected except Messrs. Durham and Holmes, who declined the honor. Lady Fraser was elected president of the Harbour Lights Guild. The Rev. \V. M. Robertson of the Port Melbourne Mission, was among the speakers."First photograph of Padre Oliver and his family at the Mission in 1930.Written in black on verso: Dad (Padre Oliver) , Miss Tracy, Mum (Mrs Oliver), Phyllis Atkins (secretary), Beverleyfrank oliver, flinders street, garden, phyllis atkins, secretary, alice sibthrope tracy, moira bird oliver (nee good), archbishop head, beverley oliver, rev. w.m robertson -
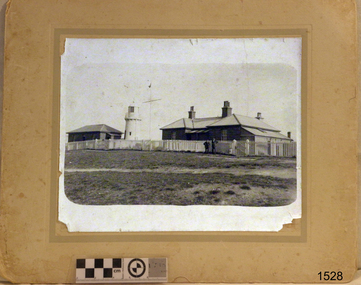 Flagstaff Hill Maritime Museum and Village
Photograph - Historical, building, Late 19th to early 20th century
The black and white photograph depicts the Lady Bay Lighthouse Complex at Flagstaff Hill, Warrnambool. It was opened on this site in 1871. From left to right, the Chartroom (previously named the Store), Upper Lighthouse, Flagstaff, Lighthouse Keeper's Quarters. The bluestone buildings are facing North on Merri Street. The Harbour Pilot's Lodgings were on the east of the Complex. There are two unknown male figures standing in front of the light-coloured picket fence that encompasses the Complex. The photograph is mounted on card. WARRNAMBOOL'S LADY BAY LIGHTHOUSES In the 1800s ships sailing from England to Australia began to use Bass Strait as a faster route to Melbourne. Small navigation errors led to many tragic shipwrecks. From 1848 lighthouses were operating along Victoria’s southern coast as a guide for sailors. Coastal towns such as Warrnambool grew and the exchange of trade and passengers was of great benefit. However, the uncertain weather changes, relatively shallow waters and treacherous, hidden rocky reefs were not really suitable for a Harbour and in the 1840s and 1850s, there were many shipwrecks in the area, with some even stranded in its Lady Bay harbour. A jetty was built in 1850 and a flagstaff to guide seafarers was placed up high on what became known now as Flagstaff Hill. In November 1857 the Victorian Government recommended that Warrnambool Harbour had beacons and two lighthouses to guide vessels into and out of the Harbour safely. The white light of the Middle Island lighthouse was to be used for the first time on September 1, 1859. The red light of the Beach Lighthouse, a wooden obelisk structure, was first operated on March 25, 1860, but in 1868 this light was ‘discontinued’ due to it being too low. Melbourne’s Department of Public Works decided to relocate the Middle Island Lighthouse Complex - Lighthouse, Keeper’s Quarters, Privy, Store Room and even water tanks - to Flagstaff Hill. The lower obelisk was shortened, and a protruding gallery, railing, and external ladder were added, and the light from the Beach Lighthouse. A green guiding light was erected on the end of the jetty. The transfer of the Complex began in March 1871. Each shaped stone of the lighthouse was carefully numbered, removed then reassembled on Flagstaff Hill. In 1872 the well was sunk behind the Lighthouse Keeper’s Cottage. The Keepers and families had left Middle Island in April and moved to Flagstaff Hill in October 1871. Vessels entering Lady Bay align the Upper and Lower Lighthouse towers during the day and the lights at night. The Upper Lighthouse is a round tower, and the Lower Light is square. The Lighthouses were categorised as harbour lights rather than coastal lights, so they remain under the control of the Victorian Government’s Ports and Harbours section. The lights were originally powered by oil, then acetylene gas, later by electricity, and then converted to solar power in 1988. In 1993 the solar panel was replaced by a battery charger. A decision was made in 1936 to replace the lighthouses’ lights with unattended lights that no longer required Keepers and Assistants. At least 29 Keepers had attended to the lighthouse from its opening in 1859 to when the last official Lightkeepers left In April 1916. The Warrnambool Harbour Board rented out the Quarters from 1916 to 1936. The Board closed down but the rentals continued with other unknown landlords. In the 1970s the Flagstaff Hill Planning Board was set up under the chairmanship of John Lindsay. The Board was to make recommendations to the Warrnambool City Council regarding using the buildings and the rest of the Crown Land on the site. The Flagstaff Hill Maritime Village opened in 1975 and began renovating the Cottage in stages, during which time evidence of a 1920s fire was found in the eastern section of the cottage. Additions of a porch on the west and a washroom on the east were made in the 1980s. The western part of the building is now a Shipwreck Museum and the east has returned to a late 19th-century Lighthouse Keeper’s cottage and includes the screen made by Assistant Lighthouse Keeper Thomas Hope in the late 19th century. He served as Assistant Keeper in Warrnambool for two periods.The Warrnambool Lighthouse Complex is now listed on the Victorian Heritage Register, H1520, for being of historical, scientific (technological) and architectural significance to the State of Victoria. The Complex is significant as an example of early colonial development. The buildings are significant for their connection with the important navigational function of the Lighthouses, a function still being performed to this day. The buildings are also significant as an example of structures designed and works carried out by the Public Works Department in Victoria in the mid-to-late 19th century. The structures still stand strong. Photograph; Warrnambool Lighthouse Keeper's cottage, lighthouse, flagstaff and chartroom at Flagstaff Hill, and a light-coloured picket fence with gate. Two male figures are in front of the fence. Black and white print glued to a yellow card. The inscription is indecipherable. The right side of the cottage has a built-in, enclosed addition.Ink stamped in lower right hand corner, too faded to be legible.flagstaff hill, flagstaff hill maritime museum, flagstaff hill maritime village, warrnambool, maritime museum, shipwreck coast, lighthouse keeper's cottage, lighthouse residence, lighthouse, chart room, quarters, privy, middle island, beach lighthouse, obelisk, lighthouse complex, lady bay complex, warrnambool port, warrnambool harbour, lady bay, keepers, lighthouse keeper, upper lighthouse, lower lighthouse, assistant keeper, ports and harbours, cottage -
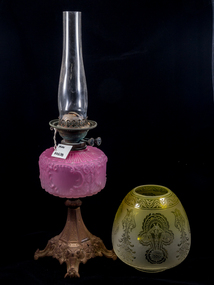 City of Moorabbin Historical Society (Operating the Box Cottage Museum)
Lights, Victorian kerosene banquet lamp, c1900
The kerosene lamp is a type of lighting device that uses kerosene as a fuel. Kerosene lamps have a wick or mantle as light source, protected by a glass chimney or globe; lamps may be used on a table, or hand-held lanterns may used for portable lighting. There are three types of kerosene lamp: traditional flat wick, central draught (tubular round wick), and mantle lamp. The side screws adjust the length of the wick and hence the strength of the flame / light produced. Prior to the introduction of gas and electricity these lamps provided light in households after sunset.Prior to the introduction of gas and electricity these lamps provided light after sunset for the early settlers, as they established their farms and businesses, in Moorabbin Shire.A Victorian kerosene banquet lamp, with a gilded metal quad footed base, cranberry glass oil reservoir with geometric patterns, original etched, yellow, glass globe shade and clear glass chimney. There are 2 side screws for adjusting the flame.early settlers. pioneers, follett w, moorabbin, bentleigh, brighton, ormond, market gardeners, kerosene, paraffin, lights, lamps, candles -
 Bendigo Historical Society Inc.
Document - NORMAN OLIVER COLLECTION: SPEECH NOTES 7 AUGUST 1951
The Norman Oliver collection. Norman Oliver was three times Mayor of Bendigo - 1950-51, 1964-65, 1970-71. Fifteen pages of typed notes headed Mayor's Report 7 August 1951. In the format used for his talks on 3BO 'The Mayor Speaks'. Additions in blue ink. Topics include : death of Mr E. M. Vains (Mort), Mayor of Bendigo in 1925, City By- laws, the school site for deaf children, the traffic lights, road traffic code, the Mayor's Blanket Fund, and the end of the municipal year.bendigo, council, speech notes, norman joseph oliver , councillor norman oliver. mayor of bendigo. 3bo 'the mayor speaks'. school for deaf children. vains, e. m. -
 Bendigo Historical Society Inc.
Document - NORMAN OLIVER COLLECTION: SPEECH NOTES 30 MAY 1951
The Norman Oliver collection. Norman Oliver was three times Mayor of Bendigo - 1950-51, 1964-65, 1970-71. Nineteen pages of typed notes dated 30 May 1951. In the format of his weekly talk on 3BO 'The Mayor Speaks'. Topics include : announcement of a loan for 37,000 pounds for plant and equipment, Federal Aids Roads Grants, traffic lights, taxi services, hackney carriage licenses, South Bendigo Football Club, the School for Deaf Children, the engineer's report, town planning, the Baby Health Centre.bendigo, council, speech notes, norman joseph oliver , councillor norman oliver. mayor. 3bo 'the mayor speaks'. school for deaf children. -
Ballarat Tramway Museum
Newspaper, The Courier Ballarat, "On the Right Track", "Tram rides light up lake", 24/05/2021 12:00:00 AM
Set of two newspaper cuttings regarding the illuminated Night Tram, No. 18 - using LED Neon lights. See also the June 2021 issue of Fares Please! for further details. .1 - front page of The Ballarat Times with a photo of Chris Phillips standing in front of the tram. .2 - Page 8 of The Courier 24/5/2021, titled "Tram rides light up lake", written by Jackson Russell, photo Lachlan Bence of No. 18 with Mark McKay leaning out of the tram. Part of the Ballarat Heritage Festival.btm, night lighting, night photo -
 Ballarat Tramway Museum
Postcard, Murfett Pty Ltd, Princes Bridge Melbourne, c1968
Colour postcard of Princes Bridge and South Gate Fountain Melbourne, late 1960's. Postcard shows the southern end of the Princes Bridge, has 3 W2's on bridge, each with marker lights and the South Gate fountains, existing at the time of the photograph. Since replaced by the Arts Centre. On rear is printed caption, giving details of the location, the date of the fountain construction (1959), stamp placement area and publishers details and post card number (8P 1053-2), National View by Murfett Publishers.On top edge near stamp area in black ink "1968".trams, tramways, melbourne, southgate, princes bridge, mmtb -
 Ballarat Tramway Museum
Negative, Geoff Grant, 19/06/1955 12:00:00 AM
Negative No. N331 and black and white print made by a laser printer (stored in folder ) of a side on view of W6 988 turning from Nicholson St. to go eastbound in Victoria Parade. Photo taken 19/6/1955. Two tower trucks in background. Intersection does not appear to have any traffic lights at the time. Note: Geoff Grant's typed information has the photo as the tram swinging from Victoria Parade into Nicholson St. Negative scanned hi res and imaged updated 21/5/2020.trams, tramways, melbourne, nicholson st, victoria parade, testing overhead, commissioning, tram w6 988 -
 Ballarat Tramway Museum
Slide - 35mm slide/s, Travis Jeffrey, c1961
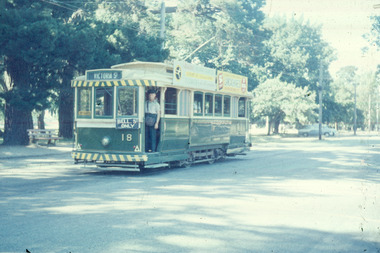
Agfa plastic mount (blue base, white cover) with a photo of No. 18 at Gardens Loop, showing Victoria St., note Bell St. auxiliary board, not correct and door opened on wrong side. Posed photograph. Tram is in the process of being fitted with dash canopy lights and tiger strips. Roof advertisements - Whites Florist shop of 2 Sturt St. and Lancashires. Slide rescanned at 3200 dpi 24-10-2020, jpg replaced, tiff file retained. This file was scanned in 2003 and may show colour changes."BAS 9" in penciltramways, trams, gardens loop, wendouree parade, tram 18 -
 Ballarat Tramway Museum
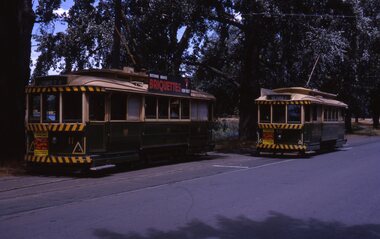
Slide - 35mm slide/s, Peter Moses, Dec. 1963
Photo of Ballarat trams 11 and 18 crossing at Carlton St. Loop. Tram 18 showing destination of Victoria St. and Tram 11, southbound in Wendouree Parade, showing Lydiard St North on rear of tram. Both trams have advertisements for 50/50 dancing at the Civic Hall are on the front panel of the tram and No. 11 a roof advertisement for SEC Briquettes. Both trams have tiger stripes but not the white dash under the lights. Kodak cardboard mount slide, taken by Peter Moses December 1963.On back of slide in blue ink "1963 Dec. Trams Lake Wendouree, Ballarat Vic." and bottom right hand corner "P. Moses"tramways, trams, wendouree parade, carlton st, tram 11, tram 18 -
 Ballarat Tramway Museum
Photograph - Black & White Photograph/s, c1960
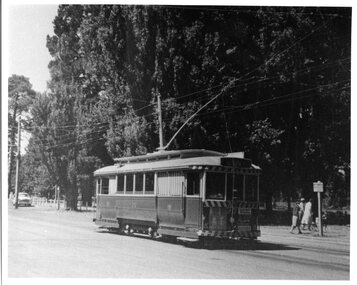
Black and white photograph of SEC tram No. 20 standing in the northbound track at Gardens Loop, c1960, photo taken after tram has been fitted with dash canopy lights, but not with enlarged white band under lighting. Photo taken looking at rear of tram, with a family walking away from the tram towards the Gardens Pavilion (Lake Lodge in 1997). Has two ads beneath the drivers windows, one about the dancing, the other cannot be read. See Reg Item 3847 for another print of the same photograph.trams, tramways, ballarat, gardens loop, sec , tram 20 -
 Ballarat Tramway Museum
Photograph - Black & White Photograph/s, Ian Barkla, c1960
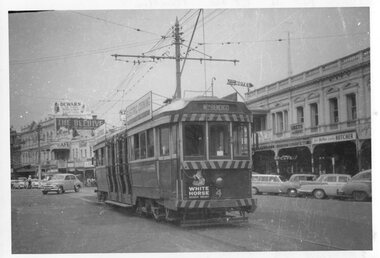
Black and white photograph of Bendigo, northbound about to arrive at the Fountain. Photo taken after tram has passed the photographer. Tram has destination of "Nth Bendigo" Undated, tram has been fitted with dash canopy lights but not the enlarged white strip under the driver's cab windows. Has buildings on the east side of Pall Mall in background with many cars of the era - early 60's. Tram has "White Horse" whisky ad on rear drivers dash panel and two SEC roof ads.On rear in black biro "Bendigo No. 4 at the Fountain / (was last Geelong tram 25-3-56) / Ex Geelong 33, Ex 120 MMTB"trams, tramways, bendigo, pall mall, tram 4 -
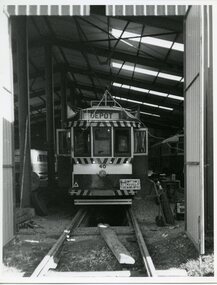 Ballarat Tramway Museum
Photograph - Black & White Photograph/s, 8 or 9/1981
Black and White photograph of BTM No. 40 on the front of No. 5 road at the depot, August or September 1981 to be ready for use during the 10th anniversary of the closure of the tramway. Track has been laid outside the door, but no overhead in position as yet. The tram has its lights on and a wandering lead connected. In the background can be seen Geoff Cargeeg's stored bus and W5 671. Photo printed on Kodak paper. See July 1981 Fares Please! for background. see July 1981 Fares Please and Annual Reportstramways, trams, btm, depot, trackwork, tram 40 -
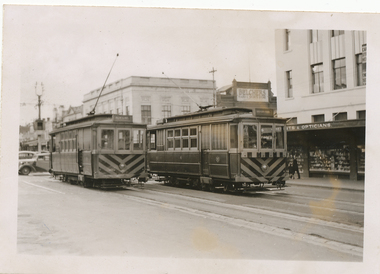 Ballarat Tramway Museum
Photograph - Black & White Photograph/s, Wal Jack, 1/01/1956 12:00:00 AM
Black and White print contained within the Wal Jack Bendigo and Geelong Album, see Reg Item 5003 for more details. Photo of Geelong No. 5 and No. 4 in Ryrie St near Moorabool St. 1-1-1956, Photo by Wal Jack. In the background is Belchers Radio and Sport Store and a set of bar traffic lights. No. 5 has the destination of Newtown, and No. 4 the destination of Eastern Park. i1 - scan of print in the album i2 - rear of image i3 - scan of negative at 3200dpi added 27/6/2020.On the rear in blue ink "Geelong No. 5 to Newtown, No. 4 to Eastern Park, Ryrie St near Moorabool St, 1-1-56" with Wal Jack copyright stamp in the top right hand corner and the number "T1303" written in.trams, tramways, geelong, ryrie st, tram 5, tram 4