Showing 1106 items
matching east bendigo
-
 Bendigo Military Museum
Award - MEDAL, Post 1945
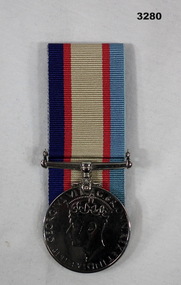
Frederick HAYES enlisted in the 2nd AIF on 28.6.1940 Regt No VX41213 age 30 years. He embarked with the 2/24th Bn on 5.2.1941 and disembarked in the Middle East on 23.3.1941. The unit was soon in Tobruk. He was hospitalised on 27.7.1941 with Otitis Media a serious Ear Infection. he was returned to Australia disembarking on 23.5.1942. He was discharged from the Army on 2.5.1943 holding the rank of CPL in the 2/1st SEC Aust Kit Store. Records show he was entitled to 3 other medals including the Africa Star.Australian Service Medal, court mounted, no rear pin.VX41213 F HAYESmedals, military, history -
 Bendigo Military Museum
Card - CARD, CHRISTMAS FROM THE MIDDLE EAST
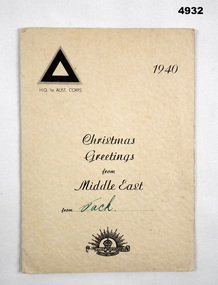
Probably related to the service of a Jack Parsons, Full details not clear.This is a folded card. On the front cover, top left is a triangle symbol. The phrase HQ 1 Aust Corps is underneath that. The year 1940 is in top right side. In the corner are the words, Christmas Greetings from Middle East. At the bottom is the Rising Sun Badge. Inside is a B & W print of an Arabic domed building. The printing is in black ink.The name "Jack" is written in green ink in the space provided.christmas card, middle east, ww2 -
 Bendigo Military Museum
Photograph - PORTRAITS, Paramount Photo. J. Solomon, Jerusalem, Photos of Jack Parsons in the Middle East
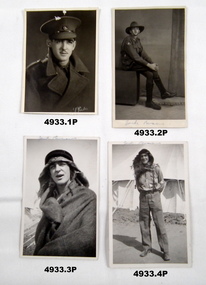
Photos/postcards are addressed with much affection to "Thel". 1. B & W portrait of soldier with peaked cap. Aust Rising Sun is on the cap and he is wearing a great coat. He has a moustache. 2. B & W studio portrait of soldier seated. He has his slouch hat folded down with the chin strap on. He has a triangle colour patch on right shoulder, He is wearing leather leggings. 3. B & W portrait of Jack Parsons in a type of Arabic costume. Tents in background. On rear it states "Middle East - Jack Parsons 1940." The moustache has gone. 4. B & W full length portrait. Jack Parsons in uniform with an Arabic style head-dress. Tents in background. 5. Seated portrait of Jack Parsons in uniform. He has a peaked cap, jersey and an MP armband. 6. B & W photo of soldier standing beside a vehicle which has the bonnet up. On the rear is written 25/11/40 to Thel from Jack. Palestine. 7. B & W portrait of soldier standing at ease. He has a peaked cap. Uniform shorts, long socks & shoes. He is wearing a pistol holster on his left hip. On the the back is written "Jack Parsons, Middle East 1940," 8. B & W photo of Jack Parsons in civilian attire, dark shirt & tie. A jacket with light trim. Light coloured trousers. No moustache. On the rear is written "Jack Parsons, Bankstown". 2. The green ink has run. From " Alexandria - Egypt."photos, ww2 -
 Bendigo Military Museum
Photograph - CARD & PHOTOGRAPHS, AUST LIGHT HORSE WW1, The Australian Memorial Card Co
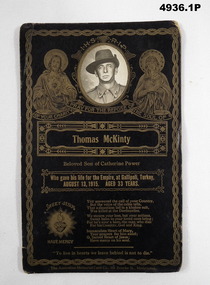
In WW1 the Australian Light Horse served from the Suez Canal right around through Palestine - Syria.1. Memorial Card. Black cardboard with gold printing. It is a religious article with images and prayers. In the top centre is an oval shaped hole with a B & W portrait of an Aust soldier. Slouch hat with side up. 2. Set of 31 B & W photos depicting scenes of light horse activity. Beaches - Middle East buildings - locals - repairing train lines - daily life - campsites - ships off shore etc.Thomas McGinty, Beloved son of Catherine Power. "Who gave his life for the Empire. At Gallipoli, Turkey, August 13 - 1915. Aged 33 years.ww1, middle east, light horse -
 Bendigo Military Museum
Photograph - PHOTOGRAPH 38th BN, Post 1987
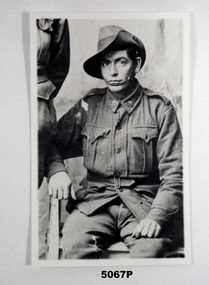
The photo is John Matheson No 1670 C Coy 1st Reinforcements 38th BN AIF. Enlisted 10.4.16 age 27 years, embark for England 20.6.1916, hospital England 21.8.1916 Pnuemonia severe, rejoin unit 26.10.1916, embark for France 22.11.1916, hospital 7.2.1917 Pnuemonia again, rejoin unit 4.8.1917, awarded “MM” 12.10.1917 East of Ypres, hospital 16.1.1918 with Bronchitis, RTA 13.8.1918, discharged from the AIF 19.10.1918 medically unfit. John passed away Oct 1922 classed as War ServicePhoto B & W rectangular shape, soldier in uniform sitting, part of another soldier is on the left, studio background.photographs, 38th bn, c coy, mm -
 Bendigo Military Museum
Banner - SOUVENIR BANNER, FRAMED, 1941
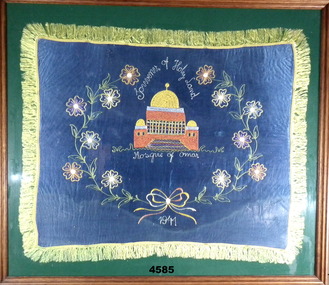
Framed banner on stand. Frame - timber with decorative detail, brown stain with glass front, frame attached to timber stand. Feet supporting frame with piano hinge and chain. Mount - green felt Banner - blue silk like background, with embroidered foliage, flowers, building and inscription in colour. Yellow silk like fringe.Handwritten on back of frame "Made by M. Bowles. Feb. 1993" Embroidered on banner "Souvenir of Holyland/Mosque of Omar/1941"souvenir, wwii, middle east -
 Bendigo Military Museum
Postcard - POSTCARD PHOTOGRAPH, Whitney Bros Electric Studio, C.1940
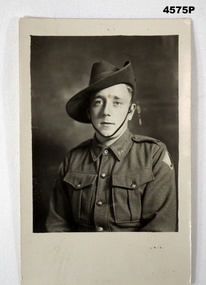
The photo is Douglas Niven Dean VX32652 2nd AIF, enlisted 15/7/1940, age 23 years, posted 7th Div A.A.S.Corp, served in siege of Tobruk, Middle East, New Guinea and Borneo, discharged on 7.12.1945. He was a member of the Bendigo Rats of Tobruk Association, served as secretary 1978 - 87 incl, Jnr V Pres 1992 - 95 and was a life Member of the Association.Postcard photo, portrait, B & W, shows a soldier in uniform, slouch hat, Rising sun collar badges, diamond shape colour patch showing on left arm, rear re post card has space for stamp, address and correspondence, faint makers stamp.On rear in blue ink, “Doug Dean”tobruk, 7th div, aasc, -
 Bendigo Military Museum
Currency - CURRENCY, DUTCH, Netherlands East Indies, March 1943
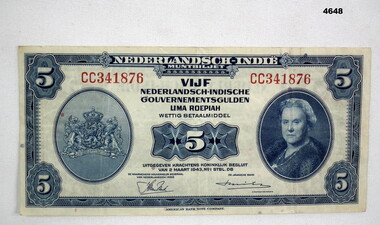
Item souvenired by Alan Mason, refer cat No 3979.2Currency note, “Netherlands East Indies, (Dutch) Five Roepiah, rectangular shape, colours front red, blue, white with depiction of Queen Wilhemina, rear colours greens, white with depictions of planes, soldiers, naval, note datedIn red,”CC341876” twice. “Van 2 MAART 1943” in bluecurrency, dutch 1943, netherlands east indies -
 Bendigo Military Museum
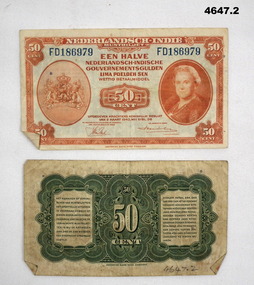
Currency - CURRENCY, DUTCH, Netherlands East Indies, March 1943
Items souvenired by Alan Mason, refer cat No 3979.2.1).2) Currency notes, “Netherlands East Indies” (Dutch) 50 cent, rectangular shape, colours front red, blue, white, rear green and white, depiction of Queen Wilhemina on RH side front, notes dated..1) In blue, “FD119281” twice. .2) In blue “FD186979” twice. Both have “VAN 2 MAART 1943” oncurrency, dutch 1943, netherlands east indies -
 Bendigo Military Museum
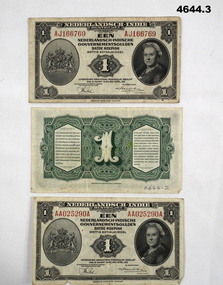
Currency - CURRENCY, DUTCH, DUTCH Government, March 1943
Items souvenired by Alan Mason, refer Cat No 3979.2.1).2).3) Currency notes, “Netherlands East Indies” (Dutch) “1ROEPIAH” rectangular shape, red, white and black colours, depiction of Queen Wilhemina on RH side, notes dated..1) In red, “AJ166769” .2) In red, “AZ237695” .3) In red, “AA02590A” All dated “VAN 2 MAART 1943”currency, dutch, roepiah -
 Eltham District Historical Society Inc
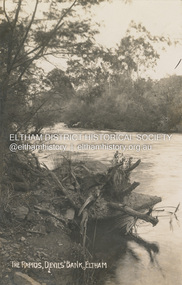
Postcard - Photograph postcard, The Rapids, Devils' Bank, Eltham, 1907
Devils' Bank was situated some two miles from Eltham. It is probably the section along the Yarra River where there are a series of rapids stretching past Petty's Orchard to Griffiths Park and the confluence with the Diamond Creek. Only three properties existed in this area in 1945 aerial maps, Worlingworth and the adjoining property on the bank of the Diamond Creek in Banoon Road and No. 2 Kent Hughes Road. Devils' Bank. The death of Ann Edwards, 77 years, an old resident of the district was reported who lived in an old hut at Devil's Bank who had been found dead in her bed on 13 May 1897 FOUND DEAD IN BED. (1897, May 28). Evelyn Observer, and South and East Bourke Record (Vic. : 1882 - 1902), p. 2 (MORNING.). Retrieved September 3, 2022, from http://nla.gov.au/nla.news-article60696388 A very similar view was published in the Leader paper in January 1908 - Devil's Bank Falls, Eltham VIEWS ON THE UPPER YARRA. (1908, January 11). Leader (Melbourne, Vic. : 1862 - 1918, 1935), p. 28. Retrieved September 3, 2022, from http://nla.gov.au/nla.news-article198106006 On the reverse of the postcard it appears to be postmarked Eltham, Dec 27, 1907 addressed to Mrs Christie Millmoss of Bull Street, Bendigo "Arrived here 10.45 am - ? ? raining cause of ? - ? till evenings it is lovely - but quite fresh after the (rain - crossed out) great ? - I may assume it all go well"Digital file only Postcards scanned from the collection of Michael Aitken on loan to EDHS, 2 Sep. 2022michael aitken collection, devils bank, eltham, postcards, rapids, yarra river -
 Eltham District Historical Society Inc
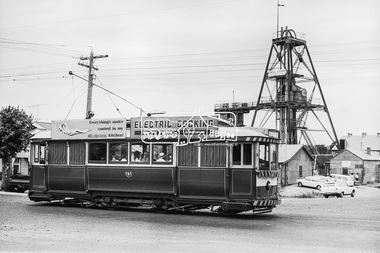
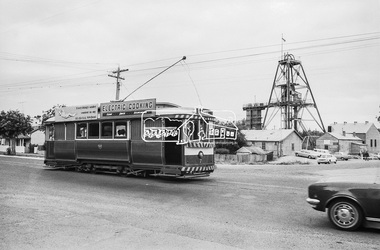
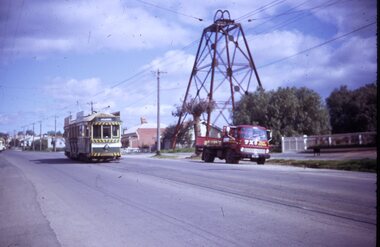
Photograph, Bendigo Tramways No. 7 en route to Golden Square passes the Central Deborah Gold Mining Co, High Street (Midland Highway) and Violet Street, Bendigo, January 1972, Jan 1972
Looking east from Midland Highway at intersection of Violet StreetDigital TIFF file Scan of 35mm Ilford FP3 black and white negative transparencybendigo, bendigo tramways no. 7, central deborah gold mining co. n.l., eaglehawk, george coop collection, golden square, high street, midland highway, tram, violet street -
 Eltham District Historical Society Inc
Folder, George Fletcher, 1878
Folder of information on George Fletcher, Councillor, Steels Creek, 1878. Fletcher, George, Yarra Flats was born in Herefordshire, England, in 1830, and came to Australia, landing in Adelaide, S.A. in 1851. A year afterwards he came to Victoria, but after visiting the Bendigo goldfields and other places returned to Adelaide. In 1859, he again came to Victoria, was employed on the View Hill station, Yarra Flats, and stayed there for four years. In 1867 he selected 80 acres under the Land Act of 1865, and afterwards an additional 320 acres on Steel's Creek, where he now carries on faming and dairying. During htis time Mr. Fletcher has been a member of the board of advice for the east riding of the shire of Eltham, and about twelve years ago he was elected a member of the shire council, and continued so for a term. Mr Fletcher was married in 1859, and has a family of four sons and four daughters. Fom "Victoria and its Metropolis: Past and Present" written in 1888 by Alexander Sutherland. Chapter 19, "The Upper Yarra District" pages [402] - 415. Includes descriptions of some townships and short biographies of local residents. Page 405 george fletcher, steels creek -
 Coal Creek Community Park & Museum
Bottle, glass, c.1887- c.1903
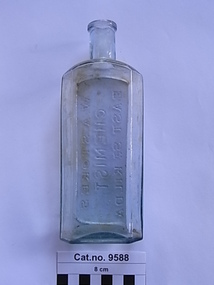
Victorian Government gazette, Wednesday January 28, 1902, page 20. 'The Pharmaceutical Register cont'd.........No. on register : 140, Date of registration : 30 May 1877, Stokes, William Albert, Balaclava Road, East St. Kilda, Qualification : in business in Victoria before 1 October 1876'. TROVE : Argus (Melbourne, Vic. : 1848 - 1957), Tuesday 7 September 1875, page 1. 'WANTED, a respectable BOY ; must live in the neighbourhood. References W. A. Stokes, chemist, Balaclava'. TROVE : Bendigo Independent (Vic. : 1891 - 1918), Tuesday 1 December 1914, page 5. 'ABOUT PEOPLE. The death of Dr. James Stokes, M.R.C.S., L., occurred at his home, 43 Ebden Street, Elsternwick, on Saturday at the age of 90 years. Dr. Stokes, who was born in London,, arrived in Victoria in 1849 and for many years practiced in different parts of the State. He was the last on the male side of an old family, one of his sons, who predeceased him, being the late Mr. W. A. Stokes, chemist, of Carlisle Street, St. Kilda. The funeral took place yesterday morning, when the remains were in interred in the family grave at St, Kilda Cemetery'. TROVE : The Age (Melbourne, Vic. : 1854 - 1954) Tuesday 13 December 1887 p 5 Article " ROUGH ON RATS" POISON.' . PROSECUTION UNDER THE POISONS ACT. At the St. Kilda police court, on Friday, W, A. Stokes, chemist, Carlisle-street, Balaclava, was prosecuted under the Poisons Statute on the charge of selling to one Mrs. Hannah Charlton a poison without having made and signed the entry required by the act. A second charge of selling to Mrs, Hannah Charlton a poison without having obtained the signature of the purchaser to an entry as required by the act was also preferred against the defendant. Both cases were taken together. Mr, Donovan appeared to prosecute, and Mr. Cole for the defence. Senior-constable Connell deposed that he knew the defendant. On the 24th of October last an inquest was held at East St. Kilda relative to the cause of the death of a man named Charlton. A packet bearing the label " Rough on Rats," which was found. in the deceased's bedroom, was produced at the inqiry, and afterwards handed over to Mr. Blackett, Government analytical chemist for analysis. The verdict of the jury was that the deceased died from the effects of arsenical poisoning. Hannah Charlton, a widow, residing in South Yarra, said in September last she purchased a packet of "Rough on Rats" from the defendant's assistant. Witness was not asked her name, place of abode, occupation or for what purpose the poison was required; neither did she observe the assistant make any entry in a book, She did not attach her signature to any document, and was not asked to do so. The packet was purchased for the purpose of poisoning rats. Cuthbert Robert Blackett, Government analytical chemist, stated that Constable Ballantyne handed him the packet produced. Witness made an analysis of the contents, and found it composed of arsenic, slightly coloured with a carbonaceous matter. The mayor announced that there was a doubt in the minds of the magistrates as to whether the defendant could be held guilty under the law, but they thought the prosecution had attained its object by making known the fact that "Rough on Rats" is a poison. They thought that such preparations should be entered by the sellers, but in that case they were inclined to give the defendant the benefit of the doubt and dismiss the case.Aqua tinted clear glass bottle with angled corners for stopper seal with text embossed on one side and on base.On side : 'W.A.STOKES CHEMIST EAST ST. KILDA'. On base : 'K6228'.w a stokes, chemist -
 Coal Creek Community Park & Museum
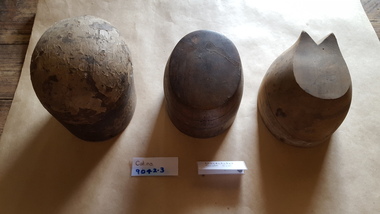
Functional object - Three hat blocks
Oliver Gilpin (1874-1942), chain store proprietor, was born on 8 July 1874 at Seven Creeks near Euroa, Victoria, fourth child and second son of William Gilpin, farmer, and his wife Dinah, née Barton, both from Tyrone, Ireland. He was educated at local state schools and became a draper's assistant at Euroa. A testimonial as 'an energetic, pushing salesman, a careful stock-keeper … honest and industrious' gained him city experience with Ball & Welch Ltd, drapers, in their Carlton store. He used an inheritance to open a drapery store at Korumburra, south Gippsland, in 1895, moving to Rutherglen in the upper Murray valley in 1899. Frustrated by irregular stock deliveries, he moved to Fitzroy, Melbourne, in 1902, seeking a warehouse and the benefits of combined supplies for effective development of country trading. By 1905 he was producing many stock items at Northcote and had established retail outlets at Bendigo and Warracknabeal. Branches at Echuca, Numurkah and Yarrawonga followed in 1906, with ten more in 1907. He moved his city establishment to East Malvern in 1911, and had opened forty shops by 1920 and seventy-four by 1928. All were managed by women, on a strictly cash basis. Drapery remained the main line, supplemented by ironmongery, crockery, school requisites and toys. Gilpin saw the Depression years as a challenge. Between 1928 and 1931 he established eighteen new branches, including two in Tasmania, at Devonport and Ulverstone. The chain included South Australian branches at Mount Gambier, Millicent and Renmark, twenty-five stores in southern and western New South Wales, and ten in suburban Melbourne. Gilpin's Chain Store News was issued monthly. In 1944 Foy & Gibson acquired a controlling interest in Gilpin's business and in 1951 the chain was bought by G. J. Coles & Co. Ltd for £1,250,000. Three wooden blocks used to display hats. 9042.1 Slightly head shaped on top 9042.2 Light timber, flat on top, a wedge at back. 9042.3 Dark timber, flat on top.hat blocks, millinery, haberdashery, gilpin, korumburra -
 Charlton Golden Grains Museum Inc
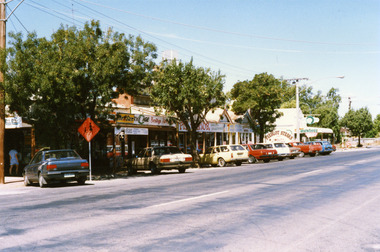
Photograph, Shops, east end of High St, Charlton c. 1987
Newsagency established c. 1912 by Dudley & Morse. Sold to F Jones in early 1940's. Royal Cafe built for Travaglia's c. 1912Colour photograph showing a row of shops. Cars are parked in front of the shops and there are three trees. An orange school crossing sign is next to dark blue car. Person in pale blue on LH side of photo. There are a variety of signs displayed along the front of the shop verandahs. From left to right; The Sun, THE AGE, Bendigo Advertiser , FUN PARLOR, (both partially obscured by a tree), FRUIT & VEGETABLES, 7 DAYS WEEKLY, FISH & CHIPS, CHICKENS B.B.Q. Building at the end of the shops is a Butchery and has a large sign for FEEDLOT STEAKS on the side wall.dudley, morse, f jones, royal cafe, travaglia -
 Ballarat Tramway Museum
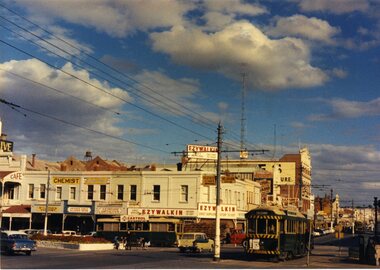
Slide - 35mm slide/s - set of 24, Noel Simons, 20/05/1971 12:00:00 AM
Set of 24 transparencies taken on 20/5/1971 on Kodak mounts. 1195.1 - Bendigo 19 arriving at Charing Cross en route to North Bendigo with Fountain Plaza and the City Family Hotel in the background. No. 19 has two roof ads for the SEC. -'Electricity better for cooking' and 'Everything's under control in my all electric kitchen' 1195.2 - as above, but standing at the Charing cross stop, with the Beehive Stores and other buildings along the east side of Pall Mall in the background. 1195.3 - No 21 ex Golden Square crossing View St. trackwork in front of No. 25 waiting to depart for Quarry Hill. No.21 has two roof ads (as for No.19 in 1195.1) and No.25 has one SEC roof ad and another. Ezywalkin sign in the background, and Fountain Plaza. 1195.4 - as for 1195.3, but after 21 has arrived and 25 left for Quarry Hill. Has Ezywalkin store and the Beehive store in the background. 1195.5 - No. 5 at the Eaglehawk terminus. Photo taken with a cannon in foreground looking along High St. Eaglehawk. Has shops on the west side of High St. in the background. 1195.6 - No. 5 at the Eaglehawk terminus, close up of the rear of the tram - note tow bar arrangement. Has destination of Quarry Hill. 1195.7-Nos.25 and 5 crossing at the Thorpe St. Loop, California Gully. No. 25 bound for Eaglehawk (has SEC Briquette and electric cooking roof ads) and 5 en route for Quarry Hill with a SEC and Cinzano roof ad. 1195.8 - as for 1195.7, but after trams have passed each other. Has Borough Auto Service building in the background. 1195.9 - No. 5 in Mt Korong Road, towards Bamard Street, photo taken after tram has passed photographer. 1195.10 - No. 30 at the Golden Square terminus with the Milk Bar on the right hand side of the photograph. 1195.11 - No. 30 inbound at Fire Station Loop, High St. Golden Square. Has old fire station in the background. Passengers are boarding the tramcar. 1195.12 - No. 30 in High St, bound for North Bendigo between Vine and Wattle Streets. 1195.13 - No. 5 bound for Eaglehawk waits at Iron Bark Gully Loop, at Hayes St. 1195.14 - No. 5 and No. 2 crossing at Iron Bark Gully Loop. 1195.15 - No. 5 bound for Eaglehawk leaving the Manchester Loop, Long gully. 1195.16 - No. 5 passing William Street, Long Gully en route to Eaglehawk. 1195.17 - No. 5 just before the California Gully Crossing Loop. 1195.18 - Nos. 5 and 26 crossing at California Gully crossing Loop. No. 5 heading to Eaglehawk, 26, Quarry Hill. 1195.19 - No. 5 in High St. Eaglehawk with Bob Moyle's Victoria Hotel and the TAB in the background. 1195.20 - No. 5 in High St. Eaglehawk approaching the terminus. Photo taken after the tram has passed the photographer. Has Foodland store and J. Best Fruit supply in the background, along with Eaglehawk Town Hall. 1195.21 - No. 5 at the Eaglehawk terminus, photo taken along seldom used track along High St. 1195.22 - as for 1195.22 - but at the very end of the track. 1195.23 - No. 5 en route for Quarry Hill climbs High St. Eaglehawk with the Victoria Hotel and Eaglehawk Town Hall in the background. 1195.24 - No. 5 and 25 crossing at Jobs Gully Loop. Note 25 has a black on white destination roll, while No. 5 has a white on black destination roll. Information written on in black ink and date stamped on purple ink. 1195.1 - "No. 19 arrives at Charing Cross Bendigo from Golden Square" 1195.2 - "No. 19 about to leave Charing Cross for North Bendigo" 1195.3 - "No. 25 awaiting departure for Quarry Hill, watches No. 21 arrive at Charring Cross from Golden Square" 1195.4 - "No. 21 on North Bendigo service and No. 25 on Quarry Hill run await departure at Charing Cross" 1195.5 - "No. 5 at Eaglehawk terminus" 1195.6 - "No. 5 at Eaglehawk terminus" 1195.7 - "Nos. 5 and 25 crossing at Thorpe St. Loop, California". 1195.8 - "Nos. 25 and 5 crossing Thorpe St. Loop, California Gully". 1195.9 - "No. 5 descending Mt Korong Rd. towards Bamard St." 1195.10 - "Birney car No. 30 at Golden Square terminus" 1195.11 - "Birney car No. 30 in High Street near Thistle Street (Fire Station Loop)" 1195.12 - "No. 30 in High St. between vine and Wattle Streets" 1195.13 - "No. 25 at Hayes Street Loop Iron Bark". 1195.14 - "Nos. 2 and 5 crossing at Hayes Street Loop Iron Bark" 1195.15 - "No. 5 at Manchester Loop opposite Havilah Road, Long Gully" 1195.16 - "No. 5 passing William Street, Long Gully". 1195.17 - "No. 5 at California Gully" 1195,18 - "Nos. 26 and 5 at Thorpe St. Loop, California Gully". 1195.19 - "No. 5 in High St. Eaglehawk". 1195.20 - "No. 5 approaching Eaglehawk terminus" 1195.21 - "No. 5 at Eaglehawk terminus" 1195.22 - "No. 5 at Eaglehawk terminus" 1195.23 - "No. 5 in High St. Eaglehawk" tramways, trams, bendigo, charing cross, eaglehawk, california gully, golden square, iron bark gully, jobs gully, tram 2, tram 5, tram 19, tram 21, tram 25, tram 26, tram 30 -
 Ballarat Tramway Museum
Slide - 35mm slide/s - set of 19, Noel Simons, 26/02/1972 12:00:00 AM
Set of 18 transparencies taken on 26/2/1972 on Kodak mounts. 1203.1 - Bendigo 5 at Eaglehawk terminus - with new traffic works. 1203.2 - No. 5 climbing the High St. hill Eaglehawk with the buildings on the east side in the photo. 1203.3 - No 2 descending the road over rail bridge at Job's Gully, heading for Quarry Hill. 1203.4 - as for 1202.3, but more side on. Tram has two SEC roof ads. 1203.5 - as for 1202.4 1203.6 - No. 26 entering Garden Gully Loop, Mt. Korong Road, Ironbark. Tram en route to Eaglehawk. Water column on right hand side of photograph. 1203.7 - No. 2 on the Eaglehawk route, Iron Bark area?, bound for Quarry Hill. 1203.8 - as for 1202.7, but photo taken after tram has past photographer. 1203.9 - No. 5 at Eaglehawk terminus, night photo. Tram has arrived at terminus, showing Quarry Hill, pole turned, but the tram lights have yet to be turned around. 1203.10 - as for 1202.9, but lights have been turned around. 1203.11 - No. 26 climbing the View St. Hill near the Commodore Hotel. Has Campbells Electrical Services building in the background. Photo taken after the tram has passed the photographer. 1203.12 - No. 7 end on photograph, at Golden Square, destination showing Golden Square - night photo. 1203.13 - number not used. 1203.14 - as for 1202.12, but partially side on, has a passenger looking out the tram. 1203.15 - as for 1202.12, but with hotel in the background. 1203.16 - No. 26 and 2 at Charing Cross, night photo. Tram 26 en route to Quarry Hill, 2 to Eaglehawk. 1203.17 - Interior photo of No. 26, at night. 1203.18 - No. 26 at the Quarry Hill terminus as night. 1203.19 - as for 1202.18, but central portion of the tramcar.Information written on in blue ink and date stamped on purple ink. 1203.1 - "No. 5 at Eaglehawk terminus" 1203.1 - "No. 5 in High St. Eaglehawk" 1203.3 - "No. 2" 1203.4 - "No. 2" 1203.5 - "No. 2" 1203.6 - "No. 26 at Garden Gully Loop Mt Korong Rd., Ironbark" 1203.7 - "No. 2" 1203.8 - "No. 2" 1203.9 - "No. 5 at Eaglehawk terminus" 1203.10 - "No. 5 at Eaglehawk terminus" 1203.11 - "No. 26 in View St. Near the Commodore Motel" 1203.12 - "No. 7 at Golden Square Terminus" 1203.14 - "No. 7 at Golden Square Terminus" 1203.15 - "No. 7 at Golden Square Terminus" 1203.16 - "Nos. 26 and 2 at Charing Cross" 1203.17 - "Interior of No. 26" 1203.18 - "No. 26 at the Quarry Hill terminus" 1203.19 - "No. 26 at the Quarry Hill terminus "tramways, trams, bendigo, eaglehawk, bridges, iron bark gully, night photo, quarry hill, golden square, tram 2, tram 5, tram 7, tram 26 -
 Ballarat Tramway Museum
Slide - 35mm slide/s set of 7, Noel Simons, 1972
Set of 7 transparencies undated on PAKON mounts - appear to be early 1970's. 1212.1 - No. 18 about to enter the Long Gully loop with ESSO service station on the right hand side. 1212.2 - No. 6 in Mitchell Street bound for Charing Cross. Tram has destination of "Rly Station". Has buildings on the east side of Mitchell St. in the background. 1212.3 - No. 7 (North Bendigo) and 29 (Golden Square) crossing. Actual location? 1212.4 - "No 6 showing 'SPECIAL' at Eaglehawk terminus. Has the Foodland store and Fruit shop in the background. 1212.5 - No. 19 at Eaglehawk terminus, on the extension to the normal Eaglehawk terminus. Tram has showing 'Eaglehawk'. Tram has two SEC roof ads. 1212.6 - No. 25 and another Bogie car at Quarry Hill terminus on last day. 1212.7 - No. 18 and 29 at Quarry Hill terminus. No.. 18 showing 'Quarry Hill' - has two SEC roof ads 'Electric Cooking - Matchless' and 'Everything's fine in my all electric kitchen' and No. 29 has a briquettes roof ad.Information typed onto a white label stuck on the slide. 1212.1 - "No. 18 at Long Gully" 1212.2 - "No. 6 in Mitchell Street." 1212.3 - "7 and 29 Lake View Hotel" 1212.4 - "No. 6 at Eaglehawk" 1212.5 - "No. 19 at Eaglehawk Term." 1212.6 - "Last cars Quarry Hill." 1212.7 - "18 & 29 Quarry Hill"tramways, trams, bendigo, long gully, mitchell st., eaglehawk, quarry hill, last tram, tram 6, tram 7, tram 18, tram 19, tram 25, tram 29 -
 Ballarat Tramway Museum
Photograph - Colour Photograph/s, 23/11/1962 12:00:00 AM
Colour postcard size print of SEC Bendigo trams 26 and a single trucker at Charing Cross with Mitchell St. in the background. Photo dated 21.11.1962. Printed on AGFA paper. Both trams fitted with dash canopy lighting, but no large white strip under the driver's windows. 26 showing destination of "Eaglehawk" with two SEC ads and another ad on the front dash panel. Single trucker has a Castrol ad on the roof. In the background are various buildings along the east side of Pall Mall and along Mitchell St. Pole by the front of 26 has directional signs "Melbourne" and "Heathcote / Echuca". On rear top left hand corner "21.11.62" in very wavy handwriting typical of an aged person.bendigo, pall mall, charing cross, tram 26 -
 Ballarat Tramway Museum
Photograph - Colour Photograph/s, 1960's
Colour postcard size print of an SEC Bendigo trams 7 and 21 at Charing Cross. Printed on AGFA paper. Photo taken during last years of Bendigo. Trams have dash canopy lighting and large white strip under the driver's windows. Tram 21 showing "North Bendigo" and 7 showing "Golden Square" destinations. Photo has Cenotaph, fountain and buildings on the south east corner of Mitchell St and Pall Mall in background.bendigo, pall mall, charing cross, tram 7, tram 21 -
 Ballarat Tramway Museum
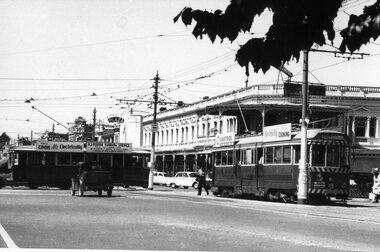
Photograph - Black & White Photograph/s, early 1960's
Black and White print of an aerial view of Bendigo SECV Bendigo tram 18 at Charing Cross terminus for the Eaglehawk route with another bogie tram and two single truck trams in the background. Trams have dash canopy lights, but no large white strip under the drivers windows. Photo not dated but appears to be at during early 1960's. Tram 18 has White Horse Whiskey ad on front dash panel, SEC Roof ads. Numbers of other trams cannot be determined. All trams have roof ads, including SEC ads and a CASTROL ad. Good view of the fountain and buildings on the north east corner. Has Ezywalkin store, City Club Hotel and other buildings. Shows traffic arrangements for cars to do a right turn from Pall Mall into Mitchell St. On a building in Mitchell St. is an advertisement for "ASTOR Radio"trams, tramways, charing cross, bendigo, mitchell st, aerial views, tram 18 -
 Ballarat Tramway Museum
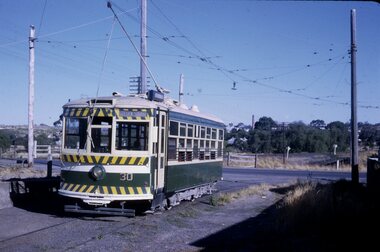
Slide - 35mm slide/s - set of 3, Peter Moses, Jan. 1969
Set of two colour slides taken at the North Bendigo terminus and another in Pall Mall, Bendigo, Jan. 1969. .1 - No. 30 at North Bendigo terminus - has destination "Golden Square" .2 - Interior view of Birney tram with crew members numbers 22, 29 and three seated passengers. .3 - View of Pall Mall looking north from the tram stop - has the Shamrock Hotel in the distance and other buildings on the east side of the street, including a 3BO (Bendigo radio) sign. Kodak cardboard mount slide, taken by Peter Moses, Jan. 1969.On the rear of all the slides "P. Moses" in black ink .1 -"Bendigo / North Bendigo terminus" in blue ink, and in red ink “12” .2 - " Jan 1969 Bendigo / Inside Brill car" in blue ink .3 - "Bendigo Pall Mall" in black ink and in red ink “7”.tramways, trams, bendigo, north bendigo, birney, tram crews, pall mall, tram 30 -
 Ballarat Tramway Museum
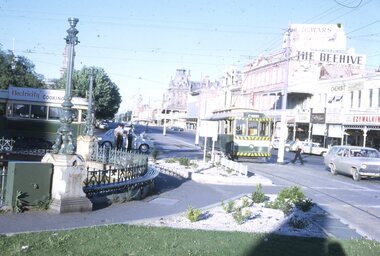
Slide - 35mm slide/s, Peter Moses, Jan. 1969
Photo of SEC Bendigo No. 6 crossing Mitchell St, north bound for North Bendigo, while a bogie tram waits to depart Charing Cross, east bound for Quarry Hill. Three SEC crew members standing by the front of the bogie tram and an inspector crossing the road near No. 6. Has part of the fountain in the view. Also in the photo are The Beehive building, and advertisement for Dewars whiskey and a shop front for "Ezywalkin" shoes. The bogie tram has a SEC roof advertisement "Electricity Best for cooking". Kodak cardboard mount slide, taken by Peter Moses, Jan. 1969.On the rear of the slide "Jan. 1969 Bendigo:" in blue ink, "P. Moses" in black ink and other side of the slide in red ink “22”.tramways, trams, bendigo, charing cross, tram 6 -
 Ballarat Tramway Museum
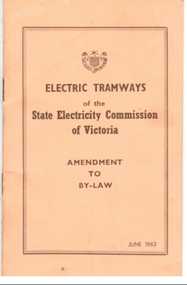
Book, State Electricity Commission of Victoria (SECV), "Electric Tramways Amendment to By-Law June 1963", Jun. 1963
Demonstrates aspects of the SEC governance system in issuing By-laws for the travelling public, as part of their Act. Yields information about fares charged for tram services in Ballarat and Bendigo. Issued to crews.Booklet with orange card cover and 12 pages, numbered 1 to 10, side stapled, off set printed giving details of fares, revised in June 1963 for both Ballarat and Bendigo, to come into force on 1/8/1963. Has details of sections etc. Was shown as being approved by the Governor in Council on 25/6/1963. Adjust the City Section fares only. See Alan Bradley notes in references re this. Full pdf copy added 28/5/2019. Alan Bradley advised 25/4/2005. In the "Courier" of 26/6/1963, the adjustments to fares from 1/8/1963 were announced. They were only for adjustments to city section fares. Fares outside the city area remained unchanged. The SEC promoted these as being cheaper city section fares. Tom Evans gave me a copy of a poster showing a Scotsman boarding a tram. The caption was: "Now! It's cheaper to travel by tram! Beats walking every time!" New economy city fares. From Dawson St to the Railway Station return, & from Dawson St to the east end of Bridge St or return, 4d. From the intersection of Lydiard & Sturt Sts - To Dawson St, east end Bridge St, to Railway Station 3d. trams, tramways, secv rules, by-laws, tickets, fares -
 Ballarat Tramway Museum
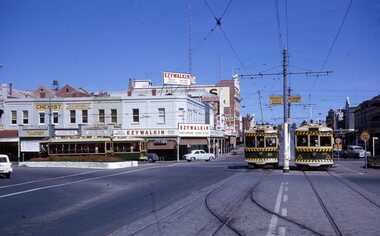
Slide - 35mm slide/s, early 1960's
... Bendigo Charing Cross, looking east towards railway station... Parade Ballarat Ballarat goldfields 35mm slide/s Slide Bendigo ...Bendigo Charing Cross, looking east towards railway station, with SEC No. 7 about to depart for Eaglehawk. A Birney tram in background heading for Quarry Hill. Photo shows 'Ezywalkin' and 'Fountain Plaza' buildings, has large white with black lettering road signs on left. On centre pole in front of tram is smaller road direction signs (yellow with black letters) for Echuca, Heathcote and Melbourne. Tram has dash canopy lights, early 1960's.niltramways, trams, bendigo, charing cross, quarry hill, eaglehawk, tram 7 -
 Ballarat Tramway Museum
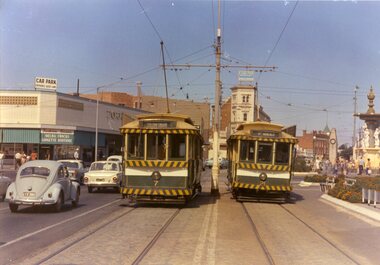
Slide - 35mm slide/s, Keith Kings, 20/01/1963 12:00:00 AM
Bendigo, Charing Cross, four Birneys on Sunday 20-1-1963, 3.36pm. Photo taken from View St. looking east along Mitchell Street. Tram 11 to North, 30 to Golden Aq, 28 to Quarry Hill and 29 to Eaglehawk. Note road signs (yellow with black writing)on centre poles, Ezywalkin building in rear, cross over in foreground. Black and white version of photo appears on page 66 of K.S.Kings book 'The Bendigo Tramways'. Photo by Keith Kings.Stamped on 'K.S.Kings etc.' and in blue ink 'K(r)(390), Bendigo, 1/250., f8 20/1/63, Charing Cross, Sunday, 3.36pm 11 to North, 30 to Golden Square, 28 to Quarry Hill, 29 to Eaglehawk.'tramways, trams, bendigo, birney, charing cross, tram 11, tram 30, tram 28, tram 29 -
 Ballarat Tramway Museum
Slide - 35mm slide/s - set of 8, Carolyn Dean, 24/09/1970 12:00:00 AM
Set of photographs of operations, near the central area, in particular Charing Cross.Set of 13 Kodak slides, white cardboard of Bendigo trams. Taken 24.9.1970 by Carolyn Dean. .1 - "1" - No. 5 enroute to Eaglehawk passing former poppet head. .2 - "2" - Possibly No. 4 enroute to Eaglehawk - side on view (same ads shown on .4) .3 - "3" - View looking down onto Charing Cross from North East corner with single truck and Bogie car arriving. Has Ezywalkin, Maples and the Beehive buildings in the background. .4 - "7" - No 4, with destination of Eaglehawk, Mitchell St, near end of double track, with Shell Service station alongside. .5 - "8" - Alexandria Fountain, Charing Cross, with bogie tram behind. Has the Ezywalkin and The Beehive buildings in the view as well. .6 - "9" - No. 6 arriving at Charing Cross. Has the Ezywalkin and The Beehive buildings in the view as well. .7 - "10" - Bogie tram and single trucker at Charing Cross. Has the Ezywalkin and The Beehive buildings in the view as well. .8 - "11" - No. 7 departing ditto. Has the Ezywalkin and The Beehive buildings in the view as well. .Each slide has in corner a number in pencil and the first one the date of "24-9-70".tramways, trams, bendigo, charing cross, mitchell st, eaglehawk, tram 5, tram 4, tram 6, tram 7 -
 Victorian Harness Racing Heritage Collection at Lord's Raceway Bendigo
Photograph - Wooden framed photo finish, Meadow Lark. 25/2/1929 - Association Handicap (2nd Division), Owner V Dullard, Trainer and Driver R.Shadbolt. Bred by MrJ.F.Hillier, Shepparton East
trotting, richmond, vic dullard, joe hillier, meadow lark, shepparton, 25/2/1929