Showing 846 items
matching route 2
-
 Melbourne Tram Museum
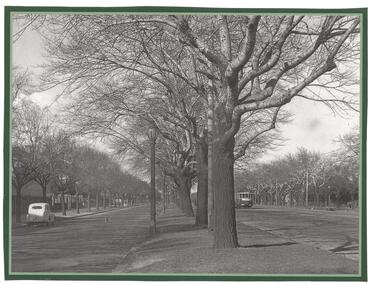
Photograph - Black and White photograph, early 1940
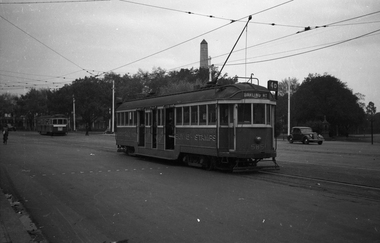
Black and white photograph white a grey and green border of possibly tram W2 class 219, southbound in St Kilda Road with one parked car on the left hand side. Shows the nature of St Kilda Road during the winter. Photo during the early 1940's with the tram having white stripes for war time. The tram has the destination of East Brighton, Route 64.trams, tramways, st kilda rd, route 64, east brighton, tram 219 ?, w2 class, world war 2 -
 Melbourne Tram Museum
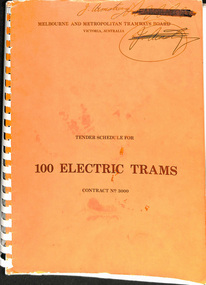
Document - Tender Document, Melbourne & Metropolitan Tramways Board (MMTB), "Tender Schedule for 100 Electric Trams Contract No. 3000", Apr. 1977
Comb bound (white plastic) specification or tender document, approx. 180 pages, with glossy card orange covers, titled "Tender Schedule for Electric Trams" and "Contract 3000". Compiled and published by the Melbourne and Metropolitan Tramways Board, closing Monday 10 May 1977. Details the conditions of tender, conditions of contract, notes, specification, gives background information about Melbourne, dimensions, performance, drivers and conductors, trucks, wheels, brakes, electrical equipment, control panels and drawings. The drawings give a map of the system, typical city route, Glenferrie Road route (grade diagram), concrete track construction, min. radius curves, loading gauge, all-electric tram and mounting details for the trolley base, schedule of prices, tender form, form of contract, schedule of information to be provided by the tenderer. Includes an Alphabetical Index. Includes a drawing for a single ended version of the tramcar. Became the Z3 class. Only the table of contents and the drawings scanned. See Reg Items 1583 and 2266 for other similar documents. See Reg Items 337 and 338 for a report on the operation of single ended tramcars 2 copies held.Has in ink written on front cover "J Armstrong" with a stamp blacked out and other copy of the same signature.trams, tramways, z3 class, specification, tenders, mmtb, melbourne, single ended tramcars -
 Melbourne Tram Museum
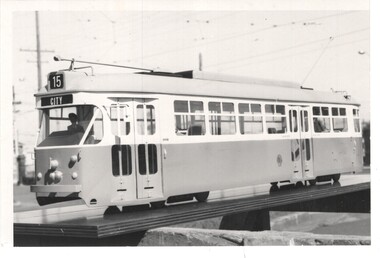
Photograph - Set of 4 Black & White Photograph/s, c1973
Set of four Black and White photographs of the model of prototype 1041 at Preston Workshops. .1 - photographed in the open area within Preston Workshops to give the impression that it was connected to the overhead. Showing Route 15, City - 110H x 165W .2 - Similar photograph but without the driver. Showing Route 88, East Preston - 166H x 217W (not imaged) .3 - Similar photograph, showing Route 64, E. Brighton - 110H x 165W .4 - Similar photograph, possibly different colour, appears to be darker, showing Mont Albert Route 42 - 124H x 203W.trams, tramways, 1041, preston workshops, models, tram 1041 -
 Melbourne Tram Museum
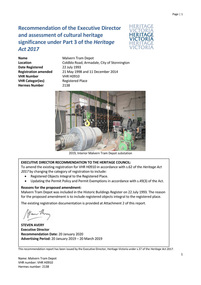
Document - Report, Heritage Victoria, "Recommendation of the Executive Director and assessment of cultural heritage significance - Malvern Tram Depot - Amendment - 20/2/2020", Jan. 2020
Digital copy of a 60 page report - ""Recommendation of the Executive Director and assessment of cultural heritage significance - Malvern Tram Depot - Amendment - 20/2/2020" Details the history and context of the location relevant to the development of the PMTT and MMTB systems route, the equipment contained within the building, includes all moveable objects within the building including documents. Has a detailed statement of cultural significance, proposed permit policy. The history includes details of the electrification of the Melbourne's tramways, the rotary converter equipment, its operation, architecture. Report includes photographs of the interior of the building. The last amendment was to include the items with the former Rotary Converter sub-station.trams, tramways, substation, malvern depot, rotary converters, heritage victoria, significance, coldblo road, transformer, power supply, electrical engineering, pmtt, mmtb -
 Melbourne Tram Museum
Negative - Set of 2, Wal Jack, 23/05/1941 12:00:00 AM
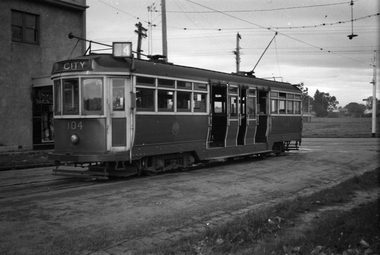
Set of two Black and white negatives, by Wal Jack, of L 104 (City Route 4) at the Carnegie Terminus - two views, one from each side of the tram. Photo dated 23-5-1941, in the Wal Jack album.trams, tramways, l class, carnegie, route 4, tram 104 -
 Melbourne Tram Museum
Negative - Set of 2, Wal Jack, 30/08/1941 12:00:00 AM
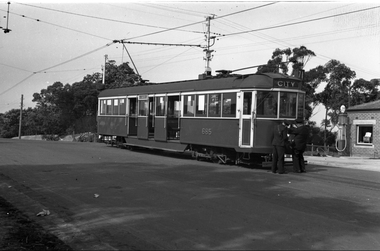
Set of two Black and white negatives, by Wal Jack, of CW5 685 (City, Route 71) at the intersection of Warragul Road and Riversdale Road. The first photo shows two crewmen looking at the headlight on the tram. The second photo shows it is fitted with a war time head light mask and shows a crewman walking out of the building - a service station with Shell pumps. Above the tram on a pole is a tram signal for the single line operation between Warragul Road and the Wattle Park terminus. See also item 6771 for a photo of the pole itself. Photo dated 30-8-1941, in the Wal Jack album.trams, tramways, cw5 class, wattle park, riversdale road, headlight mask, route 71, tram 685 -
 Melbourne Tram Museum
Negative, Wal Jack, 10/02/1941 12:00:00 AM
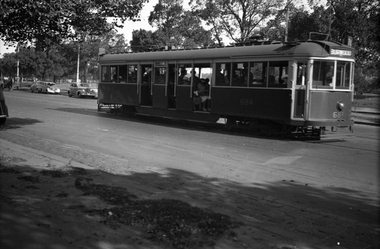
Black and white negative, by Wal Jack, of No.CW5 684 Batman Ave on its way to Burwood. Has the Yarra River and the Gardens in the background. The tram is well loaded. Photo dated 10-2-1941 in the Wal Jack album along with details of the location.trams, tramways, batman ave, cw5 class, burwood, tram 684, route 74, mmtb -
 Melbourne Tram Museum
Negative, Wal Jack, 16/02/1941 12:00:00 AM
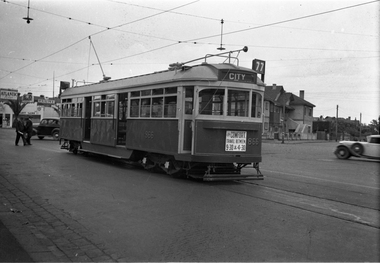
Black and white negative, by Wal Jack, of No. SW6 866 at the route 77 terminus Chapel St and Brighton Road. Tram has dash canopy lighting. In the background is a service station, selling Atlantic Petrol, Plume and Pax. Also visible is a Beauty Salon. Photo dated 16-2-1941 in the Wal Jack album along with details of the location.trams, tramways, sw6 class, route 77, chapel st, brighton road, tram 866 -
 Melbourne Tram Museum
Negative, Wal Jack, 16/02/1941 12:00:00 AM
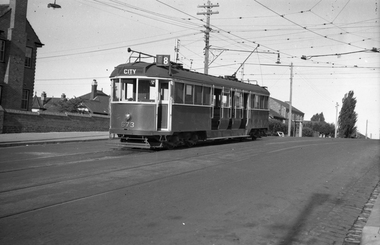
Black and white negative, by Wal Jack, of No. W4 673 at the Toorak, Route 8 terminus at the corner of Toorak and Glenferrie Roads. The tram has a South Melbourne or Hanna St Run number. Photo dated 16-2-1941 in the Wal Jack album along with details of the location.trams, tramways, w4 class, toorak road, glenferrie road, route 8, hanna st depot, tram 673 -
 Melbourne Tram Museum
Newspaper, The Age, "Brakes could spell the end of line for classic trams", 2/06/2000 12:00:00 AM
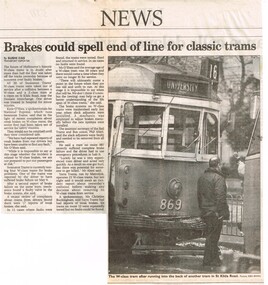
Newspaper clipping from The Age, (2/6/2000?), about an accident in St Kilda Road when a W class tram collided with a Z class tram. Article reports on the withdrawal of W class trams by Swanston St tram immediately. Titled "Brakes could spell the end of line for classic trams" Hugh Waldron's Transit Australia notes (Reg Item 5359 for June 2000) reports "After an accident between “SW6” 869 and “Z1” 75 at about 4pm on Thursday 1st June 2000 all Swanston “W” class trams were instructed to shunt at the closest crossover and return special to the Depot. " Article buy Sushi Das and photo by Ken Irwin of the front of Sw5 869 (University route 16). Quotes from Kevin O'Shea of National Express (Swanston Trams), Phil Alteri (RTBU) and Christine Buckingham of Yarra Tramstrams, tramways, w class, sw5 class, accidents, route 16, st kilda rd, tram 869 -
 Melbourne Tram Museum
Newspaper, The Melbourne Times, "When W stands for Wedundant", 22/07/1992 12:00:00 AM
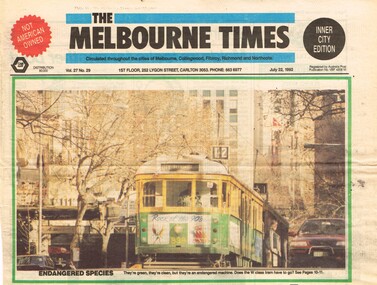
Set of three Newspaper clippings from The Melbourne Times, 22/7/1992 about the withdrawal of the W class trams. .1 - Front page - with a colour photo of W5 838, Route 12 in Swanston St - Endangered Species. .2 - Page 10 with the headline "When W stands for Wedundant", report of the PTC Strategic Review Committee - too many trams, Peter Spyker Minster, cut from 258 Operational trams to 111, cost of overhauls, National Trust views, quotes Dr Michael Wilmot, availability of the cars. .3 - continuation on page 11 - comparison with Z class, operation of various trams on routes, importance to have a modern tram fleet as well - survey results.trams, tramways, w class, swanston st, w5 class, operations, national trust, withdrawn trams, z class, overhauls, tram 838 -
 Melbourne Tram Museum
Newspaper, The Age, "Planned cross - city tram routes draw criticism", "Coalition pledges efficiency review of tramways plan", "System hit by years of Neglect" "A new tramway game of nought's and crosses", 14/06/1992 12:00:00 AM
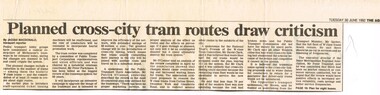
Set of three Newspaper clippings about the proposed cross linking of Melbourne tram routes, written by Jacqui Macdonald and Claude Forrell. .1 - The Age, 30/6/1992 - by Jacqui Macdonald, titled "Planned cross - city tram routes draw criticism", PTC review, W class trams, conductors, PTUA Patrick O'Connor, National Trust David Clark, Opposition Alan Brown and Peter Spyker all commented. Noted by one body a lack of research and surveys. .2 - The Age 1/7/1992 - two items - "Coalition pledges efficiency review of tramways plan", about the plan prepared by the Strategic Review Committee chaired by Peter Parkinson, workplace reforms, cross linking of tram routes, release of the review report the previous day by Peter Spyker. Also quotes Union Secretary Lou DiGregorio and PTUA. The second item - "System hit by years of Neglect" - comments about the report and The Met ticket dispute. Item has a map showing the proposed routes. .3 - The Age 1/7/1992 - "A new tramway game of nought's and crosses" - Claude Forrell - looking at the savings of the plan, conductors, union consent, Government and Coalition attitudes to the proposal of cross linking routes. finances.trams, tramways, operations, transport, public transport, unions, finances, maps, tram routes, w class, national trust, ptua, conductors -
 Melbourne Tram Museum
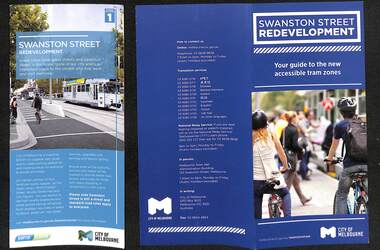
Pamphlet, VicRoads, "Swanston Street Proposed Tram Project", 2010 to 2011
Set of five pamphlets associated with the installation of Superstops with a bike path in Swanston St during 2010 and 2012. .1 - DL - General redevelopment - Stage 1 - general pamphlet, Published by City of Melbourne and Yarra Trams. 2 - DL - double fold - guide to the new accessible tram zones - City of Melbourne, mainly around the new bike lane arrangements. 3 - DL - tri fold - Information Update 1 - giving an outline of the proposed staging of the works, service changes and dates for works during 2011. Has logos for Yarra, VicRoads, State Government and think tram. 4 - DL - two fold - Tram service changes, for all Swanston St routes, May 2011 with a photo of C1 3525 on the front cover. 5 - DL - six fold - August 2010 - project survey, outlining project for Franklin St to Grattan St Carlton. Has logos for Yarra, VicRoads and think tram.trams, tramways, swanston st walk, swanston st, trackwork, city of melbourne, franklin st, carlton, proposals, tram 3525 -
 Melbourne Tram Museum
Pamphlet, Yarra Trams, "Spring into Collins on Route 48 - Your new service to Victoria Harbour, Docklands", Sep. 2009
Pamphlet - 2 fold DL - titled "Spring into Collins on Route 48 - Your new service to Victoria Harbour, Docklands", September 2009, includes changes to Collins St services, route 70, map, with a listing of service frequencies.trams, tramways, collins st, victoria harbour, route 48, new tramway, docklands -
 Melbourne Tram Museum
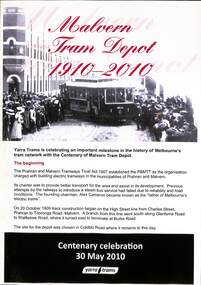
Pamphlet, Yarra Trams, "Malvern Tram Depot 1910 - 2010", "Key dates - mostly opening dates of routes", May. 2010
Set of two pamphlets associated with the centenary of the Malvern Tram Depot in 2010. .1 - A4 full colour on gloss paper, titled "Malvern Tram Depot 1910 - 2010", advising of the background and date of the celebrations - 30/5/2010. Gives details of the opening, routes and the depot today. .2 - A4 printed on non glass paper, titled "Key dates - mostly opening dates of routes", list dates from 1910 to 1920, with a photo of a painting by Graham Lee of bogie car 26, side elevations of a single trucker and bogie car, and a map from "Feeding and Filling" book of the PMTT system.Has "May 95" in ink in top right hand corner.trams, tramways, pmtt, centenary, malvern depot, map, dates, lists, tram 26 -
 Melbourne Tram Museum
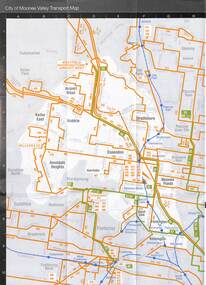
Map, Metlink, "Your Guide to Melbourne's Public Transport System - City of Manningham", "City of Moonee Valley", c2005
Map - 18 fold - 6x3 - pocket size, printed in full colour, titled "Your Guide to Melbourne's Public Transport System - City of Manningham", published by Metlink c2005. Has a map of transport routes in the City of Manningham, details of Metcards, bus routes, maps of the tram and train network and Metcard agents. .2 - as for .1, but for the City of Moonee Valleytrams, tramways, maps, city of manningham, city of moonee valley -
 Melbourne Tram Museum
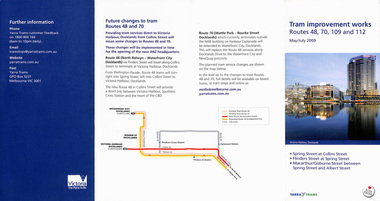
Pamphlet, Yarra Trams, "Tram improvement works routes 48, 70, 109 and 112", "Tram service changes St Kilda Road - tram track renewal", 2008 and 2012
,1 - pamphlet - 4 fold DL, titled "Tram improvement works routes 48, 70, 109 and 112" - May and July 2008 - installation of curves at Wellington Parade, Spring and Flinders St and for Spring Macarthur and Collins St along with tram stop works. Has a map and project details. .2 - Pamphlet - 3 fold DL - "Tram service changes St Kilda Road - tram track renewal" - April 2012 - between commercial road and Domain Interchange. Has map. Both have State Govt and Yarra trams logos.trams, tramways, trackwork, new tramway, spring st, flinders st, junction, collins st, wellington parade, macarthur st, st kilda road, domain interchange, commercial road -
 Melbourne Tram Museum
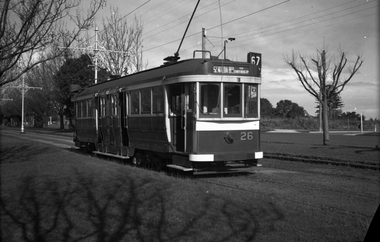
Negative - Set of 2 - Maximum Traction bogie trams Dandenong Road, Wal Jack, c1944
.1 - Black and white negative, by Wal Jack, of C 26 (St Kilda Beach via Dandenong road, Route 67), westbound in Dandenong Road. Appears to be a new sub-division on the other side of the road. .2 - ditto - C 35, note the building in front of the tram in the centre median strip. Photo not dated in the Wal Jack album. Possibly 14-9-42 based on other similar photos.trams, tramways, c class, dandenong road, route 67, tram 35, tram 26, world war ii -
 Melbourne Tram Museum
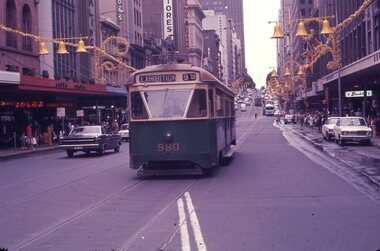
Slide - Set of 4, Les Fordham, Dec. 1963
Set of four hanimount light brown 35mm slides - December 1963 taken by Les Fordham. .1 - PCC Class 980 (Exhibition Route 95) eastbound in Bourke St between Elizabeth and Swanston St's - has Coles Stores, London Stores, Myer and Buckley's stores in the background along with Christmas decorations. .2 - view looking west from near Swanston St .3 - W2 415 southbound in Swanston St with a traffic policeman on duty. A W7 (route 88) is waiting to cross. Has the Royal Mail House, The Leviathan building in the background. .4 - 1002 (Route 88) waiting to cross Swanston St. In the background is Douglas Trading, Southern Cross Hotel,trams, tramways, bourke st, route 95, christmas, police, route 88, tram 980, tram 1002, w7 class, pcc class, w2 class, exhibition, swanston st, tram 415, mmtb -
 Melbourne Tram Museum
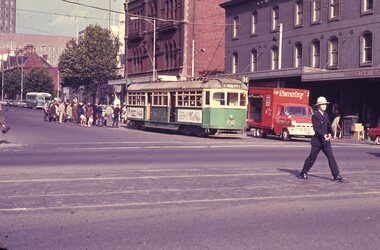
Slide - Set of 3, Les Fordham, Dec. 1963
... duty. .2 - W7 1010 (Route 88 East Preston) at the Spencer St... Trams tramways Bourke St Route 96 East Brunswick Police W6 class ...Set of three hanimount light brown 35mm slides - December 1963 taken by Les Fordham. .1 - W6 981 (Route 96, East Brunswick, Blyth St) at the Spencer St terminus with a large mob or group of people waiting to board a tram. Note both trolley poles are in the up position. IN the background is the West Melbourne Police Station, The tramway building and Carlyon's Hotel. Alongside is a Newsday (newspaper) van. A policeman is on point duty. .2 - W7 1010 (Route 88 East Preston) at the Spencer St terminus, Has the Mail Exchange in the background. .3 - W6 988 waiting to enter the terminus (Exhibition), a crewman is changing the route number. In the Safety Zone is W7 (1008??), Route 97 with a conductor walking in front of the tram.trams, tramways, bourke st, route 96, east brunswick, police, w6 class, w7 class, route 88, tram 981, tram 1010, tram 988, tram 1008 -
 Melbourne Tram Museum
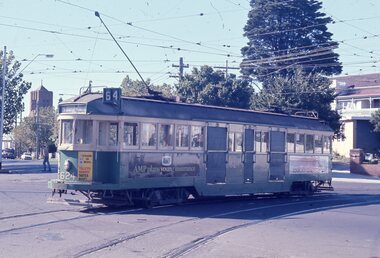
Slide - Set of 2, Les Fordham, Dec. 1963
hanimount light brown 35mm slides - December 1963 taken by Les Fordham of: .1 - W2 624, (East Brighton, route 64) turning from Dandenong Road into Hawthorn Road. Tram has adverts for Tolleys Brandy and AMP Life Insurance. .2 - W2 373, (East Brighton, route 64) outbound in Dandenong Road, possibly nearing Hawthorn Road.trams, tramways, dandenong road, caulfield, hawthorn road, tram 624, tram 373 -
 Melbourne Tram Museum
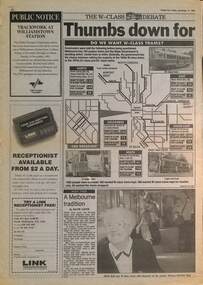
Newspaper, Herald Sun, "Thumbs down for old trams", 12/11/1993
Gives the result of a Herald Sun survey with a map - People were asked: 1 - Want to keep the W class trams 2 - Want W class for Tourism 3 - Want W class withdrawn Survey involved the Airport West, North Coburg, Mont Albert, South East (route 8 and 69, and city streets. The choice included retiring the early Z class trams, that were not even 20 years old. Includes an interview with Jean Geil by David Jarvis on the trams and with Lisa Fabian who did not like the W. Item written by Damon Johnston, Transport Reporter.Demonstrates The Herald Sun investigation into W class trams during 1993.Newspaper clipping from The Herald Sun, Friday 12/11/1993, titled partly ""Thumbs down for old trams" spread over two pages.trams, tramways, w class, surveys, public transport, state transport authority, ptc -
 Melbourne Tram Museum
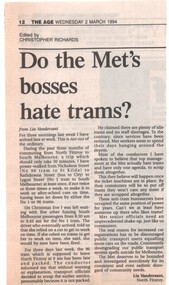
Newspaper, "Do the Met's bosses hate trams?", 2/03/1994 12:00:00 AM
Newspaper clipping from The Age, 2/3/1994, titled "Do the Met's bosses hate trams?", concerning the time keeping of route 96 trams, with the author (letter - Lia Vandersant) walking at times, reduction in services, ticket machines and the poor general attitude to trams and the passengers.trams, tramways, the met, mta, ptc, tramways, melbourne, route 96, timetables -
 Melbourne Tram Museum
Newspaper, "The end for two lines", "Safety at risk - Union", "Buses to take over from 8pm", 7/01/1993 12:00:00 AM
Series of four newspaper cuttings from The Herald Sun 7/1/1993, about the closure of rail lines, buses to replace trains, all pages headed "Transport Revolution". The front page not collected. .1 - Page 4 - "The end for two lines" and "Buses to run all night" - about the planned closure of rail lines (Williamstown and Upfield), operation of buss on nine different routes between midnight and down on Friday and Saturday nights. Also includes that airport and football bus likely to rise under Vic Govt. polices. .2 - Page 5 - "Safety at risk - Union" - ARU remarks about Safety on public transport, tram conductors (photo of Merv Peters), photo of a lone passenger on a No. 72 tram at 10.25, union .3 - page 6 - map showing planned tram route closures (82 and part of 9), and bus replacements after 8pm, with the headline ""Buses to take over from 8pm", closure of rail lines and impacts on trains and trams. .4 - page 7 - map of rail line closures and bus replacement in the evening, "nine country lines for sale", and "The long and the short of a rort" - item about restrictive work practices and awards in public transport.trams, tramways, ptc, tramways, melbourne, railways, upfield, closure, buses, unions, public transport, conductors -
 Melbourne Tram Museum
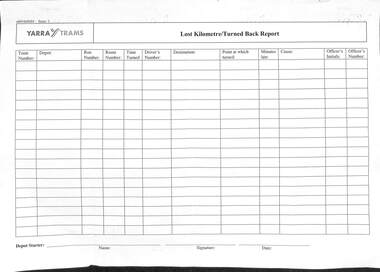
Document - Form/s, Yarra Trams, "Operations Officer's Report of car turned back and kilometres lost for..", "Lost Kilometre/Turned Back Report", c2005?
Set of two forms - A4 photocopies - Yarra Trams .1 - "Operations Officer's Report of car turned back and kilometres lost for.." .2 - "Lost Kilometre/Turned Back Report" To provide details of tram services that were turned back or "short shunted" and details - recording the tram, depot, run number, route, time, driver's details, destination, point of turn back, minutes late, cause, and Officer's details. This information became important for the performance reports to Government.trams, tramways, tramcars, operations, forms, depots, yarra trams -
 Melbourne Tram Museum
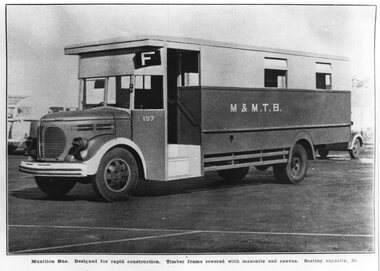
Photograph - Black & White Photograph/s, Public Transport Corporation (PTC), 1940's
... Trams tramways MMTB World War 2 Buses Route F tram 197 Black ...Black and white print of MMTB Bus No. 197 - Munitions bus. Photographed from an MMTB Original illustration with caption "Munitions bus - designed for rapid construction. Timber frames covered with Masonite and canvas. Seating capacity 30." Has head light covers. Showing route F - Footscray station? Photo from the PTC Historic Photo collection with copyright stamp on rear - H51trams, tramways, mmtb, world war 2, buses, route f, tram 197 -
 Melbourne Tram Museum
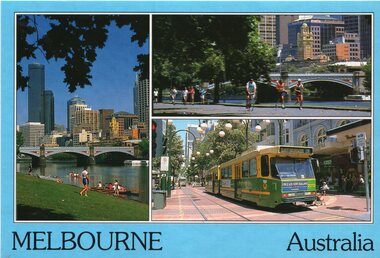
Postcard, Bartel Postcards, three photos of Melbourne scenes, early 1990's
Colour postcard 3 photo panels, blue border, divided back - Bartel Postcards: 1 - View of Melbourne over the Yarra River 2 - Princes Bridge 3 - B2 2013 in Bourke St, East Brunswick, Route 96 Back has space for name and address, stamp and a message and details of the postcard. Produced by Bartel Postcards possibly early 1990's Card No. BG318 Has "Melbourne Australia" along the bottom edge. Two copies held.trams, tramways, bourke st, mall, b class, tram 2013 -
 Melbourne Tram Museum
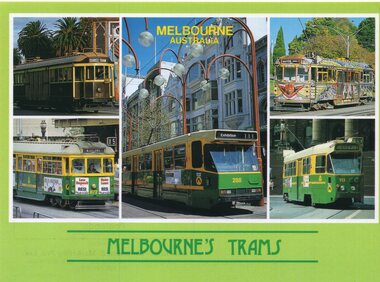
Postcard, Australian Souvenirs and Marketing Pty Ltd of Moorabbin, "Melbourne Trams", late 1980's
... , titled "Melbourne Trams", 1 - W1 431 2 - SW6 872, Moreland... "Melbourne Trams", 1 - W1 431 2 - SW6 872, Moreland, Route 15 3 ...Colour postcard green border, divided back - 5 panel, titled "Melbourne Trams", 1 - W1 431 2 - SW6 872, Moreland, Route 15 3 - A288, Bourke St, route 111 to Exhibition 4 - W5 682, Merrin Eirth, Transporting Art Tram, Malvern Bourke Road, route 5. Tram was painted during 1987. 5 - Z2 113, route 95, route 95, Parliament House. Back has space for name and address, stamp and a message and details of the postcard, giving a brief history of trams in Melbourne, gives a date of 1983 for track distance. Photographs by Geoff Inkstertrams, tramways, w1 class, sw6 class, a class, route 111, route 15, route 5, z class, route 95, tram 431, tram 872, tram 288, tram 113 -
 Melbourne Tram Museum
Photograph - Set of 3 Colour Print/s, Jeff Bounds, 11/03/1991 12:00:00 AM
Set of three colour prints of TMSV operating the motorised cable tram set and Royal Park tram 256 11/3/1991. The rear of each photograph gives the details. Photos by Jeff Bounds. 1 - "Cable tram dummy 593 being pushed along Kingsway along Kingsway, side South Melbourne Depot after breaking chain drive in Park St when turning from St Kilda Road." SW 5, 777, route 64 following along with another tram. 2 - "Cable tram set 593 and 171 in Swanston St, looking north to Franklin St, as TMSV Exhibit in Moomba Parade in conjunction with the Villa Maria Society." 3 - "Horse tram 256 waiting alongside tracks in Swanston St (north) for Met Tram service to allow for it to enter The Moomba Parade as part of The Met exhibit." 256 is alongside W6 964, running a South Melbourne Beach route 1, followed by a W7 St Kilda Beach, route 15. Has the Royal Women's Hospital in the background.All have above details written in ink, along with "TMSV" and "11/3/91".trams, tramways, tmsv, moomba, events, swanston st, kingsway, w6 class, cable trams, w7 class, sw5 class, route 1, route 15, route 64, w6 class, tram 593, tram 171, tram 593, tram 777, tram 964 -
 Melbourne Tram Museum
Negative, Wal Jack, c1945
... Trams tramways Domain Junction World War 2 W2 class Route 4D ...Black and white negative, by Wal Jack, W2 585 (Darling Road Route 4D) at Domain Junction and a SW6 with dash canopy light (White stripe), route 7, City. The W2 has on the side "Subscribe Now Victory Bonds Speed Victory Buy 5/- Stamps" Photo c1945? May be earlier.trams, tramways, domain junction, world war 2, w2 class, route 4d, darling rd, route 7, sw6 class, tram 585