Showing 1979 items matching "signal"
-
 Wangaratta RSL Sub Branch
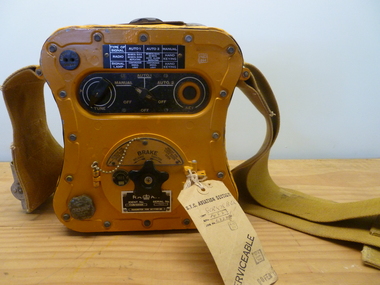
Equipment - Signals Head Set
1942 Signals Head Set. Two black bakelite earpieces attached to black wire headpiece. Brown electrical cord is attached to wire and bakelite. Thick black rubber cord is attached to one earpiece. Has khaki canvas material attached to go around back of head.ZA28658 D ^ Dwwii, head set, signals head set, bakelite -
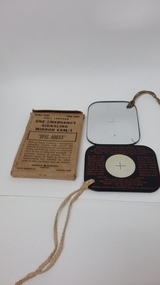 B-24 Liberator Memorial Restoration Australia Inc
Emergency Signalling Mirror, Circa 1940's
A.J.Abicair was C/O of 486 Maintenance Squadron from 22/08/1946 having been promoted to A/W.Cdr in May 1944 , then T/OT/W/Cdr. January 1945. .Part of the collection of Wing Commander A.J.Abicair issued equipment.Rectangular mirror with see through cross in centre on front. Instructions for use printed on rear. Cord threaded through corner hole. Contained in original cardboard container.One Emergency Signalling Mirror ESM/1. "Spec. 40653" Open this end and pull lanyard. This package contains 1 emergency signalling mirror with which the attention of persons in the distance (in ships, aircraft, etc) may be attracted by a beam of reflected sunlight. A positive means of aiming the reflected beam of light is provided.Instructions are printed on the other side of this package and on mirror. General Electric company. Instruction for use are written on the rear. From collection of Wing/Com A.J. Abicair -
 Frankston RSL Sub Branch
Microphone
Hand held communications microphone with push button rotary switch. Made of alloy and bakelite with flexible cable which terminates in a three pole line plug. The rotary switch is for adjustment.The main body is embossed with the following,'SIGNAL CORPS T-17-D CAAG 19332-PH-4422'. The rotary switch knob is embossed with the following, 'SW-217' and the symbol 'U' in a circle with a lightning symbol.radio, ww2, microphone, communications -
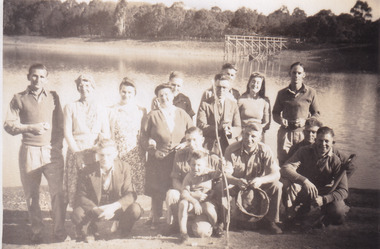 The Beechworth Burke Museum
Photograph, 1944
Taken in 1944, depicted are members of the Army Signal Detachment Unit with local residents at at Lake Kerferd. David Pittard (back row, right) is standing beside Dorrie Elliot. The other people are unidentified. A secret experimental micro-wave radio station was established and tested at this site by the Army Signal Detachment Unit during World War II. It was part of an experimental Ultra High Frequency (UHF) link between Melbourne and Sydney. At the time, it was highly classified. It intended to enquire into the hitherto unexplored transmission of micro-waves; that is, a radio signal which could only be transmitted by line of sight, and thus required hill-top to hill-top location.The photograph is historically significant as it pertains to World War II; the largest global conflict in history. This significance is enhanced by Australia's prominent involvement in campaigns across the Pacific, particularly on land in New Guinea and across the Huon Peninsula. It was also the first time that the Australian mainland came under direct attack by the Axis, with Japanese forces targeting north-west Australia and Sydney Harbour. These battles became Australia's largest and most complex offensives during the war. The record is also historically significant as it relates to the Royal Australian Corps of Signals, or "RA Sigs". This significance is strengthened by Australia's unique distinction of having the first established signal unit under the British Empire. This unit provides electronic warfare. They enable commanders to implement highly dynamic battle control against opposing forces by using a number of methods including radio, fibre optic, micro-wave, information systems and satellite links. The record has strong research potential. This is due to the ongoing scholarly and public interest in war, military history, the ANZAC legend, and the continuing existence of the RA Sigs. The historic context of this record can provide insight into Australia's history, military, technological innovation and advancements, as well as national economic, defence and foreign policies after 1945.Sepia rectangular photograph printed on matte photographic paper.Reverse: BMM5095.5 / Relaxing with some of / the Stanley locals / David Pittard (back row Rt.) / next to Dorrie Elliot / I can't recall the others / Lake Sambell, I think / Kerferd /military album, army album, lake kerford, army signal detachment unit, royal australian corps of signals, military, war, wwii, world war ii, beechworth, victoria, sydney, melbourne -
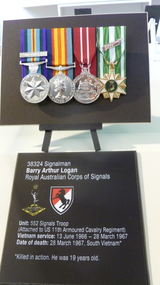 National Vietnam Veterans Museum (NVVM)
Medal - Medals, Replica
38324 Signalman Barry Arthur Logan, 552 Signal Troop, 145 Signal Squadron, Age 19, from Mildura, Victoria He was killed in action when the APC in which he was traveling stuck a mine and exploded in Xuyen Loc Province, south west of Saigon on 28th March 1967 while attached to the United States Army 11th Armoured Cavalry Regiment on Operation PORTSEA.1x Australian Active Service medal 1x Australian Service medal 1X Australian Defence medal 1x Republic of Vietnam Campaign medalmedals, australian, barry arthur logan, killed in action, apc, xuyen loc povince, saigon, united states army, 11th armoured cavalry regiment, operation portsea, signalman, 38324, royal australian corps of signals, 709 signal troop, 552 signal troop, mine explosion -
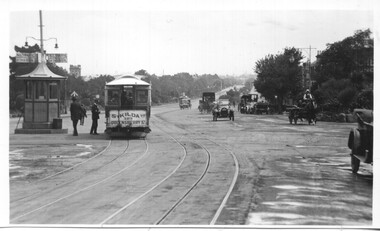 Melbourne Tram Museum
Postcard - St Kilda Junction - cable tram 123, 1910s
Photo of St Kilda Road, from the junction looking north with tram 123 standing opposite the signal box. The tram is sign written for "St Kilda to Queensberry St. The signal box has signs advising that "All traffic keep to the left of this box". A uniformed employee is standing between the box and the tramcar. There are several motor cars in view, along with one horse-drawn cart.Yields information about St Kilda Junction, and cable tram operations.Black and White Photograph postcard format, divided back with note on rear.In pencil on the rear "St Kilda Rd from the junction"tramways, trams, cable tram, st kilda, st kilda road, st kilda junction, signal box, tram 123 -
 Montmorency–Eltham RSL Sub Branch
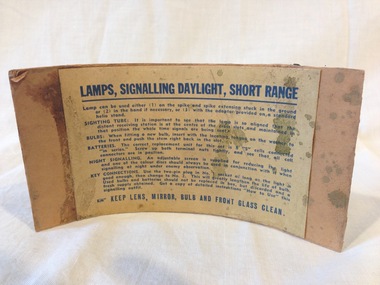
Equipment - Instruction Card, Lamps, Signalling Daylight, Short Range, MK II, PMG 1942, 1942
Dark blue printed instructions on paper mounted on a buff coloured cardboard card.LAMPS, SIGNALLING DAYLIGHT, SHORT RANGE Lamp can be used either (1) on the spike and spike extension stuck in the ground or (2) in the hand if necessary, or (3) withe the adaptor provided on a standard helio stand. SIGHTING TUBE: It is important to see that the lamp is so aligned that the distant receiving station is at the centre of the cross slots and maintained in that position the whole time that signals are being sent. BULBS: when fitting a new bulb, insert the locating tongue on the washer to the front and push the stem right back in the slot. BATTERIES: The correct replacment unit for this set is 8 "S" cells connected "in series". Screw up both terminal nuts tightly, ans see thar all connectors are in position. NIGHT SIGNALLING: An adjustable screen is supplied for reducing the light and one of the colour discs should always be used in conjunction with it when signalling at night under enemy observation. KEY CONNECTIONS. Use the two-pin plug in No.1 socket as long as the light is good enough, then cahnge to No.2. This will greatly lengthen the life of bulb. Used bulbs and batteries should not be relaced in the box, but discarded and a fresh supply obtained. Get a copy of detailed instructions "How to Use" this signalling outfit. KEEP LENS, MIRROR, BULB AND FRONT GLASS CLEAN.instructions, lamp, signalling, daylight, short range -
 Bendigo Military Museum
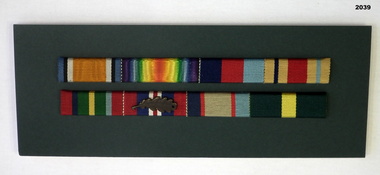
Award - SERVICE RIBBON SETS WW1, WW2, Post 1919, post 1945
The Service Ribbons relate to Benjamin Thomas Roy Chadd 1st and 2nd AIF. Enlisted on 27.1.1916 No 10594 in Div Signal Company 3 age 20 years. Embarked for overseas 27.5.1916. As a driver in Signals he was WIA on 4.6.1918 GSW to right thigh. Discharged from the AIF on 14.6.1919. At some point he enlisted in the Peace time Army and was promoted to Lieut 3rd Div Signals on 1.7.1921, promoted Major 19.2.1929, to Command 2nd Div Sigs 9.9.1936, 3rd Div Sigs 5.5.1939 then to 7th Div Sigs as Lt Col and transfers to the AIF as VX20311, serves in the Middle East, Syria and Pacific. Discharged from the Army on 9.1.1946 with the rank of Colonel. Refer 2034P.Service Ribbons set WWI & WWII mounted on green cardboard backing re BTR CHADD Top row: 1. War Medal 1914-18. 2. Victory Medal 1914 - 19 3. 1939-45 Star 4. Africa Star Bottom Row: 1. Pacific Star 2. War Medal 1939-45 with oak leaf clasp 'MID' 3. Australian Service Medal 1939 - 45 4. Efficiency Decorationmanchester-trimmings, military history -
Stawell Historical Society Inc
Instrument - Realia, Astor Model TV-1 Oscilloscope, 1960's
Instrument which demonstrates waveform of any electrical current. The waveform shows the amplitude of a signal on a Y axis and time is shown on the X Axis.Grey case with black front containing dials and small round cathode screenCloud Chamber Spray Style Supplied By Townson and Mercer (dist) Pty Ltdscience, education -
 National Vietnam Veterans Museum (NVVM)
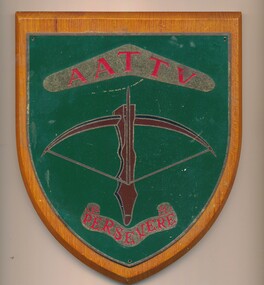
Plaque - AATTV Plaque
This item was donated by Sgt JL Bramston, Army Intelligence Corps, who served in Detachment, 547 Signal Troop, Vietnam 1967-68.Shield-shaped wooden plaque with a large metal plate attached depicting a brown crossbow beneath a boomerang.AATTV Persevereaattv, persevere, bramston -
 Lakes Entrance Historical Society
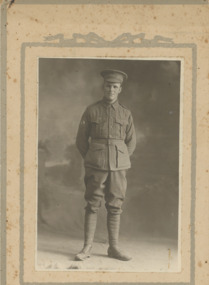
Photograph - Private Charles R Sands, Yeomans and Co Melbourne, 1916 August
To Mrs D Davidson Forestville with Best Wishes from Private C R Sands Signal School Broadmedows August 22/16Black and white photograph of Private Charles R Sands wearing AIF uniform peaked cap, signalers patch on upper right sleeve Melbourne Victoria. Mounted on presentation card armed forces, correspondence, ww1 -
 Parks Victoria - Cape Nelson Lightstation
Instrument - Lamp, Aldis
This portable, hand held visual signaling lamp, with trigger mechanism and inner reflective disk, was used for optical communication via Morse code, with the concave mirror tilted to focus the light into pulse signals. Larger versions of these lamps are fixed on ships or pedestals and have shutters in front of the light that are opened and closed to transmit signals. Smaller hand held versions like the Cape Nelson example have a concave mirror that is tilted to focus the light into pulse signals, and despite their size the lamps were renowned for their brilliant light. Invented by Arthur C W Aldis (1878‐1953) and pioneered by the British navy in the late nineteenth century, they continue to be used to the present day. Details on the Cape Nelson lamp include a serial number, a date of 1960 and the initials of the Department of Transport, which at that time incorporated the Commonwealth Lighthouse Service. Another lamp of the same date which is held at Wilsons Promontory was provided to the lighthouse by the Department of Shipping for signaling ships but was also used for communicating with Cliffy Island, 18 nautical miles away. Point Hicks also has an Aldis lamp and an associated case, which is painted an army green colour. A fourth lamp and case formerly at Cape Schanck disappeared from the collection sometime between 1995 and 2003. These types of lamps are not rare in museum collections.These types of lamps are not rare in museum collections however the Cape Nelson example has a reliable provenance to the lightstation and has first level contributory significance as a fine example of the Aldis lamps that were distributed to lightstations throughout Victoria and Australia.This object is comprised of a black metal encased Aldis lamp with electrical cord and associated wooden carrying case with metal clasp and red leather hand grip. yes -
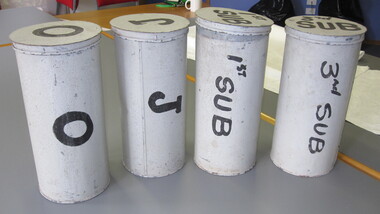 Parks Victoria - Gabo Island Lightstation
Flag canisters
The 41 alphabetic and numeric visual signalling flags (including substitute and answering pennants) have either square or pointed ends. They are made of bunting, a coarse fabric of worsted (open yarn wool) in various colour combinations. Some of the flags are marked with inscriptions, for example “B”. Attachments to the flags include hemp rope and metal clips. Each flag has its own galvanised canister and lid, each of which is painted grey and marked with a letter, number or word. The flags were used for communicating messages to passing ships. Knowledge of visual signalling was mandatory for all lightkeepers and all lightstations maintained a set of flags. Although used for centuries, visual flag signalling formally developed in the nineteenth century and was published internationally as a system in 1857. By the early twentieth century it had developed into an effective means of conveying all kinds of short range visual messages. The signal flags and canisters at Gabo Island form a complete set and are not historically linked to the lightstation and their provenance is unknown. It is known however that they originate from a lightstation in Victoria and for some years were on loan from AMSA to the Queenscliff Maritime Museum, where they were held in storage and not displayed. In three of the six lightstations that Parks Victoria manages have sets of signal flags in their collections. Forty-one galvanised canisters with separate lids. The canisters are painted a grey/white colour and have either numbers, letters or words painted on the lid and on the cannister in black paint. There are variations in the style of canister and in the style of the inscriptions. -
 Flagstaff Hill Maritime Museum and Village
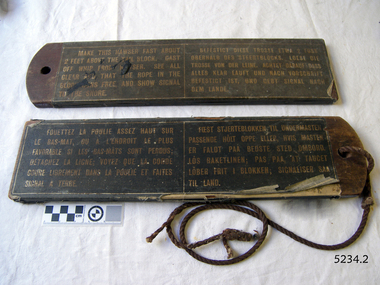
Equipment - Tally Board, 1860s
The boards each have instructions adhered to each side, printed in four languages (English, French, Dutch and German). At the beginning of a shore-to-ship rescue the instructions are sent to the distressed vessel after the first rocket line was received by them. The stranded people on the vessel follow the instructions to assist the life saving rescue crew in saving their lives. Saving lives in Warrnambool – The coastline of South West Victoria is the site of over 600 shipwrecks and many lost lives; even in Warrnambool’s Lady Bay there were around 16 known shipwrecks between 1850 and 1905, with eight lives lost. Victoria’s Government responded to the need for lifesaving equipment and, in 1858, the provision of rocket and mortar apparatus was approved for the lifeboat stations. In 1859 the first Government-built lifeboat arrived at Warrnambool Harbour and a shed was soon built for it on the Tramway Jetty, followed by a rocket house in 1864 to safely store the rocket rescue equipment. In 1878 the buildings were moved to the Breakwater (constructed from 1874-1890), and in 1910 the new Lifeboat Warrnambool arrived with its ‘self-righting’ design. For almost a hundred years the lifesaving and rescue crews, mostly local volunteers, trained regularly to rehearse and maintain their rescue skills. They were summoned when needed by alarms, gunshots, ringing bells and foghorns. In July 1873 a brass bell was erected at Flagstaff Hill specifically to call the rescue crew upon news of a shipwreck. Some crew members became local heroes but all served an important role. Rocket apparatus was used as recently as the 1950s. Rocket Rescue Method - Rocket rescue became the preferred lifesaving method of the rescue crews, being much safer that using a lifeboat in rough seas and poor conditions. The Government of Victoria adopted lifesaving methods based on Her Majesty’s Coast Guard in Great Britain. It authorised the first line-throwing rescue system in 1858. Captain Manby’s mortar powered a projectile connected to rope, invented in 1808. The equipment was updated to John Dennett’s 8-foot shaft and rocket method that had a longer range of about 250 yards. From the 1860s the breeches buoy and traveller block rocket rescue apparatus was in use. It was suspended on a hawser line and manually pulled to and from the distressed vessel carrying passengers and items. In the early 1870s Colonel Boxer’s rocket rescue method became the standard in Victoria. His two-stage rockets, charged by a gunpowder composition, could fire the line up to 500-600 yards, although 1000 yards range was possible. Boxer’s rocket carried the light line, which was faked, or coiled, in a particular way between pegs in a faking box to prevent twists and tangles when fired. The angle of firing the rocket to the vessel in distress was measured by a quadrant-type instrument on the side of the rocket machine. Decades later, in 1920, Schermuly invented the line-throwing pistol that used a small cartridge to fire the rocket. . The British Board of Trade regularly published instructions for both the beach rescue crew and ship’s crew. It involved setting up the rocket launcher on shore at a particular angle, determined by the Head of the crew and measured by the quadrant, inserting a rocket that had a light-weight line threaded through its shaft, and then firing it across the stranded vessel, the line issuing freely from the faking board. A continuous whip line was then sent out to the ship’s crew, who hauled it in then followed the instructions – in four languages - on the attached tally board. The survivors would haul on the line to bring out the heavier, continuous whip line with a tail block connected to it. They then secured the block to the mast or other strong part the ship. The rescue crew on shore then hauled out a stronger hawser line, which the survivors fixed above the whip’s tail block. The hawser was then tightened by the crew pulling on it, or by using the hooked block on the shore end of the whip and attaching it to a sand anchor. The breeches buoy was attached to the traveller block on the hawser, and the shore crew then used the whip line to haul the breeches buoy to and from the vessel, rescuing the stranded crew one at a time. The rescue crew wore scarlet, numbered armbands and worked on a numerical rotation system, swapping members out to rest themThis pair of tally board is significant for its connection with local history, maritime history and marine technology. Lifesaving has been an important part of the services performed from Warrnambool's very early days, supported by State and Local Government, and based on the methods and experience of Great Britain. Hundreds of shipwrecks along the coast are evidence of the rough weather and rugged coastline. Ordinary citizens, the Harbour employees, and the volunteer boat and rescue crew, saved lives in adverse circumstances. Some were recognised as heroes, others went unrecognised. In Lady Bay, Warrnambool, there were around 16 known shipwrecks between 1850 and 1905. Many lives were saved but tragically, eight lives were lost.Tally boards, two, rectangular wooden boards, both with a hole drilled into one short end. Instructions are glued onto the boards. They were printed in light letters onto dark canvas in four languages (English, French, Dutch and German). Text (English) "MAKE THIS HAWSER FAST ABOUT 2 FEET ABOVE THE TAIL BLOCK. CAST OFF WHIP FROM HAWSER. SEE ALL CLEAR AND THAT THE ROPE IN THE BLOCK RUNS FREE, AND SHOW SIGNAL TO THE SHORE."flagstaff hill maritime museum and village, flagstaff hill, maritime museum, maritime village, warrnambool, great ocean road, lady bay, warrnambool harbour, port of warrnambool, tramway jetty, breakwater, shipwreck, life-saving, lifesaving, rescue crew, rescue, rocket rescue, rocket crew, lifeboat men, beach rescue, line rescue, rescue equipment, rocket firing equipment, rocket rescue equipment, maritime accidents, shipwreck victim, rocket equipment, marine technology, rescue boat, lifeboat, volunteer lifesavers, volunteer crew, life saving rescue crew, lifesaving rescue crew, rocket apparatus, rocket rescue method, shore to ship, rocket apparatus rescue, stranded vessel, line throwing mortar, mortar, rocket rescue apparatus, line thrower, line throwing, lifeboat warrnambool, beach apparatus, rocket machine, rocket head, rocket launcher, rocket line, beach rescue set, rocket set, tally board, rescue instructions -
 Coal Creek Community Park & Museum
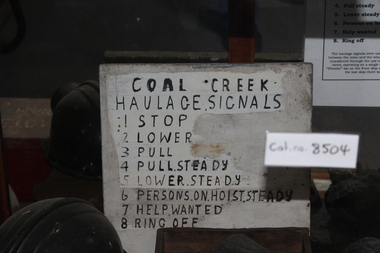
Signals sign
8504.1 - Square wooden sign painted white with black letters.- COAL CREEK - Haulage signals - 1 stop - 2 lower - 3 pull - 4 pull steady - 5 lower steady - 6 persons on hoist steady - 7 help wanted - 8 ring off -
 4th/19th Prince of Wales's Light Horse Regiment Unit History Room
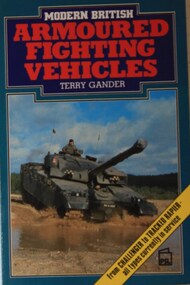
Book, Terry Gander: Modern British Armoured Fighting Vehicles, 1986 (exact)
This book gives details of armoured fighting vehicles in service with the British Army of the eighties. Included are tracked and wheeled reconnaissance vehicles such as Scorpion, Scimitar and Fox, armoured personnel carriers, command, engineer and signals vehicles, bridge layers and others. Specifications and performance details are accompanied by constant-scale plans and photographs.ISBN 0-85059-836-2photographs, armour, armoured fighting vehicles, british army, specifications, terry gander, photographs, armour, armoured fighting vehicles, british army, specifications, terry gander -
 National Vietnam Veterans Museum (NVVM)
Equipment - Bendix Transmitter, "Gibson Girl" radio
Squat yellow transmitter used in emergency life rafts carried by aircraft on flights over water. Shape enabled it to be held between knees to crank generator to provide signal. known as the 'Gibson Girl" radio because of its waisted shape. ("Gibson girl " was a marketing image of a woman with a curved waist).RA (Crown emblem). A.F. Indent No. Y11OD/500320.transmitter -
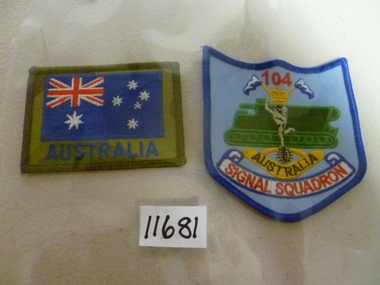 National Vietnam Veterans Museum (NVVM)
Uniform - Uniform, Army
One cloth badge depicting Australian Flag blue on green with velcro backing. One cloth badge depicting red 104, two blue flags on gold crown, green tank, yellow boomerang with Australia written in black on it. Blue border around silver banner with red signal SquadronAction badges on sticker attached to back of Squadron badgecloth badges -
 Diamond Valley Vietnam Veterans Sub-Branch
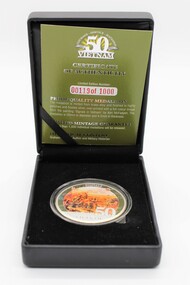
Memorabilia - Medallion, 18/8/2016
Certificate of Authenticity confirms that the item is no. 119 of no more than 1,000 issued.A limited number of this item has been released.The medallion is minted from brass alloy and finished in highly frosted and polished silver, over-printed with a full colour image from the painting "Signals in Vietnam" by Ken McFadyen. The medallion is 50mm in diameter and 4.5mm in thickness. Number 119 of a guaranteed limited release of no more than 1,000 individual medallions.A description of the medallion including a Certificate of Authenticity.vietnam, vietnam war, diamond valley vietnam veterans sub branch -
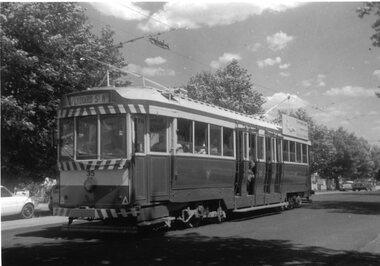 Ballarat Tramway Museum
Photograph - Black & White Photograph/s, Bob Lilburn, c1970
Black and white photograph of Ballarat tram No. 35 northbound in Drummond St. leaving Urquhart St. loop (trolley wire and signal contactor). Tram has destination of "Lydiard St. Nth" and SEC Roof advertisement "Everything's under control in my all electric kitchen." Two copies held.trams, tramways, sebastopol, drummond st. sth, urquhart st., tram 35 -
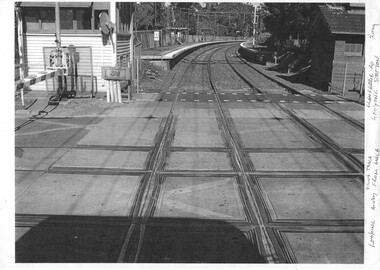 Melbourne Tram Museum
Photograph - Black & White Photograph/s, 2009
Set of two Photographs printed on A4 sheet, photocopy - of the rail tram level crossing at Glenferrie Road, Kooyong showing the rubber inserts and the level crossing - taken from the cab of a train in either direction. Shows the level crossing, platform and track, along with part of the signal box and boom barriers.1 - "Looking away down track from Melbourne - Glenferrie Rd Kooyong Station - 2009" 2 - "Looking towards Melbourne up track - Glenferrie Rd Kooyong Station - 2009"trams, tramways, kooyong, level crossings, glenferrie road, tramway square, railway squares -
 National Vietnam Veterans Museum (NVVM)
Equipment - Bendix transmitter, "Gibson Girl' radio
Squat yellow transmitter used in emergency life rafts carried by aircraft on flights over water. Shape enabled it to be held between knees to crank generator to provide signal. Known as the ' Gibson Girl' radio (named after the famous 'Gibson Girl' marketing image who had a curved waist).RA (crown emblem) AF. ID No Y1100/500320. Serial No. 14823. 'Gibson Girl' (named after the famous 'Gibson Girl' marketing neon sign).transmitter, bendix, radio, raaf, aviation -
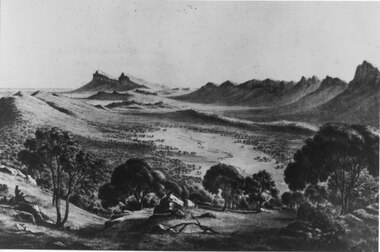 Halls Gap & Grampians Historical Society
Photograph - B/W
This is a photo of a lithograph by Eugene von Guerard (1811-1901), "Source of the Wannon", circa 1866-1868. The peaks in the distance are Mr Abrupt and Signal Peak.This is a photo of a lithograph. It is a stylised view of a mountain range with sharp rocky peaks with a valley through the centre. A river meanders down the valley. There are eucalyptus trees in the foreground and two figures can be seen in the left foreground.Photo printers stamp in back is "H/GAP0007 NNNAA"painting, landscape -
 Ballarat Tramway Museum
Photograph - B&W print of donated negative, John Webster, 11/4/1953
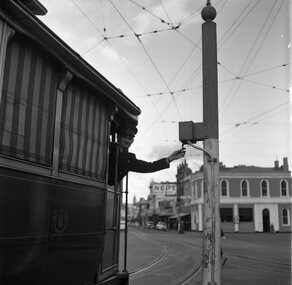
Yields information about the Bucks Head Hotel and demonstrates the way the signals were set in Bridge St for either the Mt Pleasant or Victoria St routesBlack and digital white print from a scan of a donated negative of a driver leaning out from a single trucker to set the switch on the signal for either the Victoria St or Mt Pleasant routes. Has the Bucks Head Hotel in the background. Shows the pole the signal controller or switch was mounted on. Black and White print made from scan of negative. Original Negative stored with Negatives. Image rescanned from copy neg and updated 31/5/2020. See On this basis, the envelope and marking matches that of Reg Item 4158, photo of No. 40, by John Webster and assumed taken on the same day as Item 4157, 4158, 4168, 4178 - 11/4/1953. Contained within Envelope No. 33.On left hand side of the negative in ink is "EI 35".tramways, trams, sturt st, grenville st, signals, bridge st -
 The Beechworth Burke Museum
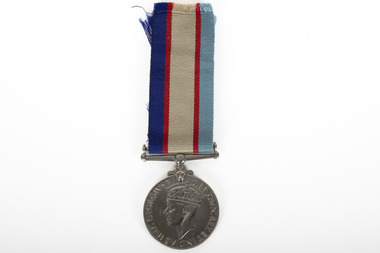
Medal - Service Medal, c1948
An Army Medal 1939 - 1945, issued to Corporal Joan Cahill. During her service, Joan serviced in the Signals Branch of the Australian Women's Army Service.A army service medal featuring a silver pendant and a light blue, dark blue, white, and red striped ribbonFRONT: 1939 / 1945 BACK: G:BR:OMN:REX ET INDIAE IMP: GEORGIV S VIburke museum, beechworth, army service, australian women's army service, army medal, ww2, wwii, world war two -
 Melbourne Tram Museum
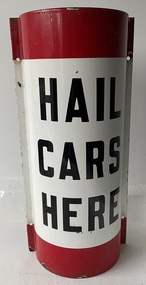
Sign - Tram Stop - "Hail Cars Here"
Indicated or provided a location to tram drivers and passengers of a tram stop that trams had to be hailed or signaled to stop or to alight. Most tram stops were of this style.Demonstrates the form of tram stop that the MMTB used in Melbourne that trams had to be signaled to stop at. Phased out from the mid 1970's. Similar signs used by the SEC in Ballarat and Bendigo. Sign - Tram Stop - Hail Cars Here - rounded with flat sections on either side for fitting to a small pole, enamel finish with white background and red top and bottom stripes. Black enamel on rear.tram stop, signs, mmtb, trams, tramways -
 Ballarat Tramway Museum
Photograph - Digital image, Late 1950's
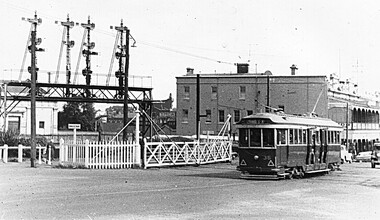
Yields information the appearance and details about SEC Tram No. 36 in the late 1950's and the railway level crossing at Ballarat station.Digital scan from the Ben Parle collection of SEC No. 36 crossing the level crossing at the Ballarat Railway station with the signalling mast and Reid's Coffee Palace in the background. Photo 1950's or early 1960 prior to introduction of dash canopy lighting. Photo received with the Ben Parle slides 09/2004. trams, tramways, lydiard st nth, railway, level crossings, tram 36 -
 Ballarat Tramway Museum
Negative, Wal Jack, early 1950's
Yields information about tram services in Sturt St and Grenville St and the building structures.Negative and Digital images of the Wal Jack Ballarat Negative file of tram 39 entering Bridge St, crossing Grenville St after leaving Sturt St. In the background is the Bucks Head Hotel. a Jeweller and Handbags Novelties shop. Note the Forest City signal on the pole and a letter (receiving pillar) box.trams, tramways, bridge st, grenville st, sturt st, signals, forest city signals, tram 39 -
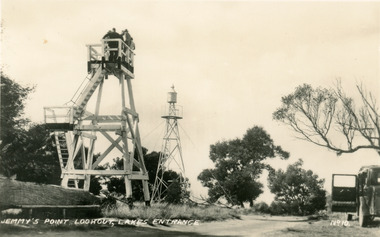 Lakes Entrance Historical Society
Postcard - Lookout tower Jemmy's Point, 1940
Black and white small format postcard of the timber observation lookout at Jemmys Point, Lakes Entrance, Victoria, showing the updated and safer steps from ground to observation deck, with fenced landing at halfway point. Old log and seat still nearby, signal light on steel tower a short distance away.historic sites, navigation, fences -
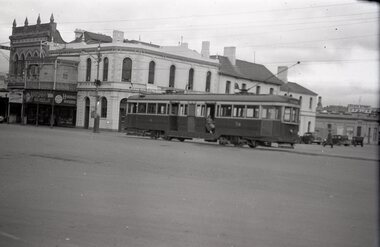
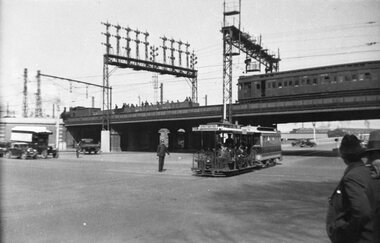 Melbourne Tram Museum
Negative, 1936
Negative of cable tram crossing from Queensbridge Road into Market St after passing under the railway underpass, along Flinders St. In the background is a the bridge with a Tait train crossing, a work or ballast train on the bridge and the signal gantry. There is a policeman on point duty. The cable tram has the destination of Collins St.trams, tramways, cable trams, flinders st, market st, collins st, railways