Showing 2677 items
matching year 2
-
 Flagstaff Hill Maritime Museum and Village
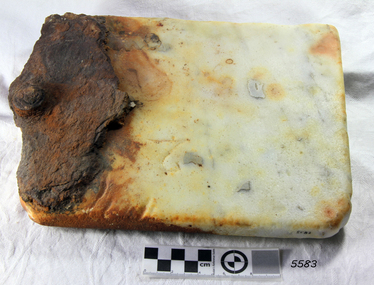
Geological specimen - Marble, 1873-1878
The Loch Ard got its name from ”Loch Ard” a loch that lies west of Aberfoyle, and east of Loch Lomond. It means "high lake" in Scottish Gaelic. The vessel belonged to the famous Loch Line which sailed many vessels from England to Australia. The Loch Ard was built in Glasgow by Barclay, Curdle and Co. in 1873, the vessel was a three-masted square-rigged iron sailing ship that measured 79.87 meters in length, 11.58 m in width, and 7 m in depth with a gross tonnage of 1693 tons with a mainmast that measured a massive 45.7 m in height. Loch Ard made three trips to Australia and one trip to Calcutta before its fateful voyage. Loch Ard left England on March 2, 1878, under the command of 29-year-old Captain Gibbs, who was newly married. The ship was bound for Melbourne with a crew of 37, plus 17 passengers. The general cargo reflected the affluence of Melbourne at the time. Onboard were straw hats, umbrella, perfumes, clay pipes, pianos, clocks, confectionery, linen and candles, as well as a heavier load of railway irons, cement, lead and copper. There were other items included that were intended for display in the Melbourne International Exhibition of 1880. The voyage to Port Phillip was long but uneventful. Then at 3 am on June 1, 1878, Captain Gibbs was expecting to see land. But the Loch Ard was running into a fog which greatly reduced visibility. Captain Gibbs was becoming anxious as there was no sign of land or the Cape Otway lighthouse. At 4 am the fog lifted and a lookout aloft announced that he could see breakers. The sheer cliffs of Victoria's west coast came into view, and Captain Gibbs realised that the ship was much closer to them than expected. He ordered as much sail to be set as time would permit and then attempted to steer the vessel out to sea. On coming head-on into the wind, the ship lost momentum, the sails fell limp and Loch Ard's bow swung back towards land. Gibbs then ordered the anchors to be released in an attempt to hold its position. The anchors sank some 50 fathoms - but did not hold. By this time the ship was among the breakers and the tall cliffs of Mutton Bird Island rose behind. Just half a mile from the coast, the ship's bow was suddenly pulled around by the anchor. The captain tried to tack out to sea, but the ship struck a reef at the base of Mutton Bird Island, near Port Campbell. Waves subsequently broke over the ship and the top deck became loosened from the hull. The masts and rigging came crashing down knocking passengers and crew overboard. When a lifeboat was finally launched, it crashed into the side of Loch Ard and capsized. Tom Pearce, who had launched the boat, managed to cling to its overturned hull and shelter beneath it. He drifted out to sea and then on the flood tide came into what is now known as Loch Ard Gorge. He swam to shore, bruised and dazed, and found a cave in which to shelter. Some of the crew stayed below deck to shelter from the falling rigging but drowned when the ship slipped off the reef into deeper water. Eva Carmichael a passenger had raced onto the deck to find out what was happening only to be confronted by towering cliffs looming above the stricken ship. In all the chaos, Captain Gibbs grabbed Eva and said, "If you are saved Eva, let my dear wife know that I died like a sailor". That was the last Eva Carmichael saw of the captain. She was swept off the ship by a huge wave. Eva saw Tom Pearce on a small rocky beach and yelled to attract his attention. He dived in and swam to the exhausted woman and dragged her to shore. He took her to the cave and broke the open case of brandy which had washed up on the beach. He opened a bottle to revive the unconscious woman. A few hours later Tom scaled a cliff in search of help. He followed hoof prints and came by chance upon two men from nearby Glenample Station three and a half miles away. In a complete state of exhaustion, he told the men of the tragedy. Tom then returned to the gorge while the two men rode back to the station to get help. By the time they reached Loch Ard Gorge, it was cold and dark. The two shipwreck survivors were taken to Glenample Station to recover. Eva stayed at the station for six weeks before returning to Ireland by steamship. In Melbourne, Tom Pearce received a hero's welcome. He was presented with the first gold medal of the Royal Humane Society of Victoria and a £1000 cheque from the Victorian Government. Concerts were performed to honour the young man's bravery and to raise money for those who lost family in the disaster. Of the 54 crew members and passengers on board, only two survived: the apprentice, Tom Pearce and the young woman passenger, Eva Carmichael, who lost her family in the tragedy. Ten days after the Loch Ard tragedy, salvage rights to the wreck were sold at auction for £2,120. Cargo valued at £3,000 was salvaged and placed on the beach, but most washed back into the sea when another storm developed. The wreck of Loch Ard still lies at the base of Mutton Bird Island. Much of the cargo has now been salvaged and some items were washed up into Loch Ard Gorge. Cargo and artefacts have also been illegally salvaged over many years before protective legislation was introduced in March 1982. One of the most unlikely pieces of cargo to have survived the shipwreck was a Minton majolica peacock- one of only nine in the world. The peacock was destined for the Melbourne 1880 International Exhibition. It had been well packed, which gave it adequate protection during the violent storm. Today the Minton peacock can be seen at the Flagstaff Hill Maritime Museum in Warrnambool. From Australia's most dramatic shipwreck, it has now become Australia's most valuable shipwreck artifact and is one of very few 'objects' on the Victorian State Heritage Register. The shipwreck of the Loch Ard is of significance for Victoria and is registered on the Victorian Heritage Register ( S 417). Flagstaff Hill has a varied collection of artefacts from Loch Ard and its collection is significant for being one of the largest accumulation of artefacts from this notable Victorian shipwreck. The collections object is to also give us a snapshot into history so we can interpret the story of this tragic event. The collection is also archaeologically significant as it represents aspects of Victoria's shipping history that allows us to interpret Victoria's social and historical themes of the time. The collections historically significance is that it is associated unfortunately with the worst and best-known shipwreck in Victoria's history. Rectangular piece of cream coloured marble fireplace surround, with an embedded section of wrought iron in one end. Recovered from the wreck of the Loch Ard. Noneflagstaff hill, warrnambool, shipwrecked coast, flagstaff hill maritime museum, maritime museum, shipwreck coast, flagstaff hill maritime village, great ocean road, loch line, loch ard, captain gibbs, eva carmichael, tom pearce, glenample station, mutton bird island, loch ard gorge, marble fireplace, wrought iron, fireplace surround -
 Flagstaff Hill Maritime Museum and Village
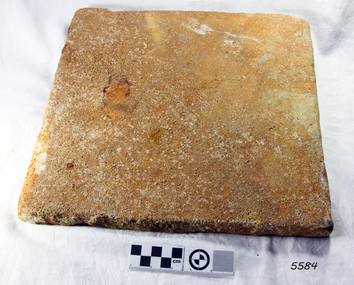
Marble Tile, circa 1878
The artefact is a white marble tile raised from the wreck of the LOCH ARD (1878). The cargo manifest of the sunken vessel has the entry “Marble £400”. This is placed directly following the entry “Glass (604 cases)”. This conjunction suggests the marble tile was originally part of a consignment intended for use in a ‘high end’ residential or public building project in the gold and wool rich Colony of Victoria. Traditionally, white or cream marble was imported into Britain from the Mediterranean region of Europe, where beds of sedimentary limestone (calcium and magnesium carbonate) had been buried over a long geological period of time. Deep in the earth’s crust, it had been subjected to immense pressures and high temperatures, sufficient to completely re-crystallise the original deposits. Marble beds began as layers of sediment at the bottom of ancient tropical seas, forming from the skeletal remains of calcareous fossils, shell, and coral fragments. The metamorphic process of prolonged compression and heating recrystallised this skeletal material, destroying all signs of the original sedimentary fabric. The resulting ‘true’ marbles of, for example, White Carrara (Tuscany, Italy), Verdi (green) Antico (Thessaly, Greece), and Rouge (red) Languadoc (Carcassone, France), were highly prized in classical decoration (sculpture and friezes) and architecture (temples and arches). Marble was found in nineteenth century Australia, but in small, uneconomic deposits, not suitable for commercial quarrying. The comparative expense of imported marble restricted its use in colonial buildings to carved fireplaces and mantel pieces, or outdoor ornaments such as fountains, statuary and grave stones. If Carrara marble floor tiles were used, they were used sparingly, as an arresting feature in entrance halls for instance. However, most prominent private and public construction used timber flooring, waxed or ‘japanned’, with carpet runners and rugs (for example the Austin’s Barwon Park Mansion, 1871), or laid tessellated and ceramic tiles of baked clay infused with colour (for example the Chirnside’s Werribee Park Mansion, 1878). HISTORY OF THE LOCH ARD The LOCH ARD belonged to the famous Loch Line which sailed many ships from England to Australia. Built in Glasgow by Barclay, Curdle and Co. in 1873, the LOCH ARD was a three-masted square rigged iron sailing ship. The ship measured 262ft 7" (79.87m) in length, 38ft (11.58m) in width, 23ft (7m) in depth and had a gross tonnage of 1693 tons. The LOCH ARD's main mast measured a massive 150ft (45.7m) in height. LOCH ARD made three trips to Australia and one trip to Calcutta before its final voyage. LOCH ARD left England on March 2, 1878, under the command of Captain Gibbs, a newly married, 29 year old. She was bound for Melbourne with a crew of 37, plus 17 passengers and a load of cargo. The general cargo reflected the affluence of Melbourne at the time. On board were straw hats, umbrella, perfumes, clay pipes, pianos, clocks, confectionary, linen and candles, as well as a heavier load of railway irons, cement, lead and copper. There were items included that intended for display in the Melbourne International Exhibition in 1880. The voyage to Port Phillip was long but uneventful. At 3am on June 1, 1878, Captain Gibbs was expecting to see land and the passengers were becoming excited as they prepared to view their new homeland in the early morning. But LOCH ARD was running into a fog which greatly reduced visibility. Captain Gibbs was becoming anxious as there was no sign of land or the Cape Otway lighthouse. At 4am the fog lifted. A man aloft announced that he could see breakers. The sheer cliffs of Victoria's west coast came into view, and Captain Gibbs realised that the ship was much closer to them than expected. He ordered as much sail to be set as time would permit and then attempted to steer the vessel out to sea. On coming head on into the wind, the ship lost momentum, the sails fell limp and LOCH ARD's bow swung back. Gibbs then ordered the anchors to be released in an attempt to hold its position. The anchors sank some 50 fathoms - but did not hold. By this time LOCH ARD was among the breakers and the tall cliffs of Mutton Bird Island rose behind the ship. Just half a mile from the coast, the ship's bow was suddenly pulled around by the anchor. The captain tried to tack out to sea, but the ship struck a reef at the base of Mutton Bird Island, near Port Campbell. Waves broke over the ship and the top deck was loosened from the hull. The masts and rigging came crashing down knocking passengers and crew overboard. When a lifeboat was finally launched, it crashed into the side of LOCH ARD and capsized. Tom Pearce, who had launched the boat, managed to cling to its overturned hull and shelter beneath it. He drifted out to sea and then on the flood tide came into what is now known as LOCH ARD Gorge. He swam to shore, bruised and dazed, and found a cave in which to shelter. Some of the crew stayed below deck to shelter from the falling rigging but drowned when the ship slipped off the reef into deeper water. Eva Carmichael had raced onto deck to find out what was happening only to be confronted by towering cliffs looming above the stricken ship. In all the chaos, Captain Gibbs grabbed Eva and said, "If you are saved Eva, let my dear wife know that I died like a sailor". That was the last Eva Carmichael saw of the captain. She was swept off the ship by a huge wave. Eva saw Tom Pearce on a small rocky beach and yelled to attract his attention. He dived in and swam to the exhausted woman and dragged her to shore. He took her to the cave and broke open case of brandy which had washed up on the beach. He opened a bottle to revive the unconscious woman. A few hours later Tom scaled a cliff in search of help. He followed hoof prints and came by chance upon two men from nearby Glenample Station three and a half miles away. In a state of exhaustion, he told the men of the tragedy. Tom returned to the gorge while the two men rode back to the station to get help. By the time they reached LOCH ARD Gorge, it was cold and dark. The two shipwreck survivors were taken to Glenample Station to recover. Eva stayed at the station for six weeks before returning to Ireland, this time by steamship. In Melbourne, Tom Pearce received a hero's welcome. He was presented with the first gold medal of the Royal Humane Society of Victoria and a £1000 cheque from the Victorian Government. Concerts were performed to honour the young man's bravery and to raise money for those who lost family in the LOCH ARD disaster. Of the 54 crew members and passengers on board, only two survived: the apprentice, Tom Pearce and the young woman passenger, Eva Carmichael, who lost all of her family in the tragedy. Ten days after the LOCH ARD tragedy, salvage rights to the wreck were sold at auction for £2,120. Cargo valued at £3,000 was salvaged and placed on the beach, but most washed back into the sea when another storm developed. The wreck of LOCH ARD still lies at the base of Mutton Bird Island. Much of the cargo has now been salvaged and some was washed up into what is now known as LOCH ARD Gorge. Cargo and artefacts have also been illegally salvaged over many years before protective legislation was introduced. One of the most unlikely pieces of cargo to have survived the shipwreck was a Minton porcelain peacock - one of only nine in the world. The peacock was destined for the Melbourne International Exhibition in 1880. It had been well packed, which gave it adequate protection during the violent storm. Today, the Minton peacock can be seen at the Flagstaff Hill Maritime Museum in Warrnambool. From Australia's most dramatic shipwreck it has now become Australia's most valuable shipwreck artefact and is one of very few 'objects' on the Victorian State Heritage Register. The wreck of the LOCH ARD is of State significance — Victorian Heritage Register S417 Flagstaff Hill’s collection of artefacts from LOCH ARD is significant for being one of the largest collections of artefacts from this shipwreck in Victoria. It is significant for its association with the shipwreck, which is on the Victorian Heritage Register (VHR S417). The collection is significant because of the relationship between the objects, as together they have a high potential to interpret the story of the LOCH ARD. The LOCH ARD collection is archaeologically significant as the remains of a large international passenger and cargo ship. The LOCH ARD collection is historically significant for representing aspects of Victoria’s shipping history and its potential to interpret sub-theme 1.5 of Victoria’s Framework of Historical Themes (living with natural processes). The collection is also historically significant for its association with the LOCH ARD, which was one of the worst and best known shipwrecks in Victoria’s history. A square marble tile retrieved from the wreck of the LOCH ARD. Most of its surface is covered by a thin layer of limestone and marine growth encrustation that is stained rust-red. The tile is ‘rough-worked’, cut to shape and size, but not smoothed or polished. There is a companion tile in similar condition in the Flagstaff Hill collection. From visual observation of the original surface (at low magnification) the tile appears to be of white Carrara-type marble.flagstaff hill, warrnambool, shipwrecked coast, flagstaff hill maritime museum, maritime museum, shipwreck coast, flagstaff hill maritime village, great ocean road, loch line, loch ard, captain gibbs, eva carmichael, tom pearce, glenample station, mutton bird island, loch ard gorge, white marble, marble tile, carrara marble, imported marble, colonial architecture, victorian building materials -
 Flagstaff Hill Maritime Museum and Village
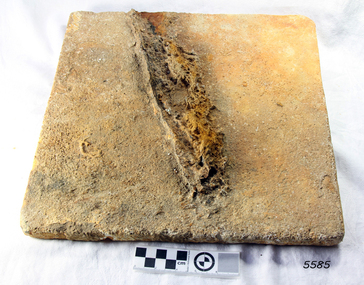
Marble Tile, circa 1878
The artefact is a white marble tile raised from the wreck of the LOCH ARD (1878). The cargo manifest of the sunken vessel has the entry “Marble £400”. This is placed directly following the entry “Glass (604 cases)”. This conjunction suggests the marble tile was originally part of a consignment intended for use in a ‘high end’ residential or public building project in the gold and wool rich Colony of Victoria. Traditionally, white or cream marble was imported into Britain from the Mediterranean region of Europe, where beds of sedimentary limestone (calcium and magnesium carbonate) had been buried over a long geological period of time. Deep in the earth’s crust, it had been subjected to immense pressures and high temperatures, sufficient to completely re-crystallise the original deposits. Marble beds began as layers of sediment at the bottom of ancient tropical seas, forming from the skeletal remains of calcareous fossils, shell, and coral fragments. The metamorphic process of prolonged compression and heating recrystallised this skeletal material, destroying all signs of the original sedimentary fabric. The resulting ‘true’ marbles of, for example, White Carrara (Tuscany, Italy), Verdi (green) Antico (Thessaly, Greece), and Rouge (red) Languadoc (Carcassone, France), were highly prized in classical decoration (sculpture and friezes) and architecture (temples and arches). Marble was found in nineteenth century Australia, but in small, uneconomic deposits, not suitable for commercial quarrying. The comparative expense of imported marble restricted its use in colonial buildings to carved fireplaces and mantel pieces, or outdoor ornaments such as fountains, statuary and grave stones. If Carrara marble floor tiles were used, they were used sparingly, as an arresting feature in entrance halls for instance. However, most prominent private and public construction used timber flooring, waxed or ‘jappaned’, with carpet runners and rugs (for example the Austin’s Barwon Park Mansion, 1871), or laid tessellated and ceramic tiles of baked clay infused with colour (for example the Chirnside’s Werribee Park Mansion, 1878). HISTORY OF THE LOCH ARD The LOCH ARD belonged to the famous Loch Line which sailed many ships from England to Australia. Built in Glasgow by Barclay, Curdle and Co. in 1873, the LOCH ARD was a three-masted square rigged iron sailing ship. The ship measured 262ft 7" (79.87m) in length, 38ft (11.58m) in width, 23ft (7m) in depth and had a gross tonnage of 1693 tons. The LOCH ARD's main mast measured a massive 150ft (45.7m) in height. LOCH ARD made three trips to Australia and one trip to Calcutta before its final voyage. LOCH ARD left England on March 2, 1878, under the command of Captain Gibbs, a newly married, 29 year old. She was bound for Melbourne with a crew of 37, plus 17 passengers and a load of cargo. The general cargo reflected the affluence of Melbourne at the time. On board were straw hats, umbrella, perfumes, clay pipes, pianos, clocks, confectionary, linen and candles, as well as a heavier load of railway irons, cement, lead and copper. There were items included that intended for display in the Melbourne International Exhibition in 1880. The voyage to Port Phillip was long but uneventful. At 3am on June 1, 1878, Captain Gibbs was expecting to see land and the passengers were becoming excited as they prepared to view their new homeland in the early morning. But LOCH ARD was running into a fog which greatly reduced visibility. Captain Gibbs was becoming anxious as there was no sign of land or the Cape Otway lighthouse. At 4am the fog lifted. A man aloft announced that he could see breakers. The sheer cliffs of Victoria's west coast came into view, and Captain Gibbs realised that the ship was much closer to them than expected. He ordered as much sail to be set as time would permit and then attempted to steer the vessel out to sea. On coming head on into the wind, the ship lost momentum, the sails fell limp and LOCH ARD's bow swung back. Gibbs then ordered the anchors to be released in an attempt to hold its position. The anchors sank some 50 fathoms - but did not hold. By this time LOCH ARD was among the breakers and the tall cliffs of Mutton Bird Island rose behind the ship. Just half a mile from the coast, the ship's bow was suddenly pulled around by the anchor. The captain tried to tack out to sea, but the ship struck a reef at the base of Mutton Bird Island, near Port Campbell. Waves broke over the ship and the top deck was loosened from the hull. The masts and rigging came crashing down knocking passengers and crew overboard. When a lifeboat was finally launched, it crashed into the side of LOCH ARD and capsized. Tom Pearce, who had launched the boat, managed to cling to its overturned hull and shelter beneath it. He drifted out to sea and then on the flood tide came into what is now known as LOCH ARD Gorge. He swam to shore, bruised and dazed, and found a cave in which to shelter. Some of the crew stayed below deck to shelter from the falling rigging but drowned when the ship slipped off the reef into deeper water. Eva Carmichael had raced onto deck to find out what was happening only to be confronted by towering cliffs looming above the stricken ship. In all the chaos, Captain Gibbs grabbed Eva and said, "If you are saved Eva, let my dear wife know that I died like a sailor". That was the last Eva Carmichael saw of the captain. She was swept off the ship by a huge wave. Eva saw Tom Pearce on a small rocky beach and yelled to attract his attention. He dived in and swam to the exhausted woman and dragged her to shore. He took her to the cave and broke open case of brandy which had washed up on the beach. He opened a bottle to revive the unconscious woman. A few hours later Tom scaled a cliff in search of help. He followed hoof prints and came by chance upon two men from nearby Glenample Station three and a half miles away. In a state of exhaustion, he told the men of the tragedy. Tom returned to the gorge while the two men rode back to the station to get help. By the time they reached LOCH ARD Gorge, it was cold and dark. The two shipwreck survivors were taken to Glenample Station to recover. Eva stayed at the station for six weeks before returning to Ireland, this time by steamship. In Melbourne, Tom Pearce received a hero's welcome. He was presented with the first gold medal of the Royal Humane Society of Victoria and a £1000 cheque from the Victorian Government. Concerts were performed to honour the young man's bravery and to raise money for those who lost family in the LOCH ARD disaster. Of the 54 crew members and passengers on board, only two survived: the apprentice, Tom Pearce and the young woman passenger, Eva Carmichael, who lost all of her family in the tragedy. Ten days after the LOCH ARD tragedy, salvage rights to the wreck were sold at auction for £2,120. Cargo valued at £3,000 was salvaged and placed on the beach, but most washed back into the sea when another storm developed. The wreck of LOCH ARD still lies at the base of Mutton Bird Island. Much of the cargo has now been salvaged and some was washed up into what is now known as LOCH ARD Gorge. Cargo and artefacts have also been illegally salvaged over many years before protective legislation was introduced. One of the most unlikely pieces of cargo to have survived the shipwreck was a Minton porcelain peacock - one of only nine in the world. The peacock was destined for the Melbourne International Exhibition in 1880. It had been well packed, which gave it adequate protection during the violent storm. Today, the Minton peacock can be seen at the Flagstaff Hill Maritime Museum in Warrnambool. From Australia's most dramatic shipwreck it has now become Australia's most valuable shipwreck artefact and is one of very few 'objects' on the Victorian State Heritage Register. HISTORY OF THE LOCH ARD The LOCH ARD belonged to the famous Loch Line which sailed many ships from England to Australia. Built in Glasgow by Barclay, Curdle and Co. in 1873, the LOCH ARD was a three-masted square rigged iron sailing ship. The ship measured 262ft 7" (79.87m) in length, 38ft (11.58m) in width, 23ft (7m) in depth and had a gross tonnage of 1693 tons. The LOCH ARD's main mast measured a massive 150ft (45.7m) in height. LOCH ARD made three trips to Australia and one trip to Calcutta before its final voyage. LOCH ARD left England on March 2, 1878, under the command of Captain Gibbs, a newly married, 29 year old. She was bound for Melbourne with a crew of 37, plus 17 passengers and a load of cargo. The general cargo reflected the affluence of Melbourne at the time. On board were straw hats, umbrella, perfumes, clay pipes, pianos, clocks, confectionary, linen and candles, as well as a heavier load of railway irons, cement, lead and copper. There were items included that intended for display in the Melbourne International Exhibition in 1880. The voyage to Port Phillip was long but uneventful. At 3am on June 1, 1878, Captain Gibbs was expecting to see land and the passengers were becoming excited as they prepared to view their new homeland in the early morning. But LOCH ARD was running into a fog which greatly reduced visibility. Captain Gibbs was becoming anxious as there was no sign of land or the Cape Otway lighthouse. At 4am the fog lifted. A man aloft announced that he could see breakers. The sheer cliffs of Victoria's west coast came into view, and Captain Gibbs realised that the ship was much closer to them than expected. He ordered as much sail to be set as time would permit and then attempted to steer the vessel out to sea. On coming head on into the wind, the ship lost momentum, the sails fell limp and LOCH ARD's bow swung back. Gibbs then ordered the anchors to be released in an attempt to hold its position. The anchors sank some 50 fathoms - but did not hold. By this time LOCH ARD was among the breakers and the tall cliffs of Mutton Bird Island rose behind the ship. Just half a mile from the coast, the ship's bow was suddenly pulled around by the anchor. The captain tried to tack out to sea, but the ship struck a reef at the base of Mutton Bird Island, near Port Campbell. Waves broke over the ship and the top deck was loosened from the hull. The masts and rigging came crashing down knocking passengers and crew overboard. When a lifeboat was finally launched, it crashed into the side of LOCH ARD and capsized. Tom Pearce, who had launched the boat, managed to cling to its overturned hull and shelter beneath it. He drifted out to sea and then on the flood tide came into what is now known as LOCH ARD Gorge. He swam to shore, bruised and dazed, and found a cave in which to shelter. Some of the crew stayed below deck to shelter from the falling rigging but drowned when the ship slipped off the reef into deeper water. Eva Carmichael had raced onto deck to find out what was happening only to be confronted by towering cliffs looming above the stricken ship. In all the chaos, Captain Gibbs grabbed Eva and said, "If you are saved Eva, let my dear wife know that I died like a sailor". That was the last Eva Carmichael saw of the captain. She was swept off the ship by a huge wave. Eva saw Tom Pearce on a small rocky beach and yelled to attract his attention. He dived in and swam to the exhausted woman and dragged her to shore. He took her to the cave and broke open case of brandy which had washed up on the beach. He opened a bottle to revive the unconscious woman. A few hours later Tom scaled a cliff in search of help. He followed hoof prints and came by chance upon two men from nearby Glenample Station three and a half miles away. In a state of exhaustion, he told the men of the tragedy. Tom returned to the gorge while the two men rode back to the station to get help. By the time they reached LOCH ARD Gorge, it was cold and dark. The two shipwreck survivors were taken to Glenample Station to recover. Eva stayed at the station for six weeks before returning to Ireland, this time by steamship. In Melbourne, Tom Pearce received a hero's welcome. He was presented with the first gold medal of the Royal Humane Society of Victoria and a £1000 cheque from the Victorian Government. Concerts were performed to honour the young man's bravery and to raise money for those who lost family in the LOCH ARD disaster. Of the 54 crew members and passengers on board, only two survived: the apprentice, Tom Pearce and the young woman passenger, Eva Carmichael, who lost all of her family in the tragedy. Ten days after the LOCH ARD tragedy, salvage rights to the wreck were sold at auction for £2,120. Cargo valued at £3,000 was salvaged and placed on the beach, but most washed back into the sea when another storm developed. The wreck of LOCH ARD still lies at the base of Mutton Bird Island. Much of the cargo has now been salvaged and some was washed up into what is now known as LOCH ARD Gorge. Cargo and artefacts have also been illegally salvaged over many years before protective legislation was introduced. One of the most unlikely pieces of cargo to have survived the shipwreck was a Minton porcelain peacock - one of only nine in the world. The peacock was destined for the Melbourne International Exhibition in 1880. It had been well packed, which gave it adequate protection during the violent storm. Today, the Minton peacock can be seen at the Flagstaff Hill Maritime Museum in Warrnambool. From Australia's most dramatic shipwreck it has now become Australia's most valuable shipwreck artefact and is one of very few 'objects' on the Victorian State Heritage Register. The wreck of the LOCH ARD is of State significance — Victorian Heritage Register S417 Flagstaff Hill’s collection of artefacts from LOCH ARD is significant for being one of the largest collections of artefacts from this shipwreck in Victoria. It is significant for its association with the shipwreck, which is on the Victorian Heritage Register (VHR S417). The collection is significant because of the relationship between the objects, as together they have a high potential to interpret the story of the LOCH ARD. The LOCH ARD collection is archaeologically significant as the remains of a large international passenger and cargo ship. The LOCH ARD collection is historically significant for representing aspects of Victoria’s shipping history and its potential to interpret sub-theme 1.5 of Victoria’s Framework of Historical Themes (living with natural processes). The collection is also historically significant for its association with the LOCH ARD, which was one of the worst and best known shipwrecks in Victoria’s history. A square marble tile retrieved from the wreck of the LOCH ARD. Most of its surface is covered by a thin layer of limestone and marine growth encrustation that is stained rust-red. There is a piece of corroded iron encrusted at an oblique angle on the tile’s rear face. The tile is ‘rough-worked’, cut to shape and size, but not smoothed or polished. There is a companion tile in similar condition in the Flagstaff Hill collection. From visual observation of the original surface (at low magnification) the tile appears to be of white Carrara-type marble.flagstaff hill, warrnambool, shipwrecked coast, flagstaff hill maritime museum, maritime museum, shipwreck coast, flagstaff hill maritime village, great ocean road, loch line, loch ard, captain gibbs, eva carmichael, tom pearce, glenample station, mutton bird island, loch ard gorge, white marble, marble tile, carrara marble, colonial architecture, victorian building materials -
 Flagstaff Hill Maritime Museum and Village
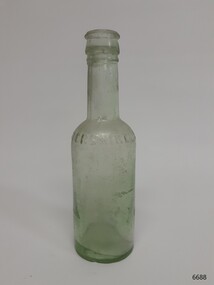
Container - Sauce Bottle, 1878
This Worcestershire Sauce bottle was made by Lee & Perkins. It was hand blown into a two-piece mould, snapped off the blowing rod and then had a separate mouth applied to the neck, as evidenced by the side seams, ripples in the body, join below the mouth, bubbles in the glass and a push-up base that is uneven in thickness. The Loch Ard got its name from ”Loch Ard” a loch that lies to the west of Aberfoyle, and the east of Loch Lomond. It means "high lake" in Scottish Gaelic. The vessel belonged to the famous Loch Line which sailed many vessels from England to Australia. The Loch Ard was built in Glasgow by Barclay, Curdle and Co. in 1873, the vessel was a three-masted square-rigged iron sailing ship that measured 79.87 meters in length, 11.58 m in width, and 7 m in depth with a gross tonnage of 1693 tons with a mainmast that measured a massive 45.7 m in height. Loch Ard made three trips to Australia and one trip to Calcutta before its fateful voyage. Loch Ard left England on March 2, 1878, under the command of 29-year-old Captain Gibbs, who was newly married. The ship was bound for Melbourne with a crew of 37, plus 17 passengers. The general cargo reflected the affluence of Melbourne at the time. Onboard were straw hats, umbrellas, perfumes, clay pipes, pianos, clocks, confectionery, linen and candles, as well as a heavier load of railway irons, cement, lead and copper. There were other items included that were intended for display in the Melbourne International Exhibition of 1880. The voyage to Port Phillip was long but uneventful. Then at 3 am on June 1, 1878, Captain Gibbs was expecting to see land. But the Loch Ard was running into a fog which greatly reduced visibility. Captain Gibbs was becoming anxious as there was no sign of land or the Cape Otway lighthouse. At 4 am the fog lifted and a lookout aloft announced that he could see breakers. The sheer cliffs of Victoria's west coast came into view, and Captain Gibbs realised that the ship was much closer to them than expected. He ordered as much sail to be set as time would permit and then attempted to steer the vessel out to sea. On coming head-on into the wind, the ship lost momentum, the sails fell limp and Loch Ard's bow swung back towards land. Gibbs then ordered the anchors to be released in an attempt to hold their position. The anchors sank some 50 fathoms - but did not hold. By this time the ship was among the breakers and the tall cliffs of Mutton Bird Island rose behind. Just half a mile from the coast, the ship's bow was suddenly pulled around by the anchor. The captain tried to tack out to sea, but the ship struck a reef at the base of Mutton Bird Island, near Port Campbell. Waves subsequently broke over the ship and the top deck became loosened from the hull. The masts and rigging came crashing down knocking passengers and crew overboard. When a lifeboat was finally launched, it crashed into the side of Loch Ard and capsized. Tom Pearce, who had launched the boat, managed to cling to its overturned hull and shelter beneath it. He drifted out to sea and then on the flood tide came into what is now known as Loch Ard Gorge. He swam to shore, bruised and dazed, and found a cave in which to shelter. Some of the crew stayed below deck to shelter from the falling rigging but drowned when the ship slipped off the reef into deeper water. Eva Carmichael a passenger had raced onto the deck to find out what was happening only to be confronted by towering cliffs looming above the stricken ship. In all the chaos, Captain Gibbs grabbed Eva and said, "If you are saved Eva, let my dear wife know that I died like a sailor". That was the last Eva Carmichael saw of the captain. She was swept off the ship by a huge wave. Eva saw Tom Pearce on a small rocky beach and yelled to attract his attention. He dived in and swam to the exhausted woman and dragged her to shore. He took her to the cave and broke the open case of brandy which had washed up on the beach. He opened a bottle to revive the unconscious woman. A few hours later Tom scaled a cliff in search of help. He followed hoof prints and came by chance upon two men from nearby Glenample Station three and a half miles away. In a complete state of exhaustion, he told the men of the tragedy. Tom then returned to the gorge while the two men rode back to the station to get help. By the time they reached Loch Ard Gorge, it was cold and dark. The two shipwreck survivors were taken to Glenample Station to recover. Eva stayed at the station for six weeks before returning to Ireland by steamship. In Melbourne, Tom Pearce received a hero's welcome. He was presented with the first gold medal of the Royal Humane Society of Victoria and a £1000 cheque from the Victorian Government. Concerts were performed to honour the young man's bravery and to raise money for those who lost family in the disaster. Of the 54 crew members and passengers on board, only two survived: the apprentice, Tom Pearce and the young woman passenger, Eva Carmichael, who lost her family in the tragedy. Ten days after the Loch Ard tragedy, salvage rights to the wreck were sold at auction for £2,120. Cargo valued at £3,000 was salvaged and placed on the beach, but most washed back into the sea when another storm developed. The wreck of Loch Ard still lies at the base of Mutton Bird Island. Much of the cargo has now been salvaged and some items were washed up into Loch Ard Gorge. Cargo and artefacts have also been illegally salvaged over many years before protective legislation was introduced in March 1982. One of the most unlikely pieces of cargo to have survived the shipwreck was a Minton majolica peacock- one of only nine in the world. The peacock was destined for the Melbourne 1880 International Exhibition. It had been well packed, which gave it adequate protection during the violent storm. Today the Minton peacock can be seen at the Flagstaff Hill Maritime Museum in Warrnambool. From Australia's most dramatic shipwreck, it has now become Australia's most valuable shipwreck artifact and is one of very few 'objects' on the Victorian State Heritage Register. The shipwreck of the Loch Ard is of significance for Victoria and is registered on the Victorian Heritage Register ( S 417). Flagstaff Hill has a varied collection of artefacts from Loch Ard and its collection is significant for being one of the largest accumulation of artefacts from this notable Victorian shipwreck. The collections object is to also give us a snapshot into history so we can interpret the story of this tragic event. The collection is also archaeologically significant as it represents aspects of Victoria's shipping history that allows us to interpret Victoria's social and historical themes of the time. The collections historically significance is that it is associated unfortunately with the worst and best-known shipwreck in Victoria's history.Clear glass bottle with a green tinge. The bottle has an applied mouth, seams from base to mouth, bubbles and impurities in the glass, and uneven glass thickness. Vertical and horizontal inscriptions are raised. The bottle once contained Worcestershire Sauce and was made by Lea and Perkins. Vertical; "LEA & PERKINS" and around shoulder "WORCESTERSHIRE SAUCE" flagstaff hill, flagstaff hill maritime museum and village, warrnambool, maritime museum, maritime village, great ocean road, shipwreck coast, sauce bottle, worcestershire sauce, shipwreck artefact, condiment bottle, loch ard artifacts, lea and perkins -
 Flagstaff Hill Maritime Museum and Village
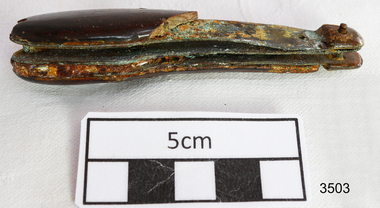
Pocket Knife, before 1878
Found on board the "Loch Ard" . 'Loch Ard" left Gravesend, England on 2nd March 1878, under the command of Captain Gibb, bound for Melbourne loaded with passengers and cargo. On June 1st 1878, almost at the end of her journey, she ran into a rocky reef at the base of Mutton Bird Island, near Port Campbell. Of the 54 crew members and passengers on board, only two survived: an apprentice, Tom Pearce and a young woman passenger, Eva Carmichael, who lost all of her family in the tragedy. The wreck of Loch Ard still lies at the base of Mutton Bird Island and much of the cargo has been salvaged. Some was washed up into what is now known as Loch Ard Gorge following the shipwreck. Amongst artefacts salvaged from the Loch Ard is the now famous Minton Peacock Statue which was destined for the Melbourne International Exhibition to be held in 1880 HISTORY OF THE LOCH ARD The LOCH ARD belonged to the famous Loch Line which sailed many ships from England to Australia. Built in Glasgow by Barclay, Curdle and Co. in 1873, the LOCH ARD was a three-masted square rigged iron sailing ship. The ship measured 262ft 7" (79.87m) in length, 38ft (11.58m) in width, 23ft (7m) in depth and had a gross tonnage of 1693 tons. The LOCH ARD's main mast measured a massive 150ft (45.7m) in height. LOCH ARD made three trips to Australia and one trip to Calcutta before its final voyage. LOCH ARD left England on March 2, 1878, under the command of Captain Gibbs, a newly married, 29 year old. She was bound for Melbourne with a crew of 37, plus 17 passengers and a load of cargo. The general cargo reflected the affluence of Melbourne at the time. On board were straw hats, umbrella, perfumes, clay pipes, pianos, clocks, confectionary, linen and candles, as well as a heavier load of railway irons, cement, lead and copper. There were items included that intended for display in the Melbourne International Exhibition in 1880. The voyage to Port Phillip was long but uneventful. At 3am on June 1, 1878, Captain Gibbs was expecting to see land and the passengers were becoming excited as they prepared to view their new homeland in the early morning. But LOCH ARD was running into a fog which greatly reduced visibility. Captain Gibbs was becoming anxious as there was no sign of land or the Cape Otway lighthouse. At 4am the fog lifted. A man aloft announced that he could see breakers. The sheer cliffs of Victoria's west coast came into view, and Captain Gibbs realised that the ship was much closer to them than expected. He ordered as much sail to be set as time would permit and then attempted to steer the vessel out to sea. On coming head on into the wind, the ship lost momentum, the sails fell limp and LOCH ARD's bow swung back. Gibbs then ordered the anchors to be released in an attempt to hold its position. The anchors sank some 50 fathoms - but did not hold. By this time LOCH ARD was among the breakers and the tall cliffs of Mutton Bird Island rose behind the ship. Just half a mile from the coast, the ship's bow was suddenly pulled around by the anchor. The captain tried to tack out to sea, but the ship struck a reef at the base of Mutton Bird Island, near Port Campbell. Waves broke over the ship and the top deck was loosened from the hull. The masts and rigging came crashing down knocking passengers and crew overboard. When a lifeboat was finally launched, it crashed into the side of LOCH ARD and capsized. Tom Pearce, who had launched the boat, managed to cling to its overturned hull and shelter beneath it. He drifted out to sea and then on the flood tide came into what is now known as LOCH ARD Gorge. He swam to shore, bruised and dazed, and found a cave in which to shelter. Some of the crew stayed below deck to shelter from the falling rigging but drowned when the ship slipped off the reef into deeper water. Eva Carmichael had raced onto deck to find out what was happening only to be confronted by towering cliffs looming above the stricken ship. In all the chaos, Captain Gibbs grabbed Eva and said, "If you are saved Eva, let my dear wife know that I died like a sailor". That was the last Eva Carmichael saw of the captain. She was swept off the ship by a huge wave. Eva saw Tom Pearce on a small rocky beach and yelled to attract his attention. He dived in and swam to the exhausted woman and dragged her to shore. He took her to the cave and broke open case of brandy which had washed up on the beach. He opened a bottle to revive the unconscious woman. A few hours later Tom scaled a cliff in search of help. He followed hoof prints and came by chance upon two men from nearby Glenample Station three and a half miles away. In a state of exhaustion, he told the men of the tragedy. Tom returned to the gorge while the two men rode back to the station to get help. By the time they reached LOCH ARD Gorge, it was cold and dark. The two shipwreck survivors were taken to Glenample Station to recover. Eva stayed at the station for six weeks before returning to Ireland, this time by steamship. In Melbourne, Tom Pearce received a hero's welcome. He was presented with the first gold medal of the Royal Humane Society of Victoria and a £1000 cheque from the Victorian Government. Concerts were performed to honour the young man's bravery and to raise money for those who lost family in the LOCH ARD disaster. Of the 54 crew members and passengers on board, only two survived: the apprentice, Tom Pearce and the young woman passenger, Eva Carmichael, who lost all of her family in the tragedy. Ten days after the LOCH ARD tragedy, salvage rights to the wreck were sold at auction for £2,120. Cargo valued at £3,000 was salvaged and placed on the beach, but most washed back into the sea when another storm developed. The wreck of LOCH ARD still lies at the base of Mutton Bird Island. Much of the cargo has now been salvaged and some was washed up into what is now known as LOCH ARD Gorge. Cargo and artefacts have also been illegally salvaged over many years before protective legislation was introduced. One of the most unlikely pieces of cargo to have survived the shipwreck was a Minton porcelain peacock - one of only nine in the world. The peacock was destined for the Melbourne International Exhibition in 1880. It had been well packed, which gave it adequate protection during the violent storm. Today, the Minton peacock can be seen at the Flagstaff Hill Maritime Museum in Warrnambool. From Australia's most dramatic shipwreck it has now become Australia's most valuable shipwreck artefact and is one of very few 'objects' on the Victorian State Heritage Register. The "Loch Ard" is registered on the National Shipwreck database and is protected as an Historic "Shipwreck. It is one of Australia's and Victoria's most tragic and most famous shipwrecks. The quantity of luxury and commercial items carried as cargo show the type and quality of goods passengers migrating to Australia at that time were bringing with them Flagstaff Hill’s collection of artefacts from LOCH ARD is significant for being one of the largest collections of artefacts from this shipwreck in Victoria. It is significant for its association with the shipwreck, which is on the Victorian Heritage Register (VHR S417). The collection is significant because of the relationship between the objects, as together they have a high potential to interpret the story of the LOCH ARD. The LOCH ARD collection is archaeologically significant as the remains of a large international passenger and cargo ship. The LOCH ARD collection is historically significant for representing aspects of Victoria’s shipping history and its potential to interpret sub-theme 1.5 of Victoria’s Framework of Historical Themes (living with natural processes). The collection is also historically significant for its association with the LOCH ARD, which was one of the worst and best known shipwrecks in Victoria’s history. Small pocket knife salvaged from the wreck of the Loch Ard. It has a dark brown cover on one side. Reverse side is only partly there. Both blades are missingflagstaff hill, warrnambool, shipwrecked coast, flagstaff hill maritime museum, maritime museum, shipwreck coast, flagstaff hill maritime village, great ocean road, loch line, loch ard, captain gibbs, eva carmichael, tom pearce, glenample station, mutton bird island, loch ard gorge, pocket knife, knife, tool -
 Bendigo Military Museum
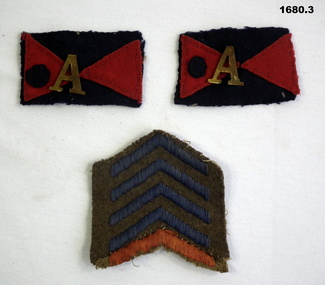
Accessory - COLOUR PATCH AND CHEVRONS, 1914-1919
The letter "A" is for "Anzac". Issued to those who served on the Gallipoli Peninsula and surrounding Islands, Hospital ships etc and worn as is on the Colour Patches. Instituted in 1917. Service Chevrons are worn on the right arm below the elbow of your uniform. The red one is for those who embarked in 1914, the blue, one for each year of service after. Instituted in 1918. These belonged to Frederick Campbell Moller No 2233 AIF. Refer 1661.3, 1682.5, 1663P. .1) Colour patches, 3rd Field Artillery Brigade, 2 red triangles set onto dark blue felt with a dark dot on the left red triangle. A brass letter "A" is attached to the patch. .2) Same as point .1). .3) Chevrons, 4 blue and 1 red "V" shaped cloth chevrons sewn on to khaki piece of uniform.uniforms-army badges, insignia, chevrons, “a”, colour patches -
 Bendigo Military Museum
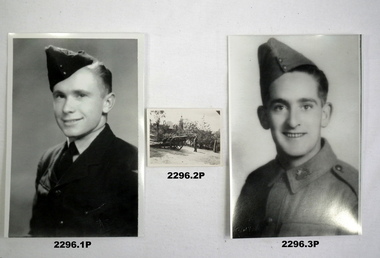
Photograph - PHOTOGRAPHS, CHRISTMAS / NEW YEAR CARD, C. WW1, c.WW2
.1) Black & white photo, copy, Air Force, BILL WEST on back. .2) Black & white photo, original, cannon in park setting. .3) Black & white, photocopy, RALPH BELL (Spinner) on back. .4) Sepia photo, original, RALPH BELL & Jean .5) Sepia photo, original, RALPH BELL, Bendigo Milk Co on back, inside sprig of flowers, Greetings to McKenzie Family from Ralph Bell. .6) Xmas / New Year card, cover: Photo of Solomons Pools. .7) Sepia, photocopy, soldier in uniform, ERNIE DOWER. .8) Black & white photo, soldier in uniform, ERNIE DOWER..1) BILL WEST on back. .3) RALPH BELL (Spinner) on back. .5) RALPH BELL, Bendigo Milk Co on back, inside sprig of flowers, Greetings to McKenzie Family from Ralph Bell.photography-photographs, military history - air force - army -
 Bendigo Military Museum
Photograph - PHOTOGRAPHS WW2, 1940 - 1942
.7) Back row, Len STEVENS, Len TRIPP, Charles WOODWARD - ? 1st row, Les WARREN - ? Leonard Jordan TRIPP VX25096 2/24 BATT A.I.F K.I.A Alamein 24/10/42 Refer Cat No 205P for Len Tripps full service details..1) Photo, B&W on steel frame, photo surrounded by yellow edging, photo has plastic covering. Photo re L.J. TRIPP. .2) - .4) Photos, sepia colour, potrait re L.J. TRIPP. .5) Photo, B&W, shows group of 8 soldiers in Tin Hats and webbing. .6) Photo, B&W, shows group of 7 soldiers standing by a large rock. .7) Postcard photo, B&W, shows group of 6 soldiers outside a tent. .8) Postcard, cartoon B&W, with central inset photo of L.J. TRIPP..2) - .4) "Seymour 14.9.40" .7) "Merry Xmas & Happy New Year"photography-photographs, documents - postcards, military history -
 Bendigo Military Museum
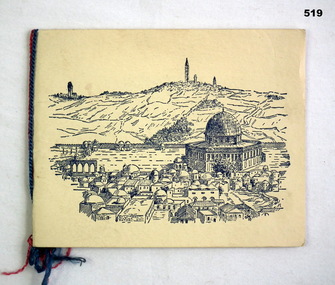
Card - XMAS CARD, 1940 -1943
Leslie Alfred TENNANT VX55621 enlisted in the 2nd AIF on 12.5.41. On discharge from the AIF 30.10.45 he was a Craftsman in 2/4th Base Work Shops. Cat No 520 is another card from Les to A McLURE. Refer Cat No 536 for more information re Miss A McLURE.Christmas card made from cardboard, folds in half, has red and blue cord where it folds in half, front has drawing of a town with a mosque , card is yellowish with blue coloured drawing. Inside card in pen " Dear Mrs. McClure I wish you and all your family a Merry Xmas and a happy new year, from Your sincere friend Les Tennant VX55621 PTE L.A. Tennant."documents - cards, greetings, xmas, middle east -
 Bendigo Military Museum
Card - XMAS CARD & ENVELOPE, Nov 1941
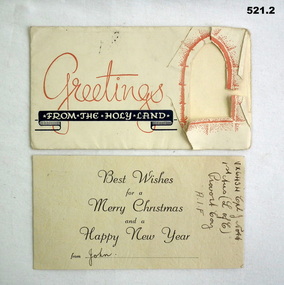
John Guskett NOTT VX6434 enlisted in the 2nd AIF on 21.10.39. On discharge from the AIF 4.3.47 he was a Sergeant in HQ 1 Aust Corps Signals. Miss McLURE. Refer Cat No 536 for her main details..1) Envelope for Xmas card, yellow, red, blue. Front has cutout section to show card inside. Front has "Greetings from the Holy Land." Rear has recipient's address, stamped 12-11-1941. .2) Card for envelope, front has "Best wishes for a Merry Christmas and a happy new year, from John." Rear has 4 depictions of scenes in the Holy Land.1) "Miss Addie McClure, 40 York St Prahran Victoria" .2) "VX6434 Cpl J. Nott 1st AUS (L of C) Provost Coy AIF"cards, xmas, holy land -
 Bendigo Military Museum
Card - XMAS CARD AND ENVELOPE, 1941
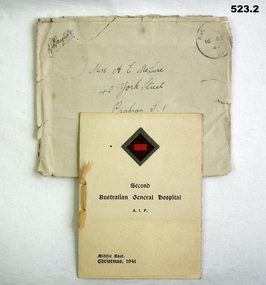
The cards relate to a collection re John EDWARDS VX3857 2nd AIF. Refer Cat No 536 for his service details and Miss McLURE..1) Envelope, faded blueish colour, stamped by censor in top left corner and signed. Stamped by P.O appears to be 16 Dec 42. Envelope addressed to "Miss A.E McClure 40 York St Prahran TI Victoria Australia." .2) Christmas card, folds in half, yellow ribbon at fold, front has colour patch at top, under "Second Australian General hospital AIF, Middle East Christmas 1941." Inside, photo of lake and boats. Printed with "Season's Greetings," handwritten message included..2) "WIshing you a Merry Christmas & a Bright & Happy New Year 1941, from John to Addie."cards, xmas, 2nd agh -
 Bendigo Military Museum
Card - XMAS CARD, C.1969 - 71
Hand written inside. "Murray, I will never forget you, how are you? I hope you are always well! My regards to your mother. I hope to one day see you again in V.Nam. Sister Augustine". The card relates to Geoff Murray No 3411521, 3 Cav Regt Vietnam 27.11.67 to 22.10.68, Survey Corp Vietnam 15.10.69 to 15.10.70. On his 2nd tour with Survey Corp Geoff procured a lot of food etc for the Baria Orphanage. Refer 610.2P, 611.8, 1866.3 re the Orphanage and Sister Augustine also 638P.Christmas card with river scene painted on front. .1) Heavy card outer pages. .2) Fine tissue paper inner pages..1) "Greetings" .2) "Merry Christmas and Best Wishes for a Happy New Year"cards, xmas, vietnam -
 Bendigo Military Museum
Literary work - ADVERTISING LEAFLETS, 9) 5.8.1944. .10) 23.6.1945
This collection of leaflets were enclosed in various Volumes of the First to the Sixth years of the war in pictures. Refer Cat No 4184.6.1)- .2) Leaflet, Life and times of Winston Churchill, folded, exterior orange colour, B & W print, interior white with black & orange print with white photo. .3) .4) Leaflet, The Sun News Pictorial, folded, white paper with black print. .5) - .6) Leaflet, The first year, the second year of the war in pictures, .5) cream colour, .6) green colour both B & W print. .7) - .8) Envelopes, paper, beige colour stamped “Inscriptions”. .9 - .10) War map Section. Page of a newspaper, folded, beige colour black print. .7) & .8) Hand written on both slightly different, “Reg RUNCIMAN Rutherford St Swanhill”, .8) has “8 JL 42”leaflets, advertising -
 Bendigo Military Museum
administrative record - Australian - United Kingdom Exchange Mid Tour Report by SSGT NJ Collins RE 1987, SSGT N.J. Collins RE, 29. 03.1987
The document is the Mid Tour Report by SSGT N.J. Collins RE, a British Army Senior NCO on a two-year exchange to the Army Survey Regiment. A4 size, Stapled, Front cover has a reproduction of a painting of Fortuna Villa in bottom half. Back cover has a difficult to see street scene of Pall Mall, Bendigo with a paragraph describing Bendigo's history superimposed. 19 Pages. The actual Report is contained on Pages 1-16. Annex A is 2 x pages plus a contents page.Green Hi-Light on parts of pages 10 and 11.royal australian survey corps, rasvy, fortuna, army survey regiment, army svy regt, asr -
 Bendigo Military Museum
photograph - Fortuna - 1st Year of Army Occupation in Bendigo, 1942
This is a set of 17 photographs taken during the first year of Army occupation at Fortuna, Bendigo in 1942. The photos provide an insight into the preparatory work performed on the Fortuna Villa and surrounding buildings, by the Working Party 5th Army Troop and Ordnance Training Depot, before its occupation by personnel from LHQ Cartographic Company, Royal Australian Survey Corps. The annotation on the back of Photos .9P and .10P is misspelt. The correct spelling is ‘Nell Gwynne’. The poppet head of the Central Nell Gwynne mine is still an iconic landmark in Bendigo, lying just down the road from the poppet head lookout at Victoria Hill. The Central Nell Gwynne was the premier mine of Bendigo's 1930s mining revival and is of high historical value, due to the extensive and relatively intact features which remain at the site. The annotation on the back of Photo .17P is incorrect. The location of HQ 5th Army Troop was ‘Reynard St, Coburg.’ By late 1941 as Japan extended its control throughout Indo-China, resolving the accommodation problem of AHQ Cartographic Company located in Melbourne became more urgent. The steady Japanese advance made the bombing of Melbourne no longer a remote possibility, and in accordance with a general policy of dispersion, the Deputy Chief of the General Staff, Major General Sidney Rowell instructed Major William Sarll, in the interests of security of plant and to provide against possible damage of air attack, to investigate suitable safer inland accommodation for AHQ Cartographic Company. Major Sarll inspected many properties before finding one that would meet the requirements of the Cartographic Company. In late 1941, he came to inspect Fortuna, a rambling old mansion with about fifteen acres of ground in central Bendigo. Initially there was no intention to occupy the site beyond the end of the war, although Major Sarll's report to the Director of Survey noted many advantages in moving the Company to Bendigo. Major General Rowell quickly approved the selection of Fortuna before other authorities, which were investigating the evacuation of school children, could get in ahead of the Cartographic Company. On 23 March 1942, the Commonwealth of Australia, under the provisions of the National Security Act of 1939, took possession of the house, the old battery buildings and the fifteen acres of grounds. Under Warrant Officer J. Trist’s direction, over fifty Parks and Works tradesmen completed building works necessary to accommodate the Survey Corps’ military, map making and printing requirements. The building program was still under way when the first officer, Lieutenant Ralph Westgarth, arrived in May 1942 with the advance party which received and positioned all equipment as it came up from Melbourne in semi-trailers. Once the equipment was installed the rest of the Cartographic Company completed its shift to Bendigo by 11th June 1942. The first year of the Survey Corps’ occupation of Fortuna is covered in more detail with additional historic photographs, in pages 17-22 of Valerie Lovejoy’s book 'Mapmakers of Fortuna – A history of the Army Survey Regiment’ ISBN: 0-646-42120-4.This is a set of 17 photographs taken during the first year of Army Occupation at Fortuna, Bendigo in 1942. The black and white photographs were printed on photographic paper and are part of the Army Survey Regiment’s Collection. The photographs were scanned at 300 dpi. .1) - Photo, black & white, 1942. Bendigo Parks and Works tradesmen at Fortuna. L to R: Cliff Day, Ernie Arnold, Norm? .2) - Photo, black & white, 1942. “Don” - possibly SGT Don Sutcliffe. Fortuna, Bendigo. .3) - Photo, black & white, 1942. Parks and Works tradesmen in garden at Fortuna, Bendigo. L to R: Fred & Ernie. .4) - Photo, black & white, 1942. Benny Jack Williams at Fortuna, Bendigo. Accommodation tents were erected above the lake, which later became the parade ground. .5) - Photo, black & white, 1942. Working dress - Giggle suits. Parks and Works tradesmen at Fortuna, Bendigo. L to R: Cliff and Harry on big roof. .6) - Photo, black & white, 1942. Parks and Works tradesmen at Fortuna, Bendigo. Ted on big roof. .7) - Photo, black & white, 1942. Gold crusher battery just behind Fortuna. .8) - Photo, black & white, 1942. Scene of Bendigo from Fortuna. .9) - Photo, black & white, 1942. Nell Gwynne Mine from mullock heap at Victoria Hill near Fortuna, Bendigo. .10) - Photo, black & white, 1942. Nell Gwynne Mine and crusher near Fortuna, Bendigo. .11) - Photo, black & white, 1942. Sluicing for gold at Eaglehawk. .12) - Photo, black & white, 1942. Fortuna, Bendigo taken from the far side of tennis courts. .13) - Photo, black & white, 1942. Fortuna, Bendigo & its reflection from across the lake. .14) - Photo, black & white, 1942. Fortuna, Bendigo from the fishpond. .15) - Photo, black & white, 1942. Fortuna, Bendigo. .16) - Photo, black & white, 1942. First Fortuna Football Team at unknown location. L to R: 5th Bob Wright, 11th SGT Don Sutcliffe. .17) - Photo, black & white, 1942. Working Party from 5th Army Troop and Ordnance Training Depot at Fortuna, Bendigo.Some personnel are identified. Annotated with date within photos. .1) – Annotated on back ‘Cliff, Ernie, Norm, Dec ‘42. Cliff Day - dairy farmer, plasterers’ labourer. Ernie Arnold – hard plasterer. Norm? - QM Store for tools etc. QM Store was the Stables.’ .2) - Annotated on back ‘Don. Fortuna 1942’ .3) - Annotated on back ‘Fred & Ernie. Dec 1942. Carpenters. Note the state of the gardens.’ .4) - Annotated on back ‘Benny Jack Williams Fortuna Bendigo. Tents were erected where present day parade ground is above the lake.’ .5) - Annotated on back ‘Working dress - Giggle suits. June 42. Cliff and Harry on big roof. This photo was taken as the ventilating ridge was being installed on the building housing the printing machines. The machines were installed later by civilian labour when building was complete.’ .6) - Annotated on back ‘Ted on big roof Fortuna Bendigo.’ .7) - Annotated on back ‘Gold crusher battery – Bendigo for slay heap – 1942. 12 stamp battery. Just behind Fortuna. Was working at night when the “Army” came to Bendigo. Later removed to “Coolgardie - WA. Present site of Southern Cross TV.’ .8) - Annotated on back ‘Scene of Bendigo from Fortuna. June 1942.’ .9) - Annotated on back ‘Nell Gwyne Mine from mullock heap (Victoria Hill) Sept 1942.’ .10) - Annotated on back ‘Nell Gwyne Mine and crusher September 1942.’ .11) - Annotated on back ‘Sluicing for gold at Eaglehawk. August 1942.’ .12) - Annotated on back ‘Fortuna Bendigo 1942. Taken from far side of tennis courts.’ .13) - Annotated on back ‘ “Fortuna” across the lake & reflection.’ .14) - Annotated on back ‘Fortuna from fishpond June 1942.’ .15) - Annotated on back ‘Fortuna Dec 1942.’ .16) - Annotated on front ‘X’ x2. Annotated on back First Fortuna Football Team 1942‘Bob Wright’, ‘SGT Don Sutcliffe’. .17) - Annotated ‘Working Party at Fortuna before one of the drafts’, Working Party 5th Army Troop and Ordnance Training Depot Showgrounds, now the Sportsground Bendigo’, ‘HQ of 5th Army Troop was Reynards Rd, Coburg.’royal australian survey corps, rasvy, army survey regiment, army svy regt, fortuna, asr -
 Bendigo Military Museum
Badge - BADGES, RSL MEMBERSHIP, Stokes and Son Melbourne, 1) Post WW1, .2) Post WW2
.1) This is the original old style. .2) Clip on top with "73" means financial member that year. Item in collection relating to the Jackson Family..1) Badge, large, brass, crown at top, two central figures, rear has two lugs and is stamped. .2) Badge, small, brass, crown at top, three central figures, rear has one lug and stamped. The crown has a clip on with the number "73" on..1) "Returned Sailors & Soldiers Imperial League", on rear, "11693" .2) "Returned Sailors, Soldiers & Airmans Imperial League"badges, rsl, league -
 Bendigo Military Museum
Administrative record - American - Australian Officer Exchange - Mid Tour Report ASR 1981, Major D Bowen US Army Corps of Engineers, Major David Bowen US Army Corps of Engineers, 07.1981
American - Australian Officer Exchange - Mid Tour Report ASR 1981, Major D Bowen US Army Corps of Engineers. A two-year exchange program existed between the Australian Survey Corps and the US Army Corps of Engineers. This is a report by the US Exchange Officer in 1981 half way through the exchange tour.Clear film plastic covers front and back, Light Purple cardboard covers. Contains Cover Letter to American Embassy, Canberra ACT. Page 2 is Information page with references. Table of Contents page. Actual Report is pages numbered 1-19. Booklet "Lansells Fortuna (green cover edition) pages 1-16, only some pages are numbered. Army Survey Regiment Organisation Chart, "Map Production Story"- 8 pages, Bowen to Gram No1- WestPoint to Australia 2 pages, Enclosure 9 - Use Addresses (USA). Armed Forces of Australia - Badges of Rank, Enclosure 5 - Recommended Changes 2 pages, Enclosure 6 - Technical Services R&D Tasks, Married Quarter Floor Plan.royal australian survey corps, rasvy, fortuna, army survey regiment, army svy regt, asr -
 Bendigo Military Museum
Booklet - BOOKLETS PAY AND RECORDS, C 1915 - 1919
WWI Service & Pay Books for John Stanley HOWLETT No. 2676 AIF 59th Battalion. Refer 41 medals, 48.4P photos..1) Soldier's Pay Book, AIF. .2) Soldier's Pay Book, for use on active service. .3) Record of Service Book..1) Pay Book NR 59072 for John Stanley Howlett No 2676 AIF 59th Batt. .2) Active Service Pay Book 59072 59th Batt. 2675 Pte John Stanley Howlett. Attested Aug 15th, 1916. .3) Record of Service Book issued to John Stanley Howlett . Year of birth 1895.documents, military records, military history -
 Bendigo Military Museum
Memorabilia - DOCUMENTS, PHOTO, circa 1918
Harry Thompson was from Australia. He enlisted in New Zealand No 69437, 2nd Batt Canterbury Infantry Regiment. He was WIA early September 1918 and admitted to hospital United Kingdom on 10th September with a GSW slight to the right leg. He served 1 year 110 days overseas and was discharged from the Army 25.6.19. Refer 1258, 2026.2, 2027..1) Photo, black and white copy of a New Zealand Soldier in uniform re H.Thompson. .2) New Zealand Military Forces Telegram dated 20th September to Mrs J.W Thompson of Sebastion, Bendigo, Victoria re the wounding of H.Thompson. .3) Certificate of Discharge from the New Zealand Expeditionary Force, form No 207, No 53263 re H Thompson. .2) "69437 Harry Thompson" .3) "69437 Pte, Canterbury Infantry Regiment, Harry Thompson, 25th June 1919"documents - certificates, communications - telegraphic, photography - photographs, -
 Bendigo Military Museum
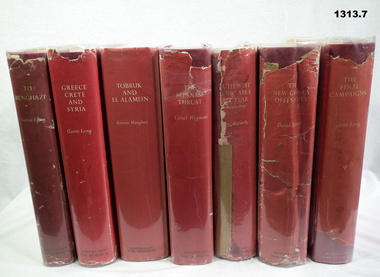
Book - BOOKS, 1), .2) & .7) Gavin Long et al, Australians in the War of 1939-1945 . Series One. Army, 1) 1952; .2) 1953; .3) 1966; .4) 1957; .5) 1963; .6) 1961; .7) 1963
.3) A Lee, 27 Alamein Court, Golden Square, Bendigo.Red buckram covers with loose paper & plastic covers. White text on loose covers. Black & white photos & illustrations. .1) Vol I The Benghazi, 336 pages .2) Vol II Greece, Crete and Syria, 587 pages .3) Vol III Tobruk and El Alamein, 854 pages .4) Vol IV The Japanese Thrust, 715 pages .5) Vol V South-West Pacific Area - First Year, 655 pages .6) Vol VI The New Guinea Offensives, 851 pages .7) Vol VII The Final Campaigns, 667 pagesbooks, military history -
 Bendigo Military Museum
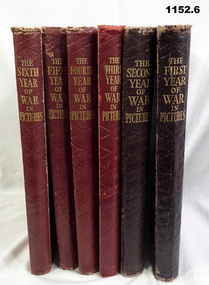
Book - BOOKS, The Sun News - Pictorial, The War in Pictures, c.WWII
... cover .2) Voume 2. The Second Year of War in Pictures - 319... pages, hard, black buckram cover .2) Voume 2. The Second Year ...Volume 2 Volume 3 Volume 4 Volume 5 (stamp) from The Library of E 7 E Charles, 101 Harley Street, Bendigo 3550. Ph: 054 436 512\ Volume 6 Claudia English Books, black & white photos throughout. .1) Volume 1 The First Year of War in Pictures - 319 pages, hard, black buckram cover .2) Voume 2. The Second Year of War in Pictures - 319 pages, hard, black buckram cover .3) Volume 3 The Third Year of War in Pictures - 255 pages, hard, red buckram cover .4) Volume 4 The Fourth Year of War in Pictures - 255 pages, .5) Volume 5 The Fifth Year of War in Pictures - 255 pages, hard, red buckram cover .6) Volume 6 The Sixth Year of War in Pictures - 255 pages, hard, red buckram coverbooks, miltary, history -
 Bendigo Military Museum
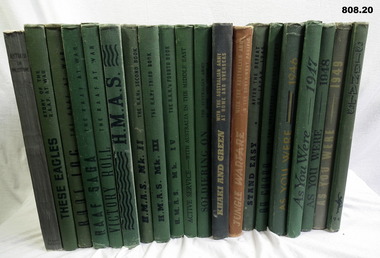
Literary work - BOOK SET, Australian War Memorial Set of 20, 1) 1919; .2) & .6) 1942; .3) & .12) 1943; .4), .7), 8), &.16) 1953; .5), .9) & .14) 1945; .10) 1941; .11) & .20) 1954. .13) & .14) 1944;
Set of Books commonly called 'As You Were' from WW1 and WW2. Green cloth. .1) Australia in Palestine (WWI) Book, hard cover, cardboard in centre of cover is silhouette of a Light Horseman & horse. Print is black ink, 153 pages. Illustrated with photos, drawings & maps. .2) These Eagles. Story of the RAAF at War. Book, green hard buckram cover, 200 pages. Front cover has black print with outline drawing of an eagle. Illustrated with photos, drawings. .3) RAAF Log - The RAAF at War. Book, green buckram hard cover. Front has profile of a pilot, black print, 200 pages, illustrated with photos, maps. paintings & drawings. .4) RAAF SAAG - The RAAF at War. Front cover has drawing of 2 Fighter Pilots in black ink, black print. 200 pages, illustrated with photos, drawings & paintings. Book, green buckram hard cover. Front cover has drawing of 2 Fighter pilots, black print, 200 pages, photos, drawings & paintings. .5) Victory Roll - The RAAF at War. Book, green buckram, black print, 200 pages, photos, drawings & charts. .6) HMAS Green buckram hard cloth cover, cloth cover with black text. 200 pages, black & white print, black text on white paper. .7) HMAS Mk II. Book, green buckram hard cover, black & white text on white paper. 200 pages, illustrated colour prints. .8) HMAS Mk III Book , green buckram hard cover, black text on white paper. 200 pages, illustrated colour prints. .9) HMAS Mk IV Book, green buckram hard cover, black text on white paper. Illustrated colour prints. .10) Active Service with Australia in the Middle East. Book, green buckram hard cover, black text on white paper, 129 pages. .11) Soldering on the Australian Army at Home & Overseas. Book, green buckram hard cover, black text on white paper, 200 pages. Rising Sun badge at bottom right hand corner. Illustrated with black & white photos, paintings, maps & drawings. .12) Khaki & Green with the Australian Army at Home & Overseas. Book, green buckram hard cover, black text on white paper, 204 pages. Front cover has a layout of words khaki & green, 2nd tone in light yellow. Illustrated with black & white photos, paintings, & drawings. .13) Jungle Warfare with the Australian Army in the South West Pacific. Book, brown buckram hard cover, light brown ink. Image at bottom of Australian soldier in jungle, 208 pages. Illustrated with photos, paintings, maps & drawings. .14) Stand Easy. After the Defeat of Japan, 1945. Book, light green buckram hard cover, black text on white paper, 208 pages. Image of soldier, both arms outstretched, smiling. Illustrated with photos, maps, paintings, & drawings. .15 On Guard with the Volunteer Defence Corps. Book, green & black buckram hard cover, black text on white paper, 172 pages. Illustrated with colour prints, & black & white photos. .16) As You Were. A Cavalcade of Events with The Australian Services from 1788 to 1946. Book, green buckram hard cover, tan & black text on white paper, 202 pages. Illustrated with black & white photos & colour prints. .17) As You Were. A Cavalcade of Events with The Australian Services from 1788 to 1947. Book, green buckram hard cover, black text on white paper, 202 pages. Illustrated with black & white photos & colour prints. .18) As You Were. A Cavalcade of Events with The Australian Services from 1788 to 1948. Book, green buckram hard cover, black text on white paper, 202 pages. Illustrated with black & white photos & colour prints. .19) As You Were. A Cavalcade of Events with The Australian Services from 1788 to 1949. Book, green buckram hard cover, green text on white paper, red & green diagram, 194 pages. Illustrated with black & white photos & colour prints. .20) Signals. Story of the Australian Corps of Signals. Book, green buckram hard cover, black text on white paper, 196 pages. In the corner of the front cover is the badge with motif of the Australian Corps of Signals. Illustrated with photos & drawings..1) 4214 TPR J E Neilson Year 1919 F E Addlem 1962 .books-military, museums, history -
 Bendigo Military Museum
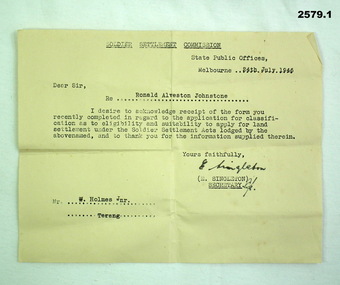
Document - DOCUMENTS, SOLDIER SETTLEMENT, Soldier Settlement Commission, 24.7.1946
Part of WILLIAM HOLMES COLLECTION. Refer Cat No 2548.2P his service history. The applications relate to the following; Percy Douglas James HEARD No V170819 enlisted on 15.1.1942 age 26 years old. At discharge from the Army on 15.11.19145 he was a Pte in 135th Australian General Transport. Ronald Alveston Johnstone No VX15541 enlisted on 17.5.1949 age 22 year’s old. At discharge from the Army he was a Gunner in 2/2nd Heavy Anti Aircraft Regt..1) & .2) Acknowledgement of an application for a Soldier Settlement Grant post WWIIdocuments - applications, military history, settlement -
 Bendigo Military Museum
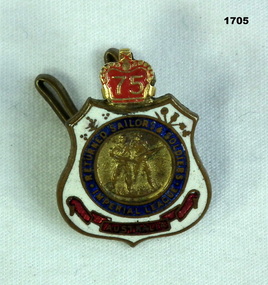
Badge - BADGE RSL, Stokes & Sons, Possibly post 1945
RSL membership badge, made of enamelled brass. Centre circle has 2 figures of soldiers with text "Returned Sailors & Soldiers Imperial League Australia" in blue enamelled section. Top of badge has a red crown with "75", indicating paid membership for that year. Rear has pins for attaching to clothes."V6878" on rear.numismatics-badges, societies-service clubs, military history, rsl -
 Werribee RSL Sub Branch
Book, Pictorial, THE FIRST YEAR OF WAR IN PICTURES
The front cover is embossed. The embossing is of a plane, tank and a ship. These are to represent the three Arms of the Services.wip 1 2 -
Werribee RSL Sub Branch
Book, Pictorial, THE FOURTH YEAR OF WAR IN PICTURES
wip 4 2 -
4th/19th Prince of Wales's Light Horse Regiment Unit History Room
Field Ration Eating Device (FRED), CMI Pty Ltd, 2009
A standard component of Army ration packs from the 60's to about 2010A pressed steel tool with one end shaped for use as a spoon and the other incorporating a bottle opener. A 2 cm long fold out can opener blade is fitted to the side. A 3 mm hole is drilled through the device at the can opener end. Yellow (anodised ?) finish.Defence Stock No: "7330-66-010-0933" Contractor: "CMI" Year of Manufacture: "2009" Defence broad arrow.army, fred, rations, can opener, ration packs, cmi, field rations eating device -
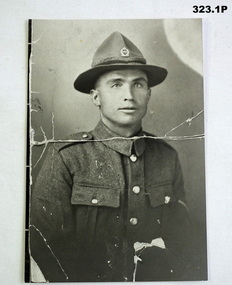
4th/19th Prince of Wales's Light Horse Regiment Unit History Room
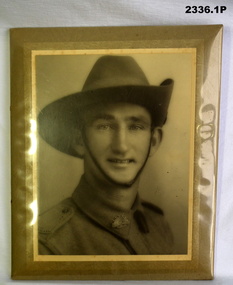
Photograph, Col Frank Pearson
Francis Charles Pearson was born on 23rd August 1913 in Ballarat. During the course of his long life -he died just before his 96th birthday - he was a successful businessman, notably in the field of air conditioning, as well as a world renown farmer noted for his cattle breeding methods. This was in addition to a meritorious military career. Frank Pearson enlisted as a 16 year old cadet in 6 Field Company, Australian Engineers on 29 Jan 1930., CSM in 1935, he transferred to 2 Field Coy RAE on 1 July 1936. Next, he joined the cadre of 2 AA Searchlight Coy, RAE and was commissioned on 14 Oct 1939. That unit became 53rd AA Coy, providing personnel for 1/54 AA Coy late in 1939. Lt Pearson was was 2IC at this time. When the unit was mobilised on 14 Sep 1940, T/Capt Pearson was appointed OC. Seconded to the AIF on 14 May 1941 he was appointed to raise A Squadron, 2/6 Armoured Regiment, and once that was done, he raised B Squadron. Promoted temporary Major in June 1942 he served with the regiment in Stuart tanks during the difficult operations around Cape Endaiadere and Buna from October 1942 until April 1943. After return to Australia the regiment waited in vain for further operational employment. Frank Pearson was demobilised on 23 October 1945. With the raising of the Citizen Military Forces in 1948, Major Pearson was appointed 2IC 8th/13th Victorian Mounted Rifles. On 1 January 1953 he assumed command of 4th/19th Prince of Walers's Light Horse Regiment, a post he held until the end of 1956. After service in more senior postings he retired with the rank of Colonel on 24 August 1964. From then until just a few years before his passing, Colonel Pearson remained actively involved in the life of his regiment. Following a couple of less successful attempts to do so, he was instrumental in establishing the regimental museum, these days the Unit History Room. Undaunted by a continuing sequence of changing venues it is to his credit that the history of the regiment is not only preserved but readily available to today's members of the unit and the general public. Coloured photo of Colonel Francis (Frank) Pearson OAM ED. Mounted in wooden frame.frank pearson, photographs -
4th/19th Prince of Wales's Light Horse Regiment Unit History Room
Annual General Meeting papers, 4th Light Horse Association Annual General Meeting & Reunion, 1985-89
Two page documents for the general meetings and 66th to 70th (2 copies) annual reunions of the 4th Light Horse Association. They include President's, Treasurer's and Secretary's reports and as well as the Association's activities for the year - spanning 1985-894 light horse, agm -
 Frankston RSL Sub Branch
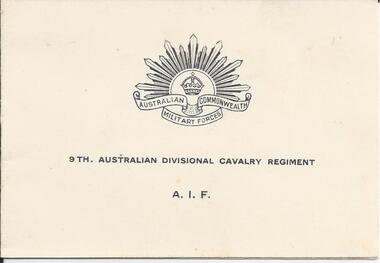
Card
Christmas card sent to a family in Australia by Australian Army serviceman, Noel Blundell who served in Syria during World war 2. The card is in the form of a booklet consisting of the cover and one double page insert. The card front cover has the Australian 'Rising Sun' badge and the words "9th Australian Divisional Cavalry Regiment" and "A. I. F.". The centre pages have an illustration of a village scene on the left page and the words "A Merry Christmas And A Happy New Year" printed on the right page. The serviceman has written "To Alice From Noel" beneath the Christmas message. At the bottom of this page are the words "MIDDLE EAST" and "DECEMBER 1941". The rear cover page has an illustration of two camels, one leading the other.christmas, middle east, 2nd aif, army, aif, ww2, world war 2, syria, blundell, noel blundell, 9th australian division