Showing 2198 items
matching tram routes
-
 Ballarat Tramway Museum
Slide - 35mm slide/s, Noel Simons, 21/11/1962 12:00:00 AM
Set of 17 transparencies taken on 21/11/1962 on Kodak mounts. 1188.1 - Bendigo No. 11 at Depot Junction McCrae and Arnold St. with driver/conductor changing points. 1188.2 - Bendigo No. 4 at Charing Cross, side on photo, with City Club Hotel and Alexandra Fountain in the background. Tram has Castrol and SEC 'Electric Cooking' ads. 1188.3 - Bendigo No. 4 climbing View St. after tram has passed photographer. Tram has Streets Ice Cream and Cohns Soft Drinks ad on rear dash panel. In the background are the buildings in View St., including the Princess Theatre. Tram has destination of Eaglehawk. 1188.4 - Trams 2 and 4 crossing at the California Gully or Thorpe St Loop. 1188.5 - Bendigo 4 in Mt Korong Road. Tram inbound with destination of Quarry Hill, just leaving Garden Gully Loop. 1188.6 - Bendigo 4 and 17 crossing at the Hayes St. or Iron Bark Gully Loop. No. 17 bound for Eaglehawk, No. 4, Quarry Hill. 17 has two SEC roof ads and a white horse whiskey ad. 1188.7 - No. 17 bound for Eaglehawk, soon after leaving California Gully. Has large mullock heap in background. 1188.8 - Bendigo 2 and 17 crossing at the Thorpe St. or California Gully Loop. Has butchers shop in background. 1188.9 - Bendigo 17 at the Eaglehawk terminus. Has destination of Quarry Hill. In background is the hotel and shops at the terminus, showing ads for "Melbourne Bitter". Tram has two SEC 'Electric Cooking' ads. Driver and conductor about to assist two lady passengers with a pram and baby. 1188.10 - No. 17 at Eaglehawk terminus, awaiting departure. Has Eaglehawk Town Hall and Post Office in background. Tram has a Whitehorse Whiskey ad on the front dash panel. 1188.11 - No. 3 in High St. Eaglehawk, with destination of Eaglehawk. Has the shops on the south side of High St. in the background, including the Eaglehawk fish shop. Tram has two roof ads, one an SEC roof ad, and Cohns Drinks and Streets Ice cream ads on front dash panel. 1188.12 - as above, but after tram has passed photographer. Note the centre of the road poles. 1188.13 - No. 2 outbound for Eaglehawk at the intersection of Mt. Korong Road and the Calder Highway. Photo taken after the tram has passed the photographer. Has an Ampol service station in the background. 1188.14 - No. 11 leaving the Bendigo depot, crossing the bridge, with the Scrubber car in the background. 1188.15 - No. 21 at the North Bendigo terminus. Tram has destination of Golden Square and Cohns drink ad on front dash and two roof ads on side. 1188.16 - No. 11 on Golden Square route, in High St. at intersection with Old High St. 1188.17 - No. 11 at the Golden Square terminus, conductor turning the pole. Hotel on the left side of the photo. Note the road works barrier and red flag behind the tram. Slide has an end of roll mark on the right hand side of the image.Information written on in black ink and date stamped on purple ink. 1188.1 - "Birney car No. 11 in McCrae St. at Cnr of Arnold about to run into depot, Bendigo" 1188.2 - "No. 4 at Alexandra Fountain, Charing Cross Bendigo" 1188.3 - "No. 4 climbing the View St. Hill from Charing Cross, Bendigo (Eaglehawk Route)" 1188.4 - "No. 4 and 2 at Thorpe St. Loop, California Gully" 1188.5 - "No. 4 in Mt Korong Rd., Long Gully, Near Havilah Rd. (Bendigo) (Eaglehawk Route)" 1188.6 - "Nos. 17 and 4 crossing on Hayes St. Loop, Ironbark, Bendigo" 1188.7 - "No. 17 soon after leaving California Gully (Eaglehawk Route)" 1188.8 - "No.2 and 17 crossing on Thorpe St. Loop, California Gully (Eaglehawk Route)" 1188.9 - "No. 17 at Eaglehawk terminus" 1188.10 - "No. 17 at Eaglehawk terminus" 1188.11 - "No. 3 in High St. Eaglehawk" 1188.12 - "No. 3 nearing Eaglehawk terminus" 1188.13 - "No. 2 in Mt. Korong Rd., Ironbark. Calder highway on left (Eaglehawk route) 1188.14 - "Birney car No. 11 leaving Bendigo depot. Scrubber car at rear" 1188.15 - "No. 21 at North Bendigo Terminus" 1188.16 - "Birney car No. 11 in High St. Bendigo at intersection with Old High Street (Golden Square Route)" 1188.17 - "Birney Car No. 11 at Golden Square terminus, High St., Bendigo". tramways, trams, bendigo, depot junction, charing cross, view st., eaglehawk, north bendigo, golden square, tram 2, tram 3, tram 4, tram 11, tram 17, tram 21, tram scrubber -
 Ballarat Tramway Museum
Slide - 35mm slide/s - set of 4, Noel Simons, Apr. 1967
... No. 23 at Needle Loop en route to Eaglehawk. Tram has two SEC... No. 23 at Needle Loop en route to Eaglehawk. Tram has two SEC ...Set of 2 slides made from the Association of Railway Enthusiast Provincial Tramways film strip, possibly during April 1967. 1192.1 and 1192.3 mounted in Kodak Ready Mounts. The others in plain white mounts. Slides dated Dec. 1968. 1192.1 - No. 21 out bound to Golden Square in High St., between Wattle and Vine Streets. Photo taken after tram has passed photographer. Has a sign for "Reid's Furnituorium" in the background. 1192.2 - Bendigo No. 28 dressed up as Myers Christmas tram, passing the Post Office and Courts in Pall Mall. 1192.3 - Bendigo No. 23 at Needle Loop en route to Eaglehawk. Tram has two SEC roof ads, one "Electric Cooking" and the other "Everything fine in my all electric kitchen". 1192.4 - Bendigo scrubber parked at the end of the main depot lead, alongside the depot office buildings.Details in blue ink, date hand stamped in purple ink. 1192.1 - "No. 21 heads along High St for Golden Square between Wattle and Vine Streets." 1192.2 - "Birney No. 28 in Christmas Garb, traverses Pall Mall en route to North Bendigo". 1192.3 - "No. 23 at Needle Loop on its run to Eaglehawk". 1192.4 - "Scrubber car at Bendigo Depot".tramways, trams, north bendigo, bendigo, bridge st loop, depot, tram 21, tram 23, tram 28, tram scrubber -
 Ballarat Tramway Museum
Slide - 35mm slide/s - set of 24, Noel Simons, 20/05/1971 12:00:00 AM
Set of 24 transparencies taken on 20/5/1971 on Kodak mounts. 1195.1 - Bendigo 19 arriving at Charing Cross en route to North Bendigo with Fountain Plaza and the City Family Hotel in the background. No. 19 has two roof ads for the SEC. -'Electricity better for cooking' and 'Everything's under control in my all electric kitchen' 1195.2 - as above, but standing at the Charing cross stop, with the Beehive Stores and other buildings along the east side of Pall Mall in the background. 1195.3 - No 21 ex Golden Square crossing View St. trackwork in front of No. 25 waiting to depart for Quarry Hill. No.21 has two roof ads (as for No.19 in 1195.1) and No.25 has one SEC roof ad and another. Ezywalkin sign in the background, and Fountain Plaza. 1195.4 - as for 1195.3, but after 21 has arrived and 25 left for Quarry Hill. Has Ezywalkin store and the Beehive store in the background. 1195.5 - No. 5 at the Eaglehawk terminus. Photo taken with a cannon in foreground looking along High St. Eaglehawk. Has shops on the west side of High St. in the background. 1195.6 - No. 5 at the Eaglehawk terminus, close up of the rear of the tram - note tow bar arrangement. Has destination of Quarry Hill. 1195.7-Nos.25 and 5 crossing at the Thorpe St. Loop, California Gully. No. 25 bound for Eaglehawk (has SEC Briquette and electric cooking roof ads) and 5 en route for Quarry Hill with a SEC and Cinzano roof ad. 1195.8 - as for 1195.7, but after trams have passed each other. Has Borough Auto Service building in the background. 1195.9 - No. 5 in Mt Korong Road, towards Bamard Street, photo taken after tram has passed photographer. 1195.10 - No. 30 at the Golden Square terminus with the Milk Bar on the right hand side of the photograph. 1195.11 - No. 30 inbound at Fire Station Loop, High St. Golden Square. Has old fire station in the background. Passengers are boarding the tramcar. 1195.12 - No. 30 in High St, bound for North Bendigo between Vine and Wattle Streets. 1195.13 - No. 5 bound for Eaglehawk waits at Iron Bark Gully Loop, at Hayes St. 1195.14 - No. 5 and No. 2 crossing at Iron Bark Gully Loop. 1195.15 - No. 5 bound for Eaglehawk leaving the Manchester Loop, Long gully. 1195.16 - No. 5 passing William Street, Long Gully en route to Eaglehawk. 1195.17 - No. 5 just before the California Gully Crossing Loop. 1195.18 - Nos. 5 and 26 crossing at California Gully crossing Loop. No. 5 heading to Eaglehawk, 26, Quarry Hill. 1195.19 - No. 5 in High St. Eaglehawk with Bob Moyle's Victoria Hotel and the TAB in the background. 1195.20 - No. 5 in High St. Eaglehawk approaching the terminus. Photo taken after the tram has passed the photographer. Has Foodland store and J. Best Fruit supply in the background, along with Eaglehawk Town Hall. 1195.21 - No. 5 at the Eaglehawk terminus, photo taken along seldom used track along High St. 1195.22 - as for 1195.22 - but at the very end of the track. 1195.23 - No. 5 en route for Quarry Hill climbs High St. Eaglehawk with the Victoria Hotel and Eaglehawk Town Hall in the background. 1195.24 - No. 5 and 25 crossing at Jobs Gully Loop. Note 25 has a black on white destination roll, while No. 5 has a white on black destination roll. Information written on in black ink and date stamped on purple ink. 1195.1 - "No. 19 arrives at Charing Cross Bendigo from Golden Square" 1195.2 - "No. 19 about to leave Charing Cross for North Bendigo" 1195.3 - "No. 25 awaiting departure for Quarry Hill, watches No. 21 arrive at Charring Cross from Golden Square" 1195.4 - "No. 21 on North Bendigo service and No. 25 on Quarry Hill run await departure at Charing Cross" 1195.5 - "No. 5 at Eaglehawk terminus" 1195.6 - "No. 5 at Eaglehawk terminus" 1195.7 - "Nos. 5 and 25 crossing at Thorpe St. Loop, California". 1195.8 - "Nos. 25 and 5 crossing Thorpe St. Loop, California Gully". 1195.9 - "No. 5 descending Mt Korong Rd. towards Bamard St." 1195.10 - "Birney car No. 30 at Golden Square terminus" 1195.11 - "Birney car No. 30 in High Street near Thistle Street (Fire Station Loop)" 1195.12 - "No. 30 in High St. between vine and Wattle Streets" 1195.13 - "No. 25 at Hayes Street Loop Iron Bark". 1195.14 - "Nos. 2 and 5 crossing at Hayes Street Loop Iron Bark" 1195.15 - "No. 5 at Manchester Loop opposite Havilah Road, Long Gully" 1195.16 - "No. 5 passing William Street, Long Gully". 1195.17 - "No. 5 at California Gully" 1195,18 - "Nos. 26 and 5 at Thorpe St. Loop, California Gully". 1195.19 - "No. 5 in High St. Eaglehawk". 1195.20 - "No. 5 approaching Eaglehawk terminus" 1195.21 - "No. 5 at Eaglehawk terminus" 1195.22 - "No. 5 at Eaglehawk terminus" 1195.23 - "No. 5 in High St. Eaglehawk" tramways, trams, bendigo, charing cross, eaglehawk, california gully, golden square, iron bark gully, jobs gully, tram 2, tram 5, tram 19, tram 21, tram 25, tram 26, tram 30 -
 Ballarat Tramway Museum
Slide - 35mm slide/s - set of 20, Noel Simons, 21/05/1971 12:00:00 AM
Set of 20 transparencies taken on 21/5/1971 on Kodak mounts. 1197.1 - Bendigo No. 5 en route to Eaglehawk at Creeth St Long Gully. Tram has a SEC roof ad and Cinzano roof ad. 1197.2 - No 5 approaching Needle Loop between Long Gully and California Gully. On left hand side is the City of Bendigo sign, indicating city boundary. 1197.3 - As for 1197.2 but actually entering loop. Photo taken after tram has passed photographer. 1197.4 - No. 26 bound for Eaglehawk descending the railway bridge near Eaglehawk, at Jobs Gully. 1197.5 - as for 1197.4, but after crossing bridge, now ascending a hill. Photo taken after tram has passed photographer. 1197.6 - No. 26 climbing High St. hill Eaglehawk, nearing end of Double track, bound for Quarry Hill. Shows centre of the road poles. 1197.7 - As for 1197.6, with tram entering single track section. Photo taken after tram has passed photographer. Has a BP service station in the background. 1197.8 - No. 26 (bound for Quarry Hill) crossing No. 17 (Eaglehawk) at Job's Gully Loop. 1197.9 - No. 17 climbing railway bridge at Job's Gully, en route to Eaglehawk. Photo taken after tram has passed photographer. 1197.10 - No.26 bound for Quarry Hill, leaving Long Gully Loop? Has the Creeth St. church in l197.l in the far background. Photo taken after tram has passed photographer. 1197.11 - Tramway Point work at the northern end of Long Gully Loop. 1197.12 - No. 17 en route for Quarry Hill turning into View St. from Bamard St. Tram has SEC roof ads "Everything fine in my all electric Kitchen' and 'Electric Cooking is Matchless'. 1197.13 - as for 1197.12, but tram has turned into View St and about to enter the double line track. Photo taken after tram has passed photographer. 1197.14 - No. 21 enters Nolan St after turning from MacRae St. en route to Bendigo. Note sign on its own post noting tram turns "Beware Tram Turns" and stop sign on adjacent pole "Trams stop on Request". No. 21 has two SEC roof ads. 1197.15 - No. 21 in Nolan St. after turning from Bridge St. (White Hills Road). Note signal light for Bridge St. loop on pole corner of street. Photo taken after tram has passed photographer. 1197.16 - No. 2 bound for Eaglehawk at unknown location. 1197.17 - Tram stop sign on a pole "CARS STOP BY REQUEST" 1197.18 - No. 5 in Carpenter St.? en route to Quarry Hill. 1197.19 - No. 28 has just arrive at Golden Square terminus, passengers are disembarking and the trolley pole is being turned. Golden Square Hotel in the background. 1197.20 - No. 28 at Golden Square terminus. Has a "Nothing beats Briquettes for hear roof ad. Information written on in black ink and date stamped on purple ink. 1197.1 - "No. 5 at Creeth St. Long Gully" 1197.2 - "No. 5 approaching Needle Loop between Long Gully and California Gully" 1197.3 - "No. 5 at Needle Loop between Long Gully and California Gully" 1197.4 - "No. 26 crossing railway bridge at Job's Gully near Eaglehawk" 1197.5 - "No. 26 just after crossing railway bridge at Job's Gully near Eaglehawk/ 1197.6 - "No. 26 in High St. Eaglehawk" 1197.7 - "No. 26 at end of double track in High St. Eaglehawk" 1197.8 - "Nos. 26 and 17 crossing at Job's Gully Loop" 1197.9 - "No. 17 crossing railway bridge at Job's Gully near Eaglehawk". 1197.10 - "No. 26 at Long Gully" 1197.11 - 'Northern end of points at Long Gully Loop". 1197.12 - "No. 17 turning into View St. from Bamard St. Bendigo". 1197.13 -'No. 17 at beginning of double track in View St. after leaving Bamard St. Bendigo. 1197.14 - "No. 21 enters Nolan St. from MacRae St. Bendigo." 1197.15 - "No. 21 in Nolan St. Bendigo just after leaving White Hills Road." 1197.16 - "No. 2" 1197.18 - "No. 5" 1197.19 - "Birney car No. 28 at Golden Square Terminus" 1197.20 "Birney car No. 28 at Golden Square Terminus" tramways, trams, bendigo, long gully, railway bridge, jobs gully, trackwork, nolan st, quarry hill, tram stops, golden square, tram 2, tram 5, tram 17, tram 21, tram 26, tram 28 -
 Ballarat Tramway Museum
Slide - 35mm slide/s - set of 4, Noel Simons, 24/05/1971 12:00:00 AM
Set of 4 transparencies taken on 24/5/1971 on Kodak mounts. 1199.1 - No. 21 in High St. at junction with old High St., near Fire Station Loop. Tram has two SEC roof ads. 1199.2 - No. 21 in High St. between Shamrock and Thistle Sts. Photo taken after the tram has passed the photographer. 1199.3 - Photo of a green box containing timetables for the four Bendigo routes. Located at Charing Cross. 1199.4 - Bendigo No. 23 en route to Eaglehawk at Charing Cross, with two SEC roof ads 'Everything's fine in my all electric kitchen' and "Switch to electric cooking'. Has the Ezywalkin building and the Beehive building in the background. Information written on in black ink and date stamped on purple ink. 1199.1 - "No. 21 in High St. at junction with old High St., near Fire Station Loop." 1199.2 - "No. 21 in High St. between Shamrock and Thistle Sts." 1199.3 - "Bendigo Tramways timetable at Alexandra Fountain Charing Cross." 1199.4 - "No. 23 at Alexandra Fountain Charing Cross, Bendigo." tramways, trams, bendigo, timetables, charing cross, high st., tram 21, tram 23 -
 Ballarat Tramway Museum
Slide - 35mm slide/s - set of 13, Noel Simons, 24/05/1971 12:00:00 AM
Set of 13 transparencies taken on 24/5/1971 on Kodak mounts. 1200.1 - No. 7 en route to Golden Square turning from Bridge St. into Nolan St. Photo taken after tram has passed photographer. Tram has a briquettes roof ad. 1200.2 - No. 21 in McCrae St. just before Nolan St. Photo taken after tram has passed photographer. 1200.3 - No. 7 in Nolan St at corner with McCrae St. Passenger boarding tram at a tram stop. 1200.4 - No 7 turning from Nolan into McCrae St. with Golden Fleece service station in background. 1200.5 - No. 7 in Thunder St en route to North Bendigo. Photo taken after tram has passed photographer. 1200.6 - No. 5 en route to Eaglehawk just after leaving Needle Loop between Long Gully and California Gully. 1200.7 - No. 5 at the start of the double track in High St. Eaglehawk. 1200.8 - No. 5 at Eaglehawk terminus showing "Depot" with Leo A Hughes Photographer advertisement on building in background. 1200.9 - No. 5 at Eaglehawk terminus. Has two SEC roof ads 'Everything's fine in my all electric kitchen' and 'Electricity best for cooking'. 1200.10 - No. 5 at Eaglehawk terminus, with canon, war memorial outside Town Hall and Leo A Hughes Photographer advertisement on building in background. 1200.11 - No. 5 in McCrae St. about to enter Arnold St. and depot. Tram showing depot, has driver changing points. 1200.12 - No. 5 in Arnold St. Photo taken looking up the centre of the access track - shows the overhead at depot junction. 1200.13 - Depot entrance with signage at depot entrance and depot building in background.Information written on in black ink and date stamped on purple ink. 1200.1 - "No. 7 entering Nolan St. from Bridge St." 1200.2 -"No. 21 in McRae St. about to turn into Nolan St." 1200.3 - "No. 7 in Nolan St. at corner of McRae St." 1200.4 - "No. 7 turning from Nolan St. into McRae St." 1200.5 - "No. 7 in Thunder St. just after turning from Caledonia St." 1200.6 - "No. 5 just after leaving Needle Loop between Long Gully and California Gully. 1200.7 - "No. 5 in High St. Eaglehawk at start of double track." 1200.8 - "No. 5 at Eaglehawk terminus" 1200.9 - "No. 5 at Eaglehawk terminus" 1200.10 - "No. 5 at Eaglehawk terminus."\ 1200.11 - "No. 5 in McCrae St. about to enter Arnold St." 1200.12 - "No. 5 in Arnold St." 1200.13 - "Entrance to Bendigo Tram Depot, No. 5 running into shed."tramways, trams, bendigo, mccrae st, north bendigo, california gully, eaglehawk, depot, tram 5, tram 7, tram 21 -
 Ballarat Tramway Museum
Slide - 35mm slide/s - set of 25, Noel Simons, 26/02/1972 12:00:00 AM
Set of 25 transparencies taken on 26/2/1972 on Kodak mounts. 1204.1 - Bendigo No. 5 - just arrived at Manchester Loop near Havilah Road, Long Gully. Photo taken after tram has passed photographer. 1204.2 - No. 26 in Backhaus St. Long Gully passing William St, en route to Quarry Hill. Photo taken after tram has passed photographer. 1204.3 - No. 5 climbing the High St. Hill Eaglehawk, heading for Quarry Hill with the buildings on the West side of High St. in the background, including the Eaglehawk Town Hall. 1204.4 - as for 1204.3, but tram close up. 1204.5 - as for 1204.3, but after tram has passed photographer. 1204.6 - No. 5 at intersection of Mt Korong Road Ironbark and Calder Highway, with the AMPOL service 'station in the background. Photo taken after tram has passed photographer. 1204.7 - No. 26 en route to Quarry Hill shortly after leaving Needle Loop, passing William St., Long Gully. 1204.8 - No. 5 at California Gully Loop, picking up a passenger, with the shops at Long Gully in the background. Photo taken after tram has passed photographer. 1204.9 - No. 5 in Long Gully, en route to Quarry Hill. Photo taken after tram has passed photographer. 1204.10 - No. 2 at Eaglehawk terminus with the Eaglehawk Town Hall and Post Office in the background. Tram has two SEC roof ads. 1204.11 - No. 2 at Eaglehawk terminus, close up. 1204.12 - as for 1204.11, but through the park gates. 1204.13 - as for 1204.11, but with tram stop shelters in the foreground and buildings on the West side of High St in the background. 1204.14 - No. 2 in Mt. Korong Rd, midway between California Gully Loop and Needle Loop. Photo taken after tram has passed photographer. 1204.15 - No. 5 in Long Gully, en route to Quarry Hill. 1204.16 - as for 1204.15, but with trams departed loop. Has an ESSO service station in the background. 1204.17 - No. 26 leaves Charing Cross up View St.. Photo taken after tram has passed photographer. Has Armstrong Tyre Service, Cohns Drinks ad on a building and the T&G building in the background. Also Firestone ads on the tyre service building. 1204.18 - No. 5 waits at Charing Cross with the Alexandra Fountain in the background. Tram has two SEC roof ads, 'Everything s fine in my all electric kitchen' and 'Electricity Best for Cooking'. Has RACV, Colonial Mutual Life buildings in the background and the planting areas around Charing Cross gardens in the foreground. 1204.19 - No. 21 en route to North Bendigo arrives at Charing Cross, with passengers waiting to board. No. 5 in the background. In the background is the Fountain Gate Plaza building and the City Family Hotel. 1204.20 - as for 1204.19, but with No. 7 en route to Golden Square. 1204.21 - as for 1204.19, but closer up. 1204.22 - as for 1204.18 1204.23 - No. 25 in Nolan St. near the crossing of Bendigo Creek, running a special tram tour. 1204.24 - No. 25 on a special charter, in Weeroona Ave. at Cnr of Caledonia St. passing the Gas works. 1204.25 - Nos. 25 (showing Golden Square), 7 and 26 at Charing Cross. Has fountain in the background.Information written on in blue ink and date stamped on purple ink. 1204.1 - "No. 5 at Manchester Loop, near Havilah Rd. Long Gully." 1204.2 - "No. 26 in Backhaus St. Long Gully passing William St." 1204.3 - "No. 5 in High St. Eaglehawk." 1204.4 - "No. 5 in High St. Eaglehawk." 1204.5 - "No. 5 in High St. Eaglehawk." 1204.6 - "No. 5 in Mt. Korong Rd., Ironbark, passing Calder Highway Junctn." 1204.7 - "No. 26 shortly after leaving Needle Loop, passing William St., Long Gully. No. 5 cresting hill in distance." 1204.8 - "No. 5 at California Gully Loop." 1204.9 - "No. 5 in Long Gully" 1204.10 - "No. 2 at Eaglehawk terminus." 1204.11 - "No. 2 at Eaglehawk terminus." 1204.12 - "No. 2 at Eaglehawk terminus." 1204.13 - "No. 2 at Eaglehawk terminus." 1204.14 - "No. 2 in Mt. Korong Rd, midway between California Gully Loop and Needle Loop. 1204.15 - "Nos. 2 and 26 crossing at Long Gully." 1204.16 - "No. 26 leaves Long Gully loop for Eaglehawk as No. 2 pulls out of the far end towards Bendigo" 1204.17 - "No. 26 beginning the climb up View St. from Charing Cross." 1204.18 - "No. 5 at Charing Cross." 1204.19 - "No 21 arrives at Charing Cross from Golden Square while No. 5 awaits departure time for Eaglehawk." 1204.20 - "Nos. 7, 21, and 2 (behind which is No. 5) at Charing Cross." 1204.21 - "Nos. 7, 21, and 2 at Charing Cross." 1204.22 - "No. 5 at Charing Cross." 1204.23 - "No. 25 in Nolan St. near Bendigo creek crossing" 1204.24 - "No. 25 in Weeroona Ave. at cnr of Caledonia St." 1204.25 - "Nos. 25, 7, 26 and 2 (behind 26) at Charing Cross."tramways, trams, bendigo, eaglehawk, long gully, california gully, charing cross, north bendigo, tram 2, tram 5, tram 7, tram 21, tram 25, tram 26 -
 Ballarat Tramway Museum
Slide - 35mm slide/s - set of 23, Noel Simons, 26/02/1972 12:00:00 AM
Set of 23 transparencies taken on 26/2/1972 on Kodak mounts. 1205.1 - Bendigo No. 25 on a special tour at Fire Station Loop, en route to Golden Square. 1205.2 - No. 21 and 25 crossing at Fire Station Loop, note photographers on the ground. No. 21 bound for North Bendigo. 1205.3 - as for 1205.3, but with trams departing loop and fire station in the background. 1205.4 - No. 25 at Golden Square Hotel with 'Rodda's Golden Square Hotel' in the background. Tram on a special tour, but showing destination of North Bendigo. 1205.5 - as for 1205.4 - but showing special. Has the end of the track in the photograph. 1205.6 - Nos. 7 and 25 (on a special tour) crossing at Myrtle St. Loop. 1205.7 - No. 7 leaving Myrtle St. loop with the mine poppet head in the background. Photo taken after tram has passed photographer. (Print made of this slide 10/2001 for use in the Gold Gold Gold exhibition of 10/2001 - See Reg. item 1979. 1205.8 - No. 25 entering depot. Tram showing 'special'. Tennis court on right has players. Photo taken after tram has passed photographer. 1205.9 - No. 24 (showing 'special') and No. 20 (showing 'Long Gully') at Bendigo Depot. 1205.10 - No. 24 on a special charter, leaving Bendigo depot. Tram has two 'Johnnie Walker' roof ads. 1205.11 - Bendigo depot with 29, 25 and a bogie car inside the depot doors. 1205.12 - As for 1205.11, but with 28 and 29. 1205.13 - No. 24 standing at front entrance of Bendigo depot with No. 20 in the background. 1205.14 - No. 24 running out into McCrae St showing special, with conductor on front step. 1205.15 - No. 24 in Caledonia St. at corner of Thunder St with the Gasworks in the background. 1205.16 - No. 5 en route for Quarry Hill at Charing cross with No. 26 (en route for Eaglehawk) about to arrive. Has former crossover at this location in the foreground. Has the Ezywalkin building in the background. 1205.17 - No. 5 and 26 at Charing Cross, with the Alexandra Fountain in the foreground and the Beehive and Ezywalkin buildings in the background. No.26 has two SEC roof ads. 1205.18 - Charing Cross looking along Pall Mall with trams 7 and 21 and 26 in the picture. 1205.19 - Charing Cross, with 21 departing for Golden Square and No. 5 heading for Quarry Hill. Has the Ezywalkin and the Beehive buildings in the background. 1205.20 - as for 1205.19, but a few moments later. Adjacent pole has a "NO ROAD" letter in reflectors vertically. 1205.21 - Charing Cross with Nos. 25, 21, 26 and 7, looking south from Pall Mall end. 1205.22 - No. 24 crossing Mitchell St. en route for Golden Square, showing 'special' with the Beehive and Ezywalkin buildings in the background. 1205.23 - Charing Cross with Nos. 24, 21 and 7 in the photo and Fountain Plaza in the background. Print of 1205.7 - stored in box D1.Information written on in blue ink and date stamped on purple ink. 1205.1 - "No. 25 at Fire Station Loop High Street, Golden Square." 1205.2 - "Nos. 25 and 21 crossing at Fire Station Loop, near Golden Square." 1205.3 - "Nos. 25 and 21 crossing at Fire Station Loop, near Golden Square." 1205.4 - "No. 25 at Golden Square terminus." 1205.5 - "No. 25 at Golden Square terminus." 1205.6 - "Nos. 7 and 25 crossing at Myrtle St. Loop." 1205.7 - "No. 7 leaving Myrtle St. Loop." 1205.8 - "No 25, entering Bendigo Depot." 1205.9 - "Nos. 20 and 24 at Bendigo Depot." 1205.10 - "No. 24 at Bendigo Depot." 1205.11 - "Nos. 25 and 29 at Bendigo Depot." 1205.12 - "Birney cars 29 and 28 at Bendigo Depot." 1205.13 - "No. 24 (with 20 beyond) at Bendigo Depot." 1205.14 - "No. 24 entering McCrae St. from Arnold St." 1204.15 - "No. 24 in Caledonia St. at cnr of Thunder St." 1204.16 - "No. 5 waits at Charing Cross as No. 26 arrives from Quarry Hill. Note remains of crossover abandoned on relocation in 1965." 1204.17 - "Nos. 5 and 26 at Charing Cross." 1204.18 - "Nos. 26, 7 and 21 at Charing Cross (No. 5 just visible behind No. 26)." 1204.19 - "No. 21 leaves Charing Cross for Golden Square as No. 5 starts off for Quarry Hill." 1204.20 - "No. 21 swings onto the single track Golden Square line as No. 5 heads into Mitchell St. towards Quarry Hill." 1204.21 - "Nos. 25, 21 and 26 watch No. 7 arrive at Charing Cross from Golden Square." 1204.22 - "No. 24 at Charing Cross crossing Mitchell St." 1204.23 - "Nos. 24, 21 and 7 at Charing Cross."tramways, trams, bendigo, golden square, myrtle st., fire station, depot, charing cross, tram 5, tram 7, tram 20, tram 21, tram 24, tram 25, tram 28, tram 29 -
 Ballarat Tramway Museum
Slide - 35mm slide/s - set of 6, Noel Simons, 28 Feb. 1972
Set of 6 transparencies taken on 28/2/1972 on Kodak mounts. 1206.1 - Bendigo No. 5 at Hayes St. Loop, en route for Quarry Hill. 1206.2 - No. 5 at Garden Gully Loop, Mt. Korong road, Ironbark. en route to Quarry Hill. Note the water column in the background. 1206.3 - No. 5 in View St. Bendigo, with the Commodore Motel in the background. 1206.4 - No. 6 en route for Golden Square in Fire Station loop, with the fire station building in the background. Photo taken after tram has passed photographer. 1206.5 - No. 6 in High St., running through Golden Square Shopping Centre, en route for Golden Square. Photo taken after tram has passed photographer. 1206.6 - No. 6 arriving at Charing Cross, bound for North Bendigo, with the City Family Hotel, ANZ bank and the Cenotaph (war memorial) in the background.Information written on in blue ink and date stamped on purple ink. 1206.1 - "No. 5 at Hayes Loop, Ironbark." 1206.2 - "No. 5 at Garden Gully Loop, Mt. Korong road, Ironbark." 1206.3 - "No. 5 in View St. just after start of double track near Barnard St." 1206.4 - "No. 6 in High St. at Fire Station loop." 1206.5 - "No. 6 in High St. running through Golden Square shopping centre." 1206.6 - "No. 6 arriving at Charing Cross from Golden Square."tramways, trams, bendigo, hayes st. loop, garden gully loop, view st., golden square, charing cross, tram 5, tram 6 -
 Ballarat Tramway Museum
Slide - 35mm slide/s - set of 12, Noel Simons, 28 Feb. 1972
Set of 12 transparencies taken on 28/2/1972 on Kodak mounts. 1207.1 - Bendigo 26 and 2 at Charing Cross. 26 en route for Eaglehawk, 2 for Quarry Hill. Has the Colonial Mutual Life, Armstrong Tyre Service, and Australian Mutual Provident Society buildings and a Cohns Drinks ad. in the background. 1207.2 - as for 1207.1 but with Alexandra fountain in the foreground. 1207.3 - No. 2 in Mitchell St. heading for Quarry Hill. Photo taken after tram has passed photographer. Has buildings on either side of Mitchell St. in the background, including the Plaza Theatre. 1207.4 - No. 6 en route for Golden Square departing Charing Cross. Has the RACV and ANZ bank in the background. 1207.5 - No. 2 crossing Pall Mall to enter Charing Cross ex Quarry Hill, with the Fountain Plaza in the background. 1207.6 - No. 6 arriving Charing Cross ex Golden Square with No. 21 alongside. No. 21 has the SEC ad. 'Everything's fine in my all electric kitchen.' Has the City Family Hotel and the Fountain Plaza shopping centre in the background. 1207.7 - No. 5 at Charing Cross en route for Quarry Hill with No. 2 behind. No. 2 has two SEC roof ads, 'Everything s fine in my all electric kitchen' and 'Electricity best for cooking'. RACV building in the background. Tram crews are discussing the day in the front of the tram. 1207. 8 - No. 21 in High St. Bendigo with the Cathedral in the background. No. 21 has two SEC roof ads, 'Everything's fine in my all electric kitchen' and 'Electricity best for cooking'. 1207.9 - No. 6 in High St. Bendigo with the Cathedral in the background. 1207.10 - No. 6 in High St. Bendigo, just past Wattle St. Photo taken after the tram has passed the photographer from within the Highway Car Sales yard. 1207.11 - No. 26 bound for Eaglehawk at the end of the double track in View St., note signal contactors, tram stop and section signs mounted on pole. 1207.12 - No. 26 turning from View St. into Barnard St.Information written on in blue ink and date stamped on purple ink. 1207. 1- "Nos. 26 and 2 at Charing Cross." 1207.2 - "Nos. 26 and 2 at Charing Cross." 1207.3 - "No. 2 in Mitchell St. just after leaving Charing Cross." 1207.4 - "No.6 leaving Charing Cross for Golden Square." 1207.5 - "No. 2 arriving at Charing Cross from Quarry Hill." 1207.6 - "No. 21 waits at Charing Cross as No. 6 arrives from Golden Square." 1207.7 - "No 5 at Charing Cross with No. 2 lurking behind." 1207.8 - "No. 21 in High St. at cnr of Wattle St." 1207.9 - "No. 6 in High St. at cnr of Wattle St." 1207.10 - "No. 6 in High St. between Wattle and Vine Sts." 1207.11 - "No. 26 at end of double track in View St. near Barnard. St. 1207.12 - "No. 26 seen at dusk turning from View St. into Barnard St."tramways, trams, bendigo, charing cross, high st, view st., tram 2, tram 5, tram 6, tram 21, tram 26 -
 Ballarat Tramway Museum
Slide - 35mm slide/s set of 7, Noel Simons, 29 Feb. 1972
Set of 7 transparencies taken on 29/2/1972 on Kodak mounts. 1208.1 - Bendigo 18 (en route to Quarry Hill) and 2 (Eaglehawk) in the early morning at Charing cross with the Alexandra fountain and the Fountain Plaza building in the background. 1208.2 - No. 2 descending View St. Photo taken after tram has passed the photographer. 1208.3 - as for 1208.2 at Mackenzie St. intersection 1208.4 - No. 26 ascending View St. with the ANZ bank, T& G in the background. 1208.5 - as for 1208.4, but at Mackenzie St. intersection. Photo taken after tram has passed the photographer. 1208.6 - No. 18 in View St. seen from the lookout tower in Rosalind Park. 1208.7 - No. 7 en route to North Bendigo in Nolan St. Photographed across the Centenary Oval.Information written on in blue ink and date stamped on purple ink. 1208.1 - "Nos. 18 and 2 in the early morning sun at Charing Cross." 1208.2 - "No. 2 descending View St. towards Charing Cross." 1208.3 - "No. 2 in View St. passing Mackenzie St." 1208.4 - "No. 26 in View St. just after leaving Charing Cross." 1208.5 - "No. 26 climbing View St. past Mackenzie St." 1208.6 - "No. 18 climbing View St. seen from lookout tower in Rosalind Park." 1208.7 - "No. 7 in Nolan St. heading towards North Bendigo. / Last picture of a Bendigo tram."tramways, trams, bendigo, charing cross, view st., nolan st., tram 2, tram 7, tram 18, tram 26 -
 Ballarat Tramway Museum
Slide - 35mm slide/s - set of 4, Noel Simons, Apr. 1972
Set of 4 transparencies - copy slides - possibly ARE film strip dated March 1972. 1209.2 and 1209.4 on Kodak Readymount mounts. 1209.1 - Bendigo 5, 6 and 28 on a special tram service in bound to the City on a tour in Caledonia St. about to enter Lucan St, or White Hills Road or Weeroona Ave. (mis match in names in various maps). Gas works in the background. No. 5 has a white disk on the rear of the tram. 1209.2 - Nos 2 and 26 at Charing Cross with the Fountain Plaza in the background. Both trams have the destination of Quarry Hill, though 26 is on the Eaglehawk bound track. 1209.3 - No. 19 at the Golden Square terminus, with the conductor or driver swinging the pole and Billy Rodda's Golden Square hotel in the background. 1209.4 - No. 7 at Fire Station loop, en route to North Bendigo, picking up a passenger with a pram. Part of a set of 20 slides made by the Association of Railway Enthusiast Provincial Tramways film strip. Reference Item 2560 details the ARE Film Strip and provide references to other slides.Information written on in blue ink and date stamped on purple ink. 1209.1 - "Nos 5, 6 and 28 in Caledonia St. about to enter Weeroona Ave." 1209.2 - "Nos 2 and 26 at Charing Cross." 1209.3 - "Swinging the pole on No. 19 at Golden Square Terminus." 1209.4 - "No. 7 inward bound from Golden Square stops at Fire Station Loop."tramways, trams, bendigo, charing cross, golden square, gas works, special trams, tram 2, tram 5, tram 6, tram 7, tram 19, tram 28 -
 Ballarat Tramway Museum
Document - Correspondence, B. Prentice, 1973
1230.1 - copy of letter sent to Neville Gower from Bob Prentice enclosing a number of documents regarding submissions and other associated documents pertaining to the operation of Bendigo's trams by the Bendigo trust. Sent on the 1st March 1973. Typed onto light blue paper. 1230.2 - 14 page photocopy (Foolscap size on heat sensitive paper) of the submission prepared by the Bendigo trust - detailing the history of trams in Bendigo, types of trams in Bendigo, selection of the route, equipment and plant required, planned development, list of trams in Bendigo, their condition and financial statements of the Bendigo Trust 1972. 1230.3 - 14 pages photocopy (Foolscap size on heat sensitive paper) Appendix II - submission details projected passengers, operational details and proposals, estimated revenue, Philosophy of operation, trams required, operating budgets, how the service could be operated - internal combustion engines, batteries, stationary engine and generator or converter station and costs associated with the options. If item to be researched, copy on more stable photocopy paper to be provided.tram, trams, bendigo, bendigo trust, tourist trams, power supply -
 Ballarat Tramway Museum
Photograph - Colour Photograph/s, David Endacott, 1971
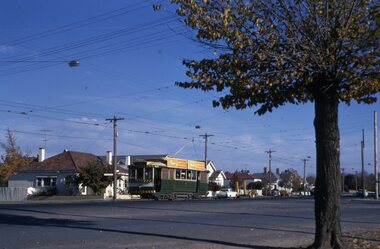
Colour print of a Ballarat single trucker en route for the Gardens, just past St Aidans Drive during Winter 1971. Photo taken from partly within Lake Wendouree, looking at the tramcar through the trees, which has passed the photographer. See also Reg Nos. 1279 and 1280 for related images. On Kodak paper. Not the same tram as on 1279 or 1280 as it has a SEC and Eureka Tiles roof ad. Original film image scanned at 3200dpi 12/5/2020.On rear in blue ink "Lake Wendouree" and in top left hand corner "1971".ballarat, lake wendouree, st aidans drive -
 Ballarat Tramway Museum
Photograph - Colour Photograph/s, David Endacott, 1971
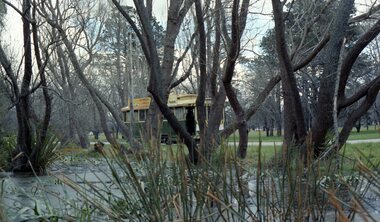
Colour print of a Ballarat No. 13 en route for the Gardens, just past St Aidans Drive during Winter 1971. Photo taken from partly within Lake Wendouree, looking at the tramcar through the trees, which has passed the photographer. See also Reg Nos. 1278 and 1280 for related images. On Kodak paper. Would appear to be the same trams as in 1280 as it does not have a roof advertisement. Original film image scanned at 3200dpi 12/5/2020.On rear in blue ink "Lake Wendouree" and in top left hand corner "1971".ballarat, lake wendouree, st aidans drive, tram 13 -
 Ballarat Tramway Museum
Photograph - Colour Photograph/s, David Endacott, 1971
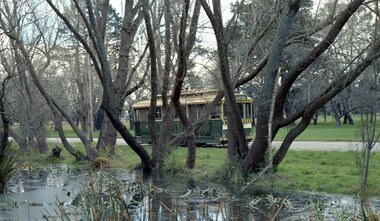
Colour print of a Ballarat No. 13 en route for the Gardens, just past St Aidans Drive during the winter of 1971. Photo taken from partly within Lake Wendouree, looking at the tramcar through the trees, before it has passed the photographer. See also Reg Nos. 1278 and 1279 for related images. On Kodak paper. Tram has a Twin Lakes advertisement on the front dash panel. Homes along St. Aidans drive can be seen in the background. Original film image scanned at 3200dpi 12/5/2020.On rear in blue ink "Lake Wendouree" and in top left hand corner "1971".ballarat, lake wendouree, st aidans drive, tram 13 -
 Ballarat Tramway Museum
Album - Photo Album, Newstar, 1960s to 1970's
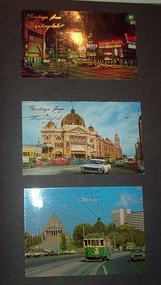
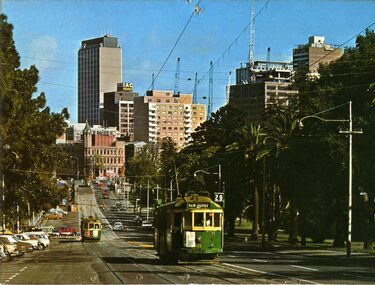
Photographic album containing 39 Colour postcards of Melbourne trams. The album consists of 30 leaves of dark grey heavy paper with three creases on left hand side of sheet, bound into a heavy bluey grey folder, embossed in gold 'Scrap Book" and bound with bluey grey string with two holes. The cover has been embossed with a the blue grey in swirls. Inside of back cover is a white label, "A New Star Product", with a please ask for No. with "425" stamped on. Postcards have been glued into the album. Entries have been kept to a single line - cards are able to be dated from buildings, whether the trams have marker lights, types of motor cars and general Melbourne history. Image files in page number order. Image 15 is of book. All taken with a electronic camera. Page 1 - Night photo - Flinders and Swanston St. - with "Greetings from Huntingdale" embossed in gold. Flinders St. station, with "Greetings from Huntingdale" embossed in gold. (post 1972 ) St. Kilda road with the Shrine of Remembrance in the background and W2 453 inbound on route 6. (post 1974) Page 2 - Bourke St, looking from Parliament House westwards, with Z8 inbound - after 13/8/1975 on route 89. Bourke St, looking east from Queen St., night photo, early 1970's. Princes Bridge looking towards Flinders St. Station Page 3 - Flinders St. Station, from Princes Gate buildings, - Photo E. Ludwig, John Hinde Studios. Bourke St. from Queen St, looking east, late 1960's - all W's. - W7 1026 east bound on route 88. Flinders St and Swanston St. corner, from Princes Bridge - night photo - W5 756 northbound route 15. Page 4 - W2 584 inbound route 64, St. Kilda Road and Nolan St., late 1960s - photograph. Princes Bridge, looking over Yarra River to the east. (pre Concert Hall) St. Kilda Road, with Shine of Remembrance in background, W2 303 inbound route 4D, mid 1960's. Page 5 - Flinders and Swanston St, W2 530 outbound route 8, early 1970's. Swanston and Collins St., W2 596 westbound in Collins St. City Square built - 1st version. (post 1972) St Kilda Road, with Shine in background, W2 298 and others, route 8 and 72. (post 1972) Page 6 - Flinders and Swanston St., W2, inbound route 5 on a wet evening. (mid 1970's) W2 515 outbound, Collins St., late 1960's, with Town Hall in background. (early 1970's, prior to lights) Collins St. looking west at Russell St with W2 637outbound route 42, early 1960's. Page 7 - Swanston St looking south at Little Bourke, W2's 373 route 67 and 374?(route 5), southbound, early 1970's Flinders St. Station, looking west in Flinders St., early 1970's, at dusk. Melbourne Town Hall with City Square from the North West (early 1970's) Page 8 - Bourke St looking east from Queen St. with W7 1005 inbound on route 96 - early 1970's. Bourke St. looking west from Exhibition St. with W6 976 outbound on route 95 - early 1970's. Swanston St. looking south from Lonsdale, with W2 484 on route 64, W2 228 and W2 364 in photo - early 1970's. Page 9 - Swanston looking south from north of Lonsdale St with many tramcars in photo - mid 1970's. St Kilda Road, with Shrine in background, W2 345 outbound route 4, SW6 913 inbound route 4 - prior to 1970. St Kilda Road, with Shrine in background, with trams in photo - early 1970's. (Photo loose in album - National View postcard by Murfett Ltd. Aust.) Page 10 - Postcard - TMSV? of 1041 and cable car set at Preston Workshops. 1041 in Bourke St., looking east from Queen St. - early 1970's - 1974? Collins St. looking east from Elizabeth St. with W2 253 inbound route 11, and W2 224 outbound - rout 47, early 1970's Page 11 - TMSV Postcard, X217 in Dandenong Road with L class in background. Shrine of Remberance from BP building, looking towards the city with St. Kilda Road on the left. Princes Gate and Flinders St. from the SEC buildings in Flinders St. looking south east - mid 1960's. Page 12 - Swanston St. at Flinders St. looking north at dusk. Flinders St. station at Swanston St with trams crossing at intersection - late 1960's Flinders St. station with W2 327 outbound. Page 13 - Temporary City Square at Collins and Swanston St. with tramcars at intersection. Wellington Parade (Mugs Alley), looking towards the City, with W2 546 inbound on route 38 - mid to late 1960's. Page 14 - Swanston St. looking south, at Lonsdale St, W2 432 inbound route 7 - late 1960's or early 1970's. Partly loose in album - National View postcard by Murfett Ltd. Aust. trams, tramways, photo album, melbourne, postcards -
 Ballarat Tramway Museum
Newspaper, The Courier Ballarat, "A long slow operation", 19/06/1972 12:00:00 AM
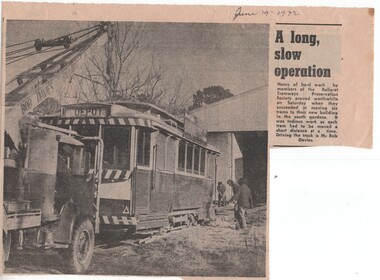
Newspaper cutting from The Courier, Ballarat 19/6/1972 of the moving of tram 26 into the depot. Has photo of tram 26 being moved into the depot using steel channels and rails on their side. Also Bob Davies crane in photo assisting with move. The method of moving 26 was slow and difficult, having derailed it at the depot access road and dragged it up the road and then onto steel channels pushing it into the shed. Information to members for June-July 1972 gives the moving date as 16 June and completed on 17 June. The other trams were not moved until temporary track had been laid between the depot and the kerb in Wendouree Parade, roughly along the same route as the depot access track. The September 1972 issue gives full details of the move and the date. The photo was taken on Sat. 17 June. See Reg Item No. 1858 for Courier Print of the photo. Second copy added 5/11/2018 from donation of Glenise Kellett. See Information for Members (BTPS) - June-July 1972 and Sept. 1972."June 19 -1972" in top right hand cornerbtps, moving trams -
 Ballarat Tramway Museum
Document - Photocopies, Alan Bradley, "One Man Farebox cars, tokens and statistics of the Ballarat Tramways", 18/07/2001 12:00:00 AM
Photocopies of an article written by Bob Prentice made by Alan Bradley in relation to the use of Fare Tokens by the Electric Supply Co. of Victoria - See Reg. Item 1794. Photocopies made 18.07.2001. Photocopy of the article from his collection. Comprises three sheets stapled together in top left hand corner. Article contains details of the use of tokens, colours of discs or lights used on trams while running on the various routes, fares, sections, fare box operation, and when and where tokens were issued. Includes a photograph of Barkly St. looking South from the fire station tower. Also gives details of tokens in use, cost of manufacture from other materials (Haxite and Crystalate) and the number in circulation. Has copy of an advertisement for the Southern Cross Hotel, S.A. Brabner, Proprietor, notes that all trams STOP. See Reg. Item 2514 for H.P. James notes on the token system.Parts of letter have been highlighted by Alan re tokens and other interesting points.trams, tramways, tokens, fares, tickets, esco, southern cross hotel, costs -
Ballarat Tramway Museum
Document - Report, Maunsell Pty Ltd, "City of Ballarat - Feasibility Study for Reinstatement of the Ballarat Trams - Final Report - July 1998", Jul. 1998
Thirty six page (A4) plus 10 folded A3 pages report with clear plastic cover, card rear cover and bound using a white comb binder, featuring a black and white photograph of BTM No. 33 on front cover. Report titled "City of Ballarat - Feasibility Study for Reinstatement of the Ballarat Trams - Final Report - July 1998". Report looks at background, geometric criteria, depot location, alignment proposals, the BTM, existing tramcars, availability and sources of materials, tramcar requirements, operational equipment and has an Appendix. Prepared as revision F, Final report 31/7/1998 by Richard Darby of Maunsell Proprietary Limited in association with Allom Lovell and Associates Pty Ltd. Contains a A3 map of the main area of "original tramway system" - excludes Sebastopol and ends of Mt Pleasant and Victoria St. lines. Has three State Library of Victoria photos of Ballarat, three folded A3 sheets containing 12 photographs each of the 1998 conditions, four fold A3 sheets of the proposed route showing photo locations, suggested loops and two folded A3 sheets of cross sections.trams, tramways, city tramway, ballarat tramways, maunsell, tramway revival -
Ballarat Tramway Museum
Document - Photocopy, Graeme David and Tourism Victoria, "Ballarat Tourist Tramway Proposal, Ballarat Railway Station to Sovereign Hill, Information package for development of a Feasibility Study brief - 9 Dec. 1999", Jul. 2000
Twenty three page report, doubled sided on A4 sheets, titled "Ballarat Tourist Tramway Proposal, Ballarat Railway Station to Sovereign Hill, Information package for development of a Feasibility Study brief - 9 Dec. 1999". Prepared by Graeme David, Tourism Victoria. Copy printed 23/07/00 and then photocopied for the Ballarat Trams and Transportation Steering Group. Study looks at key issues, decisions and directions to finalise scope, project issues, proposals, issues for referral, draft consultancy brief, draft route chrematistics and summary of finance figures from Harrison review. Stapled together in top left hand corner.trams, tramways, city tramway, tourism victoria, tramway revival, ballarat tramways -
 Ballarat Tramway Museum
Postcard - Illustration/s, McCarron Bird, MMTB tram postcards
Set of nine of printed illustrations - postcard size of Melbourne and Metropolitan Tramways Board Tramcars produced in 1978. Separate card for each class of tramcar featured, with notes, statistics, MMTB name. Each card also has printers name and date on back. Not a formal postcard, no place for a stamp. 1810.1 - X1 - 465 with 466 in background. Photographed at Footscray station terminus, c1962. 465 has destination of "Ballarat Rd." 1810.2 - Z7 in Victoria Parade, c1975 - has destination of "West Preston - Regent St." and route number "13". 1810.3 - Cable car set (No. 1) - photographed at Preston Workshops 1810.4 - L104 - showing destination of Carnegie and route number 67. 1810.5 - Y469 - showing destination of "Wattle Park - Elgar Road", possibly with Wattle Park in background. 1810.6 - T180 - showing "Special", while on a charter. 1810.7 - W7 1022 - showing destination "West Preston", route 11, freshly painted. 1810.8 - X2676 - freshly painted. 1810.9 - W2511 - fitted with marker lights, freshly painted, showing "City" - route 11. Cards 8 and 9 added 9/3/2018 from Donation of John Ruyg. trams, tramways, melbourne, mmtb, tramcars -
 Ballarat Tramway Museum
Postcard, Murfett Pty Ltd, St. Kilda Road Melbourne
Colour postcard of St. Kilda Road Melbourne with Shrine of Remembrance in background, with W6 913 inbound on route 4, showing 'CITY' and W2 345 outbound on route 4 to "Carnegie". Buildings in view are the BP building and part of Prince Henry's Hospital. Has on rear caption, "National View" by Murfett Pty Ltd. Australia, place for address and stamp. Taken late 60's, prior to route renumbering in 1970.trams, tramways, melbourne, st kilda road, postcards, tram 509 -
 Ballarat Tramway Museum
Postcard, Murfett Pty Ltd, Wellington Parade, East Melbourne
Colour postcard of Wellington Parade, East Melbourne with Melbourne skyline in background and Fitzroy Gardens in background. Would appear works for the underground are in progress. Has W2 509, outbound on route 29 to 'Kew Depot' and a tram (wide body car) in bound on route 74. Has on rear caption, "National View" by Murfett Pty Ltd. Australia, place for address and stamp. Taken early 70's.trams, tramways, melbourne, wellington parade, postcards, tram 484, tram 229, tram 364 -
 Ballarat Tramway Museum
Postcard, Murfett Pty Ltd, Swanston St. Melbourne
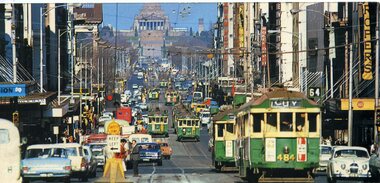
... . Front tram is W2 484, showing CITY, inbound on route 64. Other.... Intersection. Front tram is W2 484, showing CITY, inbound on route 64 ...Colour postcard of Swanston St. Melbourne during a busy time, with many trams in view. Taken with a telephoto lens near Latrobe St., looking down at Lonsdale St. Intersection. Front tram is W2 484, showing CITY, inbound on route 64. Other trams are 364, 229. Has about 14 trams in photo. Shrine of Remembrance in far background. Has on rear caption, "National View" by Murfett Pty Ltd. Australia, place for address and stamp. Taken prior to fitting marker lights on the W2's. A wide body car in the background appears to have been fitted with them. Assume photo taken early 1970's.trams, tramways, melbourne, swanston st, postcards -
 Ballarat Tramway Museum
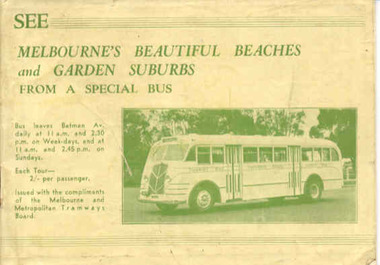
Book, Melbourne and Metropolitan Tramways Board (MMTB), "See Melbourne's Beautiful Beaches and Garden Suburbs from a Special Bus", 1939
Thirty two page landscape booklet on semi gloss white paper with off white cover and single supplementary white sheet tipped onto the inside of the front cover titled "See Melbourne's Beautiful Beaches and Garden Suburbs from a Special Bus". Saddle stapled, printed letterpress. Text printed in black and green ink. Cover green ink only. The book advertising MMTB's Special tourist bus, giving overall tour details on page 1, including fares, time of departures and reservations. Each tour has a map showing the route, details of the tour route with notes and photographs. Page 14 shows a maximum traction tram on the reserved track in Dandenong road and page 30, W2 488 outbound in Victoria Parade. Page 32 has an advertisement for the Round Trip by Tram 1/-. Front cover has details of the departure times and fares and a photo of the Tourist Bus. The supplementary sheet has been prepared for the tours that operated daily from Sun Sept. 17 to Friday May 31, except Anzac Day. Melbourne Tram Museum has a similar book - different bus - Reg Item 99 - 1938-39 version..trams, tramways, mmtb, bus tours, melbourne, sightseeing -
 Ballarat Tramway Museum
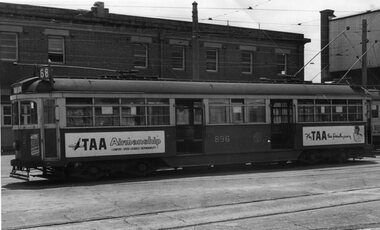
Photograph - Black & White Photograph/s, early 1960's
Black and white photograph of MMTB SW6 896 at South Melbourne depot. Photographed on the fan, looking at the depot building. Has route number "68" visible. On the sides has two advertisements for TAA (Trans Australian Airlines) - "TAA Airmanship" and "Fly TAA the friendly way". Trams have trolley wheels. Indicates possibly early 1960's?.On the rear in pencil "Melbourne"trams, tramways, mmtb, south melbourne depot, sw6 class, taa, tram 896 -
 Ballarat Tramway Museum
Photograph - B&W print of donated negative, Ron E. Fluck, 25/03/1950 12:00:00 AM
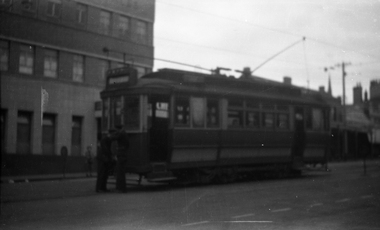
Black and white print of a donated negative. Print made 8/1998. Photo of a single truck Geelong tram at Moorabool St. and Ryrie St. intersection on the North Route. Photo has poor focus. Photo taken 25-3-1950. Appears to have two crewmen standing by the front of the tram. Has large building in the background. D. O'Neil provided location of photo - 1/1999 - see notes with sheet. High res scan of negative added 10/5/2020. tramways, trams, geelong -
 Ballarat Tramway Museum
Photograph - Private bus in Swanston St with Foys in the background, Ron E. Fluck, 10/04/1950
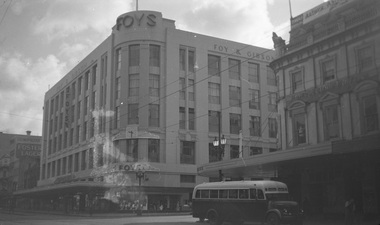
Photo of a privately operated bus in Swanston St. Melbourne at the intersection of Bourke St., with Foys (Foy and Gibson) department store in the background. Bourke St. trams yet to be built. Photo taken 10-4-1950. Also has the Cosmopolitan Hotel in the background. From information provided by the Bus and Coach Society of Victoria: "The bus outside Foys belongs to Lew Page who was one of the multiple operators on Route 1 in 1950 ( he also had one bus on Route 2) which was four years before they amalgamated to form Melbourne - Brighton Bus Lines. The bus is a Reo with a Giles body. Giles Motor Body Works was based in New Street Brighton and built bodies for commercial vehicles but not a lot of buses. Their half a dozen post-war buses mainly went to operators in Routes 1 and 2. Being on Route 1, the bus would have been red and cream." Yields information about private bus lines in Melbourne and the Foy & Gibson building.Black and white print and hi res scan of a donated negative. tramways, trams, melbourne, swanston st, foy & gibson, bourke st., lew page, giles, melbourne brighton bus -
 Ballarat Tramway Museum
Magazine, Melbourne and Metropolitan Tramways Board (MMTB), "Tramway Topics" - M&MTB, 1947 and 1948
16 issues of the, "Tramway Topics" - "The Official Bulletin of The Melbourne & Metropolitan Tramways Board", issues 50, 51, 53 to 61, issued between August 1947 and October 1948. All printed on cream coloured paper. Headings of significance are listed below. Common items were; Retiring and Death Gratuities, Appointments and Promotions, long service records. 918.1 - 50 - August 1947 - 4 pages - Comment from London, Scalers in Sydney, Brisbane Services, PAYE to go, Newcastle wants to own the trams, Diesels in favour, Fares in London and Melbourne, Something like a deficit, a remarkable record (substations), Work of Testing Department, Accidents are Expensive, and Transport Operations Indicted (National City Lines - USA) 918.2 - 51 - Sept. 1947 - 4 pages - Our SW6 tram, Transport in the US, Conductresses again, How bus costs have risen, Footscray Extensions, Of Course you are good (drivers and driving), How Fares Go, 40-Hour week. 918.3 - 53 - November 1947 - 4 pages - No increase in fares, an unusually interesting tram (Glasgow), alcohol and driving do not mix, pedestrian crossing case, how wages have increased, Russia prefers trams, Sydney's "Honesty" joke, Higher Fares wanted, Tramcars as hearses, an editor on Trolley buses, buses lead - but at a cost (Leicester), the Non paying passenger (Sydney) 918.4 - 54 - December 1947 - 4 pages - Christmas 1947 (Chairman's notes on the future), New Stockholm tram, according to use and wont - Birmingham, Trams in the USA, Board re-appointed, Buses few, so coaches are hired (London), transport from Footscray, "Philadelphians must have the best" - so they are given trams!, The Merri Creek Bridge and appreciations. 918.5 - 55 - March 1948 - 4 pages - That 4/- doubts arising over the 5-day week, Buses carried pick-a-back, Sydney to lose L500,000 this year, Trolleybuses, Rapid transit with PCC trams, another compliment (rosters in Perth), the bill for it all (Melbourne tram strike), an Extraordinary award (Washington DC), Prison tram's last load (Sydney), Douglas horse trams, Lord Ashfield, Glasgow's all night buses. 918.6 -56 - April 1948 - 4 pages - The Board's ambassadors (MMTB Conductors), Brisbane's bus routes, Another deficit in sight (Liverpool UK), Poor Paris, The resilient wheel, the 5-day week rosters, a subway and its costs (Detroit), PCC's in Belgium, South London Trams. 918.7 -57 -May 1948 - 4 pages - Spread of Hours Payment - 5 day week, weak breaks, Buses multiply - losses expand (Manchester UK), Static Electricity, L750,000 deficit in Sydney, praise for conductresses, no purchase by Newcastle, a loss at Adelaide, Transport in Switzerland, Denmark's giant bus, new trams for Glasgow, Grants for sports, single deckers out of favour (UK buses), Transport by Water (London). 918.8 - 58 - June 1948 - 8 pages - Stirring up strife (Melb.) No profit - no sharing (Kansas City), Just why - prices and fares in the US, MMTB staff needs from 5 day week, Section fares in the US, trams at L5,500 each (Sheffield), The unfinished dance (Perth and Hay St.), Thanks from Bristol, Interest in Melbourne trams (letters to the Board), Adelaide's Deficit, Fares up in Sydney and Adelaide, Moscow transport, No trolleybuses thankyou in Belgium, thanks to the Traffic staff, the Late Inspector Boardman, 24,000 irregularities (passengers), Sth London trams, Melbourne's trams amazing, Winnipeg's transport Growth and Standing passengers - London. 918.9 - 59 - July 1948 - 4 pages - The Red Light - RACV and red lights on trams, A request from Argentina,, where our SW6's are, the last 5c fare (New York), Work in the Fog, Traffic headaches in the US, Brisbane's Streamlined tram, Safety glass, Now for La Trobe St. The Tramways Band (South St.), Transport Losses in Sydney. 918.10 - 60 - August 1948 - 4 pages - from Pretoria (Comments on Melbourne), Buses with sliding Doors (OPS1), PCC trams, trams of the future (Glasgow), new trams in Rome, Clearing up the Parking Problem (Sacramento), Fantastic figures - world tram car figures - anti tram, Trainer Drivers, the railway trams and disaster to Liverpool trams, Monte Video trams purchased. 918.11 - 61 - September 1948 - 4 pages - The Year's Work (Melbourne), How Absurd (transport management), items from Britain, Tramway Band News, Food from Melbourne (to Scotland floods), London's Extraordinary traffic, New trams for The Hague, who are the road hogs, the La Trobe St. extension, out clothing factory, Preston Workshops, Toil on the tracks, how the money comes in (fares distribution). 918.12 - 62 - October 1948 - 4 pages - Melbourne's tram fares, Bourke St., Sydney's Street Transport, Scientist or Baker (London), Trolleybuses out of favour, London's poor bus fleet, tram and bus fares, The band at Wattle Park, Madras tramway deal, 121 decide for 6000 (Sydney Sunday trams), Preston workshops, A Engineer's tribute, Was the Street Quiz on trams faked? (The Sun). 918.3 - No. 31 - September 1945 - Year in review - trams more reliable than buses, loss on buses to munitions and Fisherman's bend, ticket checking, Hawthorn clothing factory SW6 trams construction, news from cities in Europe, sub-stations. 918.14 - 64 - September 1949 - higher operating expenses and revenue, school children behaviour, headway recording system - communication issues, golf at Wattle Park, Mr Bell lives in Riversdale Rd. 918.15 - 67 - December 1949 - Record Payment to Consolidated Revenue, payment to MFB etc, flat fares, Latrobe St extension - delayed, fare concessions - who pays, 918.16 - 68 - January 1950 - Bourke St conversion - Risson looking for an early start, fitting of radios to MMTB vehicles, Resilient wheels 918.4 - on top edge in pencil is "Mr Russell", and 918.10 ditto.trams, tramways, mmtb, melbourne, tramways