Showing 864 items matching "sea boat"
-
 Flagstaff Hill Maritime Museum and Village
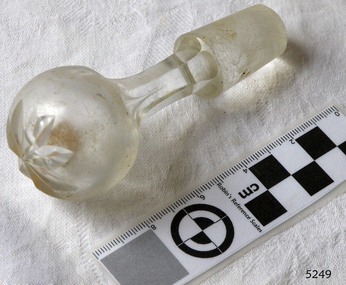
Domestic object - Glass Decanter Stopper, 1850+
History of the Loch Ard: The Loch Ard got it’s name from ”Loch Ard” a loch which lies to the west of Aberfoyle, and to the east of Loch Lomond. It means "high lake" in Scottish Gaelic.The vessel belonged to the famous Loch Line which sailed many vessels from England to Australia. The Loch Ard was built in Glasgow by Barclay, Curdle and Co. in 1873, the vessel was a three-masted square-rigged iron sailing ship that measured 79.87 meters in length, 11.58 m in width, and 7 m in depth with a gross tonnage of 1693 tons with a mainmast that measured a massive 45.7 m in height. Loch Ard made three trips to Australia and one trip to Calcutta before its fateful voyage. Loch Ard left England on March 2, 1878, under the command of 29-year-old Captain Gibbs, who was newly married. The ship was bound for Melbourne with a crew of 37, plus 17 passengers. The general cargo reflected the affluence of Melbourne at the time. Onboard were straw hats, umbrella, perfumes, clay pipes, pianos, clocks, confectionery, linen and candles, as well as a heavier load of railway irons, cement, lead and copper. There were other items included that were intended for display in the Melbourne International Exhibition of 1880. The voyage to Port Phillip was long but uneventful. Then at 3 am on June 1, 1878, Captain Gibbs was expecting to see land. But the Loch Ard was running into a fog which greatly reduced visibility. Captain Gibbs was becoming anxious as there was no sign of land or the Cape Otway lighthouse. At 4 am the fog lifted and a lookout aloft announced that he could see breakers. The sheer cliffs of Victoria's west coast came into view, and Captain Gibbs realised that the ship was much closer to them than expected. He ordered as much sail to be set as time would permit and then attempted to steer the vessel out to sea. On coming head-on into the wind, the ship lost momentum, the sails fell limp and Loch Ard's bow swung back towards land. Gibbs then ordered the anchors to be released in an attempt to hold its position. The anchors sank some 50 fathoms - but did not hold. By this time the ship was among the breakers and the tall cliffs of Mutton Bird Island rose behind. Just half a mile from the coast, the ship's bow was suddenly pulled around by the anchor. The captain tried to tack out to sea, but the ship struck a reef at the base of Mutton Bird Island, near Port Campbell. Waves subsequently broke over the ship and the top deck became loosened from the hull. The masts and rigging came crashing down knocking passengers and crew overboard. When a lifeboat was finally launched, it crashed into the side of Loch Ard and capsized. Tom Pearce, who had launched the boat, managed to cling to its overturned hull and shelter beneath it. He drifted out to sea and then on the flood tide came into what is now known as Loch Ard Gorge. He swam to shore, bruised and dazed, and found a cave in which to shelter. Some of the crew stayed below deck to shelter from the falling rigging but drowned when the ship slipped off the reef into deeper water. Eva Carmichael a passenger had raced onto the deck to find out what was happening only to be confronted by towering cliffs looming above the stricken ship. In all the chaos, Captain Gibbs grabbed Eva and said, "If you are saved Eva, let my dear wife know that I died like a sailor". That was the last Eva Carmichael saw of the captain. She was swept off the ship by a huge wave. Eva saw Tom Pearce on a small rocky beach and yelled to attract his attention. He dived in and swam to the exhausted woman and dragged her to shore. He took her to the cave and broke the open case of brandy which had washed up on the beach. He opened a bottle to revive the unconscious woman. A few hours later Tom scaled a cliff in search of help. He followed hoof prints and came by chance upon two men from nearby Glenample Station three and a half miles away. In a complete state of exhaustion, he told the men of the tragedy. Tom then returned to the gorge while the two men rode back to the station to get help. By the time they reached Loch Ard Gorge, it was cold and dark. The two shipwreck survivors were taken to Glenample Station to recover. Eva stayed at the station for six weeks before returning to Ireland by steamship. In Melbourne, Tom Pearce received a hero's welcome. He was presented with the first gold medal of the Royal Humane Society of Victoria and a £1000 cheque from the Victorian Government. Concerts were performed to honour the young man's bravery and to raise money for those who lost family in the disaster. Of the 54 crew members and passengers on board, only two survived: the apprentice, Tom Pearce and the young woman passenger, Eva Carmichael, who lost her family in the tragedy. Ten days after the Loch Ard tragedy, salvage rights to the wreck were sold at auction for £2,120. Cargo valued at £3,000 was salvaged and placed on the beach, but most washed back into the sea when another storm developed. The wreck of Loch Ard still lies at the base of Mutton Bird Island. Much of the cargo has now been salvaged and some items were washed up into Loch Ard Gorge. Cargo and artefacts have also been illegally salvaged over many years before protective legislation was introduced in March 1982. One of the most unlikely pieces of cargo to have survived the shipwreck was a Minton majolica peacock- one of only nine in the world. The peacock was destined for the Melbourne 1880 International Exhibition in. It had been well packed, which gave it adequate protection during the violent storm. Today the Minton peacock can be seen at the Flagstaff Hill Maritime Museum in Warrnambool. From Australia's most dramatic shipwreck it has now become Australia's most valuable shipwreck artifact and is one of very few 'objects' on the Victorian State Heritage Register. The shipwreck of the Loch Ard is of significance for Victoria and is registered on the Victorian Heritage Register ( S 417). Flagstaff Hill has a varied collection of artefacts from Loch Ard and its collection is significant for being one of the largest accumulation of artefacts from this notable Victorian shipwreck. The collections object is to also give us a snapshot into history so we are able to interpret the story of this tragic event. The collection is also archaeologically significant as it represents aspects of Victoria's shipping history that allows us to interpret Victoria's social and historical themes of the time. The collections historically significance is that it is associated unfortunately with the worst and best-known shipwreck in Victoria's history. Glass decanter stopper; hand blown. The bulbous glass head has floral motif, neck is six-sided, base has textured surface. The stopper was, recovered from the wreck of the Loch Ard. flagstaff hill, warrnambool, shipwrecked coast, flagstaff hill maritime museum, maritime museum, shipwreck coast, flagstaff hill maritime village, great ocean road, loch line, loch ard, captain gibbs, eva carmichael, tom pearce, glenample station, mutton bird island, loch ard gorge, decanter stopper, stopper, hand blown, bottle stopper -
 Flagstaff Hill Maritime Museum and Village
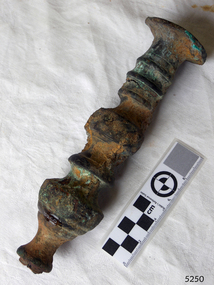
Light Fitting
HISTORY OF THE LOCH ARD The LOCH ARD belonged to the famous Loch Line which sailed many ships from England to Australia. Built in Glasgow by Barclay, Curdle and Co. in 1873, the LOCH ARD was a three-masted square rigged iron sailing ship. The ship measured 262ft 7" (79.87m) in length, 38ft (11.58m) in width, 23ft (7m) in depth and had a gross tonnage of 1693 tons. The LOCH ARD's main mast measured a massive 150ft (45.7m) in height. LOCH ARD made three trips to Australia and one trip to Calcutta before its final voyage. LOCH ARD left England on March 2, 1878, under the command of Captain Gibbs, a newly married, 29 year old. She was bound for Melbourne with a crew of 37, plus 17 passengers and a load of cargo. The general cargo reflected the affluence of Melbourne at the time. On board were straw hats, umbrella, perfumes, clay pipes, pianos, clocks, confectionary, linen and candles, as well as a heavier load of railway irons, cement, lead and copper. There were items included that intended for display in the Melbourne International Exhibition in 1880. The voyage to Port Phillip was long but uneventful. At 3am on June 1, 1878, Captain Gibbs was expecting to see land and the passengers were becoming excited as they prepared to view their new homeland in the early morning. But LOCH ARD was running into a fog which greatly reduced visibility. Captain Gibbs was becoming anxious as there was no sign of land or the Cape Otway lighthouse. At 4am the fog lifted. A man aloft announced that he could see breakers. The sheer cliffs of Victoria's west coast came into view, and Captain Gibbs realised that the ship was much closer to them than expected. He ordered as much sail to be set as time would permit and then attempted to steer the vessel out to sea. On coming head on into the wind, the ship lost momentum, the sails fell limp and LOCH ARD's bow swung back. Gibbs then ordered the anchors to be released in an attempt to hold its position. The anchors sank some 50 fathoms - but did not hold. By this time LOCH ARD was among the breakers and the tall cliffs of Mutton Bird Island rose behind the ship. Just half a mile from the coast, the ship's bow was suddenly pulled around by the anchor. The captain tried to tack out to sea, but the ship struck a reef at the base of Mutton Bird Island, near Port Campbell. Waves broke over the ship and the top deck was loosened from the hull. The masts and rigging came crashing down knocking passengers and crew overboard. When a lifeboat was finally launched, it crashed into the side of LOCH ARD and capsized. Tom Pearce, who had launched the boat, managed to cling to its overturned hull and shelter beneath it. He drifted out to sea and then on the flood tide came into what is now known as LOCH ARD Gorge. He swam to shore, bruised and dazed, and found a cave in which to shelter. Some of the crew stayed below deck to shelter from the falling rigging but drowned when the ship slipped off the reef into deeper water. Eva Carmichael had raced onto deck to find out what was happening only to be confronted by towering cliffs looming above the stricken ship. In all the chaos, Captain Gibbs grabbed Eva and said, "If you are saved Eva, let my dear wife know that I died like a sailor". That was the last Eva Carmichael saw of the captain. She was swept off the ship by a huge wave. Eva saw Tom Pearce on a small rocky beach and yelled to attract his attention. He dived in and swam to the exhausted woman and dragged her to shore. He took her to the cave and broke open case of brandy which had washed up on the beach. He opened a bottle to revive the unconscious woman. A few hours later Tom scaled a cliff in search of help. He followed hoof prints and came by chance upon two men from nearby Glenample Station three and a half miles away. In a state of exhaustion, he told the men of the tragedy. Tom returned to the gorge while the two men rode back to the station to get help. By the time they reached LOCH ARD Gorge, it was cold and dark. The two shipwreck survivors were taken to Glenample Station to recover. Eva stayed at the station for six weeks before returning to Ireland, this time by steamship. In Melbourne, Tom Pearce received a hero's welcome. He was presented with the first gold medal of the Royal Humane Society of Victoria and a £1000 cheque from the Victorian Government. Concerts were performed to honour the young man's bravery and to raise money for those who lost family in the LOCH ARD disaster. Of the 54 crew members and passengers on board, only two survived: the apprentice, Tom Pearce and the young woman passenger, Eva Carmichael, who lost all of her family in the tragedy. Ten days after the LOCH ARD tragedy, salvage rights to the wreck were sold at auction for £2,120. Cargo valued at £3,000 was salvaged and placed on the beach, but most washed back into the sea when another storm developed. The wreck of LOCH ARD still lies at the base of Mutton Bird Island. Much of the cargo has now been salvaged and some was washed up into what is now known as LOCH ARD Gorge. Cargo and artefacts have also been illegally salvaged over many years before protective legislation was introduced. One of the most unlikely pieces of cargo to have survived the shipwreck was a Minton porcelain peacock - one of only nine in the world. The peacock was destined for the Melbourne International Exhibition in 1880. It had been well packed, which gave it adequate protection during the violent storm. Today, the Minton peacock can be seen at the Flagstaff Hill Maritime Museum in Warrnambool. From Australia's most dramatic shipwreck it has now become Australia's most valuable shipwreck artefact and is one of very few 'objects' on the Victorian State Heritage Register. Flagstaff Hill’s collection of artefacts from LOCH ARD is significant for being one of the largest collections of artefacts from this shipwreck in Victoria. It is significant for its association with the shipwreck, which is on the Victorian Heritage Register (VHR S417). The collection is significant because of the relationship between the objects, as together they have a high potential to interpret the story of the LOCH ARD. The LOCH ARD collection is archaeologically significant as the remains of a large international passenger and cargo ship. The LOCH ARD collection is historically significant for representing aspects of Victoria’s shipping history and its potential to interpret sub-theme 1.5 of Victoria’s Framework of Historical Themes (living with natural processes). The collection is also historically significant for its association with the LOCH ARD, which was one of the worst and best known shipwrecks in Victoria’s history. Section of ornate light fitting, brass stem is cracked. Slight encrustation and verdigris. Recovered from the wreck of the Loch Ard. Artefact Rego No LA/??.flagstaff hill, warrnambool, shipwrecked coast, flagstaff hill maritime museum, maritime museum, shipwreck coast, flagstaff hill maritime village, great ocean road, loch line, loch ard, captain gibbs, eva carmichael, tom pearce, glenample station, mutton bird island, loch ard gorge, light fitting -
 Flagstaff Hill Maritime Museum and Village
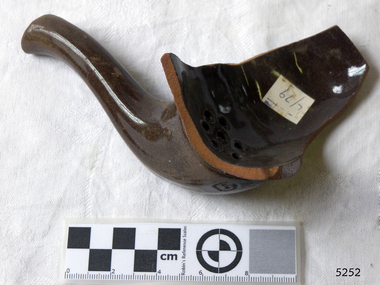
Teapot Spout
HISTORY OF THE LOCH ARD The LOCH ARD belonged to the famous Loch Line which sailed many ships from England to Australia. Built in Glasgow by Barclay, Curdle and Co. in 1873, the LOCH ARD was a three-masted square rigged iron sailing ship. The ship measured 262ft 7" (79.87m) in length, 38ft (11.58m) in width, 23ft (7m) in depth and had a gross tonnage of 1693 tons. The LOCH ARD's main mast measured a massive 150ft (45.7m) in height. LOCH ARD made three trips to Australia and one trip to Calcutta before its final voyage. LOCH ARD left England on March 2, 1878, under the command of Captain Gibbs, a newly married, 29 year old. She was bound for Melbourne with a crew of 37, plus 17 passengers and a load of cargo. The general cargo reflected the affluence of Melbourne at the time. On board were straw hats, umbrella, perfumes, clay pipes, pianos, clocks, confectionary, linen and candles, as well as a heavier load of railway irons, cement, lead and copper. There were items included that intended for display in the Melbourne International Exhibition in 1880. The voyage to Port Phillip was long but uneventful. At 3am on June 1, 1878, Captain Gibbs was expecting to see land and the passengers were becoming excited as they prepared to view their new homeland in the early morning. But LOCH ARD was running into a fog which greatly reduced visibility. Captain Gibbs was becoming anxious as there was no sign of land or the Cape Otway lighthouse. At 4am the fog lifted. A man aloft announced that he could see breakers. The sheer cliffs of Victoria's west coast came into view, and Captain Gibbs realised that the ship was much closer to them than expected. He ordered as much sail to be set as time would permit and then attempted to steer the vessel out to sea. On coming head on into the wind, the ship lost momentum, the sails fell limp and LOCH ARD's bow swung back. Gibbs then ordered the anchors to be released in an attempt to hold its position. The anchors sank some 50 fathoms - but did not hold. By this time LOCH ARD was among the breakers and the tall cliffs of Mutton Bird Island rose behind the ship. Just half a mile from the coast, the ship's bow was suddenly pulled around by the anchor. The captain tried to tack out to sea, but the ship struck a reef at the base of Mutton Bird Island, near Port Campbell. Waves broke over the ship and the top deck was loosened from the hull. The masts and rigging came crashing down knocking passengers and crew overboard. When a lifeboat was finally launched, it crashed into the side of LOCH ARD and capsized. Tom Pearce, who had launched the boat, managed to cling to its overturned hull and shelter beneath it. He drifted out to sea and then on the flood tide came into what is now known as LOCH ARD Gorge. He swam to shore, bruised and dazed, and found a cave in which to shelter. Some of the crew stayed below deck to shelter from the falling rigging but drowned when the ship slipped off the reef into deeper water. Eva Carmichael had raced onto deck to find out what was happening only to be confronted by towering cliffs looming above the stricken ship. In all the chaos, Captain Gibbs grabbed Eva and said, "If you are saved Eva, let my dear wife know that I died like a sailor". That was the last Eva Carmichael saw of the captain. She was swept off the ship by a huge wave. Eva saw Tom Pearce on a small rocky beach and yelled to attract his attention. He dived in and swam to the exhausted woman and dragged her to shore. He took her to the cave and broke open case of brandy which had washed up on the beach. He opened a bottle to revive the unconscious woman. A few hours later Tom scaled a cliff in search of help. He followed hoof prints and came by chance upon two men from nearby Glenample Station three and a half miles away. In a state of exhaustion, he told the men of the tragedy. Tom returned to the gorge while the two men rode back to the station to get help. By the time they reached LOCH ARD Gorge, it was cold and dark. The two shipwreck survivors were taken to Glenample Station to recover. Eva stayed at the station for six weeks before returning to Ireland, this time by steamship. In Melbourne, Tom Pearce received a hero's welcome. He was presented with the first gold medal of the Royal Humane Society of Victoria and a £1000 cheque from the Victorian Government. Concerts were performed to honour the young man's bravery and to raise money for those who lost family in the LOCH ARD disaster. Of the 54 crew members and passengers on board, only two survived: the apprentice, Tom Pearce and the young woman passenger, Eva Carmichael, who lost all of her family in the tragedy. Ten days after the LOCH ARD tragedy, salvage rights to the wreck were sold at auction for £2,120. Cargo valued at £3,000 was salvaged and placed on the beach, but most washed back into the sea when another storm developed. The wreck of LOCH ARD still lies at the base of Mutton Bird Island. Much of the cargo has now been salvaged and some was washed up into what is now known as LOCH ARD Gorge. Cargo and artefacts have also been illegally salvaged over many years before protective legislation was introduced. One of the most unlikely pieces of cargo to have survived the shipwreck was a Minton porcelain peacock - one of only nine in the world. The peacock was destined for the Melbourne International Exhibition in 1880. It had been well packed, which gave it adequate protection during the violent storm. Today, the Minton peacock can be seen at the Flagstaff Hill Maritime Museum in Warrnambool. From Australia's most dramatic shipwreck it has now become Australia's most valuable shipwreck artefact and is one of very few 'objects' on the Victorian State Heritage Register. Flagstaff Hill’s collection of artefacts from LOCH ARD is significant for being one of the largest collections of artefacts from this shipwreck in Victoria. It is significant for its association with the shipwreck, which is on the Victorian Heritage Register (VHR S417). The collection is significant because of the relationship between the objects, as together they have a high potential to interpret the story of the LOCH ARD. The LOCH ARD collection is archaeologically significant as the remains of a large international passenger and cargo ship. The LOCH ARD collection is historically significant for representing aspects of Victoria’s shipping history and its potential to interpret sub-theme 1.5 of Victoria’s Framework of Historical Themes (living with natural processes). The collection is also historically significant for its association with the LOCH ARD, which was one of the worst and best known shipwrecks in Victoria’s history. Ceramic teapot spout from the wreck of the Loch Ard. Brown in colour. Length 5¼". Artefact Reg No LA/79.flagstaff hill, warrnambool, shipwrecked coast, flagstaff hill maritime museum, maritime museum, shipwreck coast, flagstaff hill maritime village, great ocean road, loch line, loch ard, captain gibbs, eva carmichael, tom pearce, glenample station, mutton bird island, loch ard gorge, ceramic teapot, teapot -
 Flagstaff Hill Maritime Museum and Village
Plate, before 1878
This earthenware dinner plate fragment is very similar to others recovered from the wreck of the LOCH ARD. It is uncertain whether the plates were personal belongings or part of the cargo. The Asiatic Pheasant pattern is a transfer design and was the most popular design of the 19th century Victorian era. It is still being produced today. The design was produced as high quality, decorative dinnerware by the potters in the Staffordshire, England, area from the late 1830’s, but no-one is sure exactly who the original designer was. The industrial age made production of this design more affordable to the ordinary person who purchased and proudly displayed settings in their homes. The high demand for production resulted in loss of quality in both potting and design, particularly between 1860-1914 when the design reached its height of popularity, and the results were often a poor match for the earlier pieces’ quality and detail. Some engravers would make copies of the Asiatic Pheasant design (and other designs) onto copper plates and sell them to more than one pottery producer (the Copyright Act of 1842 was intended to control this very thing). Consequently the list of Makers’ Marks associated with the Asiatic Pheasant is well over 100. A single pottery factory could have several owners, all with their own Marks. These factors all make the dating of pieces difficult. Also, after 1891, pieces produced for the export were required to be stamped with “ENGLAND”, but pieces produced for the domestic market in England did not need this stamp, so early pieces and pieces produced for the domestic marked would all be without the “ENGLAND” stamp, confusing the matter. Over time the body shape of the pieces changed, the feathered, curved and fluted edges giving way to the simpler, cheaper oblong shapes. The LOCH ARD belonged to the famous Loch Line which sailed many ships from England to Australia. Built in Glasgow by Barclay, Curdle and Co. in 1873, the LOCH ARD was a three-masted square rigged iron sailing ship. The ship measured 262ft 7" (79.87m) in length, 38ft (11.58m) in width, 23ft (7m) in depth and had a gross tonnage of 1693 tons. The LOCH ARD's main mast measured a massive 150ft (45.7m) in height. LOCH ARD made three trips to Australia and one trip to Calcutta before its final voyage. LOCH ARD left England on March 2, 1878, under the command of Captain Gibbs, a newly married, 29 year old. She was bound for Melbourne with a crew of 37, plus 17 passengers and a load of cargo. The general cargo reflected the affluence of Melbourne at the time. On board were straw hats, umbrella, perfumes, clay pipes, pianos, clocks, confectionary, linen and candles, as well as a heavier load of railway irons, cement, lead and copper. There were items included that intended for display in the Melbourne International Exhibition in 1880. The voyage to Port Phillip was long but uneventful. At 3am on June 1, 1878, Captain Gibbs was expecting to see land and the passengers were becoming excited as they prepared to view their new homeland in the early morning. But LOCH ARD was running into a fog which greatly reduced visibility. Captain Gibbs was becoming anxious as there was no sign of land or the Cape Otway lighthouse. At 4am the fog lifted. A man aloft announced that he could see breakers. The sheer cliffs of Victoria's west coast came into view, and Captain Gibbs realised that the ship was much closer to them than expected. He ordered as much sail to be set as time would permit and then attempted to steer the vessel out to sea. On coming head on into the wind, the ship lost momentum, the sails fell limp and LOCH ARD's bow swung back. Gibbs then ordered the anchors to be released in an attempt to hold its position. The anchors sank some 50 fathoms - but did not hold. By this time LOCH ARD was among the breakers and the tall cliffs of Mutton Bird Island rose behind the ship. Just half a mile from the coast, the ship's bow was suddenly pulled around by the anchor. The captain tried to tack out to sea, but the ship struck a reef at the base of Mutton Bird Island, near Port Campbell. Waves broke over the ship and the top deck was loosened from the hull. The masts and rigging came crashing down knocking passengers and crew overboard. When a lifeboat was finally launched, it crashed into the side of LOCH ARD and capsized. Tom Pearce, who had launched the boat, managed to cling to its overturned hull and shelter beneath it. He drifted out to sea and then on the flood tide came into what is now known as LOCH ARD Gorge. He swam to shore, bruised and dazed, and found a cave in which to shelter. Some of the crew stayed below deck to shelter from the falling rigging but drowned when the ship slipped off the reef into deeper water. Eva Carmichael had raced onto deck to find out what was happening only to be confronted by towering cliffs looming above the stricken ship. In all the chaos, Captain Gibbs grabbed Eva and said, "If you are saved Eva, let my dear wife know that I died like a sailor". That was the last Eva Carmichael saw of the captain. She was swept off the ship by a huge wave. Eva saw Tom Pearce on a small rocky beach and yelled to attract his attention. He dived in and swam to the exhausted woman and dragged her to shore. He took her to the cave and broke open case of brandy which had washed up on the beach. He opened a bottle to revive the unconscious woman. A few hours later Tom scaled a cliff in search of help. He followed hoof prints and came by chance upon two men from nearby Glenample Station three and a half miles away. In a state of exhaustion, he told the men of the tragedy. Tom returned to the gorge while the two men rode back to the station to get help. By the time they reached LOCH ARD Gorge, it was cold and dark. The two shipwreck survivors were taken to Glenample Station to recover. Eva stayed at the station for six weeks before returning to Ireland, this time by steamship. In Melbourne, Tom Pearce received a hero's welcome. He was presented with the first gold medal of the Royal Humane Society of Victoria and a £1000 cheque from the Victorian Government. Concerts were performed to honour the young man's bravery and to raise money for those who lost family in the LOCH ARD disaster. Of the 54 crew members and passengers on board, only two survived: the apprentice, Tom Pearce and the young woman passenger, Eva Carmichael, who lost all of her family in the tragedy. Ten days after the LOCH ARD tragedy, salvage rights to the wreck were sold at auction for £2,120. Cargo valued at £3,000 was salvaged and placed on the beach, but most washed back into the sea when another storm developed. The wreck of LOCH ARD still lies at the base of Mutton Bird Island. Much of the cargo has now been salvaged and some was washed up into what is now known as LOCH ARD Gorge. Cargo and artefacts have also been illegally salvaged over many years before protective legislation was introduced. One of the most unlikely pieces of cargo to have survived the shipwreck was a Minton porcelain peacock - one of only nine in the world. The peacock was destined for the Melbourne International Exhibition in 1880. It had been well packed, which gave it adequate protection during the violent storm. Today, the Minton peacock can be seen at the Flagstaff Hill Maritime Museum in Warrnambool. From Australia's most dramatic shipwreck it has now become Australia's most valuable shipwreck artefact and is one of very few 'objects' on the Victorian State Heritage Register. [References: Flagstaff Hill Maritime Village information sheets and documents, http://www.asiaticpheasants.co.uk/index.html ]Flagstaff Hill’s collection of artefacts from LOCH ARD is significant for being one of the largest collections of artefacts from this shipwreck in Victoria. It is significant for its association with the shipwreck, which is on the Victorian Heritage Register (VHR S417). The collection is significant because of the relationship between the objects, as together they have a high potential to interpret the story of the LOCH ARD. The LOCH ARD collection is archaeologically significant as the remains of a large international passenger and cargo ship. The LOCH ARD collection is historically significant for representing aspects of Victoria’s shipping history and its potential to interpret sub-theme 1.5 of Victoria’s Framework of Historical Themes (living with natural processes). The collection is also historically significant for its association with the LOCH ARD, which was one of the worst and best known shipwrecks in Victoria’s history. Fragment of earthenware dinner plate recovered from the wreck of the Loch Ard. White glazed porcelain with blue Asiatic Pheasant design; this piece shows a pheasant. Sticker underneath has blue pen handwriting "L/58". Asiatic Pheasant Cartouche has Maker’s name (hard to decipher). Stamped underneath "0 1 2 8 1 (or 9)" Sticker underneath has blue pen handwriting "L/58". Asiatic Pheasant Cartouche has Maker’s name (hard to decipher). Stamped underneath "0 1 2 8 1 (or 9)" flagstaff hill, warrnambool, shipwrecked coast, flagstaff hill maritime museum, maritime museum, shipwreck coast, flagstaff hill maritime village, great ocean road, loch line, loch ard, captain gibbs, eva carmichael, tom pearce, glenample station, mutton bird island, loch ard gorge, dinner plate, asiatic pheasant, loch ard, plate -
 Flagstaff Hill Maritime Museum and Village
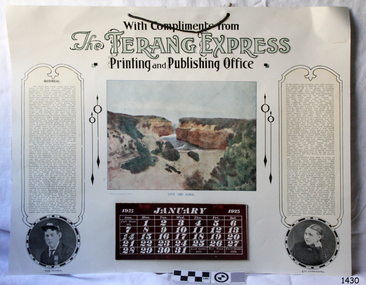
Calendar, T.S. McInnes, August 1923
HISTORY OF THE LOCH ARD The LOCH ARD belonged to the famous Loch Line which sailed many ships from England to Australia. Built in Glasgow by Barclay, Curdle and Co. in 1873, the LOCH ARD was a three-masted square rigged iron sailing ship. The ship measured 262ft 7" (79.87m) in length, 38ft (11.58m) in width, 23ft (7m) in depth and had a gross tonnage of 1693 tons. The LOCH ARD's main mast measured a massive 150ft (45.7m) in height. LOCH ARD made three trips to Australia and one trip to Calcutta before its final voyage. LOCH ARD left England on March 2, 1878, under the command of Captain Gibbs, a newly married, 29 year old. She was bound for Melbourne with a crew of 37, plus 17 passengers and a load of cargo. The general cargo reflected the affluence of Melbourne at the time. On board were straw hats, umbrella, perfumes, clay pipes, pianos, clocks, confectionary, linen and candles, as well as a heavier load of railway irons, cement, lead and copper. There were items included that intended for display in the Melbourne International Exhibition in 1880. The voyage to Port Phillip was long but uneventful. At 3am on June 1, 1878, Captain Gibbs was expecting to see land and the passengers were becoming excited as they prepared to view their new homeland in the early morning. But LOCH ARD was running into a fog which greatly reduced visibility. Captain Gibbs was becoming anxious as there was no sign of land or the Cape Otway lighthouse. At 4am the fog lifted. A man aloft announced that he could see breakers. The sheer cliffs of Victoria's west coast came into view, and Captain Gibbs realised that the ship was much closer to them than expected. He ordered as much sail to be set as time would permit and then attempted to steer the vessel out to sea. On coming head on into the wind, the ship lost momentum, the sails fell limp and LOCH ARD's bow swung back. Gibbs then ordered the anchors to be released in an attempt to hold its position. The anchors sank some 50 fathoms - but did not hold. By this time LOCH ARD was among the breakers and the tall cliffs of Mutton Bird Island rose behind the ship. Just half a mile from the coast, the ship's bow was suddenly pulled around by the anchor. The captain tried to tack out to sea, but the ship struck a reef at the base of Mutton Bird Island, near Port Campbell. Waves broke over the ship and the top deck was loosened from the hull. The masts and rigging came crashing down knocking passengers and crew overboard. When a lifeboat was finally launched, it crashed into the side of LOCH ARD and capsized. Tom Pearce, who had launched the boat, managed to cling to its overturned hull and shelter beneath it. He drifted out to sea and then on the flood tide came into what is now known as LOCH ARD Gorge. He swam to shore, bruised and dazed, and found a cave in which to shelter. Some of the crew stayed below deck to shelter from the falling rigging but drowned when the ship slipped off the reef into deeper water. Eva Carmichael had raced onto deck to find out what was happening only to be confronted by towering cliffs looming above the stricken ship. In all the chaos, Captain Gibbs grabbed Eva and said, "If you are saved Eva, let my dear wife know that I died like a sailor". That was the last Eva Carmichael saw of the captain. She was swept off the ship by a huge wave. Eva saw Tom Pearce on a small rocky beach and yelled to attract his attention. He dived in and swam to the exhausted woman and dragged her to shore. He took her to the cave and broke open case of brandy which had washed up on the beach. He opened a bottle to revive the unconscious woman. A few hours later Tom scaled a cliff in search of help. He followed hoof prints and came by chance upon two men from nearby Glenample Station three and a half miles away. In a state of exhaustion, he told the men of the tragedy. Tom returned to the gorge while the two men rode back to the station to get help. By the time they reached LOCH ARD Gorge, it was cold and dark. The two shipwreck survivors were taken to Glenample Station to recover. Eva stayed at the station for six weeks before returning to Ireland, this time by steamship. In Melbourne, Tom Pearce received a hero's welcome. He was presented with the first gold medal of the Royal Humane Society of Victoria and a £1000 cheque from the Victorian Government. Concerts were performed to honour the young man's bravery and to raise money for those who lost family in the LOCH ARD disaster. Of the 54 crew members and passengers on board, only two survived: the apprentice, Tom Pearce and the young woman passenger, Eva Carmichael, who lost all of her family in the tragedy. Ten days after the LOCH ARD tragedy, salvage rights to the wreck were sold at auction for £2,120. Cargo valued at £3,000 was salvaged and placed on the beach, but most washed back into the sea when another storm developed. The wreck of LOCH ARD still lies at the base of Mutton Bird Island. Much of the cargo has now been salvaged and some was washed up into what is now known as LOCH ARD Gorge. Cargo and artefacts have also been illegally salvaged over many years before protective legislation was introduced. One of the most unlikely pieces of cargo to have survived the shipwreck was a Minton porcelain peacock - one of only nine in the world. The peacock was destined for the Melbourne International Exhibition in 1880. It had been well packed, which gave it adequate protection during the violent storm. Today, the Minton peacock can be seen at the Flagstaff Hill Maritime Museum in Warrnambool. From Australia's most dramatic shipwreck it has now become Australia's most valuable shipwreck artefact and is one of very few 'objects' on the Victorian State Heritage Register. Flagstaff Hill’s collection of artefacts from LOCH ARD is significant for being one of the largest collections of artefacts from this shipwreck in Victoria. It is significant for its association with the shipwreck, which is on the Victorian Heritage Register (VHR S417). The collection is significant because of the relationship between the objects, as together they have a high potential to interpret the story of the LOCH ARD. The LOCH ARD collection is archaeologically significant as the remains of a large international passenger and cargo ship. The LOCH ARD collection is historically significant for representing aspects of Victoria’s shipping history and its potential to interpret sub-theme 1.5 of Victoria’s Framework of Historical Themes (living with natural processes). The collection is also historically significant for its association with the LOCH ARD, which was one of the worst and best known shipwrecks in Victoria’s history. Calendar printed by Terang Express for August 1923 with picture of Loch Ard Gorge and survivors of wreck and also story of the episode. flagstaff hill, warrnambool, shipwrecked coast, flagstaff hill maritime museum, maritime museum, shipwreck coast, flagstaff hill maritime village, great ocean road, loch line, loch ard, captain gibbs, eva carmichael, tom pearce, glenample station, mutton bird island, terang express, calendar, 1923, calendar 1923, printer, newspaper, loch ard gorge -
 Flagstaff Hill Maritime Museum and Village
Print, Loch Ard
HISTORY OF THE LOCH ARD The LOCH ARD belonged to the famous Loch Line which sailed many ships from England to Australia. Built in Glasgow by Barclay, Curdle and Co. in 1873, the LOCH ARD was a three-masted square rigged iron sailing ship. The ship measured 262ft 7" (79.87m) in length, 38ft (11.58m) in width, 23ft (7m) in depth and had a gross tonnage of 1693 tons. The LOCH ARD's main mast measured a massive 150ft (45.7m) in height. LOCH ARD made three trips to Australia and one trip to Calcutta before its final voyage. LOCH ARD left England on March 2, 1878, under the command of Captain Gibbs, a newly married, 29 year old. She was bound for Melbourne with a crew of 37, plus 17 passengers and a load of cargo. The general cargo reflected the affluence of Melbourne at the time. On board were straw hats, umbrella, perfumes, clay pipes, pianos, clocks, confectionary, linen and candles, as well as a heavier load of railway irons, cement, lead and copper. There were items included that intended for display in the Melbourne International Exhibition in 1880. The voyage to Port Phillip was long but uneventful. At 3am on June 1, 1878, Captain Gibbs was expecting to see land and the passengers were becoming excited as they prepared to view their new homeland in the early morning. But LOCH ARD was running into a fog which greatly reduced visibility. Captain Gibbs was becoming anxious as there was no sign of land or the Cape Otway lighthouse. At 4am the fog lifted. A man aloft announced that he could see breakers. The sheer cliffs of Victoria's west coast came into view, and Captain Gibbs realised that the ship was much closer to them than expected. He ordered as much sail to be set as time would permit and then attempted to steer the vessel out to sea. On coming head on into the wind, the ship lost momentum, the sails fell limp and LOCH ARD's bow swung back. Gibbs then ordered the anchors to be released in an attempt to hold its position. The anchors sank some 50 fathoms - but did not hold. By this time LOCH ARD was among the breakers and the tall cliffs of Mutton Bird Island rose behind the ship. Just half a mile from the coast, the ship's bow was suddenly pulled around by the anchor. The captain tried to tack out to sea, but the ship struck a reef at the base of Mutton Bird Island, near Port Campbell. Waves broke over the ship and the top deck was loosened from the hull. The masts and rigging came crashing down knocking passengers and crew overboard. When a lifeboat was finally launched, it crashed into the side of LOCH ARD and capsized. Tom Pearce, who had launched the boat, managed to cling to its overturned hull and shelter beneath it. He drifted out to sea and then on the flood tide came into what is now known as LOCH ARD Gorge. He swam to shore, bruised and dazed, and found a cave in which to shelter. Some of the crew stayed below deck to shelter from the falling rigging but drowned when the ship slipped off the reef into deeper water. Eva Carmichael had raced onto deck to find out what was happening only to be confronted by towering cliffs looming above the stricken ship. In all the chaos, Captain Gibbs grabbed Eva and said, "If you are saved Eva, let my dear wife know that I died like a sailor". That was the last Eva Carmichael saw of the captain. She was swept off the ship by a huge wave. Eva saw Tom Pearce on a small rocky beach and yelled to attract his attention. He dived in and swam to the exhausted woman and dragged her to shore. He took her to the cave and broke open case of brandy which had washed up on the beach. He opened a bottle to revive the unconscious woman. A few hours later Tom scaled a cliff in search of help. He followed hoof prints and came by chance upon two men from nearby Glenample Station three and a half miles away. In a state of exhaustion, he told the men of the tragedy. Tom returned to the gorge while the two men rode back to the station to get help. By the time they reached LOCH ARD Gorge, it was cold and dark. The two shipwreck survivors were taken to Glenample Station to recover. Eva stayed at the station for six weeks before returning to Ireland, this time by steamship. In Melbourne, Tom Pearce received a hero's welcome. He was presented with the first gold medal of the Royal Humane Society of Victoria and a £1000 cheque from the Victorian Government. Concerts were performed to honour the young man's bravery and to raise money for those who lost family in the LOCH ARD disaster. Of the 54 crew members and passengers on board, only two survived: the apprentice, Tom Pearce and the young woman passenger, Eva Carmichael, who lost all of her family in the tragedy. Ten days after the LOCH ARD tragedy, salvage rights to the wreck were sold at auction for £2,120. Cargo valued at £3,000 was salvaged and placed on the beach, but most washed back into the sea when another storm developed. The wreck of LOCH ARD still lies at the base of Mutton Bird Island. Much of the cargo has now been salvaged and some was washed up into what is now known as LOCH ARD Gorge. Cargo and artefacts have also been illegally salvaged over many years before protective legislation was introduced. One of the most unlikely pieces of cargo to have survived the shipwreck was a Minton porcelain peacock - one of only nine in the world. The peacock was destined for the Melbourne International Exhibition in 1880. It had been well packed, which gave it adequate protection during the violent storm. Today, the Minton peacock can be seen at the Flagstaff Hill Maritime Museum in Warrnambool. From Australia's most dramatic shipwreck it has now become Australia's most valuable shipwreck artefact and is one of very few 'objects' on the Victorian State Heritage Register. Flagstaff Hill’s collection of artefacts from LOCH ARD is significant for being one of the largest collections of artefacts from this shipwreck in Victoria. It is significant for its association with the shipwreck, which is on the Victorian Heritage Register (VHR S417). The collection is significant because of the relationship between the objects, as together they have a high potential to interpret the story of the LOCH ARD. The LOCH ARD collection is archaeologically significant as the remains of a large international passenger and cargo ship. The LOCH ARD collection is historically significant for representing aspects of Victoria’s shipping history and its potential to interpret sub-theme 1.5 of Victoria’s Framework of Historical Themes (living with natural processes). The collection is also historically significant for its association with the LOCH ARD, which was one of the worst and best known shipwrecks in Victoria’s history. Reproduction 0620 of 1000 taken from the original painting of the Loch Ard by Neil Savage.flagstaff hill, warrnambool, shipwrecked coast, flagstaff hill maritime museum, maritime museum, shipwreck coast, flagstaff hill maritime village, great ocean road, loch line, loch ard, captain gibbs, eva carmichael, tom pearce, glenample station, mutton bird island, loch ard gorge, photograph, neil savage -
 Flagstaff Hill Maritime Museum and Village
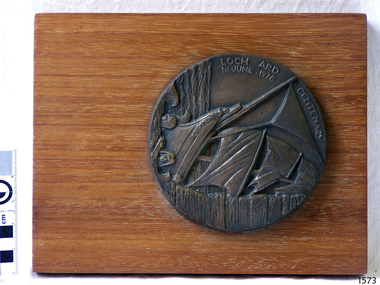
Plaque, Loch Ard
HISTORY OF THE LOCH ARD The LOCH ARD belonged to the famous Loch Line which sailed many ships from England to Australia. Built in Glasgow by Barclay, Curdle and Co. in 1873, the LOCH ARD was a three-masted square rigged iron sailing ship. The ship measured 262ft 7" (79.87m) in length, 38ft (11.58m) in width, 23ft (7m) in depth and had a gross tonnage of 1693 tons. The LOCH ARD's main mast measured a massive 150ft (45.7m) in height. LOCH ARD made three trips to Australia and one trip to Calcutta before its final voyage. LOCH ARD left England on March 2, 1878, under the command of Captain Gibbs, a newly married, 29 year old. She was bound for Melbourne with a crew of 37, plus 17 passengers and a load of cargo. The general cargo reflected the affluence of Melbourne at the time. On board were straw hats, umbrella, perfumes, clay pipes, pianos, clocks, confectionary, linen and candles, as well as a heavier load of railway irons, cement, lead and copper. There were items included that intended for display in the Melbourne International Exhibition in 1880. The voyage to Port Phillip was long but uneventful. At 3am on June 1, 1878, Captain Gibbs was expecting to see land and the passengers were becoming excited as they prepared to view their new homeland in the early morning. But LOCH ARD was running into a fog which greatly reduced visibility. Captain Gibbs was becoming anxious as there was no sign of land or the Cape Otway lighthouse. At 4am the fog lifted. A man aloft announced that he could see breakers. The sheer cliffs of Victoria's west coast came into view, and Captain Gibbs realised that the ship was much closer to them than expected. He ordered as much sail to be set as time would permit and then attempted to steer the vessel out to sea. On coming head on into the wind, the ship lost momentum, the sails fell limp and LOCH ARD's bow swung back. Gibbs then ordered the anchors to be released in an attempt to hold its position. The anchors sank some 50 fathoms - but did not hold. By this time LOCH ARD was among the breakers and the tall cliffs of Mutton Bird Island rose behind the ship. Just half a mile from the coast, the ship's bow was suddenly pulled around by the anchor. The captain tried to tack out to sea, but the ship struck a reef at the base of Mutton Bird Island, near Port Campbell. Waves broke over the ship and the top deck was loosened from the hull. The masts and rigging came crashing down knocking passengers and crew overboard. When a lifeboat was finally launched, it crashed into the side of LOCH ARD and capsized. Tom Pearce, who had launched the boat, managed to cling to its overturned hull and shelter beneath it. He drifted out to sea and then on the flood tide came into what is now known as LOCH ARD Gorge. He swam to shore, bruised and dazed, and found a cave in which to shelter. Some of the crew stayed below deck to shelter from the falling rigging but drowned when the ship slipped off the reef into deeper water. Eva Carmichael had raced onto deck to find out what was happening only to be confronted by towering cliffs looming above the stricken ship. In all the chaos, Captain Gibbs grabbed Eva and said, "If you are saved Eva, let my dear wife know that I died like a sailor". That was the last Eva Carmichael saw of the captain. She was swept off the ship by a huge wave. Eva saw Tom Pearce on a small rocky beach and yelled to attract his attention. He dived in and swam to the exhausted woman and dragged her to shore. He took her to the cave and broke open case of brandy which had washed up on the beach. He opened a bottle to revive the unconscious woman. A few hours later Tom scaled a cliff in search of help. He followed hoof prints and came by chance upon two men from nearby Glenample Station three and a half miles away. In a state of exhaustion, he told the men of the tragedy. Tom returned to the gorge while the two men rode back to the station to get help. By the time they reached LOCH ARD Gorge, it was cold and dark. The two shipwreck survivors were taken to Glenample Station to recover. Eva stayed at the station for six weeks before returning to Ireland, this time by steamship. In Melbourne, Tom Pearce received a hero's welcome. He was presented with the first gold medal of the Royal Humane Society of Victoria and a £1000 cheque from the Victorian Government. Concerts were performed to honour the young man's bravery and to raise money for those who lost family in the LOCH ARD disaster. Of the 54 crew members and passengers on board, only two survived: the apprentice, Tom Pearce and the young woman passenger, Eva Carmichael, who lost all of her family in the tragedy. Ten days after the LOCH ARD tragedy, salvage rights to the wreck were sold at auction for £2,120. Cargo valued at £3,000 was salvaged and placed on the beach, but most washed back into the sea when another storm developed. The wreck of LOCH ARD still lies at the base of Mutton Bird Island. Much of the cargo has now been salvaged and some was washed up into what is now known as LOCH ARD Gorge. Cargo and artefacts have also been illegally salvaged over many years before protective legislation was introduced. One of the most unlikely pieces of cargo to have survived the shipwreck was a Minton porcelain peacock - one of only nine in the world. The peacock was destined for the Melbourne International Exhibition in 1880. It had been well packed, which gave it adequate protection during the violent storm. Today, the Minton peacock can be seen at the Flagstaff Hill Maritime Museum in Warrnambool. From Australia's most dramatic shipwreck it has now become Australia's most valuable shipwreck artefact and is one of very few 'objects' on the Victorian State Heritage Register. Flagstaff Hill’s collection of artefacts from LOCH ARD is significant for being one of the largest collections of artefacts from this shipwreck in Victoria. It is significant for its association with the shipwreck, which is on the Victorian Heritage Register (VHR S417). The collection is significant because of the relationship between the objects, as together they have a high potential to interpret the story of the LOCH ARD. The LOCH ARD collection is archaeologically significant as the remains of a large international passenger and cargo ship. The LOCH ARD collection is historically significant for representing aspects of Victoria’s shipping history and its potential to interpret sub-theme 1.5 of Victoria’s Framework of Historical Themes (living with natural processes). The collection is also historically significant for its association with the LOCH ARD, which was one of the worst and best known shipwrecks in Victoria’s history. Plaque to commemorate the centenary of the wreck of the Loch Ard. Circular piece of bronze depicting a scene of the wreck set in a rectangular piece of varnished wood. Plaque is 9/50. Artist Michael Meszarosflagstaff hill, warrnambool, shipwrecked coast, flagstaff hill maritime museum, maritime museum, shipwreck coast, flagstaff hill maritime village, great ocean road, loch line, loch ard, captain gibbs, eva carmichael, tom pearce, glenample station, mutton bird island, loch ard gorge, plaque, loch ard, michael meszaros -
 Flagstaff Hill Maritime Museum and Village
Award - Medal, James Patten, 18-041890
The Bronze Medal and Certificate of Merit of the Royal Humane Society of Australasia were awarded to James Patten for the bravery he displayed on 18th April 1890, and presented to him on 21st May 1890. The Royal Humane Society of Australasia was founded in 1874 with the aim to recognise those who risked their lives to save others and to assist those whose acts of bravery caused them or their surviving dependants to be disadvantaged in some way. Details of the incident were published in the Argus, Saturday 19 April 1890, page 11 - "FATAL BOATING ACCIDENT, (BY TELEGRAPH FROM OUR CORRESPONDENT.), WARRNAMBOOL, FRIDAY A fatal boating disaster occurred in Lady Bay this morning, the victim being Joseph Lowe, licensee of the Bay View Hotel, South Warrnambool. The deceased, in company with two lads named James Ferrier and James Patten, went out in a small dingy to shoot musk ducks. The water was perfectly smooth, and the party were tempted to proceed as far as the mouth of the Hopkins River. In their eagerness they neglected to keep clear of the breakers, and were presently carried in on the crest of a large wave, and the boat cap sized within a cable's length of the shore, precipitating the occupants into the water. Patten and Lowe stuck to the overturned boat, Ferrier striking out for the shore, which he reached in an exhausted state. In the meantime his companions had been washed off the boat, and were struggling in the breakers. Lowe was unable to swim, and Patten kept him afloat, at the same time making gallant attempts to get him ashore, but finally had to leave him to his fate. Ferrier, seeing Lowe's danger, undressed and swam out, but became exhausted. Ferrier and Patten were both found in a fainting condition by persons who saw the catastrophe from the jetty, and ran along the beach to render assistance. Attempts were subsequently made to rescue Lowe's body, which could be seen washing abort in the surf. These proved unsuccessful, and no hope is now entertained of recovering it. Lowe was a smart young man, 28 years of age, and unmarried. He was formerly bar-man at the Commercial Hotel here, having been engaged in Melbourne ..." This medal recognises the bravery of James Patten, a local citizen who risked his life to save the life of his friend Joseph Lowe whilst at sea and was recognised for this act by the Royal Humane Society of Australasia.Medal awarded to James Patten by the Royal Humane Society of Australasia for his bravery on18 April 1890 and presented to him on 21 May 1890. Bronze medal in hard black rectangular case. Lid and base have centre hinge and brass spring button catch. Case is padded and lined with blue silk and has a fitted hook. The round medal has a bronze bar with pin closure, dark blue, braided ribbon with brass swivel mount. The case has a gold embossed rectangular border on the lid and base. Embossed inscription on lid. The obverse shows a woman on the left in long robe placing a wreath on the head of a kneeling man at right, with the five stars of the Southern Cross constellation above his head. A motto is inscribed around the edge. The reverse has inscriptions around the edge, a wreath of two overlapping olive branches, and engraved text.OBVERSE: Embossed around "VIRTUTE PARATUM" REVERSE: Embossed on the medal around the edge "ROYAL HUMANE SOCIETY OF AUSTRALASIA INSTD. A.D. 1874", in the centre "AWARDED TO" Engraved in the centre "James Patten/ 18th April / 1890" CASE LID: "PRESENTED BY / THE ROYAL HUMANE SOCIETY / OF AUSTRALASIA / TO / JAS. PATTEN. / 21ST MAY 1890."flagstaff hill, warrnambool, flagstaff-hill, maritime museum, maritime village, shipwreck-coast, flagstaff hill maritime museum & village, bronze medal 1890, royal humane society of australasia, james patten, medal, australian award medal, commemorative medal, numismatics, life saving, lifesaving, rescue, bravery, drowning, joseph lowe, james ferrier, lady bay, hopkins river, boating accident, certificate of merit, north eastern bight -
 Flagstaff Hill Maritime Museum and Village
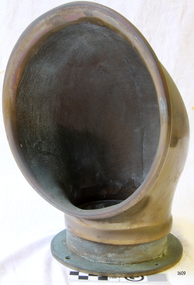
Functional object - Dorade Vent Cowl, 1930s
A dorade is a type of ventilator that permits the passage of air in and out of the cabin or engine room of a boat while keeping rain, spray, and sea wash out. The basic form is a low, rectangular box fixed to the deck or cabin top, fitted with interleaving vertical baffles. The baffles alternate to be free at the floor of the box, or free at the ceiling, forming a series of chambers. A horn-shaped ventilation cowl is usually fitted facing forward to a large hole at the top of the chamber at one end of the box with another large hole opening down into the boat from the chamber at the other end. Limber holes perforate the wall of the box at the floor of each chamber. Dorade boxes operate on the principle that air can pass relatively freely through the chambers, yet rain or sea wash will be trapped in successive chambers and drain out the small holes in the sides of the box. The first appearance of Dorade boxes was on the Olin Stephens-designed Dorade, a yacht built in 1929 for ocean racing. As originally built, the Dorade's vents led directly below, but this was found to allow water below, and the vents were modified in the early 1930s.An early piece of marine equipment from the 1930s that still is in use today on smaller vessels to improve below deck ventilation. Dorade Ventilator Cowl brass casting with wide open mouth twisted to side with swivel base. Box and baffles missingNonewarrnambool, flagstaff-hill, flagstaff-hill-maritime-museum, maritime-museum, shipwreck-coast, flagstaff-hill-maritime-village, ventilator, dorade, maritime equipment, ships fittings, ventilator box -
 Federation University Historical Collection
Booklet, United Services: A Story Book with Eighteen Coloured Plates, c1932
The Geoff mentioned in the inscription is Geoff Biddington.Children's book with colour and black and white illustrations.Inside front cover "To Geoff With Best Wishes From Aunty Vi 1932army, airforce, navy, armed service, royal marines, sailors, naval aircraft carrier, signalling, submarine, royal horse guards, military band, drum major, argyll and sutherland highlanders, royal artillery, machine gunners, tanks, bridge building, the piper, whippet tank, airmen, armstrong whitworth atlas machine, hawlker fury aeroplance, super-marine napier, schneider racing aeroplane, fairet iiif sea-plane, hawker hart day bomber, parachute jumping, schneifer trophy sea-plane, bristol bulldogs, iris flying-boat, geoff biddington, uniforms -
 Glenelg Shire Council Cultural Collection
Photograph - Photograph - Mawashi Al-Gasseen Boat, n.d
Port of Portland Authority Archivesport of portland archives -
Glenelg Shire Council Cultural Collection
Photograph - Photograph - Henty Beach, Hobie Cats, n.d
Port of Portland Authority Archivesport of portland archives, henty beach -
 Flagstaff Hill Maritime Museum and Village
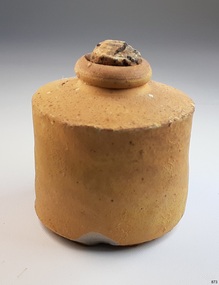
Container - Ink Bottle, Prior to 1878
This design of ink bottle was commonly referred to as a ‘penny ink well’ because it was very inexpensive to produce. It is also known as a dwarf ink bottle. Pen and ink has been in use for hand writing from about the seventh century up until the mid-20th century up until around the mid-19th century a quill pen made from a bird’s feather was used. In the 1850s the steel point pen was invented and could be manufactured on machines in large quantities. In the 1880s a successful portable fountain pen was designed, giving a smooth flowing ink and ease of use replacing the quill or dip pen. History of the Loch Ard: The Loch Ard got its name from "Loch Ard" a loch that lies to the west of Aberfoyle, and the east of Loch Lomond. It means "high lake" in Scottish Gaelic. The vessel belonged to the famous Loch Line which sailed many vessels from England to Australia. The Loch Ard was built in Glasgow by Barclay, Curle & Co. in 1873, the vessel was a three-masted square-rigged iron sailing ship that measured 79.87 meters in length, 11.58 m in width, and 7 m in depth with a gross tonnage of 1693 tons with a mainmast that measured a massive 45.7 m in height. Loch Ard made three trips to Australia and one trip to Calcutta before its fateful voyage. Loch Ard left England on March 2, 1878, under the command of 29-year-old Captain Gibbs, who was newly married. The ship was bound for Melbourne with a crew of 37, plus 17 passengers. The general cargo reflected the affluence of Melbourne at the time. Onboard were straw hats, umbrellas, perfumes, clay pipes, pianos, clocks, confectionery, linen, and candles, as well as a heavier load of railway irons, cement, lead, and copper. There were other items included that were intended for display in the Melbourne International Exhibition of 1880. The voyage to Port Phillip was long but uneventful. Then at 3 am on June 1, 1878, Captain Gibbs was expecting to see land. But the Loch Ard was running into a fog which greatly reduced visibility. Captain Gibbs was becoming anxious as there was no sign of land or the Cape Otway lighthouse. At 4 am the fog lifted and a lookout aloft announced that he could see breakers. The sheer cliffs of Victoria's west coast came into view, and Captain Gibbs realised that the ship was much closer to them than expected. He ordered as much sail to be set as time would permit and then attempted to steer the vessel out to sea. On coming head-on into the wind, the ship lost momentum, the sails fell limp and Loch Ard's bow swung back towards land. Gibbs then ordered the anchors to be released in an attempt to hold their position. The anchors sank some 50 fathoms - but did not hold. By this time the ship was among the breakers and the tall cliffs of Mutton Bird Island rose behind. Just half a mile from the coast, the ship's bow was suddenly pulled around by the anchor. The captain tried to tack out to sea, but the ship struck a reef at the base of Mutton Bird Island, near Port Campbell. Waves subsequently broke over the ship and the top deck became loosened from the hull. The masts and rigging came crashing down knocking passengers and crew overboard. When a lifeboat was finally launched, it crashed into the side of Loch Ard and capsized. Tom Pearce, who had launched the boat, managed to cling to its overturned hull and shelter beneath it. He drifted out to sea and then on the flood tide came into what is now known as Loch Ard Gorge. He swam to shore, bruised and dazed, and found a cave in which to shelter. Some of the crew stayed below deck to shelter from the falling rigging but drowned when the ship slipped off the reef into deeper water. Eva Carmichael a passenger had raced onto the deck to find out what was happening only to be confronted by towering cliffs looming above the stricken ship. In all the chaos, Captain Gibbs grabbed Eva and said, "If you are saved Eva, let my dear wife know that I died like a sailor". That was the last Eva Carmichael saw of the captain. She was swept off the ship by a huge wave. Eva saw Tom Pearce on a small rocky beach and yelled to attract his attention. He dived in and swam to the exhausted woman and dragged her to shore. He took her to the cave and broke the open case of brandy that had washed up on the beach. He opened a bottle to revive the unconscious woman. A few hours later Tom scaled a cliff in search of help. He followed hoof prints and came by chance upon two men from nearby Glenample Station three and a half miles away. In a complete state of exhaustion, he told the men of the tragedy. Tom then returned to the gorge while the two men rode back to the station to get help. By the time they reached Loch Ard Gorge, it was cold and dark. The two shipwreck survivors were taken to Glenample Station to recover. Eva stayed at the station for six weeks before returning to Ireland by steamship. In Melbourne, Tom Pearce received a hero's welcome. He was presented with the first gold medal of the Royal Humane Society of Victoria and a £1000 cheque from the Victorian Government. Concerts were performed to honour the young man's bravery and to raise money for those who lost families in the disaster. Of the 54 crew members and passengers on board, only two survived: the apprentice, Tom Pearce, and the young woman passenger, Eva Carmichael, who lost her family in the tragedy. Ten days after the Loch Ard tragedy, salvage rights to the wreck were sold at auction for £2,120. Cargo valued at £3,000 was salvaged and placed on the beach, but most washed back into the sea when another storm developed. The wreck of Loch Ard still lies at the base of Mutton Bird Island. Much of the cargo has now been salvaged and some items were washed up into Loch Ard Gorge. Cargo and artefact's have also been illegally salvaged over many years before protective legislation was introduced in March 1982. One of the most unlikely pieces of cargo to have survived the shipwreck was a Minton majolica peacock- one of only nine in the world. The peacock was destined for the Melbourne 1880 International Exhibition. It had been well packed, which gave it adequate protection during the violent storm. Today the Minton peacock can be seen at the Flagstaff Hill Maritime Museum in Warrnambool. From Australia's most dramatic shipwreck it has now become Australia's most valuable shipwreck artefact and is one of very few 'objects' on the Victorian State Heritage Register.This ink bottle is historically significant as it represents methods of hand written communication that were still common up until the mid-20th century, when fountain pens and ballpoint pens took over in popularity and convenience. The shipwreck of the Loch Ard is of significance for Victoria and is registered on the Victorian Heritage Register ( S 417). Flagstaff Hill has a varied collection of artefact's from Loch Ard and its collection is significant for being one of the largest accumulation of artefact's from this notable Victorian shipwreck of which the subject items are a small part. The collection's objects give us a snapshot of how we can interpret the story of this tragic event. The collection is also archaeologically significant as it represents aspects of Victoria's shipping history that allows us to interpret Victoria's social and historical themes of the time. Through is associated with the worst and best-known shipwreck in Victoria's history.Stoneware penny ink bottle; ironstone salt-glazed stoneware, cylindrical shape with small mouth and squat neck, broad shoulders, brown colour. Bottle still has cork in neck. Dark encrustations on body and base.Sticker "L/62"flagstaff hill, warrnambool, flagstaff hill maritime museum, shipwreck coast, flagstaff hill maritime village, great ocean road, loch line, loch ard, penny ink well, writing equipment, domestic, stoneware, clay, ceramic, pottery, ink well, inkwell, ink bottle, dip pen, ink, hand writing, business, vintage, dwarf ink -
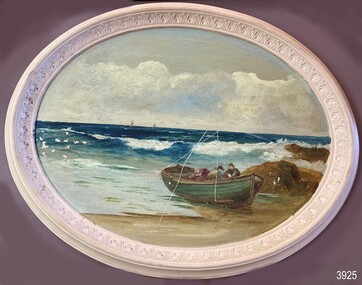 Flagstaff Hill Maritime Museum and Village
Painting - Maritime, 19th century
This handmade picture has been painted on a cast plaster or composition frame. Plaster frames were popular in the e19th century. The material is quite fragile and many pictures from this era suffer from damage such as chips and cracks.This simple handmade painting on cast composite frame is typical of 19th century art work found in middle and upper class Victorian homes of that era. It cannot be attributed to a particular artist due to lack of inscriptons.Painting, oil on composite material, handmade Pink coloured cast composite oval frame with decorative border. Painting depicts two figures in a small green boat on the shore, sandy beach, rocks nearby, small surf waves, mild sea, two sailing vessels in background. No inscription on front of painting. flagstaff hill, warrnambool, maritime village, maritime museum, flagstaff hill maritime museum & village, shipwreck coast, great ocean road, victorian art work, maritime scen, composite material, plaster, cast frame, oval frame, victorian era -
 Flagstaff Hill Maritime Museum and Village
Tool - Sheathing hammer, Mid-to-late 20th century
A sheathing hammer is used for attaching the copper or Muntz sheathing to the outside of a vessel. The outside cover of the hull of a ship or boat is called sheathing. In previous centuries the sheathing was timber but on long voyages, the sea worms could eat through the timber and their holes would weaken the sheathing, sometimes causing the vessel to break up in the rough sea or if the ship was beached. Copper or Muntz sheathing was later used. It was effective but very expensive. In modern times the hulls of ships are iron. The shipwright’s tools on display in the Great Circle Gallery are connected to the maritime history of Victoria through their past owner, user and donor, Laurie Dilks. Laurie began his career as a shipwright in the mid-1900s, following in the wake of the skilled carpenters who have over many centuries used their craft to build and maintain marine vessels and their fittings. You can see Laurie’s inscription on the tool called a ‘bevel’. Laurie worked for Ports and Harbours, Melbourne, for over 50 years, beginning in the early 1960s. He and a fellow shipwright inscribed their names on a wheelhouse they built in 1965; the inscription was discovered many decades later during a repair of the plumbing. Many decades later Laurie worked on the Yarra moving barges up and down the river and was fondly given the title ‘Riverboat Man’ His interest in maritime history led him to volunteer with the Maritime Trust of Australia’s project to restore and preserve the historic WWII 1942 Corvette, the minesweeper HMAS Castlemaine, which is a sister ship to the HMAS Warrnambool J202. Laurie Dilks donated two handmade displays of some of his tools in the late 1970s to early-1980s. The varnished timber boards displayed the tools below together with brass plaques. During the upgrade of the Great Circle Gallery Laurie’s tools were transferred to the new display you see there today. He also donated tools to Queenscliffe Maritime Museum and Clunes Museum.The shipwright’s tools on display in the Great Circle Gallery are connected to the maritime history of Victoria through their past owner, user and donor, Laurie Dilks. Laurie began his career as a shipwright at Ports and Harbours in Melbourne in the mid-1900s, following in the wake of the skilled carpenters who have over many centuries used their craft to build and maintain marine vessels and their fittings.The sheathing hammer has a wooden handle and metal head. One side of the head has a long claw for removing nails with minimum damage to the surrounding surface. The other side has a wide, flat round head for hammering in the large nails used in shipbuilding. It once belonged to shipwright Laurie Dinks.flagstaff hill, warrnambool, great ocean road, shipwreck coast, maritime museum, maritime village, shipwright, carpenter, shipbuilding, ship repairs, hand tool, equipment, ship maintenance, cooper, tool, marine technology, sheathing hammer, hammer, shipwright's hammer, ship's sheathing, laurie dilks, l dilks, port and harbours melbourne -
 Flagstaff Hill Maritime Museum and Village
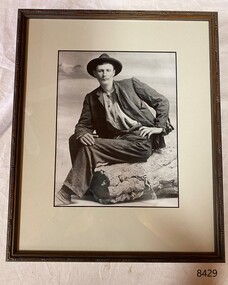
Photograph - William Ferrier, Henna Street Picture Framers, 2005
The photograph of William Ferrier was given to Avis Quarrell by Lewis Ferrier, 3rd youngest son of William during the centenary of the wreck of the La Bella. The photograph was framed by the Henna Street Picture Framers, Warrnambool in 2005. The photograph is of William Ferrier, the 25-year-old fisherman from South Warrnambool, whose rescue of two sailors from the wrecked La Bella made him an overnight national hero. The La Bella was wrecked on 10th November 1905,and the remains of the vessel now lie on her port side in 13 metres of sheltered water inside the reef she struck. The bow section is relatively intact and part of the stern has drifted north-easterly towards the mouth of the Hopkins River. The reef the La Bella struck now bears its name. Several attempts were made by the Warrnambool lifeboat crew to rescue the stricken sailors on the La Bella, but the rough conditions made this difficult for the boat to get close enough to the ship and the lifeboat had to return to shore. A another rescue attempt was made by Ferrier who rowed a small dingy through the heavy seas and managed to rescue the Captain George Mylius, whom he landed on the breakwater. Ferrier then returned to the ship to attempt a final rescue, losing his oars and rowlocks into the high sea. Using just a spare paddle he swam towards the La Bella, reaching her stern in time to cut loose the lone surviving sailor, Payne, from the ropes and debris that held him to the ship; the terrified sailor dropped from the ship and into the dingy. Shortly after the last man was rescued, the La Bella was lifted by a huge wave and crashed back down on the reef; she broke up and sank. The survivors were taken to the nearby Bay View Hotel and gratefully received warm food and clothing, medical attention and a place to sleep. William Ferrier became a national hero as news of the daring rescue spread. In recognition of his bravery in the two daring rescues, he was awarded the Silver Medal for Bravery by the Royal Humane Society and was honoured in the letter from the Prime Minister and the Parliament of the Commonwealth, telegrams and a cheque for £20 from the Governor-General, over £150 subscribed by the public, including Warrnambool and district and readers of The Argus, and a gold medal from the Glenelg Dinghy Club of South Australia. Ferrier’s rescue efforts are one of the most heroic in Victoria’s shipwreck history.This photograph is significant at both a local and state level. Its connection to the La Bella shipwreck and the rescue of survivors highlights the dangers of Victoria’s Shipwreck Coast and demonstrates the bravery of ordinary Australians like William Ferrier who risked their lives to save victims of shipwrecks along the coast. Moreover, the photograph has an association with the sailing ship ‘La Bella’, as it is one of the only two shipwrecks discovered in Lady Bay, Warrnambool, out of the 15-17 shipwrecks known to have been wrecked in the bay.Framed sepia photograph, mounted behind glass. Portrait of a man seated on a log. He is wearing a brimmed hat, dark coloured jacket and trousers, and a light coloured collarless shirt with buttons. The figure in the photograph is William Ferrier.flagstaff hill, warrnambool, maritime museum, shipwreck coast, la bella, william ferrier, rescue, hero william ferrier -
 Bendigo Historical Society Inc.
Document - MALONE COLLECTION: GREETING CARDS
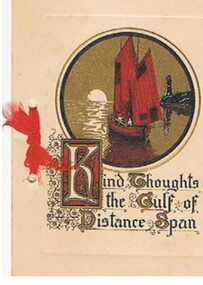
... . Inside the black circle is a scene with a red sailing boat... boat with gold sea and sky. The moon setting behind the water ...Document. Greeting Cards. Small cream card with raised border. Inside the border is a black circle inside a gold border. Inside the black circle is a scene with a red sailing boat with gold sea and sky. The moon setting behind the water. On the right is black land with a light house. 'Kind Thoughts the Gulf of Distance Span' is printed and underlined in black with black edged gold capitals. The K is cream with gold edges, filigree and border on a red background. Left and bottom of the K are black leaves and gold flowers.The underlining and capitals are decorated too. Card & insert are held together with a small red ribbon.person, greeting cards, malone collection, malone collection, greeting cards -
 Bendigo Historical Society Inc.
Postcard - GLADYS DEAN COLLECTION: POSTCARD, 1906 - 1908
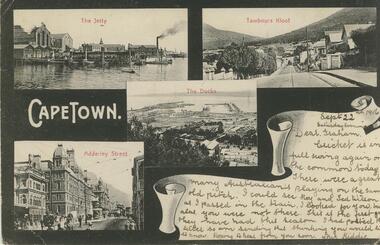
Printed black and white postcard. Images depict various views of Capetown. Clockwise from upper left is of a jetty with boats and buildings with the words The Jetty printed in red across the top. Next is a streetscape with buildings and trees with the words Tambours Kloof printed in red across the top. Next is an aerial view of a sea port with the words The Docks printed in red across the top. Finally a streetscape with buildings, horse drawn vehicles and people walking with the words Adderley Street printed in red across the top. The words Cape Town are printed in White on the left hand side. A white space depicted as a scroll is in the lower right hand corner containing handwriting. On reverse card is addressed to Mr G Balsillie Hopper St Bendigo Victoria Australia. Writing covers the left hand side.postcard -
 Monbulk RSL Sub Branch
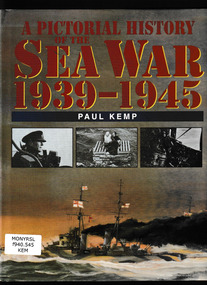
Book, Naval Institute Press, A pictorial history of the sea war, 1939-1945, 1995
More than 450 photographs present a superb visual record of World War Two - the great convoy battles fought between aircraft, U-boats and escorts; the battles with the German raiders; desperate struggles in the icy seas of the Arctic; great naval-air battles in the Pacific; the vast amphibious operations that brought the Allies to grips with the enemy on land; and much more. For the six years between 1939 and 1945, naval action was seen on every ocean of the world. This sea war was on a unique scale - it had never been seen before, has not been experienced since and surely will never be witnessed again. This pictorial history brings together images from international archives and personal collections to demonstrate the diversity and drama of these years, to portray the atmosphere experienced by the mariners in this most unforgiving battlefield of all, and to provide an unprecedented visual record of this most event filled period of naval history.Ill, p.190.non-fictionMore than 450 photographs present a superb visual record of World War Two - the great convoy battles fought between aircraft, U-boats and escorts; the battles with the German raiders; desperate struggles in the icy seas of the Arctic; great naval-air battles in the Pacific; the vast amphibious operations that brought the Allies to grips with the enemy on land; and much more. For the six years between 1939 and 1945, naval action was seen on every ocean of the world. This sea war was on a unique scale - it had never been seen before, has not been experienced since and surely will never be witnessed again. This pictorial history brings together images from international archives and personal collections to demonstrate the diversity and drama of these years, to portray the atmosphere experienced by the mariners in this most unforgiving battlefield of all, and to provide an unprecedented visual record of this most event filled period of naval history.world war 1939 – 1945 –naval operations, world war 1939-1945 - naval operations - pictorial works -
Moorabbin Air Museum
Document (Item) - Miscellaneous Notes 1940/45
Description: Air Ministry account of the Part played by Coastal Command in the battle of the seas. 15 articles on subjects e.g. ''It's the Bismark, ''Men and Aircraft', ''Battle for Norway'', ''Attack for U boats'', ''Rescues and Secret Missions'', ''Tord\pedoes Runni Level of Importance: . -
Moorabbin Air Museum
Document (Item) - Cloud Seeding In Australia
Description: 6 x Assorted B&W Photos wg: Early flying boats Helicopters machinery Black Hawk/ Sea Hawk Level of Importance: . -
 Benalla Art Gallery
Painting, William OWEN, Naval battle, English v. Dutch, Not dated
... Seascape Sea Ships Boats Sails Naval Recto: Not signed, not dated ...Born Ludlow, Shropshire, England 1769; Died: London, England 1825 RomanticismGift of Wooleen Pty. Ltd., 1980Six battleships on water in smoky atmosphere. Gold gesso wood moulding with decorative corners.Recto: Not signed, not dated, not titledpainting, seascape, sea, ships, boats, sails, naval -
 Benalla Art Gallery
Print, Conrad MARTENS, View of Sydney. NSW, 1855
... Waterscape Sea Harbour Land Figures Boats Tress Sydney Harbour ...Born: London, England 1801; Arrived: Sydney, New South Wales, Australia 1835; Died: Sydney, New South Wales, Australia 1878ColonialBennett Bequest, 1999 Hand-coloured lithograph depicting industrial waterscape with rocky shoreline and ships and buildings in background. Black painted timber frame with off white arched window mount and gold brushed internal window edgeRecto: Not signed, not dated, not titled print, waterscape, sea, harbour, land, figures, boats, tress, sydney harbour, buildings -
 Jewish Museum of Australia
Tefillin bag, 1910
At the end of August 1940 the Hired Military Transport Dunera, a boat carrying around 2,500 European male internees, the majority of which were Jewish, arrived on Australian shores after two arduous months at sea. Although many had made England their home, their German or Austrian background caused these men to be classified as ‘enemy aliens’ by the British Government and sent to Australia without their families. The ‘Dunera Boys’ were interned in camps at Tatura and Hay. Although some internees were released after two years because they possessed specific industry skills which would aid the nation, others were interned for the entire duration of the war. This collection brings together objects, personal effects and documents relating to the journey, internment and subsequent military service in the 8th regiment experienced by the ‘Dunera Boys’. Also included are artworks and poems created by the internees during their interment, which express the thoughts and feelings of the men and document the daily life in the camps. Velvet, silk, silk embroidery thread, cotton thread, silk cord, leather, cotton and wood -
 Jewish Museum of Australia
diary, Diary of Rainer Radok, 6/1940 - 5/05/1942
Diary kept during Prof. Rainer Radok's internment in Australia, following his arrival by ship on the HMT Dunera.At the end of August 1940 the Hired Military Transport Dunera, a boat carrying around 2,500 European male internees, the majority of which were Jewish, arrived on Australian shores after two arduous months at sea. Although many had made England their home, their German or Austrian background caused these men to be classified as ‘enemy aliens’ by the British Government and sent to Australia without their families. The ‘Dunera Boys’ were interned in camps at Tatura and Hay. Although some internees were released after two years because they possessed specific industry skills which would aid the nation, others were interned for the entire duration of the war. This collection brings together objects, personal effects and documents relating to the journey, internment and subsequent military service in the 8th regiment experienced by the ‘Dunera Boys’. Also included are artworks and poems created by the internees during their interment, which express the thoughts and feelings of the men and document the daily life in the camps.This is an A5 size notebook of 90 pages, all handwritten in German. Pages are numbered on the upper corners and each entry is dated. Back cover is titled: "Arithmetical Tables" and "Multiplication Table". The blue cover is attached with yellow adhesive tape and is very loose from the inner pages. There are a few drawings throughout.Handwritten in ink on the front cover is the inscription "Radok 1940-1941." Written below in pencil is the address "16 Grove St. Passaie N.J." -
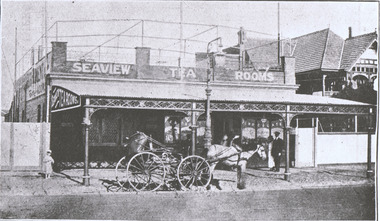 St Kilda Historical Society
Photograph, Sea View Tea and Refreshment Room, Marine Parade, St Kilda c1915, c. 1915
Sea View Tea and Refreshment Rooms, Marine Parade (below Brook's Boat Sheds). Mrs Blyth (late of Bendigo) Proprietress. I.X.L. Ice Cream. Roof promenade for Afternoon Tea and Summer Drinks. black and white photograph fair condition unmountedSea View Tea and Refreshment Rooms, Marine Parade (below Brook's Boat Sheds). Mrs Blyth (late of Bendigo) Proprietress. Tel. 1478 w. I.X.L. Ice Cream. Roof promenade for Afternoon Tea and Summer Drinks. K42 Sea View. p.64 St Kilda by the Sea Annual 1915-16 Season F600.65. NationalLibraryof Australia, Canberra. -
 Uniting Church Archives - Synod of Victoria
Banner - Banners
The letters of the completed banner were made by different churches within in the presbytery of Gippsland and spell a sentence, presumably, "BUILD YOUR CHURCH LORD!" Orbost was one of the churches that had the finished banner on display. 24 small banners with tabs at the top of each for hanging on a rod. 19 have large blue letters appliqued on them. Twenty two of the banners are roughly square and two are smaller and oblong. Three have no letters and are used as spacers in the four word sentence that the letters make. The banners are decorated with rural and coastal images. BN068.1 "B" with an embroidered boat with the number 1 on the sail. BN068.2 "U" fabric paint words: "LOCH POOWONG east poowong nyora strezlecki kernang athlone" BN068.3 "I" "Korumburra" BN068.4 "L" with a pelican, fishing boat with a net, shells and sand BN068.5 "D" with the UCA emblem and "BUNYIP Garfield Longwarry" BN068.6 "Y" BN068.7 "O" with fabric paint flag, ram, road and trees and a cow BN068.8 "U" BN068.9 "R" with green and yellow wattle in fabric paint BN068.10 "C" with ric-rac round the letter and three churches appliqued in the top left corner BN068.11 "H" edged with pale blue metallic fabric paint BN068.12 "U" with sunrise over the sea with gold chain sunbeams and sequins BN068.13 "R" with fine blue embroidery at each corner and only two tabs BN068.14 "C" with appliqued boat, sky and sun BN068.15 "H" with a black swan with a red beak BN068.16 "L" with appliqued and fabric painted scene of a beach, hills and city smoke on the horizon BN068.17 "O" with painted corn cobs in each corner BN068.18 "R" with cows, hills, sheep and a sack BN068.19 "D" with machine embroidered church "St Matthews Yinnar", hands "Friendship", building "UCA Yinnar", chuch "Holy Innocents YINNAR STH" "(Californian RED WOOD)", tree "BIG TREE grows at Christ Church Boolarra" BN068.20 "!" with fabric brown cow in grass BN068.21 spacer with appliqued house, bushes and barn BN068.22 spacer with appliqued sun with ribbon rays and black white and brown figures BN068.23 & BN068.24 spacer with a small UCA red dove in the centre "B U I L D Y O U R C H U R C H L O R D !"uniting church adult fellowship -
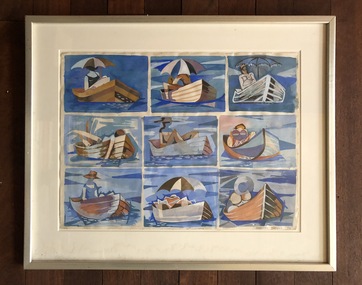 Robin Boyd Foundation
Work on paper, Dorothy Braund, Sheet of Nine Studies - Figures in Boats, 1974
... Nine frames of boats on the sea in blues and brown tones. ... right. Nine frames of boats on the sea in blues and brown tones ...This artwork was purchased by Patricia Davies (previously Boyd). Nine frames of boats on the sea in blues and brown tones. Signed and dated DOROTHY BRAUND '74 in lower right.dorothy braund, patricia boyd, robin boyd, walsh st artwork, ohm2022, ohm2022_36 -
 Robin Boyd Foundation
Document - Script, Robin Boyd, The Flying Dogtor. Episode 49 The Serpent Net, 1963
The Flying Dogtor, helping solve the mystery of a monster or sea serpent that was wandering the lakes and tunnels of the Snowy Mountains Scheme, noticed strange things happening: a speedboat driven by a snakey-looking person and a lookout tower operated by spiders, it seemed... Later, a plan to trap the serpent in an underground tunnel was arranged by The Flying Dogtor. He asked for several things: a team of fisherman; a large fishing net; two fast fishing boats; and an enormous canvas bag.The Flying Dogtor" series was broadcast on Australian Television Network (later becoming the Seven Network) between February and April 1964 (see item D254 for schedule).Typewritten, carbon copy, foolscap, 2 pagesHandwritten pencil edits and additions.the flying dogtor, robin boyd, crawford productions, manuscript -
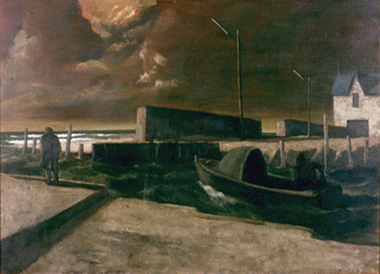 Nillumbik Shire Council
Painting: Rick AMOR (b.1948, Melb. AUS), Rick Amor, Out to Sea, 1993
Rick Amor was a good friend of three times Archibald Prize winner Clifton Pugh, living and working at Pugh's artist colony Dunmoochin, (Cottles Bridge) during the 1980-1990s. Amor made frequent outdoor painting trips with Pugh. His studies of Williamstown and areas around the port fuelled a period of sustained painting in his studio at Dunmoochin. Amor is an artist of national significance who had lived locally in Dunmoochin (Cottles Bridge) during the time of this work's making. This painting was exhibited/entered into the 1993 Shire of Eltham Art Awards. The work is representative of Amor's style and interest in seascapes as subject matter. Oil on linen, seascape painting. A solitary and motionless male figure in an overcoat stands at the edge of a dock/jetty with his hands in his pockets looking out to sea with his back towards the viewer. A motorised boat is moored close by and a white house with a blue roof can be seen in the distance. The figure is engulfed by the landscape and a resounding sense of desolation. A storm is brewing; the mood forecast by dark, heavy and thick ominous clouds, alternately darkening with the approach of night, a polluted haze and rough seas. In red paint, lower right, signed 'RICK AMOR '93'amor, seascape, painting, personal, boat, dramatic, atmospheric, ekphrasis 2015, dunmoochin