Showing 803 items matching "2 4th"
-
 Bendigo Military Museum
Photograph - 4th Field Survey Squadron Adventurous Training, Unknown Location, SA, 1994
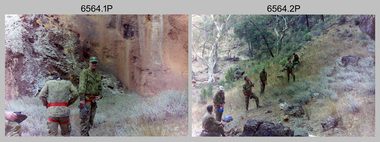
This is a set of 33 photographs of 4th Field Survey Squadron undergoing adventurous training held at unknown locations in South Australia, in 1994. It is also possible the training was in the Grampians region of Victoria. Off-road driver training and abseiling were key activities of this adventurous training as well as teamwork, leadership, and field craft. Elements from units of the Army Reserve may have participated in the training. See items 6561.31P, 6562.33P and 6564.28P for more photos taken during this training activity.This is a set of 33 photographs of 4th Field Survey Squadron personnel undergoing adventurous training held at unknown locations in South Australia in 1994. The colour photographs are on 35mm negative film and are part of the Army Survey Regiment’s Collection. The photographs were scanned at 96 dpi. .1) - Photo, colour, 1994. Preparation. LCPL Mitch Oake. .2) - Photo, colour, 1994. Preparation. SPR Chris Pearse. .3) & .4) - Photo, colour, 1994. Preparation. Unidentified soldier. .5) - Photo, colour, 1994. Preparation. SSGT Pat ‘Fuji’ Drover. .6) - Photo, colour, 1994. Preparation. L to R: SGT Steve McGuiness, CPL Steve Wegener, CPL Dick Crawford, CPL Peter Ball, SPR Greg Richards. .7) - Photo, colour, 1994. Preparation. L to R: CPL Peter Ball, SPR Greg Richards. .8) to .10) - Photo, colour, 1994. Preparation. SSGT Lynn Johnson. .11) - Photo, colour, 1994. Social activities. L to R: Unidentified (x8), SPR Chris Pearse, SSGT Lynn Johnson. .12) - Photo, colour, 1994. Social activities. SGT Dave Longbottom. .13) to .15) - Photo, colour, 1994. Social activities. Unidentified personnel. .16) - Photo, colour, 1994. Social activities. L to R: SGT Dave Cook, WO2 Simon ‘Andy’ Capp, CAPT Rob Gray, SPR Chris Pearse, SPR Mark McInerney. .17) to .19) - Photo, colour, 1994. Training area terrain. .20) to .23) - Photo, colour, 1994. Driver training. .24) - Photo, colour, 1994. Training area terrain. .25) - Photo, colour, 1994. Abseiling. SSGT Pat ‘Fuji’ Drover. .26) - Photo, colour, 1994. Abseiling. SGT Mark Donnelly. .27) to .33)- Photo, colour, 1994. Abseiling. Unidentified soldier. .1P to .33P – There are no personnel identified. ‘1994 ADV TRAINING’ annotated on negatives sleeve.royal australian survey corps, rasvy, 4 fd svy sqn -
 Bendigo Military Museum
Photograph - 4th Field Survey Squadron Adventurous Training, Unknown Location, SA, 1994
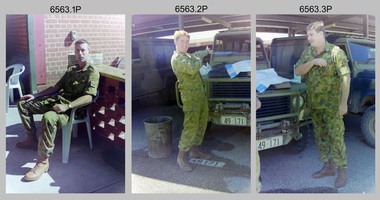
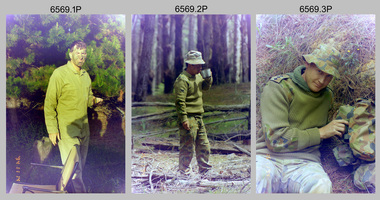
This is a set of 28 photographs of 4th Field Survey Squadron undergoing adventurous training held at unknown locations in South Australia, in 1994. It is also possible the training was in the Grampians region of Victoria. Off-road driver training and abseiling were key activities of this adventurous training as well as teamwork, leadership, and field craft. Elements from units of the Army Reserve may have participated in the training. See items 6561.31P, 6562.33P and 6563.33P for more photos taken during this training activity.This is a set of 28 photographs of 4th Field Survey Squadron personnel undergoing adventurous training held at unknown locations in South Australia in 1994. The colour photographs are on 35mm negative film and are part of the Army Survey Regiment’s Collection. The photographs were scanned at 96 dpi. .1) - Photo, colour, 1994. Abseiling. Unidentified personnel. .2) - Photo, colour, 1994. Abseiling. L to R: Unidentified (x2), WO2 Ken Talbot-Smith, unidentified, SGT Mark Donnelly, unidentified. .3) to .10) - Photo, colour, 1994. Training area terrain. .11) to .12) - Photo, colour, 1994. Abseiling. Unidentified personnel. .13) to .14) - Photo, colour, 1994. Training area terrain. .15) - Photo, colour, 1994. Training area terrain. L to R: SSGT Brian ‘BC’ Collings, unidentified (x6). .16) - Photo, colour, 1994. Training area terrain. .17) - Photo, colour, 1994. Training area terrain. Unidentified personnel. .18) - Photo, colour, 1994. Training area terrain. L to R: SSGT Brian ‘BC’ Collings, SGT Steve McGuiness. .19) - Photo, colour, 1994. Training area terrain. .20) to .27) - Photo, colour, 1994. Abseiling. Unidentified soldiers. .28) - Photo, colour, 1994. Returning to 4 Fd Svy Sqn. L to R: SPR Fran Calvert, unidentified, SPR Gordon Santo, SPR Matt Arnold, SGT Dave Cook..1P to .28P – There are no personnel identified. ‘1994 ADV TRAINING’ annotated on negatives sleeve.royal australian survey corps, rasvy, 4 fd svy sqn -
 Bendigo Military Museum
Photograph - 4th Field Survey Squadron ANZAC Day Parade. Adelaide, SA, 1994
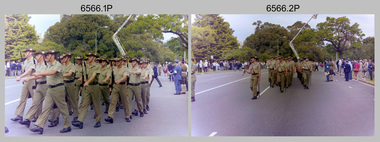
This is a set of 32 photographs of 4th Field Survey Squadron personnel parading through the streets of the Adelaide CBD on ANZAC Day, on the 25th of April 1994. The march concluded at the Cross of Sacrifice in Pennington Gardens East followed by the ANZAC Day Service of Remembrance. See items 6566.14P and 6567.11P for more photos taken during ANZAC Day, 1994.This is a set of 32 photographs of 4th Field Survey Squadron personnel parading through the streets of the Adelaide CBD on ANZAC Day, on the 25th of April 1994. The colour photographs are on 35mm negative film and are part of the Army Survey Regiment’s Collection. The photographs were scanned at 96 dpi. .1) - Photo, colour, 1994. Preparation. Bayonets fixed on SLR rifles. .2) - Photo, colour, 1994. Eyes right as unit passes dignitaries on the dais. .3) - Photo, colour, 1994. Eyes right as unit passes dignitaries on the dais. CAPT Rob Gray, centre of photo, OC MAJ Peter Demaine on right. .4) to .7) - Photo, colour, 1994. Eyes right as unit passes dignitaries on the dais. .8) - Photo, colour, 1994. Unit marches along the parade route. .9) to .13) - Photo, colour, 1994. Eyes right as unit passes dignitaries. .14) - Photo, colour, 1994. Unit marches along the parade route. Right file L to R: WO2 Peter Hammer, unidentified, SGT Dave Longbottom, SGT Paul Baker, unidentified. .15) - Photo, colour, 1994. Unit marches along the parade route. Right file L to R: SGT Paul Baker, unidentified (x2), SPR Fran Calvert, SPR Greg Richards, SGT H. Evertz. Centre file: SGT Mark Donnelly, SPR Mark McInerney, unidentified (x2), SPR Matt Arnold. .16) - Photo, colour, 1994. Unit marking time. Right file L to R: SGT Paul Baker, unidentified (x2), SPR Fran Calvert, SPR Greg Richards, SGT H. Evertz, CPL Brett Parkin. Centre file L to R: SPR Matt Arnold, SPR Mark Linwood. Right file L to R: unidentified, SPR Mark Sinderberry. Officers L to R: unidentified (x2), CAPT Rob Gray, CAPT Tony Stephens. .17) - Photo, colour, 1994. Unit marking time. L to R: SGT Paul Baker, unidentified, SSGT John ‘Shep’ Shephard, SGT Dave Longbottom, SPR Daryl Miller, CPL Steve Wegener, unidentified (x2), CPL Jeremy Archer, WO2 Peter Hammer, unidentified Warrant Officers (x2). .18) - Photo, colour, 1994. Unit marking time. L to R: SPR Mark Linwood, SPR Greg Richards, SPR Matt Arnold, SPR Mark Sinderberry, unidentified (x5), SPR Chris Pearse, unidentified, CPL Dick Crawford, unidentified, SSGT John ‘Shep’ Shephard, CPL Steve Wegener, unidentified, CPL Jeremy Archer, unidentified Warrant Officer. .19) - Photo, colour, 1994. Unit marking time. Officers L to R: unidentified (x2), CAPT Tony Stephens. L to R: SPR Mark Linwood, SPR Greg Richards, SPR Matt Arnold, SPR Mark Sinderberry, remainder unidentified. .20) - Photo, colour, 1994. Unit marched along the parade route. L to R: CAPT Rob Gray, unidentified officer. .21) - Photo, colour, 1994. Unit marches along the parade route. OC MAJ Peter Demaine. .22) - Photo, colour, 1994. Unit marches along the parade route. L to R: CAPT Tony Stephens, SPR Mark Linwood, SPR Matt Arnold, SPR Mark Sinderberry, unidentified (x3), SPR Chris Pearse, unidentified, CPL Dick Crawford, unidentified, SGT Dave Longbottom, SSGT John ‘Shep’ Shephard, CPL Steve Wegener, CPL Jeremy Archer, unidentified Warrant Officers (x2). .23) - Photo, colour, 1994. Unit marches along the parade route. L to R: SSGT John ‘Shep’ Shephard, SPR Daryl Miller, CPL Steve Wegener, unidentified, CPL Jeremy Archer, unidentified Warrant Officers (x2). .24) - Photo, colour, 1994. Unit marches along the parade route. L to R: unidentified, CPL Dick Crawford, SGT Dave Longbottom, SSGT John ‘Shep’ Shephard, unidentified, CPL Steve Wegener, WO2 Peter Hammer, CPL Jeremy Archer, unidentified Warrant Officers (x2). .25) - Photo, colour, 1994. Unit marches along the parade route. L to R: unidentified (x3), SPR Fran Calvert, unidentified (x2), SPR Chris Pearse, unidentified, CPL Dick Crawford, SPR Daryl Miller, SSGT John ‘Shep’ Shephard. .26) - Photo, colour, 1994. Unit marches along the parade route. L to R: CAPT Tony Stephens, CPL Brett Parkin, SPR Mark Linwood, SGT H. Evertz, SPR Mark Sinderberry, unidentified (x2). .27) - Photo, colour, 1994. Unit marches along the parade route. L to R: CPL Brett Parkin, CAPT Tony Stephens, SPR Mark Linwood, SPR Greg Richards, SPR Matt Arnold, unidentified, SPR Mark Sinderberry, unidentified (x3), SPR Chris Pearse, unidentified, CPL Dick Crawford, unidentified, SGT SSGT John ‘Shep’ Shephard, CPL Steve Wegener, CPL Jeremy Archer, unidentified Warrant Officer. .28) - Photo, colour, 1994. Unit marches along the parade route. L to R: Officers - OC MAJ Peter Demaine, unidentified (x2), CAPT Rob Gray, CAPT Tony Stephens. L to R: CPL Brett Parkin, SGT H. Evertz, SPR Mark Linwood, SSGT Pat ‘Fuji’ Drover, SPR Mark Sinderberry, unidentified. .29) - Photo, colour, 1994. Unit preparing to halt. .30) to .32) - Photo, colour, 1994. Unit ‘stand easy’..1P to .32P – There are no personnel identified. ‘1994 ANZAC DAY’ annotated on negatives sleeve.royal australian survey corps, rasvy, 4 fd svy sqn -
 Bendigo Military Museum
Photograph - 4th Field Survey Squadron ANZAC Day Parade. Adelaide, SA, 1994
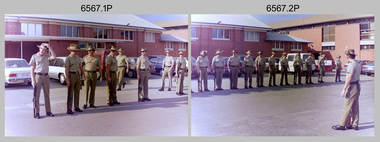
This is a set of 14 photographs of 4th Field Survey Squadron personnel parading through the streets of the Adelaide CBD on ANZAC Day, on the 25th of April 1994. The march concluded at the Cross of Sacrifice in Pennington Gardens East followed by the ANZAC Day Service of Remembrance. See items 6565.32P and 6567.11P for more photos taken during ANZAC Day, 1994.This is a set of 14 photographs of 4th Field Survey Squadron personnel parading through the streets of the Adelaide CBD on ANZAC Day, on the 25th of April 1994. The colour photographs are on 35mm negative film and are part of the Army Survey Regiment’s Collection. The photographs were scanned at 96 dpi. .1) - Photo, colour, 1994. Unit right wheeling on the parade route. L to R: CPL Brett Parkin, SPR Mark Linwood, SPR Mark Sinderberry, SPR Greg Richards, SPR Matt Arnold, unidentified, SSGT Pat ‘Fuji’ Drover, unidentified (x4), SPR Chris Pearse. .2) - Photo, colour, 1994. Unit right wheeling on the parade route. Officers L to R: OC MAJ Peter Demaine, unidentified, CAPT Rob Gray, unidentified, CAPT Tony Stephens. Markers L to R: CPL Brett Parkin, SPR Mark Linwood. .3) - Photo, colour, 1994. Unit marches along the parade route. L to R: unidentified (x2), SPR Chris Pearse, SPR Mark McInerney, unidentified (x2), SGT Paul Baker, CPL Dick Crawford, unidentified, SSGT John ‘Shep’ Shephard, unidentified, CPL Steve Wegener, unidentified Warrant Officer, CPL Jeremy Archer, unidentified Warrant Officer. .4) - Photo, colour, 1994. Eyes right as unit passes dignitaries on the dais. L to R: unidentified officers (x2), CAPT Tony Stephens. Markers L to R: CPL Brett Parkin, SPR Mark Sinderberry, remainder unidentified. .5) - Photo, colour, 1994. Eyes right as unit passes dignitaries on the dais. L to R: OC MAJ Peter Demaine, CAPT Rob Gray, unidentified officers (x2), unidentified, Marker: SPR Mark Linwood. .6) - Photo, colour, 1994. Unit marches along the parade route. .7) - Photo, colour, 1994. Unit marches along the parade route. L to R: SPR Daryl Miller, CPL Steve Wegener, unidentified, WO2 Peter Hammer (background), CPL Jeremy Archer, unidentified Warrant Officers (x2). .8) - Photo, colour, 1994. Unit marches along the parade route. L to R: unidentified (x2), SPR Chris Pearse, SPR Mark McInerney, unidentified (x2), SGT Paul Baker, CPL Dick Crawford, SSGT John ‘Shep’ Shephard. .9) - Photo, colour, 1994. Unit marches along the parade route. Officers L to R: CAPT Rob Gray, unidentified (x2), CAPT Tony Stephens. .10) - Photo, colour, 1994. Unit marches along the parade route. Officers L to R: OC MAJ Peter Demaine, CAPT Rob Gray, unidentified (x2), unidentified soldier, Marker: SPR Mark Linwood. .11) & .12) - Photo, colour, 1994. Unit marches along the parade route. .13) & .14) - Photo, colour, 1994. Other units march along the parade route..1P to .14P – There are no personnel identified. ‘1994 ANZAC DAY’ annotated on negatives sleeve.royal australian survey corps, rasvy, 4 fd svy sqn -
 Bendigo Military Museum
Photograph - 4th Field Survey Squadron ANZAC Day Parade. Adelaide, SA, 1994
This is a set of 11 photographs of 4th Field Survey Squadron personnel at Keswick Barracks preparing for the ANZAC Day parade through the streets of the Adelaide CBD on the 25th of April 1994. The march concluded at the Cross of Sacrifice in Pennington Gardens East followed by the ANZAC Day Service of Remembrance. Photos were also taken at Keswick Barracks at the end of the parade. See items 6565.32P and 6566.14P for more photos taken during ANZAC Day, 1994.This is a set of 11 photographs of 4th Field Survey Squadron personnel on ANZAC Day, on the 25th of April 1994. The colour photographs are on 35mm negative film and are part of the Army Survey Regiment’s Collection. The photographs were scanned at 96 dpi. .1) - Photo, colour, 1994. Unit sizing drill. L to R: CPL Brett Parkin, CPL Jeremy Archer, SGT Dave Longbottom, SPR Mark Sinderberry, SGT H. Evertz, SPR Matt Arnold, unidentified. .2) - Photo, colour, 1994. Unit sizing drill. L to R: unidentified (x5), SPR Chris Pearse, unidentified (x4), SPR Fran Calvert, SSGT Pat ‘Fuji’ Drover. .3) - Photo, colour, 1994. Unit sizing drill. L to R: CPL Brett Parkin, SPR Mark Sinderberry, unidentified, SPR Mark Linwood, remainder unidentified. WO2 Peter Hammer (far right). .4) - Photo, colour, 1994. Unit sizing drill. L to R: CPL Brett Parkin, SPR Mark Sinderberry, unidentified, SPR Mark Linwood, CPL Jeremy Archer, remainder unidentified. .5) - Photo, colour, 1994. Unit sizing drill. L to R: CPL Brett Parkin, unidentified (x2), SPR Mark Sinderberry, SPR Mark Linwood, remainder unidentified. .6) - Photo, colour, 1994. Unit sizing drill. L to R: unidentified (x4), SPR Mark Linwood, unidentified (x5), SPR Mark Sinderberry, remainder unidentified. .7) - Photo, colour, 1994. Unit uniform inspection. .8) - Photo, colour, 1994. Unit uniform inspection. L to R: unidentified, SPR Mark Linwood, SGT H. Evertz, SPR Mark Sinderberry, remainder unidentified. .9) - Photo, colour, 1994. Unit gathering post-parade. L to R: CPL Brett Parkin (partially obscured), SPR Greg Richards, SPR Mark McInerney. .10) - Photo, colour, 1994. Unit gathering post-parade. L to R: unidentified, Darby Munro (facing away), unidentified, John Harrison, SSGT John ‘Shep’ Shephard, unidentified (x2), SPR Fran Calvert, CPL Steve Wegener, remainder unidentified. .11) - Photo, colour, 1994. Unit gathering post-parade. L to R: Darby Munro, unidentified (x2), John Harrison, unidentified (x3), SPR Fran Calvert, unidentified (x2), SSGT John ‘Shep’ Shephard..1P to .11P – There are no personnel identified. ‘1994 ANZAC DAY’ annotated on negatives sleeve.royal australian survey corps, rasvy, 4 fd svy sqn -
 Bendigo Military Museum
Photograph - 4th Field Survey Squadron Regimental Training - Exercise ‘Fuggy Hollow’ in SA, 1994
This is a set of 30 photographs of 4th Field Survey Squadron personnel undergoing regimental training in 1994, at Second Valley Conservation Park in South Australia. The aim of Exercise ‘Fuggy Hollow’ was typically to provide personnel a practical knowledge of infantry and minor tactics (IMT) at the section level, navigation and map reading, RATEL and survival in the Field.This is a set of 30 photographs of 4th Field Survey Squadron personnel undergoing regimental training in 1994, at Second Valley Conservation Park in South Australia. The colour photographs are on 35mm negative film and are part of the Army Survey Regiment’s Collection. The photographs were scanned at 96 dpi. .1) - Photo, colour, 1994. Unidentified soldier. .2) - Photo, colour, 1994. CPL Phuc ‘Charlie’ Tran. .3 to .5) - Photo, colour, 1994. CAPT Chris Topovsek. .6) & .7) - Photo, colour, 1994. Unidentified soldiers. .8) - Photo, colour, 1994. L to R: SPR Fran Calvert, unidentified (x2), SPR Mark Linford, unidentified. .9) to .17) - Photo, colour, 1994. Unidentified soldiers. .18) & .19) - Photo, colour, 1994. L to R: LT Andrew Caudle, SSGT Brian Collings, OC Maj Peter Demaine. .20) - Photo, colour, 1994. WO2 Peter Hammer. .21) - Photo, colour, 1994. L to R: CAPT Chris Topovsek, SSGT Brian Collings, WO2 Peter Hammer .22) - Photo, colour, 1994. SSGT Brian Collings. .23) - Photo, colour, 1994. L to R: unidentified, SPR Fran Calvert. .24) - Photo, colour, 1994. L to R: SPR Mark Sinderberry, SGT Steve McGuiness, unidentified. .25) - Photo, colour, 1994. SPR Mark Linford. .26) - Photo, colour, 1994. L to R: unidentified (x2), SPR Fran Calvert, unidentified. .27 & .28) - Photo, colour, 1994. L to R: SSGT Brian Collings, WO2 Peter Hammer. .29) - Photo, colour, 1994. WO2 Simon ‘Andy’ Capp. .30) - Photo, colour, 1994. SGT H. Evertz..1P to .30P – There are no personnel identified. ‘1994 EX FUGGY HOLLOW (IMTs) Second Valley Conservation Park’ annotated on negatives sleeve.royal australian survey corps, rasvy, 4 fd svy sqn -
 Wangaratta RSL Sub Branch
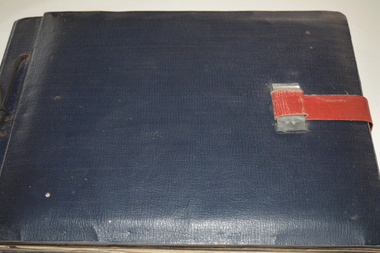
Album - Photo Album
Photograph album belonging to Eric Gibson Hamilton Born 20/12/1919 at Tallangatta in Victoria - VX42389 2/32nd Inf Bat AIF. It contains over 300 black and white images/photographs taken during WW2 in the Middle East at Tobruk, Libian Desert,Syria, Aleppo, Damascus,Beirut, Egypt, Palestine,Tel Aviv, Jerusalem and Gaza. Images include battles, cemeteries, ruins, cities and local way of life. Inside rear cover is a photograph of large group of nurses from the 4th A.G.H. Below each image is a hand written text in white ink. There are two images of "Jock Sparks"This photo album was created by Serviceman Eric Hamilton. The photos document Eric’s personal war experiences taken at various locations in the middle east during the second world war.Dark Blue leather bound album with red leather strap and silver plastic claspInside front cover - Eric Gibson Hamilton VX42389 2/32nd Inf. Bat. A.I.Fphotographs, ww2, middle east, eric hamilton, 2/32nd infantry battalion -
 National Vietnam Veterans Museum (NVVM)
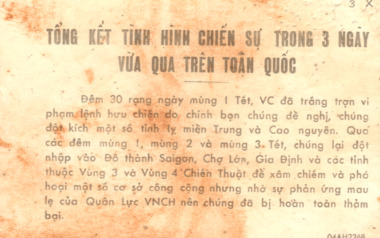
Pamphlet, A Summary of the War Situation in the country over the past days
From the 30th to the 1st day of Tet (Lunar New Year), the VC have shamelessly violated the truce that they themselves proposed. The have attacked a number of town in Central Vietnam and in the Highlands. On the nights of the 1st, 2nd, and 3rd of Tet, they have taken advantage to infiltrate into the capital, Saigon - and into Gia Dinh and Cho Lon. They have also attacked in the provinces of the 3rd and the 4th Tactical Zones to destroy infrastructure and public utilities. However, thanks to the rapid reaction of the Republic of Vietnam Armed Forces, they have been completely and humiliatingly defeated. (1968) On the reverse side reads: Herewith are the casualty rates of us and the enemy: Period: 30-01-68 - Our causalities 282 killed and wounded. Enemy 2,338 killed on the spot, 182 captured. Period 1-02-68 - Our soldiers: 203 killed and wounded. Enemy 2,617 killed, 198 captured. Period 2-02-68 to 12 midday: Our soldiers 211 killed and wounded. enemy 2,112 killed, 119 captured. Summary: Our casualties: 706, Enemy casualties 7,561. Enemy weapons captured: 144 crew-served weapon; 2,253 individual weapons.TONG KET TINH HINH CHIEN SU TRON 3 NGAY - VUA QUA TREN TOAN QUOC - A Summary of the war situation in the country over the past days: On one side there is information in Vietnamese and on the reverse side the information is in a table format.pamphlet, psycological warfare, propaganda, nva/vc, viet cong, 7th battalion, 1st battalion, the royal australian regiment, terry michael collie, 2790361, lunar new year, central vietnam, saigon, gia dinh, cho lon -
 Bendigo Military Museum
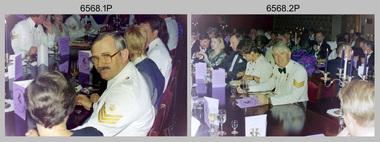
Photograph - 4th Field Survey Squadron Corps Day Formal Dinner, Keswick Barracks, Adelaide SA, 1994
This is a set of photographs of a 4th Field Survey Squadron Officers, Warrant Officers and Sergeants Corps Day Formal Dinner held at Keswick Barracks, Adelaide SA in July 1994. It is apparent there were visiting personnel from the Army Survey Regiment and other unidentified units. This is a set of 26 photographs of a 4th Field Survey Squadron Officer, Warrant Officer and Sergeant’s Formal Dinner held at Keswick Barracks, Adelaide SA in July 1994. The colour photographs are on 35mm negative film and are part of the Army Survey Regiment’s Collection. The photographs were scanned at 96 dpi. .1) - Photo, colour, 1994. Facing camera – SSGT Brian Collings. .2) - Photo, colour, 1994. L to R: facing camera – John Jones, Sharon Jones, Peter ‘Jack’ Elverd, Julie Elverd, SGT Martin Evans, remainder unidentified. .3) - Photo, colour, 1994. Unidentified guests. .4) - Photo, colour, 1994. L to R: facing camera – unidentified (x2), SSGT A. Simcock, SGT Peter Hardy, unidentified, MAJ Bob Williams. .5) - Photo, colour, 1994. L to R: facing camera – unidentified (x2), SSGT Pat ‘Fuji’ Drover, unidentified guests (x2), Ian Belmont, unidentified. .6) - Photo, colour, 1994. L to R: facing camera – unidentified (x4), Allan Adsett, Judyne Adsett, unidentified, LT Andrew Caudle, unidentified. .7) - Photo, colour, 1994. L to R: facing camera – unidentified (x7), Allan Adsett. SPR Chris Pearse (steward), Eddie Jacobs (in background). .8) - Photo, colour, 1994. John Zuringer (flower in lapel) remainder unidentified. .9) - Photo, colour, 1994. L to R: facing camera – unidentified, LTCOL George Ricketts (Ret), remainder unidentified. .10) - Photo, colour, 1994. Head table facing camera L to R: unidentified (x2), OC MAJ Peter Demaine, unidentified, WO2 Peter Hammer, SSGT Lynn Johnson, DSVY-A COL Simon Lemon. .11) - Photo, colour, 1994. Food preparation. L to R: LCPL Mitch Oake, unidentified. .12) - Photo, colour, 1994. Dixie bashing. L to R: CPL Brett Parkin, remainder unidentified. .13) - Photo, colour, 1994. Locker art. .14) - Photo, colour, 1994. Dixie bashing. SPR Mark McInerney. .15) - Photo, colour, 1994. L to R: facing camera – unidentified, Bob Williams, unidentified (x3), SGT Mark Donnelly (in background). .16) - Photo, colour, 1994. L to R: facing away from camera – LTCOL George Ricketts (Ret), unidentified. Facing camera - unidentified (x9), Allan Adsett, Judyne Adsett, unidentified, LT Andrew Caudle, unidentified(x2). .17) - Photo, colour, 1994. L to R: facing away from camera – LTCOL George Ricketts (Ret), unidentified. Facing camera - unidentified (x9), Allan Adsett, Judyne Adsett. .18) - Photo, colour, 1994. Head table facing camera L to R: SSGT Lynn Johnson (edge of photo), DSVY-A COL Simon Lemon, unidentified, CAPT Chris Topovsek, unidentified in foreground, WO1 Stevo Hinic. .19) - Photo, colour, 1994. Head table facing camera L to R: unidentified, OC MAJ Peter Demaine, unidentified, WO2 Peter Hammer, unidentified (x2) in foreground. .20) - Photo, colour, 1994. L to R: facing camera – unidentified (x4), WO1 Mick Sarson, unidentified (x2). .21) - Photo, colour, 1994. L to R: facing camera – unidentified, SSGT Brian Collings, unidentified, WO2 Roger Rees, unidentified (x3), CAPT Tony Stephens. .22) - Photo, colour, 1994. L to R: facing camera – unidentified, SSGT A. Simcock. .23) - Photo, colour, 1994. L to R: facing camera – unidentified, SSGT A. Simcock, SGT Peter Hardy. .24) - Photo, colour, 1994. L to R: facing camera – Lorraine Talbot-Smith (edge of photo), WO2 Ken Talbot-Smith, unidentified, WO2 Simon ‘Andy’ Capp, unidentified, Eddie Jacobs. .25) - Photo, colour, 1994. L to R: facing camera – unidentified, SGT H. Evertz, Pat Belmont, Ian Belmont. .26) - Photo, colour, 1994. L to R: facing camera – unidentified, CAPT Tony Stephens, unidentified..1P to .26P – There are no personnel identified. ‘1994 CORPS BIRTHDAY’ annotated on negatives sleeve.royal australian survey corps, rasvy, 4 fd svy sqn -
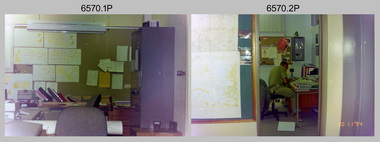 Bendigo Military Museum
Photograph - 4th Field Survey Squadron – Work Areas, Keswick Barracks, Adelaide SA, 1994
This is a set of five photographs featuring 4th Field Survey Squadron work areas at Keswick Barracks, Adelaide SA in 1994.This is a set of five photographs featuring 4th Field Survey Squadron work areas at Keswick Barracks, Adelaide South Australia, in November 1994. The colour photos are on 35mm negative film and are part of the Army Survey Regiment’s Collection. The photographs were scanned at 96 dpi. .1) - Photo, colour, 1994. Work area. .2) - Photo, colour, 1994. Unidentified Warrant Officer’s office. .3) - Photo, colour, 1994. Work area. .4) - Photo, colour, 1994. Work area. SSGT Brian Collings. .5) - Photo, colour, 1994. Office work. Unidentified soldier..1P to .5P – There are no personnel identified. royal australian survey corps, rasvy, 4 fd svy sqn -
 Bendigo Military Museum
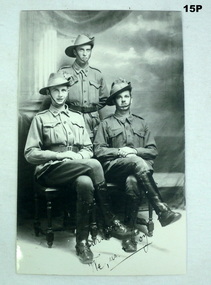
Photograph, 26.6.1916
The postcard belonged to Horace Samuel LONG 'Swag' No 437, 9th & 4th LH Regt AIF seated on the right. The original postcard stated on the rear that the other 2 were Ray Forrester from Gippsland seated and Bob Exon from down Ravenswood way. Ray is possibly Joseph Raymond Forrester No 608 2nd reinforcements 9th LHRegt who was later awarded an "MM". Bob is Rupert Exon No 408 9th LHRegt. Refer Refer Cat No 16P for Swag’s service details. Refer Cat No 486P for the collection relating to Rupert Exon No 408.Copy of black & white postcard depicting 3 soldiers in a studio portrait.Handwritten bottom: Yours truly Me, us & Coy photography, light horse, aif -
 Wangaratta RSL Sub Branch
Photograph, c1945
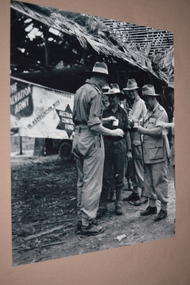
TARAKAN, BORNEO, 1945-05-08. GENERAL SIR THOMAS A. BLAMEY, COMMANDER-IN-CHIEF, ALLIED LAND FORCES, SOUTH WEST PACIFIC AREA, (4), DRINKING COFFEE WITH SENIOR OFFICERS OUTSIDE THE SALVATION ARMY RED SHIELD HUT DURING HIS INSPECTION TOUR OF THE 2/23 INFANTRY BATTALION. IDENTIFIED PERSONNEL ARE:- BRIGADIER D.A. WHITEHEAD, COMMAND 26 INFANTRY BRIGADE, (1); LIEUTENANT COLONEL F.A.G. TUCKER, (2); LIEUTENANT COLONEL DWYER, (3); LIEUTENANT GENERAL F.H. BERRYMAN, GENERAL OFFICER COMMANDING 1 CORPS (5). Brigadier David Adie Whitehead had a distinguished and decorated career in both First and Second World Wars. He joined the Citizen Military Forces when it was raised in 1947 and commanded the 2nd Armoured Brigade (4th/19th Prince of Wales’s Light Horse and 8th/13th Victorian Mounted Rifles Regiments) till 1953 The 2/24th Battalion was an infantry battalion of the Australian Army, which served during World War II .A unit of all-volunteers, it was formed in July 1940 from primarily Victorian volunteers and was known as "Wangaratta's Own" because of the time the battalion spent in the town during its formative period prior to deployment overseas. It served in North Africa in 1941–1942 as part of the 26th Brigade, which was assigned to the 7th Division, before being reassigned to the 9th Division. In early 1943, the battalion returned to Australia and later took part in campaigns against the Japanese in New Guinea in 1943–1944 and Borneo in 1945, before being disbanded in 1946. The 2/24th suffered the highest number of casualties of any 2nd AIF infantry battalion. The Unit was granted the Freedom of the City by the Rural City of Wangaratta in 1990 and one of the first, if not the first, to receive this type of honourReproduced black and white photograph of four Army Officers having a brew under roof of thatched hut and in front of banner of The Salvation Army/Australian Comfort Fund Handwritten on note attached to rear -Whitehead on L Blamey on R - Qld tablelands (?)general blamey, brigadier whitehead, 26th brigade -
 Bendigo Military Museum
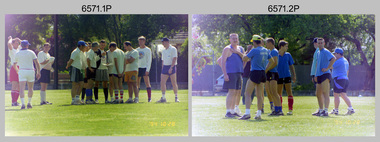
Photograph - 4th Field Survey Squadron Soccer Match. Adelaide, SA, 1994
This is a selection of 30 photographs of 4th Field Survey Squadron personnel participating in a soccer game, between the Other Ranks (ORs) and Officers/Warrant Officers/Senior Non-Commissioned Officers (OFFR/SNCOs), at an unknown location in Adelaide, South Australia on the 28th of October 1994.This is a selection of 30 photographs of 4th Field Survey Squadron personnel participating in a soccer game at an unknown location in Adelaide, South Australia on the 28th of October 1994. The colour photographs are part of a set of 72 photographs on 35mm negative film and are part of the Army Survey Regiment’s Collection. The photographs were scanned at 96 dpi. .1) - Photo, colour, 1994. OFFR/SNCOs L to R: SSGT A. Simcock. WO2 Peter Hammer, SGT Peter Hardy, unidentified, SSGT Brian Collings, unidentified, WO2 Simon ‘Andy’ Capp, SGT H. Evertz, OC MAJ Peter Demaine, unidentified, CAPT Chris Topovsek. .2) - Photo, colour, 1994. ORs L to R: unidentified (x3), CPL Steve Wegener, CPL Dick Crawford, unidentified, LCPL Mitch Oake, unidentified. .3) - Photo, colour, 1994. L to R: CAPT Chris Topovsek, SGT Steve McGuiness, LCPL Mitch Oake, WO2 Simon ‘Andy’ Capp, unidentified. .4) - Photo, colour, 1994. L to R: unidentified, CPL Steve Wegener. .5) - Photo, colour, 1994. L to R: WO2 Simon ‘Andy’ Capp, SSGT Pat ‘Fuji’ Drover, unidentified. .6) - Photo, colour, 1994. L to R: unidentified (x2). .7) - Photo, colour, 1994. L to R: SSGT A. Simcock, SPR Mark Linwood, SPR Mark McInerney, unidentified, CPL Dick Crawford. .8) - Photo, colour, 1994. CPL Dick Crawford. .9) - Photo, colour, 1994. L to R: unidentified, SGT Steve McGuiness, SPR Mark Linwood, SPR Mark McInerney, SSGT A. Simcock. .10) - Photo, colour, 1994. CPL Dick Crawford taking an indirect penalty. The wall L to R: SGT H. Evertz, WO2 Simon ‘Andy’ Capp, SSGT Pat ‘Fuji’ Drover, SGT Dave Longbottom. .11) - Photo, colour, 1994. OFFR/SNCOs half time L to R: OC MAJ Peter Demaine, unidentified, SGT Dave Longbottom, SSGT A. Simcock, unidentified, SGT Steve McGuiness, unidentified, WO2 Peter Hammer. .12) - Photo, colour, 1994. ORs half time L to R: unidentified, SPR Mark Linwood, CPL Peter Ball, CPL Steve Wegener, unidentified. .13) - Photo, colour, 1994. L to R: unidentified (x2), SPR Fran Calvert. .14) - Photo, colour, 1994. L to R: Unidentified, SPR Fran Calvert. .15) - Photo, colour, 1994. L to R: CPL Phuc ‘Charlie’ Tran, SPR Fran Calvert. .16) - Photo, colour, 1994. L to R: unidentified, SPR Mark Linwood, CPL Peter Ball. .17) & .18) - Photo, colour, 1994. Attempted goal. .19) - Photo, colour, 1994. L to R: unidentified, (x2), CPL Peter Ball, LT Andrew Caudle, SGT Steve McGuiness, CPL Dick Crawford, SSGT Pat ‘Fuji’ Drover. .20) - Photo, colour, 1994. SPR Fran Calvert tackled from behind. .21) - Photo, colour, 1994. Attempted goal. L to R: CPL Phuc ‘Charlie’ Tran, SPR Fran Calvert, remainder unidentified. .22) - Photo, colour, 1994. Goal celebration. L to R: CPL Phuc ‘Charlie’ Tran, SPR Fran Calvert, remainder unidentified. .23) - Photo, colour, 1994. Attempted goal. L to R: SGT Steve McGuiness, CPL Phuc ‘Charlie’ Tran, CPL Peter Ball, SGT Dave Longbottom. .24) - Photo, colour, 1994. Attempted goal. Keeper CPL Steve Wegener under pressure. .25) - Photo, colour, 1994. Goal scored. L to R: CPL Dick Crawford, remainder unidentified. .26) - Photo, colour, 1994. Keeper clearance L to R: SGT Steve McGuiness, CPL Dick Crawford, SGT Dave Longbottom. .27) - Photo, colour, 1994. L to R: SGT Steve McGuiness, OC MAJ Peter Demaine, SGT H. Evertz, CPL Peter Ball, CPL Phuc ‘Charlie’ Tran (eyes not on the ball), SGT Dave Longbottom. .28) - Photo, colour, 1994. Keeper saves extreme pressure L to R: unidentified, (x2), Dick Crawford, SGT Dave Longbottom, CPL Steve Wegener, unidentified. In foreground: unidentified (x2). .29) - Photo, colour, 1994. Skilled footwork L to R: SSGT Brian Collings, SPR Fran Calvert, WO2 Simon ‘Andy’ Capp. In background: unidentified, SSGT Pat ‘Fuji’ Drover. .30) - Photo, colour, 1994. L to R: unidentified, CPL Dick Crawford, OC MAJ Peter Demaine, SGT Dave Longbottom..1P to .30P – There are no personnel identified. ‘1994 OCT SOCCER MATCH ORs v OFFR/SNCOs’ annotated on negatives sleeve.royal australian survey corps, rasvy, 4 fd svy sqn -
 Ringwood and District Historical Society
Photograph, Ringwood State School - Grade 2, 1945
One sepia and one black and white photograph "Attached to photograph" Back Row - L to R: David Young, ?, ?, ?, ?, ?, 2nd Row - L to R: ?, Margaret Blood, ?, ?, ?, Margaret Burnside, ?, Lois Crouch, Rosamund Pellow, Lynette Mathews. 3rd Row - L to R: ?, Margery Anderson, Janice Yobb, Beth Williams, Joyce Marshall, Agnes Young, Leah Kelly, ?, ?, ?. 4th Row, Kneeling - L to R: No names. Front Row - L to R: Neville Burns, ?, ?, Tom Hancy, Derek Duke, ?, ?, Bruce Caughey. Teacher: -
 Wodonga & District Historical Society Inc
Book - Bound Manuscript - Many a Mile, Des Martin, 1975
This manuscript and letter represent the connection between two significant people from the North East of Victoria and their common interest in literature and development of the Upper Murray. Des Martin was raised on the family property Aherlo in the Huon Creek Valley. He joined the 8th Light Horse Regiment and in May 1940 led his Wodonga Troop into the 2/2nd Australian Pioneer Battalion, serving in Syria, Java, New Guinea and Borneo. After the war, Des returned to Aherlo and his horses. Amongst other pursuits he became the first President of the Victorian Amateur Riders Association and founded the Murray Valley Hunt Club. Des also played a major role in Australia entering an equestrian team in the Melbourne Olympics in 1956 and served as a Steward at that event. As well as “Many a Mile”, Des also wrote “Australia Astride” in 1959, a history of the Albury Racing Club – a Century of Racing and a “Tale of Twin Cities” as well as collaborating with R. M. Williams to develop the “Hoofs and Horns” publication. From 1969 to 1973, Des Martin also wrote a column for the Border Mail newspaper. Des Martin died on 12th April 1995. Thomas Walter Mitchell was born at "Towong Hill" near Corryong, Victoria and was educated at Cranbrook School, Sydney and Cambridge University. A keen skier, Mitchell founded the Australian National Ski Federation, captained the Australian skiing team and won gold medals in competitions against England and New Zealand. He was an Australian champion in the downhill and long-time member of the Ski Club of Australia. In 1937 he published Australia’s first ski handbook "Ski Heil". Mitchell joined the Second Australian Imperial Force in 1940 and was a Captain in the 2/22nd Battalion and Headquarters 8th Division. He was captured and interned in Changi POW camp until 1945. Tom Mitchell served as the Country Party Member for Benambra in the Victorian Legislative Assembly from 1947 to 1976. He was awarded the C.M.G. “For distinguished services to the Community, particularly in the fields of Politics, Alpine Sports and Safety, and Writing.” He died on 4th February 1984. This volume is significant because it is the manuscript of a book written by a local Wodonga author. The letter written to Tom Mitchell contains anecdotes and details of the writing of the novel, Many a Mile.An original typed manuscript bound in blue coverboard. It is accompanied by a typed letter.des martin, tom mitchell, many a mile -
 Bendigo Military Museum
Literary work - LITERARY WORK - NOTES, Maizie Crammond, c.WW1
Notes relate to recollections of Maizie Crammond in relation to Edgar Dewey Crosthwaite of 4th Light Horse Brigade who survived WW1. Maizie was knitting socks for soldiers on frontline. They met after the war. Claire Philips was a niece of Edgar. Refer 9791P for photo of Edgar Crosthwaite.1. & 2. Page and a half of handwritten recollections of Maizie Crammond who had communicated with Edgar Crosthwaite on the front line. 3. A4 typed up summary from Claire Phillips outlining circumstances of how notes were found. Detailed letter.4th light brigade, ww1, edgar dewey crosthwaite -
 Clunes Museum
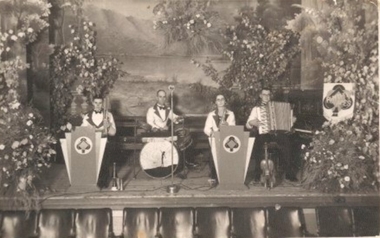
Photograph
FAWCETT'S "RHYTHM ACES" PLAYED FOR ALL THE BALLS AND DANCES DURING THE THIRTIES. L-R .STAN THOMAS, BILL FAWCETT, MADGE FAWCETT, THEO HARDENBLACK AND WHITE PHOTOGRAPH OF RHYTHM ACES DANCE ORCHESTRA. CLUNES TOWN HALL BACKDROP IN THE BACKGROUND. .1 postcard photograph of Rhythm Aces. Names on back of photo. Theo Harden (on right) Madge Fawcettt, Stan Thomas, (? Fawcett? on left - no name on photo) .2 Postcard photograph of Rhythm Aces (no inscription) .3 Enlarged photo of orchestra .4 Photocopy of photo of orchestra .5 Photocopy of photo of orchestra .1 From the left 4th Theo Harden, 3rd, Madge Fawcett, 2nd Stan Thomaslocal history, document, postcard, bands, dance -
 Alfred Hospital Nurses League - Nursing Archive
Functional object - Syringe and Needle Kit - Parke Davis & Co, Parke, Davis & Co
Most nurses had their own syringe and needle kits before the advent of disposable syringes. They were used by Alfred Hospital visiting trained nurses to administer medication in the patient's home. The analgesic tablets in the glass vials were dissolved in sterile water prior to administration.This item belonged to Louisa Mann, 6th Matron of the Alfred 1912-1928.Silver coloured metal flip up case containing: 1. a glass and metal syringe with metal cap 2. a small glass vial containing 6 hypodermic needles 3. 6 vials with cork stoppers containing analgesic tablets 4. 2 perished rubber washers used in the syringe 5. 1 wire stylet to clean needles 6. Screw on needle hubOn the base of the kit engraved - Parke, Davis & Co. Detroit & New-York Markings on the vials: No 2 Apomorphine Hydrochlorate 1-10 gr - Parke, Davis & Co. Detroit & New York No 3 Atropine Sulphate 1-50 gr - Parke, Davis & Co. Detroit & New York No 5 Cocaine Hydrochlorate 1-4 gr - Parke, Davis & Co. Detroit & New York No 13 Morphine sulphate 1-4 gr - Parke, Davis & Co. Detroit & New York No 16 Morphine sulphate 1-4 gr & Atropine sulphate 1-150 gr - Parke, Davis & Co. Detroit & New York No 72 Strychnine Nitrate 1-40 gr - Parke, Davis & Co. Detroit & New York Glass vial with needles (Patient July 7, '96): 1st line - Aseptic Hypodermic Needles 1/2 Doz. 2nd line - Schimmel's Patent Best Seamless Steel Tubing 3rd line - CAUTION - Do not return a needle once used to the vial. 4th line - Remove needles by a slight tap on vial with a pencil. 5th line - PARKE, DAVIS & CO. GENERAL AGENTS 6th line - DETROIT MICH U.S.A. Syringe inscription - on barrel, Parke Davis &Co PAT. AUG 25 1885: on plunger, measurement markings injection kit -
 University of Melbourne, Burnley Campus Archives
Album - Colour prints and negatives, Kodak, Preparations for 1991 Centenary Celebrations, 1990-1991
Colour photographs taken in late Spring. Includes negatives. Also extra copies in spares.(1) Administration Building. (2) Trees. (3,4) Celebration with cake. Peter Esdale 4th from left standing, Joss Tonkin (Archivist) far right standing. (5-8) Renovating Luffmann Ponds, Paula Cave, Gardener. (9) Dairy before being renovated for Centenary, known as Landscape Shed. (10) Michael Nechwatel, Handyman clearing out Dairy prior to renovation. (11-14) Renovating Dairy.administration building, trees, celebration, cake, peter esdale, joss tonkin, archivist, renovations, luffmann ponds, paula cave, gardener, dairy, centenary, landscape shed, michael nechwatel, handyman, lily ponds -
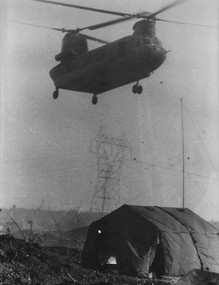 National Vietnam Veterans Museum (NVVM)
Photograph, Gibbons, Denis, CH 47 Chinook 1
Denis Gibbons (1937 – 2011) Trained with the Australian Army, before travelling to Vietnam in January 1966, Denis stayed with the 1st Australian Task Force in Nui Dat working as a photographer. For almost five years Gibbons toured with nine Australian infantry battalions, posting compelling war images from within many combat zones before being flown out in late November 1970 after sustaining injuries. The images held within the National Vietnam Veterans Museum make up the Gibbons Collection.A black and white photograph of a US Army CH47 Chinook medium helicopter delivers ammunition and supplies to A Battery 2/35th US Artillery at an Australian Fire Support Base Bien Hoa Province, during the 1969 Tet Offensive. The battery was supporting 4 RAR/NZ (ANZAC) Battalion (Circa March 1969)photograph, 2/35th us artillery, chinook, tet offensive, 1969, fire support base, 4 rar nz, bien hoa province, gibbons collection catalogue, us army ch47 chinook, helicopter, 4 rar/nz (anzac), 4th battalion, denis gibbons -
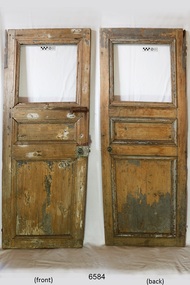 Flagstaff Hill Maritime Museum and Village
Furniture - Door, 1871 or earlier
The wooden door was salvaged from the wreck of the sailing ship Eric the Red, which was a wooden, three masted clipper ship. Eric the Red was the largest full-rigged ship built at Bath, Maine, USA in 1871, having had a 1,580 tons register. She was built and registered by Arthur Sewall, later to become the partnership E. & A. Sewall, the 51st ship built by this company. The annually-published List of Merchant Vessels of the U.S. shows Bath was still the home port of Eric the Red in 1880. The vessel was named after the Viking discoverer, Eric the Red, who was the first European to reach the shores of North America (in 980AD). The ship Eric the Red at first traded in coal between America and Britain, and later traded in guano nitrates from South America. In 1879 she was re-metalled and was in first class condition. On 10th June 1880 (some records say 12th June) Eric the Red departed New York for Melbourne and then Sydney. She had been commissioned by American trade representatives to carry a special cargo of 500 exhibits (1400 tons) – about a quarter to a third of America’s total exhibits - from America for the U.S.A. pavilion at Melbourne’s first International Exhibition. The exhibits included furniture, ironmongery, wines, chemicals, dental and surgical instruments, paper, cages, bronze lamp trimmings, axles, stamped ware, astronomical and time globes, samples of corn and the choicest of leaf tobacco. Other general cargo included merchandise such as cases of kerosene and turpentine, brooms, Bristol's Sarsaparilla, Wheeler and Wilson sewing machines, Wheeler’s thresher machine, axe handles and tools, cases of silver plate, toys, pianos and organs, carriages and Yankee notions. The Eric the Red left New York under the command of Captain Z. Allen (or some records say Captain Jacques Allen) and 24 other crew including the owner’s son third mate Ned Sewall. There were 2 saloon passengers also. The ship had been sailing for an uneventful 85 days and the voyage was almost at its end. On 4th September 1880 the Eric the Red approached Cape Otway with a moderate north-west wind and hazy and overcast atmosphere. Around 1:30am Captain Allen sighted the Cape Otway light and was keeping the ship 5-6 miles offshore to stay clear of the hazardous Otway Reef. However he had badly misjudged his position. The ship hit the Otway Reef about 2 miles out to sea, south west of the Cape Otway light station. He ordered the wheel to be put ‘hard up’ thinking that she might float off the reef. A heavy sea knocked the man away from the wheel, broke the wheel ropes and carried away the rudder. The sea swamped the lifeboats. The mizzenmast fell, with all of its rigging, then the mainmast also fell and the ship broke in two. Some said that the passenger Vaughan, who was travelling for his health and not very strong, was washed overboard and never seen again. The ship started breaking up. The forward house came adrift with three of the crew on it as well as a longboat, which the men succeeded in launching and keeping afloat by continually bailing with their sea boots. The captain, the third mate (the owner’s son) and others clung to the mizzenmast in the sea. Then the owner’s son was washed away off the mast. Within 10 minutes the rest of the ship was in pieces, completely wrecked, with cargo and wreckage floating in the sea. The captain encouraged the second mate to swim with him to the deckhouse where there were other crew but the second mate wouldn’t go with him. Eventually the Captain made it to the deckhouse and the men pulled him up. At about 4:30am the group of men on the deckhouse saw the lights of a steamer and called for help. At the same time they noticed the second mate and the other man had drifted nearby, still on the spur, and pulled them both onto the wreck. The coastal steamer Dawn was returning to Warrnambool from Melbourne, its sailing time different to its usual schedule. Captain Jones sent out two life boats, and fired off rockets and blue lights to illuminate the area. They picked up the three survivors who were in the long boat from Eric the Red. Two men were picked up out of the water, one being the owner’s son who was clinging to floating kerosene boxes. At daylight the Dawn then rescued the 18 men from the floating portion of the deckhouse, which had drifted about 4 miles from where they’d struck the reef. Shortly after the rescue the deckhouse drifted onto breakers and was thrown onto rocks at Point Franklin, about 2 miles east of Cape Otway. Captain Jones had signalled to Cape Otway lighthouse the number of the Eric the Red and later signalled that there was a wreck at Otway Reef but there was no response from the lighthouse. The captain and crew of the Dawn spent several more hours searching unsuccessfully for more survivors, even going back as far as Apollo Bay. On board the Dawn the exhausted men received care and attention to their needs and wants, including much needed clothing. Captain Allen was amongst the 23 battered and injured men who were rescued and later taken to Warrnambool for care. Warrnambool’s mayor and town clerk offered them all hospitality, the three badly injured men going to the hospital for care and others to the Olive Branch Hotel, then on to Melbourne. Captain Allen’s leg injury prevented him from going ashore so he and three other men travelled on the Dawn to Portland. They were met by the mayor who also treated them all with great kindness. Captain Allen took the train back to Melbourne then returned to America. Those saved were Captain Z. Allen (or Jacques Allen), J. Darcy chief mate, James F. Lawrence second mate, Ned Sewall third mate and owner’s son, John French the cook, C. Nelson sail maker, Clarence W. New passenger, and the able seamen Dickenson, J. Black, Denis White, C. Herbert, C. Thompson, A. Brooks, D. Wilson, J. Ellis, Q. Thompson, C. Newman, W. Paul, J. Davis, M. Horenleng, J. Ogduff, T. W. Drew, R. Richardson. Four men had lost their lives; three of them were crew (Gus Dahlgreen ship’s carpenter, H. Ackman steward, who drowned in his cabin, and George Silver seaman) and one a passenger (J. B. Vaughan). The body of one of them had been found washed up at Cape Otway and was later buried in the lighthouse cemetery; another body was seen on an inaccessible ledge. Twelve months later the second mate James F. Lawrence, from Nova Scotia, passed away in the Warrnambool district; an obituary was displayed in the local paper. The captain and crew of the Dawn were recognised by the United States Government in July 1881 for their humane efforts, being thanked and presented with substantial monetary rewards, medals and gifts. Neither the ship, nor its cargo, was insured. The ship was worth about £15,000 and the cargo was reportedly worth £40,000; only about £2,000 worth had been recovered. Cargo and wreckage washed up at Apollo Bay, Peterborough, Port Campbell, Western Port and according to some reports, even as far away as the beaches of New Zealand. The day after the wreck the government steam ship Pharos was sent from Queenscliff to clear the shipping lanes of debris that could be a danger to ships. The large midship deckhouse of the ship was found floating in a calm sea near Henty Reef. Items such as an American chair, a ladder and a nest of boxes were all on top of the deckhouse. As it was so large and could cause danger to passing ships, Captain Payne had the deckhouse towed towards the shore just beyond Apollo Bay. Between Apollo Bay and Blanket Bay the captain and crew of Pharos collected Wheeler and Wilson sewing machines, nests of boxes, bottles of Bristol’s sarsaparilla, pieces of common American chairs, axe handles, a Wheelers’ Patent thresher and a sailor’s trunk with the words “A. James” on the front. A ship’s flag-board bearing the words “Eric the Red” was found on the deckhouse; finally those on board the Pharos had the name of the wrecked vessel. During this operation Pharos came across the government steamer Victoria and also a steamer S.S. Otway, both of which were picking up flotsam and wreckage. A whole side of the hull and three large pieces of the other side of the hull, with some of the copper sheathing stripped off, had floated on to Point Franklin. Some of the vessels yards and portions of her masts were on shore. The pieces of canvas attached to the yards and masts confirmed that the vessel had been under sail. The beach there was piled with debris several feet high. There were many cases of Diamond Oil kerosene, labelled R. W. Cameron and Company, New York. There were also many large planks of red pine, portions of a small white boat and a large, well-used oar. Other items found ashore included sewing machines (some consigned to ‘Long and Co.”) and notions, axe and scythe handles, hay forks, wooden pegs, rolls of wire (some branded “T.S” and Co, Melbourne”), kegs of nails branded “A.T. and Co.” from the factory of A. Field and Son, Taunton, Massachusetts, croquet balls and mallets, buggy fittings, rat traps, perfumery, cutlery and Douay Bibles, clocks, bicycles, chairs, a fly wheel, a cooking stove, timber, boxes, pianos, organs and a ladder. (Wooden clothes pegs drifted in for many years). There seemed to be no personal luggage or clothing. The Pharos encountered a long line, about one and a half miles, of floating wreckage about 10 miles off land, south east of Cape Otway, and in some places about 40 feet wide. It seemed that more than half of it was from Eric the Red. The ship’s crew rescued 3 cases that were for the Melbourne Exhibition and other items from amongst the debris. There were also chairs, doors, musical instruments, washing boards, nests of trunks and fly catchers floating in the sea. Most of the goods were saturated and smelt of kerosene. A section of the hull lies buried in the sand at Parker River Beach. An anchor with chain is embedded in the rocks east of Point Franklin and a second anchor, thought to be from Eric the Red, is on display at the Cape Otway light station. (There is a photograph of a life belt on the verandah of Rivernook Guest House in Princetown with the words “ERIC THE RED / BOSTON”. This is rather a mystery as the ship was registered in Bath, Maine, USA.) Parts of the ship are on display at Bimbi Park Caravan Park and at Apollo Bay Museum. Flagstaff Hill Maritime Village also has part of the helm (steering wheel), a carved wooden sword (said to be the only remaining portion of the ship’s figurehead; further research is currently being carried out), a door, a metal rod and samples of wood. Much of the wreckage was recovered by the local residents before police and other authorities arrived at the scene. Looters went to great effort to salvage goods, being lowered down the high cliff faces to areas with little or no beach to collect items from the wreckage, their mates above watching out for dangerous waves. A Tasmanian newspaper reports on a court case in Stawell, Victoria, noting a man who was caught 2 months later selling tobacco from the wreckage of Eric the Red. Some of the silverware is still treasured by descendants of Mr Mackenzie who was given these items by officials for his help in securing the cargo. The gifts included silver coffee and tea pots, half a dozen silver serviette rings and two sewing machines. The wreck and cargo were sold to a Melbourne man who salvaged a quantity of high quality tobacco and dental and surgical instruments. Timbers from the ship were salvaged and used in the construction of houses and sheds around Apollo Bay, including a guest house, Milford House (since burnt down in bushfires), which had furniture, fittings and timber on the dining room floor from the ship. A 39.7 foot long trading ketch, the Apollo, was also built from its timbers by Mr Burgess in 1883 and subsequently used in Tasmanian waters. It was the first attempt at ship building in Apollo bay. In 1881 a red light was installed about 300 feet above sea level at the base of the Cape Otway lighthouse to warn ships when they were too close to shore; It would not be visible unless a ship came within 3 miles from it. This has proved to be an effective warning. The State Library of Victoria has a lithograph in its collection depicting the steamer Dawn and the shipwrecked men, titled. "Wreck of the ship Eric the Red, Cape Otway: rescue of the crew by the Dawn". “The Eric the Red is historically significant as one of Victoria's major 19th century shipwrecks. (Heritage Victoria Eric the Red; HV ID 239) The wreck led to the provision of an additional warning light placed below the Cape Otway lighthouse to alert mariners to the location of Otway Reef. The site is archaeologically significant for its remains of a large and varied cargo and ship's fittings being scattered over a wide area. The site is recreationally and aesthetically significant as it is one of the few sites along this coast where tourists can visit identifiable remains of a large wooden shipwreck, and for its location set against the background of Cape Otway, Bass Strait, and the Cape Otway lighthouse.“ (Victorian Heritage Database Registration Number S239, Official Number 8745 USA) Door from the wreck of the ship Eric the Red. The wooden singular rectangular door includes three insert panel sections. The top section is square shaped and is missing its panel or glass. The centre timber panel is about a third of the height of the top panel and the bottom timber panel is approximately equal in height to the total height of the two upper panels. The door fastenings include both a metal door latch and traditional door bolt. They are both attached to the front right hand side of the door. The bolt is just below the top panel, and the door latch is in approximately the centre of that side. The door latch has a round mark where a handle could have been attached. The wood of the door has scraping marks in a semi-circle around the door latch where the latch has swung around on its one remaining fastening and grazed the surface. There is a metal hinge at the top section of the door on the opposite side to the latch. The painted surface has been scraped back to expose the wood. The door is shorter than the average height of a person. On the reverse of the door there are lines on the panels, just inside their edges, is what appears to be pencil. The door is not aligned straight but is skew to centre.warrnambool, flagstaff hill, flagstaff hill maritime village, maritime museum, shipwreck coast, great ocean road, shipwreck artefact, eric the red, jaques allen, sewall, 1880, melbourne exhibition 1880, cape otway, otway reef, victorian shipwreck, bass strait, eric-the-red, door -
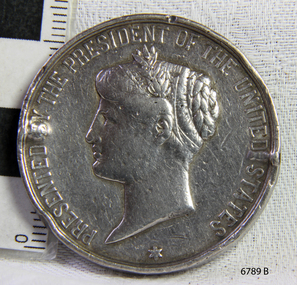 Flagstaff Hill Maritime Museum and Village
Award - Medal, Nelson Johnson, November 1880
This medal for bravery, for rescue of the crew from the shipwreck “Eric the Red” on 4th September 1880, was awarded to one of the crew of the steamer S.S. Dawn by the President of the United States in July 1881. The medal is engraved with the name “Nelson Johnson” (the anglicised version of his Swedish name Neils Frederick Yohnson). It was donated to Flagstaff Hill Maritime Village in 2013 by Nelson’s granddaughter. Nelson had migrated from Sweden to Sydney in 1879. The next year in 1880, aged 24, he was a seaman on the steamship Dawn and involved in the rescue of the survivors of the Eric the Red. Nelson Johnson was a crew member of the S.S. Dawn and was one of the rescue team in the dinghy in the early morning of September 4th 1880. Medals were awarded to the Captain and crew of the S.S. Dawn by the President of the United States, through the Consul-general (Mr Oliver M. Spencer), in July 1881 “ … in recognition of their humane efforts in rescuing the 23 survivors of the American built wooden sailing ship, the Eric the Red, on 4th September 1880.” The men were also presented with substantial monetary rewards and gifts. The city of Warrnambool’s care of the survivors was also mentioned by the President at the presentation, saying that “the city hosted and supported the crew ‘most graciously’. Previously, a week after the shipwreck, the Australian Government had also conveyed its thanks to the Captain and crew of the S.S. Dawn “Captain Griffith Jones, S.S. Dawn, The Hon. Mr Clark desires that the thanks of the Government should be conveyed to you for the prompt, persevering and seamanlike qualities displayed by you, your officers and crew in saving the number of lives you did on the occasion referred to. The hon. The Commissioner has also been pleased to award you a souvenir in commemoration of the occasion, and a sum of 65 pounds to be awarded to your officers and crew according to annexed scale. I am, &c, W Collins Rees, for and in the absence of the Chief Harbour Master.” The Awards are as follows: - Crew of DAWN'S lifeboat-Chief Officer, Mr G. Peat, 15 pounds; boat's crew-G. Sterge, A.B., 5 pounds; T. Hammond, A.B., 5 pounds; J. Black, A.B., 5 pounds; H. Edwards, A.B., 5 pounds. Dinghy's Crew-Second Officer, Mr Christie, 10 pounds; boat's crew -F. Lafer, A.B., 5 pounds; W. Johnstone, A.B., 5 pounds; Mr Lear, provedore, 5 pounds; Mr Dove, purser, 5 pounds. Captain Jones receives a piece of plate. (from “Wreck of the ship Eric the Red” by Jack Loney) The medal’s history, according to the Editor of ‘E-Sylum’ (the newsletter of The Numismatic Bibliomania Society “… appears to be an example of an 1880 State Department medal, catalogued as LS-3 (page 322 of R. W. Julian's book, Medals of the United States Mint: The First Century 1792-1892). The reverse is mostly blank for engraving, surrounded by a thin wreath. It was designed by George Morgan, chief engraver for the Philadelphia Mint, and struck in gold, silver and bronze. The one pictured here (in The Standard newspaper, 2nd July 2013) appears to be silver.” The following is an account of the events which led to the awarding of this medal. The American ship Eric the Red was a wooden, three-masted clipper ship. She had 1,580 tons register and was the largest full-rigged ship built at Bath, Maine, USA in 1871. She was built and registered by Arthur Sewall, later to become the partnership E. & A. Sewall, the 51st ship built by this company. The annually-published List of Merchant Vessels of the U.S. shows Bath was still the home port of Eric the Red in 1880. The vessel was named after the Viking discoverer, Eric ‘the Red-haired’ Thorvaldsson, who was the first European to reach the shores of North America (in 980AD). The ship Eric the Red at first traded in coal between America and Britain, and later traded in guano nitrates from South America. In 1879 she was re-metalled and was in first-class condition. On 10th June 1880 (some records say 12th June) Eric the Red departed New York for Melbourne and then Sydney. She had been commissioned by American trade representatives to carry a special cargo of 500 exhibits (1400 tons) – about a quarter to a third of America’s total exhibits - for the U.S.A. pavilion at Melbourne’s first International Exhibition. The exhibits included furniture, ironmongery, wines, chemicals, dental and surgical instruments, paper, cages, bronze lamp trimmings, axles, stamped ware, astronomical and time globes, samples of corn and the choicest of leaf tobacco. Other general cargo included merchandise such as cases of kerosene and turpentine, brooms, Bristol's Sarsaparilla, Wheeler and Wilson sewing machines, Wheeler’s thresher machine, axe handles and tools, cases of silver plate, toys, pianos and organs, carriages and Yankee notions. The Eric the Red left New York under the command of Captain Zaccheus Allen (or some records say Captain Jacques Allen) and 24 other crew including the owner’s son third mate Ned Sewall. There were also 2 saloon passengers on board. The ship had been sailing for an uneventful 85 days and the voyage was almost at its end. As Eric the Red approached Cape Otway there was a moderate north-west wind and a hazy and overcast atmosphere. On 4th September 1880 at about 1:30 am Captain Allen sighted the Cape Otway light and was keeping the ship 5-6 miles offshore to stay clear of the hazardous Otway Reef. However, he had badly misjudged his position. The ship hit the Otway Reef about 2 miles out to sea, southwest of the Cape Otway light station. Captain Allen ordered the wheel to be put ‘hard up’ thinking that she might float off the reef. The sea knocked the helmsman away from the wheel, broke the wheel ropes and carried away the rudder. The lifeboats were swamped, the mizzenmast fell, with all of its riggings, then the mainmast also fell and the ship broke in two. Some said that the passenger Vaughan, who was travelling for his health and not very strong, was washed overboard and never seen again. The ship started breaking up. The forward house came adrift with three of the crew on it as well as a longboat, which the men succeeded in launching and keeping afloat by continually bailing with their sea boots. The captain, the third mate (the owner’s son) and others clung to the mizzenmast in the sea. Then the owner’s son was washed away off the mast. Within 10 minutes the rest of the ship was in pieces, completely wrecked, with cargo and wreckage floating in the sea. The captain encouraged the second mate to swim with him to the deckhouse where there were other crew but the second mate wouldn’t go with him. Eventually, the Captain made it to the deckhouse and the men pulled him up. At about 4:30 am the group of men on the deckhouse saw the lights of a steamer and called for help. At the same time, they noticed the second mate and the other man had drifted nearby, still on the spur, and pulled them both onto the wreck. The coastal steamer SS Dawn was returning to Warrnambool from Melbourne, and its sailing time was different to its usual schedule. She was built in 1876 and bought by the Portland and Belfast Steam Navigation Co. in 1877. At the time of this journey, she was commanded by Captain Jones and was sailing between Melbourne and Portland via Warrnambool. The provedore the Dawn, Benjamin Lear, heard cries of distress coming through the portholes of the saloon. He gave the alarm and the engines were stopped. Cries could be heard clearly, coming from the land. Captain Jones sent out crew in two boats and fired off rockets and blue lights to illuminate the area. They picked up the three survivors who were in the long boat from Eric the Red. Two men were picked up out of the water, one being the owner’s son who was clinging to floating kerosene boxes. At daylight, the Dawn then rescued the 18 men from the floating portion of the deckhouse, which had drifted about 4 miles from where they’d struck the reef. Shortly after the rescue the deckhouse drifted onto breakers and was thrown onto rocks at Point Franklin, about 2 miles east of Cape Otway. Captain Jones had signalled to Cape Otway lighthouse the number of the Eric the Red and later signalled that there was a wreck at Otway Reef but there was no response from the lighthouse. The captain and crew of the Dawn spent several more hours searching unsuccessfully for more survivors, even going back as far as Apollo Bay. On board the Dawn the exhausted men received care and attention to their needs and wants, including much-needed clothing. Captain Allen was amongst the 23 battered and injured men who were rescued and later taken to Warrnambool for care. Warrnambool’s mayor and town clerk offered them all hospitality, the three badly injured men going to the hospital for care and others to the Olive Branch Hotel, then on to Melbourne. Captain Allen’s leg injury prevented him from going ashore so he and three other men travelled on the Dawn to Portland. They were met by the mayor who also treated them all with great kindness. Captain Allen took the train back to Melbourne then returned to America. Those saved were Captain Zaccheus Allen (or Jacques Allen), J. Darcy chief mate, James F. Lawrence second mate, Ned Sewall third mate and owner’s son, John French the cook, C. Nelson sail maker, Clarence W. New passenger, and able seamen Dickenson, J. Black, Denis White, C. Herbert, C. Thompson, A. Brooks, D. Wilson, J. Ellis, Q. Thompson, C. Newman, W. Paul, J. Davis, M. Horenleng, J. Ogduff, T. W. Drew, R. Richardson. Four men had lost their lives; three of them were crew (Gus Dahlgreen ship’s carpenter, H. Ackman steward, who drowned in his cabin, and George Silver seaman) and one a passenger (J. B. Vaughan). The body of one of them had been found washed up at Cape Otway and was later buried in the lighthouse cemetery; another body was seen on an inaccessible ledge. Twelve months later the second mate James F. Lawrence, from Nova Scotia passed away in the Warrnambool district; an obituary was displayed in the local paper. Neither the ship nor its cargo was insured. The ship was worth about £15,000 and the cargo was reportedly worth £40,000; only about £2,000 worth had been recovered. Cargo and wreckage washed up at Apollo Bay, Peterborough, Port Campbell, Western Port and according to some reports, even as far away as the beaches of New Zealand. The day after the wreck the government steamship Pharos was sent from Queenscliff to clear the shipping lanes of debris that could be a danger to ships. The large midship deckhouse of the ship was found floating in a calm sea near Henty Reef. Items such as an American chair, a ladder and a nest of boxes were all on top of the deckhouse. As it was so large and could cause danger to passing ships, Captain Payne had the deckhouse towed towards the shore just beyond Apollo Bay. Between Apollo Bay and Blanket Bay, the captain and crew of Pharos collected Wheeler and Wilson sewing machines, nests of boxes, bottles of Bristol’s sarsaparilla, pieces of common American chairs, axe handles, a Wheelers’ Patent thresher and a sailor’s trunk with the words “A. James” on the front. A ship’s flag-board bearing the words “Eric the Red” was found on the deckhouse; finally, those on board the Pharos had the name of the wrecked vessel. During this operation, Pharos came across the government steamer Victoria and also a steamer S.S. Otway, both of which were picking up flotsam and wreckage. A whole side of the hull and three large pieces of the other side of the hull, with some of the copper sheathing stripped off, had floated onto Point Franklin. Some of the vessels' yards and portions of her masts were on shore. The pieces of canvas attached to the yards and masts confirmed that the vessel had been under sail. The beach there was piled with debris several feet high. There were many cases of Diamond Oil kerosene, labelled R. W. Cameron and Company, New York. There were also many large planks of red pine, portions of a small white boat and a large, well-used oar. Other items found ashore included sewing machines (some consigned to ‘Long and Co.”) and notions, axe and scythe handles, hay forks, wooden pegs, rolls of wire (some branded “T.S” and Co, Melbourne”), kegs of nails branded “A.T. and Co.” from the factory of A. Field and Son, Taunton, Massachusetts, croquet balls and mallets, buggy fittings, rat traps, perfumery, cutlery and Douay Bibles, clocks, bicycles, chairs, a fly wheel, a cooking stove, timber, boxes, pianos, organs and a ladder. (Wooden clothes pegs drifted in for many years). There seemed to be no personal luggage or clothing. The Pharos encountered a long line, about one and a half miles, of f locating wreckage about 10 miles off land, southeast of Cape Otway, and in some places about 40 feet wide. It seemed that more than half of it was from Eric the Red. The ship’s crew rescued 3 cases that were for the Melbourne Exhibition and other items from amongst the debris. There were also chairs, doors, musical instruments, washing boards, nests of trunks and flycatchers floating in the sea. Most of the goods were saturated and smelt of kerosene. A section of the hull lies buried in the sand at Parker River Beach. An anchor with a chain is embedded in the rocks east of Point Franklin and a second anchor, thought to be from Eric the Red, is on display at the Cape Otway light station. (There is a photograph of a life belt on the verandah of Rivernook Guest House in Princetown with the words “ERIC THE RED / BOSTON”. This is rather a mystery as the ship was registered in Bath, Maine, USA.) Parts of the ship are on display at Bimbi Park Caravan Park and at Apollo Bay Museum. Flagstaff Hill Maritime Village also has part of the helm (steering wheel), a carved wooden sword (said to be the only remaining portion of the ship’s figurehead; further research is currently being carried out), a door, a metal rod, samples of wood and this medal awarded for the rescue of the crew. Much of the wreckage was recovered by the local residents before police and other authorities arrived at the scene. Looters went to great effort to salvage goods, being lowered down the high cliff faces to areas with little or no beach to collect items from the wreckage, their mates above watching out for dangerous waves. A Tasmanian newspaper reports on a court case in Stawell, Victoria, noting a man who was caught 2 months later selling tobacco from the wreckage of Eric the Red. Some of the silverware is still treasured by descendants of Mr Mackenzie who was given these items by officials for his help in securing the cargo. The gifts included silver coffee and teapots, half a dozen silver serviette rings and two sewing machines. A Mr G.W. Black has in his possession a medal and a purse that was awarded to his father, another Dawn crew member who was part of the rescue team. The medal is similarly inscribed and named “To John Black ….” (from “Shipwrecks” by Margaret E. Mackenzie, 3rd edition, published 1964). The wreck and cargo were sold to a Melbourne man who salvaged a quantity of high-quality tobacco and dental and surgical instruments. Timbers from the ship were salvaged and used in the construction of houses and shed around Apollo Bay, including a guest house, Milford House (since burnt down in bushfires), which had furniture, fittings and timber on the dining room floor from the ship. A 39.7-foot-long trading ketch, the Apollo, was also built from its timbers by Mr Burgess in 1883 and subsequently used in Tasmanian waters. It was the first attempt at shipbuilding in Apollo Bay. In 1881 a red light was installed about 300 feet above sea level at the base of the Cape Otway lighthouse to warn ships when they were too close to shore; It would not be visible unless a ship came within 3 miles from it. This has proved to be an effective warning. Nelson Johnson married Elizabeth Howard in 1881 and they had 10 children, the father of the medal’s donor being the youngest. They lived in 13 Tichbourne Place, South Melbourne, Victoria. Nelson died in 1922 in Fitzroy Victoria, age 66. In 1895 the owners of the S.S. Dawn, the Portland and Belfast Steam Navigation Co., wound up and sold out to the Belfast Company who took over the Dawn for one year before selling her to Howard Smith. She was condemned and sunk in Suva in 1928. The State Library of Victoria has a lithograph in its collection depicting the steamer Dawn and the shipwrecked men, titled. "Wreck of the ship Eric the Red, Cape Otway: rescue of the crew by the Dawn". The medal for bravery is associated with the ship the “The Eric the Red which is historically significant as one of Victoria's major 19th century shipwrecks. (Heritage Victoria Eric the Red; HV ID 239) The wreck led to the provision of an additional warning light placed below the Cape Otway lighthouse to alert mariners to the location of Otway Reef. The site is archaeologically significant for its remains of a large and varied cargo and ship's fittings being scattered over a wide area. The site is recreationally and aesthetically significant as it is one of the few sites along this coast where tourists can visit identifiable remains of a large wooden shipwreck, and for its location set against the background of Cape Otway, Bass Strait, and the Cape Otway lighthouse.“ (Victorian Heritage Database Registration Number S239, Official Number 8745 USA) This medal was awarded to Nelson Johnson by the U.S. President for bravery in the rescue of the Eric the Red crew. The obverse of the round, solid silver medal has an inscription around the rim. In the centre of the medal is the head of Liberty to the left, hair in a bun, with a sprig of leaves in the top left of a band around her head. There is a 6-pointed star below the portrait, between the start and end of the inscription. There are two raised areas on the rim, horizontally opposite each other, from the edge to just below the lettering and coinciding with the holes drilled in the edge. Slightly right of the top is a round indentation in the rim. The reverse has a wreath of leaves as a border, joined at the bottom by a ribbon bow. In the centre of the medal is an inscription, decorated with 3-pronged design and dots. The edge is plain with 2 small, rough and uneven holes horizontally opposite to each other, as though they had been used for mounting the medal at some stage. The medal has a matte finish on both sides and is slightly pitted and scratched.“PRESENTED BY THE PRESIDENT OF THE UNITED STATES” around the perimeter of the obverse of the medal. “TO / Nelson Johnson, / seaman of the British, / str “Dawn”, for bravery, / at risk of life, / in / rescuing the crew of / the American Ship / “Eric the Red.” “M” on obverse, truncation of the portraitwarrnambool, flagstaff hill, flagstaff hill maritime village, maritime museum, shipwreck coast, great ocean road, shipwreck artefact, eric the red, zaccheus allen, sewall, 1880, melbourne exhibition, cape otway, otway reef, victorian shipwreck, medal, nelson johnson, neils frederick yohnson, s.s. dawn, george morgan, hero -
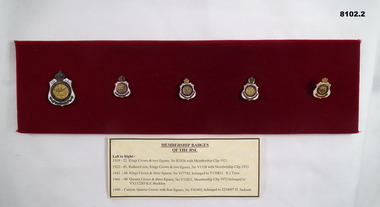 Bendigo Military Museum
Badge - DISPLAYOF THE RSL BADGES, C. 1919 to post 1990
The main centre piece of each badge has figures in, 1 & 2 have two figures Army & Navy, 3 & 4 have three figures Army, Navy, Airforce, 5 has four figures Army, Navy, Airforce, Female figure. The first 3 badges have a Kings Crown on, last 2 Queens Crown. The names listed as per on card .2) left to right. 3rd badge, R.J. Tyrer, refer Cat No 1813.5. 4th badge, K.C. Buckley, refer Cat No 1438. 5th badge, H Jackson, refer Cat No .............1) Cardboard covered with red felt with 5 RSL Badges attached in a row. One large and 4 small, 3 badges have a membership year clip on, all badges have difference's being text on or years used. .2) Card with details re each badge.Badges from left to right re text on/years in use. First two large & small. "Returned Sailors & Soldiers Imperial League - Australia". 1st 1919 - 1922 2nd 1922 - 1941 3rd and 4th. "Returned Sailors, Soldiers & Airmen's League - Australia". 3rd 1941 - 1966 4th 1966 - 1990 5th. "Returned & Services League Australia". 5th 1990 - current.brsl, smirsl, badges, rsl -
 Bendigo Military Museum
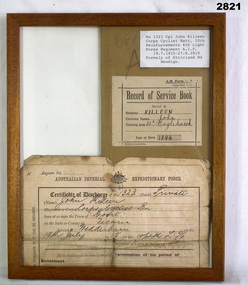
Administrative record - RECORD OF SERVICE, DISCHARGE CERTIFICATE WW1, FRAMED, 1915 - 1919
John Killeen No 1323. Refer Cat No 2824 for his service history also Cat No 2825.3.Tan veneer wood frame with glass front, white cardboard backing holding items re John Killeen. 1. Record of Service book. 2. Certificate of Discharge."No 1323 Cpl John Killeen Corps Cyclist Batt, 10th reinforcements 4th Light Horse Regiment AIF. 19.7.1915 - 27.8.1919. Formerly of Strickland Road Bendigo"military history - service records, documents - army records, passchendaele barracks trust -
 Bendigo Military Museum
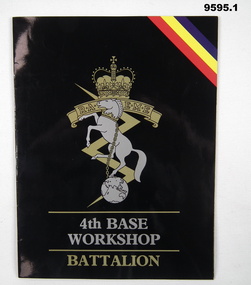
Booklet - RAEME BOOKLET, Ian Beaton, 4th Base Workshop Battalion
1. Booklet outlines the work carried out by 4th Workshop Battalion, Bandiana, Victoria. Part of the Cooper Collection. 2. Aerial photograph of Bandiana workshops.1. A4 sized booklet with twelve pages secured to cover with two staples. Front cover has RAEME insignia in gold and silver on a black background. Title in gold and silver lettering. Pages contain colour photographs and text in white. Pages have a black background. 2. Colour aerial photograph of a group of buildings at Bandiana. 3. Business card featuring RAEME insignia and text in blue print.cooper collection, bandiana, 4th workshop battalion, raeme -
 Bendigo Military Museum
Administrative record - DEMOBILIZATION PROCEDURE, RECORD OF SERVICE BOOKS, 1) 7.12.45, .2) 22.6.40 - 12.12.45
Alfred Robert Maskell VX25221, 4th Anti Tank Regt 2nd AIF. Refer 2485 for medals and service history also 1076, 1100.2, 2489P..1) Demobilization Procedure book, "AAB87" No 436230 re VX25221 Maskell Alfred Robert, brown covers, 29 pages. .2) Record of Service book, "AAB83" Re VX25221 GNR Maskell A.R, brown covers, 40 pages..1) "V.T.227"records, military -
 Bendigo Military Museum
Uniform - PYJAMAS WITH CARD, Defiance Brand, c1941
Shirt and trousers combination made of dark blue, light blue, beige and brown colour in stripes, cotton fabric. Cream colour, plastic buttons. Cream colour drawstring. 1. Shirt with long sleeves with no cuffs, collar, one front pocket and placket front, with buttons. Manufacturers white cotton label inside back of collar. 2. Trousers, long legs with drawstring at waist. 3. Manufacturers label, lightweight cardboard, previously sewn to shirt. Black and red print with purple stamp information. Also handwritten information, grey lead pencil.Manufacturers information- 1. Blue and red embroidered details "GUARANTEED/DEFIANCE/BRAND". 2. Lightweight cardboard details "MENS AND BOYS/ Pyjamas/ for/ SERVICE and COMFORT/ Distinctive/ Cloth/ Defiance/ Exclusive/ Designs/ RENOWNED/THROUGHOUT AUSTRALIA/ NO./ SIZE." Purple stamp "100/ O.S." Grey lead pencil "3 D/-/ 16/6". 3. Reverse side of label - handwritten grey lead pencil. "I am a refined type of/ gal desiring a boy friend/ if you would write I shall/ be only to pleased to answer/ I am 18 (1941)/ Norma Poulton/ 96 Flinders Street/ 4th Floor/ Melbourne" The handwritten note and pair of pyjamas were sent to an unknown soldier serving during World War Two.clothing, pyjamas, ww2 -
 Bendigo Historical Society Inc.
Document - MINING REPORTS - EXTRACTS IRONBARK SOUTH MINE MANAGER'S REPORTS
Handwritten extracts from the Manager's Reports Ironbark South Mine on the Sheepshead Line for the Hlaf-Year ended Feb. 4th, 1936. Report mentions work carried on the mine,crushings, gold yield and development work carried out. H. E. Jones, Gen. Manager and P. I. Wellington, Mine Manager. Also a profit and loss account 1/2 year to 31st Dec. 1935. Details expenses such as wages firewood, etc. Value of gold and plant and machinery. Aslo for the 1/2 year ending 19/1/1937, crushing and gold yield. H. E. Jones. M. Manager.document, gold, mining reports, ironbark south mine, h e jones, p i wellington -
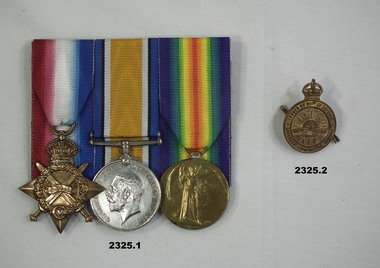 Bendigo Military Museum
Award - MEDAL SET WW1 & BADGE, Post 1919
Horace Eli Hambly No 794 enlisted on 7.12.14 in 3rd reinforcements 4th Light Horse Regt age 20 years 10 months. Embarks for Eygpt 3.2.15, hospital Gallipoli 10.9.15 classed "Enteric", returns to Australia on 20.10.15. He goes AWOL on 24.3.16, classed as a deserter on 17.4.16. He re enlists in NSW on 16.7.17 as David Edward Miles No 7856 3rd Aust Tunneling Coy, he then confesses and embarks for England on 21.11.17, hospital with PUO on 27.6.18, discharged from the AIF on 17.7.19. .1) Medals, court mounted, set of (3) re H.E Hambly. 1. 1914-15 Star. 2. War Medal 1914-18 3. Victory Medal 1914 - 1919 .2) "Returned from Active Service Badge". Metal, gold colour, round with crown at top, centre has Rising Sun with AIF under..1) "794 Cpl H.E.Hambly 4 L.H.R A.I.F" .2) "201258"medals, badges, military -
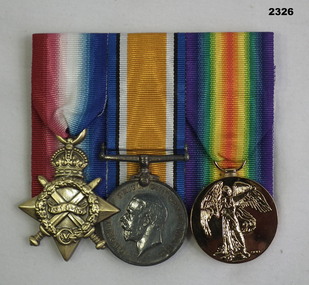 Bendigo Military Museum
Award - MEDAL SET WW1, Post 1919
Jack McMillan No 319 enlisted in D Coy 16th Batt AIF on 22.9.14 aged 20 years 2 months. Embarked for Eygpt 22.12.14, embarked for Gallipoli 12.4.15, Sprained ankle, classed as WIA on 27.4.15, embarked again for Gallipoli 8.6.15, hospital 21.7.15 with Diarrhoea, WIA 2nd occasion 8.8.15 GSW right hand turned Septic, hospital 11.4.16 with Pyorrhoea. Embarked for France 7.6.16, WIA 3rd occasion 10.8.16 GSW right thigh, WIA 4th occasion 5.2.17 shell wound to Forehead, hospital France with scalded right foot 30.5.17 then contracts Scabies 2.6.17, Boils on 28.7.17. While in England he goes AWL 3 times, embarks for France 8.5.18, goes AWL twice more, appointed L/ Cpl 2.9.18, discharged from the AIF on 13.1.19.Medals, court mounted, set of (3) re J McMillan. 1. 1914-15 Star, replica not engraved. 2. War Medal 1914-18 2. Victory Medal 1914 - 1919, replica not engraved."319 L/Cpl J McMillan 16 BN A.I.F"medals, military, ron mills collection