Showing 17160 items matching "bay-bridge"
-
 Kew Historical Society Inc
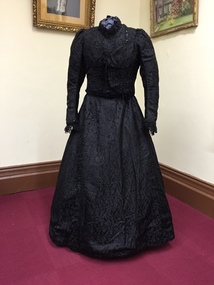
Clothing - Black Silk Damask Mourning Outfit, c.1898
Elizabeth Morrison, was born in 1874 and died in 1963, aged 89 years. She was the schoolteacher at Warrigal until she married the donor's grandfather and moved to Melbourne to take up residence with him. Her husband Edward was a porter on the train from Melbourne to Adelaide. Together they had three children: two boys and a girl. The donor's father was the youngest who was born in 1911. The eldest son, Kenneth Morrison, was a Monsignor in the Catholic Church, and an Air Force Chaplain during the Second World War, while the daughter was a spinster who owned a few haberdashery and children’s clothing stores. The donor's father had a newsagency in Bridge Road, Richmond. He and his wife lived in Carson Street, Kew for about 50 years and had four children, two of whom were to become lawyers, another a surgeon and the final child social worker/family therapist. The donor's father lived until he was 100 years of age.The Fashion & Design collection of the Kew Historical Society includes examples of women’s, men’s, children’s and infants’ clothing from the 18th, 19th and 20th centuries. Items in the collection were largely produced for, or purchased by women in Melbourne, and includes examples of outerwear, protective wear, nightwear, underwear and costume accessories.The costume, which may have been used as a mourning dress is comprised of a matching heavy black silk skirt and top. The styling of the short bodice is accentuated by pleating and by the use of spirals of Parisian jet (black glass beads) on the bodice and cuffs. Chiffon lace is attached to the cuffs and is of the period. The dress is made of silk damask with a woven design of joined lines and circles. The rigidity of the fitted bodice is achieved by the use of baleen and by a heavy striped cotton fabric. The wide skirt, in contrast, has a stiffened brown cotton lining. There is a small insertion on the inside of the bodice that may have been used for a watch. The dress is in excellent condition. elizabeth morrison, australian fashion - 1890s, women's clothing -
 Linton and District Historical Society Inc
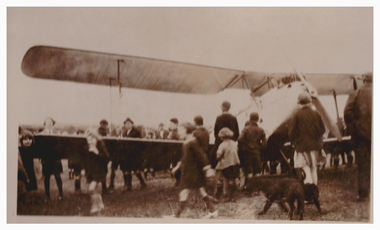
Photograph, Aeroplane Landing at Linton Park, 1928, 1928
Picture in photograph album donated by Mrs Faull. The plane landed at Linton Park as part of an advertising campaign by Astor Radios in 1928. Information provided by Ron Preston of Linton: "The day the plane landed in Linton Park / late 20s. Fairbanks and Harrison operated a garage in Sussex St opposite Bryant's shop. Fairbanks was married to Carrie Murrell's sister Dorrie and William (Bill) Harrison was married to Dulcie Nicol. Among other things that the garage sold were ASTOR RADIOS. To promote ASTOR RADIO a Gypsy Moth double seater aircraft flew low over towns to advertise. ASTOR RADIO was written under both wings. by Boltes) staying overnight. Both Harrison & Fairbanks were taken up for a ride. The pilot "dive-bombed" the local children, many of them seeking shelter under the bridge, as they were frightened, not having seen a plane up close before." Sepia photograph of a biplane surrounded by a crowd of people. One of three photographs of this occasion, the others are Registration nos. 627.1 & 627.2"1st aeroplane to land in Linton 1928". events, faull collection, aeroplanes, linton park -
 Bendigo Military Museum
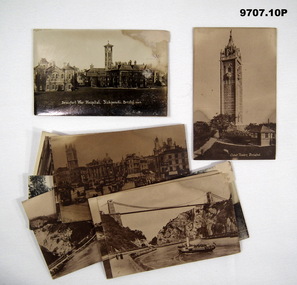
Postcard - PHOTOGRAPHIC POSTCARDS WW1, C.1918
Items in the collection relating to C.J.C. McQuie MM, refer Cat No 9680P for his service details. .1) Postcard dated 13.9.18, to McQuie's Mother, talks about his eyes getting better and that there are 2,000 lads in the Hospital. .2).3).4) Postcards dated 15.9.18. McQuie relates how he has just been appointed 2nd Lieutenant and maybe moved to an Officers Hospital. .5).6).7) Postcards dated 18.9.18, to McQuie's Mother, relates how he is now out of bed, slowly getting better. .8) Postcard dated 22.9.18, McQuie talks about the Postcard picture and his collection of Postcards on bridges. .9) Postcard dated 19.10.18. The sender appears to be Ronald Ernest McQuie No 1977 3rd Reinforcements 21st BN. .10) Postcard dated 11.11.18, "Armistice signed, I have just been before a Board. Fortnight home service then G.S."Ten Postcards. .1) B&W view of Beaufort War Hospital, text on rear in purple. .2) .3).4) Sepia tone with views around Bristol, text on rear in purple, cards are numbered 1,2 & 3. .5).6).7) Sepia tone with views around Bristol, text on rear in purple, cards are numbered 1,2 & 3. .8) Sepia tone with view of Bristol area, text on rear in purple. .9) B&W with view of Castle Walls, text on rear in black, Piece of LH corner missing. .10) Sepia tone with view in a Church Salisbury, text in black.1) to .7) All have, "Ward 20 Beaufort War Hospital". four have "Bristol" on as well. .8) "Bristol" .9) "France, Best wishes for a happy Xmas and a peaceful new year". .10) "11.11.18 Salisbury"postcards, photos, mcquie -
 Sunbury Family History and Heritage Society Inc.
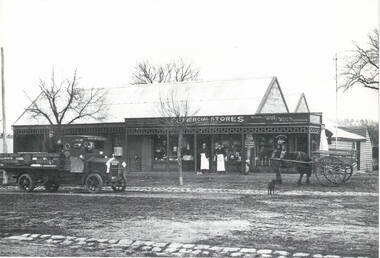
Photograph, Commercial Stores
Commercial Stores was owned and run by Peter Eadie from Perthshire in Scotland, whose brothers were John and Robert. Peter and Robert arrived in Sunbury in 1864 to help their brother John with his milling enterprise. In 1866, Peter purchased the blue stone general store in Macedon Street near the bridge. He later built the Commercial Hotel also in Macedon Street and near the Ballcourt Hotel.Before the railway arrived in Sunbury, Macedon Street was Sunbury's main commercial centre. After the establishment of the railway, the commercial centre shifted close to the railway station. The Eadie family's stately home, 'Dunblane', was on the corner of Brook and Jackson Street.A Lutheran Church now occupies the lower section of the land fronting Brook Street, but the home has a local heritage listing. Peter Eadie became a Shire of Bulla councillor and President in 1880. Dunblane is from the Scots Gaelic -'dun' is a fortified hill and 'Blane' a missionary.The Eadie Family established one of Sunbury's general stores in the town and were involved in many other commercial activities.A print of a non-digital black and white photograph of a country general store. A medium sized vintage open tray truck is parked in front of the shop on the LHSand a horse-drawn open cart is on the RHS of the image.eadie family, peter eadie, commercial stores, macedon street, businesses -
 Flagstaff Hill Maritime Museum and Village
Container - Try pot, c. 20th century
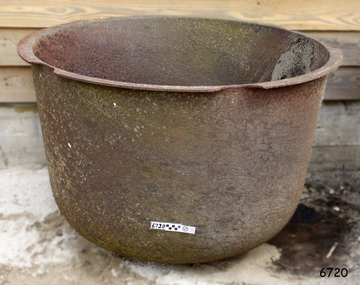
This try-pot is one of a set of three. Whalers used large iron pots, called try-pots to liquefy large chunks of whale blubber down into oil. Early on in the history of whaling, small whaling boats had no means to process blubber at sea and had to bring it into whaling stations for processing at shore-based try-works. Later, when bay whaling evolved and large scale vessel were utilised for hunting whales, try pots were mounted onto the top deck. This advance had its benefits as the processing facilities were mobile, whalers could move operations to follow whales and discover new whaling grounds. The deceased whale would be tied up alongside the ship, the crewmen cut away the blubber, or outer fat layer, in long strips. They hauled the strips aboard, cut them into smaller pieces, and tossed them into boiling cauldrons on deck to render the fat into oil. The whale oil was stored in barrels in the cargo hold, and brought to put for sale. The oil was much sought after as a good quality fuel tor heating, light and lubrication. Try pots were used in the whaling industry, one of the very early industries in Colonial Australia, including here on the southwest coast of Victoria. The high grade oil was a much sought after product and used for essential services such as fuelling the lights of the lighthouses. Commercial whaling ceased in Australia in 1979.Try pot, one of a set of three. A large cast-iron cauldron of about 200 gallons in capacity. Round metal container with rounded base and flat extended lip. flagstaff hill, warrnambool, maritime museum, shipwreck coast, try pot, trypot, cauldron, whale oil, whaling, fuel -
 Flagstaff Hill Maritime Museum and Village
Container - Try pot, c.20th century
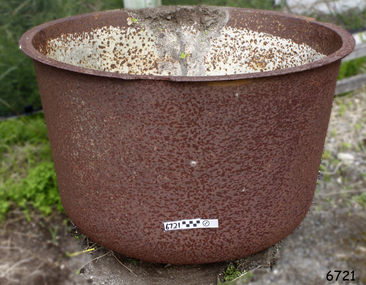
This try-pot is one of a set of three. Whalers used large iron pots, called try-pots to liquefy large chunks of whale blubber down into oil. Early on in the history of whaling, small whaling boats had no means to process blubber at sea and had to bring it into whaling stations for processing at shore-based try-works. Later, when bay whaling evolved and large scale vessel were utilised for hunting whales, try pots were mounted onto the top deck. This advance had its benefits as the processing facilities were mobile, whalers could move operations to follow whales and discover new whaling grounds. The deceased whale would be tied up alongside the ship, the crewmen cut away the blubber, or outer fat layer, in long strips. They hauled the strips aboard, cut them into smaller pieces, and tossed them into boiling cauldrons on deck to render the fat into oil. The whale oil was stored in barrels in the cargo hold, and brought to put for sale. The oil was much sought after as a good quality fuel tor heating, light and lubrication. Try pots were used in the whaling industry, one of the very early industries in Colonial Australia, including here on the southwest coast of Victoria. The high grade oil was a much sought after product and used for essential services such as fuelling the lights of the lighthouses. Commercial whaling ceased in Australia in 1979.Try pot, one of a set of three. A large cast-iron cauldron of about 200 gallons in capacity. Round metal container with rounded base and flat extended lip. It was used to heat whale blubber to remove the oil.flagstaff hill, warrnambool, maritime museum, shipwreck coast, try pot, trypot, cauldron, whale oil, whaling, fuel -
 Flagstaff Hill Maritime Museum and Village
Container - Try pot, c. 20th century
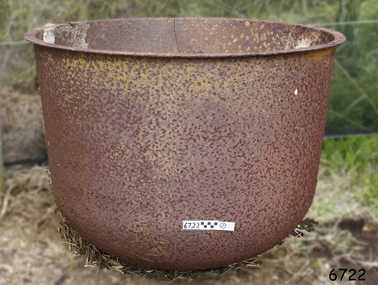
This try-pot is one of a set of three. Whalers used large iron pots, called try-pots to liquefy large chunks of whale blubber down into oil. Early on in the history of whaling, small whaling boats had no means to process blubber at sea and had to bring it into whaling stations for processing at shore-based try-works. Later, when bay whaling evolved and large scale vessel were utilised for hunting whales, try pots were mounted onto the top deck. This advance had its benefits as the processing facilities were mobile, whalers could move operations to follow whales and discover new whaling grounds. The deceased whale would be tied up alongside the ship, the crewmen cut away the blubber, or outer fat layer, in long strips. They hauled the strips aboard, cut them into smaller pieces, and tossed them into boiling cauldrons on deck to render the fat into oil. The whale oil was stored in barrels in the cargo hold, and brought to put for sale. The oil was much sought after as a good quality fuel tor heating, light and lubrication. Try pots were used in the whaling industry, one of the very early industries in Colonial Australia, including here on the southwest coast of Victoria. The high grade oil was a much sought after product and used for essential services such as fuelling the lights of the lighthouses. Commercial whaling ceased in Australia in 1979.Try pot, one of a set of three. A large cast-iron cauldron of about 180 gallons in capacity. Round metal container with rounded base and flat extended lip. It was used to heat whale blubber to remove the oil.flagstaff hill, warrnambool, maritime museum, shipwreck coast, try pot, trypot, cauldron, whale oil, whaling, fuel -
 Mission to Seafarers Victoria
Photograph, S.S. Buchanness
In an article from the Argus, Monday 7 March 1927, page 21: "Surprise was caused on the waterfront yesterday by the appearance of the Reardon Smith line steamer Buchanness, which armed in Hobson's Bay with a list to port of more than 15deg. The vessel anchored off Gellibrand yesterday morning, and a consultation was held concerning the advisability of attempting the passage up the Yarra. The list changed to 12deg. before the tug James Paterson came alongside the Buchanness, and the steamer was piloted to a berth at No 18 South Wharf by Captain K.A. Forbes. The list was caused by the consumption of the fuel oil from bunkers below the waterline and the consequent overbalancing of the vessel by the heavy deck cargo. This wass not considered dangerous by either the master of the vessel or the pilot, both of whom stated that a ship carrying timber was liable to become unstable to some extent without showing any tendency to heel over. The Buhanness comes from North Pacific lumber ports with 4,300,000 super feet of red wood, oregon, and spruce timber, all of which will be discharged at this port to the agency of C.A. Wilms and Son. The discharge will occupy about three weeks.weller album, s.s. buchanness, timber, lumber, 1927, oregon -
 Mission to Seafarers Victoria
Photograph
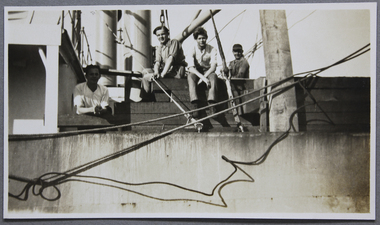
In an article from the Argus, Monday 7 March 1927, page 21: "Surprise was caused on the waterfront yesterday by the appearance of the Reardon Smith line steamer Buchanness, which armed in Hobson's Bay with a list to port of more than 15deg. The vessel anchored off Gellibrand yesterday morning, and a consultation was held concerning the advisability of attempting the passage up the Yarra. The list changed to 12deg. before the tug James Paterson came alongside the Buchanness, and the steamer was piloted to a berth at No 18 South Wharf by Captain K.A. Forbes. The list was caused by the consumption of the fuel oil from bunkers below the waterline and the consequent overbalancing of the vessel by the heavy deck cargo. This wass not considered dangerous by either the master of the vessel or the pilot, both of whom stated that a ship carrying timber was liable to become unstable to some extent without showing any tendency to heel over. The Buhanness comes from North Pacific lumber ports with 4,300,000 super feet of red wood, oregon, and spruce timber, all of which will be discharged at this port to the agency of C.A. Wilms and Son. The discharge will occupy about three weeks.weller album, s.s. buchanness, oregon, timber, lumber, 1927 -
 Glen Eira Historical Society
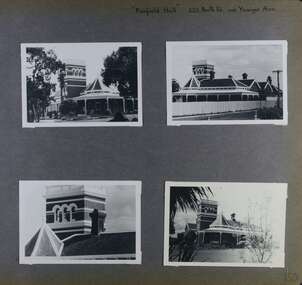
Album - Album page, Fairfield Hall, 225 North Road, Circa 1972
This photograph is part of the Caulfield Historical Album 1972. This album was created in approximately 1972 as part of a project by the Caulfield Historical Society to assist in identifying buildings worthy of preservation. The album is related to a Survey the Caulfield Historical Society developed in collaboration with the National Trust of Australia (Victoria) and Caulfield City Council to identify historic buildings within the City of Caulfield that warranted the protection of a National Trust Classification. Principal photographer thought to be Trevor Hart, member of Caulfield Historical Society. Most photographs were taken between 1966-1972 with a small number of photographs being older and from unknown sources. All photographs are black and white except where stated, with 386 photographs over 198 pages. Glen Eira Heritage Management Plan 1996 by Andrew Ward https://www.gleneira.vic.gov.au/media/4777/heritage_mment_plan_vol_3b.pdf (as of 27/01/2021) - p90 An imposing single storeyed Italianate bi-chromatic brick villa with three staged tower surmounting the entry and facetted corner bay with conical roof. White tuckpointed black body bricks are relieved with reds and stucco work. Gable ends are fretted and there is a concave cast iron verandah to the principal elevations.Victorian Heritage Database (as of 27/10/2020) - HO49 225 North Road Caulfield South https://vhd.heritagecouncil.vic.gov.au/places/42426 "Maniar" (?) is a substantial late Victorian Italianate villa with tower and extensive grounds built for Frederick Curwan, an inspector of the National Bank, in 1890. It is aesthetically and historically important. An imposing single storeyed ltalianate bi-chromatic brick villa with three staged tower surmounting the entry and facetted comer bay with conical roof. White tuckpointed black body bricks are relieved with reds and stucco work. Gable ends are fretted and there is a concave cast iron verandah to the principal elevations. It is aesthetically important as an imposing and substantially intact villa residence demonstrating the changing architectural fashions of the 1890's, evidenced by the use of face brickwork and fretted gables in the Queen Anne manner. It is historically important for the manner in which it demonstrates the lifestyle to which a businessman could aspire during the boom period.Page 150 of Photograph Album with four landscape photographs of Fairfield Hall on North Road.Handwritten: "Fairfield Hall" 225 North Rd cnr Younger Ave [top right] / 150 [bottom right]trevor hart, jenny o'donnell, verandah, porch, tower house, tower, mansion, three storey tower, bichromatic brickwork, fairfield hall, 1890's, george jobbins, conical roofed projecting corner bay, conical roofed bay, timber ceilings, north road, younger avenue, frederick wallis curwan, curwan, italianate, queen anne, australian homestead, arched windows, curved windows, columned parapet, return verandah, fairfield estate, fairfield street, slate roofed, red brick, polychrome bricks, victorian style, cast iron work, caulfield south, maniar, house names -
 Flagstaff Hill Maritime Museum and Village
Photograph - Captain F Chapman SS Dawn
The Dawn steamship was a 522-ton coastal trader built in 1876 and it’s original captain Jones operated the vessel around the Victorian west coast from 1877 until 1898 for the Portland & Belfast Steam Navigation Co, the vessel was then owned in October 1885 by the renamed company, Belfast & Koroit Steam Navigation Co., until March 1896 when it’s ownership moved to W Howard Smith & Sons Ltd., This Melbourne company used the ship to service most ports around Australia. Captain F Chapman took over from captain Jones and served on the SS Dawn from 1898 until 1900 when he took command of the SS Casino operated by the Belfast & Koroit Shipping Company at Port Fairy and became the captain from 1900 until 1922 when he retired after twenty-two years becoming the ships longest-serving captain. Captain Roberts took over command until 1924 followed by captain Middleton until 1932 when the Casino was sunk off Apollo Bay and captain Middleton collapsed and died in the surf. Picture of a long serving sea captain connected with a significant ship that was involved in a significant historical incident prior to his taking command of the vessel also his long time association with Port Fairy's Belfast Steam Navigation Company until 1922.Photograph of Captain Chapman framedCaptain F Chapman SS Dawnflagstaff hill, warrnambool, shipwrecked-coast, flagstaff-hill, flagstaff-hill-maritime-museum, maritime-museum, shipwreck-coast, flagstaff-hill-maritime-village, photograph, captain chapman, ss dawn -
 Flagstaff Hill Maritime Museum and Village
Photograph - SS Dawn
The SS Dawn steamship was a 522-ton coastal trader built in 1876 and it’s original captain Jones operated the vessel around the Victorian west coast from 1877 until 1898 for the Portland & Belfast Steam Navigation Co, the vessel was then owned in October 1885 by the renamed company, Belfast & Koroit Steam Navigation Co., until March 1896 when it’s ownership moved to W Howard Smith & Sons Ltd., This Melbourne company used the ship to service most ports around Australia. Captain F Chapman took over from captain Jones and served on the SS Dawn from 1898 until 1900 when he took command of the SS Casino operated by the Belfast & Koroit Shipping Company at Port Fairy and became the captain from 1900 until 1922 when he retired after twenty-two years becoming the ships longest-serving captain. Captain Roberts took over command until 1924 followed by captain Middleton until 1932 when the Casino was sunk off Apollo Bay and captain Middleton collapsed and died in the surf. Photograph of SS Dawn at Portland. Building in background Portland and Belfast Steamship CompanySS Dawnflagstaff hill, warrnambool, shipwrecked-coast, flagstaff-hill, flagstaff-hill-maritime-museum, maritime-museum, shipwreck-coast, flagstaff-hill-maritime-village -
 8th/13th Victorian Mounted Rifles Regimental Collection
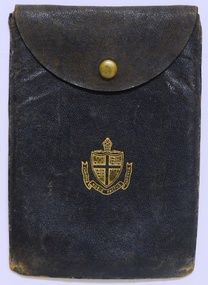
Wallet, 1941 circa
Geoffrey R Fink volunteered for military service in early 1940. He served initially with 3rd Division A.A.S.C. but was discharged as being in a reserved occupation at the Aircraft Production Commission. He resigned from the Commission and joined the AIF on 28 July 1941 and was allotted to 2/8th Armoured Regiment. He served with the regiment in New Guinea and on return to Australia was transferred to No 41 Landing Craft Company serving out the war in the South Pacific. The 2/8th Armoured Regiment was raised in June 1941 under the command of Lieutenant Colonel W G Hopkins with officers and men selected from the wider AIF in Victoria. The regiment trained in newly arrived M3 General Grant tanks at Puckapunyal before moving north to Singleton, then the Wee Waa plains. The regiment sailed for New Guinea in April 1943 and carried out mobile defence to airfields at Port Moresby, Milne Bay, Dobadura and Popondetta. The regiment returned to Australia in February 1944 and disbanded as an armoured regiment and retrained as Nos 41, 42 and 43 Landing Craft Companies. They returned to the South West pacific serving at Bougainville, Balikpapan, Lae and Wewak.Representative of gifts made to old boys serving in WWII (1939-45) by a school association. Forms part of a comprehensive collection relating to one soldier.Leather pay book cover presented by Old Geelong Grammarians to VX 60307 Trooper Geoffrey Fink, 2/8th Armoured Regiment together with presentation certificate.Signatures on presentation certificate " Leigh Falkiner, J.S.Cook" and third signature unreadable.2/8th armoured regiment, 41 landing craft company, fink geoffrey r mr, old geelong grammarians -
 City of Greater Geelong
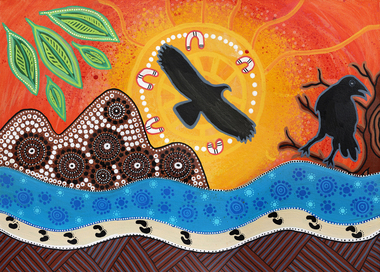
Painting - Acrylic on Canvas, Billy-Jay O'Toole, Wadawurrung Country and Connection, 2019
The blue section of the paining represents our amazing ocean, bays, rivers, creeks and wetlands. The white creamy section represents our coastline with the footprints imbedded into the sand tells the story of our old people who have been so connected to this coastline for many thousands of years, the mountain represents the You Yangs which holds a special part of our history here on Wadawurrung country, the 7 gathering circles in the mountain represents the 7 family groups within Wadawurrung, WAA the crow he is our protector here on country and Bundjil is our creator which is why I have implemented these 2 birds into my painting, the u shape people symbols represents my family of 5 generations still living on Wadawurrung country, my great grandmother Joye Eccles my pop norm Eccles my mum Corrina Eccles myself and my beautiful daughter Alira, the eucalyptus leaves up the top is a part of cleansing I have incorporated therese leaves because this country is cleansed everyday by he family when conducting a smoking ceremony.Painting of Eagle and Crow with water and footprints below. Brown, orange, blue, green, black used.bundjil, you yangs, wadawurrung -
 Royal Brighton Yacht Club
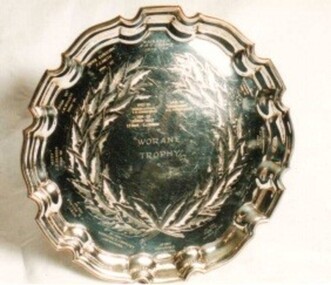
Tray, Worane Trophy (Tray)
Worane Trophy (Tray) Donor: Deed of Gift: The yacht Worane was built in 1915 for Brighton Sailing Club member Lionel Drury and who later joined Hobsons Bay Yacht Club where he later became Commodore. Worane was originally built as a top mast cutter and remained so until 1949 when RBYC members Ross Farrow and Harry Tyrell purchased her. Peter Timms also joined the crew at that time. Worane became a regular part of the RBYC racing fleet and also became known as a great party boat. In 1970 Worane was sold to a new syndicate headed by Leigh Weber and continued to race at RBYC until sold in 1983. Worane is currently being restored at Williamstown. The syndicate donated the trophy for an annual race RBYC to Port Arlingtom on IRC handicap, however due to berthing difficulties at Port Arlington the race was sailed over a mid-distance RBYC course and in 2010/11 the race was changed to RBYC to Queenscliff. The Worane race also now forms part of the Ingenue Series for cruising yachts on PHD handicap. First Winner: Wairaker, A. Larking 1979/80 worane, drury, phd, cruising -
 Flagstaff Hill Maritime Museum and Village
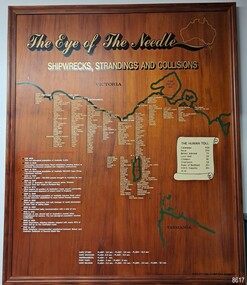
Artwork, other - Shipwreck Board, The Eye of the Needle: Shipwrecks, Stranding's and Collisions, ca 2002
The Shipwreck Board is a feature of Flagstaff Hill Maritime Museum and Village/ its subject is explained briefly in the Museum's handbook, The Flagstaff Hill Navigator, published in 2008: - "Known as the ‘Eye of the Needle’ the treacherous entrance to Bass Strait is littered with the wreckage of large international vessels and smaller sail and steam craft used in coastal trade. The vessels bringing emigrants and cargo to Australia found the western entrance to Bass Strait the most dangerous part of their voyage. They had to thread their way between the southern point of Victoria (Cape Otway) and the northern point of King Island, a stretch of water less than 90 km wide. Many smaller coastal vessels were lost at Portland, Port Fairy, Warrnambool and Apollo Bay which are not safe harbours in certain weather conditions. "The Shipwreck Board shows shipwrecks, strandings and collisions which occurred in this area up to the year 1940. Wrecks are identified by a yellow light and collisions/strandings by a green light. These lights also identify the decade the wreck occurred by lighting up when the relevant decade button is pushed. Interesting happenings of the decades are listed next to the buttons." The Shipwreck Board's demonstration of The Eye of the Needle is an interactive visual display that helps teach the perils and dangers faced by early settlers in Victoria. It tells of the vast number of lives lost. It lists the names of many infamous shipwrecks and significant events.The large stained and lacquered timber board is mounted in a timber, frame. It is painted with a small sketch of Australia, and an enlarged outline of the southern coast of Victoria, King Island and the North West coast of Tasmania. The interactive display highlights the shipwrecks, standings and collisions suffered by many vessels as they navigated the 'Eye of the Needle', a narrow stretch of Bass Strait. The locations of the Lighthouses are pinpointed. Lists of groups of ships are below the coastlines. A painted scroll shows eight major shipwrecks with the number of lives lost for each one. A table shows historical facts associated with the decades from pre-1830 to 1940. A system of coloured lights compares the decades with the vessels that suffered damage. The board was created by artist and signwriter, Alex O'Flynn Computer Signs.flagstaff hill, maritime museum, maritime village, shipwreck coast, eye of the needle, shipwreck locations, bass strait, basses strait, king island, north west tasmania, south coast of victoria, cape otway, victorian lighthouse, king island lighthouse, strandings, coastal tracers, emigrant ships, sea trade, 1930s-1940s, shipwreck board, the eye of the needle, collosions, alex o'flynn, alex o’flynn computer signs, shipwrecks of western victoria -
 Federation University Historical Collection
Ephemera - Regional Schools Outreach Program, Federation University Australia, Regional Schools Outreach Program(RSOP) - University of Ballarat, 2013
University of Ballarat is a predecessor of Federation University .1 Bridging Courses and Pathway Programs A4 Flyer .2 University. How to make it happen! - A4 Booklet 17 pages .3 VTAC 2013 - A4 Flyer .4 SEAS - Special Entry Access Scheme - A4 Flyer .5 Who me @Uni? take a look booklet - A4 10 pages .6 Focus on Your Future - Parent's Guide 2013 - A4 Booklet 8 pages .7 Focus on your future - Year 9 - A4 13 page booklet .8 focus on your future - Year 9 Teacher's Guide - A4 Booklet 13 page booklet .9 Grade5/6 Stepping Up - Reach for the stars - Teacher's Guide - A4 Booklet 15 pages .10 Open Days 2013 - A4 Flyer .11 Regional Schools Outreach Program Information Flyer - A4 university of ballarat, regional schools outreach program, rsop, bridging courses, pathway programs, university how to make it happen, vtac, seas, special entry access scheme, who me @ uni?, take a look, focus on your future, parent's guide, year 9, teacher's guide, stepping up, reach for the stars, open days -
 Ballarat Tramway Museum
Document - Digital Image, E-mail, John Phillips, "No. 569 Wednesday Photos Ballarat Trams 50 years since closure", 3/10/2021 12:00:00 AM
Yields information about the tram services in Ballarat operated by the SEC and the BTM or BTPS in relation to celebrating the 50 years of closure of the SEC system.E-mail dated 22-9-2021, from John Phillips containing eight digital images titled "No. 569 Wednesday Photos Ballarat Trams 50 years since closure" with personally recollections. 1 - seven page e-mail when printed - last page blank Photos 2 - 12 and 21 in Lydiard St North - see btm5383i 3 - 40 in Lydiard St North - see btm 4133i 4 - 28 in Bridge St - see btm 3219i 5 - 33 at Cemetery gates - see btm8193i2 6 - line up of trams tailed by tram 21 in Sturt St West - see btm8193i3 7 - BTM 27 and 33 cross at Gardens Loop - see btm8193i4 8 - BTM 27in Wendouree Parade - see btm8193i5 9 - 27 and 38 - the base for a postcard photo - see btm1781i1 trams, tramways, closure, lydiard st north, bridge st, btm, cemetery, sturt st west, wendouree parade -
 Ballarat Tramway Museum
Photograph - Digital image Set of 5, George Coop, 1968 - 1970
Yields information about the tram operations at the intersection of Bridge and Grenville St and Sturt St.Five (5) Digital images taken by George Coop during the period 1968 - 1970, of SEC trams in the Grenville St area. .1 - Tram 31 crossing Grenville St to pick up passengers in Sturt St - the shelter in the foreground and the Woolworth's Big W store in the background. .2 - Tram 17 picking up a passenger at the Shelter, with the Dickins store in the background. Tram has a "Make Bliss not Love" roof advert and has a destination of Gardens via Sturt St West. .3 - Tram 13 - as for .1 .4 - ditto with 12 in the City Loop - in the background are the Magnet Bakery, Begonia City Butch and Gilbert and Jury shop. .5 - Tram 26, in Bridge St, with the points at Grenville St in the foreground. Tram has the destination of Gardens via Sturt St West. In the background are the shops for Faull's shoes and Suttons HMV. trams, tramways, grenville st, shelters, bridge st, sturt st, city loop, passengers, tram 31, tram 17, tram 13, tram 12, tram 26 -
 Ballarat Tramway Museum
Photograph - B&W print of donated negative, Ron E. Fluck, 23/06/1962 12:00:00 AM
Black and white print of a donated negative. Print made 8/1998. Photo of SEC tram no. 31 in Main St, Ballarat East, with destination of "Gardens via Drummond St." Tram has been fitted with dash canopy lighting, but not the large white strip under the lighting. Has small triangles on the panels. Also has a small ad for White Horse whisky. Shows buildings on either side of Main St. and the Caltex service station in the background on Main Road and Bridge St. Photo taken 23-6-1962. Copy made Oct. 2001 for the "gold, Gold GOLD" temporary exhibition - colour laser print onto card, with Velcro dots on rear. Stored in box D1 (Display Box) 02/2003. High Res scan of negative added 17/1/2019.tramways, trams, main st, 31, ballarat, tram 31 -
 Ballarat Tramway Museum
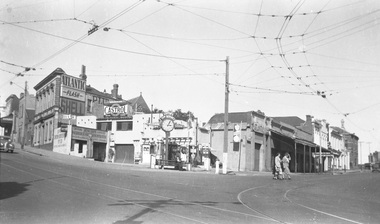
Photograph - B&W print of donated negative, Ron E. Fluck, 23/04/1950 12:00:00 AM
Black and white print of a donated negative. Print made 8/1998. Photo of the Lister's Junction Service Station, overhead and tram track at the intersection of Bridge St, Main St and Victoria St. (Stones Corner). Shows the style of overhead construction, signal contactors, the service station, its clock and associated advertising. Three ladies are crossing the road. Photo taken on 23.4.1950 at 3.05pm. Advertising on service station has Atlantic, Shell, and Castrol. Has multiple petrol dispensing bowsers. Clocks has directional arrows for Melbourne and Geelong. Tram tracks visible. Copy made Oct. 2001 for the "gold, Gold GOLD" temporary exhibition - colour laser print onto card, with Velcro dots on rear. Stored in box D1 (Display Box) 02/2003. high res scan of the negatives added 18/1/2019.tramways, trams, bridge st, stones corner, ballarat, main st -
 Ballarat Tramway Museum
Album - Photo Album, Ron Scholton, "661", c1989
A photo album, spiral bound with 10 cardboard sheets with photos of late Alf Twentyman cable car set on covers. Each sheet coated with a glue and overlain by a plastic sheet. Album contains 34 photos of BTM W3 661operating in Melbourne 1989 on a charter for Yapper Tours. - no date on photos. Photos taken at Preston depot, South Melbourne loop, Camberwell depot, Thornbury depot, Preston Workshop gates, Sth Melb. depot, Victoria Parade, St Kilda, Brunswick depot, Victoria Market and Kew depot. Also six photos of W1 427 at Kooyong and Dandenong Roads, St Kilda, Batman Avenue, Swan St. bridge, Hawthorn and Wattle Park. See also Reg Item 5986 for a larger more formal album of photographs. Sample of images added 19-12-2016trams, tramways, w3 class, melbourne, w1 class, yapper tours -
 Ballarat Tramway Museum
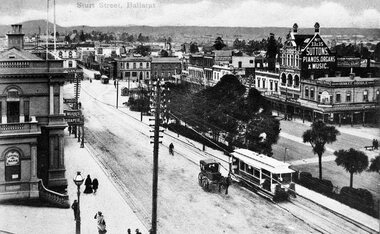
Photograph - Black & White Photograph/s, c1905
Black and white print with negative (N148) of an ESCo tram descending the Sturt St. hill from Lydiard St. North towards Grenville St. Photograph taken from possibly the post office. looking south east. Photo taken soon after opening as tram is not fitted with a destination box. Has horse drawn vehicle and person on bicycle travelling up hill alongside the tram indicating traffic arrangements at the time. Post office steps in photograph as well as Sutton store, Yankee Doodle store and Morris draper shop. Photo title "Sturt St. Ballarat". Another two tramcars at end of Bridge St. Copy negative and photograph by John Phillips of a Postcard High Res Images added 5/3/2011. Original neg scanned at hi res and updated 11/5/2020.trams, tramways, sturt st, esco, grenville st, bridge st -
 Ballarat Tramway Museum
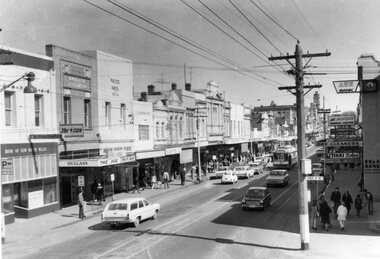
Photograph - Black & White Photograph/s - set of 2, The Courier Ballarat, Sep. 1971
Yields information about the nature of the street scene in Bridge St prior to closure of the system, showing the traffic, people getting off a tram and the buildings. One photo used in the Courier Supplement to mark the closure of the system.Black and White copy photographs of a newspaper photograph taken by The Courier - published 20/9/1971 in the Courier supplement of No. 32 inbound in Bridge St. Possibly taken early September 1971, prior to closure of Mt Pleasant. Both photographs very similar, tram has moved off from stop in the 2nd one. Shows Bank of New South Wales, Gallants News Agency, Walter Davis Pty Ltd, E. Glitch, ANZ Bank (ES&A) buildings. Also has signs for AVCO financial services, Tikki Salon and a Dry Cleaner. Taken from the east side of Peel St. Photo used in the Courier Supplement following the closure of the tramways. Collected by Alan Bradley from the Ballarat Courier early 1980's. See Excel file "Record of Ballarat Courier Photos SEC era" (Archive Documents) for source of details.On rear of 4772.2 stamped "Copyright, The Ballarat Courier Proprietary Limited."tramways, trams, bridge st, peel st, tram 32 -
 Bendigo Historical Society Inc.
Document - IAN DYETT COLLECTION: AUCTION CATALOGUE - HUME RESERVOIR
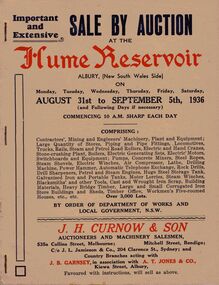
Pale beige auction catalogue with red and dark blue printing for a sale held from the 31st August to 5th September 1936 at the Hume Reservoir, Albury, (New South Wales Side) By Order of Department of Works and Local Government, N. S. W. For sale was Contractors', Mining and Engineers' Machinery, Plant and Equipment, Stores, Locomotives, Tools, Petrol and Steam Engines, Tanks, Scrap, Building Materials, Heavy Bridge Timber, Buildings, and Workmen's Five-roomed Houses, etc. J. H. Curnow & Son were the auctioneers. Black and white photos include Lots 2065 and 2622 Kelly & Lewis Engine and Condensing Plant with G.E.C. Dynamo, Generating 300 K.W.; Lot 2018 Locomotive; Lots 2617 and 2618 Steam Road Rollers; Lot 2069 Administrative Offices; and Lot 93 Locomotives (Victorian Side).business, auctioneers, j h curnow & son pty ltd, ian dyett collection - auction catalogue - hume reservoir, department of works and local government nsw, j h curnow & son, j l jamieson & co, j b garnsey, a t jones, bolton bros pty ltd -
 Bendigo Historical Society Inc.
Album - Harris Collection: Art Folio
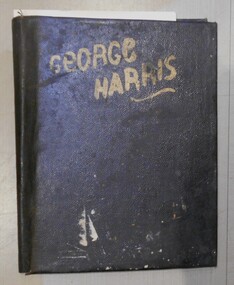
Black leather covered album containing forty two drawings and paintings belonging to the Harris Family of Axedale. Written on the front cover of the album in gold paint is the name George Harris. The album has been used as a folio to hold the artworks. The artworks vary in size and those with dates range from 1886 - 1942. Nineteen are signed or initialled by George Harris and six by D Harris. One is signed by W W May. The others are unsigned. There is a range of mediums - pencil, water colour, chalk, charcoal, paint. They are mostly country landscapes, many including structures such as fences and bridges, some with farm animals, some with water. The D Harris collection includes a cat and a goblet. Study of a French Fishing Boat. Watercolour by Captain Walter William May. https://www.istockphoto.com/vector/study-of-a-french-fishing-boat-19th-century-gm1143359556-307028737 G Harris and D Harris signatures on some. W W May signature on one.harris family, axedale -
 Ballarat Tramway Museum
Magazine, Australian Electric Traction Association (AETA), "The Trolley Wire", Vol 1, No. 6, "The Trolley Wire", Vol 3, No. 5, Jul. 1952
Yields information about Sydney trams in the early 1950s and demonstrates means of publishing information of the era.105.1 - Spirit duplicated magazine, 8 quarto pages, single sided - " The Trolley Wire", Vol 1, No. 6, July 1952, stapled down along the left hand side. Has items on Brisbane, with map, Brisbane news, Sydney news, Gladesville to Lane Cove proposed tramway and Western Suburbs Destination Roll, 1947 - 1950. 105.2 - Spirit duplicated magazine, 9 quarto pages, single sided - " The Trolley Wire", Vol 3, No. 5, 20th May 1954, stapled down along the left hand side. Has notes on association matters, map of tramways in the Moore Park area, Drummoyne Bridge and Iron Cove tram lines, Easter workings, Sydney news. See Reg Item 5685 for other Vol 1 issues and Reg Item 5686 for Vol. 2 issues. Scan with care.Vol 3, No. 5 has pencil inscription of "H.Matthews"trams, tramways, tramway news, history, sydney, brisbane -
 Kew Historical Society Inc
Photograph, J F C Farquhar, The Post Office, 1891
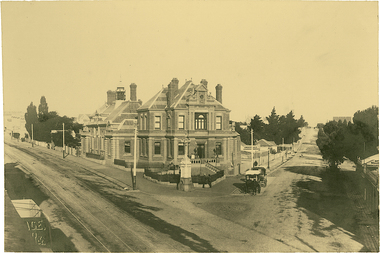
At the beginning of the 1890s, the Kew businessman and Town Councillor, Henry Kellett, commissioned J.F.C. Farquhar to photograph scenes of Kew. These scenes included panoramas as well as pastoral scenes. The resulting set of twelve photographs was assembled in an album, Kew Where We Live, from which customers could select images for purchase.The preamble to the album describes that the photographs used the ‘argentic bromide’ process, now more commonly known as the gelatine silver process. This form of dry plate photography allowed for the negatives to be kept for weeks before processing, hence its value in landscape photography. The resulting images were considered to be finely grained and everlasting. Evidence of the success of Henry Kellett’s venture can be seen today, in that some of the photographs are held in national collections.It is believed that the Kew Historical Society’s copy of the Kellett album is unique and that the photographs in the book were the first copies taken from the original plates. It is the first and most important series of images produced about Kew. The individual images have proved essential in identifying buildings and places of heritage value in the district.A panoramic photograph of the junction of High Street and Cotham Road. The photographer centres the point-of-view on the Kew Post Office and adjacent Court House. These were designed in the Queen Anne style by the Public Works Department's architect J Harvey and completed in 1888. The complex is important because it demonstrates a departure from the contemporaneously favoured High Victorian Classical to the Queen Anne style in the design of civic buildings. The earlier Jubilee Fountain in front of the Post Office was erected by the Kew Borough Council to commemorate the Golden Jubilee of Queen Victoria in 1887. It was created to a design of the architects Reed, Henderson and Smart. The fountain was later relocated to the Alexandra Gardens to make way for the Kew War Memorial. The tram tracks in High Street were used by the horse tram, which ran from the Victoria Street Bridge to the Boroondara General Cemetery. The tram was replaced by an electrified service in 1915.The Post Officekew post office, kew illustrated, kew where we live, photographic books, henry kellett -
 Kew Historical Society Inc
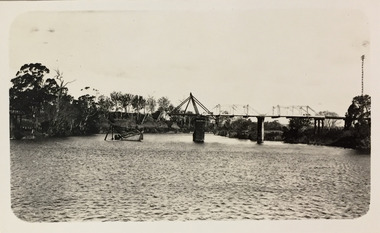
Photograph - Bridge over the Tambo River, 1926
Henry Beater Christian (1886-1962) , was a descendant of one of the earliest settler families in Kew. Employed at the Kew Asylum as a 'public servant', he was a skilled amateur photographer, photographing numerous scenes in Kew and on his travels around Victoria. The majority of his photographs date from 1916 to 1929. His finest photographs are housed in two photograph albums. Digital copy of a photograph from page 31 of the 47-page photograph album containing 261 gelatinous silver images, loaned by Diane Washfold with permission given to digitise and hold a copy in our collection. John Chapman has written in 'Bushwalking Clubs - A Brief History', about the establishment in Victoria of the first bushwalking club in 1888, and the popularisation of bushwalking during the interwar period. Henry Christian's 'walks' appear to have been undertaken solely or with a companion/s. This black and white photo is part of a group of six photos taken on an 18 kilometre walking trip between Bruthen and Swan Reach in East Gippsland in 1926. The route of the walk followed the Tambo River. The photographer has focussed the view on a ruined bridge, presumably caused by a flood, crossing the river. Sections of the left hand pier and span can be seen in the river."BRUTHEN TO SWAN REACH 1926"henry beater christian (1886-1962), landscape photography, christian-washfold collection, photograph albums, bushwalking, bruthen, swan reach, tambo river, east gippsland -
 Bacchus Marsh & District Historical Society
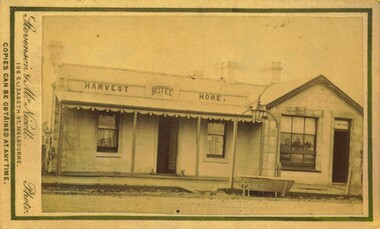
Photograph, Harvest Home Hotel Main Street Bacchus Marsh 1883
The Harvest Home Hotel was licensed as a beer shop in 1866. Patrick Vallence was the licensee. On his death in 1874 his widow Mrs M. A. Vallence obtained the license. At the time this image was taken George Marshall was leasing the hotel. Following a decrease in the population of Bacchus Marsh, by 1911 the hotel had lost its licence.The Vallence family still owned the building after the loss of the hotel licence in 1911and it was used for some years after this as a private residence by some members of the Vallence family. Small sepia unframed photograph on card with gold border framing photograph. Housed in the album, 'Photographs of Bacchus Marsh and District in 1883 by Stevenson and McNicoll', the Jeremeas Family Album. The image depicts the Harvest Home Hotel situated in Main Street Bacchus Marsh. The name of the hotel can be seen above the verandah roof. The building appears to be of stone with decorative stonework corners. A verandah is inset to the left of a gabled front section which has its own door and window. On either side of the door beneath the verandah can be seen boot or shoe scrapers. A deep gutter runs along the front of the hotel, with a slab acting as a bridge to the road. Situated in the gutter at the front of the hotel is a water trough which has an arch above it with an ornate lantern, probably to light the front entry and to enable horses to be watered at night. A hitching post is nearby.On the front: Stevenson & McNicoll. Photo. 108 Elizabeth St. Melbourne. COPIES CAN BE OBTAINED AT ANY TIME. On the back: LIGHT & TRUTH inscribed on a banner surmounted by a representation of the rising sun. Copies of this Portrait can be had at any time by sending the Name and Post Office Money Order or Stamps for the amount of order to STEVENSON & McNICOLL LATE BENSON & STEVENSON, Photographers. 108 Elizabeth Street, MELBOURNE. hotels bacchus marsh, stevenson and mcnicoll 1883 photographs of bacchus marsh and district, vallence family bacchus marsh, harvest home hotel bacchus marsh