Showing 1279 items matching "hawthorn railway"
-
 Melbourne Tram Museum
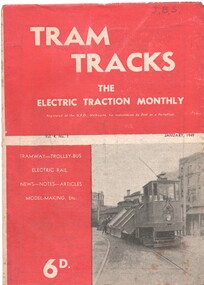
Magazine, Jack Richardson, "Tram Tracks - The Electric Traction Monthly", Jan. 1949
Vol. 4 No. 1, January 1949 of "Tram Tracks - The Electric Traction Monthly" of the Australian Electric Traction Association. Magazine consists of 20 printed pages, with a single staple on the saddle. Contains a photo of the construction of the Victoria Parade tram line, article "Trams and the Motorist", items on Melbourne (Bourke St, "Higher costs with Buses - Melbourne Experience", Brisbane, Newcastle, Sydney, Monorails, railway map of Australia track gauges, (centre page), Brisbane Tramways, Melbourne and Sydney electric trains, and letter to the Editor from John Buckland - not supportive of Bourke or Latrobe St tramways. Issue has advertisements for the Model Dockyard, ARLHS, The Hobby Shop, Barnes Tennis Centre, Fleet, Christie Model Railway Equipment of Sydney, Meadmore Model Engineering, Austral Bronze, Wattle Park, Traction Publications and Robilt "O" gauge locomotives, Parker & Gray, The Model Dockyard,Has initials "JBS" in top right hand corner in pencil.trams, tramways, electric traction, aeta, australian tramways, mmtb, pcc, sydney, newcastle, brisbane, bourke st -
 Melbourne Tram Museum
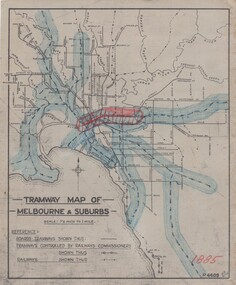
Drawing, H. S McComb, "Tramway Map of Melbourne & Suburbs", mid 1930's
Set of 19 drawings showing the development of the Melbourne tramway system between 1885 and 1921. Based on MMTB drawing "Tramway Map of Melbourne & Suburbs" P4609, 18 sheets showing year by year development of the cable and electric tram system, printed on off white paper. Mr. McComb had intended it would appear to do further work - with some 20 sheets printed on brown card paper but not used (.19 - same drawing) Each sheet has the year in red at the bottom right hand corner of the sheet. .1 - 1885 - with the Richmond line and main rail lines coloured in showing a catchment area. .2 - 1886 - shows the new cable line in Collins St and has a note that no suburban line constructed in 1886 .3 - 1887 - Bourke and northern lines and Brighton Beach to Sandringham and Hawthorn to Kew .4 - 1888 - Swanston St, Domain Road, Chapel and inner circle and towards Hurstbridge.\ .5 - 1889 - Rathdown St and Toorak Road .6 - 1890 - South and Port Melbourne, North Melbourne and Northcote. Rail lines - Ashburton and parts of the outer circle to Oakleigh. .7 - 1891 - St Kilda Esplanade and northern section of the outer circle. .8 - 1906 - NMETL .9 - 1910 - PMTT - High St and Wattletree Road .10 - 1911 - PMTT Dandenong Road .11 - 1913 - Glenferrie Road, Cotham Road, Balaclava and Glenhuntly Road .12 - 1914 - small extension in High St .13 - 1915 - Malvern Road and High St Kew .14 - 1916 - HTT and MBCTT lines and Whitehorse Road .15 - 1917 - Burke Road .16 - 1918 - Burke Road north of Camberwell station .17 - 1920 - FNPTT - St Georges Road and Plenty Road .18 - 1921 - Footscray lines .19 - base drawing only. Does not show the VR tramlines. See Reg Item 2154 for associated notes.See individual sheets.trams, tramways, times, cable trams, railways, tramways, melbourne, maps -
 Melbourne Tram Museum
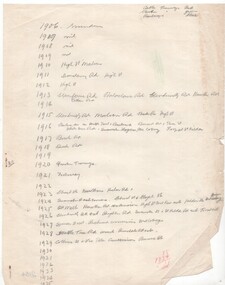
Document - Research Notes, H. S. McComb, Timeline of tramway development Melbourne, mid 1930's
Quarto plan sheet with hand written notes for the development of the drawings referred to in Reg Item 2153 - from 1906 to 1929, years 1930 and 1935 not completed. In the top right hand corner has the colour code to be used.trams, tramways, times, cable trams, railways, tramways, melbourne, maps -
 Melbourne Tram Museum
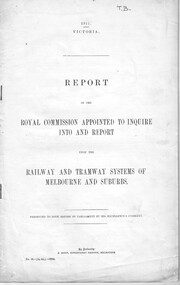
Document - Report, Parliament of Victoria, "Report of the Royal Commission - Railway and Tramway systems on Melbourne and Suburbs", Nov. 1911
Report - 42 pages, 3 sections, stapled on the left hand edge, titled "Report of the Royal Commission appointed to inquire into and report upon the Railway and Tramway systems on Melbourne and Suburbs" - dated 1911. Looks at the state of the Suburban rail system, finances, electrification's, costs, evidence of Mr. Merz, advantages of the electrification, power supply and standards, whether AC or DC, duplication, Glen Iris line, conclusions and recommendations. Tramway - summarises the current tramways operating, cable system and operational stats, the current tramway systems, other cities, relative merits, future tramways for Melbourne, operational speeds, use of cable conduits for electric traction, conversion, municipal control , control of the tramways by the railways, a general scheme, formation of a larger tramway trust and its management, purchase of the cable tramways and recommendations. Note: This document is available as a pdf on the Parliament of Victoria website. 2nd copy added 2-1-2019 from donation of Norm Cross.In ink in the top right hand corner "TB"trams, tramways, tramways, cable trams, finances, conversion, railways, royal commission, costs -
 Melbourne Tram Museum
Document - Report, Victorian Railways, Victorian Railways - Report of the Victorian Railways Commissioners, 1925
... Melbourne Tram Museum 8 Wallen Road Hawthorn melbourne ...Report - stapled and bound within blue light card covers, 118 pages + 10 photo pages + 5 diagram or graph pages + fold out map titled "Victorian Railways - Report of the Victorian Railways Commissioners for the Year ended 30th June 1925". Has a With Compliments slip on the inside front cover. Note: This document is available as a pdf on the Parliament of Victoria website.trams, tramways, railways, finances, financial statements, annual reports, costs -
 Melbourne Tram Museum
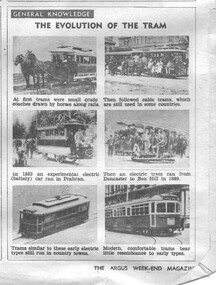
Newspaper, The Argus, The evolution of the tram, 1947 to 1950
Set of three newspaper cuttings from The Argus - Students section. .1 - General Knowledge - has photos of 6 Victorian tramcars with notes - 3/5/1947 - has advert for Parsons Custard Powder on the rear. .2 - Travel - Tramways and Protests - about the derivation of the word tramways and railways and their development -6/5/1950. 3 - Australiana - Australia's first electric tram - details the Box Hill to Doncaster tramway with an image of the poster - 15/7/1950.trams, tramways, tramways, box hill, doncaster, tramcars -
 Melbourne Tram Museum
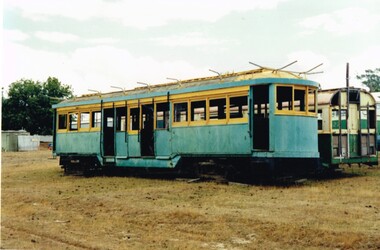
Photograph - Set of 4 Colour Print/s, Norm Cross, 1/01/1994 12:00:00 AM
Set of four colour prints of an Ex Victorian Railways bogie tram body at Sloan NSW. Photo by Norm Cross, printed on AGFA paper. Photo dated 1/1/1994. Advised by Tony Smith - 29/3/2017 "The tram in question is VR 39. It was one of the last 4 trams disposed of from Elwood depot in 1959 after the system closed. They were purchased complete by Upton's machinery dealers of Corowa. The other cars were 29, 33 & 37. He then stripped them and sold the bodies. When we obtained VR 41 in 1977 we immediately went searching for other bodies that might yield parts to help in rebuilding 41. We located 37 on the outskirts of Wangaratta and it yielded many body items including a complete drivers bulkhead that was used to replace the one in VR 41 that had been cut out with an axle by the previous owner. You may also recall that we obtained 3 complete broad gauge 77e trucks from Upton's (they had cut up the other 5 bogies years previous). These 77E trucks are now under the Christchurch Brill tram with the 3rd as a spare as we were able to obtain standard gauge 77e's when we acquired L 105 for dismantling."Each photo has written in ink on the rear "Body of VR tram # @ Sloan NSW 1 Jan 1994, photo by Norm Cross".trams, tramways, vr trams, sale of trams, scrapped trams, tram 39 -
 Melbourne Tram Museum
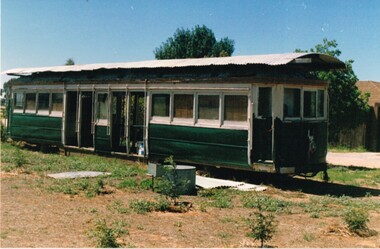
Photograph - Set of two Colour Prints, Lloyd Rogers, 8/02/1998 12:00:00 AM
Set of two colour prints of an Ex Victorian Railways bogie tram body of tram 35 at Bylands, 8/2/1998. Photo by Lloyd Rogers, printed on Kodak Paper. .1 - view of tram from the outside sitting on a set of bogie. .2 - Interior view of tram.Each photo has written in ink on the rear the details and date of the photograph and the negative number.trams, tramways, vr trams, sale of trams, scrapped trams, tmsv, bylands, tram 35 -
 Melbourne Tram Museum
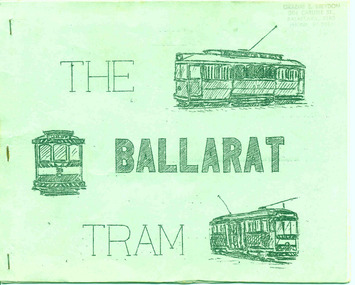
Book, A. Weston & Geoff Clark of North Sydney Boys High School, "The Ballarat Tram", 1967
Twenty page booklet on the history, operation and tramcars of Ballarat, produced by the Nth Sydney Boys High School Railway Club in July 1971. Printed on a wax cut stencil process, with manilla colour covers, drawings, maps, track layout, fleet list, gives tentative closure dates, route descriptions, sketches, stapled on edge. Title "The Ballarat Tram". Stapled on the left hand side. pdf image of copy - may not open properly in dbtext. find file and open directly.trams, tramways, ballarat trams, secv, tramcars, ballarat -
 Melbourne Tram Museum
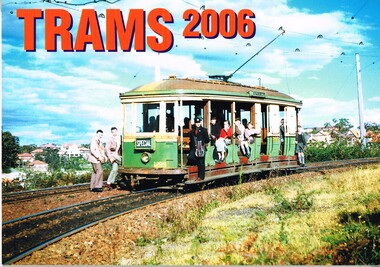
Ephemera - Calendar, Topmill Pty Ltd, "Trams - 2006", 2005
Wall Calendar - heavy card covers, 12 gloss art pages inside, titled "Trams - 2006" containing full colour photographs of Rockhampton, Ballarat, Fremantle, Grenoble France, Geelong, Sydney, Brisbane, VR Sandringham and Transporting Art Melbourne trams. Has a punched hole along the top edge to enable wall use. Provides dates for holidays, school holidays and Pension payment days and phases of the moon. Produced by Topmill Pty Ltd and distributed by Gordon & Gotch Pty Ltd. Photos by Archer Park, William Scott, A. W. Perry, Ben Parle, Maurice Kelly, Ken Smith,trams, tramways, rockhampton, ballarat, fremantle, geelong, sydney, brisbane, victorian railways, sandringham, brisbane, transporting art, tram 2107, tram 50, tram 384, tram 340, tram 497, tram 567 -
 Melbourne Tram Museum
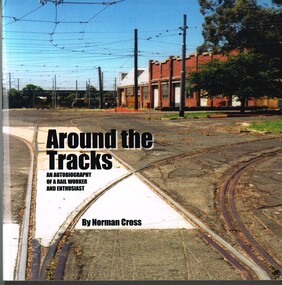
Book, Norm Cross, "Around the Tracks", 2004
Book - perfect bound - card covers - 186 pages printed on off white paper + 32 pages gloss paper printed with a mixture of black and white and colour photographs. An autobiography of a Rail Worker (Preston Workshops) and Enthusiast Norman (Norm) Cross. Tells the story of Norm, his work at Preston Workshops, characters, work mates, his travels within Australia and overseas and family. Has photographs of his work, travels and family. Published by Norm Cross 2004.trams, tramways, preston workshops, mmtb, mta, railways, tramways, heritage -
 Melbourne Tram Museum
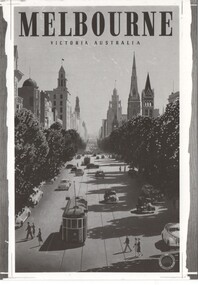
Postcard, Public Records Office of Victoria (PROV), "Melbourne", c2012
Postcard - printed on gloss paper of an illustration of Collins St Melbourne, a Victorian Railways Poster, c1950, titled "Melbourne Victoria Australia", reproduced by the Public Records Office of Victoria. The rear, divided back, details the function of the PRO, gives the locations of the PRO offices, contact details, logos and details of the poster. "Poster No. 220 Artist Trompf" and the PRO filing details. Three copies held.trams, tramways, posters, victorian railways, public records office, illustrations, collins st, melbourne -
 Melbourne Tram Museum
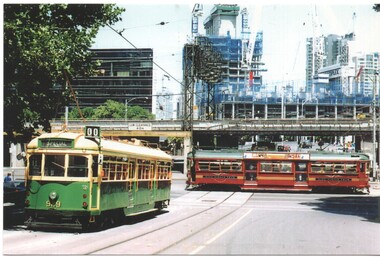
Postcard, Association of Railway Enthusiasts (ARE), Melbourne trams 929 and a City Circle tram, c2000
Colour postcard of Melbourne trams 929 and a City Circle tram at the intersection of Market and Flinders St with the Flinders St viaduct in the background. Date unknown. c2000 Postcard produced by Railcard for the Association of Railway Enthusiasts, Photo Ray Marsh. ARE No. 12/06. Has ARE logo, shop details and hours, space for small message, address and stamp.trams, tramways, melbourne, flinders st, city circle, market st, tram 929 -
 Melbourne Tram Museum
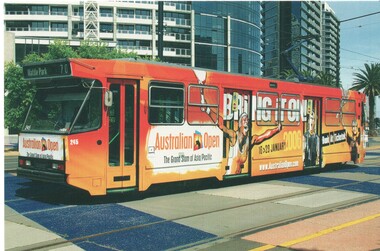
Postcard, Association of Railway Enthusiasts (ARE), Melbourne trams A245, Jan. 2006
Colour postcard of Melbourne trams A245, advertising the Melbourne Open Tennis tournament, January 2006, in the Docklands Area. Photo Ian Green. Postcard produced by Railcard for the Association of Railway Enthusiasts, ARE No. 8/06. Has ARE logo, shop details and hours, space for small message, address and stamp.trams, tramways, melbourne, a class, decorated trams, tram 245 -
 Melbourne Tram Museum
Postcard, Association of Railway Enthusiasts (ARE), Melbourne trams W6 909, Feb. 2006
Colour postcard of Melbourne trams W6 909, all over advertising or decorated for Australia Day, Feb. 2006 in the Docklands area, with Tattersall sponsorship logos. Photo Ian Green. Postcard produced by Railcard for the Association of Railway Enthusiasts, ARE No. 7/06. Has ARE logo, shop details and hours, space for small message, address and stamp.trams, tramways, melbourne, w6 class, decorated trams, docklands, tram 909 -
 Melbourne Tram Museum
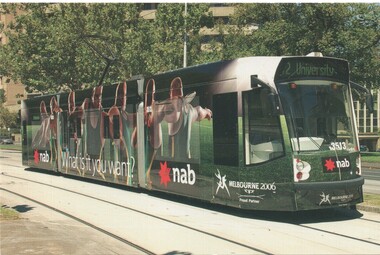
Postcard, Association of Railway Enthusiasts (ARE), Melbourne tram D 3513 advertising NAB, St Kilda Road, Mar. 2006
Colour postcard of Melbourne tram D 3513 advertising NAB, St Kilda Road, March 2006. Tram has the destination of University. Photo Ian Green. Postcard produced by Railcard for the Association of Railway Enthusiasts, ARE No. 5/06. Has ARE logo, shop details and hours, space for small message, address and stamp. 2nd copy added 22/7/2020.trams, tramways, melbourne, d class, decorated trams, advertising trams, st kilda rd, tram 3513 -
 Melbourne Tram Museum
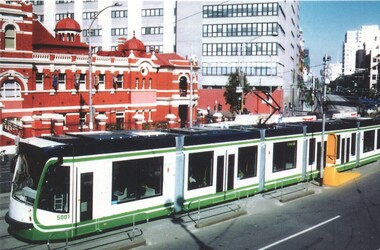
Postcard, Association of Railway Enthusiasts (ARE), D 5001 in the early M Tram colour scheme, 2006
Colour postcard of Melbourne tram D 5001 in the early M Tram colour scheme, with the Melbourne City baths in the Background, Swanston Sth 2006. Photo Ray Marsh, possibly late March 2004 after formal commissioning. Postcard produced by Railcard for the Association of Railway Enthusiasts, ARE No.11/06. Has ARE logo, shop details and hours, space for small message, address and stamp.trams, tramways, melbourne, d class, m>tram, swanston st, tram 5001 -
 Melbourne Tram Museum
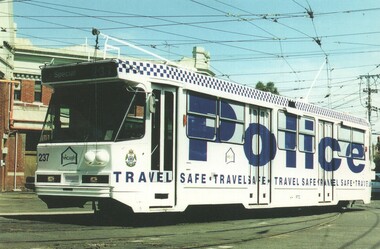
Postcard, Association of Railway Enthusiasts (ARE), A 237 for Victoria Police, Travel Safe campaign, 2007
Colour postcard of Melbourne all over advertising tram A 237 for Victoria Police, Travel Safe campaign, departing Malvern Depot. Photo Ray Marsh, March 1994. http://vicsig.net/index.php?page=trams&article=adtrams - gives the date of 19/3/1994 for entry into service for this advertising - accessed 13/4/2017. Postcard produced by Railcard for the Association of Railway Enthusiasts, ARE No.13/07. Has ARE logo, shop details and hours, space for small message, address and stamp.trams, tramways, melbourne, a class, malvern depot, advertising trams, decorated trams, tram 237 -
 Melbourne Tram Museum
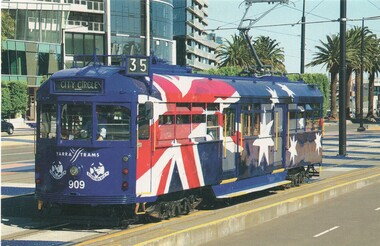
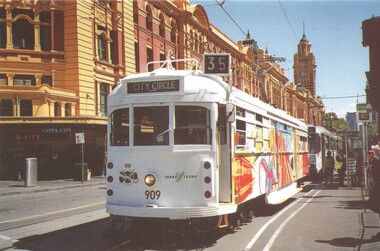
Postcard, Association of Railway Enthusiasts (ARE), decorated tram W6 909, painted for the centennial of electric trams in Melbourne, 2007
Colour postcard of Melbourne tram all-over advertising or decorated tram W6 909, painted for the centennial of electric trams in Melbourne with Flinders St Station in the background. Tram operating a City Circle Service, October 2006. Photo by Earl Ewers. Postcard produced by Railcard for the Association of Railway Enthusiasts, ARE No.14/07. Has ARE logo, shop details and hours, space for small message, address and stamp.trams, tramways, melbourne, advertising trams, decorated trams, flinders st station, centenaries, 100 years of electric trams, route 35, city circle, tram 909 -
 Melbourne Tram Museum
Document - Personal Papers, Jack McLean, Keith Kings, "Tramway / Railway level crossings", 1954
Set pf personal papers concerning tramway / railway level crossings in Melbourne. Consist of .1 - letter to Ross dated 19/3/1984, carbon copy from Jack McLean, printed on computer paper perforated computer paper torn into strips - has hand written notes. Three separate sheets. Covers Market St Melbourne (Queensbridge) South Melbourne (City Road) St George Road - North Fitzroy Queens Parade Clifton Hill Epsom Road Showgrounds Glenferrie Road Hawthorn Glenferrie Road Malvern Burke Road Camberwell, Glenferrie Rd Kooyong, Burke Road Gardiner Glenhuntly Road Glenhuntly Glenhuntly Road Elsternwick, Whitehorse Road (Deepdene), Riversdale Road, Riversdale Lygon St North Carlton Nicholson St Footscray Nicholson St North Fitzroy, .2 - six pages - retype of above document on A4 computer printing paper - covers the same material. .3 - Hand drawing of the Melbourne rail system with crossing dates including bridges noted on it for cable and electric tramways. Has initials KK 12/54 in bottom right hand corner. drawn on lined double width foolscap paper.trams, tramways, level crossings, railway squares, tramway square, cable trams -
 Melbourne Tram Museum
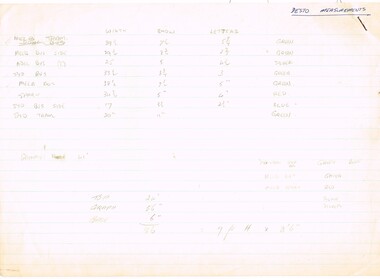
Document - Report, Charles Craig, "Destination Measurements", 1970's
Report - on two A4 sheets hand written in pencil, stapled in the top left hand corner, giving destination sign measurements and layouts on Melbourne and Sydney trams and buses and Adelaide buses and Victorian Railways suburban trains. Prepared by Charles Craig, c1970's. Gives the width, the depth or show and the size of the letters. Titled "Desto Measurements"trams, tramways, trams, buses, destination indicators, destination roll -
 Melbourne Tram Museum
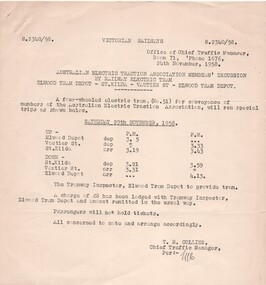
Document - Notice, Victorian Railways, "Australian Electric Traction Association Member's Excursion by Railway Electric Tram - Elwood Depot - St Kilda - Vaulter St - Elwood Tram Depot", 24/11/1958 12:00:00 AM
Quarto Sheet Gestener printed notice titled "Australian Electric Traction Association Member's Excursion by Railway Electric Tram - Elwood Depot - St Kilda - Vaulter St - Elwood Tram Depot", advising of the tour on 29 Nov. 1958. Gives times, tram No. 52, and ticket details. Signed by T. R. Collier, Chief Traffic Manager, 24 November 1958.trams, tramways, aeta, vr, tours, special trams, st kilda, elwood depot, tram 51 -
 Melbourne Tram Museum
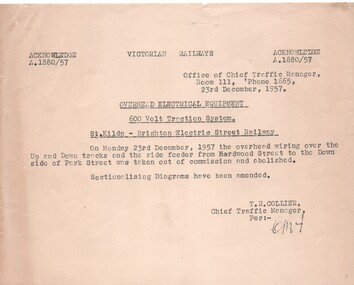
Document - Notice, Victorian Railways, "Overhead Electrical Equipment - 600V Traction System - St Kilda - Brighton Electric Street Railway", 23/12/1958 12:00:00 AM
Half foolscap Sheet Gestener printed notice titled "Overhead Electrical Equipment - 600V Traction System - St Kilda - Brighton Electric Street Railway" advising that the overhead and feeder between Hardwood St and Park St was taken out of service and abolished. Signed by T. R. Collier, Chief Traffic Manager, 23 Dec. 1957.trams, tramways, aeta, vr, overhead, closure, st kilda -
 Melbourne Tram Museum
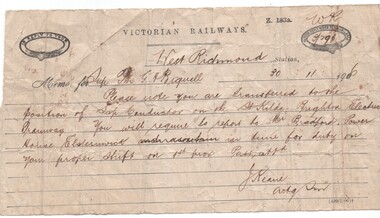
Document - Memorandum, Victorian Railways, Victorian Railways Memorandum, dated 30-11-1906 re St Kilda tramway, 30/11/1906 12:00:00 AM
Victorian Railways Memorandum, dated 30-11-1906 on VR printed form Z 183a, advising Porter (?) G. H. Biquell (?) that he had been transferred to the position of Conductor on the St Kilda Brighton Electric Tramway from 1/12. He was to report to Mr. Bradford at the Power Station, Elsternwick. Signed by J. Keane Acting Station Master West Richmond station. Has been completed using a form with a perforated edge on the left hand side.trams, tramways, victorian railways, st kilda brighton, conductors, personnel, elwood -
 Melbourne Tram Museum
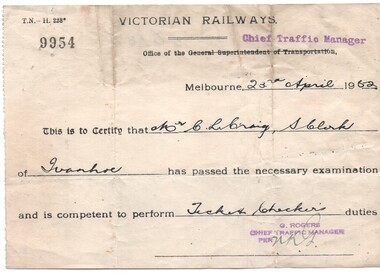
Document - Memorandum, Victorian Railways, Victorian Railways Memorandum re C Craig, 23/04/1962 12:00:00 AM
Victorian Railways Memorandum, dated 23 April 1962, on VR printed form TN - H 228, that Senior Clerk Mr. C. Craig of Ivanhoe had passed the necessary examination and was competent to perform ticket checkers duties. Signed under the stamp of the Chief Traffic Manager. Has been completed using a form with a perforated edge on the left hand side. Form No. 9954.trams, tramways, victorian railways, personnel, tickets -
 Melbourne Tram Museum
Document - Tour Notes, Australian Railway Historical Society (Vic Div) (ARHS), "ARHS Vic Div Melbourne Tram Tour - Sunday March 21st 1976", Mar. 1976
Tour Notes - four foolscap pages - 2 stapled sheets - Gestener printed, titled "ARHS Vic Div Melbourne Tram Tour - Sunday March 21st 1976", giving details, route description including open dates, some notes on the adjacent rail lines, trams to be used (VR 53, W6 995, W5 761, W2 639 and W2 635. Organised by Norm Cross. Lists crews and those who assisted with the notes. Two copies held.trams, tramways, arhs, tours, tour guide, tram 53, tram 995, tram 761, tram 639, tram 635 -
 Melbourne Tram Museum
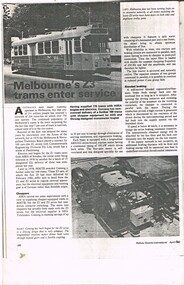
Document - Photocopy, Railway Gazette International, "Melbourne's Z3 trams enter service", c1980
Photocopy, two foolscap sheets, stapled in top left hand corner, of an article that appeared in the April 1980 issue of Railway Gazette International, pages 286 - 287, titled "Melbourne's Z3 trams enter service", giving details of the Z3 class trams, its control systems, construction, operation, braking, bogies and suppliers. Also has an article on the Frankfurt U3 metro cars.trams, tramways, z3 class, new trams, comeng, duwag, assembly, asea -
 Melbourne Tram Museum
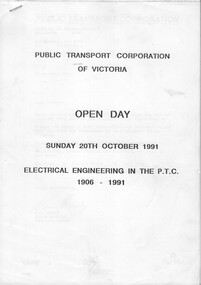
Document - Report, Public Transport Corporation (PTC), "Electrical Engineering in the PTC 1906 - 1991", Oct. 1991
Report or Programme for the Sunday 20th October 1991, PTC Open Day 23 A4 photocopied sheets + A3 folded drawing stapled in the top left hand corner titled "Electrical Engineering in the PTC 1906 - 1991". Describes the history of electric traction systems and engineering in Victoria for both rail and tram operations, overhead wiring systems, lighting and power supplies, with photos of Newport Power Station, Jolimont, Camberwell, Preston tramway substations. The last sheet has a drawing, poor quality of the 1500V DC railway traction system.trams, tramways, ptc, overhead, substation, electrical engineering, electric traction, open days -
 Melbourne Tram Museum
Drawing, Melbourne & Metropolitan Tramways Board (MMTB), "Plan of Tramway System - showing route mileage of electric tramways", Late 1960's
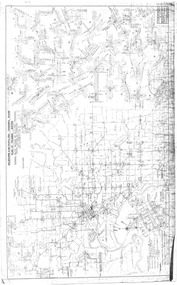
Drawings - dyeline print - titled - "Plan of Tramway System - showing route mileage of electric tramways" - Principal Junctions and intersections shown diagrammatically. Map of system shown at 40 chains to the inch. Drawing No. P6050. Shows crossovers, signal cabins, automatic points, closed cable tram lines in the city area, roads, railways and stations. Originally signed by Perway Engineer - 31-7-1951, last update March 1963. Has a list in the bottom left hand corner of abandoned cable tram lines. See Reg Item 1638 for a 1987 version and 3642 for a 1941 version.trams, tramways, mmtb, trackwork, tramways, junction, map -
 Melbourne Tram Museum
Magazine, Association of Railway Enthusiasts (ARE), "Tram Tracks - Vol 1 - No. 3 - July 1946", Jul. 1946
Magazine - five Gestener duplication sheets - titled "Tram Tracks - Vol 1 - No. 3 - July 1946" - the Journal of Association of Victorian Tramway Enthusiasts. Has notes on the PCC car, Glenhuntly depot tour, construction of the Latrobe St tram line, C class 36 "dog car", use of T class cars, W3 class trams, U206, Ballarat 16, notes from other cities, Sydney, notes on VR tramcars and details of the Association.trams, tramways, melbourne, t class, w3 class, vr trams, glenhuntly tram depot