Showing 9701 items matching "merry-go-round"
-
 Kew Historical Society Inc
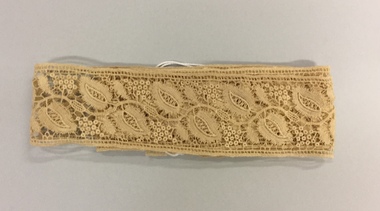
Textile - Lace Edging
The Fashion & Design collection of Kew Historical Society includes examples of textiles dating from the 18th, 19th and 20th centuries. Some of the textiles, were used as items of clothing, others as items of household decoration, or simply as travel souvenirs. These textiles were created both domestically and internationally. Predictably with the growth of an ethnically and culturally more diverse community in Kew after the Second World War, textiles, clothing and objects in the collection inevitably reflected this diversity. This form of bobbin lace is made in Malta. It is a guipure style of lace. Maltese lace is worked as a continuous width tape lace on a tall, thin, upright lace pillow called a "Trajbu" and the Bobbins are called "Combini" . Bigger pieces are made of two or more parts sewn together. Lace made in Malta was originally needle lace, from the 16th to the 19th century, when the economic depression in the islands nearly led to the extinction of lacemaking there. But in the mid 1800s, Lady Hamilton Chichester sent lacemakers from Genoa to Malta. They used the old needle lace patterns and turned them into bobbin lace, which was quicker. It was not long after its introduction that the Maltese lace developed its own style from Genoese lace. Maltese lace was shown at The Great Exhibition of 1851 and it became popular in Britain. The style was copied by lacemakers in the English Midlands, and it was one of the sources for Bedfordshire lace. Maltese lace usually has the following characteristics which are useful for identification: It is usually made from cream silk. There is often the 8 pointed Maltese cross as part of the pattern, worked in whole or cloth stitch.The pattern may also have closely worked leaves known as “wheat ears” or “oats”. These are plump and rounded in shape, rather than the long narrow leaves of other types of bobbin lace. Maltese lace edging. It shows the Wheat ears, characteristic of Maltese lacelace, maltese lace, lace tape -
 Kew Historical Society Inc
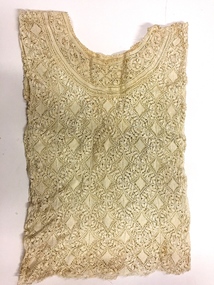
Clothing - Maltese Lace Chemisette, 1900s
The Fashion & Design collection of Kew Historical Society includes examples of textiles dating from the 18th, 19th and 20th centuries. Some of the textiles, were used as items of clothing, others as items of household decoration, or simply as travel souvenirs. These textiles were created both domestically and internationally. Predictably with the growth of an ethnically and culturally more diverse community in Kew after the Second World War, textiles, clothing and objects in the collection inevitably reflected this diversity. This form of bobbin lace is made in Malta. It is a guipure style of lace. Maltese lace is worked as a continuous width tape lace on a tall, thin, upright lace pillow called a "Trajbu" and the Bobbins are called "Combini" . Bigger pieces are made of two or more parts sewn together. Lace made in Malta was originally needle lace, from the 16th to the 19th century, when the economic depression in the islands nearly led to the extinction of lacemaking there. But in the mid 1800s, Lady Hamilton Chichester sent lacemakers from Genoa to Malta. They used the old needle lace patterns and turned them into bobbin lace, which was quicker. It was not long after its introduction that the Maltese lace developed its own style from Genoese lace. Maltese lace was shown at The Great Exhibition of 1851 and it became popular in Britain. The style was copied by lacemakers in the English Midlands, and it was one of the sources for Bedfordshire lace. Characteristics of Maltese lace. Maltese lace usually has the following characteristics which are useful for identification. It is usually made from cream silk. There is often the 8 pointed Maltese cross as part of the pattern, worked in whole or cloth stitch.The pattern may also have closely worked leaves known as “wheat ears” or “oats”. These are plump and rounded in shape, rather than the long narrow leaves of other types of bobbin lace. Camisole, made of silk thread Maltese bobbin lace that is constructed of lengths of lace forming two rectangles with a hole for the neck. Shows the characteristic Maltese cross and wheat ears. Fabric is made of tape lace joined togethercamisoles, maltese lace, bodices -
 Wodonga & District Historical Society Inc
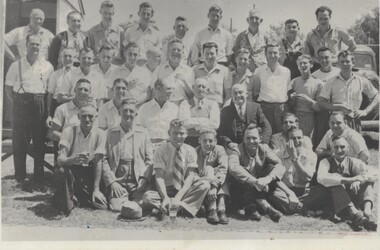
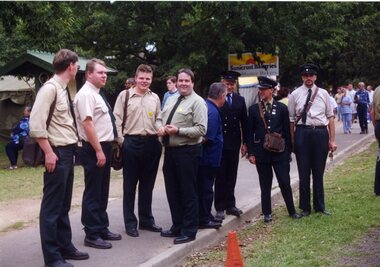
Photograph - Fred Rochow Railways Collection - Driver George Padgett's Retirement 1955
The Fred Rochow Railways Collection incorporates photos related to the operation of the Wodonga Railway Station including different types of trains and railways staff C. 1930 – 1990. It was donated to the Wodonga Historical Society by Fred Rochow, a railwayman who spent many years based in Wodonga. He joined the Victorian Railways on 17th June l947 and retired in 1988. For some time, he was a member of the Australian Federated Union of Locomotive Enginemen and served a term as a member of the Trades Hall Council. He had an extensive knowledge of the struggles that took place to achieve better conditions for railway workers. Fred worked for many years as a fireman and then worked his way up the ranks to driver, experiencing many changes from the days of steam locomotives through to diesel trains, locomotives and even the modern XPT train. He worked throughout Victoria at different stages of his career, with his final working years focused on the northeast of Victoria and the Albury to Melbourne line. After his retirement, Fred continued to share his love of steam miniature trains with the community. George Padgett was born into a railway family in Numurkah, Victoria on 3 February 1890. He began working for the Victorian Railways as a junior clerk in Maryborough and gained his Driver’s ticket in 1913 at North Melbourne. In November 1937 when the “Spirit of Progress” made its first run from Melbourne to Albury, he was moved to Wodonga. From the train's first return trip he took over the driving. During his career, he made an average of 92 round trips a year. George made his last trip on 4 February 1955 prior to his retirement. George died in Wodonga on 19 February 1967. This collection has local and statewide significance as it captures images of trains, locomotives and personnel who operated the railway services in Wodonga and throughout Northeast Victoria. The railways played a critical role in opening up Victoria and connecting Australia for trade, business, social communication and transport.A group of men gathered at a retirement function for George Padgett in 1955. George was a driver on the "Spirit of Progress". Back Row: Cyril Hughes, Steve Cuper, Ted Hamilton, Lloyd Holmes, George Lloyd, Frank Fulford, Tom Guinane (?), Mick Kowalzuk (?) Centre Row: Bill Welsh, Eric Molloy, Tom Fitzgerald, Reg Feitz (?), Unknown, George Taylor, Bill Baldock, Reg Matthews, Ted Jenkins, Buddy Straghan(?), Unknown. Seated Front Row: Vic Jones, Vin Snow, Jack Dawe. George Padgett, Alex Reid, ? Lawson, Unknown, Austin Fulford, Doug West, Wally Riley, Norm Davey, Unknown, Wally McGeachin (Clerk), Morrie Flanigan.railways wodonga, fred rochow, k class locomotives -
 Bendigo Historical Society Inc.
Document - LONG GULLY HISTORY GROUP COLLECTION: FRENCH'S CORNER AND VILLAGE PARLIAMENTS
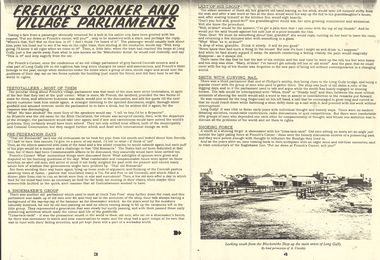
Copy of pages 3 and 4 titled French's Corner and Village Parliaments. Some passengers travelling on the tram would ask to be put down at French's corner. The conductor had no idea where it was. The passenger would be returning to where he used to live or work. The old who met at the pub corner were mostly teetotallers, but they met at the pub where the publican provided the two forms of seats for them and if business was slack he would join in the discussion. Another group met at Uncle Tom Foss' shop further down the road. This group was made up of old men over 80 and they met inside the shoemaker's shop. One old man used to go to his granddaughter's house and sit beside the kitchen fire and then he would tell her he had a pain beneath his ribs and she would give him a little wine to drink. Then he lost the last of his cronies and he went slowly up the hill and told his granddaughter he had nobody left but his old stick. The pain of being left without contemporaries made him forget about the pain in his side. There was another group that met at Philpot's smithy. The men would talk and argue while the smith was shoeing the horses. This smith has a long finger- nail on his left hand which he would use to pick up horse shoe nails as he was shoeing the horse. The bottom of the page has a photo of the main street of Long Gully taken from the Blacksmiths Shop.bendigo, history, long gully history group, the long gully history group - french's corner and village parliaments, manchester arms, french's hotel, mr french, uncle tom foss' shop, philpot's smithy, a crossley -
 Ballarat Tramway Museum
Photograph - Digital image Set of 10, George Coop, 1968 - 1970
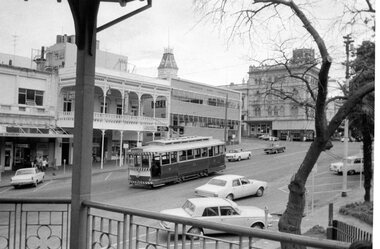
Yields information about the tram operations and the landscape views of the Sturt St median strip.Ten (10) Digital images taken by George Coop during the period 1968 - 1970, of SEC trams in Sturt St, between the City and Pleasant Streets. .1 - Tram 26 climbing the Sturt St hill to Lydiard St, with the Cook's Private Hotel, the Commonwealth Bank and the National Mutual Life building in the background. Photo taken from the Titanic Bandstand. .2 - Tram 40 Sturt St, enough to Lydiard St North just before Raglan St. Has a lady passenger by the tram stop. .3 - Tram 30 - Sturt St north side, near Armstrong St, - has a blue framing line around the photograph. .4 - Tram 39, Sturt St, near Doveton St, shows the rotunda in the median strip. .5 - Tram 18, with median step in view. .6 - Tram 31, with two Johnnie Walker whiskey roof adverts, outside the National Mutual Life building with the Alan Bros Jewellers and Golden Star Chinese Cafe in the view. .7 - Tram 31, Sturt St south side with Town Hall and the Golden City Hotel in the view. Tram has destination of Gardens via Drummond North. .8 - Tram 41 - ditto - going to Sebastopol. .9 - Tram 13, south side, Gardens via Sturt West, about , near Ripon St, with the Ampol service station in the background and about to pick up a lady passenger .10 - Tram 17, near Doveton St. Has a Twin Lakes sign and a Wilkinson Sword Razor Bladese roof advert. trams, tramways, sturt st, raglan st, passengers, doveton st, tram 26, tram 40, tram 30, tram 39, tram 18, tram 31, tram 41, tram 13, tram 17 -
 Ballarat Tramway Museum
Newspaper, The Courier Ballarat and The Age, "Fight to save Ballarat trams", "Paddle Steamer Study Planned", 1971
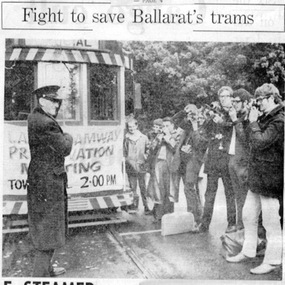
Set of two newspaper clippings pasted onto a single sheet of paper with two Punch holes on the left hand side. First clipping from The Age, p4, dated May 31, 1971 of the setting up of the BTPS by a group of young people the previous day. Has photo of a group taking a photo of the driver (Mr. Les Bird) holding the trolley pole rope. Notes that they hope to keep six trams going, tram to be operated on a voluntary basis similar to Puffing Billy, many of the group were Melbourne students and that the Ballarat contingent was consciously small. The first cutting also has a small piece on the top edge, cut out from the same newspaper referring to the article on page 4, titled "TRAMS". (Source newspaper advised by Alan Bradley 5/7/02 and updated). Second is from The Courier, Ballarat, 8/6/1971, about a Murray River paddle steamer company writing to the City of Ballaarat offering to undertake a feasibility study and discuss with Council the operation of pleasure craft on Lake Wendouree, Also mentions the establishment of the BTPS and its proposals and its letter to Council. See Reg, Item 2487 for print of photograph supplied by the AGE newspaper July 2002. Second copy from donation of the Tom Murray Estate added 20-11-2016. Full image of newspaper article added as image i2. See also Reg Item 7033 for other photographs and tramcar notes.In red ink on the second cutting, below the first paragraph "8-6-71"trams, tramways, paddle steamer, lake wendouree, charters, museum establishment -
 Brighton Historical Society
Clothing - Bodice, circa 1865
A bodice belonging to the family of George Ward Cole in the late 1800s. George Ward Cole was an early member of the Victorian Parliament and the family featured prominently in Melbourne Society in their time. They established a substantial home known as “St Ninians” at 10 Miller Street in 1841. The family reportedly entertained Melbourne’s first Royal visitor The Duke Of Edinburgh, Queen Victoria’s second son, at St Ninians in 1867. In later years St Ninians was subsequently subdivided and later demolished. A hand sewn cream silk satin evening bodice from c.1865. This bodice features a very low, wide scooped neckline with a set in sleeve and four small pleats across the head of the shoulder. The elbow length, straight fitted sleeves are trimmed with a pleated ruffle that extends around the arm finishing at the elbow crease at the inside arm and tapering to mid forearm length at the back. The fitted bodice, lined with waxed linen, fastens down the centre front with eight covered buttons of the bodice fabric. The front two panels wrap around the sides of the bodice to meet another series of panels creating a princess line with a delineated central spine. The waist position is just below the natural waist at the sides, tapering to an elongated front covering the belly. From the sides towards the back it curves up to the natural waistline and then down again to a central point. The bodice is decorated with strips of the same fabric, which has been tucked, pleated and padded to create ruching. The ruching edge has a multi coloured thread, suggestive of rosettes, on both sides. In the front of the bodice, a strip runs down the centre front, concealing the buttonholes, and finishing at the elongated point. It then goes up the bodice over the bust line where it meets the neckline. It follows the neckline around the nape of the neck and back down the front over the bust line to the centre front. More strips run around the base of the fitted sleeve near the elbow above the ruffle. The rosette like coloured thread finishes the base of the ruffle. st ninians, george ward cole, bodice, late 1800s, brighton, margaret morrison ward cole -
 Woodend RSL
Uniform - Great coat, 1967
It is a woolen khaki green great coat, with inter shoulder lining of khaki green canvas. There are back belt loop holes in the interior, lined by the same canvas. The pockets are made of the same canvas and are not sew to the interior of the coat at the bottom. The insides of the sleeves are lined with a more beige khaki green material. There is a split flap that is 500mm long in the middle at the bottom of the coat, which is fixed shut with two brown plastic buttons and a metal hook and eye at the bottom. The construction of the jacket is four panels and has been taken in at the waist for form above both pockets. The jacket has a back pleat from below the triangle stitching below the nape of the neck. The back belt has three metal insignia buttons, and the backside is lined with canvas. On both shoulders, there are epaulettes which have one metal insignia button each. On the front, there are three metal buttons on each on flap, and when the jacket is done up, the left flap goes on top. It has three button holes on the left flap and one button hole on the right flap for a large brown button on the inside of the left flap. There are two outer pockets on either side of the jacket. Beneath the jacket lapels, on either side there are metal buttons, and there are button holes for them in the middle of the bottom lapel. Where the upper and lower lapels are split, there is a hook and eye. There is a brown plastic button on the underside of both the upper lapels, which is where the extra flap of fabric on the inside of the left jacket flap, can be fixed as a face protector. The tag on the inside reads; DAVID KLEIN PTY. LTD. Victoria 1967 An arrow (Department of defence symbol) SIZE 6 CLASS 8405 66.012.0494 REGIMENTAL NO................... NAME......................... The regimantal number section had a number filled in but then scribbled out and another number written above, which is 359282. The name section was filled in with B.R.MIER. The name and regimental numbers were done in black marker pen. All the metal buttons are decorated with the medical corps symbol, which is a serpent-entwined rod (Rod of Asclepius) surrounded by a laurel wreath and above the rod is a crown (St Edward’s Crown). On the outside of the upper sleeves, just below the shoulder, there is two patches that signifies the rank of Staff Sergeant. The top patch is an embroided St Edward’s Crown and represents the staff rank. It is 47mm wide and 45mm. Below this there is a patch depicting the three stripes/ chevorns of the sergeant rank. The chevorn’s points face down, and the sides measure 66mm, while the depth down to the point is 86mm. The bottom lengths is 100mm on both sides and the top lengths are 9mm. coat, trench coat, great coat, medical corps, staff sergeant, b.p. mier, 359282, david klein pty. ltd., 1967 -
 Ballarat Tramway Museum
Photograph - Colour Photograph/s, Carolyn Dean, Mar. 1999
Set of 23 photographs taken by Carolyn Dean between 6/3/1999 and 16/4/1999 of the Begonia Festival operations and moving the ex SEC bike shed to Bungaree. On Kodak paper. 1094.1 - Group of tramway staff at Gardens Loop - used in May 1999 Fares Please! .2 - tram 40 at loop .3 - sign boards used in 1999 Begonia festival .4 - Welding joint 2-3 road - Warren Doubleday and Gary Wood .5 - ditto with Alastair Reither .6 - Fixing fence at Bungaree - John Phillips .7 - ditto .8 - ditto .9 - site for the hut to go at Bungaree .10 - ditto .11 - treated pine posts for stumps .12 - checking the layout - John Phillips .13 - cutting fire wood .14 - trimming trees .15 - Dismantling the roof on the shed at Ballarat East - John Phillips and Simon Jenkins .16 - roof off .17 - ditto .18 - the moving team - used in May 1999 Fares Please - see caption for people .19 - Lifting the shed out of position .20 - ditto .21 - ditto .22 - surveying the foundations - Peter Winspur, John Phillips and Alastair Reither .23 - ditto .1 > .3 - 6/3/1999: .4 & .5 - 7/3/1999: .6 > .13 - 20/3/1999: .14 - 21/3/1999: .15> .23 - 16/4/1999 See also Reg. No. 1095 and 1101 for next stage of the move. On rear of each photo in blue ink is date in the upper edge and on lower edge "Photo by Carolyn Dean"btm, sec bike shed, begonia festival, track repairs, tram 40 -
 Melbourne Tram Museum
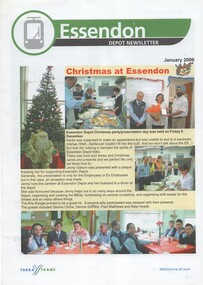
Magazine, Yarra Trams, "Malvern Depot Newsletter", "Essendon Depot Newsletter", 2006
Set of eight magazines printed in the style of a set issue in June 2006 (see Reg Item 1157). .1 - Malvern Depot - 8 pages - with a group photo in front of the depot on the front cover - article on 30 years service of Steve Olsen, Depot Marketing Staff, Tram attendants, new from Brunswick, Public Transport Cricket association, OHS and other notes. .2 - Essendon Depot - Christmas at the depot, Commonwealth Games, Think Tram, and the dog who took a tram ride. .3 - Brunswick depot - Sept. 2005 - departure of Hubert Guyot (CEO), depot works, table tennis, OH& S .4 - East Preston Depot - Sept. 2005 - departure of Hubert Guyot (CEO), message from Manager and Depot Administrator, environmental aspects, table tennis, has photos of lots of staff but no surnames. .5 - Essendon Depot - September 2005 - departure of Hubert Guyot (CEO) - various items and thanks from Lennie Bates. .6 - Malvern Depot - September 2005 - departure of Hubert Guyot (CEO) - some items from above newsletters. .7 - Malvern Depot - March 2006 - Melbourne Uni terminus works started, East Preston going green, Hugh Waldron leaves Malvern for South bank, and tennis report. .8 - Malvern Depot - September 2006 - 100 years of electric trams, late night services, tram photo competition and interview with Hugues Deleu, Ticketing Systems Manager.trams, tramways, yarra trams, malvern depot, essendon depot, brunswick depot, dogs, sports, cricket -
 Marysville & District Historical Society
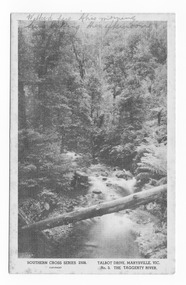
Postcard (item) - Black and white postcard, Rose Stereograph Company, Talbot Drive, Marysville, Vic. No. 3, The Taggerty River, 1913-1967
A postcard in a series produced by the Rose Stereograph Company in Victoria, Australia as a souvenir of Marysville.A black and white photograph taken along Lady Talbot Drive, Marysville, in Victoria, of the Taggerty River. Lady Talbot Drive is a 24 kilometer scenic rainforest car journey which passes a number of walks and waterfalls in the Yarra Ranges National Park. Lady Talbot Drive is named after Lady Sarah Elizabeth, the wife of Sir Reginald Talbot, who was the Governor of Victoria from 25th April, 1904 to 6th July 1908. This postcard was produced by the Rose Stereograph Company as a souvenir of Marysville.Walked here this morning/ Lure making this afternoon POST CARD. Correspondence Address Kooringa 20th March '46 Dear Margaret,/ Please excuse pencil/ but don't think my pen will see/ the distance./ Expect you have heard from Rog./ that we are having a pretty good/ time, the weather wasn't so hot but/ has picked up now and it is/ glorious./ I've had a couple of nice trips/ with Rog and friends, they took/ me to Eildon Weir one day and took/ Ness and I mushrooming yesterday not/ that we got many mushrooms but/ it was a beautiful drive./ I hope you have a very happy/ birthday tomorrow./ How is the old leg going?/ Nancy work again on Monday,/ I will slip out and see you when/ I get back./ Hoping your leg is improving and/ that you have a happy day tomorrow/ Yours sincerely/ Florencetalbot drive, marysville, victoria, taggerty river, postcard, souvenir, sir reginald talbot, lady sarah elizabeth talbot, southern cross series postcard, 2308 -
 Flagstaff Hill Maritime Museum and Village
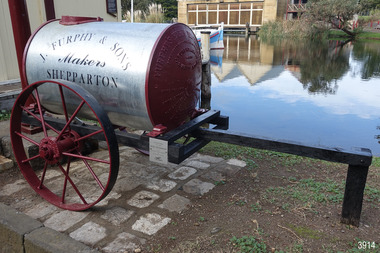
Vehicle - Furphy Water Cart, J. Furphy & Sons, c. 1942
This horse-drawn, two-wheeled cart with a tank, is known as a Furphy Farm Water Cart that was made in Shepparton, northern Victoria, c. 1942. John Furphy (1842-1920) was born in Moonee Ponds, in 1842 to Irish immigrant parents and subsequently raised in the Yarra Valley before the family moved to Kyneton in central Victoria, where he completed an apprenticeship with the firm Hutcheson and Walker. Murphy began operations of his own at a site on Piper Street in Kyneton in 1864. He relocated for a business opportunity and founded the first blacksmiths and wheelwrights shop in the newly surveyed town of Shepparton in 1873. Furphy invented many farming tools and machines including a patented grain-stripper, and won awards at the 1888-89 Melbourne International Exhibition. His most famous invention is the Furphy Farm Water Cart, designed in the 1880s, at a time when water for most households and farms was carted on wagons in wooden barrels. The Furphy’s water cart is a single item that combines a water metal tank and a cart. The design of the cart was simple yet effective, and became popular very quickly and established itself as a vital piece of farming equipment. The water cart has had a number of words cast into its ends over many years. References to the foundry’s location in Shepparton, as well as advertising of other products also manufactured by J. Furphy & Sons were present on the ends. However, the most significant set of words to feature on the tank, was a poem encouraging continual improvement: ‘Good Better Best, Never Let it Rest, Until your Good is Better, And your Better Best’. During The Great War (1914-1918), the water cart was used by the Australian militarily at a large AIF (Australian Imperial Force) camp in Broadmeadows (Melbourne) where thousands of men were camped for months, before being transported aboard. Furphy Water Carts provided water to the troops, and were usually placed near the camp latrines, which was one of the few places the troops could share gossip and tall tales away from the prying eyes and ears of their officers. The water cart drivers were also notorious sources of information, despite most of their news being hearsay, or totally unreliable. By the time the men of the AIF were in engaged in combat on the Gallipoli Peninsula and the Western Front, the carts used for water supply had no markings and became simply referred to as Furphys. This owed as much to the coining of the term ‘Furphy’, Australian slang for suspect information or rumour. After a number of decades as principally a soldier’s word, 'Furphy' entered the broader Australian vernacular and was used mainly by the political class until recently when the term was taken up by a Australian brewer as a beer brand. This Furphy Water Cart was purchased by Friends of Flagstaff Hill in 2014. The support of local individuals, organisations and businesses enabled its restoration and later its installation alongside the existing late-19th century water pipe stand and 1940s hand pump The Furphy Farm Water Cart is of historical significance as it represents a famous Australian time-saving and energy-saving invention of the 1880s, replacing the labour intensive activity of collecting and dispensing water from barrels and casks on the back of carts. The water cart’s connection with manufacturing companies J. Furphy & Sons and Furphy Foundry are significant for being early Australian businesses that are still in operation today. Furphy carts are of military significance for the role they played during The Great War (1914-1918) in Australian army camps, and theatres of war in Europe and the Middle East, to supply the AIF troops with fresh water. A wooden framed, two-wheeled, horse-drawn cart, fitted with a horizontally mounted, cylindrical metal tank. The tank is made of rolled, sheet steel with a riveted seam, and cast iron ends with cast iron ends. The spoked metal wheels have fitted flat iron tyres and metal hubs. A metal pipe is joined to the outlet. The tank is silver coloured, the ends, wheels and trims are crimson, and the script lettering on tank sides is black. There are inscriptions on the tank, ends, and hubs. The water tank was made in 1942 in Shepparton, Australia, by J. Furphy & Sons and has a capacity of 180 gallons (848 litres). Hub perimeter, embossed “J. FURPHY & SONS” “KEEP THE / BOLTS TIGHT” Hub centre embossed [indecipherable] Tank, each side, painted “J. FURPHY & SONS / Makers / SHEPPARTON” Tank ends, embossed – “FURPHY’S FARM WATER CART” “BORN ABOUT 1880 – STILL ‘GOING STRONG’ 1942” “j. FURPHY & SONS / MAKERS / SHEPPARTON - VIC “ “S - - - - - L MANUFACTURERS” [SPECIAL] “SPIKE ROLLERS” “SINGLE TREES” “PLOUGH WHEELS” “IRON CASTINGS” “LAND GRADERS” “STEEL DELVERS” “CAST IRON PIG” “CHAIN YOKES” “GOOD – BETTER – BEST / NEVER LET IT REST / TILL YOUR GOOD IS BETTER / AND YOUR BETTER – BEST” Image [Stork carrying a baby] above shorthand, transcribed "Produce and populate or perish" Image [Furphy Pig Feeder] beside ‘Cast Iron Pig’ Shorthand, transcribed “"Water is the gift of God but beer and whiskey are concoctions of the Devil, come and have a drink of water"warrnambool, flagstaff hill maritime museum, water cart, furphy cart, furphy tank, furphy farm water cart, furphy, john furphy, john furphy & sons, furphy foundry, kyneton, shepparton, mobile water tank, jinker, hutchinson & walker, blacksmith, farm equipment, implement maker, tool maker, horse drawn, stork and baby, good, better, best, barrel, tank, first world war, wwi, eastern front, gallipoli, j furphy & sons -
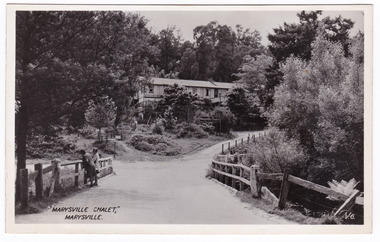 Marysville & District Historical Society
Postcard (Item) - Black and white postcard, Valentine Publishing Co. Pty. Ltd, "MARYSVILLE CHALET," MARYSVILLE, 1923-1963
A black and white postcard of Marysville Chalet that was produced by the Valentine Publishing Co Pty. Ltd. as a souvenir of Marysville.A black and white postcard of Marysville Chalet that was produced by the Valentine Publishing Co Pty. Ltd. as a souvenir of Marysville.V.6. VALENTINE'S/ POST CARD A GENUINE PHOTOGRAPH The Chalet/ Tues 3rd Dear Jean + Lloyd/ This is where Bev & I have got to/ we are staying at this place & having a great old/ time, especially Bev. She was out riding all the afternoon/ yesterday with a crowd of young folk. At night they/ make whoop-ee & dance & everything & all the old dears/ including yours truly sit by the fire & knit & listen/ We have been two trips in the bus one all day/ trip staying for dinner on the way. Anyway I'll be/ tellling you all about it when I see you again if/ ever says you. I hope you all well including/ Mrs Mac. We are going home on Sunday, so I'll be/ seeing you as soon after as I can./ Your loving cousin Mgrt XXmarysville, victoria, australia, the marysville chalet, guest house, poontawan, steavenson hotel, albert harrison, margaret harrison, elise ackerman, ralph ackerman, john van ranglerooy, joe keithard, kathy keithard, louisa goding, accommodation, valentine publishing co pty ltd, postcard, souvenir, v.6. -
 Flagstaff Hill Maritime Museum and Village
Domestic object - Bowl, Late 19th or early 20th Century
The Process of Making Pottery Decorating, Firing, Glazing, Making, Technical There is a rhythm and flow to clay. It can’t be done all at once! Even the making process! It can take weeks to get everything done, especially if you can only work on your pottery once a week! Even though we have three hour classes, it’s often just not enough time! Here is an overview of some of the processes so you have a bit more grasp on some of the technical stuff! Step One – Design There are SO many ideas out there for making stuff in clay! From delicate porcelain jewellery, through to heavy sculptural work and everything in between. Deciding your direction is sometimes not that easy – when you first start, try everything, you will naturally gravitate to the style that you enjoy! The options and variations are endless and can get a wee bit overwhelming too! Check in with me before you start to ensure your ideas will work, what order you might do things, how you could achieve the look you are seeking and any other technical data required! Step Two – Making Clay is thixotropic. This means that as you work with it, the clay first gets sloppier and wetter, before is begins to dry in the atmosphere. For most things, you simply can’t do all parts of the project at once. An example of work order might look like: Get last weeks work out from the shelves Prepare clay for today’s work – roll your clay, prepare balls for throwing, make the first stage of a pinch pot) Clean up last week’s work and put it on the shelf for bisque firing Check that you have any glazing to do – and do enough of it that you will have time to finish your main project Do the next step of your next project – there might be a further step that can’t be complete immediately, in that case, wrap your work well and put onto the shelves. Letting your work rest for a while can really help keep your work clean and professional looking. Many things require bagging under plastic to keep it ready for work the next week – put your name on the outside of the bag so you can find your work easily. We have stickers and markers. Consider how you want to decorate your work – coloured slip can be applied at a fairly wet stage (remembering that it will make your work even wetter!). Trying to apply slip to dry clay won’t work! If you want to do sgraffito – you will need to keep the work leather hard (a state of dryness where you can still work the clay with a little effort and a little water and care). Step Three – Drying Most of the time your work can go into the rack uncovered to let it dry out for the following week. If you want to continue forming or shaping you will need to double bag your work – put your work on a suitable sized bat and put the bat in a bag so the base of the bag is under the bat, then put another bag over the top of the work and tuck the top of the bag under the bat. If you want to trim (or turn) your thrown work the following week, it should also be double bagged. If your work is large, delicate, or of uneven thicknesses, you should lightly cover your work for drying. When considering the drying process, bare in mind the weather, humidity and wind! The hotter and dryer, the faster things dry and work can dry unevenly in the shelves – this can lead to cracking – another time to lightly cover your work for drying. Step Four – Trimming and Cleaning Up Your work is dry! It is called greenware now and it is at it’s most fragile! Handle everything with two hands. I often refer to soft hands – keep everything gentle and with your fingers spread as much as possible. Try to not pick up things like plates too much, and always with both hands! Before your work can be bisque fired it should be “cleaned up”. You work won’t go into the kiln if it has sharp edges – when glazed, sharp edges turn into razor blades! Use a piece of fly wire to rub the work all over – this will scratch a little so be light handed. Use a knife or metal kidney to scrape any areas that require a bit more dynamic treatment than the fly wire offers! Finally, a very light wipe over with a slightly damp sponge can help soften and soothe all of your edges and dags! Trimming thrown work: If you are planning to trim (or turn) your thrown work (and you should be), make sure you bag it well – your work should be leather hard to almost dry for easiest trimming. Use this step to finish the work completely – use a metal kidney to polish the surface, or a slightly damp sponge to give a freshly thrown look. Wipe the sponge around the rim after trimming, and check the inside of the pot for dags! Trimming slip cast work: Usually I will trim the rims of your work on the wheel the following day to make that stage easier, however you will still need to check your work for lumps and bumps. Last but not least – check that your name is still clearly on the bottom of your work. Step Five – Bisque Firing When the work is completely dry it can go into the bisque kiln. The bisque kiln is fired to 1000°C. This process burns off the water in the clay as well as some of the chemically bound water. The structure of the clay is not altered that much at this temperature. Inside the bisque kiln, the work is stacked a little, small bowl inside a larger bowl and onto a heavy plate. Smaller items like decorations or drink coasters might get stacked several high. Consideration is paid to the weight of the stack and shape of the work. A bisque kiln can fire about one and a half times the amount of work that the glaze kiln can fire. The firing takes about 10 hours to complete the cycle and about two days to cool down. Once it has been emptied the work is placed in the glaze room ready for you to decorate! Step Six – Glazing Decorating your work with colour can be a lot of fun – and time consuming! There are three main options for surface treatment at this stage: Oxide Washes Underglazes Glazes Washes and underglazes do not “glaze” the work – It will still need a layer of glaze to fully seal the clay (washes don’t need glaze on surfaces not designed for food or liquid as they can gloss up a little on their own). Underglazes are stable colourants that turn out pretty much how they look in the jar. They can be mixed with each other to form other colours and can be used like water colours to paint onto your work. Mostly they should have a clear glaze on top to seal them. Oxides are a different species – the pink oxide (cobalt) wash turns out bright blue for instance. They don’t always need a glaze on top, and some glazes can change the colour of the wash! The glazes need no other “glaze” on top! Be careful of unknown glaze interactions – you can put any combination of glaze in a bowl or on a plate, but only a single glaze on the outside of any vertical surface! Glazes are a chemical reaction under heat. We don’t know the exact chemicals in the Mayco glazes we use. I can guess by the way they interact with each other, however, on the whole, you need to test every idea you have, and not run the test on a vertical surface! Simply put, glaze is a layer of glass like substance that bonds with the clay underneath. Clay is made of silica, alumina and water. Glaze is made of mostly silica. Silica has a melting point of 1700°C and we fire to 1240°C. The silica requires a “flux” to help it melt at the lower temperature. Fluxes can be all sorts of chemicals – a common one is calcium – calcium has a melting point of 2500°C, however, together they both melt at a much lower temperature! Colourants are metal oxides like cobalt (blue), chrome (green through black), copper (green, blue, even red!), manganese (black, purple and pink) iron (red brown), etc. Different chemicals in the glaze can have dramatic effects. for example, barium carbonate (which we don’t use) turns manganese bright pink! Other elements can turn manganese dioxide brown, blue, purple and reddish brown. Manganese dioxide is a flux in and of itself as well. So, glazes that get their black and purple colours, often interact with other glazes and RUN! Our mirror black is a good example – it mixes really well with many glazes because it fluxes them – causes them to melt faster. It will also bring out many beautiful colours in the glazes because it’s black colouring most definitely comes from manganese dioxide! Glaze chemistry is a whole subject on it’s own! We use commercial Mayco glazes on purpose – for their huge range of colour possibilities, stability, cool interactions, artistic freedom with the ability to easily brush the glazes on and ease of use. We currently have almost 50 glazes on hand! A major project is to test the interactions of all glazes with each other. That is 2,500 test tiles!!!! I’m going to make the wall behind the wheels the feature wall of pretty colours! Step Seven – Glaze (Gloss or sometimes called “Glost”) Firing Most of the time this is the final stage of making your creation (but not always!) The glaze kiln goes to 1240°C. This is called cone 6, or midrange. It is the low end of stoneware temperatures. Stoneware clays and glazes are typically fired at cone 8 – 10, that is 1260 – 1290°C. The energy requirement to go from 1240°C to 1280°C is almost a 30% more! Our clay is formulated to vitrify (mature, turn “glass-like”) at 1240°, as are our glazes. A glaze kiln take around 12 hours to reach temperature and two to three days to cool down. Sometimes a third firing process is required – this is for decoration that is added to work after the glaze firing. For example – adding precious metals and lustres. this firing temperature is usually around 600 – 800°C depending upon the techniques being used. There are many students interested in gold and silver trims – we will be doing this third type of firing soon! After firing your work will be in the student finished work shelves. Remember to pay for it before you head out the door! There is a small extra charge for using porcelain clay (it’s more than twice the price of regular clay), and for any third firing process! Once your work has been fired it can not turn back into clay for millennia – so don’t fire it if you don’t like it! Put it in the bucket for recycling. https://firebirdstudios.com.au/the-process-of-making-pottery/ The bowl is an example of kitchenware used in the 19th century and still in use today.Bowl white ceramic. Crack on side. Badly stained.Backstamp very faint and unable to be read.flagstaff hill, warrnambool, shipwrecked-coast, flagstaff-hill, flagstaff-hill-maritime-museum, maritime-museum, shipwreck-coast, flagstaff-hill-maritime-village, mixing bowl, food preparation, kitchen equipment, ceramic -
 Flagstaff Hill Maritime Museum and Village
Domestic object - Bowl
The Process of Making Pottery Decorating, Firing, Glazing, Making, Technical There is a rhythm and flow to clay. It can’t be done all at once! Even the making process! It can take weeks to get everything done, especially if you can only work on your pottery once a week! Even though we have three hour classes, it’s often just not enough time! Here is an overview of some of the processes so you have a bit more grasp on some of the technical stuff! Step One – Design There are SO many ideas out there for making stuff in clay! From delicate porcelain jewellery, through to heavy sculptural work and everything in between. Deciding your direction is sometimes not that easy – when you first start, try everything, you will naturally gravitate to the style that you enjoy! The options and variations are endless and can get a wee bit overwhelming too! Check in with me before you start to ensure your ideas will work, what order you might do things, how you could achieve the look you are seeking and any other technical data required! Step Two – Making Clay is thixotropic. This means that as you work with it, the clay first gets sloppier and wetter, before is begins to dry in the atmosphere. For most things, you simply can’t do all parts of the project at once. An example of work order might look like: Get last weeks work out from the shelves Prepare clay for today’s work – roll your clay, prepare balls for throwing, make the first stage of a pinch pot) Clean up last week’s work and put it on the shelf for bisque firing Check that you have any glazing to do – and do enough of it that you will have time to finish your main project Do the next step of your next project – there might be a further step that can’t be complete immediately, in that case, wrap your work well and put onto the shelves. Letting your work rest for a while can really help keep your work clean and professional looking. Many things require bagging under plastic to keep it ready for work the next week – put your name on the outside of the bag so you can find your work easily. We have stickers and markers. Consider how you want to decorate your work – coloured slip can be applied at a fairly wet stage (remembering that it will make your work even wetter!). Trying to apply slip to dry clay won’t work! If you want to do sgraffito – you will need to keep the work leather hard (a state of dryness where you can still work the clay with a little effort and a little water and care). Step Three – Drying Most of the time your work can go into the rack uncovered to let it dry out for the following week. If you want to continue forming or shaping you will need to double bag your work – put your work on a suitable sized bat and put the bat in a bag so the base of the bag is under the bat, then put another bag over the top of the work and tuck the top of the bag under the bat. If you want to trim (or turn) your thrown work the following week, it should also be double bagged. If your work is large, delicate, or of uneven thicknesses, you should lightly cover your work for drying. When considering the drying process, bare in mind the weather, humidity and wind! The hotter and dryer, the faster things dry and work can dry unevenly in the shelves – this can lead to cracking – another time to lightly cover your work for drying. Step Four – Trimming and Cleaning Up Your work is dry! It is called greenware now and it is at it’s most fragile! Handle everything with two hands. I often refer to soft hands – keep everything gentle and with your fingers spread as much as possible. Try to not pick up things like plates too much, and always with both hands! Before your work can be bisque fired it should be “cleaned up”. You work won’t go into the kiln if it has sharp edges – when glazed, sharp edges turn into razor blades! Use a piece of fly wire to rub the work all over – this will scratch a little so be light handed. Use a knife or metal kidney to scrape any areas that require a bit more dynamic treatment than the fly wire offers! Finally, a very light wipe over with a slightly damp sponge can help soften and soothe all of your edges and dags! Trimming thrown work: If you are planning to trim (or turn) your thrown work (and you should be), make sure you bag it well – your work should be leather hard to almost dry for easiest trimming. Use this step to finish the work completely – use a metal kidney to polish the surface, or a slightly damp sponge to give a freshly thrown look. Wipe the sponge around the rim after trimming, and check the inside of the pot for dags! Trimming slip cast work: Usually I will trim the rims of your work on the wheel the following day to make that stage easier, however you will still need to check your work for lumps and bumps. Last but not least – check that your name is still clearly on the bottom of your work. Step Five – Bisque Firing When the work is completely dry it can go into the bisque kiln. The bisque kiln is fired to 1000°C. This process burns off the water in the clay as well as some of the chemically bound water. The structure of the clay is not altered that much at this temperature. Inside the bisque kiln, the work is stacked a little, small bowl inside a larger bowl and onto a heavy plate. Smaller items like decorations or drink coasters might get stacked several high. Consideration is paid to the weight of the stack and shape of the work. A bisque kiln can fire about one and a half times the amount of work that the glaze kiln can fire. The firing takes about 10 hours to complete the cycle and about two days to cool down. Once it has been emptied the work is placed in the glaze room ready for you to decorate! Step Six – Glazing Decorating your work with colour can be a lot of fun – and time consuming! There are three main options for surface treatment at this stage: Oxide Washes Underglazes Glazes Washes and underglazes do not “glaze” the work – It will still need a layer of glaze to fully seal the clay (washes don’t need glaze on surfaces not designed for food or liquid as they can gloss up a little on their own). Underglazes are stable colourants that turn out pretty much how they look in the jar. They can be mixed with each other to form other colours and can be used like water colours to paint onto your work. Mostly they should have a clear glaze on top to seal them. Oxides are a different species – the pink oxide (cobalt) wash turns out bright blue for instance. They don’t always need a glaze on top, and some glazes can change the colour of the wash! The glazes need no other “glaze” on top! Be careful of unknown glaze interactions – you can put any combination of glaze in a bowl or on a plate, but only a single glaze on the outside of any vertical surface! Glazes are a chemical reaction under heat. We don’t know the exact chemicals in the Mayco glazes we use. I can guess by the way they interact with each other, however, on the whole, you need to test every idea you have, and not run the test on a vertical surface! Simply put, glaze is a layer of glass like substance that bonds with the clay underneath. Clay is made of silica, alumina and water. Glaze is made of mostly silica. Silica has a melting point of 1700°C and we fire to 1240°C. The silica requires a “flux” to help it melt at the lower temperature. Fluxes can be all sorts of chemicals – a common one is calcium – calcium has a melting point of 2500°C, however, together they both melt at a much lower temperature! Colourants are metal oxides like cobalt (blue), chrome (green through black), copper (green, blue, even red!), manganese (black, purple and pink) iron (red brown), etc. Different chemicals in the glaze can have dramatic effects. for example, barium carbonate (which we don’t use) turns manganese bright pink! Other elements can turn manganese dioxide brown, blue, purple and reddish brown. Manganese dioxide is a flux in and of itself as well. So, glazes that get their black and purple colours, often interact with other glazes and RUN! Our mirror black is a good example – it mixes really well with many glazes because it fluxes them – causes them to melt faster. It will also bring out many beautiful colours in the glazes because it’s black colouring most definitely comes from manganese dioxide! Glaze chemistry is a whole subject on it’s own! We use commercial Mayco glazes on purpose – for their huge range of colour possibilities, stability, cool interactions, artistic freedom with the ability to easily brush the glazes on and ease of use. We currently have almost 50 glazes on hand! A major project is to test the interactions of all glazes with each other. That is 2,500 test tiles!!!! I’m going to make the wall behind the wheels the feature wall of pretty colours! Step Seven – Glaze (Gloss or sometimes called “Glost”) Firing Most of the time this is the final stage of making your creation (but not always!) The glaze kiln goes to 1240°C. This is called cone 6, or midrange. It is the low end of stoneware temperatures. Stoneware clays and glazes are typically fired at cone 8 – 10, that is 1260 – 1290°C. The energy requirement to go from 1240°C to 1280°C is almost a 30% more! Our clay is formulated to vitrify (mature, turn “glass-like”) at 1240°, as are our glazes. A glaze kiln take around 12 hours to reach temperature and two to three days to cool down. Sometimes a third firing process is required – this is for decoration that is added to work after the glaze firing. For example – adding precious metals and lustres. this firing temperature is usually around 600 – 800°C depending upon the techniques being used. There are many students interested in gold and silver trims – we will be doing this third type of firing soon! After firing your work will be in the student finished work shelves. Remember to pay for it before you head out the door! There is a small extra charge for using porcelain clay (it’s more than twice the price of regular clay), and for any third firing process! Once your work has been fired it can not turn back into clay for millennia – so don’t fire it if you don’t like it! Put it in the bucket for recycling. https://firebirdstudios.com.au/the-process-of-making-pottery/ This bowl is an example of kitchenware used in the 19th century and still in use today.Bowl white ceramic plain that has two sets of edging around lip. Inside bowl has plaster designed to look like cooking mixture.flagstaff hill, warrnambool, shipwrecked-coast, flagstaff-hill, flagstaff-hill-maritime-museum, maritime-museum, shipwreck-coast, flagstaff-hill-maritime-village, kitchen equipment, ceramic -
 Flagstaff Hill Maritime Museum and Village
Domestic object - Plate
The Process of Making Pottery Decorating, Firing, Glazing, Making, Technical There is a rhythm and flow to clay. It can’t be done all at once! Even the making process! It can take weeks to get everything done, especially if you can only work on your pottery once a week! Even though we have three hour classes, it’s often just not enough time! Here is an overview of some of the processes so you have a bit more grasp on some of the technical stuff! Step One – Design There are SO many ideas out there for making stuff in clay! From delicate porcelain jewellery, through to heavy sculptural work and everything in between. Deciding your direction is sometimes not that easy – when you first start, try everything, you will naturally gravitate to the style that you enjoy! The options and variations are endless and can get a wee bit overwhelming too! Check in with me before you start to ensure your ideas will work, what order you might do things, how you could achieve the look you are seeking and any other technical data required! Step Two – Making Clay is thixotropic. This means that as you work with it, the clay first gets sloppier and wetter, before is begins to dry in the atmosphere. For most things, you simply can’t do all parts of the project at once. An example of work order might look like: Get last weeks work out from the shelves Prepare clay for today’s work – roll your clay, prepare balls for throwing, make the first stage of a pinch pot) Clean up last week’s work and put it on the shelf for bisque firing Check that you have any glazing to do – and do enough of it that you will have time to finish your main project Do the next step of your next project – there might be a further step that can’t be complete immediately, in that case, wrap your work well and put onto the shelves. Letting your work rest for a while can really help keep your work clean and professional looking. Many things require bagging under plastic to keep it ready for work the next week – put your name on the outside of the bag so you can find your work easily. We have stickers and markers. Consider how you want to decorate your work – coloured slip can be applied at a fairly wet stage (remembering that it will make your work even wetter!). Trying to apply slip to dry clay won’t work! If you want to do sgraffito – you will need to keep the work leather hard (a state of dryness where you can still work the clay with a little effort and a little water and care). Step Three – Drying Most of the time your work can go into the rack uncovered to let it dry out for the following week. If you want to continue forming or shaping you will need to double bag your work – put your work on a suitable sized bat and put the bat in a bag so the base of the bag is under the bat, then put another bag over the top of the work and tuck the top of the bag under the bat. If you want to trim (or turn) your thrown work the following week, it should also be double bagged. If your work is large, delicate, or of uneven thicknesses, you should lightly cover your work for drying. When considering the drying process, bare in mind the weather, humidity and wind! The hotter and dryer, the faster things dry and work can dry unevenly in the shelves – this can lead to cracking – another time to lightly cover your work for drying. Step Four – Trimming and Cleaning Up Your work is dry! It is called greenware now and it is at it’s most fragile! Handle everything with two hands. I often refer to soft hands – keep everything gentle and with your fingers spread as much as possible. Try to not pick up things like plates too much, and always with both hands! Before your work can be bisque fired it should be “cleaned up”. You work won’t go into the kiln if it has sharp edges – when glazed, sharp edges turn into razor blades! Use a piece of fly wire to rub the work all over – this will scratch a little so be light handed. Use a knife or metal kidney to scrape any areas that require a bit more dynamic treatment than the fly wire offers! Finally, a very light wipe over with a slightly damp sponge can help soften and soothe all of your edges and dags! Trimming thrown work: If you are planning to trim (or turn) your thrown work (and you should be), make sure you bag it well – your work should be leather hard to almost dry for easiest trimming. Use this step to finish the work completely – use a metal kidney to polish the surface, or a slightly damp sponge to give a freshly thrown look. Wipe the sponge around the rim after trimming, and check the inside of the pot for dags! Trimming slip cast work: Usually I will trim the rims of your work on the wheel the following day to make that stage easier, however you will still need to check your work for lumps and bumps. Last but not least – check that your name is still clearly on the bottom of your work. Step Five – Bisque Firing When the work is completely dry it can go into the bisque kiln. The bisque kiln is fired to 1000°C. This process burns off the water in the clay as well as some of the chemically bound water. The structure of the clay is not altered that much at this temperature. Inside the bisque kiln, the work is stacked a little, small bowl inside a larger bowl and onto a heavy plate. Smaller items like decorations or drink coasters might get stacked several high. Consideration is paid to the weight of the stack and shape of the work. A bisque kiln can fire about one and a half times the amount of work that the glaze kiln can fire. The firing takes about 10 hours to complete the cycle and about two days to cool down. Once it has been emptied the work is placed in the glaze room ready for you to decorate! Step Six – Glazing Decorating your work with colour can be a lot of fun – and time consuming! There are three main options for surface treatment at this stage: Oxide Washes Underglazes Glazes Washes and underglazes do not “glaze” the work – It will still need a layer of glaze to fully seal the clay (washes don’t need glaze on surfaces not designed for food or liquid as they can gloss up a little on their own). Underglazes are stable colourants that turn out pretty much how they look in the jar. They can be mixed with each other to form other colours and can be used like water colours to paint onto your work. Mostly they should have a clear glaze on top to seal them. Oxides are a different species – the pink oxide (cobalt) wash turns out bright blue for instance. They don’t always need a glaze on top, and some glazes can change the colour of the wash! The glazes need no other “glaze” on top! Be careful of unknown glaze interactions – you can put any combination of glaze in a bowl or on a plate, but only a single glaze on the outside of any vertical surface! Glazes are a chemical reaction under heat. We don’t know the exact chemicals in the Mayco glazes we use. I can guess by the way they interact with each other, however, on the whole, you need to test every idea you have, and not run the test on a vertical surface! Simply put, glaze is a layer of glass like substance that bonds with the clay underneath. Clay is made of silica, alumina and water. Glaze is made of mostly silica. Silica has a melting point of 1700°C and we fire to 1240°C. The silica requires a “flux” to help it melt at the lower temperature. Fluxes can be all sorts of chemicals – a common one is calcium – calcium has a melting point of 2500°C, however, together they both melt at a much lower temperature! Colourants are metal oxides like cobalt (blue), chrome (green through black), copper (green, blue, even red!), manganese (black, purple and pink) iron (red brown), etc. Different chemicals in the glaze can have dramatic effects. for example, barium carbonate (which we don’t use) turns manganese bright pink! Other elements can turn manganese dioxide brown, blue, purple and reddish brown. Manganese dioxide is a flux in and of itself as well. So, glazes that get their black and purple colours, often interact with other glazes and RUN! Our mirror black is a good example – it mixes really well with many glazes because it fluxes them – causes them to melt faster. It will also bring out many beautiful colours in the glazes because it’s black colouring most definitely comes from manganese dioxide! Glaze chemistry is a whole subject on it’s own! We use commercial Mayco glazes on purpose – for their huge range of colour possibilities, stability, cool interactions, artistic freedom with the ability to easily brush the glazes on and ease of use. We currently have almost 50 glazes on hand! A major project is to test the interactions of all glazes with each other. That is 2,500 test tiles!!!! I’m going to make the wall behind the wheels the feature wall of pretty colours! Step Seven – Glaze (Gloss or sometimes called “Glost”) Firing Most of the time this is the final stage of making your creation (but not always!) The glaze kiln goes to 1240°C. This is called cone 6, or midrange. It is the low end of stoneware temperatures. Stoneware clays and glazes are typically fired at cone 8 – 10, that is 1260 – 1290°C. The energy requirement to go from 1240°C to 1280°C is almost a 30% more! Our clay is formulated to vitrify (mature, turn “glass-like”) at 1240°, as are our glazes. A glaze kiln take around 12 hours to reach temperature and two to three days to cool down. Sometimes a third firing process is required – this is for decoration that is added to work after the glaze firing. For example – adding precious metals and lustres. this firing temperature is usually around 600 – 800°C depending upon the techniques being used. There are many students interested in gold and silver trims – we will be doing this third type of firing soon! After firing your work will be in the student finished work shelves. Remember to pay for it before you head out the door! There is a small extra charge for using porcelain clay (it’s more than twice the price of regular clay), and for any third firing process! Once your work has been fired it can not turn back into clay for millennia – so don’t fire it if you don’t like it! Put it in the bucket for recycling. https://firebirdstudios.com.au/the-process-of-making-pottery/Ceramics have evolved over thousands of years.White earthenware dinner plate. Crazing evident all over.Backstamped ‘Made in England S LTD’flagstaff hill, warrnambool, shipwrecked-coast, flagstaff-hill, flagstaff-hill-maritime-museum, maritime-museum, shipwreck-coast, flagstaff-hill-maritime-village, ceramics, tableware -
 Flagstaff Hill Maritime Museum and Village
Domestic object - Plate, Johnson Bros
The Process of Making Pottery Decorating, Firing, Glazing, Making, Technical There is a rhythm and flow to clay. It can’t be done all at once! Even the making process! It can take weeks to get everything done, especially if you can only work on your pottery once a week! Even though we have three hour classes, it’s often just not enough time! Here is an overview of some of the processes so you have a bit more grasp on some of the technical stuff! Step One – Design There are SO many ideas out there for making stuff in clay! From delicate porcelain jewellery, through to heavy sculptural work and everything in between. Deciding your direction is sometimes not that easy – when you first start, try everything, you will naturally gravitate to the style that you enjoy! The options and variations are endless and can get a wee bit overwhelming too! Check in with me before you start to ensure your ideas will work, what order you might do things, how you could achieve the look you are seeking and any other technical data required! Step Two – Making Clay is thixotropic. This means that as you work with it, the clay first gets sloppier and wetter, before is begins to dry in the atmosphere. For most things, you simply can’t do all parts of the project at once. An example of work order might look like: Get last weeks work out from the shelves Prepare clay for today’s work – roll your clay, prepare balls for throwing, make the first stage of a pinch pot) Clean up last week’s work and put it on the shelf for bisque firing Check that you have any glazing to do – and do enough of it that you will have time to finish your main project Do the next step of your next project – there might be a further step that can’t be complete immediately, in that case, wrap your work well and put onto the shelves. Letting your work rest for a while can really help keep your work clean and professional looking. Many things require bagging under plastic to keep it ready for work the next week – put your name on the outside of the bag so you can find your work easily. We have stickers and markers. Consider how you want to decorate your work – coloured slip can be applied at a fairly wet stage (remembering that it will make your work even wetter!). Trying to apply slip to dry clay won’t work! If you want to do sgraffito – you will need to keep the work leather hard (a state of dryness where you can still work the clay with a little effort and a little water and care). Step Three – Drying Most of the time your work can go into the rack uncovered to let it dry out for the following week. If you want to continue forming or shaping you will need to double bag your work – put your work on a suitable sized bat and put the bat in a bag so the base of the bag is under the bat, then put another bag over the top of the work and tuck the top of the bag under the bat. If you want to trim (or turn) your thrown work the following week, it should also be double bagged. If your work is large, delicate, or of uneven thicknesses, you should lightly cover your work for drying. When considering the drying process, bare in mind the weather, humidity and wind! The hotter and dryer, the faster things dry and work can dry unevenly in the shelves – this can lead to cracking – another time to lightly cover your work for drying. Step Four – Trimming and Cleaning Up Your work is dry! It is called greenware now and it is at it’s most fragile! Handle everything with two hands. I often refer to soft hands – keep everything gentle and with your fingers spread as much as possible. Try to not pick up things like plates too much, and always with both hands! Before your work can be bisque fired it should be “cleaned up”. You work won’t go into the kiln if it has sharp edges – when glazed, sharp edges turn into razor blades! Use a piece of fly wire to rub the work all over – this will scratch a little so be light handed. Use a knife or metal kidney to scrape any areas that require a bit more dynamic treatment than the fly wire offers! Finally, a very light wipe over with a slightly damp sponge can help soften and soothe all of your edges and dags! Trimming thrown work: If you are planning to trim (or turn) your thrown work (and you should be), make sure you bag it well – your work should be leather hard to almost dry for easiest trimming. Use this step to finish the work completely – use a metal kidney to polish the surface, or a slightly damp sponge to give a freshly thrown look. Wipe the sponge around the rim after trimming, and check the inside of the pot for dags! Trimming slip cast work: Usually I will trim the rims of your work on the wheel the following day to make that stage easier, however you will still need to check your work for lumps and bumps. Last but not least – check that your name is still clearly on the bottom of your work. Step Five – Bisque Firing When the work is completely dry it can go into the bisque kiln. The bisque kiln is fired to 1000°C. This process burns off the water in the clay as well as some of the chemically bound water. The structure of the clay is not altered that much at this temperature. Inside the bisque kiln, the work is stacked a little, small bowl inside a larger bowl and onto a heavy plate. Smaller items like decorations or drink coasters might get stacked several high. Consideration is paid to the weight of the stack and shape of the work. A bisque kiln can fire about one and a half times the amount of work that the glaze kiln can fire. The firing takes about 10 hours to complete the cycle and about two days to cool down. Once it has been emptied the work is placed in the glaze room ready for you to decorate! Step Six – Glazing Decorating your work with colour can be a lot of fun – and time consuming! There are three main options for surface treatment at this stage: Oxide Washes Underglazes Glazes Washes and underglazes do not “glaze” the work – It will still need a layer of glaze to fully seal the clay (washes don’t need glaze on surfaces not designed for food or liquid as they can gloss up a little on their own). Underglazes are stable colourants that turn out pretty much how they look in the jar. They can be mixed with each other to form other colours and can be used like water colours to paint onto your work. Mostly they should have a clear glaze on top to seal them. Oxides are a different species – the pink oxide (cobalt) wash turns out bright blue for instance. They don’t always need a glaze on top, and some glazes can change the colour of the wash! The glazes need no other “glaze” on top! Be careful of unknown glaze interactions – you can put any combination of glaze in a bowl or on a plate, but only a single glaze on the outside of any vertical surface! Glazes are a chemical reaction under heat. We don’t know the exact chemicals in the Mayco glazes we use. I can guess by the way they interact with each other, however, on the whole, you need to test every idea you have, and not run the test on a vertical surface! Simply put, glaze is a layer of glass like substance that bonds with the clay underneath. Clay is made of silica, alumina and water. Glaze is made of mostly silica. Silica has a melting point of 1700°C and we fire to 1240°C. The silica requires a “flux” to help it melt at the lower temperature. Fluxes can be all sorts of chemicals – a common one is calcium – calcium has a melting point of 2500°C, however, together they both melt at a much lower temperature! Colourants are metal oxides like cobalt (blue), chrome (green through black), copper (green, blue, even red!), manganese (black, purple and pink) iron (red brown), etc. Different chemicals in the glaze can have dramatic effects. for example, barium carbonate (which we don’t use) turns manganese bright pink! Other elements can turn manganese dioxide brown, blue, purple and reddish brown. Manganese dioxide is a flux in and of itself as well. So, glazes that get their black and purple colours, often interact with other glazes and RUN! Our mirror black is a good example – it mixes really well with many glazes because it fluxes them – causes them to melt faster. It will also bring out many beautiful colours in the glazes because it’s black colouring most definitely comes from manganese dioxide! Glaze chemistry is a whole subject on it’s own! We use commercial Mayco glazes on purpose – for their huge range of colour possibilities, stability, cool interactions, artistic freedom with the ability to easily brush the glazes on and ease of use. We currently have almost 50 glazes on hand! A major project is to test the interactions of all glazes with each other. That is 2,500 test tiles!!!! I’m going to make the wall behind the wheels the feature wall of pretty colours! Step Seven – Glaze (Gloss or sometimes called “Glost”) Firing Most of the time this is the final stage of making your creation (but not always!) The glaze kiln goes to 1240°C. This is called cone 6, or midrange. It is the low end of stoneware temperatures. Stoneware clays and glazes are typically fired at cone 8 – 10, that is 1260 – 1290°C. The energy requirement to go from 1240°C to 1280°C is almost a 30% more! Our clay is formulated to vitrify (mature, turn “glass-like”) at 1240°, as are our glazes. A glaze kiln take around 12 hours to reach temperature and two to three days to cool down. Sometimes a third firing process is required – this is for decoration that is added to work after the glaze firing. For example – adding precious metals and lustres. this firing temperature is usually around 600 – 800°C depending upon the techniques being used. There are many students interested in gold and silver trims – we will be doing this third type of firing soon! After firing your work will be in the student finished work shelves. Remember to pay for it before you head out the door! There is a small extra charge for using porcelain clay (it’s more than twice the price of regular clay), and for any third firing process! Once your work has been fired it can not turn back into clay for millennia – so don’t fire it if you don’t like it! Put it in the bucket for recycling. https://firebirdstudios.com.au/the-process-of-making-pottery/Ceramics have evolved over thousands of years.A white earthenware side plate with a gadroon edge. Has water marks and chips on front.‘Johnson Bros England Reg No 15587’flagstaff hill, warrnambool, shipwrecked-coast, flagstaff-hill, flagstaff-hill-maritime-museum, maritime-museum, shipwreck-coast, flagstaff-hill-maritime-village, johnson bros, ceramics, tableware -
 Flagstaff Hill Maritime Museum and Village
Domestic object - Plate, Alfred Meakin
The Process of Making Pottery Decorating, Firing, Glazing, Making, Technical There is a rhythm and flow to clay. It can’t be done all at once! Even the making process! It can take weeks to get everything done, especially if you can only work on your pottery once a week! Even though we have three hour classes, it’s often just not enough time! Here is an overview of some of the processes so you have a bit more grasp on some of the technical stuff! Step One – Design There are SO many ideas out there for making stuff in clay! From delicate porcelain jewellery, through to heavy sculptural work and everything in between. Deciding your direction is sometimes not that easy – when you first start, try everything, you will naturally gravitate to the style that you enjoy! The options and variations are endless and can get a wee bit overwhelming too! Check in with me before you start to ensure your ideas will work, what order you might do things, how you could achieve the look you are seeking and any other technical data required! Step Two – Making Clay is thixotropic. This means that as you work with it, the clay first gets sloppier and wetter, before is begins to dry in the atmosphere. For most things, you simply can’t do all parts of the project at once. An example of work order might look like: Get last weeks work out from the shelves Prepare clay for today’s work – roll your clay, prepare balls for throwing, make the first stage of a pinch pot) Clean up last week’s work and put it on the shelf for bisque firing Check that you have any glazing to do – and do enough of it that you will have time to finish your main project Do the next step of your next project – there might be a further step that can’t be complete immediately, in that case, wrap your work well and put onto the shelves. Letting your work rest for a while can really help keep your work clean and professional looking. Many things require bagging under plastic to keep it ready for work the next week – put your name on the outside of the bag so you can find your work easily. We have stickers and markers. Consider how you want to decorate your work – coloured slip can be applied at a fairly wet stage (remembering that it will make your work even wetter!). Trying to apply slip to dry clay won’t work! If you want to do sgraffito – you will need to keep the work leather hard (a state of dryness where you can still work the clay with a little effort and a little water and care). Step Three – Drying Most of the time your work can go into the rack uncovered to let it dry out for the following week. If you want to continue forming or shaping you will need to double bag your work – put your work on a suitable sized bat and put the bat in a bag so the base of the bag is under the bat, then put another bag over the top of the work and tuck the top of the bag under the bat. If you want to trim (or turn) your thrown work the following week, it should also be double bagged. If your work is large, delicate, or of uneven thicknesses, you should lightly cover your work for drying. When considering the drying process, bare in mind the weather, humidity and wind! The hotter and dryer, the faster things dry and work can dry unevenly in the shelves – this can lead to cracking – another time to lightly cover your work for drying. Step Four – Trimming and Cleaning Up Your work is dry! It is called greenware now and it is at it’s most fragile! Handle everything with two hands. I often refer to soft hands – keep everything gentle and with your fingers spread as much as possible. Try to not pick up things like plates too much, and always with both hands! Before your work can be bisque fired it should be “cleaned up”. You work won’t go into the kiln if it has sharp edges – when glazed, sharp edges turn into razor blades! Use a piece of fly wire to rub the work all over – this will scratch a little so be light handed. Use a knife or metal kidney to scrape any areas that require a bit more dynamic treatment than the fly wire offers! Finally, a very light wipe over with a slightly damp sponge can help soften and soothe all of your edges and dags! Trimming thrown work: If you are planning to trim (or turn) your thrown work (and you should be), make sure you bag it well – your work should be leather hard to almost dry for easiest trimming. Use this step to finish the work completely – use a metal kidney to polish the surface, or a slightly damp sponge to give a freshly thrown look. Wipe the sponge around the rim after trimming, and check the inside of the pot for dags! Trimming slip cast work: Usually I will trim the rims of your work on the wheel the following day to make that stage easier, however you will still need to check your work for lumps and bumps. Last but not least – check that your name is still clearly on the bottom of your work. Step Five – Bisque Firing When the work is completely dry it can go into the bisque kiln. The bisque kiln is fired to 1000°C. This process burns off the water in the clay as well as some of the chemically bound water. The structure of the clay is not altered that much at this temperature. Inside the bisque kiln, the work is stacked a little, small bowl inside a larger bowl and onto a heavy plate. Smaller items like decorations or drink coasters might get stacked several high. Consideration is paid to the weight of the stack and shape of the work. A bisque kiln can fire about one and a half times the amount of work that the glaze kiln can fire. The firing takes about 10 hours to complete the cycle and about two days to cool down. Once it has been emptied the work is placed in the glaze room ready for you to decorate! Step Six – Glazing Decorating your work with colour can be a lot of fun – and time consuming! There are three main options for surface treatment at this stage: Oxide Washes Underglazes Glazes Washes and underglazes do not “glaze” the work – It will still need a layer of glaze to fully seal the clay (washes don’t need glaze on surfaces not designed for food or liquid as they can gloss up a little on their own). Underglazes are stable colourants that turn out pretty much how they look in the jar. They can be mixed with each other to form other colours and can be used like water colours to paint onto your work. Mostly they should have a clear glaze on top to seal them. Oxides are a different species – the pink oxide (cobalt) wash turns out bright blue for instance. They don’t always need a glaze on top, and some glazes can change the colour of the wash! The glazes need no other “glaze” on top! Be careful of unknown glaze interactions – you can put any combination of glaze in a bowl or on a plate, but only a single glaze on the outside of any vertical surface! Glazes are a chemical reaction under heat. We don’t know the exact chemicals in the Mayco glazes we use. I can guess by the way they interact with each other, however, on the whole, you need to test every idea you have, and not run the test on a vertical surface! Simply put, glaze is a layer of glass like substance that bonds with the clay underneath. Clay is made of silica, alumina and water. Glaze is made of mostly silica. Silica has a melting point of 1700°C and we fire to 1240°C. The silica requires a “flux” to help it melt at the lower temperature. Fluxes can be all sorts of chemicals – a common one is calcium – calcium has a melting point of 2500°C, however, together they both melt at a much lower temperature! Colourants are metal oxides like cobalt (blue), chrome (green through black), copper (green, blue, even red!), manganese (black, purple and pink) iron (red brown), etc. Different chemicals in the glaze can have dramatic effects. for example, barium carbonate (which we don’t use) turns manganese bright pink! Other elements can turn manganese dioxide brown, blue, purple and reddish brown. Manganese dioxide is a flux in and of itself as well. So, glazes that get their black and purple colours, often interact with other glazes and RUN! Our mirror black is a good example – it mixes really well with many glazes because it fluxes them – causes them to melt faster. It will also bring out many beautiful colours in the glazes because it’s black colouring most definitely comes from manganese dioxide! Glaze chemistry is a whole subject on it’s own! We use commercial Mayco glazes on purpose – for their huge range of colour possibilities, stability, cool interactions, artistic freedom with the ability to easily brush the glazes on and ease of use. We currently have almost 50 glazes on hand! A major project is to test the interactions of all glazes with each other. That is 2,500 test tiles!!!! I’m going to make the wall behind the wheels the feature wall of pretty colours! Step Seven – Glaze (Gloss or sometimes called “Glost”) Firing Most of the time this is the final stage of making your creation (but not always!) The glaze kiln goes to 1240°C. This is called cone 6, or midrange. It is the low end of stoneware temperatures. Stoneware clays and glazes are typically fired at cone 8 – 10, that is 1260 – 1290°C. The energy requirement to go from 1240°C to 1280°C is almost a 30% more! Our clay is formulated to vitrify (mature, turn “glass-like”) at 1240°, as are our glazes. A glaze kiln take around 12 hours to reach temperature and two to three days to cool down. Sometimes a third firing process is required – this is for decoration that is added to work after the glaze firing. For example – adding precious metals and lustres. this firing temperature is usually around 600 – 800°C depending upon the techniques being used. There are many students interested in gold and silver trims – we will be doing this third type of firing soon! After firing your work will be in the student finished work shelves. Remember to pay for it before you head out the door! There is a small extra charge for using porcelain clay (it’s more than twice the price of regular clay), and for any third firing process! Once your work has been fired it can not turn back into clay for millennia – so don’t fire it if you don’t like it! Put it in the bucket for recycling. https://firebirdstudios.com.au/the-process-of-making-pottery/Ceramics have evolved over thousands of years.Earthenware dessert plate, cream colour. Made by Alfred Meakin, England. Backstamped ‘Alfred Meakin England’. flagstaff hill, warrnambool, shipwrecked-coast, flagstaff-hill, flagstaff-hill-maritime-museum, maritime-museum, shipwreck-coast, flagstaff-hill-maritime-village, alfred meakin, ceramics, earthenware, kitchenware -
 Flagstaff Hill Maritime Museum and Village
Domestic object - Jug
The Process of Making Pottery Decorating, Firing, Glazing, Making, Technical There is a rhythm and flow to clay. It can’t be done all at once! Even the making process! It can take weeks to get everything done, especially if you can only work on your pottery once a week! Even though we have three hour classes, it’s often just not enough time! Here is an overview of some of the processes so you have a bit more grasp on some of the technical stuff! Step One – Design There are SO many ideas out there for making stuff in clay! From delicate porcelain jewellery, through to heavy sculptural work and everything in between. Deciding your direction is sometimes not that easy – when you first start, try everything, you will naturally gravitate to the style that you enjoy! The options and variations are endless and can get a wee bit overwhelming too! Check in with me before you start to ensure your ideas will work, what order you might do things, how you could achieve the look you are seeking and any other technical data required! Step Two – Making Clay is thixotropic. This means that as you work with it, the clay first gets sloppier and wetter, before is begins to dry in the atmosphere. For most things, you simply can’t do all parts of the project at once. An example of work order might look like: Get last weeks work out from the shelves Prepare clay for today’s work – roll your clay, prepare balls for throwing, make the first stage of a pinch pot) Clean up last week’s work and put it on the shelf for bisque firing Check that you have any glazing to do – and do enough of it that you will have time to finish your main project Do the next step of your next project – there might be a further step that can’t be complete immediately, in that case, wrap your work well and put onto the shelves. Letting your work rest for a while can really help keep your work clean and professional looking. Many things require bagging under plastic to keep it ready for work the next week – put your name on the outside of the bag so you can find your work easily. We have stickers and markers. Consider how you want to decorate your work – coloured slip can be applied at a fairly wet stage (remembering that it will make your work even wetter!). Trying to apply slip to dry clay won’t work! If you want to do sgraffito – you will need to keep the work leather hard (a state of dryness where you can still work the clay with a little effort and a little water and care). Step Three – Drying Most of the time your work can go into the rack uncovered to let it dry out for the following week. If you want to continue forming or shaping you will need to double bag your work – put your work on a suitable sized bat and put the bat in a bag so the base of the bag is under the bat, then put another bag over the top of the work and tuck the top of the bag under the bat. If you want to trim (or turn) your thrown work the following week, it should also be double bagged. If your work is large, delicate, or of uneven thicknesses, you should lightly cover your work for drying. When considering the drying process, bare in mind the weather, humidity and wind! The hotter and dryer, the faster things dry and work can dry unevenly in the shelves – this can lead to cracking – another time to lightly cover your work for drying. Step Four – Trimming and Cleaning Up Your work is dry! It is called greenware now and it is at it’s most fragile! Handle everything with two hands. I often refer to soft hands – keep everything gentle and with your fingers spread as much as possible. Try to not pick up things like plates too much, and always with both hands! Before your work can be bisque fired it should be “cleaned up”. You work won’t go into the kiln if it has sharp edges – when glazed, sharp edges turn into razor blades! Use a piece of fly wire to rub the work all over – this will scratch a little so be light handed. Use a knife or metal kidney to scrape any areas that require a bit more dynamic treatment than the fly wire offers! Finally, a very light wipe over with a slightly damp sponge can help soften and soothe all of your edges and dags! Trimming thrown work: If you are planning to trim (or turn) your thrown work (and you should be), make sure you bag it well – your work should be leather hard to almost dry for easiest trimming. Use this step to finish the work completely – use a metal kidney to polish the surface, or a slightly damp sponge to give a freshly thrown look. Wipe the sponge around the rim after trimming, and check the inside of the pot for dags! Trimming slip cast work: Usually I will trim the rims of your work on the wheel the following day to make that stage easier, however you will still need to check your work for lumps and bumps. Last but not least – check that your name is still clearly on the bottom of your work. Step Five – Bisque Firing When the work is completely dry it can go into the bisque kiln. The bisque kiln is fired to 1000°C. This process burns off the water in the clay as well as some of the chemically bound water. The structure of the clay is not altered that much at this temperature. Inside the bisque kiln, the work is stacked a little, small bowl inside a larger bowl and onto a heavy plate. Smaller items like decorations or drink coasters might get stacked several high. Consideration is paid to the weight of the stack and shape of the work. A bisque kiln can fire about one and a half times the amount of work that the glaze kiln can fire. The firing takes about 10 hours to complete the cycle and about two days to cool down. Once it has been emptied the work is placed in the glaze room ready for you to decorate! Step Six – Glazing Decorating your work with colour can be a lot of fun – and time consuming! There are three main options for surface treatment at this stage: Oxide Washes Underglazes Glazes Washes and underglazes do not “glaze” the work – It will still need a layer of glaze to fully seal the clay (washes don’t need glaze on surfaces not designed for food or liquid as they can gloss up a little on their own). Underglazes are stable colourants that turn out pretty much how they look in the jar. They can be mixed with each other to form other colours and can be used like water colours to paint onto your work. Mostly they should have a clear glaze on top to seal them. Oxides are a different species – the pink oxide (cobalt) wash turns out bright blue for instance. They don’t always need a glaze on top, and some glazes can change the colour of the wash! The glazes need no other “glaze” on top! Be careful of unknown glaze interactions – you can put any combination of glaze in a bowl or on a plate, but only a single glaze on the outside of any vertical surface! Glazes are a chemical reaction under heat. We don’t know the exact chemicals in the Mayco glazes we use. I can guess by the way they interact with each other, however, on the whole, you need to test every idea you have, and not run the test on a vertical surface! Simply put, glaze is a layer of glass like substance that bonds with the clay underneath. Clay is made of silica, alumina and water. Glaze is made of mostly silica. Silica has a melting point of 1700°C and we fire to 1240°C. The silica requires a “flux” to help it melt at the lower temperature. Fluxes can be all sorts of chemicals – a common one is calcium – calcium has a melting point of 2500°C, however, together they both melt at a much lower temperature! Colourants are metal oxides like cobalt (blue), chrome (green through black), copper (green, blue, even red!), manganese (black, purple and pink) iron (red brown), etc. Different chemicals in the glaze can have dramatic effects. for example, barium carbonate (which we don’t use) turns manganese bright pink! Other elements can turn manganese dioxide brown, blue, purple and reddish brown. Manganese dioxide is a flux in and of itself as well. So, glazes that get their black and purple colours, often interact with other glazes and RUN! Our mirror black is a good example – it mixes really well with many glazes because it fluxes them – causes them to melt faster. It will also bring out many beautiful colours in the glazes because it’s black colouring most definitely comes from manganese dioxide! Glaze chemistry is a whole subject on it’s own! We use commercial Mayco glazes on purpose – for their huge range of colour possibilities, stability, cool interactions, artistic freedom with the ability to easily brush the glazes on and ease of use. We currently have almost 50 glazes on hand! A major project is to test the interactions of all glazes with each other. That is 2,500 test tiles!!!! I’m going to make the wall behind the wheels the feature wall of pretty colours! Step Seven – Glaze (Gloss or sometimes called “Glost”) Firing Most of the time this is the final stage of making your creation (but not always!) The glaze kiln goes to 1240°C. This is called cone 6, or midrange. It is the low end of stoneware temperatures. Stoneware clays and glazes are typically fired at cone 8 – 10, that is 1260 – 1290°C. The energy requirement to go from 1240°C to 1280°C is almost a 30% more! Our clay is formulated to vitrify (mature, turn “glass-like”) at 1240°, as are our glazes. A glaze kiln take around 12 hours to reach temperature and two to three days to cool down. Sometimes a third firing process is required – this is for decoration that is added to work after the glaze firing. For example – adding precious metals and lustres. this firing temperature is usually around 600 – 800°C depending upon the techniques being used. There are many students interested in gold and silver trims – we will be doing this third type of firing soon! After firing your work will be in the student finished work shelves. Remember to pay for it before you head out the door! There is a small extra charge for using porcelain clay (it’s more than twice the price of regular clay), and for any third firing process! Once your work has been fired it can not turn back into clay for millennia – so don’t fire it if you don’t like it! Put it in the bucket for recycling. https://firebirdstudios.com.au/the-process-of-making-pottery/The form of the jug has been in use for many centuries.Stoneware jug. Two tone brown glaze with pierced lip behind spout. Spout chipped.None.flagstaff hill, warrnambool, shipwrecked-coast, flagstaff-hill, flagstaff-hill-maritime-museum, maritime-museum, shipwreck-coast, flagstaff-hill-maritime-village, jug, ceramic jug -
 The Beechworth Burke Museum
Audio - Oral History, Jennifer Williams, Alan French, 1st June 2000
Alan French was born in Beechworth in 1918 on Christmas Day, an only child descendent from French, Irish and Scottish family who had moved to and stayed in the area years before, both of his parents were born in Beechworth and were fourth generation Indigo Shire locals. Alan grew up in the depression era working the land with his dad when they could, cutting wood or helping on the local farms in and around Wooragee. Everyone able in those days bartered for goods, little coin and vegetables if there was spare to go around with labour or what little they produced from their efforts. In this interview, Alan discusses how his great grandparents Francois (French) and Catherine (Irish) Bertrand were the first vignerons in Beechworth, even mentioned in Beechworth, a Titans Field; 'Vines were draped across 156 acres of Beechworth shire in 1880, and notable vignerons included Francois Bertrand [...]' (Woods: 162) according to Alan 'you can still see where the old vines used to be, Malakoff Rose Garden' but whether or not the wine they produced was any good for drinking is open to interpretation and lost to the history of Beechworth and those who tasted it. This oral history recording was part of a project conducted by Jennifer Williams in the year 2000 to capture the everyday life and struggles in Beechworth during the twentieth century. This project involved recording seventy oral histories on cassette tapes of local Beechworth residents which were then published in a book titled: Listen to what they say: voices of twentieth century Beechworth. These cassette tapes were digitised in July 2021 with funds made available by the Friends of the Burke.This oral history account is socially and historically significant as it is a part of a broader collection of interviews conducted by Jennifer Williams which were published in the book 'Listen to what they say: voices of twentieth-century Beechworth.' While the township of Beechworth is known for its history as a gold rush town, these accounts provide a unique insight into the day-to-day life of the town's residents during the 20th century, many of which will have now been lost if they had not been preserved.This is a digital copy of a recording that was originally captured on a cassette tape. The cassette tape is black with a horizontal white strip and is currently stored in a clear flat plastic rectangular container. It holds up 40 minutes of recordings on each side.listen to what they say, beechworth, oral history, burke museum, vigneron, a titans field, beechworth a titans field, francois bertrand, wooragee, indigo shire, depression era, wood cutting, labour, farming, vines, history, malakoff rose garden -
 Federation University Historical Collection
Document - Document - Correspondence, VIOSH: Letters from Steve Cowley to prize givers for the Graduate Diploma in Occupational Hazard Management, 1988
Victorian Institute of Occupational Safety and Health (VIOSH) Australia is the Asia-Pacific centre for teaching and research in occupational health and safety (OHS) and is known as one of Australia's leaders on the field. VIOSH has a global reputation for its innovative approach within the field of OHS management. VIOSH had its first intake of students in 1979. At that time the Institution was known as the Ballarat College of Advanced Education. In 1990 it became known as Ballarat University College, then in 1994 as University of Ballarat. It was 2014 that it became Federation University. VIOSH Australia students are safety managers, senior advisors and experienced OHS professionals. They come from all over Australia and industry. Students are taught active research and enquiry; rather than textbook learning and a one-size fits all approach. VIOSH accepts people into the Graduate Diploma of Occupational Hazard Management who have no undergraduate degree - on the basis of extensive work experience and knowledge. Three letters written to associations/groups that provide prizes for the students of the Graduate Diploma in Occupational Hazard Management from Steve Cowley. Letters are to Mr Wayne Hughes - Managing Director, Industrial Rehabilitation Service. The prize is awarded to the "Best Final Year Student" and is a cheque for $500.00. Second letter is to Mr Raeburn Epthorp and award goes to the best Human Factors student. The third letter is to Mr Gordon Lewis - General Manager, National Safety Council of Australia. The award is for the best overall academic performance during the course. It is the "Max Eise Perpetual Trophy". The N.S.C.A. provide a miniature replica for the student to keep. The OHM Annual Dinner to be held on 7th July 1988 in the Bistro, Ballarat College of Advanced Education. Type written letters - single page. Memo page .Ballarat College of Advanced Education letterhead on letters. Date 13th May 1988. Signature of Steve Cowley.viosh, victorian institute of occupational safety and health, occupational hazard management, steve cowley, ohm course co-ordinator, wayne hughes, industrial rehabilitation service, best final student award, raeburn epthorp, human factors student, gordon lewis, national safety council of australia, ohm annual dinner, awards presentations, max eise perpetual trophy -
 Eltham District Historical Society Inc
Photograph, David Potts (Latrobe University), Koornong School collection, c.1940-c.1945
Photos include: Log building which the students constructed and used as a co-operative shop, Primary Class, Science class outside their classroom, Government meeting held in the outdoor theatre, Janet and Lawrence Nield. "Koornung School, Warrandyte was established by Clive and Janet Blake Nield in 1939, after they had visited progressive schools in Europe and America. They believed children should be given freedom to grow while learning to accept responsibility; that school should be a miniature democracy and education not a preparation for life but experience of life itself. A government of children and all staff (whatever their jobs in the school) met regularly, made the rules and dealt out punishment for breaking them. The few rules set down by staff related to health and safety, for instance, no pupils were allowed to go into the river without supervision. The school could not have been started at a worse time. Food rationing and coupons, petrol shortages and men at war limiting teaching staff made difficulties. It was an expensive school to run. Financial difficulties became more serious and eventually the school had to close in 1946. Efforts by the children and a Board of Management of notable people failed to save it. Janet Nield (M.A., Dip Ed.) was an inspired teacher of history. She was one of the few women at Melbourne University at that time to gain a Masters degree in history. The Nields left Melbourne to live in Sydney, Clive to work at Sydney University in lecturing in Education and particularly interested in Colombo Plan students. Janet devoted herself to children as a Lay Analyst. She was awarded the title of Training Analyst by a meeting of international psychoanalysts in Europe. - Pat Scott (Mrs Wynne Scott), a former member of staff at Koornung School Collection of five black and white photographs a, letter and descriptive material relating to Koornong School, Warrandyte showing various teachers and students and Connie and Alec Smith's studio.schools, koornong, warrandyte, danila vassilieff, lorna carter, adrian rawlins, teachers, janet nield, clive nield -
 Eltham District Historical Society Inc
Document, Stokes Orchard Estate Eltham; Macquarie Builders, 1979c
Sales brochure including photocopy map of Stokes Place lots and Sales Manager's business card (John J. Herold). Stage 1 implemented c.1976 and Stage 2 c.1979. As shown on the plan, the lots along Diosma Road did not eventuate due to the lack of sewer system. These lots and streets were divided up into 5 acre blocks, which were not able to be subdivided till the 1990s when the sewer was run up Diosma Road. Stokes Place was part of the Stokes Orchard Estate which was developed from the break-up of the the orchard owned by Frank Stokes who lived on the northeast corner of Nyora Road and Eucalyptus Road. His daughter Beryl advised that the Shire had levied a rate assessment on individual parcels of land within the orchard which became unaffordable resulting in its sub-division and sell off. The Stokes Orchard Estate was developed by Macquarie Builders in two stages starting with stage 1 in 1976. Stokes Place was part of Stage 2 in 1979. The Estate was bounded between Nyora Road, Eucalyptus Road, Diosma Road and Stokes Place. The original orchard only just reached the left most portions of Stokes Place and did not go fully up to Diosma, rather to just beyond the extant of Stokes Place. Stokes Place was known within the family as "The Oats" as that is where they grew oats. Frank Stokes moved to Eltham c.1945 after visiting Harold Bird to view his orchard, located diagonally opposite Stokes Orchard from the intersection of Eucalyptus Road, Pitt Street and Nyora Road. It was on Harold Bird's recommendation that Frank purchased the land.The Stokes Orchard Estate collection is typical of housing developments of the late 1970s and 1980s. It was one of the earliest estates in Eltham following the nearby Woodridge Estate development.A4 colour brochure double sided, A4 photocopy and business cardAs notedstokes place, eltham, stokes orchard, stokes orchard estate, streets, houses, peter and carla vermey -
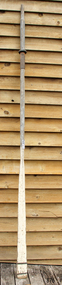 Flagstaff Hill Maritime Museum and Village
Functional object - Sculling Oar, Mid to late 19th century
An oar is an implement used for water-borne propulsion. Oars have a flat blade at one end. Rowers grasp the oar at the other end. The difference between oars and paddles is that oars are used exclusively for rowing. In rowing the oar is connected to the vessel by means of a pivot point for the oar, either an oarlock, or a hole. The oar is placed in the pivot point with a short portion inside the vessel, and a much larger portion outside. The rower pulls on the short end of the oar, while the long end is in the water. By contrast, paddles, are held in both hands by the paddler, and are not attached to the vessel. Rowers generally face the stern of the vessel, reach towards the stern, and insert the blade of their oar in the water. As they lean back, towards the vessel's bow, the blade of their oars pivots in the oarlock, and the end in the water moves towards the stern, providing forward thrust. There also is another way of propelling a small craft it's called a sculling oar which is attached to the transom and used to propel a small vessels rather than using two oars as previously described. It is believed the subject item is just such an oar given it’s long blade associated with a sculling oar. For thousands of years vessels were powered either by sails, or by the mechanical work of rowers, or by paddlers. Some ancient vessels were propelled by both oars and sail, depending on the speed and direction of the wind. Wooden oars, with canoe-shaped pottery, dating from 5000–4500 BC have been discovered in a Hemudu culture site at Yuyao, Zhejiang, in modern China. The history of man using wooden oars to propel a boat has a considerable record in marine archaeology going back many centuries. The item is significant for marine archaeology as it gives a snapshot into how a small row boat was powered using a wooden sculling oar. A method of propelling a small boat still used today an example is the gondoliers in Venice using a sculling oar in a circular motion to propel his craft. Single sculling oar with long flat blade, two copper bands, on blade with rowlock fittingNoneflagstaff hill, warrnambool, flagstaff-hill, flagstaff-hill-maritime-museum, maritime-museum, shipwreck-coast, flagstaff-hill-maritime-village, boat oar, sculling oar, row boat -
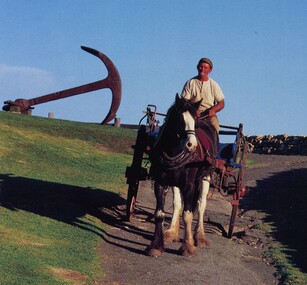 Flagstaff Hill Maritime Museum and Village
Vehicle - Spring Cart, Late 19th to early 20th centuries
A spring cart is a two-wheeled, one-horse cart, often with the driver standing up to drive it, and otherwise seated on a simple seat. Carts like this one had springs to make the ride smoother. It is a lighter version of a farm dray and is sometimes called a spring dray. Spring carts were often used on farms for carrying loads. In the towns, some businesses used a spring cart for deliveries of bread, milk and other goods. The carts would be used for travel and for families going on outings and picnics. Visitors to Flagstaff Hill Maritime Village from 1986 to 1992 would enjoy watching a Clydesdale horse named Duke as he worked around the village with his driver Pat McGowan. He would be hitched to a wagon or to this lightweight spring cart or sometimes he would pull the wagon with the cart attached as a trailer. The cart was used for maintenance, carting loads of timber or stone around the site or from town to Flagstaff Hill. Sometimes Duke and the cart would take visitors for cart rides around the Village. Pat McGowan was known for his restoration of horse-drawn vehicles including this spring cart. He already had 40 years of horse handling experience when he began looking after Duke, feeding and harnessing him and driving the horse and cart around the Village. Pat’s dog ‘Yabbie’ would often join them. In August 1992 Duke had to be put down. Warrnambool Veterinary Clinic and other fund-raisers began well-supported appeals and the beloved horse was replaced by a Clydesdale also named Duke (the second), who began work in late October 1992. He, like his predecessor, had a quiet temperament and was comfortable in the traffic. The spring card is an example of vehicles used on farms, for business delivery and for domestic transport in the late-19th and early-20th century. This cart is of note for being associated with the Clydesdale horse Duke which pulled the cart around Flagstaff Hills in the 1980s and 1990s, representing transport of that period.Spring cart; two-wheeled cart with shallow box tray and plank seat bolted across the front. Wheels have metal rims and fourteen (14) wooden spokes. A plank is bolted from side to side. A decorative metal step is on the cart's left and has acorn cut-out shapes in the plate. Both wheels have a brake block that is operated by a lever on the cart's right. The cart has eight-leaf suspension from front to back. The box tray is painted blue and has decorative pale yellow detail. Each shaft pole has has a handle fitting on it. (Horse equipment with the cart is a leather covered, straw filled collar.) flagstaff hill, flagstaff hill maritime museum and village, warrnambool, maritime museum, maritime village, great ocean road, shipwreck coast, springcart, spring cart, jingle, horse-drawn cart, one horse cart, two-wheeled cart, dray, spring dray, wagon, transportation, travel, cart, duke, clydesdale, pat mcgowan, delivery cart, yabbie, cartwright, horse-drawn vehicle, transport, horse cart -
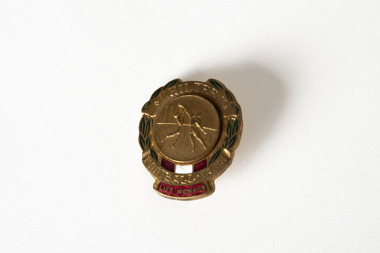 Chiltern Athenaeum Trust
Badge
This badge was given to William Clarence Busse when he became a lifetime member of the Chiltern Football Club. Football became popualr in Chiltern during the 1860s, with the local team becoming a key part of the creation of a formal competition for the Ovens and Murray region, which came about in 1893. The Chiltern team also participated in the founding of the Chiltern and District Football Association in 1912, where they won their first premiership in 1914. In 1954, the team played in a Grand Final against Greta that had a 43 minute long final quarter. Chiltern was ahead when the fourth quarter should have ended, but the timer did not go off and the game went into overtime, allowing Greta to snatch the win and set in place a decades-long rivalry. Today, the team continues to compete under the nickname the 'Swans' in the Tallangatta and District Football League. Wilfred Clarence Busse was born in Chiltern in 1898. He completed his education at Wesley College in Melbourne then studied law at the University of Melbourne, before becoming a barrister. During his career, he often worked in the chambers of Judge Bernard Cussen (1859-1933) of the Supreme Court. Cussen was popular as a judge and lawyer, known for being just and precise and for completing through statutory consolidation in his spare time. Beyond his career as a lawyer, Busse wrote historical fiction inspired by his life in Chiltern, these included "The Blue Beyond; A Romance of the Early Days in South Eastern Australia" and "The Golden Plague: A Romance of the Early Fifties," which won the T.E.Role gold medal for the best historical novel in 1930 and went on to become a best seller. He was a member of the Chiltern Athenaeum until his death in 1960. This object is significant for its link to W.C. Busse, a barrister and author born in Chiltern, and as memorabilia of the Chiltern Football Club. A small gold metallic badge depicting two men playing Australian Rules Football, surrounded by a border of leaves. Obverse: "CHILTERN/ FOOTBALL CLUB/ LIFE MEMBER" Reverse: "W.C. Busse/ K. G. 9KT/ M ??" busse, w.c. busse, wilfred clarence busse, chiltern, chiltern athenaeum, chiltern football club, football, sport, t. e. role, "the blue beyond, a romance of the early days in south eastern australia”, "the golden plague: a romance of the early fifties.", "the golden plague”, wesley college, university of melbourne, sir leo finn bernard cussen, supreme court of victoria, football league, lifetime member, chiltern football club lifetime member -
 8th/13th Victorian Mounted Rifles Regimental Collection
Work on paper - VMR, Labour and Shipping Strike
Probably originally drawn for publication in Melbourne newspaper showing detachment of Victorian Mounted Rifles on way to establish order at a strike site during the Labour and Shipping Strike of August 1890. During the strike armed troops were deployed to support the police in Melbourne and in Newcastle and a number of other ports around the country. In Melbourne, the announcement that a public meeting was going to be held on 31 August 1890 to support the maritime strikers sent the Victorian government into precautionary mode. On the eve of the meeting, the Victorian Mounted Rifles were briefed by their commanding officer Lieutenant-Colonel Tom Price: 'Men of the Mounted Rifles, one of your obligations imposes on you the duty of resisting invasion by a foreign enemy, but you are also liable to be called upon to assist in preserving law and order in the colony. ... To do your work faintly would be a grave mistake. If it has to be done effectively you will each be supplied with 40 rounds of ammunition, leaden bullets, and if the order is given to fire, don't let me see any rifle pointed in the air; fire low and lay them out so that the duty will not have to be performed again.' Price was quite clear and quite unapologetic about his intentions. He only wanted ′'to hit the strikers in the legs ... not to kill them outright. He explained that the term 'lay them out' was used in his regiment to mean 'temporary disablement'. A force of 1,000 militia and mounted police and another 1,000 special constables were embodied by the time of the meeting. These forces, apart from a troop of mounted police were held in reserve out of the way and the 40,000 who attended the meeting, although enthusiastic, were orderly and the forces were not called in. Framed coloured artistic work with three works depicting soldiers on horseback in midst of angry crowds.military, strike, melbourne, maritime, vmr -
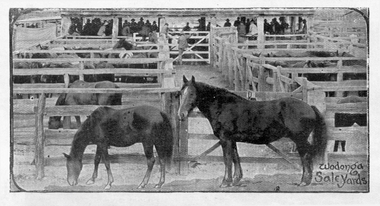 Wodonga & District Historical Society Inc
Photograph - Horse Sales at Wodonga Saleyards
The sale of stock in Wodonga goes back to its earliest history with yards being operated on the site now occupied by Elgin's Hotel and the Centro Shopping Centre, located close to the railways. Horse sales were an important part of the history of the Wodonga Saleyards. Horses were bred in north-east Victoria for the Indian Market, and records show that a truck load of horses left Wodonga Station in 1875. Campbell & Sons commenced selling horses at the Elgin Street site in 1895 and they conducted regular sales in association with Younghusband Ltd. Campbell & Sons was a Melbourne-based company, which eventually merged with Wright Stephenson & Co. Wodonga and Towong Sentinel of Friday 3rd March 1899 reported “Buyers attended from Bendigo, Ballarat, Calcutta, Madras, Singapore, The Islands, Gippsland, Dandenong, and Melbourne. Indian remounts brought up to £32 10s, draughts to £25, medium draughts to £18, town hacks and harness horses to £32, buggy pairs to £65, and light weedy sorts to £5.” After World War II, large numbers of mainly Clydesdale working horse teams were driven to Wodonga for sale. The March horse sale was the biggest and most important event of the year with overall yardings of 1,000 horses sold over two or even three days. It was a very busy period. All the horses were put through the ring singly, usually by Felix Grundy and generally caught and mouthed by Harold Boon, Andy Elliot or Toy Mulqueeney. The majority of the horses sold were trucked by rail from Wodonga. With developments in technology and the changing role of the horse in modern society, the sale of horses dwindled although horse sales at Wodonga continued until the early 1980s.These items are significant because they represent an important industry in Wodonga's past as a major centre of livestock sales in Victoria.Photographic images of horses on sale at Wodonga Saleyards.wodonga saleyards, horse sales wodonga -
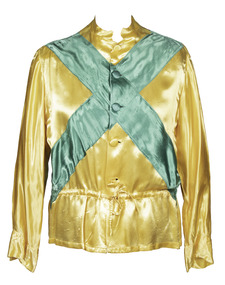 Victorian Harness Racing Heritage Collection at Lord's Raceway Bendigo
Clothing - Race colours, Don Dove
DON DOVE – 2016 Victorian Harness Racing Hall of Fame inductee A highly successful trainer-driver, Don Dove had something that most colleagues never had – his own sire. After making his mark early on as a driver, Don began training and driving the progeny of Dignus, a grand-son of Light Brigade he had purchased. Many of its 57 winners he trained and drove himself. The most memorable of these of course was his best-ever pacer, a 1966 colt he named Monara. It won successive A. G. Hunter Cups in 1973 and 74, and many other races – so often with this brilliant beginner going to the lead and then Don playing cat-and-mouse tactics out in front before dashing this son of Dignus away and holding off all comers. Those who may remember the 1972 Inter Dominion Final when Don was having a little holiday, will agree Monara was something beaten into second place that night. Don won many races on his brother Eric’s trotter Just Money, along with Nelson’s Report, Lauries Legacy and Kara Miss, and filled in well when winning the 1965 Warragul Cup driving the great little Macaree, and the 1967 Victoria Derby driving Kelly Kid. When the Victorian Trainers and Drivers Association formed in 1968, he was elected to its first committee. Don is also the father of Trevor and Stephen, both well known horsemen of a few seasons back. In retirement, Don Dove moved to Queensland in 1998 and it was there he passed away in 2014 at the age of 86.Yellow, with green crossed sashesdon dove, d dove, monara, amlin, bendigo harness racing club, bhrc, bendigo, horses, race colours, trotting, pacing, harness racing, dv dove -
 Melbourne Legacy
Document - Document, diary
A diary written by Legatee Frank Doolan as he sailed to Perth and then visited Legatee Ivan Davies and his wife Mercy. He mentions docking at King George Sound which was the harbour from which transport assembled to convoy to the Middle East for the first World War. He was greeted by a member of Perth Legacy, Keith Manwell. He mentions visiting Mt Clarence and The Anzac Desert Mounted Monument "which was destroyed by Nasser's Gyppos at Port Said, and of which the pieces were transported back to Australia, stone base and all complete. Where a new model was made by Ray Ewen at Frankston and was sent back to Italy to be melted down and recast. It is double life size and very striking, depicting an Anzac charging from a horse which has been shot down under shellfire, to a new charger - rearing to go." He leaves the SS Kangaroo for a few days to visit a "Legacy pal", Ivan Davies. They toured his farm 'Carngham'. His observation at the end shows the comradeship of Legatees. "time to depart after several glorious days of perfect hospitality. To be accepted spontaneously as one of the family is the test of true friendship, and we received the full treatment from Mercy and Ivan at 'Carngham'". The year is unknown but the trip was in March. It could have been before a Legacy Conference in Perth. Was with other memorabilia that has come from Frank Doolan from both his war service and his time with Legacy. Frank Doolan posted this copy of his diary to Ivan Davies in 1978. Not sure how it and the cover letter (01131) were returned to Legacy's collection. The diary shows that Legatees from different regions of Australia visited each other and had strong friendships over the years. A carbon copy of a diary x 11 pages, written by L/- Frank Doolan on a trip on the SS Kangaroo and a visit to L/- Ivan Davies.Dairy is handwritten. Pages are numbered 67 to 78 in printed numerals in top right of each page.comradeship, frank doolan