Showing 995 items
matching fountain
-
 Ballarat Tramway Museum
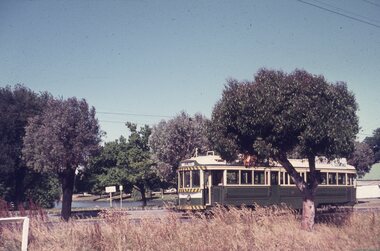
Slide - 35mm slide/s - set of 11, Eldon Hogan, mid 1960's to early 1970's
Set of 11 Agfa Plastic mounted slides - from the Eldon Hogan collection - possibly on an ARE Bendigo tours - mid 1960's (black destination rolls) and late 1960's or early 1970's. Scanned on the Canon scanner at the depot 15/12/1971 at the time of the installation of the scanner. .1 - No 18 with Lake Weeroona in the background - possibly at the same time as the tour with No. 18, though showing destination of Charing Cross. .2 - ditto .3 - No. 25 and two following trams on a special tour, note the white disc - Quarry Hill line? .4 - No. 29 on the Eaglehawk line at the Mt. Korong Road and the Calder Highway, with the Ampol Service station in the background. .5 - No. 29 passing Lake Weeroona with Destination of Nth Bendigo - has a Briquettes Roof Advertisement., .6 - No. 26 ditto - with two SEC Roof Advertisements. .7 - No. 24 leaving Charing Cross for Golden Square with The Beehive building, Ezywalkin, Coca Cola and the Fountain Shopping Centre in the background. .8 - No. 29 and a bogie tram at the Golden Square terminus with Golden Square Hotel and Victoria Bitter fence in the background. No. 29 has a SEC Briquettes roof advertisement. .9 - No. 29, with the Cathedral in background. Tram has a SEC Briquettes roof advertisement and destination of Golden Square. .10 - side view of a bogie tram on the Eaglehawk line? Tram has a Electric cooking roof advertisement. Photo has been over exposed. .11 - Single trucker, Violet St with the Central Deborah mine head in the background. Tram has two SEC Electric Cooking roof advertisements. tramways, trams, bendigo, lake weeroona, eaglehawk, golden square, charing cross, central deborah, tram 18, tram 25, tram 29, tram 24 -
 Kew Historical Society Inc
Plan, Melbourne and Metropolitan Board of Works, Borough of Kew : Detail Plan No.1580, 1904
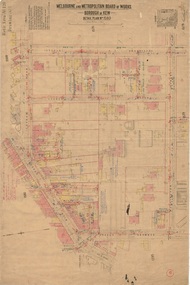
The Melbourne and Metropolitan Board of Works (MMBW) plans were produced from the 1890s to the 1950s. They were crucial to the design and development of Melbourne's sewerage and drainage system. The plans, at a scale of 40 feet to 1 inch (1:480), provide a detailed historical record of Melbourne streetscapes and environmental features. Each plan covers one or two street blocks (roughly six streets), showing details of buildings, including garden layouts and ownership boundaries, and features such as laneways, drains, bridges, parks, municipal boundaries and other prominent landmarks as they existed at the time each plan was produced. (Source: State Library of Victoria)This plan forms part of a large group of MMBW plans and maps that was donated to the Society by the Mr Poulter, City Engineer of the City of Kew in 1989. Within this collection, thirty-five hand-coloured plans, backed with linen, are of statewide significance as they include annotations that provide details of construction materials used in buildings in the first decade of the 20th century as well as additional information about land ownership and usage. The copies in the Public Record Office Victoria and the State Library of Victoria are monochrome versions which do not denote building materials so that the maps in this collection are invaluable and unique tools for researchers and heritage consultants. A number of the plans are not held in the collection of the State Library of Victoria so they have the additional attribute of rarity.Original survey plan, issued by the MMBW to a contractor with responsibility for constructing sewers in the area identified on the plan within the Borough of Kew. The plan was at some stage hand-coloured, possibly by the contractor, but more likely by officers working in the Engineering Department of the Borough and later Town, then City of Kew. The hand-coloured sections of buildings on the plan were used to denote masonry or brick constructions (pink), weatherboard constructions (yellow), and public buildings (grey). The area represented in this detail plan has undergone significant change during the 20th century. The widening of High Street in the 1930s and 1950s involved the shops on the south side of High Street being demolished and later rebuilt to fit the widened street. Another significant loss was the mansion ‘Drayton’ fronting Wellington Street, owned at this stage by Susannah Fenton. Her family name would later to be given to Fenton Way, which was to be built over the grounds of the house following its demolition. The plan of the garden is particularly interesting, containing a batten dome fronting Wellington Street, an ornamental pond, a fountain and a brick and glass conservatory. The notes by the plumbing contractor on this plan are particularly detailed. Pink borders delineate the ownership of the varying parcels of land. Some of the better known owners listed include the real estate agent Cr. Henry de Castres Kellett (bt) and John Padbury, the funeral director. This particular plan provides a clear view of the configuration of the Kew Junction in 1903 and the commercial buildings that surrounded it.melbourne and metropolitan board of works, detail plans, maps - borough of kew, mmbw 1580, cartography -
 Kew Historical Society Inc
Plan, Melbourne & Metropolitan Board of Works : Borough of Kew : Detail Plan No.1588, 1904
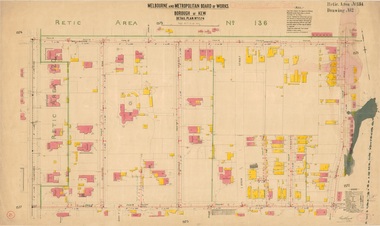
The Melbourne and Metropolitan Board of Works (MMBW) plans were produced from the 1890s to the 1950s. They were crucial to the design and development of Melbourne's sewerage and drainage system. The plans, at a scale of 40 feet to 1 inch (1:480), provide a detailed historical record of Melbourne streetscapes and environmental features. Each plan covers one or two street blocks (roughly six streets), showing details of buildings, including garden layouts and ownership boundaries, and features such as laneways, drains, bridges, parks, municipal boundaries and other prominent landmarks as they existed at the time each plan was produced. (Source: State Library of Victoria)This plan forms part of a large group of MMBW plans and maps that was donated to the Society by the Mr Poulter, City Engineer of the City of Kew in 1989. Within this collection, thirty-five hand-coloured plans, backed with linen, are of statewide significance as they include annotations that provide details of construction materials used in buildings in the first decade of the 20th century as well as additional information about land ownership and usage. The copies in the Public Record Office Victoria and the State Library of Victoria are monochrome versions which do not denote building materials so that the maps in this collection are invaluable and unique tools for researchers and heritage consultants. A number of the plans are not held in the collection of the State Library of Victoria so they have the additional attribute of rarity.Original survey plan, issued by the MMBW to a contractor with responsibility for constructing sewers in the area identified on the plan within the Borough of Kew. The plan was at some stage hand-coloured, possibly by the contractor, but more likely by officers working in the Engineering Department of the Borough and later Town, then City of Kew. The hand-coloured sections of buildings on the plan were used to denote masonry or brick constructions (pink), weatherboard constructions (yellow), and public buildings (grey). This plan shows the original configuration of the Kew Post Office, Court House and Police Station, which had opened in 1888. This configuration was to essentially remain until the purchase of the Court House and Police Station by the City of Boroondara in 2007 and its subsequent renovation. Interestingly, the MMBW surveyors incorrectly labelled parts of the complex. In the triangle in front of the Post Office, before the erection of the Kew Cenotaph in 1925, was located a lawn and the Queen Victoria Jubilee Fountain. While many of the shops on the south side of High street had been constructed by 1903 a number of sites were still used as vegetable gardens. Further along High Street, on the corner of Charles Street, the Salvation Army Barracks can be seen on the plan. These Barracks predate the later Citadel and ‘Young People’s Hall’ that were opened in 1919. At 22 Charles Street can be seen the house of James Venn Morgan. Hailed as the ‘father of Kew’, Morgan arrived in Melbourne in 1840. He was first engaged as a bookmaker, but a fortunate venture on the goldfields enabled him to purchase land in Kew. He conducted a market garden and dairy in Kew for many years.melbourne and metropolitan board of works, detail plans, maps - borough of kew, mmbw 1588, cartography -
 Kew Historical Society Inc
Plan, Melbourne & Metropolitan Board of Works : Borough of Kew : Detail Plan No.1574, 1905
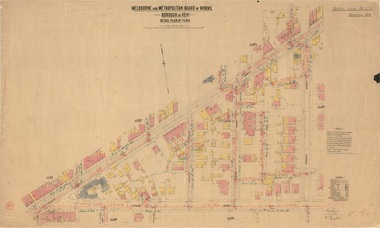
The Melbourne and Metropolitan Board of Works (MMBW) plans were produced from the 1890s to the 1950s. They were crucial to the design and development of Melbourne's sewerage and drainage system. The plans, at a scale of 40 feet to 1 inch (1:480), provide a detailed historical record of Melbourne streetscapes and environmental features. Each plan covers one or two street blocks (roughly six streets), showing details of buildings, including garden layouts and ownership boundaries, and features such as laneways, drains, bridges, parks, municipal boundaries and other prominent landmarks as they existed at the time each plan was produced. (Source: State Library of Victoria)This plan forms part of a large group of MMBW plans and maps that was donated to the Society by the Mr Poulter, City Engineer of the City of Kew in 1989. Within this collection, thirty-five hand-coloured plans, backed with linen, are of statewide significance as they include annotations that provide details of construction materials used in buildings in the first decade of the 20th century as well as additional information about land ownership and usage. The copies in the Public Record Office Victoria and the State Library of Victoria are monochrome versions which do not denote building materials so that the maps in this collection are invaluable and unique tools for researchers and heritage consultants. A number of the plans are not held in the collection of the State Library of Victoria so they have the additional attribute of rarity.Original survey plan, issued by the MMBW to a contractor with responsibility for constructing sewers in the area identified on the plan within the Borough of Kew. The plan was at some stage hand-coloured, possibly by the contractor, but more likely by officers working in the Engineering Department of the Borough and later Town, then City of Kew. The hand-coloured sections of buildings on the plan were used to denote masonry or brick constructions (pink), weatherboard constructions (yellow), and public buildings (grey). This plan shows several very large houses, particularly along Glenferrie Road, and the area now occupied by Ruyton Girls’ School. ‘Tarring’ (incorrectly spelled here as ‘Karring’) was built for Henry Henty in 1872, on part of his original allotment of 20 acres, and ‘Mount View’, which retains its original building and the fountain in the front garden, is part of Ruyton’s Junior School. The most significant change to Tarring and its grounds since 1903, involve the removal of a number of the outbuildings, including a Burmese temple, bought by Henty from the Burmese Exhibit at the Great Exhibition of 1880. It is shown on the plan as a summerhouse. The two-storey mansion, on the corner of Glenferrie Road and Wellington Street, was built in 1891 by leading architect Alfred White as his own home. Having an initial N.A.V. of £160, the house was purchased by a warehouseman Henry Lister, by 1900, when the N.A.V. was recorded at £111. By the turn of the century the house was known as ‘Comaques’. By contrast, much smaller houses are shown in Scott and Byron Streets, including a tiny Mission Hall in Byron Street, which belonged to the Anglican Church from at least 1903 to 1917.melbourne and metropolitan board of works, detail plans, maps - borough of kew, mmbw 1574, cartography -
 University of Melbourne, Burnley Campus Archives
Album - Black and white and sepia prints, Gardens Other Than Burnley, 1890-1920
Identification and information on reverse of some photographs given by Georgina Whitehead (Tel-9572 1225) who visited the Archives on 26 September, 1995 when she was writing a book on the various gardens owned and run by the Melbourne City Council-'Civilizing the city: a history of Melbourne's public gardens,' State Library of Victoria, Melbourne 1997.34 bkack and white and sepia photographs. Possibly used for Magic Lantern slides. Fitzroy Gardens: (1) Possibly, towards St Patrick's Cathedral. (2, 3) Path through avenue of trees. (4) Winter. Heavily pruned Elms. (5) Looking towards Clarendon St-eastwards. (6) Probably, lawn. (7) 2 copies, possibly Kiosk. (8) 1920's or earlier. Man sitting on bench. (9) Path through avenue of trees. (10) 2 copies. Probably-fenced originally-fences coming down 1890's on. (11) Statue at crossroad. (12) The Vase Fountain. (13) Tree trunks. (14) Tree trunks. (15) Probably, tree trunks. (16) Winding path. (17) Probably, misty winter scene. (18) Probably, summer. (19) Probably, this is the sort of garden seat used. (20) Avenue of trees, information about exposure on reverse. (21) 2 copies. Probably. Treasury Gardens: (22) Japanese Garden. (23)Japanese Garden. This area around the Lake done by Guilfoyle c.1901-1902. This photograph about this period. (24) Gardener at lake edge. Snowdon Gardens: (25) View towards city. Unidentified: (26) ?Botanic fern Gully/ Fitzroy Fern Gully. (27) Lake view. (28) Narrow path through long grass and trees. (29) Trees in winter. (30, 30a) Tree ferns. (31,32) Cordylines. (33) People on lawn. (34) Winter view of path through elms. These photographs have been scanned but have not been uploaded.georgina whitehead, fitzroy gardens, trees, elms, the vase fountain, trunks, treasury gardens, japanese garden, guilfoyle, snowdon gardens, fern gully, lake view, parks -
 Ballarat Tramway Museum
Slide - 35mm slide/s - set of 24, Noel Simons, 20/05/1971 12:00:00 AM
Set of 24 transparencies taken on 20/5/1971 on Kodak mounts. 1195.1 - Bendigo 19 arriving at Charing Cross en route to North Bendigo with Fountain Plaza and the City Family Hotel in the background. No. 19 has two roof ads for the SEC. -'Electricity better for cooking' and 'Everything's under control in my all electric kitchen' 1195.2 - as above, but standing at the Charing cross stop, with the Beehive Stores and other buildings along the east side of Pall Mall in the background. 1195.3 - No 21 ex Golden Square crossing View St. trackwork in front of No. 25 waiting to depart for Quarry Hill. No.21 has two roof ads (as for No.19 in 1195.1) and No.25 has one SEC roof ad and another. Ezywalkin sign in the background, and Fountain Plaza. 1195.4 - as for 1195.3, but after 21 has arrived and 25 left for Quarry Hill. Has Ezywalkin store and the Beehive store in the background. 1195.5 - No. 5 at the Eaglehawk terminus. Photo taken with a cannon in foreground looking along High St. Eaglehawk. Has shops on the west side of High St. in the background. 1195.6 - No. 5 at the Eaglehawk terminus, close up of the rear of the tram - note tow bar arrangement. Has destination of Quarry Hill. 1195.7-Nos.25 and 5 crossing at the Thorpe St. Loop, California Gully. No. 25 bound for Eaglehawk (has SEC Briquette and electric cooking roof ads) and 5 en route for Quarry Hill with a SEC and Cinzano roof ad. 1195.8 - as for 1195.7, but after trams have passed each other. Has Borough Auto Service building in the background. 1195.9 - No. 5 in Mt Korong Road, towards Bamard Street, photo taken after tram has passed photographer. 1195.10 - No. 30 at the Golden Square terminus with the Milk Bar on the right hand side of the photograph. 1195.11 - No. 30 inbound at Fire Station Loop, High St. Golden Square. Has old fire station in the background. Passengers are boarding the tramcar. 1195.12 - No. 30 in High St, bound for North Bendigo between Vine and Wattle Streets. 1195.13 - No. 5 bound for Eaglehawk waits at Iron Bark Gully Loop, at Hayes St. 1195.14 - No. 5 and No. 2 crossing at Iron Bark Gully Loop. 1195.15 - No. 5 bound for Eaglehawk leaving the Manchester Loop, Long gully. 1195.16 - No. 5 passing William Street, Long Gully en route to Eaglehawk. 1195.17 - No. 5 just before the California Gully Crossing Loop. 1195.18 - Nos. 5 and 26 crossing at California Gully crossing Loop. No. 5 heading to Eaglehawk, 26, Quarry Hill. 1195.19 - No. 5 in High St. Eaglehawk with Bob Moyle's Victoria Hotel and the TAB in the background. 1195.20 - No. 5 in High St. Eaglehawk approaching the terminus. Photo taken after the tram has passed the photographer. Has Foodland store and J. Best Fruit supply in the background, along with Eaglehawk Town Hall. 1195.21 - No. 5 at the Eaglehawk terminus, photo taken along seldom used track along High St. 1195.22 - as for 1195.22 - but at the very end of the track. 1195.23 - No. 5 en route for Quarry Hill climbs High St. Eaglehawk with the Victoria Hotel and Eaglehawk Town Hall in the background. 1195.24 - No. 5 and 25 crossing at Jobs Gully Loop. Note 25 has a black on white destination roll, while No. 5 has a white on black destination roll. Information written on in black ink and date stamped on purple ink. 1195.1 - "No. 19 arrives at Charing Cross Bendigo from Golden Square" 1195.2 - "No. 19 about to leave Charing Cross for North Bendigo" 1195.3 - "No. 25 awaiting departure for Quarry Hill, watches No. 21 arrive at Charring Cross from Golden Square" 1195.4 - "No. 21 on North Bendigo service and No. 25 on Quarry Hill run await departure at Charing Cross" 1195.5 - "No. 5 at Eaglehawk terminus" 1195.6 - "No. 5 at Eaglehawk terminus" 1195.7 - "Nos. 5 and 25 crossing at Thorpe St. Loop, California". 1195.8 - "Nos. 25 and 5 crossing Thorpe St. Loop, California Gully". 1195.9 - "No. 5 descending Mt Korong Rd. towards Bamard St." 1195.10 - "Birney car No. 30 at Golden Square terminus" 1195.11 - "Birney car No. 30 in High Street near Thistle Street (Fire Station Loop)" 1195.12 - "No. 30 in High St. between vine and Wattle Streets" 1195.13 - "No. 25 at Hayes Street Loop Iron Bark". 1195.14 - "Nos. 2 and 5 crossing at Hayes Street Loop Iron Bark" 1195.15 - "No. 5 at Manchester Loop opposite Havilah Road, Long Gully" 1195.16 - "No. 5 passing William Street, Long Gully". 1195.17 - "No. 5 at California Gully" 1195,18 - "Nos. 26 and 5 at Thorpe St. Loop, California Gully". 1195.19 - "No. 5 in High St. Eaglehawk". 1195.20 - "No. 5 approaching Eaglehawk terminus" 1195.21 - "No. 5 at Eaglehawk terminus" 1195.22 - "No. 5 at Eaglehawk terminus" 1195.23 - "No. 5 in High St. Eaglehawk" tramways, trams, bendigo, charing cross, eaglehawk, california gully, golden square, iron bark gully, jobs gully, tram 2, tram 5, tram 19, tram 21, tram 25, tram 26, tram 30 -
 Bendigo Historical Society Inc.
Book - CITY OF BENDIGO HISTORICAL WALK BOOK, 2001
Photocopy mock up of original booklet of The Bendigo Historical Society Inc. 'City of Bendigo Historical Walk' containing photographs of historic buildings to be seen on the walk. Front cover Queen Victorian Gardens, Town hall, Mechanics Institute/School Of Mines and Industry, H. M. Prison Bendigo, Camp Hill Police Barracks, Sandhurst Corporate High School, Central State School No. 1976, The Cascades, District Lands Office (Dudley House), Masonic Temple and Hall, Sandhurst Volunteer Rifle Brigade Orderly Room, Bank of Victoria, Henry Jackson's Store View Point,Alexandra Fountain, Beehive Store/Mining Exchange, Colonial Bank. Hustlers Royal Reserve NO. 2/R.S.L. Memorial Hall, Post Office 3rd 4th and final, Bendigo Law Courts, Shamrock Hotel 2nd and another view. Important Bendigo Dates; 1851, April gold discovered at Golden Square by Margaret Kennedy,1851 Approx. 200,000Troy oz. of gold found in Bendigo, 1852 475,857 Troy oz. Gold for the year, 1853 November 31st Bendigo Hospital admits first patient,1853 December 9th Bendigo Advertiser first issue printed, 1854 First Land Sales and streets are surveyed and named for the first time, 1854 Census of Bendigo showed 15,480 residents plus 4,000 Chinese, 1855 Sandhurst Municipal District formed, 1861 Sandhurst Proclaimed a Town. 1862 Railway to Melbourne opened, 1867 Visit by His Royal Highness the Duke of Edinburgh, 1871 July 21st Sandhurst proclaimed a City, 1881 Population of Sandhurst 14,577 residents, 1882 First telephone communications introduced, 1890 Electric trams (battery) commenced running, 1891 May 18th City of Sandhurst changes its name to City of Bendigo.book, bendigo, buildings, historic -
Bendigo Historical Society Inc.
Document - SPECIMEN COTTAGE COLLECTION: VARIOUS DOCUMENTS
Various documents in plastic folders. Topics are: 1. Rocky Vale Villa in Maiden Gully built by William Beebe Snr, historical information and significance assessment. 2. The powder magazines of Bendigo and Eaglehawk talk given by Ralph Birrell. 3. Ralph Birrell obituary. 4. Early Surveyors on the Bendigo goldfields 1852-1860 three pages essay by Ralph Birrell. 5. History of Eaglehawk courthouse and log lock up with four photographs. 6. Submission from the National Trust regarding Bendigo Pottery. 7. Fistcuffs, Diamonds and Lace synopsis of a novel by Ann Rayner on the boxer Abednego Thompson after whom the name of the City of Bendigo is said (by same to be derived. 8. Historical facts and dates on Bendigo by the Royal historical society of Victoria, Bendigo branch. 9. Arcades of Bendigo, by Tom Luke. 10. Benedict Branch family history with picture. Benedict invented a Miners Safety cage in 1883 and was awarded a medal, photos of the cage and medal included. 11. Burke & Wills 150 years on pamphlet, Jim Evans newspaper article, notes and photos of the monument at the Bendigo cemetery. 12. Marlborough House document on the history of this house. 13. Codicil to the last will and testament of William Beebe of Inglewood Road, Sandhurst. 18th September 1891. 14. Document outlining the life of Sister Jessie Aitken 15. Document - W. Anderson and Sons business in Mitchell Street 'Fancy goods'' history of the family. 16. Handwritten notes on Florence Anderson. 17. Document family history of Hamlet Smart Appleby. 18. Document - Amy Castles ''The little Bendigonian singer'' 19. Quentin Clifford (Cliff Binks words in remembrance, Bendigo Monday 23rd November 2015. 20. Background report on Vahland drinking fountain, list of William Vahland buildings, copies of photos of Vahland descendants and two brochures celebrating Vahland. 21. Blank invoice for the Taraxale Brewing Co. of Golden Square - G. A. Pethard, manager. -
 Eltham District Historical Society Inc
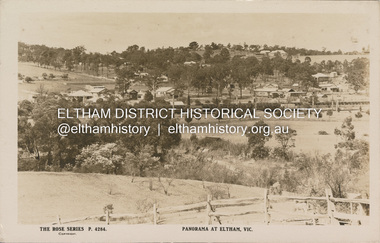
Postcard - Photograph postcard, Panorama at Eltham, Vic, c.1923
The Rose Series P. 4284 post card Taken from near what would be present day CLC car park looking southwest across Diamond Street, present-day Andrew Park to the railway station and developing Eltham shopping precinct. Arthur Street visible, Pryor and Luck Street not evident. Sunnybrook, the Taylor home is visible at the top of the hill in Bible Street. Only three residences visible in Arthur Street on the southern side, two of these are the David Harbison Rest Home at 10 and 12 Arthur Street (built and opened in November 1919), present day site of Eltham Mall. There are none on the north side of the street. Based on 1945 aerial view there are 8 buildings on the northern side between Main Road and Bible Street which and given the extent of commercial development on Main Road, it is estimated this image is circa 1925. Luther Haley was the first to build an open a baker and General Store in this location next to the railway station in 1902. However, it took nearly twenty years until the early to mid-1920s when a period of significant growth in the Eltham shopping centre happened with many businesses relocating their operations from the original town centre of Maria Street in Little Eltham as well as new businesses opening. Other stores/buildings noted (L-R) are: Stationmaster's House built circa 1910 Eltham Hardware Store opposite the railway station first opened on Main Road opposite the Railway Station around late 1922. An advertisement placed in the Hurstbridge Advertiser advised that the Hardware Store had just opened with a varied stock of Saws, Hammers, Nails, Shovels, Screw Drivers, and every article required in a house or on a farm. People were also encouraged to try their Jams, Pickles, Sauces, Cups and Saucers, etc. Newsagency with 'Leader' advertising on awning - E. J. Andrew opened his newsagency shop opposite the station in March 1923, advertising for sale stationery, school requisites and periodicals. Bird Brothers Cash Grocer & Fruiterer opposite the railway station offering summer drinks and confectionery a specialty with a full Stock of groceries of the best quality always on hand at city prices opened December 1921 William Capewell's Butcher shop at the corner of Dudley Street. Capewell previously had a small shop in front of the station opposite Luck Street. He enlisted in the AIF during WW1 and returned home in 1919. He re-applied for a slaughtering license in February 1920 and was advertising by October 1922 supplying all districts. Not visible (or not yet identified) but in business by October 1922 were: J.H. Fraser, Carpenter and Builder at Luck Street opposite the station George A. Danslow, Hairdresser and Tobacconist opposite the railway station Miss Barber's 'Blue Gum' Soda Fountain opened October 1922 opposite the railway station (hidden behind Stationmaster's House). It was so named due to its proximity to a tall Blue Gum tree G.H. McDonald Boot Repairer opposite the railway station In December 1923 the first portion of the main street to be formed from Dudley to Arthur streets was almost completed. This is the section in front of Capewell's Butcher shop though it is difficult to fully make out from the photoDigital file only Postcards scanned from the collection of Michael Aitken on loan to EDHS, 2 Sep. 2022michael aitken collection, eltham, postcards, arthur street, david harbison rest home, electrine candles, eltham railway station, eltham shopping centre, lloyd's general store, red rattler, rose series postcard, rose stereograph company, tait train, velvet soap, andrew park, bible street, bird brothers cash grocer & fruiterer, bird brothers cash grocer and fruiterer, butcher, diamond street, dudley street, eltham hardware and timber, eltham hardware store, eltham mall, main road, station masters house, stationmaster's house, sunnybrook, w.j. capewell, w.j. capewell butcher shop -
 Eltham District Historical Society Inc
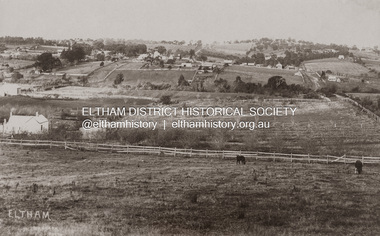
Photograph - Photograph postcard, J.H. Clark, Eltham (from Bolton Street), c.1915
Original sepia photo postcard of early view of Eltham looking east from Bolton Street between Bridge Street and Brougham Street (Wellington). Fenced road reserve on right is Brougham Street. Originally dated as pre-1877 introduction of the Telegraph (the Telegraph was connected to the Post Office on Thursday, June 7, 1877) given the lack of poles and wires visible, a more recent higher resolution scan has revealed more detail highlighting the presence of several Telegraph poles: one about half way between Brougham Street and Dalton Street, one opposite the Police Residence, another opposite W.B Andrew’s Corn Store (Zen Den site), one possibly near the Fountain/Evelyn Hotel. Also, given the photo was originally marked “J. H. Clark Photo” it is safer to assume the image is dated circa 1915 until dates of further image details can be confirmed. Photographer: J.H. Clark John Henry Clark was the youngest of three boys born to William Henry Clark (1823-1877) and Maria White (1843-1914). He and his brothers, William Charles Clark (1872-1945), Clement Kent Clark (1874-1912) operated a photography business (Clark Bros.) from 25 Thomas Street, Windsor near Prahran during the period c.1894 to 1914. Following death of Clement in September 1912 and their mother in 1914, the Clark Bros business appears to have dissolved, the premises demolished, and a new house was under construction in 1915. John set up business independently in 1914 operating out of 29 Moor Street, Fitzroy where he is registered in the 1914 and 1915 Electoral Rolls. By 1916 John had relocated to Eltham where he continued his practice as a photographer and took many of the early images around the district of Little Eltham. Around 1930 John changed professions and opened a small cobbler's shop in 1931 near the pond opposite Dalton Street adjacent to the Jarrold family cottage. He never married and continued his profession as a bootmaker from this little shop, maintaining a close relationship with Mrs Jarrold for the rest of their lives. His bootmaker shop remains today beside the Whitecloud cottage and is one of only three remaining shops in the area from the early 20th century. There are a couple of images of Eltham taken by Clark Bros. in the Eltham District Historical Society collection, one such example being Hunniford’s Post Office with Miss Anne Hunniford out front (EDHS_00140 - marked on the back of the print, Clark Bros., 25 Thomas St. Windsor), which would date this image between c.1894 and 1914. Other early images of Eltham taken by John Henry Clark are marked on the face “J. H. Clark Photo” and it is assumed these are dated between 1914 and 1930. It is noted that the Grant of Probate for John H Clark of Eltham South dated 5 April 1957 (513/387) records his occupation as "X Photographer".1. Original sepia postcard - water damaged lower left corner over approximate 30mm diameter destroying image and photohgrapher's markings (same as EDHS_00533 and EDHS_00535 - all from same donor collection) 2. A second black and white print copy of the same image from a different unknown source (of lower resolution quality) is also held. 3. A digital enhanced version has been created using the lower quality black and white print as a donor source for the damaged section of the postcard.In pencil on back of postcard: A. Petrie Verandah on Andrews shop Pearsons house (Living and Learning Centre)bolton street, brougham street, cafe zen den, courthouse, eltham courthouse, eltham hotel, eltham living and learning centre, eltham living and learning, eltham, fountain hotel, j.h. clark photo, knapmans forge, main road, maria street, pitt street, police residence, police station, post office, st margaret’s church, w.b. andrew corn store, wellington street, early eltham, little eltham -
 Ballarat Tramway Museum
Photograph - Black & White Photograph/s set of 19, Mar. 1972
Set of 19 black and white prints, all 89mm square of Bendigo trams, date machine printed on print is "Mar 1972". 981.1 - Tram 21 at North Bendigo terminus, with level crossing in background. Has destination "Golden Square" and two SEC roof ads. 981.2 - tram 2? at Eaglehawk, with destination "Depot", two SEC roof ads and "Leo A. Hughes Photographer" on side of building in background. 981.3 - tram 2? at Eaglehawk, side on view. 981.4 - tram 26 at Quarry Hill terminus looking back into city. 981.5 - tram 7 en route to North Bendigo at the site of the Bridge St. loop. Has a Peters Ice Cream truck and Sandhurst Fruit Juices truck on right side of photograph. 981.6 - tram 2 at Quarry Hill terminus. 981.7 - tram 2? at one of the loops on the Eaglehawk line, inbound? 981.8 - bogie tram at Charing Cross with fountain in background. Side on view looking south. 981.9 -trams 7 and 21 on Golden Square/North Bendigo line with bogie tram in background, at Charing Cross. Same as item 972. 981.10 - bogie tram at Charing Cross - has buildings in south west corner in background, including Colonial Mutual Life and an advertisement for the Herald newspaper. 981.11 - trams 25, 7 and two other trams at Charing Cross. 981.12 - trams 2 and 26 and three others at Charing Cross. 981.13 - tram 25 at Golden Square terminus, with Rodda's Golden Square Hotel in the background. Tram showing destination of "Nth Bendigo" 981.14 - tram 24, showing "Special" on depot access track. Has two Johnnie Walker roof ads on side. 981.15 - as above, but tram on bridge outside depot. 981.16 - trams 25 and 28 at depot 981.17 - tram 24 showing "Special" on depot access track with a single truck car in background. 981.18 - trams 2 and 26 at Charing Cross. Has advertisements for "Armstrong Tyre Service" and "Cohn's drinks" on buildings in background. 981.19 - Bendigo 2 at location?, about to enter a loop or double track section. Has hotel in background. On rear of each photo in the top left hand corner is a print number 1 to 19 in ink and location notes, generally "Bendigo"trams, tramways, charing cross, bendigo, golden square, quarry hill, tram 2, tram 21, tram 7, tram 24, tram 26 -
 Ballarat Tramway Museum
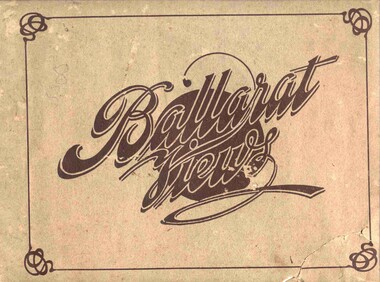
Book, Baxter & Stubbs, "Ballarat Views", 1920's
Yields information about Ballarat through pictures of the 1910-1920's various locations, institutions and street scenes, including tramways and railways.Twenty four page book within light brown covers, titled "Ballarat Views". Sheets, other than covers have been individually printed both sides, stapled within the covers. Cover - gives title, rear cover has printer details - Baxter and Stubbs. Pages 1 - Tonner Memorial , Fountain Lake Wendouree, Ballarat District Hospital, Sturt St south side at Grenville St with tram in distance and Sturt St North Side showing shops (image btm3900i2.jpg). 2 - Ballarat Street Scenes - Sturt Streets, Lydiard St with ESCo 18 in view, and Railway station with R193 in platform on passenger train. (image btm3900i3.jpg). 3 - Lake Wendouree views. 4 - Lake Wendouree, fish hatchery, Gardens and Sturt St at Dawson St (image btm3900i4.jpg). 5 - Art Gallery Ballarat 6 - Botanical Gardens 7 - Public Institution s- Benevolent asylum, Orphanage, Nazareth House, St Joseph Home, Hospital 8 & 9 - Statues, the Flight from Pompeii and others. 10 & 11 - Churches of Ballarat 12 - The Arch at The Avenue of Honour 13 - McDonald Pergola at the Gardens 14 - Zoological Gardens Ballarat 15 - Gardens aerial view and gates at the South End with tram in the distance (image btm3900i5.jpg). 16 - Some views in Ballarat East - Eureka Stockade, Ballarat East Bowling Green, Bridge St looking east and the lake at the Eureka Gardens (image btm3900i6.jpg). 17 - Snow Scene at Botanical Gardens, Begonia House 18 & 19 - Ballarat Water supply reservoirs 20 - Ballarat State Schools 21 - Ballarat East Views, includes view of track in Victoria St looking east (image btm3900i7.jpg). 22 - Views of the Water Reserves 23 - Views about the City - includes City fire station , agricultural High School, City Baths and View Point. 24 - Views at Lake Wendouree. \ Pdf copy of full book added 8/5/2019 - see btm3900i9.pdf trams, tramways, ballarat, lydiard st, sturt st, gardens, railway station, hospital, lake wendouree, wendouree parade, carlton st, esco -
 Federation University Historical Collection
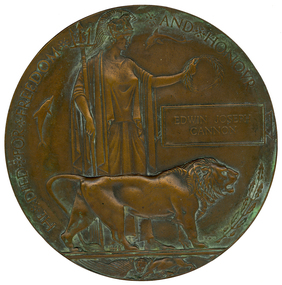
Medal - Numismatics, 'Dead Man's Penny' for Edwin Joseph 'Ted' Cannon, c1919
The Dead Man’s Penny is a commemorative medallion which was presented to the next-of-kin of the men and women from England and the Empire who died during World War One. The Dead Man’s Penny was accompanied by a letter from King George V, stating ‘I join with my grateful people in sending you this memorial of a brave life given for others in the Great War’.[http://nma.gov.au/blogs/education/2010/11/14/dead-mans-penny/] Popularly known as the "Dead Man’s Penny", because of the similarity in appearance to the somewhat smaller penny coin. 1,355,000 plaques were issued, which used a total of 450 tonnes of bronze, and continued to be issued into the 1930s to commemorate people who died as a consequence of the war. [http://en.wikipedia.org/wiki/Memorial_Plaque_(medallion)] It was decided that the design of the plaque was to be picked from submissions made in a public competition. Over 800 designs were submitted and the competition was won by the sculptor and medallist Edward Carter Preston with his design called Pyramus, receiving a first place prize of £250.[http://en.wikipedia.org/wiki/Memorial_Plaque_(medallion)] They were initially made at the Memorial Plaque Factory, 54/56 Church Road, Acton, W3, London from 1919. Early plaques did not have a number stamped on them but later ones have a number stamped behind the lion's back leg. [http://en.wikipedia.org/wiki/Memorial_Plaque_(medallion)] Ted Cannon's plaquette does not have a stamped number. Ted Cannon was a gifted artist and cartoonist who studied at the Ballarat School of Mines Technical Art School. During the Battle of Pozieres on the Western Front Ted Cannon worked with the Scout Platoon sketching the enemy's gun emplacements. Ted proved invaluable to the Brigade and brought he came under the attention of the Australian High Command. On 13 September 1916 Ted was given a special assignment for General C.B.B. White. Ted was sent out forward of the Old Mill at Verbrandenmolen (in the Ypres Salient) to draw a panorama of the German lines in the area from Hill 60 to The Bluff. It was a hazardous task and Ted was warned to be careful. Tragically he was sniped by an enemy machine-gunner and sustained severe abdominal wounds. Stretcher-bearers rushed him to the 17th Casualty Clearing Station where he was operated on by the doctors at 8.30 that night. With little chance of success, but ever resilient, Ted remained conscious almost to the end. He died early in the morning of the 14 September 1916. His body was buried in the large Military Cemetery at Lijssenthoek. The effects of the late Ted Cannon were returned to his parents. These were an autograph book, three brushes, prayer book, housewife, whistle, book, hymn book, curios. Another listing gives his effects as "identity disc, letters, photos, wallet, 2 books, Mexican Dollar, 1 cent (Ceylon), 3 German Straps, Fountain Pen, Cigarette-holder, Franc Note, 50 centimes Note, devotional book, mirror, rosary, scapula, metal ring, two combs, book of views, nail clippers, badges, tie clip, Egyptian stamp.[http://recordsearch.naa.gov.au/scripts/Imagine.asp?B=3202589] Ted Cannon was an only child. It is not known how the 'Dead Man's Penny' came into the ownership of the donor, but it is thought that it may have been left in a house owned by the donor's mother. Further information on Ted Cannon can be found at http://bih.ballarat.edu.au/index.php/Edwin_J._Cannon and http://www.ballarat.edu.au/about-ub/history/art-and-historical-collection/ub-honour-roll/c/edwin-joseph-ted-cannon-1895-1916Large bronze medallion or plaquette featuring an image of Lady Britannia surrounded by two dolphins (representing Britain’s sea power) and a lion (representing Britain) standing over a defeated eagle (symbolising Germany). Around the outer edge of the medallion are the words ‘He died for freedom and honour’. Next to Lady Britannia is the deceased solider’s name, with no rank provided to show equality in their sacrifice. (http://nma.gov.au/blogs/education/2010/11/14/dead-mans-penny) The plaque was distributed throughout the British Empire, and the first plaques were distributed in Australia in 1922 "Returned home" by W. & O. Mayne, 2013. ted cannon, edwin joseph cannon, cannon, world war 1, world war -
 Bendigo Military Museum
Photograph - Army Survey Regiment Open Day, Fortuna, Bendigo, 1982
This is a set of 25 photographs of an Open Day held at the Army Survey Regiment, Bendigo in 1982. Although most of the photos were taken outdoors, a technical tour may have been conducted through the production areas of Air Survey, Cartographic and Lithographic Squadrons. .1) - Photo, black and white, 1982. Unidentified civilian visitors. CO LTCOL Peter Eddy on right. .2) - Photo, black and white, 1982. Unidentified personnel and civilian visitors. .3) &.4) - Photos, black and white, 1982. Unidentified personnel and civilian visitors, SPR Janet (Chopping) Justin, .5) - Photo, black and white, 1982. Unidentified personnel and civilian visitors. .6) - Photo, black and white, 1982. Unidentified personnel and civilian visitors by CPL Le-Anne (Smallshaw) Shirley. .7) to .10) - Photos, black and white, 1982. Unidentified personnel and civilian visitors. .11) - Photo, black and white, 1982. Unidentified personnel and civilian visitors. Centre of photo - Bendigo Lord Mayor Dr. Joseph Pearce, CO LTCOL Peter Eddy on right. .12) - Photo, black and white, 1982. Unidentified personnel and civilian visitors. Bendigo Lord Mayor Dr. Joseph Pearce delivers his speech. .13) to .14) - Photos, black and white, 1982. Unidentified civilian visitors. Centre of photo - Bendigo Lord Mayor Dr. Joseph Pearce delivers his speech, CO LTCOL Peter Eddy on right. .15) - Photo, black and white, 1982. Unidentified personnel and civilian visitors. Bendigo Lord Mayor Dr. Joseph Pearce delivers his speech. .16) - Photo, black and white, 1982. Unidentified civilian visitors. CO LTCOL Peter Eddy delivers his speech. .17) - Photo, black and white, 1982. Unidentified civilian visitors. Unidentified dignitary delivers his speech. .18) - Photo, black and white, 1982. CO LTCOL Peter Eddy leads unidentified civilian visitors and Bendigo Lord Mayor Dr. Joseph Pearce to Fortuna’s front steps. .19) &..20) - Photos, black and white, 1982. CO LTCOL Peter Eddy on Fortuna’s front steps briefs Bendigo Lord Mayor Dr. Joseph Pearce and unidentified civilian visitors. .21) - Photo, black and white, 1982. CO LTCOL Peter Eddy on briefs Bendigo Lord Mayor Dr. Joseph Pearce and unidentified civilian visitors in Fortuna’s front foyer. .22) &..23) - Photos, black and white, 1982. Unidentified pipes and drums band. .24) &..25) - Photos, black and white, 1982. CPL Megan (McBurney) Reynolds briefs unidentified civilian visitors at the front of Fortuna Villa near the Pompeii Fountain.royal australian survey corps, rasvy, army survey regiment, army svy regt, fortuna, asr -
 Bendigo Military Museum
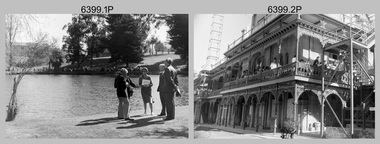
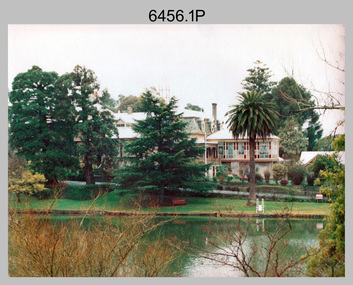
Photograph - Army Survey Regiment - Fortuna & Surrounds, Bendigo, c1985
This set of 30 photographs of the Army Survey Regiment’s Fortuna Villa and surrounding facilities was taken circa 1985. The photos feature much of Fortuna’s exterior and most of the out-buildings spread over the property’s fifteen acres of grounds. After Defence took possession of Fortuna in 1942, the Q-store and engineering workshops were added during the wartime period. Soldiers were accommodated in tents during WW2 for 20 years next to the parade ground before the construction of accommodation buildings in 1962. In 1990 most of the weatherboard buildings in the Q-store area were replaced. A climate-controlled building was also constructed to house a map library and digital data media. This photo set also includes the exterior of Air Survey Squadron’s Building 16 and two modular buildings -16A and 16B that were added in the early 1980s to accommodate map production and technical services. See item 6457.22P for photos of Fortuna Villa’s interior that were taken at the same time.This set of 30 photographs of the Army Survey Regiment’s Fortuna Villa and surrounding facilities was taken circa 1985. The colour photographs were printed on photographic paper and are part of the Army Survey Regiment’s Collection. The photographs were scanned at 300 dpi. .1) - Photo, colour, c1985. Fortuna Villa – view from the lake. .2) to .4) - Photo, colour, c1985. Fortuna Villa – front view. .5) - Photo, colour, c1985. Fortuna Villa – balcony view of transport compound and Air Survey Squadron. .6) - Photo, colour, c1985. Fortuna Villa – balcony view of Q-store and transport compound. .7) - Photo, colour, c1985. Fortuna Villa – balcony view of transport compound and Bendigo. .8) - Photo, colour, c1985. Fortuna Villa – balcony view of Q-store buildings. .9) - Photo, colour, c1985. Fortuna Villa – Pompeii Fountain and Stables. .10) - Photo, colour, c1985. Fortuna Villa – coach house. .11) - Photo, colour, c1985. Lithographic Squadron delivery docks. .12) - Photo, colour, c1985. Fortuna Villa - Original Roman Bath entry. .13) - Photo, colour, c1985. RAEME and carpentry buildings. .14) - Photo, colour, c1985. Q-store buildings. .15) - Photo, colour, c1985. Q-store buildings. .16) - Photo, colour, c1985. Transport compound. .17) - Photo, colour, c1985. Fortuna Villa’s original laundry, gardeners’ building. .18) - Photo, colour, c1985. Duty Room. .19) - Photo, colour, c1985. L to R: Side of Duty Room, RAP building. .20) - Photo, colour, c1985. Transport compound, Q-store in background. .21) - Photo, colour, c1985. Air Survey Squadron’s Building 16 viewed from carpark. .22) - Photo, colour, c1985. Technical Services, Building 16B. .23) - Photo, colour, c1985. Air Survey Squadron’s Building 16 courtyard. .24) - Photo, colour, c1985. Technical Services, Building 16B viewed from Building 16 courtyard. .25) - Photo, colour, c1985. Air Survey Squadron’s Building 16A and fernery viewed from walkway. .26) - Photo, colour, c1985. Officers Accommodation. .27) - Photo, colour, c1985. Other Ranks (OR’s) ‘New’ Barracks. .28) - Photo, colour, c1985. OR’s Kitchen and Dining Room. .29) & .30) - Photo, colour, c1985. Army Survey Regiment - Front Entry GateThere are brief descriptions on a note behind each photograph.royal australian survey corps, rasvy, army survey regiment, army svy regt, fortuna, asr -
Bendigo Historical Society Inc.
Document - SPECIMEN COTTAGE COLLECTION: VARIOUS DOCUMENTS
Various documents in plastic folders. The topics are: 1. The Myer story - articles on the history of the Myer family and business. 2. The history of the Bendigo Railway and memoirs of early train travel by Bob Carr. 3. Victorian history of railway and Bendigo, linking a state. 4. A brief history of steam locomotives R711 and R766. 5. Bendigo Advertiser article: coming of the railway with 4 photos. 6. Celebrating 150 years of rail in Bendigo brochure plus postcard and Bendigo Railway Museum newsletter. 7. Phoenix FM radio interview 13th September 2011. interviewer John Hall, guest: Garry Long, Convenor friends of the Bendigo-Kilmore rail trail. 8. Mail by rail by Tom Luke and Railway history Leo Hogan. 9. Document on the Red Ribbon Movement. 10. Document - Sport in Bendigo in the early days. 11. History of the Girton Church of England Girls' Grammar School with a list of prominent students. 12. Bendigo's loss-Chinese secret society's gain? Talk given by Carol Holsworth. 13. Document - Bendigo in the fifties. 14. Jones, Miller & Co. history. 15. Transcript of an audio tape by Cyril Michelsen, black and white photo and newspaper article. 16. A garden history by Ken Maes. 17. Document - Marsh and Scholten Coach builders. 18. Notes from the diary of Thomas Ninnes, newspaper articles on the restoration of the Ninnes grave. 19. Sandhurst 1853-54 The Southern world Rev. Robert Young. 20. Correspondence from Cobb & Co. Royal Flying Doctor Service 1963 coach run and the 1963 coach run itinerary. 21. Various newspaper clippings on Rosalind Park. 22. Rosalind Park discovery walk brochure and heritage mosaic Rosalind Park lookout brochure. 23. Camp Reserve, Rosalind Park, used and abused by James Lerk, also newspaper articles by James Lerk about Rosalind Park and various other documents relating to the Park. 24. Rotary Club History - A bulletin from 1971 and two cards in the name of Albert Richardson. 25. History Lives: Bendigo east's Anzac Avenue photographs and documents. 26. Short biography of John Walker. 27. Restoring our heritage - The Beehive story. 28. Documents about the Bendigo Advertiser, including historical notes by Carol Holsworth and notes given in 2005 by Leanne Younes. 29. Document - National Trust of Australia: City of Bendigo abattoirs (form, 47 Lansell Street. 30. The Alexandra Fountain by Lucy Williams also newspaper clippings and a document from the RHSV. 31. Newspaper clippings and correspondence on the demolition of the A.N.A. building. -
 Flagstaff Hill Maritime Museum and Village
Container - Horse trough, Annis & George Bills, circa Dec. 1932
This horse trough is the only survivor of the two troughs originally installed in Raglan Parade, Warrnambool, in 1932. It was later moved to the Pony Club at Albert Part, near the north corner of Coulstock and Craig Streets. Over the time there its purpose was changed from a horse watering trough to a colourful garden bed of agapanthus plants. By February 2013 the horse trough had been transferred to Flagstaff Hill for display in the Maritime Village’s grounds. This trough is one of hundreds provided by the Annis and George Bills Estate Trust since 1927 for the welfare of working horses and dogs. The original concrete cap over the small compartment is still retained. There are also markings on the right side of the trough where it probably had a birdbath, tap or a dish for the horseman’s dog, similar to other troughs donated elsewhere by the Trust. Less than half of the troughs produced for the Annis and George Bills Trust still survive. In 2017 Felicity Watson, National Trust Victoria’s advocacy manager, said that the troughs were treasures and becoming rare, with more than a dozen across Victoria now being heritage protected. ABOUT ANNIS AND GEORGE BILLS The 1927 Will of George Bills included setting up the Annis and George Bills Estate Trust, which provided for hundreds of horse troughs to be supplied and installed throughout Australia, Britain, USA and other parts of the world for the welfare of horses. Town and city councils could apply to the Trustees for a horse trough for their communities. George “Joe” Bills was born in Brighton, England, in 1859. The family migrated first to New Zealand then to Australia in 1873, settling in the Echuca-Moama district. George moved to Brisbane in 1882 where he met Annis Swann, formerly from Sheffield. Both were animal lovers. George and Annis married 1885 and moved to Sydney to join George’s brother Henry in his mattress wire weaving business, later known as the Bills Brothers. They patented their own machine in 1893 and the business became very profitable. George was able to donate to charities that supported his passion to improve animal welfare. He and Annis joined the Victorian Society for the Protection of Animals and in 1924 George received a Life Membership with the RSPCA. George retired in 1908. The couple moved to Hawthorn, Victoria, in 1910, where they donated troughs for the work horses of Melbourne. During a visit to England Annis passed away. In 1927 George moved from Hawthorn to Camberwell, where he passed away at the end of that year. George had requested in his Will that a trust fund be set up from his estate "…construct and erect and pay for horse troughs wherever they may be of the opinion that such horse troughs are desirable for the relief of horses and other dumb animals either in Australasia, in the British Islands or in any other part of the world subject to the consent of the proper authorities being obtained." The troughs were to bear a plaque inscribed “Donated by Annis and George Bills, Australia”. In 1927 the cost to make a trough was about £13 (which converts to about $1079 in 2020 ), plus transport and installation costs. Most of the troughs were installed between 1930 and 1939 in Victoria and New South Wales. It is estimated that over that time around 500-700 Bills Horse Troughs were installed in Australia and another 50 overseas. Most of the troughs made in Victoria had three moulded front panels like this trough, and no panels moulded on the rear, whereas troughs made in NSW had four panels on the front and five on the back. Victorian troughs were made by a Bills’ relative, J H Phillips. Later, other manufactures for the Trust’s troughs included Rocla Concrete Pipes Ltd, in Auburn Road, Hawthorn, Victoria, who produced to the same original design. No further troughs produced after the end of World War II. A memorial to Annis and George Bills was first erected in Hawthorn in 1929. It included a drinking fountain and a dog dish. Its current location is unknown. In 1964 the George Bills RSPCA Resource Centre opened in Burwood East. This Bills horse trough is nationally significant as one of the surviving examples of the standard Bills memorial horse troughs that still has its compartment cap and evidence of it once having had attached fittings, possibly for a birdbath or dog dish. This trough has State historical significance for being produced in the early 1930s by a business in Hawthorn, Victoria. This example of a Bills horse trough is significant for being in comparatively good condition. The trough is locally significant for being the sole survivor of the two Bills horse troughs installed in the City of Warrnambool in 1932, originally installed on Raglan Parade and continued to be used in the community at the Pony Club, then finally transferred to its current location at Flagstaff Hill by early 2013. It is culturally significant as it represents the community’s dependence on horses for travel and transportation previous to motorised vehicles. It is morally significant as a generous gift from a couple concerned with the welfare of animals.Horse trough; a long narrow rectangular container used for storing water. Trough is made from pre-cast concrete with one large open compartment and a small covered compartment. The base of the small compartment is raised slightly above the base of the trough and is covered by a removable concrete cap. The design of the front of the trough includes three panels moulded into it that align with the shape of the back pediment (panel). The pediment is shaped with side arcs that step up to a wide centre arc. A rectangular concrete plaque is cast into the centre of the pediment and is engraved with the names of the original donors, Annis and George Bills. The trough was made in Hawthorn, Victoria, by J H Phillips circa 1932. “DONATED BY / ANNIS & GEORGE BILLS / AUSTRALIA”flagstaff hill, warrnambool, shipwrecked coast, flagstaff hill maritime museum, maritime museum, shipwreck coast, flagstaff hill maritime village, great ocean road, annis and george bills, bills trust, j h phillips, rocla concrete pipes ltd, hawthorn, water trough, watering trough, horse trough, animal welfare, bills horse trough -
 Emerald Museum & Nobelius Heritage Park
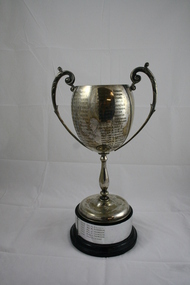
Golf Trophy
Emerald Country Club Associates Ladies Championship Trophy from 1937 to 1996Local golf club trophy donated by ex committee member Rosalie LeakeSilver Golf Trophy Cup (Ladies) on wooden base.. engraved with winners from 1937 to 1996 Emerald Country Club Associates E.M..KENNON CUP 1937 Mrs G.L. Elkins 1938 Mrs T.W. Gunnersen 1939 Mrs Norman 1940 Mrs A. Baker 1946 Mrs L.A. Fenton 1947 Mrs A.L. Newold 1948 Mrs C. Bedgood 1949 Mrs A. Baker 1950 Miss P. Massey 1951 Mrs W.H. Symon 1952 Mrs W.H. Symon 1953 Mrs A.L. Newbold 1954 Mrs W.H. Symon 1955 Miss M. Jamison 1956 Mrs W.H. Symon 1957 Miss J. Mellor 1958 Mrs L. Bulmer 1959 Mrs W.H. Symon 1960 Miss J. Mellor 1961 Mrs E. Hoy 1962 Mrs L. Bulmer 1963 Miss D. Smith 1964 Mrs N. Tuxen 1965 Mrs M. Hanger 1966 Mrs A. Howard 1967 Mrs R. Morgan 1968 Mrs P. Young 1969 Mrs J. Little 1970 Mrs J. Fountain 1971 Miss P. Jackson 1972 Mrs J. Little 1973 Mrs J. Houghton 1974 Mrs J. Meldrum 1975 Mrs. B. Barraclough 1976 Mrs J. Meldrum 1977 Mrs F. Gooch 1978 Mrs S. Hunter 1979 Ms F. Fenton 1980 Mrs J. Martin 1981 Mrs C. Grand-Court 1982 Mrs J. Pugh 1983 Mrs M. Ruigrok 1984 Mrs P. Summers 1985 Miss A. Scurry 1986 Mrs P. White 1987 Mrs M. Ruigrok 1988 Mrs P. White 1989 J. Ross 1990 Miss B. Bates 1991 Ms A. Felgate 1992 Ms M. Purbrick 1993 Ms J. Thomson 1994 Ms J Tomson 1995 Ms J Thomson 1996 Mrs R. Leake emerald country club, wm kennon cup, golf trophy 1937 to 1996 -
 Eltham District Historical Society Inc
Document, Russell Yeoman, Tour of Historic Buildings and Locations, 1978
Self guided heritage tour information produced by the Shire of Eltham Historical Society for 1978 Eltham Community Festival of 36 locations each numbered on accompanying map. Locations and detail provided current to 1978: 1. ELTHAM SHOPPING CENTRE Whilst very little remains in the centre of historical importance, this area has interest as the "village" which developed over many years following the opening of the railway from Melbourne in 1902. Previously the shopping centre had been spread out over a long length of Main Road to the south. Shops have been continuously demolished or remodelled and the majority of buildings date from the 1950's or later. The recently erected Post Office replaced the "old" Post Office opened on the same site only in 1958. 2. WOOLWORTHS ELTHAM VILLAGE Part of the site of this modern shopping development was occupied by the former Eltham Shire Offices and Hall. The hall was paid for by public subscription whilst the Council raised a loan for the offices. The combined building was opened in 1941. It served as office and Council meeting place until 1965 and as the hall until its demolition in 1970. 3. ELTHAM WAR MEMORIAL The complex of buildings adjoining the present Shire Offices were financed by public subscription as a Memorial following World War II. Their construction and for many years their operation was organised by the now disbanded Eltham War Memorial Committee. The original buildings were the; Infant Welfare Centre, Children’s Library (now War Memorial Hall and Dental Clinic) and Kindergarten. In later years the Elderly Citizens Club was built at the rear. 4. ELTHAM SHIRE OFFICES These offices were opened in 1965 and extended in 1971 to provide additional office accommodation and the Eltham Library. They represent the last of a long line of offices and meeting places of the Eltham Shire Council and its predecessor the Eltham District Road Board. The building occupies the former site of Shillinglaw Cottage. The three tall cypress trees which stood in front of the Cottage have been retained as a feature of the office surrounds. 5. OUR LADY'S CHURCH AND SCHOOL The Catholic Church and School complex opposite the Shires Offices shows a number of stages in the development of Eltham township. The recently constructed church adjoins its predecessor (now the parish centre). Many years ago the Catholic Church was located opposite Wingrove Park and the present central site follows the northerly drift of the township. 6. SHILLINGLAW COTTAGE The Cottage was built in 1859 by George Stebbing, a local builder who was responsible for a number of other prominent buildings in the area. Its removal from the site of the Shire Offices and re-erection on the present site was financed by public subscription. It is built of handmade bricks laid in Flemish Bond with an unusual design featuring burnt "leader" bricks over the whole facade. The Cottage is occupied by Eltham Fleececrafts and will be open during the Festival and at other times during weekends. It is classified by the National Trust. 7. RAILWAY BRIDGE The timber trestle bridge over the Diamond Creek was built in 1901. Whilst all of its timbers have been replaced at various times over the years the only change to its character has been the addition of pylons and wiring for electric trains in 1923. It is one of very few similar bridges remaining in the metropolitan area. In 1976 a proposal to replace the bridge with an earth embankment and large culvert pipes was abandoned following community protests. The bridge, however, remains under threat because of the necessity for future deuplication of the railway line. 8. ELTHAM CENTPAL PARK The area between the railway and the creek has for many years been used as a park which included Eltham' s main football oval. The access road, Panther Place is named after Eltham's team playing in the Diamond Valley League. In recent years a large area extending to Bridge Street and locally known as the Town Park has been landscaped and added to the area. The excellent blending of the park with the natural landscape of the creek valley has earned a National Trust Landscape Classification. 9. OLD BAKERY On the southern corner of York Street and Main Road is an old house with a shop front which was for many years the local baker's shop. The brick bakery at the rear is of somewhat later vintage than the house. 10. BRIDGE STREET CUTTING Before reconstruction of Main Road this intersection had deep cutting embankments on all four corners, forming a distinctive feature of the entrance to Eltham. Roadworks and private development have levelled the land on the low side of the road. A memorial to the Eltham soldiers of World War I which was located at the north-western corner is now situated at the Eltham R.S.L. 11. HILLTOP MILK BAR For many years this was the site of the Eltham Post Office under the control of the Hunniford family and later their descendants the Burgoynes. It was transferred to this site in 1855, although at that time the building apparently fronted Bridge Str e et. The site contained Eltham's first telephone exchange. The post office was relocated in 1954 but the shop was operated until recently by the Burgoyne family who still own the surrounding land. 12. UNITING CHURCH and former C.B.A. BANK The former Methodist Church was built in 1880 by George Stebbing. The Sunday School extension was built in 1929 and there have been more recent extensions. The adjoining opportunity shop was built as a bank in 1874 and purchased by the Methodist Church in 1954. 13. R.S.L. HALL, TELEPHONE EXCHANGE These relatively recent buildings occupy the site of a row of shops forming part of the early ribbon of business development along Main Road. In front of the R.S.L. building is the World War I Memorial relocated from the corner of Bridge Street and Main Road. 14. ELTHAM COMMUNITY CENTRE Australia's first mudbrick "community building" was opened in April this year. Part of the site of the building was purchased in 1856 by Henry Dendy (of Brighton fame). At the rear of the land near the creek was a steam flour mill whilst Dendy's house was at the Main Road frontage of the land. His purchase totalled about 2 Ha (5 acres) and included land on the opposite side of Maria Street (Main Road). Dendy became a prominent member of the Eltham community and served one term as President of the Eltham District Road Board. In 1867 Dendy sold his land and business to William Ford of Malmsbury and shifted to Walhalla. The avenue of trees leading past the Community Centre to the creek may well have bordered the track to the mill. 15. ELTHAM HOTEL The original part of this hotel was built in 1927 following the burning of the former Watson's Eltham Hotel on the same site. The car park on the opposite side of Main Road was also the site of a hotel variously known over the years as; the Fountain of Friendship, the Fountain and the Evelyn Arms. As the Fountain of Friendship it was the first meeting place of the Eltham District Road Board in 1856. 16. ST. MARGARET'S CHURCH, PITT STREET In 1860 Henry Dendy was appointed Chairman of a committee to establish a church of England in Eltham. He donated part of his land in Pitt Street and in 1861 the church was opened. It was built by George Stebbing and remains in a well preserved state today. Th adjoining old vicarage is now named Dendy Hou se. A new mudbrick church hall is under construction on the site. The church and Dendy House are now listed on the Register of Historic Buildings. 17. NO. 86 PITT STREET Cottage built by George Stebbing and believed to be his home for some years in the 1850s. 18. LIVING AND LEARNING CENTRE The house was built in the 1850s with the kitchen at the front being added about 40 years later. By the creek below the house a number of early Eltham industries were located. These included a tannery and a brewery. 19. ELTHAM COURT HOUSE A Court of Petty Sessions was established in Eltham in 1858 and the present building dates from 1860. It is the oldest public building remaining in Eltham. In its early days the building was used as the meeting place and office of the Eltham District Road Board and as an overflow classroom for the local school. The Court House has been classified by the National Trust. The citation states that it is an example of the simple form of early brick Court House with gabled roof and porch. 20. LANDS DEPARTMENT OFFICE This building is the former police station and is probably of about the same age as the Court House. The lockup at the rear has been demolished but the old stables remain as garages. A licence was first granted for a police station at Eltham in 1856. 21. JARROLD COTTAGE The old Cottage opposite Dalton Street was formerly owned by the Jarrold family. Early records indicate that this was the building leased from the Jarrolds as a temporary police station prior to construction of the building on the corner of Brougham Street. The small building on the corner of the property was used as a boot repairer's shop. The elevated studio at the rear is a more recent construction by the present owners. 22. STATE SCHOOL RESIDENCE Erected in 1891 23. WINGROVE COTTAGE This building fills an important place in the history of Eltham and is now used as a medical clinic. It was built in 1858 for Charles S. Wingrove who was Secretary to the Eltham District Road Board and Shire Council from 1858 to 1904. During part of this period he was also Shire Engineer and was Secretary to the Heidelberg Road Board. The house was used as the office of the Board and Council for many years. Wingrove is buried in the cemetery at St. Helena. 24. WINGROVE PARK The parkland opposite Wingrove Cottage has been named after Charles Wingrove. The old Manna Gums are an outstanding feature of the park. 25. ELTHAM FRI.MARY SCHOOL NO. 209 The school first opened in the slab building in 1855 and operated from the present site since 1857. The oldest part of the present school is the stone building erected in 1876. The first school teacher, David Clark remained at the school until 1888. This school is the government township and has always been known as the Eltham School. An earlier school (no.371) known as Little Eltham School operated in Swan Street from 1853 to 1872. 26. "SHOESTRING" This house was built for school teacher David Clark. It has been extensively extended in recent years but the extensions do not detract from the character of the older part of the building. 27. ELTHAM CEMETERY The cemetery contains the graves of many of the district's pioneers . 28. MONTSALVAT This unique complex of buildings was commenced in 1935 by the late Justus Jorgensen and its development has extended over many years. Montsalvat has exerted a significant impact on Eltham The earth and stone construction of many of the buildings has influenced local architecture to a great extent and it has served as a "nerve centre" of the local artistic community. Montsalvat is open to the public for a small charge. 29. MAIN ROAD BRIDGE This location has been the main crossing of Diamond Creek since the earliest days of settlement. The present concrete bridge was erected in 1925 .and was preceded by a number of timber bridges. 30. ELTHAM LOWER PARK This park, being an unusually large flat area for Eltham, was originally the local racecourse. Horse races were held here from 1855 and the area was gazetted as a reserve for a racecourse and recreation reserve in 1857. The park is well known as a venue for school "bird days" and more recently as the site of the Diamond Valley Railway. This miniature railway features scale models of modern and old locomotives and rolling stock and has operated on this site since 1961 . Before that the railway operated at Chelsworth Park, Ivanhoe. 31. FALKINER HOUSE Frederick Falkiner was one of the earliest settlers in the Eltham township area and occupied a substantial leasehold prior to the first land sales. Early records show that Falkiner was the subject of a number of complaints from his neighbours but he has nevertheless been considered a prominent enough citizen to have a street named for him. This house was the home of Evelyn (Ely) Falkiner a member of Frederick's family. 32. WEST HOUSE Behind the large house on the hill is an early house built by the West family. This was relocated from a site near the front of the land by the present owner Mr. Fabbro. 33. FALKINER HOUSE This very old house is believed to have been the home of Frederick and may have been Eltham's first post office. Falkiner was the first post master for a short period. in 1854/55. 34. WITHERS HOUSE This house was the home of famous artist Walter Withers who shifted here from Heidelberg in 1903. 35. ELTHAM HIGH SCHOOL This school celebrated its jubilee this year, having commenced as the Eltham Higher Elementary School 50 years ago. 36. DIAMOND CREEK FOOTWAY If returning from the High School to the town centre the footpath by the bank of the Diamond Creek provides a pleasant route to finish your walk. The creek is a major tributary of the Yarra River. Together with its own major tributaries Arthurs Creek and Running Creek it commences on the southern slopes of the Dividing Range at Kinglake. It gives the name Diamond Valley to an area extending well beyond its actual drainage catchment.Recognition of the significance of various landmarks to the history of the Eltham community as of 1978‘shoestring’, 1978, bridge street cutting, burgoyne store, c.b.a. bank, diamond creek trail, eltham cemetery, eltham central park, eltham community centre, eltham community festival, eltham court house, eltham festival, eltham high school, eltham hotel, eltham lower park, eltham primary school, eltham railway trestle bridge, eltham shire offices, eltham shopping centre, eltham state school no. 209, eltham village, eltham war memorial, falkiner house, heritage trail, hilltop milk bar, jarrold cottage, lands department office, living, living and learning centre, main road bridge, montsalvat, old bakery, our eltham artistic recollections, our lady help of christian’s church, our lady help of christian’s primary school, pitt street, post office, r.s.l. hall, shillinglaw cottage, st margaret’s church, state school residence, stebbing cottage, telephone exchange, uniting church, west house, wingrove cottage, wingrove park, withers house, woolworths -
 Kew Historical Society Inc
Postcard, R McGeehan, The Effect of Storm. Train Passing Through Flood Waters, South Yarra, 25-1-07, 1907
SHARP DOWNPOUR. ONE INCH IN 45 MINUTES. SOUTHERN SUBURBS DELUGED. TRAIN STOPPED AT SOUTH YARRA. One of the sudden downpours of rain which occasionally fall in Melbourne occurred yesterday afternoon, when nearly an inch of rain fell in the course of three quarters of an hour, and caused a flood for an hour or two in certain localities. During the early part of the day, the sky had been clouded over, but there was nothing to indicate a storm of such intensity as that which followed. At about half-past 1 o'clock residents of South Yarra, South Melbourne, Prahran, and St. Kilda noticed a few drops of rain. Still, it appeared unlikely that there would be anything exceptional, until with startling suddenness at about 10 minutes to 1 o'clock, one of the heaviest downpours within the memory of residents burst upon those suburbs. A strange feature of the storm was that it was practically confined to an area of about three miles square. The city was but little affected, though at a spot as close as the Observatory 86 points of rain were recorded in three-quarters of an hour. Thunder and lightning accompanied the downpour, which was cyclonic in character, the rain driving heavily from all points of the compass as the cyclone passed. It was in South Yarra and Prahran that the rain fell heaviest. Within a few minutes after it commenced, the low-lying portions of Toorak-road and practically the whole length of Chapel-street were under water. The depression at the intersection of Toorak-road and Darling-street speedily filled to the dimensions of a small lake. Several shops were inundated, while the water from the higher levels rushed down like a mountain torrent, and in several in-stances swept through the rear of houses and shops, carrying furniture in a floating mass against the further walls. In one case a footbridge was carried bodily away and dashed to pieces. Darling-street itself Great Davis-street, and other low-lying and flat thoroughfares in the vicinity became flooded from kerb to kerb, while on the other side of the railway-bridge the valley between Kensington-road and River-street became filled for some minutes to a depth of several feet. Meanwhile the waters from South Yarra hill, seeking a lower level, found it in the railway cutting, and the excavations from South Yarra station to Prahran on the one line, and to the Chapel-street bridge on the other, were converted into a couple of canals. At the platforms at South Yarra the water was two feet deep on the permanent way, and towards Hawksburn, at the sudden depression under Chapel-street bridge, it was at one time deep enough to cover a tall man's head. Into this swirling mass of water the 1:50 p.m. train from Oakleigh plunged on its way to Melbourne. The impact caused a mighty fountain of water to rise to a height of about 20 feet above the level of Chapel-street and send clouds of spray in all directions. Under the belief that a terrible explosion had occurred residents braved the rain and rushed to the spot, only to find that the train had been brought to a stand-still in the middle of what seemed to be a river. The water was so high that it had entered the fire-box from below, extinguishing the fires and cutting off the steam supply. In the meantime the officials at the South Yarra station had been preparing for emergencies. Inspectors were on duty at intervals along the line, and the moment the alarm was given an extra engine was backed carefully down and continued on to connect with the stranded train without losing its own power. There was a delay of about ten minutes in the service for an hour or two, but by 5 o'clock all the trains were running on time again, and the water had run off all but the spot beneath the Chapel-street bridge. Here the water remained about four feet deep until nightfall, and throughout the afternoon several hundreds of people including biograph operators and photographers, were gathered around watching each train pass through. Even with the water two feet lower, this was a work attended with considerable difficulty. Each train had to absolutely force its way through the weight of water, almost enveloped by the spray thrown up, and it was only just able to negotiate the "ford" by using every ounce of steam. ... The Argus, 26 January 1907, p19.The item forms part of the Laurie Bennett collection of thirty-six postcards and photographs of Kew and early Melbourne, donated to the Kew Historical Society in 1980. The postcards in the Bennett collection, like other images in the Society's holdings date from the 1890s to the present and comprehensively indicate points-of-view or scenes considered historically, aesthetically or socially significant in the period in which they were produced.Postcard depicting a flood at South Yarra Station in 1907. The title and photographer's name are identified on the front of the postcard. Donated by L. Bennett, 1980flood - south yarra, trains - melbourne, postcards, r mcgeehan - prahran -
 Bendigo Historical Society Inc.
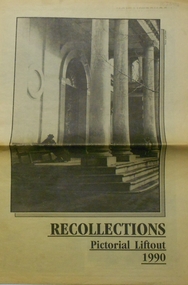
Newspaper - PETER ELLIS COLLECTION: RECOLLECTIONS PICTORIAL LIFTOUT
Historical lift out. Newspaper. Titled RECOLLECTIONS Pictorial Lift out 1990.1 looking down Mitchell St. from Railway Bridge. 2 Original railway station viewed from Mitchell St. bridge. 3 The great extended Hustlers mine. 4 1873 photo recently extended town hall with corn exchange at front left. 5 looking north westerly from city rec reserve at royal hustlers. 6 children play on mullock heap in front of a view of westerly quarter of Sandhurst. 7 Bank of Victoria, Mitchell St. left is Bendigo's original post office. 8 Looking down from what is now Rosalind Park. Shamrock Hotel can be seen on corner of Williamson St. and Pall Mall. This photo predates the construction of post office and law courts. 9 girl eating fairy floss. 10 4 kids on 1 horse in procession. 11 monkey and pedal car, a novelty attraction 1940's. 12 pony rides. 13 flying horses (ride). 14 processions past city hall. 15 Original ANZ bank corner Williamson St. & Pall Mall. 16 Chinese Dragons Bendigo Easter Fair 1940's. 17 City Hall viewed from Bull St. 18 City Hall original ceiling. 19 new town hall 1861. Mike Butcher, local historian. 21 Interior plan of city hall (ground floor) 22 circa 1920's 23 Tattered fragment original architect's drawing. 24 original assembly room. 25 Camp Hill PS Shamrock hotel without top story 27 shop with signage advertising Bushells, Bex and Swallow's Biscuits. 28 View from where fountain is now. 29 Hargreaves St. Looking south, now Hargreaves mall. Horse drawn water tank watering down road. 30 Central Deborah Gold mine poppet head. 31 Borough town hall, tram ways. 32 Original ANZ Bank corner Williamson St. and Pall Mall, demolished in mid 1960's. 33 Bush's store corner Williamson and Myer streets.34 Men on boat, don't know what or where. 35 Shearers. 36 men on a three wheeled bike. 37 4 Gold miners with shovels. 38 6pm closing, no trade Sundays, no women in main bar. 39 Peaceful scene Castlemaine 1940's Photographer Alan Doney. 40 Qantas Jet the City of Bendigo Tullamarine Airport. BCV-8 camera man & Advertiser photographer. 41 Ladies. 42 Tennis -> men and women (women in hats). 43 Sandhurst footy team. 44 Early school photos.bendigo, history, photographic history -
 Eltham District Historical Society Inc
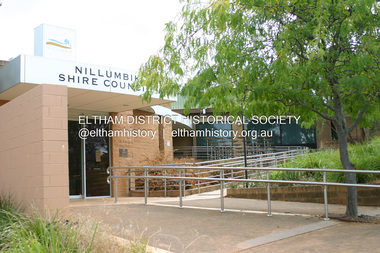
Photograph - Digital Photograph, Alan King, Nillumbik Shire Offices, Greensborough, 30 March 2008
Nillumbik Shire Council transferred to the former Diamond Valley Shire Offices in Greensborough after municipal restructuing. The offices became the official Nillumbik Shire Council Offices on 16 October 1995. The former Shire of Diamond Valley Civic Centre or Shire Office building was officially opened on 26th February 1972. Archtiects were A.K. Lines, McFarlane & Marshall and it was built by L.U. Simon Pty Ltd, The Diamond Valley Shire had been created in 1964 from part of the City of Heidelberg. On December 15, 1994 the Shire of Nillumbik was established. Under the Council amalgamations imposed by the Kennett government, the Shire of Eltham, Shire of Diamond Valley and City of Heidelberg ceased to exist with the establishment of Nillumbik Shire Council and the City of Banyule.The new Nillumbik shire surrended the west riding from Eltham to Banyule but in place gained parts of the former Diamond Valley Shire which itself had been created in 1964 from parts of the City of Heidelberg. Three unelected and non-local Commissioners were put in place by the government bringing democracy into question by many members of the local community. The Commissioners determined to abandon the former Shire of Eltham offices located in Main Road, Eltham and in turn occupy the former Shire of Diamond Valley offices located at the boundary of the new shire with Banyule, in Civic Drive, Greensborough. In July 1996 the Commissioners sold the former Eltham Shire Offices and had them bulldozed leading to many years of communiity protest over the process and future development applications. The site has remained vacant ever since. Published: Nillumbik Now and Then / Marguerite Marshall 2008; photographs Alan King with Marguerite Marshall.; p43 It was the need for roads that led to this district’s first council. In 1853 a committee was formed to improve the rough roads, some in Kangaroo Ground being almost impassable in winter.1 The committee fundraised by voluntary levies and grants to improve in particular, the main road between Kangaroo Ground and the Plenty River. From this committee arose the Eltham District Road Board, in 1856, which was the precursor to the Eltham Shire Council. The Board’s first chairman was Kangaroo Ground farmer, John Barr. Secretary was the former committee’s secretary, Andrew Ross, Kangaroo Ground’s first school teacher, and founder of the district newspaper, The Evelyn Observer.2 Most of the board’s income came from a toll-house north of the Lower Plenty Bridge, which funded such projects as a road from Kangaroo Ground to the Caledonia Diggings. In 1871 the Shire of Eltham was proclaimed, with its boundaries the same as those of the Road Board, and Councillor A Donaldson of Kangaroo Ground was the first president. Eltham was at the southern tip of the shire, which extended north to Kinglake and east beyond Yarra Glen. In 1878, part of Kinglake was added to the shire, while the area east of Watts River, near Healesville was removed. In 1912, then again in 1958, the shire was further reduced. Yarra Glen, Steels Creek, Tarrawarra, parts of Healesville and Christmas Hills, were transferred to the Shire of Healesville. In 1972 a smaller area, at Kinglake, was transferred to the Shire of Yea, leaving 277 square kilometres in the Eltham Shire. Perhaps no other Victorian municipality has had so many meeting places. Although from 1858 to 1904, the council convened at the office in the home of Secretary Charles Wingrove, the board, and later the council, also met at other more central locations.3 The board moved from the Fountain of Friendship Hotel to the Eltham Courthouse, to the Kangaroo Ground schoolhouse. It then met at the Kangaroo Ground Hotel, which some considered put it in danger of interruptions by people ‘the worse for liquor’.4 In 1885 the council met at the hall on Mr J Donaldson’s land at Kangaroo Ground. After Wingrove’s retirement, the council rented space at the Kangaroo Ground General Store and Post Office. Then, in 1917, the council bought the former office of The Evelyn Observer, after its printing works transferred to Hurstbridge. In 1934, fire destroyed the shire office, which was temporarily relocated to the Kangaroo Ground home of Shire Secretary, Mr P J McMahon. In 1941, the shire office moved to a new building (which included a public hall) in Eltham, at the corner of Arthur Street and Main Road, where the Eltham Village Shopping Centre was eventually built. Growth required new offices, which opened in 1965, on the former Shillinglaw property in Main Road.5 In 1994, as part of municipal restructuring under the Jeff Kennett Liberal Government, most of the Eltham Shire formed part of the new Shire of Nillumbik. It joined with the north section of the Diamond Valley Shire and parts of the Healesville and Whittlesea municipalities. The Diamond Valley Shire had been created in 1964, from part of the City of Heidelberg. Turbulence followed Nillumbik Shire’s formation. Under the Commissioners the council transferred to the former Diamond Valley Shire offices in Greensborough, and the Eltham council offices were demolished. In March 1997 the first five-member Nillumbik Council was elected. But, in October 1998, the government suspended the council and appointed an administrator . Early in 1999, shire residents voted to increase councillors to nine: comprising five ward councillors and four shire-wide councillors. Elections were held in March 1999. Then, before the March 2002 elections, nine new wards were created.6 In 2008 these were reduced to seven. Today [2008] the council governs a varied population of more than 60,000 people living in townships and on bush properties in the green wedge.This collection of almost 130 photos about places and people within the Shire of Nillumbik, an urban and rural municipality in Melbourne's north, contributes to an understanding of the history of the Shire. Published in 2008 immediately prior to the Black Saturday bushfires of February 7, 2009, it documents sites that were impacted, and in some cases destroyed by the fires. It includes photographs taken especially for the publication, creating a unique time capsule representing the Shire in the early 21st century. It remains the most recent comprehenesive publication devoted to the Shire's history connecting local residents to the past. nillumbik now and then (marshall-king) collection, greensborough, nillumbik shire council offices, civic drive -
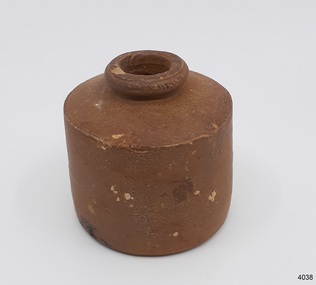 Flagstaff Hill Maritime Museum and Village
Container - Ink Bottle, Prior to 1878
This design of ink bottle was commonly referred to as a ‘penny ink well’ because it was very inexpensive to produce. It is also known as a dwarf ink bottle. Pen and ink has been in use for hand writing from about the seventh century up until the mid-20th century up until around the mid-19th century a quill pen made from a bird’s feather was used. In the 1850s the steel point pen was invented and could be manufactured on machines in large quantities. In the 1880s a successful portable fountain pen was designed, giving a smooth flowing ink and ease of use replacing the quill or dip pen. History of the Loch Ard: The Loch Ard got its name from "Loch Ard" a loch that lies to the west of Aberfoyle, and the east of Loch Lomond. It means "high lake" in Scottish Gaelic. The vessel belonged to the famous Loch Line which sailed many vessels from England to Australia. The Loch Ard was built in Glasgow by Barclay, Curle & Co. in 1873, the vessel was a three-masted square-rigged iron sailing ship that measured 79.87 meters in length, 11.58 m in width, and 7 m in depth with a gross tonnage of 1693 tons with a mainmast that measured a massive 45.7 m in height. Loch Ard made three trips to Australia and one trip to Calcutta before its fateful voyage. Loch Ard left England on March 2, 1878, under the command of 29-year-old Captain Gibbs, who was newly married. The ship was bound for Melbourne with a crew of 37, plus 17 passengers. The general cargo reflected the affluence of Melbourne at the time. Onboard were straw hats, umbrellas, perfumes, clay pipes, pianos, clocks, confectionery, linen, and candles, as well as a heavier load of railway irons, cement, lead, and copper. There were other items included that were intended for display in the Melbourne International Exhibition of 1880. The voyage to Port Phillip was long but uneventful. Then at 3 am on June 1, 1878, Captain Gibbs was expecting to see land. But the Loch Ard was running into a fog which greatly reduced visibility. Captain Gibbs was becoming anxious as there was no sign of land or the Cape Otway lighthouse. At 4 am the fog lifted and a lookout aloft announced that he could see breakers. The sheer cliffs of Victoria's west coast came into view, and Captain Gibbs realised that the ship was much closer to them than expected. He ordered as much sail to be set as time would permit and then attempted to steer the vessel out to sea. On coming head-on into the wind, the ship lost momentum, the sails fell limp and Loch Ard's bow swung back towards land. Gibbs then ordered the anchors to be released in an attempt to hold their position. The anchors sank some 50 fathoms - but did not hold. By this time the ship was among the breakers and the tall cliffs of Mutton Bird Island rose behind. Just half a mile from the coast, the ship's bow was suddenly pulled around by the anchor. The captain tried to tack out to sea, but the ship struck a reef at the base of Mutton Bird Island, near Port Campbell. Waves subsequently broke over the ship and the top deck became loosened from the hull. The masts and rigging came crashing down knocking passengers and crew overboard. When a lifeboat was finally launched, it crashed into the side of Loch Ard and capsized. Tom Pearce, who had launched the boat, managed to cling to its overturned hull and shelter beneath it. He drifted out to sea and then on the flood tide came into what is now known as Lochard Gorge. He swam to shore, bruised and dazed, and found a cave in which to shelter. Some of the crew stayed below deck to shelter from the falling rigging but drowned when the ship slipped off the reef into deeper water. Eva Carmichael a passenger had raced onto the deck to find out what was happening only to be confronted by towering cliffs looming above the stricken ship. In all the chaos, Captain Gibbs grabbed Eva and said, "If you are saved Eva, let my dear wife know that I died like a sailor". That was the last Eva Carmichael saw of the captain. She was swept off the ship by a huge wave. Eva saw Tom Pearce on a small rocky beach and yelled to attract his attention. He dived in and swam to the exhausted woman and dragged her to shore. He took her to the cave and broke the open case of brandy that had washed up on the beach. He opened a bottle to revive the unconscious woman. A few hours later Tom scaled a cliff in search of help. He followed hoof prints and came by chance upon two men from nearby Glenample Station three and a half miles away. In a complete state of exhaustion, he told the men of the tragedy. Tom then returned to the gorge while the two men rode back to the station to get help. By the time they reached Loch Ard Gorge, it was cold and dark. The two shipwreck survivors were taken to Glenample Station to recover. Eva stayed at the station for six weeks before returning to Ireland by steamship. In Melbourne, Tom Pearce received a hero's welcome. He was presented with the first gold medal of the Royal Humane Society of Victoria and a £1000 cheque from the Victorian Government. Concerts were performed to honour the young man's bravery and to raise money for those who lost families in the disaster. Of the 54 crew members and passengers on board, only two survived: the apprentice, Tom Pearce, and the young woman passenger, Eva Carmichael, who lost her family in the tragedy. Ten days after the Lochard tragedy, salvage rights to the wreck were sold at auction for £2,120. Cargo valued at £3,000 was salvaged and placed on the beach, but most washed back into the sea when another storm developed. The wreck of Lochard still lies at the base of Mutton Bird Island. Much of the cargo has now been salvaged and some items were washed up into Lochard Gorge. Cargo and artefact's have also been illegally salvaged over many years before protective legislation was introduced in March 1982. One of the most unlikely pieces of cargo to have survived the shipwreck was a Minton majolica peacock- one of only nine in the world. The peacock was destined for the Melbourne 1880 International Exhibition. It had been well packed, which gave it adequate protection during the violent storm. Today the Minton peacock can be seen at the Flagstaff Hill Maritime Museum in Warrnambool. From Australia's most dramatic shipwreck it has now become Australia's most valuable shipwreck artifact and is one of very few 'objects' on the Victorian State Heritage Register.This ink well is historically significant as it represents methods of hand written communication that were still common up until the mid-20th century, when fountain pens and ballpoint pens took over in popularity and convenience. The shipwreck of the Loch Ard is of significance for Victoria and is registered on the Victorian Heritage Register ( S 417). Flagstaff Hill has a varied collection of artefact's from Loch Ard and its collection is significant for being one of the largest accumulation of artefact's from this notable Victorian shipwreck of which the subject items are a small part. The collection's objects give us a snapshot of how we can interpret the story of this tragic event. The collection is also archaeologically significant as it represents aspects of Victoria's shipping history that allows us to interpret Victoria's social and historical themes of the time. Through is associated with the worst and best-known shipwreck in Victoria's history.Stoneware penny Ink bottle ironstone salt-glazed, stoneware cylindrical shape with small mouth and squat neck, broad shoulders brown colour, . with light coloured encrustation spots.flagstaff hill, warrnambool, flagstaff hill maritime museum, shipwreck coast, flagstaff hill maritime village, great ocean road, loch line, loch ard, captain gibbs, eva carmichael, tom pearce, glenample station, mutton bird island, loch ard gorge, penny ink well, writing equipment, domestic, stoneware, clay, ceramic, pottery, ink well, inkwell, ink bottle, dip pen, ink, hand writing, business, vintage, dwarf ink -
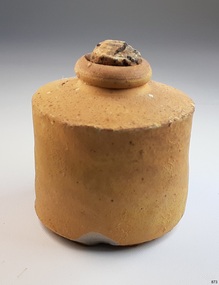 Flagstaff Hill Maritime Museum and Village
Container - Ink Bottle, Prior to 1878
This design of ink bottle was commonly referred to as a ‘penny ink well’ because it was very inexpensive to produce. It is also known as a dwarf ink bottle. Pen and ink has been in use for hand writing from about the seventh century up until the mid-20th century up until around the mid-19th century a quill pen made from a bird’s feather was used. In the 1850s the steel point pen was invented and could be manufactured on machines in large quantities. In the 1880s a successful portable fountain pen was designed, giving a smooth flowing ink and ease of use replacing the quill or dip pen. History of the Loch Ard: The Loch Ard got its name from "Loch Ard" a loch that lies to the west of Aberfoyle, and the east of Loch Lomond. It means "high lake" in Scottish Gaelic. The vessel belonged to the famous Loch Line which sailed many vessels from England to Australia. The Loch Ard was built in Glasgow by Barclay, Curle & Co. in 1873, the vessel was a three-masted square-rigged iron sailing ship that measured 79.87 meters in length, 11.58 m in width, and 7 m in depth with a gross tonnage of 1693 tons with a mainmast that measured a massive 45.7 m in height. Loch Ard made three trips to Australia and one trip to Calcutta before its fateful voyage. Loch Ard left England on March 2, 1878, under the command of 29-year-old Captain Gibbs, who was newly married. The ship was bound for Melbourne with a crew of 37, plus 17 passengers. The general cargo reflected the affluence of Melbourne at the time. Onboard were straw hats, umbrellas, perfumes, clay pipes, pianos, clocks, confectionery, linen, and candles, as well as a heavier load of railway irons, cement, lead, and copper. There were other items included that were intended for display in the Melbourne International Exhibition of 1880. The voyage to Port Phillip was long but uneventful. Then at 3 am on June 1, 1878, Captain Gibbs was expecting to see land. But the Loch Ard was running into a fog which greatly reduced visibility. Captain Gibbs was becoming anxious as there was no sign of land or the Cape Otway lighthouse. At 4 am the fog lifted and a lookout aloft announced that he could see breakers. The sheer cliffs of Victoria's west coast came into view, and Captain Gibbs realised that the ship was much closer to them than expected. He ordered as much sail to be set as time would permit and then attempted to steer the vessel out to sea. On coming head-on into the wind, the ship lost momentum, the sails fell limp and Loch Ard's bow swung back towards land. Gibbs then ordered the anchors to be released in an attempt to hold their position. The anchors sank some 50 fathoms - but did not hold. By this time the ship was among the breakers and the tall cliffs of Mutton Bird Island rose behind. Just half a mile from the coast, the ship's bow was suddenly pulled around by the anchor. The captain tried to tack out to sea, but the ship struck a reef at the base of Mutton Bird Island, near Port Campbell. Waves subsequently broke over the ship and the top deck became loosened from the hull. The masts and rigging came crashing down knocking passengers and crew overboard. When a lifeboat was finally launched, it crashed into the side of Loch Ard and capsized. Tom Pearce, who had launched the boat, managed to cling to its overturned hull and shelter beneath it. He drifted out to sea and then on the flood tide came into what is now known as Loch Ard Gorge. He swam to shore, bruised and dazed, and found a cave in which to shelter. Some of the crew stayed below deck to shelter from the falling rigging but drowned when the ship slipped off the reef into deeper water. Eva Carmichael a passenger had raced onto the deck to find out what was happening only to be confronted by towering cliffs looming above the stricken ship. In all the chaos, Captain Gibbs grabbed Eva and said, "If you are saved Eva, let my dear wife know that I died like a sailor". That was the last Eva Carmichael saw of the captain. She was swept off the ship by a huge wave. Eva saw Tom Pearce on a small rocky beach and yelled to attract his attention. He dived in and swam to the exhausted woman and dragged her to shore. He took her to the cave and broke the open case of brandy that had washed up on the beach. He opened a bottle to revive the unconscious woman. A few hours later Tom scaled a cliff in search of help. He followed hoof prints and came by chance upon two men from nearby Glenample Station three and a half miles away. In a complete state of exhaustion, he told the men of the tragedy. Tom then returned to the gorge while the two men rode back to the station to get help. By the time they reached Loch Ard Gorge, it was cold and dark. The two shipwreck survivors were taken to Glenample Station to recover. Eva stayed at the station for six weeks before returning to Ireland by steamship. In Melbourne, Tom Pearce received a hero's welcome. He was presented with the first gold medal of the Royal Humane Society of Victoria and a £1000 cheque from the Victorian Government. Concerts were performed to honour the young man's bravery and to raise money for those who lost families in the disaster. Of the 54 crew members and passengers on board, only two survived: the apprentice, Tom Pearce, and the young woman passenger, Eva Carmichael, who lost her family in the tragedy. Ten days after the Loch Ard tragedy, salvage rights to the wreck were sold at auction for £2,120. Cargo valued at £3,000 was salvaged and placed on the beach, but most washed back into the sea when another storm developed. The wreck of Loch Ard still lies at the base of Mutton Bird Island. Much of the cargo has now been salvaged and some items were washed up into Loch Ard Gorge. Cargo and artefact's have also been illegally salvaged over many years before protective legislation was introduced in March 1982. One of the most unlikely pieces of cargo to have survived the shipwreck was a Minton majolica peacock- one of only nine in the world. The peacock was destined for the Melbourne 1880 International Exhibition. It had been well packed, which gave it adequate protection during the violent storm. Today the Minton peacock can be seen at the Flagstaff Hill Maritime Museum in Warrnambool. From Australia's most dramatic shipwreck it has now become Australia's most valuable shipwreck artefact and is one of very few 'objects' on the Victorian State Heritage Register.This ink bottle is historically significant as it represents methods of hand written communication that were still common up until the mid-20th century, when fountain pens and ballpoint pens took over in popularity and convenience. The shipwreck of the Loch Ard is of significance for Victoria and is registered on the Victorian Heritage Register ( S 417). Flagstaff Hill has a varied collection of artefact's from Loch Ard and its collection is significant for being one of the largest accumulation of artefact's from this notable Victorian shipwreck of which the subject items are a small part. The collection's objects give us a snapshot of how we can interpret the story of this tragic event. The collection is also archaeologically significant as it represents aspects of Victoria's shipping history that allows us to interpret Victoria's social and historical themes of the time. Through is associated with the worst and best-known shipwreck in Victoria's history.Stoneware penny ink bottle; ironstone salt-glazed stoneware, cylindrical shape with small mouth and squat neck, broad shoulders, brown colour. Bottle still has cork in neck. Dark encrustations on body and base.Sticker "L/62"flagstaff hill, warrnambool, flagstaff hill maritime museum, shipwreck coast, flagstaff hill maritime village, great ocean road, loch line, loch ard, penny ink well, writing equipment, domestic, stoneware, clay, ceramic, pottery, ink well, inkwell, ink bottle, dip pen, ink, hand writing, business, vintage, dwarf ink -
 Ballarat Tramway Museum
Slide - 35mm slide/s - set of 32, Noel Simons, 25/02/1971 12:00:00 AM
Set of 31 transparencies taken on 25/2/1972 on Kodak mounts. 1201.1 - Bendigo No. 26 in Bond St. just after leaving Long Gully en route for Quarry Hill. Has Norris Supermarket in background. Has two SEC roof ads. 1201.2 - No. 26 climbing View St. from Charing Cross en route to Eaglehawk. Has ANZ bank and AMOCO service station in background. 1201.3 - as for 1201.3, but after tram has passed photographer. Has buildings west of Mackenzie St. in photograph. 1201.4 - Tram stop and centre of the road pole with two "CARS STOP BY REQUEST" signs mounted on pole at the corner of Mackenzie St. 1201.5 - same position as for 1201.3, but with No. 5 descending the street. 1201.6 - same position as for 1201.2, but with No. 5 descending the street. Photo taken after tram has passed photographer. 1201.7 - No. 7 in Nolan St. from across the park at Lake Weeroona. 1201.8 - No. 7 entering McCrae St from Nolan St. - distant view. Note "TRAM "sign on left hand side under tree and overhead in McCrae St. from former track that once was in this street. 1201.9 - No. 7 in High St. with Cathedral in background. Tram en route to North Bendigo. Note scaffolding around Cathedral main spire area. 1201.10 - No. 7 crossing Bendigo Creek bridge in High St. near Golden Square. Has a Caltex Service station in the background. 1201.11 - No. 7 at Golden Square terminus with Sunburst Fruit Juices and a Peters Ice cream delivery vans alongside. 1201.12 - as for 1201.11 but photo taken from behind tram, with the end of the rails in the photograph. 1201.13 - No. 7 and 21 in Pall Mall at Charing Cross with No. 5 in the background. Taken some distance away from the location. 1201.14 - No. 7 at Golden Square terminus, taken a short distance from the tram terminus. Shows Milk Bar on right hand side and the hotel on the left hand side. Taken from the south side of the roadway. 1201.15 - as from 1201.14 but taken from the north side of the roadway. 1201.16 - No 5 waiting at California Gully loop. Distant photo showing surrounds 1201.17 - No. 5 en route for Quarry Hill crossing No. 26 at California Gully. 1201.18 - No. 26 at Eaglehawk terminus with Eaglehawk Town Hall and Post Office in background. 1201.19 - No. 21 arriving at Charing Cross en route to North Bendigo. Has Alexandra Fountain in the background, ANZ bank RACV building, and other buildings on the north side of Pall Mall or Nolan St. 1201.20 - No. 26 en route for Quarry Hill at Charing Cross, with crew standing by front door. Has Colonial Mutual life building, Armstrong Tyre Service (Firestone) and a sign for Cohns Drinks in the background. 1201.21 - as for 1201.20 but with No. 5 en route to Eaglehawk now in photograph. 1201.22 - No. 26 at Quarry Hill terminus. 1201.23 - No. 26 at Quarry Hill terminus, view of front portion of tram only from a gate at the Bendigo cemetery. 1201.24 - Track at the end of the Quarry Hill line showing the point blades of the former "Y" terminus and the overhead for this. 1201.25 - No. 2 at the Quarry Hill terminus, looking along the former Trackwork. 1201.26 - as for 1201.25 1201.27 - number not used. 1201.28 - Golden Square terminus from some distance from the actual terminus, showing the Warning sign "TRAM" for motorists from the south. No. 7 at the terminus. 1201.29 - No. 7 passing through the Golden Square shopping centre. Numerous cars and pedestrians. Tram en route for North Bendigo. 1201.30 - No. 7 in High St. Golden Square, en route for North Bendigo. Photo taken after tram has passed photographer. 1201.31 - No. 7 in High St. just past Wattle St. with the Cathedral in the background. Tram has two SEC roof ads good side on photo, 'Everything's fine in my all electric kitchen' and 'Electrical cooking - clean, quick, economical'. 1201.32 - No. 7 in High St. nearing Wattle St. Has Cathedral in the background. Photo taken after tram has passed photographer.Information written on in black ink and date stamped on purple ink. 1201.1 - "No. 26 in Bond St just after leaving Long Gully" 1201.2 - "No. 26 climbing View St. from Charing Cross" 1201.3 - "No. 26 ascending View St. from Charing Cross (At Mackenzie St.)" 1201.4 - "View St. & Mackenzie St." 1201.5 - "No. 5 in View St. near Mackenzie St." 1201.6 - "No. 5 in View St. nearing Charing Cross." 1201.7 - "No. 7 in Nolan St. seen from Lake Weeroona Park." 1201.8 - "No. 7 entering McRae St. from Nolan St. Note "TRAM" warning sign on left. 1201.9 - "No. 7 in High St. passing Short St." 1201.10 - "No. 7 crossing Bendigo Creek bridge in High St. near Golden Square." 1201.11 - "No. 7 at Golden Square terminus" 1201.12 - "No. 7 at Golden Square terminus" 1201.13 - "No 7, 21 and 5 at Charing Cross" 1201.14 - "No. 7 at Golden Square terminus" 1201.15 - "No. 7 at Golden Square terminus" 1201.16 - "No 5 waiting at California Gully loop." 1201.17 - "Nos. 5 and 26 crossing at California Gully loop" 1201.18 - "No. 26 at Eaglehawk terminus" 1201.19 - "No. 21 arriving at Charing Cross from Golden Square" 1201.20 - "No. 26 at Charing Cross" 1201.21 - "Nos. 5 and 26 at Charing Cross." 1201.22 - "No. 26 at Quarry Hill terminus" 1201.23 - "No. 26 at Quarry Hill terminus seen through the gates of the Bendigo Cemetery." 1201.24 - "Quarry Hill terminus showing remains for former double track layout abandoned before 1964." 1201.25 - "No. 2 at Quarry Hill terminus" 1201.26 - "No. 2 at Quarry Hill terminus" 1201.28 - "The Southern approach to Golden Square with No. 7 standing at the terminus, "TRAM" warning sign on the left. 1201.29 - "No. 7 passing through Golden Square Shopping Centre" 1201.30 - "No. 7 in High St. Golden Square" 1201.31 - "No. 7 in High St. passing Wattle St." 1201.32 - "No. 7 in High St. nearing Wattle St."tramways, trams, bendigo, bond st., view st., nolan st., high st., eaglehawk, california gully, charing cross, quarry hill, trackwork, tram 2, tram 5, tram 7, tram 21, tram 26 -
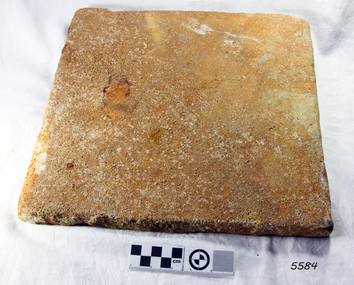 Flagstaff Hill Maritime Museum and Village
Marble Tile, circa 1878
The artefact is a white marble tile raised from the wreck of the LOCH ARD (1878). The cargo manifest of the sunken vessel has the entry “Marble £400”. This is placed directly following the entry “Glass (604 cases)”. This conjunction suggests the marble tile was originally part of a consignment intended for use in a ‘high end’ residential or public building project in the gold and wool rich Colony of Victoria. Traditionally, white or cream marble was imported into Britain from the Mediterranean region of Europe, where beds of sedimentary limestone (calcium and magnesium carbonate) had been buried over a long geological period of time. Deep in the earth’s crust, it had been subjected to immense pressures and high temperatures, sufficient to completely re-crystallise the original deposits. Marble beds began as layers of sediment at the bottom of ancient tropical seas, forming from the skeletal remains of calcareous fossils, shell, and coral fragments. The metamorphic process of prolonged compression and heating recrystallised this skeletal material, destroying all signs of the original sedimentary fabric. The resulting ‘true’ marbles of, for example, White Carrara (Tuscany, Italy), Verdi (green) Antico (Thessaly, Greece), and Rouge (red) Languadoc (Carcassone, France), were highly prized in classical decoration (sculpture and friezes) and architecture (temples and arches). Marble was found in nineteenth century Australia, but in small, uneconomic deposits, not suitable for commercial quarrying. The comparative expense of imported marble restricted its use in colonial buildings to carved fireplaces and mantel pieces, or outdoor ornaments such as fountains, statuary and grave stones. If Carrara marble floor tiles were used, they were used sparingly, as an arresting feature in entrance halls for instance. However, most prominent private and public construction used timber flooring, waxed or ‘japanned’, with carpet runners and rugs (for example the Austin’s Barwon Park Mansion, 1871), or laid tessellated and ceramic tiles of baked clay infused with colour (for example the Chirnside’s Werribee Park Mansion, 1878). HISTORY OF THE LOCH ARD The LOCH ARD belonged to the famous Loch Line which sailed many ships from England to Australia. Built in Glasgow by Barclay, Curdle and Co. in 1873, the LOCH ARD was a three-masted square rigged iron sailing ship. The ship measured 262ft 7" (79.87m) in length, 38ft (11.58m) in width, 23ft (7m) in depth and had a gross tonnage of 1693 tons. The LOCH ARD's main mast measured a massive 150ft (45.7m) in height. LOCH ARD made three trips to Australia and one trip to Calcutta before its final voyage. LOCH ARD left England on March 2, 1878, under the command of Captain Gibbs, a newly married, 29 year old. She was bound for Melbourne with a crew of 37, plus 17 passengers and a load of cargo. The general cargo reflected the affluence of Melbourne at the time. On board were straw hats, umbrella, perfumes, clay pipes, pianos, clocks, confectionary, linen and candles, as well as a heavier load of railway irons, cement, lead and copper. There were items included that intended for display in the Melbourne International Exhibition in 1880. The voyage to Port Phillip was long but uneventful. At 3am on June 1, 1878, Captain Gibbs was expecting to see land and the passengers were becoming excited as they prepared to view their new homeland in the early morning. But LOCH ARD was running into a fog which greatly reduced visibility. Captain Gibbs was becoming anxious as there was no sign of land or the Cape Otway lighthouse. At 4am the fog lifted. A man aloft announced that he could see breakers. The sheer cliffs of Victoria's west coast came into view, and Captain Gibbs realised that the ship was much closer to them than expected. He ordered as much sail to be set as time would permit and then attempted to steer the vessel out to sea. On coming head on into the wind, the ship lost momentum, the sails fell limp and LOCH ARD's bow swung back. Gibbs then ordered the anchors to be released in an attempt to hold its position. The anchors sank some 50 fathoms - but did not hold. By this time LOCH ARD was among the breakers and the tall cliffs of Mutton Bird Island rose behind the ship. Just half a mile from the coast, the ship's bow was suddenly pulled around by the anchor. The captain tried to tack out to sea, but the ship struck a reef at the base of Mutton Bird Island, near Port Campbell. Waves broke over the ship and the top deck was loosened from the hull. The masts and rigging came crashing down knocking passengers and crew overboard. When a lifeboat was finally launched, it crashed into the side of LOCH ARD and capsized. Tom Pearce, who had launched the boat, managed to cling to its overturned hull and shelter beneath it. He drifted out to sea and then on the flood tide came into what is now known as LOCH ARD Gorge. He swam to shore, bruised and dazed, and found a cave in which to shelter. Some of the crew stayed below deck to shelter from the falling rigging but drowned when the ship slipped off the reef into deeper water. Eva Carmichael had raced onto deck to find out what was happening only to be confronted by towering cliffs looming above the stricken ship. In all the chaos, Captain Gibbs grabbed Eva and said, "If you are saved Eva, let my dear wife know that I died like a sailor". That was the last Eva Carmichael saw of the captain. She was swept off the ship by a huge wave. Eva saw Tom Pearce on a small rocky beach and yelled to attract his attention. He dived in and swam to the exhausted woman and dragged her to shore. He took her to the cave and broke open case of brandy which had washed up on the beach. He opened a bottle to revive the unconscious woman. A few hours later Tom scaled a cliff in search of help. He followed hoof prints and came by chance upon two men from nearby Glenample Station three and a half miles away. In a state of exhaustion, he told the men of the tragedy. Tom returned to the gorge while the two men rode back to the station to get help. By the time they reached LOCH ARD Gorge, it was cold and dark. The two shipwreck survivors were taken to Glenample Station to recover. Eva stayed at the station for six weeks before returning to Ireland, this time by steamship. In Melbourne, Tom Pearce received a hero's welcome. He was presented with the first gold medal of the Royal Humane Society of Victoria and a £1000 cheque from the Victorian Government. Concerts were performed to honour the young man's bravery and to raise money for those who lost family in the LOCH ARD disaster. Of the 54 crew members and passengers on board, only two survived: the apprentice, Tom Pearce and the young woman passenger, Eva Carmichael, who lost all of her family in the tragedy. Ten days after the LOCH ARD tragedy, salvage rights to the wreck were sold at auction for £2,120. Cargo valued at £3,000 was salvaged and placed on the beach, but most washed back into the sea when another storm developed. The wreck of LOCH ARD still lies at the base of Mutton Bird Island. Much of the cargo has now been salvaged and some was washed up into what is now known as LOCH ARD Gorge. Cargo and artefacts have also been illegally salvaged over many years before protective legislation was introduced. One of the most unlikely pieces of cargo to have survived the shipwreck was a Minton porcelain peacock - one of only nine in the world. The peacock was destined for the Melbourne International Exhibition in 1880. It had been well packed, which gave it adequate protection during the violent storm. Today, the Minton peacock can be seen at the Flagstaff Hill Maritime Museum in Warrnambool. From Australia's most dramatic shipwreck it has now become Australia's most valuable shipwreck artefact and is one of very few 'objects' on the Victorian State Heritage Register. The wreck of the LOCH ARD is of State significance — Victorian Heritage Register S417 Flagstaff Hill’s collection of artefacts from LOCH ARD is significant for being one of the largest collections of artefacts from this shipwreck in Victoria. It is significant for its association with the shipwreck, which is on the Victorian Heritage Register (VHR S417). The collection is significant because of the relationship between the objects, as together they have a high potential to interpret the story of the LOCH ARD. The LOCH ARD collection is archaeologically significant as the remains of a large international passenger and cargo ship. The LOCH ARD collection is historically significant for representing aspects of Victoria’s shipping history and its potential to interpret sub-theme 1.5 of Victoria’s Framework of Historical Themes (living with natural processes). The collection is also historically significant for its association with the LOCH ARD, which was one of the worst and best known shipwrecks in Victoria’s history. A square marble tile retrieved from the wreck of the LOCH ARD. Most of its surface is covered by a thin layer of limestone and marine growth encrustation that is stained rust-red. The tile is ‘rough-worked’, cut to shape and size, but not smoothed or polished. There is a companion tile in similar condition in the Flagstaff Hill collection. From visual observation of the original surface (at low magnification) the tile appears to be of white Carrara-type marble.flagstaff hill, warrnambool, shipwrecked coast, flagstaff hill maritime museum, maritime museum, shipwreck coast, flagstaff hill maritime village, great ocean road, loch line, loch ard, captain gibbs, eva carmichael, tom pearce, glenample station, mutton bird island, loch ard gorge, white marble, marble tile, carrara marble, imported marble, colonial architecture, victorian building materials -
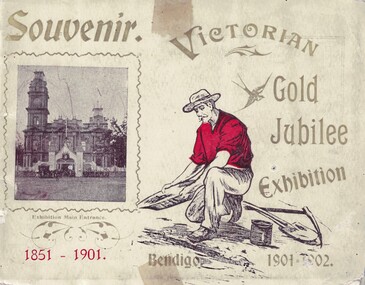 Bendigo Historical Society Inc.
Souvenir - Views of Bendigo, 1902
The Victorian Gold Jubilee Exhibition, held at Bendigo from 13 November 1901 to 14 May 1902. The courts were numbered from one, or had titles like “Machinery”, “Agricultural”, “Naval & Military Court” and “Art”. The female visitors to the Exhibition were able to view exhibits deemed suitable for the fairer sex and located within their own “Women’s Court”. There were exhibits such as “Parasols & Umbrellas”, cotton and haberdashery from Manchester and Staffordshire, “Corsets & Embroideries” from Paris. The most valuable exhibits were mining machinery such as Taylor Horsfield’s £850 “Air Compressor & Rock Borer”. “Bohemian Glassware” brought down from Sydney was valued at £600. The profits from this Exhibition were used to fund the sculpture known as the Gold Monument, which still gazes along Pall Mall (from the McCrae Street end). The Exhibition’s Cash Book shows payments, which totalled £1160, were made to then up and coming sculptor C.D.Richardson. Recently a City of Greater Bendigo staff member used both these volumes to write a detailed report about this monument, for Heritage Victoria.Carol Holsworth Collection: Small book Souvenir, 29 pages plus cover; each page. has a photo of the exhibit. Exhibition was held on the site of the present Bendigo Library between Hargreaves St and Lyttleton Terrace. * 8662.1a Victorian Gold Jubilee Exhibition - Front Cover: Printed 'Souvenir', 'Bendigo 1901-1902'; a photo of the Entrance to the exhibition beside the Town Hall. * 8662.1b Victorian Gold Jubilee Exhibition - Inside Front Cover - Page 1 of 29. Portraits of Exhibition President S.H. Cowen esq.; and G.V. Allen esc., General Secretary. Photos by W.H. Robinson publisher. Printed by T. Cambridge, Market Square Bendigo. * 8662.1c Victorian Gold Jubilee Exhibition - Page 1 of 29 The Governor General at the Exhibition. Photo of the crowd, police, trooper and horse drawn vehicles. * 8662.1d Victorian Gold Jubilee Exhibition - Page 2 of 29 Procession Passing the Fountain, Pall Mall. The crowd and horse drawn vehicles. *8662.1e Victorian Gold Jubilee Exhibition - Page 3 of 29 James Martin and Co's Exhibit. James Martin & Co was an Australian engineering company which progressed from making agricultural equipment to making railway locomotives. * 8662.1f Victorian Gold Jubilee Exhibition - Page 4 of 29 Old Pioneers. Elderly gentlemen on foot and carriage - at the Bendigo Railway Station. * 8662.1g Victorian Gold Jubilee Exhibition - Page 5 of 29 Robert Harper and Company's Exhibit. From Trove - The Brisbane Courier 25 Aug 1891: One of the best known firms in the Southern hemisphere is Messrs. Robert Harper and Co , tea importers, coffee, rice, and spice merchants and manufacturers Then productions circle this continent, and every thrifty housewife is familiar with their Empire tens, their Star' brand of goods, then oatmeal, wheatmeal, and other breakfast table luxuries The headquarters of the firm are placed at Port Melbourne, and the manufactory there occupies over an acre of ground, while the mills at Sydney and Adelaide are as great in proportion It is eight cars since the firm opened business in this colony. The step was taken with much confidence, the principals the firm being quite attracted. * 8662.1h Victorian Gold Jubilee Exhibition - Page 6 of 29 The Electric Tram * 8662.1i Victorian Gold Jubilee Exhibition - Page 7 of 29 G. Weymouth Proprietary Ltd. The business of G. Weymouth & Co was founded in 1898 by George Andrew Philip Weymouth, who began operating from a small workshop on City Road, South Melbourne (opposite Princes Bridge). An early advertisement describes the firm's activities at this time as being 'makers of dynamos, (electric) motors, x-ray apparatus and electrical instruments, &c' together with 'repairs to every class of electrical work'. * 8662.1j Victorian Gold Jubilee Exhibition - Page 8 of 29 The Exhibition Fernery * 8662.1k Victorian Gold Jubilee Exhibition - Page 9 of 29 Cohn Bros'. Exhibit. In 1857 at the height of the gold rush, with people pouring into Central Victoria from all over the world, three brothers from Denmark – Moritz, Julius and Jacob Cohn – founded a small cordial factory in the booming town of Bendigo. They went on to build an empire and, through introducing lager, which is served cold, to the country, changed the drinking preferences of Australians. * 8662.1l Victorian Gold Jubilee Exhibition - Page 10 of 29 Ornamental Lake in the Exhibition Grounds * 8662.1m Victorian Gold Jubilee Exhibition - Page 11 of 29 Australian Explosives and Chemical Co.'s Exhibit. The Australian Explosives and Chemical Company began manufacturing explosives in Melbourne's outskirts (the area now known as Deer Park) in 1875. In 1897 the Company was purchased by Nobel, forming Nobel (Australasia) Ltd. * 8662.1n Victorian Gold Jubilee Exhibition - Page 12 of 29 Tasmanian Court * 8662.1o Victorian Gold Jubilee Exhibition - Page 13 of 29 N. Guthridge's Limited Exhibit. Guthridge sold a variety of mining supplies and equipment; also 'Rackarock' which was used to fill the mining drill holes before blasting. * 8662.1p Victorian Gold Jubilee Exhibition - Page 14 of 29 Navel and Military Court (LARGE File) * 8662.1q Victorian Gold Jubilee Exhibition - Page 15 of 29 Women's Court * 8662.1r Victorian Gold Jubilee Exhibition - Page 16 of 29 T. J. Connelly and Co's Exhibit. T.J. Connelly an American immigrant came to the Bendigo goldfields where he later established Connelly’s Tin Shop on the corner of High and Forest Streets 1853. Connelly was named after Thomas Jefferson the famous statesman who wrote much of the American Declaration of Independence in 1776 and became the third United States President. Connelly, along with other prominent citizens of the time established Bendigo’s first Fire Brigade, Mechanics Institute. * 8662.1s Victorian Gold Jubilee Exhibition - Page 17 of 29 The Potter's Wheel * 8662.1t Victorian Gold Jubilee Exhibition - Page 18 of 29 G. D. Guthrie and Co.'s Exhibit. In 1863 the Bendigo Pottery was set up by Guthrie. * 8662.1u Victorian Gold Jubilee Exhibition - Page 19 of 29 The Ladies' Committee * 8662.1v Victorian Gold Jubilee Exhibition - Page 20 of 29 J. Kitchen and Sons Exhibit. In Port Melbourne since the 1850s they made such products as Velvet Soap and Electrine Candles from the tallow and other animal fats from the nearby slaughter yards. In recent decades the company has become Kitchen & Lever then Unilever and most recently Unichema. * 8662.1w Victorian Gold Jubilee Exhibition - Page 21 1of 29 The Executive Committee * 8662.1x Victorian Gold Jubilee Exhibition - Page 22 of 29 Taylor Horsfield Exhibit. The most valuable exhibits were mining machinery such as Taylor Horsfield’s £850 “Air Compressor & Rock Borer” * 8662.1y Victorian Gold Jubilee Exhibition - Page 23 of 29 A Peep at the Education Department 8662.1z Victorian Gold Jubilee Exhibition - Page 24 of 29 John Danks and Co's Exhibit. John Danks & Son was a major manufacturing company in Melbourne, Victoria and Sydney, New South Wales. * 8662.1aa Victorian Gold Jubilee Exhibition - Page 25 of 29 Glance at the Agricultural Department's Court * 8662.1bb Victorian Gold Jubilee Exhibition - Page 26 of 29 T. York's Exhibit. Thomas York was an instrument repairer and brass instrument maker that resided in Melbourne in the late 19th to the early 20th century. While old newspaper advertisements suggested he repaired all instruments, it appears the focus of his business were military and brass band instruments. (BrassandWoodWind.com) * 8662.1cc Victorian Gold Jubilee Exhibition - Page 27 of 29 T. McPherson and Son's Exhibit. Possibly monumental masons. * 8662.1dd Victorian Gold Jubilee Exhibition - Page 28 of 29 T. Lewis and Whitty's Exhibit - Inside Back Cover. Lewis & Whitty were prominent boot blacking manufacturers as well as a number of other chemical products such as “Odourbane" disinfectant. * 8662.1ee Victorian Gold Jubilee Exhibition - Page 29 of 29 Singer Manufacturing Coy's Exhibithistory, bendigo, victorian gold jubilee exhibition bendigo, carol holsworth collection -
Bendigo Historical Society Inc.
Document - MERLE HALL COLLECTION: ROSALIND PARK CREATIVE VILLAGE BENDIGO PROJECT AND FINAL REPORTS, 1995
MERLE HALL COLLECTION: ROSALIND PARK CREATIVE VILLAGE BENDIGO Project and Final Reports 3858.13 PDF File 11th August 1997 - three pages From: Merle Hall, Secretary Arts Bendigo To: Mike (final Media Release probably the Bendigo Advertiser) Content: Media Release two pages and a poem read out by Mosaic Artist Maery Gabriel (Hall) 'Reflections from Rosalind Park' Date Unknown: First invitation mail-out for C.V.T. Presentation and notes. Invitations to Felicity Kingerlee, Rod, Orr, Jane Cleary, Ian Stewart (Flora Hill Secondary College), Marion Stewart (White Hills Secondary College), Marion Wright, G. Maddams (& staff), Frank Ham, Tony Morris (Astronomy chap), Trevor Tonking (Cont. Ed.), Bernard smith and others at City of Bendigo, All A.B. Committee. Included are handwritten notes. Date Unknown: Two page document entitled: Enhancing the livable environment. Document contains details of the project, aims etc. 14th March 1995 To: The Greater City of Bendigo From Arts Bendigo Content: Two pages, a formal proposal for the involvement of the City of Greater Bendigo in the Creative Village project of the V.A.C. It contains information on Background, Concept,Implementation,Expected outcomes, Summary, Appendix 1 and 2 (Examples of the work of the artist). Date Unknown From John L. Content: one page of notes on similar projects and involvement by Arts Bendigo. The title of the document is Creative Village - Enhancing the Livable Environment. 5th Septemberh 1995 To: Members of the community who contributed ideas and suggestions From Arts Bendigo Ann Buzza and Merle Hall. Content: Invitation to attend a meeting with the Creative Village Team to view the Team's full report and explanation of designs etc. 9-10 June To: Participants in the Maery Hall Workshop From Arts Bendigo Ann Buzza and Merle Hall. Content: Location - ceramic department, Fine Arts building, Latrobe University Bendigo; acces information and what to bring to the workshop. Date Unknown To: City of Greater Bendigo Content: Arts Bendigo committment to the guidelines discussed with the relevent Council officers. Date Unknown To: City of Greater Bendigo From Arts Bendigo Content: Title - Historic Mining Mosaic Pavement at rosalind Park Poppet Head. A report on the project so far. Typed and ewritten notes. 28 July To: Public From Arts Bendigo Merle Hall. Content: Public invite to mark the completion of the project. June 1997 To: Public Content: A copy of Bendigo Heritage Mosaic City of Greater Bendigo plaque. 2nd September To: Attention Leanne McDonnell, Bendigo Advertiser From Arts Bendigo Merle Hall. Content: Media Release on 'The Laying Begins' Date Unknown To: Potential Donors From Arts Bendigo Merle Hall, sponsorship committee. Content: Description of the project titled 'Exciting Addition to Bendigo's Central Area. Date Unknown To: Potential Donors From Arts Bendigo Merle Hall, sponsorship committee. Content: Description of the project titled 'Exciting Addition to Bendigo's Central Area. Date Unknown List of LEAP team members for the project. Date Unknown To: Emma Power From Arts Bendigo Secretary Merle Hall. Content: three pages of information on the project (1. Intoduction 2. Small leaflet, prepared for visitors to the team 3. General outline of the project and the background on the Creative Village Team. 19-21 July To: All schools of the Bendigo area From: Merle Hall Secretary Arts Bendigo Content: An invitation for staff and students to visit the Creative Village Team during their time in Bendigo, at the Central Library on 19-21 July 19-21 July To: The Public From: Merle Hall Secretary Arts Bendigo Content: An invitation for staff and students to visit the Creative Village Team during their time in Bendigo, at the Central Library on 19-21 July 5th October 1995 To: Mr Peter Seamer, Chief Executive Officer, City of Greater Bendigo. From Merle Hall Secretary Arts Bendigo Content: RE 'Creative village team report and ongoing plans' 14 March 1996 To: Committee of Arts Bendigo From: Ann Buzza Content: Two pages hand-written report on visit of Maery Hall ot Bendigo 14/3/96 Date Unknown To: Bernard Smith, City ogf Greater Bendigo From: Merle Hall, Secretary Arts Bendigo Content: A list of urgent requirements needed by May 24th, material list from council stock. 27 June 1996 To: The Professionals, 54 Mitchell Street Bendigo, Attention Stephen Carter From: Merle Hall, Secretary Arts Bendigo Content: Account for use of shop in Allan's walk and cheque. 2nd July 1996 To: Cr Megan Weston Mayor, city of Greater Bendigo, copy to Bernard Smith. From: Merle Hall, Secretary Arts Bendigo Content: Thank you for $3500 to match the Arts Bendigo sponsorship. 2 June 1996 To: James C donnelly and associates, 5 School Lane, Wangi Wangi. From: Merle Hall, Secretary Arts Bendigo Content: Draft cover letter including a one page draft letter and a two page submission. James Donnelly was a parent of one of the LEAP workers who were helping on the project. James donnelly had suggestions for approaching mining companys for potential sponsorship. 1st October 1996 To: Mr D. Goldsworthy, City of Greater Bendigo From: Merle Hall, Secretary Arts Bendigo Content: Historic mining Mosaic Project, Rosalind Park Poppet Head. A formal submission for the council for some essential provisions for the extension of work on this project. 1st October 1996 To: Cr M. Weston, Mayor, City of Greater Bendigo. From: Merle Hall, secretary arts Bendigo Content: Three pages including a listing of income and costs to the project. 28th October 1996 To: Arts Bendigo From: Maery Hall Artist Content: two page report on the status of the project and problems that have been faced. 19th To: Leanne (maybe the Bendigo Advertiser) From: Merle Hall, secretary arts Bendigo Content: two pages on the finished project (Bendigo's Newest attraction) 19th March 1997 To: Steve From: Merle Hall, secretary arts Bendigo Content: Asking for rough quotes for printing of brochures. Date Unknown To: The Bendigo Bank From: Merle Hall, secretary arts Bendigo Content: two pages seeking a sum of $1000 to complete the project. 28th April 1997 To: Suzi Birthisel, Sponsorship Coordinator, Bendigo bank, Fountain Court, Bendigo From: Merle Hall, secretary arts Bendigo Content: Asking for a small sum for production of coloured brochures Date Unknown To: Committee From: Merle Hall, secretary arts Bendigo Content: Suggested invitation list from 'Arts Victoria' to the Committee re the opening on 28th July of the Bendigo Heritage Mosaic. 28 July 1997 From: City of Greater Bendigo and Arts Bendigo to public Content: Invitation to a brief ceremony to mark the occasion of the completion of The Bendigo Heritage Mosaic at the Poppet Head Lookout, Rosalind Park on Monday 28 July 1997. 5th August 1999 From: Merle Hall, Secretary Arts Bendigo To: Cr. B. Ackerman, Mayor, City of Greater Bendigo. Content: A brief note from the committee of Arts Bendigo, in appreciation of your attendance and speech at the 'completion ceremony, last week. 30th October 1997 From Merle Hall, Secretary Arts Bendigo To: the National Community links Awards, Category 1 - Arts and Culture Content: Included were Nomination Form, Written Statement as required under (5), a written reference from the mayor of the City of Greater Bendigo, two pages of photographs of the project, and five copies of a brochure printed to publicise the project. 2nd Feb 1998 From Merle Hall, Secretary Arts Bendigo To: Mrs. S. Parain, President, Regional Arts Fund Content: Regional Arts Fund Application, Sections 1 to 4 requesting a grant of $5197.00 -
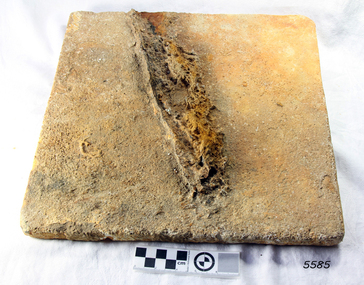 Flagstaff Hill Maritime Museum and Village
Marble Tile, circa 1878
The artefact is a white marble tile raised from the wreck of the LOCH ARD (1878). The cargo manifest of the sunken vessel has the entry “Marble £400”. This is placed directly following the entry “Glass (604 cases)”. This conjunction suggests the marble tile was originally part of a consignment intended for use in a ‘high end’ residential or public building project in the gold and wool rich Colony of Victoria. Traditionally, white or cream marble was imported into Britain from the Mediterranean region of Europe, where beds of sedimentary limestone (calcium and magnesium carbonate) had been buried over a long geological period of time. Deep in the earth’s crust, it had been subjected to immense pressures and high temperatures, sufficient to completely re-crystallise the original deposits. Marble beds began as layers of sediment at the bottom of ancient tropical seas, forming from the skeletal remains of calcareous fossils, shell, and coral fragments. The metamorphic process of prolonged compression and heating recrystallised this skeletal material, destroying all signs of the original sedimentary fabric. The resulting ‘true’ marbles of, for example, White Carrara (Tuscany, Italy), Verdi (green) Antico (Thessaly, Greece), and Rouge (red) Languadoc (Carcassone, France), were highly prized in classical decoration (sculpture and friezes) and architecture (temples and arches). Marble was found in nineteenth century Australia, but in small, uneconomic deposits, not suitable for commercial quarrying. The comparative expense of imported marble restricted its use in colonial buildings to carved fireplaces and mantel pieces, or outdoor ornaments such as fountains, statuary and grave stones. If Carrara marble floor tiles were used, they were used sparingly, as an arresting feature in entrance halls for instance. However, most prominent private and public construction used timber flooring, waxed or ‘jappaned’, with carpet runners and rugs (for example the Austin’s Barwon Park Mansion, 1871), or laid tessellated and ceramic tiles of baked clay infused with colour (for example the Chirnside’s Werribee Park Mansion, 1878). HISTORY OF THE LOCH ARD The LOCH ARD belonged to the famous Loch Line which sailed many ships from England to Australia. Built in Glasgow by Barclay, Curdle and Co. in 1873, the LOCH ARD was a three-masted square rigged iron sailing ship. The ship measured 262ft 7" (79.87m) in length, 38ft (11.58m) in width, 23ft (7m) in depth and had a gross tonnage of 1693 tons. The LOCH ARD's main mast measured a massive 150ft (45.7m) in height. LOCH ARD made three trips to Australia and one trip to Calcutta before its final voyage. LOCH ARD left England on March 2, 1878, under the command of Captain Gibbs, a newly married, 29 year old. She was bound for Melbourne with a crew of 37, plus 17 passengers and a load of cargo. The general cargo reflected the affluence of Melbourne at the time. On board were straw hats, umbrella, perfumes, clay pipes, pianos, clocks, confectionary, linen and candles, as well as a heavier load of railway irons, cement, lead and copper. There were items included that intended for display in the Melbourne International Exhibition in 1880. The voyage to Port Phillip was long but uneventful. At 3am on June 1, 1878, Captain Gibbs was expecting to see land and the passengers were becoming excited as they prepared to view their new homeland in the early morning. But LOCH ARD was running into a fog which greatly reduced visibility. Captain Gibbs was becoming anxious as there was no sign of land or the Cape Otway lighthouse. At 4am the fog lifted. A man aloft announced that he could see breakers. The sheer cliffs of Victoria's west coast came into view, and Captain Gibbs realised that the ship was much closer to them than expected. He ordered as much sail to be set as time would permit and then attempted to steer the vessel out to sea. On coming head on into the wind, the ship lost momentum, the sails fell limp and LOCH ARD's bow swung back. Gibbs then ordered the anchors to be released in an attempt to hold its position. The anchors sank some 50 fathoms - but did not hold. By this time LOCH ARD was among the breakers and the tall cliffs of Mutton Bird Island rose behind the ship. Just half a mile from the coast, the ship's bow was suddenly pulled around by the anchor. The captain tried to tack out to sea, but the ship struck a reef at the base of Mutton Bird Island, near Port Campbell. Waves broke over the ship and the top deck was loosened from the hull. The masts and rigging came crashing down knocking passengers and crew overboard. When a lifeboat was finally launched, it crashed into the side of LOCH ARD and capsized. Tom Pearce, who had launched the boat, managed to cling to its overturned hull and shelter beneath it. He drifted out to sea and then on the flood tide came into what is now known as LOCH ARD Gorge. He swam to shore, bruised and dazed, and found a cave in which to shelter. Some of the crew stayed below deck to shelter from the falling rigging but drowned when the ship slipped off the reef into deeper water. Eva Carmichael had raced onto deck to find out what was happening only to be confronted by towering cliffs looming above the stricken ship. In all the chaos, Captain Gibbs grabbed Eva and said, "If you are saved Eva, let my dear wife know that I died like a sailor". That was the last Eva Carmichael saw of the captain. She was swept off the ship by a huge wave. Eva saw Tom Pearce on a small rocky beach and yelled to attract his attention. He dived in and swam to the exhausted woman and dragged her to shore. He took her to the cave and broke open case of brandy which had washed up on the beach. He opened a bottle to revive the unconscious woman. A few hours later Tom scaled a cliff in search of help. He followed hoof prints and came by chance upon two men from nearby Glenample Station three and a half miles away. In a state of exhaustion, he told the men of the tragedy. Tom returned to the gorge while the two men rode back to the station to get help. By the time they reached LOCH ARD Gorge, it was cold and dark. The two shipwreck survivors were taken to Glenample Station to recover. Eva stayed at the station for six weeks before returning to Ireland, this time by steamship. In Melbourne, Tom Pearce received a hero's welcome. He was presented with the first gold medal of the Royal Humane Society of Victoria and a £1000 cheque from the Victorian Government. Concerts were performed to honour the young man's bravery and to raise money for those who lost family in the LOCH ARD disaster. Of the 54 crew members and passengers on board, only two survived: the apprentice, Tom Pearce and the young woman passenger, Eva Carmichael, who lost all of her family in the tragedy. Ten days after the LOCH ARD tragedy, salvage rights to the wreck were sold at auction for £2,120. Cargo valued at £3,000 was salvaged and placed on the beach, but most washed back into the sea when another storm developed. The wreck of LOCH ARD still lies at the base of Mutton Bird Island. Much of the cargo has now been salvaged and some was washed up into what is now known as LOCH ARD Gorge. Cargo and artefacts have also been illegally salvaged over many years before protective legislation was introduced. One of the most unlikely pieces of cargo to have survived the shipwreck was a Minton porcelain peacock - one of only nine in the world. The peacock was destined for the Melbourne International Exhibition in 1880. It had been well packed, which gave it adequate protection during the violent storm. Today, the Minton peacock can be seen at the Flagstaff Hill Maritime Museum in Warrnambool. From Australia's most dramatic shipwreck it has now become Australia's most valuable shipwreck artefact and is one of very few 'objects' on the Victorian State Heritage Register. HISTORY OF THE LOCH ARD The LOCH ARD belonged to the famous Loch Line which sailed many ships from England to Australia. Built in Glasgow by Barclay, Curdle and Co. in 1873, the LOCH ARD was a three-masted square rigged iron sailing ship. The ship measured 262ft 7" (79.87m) in length, 38ft (11.58m) in width, 23ft (7m) in depth and had a gross tonnage of 1693 tons. The LOCH ARD's main mast measured a massive 150ft (45.7m) in height. LOCH ARD made three trips to Australia and one trip to Calcutta before its final voyage. LOCH ARD left England on March 2, 1878, under the command of Captain Gibbs, a newly married, 29 year old. She was bound for Melbourne with a crew of 37, plus 17 passengers and a load of cargo. The general cargo reflected the affluence of Melbourne at the time. On board were straw hats, umbrella, perfumes, clay pipes, pianos, clocks, confectionary, linen and candles, as well as a heavier load of railway irons, cement, lead and copper. There were items included that intended for display in the Melbourne International Exhibition in 1880. The voyage to Port Phillip was long but uneventful. At 3am on June 1, 1878, Captain Gibbs was expecting to see land and the passengers were becoming excited as they prepared to view their new homeland in the early morning. But LOCH ARD was running into a fog which greatly reduced visibility. Captain Gibbs was becoming anxious as there was no sign of land or the Cape Otway lighthouse. At 4am the fog lifted. A man aloft announced that he could see breakers. The sheer cliffs of Victoria's west coast came into view, and Captain Gibbs realised that the ship was much closer to them than expected. He ordered as much sail to be set as time would permit and then attempted to steer the vessel out to sea. On coming head on into the wind, the ship lost momentum, the sails fell limp and LOCH ARD's bow swung back. Gibbs then ordered the anchors to be released in an attempt to hold its position. The anchors sank some 50 fathoms - but did not hold. By this time LOCH ARD was among the breakers and the tall cliffs of Mutton Bird Island rose behind the ship. Just half a mile from the coast, the ship's bow was suddenly pulled around by the anchor. The captain tried to tack out to sea, but the ship struck a reef at the base of Mutton Bird Island, near Port Campbell. Waves broke over the ship and the top deck was loosened from the hull. The masts and rigging came crashing down knocking passengers and crew overboard. When a lifeboat was finally launched, it crashed into the side of LOCH ARD and capsized. Tom Pearce, who had launched the boat, managed to cling to its overturned hull and shelter beneath it. He drifted out to sea and then on the flood tide came into what is now known as LOCH ARD Gorge. He swam to shore, bruised and dazed, and found a cave in which to shelter. Some of the crew stayed below deck to shelter from the falling rigging but drowned when the ship slipped off the reef into deeper water. Eva Carmichael had raced onto deck to find out what was happening only to be confronted by towering cliffs looming above the stricken ship. In all the chaos, Captain Gibbs grabbed Eva and said, "If you are saved Eva, let my dear wife know that I died like a sailor". That was the last Eva Carmichael saw of the captain. She was swept off the ship by a huge wave. Eva saw Tom Pearce on a small rocky beach and yelled to attract his attention. He dived in and swam to the exhausted woman and dragged her to shore. He took her to the cave and broke open case of brandy which had washed up on the beach. He opened a bottle to revive the unconscious woman. A few hours later Tom scaled a cliff in search of help. He followed hoof prints and came by chance upon two men from nearby Glenample Station three and a half miles away. In a state of exhaustion, he told the men of the tragedy. Tom returned to the gorge while the two men rode back to the station to get help. By the time they reached LOCH ARD Gorge, it was cold and dark. The two shipwreck survivors were taken to Glenample Station to recover. Eva stayed at the station for six weeks before returning to Ireland, this time by steamship. In Melbourne, Tom Pearce received a hero's welcome. He was presented with the first gold medal of the Royal Humane Society of Victoria and a £1000 cheque from the Victorian Government. Concerts were performed to honour the young man's bravery and to raise money for those who lost family in the LOCH ARD disaster. Of the 54 crew members and passengers on board, only two survived: the apprentice, Tom Pearce and the young woman passenger, Eva Carmichael, who lost all of her family in the tragedy. Ten days after the LOCH ARD tragedy, salvage rights to the wreck were sold at auction for £2,120. Cargo valued at £3,000 was salvaged and placed on the beach, but most washed back into the sea when another storm developed. The wreck of LOCH ARD still lies at the base of Mutton Bird Island. Much of the cargo has now been salvaged and some was washed up into what is now known as LOCH ARD Gorge. Cargo and artefacts have also been illegally salvaged over many years before protective legislation was introduced. One of the most unlikely pieces of cargo to have survived the shipwreck was a Minton porcelain peacock - one of only nine in the world. The peacock was destined for the Melbourne International Exhibition in 1880. It had been well packed, which gave it adequate protection during the violent storm. Today, the Minton peacock can be seen at the Flagstaff Hill Maritime Museum in Warrnambool. From Australia's most dramatic shipwreck it has now become Australia's most valuable shipwreck artefact and is one of very few 'objects' on the Victorian State Heritage Register. The wreck of the LOCH ARD is of State significance — Victorian Heritage Register S417 Flagstaff Hill’s collection of artefacts from LOCH ARD is significant for being one of the largest collections of artefacts from this shipwreck in Victoria. It is significant for its association with the shipwreck, which is on the Victorian Heritage Register (VHR S417). The collection is significant because of the relationship between the objects, as together they have a high potential to interpret the story of the LOCH ARD. The LOCH ARD collection is archaeologically significant as the remains of a large international passenger and cargo ship. The LOCH ARD collection is historically significant for representing aspects of Victoria’s shipping history and its potential to interpret sub-theme 1.5 of Victoria’s Framework of Historical Themes (living with natural processes). The collection is also historically significant for its association with the LOCH ARD, which was one of the worst and best known shipwrecks in Victoria’s history. A square marble tile retrieved from the wreck of the LOCH ARD. Most of its surface is covered by a thin layer of limestone and marine growth encrustation that is stained rust-red. There is a piece of corroded iron encrusted at an oblique angle on the tile’s rear face. The tile is ‘rough-worked’, cut to shape and size, but not smoothed or polished. There is a companion tile in similar condition in the Flagstaff Hill collection. From visual observation of the original surface (at low magnification) the tile appears to be of white Carrara-type marble.flagstaff hill, warrnambool, shipwrecked coast, flagstaff hill maritime museum, maritime museum, shipwreck coast, flagstaff hill maritime village, great ocean road, loch line, loch ard, captain gibbs, eva carmichael, tom pearce, glenample station, mutton bird island, loch ard gorge, white marble, marble tile, carrara marble, colonial architecture, victorian building materials -
 Ballarat Tramway Museum
Album - Postcards & Photographs - Vic Solomons and others - Australian Tramways, Vic Solomons, 2023
Contains 184 images of postcards and photographs collected primarily by Vic Solomons of Sydney, with others from the collection of Wal Jack and Warren Doubleday. Covers almost all of Australia's tramway systems. 1 Post Card Hay St Perth Looking East No 3 Unknown Perth 2 Post Card Cars 30 & 90 both on Route 19 pass in Barrack St looking South Perth WA 1935.02.18 Perth 3 Post Card Hay St Looking East Perth WA Unknown Perth 4 Post Card William St Perth WA Unknown Perth 5 Post Card Perth from Shaftsbury Hotel Unknown Perth 6 Post Card Hay St Perth WA Looking East Unknown Perth 7 Post Card Barrack St Perth Unknown Perth 8 Post Card Murray Views No 3 High St Showing Town Hall Fremantle WA Unknown Fremantle 9 Post Card High St Fremantle WA Unknown Fremantle 10 Post Card View of Bolder City Golden Mile in the Background (Section No 1) 1908.08.20 Kalgoolie 11 Post Card Hannan St Kalgoolie 1900.08.19 Kalgoolie 12 Post Card Hannan St Kalgoolie WA (No 2) Unknown Kalgoolie 13 Post Card Intersection Hannan & Maritana Sts Kalgoolie WA Unknown Kalgoolie 14 Post Card Hannan St Kalgoolie Unknown Kalgoolie 15 Post Card Lane Street Bolder City Unknown Kalgoolie 16 Post Card Hobart Double Deck Tram Unknown Hobart 17 Post Card Macquarie St Hobart Unknown Hobart 18 Photo Liverpool Street Hobart Unknown Hobart 19 Photo Hobart 21 Unknown Hobart 20 Photo Hobart 14 in Elizabeth St Hobart Unknown Hobart 21 Post Card Macquarie St Hobart Unknown Hobart 22 Post Card Macquarie St Hobart Tas Unknown Hobart 23 Photo Double Decker Tram 3 at G.P.O. Hobart Tas No 31 Unknown Hobart 24 Post Card Double Decker Tram 19 Hobart Tas A B Series No 24 Unknown Hobart 25 Photo Hobart Municipal Tramways Tas No 95 Unknown Hobart 26 Post Card Elizabeth St Hobart Unknown Hobart 27 Post Card Elizabeth St Hobart Unknown Hobart 28 Post Card Elizabeth St Hobart Unknown Hobart 29 Post Card Elizabeth St Hobart Tas Unknown Hobart 30 Post Card HMT 21 with crew at Beach Road Terminus Unknown Hobart 31 Post Card HMT 9 & another with crew at Beach Road Terminus. Front cover photo of Destination GPO 1921.01.00 Hobart 32 Post Card Cascade Road and Mount Wellington Hobart Unknown Hobart 33 Post Card Elizabeth St Hobart Unknown Hobart 34 Post Card Elizabeth St Hobart Unknown Hobart 35 Post Card Elizabeth St Hobart 1915.04.07 Hobart 36 Post Card Macquarie St Hobart Tas Unknown Hobart 37 Post Card Macquarie St showing Post Office Hobart 1908.03.12 Hobart 38 Post Card Hobart Municipal Tramways 21 Unknown Hobart 39 Post Card Elizabeth St Hobart Tas Unknown Hobart 40 Post Card Liverpool Street Hobart Unknown Hobart 41 Post Card Electric Tram Launceston Tas 446 W J Little Photo 1919.02.08 Launbceston 42 Post Card Launceston Tram no 3 1911.08.30 Launbceston 43 Post Card Launceston Tram no 3 passes tram No 1 Unknown Launbceston 44 Post Card Tram 6 at Trevallyn a popular suburb Launceston Tasmania Unknown Launbceston 45 Post Card Tram 7 at Trevallyn Road Terminus Launceston Tasmania Unknown Launbceston 46 Post Card Tram 4 in Brisbane St Launceston Unknown Launbceston 47 Post Card Tram 9 in Brisbane St Launceston Tasmania Unknown Launbceston 48 Post Card Camerom Street Launceston Tasmania Unknown Launbceston 49 Post Card Murray Views No 15 Jetty Road Glenelg Terminus 1962-02-08 Adelaide 50 Post Card Bay Tram at Jetty Road Terminus Glenelg SA Unknown Adelaide 51 Post Card Tram 3 in King William Street Adelaide S Aust Unknown Adelaide 52 Post Card Valentine Series No 3065 The Old Horse Tram Victor Harbour Unknown Victor Harbour 53 Post Card Bourke Street Melbourne with Cable Car Looking East 1904.04.25 Melbourne 54 Post Card Opening of New Electric Tramway Elsternwick 1913-11-13 Melbourne 55 Post Card Cable trams in Clarendon St Sth Melb Unknown Melbourne 56 Post Card Pall Mall from Charing Cross Bendigo Unknown Bendigo 57 Post Card Tram 4 & 7 pass at The Fountain and Mitchell Street Bendigo Vic Rose Series P 3198 Unknown Bendigo 58 Post Card M&MTB 133 at Charing Cross bound for Eaglehawk Bendigo Vic Murray Views No 45 Unknown Bendigo 59 Post Card Pall Mall Bendigo Vic Unknown Bendigo 60 Post Card Charing Cross & Mitchell St Bendigo Trams passing 1919.00.00 Bendigo 61 Post Card Pall Mall Looking East Unknown Bendigo 62 Post Card Electric Trams and City Hotel Bendigo Vic Unknown Bendigo 63 Post Card Moorabool Street Geelong V 23 Unknown Geelong 64 Post Card Murray Views No 3 Moorabool Street Geelong Vic Unknown Geelong 65 Post Card The Rose Series P 2487 Ryrie Street Geelong Vic Unknown Geelong 66 Post Card Southern Cross Series 2696 Ryrie Stret Geelong Vic Unknown Geelong 67 Post Card The Rose Series P 1490 Ryrie Street Geelong Vic 1920-03-04 Geelong 68 Post Card Valentine Series No 1568 Lower Sturt Street Ballarat Unknown Ballarat 69 Post Card Rose Series P 1710 Sturt Street Ballarat Victoria Unknown Ballarat 70 Post Card Sturt Street Ballarat Victoria Unknown Ballarat 71 Post Card Horse Tram In Sturt Street Ballarat 1905.11.10 Ballarat 72 Post Card Sturt Street Ballarat Looking North-West Unknown Ballarat 73 Post Card Shoppes Square Sturt Street Ballarat Looking North Unknown Ballarat 74 Post Card Junction Sturt and Lydiard Streets Ballarat 1909-09-01 Ballarat 75 Post Card The Electric Supply Co Souvenir Tram Ticket No 3085of the opening of Electric System August 18 1905 1905.08.18 Ballarat 76 Post Card Sturt Street Ballarat Victoria 1907.11.25 Ballarat 77 Post Card Off to the Gardens Electric Tram Ballarat Unknown Ballarat 78 Post Card Sturt Street Ballarat 1907.04.16 Ballarat 79 Post Card Sturt Street Ballarat Looking East Electric tram with Double Deck Trailer 1911.04.17 Ballarat 80 Post Card Sturt Street Ballarat Looking East Unknown Ballarat 81 Post Card Sturt Street Ballarat Looking West 1911.03.01 Ballarat 82 Post Card Town Hall and Sturt Street Ballarat Unknown Ballarat 83 Post Card Lydiard Street Ballarat 1906.11.23 Ballarat 84 Post Card Looking North along Adelaide Street from George Street Brisbane Sidues Series No 764 Unknown Brisbane 85 Post Card Looking South along Queen Street from the Creek Street Intersection Brisbane Qld Sirues Series No 1379 Unknown Brisbane 86 Post Card George Street from near Supreme Court Brisbane Unknown Brisbane 87 Post Card Queen and Eagle Streets Brisbane 1907.07.04 Brisbane 88 Post Card Queen Street showing His Majesty’s Theatre Brisbane Unknown Brisbane 89 Post Card Queen Street Treasury Building 1908.01.20 Brisbane 90 Post Card G P O and Queen Street Brisbane Unknown Brisbane 91 Post Card Queen Street Brisbane Looking from Wharf Street Unknown Brisbane 92 Post Card Customs House Brisbane 1905.02.16 Brisbane 93 Post Card Queen St Brisbane 1905.09.16 Brisbane 94 Post Card Queen St Brisbane 1907.11.19 Brisbane 95 Post Card Treasury Buildings Brisbane Unknown Brisbane 96 Post Card Queen and Eagle Streets Brisbane Unknown Brisbane 97 Post Card The Valley Corner Brisbane Unknown Brisbane 98 Post Card Brisbane Queen Street opposite General Post Office Unknown Brisbane 99 Post Card North Quay and Milton Beach Brisbane Q Unknown Brisbane 100 Post Card Victoria Bridge Brisbane South Side 1907.08.14 Brisbane 101 Post Card Victoria Bridge Brisbane Unknown Brisbane 102 Post Card Breakfast Creek Bridge Brisbane Q Unknown Brisbane 103 Post Card Melbourne Street Station South Brisbane Queensland Unknown Brisbane 104 Post Card General Post Office Queen Street Brisbane 1955.09.23 Brisbane 105 Post Card Customs House Brisbane 1904.11.04 Brisbane 106 Post Card Queen St Brisbane 1919.11.00 Brisbane 107 Post Card Queen St Brisbane Sidues Series No 627 Unknown Brisbane 108 Post Card Creek Street Brisbane Queensland Unknown Brisbane 109 Post Card Customs House and Garden Reach Brisbane Queensland 1910.00.08 Brisbane 110 Post Card Queen and Creek Streets Brisbane 1909.06.07 Brisbane 111 Post Card Queensland National Bank andd Queen Street Brisbane Queensland Unknown Brisbane 112 Post Card Queen Street and Treasury Buildings Brisbane 0000.09.07 Brisbane 113 Post Card Queen Street showing “Courier” Buildings Brisbane Unknown Brisbane 114 Post Card Intersection George & Roma Streets Brisbane Q 1916.05.11 Brisbane 115 Post Card Adelaide Street Brisbane Q Unknown Brisbane 116 Post Card G P O Queen Street Brisbane Q Unknown Brisbane 117 Post Card Treasury Building Brisbane 1906.03-20 Brisbane 118 Post Card Queen and Eagle Streets Brisbane 1907.02.01 Brisbane 119 Post Card Queen St Brisbane Unknown Brisbane 120 Post Card Queen St Brisbane Q Unknown Brisbane 121 Post Card Victoria Bridge Brisbane 1906.07.30 Brisbane 122 Post Card An Unusual View showing Head of Queen Street Victoria Bridge & South SideSuburbs Brisbane Q Unknown Brisbane 123 Post Card Petries Bight Brisbane Q Unknown Brisbane 124 Post Card South End Victoria Bridge Brisbane Q Unknown Brisbane 125 Post Card Customs House Brisbane Unknown Brisbane 126 Post Card Photo of toastrack car circa 1910 Unknown Brisbane 127 Post Card Treasury Buildings Brisbane Unknown Brisbane 128 Post Card East Street Rockhampton with Steam Tram & trailer Unknown Rockhampton 129 Post Card Post Office Rockhampton with steam tram Unknown Rockhampton 130 Post Card East Street Rockhampton with Steam Trams Rose Series P 7154 Unknown Rockhampton 131 Post Card William Street Rockhampton Rose Series P 7156 Unknown Rockhampton 132 Post Card Central East Street Rockhampton Q with Steam Trams Unknown Rockhampton 133 Photo Sturt St Ballarat Unknown Ballarat 134 Photo Bridge Street Ballarat Unknown Ballarat 135 Post Card George St Sydney Unknown Sydney 136 Post Card Elizabeth St Sydney Unknown Sydney 137 Post Card Railway Square Unknown Sydney 138 Post Card Sydney Harbor Bridge - pending receipt 139 Post Card Kings Cross - Mowbray Series with description on rear from C Roy G Field Unknown Sydney 140 Post Card Kings Cross - Mowbray Series with description on rear from C Roy G Field Unknown Sydney 141 Post Card Central Railway Station Sydney - Rose Series P6033 1954-01-26 Sydney 142 Post card William Street Darlinghurst looking towards City - Rose Series P6602 unknown Sydney 143 Post Card Circular Quay Sydney - Rose Series P6680 Unknown Sydney 144 Post Card View at Manly NSW - Rose Series B1003 Unknown Sydney 145 Post Card Hunter St Newcastle NSW - Rose Series P7843 Unknown Newcastle 146 Post Card Bank Corner Newcastle NSW - Mowbray Series No. 155 Unknown Newcastle 147 Post Card Hunter St Newcastle NSW Unknown Newcastle 148 Post Card Criterion Hotel Hunter St Newcastle NSW Unknown Newcastle 149 Photo Horse tram at Newtown Station 1894 to 1898 - PTC photo c1894 Newtown 150 Photo Steam tram motor No 3 at Railway Square 1879 1879 Sydney 151 Photo Railway steam tram c1900 with a horse drawn double deck bus c1900 Sydney 152 Photo Steam motor 5A and doubled deck bus Unknown Sydney 153 Photo Steam motor 53A with detail notes on rear 1922 Sydney 154 Photo Cable tram set at Milsons Point ferry terminal c1900 Sydney 155 Photo Early Sydney electric car - Ocean St - Rose Bay Unknown Sydney 156 Photo George St looking souoth c1905 c1905 Sydney 157 Photo Tram 165 at Circular Quay Unknown Sydney 158 Photo Tramcar ferry or transporter at The Spit Unknown Sydney 159 Photo tram 882 George St at Marti Place, 1937 1937 Sydney 160 Photo Tram 826 Railway Sq area Unknown Sydney 161 Photo Railway Sq in background, Broadway with double decker bus and toastrack car late 1930s Sydney 162 Photo Coupled St Pitt St? - photo Ben Parle Feb. 1950 Sydney 163 Photo Electric tram No. 2 - North Sydney with side trolley pole running Unknown Sydney 164 Photo George St - Horden's Corner Unknown Sydney 165 Photo George St at Martin Place c1920 Sydney 166 Photo Castlereagh St Sydney c1928 c1928 Sydney 167 Photo Railway Sqare c1920 c1920 Sydney 168 Photo Darling St Countereweight Unknown Sydney 169 Photo Trolley bus depot Unknown Sydney 170 Photo Trolley bus No. 14 Unknown Sydney 171 Photo Newcastle Railway Station with steam tram - Wharf Road?? Unknown Newcastle 172 Photo High St West Maitland - steam tram Unknown Maitland 173 Photo High St West Maitland - steam tram Unknown Maitland 174 Post Card Argent St near tram terminal Broken Hill NSW c1900 Broken Hill 175 postcard Argent St looking south Broken Hill - with Ken Magor's notes on rear Unknown Broken Hill 176 Photo Toronto - steam tram 61A Unknown Toronto 177 Photo 124A trial run 1911? Sutherland - Cronulla line 1911 Sutherland 178 Photo 103A at a tram stop Unknown Sydney 179 Photo Cable tram set at Crows Nest terminus grip car 12, trailer 22 Unknown Sydney 180 Photo Cable tram Queens Square Sydney 1903 Sydney 181 Photo cars 2078 and 2077 Chatswood late 1950s Sydney 182 Photo car 1877 Balmain area late 1950s Sydney 183 Photo Trolley bus - Rockdale destination Late 1950s Sydney 184 Photo Broken Hill steam tram - motor 18A North Tram Unknown Broken Hill 185 Photo Millars Point Sydney NSW - ferry/tram interchange, unknown Sydney All items imaged including the rear or back where there was writing of information. All files stored on the Museum's Photo Collections directory. Demonstrates through the medium of many images, Australian tramway systems and Ballarat's place in them.Album - heavy card covers, plastic lined with postcard or 6x4 photo sleeves.australia, tramways, postcards, photographs, steam trams, horse trams, cable trams, trolley buses