Showing 1327 items
matching hawthorn tram depot
-
 Melbourne Tram Museum
Sign - Run Number Plate A38
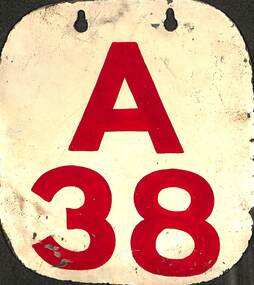
Run Number pressed metal plate with corners trimmed and rounded, top section with two slotted holes, painted with a white background and the letter "A" and number "38" painted in red, to give a Run Number Plate for South Melbourne Depot. Painted with the same detail on either side of the plate.Used by South Melbourne Depot until they were phased out and replaced with the Automatic Vehicle Monitoring system c1990. Used to identify the depot and "run number" or timetable that the tram was running on, two in each tram, to enable monitoring by inspectors and crews.Run Number pressed metal plate with corners trimmed and rounded, top section with two slotted holes, painted with a white background and the letter "A" and number "38" painted in red, to give a Run Number Plate for South Melbourne Depot. Painted with the same detail on either side of the plate.tramways, trams, signs, south melbourne, south melbourne depot, run number plates, timetables -
 Melbourne Tram Museum
Film - DVD, Gabriel Hermes, WW1 Monument - Malvern Tram Depot unveiling, 23-4-2015
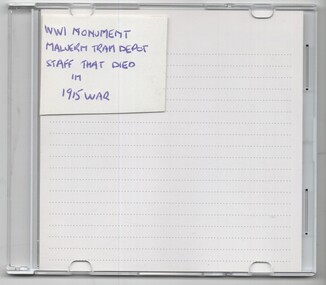
DVD made by Gabriel Hermes of the unveiling of the monument to those Malvern Depot employees who died during the First World War. See the pdf file for a synopsis of the DVD and some screenshots. Present were: Kelly O’Dywer MP – Federal Member for Higgins Cr Melina Sehr – Mayor City of Stonnington Jim Nadda – Manager of Lines Malvern Tram Depot Gabriel Hermes – President of the Prahran Historical and Arts Society Lorraine Sage – President of the Malvern Historical Society Special Guest – Norm Maddock - WW2 veteran, Prisoner of War and Union Assistant Secretary. Records the depot staff who died while on Active service: Armstrong John A – Senior Receiver Bennett, Robert – Conductor Collet, Earnest Oswald – Ticket Clerk Coulton, Ernest – Motorman Eden, John Henry – Conductor Freeman, Thomas Frederick – trackman Garnham, Alfred Jesse – Motorman Harvey, James Henry – Motorman Hill, William John – Conductor McSweeny, John – Ticket Examiner Still, J - Trackman Tram D1 3537 was present at the service. Yields information about the event to mark those trammies from Malvern depot who died during World War 1DVD - white clear plastic case with unmarked Sony DVDOn front - WW1 Monument Malvern Tram Depot - staff that died in 1915 War.trams, tramways, pmtt, malvern depot, anzac, world war 1, memorials -
 Melbourne Tram Museum
Photograph - Black and White - "Buy Bonds" Melbourne Double Decker Bus
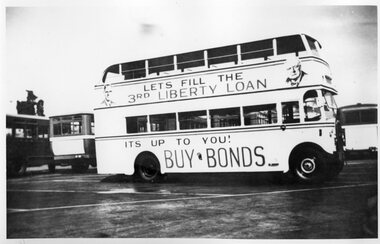
Photos shows a Melbourne, MMTB, double-deck bus painted in an all-over livery for the Buy Bonds Let's fill the 3rd Liberty Loan - World War 2 campaign. Has images of Winston Churchill and Australian Prime Minister John Curtain on the side of the bus. The bus is a Leyland TD5c type. In the background is a bus with a James Motors 1925 body, which were remounted on K6 International chassis in 1942 - 1943. Photographed at North Fitzroy Depot. These buses were used to replace the cable trams in Bourke St from October 1940. John Curtain became Prime Minister on 7 October 1941 and died on 5 July 1945. The paint shop record for buses (See Reg Item 126) gives the bus number 220, that it was painted from the 2nd to the 3rd Victory Loan in Jan. 1945 and then painted to green and cream in 8/1945.Yields information about a bus decorated or painted to promote the 3rd World War loan.Set of two photographs of a MMTB double decker bus advertising Buy the World War 2, 3rd Liberty Loan.tramways, buses, mmtb, double deck buses, john curtain, winston churchill, north fitzroy bus depot, world war 2, war loans, leyland, td5c class, central bus garage, bus 220 -
 Melbourne Tram Museum
Photograph - Conductress School - MMTB - 1941
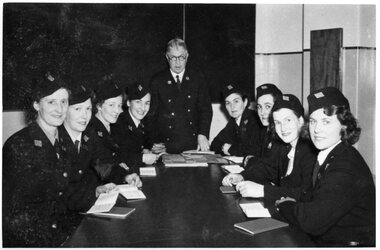
In mid 1941, the MMTB commenced to employ females as Conductresses to alleviate a man power shortage as result of the Second World War. The first 8 commenced training at Hawthorn Depot during August and commenced work on 4 September. See reference for more details on the use of female staff. A MMTB Poster "Melbourne Tramways Past & Present" identifies that the instructor was G. S Boardman and the photo was taken by The Herald.Yields information about the first group to trained as conductresses during 1941.Black and white photograph of 8 women trainee conductresses and Instructor - August 1941tramways, trams, crews, conductors, conductresses, training, world war 2, mmtb -
 Melbourne Tram Museum
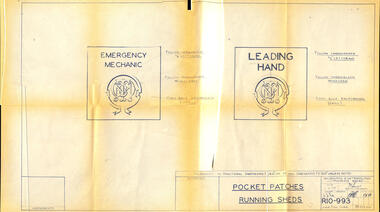
Drawing, Melbourne & Metropolitan Tramways Board (MMTB), "Pocket Patches Running Sheds - R10-993", 2-2-74
Prepared for a manufacturer to manufacture pocket patches for Running Sheds or Depot staff for use on their overalls.Illustrates methods of identifying workers prior to the use hi-vis vests.Print of drawing "Pocket Patches Running Sheds - R10-993"tramways, badges, depots, uniforms, tramcar maintenance staff, running sheds -
 Melbourne Tram Museum
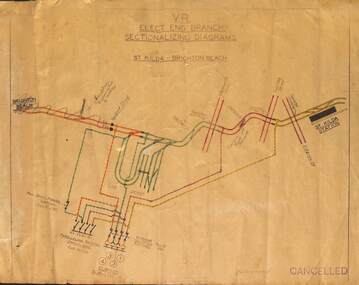
Drawing, Victorian Railways (VR), "Sectionalizing Diagram - St Kilda - Brighton Beach", c1957
Drawing shows the power supply arrangement to the overhead for the VR St Kilda Brighton tramway, including Elwood depot and substation. Has been marked up for removal of the line south of Elwood Depot to Brighton and Dickens St crossover. Shows the isolating and paralleling switches and their pole numbers. Not known when the original drawing was prepared. The tramway or electric street raikway operated from 1906 to 1959, the section south of Elwood depot closing in two stages during 1956. See reference for history of the line.Yields information about the power supply arrangements for the St Kilda Brighton tramway.Drawing dyeline print and hand coloured with a cloth back sheet with two punch holes on the left hand side to enable filing.Has numerous pencil inscriptions that updated the drawing to c1957 and a "Cancelled" stamp in the bottom right hand corner.tramways, vr, victorian railways, power supply, electrical switching, electrical engineering, st kilda brighton tramway, elwood depot -
 Melbourne Tram Museum
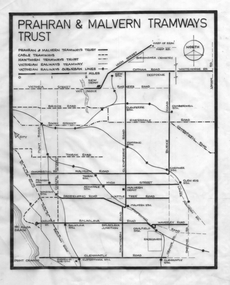
Drawing - Tramway plan, Robert Green, "Prahran and Malvern Tramways Trust", c1970
Drawing - showing the extent of the "Prahran and Malvern Tramways Trust" tramways prior to the take over by the MMTB in 1920. Shows their lines, as well as cable trams, Hawthorn Tramways Trust lines and the Victorian Railways tramways and railways. Includes depots and substations. Used in publications such as Feeding and Filling by Graeme Breydon item 1350, though slightly modified to show the curves at junctions.Yields information about the PMTT operated lines and how they served the eastern suburbs of Melbourne.Drawing - black ink on linen.Has "1/" in top left hand corner.tramways, pmtt, track plans, tram lines, htt -
 Melbourne Tram Museum
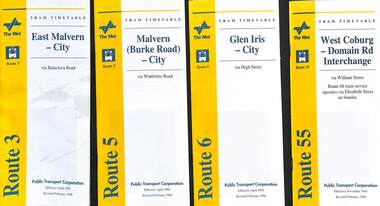
Ephemera - Timetable - The Met - set of 13, The Met, 1996
Set of 13 The Met timetables, with an image of the relevant depot manager, details of hiring a tram, The Met fare system, and a diagrammatic map. All are revised issues of earlier timetables and dated Feb. 1996 unless noted otherwise. 1 - Route 3 - East Malvern - City 2 - Route 5 - Malvern Burke Road - City 3 - Route 6 - Glen Iris - City 4 - Route 55 - West Coburg - Domain Interchange 5 - Route 57 - West Maribyrnong - City 6 - Route 59 - Airport West - City 7 - Route 69 - Kew Cotham Road - St Kilda Beach 8 - Route 70 - Wattle Park - Princes Bridge 9 - Route 72 - Camberwell - Melbourne Uni - Dec. 1996 10 - Route 78, 79, North Richmond - St Kilda Beach or Prahran 11 - Route 82 - Moonee Ponds - Footscray 12 - Route 96 - St Kilda Beach - East Brunswick 13 - Route 34 - La Trobe St Services - includes routes that served La Trobe St.Yields information about some of The Met tram services Feb. 1996Set of 13 The Met timetables, DL size, printed in two colours.timetables, the met, route 3, route 5, route 6, route 55, rout 57, route 59, route 69, route 70, route 72, route 78, route 79, route 82, route 96, route 34, la trobe st -
 Melbourne Tram Museum
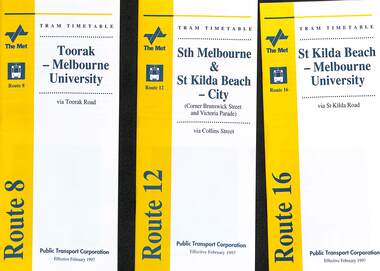
Ephemera - Timetable - The Met - set of 3, The Met, 1997
Set of 3 The Met timetables, with an image of the relevant depot manager, details of hiring a tram, The Met fare system, and a diagrammatic map. All are revised issues of earlier timetables and dated Feb. 1997 unless noted otherwise. 1 - Route 8 - Toorak - Melbourne University 2 - Route 16 - St Kilda Beach - Melbourne University 3 - Route 12 - Sth Melbourne & St Kilda Beach - CityYields information about some of The Met tram services Feb. 1997Set of 3 The Met timetables, DL size, printed in two colours.timetables, the met, route 8, route 16, route 12 -
 Melbourne Tram Museum
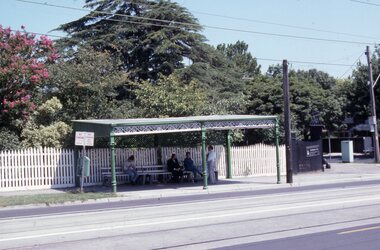
Slide - Set of 17 - Tramway Shelters, Robert Green, c1990
Set of 17 colour slides of tramway shelters, poles, and substations by Robert Green c1990. Shelters by the PMTT, HTT and MMTB 1 Tramway Shelter (PMTT) - Cnr Balaclava and Orrong Road, Caulfield 2 - ditto 3 - Tramway Shelter (PMTT) - Cnr. Cotham Road and Burke Road, Deepdene 4 - Tramway Shelter (PMTT) - Cnr. Cotham Road and Burke Road, Deepdene with telephone box alongside. 5 - Cnr. Malvern Rd and Orrong Road, Toorak 6 - Cnr. Malvern Rd and Orrong Road, Toorak 7 - Cnr. Dandenong Road and Hawthorn Road, Caufield 8 - ditto 9 - PMTT Substation - Rusden Street, Elsternwick 10 - PMTT poles cnr. Dandenong Road and Wattletree Road 11 - Tram shelter (HTT) Riversdale Road and Highfield Road - Camberwell - Highfield Park 12 - Tram shelter (HTT) Riversdale Road and Wattlevalley Road, Camberwell 13 - ditto 14 - Tram shelter (HTT) Camberwell Road, cnr Bowen St. Camberwell. 15 - Tram Shelter (HTT) Camberwell Depot, Riversdale Road, Hawthorn 16 - Merri Creek Bridge, St. Georges Road, North Fitzroy 17 - Merri Creek Bridge, St. Georges Road, North Fitzroy - foundation stone Yields information about Melbourne's tramway stop shelters and other infrastructure.Set of 17 Kodak colour slides in plastic mounts.tramways, shelters, caufield, deepdene, toorak, orrong road, cotham road, balaclava road, pmtt, htt, mmtb, riversdale road, camberwell depot, merri creek bridge, foundation stone, dandenong road, poles, rusden st, substations, hawthorn road, st.georges road -
 Melbourne Tram Museum
Slide - Set of 23 - MMTB Tram substations and offices, Robert Green, 3/1990
Set of 23 colour slides of MMTB tramway substations and the Victoria St Office, by Robert Green Mar 1990. 1 - Carlton Substation - Queensberry St. 2 - Carlton Substation - Queensberry St. 3 - Coburg - Moore St 4 - Glen Huntly Depot substation 5 - Fitzroy - Young St. 6 - Fitzroy - Young St. 7 - Station St Camberwell 8 - Malvern Tram depot 9 - Brunswick Rd, Brunswick 10 - Brunswick Rd, Brunswick 11 - Brunswick Rd, Brunswick 12 - Holden St North Fitzroy 13 - Holden St North Fitzroy 14 - East Kew - High St. 15 - East Kew - High St. 16 - East Kew - High St. 17 - East Kew - High St. 18 - Little Bourke St Melbourne 19 - Former branch offices - Victoria Parade Fitzroy 20 - Former branch offices - Victoria Parade Fitzroy 21 - Former branch offices - Victoria Parade Fitzroy 22 - Former branch offices - Victoria Parade Fitzroy - 2004 23 - Former branch offices - Victoria Parade Fitzroy = 2004Yields information about Melbourne tramway substationsSet of 23 Kodak colour slides in plastic mounts.All slides have their location marked on them in black ink.tramways, mmtb, substations, carlton, queensberry st, coburg, glen huntly, north fitzroy, young st, camberwell, malvern depot, brunswick road, brunswick, holden st, east kew, little bourke st, branch offices, victoria parade -
 Melbourne Tram Museum
Photograph - Set of 2 - Shunting cable trams - Brunswick, McCarty Underwood & Co, May 1914
The two photographs show cable trams being shunted into the Brunswick Cable Tram Depot or car house from Sydney Road. The first shows a horse pulling a bogie tram trailer into the car house while the second shows the grip being pushed in by hand. Note the raised position of the grip when this shunting task is performed - 1920s. Yields information about the shunting of cable trams at the Brunswick car house or depot.Set of two black and white copy photographs with adhesive marks on the rear.tramways, tramcars, cable trams, brunswick, brunswick depot, car house, shunting, mmtb, tram 41, trams, grip -
 Melbourne Tram Museum
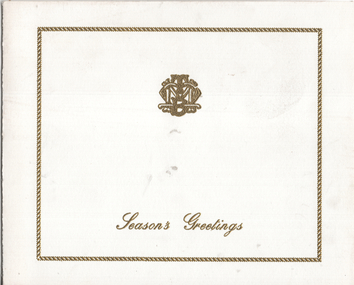
Ephemera - Christmas Card - PCC 1041, Melbourne & Metropolitan Tramways Board (MMTB), 1973
Card features PCC Class tram 1041 in Bourke St at a tram stop on route 96 to East Brunswick. The tram entered service during August 1973, so presumed this card was printed in 1973. The tram is on display at the Museum at Hawthorn depot.Demonstrates a MMTB Christmas Card issued with a photo of prototype tram 1041.Card printed - 8 pages glued - colour photograph and gold front with MMTB logo. Two copies held.tramways, mmtb, tram 1041, pcc class, christmas, greeting cards, bourke st, route 96 -
 Melbourne Tram Museum
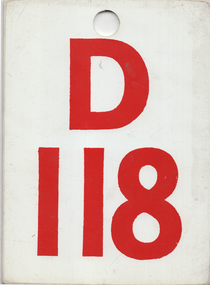
Functional object - Run Number Plate, Melbourne & Metropolitan Tramways Board (MMTB), Doncaster D118, 1970's?
Used by Doncaster bus depot to indicate to Inspectors and other staff the allocated run or timetable trip for a particular service. Was displayed in the front window of the vehicle.Demonstrates a MMTB Run Number plate used on both trams and buses.Run Number pressed plastic sheet with rounded corners, off white or cream sheet with the letter "D" and number "118" using a red adhesive tape.trams, tramways, mmtb, timetables, buses, doncaster depot -
 Melbourne Tram Museum
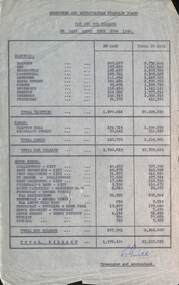
Administrative record, Melbourne & Metropolitan Tramways Board (MMTB), "Car and Bus Mileage", June 1940
Administrative record - "Car and Bus Mileage" for 28 days ended 29th June 1940, lists each electric depot, cable, and bus for each bus route. Includes total to date. Signed by H Guice as Treasurer and Accountant.Yields information about the mmtb tram and bus mileages to June 1940, a few months before the cable system closed.Carbon copy typed foolscap sheet signed F Guicetramways, trams, mmtb, depots, mileages, buses, cable trams, statistics -
 Melbourne Tram Museum
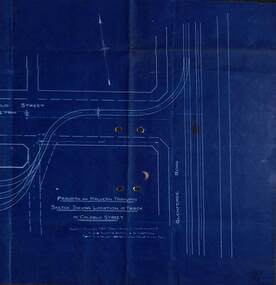
Drawing - PMTT, "Sketch shewing Location of track in Coldblo Street", 12/1908
The drawing shows a 3 road depot layout, with an access track from Glenferrie Road, referring to a letter and a point D on the drawing. Drawing dated 18-12-1908 is some 18 months before the PMTT opened with a 6 road depot and is possibly related to land acquisition. Yields information about PMTT depot planning in 1908.Blueprint of a drawing showing the track layout for the entry to Malvern Tram depot.tramcars, pmtt, malvern depot, trackwork -
 Melbourne Tram Museum
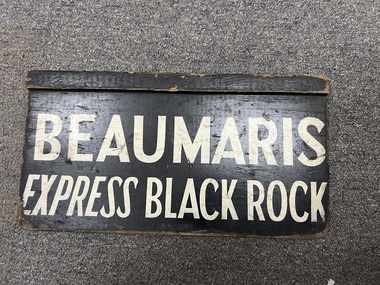
Sign - Form - Receipt docket, Victorian Railways (VR), Auxiliary Destination Board - Express - Beaumaris
Used as a destination or auxiliary board on Sandringham trams and buses that operated from the Sandringham railway station tram/bus depot. Tram and bus services were operated by the Victorian Railways. Have been letter Beaumaris Express and Beaumaris Express Black Rock which indicate more bus rather than trams.Demonstrates destination signs used by the Victorian Railways on their Sandringham services. Sign - plywood - 3 ply with a rebated timber section at the top of the sign, painted black with white letters. tramways, vr, sandringham, vr buses, buses, signs -
 Melbourne Tram Museum
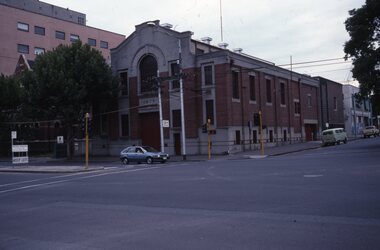
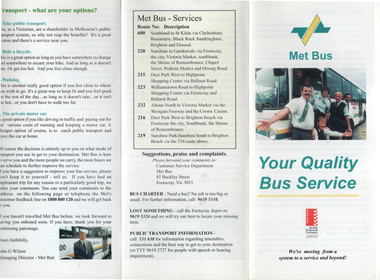
Pamphlet, Met Bus, "Met Bus - Your Quality Bus Service", c1993
Pamphlet produced by Met Bus, the Government operator of 7 routes following the 1993 tender to provide information on the operation, its plans, public transport, routes operated, contact details and general information. Managing Director John G Wilson. Services were operated out of the former Footscray Tram depot in Buckley St.Yields information about Met Bus in 1993.Pamphlet, 3 fold DLfull colour.met bus, buses, public transport -
 Melbourne Tram Museum
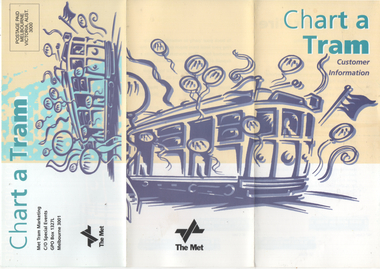
Pamphlet, Met Tram, "Chart a Tram - Customer information", c1995
Pamphlet produced by Met Tram Marketing about the hiring of trams - gives rates, seating capacity, depots and tram types. Has a list of depots and the contact details. Not dated, c1995. Has an enquiry form attached.Yields information about hiring a tram c1995.Pamphlet, 3 fold DLfull colour.met tram, tramways, tram hire, charters -
 Melbourne Tram Museum
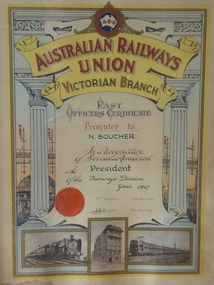
Certificate - Illuminated Address, Australian Railways Union (ARU), ARU President N C Boucher, 1947
Certificate presented to N C Boucher after retiring as President of the Tramway Division of the Australian Railways Union in 1947. Signed by A J Cregan as State President and J J Brown as State Secretary. The Union seal has been applied to the item. The Union had several divisions such as guards, signalmen, shunters etc. The Tramway Division represented the tramway depots at Elwood and Sandringham. The certificate includes a photo of the Union building, a train hauled by A2 945 and an Electric Train. The Union did not represent locomotive or electric train crews, these were represented by the Australian Federated Union of Locomotive Employees. For notes on Mr Boucher's career see item 7056.Demonstrates an ARU Illuminated address of the 1940sFramed Certificate - printed base on paper with name, position inked on over a light blue wash. Timber surround with gold surround and glazed.n c boucher, unions, vr trams, aru, certificates, illuminated address -
 Melbourne Tram Museum
Ephemera - Timetables - Route 96 and 111, The Met, 12/1992
Light Rail Timetables from 6 Dec. 1992 for routes 96 East Brunswick to St Kilda Beach and route 111 - Port Melbourne to Exhibition St. Gives frequency of the trams for weekdays and weekends. Has the depot locations and numbers for further information.Demonstrates a set of The Met timetable for routes 96 and 111 for 1992.Timetable - set of two A4 printed sheets.tramways, the met, route 111, route 96, timetables, light rail -
 Melbourne Tram Museum
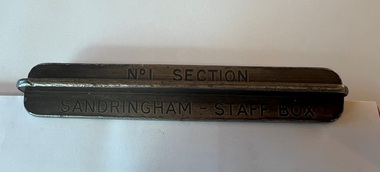
Functional object - Sandringham tramway - section staff, 1920s
Item used on the Victorian Railways Sandringham - Black Rock tram line for the short section of the single track of the line between the railway station in Station Street and the depot entrance in Bay Road. Tram drivers were required to carry this to prevent a head-on collision on the single-line section. Image 3 shows the driver placing the item in the "staff box" outside the depot. Image from the DVD "VR Tramways in the 1950s", with permission from Effectch the Producer. The Newport Railway Museum holds the other staffs for this line along with a damaged one (or two) for the same section - see photo 4 for the Black Rock to Beaumaris Section.Demonstrates an item used to safely work trams on the Sandringham - Black Rock - Beaumaris tram line.Two sections of steel intermeshed to form a cross and stamped.Stamped "No. 1 Section" and "Sandringham - Staff Box"trams, tramways, safeworking, sandringham, section staff -
 Melbourne Tram Museum
Photograph - Set of 5 Black & White - First AETA tour, 15-2-1947
Set of five photographs of the first Australian Electric Traction Association (AETA) tram tour of Melbourne on 15/2/1947. See page 8 of the March 1947 issue of "Tram Tracks" for details of the tour and the MMTB Crew. 1 - SW6 881 about to leave Glen Huntly Depot 2 - Crossing Balaclava Junction 3 - Crossing the Kooyong railway level crossing in Glenferrie Road - has the railway signal box and gates in view. 4 - Turning into Riversdale Road from Glenferrie Road with the Stotts Business College building in the background. 5 - Just to the east of Yarra River Bridge in Swan Street with the Burnley Gardens on the right.Yields information about the first AETA tram tour in 1947Set of 5 Black and white photograph on paper. Two copies of each held.Each one of the set has a photographers file stamp on the rear, but no details filled in.trams, tramways, aeta, tram tours, tram 881, sw6 class, glen huntly, kooyong level crossing, glenferrie road, riversdale road, burnley, hawthorn, balaclava junction, glen huntly depot, hawthorn road, swan st -
 Melbourne Tram Museum
Photograph - Set of two colour prints of L class 102 on a tram tour, Bill Kingsley, July 1974
Set of two photographs, possibly during a Footscray Technical College tour in July 1974. Such tours were arranged by Bill Kingsley. 1 - L 102 at Brunswick Depot. Note the destination of "Fawkner" - which was used to link with bus services at various times of the day between North Coburg and Fawkner station - see reference. 2 - ditto turning from Pilkington St into Barkly St North Fitzroy, part of the single track Holden St. line.Yields information about the use of L class trams.Set of two colour prints, Kodak paper with date of July 1974 on rear.Location and tour notestrams, tramways, l class, tram 102, pilkington st, barkly street, bill kingsley., brunswick depot -
 Melbourne Tram Museum
Negative - Copy - W5 811 Caulfield Racecourse loop, late 1940s
Copy negative of a photograph of tram W5 811 turning from the railway underpass at the Caulfield Railway Bridge into the former Railway Avenue. Part of this track was removed during1983 and changed arrangements provided for Caulfield Race traffic. An inspector is standing behind the tram on the left hand side of the photo. On the right side is the Caulfield Marketing Emporium. Based on depot listings and a Glen Huntly run number in the back cab, photo is dated to the late 1940s.Yields information about the Caulfield Racecourse loopCopy negative of a black and white photographtramcars, tramways, w5 class, tram 811, racecourse, caulfield, dandenong road -
 Melbourne Tram Museum
Negative - Copy - L 101 Balaclava Junction Hawthorn Road Caufield, early 1940s
Copy negative of a photograph of L 101 Balaclava Junction Hawthorn Road Caufield, with a destination of Glenhuntly Depot. The tram was fitted with a route number boxes in June 1939, which provides a date era for the tram, but is yet to have its drop centre floor raised. Behind the tram is the shelter at this location along with a sign stating the trams could be taken to Balaclava, St Kilda Beach and Caulfield, along with a tram stop sign and an End Section sign.Yields information about the use of L class trams.Copy negative of a black and white photographtramways, caulfield, l class, tram 101, hawthorn road, shelters, signs, trams -
 Melbourne Tram Museum
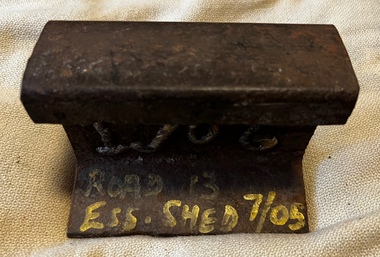
Functional object - Section of 1906 rail - Essendon Tram Depot, Carnegie Steel Co, 1906
Rail used by The North Melbourne and Essendon Tramways and Lighting Co. at their Essendon Depot. Based on item 2566, originally rolled by Carnegie Steel in Pittsburg. The reference link provides the history of the company. Section taken from No. 13 road July 2005. Has rolling date welded onto one side, with location and date written in yellow paint on the foot of the rail.Yields information about the type of rail used in 1906 at Essendon Tram depot.Section of rail recovered from Essendon Tram depot relay with "1906" welded to one side. Has a hole on the underside cut using an oxy-acetylene torch for a bolt possibly to secure the rail. Has been sawn from a salvaged section of rail. See item 2566 for a photograph of a section of rail at Essendon depot with the date and manufacturer's name rolled onto it. tramways, rail, essendon tram depot, carnegie steel, nmetl -
 Melbourne Tram Museum
Photograph - Set of five colour prints - last day of Footscary - AETA tour, 10/2/1962
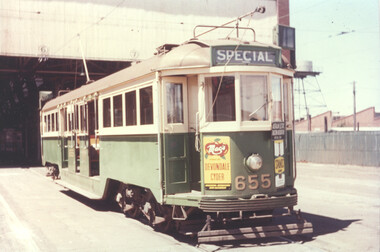
Colour prints show the trams used by the AETA (Australian Electric Traction Association) on 10/2/1962 to mark the closure of the local routes at Footscray. 1 - W3 655 at South Melbourne depot 2 - W3 655 shunting at Moonee Ponds Junction 3 - W4 670 followed by W3 655 crossing the Maribyrnong Road Bridge. 4 - The two trams at Footscray Station 5 - At Footscray tram depot with local cars. See item 3992 for other photographs. Yields information about the AETA tour to mark the closure of the Footscray local system. Set of five Colour print on Kodak Royal paper.trams, tramways, w3 class, w4 class, tram 655, tram 670, footscray, maribyrnong road, moonee ponds junction, south melbourne depot, footscray depot, leeds st, aeta -
 Melbourne Tram Museum
Photograph - Set of six colour prints - last day of local Footscary lines, 10/2/1962
Colour prints showing some of the trams used on the last day of local Footscray services. 1 - X1 459 - picking up a passenger in Ballarat Road - has a service station in the background and the Footscray Hospital 2 - X1 459 and another X2 in Leeds St Footscray. 3 - X1 467, and another X1 and X2 677 at Footscray Tram depot for the AETA tour. (Reference provides information that X2 468 was the second car) 4 - X1 468 with the destination of Williamstown Road turning into Leeds St from Hopkins St 5 - X2 677 and two X1s at Footscray Station in Leeds St. - on the AETA tour. 6 - X2 678 turning from Ballarat Road into Droop St showing the "Ballarat Road" destination. Note Kinnears Rope works building behind the tram.Yields information about the AETA tour to mark the closure of the Footscray local system. Set of six Colour print on Kodak Royal paper.trams, tramways, footscray, ballarat road, leeds st, x1 class, x2 class, aeta tours, tram 459, tram 678, tram 467, tram 468, tram 677, mmtb, footscray depot -
 Melbourne Tram Museum
Photograph - Colour print - Freight Car 17 at Hawthorn Depot, early 1965
... at Hawthorn Depot prior to its closure as a running shed. The tram... is advertising Sunkist Peas. Alongside the tram is W2 324 (Hawthorn Depot ...Colour print showing Freight Car 17 on No. 1 Road at Hawthorn Depot prior to its closure as a running shed. The tram is advertising Sunkist Peas. Alongside the tram is W2 324 (Hawthorn Depot, Route 80) No. 17 was converted from NMETL No. 13 and this tram is now on display at the Museum. See Reference. Photo most likely taken shortly before the depot closed as a running shed. The depot ceased as a running shed on 14/2/1965. Yields information about the last days of Hawthorn tram depot as a running depot and the use of the Freight car.Colour print - printed on Kodak Royal paper.trams, tramways, w2 class, tram 17, tram 324, freight car, sunkist peas, mmtb, v class, hawthorn depot