Showing 1812 items
matching ballarat road
-
 Ballarat Tramway Museum
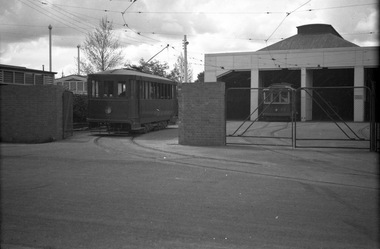
Photograph - Digital image, Dick Jones, W3 661 outbound in St Kilda Road, Dec. 1964
Demonstrates one of the Museum's trams in service in Melbourne.Digital Image of MMTB tram W3 661 outbound in St Kilda Road, approaching Doman Junction. Tram has destination of East Brighton, Route 64 and an advertisement for Proofkote (rain wear protection?) BP House in the background. Photo December 1964. Photo reference from Dick Jones - 661_StKildaRd_DickJones_6412MIns.23.04trams, tramways, w3 class, st kilda road, east brighton, tram 661 -
 Ballarat Tramway Museum
Photograph - Digital image, Dave Macartney, c1969
Digital Image of MMTB tram W5 836 inbound in Mt Alexander road, just before the crossing of Moonee Ponds Creek. Tram is freshly painted, showing City Route 59. In the background is a Holden car dealer, the railway bridge over Flemington Road. Photo by Dave Macartney 1969?trams, tramways, w5 class, mt alexander road, tram 836 -
 Ballarat Tramway Museum
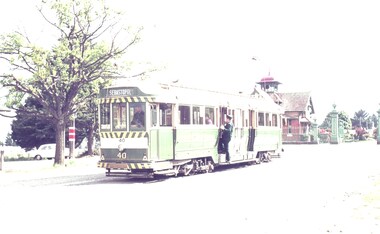
Slide - 35mm slide/s - set of 2, Robert Thomson, 27-4-1965?
Yields information about tram 40, the Lydiard St terminus tram stop and the Sebastopol tram terminus and tram 40.Agfa blue/white mount, colour slide of tram 40 at both the Lydiard St North and Sebastopol terminus. Both over exposed photos. .1 - No. 40 early in the morning given the sun position, shows the cemetery gates and the tram stop sign on the west side of the road. The conductor is boarding and the driver is in the cabin. Tram has the destination of Sebastopol. .2 - has the tram side on, with the Royal Mail Hotel in the background. Slide not dated, but based on slide mount and views and Reg item 7483, likely to be 27-4-1965tramways, trams, lydiard st north, sebastopol, tram stops, tram 40 -
 Ballarat Tramway Museum
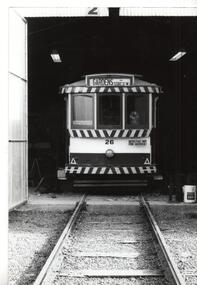
Photograph - Black & White Photograph/s, Richard Gilbert, c1976
Black and white photograph of Graeme Jordan painting a life guard bracket, possibly for No. 28. The tram is behind on No. 2 road and No. 26 on 3 road. Printed on Kodak Paper. Photo c1976. trams, tramways, btps, depot, tram 28, tram 26 -
 Ballarat Tramway Museum
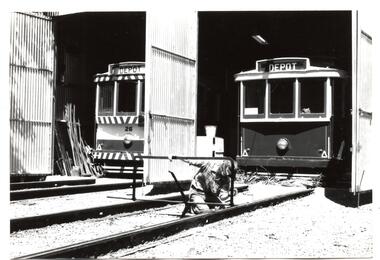
Photograph - Black & White Photograph/s - set of 4, Richard Gilbert, c1975
Series of four Black and white photographs of tram 26 on No. 2 road at the BTPS Depot, undergoing replacement of the broken frame on the Brill 21E truck. The tramcar record sheets note that the car was lifted 15-3-1975 and lower 27-7-1975 and tested on the same day. Seems to have re-entered service on 28/9/1975. .1 - on the front of the road, with a "Defective Not for Service" sign. .2 - car on jacks being either lifted or lowered. .3 - tramcar body lifted showing the word to replace the side frame underway, has the good and broken side frame in the view. .4 - tram being either lifted or lowered - with Rolf Jinks in the view. trams, tramways, btps, depot, brill trucks, maintenance, tram 26 -
 Ballarat Tramway Museum
Photograph - Black & White Photograph/s, Richard Gilbert, mid 1987
Black and white photograph of tram 26 jacked up for wheel and motor maintenance, after it had been reconverted back to California Combination tram during the previous few years. Tram on jacks at the rear of No. 4 road. The tramcar record sheets note that the car was lifted April 1987 and lowered Oct. 1987. trams, tramways, btps, depot, maintenance, tram 26 -
 Ballarat Tramway Museum
Photograph - Digital image, John Ward, 21/08/1971 12:00:00 AM
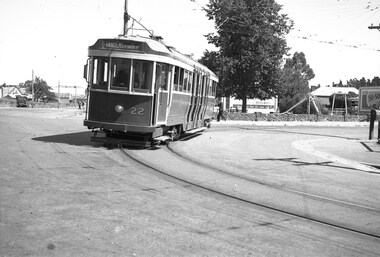
Yields information about the Victoria St appearance and a major hail storm in Sturt St at the time of the tramway closure.Digital image of No. 21, outbound in Victoria St to Victoria St. On either side of the road is the remains of a major hail storm that struck Ballarat the previous day. Tram has destination of Victoria St. Photo by John Ward 21 August 1971. Slide title "01311 210871 SEC single truck tram 21 on Victoria St line in suburban Ballarat Vic"trams, tramways, victoria st, tram 21 -
 Ballarat Tramway Museum
Photograph - Black & White Photograph/s - set of 4, Andrew Howlett, c1971
Yields information about the appearance of the depot and associated tramcar operations.Series of four Black and White photograph print of trams at the Ballarat depot, c1971. .1 - tram 12 parked or about to leave the depot to Mt Pleasant - has a Twin Lakes sign. .2 - trams 12 and 34 in Wendouree Parade at the depot junction. .3 - ditto .4 - Scrubber tram parked on 0 road with the tennis court fence adjacent.trams, tramways, depot, scrubber tram, wendouree parade, tram 12, tram 34, scrubber -
 Ballarat Tramway Museum
Negative, Wal Jack, late 1930's to early 1940's?
Yields information about the depot appearance and the scrubber car.Negative and Digital image of the Wal Jack Ballarat Negative file of the scrubber tram parked on the depot fan and tram 23 in No. 2 road. Late 1930's to early 1940's?trams, tramways, depot, scrubber tram, tram scrubber tram 23 -
 Ballarat Tramway Museum
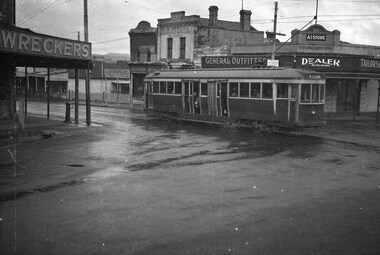
Negative, Wal Jack, late 1945 early 1946
Yields information about the appearance of the ex Melbourne bogie trams during the initial period of operations in Ballarat and the appearance of the Humffray St and Main Road intersection.Negative and Digital image of the Wal Jack Ballarat Negative file of bogie car, 22 at the corner of Main Road and Humffray St, late 1945/ early 1946 on a very wet day. Tram has the destination of Mt Pleasant. In the background are sores for "A I Store - dealer - will buy anything, Tailors General Outfitters, W. N. Symons Plumber, a hair dresser and a "wrecker" See Reg Item 2882 for a 1958 photo. trams, tramways, main road, mt pleasant, humffray st, tram 22 -
 Ballarat Tramway Museum
Negative, Wal Jack, late 1945 early 1946
... that came to Ballarat. Trams tramways Main Road Mt Pleasant Barkly ...Yields information about the corner of Main St and Barkly St and the first bogie trams that came to Ballarat.Negative and Digital image of the Wal Jack Ballarat Negative file of bogie car, 22 at the corner of Main Road and Barkly St. Tram has the destination of Gardens via Drummond Nth. late 1945 early 1946 trams, tramways, main road, mt pleasant, barkly st, tram 22 -
 Ballarat Tramway Museum
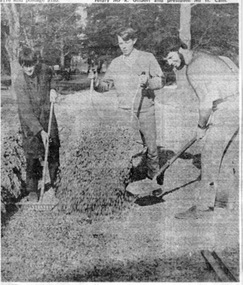
Newspaper, The Courier Ballarat, "Ballarat support for tramway preservation is small: President", 25/09/1972 12:00:00 AM
Has a strong association with the people who were involved in the early formation of the BTPS and the 1972 Annual General Meeting.Newspaper clipping from The Courier of Ballarat of Monday 25/9/1972 with two photos. Article quotes BTPS President saying support for the BTPS was still small. This followed the Annual General Meeting of the Society the previous Saturday. Other items were the trams had been transferred from the old SEC depot, Incorporation was being sought, track laying and maintenance work underway. Two photos 1084i1: - Photo shows Lindsay Bounds, Clyde Croft and David Wisher spreading gravel along No. 2 road. 1084i2: - Photo shows group of Board members at meeting: Mr. G. Netherway, Mr. M. Calnin, Mr. C.W.Jessup, Mr. R.Gilbert and Mr. H.Cain (President) See Reg Item 3824 for a print of the actual photograph. Second copy added 28/10/2005.On top edge of cutting in black ink "25/9/72"trams, tramways, btps, construction, museum establishment, agm -
 Ballarat Tramway Museum
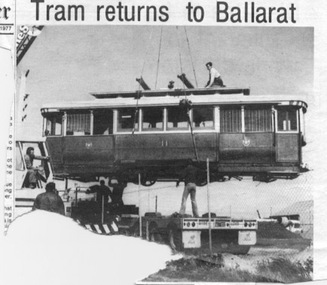
Newspaper, The Courier Ballarat, "Tram returns to Ballarat", "Sebastopol home for tram", 11/08/1977 12:00:00 AM
Newspaper cuttings from The Courier, Ballarat, August 11 1977 with photos of SEC tram No. 11 returning to Ballarat from Sebastopol. 1112.1 - from the page with the Editorial, has a photo (large portion from the bottom left hand corner missing of the rear of the crane) being unloaded at Sebastopol for storage with a column of text detailing the story of the tram and the BTPS plans. Also refers to another photo on page 15. 1112.2 - from page 15 of the Courier, with Jack Chadwick standing on the front step of the tram, outside the entry to the Smythes Road, Sebastopol storage building. Has an inset item on the story. See Reg Item 3827 for a print of the actual photograph.1112.2 - in central right hand side in brackets in blue ink (page(15) and on rear top edge "11/Aug. 1977." in blue ink.trams, tramways, btps, sebastopol, 11, daylesford, tramcar acquisition -
 Ballarat Tramway Museum
Newspaper, The Courier Ballarat, "In Retrospect", 20/09/1994 12:00:00 AM
Newspaper cutting from The Courier, Ballarat, Tuesday 20/9/1994 of the reproduction of a postcard photograph showing an ESCo tram soon after opening running west bound in Sturt St with the Town Hall in the background. Shows the development of the Gardens at the time and buildings on either side of Sturt St. and type of poles etc. The tram is fitted with a destination board on the front dash - the type used soon after opening in 1905. Caption of the photo says "Trams run up Sturt St and people relax in this postcard sent in December 1907. Ballarat's Town Hall is pictured at right." Also has an item in the "In Retrospect" section of the newspaper, about the construction of a new road to avoid two level crossings between Talbot and Clunes. Item compiled by Lorrie BrownIn bottom right hand corner, in blue ink "Tues 20/9/94".trams, tramways, sturt st, esco, town hall -
 Ballarat Tramway Museum
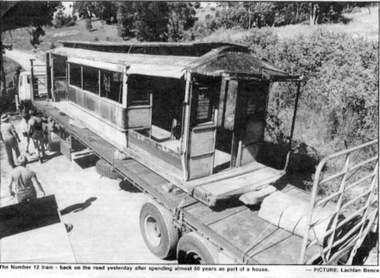
Newspaper, The Courier Ballarat, "Number 12 goes back on the road", 6/11/1990 12:00:00 AM
... Ballarat Tramway Museum South Gardens Reserve Wendouree ...Yields information about the recovery of ESCo No. 12 and its transportation from the site.Newspaper cutting from The Courier, Ballarat, Tuesday 6/11/1990 with a photo of the body of ESCo. No. 12 loaded onto the truck at Nerrina prior to being transported to the depot. Photo by Lachlan Bence and article of Kendall Hill. Notes action by the BTPS, Ballarat By-pass construction, Vic roads donation of the tramcar body, basic background history and quotes Richard Gilbert about the work to be undertaken. See Reg Item 3837 for the prints of the photograph in the newspaper.trams, tramways, 12, esco, tramcar acquisition, btps, preservation -
 Ballarat Tramway Museum
Photograph - Colour Photograph/s, Darren Hutchesson, 8/01/1999 12:00:00 AM
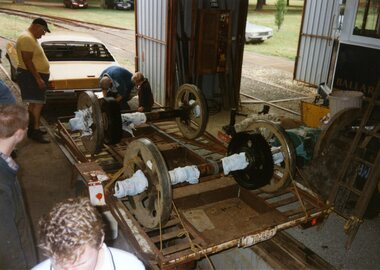
Colour photograph of BTM tram 28 wheels loaded onto a John Clowes supplied trailer for transport to AETM Adelaide on 8/1/1999 for reprofiling. In photo are John Clowes (standing by car), Stephen Butler, Simon Jenkins and Alastair Reither and two other people. Trailer positioned over pit in 5 road. Used in Feb. 1999 issue of Trolley Wire, page 41. Note spelling of John Clowes name in caption is "Clowes". Photo by Darren Hutchesson. Photo on AGFA Prestige paper.On rear of photo in blue ink "8/1/99 / Car 28, wheels/axles being loaded onto John Clowes' trailer for transport to out friends at AETM St Kilda - for reprofiling. / Photo: Darren Hutchesson"wheels, 28, aetm, btm, john clowes, tram 28 -
 Ballarat Tramway Museum
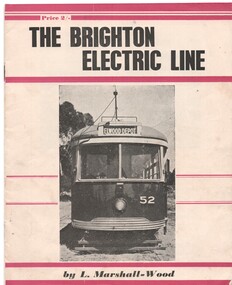
Book, Leon Marshall -Wood, "The Brighton Electric Line", 1956, 1958
.1 - Twenty page booklet on the history of the Brighton Electric Line by Leon Marshall-Wood, published 1956. Gives a brief history of the electric tramway operated by the Victorian Railways between St. Kilda Station and the Brighton Beach railway station, that commenced operation in 1905. The booklet was priced 2/-, published by the Traction Publications. Has 18 photographs, map 1905 and present day (when printed), rolling stock roster and notes and on the rear cover has details of the AETA. Front cover has horizontal crimson stripes. Has details of the AETA on the back cover and listing of some publications. Second copy from Ian Stanley added 24-1-2016. .2 - as for above - second edition, 1958, similar text, different photo layout and different front cover photo. See Reg Item 7631i for a scan of the 1966 edition.On front cover of first copy of .1 - top right hand corner; "N.Z.R.L.S / with compliments" and initials. Under title of book, "Price to Society 18/- Aust. per doz. / Retails 2/-" On page 3 of second copy of .1 - "Ian J Stanley 28 Park Road, South Camberwell, SE6, BK3746" On page 3 of .2 - "Ian J Stanley" in ink.trams, tramways, vr, melbourne, brighton, st kilda -
 Ballarat Tramway Museum
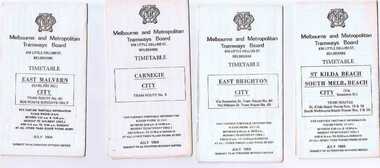
Ephemera - Timetable/s, Melbourne and Metropolitan Tramways Board (MMTB), Set of 24 MMTB Melbourne tram timetables, 1969
Set of 24 MMTB timetables for various routes, dated July 1969. Generally includes Sat and Suns, Good Friday and Christmas day as well as weekdays, unless noted otherwise. Also includes a map of the route, detailed time points, sections, connecting services, fares, and organisation address - 616 Little Collins St. Melbourne. Have been folded into ten portions. All on white paper unless noted otherwise. Items shown with an # - have a sticker modifying timetable information details on the front page. 1154.1 - Route 4 - Carnegie - City .2 - Route 4D - East Malvern (Darling Road) - City # .3 - Route 5 - Malvern Burk Road, - City # .4 - Route 6 - Glen Iris - City # .5 - Route 7 - Camberwell - City # .6 - Route 8 - Toorak - City # .7 - Routes 9, 10 and 12 - South Melbourne and St Kilda Beach - City (Brunswick St.) - via Collins St. .8 - Routes 10, 11 - West Preston and routes 9 & 9A Northcote .9 - Routes 15 & 22 - Moreland and 1 & 21 - East Coburg .10 - Route - 15 & 16 - St Kilda Beach and 1 & 2A - South Melbourne Beach - via Swanston St. .11 - Route 19 - North Coburg - City # .12 - Route 42 - Mont Albert - City # .13 - Routes 48 - North Balwyn and Burwood - City .14 - as above, but for Saturdays and Sundays on pink paper .15 - Routes 55 & 56, West Coburg - City - (William St.) - Domain Road. .16 - Route 57 - West Maribyrnong - City .17 - Route 59 - Essendon (Aerodrome) - City .18 - Route 64 & 65 - East Brighton - City .19 - Route 69 - Kew Cotham Road - St. Kilda Beach # .20 - Route 70 - Wattle Park - City # .21 - Routes 77 - Prahran - City, 78 - North Richmond - Prahran, 79 - North Richmond - St Kilda Beach .22 - Route 82 - Footscray to Moonee Ponds .23 - Route 88 - East Preston - City and Route 96, East Brunswick - City .24 - as above but for Saturdays and Sundays on pink paper. Images of a sample of documents added 16-11-2013.mmtb, timetables, melbourne -
 Ballarat Tramway Museum
Slide - 35mm slide/s - set of 14, Noel Simons, 23/11/1962 12:00:00 AM
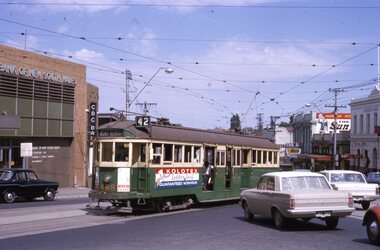
Set of 14 Kodachrome transparencies taken on 23/11/1962. 1162.1 - tram 38 turning into Lydiard St. North from Sturt St. with tram 20 in background. Many motor vehicles in photo. 1162.2 - as above, but a minute of so later. Has Mutual Life building in background as well as Town Hall. 1162.3 - No. 40 entering Albert St. from Skipton St. outbound to Sebastopol. 1162.4 - No. 40 near start of side of the road running in Albert St. heading to Sebastopol. 1162.5 - No. 40 at the City terminus, on the South side of Sturt St. Has Town Hall and other buildings along the south side of Sturt St. in the background. 1162.6 - No. 40 at Sebastopol terminus - shows arrangement of the signs at the terminus. 1162.7 - No. 40 and No. 38 crossing at loop between Sayle and Grey St. No. 40 inbound. 1162.8 - No. 40 turning from Drummond St. South to Sturt St. at Hospital Corner with Southern Cross Hotel in background. 1162.9 - No. 18 in Wendouree Parade near Forest St. heading east with destination of "Victoria St." 1162.10 - Nos 41 and 39 at Depot Junction. Both trams have SEC ads. 1162.11 - No. 39 turning into the depot from Wendouree Parade - showing destination of "Gardens via Drummond Nth" 1162.12- No. 17 at Lydiard St. North terminus, showing destination of "Grey St. Sebas". Has a Twin Lakes sign 1162.13 - ditto, but with trolley pole turned around. Has SEC Briquettes roof ad and Whitehorse whiskey ad on rear dash panel. 1162.14 - No. 40 outbound to Sebastopol crossing Albert St. 1162.1 -"Nos. 38 and 20 in Sturt St. Ballarat at corner of Lydiard St." 1162.2 - "No. 38 turns into Lydiard St. as No. 20 waits at stop in Sturt St. Ballarat" 1162.3 - "No. 40 entering Albert St. from Skipton St. Redan on Sebastopol route." 1162.4 - "No 40 at beginning of reserved track on Sebastopol route, Albert St. Redan." 1162.5 - "No. 40 in Sturt St. Ballarat near cnr. of Armstrong St." 1162.6 - "No. 40 at Sebastopol terminus" 1162.7 - "No. 38 and 40 crossing at Sayle St. Loop on Albert St. reserved track, Sebastopol route" 1162.8 - "No. 40 turning into Sturt St. from Drummond St." 1162.9 - "No. 18 in Wendouree Pde. Ballarat near tramway depot" 1162.10 - "No. 41 and 39 outside Ballarat tramway depot, Lake Wendouree in background" 1162.11 - "No. 39 entering tramway depot from Wendouree Parade, Ballarat" 1162.12 - "No 17 at Lydiard St. North terminus, Ballarat North" 1162.13 - "No 17 at Lydiard St. North terminus, Ballarat North" 1162.14 - "No. 40 crossing Albert St. Sebastopol as reserved track switches from left to right of road" All have date stamp of "23 Nov. 1962" in purple ink. All black ink unless otherwise noted.tramways, trams, ballarat, albert st., sturt st., sebastopol, grey st., hospital corner, wendouree parade, depot junction, lydiard st. north, tram 17, tram 18, tram 20, tram 38, tram 39, tram 40, tram 41 -
 Ballarat Tramway Museum
Slide - 35mm slide/s - set of 14, Noel Simons, 22/05/1971 12:00:00 AM
Set of 14 transparencies taken on 22/5/1971. 1170.1 - No. 31 outbound in Sturt St. West near Murray St. - has "To read pack Tilt Train" roof advert. 1170.2 - No. 31 ditto, near Russel St. loop. 1170.3 - No. 14 in Wendouree Parade at what is now BTM Depot Junction, near Toilet block. 1170.4 - No. 31 in Wendouree Parade at the North Gardens, approaching St. Aidans Drive 1170.5 - Scrubber car on "O " road with tennis court alongside. 1170.6 - Scrubber, 43 and 3 8 on 0 road at depot. 1170.7 - 3 8 and 43 on 0 road at depot 1170.8 - 38 on 0 road at depot, showing sharpness of 0 road curves. 1170.9 - 39 and 40 inside depot. 40 has "To read pack, tilt tram" roof advertisement. 1170. 10 - Tram 27 passes the depot gates, east bound with Lake Wendouree in the background. 1170.11 - SEC Depot, from Wendouree Parade, with No. 38 on "O" road. 1170.12 - trams 14 and 30 at depot loop, Wendouree Parade 1170.13 - ditto 1170.14 - "Cars take following line" sign on tram stop pole at Wendouree Parade Loop. All have date stamp of "28 Apr 1971" in purple ink on base. All blue ink unless otherwise noted. 1170.1 - "No. 31 in Sturt St. West between Murray and Wonliss Sts." 1170.2 - "No. 31 approaching Russell St. Loop in Sturt St. West Ballarat" 1170.3 - "No. 14 Gardens" 1170.4 - "No. 3 1 North Gardens 1170.5 - "Track cleaner car (formerly No. 23) at Wendouree Depot" 1170.6 - "Track cleaner, No. 43 and No. 38 at Wendouree Depot" 1170.7 - "No. 43 and No. 38 at Wendouree Depot" 1170.8 - "No. 38 gazes across Lake Wendouree from depot" 1170.9 - "Nos 3 9 and 40 in Wendouree Depot" 1170.10 - "No. 27 passing Wendouree Depot" 1170.11 - "Wendouree Depot with No. 38 on road No. "O" on left. 1170.12 - "Depot Loop" 1170.13 - "Depot Loop" 1170.14 - "Depot" tramways, trams, sturt st. west, wendouree parade, o road, depot, depot loop, signs, bliss bombs, tram 14, tram 27, tram 30, tram 31, tram 38, tram 39, tram 40, tram 43, tram scrubber -
 Ballarat Tramway Museum
Slide - 35mm slide/s - set of 6, Noel Simons, 27/02/1972 12:00:00 AM
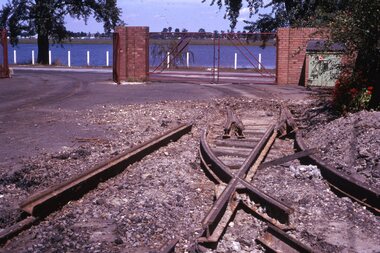
Has a strong association with the early days of the BTPS in preparing to move the tramcars from the depot and working at the former SEC depot itself. Yields information about the work done in the yard to recover materials.Set of 6 transparencies taken on 27/2/1972 on Kodak mounts. 1177.1 - photo of the dismantling of the points leading to "0" road at the SEC depot by the BTPS, looking south to Lake Wendouree. 1177.2 - view across depot front with No. 28 parked slightly outside and No. 40 inside door. Shows trackwork being dismantled and offices at front of depot. 1177.3 - view of No. 40 inside depot. 1177.4 - close up of the point blades leading to "0" road. 1177.5 - view of the front of the depot showing 40 and 28 parked outside, with dismantled point work in the foreground. 1177.6 - view of trackwork at part of Sturt and Drummond Sts. See also Reg Item 3533 for a similar series of photographs.Information written on in blue ink and date stamped on purple ink. 1177.1 - "Depot, Ballarat" 1177.2 - "Depot, Ballarat" 1177.3 - "Depot, Ballarat" 1177.4 - "Depot, Ballarat" 1177.5 - "Depot" 1177.6 - "Sturt and Drummond Sts"tramways, trams, wendouree parade, depot, sturt st, drummond st, pointwork, trackwork, o road, tram 28, tram 40 -
 Ballarat Tramway Museum
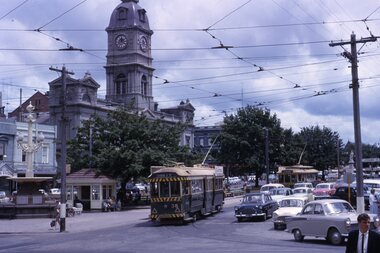
Slide - 35mm slide/s - set of 7, Noel Simons, 23/10/1965 12:00:00 AM
Set of 7 Kodachrome transparencies taken on 23/10/1965 in Melbourne. 1179.1 - W2 488 (route 42, Mont Albert) at the corner of High St. and Cotham Road Kew. Taken from Kew Post Office, has Bank of New South Wales in the background, CBC bank and the Greyhound Hotel. Tram has ads for Kolotex stockings and Ryco oil filters. 1179.2 - SW2 436, in bound (route 45, City) leaving Cotham Road, about to join High St, Kew. Buildings on the south side of Cotham Road in photo. Tram has an ad along with others for Vincent's powders. 1179.3 - W2 545 (route 48, North Balwyn) in High St. Kew. Has Commercial bank in background along with other shops. 1179.4 - W2 648 (route 42, Mont Albert) turning from High St. South into High St at Kew Junction, with Clifton Hotel in background. Tram has an ad for Kenric clothes. Note an MFBB street fire alarm by the tram stop. 1179.5 - W2 566 (inbound route 42, City) at same location as 1179.5. Tram has a Jex and a Remy Martin Brandy ads. on front dash panel. 1179.6 - W2 572 entering Victoria Parade from Brunswick St. Fitzroy. Tram has a Jex and a Remy Martin Brandy ads. on front dash panel. Eastern Hill Fire Station and ICI building in background. 1179.7 - W2 378 (inbound, route 45, City) and W2 572, inbound, in Victoria Parade between Brunswick St and Gismo St. East Melbourne. Otherwise as for 1179.6.All have date stamp of "23 Oct 1965" in purple ink. All black ink unless otherwise noted. 1179.1 - "W2 488 Entering Cotham Rd. from High St. Kew" 1179.2 - "SW2 436 in Cotham Rd., Kew, about to enter High St." 1179.3 - "W2 545 in High Street Kew, nearly opposite Cotham Road" 1179.4 - "W2 648 entering High Street from High Street South, Kew". 1179.5 - "W2 566 entering High St. South from High St. Kew" 1179.6 - "W2 572 entering Victoria Pde from Brunswick St. East Melbourne" 1179.7 - "W2 378 and 572 in Victoria Pde between Brunswick and Gisborne Sts. East Melbourne."tramways, trams, kew, high st kew, cotham road, victoria parade, melbourne, tram 545, tram 488, tram 436, tram 648, tram 566, tram 572, tram 378 -
 Ballarat Tramway Museum
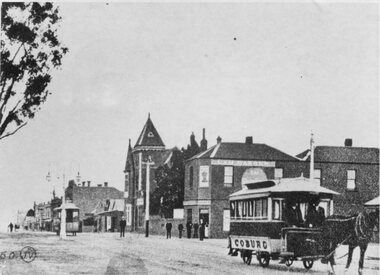
Photograph - Black & White Photograph/s
Black and white print of a horse drawn tram and a second in the background, in Sydney Road Coburg. Has a church and other shops in the background.trams, tramways, horse trams, coburg, melbourne -
 Ballarat Tramway Museum
Slide - 35mm slide/s - set of 17, Noel Simons, 20/11/1962 12:00:00 AM
Set of 17 transparencies taken on 20/11/1962 on Kodak mounts. 1187.1 - Bendigo No. 2 at the Quarry Hill terminus, showing destination of Quarry Hill. Has Cohns Drinks and Streets Ice Cream ads on dash panel, a SEC 'electric cooking' roof ad and another roof ad. Shows the Y terminus at this location, but tram standing just before it. Overhead in position. 1187.2 - as above, but closer up. 1187.3 - as above, but from the north side, showing cemetery in the background. 1187.4 - Bendigo No.3 at Eaglehawk terminus. Tram showing destination of Quarry Hill. Has the various buildings at Eaglehawk in the background including the Foodland store. Has Streets Ice cream and White Horse Whiskey ads on the dash panel. 1187.5 - Bendigo No. 18 at Garden Gully crossing loop, in bound, with destination of Eaglehawk. Passengers waiting for an Eaglehawk tram at the stop. Has a white horse whiskey ad on dash panel and SEC roof ads. Conductor standing in doorway looking out. 1187.6 - Bendigo No. 7 inbound in Nolan St. at cnr of McCrae St. showing destination of Golden Square. Has Streets Ice cream ad on dash panel and a Castrol Roof ad. 1187.7 - Bendigo No. 19 at the North Bendigo terminus with railway level crossing in background. Tram has a Cohns Drinks ad and an SEC 'Electric Cooking' roof ad. 1187.8 - Bendigo No. 2 at the Quarry Hill terminus, looking back into Bendigo, showing destination of Eaglehawk. 1187.9 - Bendigo No. 21 in McCrae St, near Nolan St outbound for North Bendigo. Photo taken after tram has passed photographer. 1187.10 - Bendigo Nos. 4 and 26 at Charing Cross in View St. with fountain alongside and the Beehive, Ezywalkin Buildings in the background. No. 26 has a Sandhurst Milk and SEC 'Electric Cooking' roof ad. 1187.11 - close up of 22E maximum traction truck and folded footstep. 1187.12 - Bendigo No. 19 at Charing Cross terminus, after tram has passed photographer, showing destination of North Bendigo, with the Beehive building in the background and passengers boarding tram. 1187.13 - Bendigo No. 11, turning from View St. into Pall Mall, showing Special with the conductor holding point bar. Has the Beehive and Ezywalkin Buildings in the background. 1187.14 - No. 7 at Charing Cross terminus, in Pall Mall, bound for Golden Square. Has the Beehive and Ezywalkin buildings in the background and passengers waiting at the tram stop. 1187.15 - No. 18 at the Charing Cross terminus, bound for Eaglehawk. Has the Beehive and Ezywalkin buildings in the background and passengers waiting at the tram stop. Also has the 'Safety Zone' sign in the photograph. 1187.16 - No. 2 at Quarry Hill terminus, night or dusk photo. Tram showing destination of Depot. 1187.17 - No. 26 at Charing Cross, night photo. Tram has destination of Quarry Hill, but is on the line for Eaglehawk. Photo looks along Mitchell St. Also shows Safety Zone sign. Information written on in black ink and date stamped on purple ink. 1187.1 - "No. 2 at Quarry Hill terminus Bendigo" 1187.2 - "No. 2 at Quarry Hill terminus Bendigo" 1187.3 - "No. 2 at Quarry Hill terminus Bendigo" 1187.4 - "No. 3 at Eaglehawk terminus" 1187.5 - "No. 18 in Mt Korong Road, Long Gully at cnr of Havilah Road (Eaglehawk Route)" 1187.6 - "No. 7 in Nolan St. Bendigo, at Cnr of McCrae St., near lake Weeroona, (North Bendigo Route)' 1187.7 - "No. 19 at North Bendigo terminus" 1187.8 - "No. 2 at Quarry Hill terminus" 1187.9 - "No. 21 in McCrae St. Bendigo, near Nolan St. (North Bendigo Route) 1187.10 - "4 and 26 at Alexandra Fountain, Charing Cross Bendigo" 1187.11 - "Truck of Bogie Car, Bendigo Tramways" 1187.12 - "No. 19 in Pall Mall at Charing Cross, Bendigo" 1187.13 - "Birney car No. 11 entering Pall Mall from View St. at Charing Cross Bendigo" 1187.14 - "No. 7 in Pall Mall at Charing Cross, Bendigo" 1187.15 - "No. 18 at Alexandra Fountain, Charing Cross, Bendigo" 1187.16 - "No. 2 at Quarry Hill terminus, Bendigo" 1187.17 - "No. 26 at Alexandra Fountain, Charing Cross, Bendigo" tramways, trams, bendigo, quarry hill, eaglehawk, north bendigo, maximum traction, night photo, tram 2, tram 3, tram 4, tram 7, tram 11, tram 18, tram 19, tram 21, tram 26 -
 Ballarat Tramway Museum
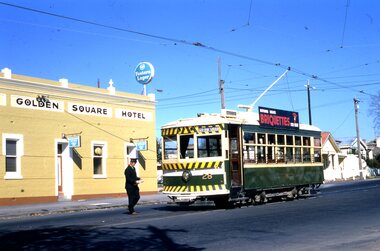
Slide - 35mm slide/s - set of 2, Noel Simons, 21/05/1971 12:00:00 AM
Set of 2 transparencies taken on 21/5/1971 on Kodak mounts. 1198.1 - Bendigo No. 28 at the Golden Square terminus with the Golden Square Hotel in the background. Driver walking across road to join tram. Tram has a SEC briquettes roof ad. 1198.2 - as for 1198.1 - but further back showing nature of the terminus and the Calder Highway or High St. behind the tram. Information written on in black ink and date stamped on purple ink. 1198.1 - "Birney car No. 28 at Golden Square terminus". 1198.2 - "Birney car No. 28 at Golden Square terminus" tramways, trams, bendigo, golden square, high st., tram 28 -
 Ballarat Tramway Museum
Slide - 35mm slide/s - set of 6, Noel Simons, 28 Feb. 1972
Set of 6 transparencies taken on 28/2/1972 on Kodak mounts. 1206.1 - Bendigo No. 5 at Hayes St. Loop, en route for Quarry Hill. 1206.2 - No. 5 at Garden Gully Loop, Mt. Korong road, Ironbark. en route to Quarry Hill. Note the water column in the background. 1206.3 - No. 5 in View St. Bendigo, with the Commodore Motel in the background. 1206.4 - No. 6 en route for Golden Square in Fire Station loop, with the fire station building in the background. Photo taken after tram has passed photographer. 1206.5 - No. 6 in High St., running through Golden Square Shopping Centre, en route for Golden Square. Photo taken after tram has passed photographer. 1206.6 - No. 6 arriving at Charing Cross, bound for North Bendigo, with the City Family Hotel, ANZ bank and the Cenotaph (war memorial) in the background.Information written on in blue ink and date stamped on purple ink. 1206.1 - "No. 5 at Hayes Loop, Ironbark." 1206.2 - "No. 5 at Garden Gully Loop, Mt. Korong road, Ironbark." 1206.3 - "No. 5 in View St. just after start of double track near Barnard St." 1206.4 - "No. 6 in High St. at Fire Station loop." 1206.5 - "No. 6 in High St. running through Golden Square shopping centre." 1206.6 - "No. 6 arriving at Charing Cross from Golden Square."tramways, trams, bendigo, hayes st. loop, garden gully loop, view st., golden square, charing cross, tram 5, tram 6 -
 Ballarat Tramway Museum
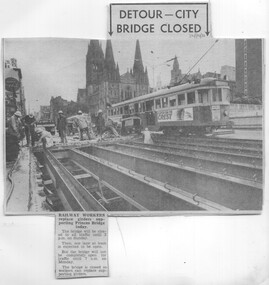
Newspaper, Herald & Weekly Times Ltd, "Detour - City Bridge Closed", 24/10/1970 12:00:00 AM
Newspaper Clipping from The Sun newspaper 24/10/1970 about the replacement of bridge girders in Swanston St. over the Railway lines with W2 381 in the background. Gives details of road closure. Good photo of the type of structure."24/10/70" in blue ink in top left hand corner.trams, tramways, swanston st., mmtb, bridges -
 Ballarat Tramway Museum
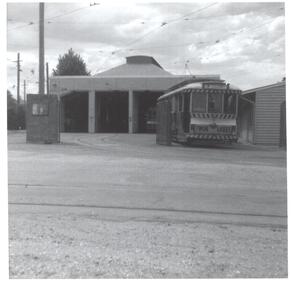
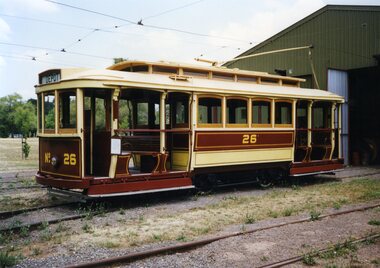
Photograph - Colour Photograph/s, Warren Doubleday, 1993
Photograph of Ballarat Tram No. 26, converted to the ESCo colour scheme standing on No. 5 road at the BTM depot c1993. Has destination of "Depot".btm, esco, depot, tram 26 -
 Ballarat Tramway Museum
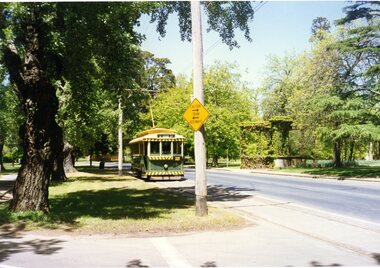
Photograph - Colour Photograph/s, Earl Ewers, 1994
Colour photograph of BTM No. 18 north bound in Wendouree Parade, about to cross Windmill Drive North. Tram showing destination of "St. Aidans Drive". The "Caution Tram Bothways" sign on the pole adjacent to Windmill Drive had recently been positioned, following donation of the signs from St. Georges Road by the City of Northcote. Taken c1994 Has the MacDonald Gates in the view."E E" on back.windmill drive, wendouree parade, road signs, tram 18 -
 Ballarat Tramway Museum
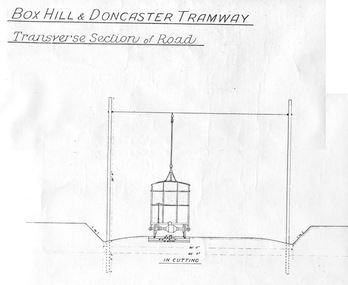
Document - Photocopy, "Box Hill - Doncaster Tramway, Transverse Section of Road", c1990?
Photocopy of a drawing showing the proposed transverse sections of the Box Hill to Doncaster Tramway. Drawing prepared at a scale of 4 feet to the inch. Shows the dimensioned sections with the tramcar, poles, sleepers and metal ballast in cutting and in bank (fill). Photocopy larger than original drawing. Has part of a stamp in the lower right hand corner.trams, tramways, box hill, doncaster, plans, sections