Showing 162 items
matching colonial bendigo
-
 Bendigo Historical Society Inc.
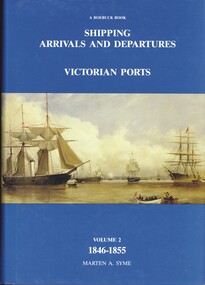
Book - SHIPPING ARRIVALS AND DEPARTURES VICTORIAN PORTS VOLUME 2 1846-1855, 1987
Compiled from newspaper reports, customs and other Government records and records of other Colonial ports, the list documents the arrival of vessels containing assisted and unassisted immigrants before and during the gold rush, the intra-colonial trading voyages, the growth in overseas trade from Melbourne and Geelong in wool, tallow skins and gold dust and the surge of activity flowing from the discovery of gold in Victoria in 1852.Marten A Symevictoria, history, shipping, shipping, transport, port phillip history, family history. -
 Bendigo Historical Society Inc.
Book - CITY OF BENDIGO HISTORICAL WALK BOOK, 2001
Photocopy mock up of original booklet of The Bendigo Historical Society Inc. 'City of Bendigo Historical Walk' containing photographs of historic buildings to be seen on the walk. Front cover Queen Victorian Gardens, Town hall, Mechanics Institute/School Of Mines and Industry, H. M. Prison Bendigo, Camp Hill Police Barracks, Sandhurst Corporate High School, Central State School No. 1976, The Cascades, District Lands Office (Dudley House), Masonic Temple and Hall, Sandhurst Volunteer Rifle Brigade Orderly Room, Bank of Victoria, Henry Jackson's Store View Point,Alexandra Fountain, Beehive Store/Mining Exchange, Colonial Bank. Hustlers Royal Reserve NO. 2/R.S.L. Memorial Hall, Post Office 3rd 4th and final, Bendigo Law Courts, Shamrock Hotel 2nd and another view. Important Bendigo Dates; 1851, April gold discovered at Golden Square by Margaret Kennedy,1851 Approx. 200,000Troy oz. of gold found in Bendigo, 1852 475,857 Troy oz. Gold for the year, 1853 November 31st Bendigo Hospital admits first patient,1853 December 9th Bendigo Advertiser first issue printed, 1854 First Land Sales and streets are surveyed and named for the first time, 1854 Census of Bendigo showed 15,480 residents plus 4,000 Chinese, 1855 Sandhurst Municipal District formed, 1861 Sandhurst Proclaimed a Town. 1862 Railway to Melbourne opened, 1867 Visit by His Royal Highness the Duke of Edinburgh, 1871 July 21st Sandhurst proclaimed a City, 1881 Population of Sandhurst 14,577 residents, 1882 First telephone communications introduced, 1890 Electric trams (battery) commenced running, 1891 May 18th City of Sandhurst changes its name to City of Bendigo.book, bendigo, buildings, historic -
 Bendigo Historical Society Inc.
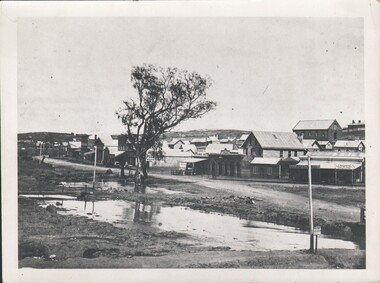
Photograph - HARRY BIGGS COLLECTION: HIGH ST. BENDIGO, 1857
Harry Biggs Collection. Black & white photo of High St. Bendigo. Shop signs visible - T. Baldwin Hair Cutting, shaving shampooing; Burston's Colonial Boot Store, Royal Hotel, Britannia House. A sign post: 'Eadie & McIntyre Gold Office'. In foreground Bendigo Creek with a footbridge to the left. Two gnarled trees in centre of photo. Photo taken near View Point. Image taken in 1850's.place, building, commercial, harry biggs collection, high st. bendigo -
 Bendigo Historical Society Inc.
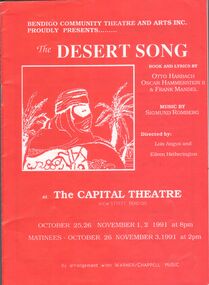
Programme - Programme ""The Desert Song" by Bendigo Community Theatre and Arts Inc
"The Desert Song" is an operetta in two acts with book and lyrics by Otto Harbach, Oscar Hammerstwin II and Frank Mandel and music by Sigmund Romberg inspired by the 1925 upprising of a group of Berber fighters against French colonial rule in Morocco. Music Programme for The Desert Song" a musical performed by Bendigo Community Theatre and Arts Inc. October 25, 26, November 1, 2 and matinees October 26, November 3, 1991 at the Capital Theatre, View Street- a 20 page booklet with acknowledgements, advertisements, details of Acts, cast,and story synopsis. programme, concert -
 Bendigo Historical Society Inc.
Document - KELLY AND ALLSOP COLLECTION: THE COLONIAL BANK OF AUSTRALASIA LTD, CHEQUES, 01/09/1901 to 01/03/1905
Document. KELLY & ALLSOP COLLECTION. Ten off cheques drawn on The Colonial Bank of Australasia Ltd, Bendigo Branch. All payable to M. P. Kelly of various amounts and signed by Alfred Bailes. Cheque numbers on the back. [a] No.3 dated 1 Sept 1901 for 20 Pounds. [b] No.14 dated 1May 1904 for 10 Pounds. [c] No.18 dated 1 Aug 1904 for Six Pounds nine shillings and twopence. The rest of them are for the same amount. [d] No.19 dated 1 Sept 1904. [e] No.20 dated 1 Oct 1904. [f] No.21 dated 1 Oct 1904. [g] No.22 dated 1 Dec 1904. [h] No. 23 dated 1 Jan 1905. [i] No.24 dated 1 Feb 1905. [j] No.25 dated 1 March 1905.Alfred Bailesbusiness, stockbroker, kelly & allsop, kelly & allsop collection, the colonial bank of australasia, m.p.kelly, alfred bailes, cheques -
 Bendigo Historical Society Inc.
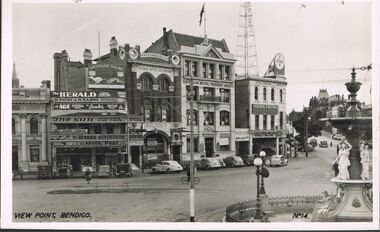
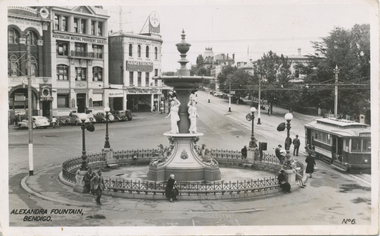
Photograph - VIEW POINT BENDIGO
Photograph - black and white. Photo of View Point Bendigo. Fountain right hand side of photo. A large clock on top of Armstrong Tyre Service. Also Australian Mutual Provident Society, Colonial Mutual Life Building and other buildings. No.14 on right hand bottom of photo. Newsagent advertising The Herald, Age, The Sun, Argus.place, bendigo, view point, sandhurst, view point bendigo. -
 Bendigo Historical Society Inc.
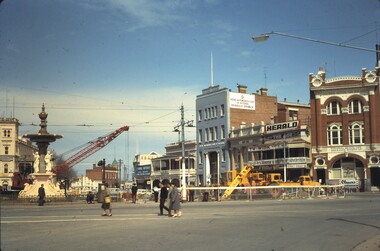
Slide - BENDIGO BUILDINGS, Oct 1964
Slide. Bendigo Buildings. A red crane doing construction work at Charing Cross, between the fountain and cenotaph, with the City Family Hotel on the left, the View Point Hotel, RACV Building, Colonial Mutual Life Building on right.slide, bendigo, bendigo buildings., bendigo buildings. -
 Bendigo Historical Society Inc.
Book - BUSH COLLECTION : LEDGER BOOK 1888 TO 1920
a. Book with a mottled blue-grey cover with brown leather spine and extends 5.5 cm to front and back. Corner edges also had the leather, two are missing and the other two are dilapidated. A red stuck on tape near the top of the spine had Ledger printed with some gold edging, most of which is worn off. Inside the front and back covers is a red, blue and white marble pattern. Front and back covers have been reinforced with white tape. 542 page Ledger Book for a general produce merchant. Probably Albert Bush. Alphabetical index at front. Entries in black ink on all pages and date from 1888 to 1920. Loose 4 page foolscap inside front cover listing Rolling Stock and Value. b. A pocket in the back of the book contains 6 pieces of paper relating to business and finance. Items include Discounts and Commission from 1888 to 1899, a note on insurance, a note dated June 2/90 headed Mr A Bush Sandhurst Dr to S A Bush & Co listing monthly amounts of money from Jan 1890 and 1889. Some amounts are with the name G P Reddie.Another one is a Building A/C dated 1889. Another is a balance sheet written on a page with another one written on the back and dated 1893. One written on paper headed Bush's Stores, Main Street, Bairnsdale and printed S.A.Bush & Co. It looks like a list of repayments listed in 8 bills. The other side of the page refers to Bill of Sales for Yeates & Baker and Bill of Sales held by the Bank of New South Wales. There is also a copy of two letters addressed to A Bush, one dated Oct 17.06 from H Hopkins referring to the late Mr Baker's property in Sale. The other is addressed to A Bush Esq and signed Harry Hopkins and also signed by Albert Bush and dated Nov 28 1906 in reference to the sale of a property.business, retail, bushs, bush collection - ledger book 1888 to 1920, abbott & co, allcock ?, australian producers & traders ltd, bush s a, bush albert, broome sp, brealey w h, blogg bros, b'daledistrict farmers co-op coy ltd, bush and hopkins, berry henry, brockhoff & co, bush mrs albert, colonial bank, corden i s & co, crosby h m, cannon j e, dudgeon and arnell, drevermann & coy, fry bros, felton grimwade & coy, fyansford maunfacturing coy, gearing jas, hawthorn rhodes & coy, henebery john, harper r & co, holford's contract, jack a & co, kellie wm, kitchen & co, kronheimer & co, miller d, lewis & whitty, levy bros and coy, melbourne chilled butter coy, mooney i, mitchell & coy, mann mrs, mceacharn & son, macrobertson, mckenzie i & co, parsons bros & coy ltd, peterson & coy, phoenix biscuit coy, reddie g p estate, ross bros, gippsland news, rosella preserving coy, rolfe and coy, robur tea coy, ross, ryan w, russo and santamria, sniders i ? b, swallow and ariell ltd, sutherland john, service & co jas, smallman mrs, thomas w c, sandhurst & n d trustees coy, voght george, victoria soap & candle coy, vogt k, vickers and gardner's contract, west z, west h m, water and kerang roller mill coy, yeates and watson, yeates and baker, yates and c ? arthur, yeates jas -
 Bendigo Historical Society Inc.
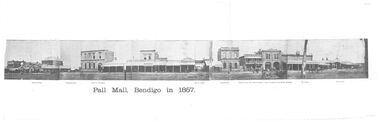
Photograph - BLACK AND WHITE PANORAMIC PHOTOGRAPH OF PALL MALL BENDIGO IN 1857
Black and white fold - out Panoramic Composite photograph of Pall mall Bendigo in 1857 on cream, aged paper showing the Shamrock hotel, Williamson St, Bank of Australasia, site of Arcade, Colonial Bank, Victoria Hotel (now National bank), Hall of Commerce (now Mining Exchange), the Beehive - Francis Brothers Beehive Stores, Pikes Corner, B Morey Saddler, Blythe & Inglis Family Grocer Provisions dealer, Horse Bazaar Cattle sale Yard, Jones & Shiress Chemists, horses and carts- enclosed in envelope addressed to 'Mrs Reube P Lumbe C/- Bethlehem Home for Aged Taylor St Specimen Hillbendigo, streetscape, pall mall, pall mall bendigo in 1857 / shamrock hotel / , colonial bank / victoria hotel /, hall of commerce / mining exchange / the beehive - francis brothers beehive stores/ pikes corner / b morey saddler / , blythe & inglis family grocer provisions dealer / jones & shiress chemists /, horse bazaar cattle sale yard -
 Puffing Billy Railway
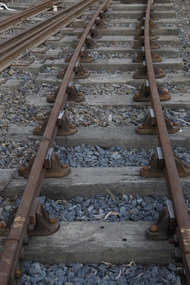
Double Headed Rail, circa 1872 - 1883
Double Headed Rail from Ravenswood Station Siding which was dismantled circa 1987 the two rails were stored for a time at Maldon before being donated to Puffing Billy Museum Bearing makers marks of Wilson & Cammell - Dronfield- Steel works Wilson & Cammell made Steel rails at their Dronfield Steel Works, in Dronfield, North East Derbyshire, England from 1872 - 1883 Double-headed rail In late 1830s Britain, railway lines had a vast range of different patterns. One of the earliest lines to use double-headed rail was the London and Birmingham Railway, which had offered a prize for the best design. This rail was supported by chairs and the head and foot of the rail had the same profile. The supposed advantage was that, when the head became worn, the rail could be turned over and re-used. In practice, this form of recycling was not very successful as the chair caused dents in the lower surface, and double-headed rail evolved into bullhead rail in which the head was more substantial than the foot. Info from Wikipedia - Rail Profile https://en.wikipedia.org/wiki/Rail_profile The first records of double headed rail being used In Victoria by Victorian Railways was in 1859, the rails, chairs, oak and trenails were imported from UK. After the 1870’s the Victorian Railways went over to using flat bottom rails, but they still needed replacement double headed rail for lines already laid and this continued up to at least 1883 Wilson & Cammell - Dronfield- Steel works Wilson & Cammell made Steel rails at their Dronfield Steel Works, in Dronfield England from 1872 - 1883 Mount Alexander & Murray River Railway The Melbourne, Mount Alexander & Murray River Railway Company received parliamentary assent in February 1853 to build Victoria's first inland railway from Melbourne to Williamstown, and Melbourne to Bendigo and Echuca. Construction commenced in January 1854 with work on a pier at Williamstown but lack of funds slowed progress, eventually prompting the company to sell out to the government. The 100-mile (162 km) section to Bendigo opened in October 1862. Its cost of £35,000 per mile made it the most expensive railway ever built in Australia. In 1864, the line was extended to Echuca, tapping into the booming Murray-Darling paddlesteamer trade. info from Museums Victoria - Victorian Railways https://museumsvictoria.com.au/railways/theme.aspx?lvl=3&IRN=450&gall=456 1863 Ravenswood Station open on the 1st Feb 1863 Victorian Railways - purchased and imported the Rail and Chairs from Raleigh, Dalgleish, White and Co. London Importation of railway plant : abstract of a return to an order of the Legislative Assembly dated 27th June 1860 for - Copies of the advertisements calling for tenders, the names of the tenderers and the accounts and correspondence with Mr Brunel relating thereto GP V 1859/60 no. C 15 http://www.parliament.vic.gov.au/papers/govpub/VPARL1859-60NoC15.pdf Report from the Select Committee upon the Importation of Railway Plant : together with proceedings of the Committee, minutes of evidence and appendix GP V 1859/60 no. D 38 (2.9 MB) http://www.parliament.vic.gov.au/papers/govpub/VPARL1859-60NoD38.pdf Ravenswood Siding When the Victorian Railways were established in 1856 they adopted one of the popular British permanent way standards - heavy 80lb (36.3kg) double-headed rail held up right in cast iron chairs attached to transverse timber sleepers by wooden pegs called trenails. The Ravenswood Railway siding was constructed in 1862 with 12 feet wrought iron double-head rail held in cast iron chairs with Ransom and May patent compressed keys. Trenails held the chairs to the sleepers and the joints were secured in joint chairs. Joints were subsequently joined using fish plates. It formed part of the Melbourne to Echuca rail line, initially known as the Melbourne, Mt Alexander and Murray River Railway. George Christian Derbyshire, the first Engineer-in-Chair of the Victorian Railways was responsible for the design and construction of the works. No new lines were built in Victoria using double-headed rail after 1870. The siding was disconnected from the main line in 1988. The Ravenswood Railway Siding demonstrates the original 1856 philosophy of the Victorian Railways to adopt British permanent way technology. The siding demonstrates significant aspects in the development of permanent way technology in England and Victoria over the period from the 1830's to the 1880's. The chairs in the Ravenswood siding are physical evidence of early railway technology rendered obsolete 120 years ago, namely joint chairs at rail joints and trenails to secure the chairs to the sleepers. The double-headed rail demonstrates an important stage in the evolution of British rail technology in the 1830s. The old fish plates, square headed bolts and square nuts demonstrate the success of fishing the rail joins. The Ravenswood siding demonstrates the earliest form of rail joint technology developed in England, and existing in Australia, the joint chair. In part of the siding the sequence of joint and intermediate chairs is consistent with the 1856 specifications, that sequence is rare with the joints secured in joint chairs. The survival of chairs in this sequence is rare and almost certainly demonstrates that they remained in continuous use at the same location from 1862 to 1988. This remnant of the Ravenswood siding has survived 126 years. The siding has proved to be the most significant of extant remnant double-headed sidings in Victoria, containing a rare combination of early permanent way technologies. Construction dates 1862, Info from Ravenswood Railway Siding Victorian Heritage Database Report http://vhd.heritagecouncil.vic.gov.au/places/4693/download-report The remaining section of this siding is significant at the State and National levels in that it demonstrates the use of chaired rail by the Victorian Railways Department for the Trunk Lines and, more particularly, the following stages in the evolution of this long obsolete method of permanent way construction: a) The use of joint chairs and intermediate chairs at regular intervals inferring that the original wrought iron rail lengths were 12 feet, as is known through documentary sources to have been the case. The survival of chairs in this sequence is unique and almost certainly demonstrates that they have remained in continuous use at the same location and in the same sequence from 1862 to 1988 . b) The use of joint chairs and intermediate chairs designed for use with trenails. c) The use of later intermediate chairs designed for use with steel pins and the use of fished joints with steel double head chaired rail, representing a second method of constructing the permanent way using chaired rail technology. info from Ravenswood Siding - Melbourne/Echuca Railway Line - Victorian Heritage Database Report http://vhd.heritagecouncil.vic.gov.au/places/70103/download-report Addition to Citation for Melbourne to EchucaRailway Line 1/10/1990 Double Head Rail The surviving lengths of double head rail with chairs on this railway compare with one surviving similar remnant on the Geelong to Ballarat railway and are representative of permanent way construction techniques applied exclusively to the two trunk railways of the 1860's. In this respect they are rare survivors and may be unique at the national level and of technical importance at the international level to the extent that they enhance contemporary understanding of early railway building technology. Surviving lengths of chaired double head rail survive at Kyneton, Ravenswood and Bendigo on this railway and include a number of different types of cast iron intermediate and joint chairs with hardwood keys and metal pins. The Ravenswood siding is of special significance for the diversity of chair types and for the sequence of chairs recalling rail lengths known to be associated with construction of the line in 1862. Construction of the Railway Tenders closed on 24 March 1858 with no less than 133 tenders being received. A contract was let to Cornish and Bruce for £3,356,937 to commence work on 1 June 1858 and complete the line by 31 July 1861. Cornish and Bruce made quick early progress with the Melbourne to Sunbury section being officially opened on 13 January 1859. The line was officially opened to Bendigo (Sandhurst) on 20 October 1862 by the Governor of Victoria, Sir Henry Barkly. A great banquet was held for 800 guests and this was followed by a grand ball. The extension of the line to Echuca was a relatively simple matter as that part of the line was across plain country without any significant engineering challenges. Tenders were called for the work in 1863 and the work was completed in 1864 by contractors Collier and Barry Apart from the line contractors, other firms directly involved were J Shire law and Co (sleepers), R Fulton, Langlands Brothers and Co, William Crossley (water supply), B Moreland, Langlands Brothers and Co (platelayers lorries), E Chambers (iron pins, traversers), Miller and McQuinstan (luggage vans and steam engines) and various contractors for building works. Info from Engineers Australia Engineering Heritage Victoria Nomination for Recognition under the Engineering Heritage Australia Heritage Recognition Program for the Goldfields Railways - Melbourne , Bendigo & Echuca Railway Page 25 - .2.9.2 Statement from National Trust of Australia (Victoria) Listing number B5323 for Mt Alexander/Murray Valley Rail Line: Page 69 - Theme 3 https://www.engineersaustralia.org.au/portal/system/files/engineering-heritage-australia/nomination-title/Melbourne_%20Bendigo_Echuca%20Railway%20Nomination.pdf The Melbourne, Mount Alexander and Murray River Railway Company was a railway company in Victoria, Australia. It was established on 8 February 1853 to build a railway from Melbourne to Echuca on the Victorian-NSW border and a branch railway to Williamstown. The company struggled to make any progress and on 23 May 1856, the colonial Government took over the Company and it became part of the newly established Department of Railways, part of the Board of Land and Works. The Department of Railways became Victorian Railways in 1859. Construction of the Bendigo line commenced in 1858, but this private consortium also met with financial difficulties when it was unable to raise sufficient funds, and was bought out by the Victorian colonial government. The design work was then taken over by Captain Andrew Clarke, R. E., Surveyor-General of Victoria, with bridge designs completed by Bryson and O'Hara The contract for the first stage of the line from Footscray to Sandhurst (now Bendigo), was let to Cornish and Bruce for £3,356,937.2s.2d ($6.714 million) with work commencing on 1 June 1858. Completion of the permanent way was to be by 31 July 1861 https://en.wikipedia.org/wiki/Melbourne,_Mount_Alexander_and_Murray_River_Railway_Company Victorian Railways - purchased and imported the Rail and Chairs from Raleigh, Dalgleish, White and Co. London Importation of railway plant : abstract of a return to an order of the Legislative Assembly dated 27th June 1860 for - Copies of the advertisements calling for tenders, the names of the tenderers and the accounts and correspondence with Mr Brunel relating thereto GP V 1859/60 no. C 15 http://www.parliament.vic.gov.au/papers/govpub/VPARL1859-60NoC15.pdf Report from the Select Committee upon the Importation of Railway Plant : together with proceedings of the Committee, minutes of evidence and appendix GP V 1859/60 no. D 38 (2.9 MB) http://www.parliament.vic.gov.au/papers/govpub/VPARL1859-60NoD38.pdf Victorian Railways : report of the Board of Land and Works November 1862 GP V 1862/63 no. 21 (2.8 MB) https://www.parliament.vic.gov.au/papers/govpub/VPARL1862-63No21.pdfHistoric - Victorian Railways - Double Headed rail Ravenswood Railway Station and Siding Victorian Heritage Database Reports Victorian Heritage Register VHR H1100 Victorian Heritage Register VHR H1786 National Trust VHR H1100 Mount Alexander and Murray River Rail way Line National Trust2 rail lengths of Double Headed Rail made of Iron makers marks : Wilson & Cammell - Dronfield - Steel and 20 joint chairs with metal rail pins Makers mark Wilson & Cammell - Dronfield - Steel (possible date 187? very hard to read ) puffing billy, double headed rail, wilson & cammell - dronfield - steel works, ravenswood station siding, melbourne to echuca rail line, initially known as the melbourne, mt alexander and murray river railway. -
 Whitehorse Historical Society Inc.
Article, Amsterdam Exhibition, 1883
An A4 photocopy of awards made at the 1853 Amsterdam Exhibitionnon-fictionAn A4 photocopy of awards made at the 1853 Amsterdam Exhibitionschwerkolt august, smith l l dr, exhibits, awards -
 Ballarat Tramway Museum
Slide - 35mm slide/s - set of 32, Noel Simons, 25/02/1971 12:00:00 AM
Set of 31 transparencies taken on 25/2/1972 on Kodak mounts. 1201.1 - Bendigo No. 26 in Bond St. just after leaving Long Gully en route for Quarry Hill. Has Norris Supermarket in background. Has two SEC roof ads. 1201.2 - No. 26 climbing View St. from Charing Cross en route to Eaglehawk. Has ANZ bank and AMOCO service station in background. 1201.3 - as for 1201.3, but after tram has passed photographer. Has buildings west of Mackenzie St. in photograph. 1201.4 - Tram stop and centre of the road pole with two "CARS STOP BY REQUEST" signs mounted on pole at the corner of Mackenzie St. 1201.5 - same position as for 1201.3, but with No. 5 descending the street. 1201.6 - same position as for 1201.2, but with No. 5 descending the street. Photo taken after tram has passed photographer. 1201.7 - No. 7 in Nolan St. from across the park at Lake Weeroona. 1201.8 - No. 7 entering McCrae St from Nolan St. - distant view. Note "TRAM "sign on left hand side under tree and overhead in McCrae St. from former track that once was in this street. 1201.9 - No. 7 in High St. with Cathedral in background. Tram en route to North Bendigo. Note scaffolding around Cathedral main spire area. 1201.10 - No. 7 crossing Bendigo Creek bridge in High St. near Golden Square. Has a Caltex Service station in the background. 1201.11 - No. 7 at Golden Square terminus with Sunburst Fruit Juices and a Peters Ice cream delivery vans alongside. 1201.12 - as for 1201.11 but photo taken from behind tram, with the end of the rails in the photograph. 1201.13 - No. 7 and 21 in Pall Mall at Charing Cross with No. 5 in the background. Taken some distance away from the location. 1201.14 - No. 7 at Golden Square terminus, taken a short distance from the tram terminus. Shows Milk Bar on right hand side and the hotel on the left hand side. Taken from the south side of the roadway. 1201.15 - as from 1201.14 but taken from the north side of the roadway. 1201.16 - No 5 waiting at California Gully loop. Distant photo showing surrounds 1201.17 - No. 5 en route for Quarry Hill crossing No. 26 at California Gully. 1201.18 - No. 26 at Eaglehawk terminus with Eaglehawk Town Hall and Post Office in background. 1201.19 - No. 21 arriving at Charing Cross en route to North Bendigo. Has Alexandra Fountain in the background, ANZ bank RACV building, and other buildings on the north side of Pall Mall or Nolan St. 1201.20 - No. 26 en route for Quarry Hill at Charing Cross, with crew standing by front door. Has Colonial Mutual life building, Armstrong Tyre Service (Firestone) and a sign for Cohns Drinks in the background. 1201.21 - as for 1201.20 but with No. 5 en route to Eaglehawk now in photograph. 1201.22 - No. 26 at Quarry Hill terminus. 1201.23 - No. 26 at Quarry Hill terminus, view of front portion of tram only from a gate at the Bendigo cemetery. 1201.24 - Track at the end of the Quarry Hill line showing the point blades of the former "Y" terminus and the overhead for this. 1201.25 - No. 2 at the Quarry Hill terminus, looking along the former Trackwork. 1201.26 - as for 1201.25 1201.27 - number not used. 1201.28 - Golden Square terminus from some distance from the actual terminus, showing the Warning sign "TRAM" for motorists from the south. No. 7 at the terminus. 1201.29 - No. 7 passing through the Golden Square shopping centre. Numerous cars and pedestrians. Tram en route for North Bendigo. 1201.30 - No. 7 in High St. Golden Square, en route for North Bendigo. Photo taken after tram has passed photographer. 1201.31 - No. 7 in High St. just past Wattle St. with the Cathedral in the background. Tram has two SEC roof ads good side on photo, 'Everything's fine in my all electric kitchen' and 'Electrical cooking - clean, quick, economical'. 1201.32 - No. 7 in High St. nearing Wattle St. Has Cathedral in the background. Photo taken after tram has passed photographer.Information written on in black ink and date stamped on purple ink. 1201.1 - "No. 26 in Bond St just after leaving Long Gully" 1201.2 - "No. 26 climbing View St. from Charing Cross" 1201.3 - "No. 26 ascending View St. from Charing Cross (At Mackenzie St.)" 1201.4 - "View St. & Mackenzie St." 1201.5 - "No. 5 in View St. near Mackenzie St." 1201.6 - "No. 5 in View St. nearing Charing Cross." 1201.7 - "No. 7 in Nolan St. seen from Lake Weeroona Park." 1201.8 - "No. 7 entering McRae St. from Nolan St. Note "TRAM" warning sign on left. 1201.9 - "No. 7 in High St. passing Short St." 1201.10 - "No. 7 crossing Bendigo Creek bridge in High St. near Golden Square." 1201.11 - "No. 7 at Golden Square terminus" 1201.12 - "No. 7 at Golden Square terminus" 1201.13 - "No 7, 21 and 5 at Charing Cross" 1201.14 - "No. 7 at Golden Square terminus" 1201.15 - "No. 7 at Golden Square terminus" 1201.16 - "No 5 waiting at California Gully loop." 1201.17 - "Nos. 5 and 26 crossing at California Gully loop" 1201.18 - "No. 26 at Eaglehawk terminus" 1201.19 - "No. 21 arriving at Charing Cross from Golden Square" 1201.20 - "No. 26 at Charing Cross" 1201.21 - "Nos. 5 and 26 at Charing Cross." 1201.22 - "No. 26 at Quarry Hill terminus" 1201.23 - "No. 26 at Quarry Hill terminus seen through the gates of the Bendigo Cemetery." 1201.24 - "Quarry Hill terminus showing remains for former double track layout abandoned before 1964." 1201.25 - "No. 2 at Quarry Hill terminus" 1201.26 - "No. 2 at Quarry Hill terminus" 1201.28 - "The Southern approach to Golden Square with No. 7 standing at the terminus, "TRAM" warning sign on the left. 1201.29 - "No. 7 passing through Golden Square Shopping Centre" 1201.30 - "No. 7 in High St. Golden Square" 1201.31 - "No. 7 in High St. passing Wattle St." 1201.32 - "No. 7 in High St. nearing Wattle St."tramways, trams, bendigo, bond st., view st., nolan st., high st., eaglehawk, california gully, charing cross, quarry hill, trackwork, tram 2, tram 5, tram 7, tram 21, tram 26 -
 Ballarat Tramway Museum
Slide - 35mm slide/s - set of 25, Noel Simons, 26/02/1972 12:00:00 AM
Set of 25 transparencies taken on 26/2/1972 on Kodak mounts. 1204.1 - Bendigo No. 5 - just arrived at Manchester Loop near Havilah Road, Long Gully. Photo taken after tram has passed photographer. 1204.2 - No. 26 in Backhaus St. Long Gully passing William St, en route to Quarry Hill. Photo taken after tram has passed photographer. 1204.3 - No. 5 climbing the High St. Hill Eaglehawk, heading for Quarry Hill with the buildings on the West side of High St. in the background, including the Eaglehawk Town Hall. 1204.4 - as for 1204.3, but tram close up. 1204.5 - as for 1204.3, but after tram has passed photographer. 1204.6 - No. 5 at intersection of Mt Korong Road Ironbark and Calder Highway, with the AMPOL service 'station in the background. Photo taken after tram has passed photographer. 1204.7 - No. 26 en route to Quarry Hill shortly after leaving Needle Loop, passing William St., Long Gully. 1204.8 - No. 5 at California Gully Loop, picking up a passenger, with the shops at Long Gully in the background. Photo taken after tram has passed photographer. 1204.9 - No. 5 in Long Gully, en route to Quarry Hill. Photo taken after tram has passed photographer. 1204.10 - No. 2 at Eaglehawk terminus with the Eaglehawk Town Hall and Post Office in the background. Tram has two SEC roof ads. 1204.11 - No. 2 at Eaglehawk terminus, close up. 1204.12 - as for 1204.11, but through the park gates. 1204.13 - as for 1204.11, but with tram stop shelters in the foreground and buildings on the West side of High St in the background. 1204.14 - No. 2 in Mt. Korong Rd, midway between California Gully Loop and Needle Loop. Photo taken after tram has passed photographer. 1204.15 - No. 5 in Long Gully, en route to Quarry Hill. 1204.16 - as for 1204.15, but with trams departed loop. Has an ESSO service station in the background. 1204.17 - No. 26 leaves Charing Cross up View St.. Photo taken after tram has passed photographer. Has Armstrong Tyre Service, Cohns Drinks ad on a building and the T&G building in the background. Also Firestone ads on the tyre service building. 1204.18 - No. 5 waits at Charing Cross with the Alexandra Fountain in the background. Tram has two SEC roof ads, 'Everything s fine in my all electric kitchen' and 'Electricity Best for Cooking'. Has RACV, Colonial Mutual Life buildings in the background and the planting areas around Charing Cross gardens in the foreground. 1204.19 - No. 21 en route to North Bendigo arrives at Charing Cross, with passengers waiting to board. No. 5 in the background. In the background is the Fountain Gate Plaza building and the City Family Hotel. 1204.20 - as for 1204.19, but with No. 7 en route to Golden Square. 1204.21 - as for 1204.19, but closer up. 1204.22 - as for 1204.18 1204.23 - No. 25 in Nolan St. near the crossing of Bendigo Creek, running a special tram tour. 1204.24 - No. 25 on a special charter, in Weeroona Ave. at Cnr of Caledonia St. passing the Gas works. 1204.25 - Nos. 25 (showing Golden Square), 7 and 26 at Charing Cross. Has fountain in the background.Information written on in blue ink and date stamped on purple ink. 1204.1 - "No. 5 at Manchester Loop, near Havilah Rd. Long Gully." 1204.2 - "No. 26 in Backhaus St. Long Gully passing William St." 1204.3 - "No. 5 in High St. Eaglehawk." 1204.4 - "No. 5 in High St. Eaglehawk." 1204.5 - "No. 5 in High St. Eaglehawk." 1204.6 - "No. 5 in Mt. Korong Rd., Ironbark, passing Calder Highway Junctn." 1204.7 - "No. 26 shortly after leaving Needle Loop, passing William St., Long Gully. No. 5 cresting hill in distance." 1204.8 - "No. 5 at California Gully Loop." 1204.9 - "No. 5 in Long Gully" 1204.10 - "No. 2 at Eaglehawk terminus." 1204.11 - "No. 2 at Eaglehawk terminus." 1204.12 - "No. 2 at Eaglehawk terminus." 1204.13 - "No. 2 at Eaglehawk terminus." 1204.14 - "No. 2 in Mt. Korong Rd, midway between California Gully Loop and Needle Loop. 1204.15 - "Nos. 2 and 26 crossing at Long Gully." 1204.16 - "No. 26 leaves Long Gully loop for Eaglehawk as No. 2 pulls out of the far end towards Bendigo" 1204.17 - "No. 26 beginning the climb up View St. from Charing Cross." 1204.18 - "No. 5 at Charing Cross." 1204.19 - "No 21 arrives at Charing Cross from Golden Square while No. 5 awaits departure time for Eaglehawk." 1204.20 - "Nos. 7, 21, and 2 (behind which is No. 5) at Charing Cross." 1204.21 - "Nos. 7, 21, and 2 at Charing Cross." 1204.22 - "No. 5 at Charing Cross." 1204.23 - "No. 25 in Nolan St. near Bendigo creek crossing" 1204.24 - "No. 25 in Weeroona Ave. at cnr of Caledonia St." 1204.25 - "Nos. 25, 7, 26 and 2 (behind 26) at Charing Cross."tramways, trams, bendigo, eaglehawk, long gully, california gully, charing cross, north bendigo, tram 2, tram 5, tram 7, tram 21, tram 25, tram 26 -
 Ballarat Tramway Museum
Slide - 35mm slide/s - set of 12, Noel Simons, 28 Feb. 1972
Set of 12 transparencies taken on 28/2/1972 on Kodak mounts. 1207.1 - Bendigo 26 and 2 at Charing Cross. 26 en route for Eaglehawk, 2 for Quarry Hill. Has the Colonial Mutual Life, Armstrong Tyre Service, and Australian Mutual Provident Society buildings and a Cohns Drinks ad. in the background. 1207.2 - as for 1207.1 but with Alexandra fountain in the foreground. 1207.3 - No. 2 in Mitchell St. heading for Quarry Hill. Photo taken after tram has passed photographer. Has buildings on either side of Mitchell St. in the background, including the Plaza Theatre. 1207.4 - No. 6 en route for Golden Square departing Charing Cross. Has the RACV and ANZ bank in the background. 1207.5 - No. 2 crossing Pall Mall to enter Charing Cross ex Quarry Hill, with the Fountain Plaza in the background. 1207.6 - No. 6 arriving Charing Cross ex Golden Square with No. 21 alongside. No. 21 has the SEC ad. 'Everything's fine in my all electric kitchen.' Has the City Family Hotel and the Fountain Plaza shopping centre in the background. 1207.7 - No. 5 at Charing Cross en route for Quarry Hill with No. 2 behind. No. 2 has two SEC roof ads, 'Everything s fine in my all electric kitchen' and 'Electricity best for cooking'. RACV building in the background. Tram crews are discussing the day in the front of the tram. 1207. 8 - No. 21 in High St. Bendigo with the Cathedral in the background. No. 21 has two SEC roof ads, 'Everything's fine in my all electric kitchen' and 'Electricity best for cooking'. 1207.9 - No. 6 in High St. Bendigo with the Cathedral in the background. 1207.10 - No. 6 in High St. Bendigo, just past Wattle St. Photo taken after the tram has passed the photographer from within the Highway Car Sales yard. 1207.11 - No. 26 bound for Eaglehawk at the end of the double track in View St., note signal contactors, tram stop and section signs mounted on pole. 1207.12 - No. 26 turning from View St. into Barnard St.Information written on in blue ink and date stamped on purple ink. 1207. 1- "Nos. 26 and 2 at Charing Cross." 1207.2 - "Nos. 26 and 2 at Charing Cross." 1207.3 - "No. 2 in Mitchell St. just after leaving Charing Cross." 1207.4 - "No.6 leaving Charing Cross for Golden Square." 1207.5 - "No. 2 arriving at Charing Cross from Quarry Hill." 1207.6 - "No. 21 waits at Charing Cross as No. 6 arrives from Golden Square." 1207.7 - "No 5 at Charing Cross with No. 2 lurking behind." 1207.8 - "No. 21 in High St. at cnr of Wattle St." 1207.9 - "No. 6 in High St. at cnr of Wattle St." 1207.10 - "No. 6 in High St. between Wattle and Vine Sts." 1207.11 - "No. 26 at end of double track in View St. near Barnard. St. 1207.12 - "No. 26 seen at dusk turning from View St. into Barnard St."tramways, trams, bendigo, charing cross, high st, view st., tram 2, tram 5, tram 6, tram 21, tram 26 -
 Ballarat Tramway Museum
Photograph - Black & White Photograph/s set of 19, Mar. 1972
Set of 19 black and white prints, all 89mm square of Bendigo trams, date machine printed on print is "Mar 1972". 981.1 - Tram 21 at North Bendigo terminus, with level crossing in background. Has destination "Golden Square" and two SEC roof ads. 981.2 - tram 2? at Eaglehawk, with destination "Depot", two SEC roof ads and "Leo A. Hughes Photographer" on side of building in background. 981.3 - tram 2? at Eaglehawk, side on view. 981.4 - tram 26 at Quarry Hill terminus looking back into city. 981.5 - tram 7 en route to North Bendigo at the site of the Bridge St. loop. Has a Peters Ice Cream truck and Sandhurst Fruit Juices truck on right side of photograph. 981.6 - tram 2 at Quarry Hill terminus. 981.7 - tram 2? at one of the loops on the Eaglehawk line, inbound? 981.8 - bogie tram at Charing Cross with fountain in background. Side on view looking south. 981.9 -trams 7 and 21 on Golden Square/North Bendigo line with bogie tram in background, at Charing Cross. Same as item 972. 981.10 - bogie tram at Charing Cross - has buildings in south west corner in background, including Colonial Mutual Life and an advertisement for the Herald newspaper. 981.11 - trams 25, 7 and two other trams at Charing Cross. 981.12 - trams 2 and 26 and three others at Charing Cross. 981.13 - tram 25 at Golden Square terminus, with Rodda's Golden Square Hotel in the background. Tram showing destination of "Nth Bendigo" 981.14 - tram 24, showing "Special" on depot access track. Has two Johnnie Walker roof ads on side. 981.15 - as above, but tram on bridge outside depot. 981.16 - trams 25 and 28 at depot 981.17 - tram 24 showing "Special" on depot access track with a single truck car in background. 981.18 - trams 2 and 26 at Charing Cross. Has advertisements for "Armstrong Tyre Service" and "Cohn's drinks" on buildings in background. 981.19 - Bendigo 2 at location?, about to enter a loop or double track section. Has hotel in background. On rear of each photo in the top left hand corner is a print number 1 to 19 in ink and location notes, generally "Bendigo"trams, tramways, charing cross, bendigo, golden square, quarry hill, tram 2, tram 21, tram 7, tram 24, tram 26 -
 Ballarat Tramway Museum
Photograph - Digital image Set of 20, 1971-72
Set of 22 digital images of Bendigo Tramways, 1972 at or before closure while on a tram tour by Stuart Lodington. .1 - No. 7 arriving at North Bendigo .2 - No. 5 departing Charing Cross along View St, with a Firestone tyres in the background. .3 - front view of a tram in View St with a blurred background image. .4 - No. 24 showing Eaglehawk destination .5 - No 26 and 3 in View St, with the Armstrong Tyre Service building in the background and signs for T&G and Cohn's Drinks. .6 - ditto .7 - No. 3 arriving at Charing Cross from Eaglehawk in View St, with a Quarry Hill destination. .8 - No. 3 and 18 at Charing Cross. .9 - No. 24 on the Quarry Hill line. .10 - No 26 in View St, with the Armstrong Tyre Service building in the background and signs for T&G and Cohn's Drinks. .11 - ditto, with fountain in view, Colonial Mutual building and a newsagent with a Herald sign on the building. .12 - No. 7 at North Bendigo terminus .13 - ditto with pole being reversed. .14 - No. 18 at Quarry Hill terminus with Northern Terrazzo sign in the background. .15 - No. 24 at Quarry Hill terminus .16 - No. 18 arriving at Charring Cross, with Fountain Plaza and Bendigo Pharmacy in the background. .17 - No. 3 and 18 at Charing Cross. .18 - No. 7 at North Bendigo terminus with pole being placed on the overhead. .19 - No. 26 in View St inbound, with Sandhurst Trustees sign in the background. .20 - No. 6 leaving Charing Cross in Pall Mall with Myer and other buildings in the background. .21 - No. 7 at North Bendigo .22 - Single trucker with two roof Advertisements crossing View St with fountain in view, Colonial Mutual building and a newsagent with a Herald sign on the building.trams, tramways, bendigo, eaglehawk, quarry hill, north bendigo, charing cross, view st, tram 7, tram 5, tram 24, tram 26, tram 5, tram 3, tram 18, tram 6 -
 Ballarat Tramway Museum
Postcard, Valentine & Sons Publishing Co, Valentines Series Postcard, No 6 of the Alexandra Fountain, Bendigo
Black and White postcard contained within the Wal Jack Bendigo and Geelong Album, see Reg Item 5003 for more details. Valentines Series Postcard, No 6 of the Alexandra Fountain, Bendigo. Charing Cross. Has a single trucker in the photo with the destination of Eaglehawk. In the back ground is the Australian Mutual Provident Society Building, Colonial Mutual Life building and Armstrong tyre service building. On rear of card is Valentine's name with space for written notes and stamps. Has a handwritten message to Wal Jack from Roy Field of Sydney, dated 21-6-1949 and 1d and 1/2 stamps. trams, tramways, bendigo, charing cross, alexandra fountain, tram 22 -
 Bendigo Historical Society Inc.
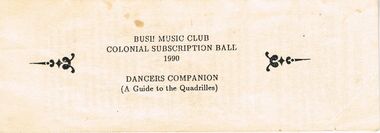
Document - PETER ELLIS COLLECTION: BUSH MUSIC CLUB COLONIAL BALL, 1990
Small off white coloured booklet Bush Music Club Inc. Colonial Subscription Ball 1990 Dancers Companion (A guide to the Quadrilles) The Quadrille Figure 1 (Le Pantelon) (2x32) 8 Top couples R and L through. (without giving hands). 8 Set & turn Partners 8 Top ladies chain. 4 Top couples promenade across set. 4 Half R and L to place. 32 Side couples repeat Figure 2 (Le 'Ete) (4x24) 4 Top couples advance & retire. 4 Cross over (without changing places with partner). 8 Repeat back to place. 8 Set & turn partners. 24 Sides repeat. 48 Top and Sides repeat. Figure 3 (La Poule) (4x32) 4 Lady 1, Man 2 adv, tough RH, retire to opposite place. 4 Lady 1, Man 2 adv, join LH give RH to partner 4 Line of 4 balance fwd & back twice. 4 Men lead partners to opp. Place. 4 Lady 1, Man 2 adv. & ret. 4 Lady 1, Man 2 adv, honour & ret. 4 Top couples, advance & retire. 4 Half R & L to place. 32 Repeat with Lady 2, Man !. 32 Repeat with Lady 3, Man 4. 32 Repeat with Lady 4, Man 3. The Quadrille Figure 4. (La Pastourelle) (4x32) 4 1st couple advance & retire. 4 1st couple adv, lady join 2nd couple. 4 Line of 3 adv. & ret, 1st man retire. 4 Line of 3 adv. Ladies cross to 1st man. 4 Line of 3 adv. & ret, 2nd man retire. 4 Re-advance, form circle with 2nd man. 4 Circle L half way round. 4 Half R & L to place. 32 Repeat with 2nd couple leading. 32 Repeat with 3rd couple leading. 32 Repeat with 4th couple leading. Figure 5 (La Finale) (4 x 32 + 8) 4 All advance & retire. 4 Turn partners. 4 Ladies adv, curtsey & retire. 4 Men advance, bow & retire. 8 All set & turn corners. 8 Promenade with corner. (men to original place with corner) 96 Repeat 3 times to return to partner. 4 All advance & retire. Turn Partners. Notes: 1 Couples numbered 2 Set & turn is a 'balance' set and open hand turn. The Prince Imperial's Quadrille Figure 1. (4x24) 4 Top couples visit right, honour sides. 4 Top men retire with partner & side lady to opposite place, (ladies facing each other). 8 Ladies grand chain to places 8 All set and turn partners 24 Top couples repeat back to place. 48 Repeat with side couples. Figure 2 (4 x 24) 4 1st Lady, 2nd man adv & turn in centre finish facing 2nd lady. 2 2nd lady pass through to 1st man. 2 Both couples turn out to place. 4 top couples advance & retire. 4 Ladies chain back to place. (Nariel) 8 Chasse-croise. (4 steps past partner RH turn corner 4 steps back, LH turn with partner.) 24 Repeat wth 2nd lady, 1st man leading 24 Repeat wth 3rd lady, 4th man leading 24 Repeat wth 4th lady, 3rd man leading. Figure 3 (4x32) 4 1st lady to centre, curtsey to partner. (RH in RH, ACW turn in to centre) 4 2nd lady to centre, curtsey to partner. 4 3rd lady to centre, curtsey to partner.4 4th lady to centre, curtsey to partner. 8 ladies join hands, circle R, small steps after circle R, Men join circle, (giving RH to partner). 4 Balance for 4 (step lift x 4) 4 Turn partners to place, bow & curtsey. 32 Repeat, Lady 2, 1, 4 & 3 to centre 32 Repeat Lady 3, 4, 2 & 1 to centre 32 Repeat, Lady 4, 3, 1 & 2 to centre The Prince Imperial's Quadrille Figure 4 (4x32) 4 Top couples advance & retire. 4 Top couples adv, ladies move to R, as men retire to place. 8 Line of 3 adv & ret twice. 4 Single men adv, bow and retire. 4 Re-advance and turn to face partner. 4 Circle L half way round (with partner & side couple). 4 Half R & L to place. 32 Repeat with side couples leading. 32 Repeat with top couples leading (men moving to left as ladies retire) 32 Repeat with Side couple leading. (Men moving to left as ladies retire) Figure 5 (4x32 +32) 16 Ladies to the right, (RH turn with corner man then continue round to the right turning each man) 4 1st Lady, 2nd man advance & retire 4 re-advance & turn RH (finish facing partners) 8 set & turn partners (finishing in place) 32 Repeat with 2nd Lady, 1st man leading 32 repeat with 3rd lady, 4th man leading 32 Repeat with 4th Lady, 3rd man leading 16 Ladies to the right again. 4 Men turn partners to centre. 4 All bow and curtsey. 8 Promenade set ( hall) Note: Set & turn is a 'balance' set and open hand turn. The Parisienne Quadrille Figure 1 (1x32) 8 Couples R and L through. (without giving hands) 8 set & turn partners 8 Ladies chain. 4 Couples promenade across set. 4 Half R and L to place. Figure 2 (2x24) 4 Couples advance & retire. 4 Cross over (without changing places with partners) 8 Repeat back to place. 8 Set & turn partners. 24 Repeat. Figure 3 (2x32) 4 Lady 1, Man 2 adv, touch RH, retire to opposite place. 4 Lady 1, Man 2 adv, join LH, give RH to partner. 4 Line of 4 balance fwd & back twice 4 Men lead partners to opp. Place 4 Lady 1, Man 2 adv & retire 4 Lady 1, Man 2 adv, honour & ret. 4 Couples, advance & retire. 4 Half R & L to place. 32 Repeat with Lady 2, Man 1. The Parisienne Quadrille Figure 4. (2x32) 4 1st couple advance & retire. 4 1st couple adv, lady join 2nd couple. 4 Line of 3 adv. & ret, 1st man retire. 4 Line of 3 adv. Ladies cross to 1st man. 4 Line of 3 adv. & ret, 2nd man retire. 4 Re-advance, form circle with 2nd man. 4 Circle L half way round. 4 Half R & L to place. 32 Repeat with 2nd couple leading. Figure 5 (2x32) 4 Couples advance & retire 4 Cross over 8 Repeat back to place. 8 Ladies chain across & back.8 Set & turn partners. 32 Repeat Notes: 1 This 'quadrille' is similar to the first set (1st 4 figures) and is danced as two couple sets. 2 Set & turn is a 'balance' set and open hand turn. The Lancers Quadrille Figure 1 (4x24) 4 1st lady, 2nd man advance & retire, 4 Adv, turn two hands, return to place. 4 1st couple lead through across set 4 2nd couple lead through back 8 all set & turn corners. 24 Repeat, 2nd lady, 1st man leading 24 Repeat 3rd lady, 4th man leading 24 Repeat, 4th lady, 3rd man leading Figure 2 (4x24) 4 1st couple advance & retire. 2 1st lady adv to centre, turn to face partner 2 1st couple honour each other. 8 1st couple set and turn then sides form top & bottom lines 4 Lines advance & retire, 4 Advance and turn partners to place. 24 Repeat with 2nd couple leading 24 Repeat with 3rd couple leading 24 Repeat with 4th couple leading Figure 3. (2x32) 4 Ladies advance, curtsey & retire. 4 Men adv, bow, turn by left, bow to partners, then join RH in centre, (ladies RH on partners left elbow). 8 Promenade round set to place. 4 Ladies adv, curtsey & retire again. 4 Men adv, bow, turn by right, bow to partners, join LH in centre, right arm behind partner. 8 Promenade round to set in place. 32 Repeat. The Lancers Quadrille. Figure 4. (4x24) 8 Top couples visit R then L 4 Right Hands around with LH couple 4 then left hands around. 8 Circle left with that couple. 24 Repeat with side couples leading. 24 repeat, top couples visit L then R. 24 Repeat, side couples visit L then R. Figure 5. (4x48 +24) 8 All grand chain 1/2 way round and honour partners. 8 Continue grand chain to place and honour partners. 8 1st couple visit, return to place, facing out with sides in behind. 2 Change places with partner, 2 All rock fwd and back 2 change places again 2 All rock fwd and back 8 Cast out reform in lines 4 Lines advance & retire 4 Advance & turn partners to place 48 Repeat with 2nd couple leading 48 Repeat with 3rd couple leading 48 Repeat with 4th couple leading. 8 Grand chain 1/2 way round and honour partners. 8 continue grand chain to place and honour partners 8 swing partners (R arm round partner, LH in air) Note: All figures walked. Set & Turn is a 'balance' set and open two hand turn. The Caledonians Quadrille Figure 1. (2x32) 4 Top couples R.H. across, move CW (Ladies hands joined over Mens). 4 then L.H. across, move ACW. 8 Set & swing Partners 8 Top ladies chain. 4 Top couples promenade across set. 4 Half R and L to place. 32 Side couples repeat. Figure 2. (4x24) 8 1st Man advance & retire twice. 8 Set & swing corners. 8 Promenade with corners (to men's position.) 24 2nd man repeat. 48 3rd and 4th man repeat. Figure 3. (4x32) 4 Lady 1, Man 2 advance & retire. 4 Re-advance, 2 hand turn to place. 8 1st & 2nd couples lead through and back. (1st lead through across, 2nd back) 8 Set & swing corners. 4 All advance & retire. 4 Swing partners. 32 Repeat with Lady 2, Man 1. 32 Repeat with Lady 3, Man 4. 32 Repeat with Lady 4, Man 3. The Caledonians Quadrille Figure 4. (4x24) 2 Lady 1, Man 2 advance and stop. 2 Lady 2, Man 1 advance and stop. 4 Turn partners back to place. 2 All ladies to the right 4 steps. 2 All men to the left 4 steps. 2 All ladies to the right 4 steps. 2 All men to the left 4 steps. 4 Promenade to place. 4 Swing partners. 24 Repeat with Lady 2, Man 1 leading. 24 Repeat with Lady 3, Man 4 leading. 24 Repeat with Lady 4, Man 3 leading. Figure 5. (4x48 + 16) 8 1st couple visit. 4 Ladies advance, curtsey & retire. 4 Men advance, bow & retire. 8 All set & swing partners. 8 Grand chain 1/2 way round and honour partners. 4 Promenade to place 4 and swing partners. 8 Chasse-croise, (4 steps past partner, RH to corner balance fwd & back, then 4 steps back, LH to partner balance fwd & back). 48 Repeat with 2nd couple leading. 48 Repeat with 3rd couple leading. 48 Repeat with 4th couple leading. 8 All promenade set. 8 Swing partners. Note: Set & swing is 'normal' set and cross hand swing. The Royal Irish Quadrille Figure 1. (2x32) 8 Top couples to Right, R & L through 8 Set & swing Partners. 8 Ladies chain. 4 Couples promenade across (to the other couples position). 4 Half R & L to place. 32 Repeat with tops to the left. Figure 2. (4x24) 4 Top couples to Right, adv & ret. 4 Cross over (without changing places with partner). 8 Repeat back to place. 8 Set & swing partners. 24 Repeat with top couples to the Left. 48 Tops repeat with Right and Left sides. Figure 3. (4x32) 4 Lady 1,2 and Man on Right, advance, touch RH, retire to opposite place. 4 Advance again, join LH, give RH to partner. 4 Line of 4 balance fwd & back twice. 4 Men Lead partners to opp. Place. 4 Lady 1,2 and opp. Man adv & ret. 4 Advance, honour & retire. 4 Couples, advance & retire. 4 Half R & L to place. 32 Repeat with Ladies 3,4 leading. 64 Repeat with Tops facing left. The Royal Irish Quadrille Figure 4. (4x32) 4 Top couples to Right, adv & ret. 4 Re-adv, Top Ladies join opp. Couple. 4 Line of 3 adv & ret. Top men retire. 4 Line of 3 adv, ladies join other man. 4 Line of 3 adv & ret, Side men retire. 4 Re-advance, form circle with opp. Man. 4 Circle L half way round. 4 Half R & L to place. 32 Repeat with Side ladies leading. 64 Repeat with Top couples facing left. Figure 5. (4 x 32 + 8) 4 All advance & retire. 4 Swing partners. 4 Ladies advance, curtsey & retire. 4 Men advance, bow & retire. 8 All set & swing corners. 8 Promenade with corner. (Men to original place with corner). 96 Repeat 3 times to return to partner. 4 All advance & retire. 4 Swing partners. Notes: 1. This is The Quadrille danced diagonally, with Top couples dancing first with the side couple on their right, then the left. Ie. 1-3 and 2-4 then 1-4 and 2-3. 2. Set & swing is 'normal' set and irish swing.The Eightsome Reel Numbering: Clockwise 1-2-3-4 Part A (40 Bars) 4 All join hands, circle left 4 All circle right. 4 Grand Cross, Ladies join RH. 4 Grand Cross, Men join LH. 8 Set & turn Partners 16 Grand chain right round set. Part B ( 8x48 bars) 1st Lady advance to centre, Others join hands in circle. 8 Circle left and right 4 Set once and turn partner 1st Lady sets to partner then open hand turn once with partner. 4 Set once and turn opposite 1st Lady sets to opposite man, then open hand turn once. 8 Reel of 3, 1st Lady, partner and opposite man 1st Lady remains in centre. 8 Circle left and right again 4 Set once and turn side man 1st lady and man on right. 4 Set once and turn other side man 1st lady and man on left. 8 Reel of 3, 1st lady, and two side men. 48 2nd lady repeat. 96 3rd and 4th ladies repeat. 192 Men repeat same movement. The Eightsome Reel Part C (40 Bars) 8 All circle left and right. 4 Grand cross - Ladies join RH. 4 Grand Cross - Men join LH. 8 All set and turn partners. 16 Grand Chain round set. Note: Set is 'normal' set. Turn is open hand turn. NOTES 1. The Quadrille 2. The Prince Imperials 3. The Parisienne Quadrille 4. The Lancers Quadrille 5. The Caledonians Quadrille 6. The Royal Irish Quadrille 7. The Eightsome Reelperson, individual, peter ellis oam -
 Bendigo Historical Society Inc.
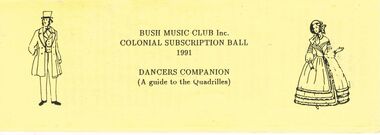
Document - PETER ELLIS COLLECTION: BUSH MUSIC CLUB COLONIAL BALL, 1991
Small yellow booklet outline of a man on left of title and woman on right. Bush Music Club Inc. Colonial Subscription Ball 1991 Dancers Companion (A guide to the Quadrilles) The Quadrille Figure 1 (Le Pantelon) (2x32) 8 Top couples R and L through. (without giving hands). 8 Set & turn Partners 8 Top ladies chain. 4 Top couples promenade across set. 4 Half R and L to place. 32 Side couples repeat Figure 2 (Le 'Ete) (4x24) 4 Top couples advance & retire. 4 Cross over (without changing places with partner). 8 Repeat back to place. 8 Set & turn partners. 24 Sides repeat. 48 Top and Sides repeat. Figure 3 (La Poule) (4x32) 4 Lady 1, Man 2 adv, tough RH, retire to opposite place. 4 Lady 1, Man 2 adv, join LH give RH to partner 4 Line of 4 balance fwd & back twice. 4 Men lead partners to opp. Place. 4 Lady 1, Man 2 adv. & ret. 4 Lady 1, Man 2 adv, honour & ret. 4 Top couples, advance & retire. 4 Half R & L to place. 32 Repeat with Lady 2, Man !. 32 Repeat with Lady 3, Man 4. 32 Repeat with Lady 4, Man 3. The Quadrille Figure 4. (La Pastourelle) (4x32) 4 1st couple advance & retire. 4 1st couple adv, lady join 2nd couple. 4 Line of 3 adv. & ret, 1st man retire. 4 Line of 3 adv. Ladies cross to 1st man. 4 Line of 3 adv. & ret, 2nd man retire. 4 Re-advance, form circle with 2nd man. 4 Circle L half way round. 4 Half R & L to place. 32 Repeat with 2nd couple leading. 32 Repeat with 3rd couple leading. 32 Repeat with 4th couple leading. Figure 5 (La Finale) (4 x 32 + 8) 4 All advance & retire. 4 Turn partners. 4 Ladies adv, curtsey & retire. 4 Men advance, bow & retire. 8 All set & turn corners. 8 Promenade with corner. (men to original place with corner) 96 Repeat 3 times to return to partner. 4 All advance & retire. Turn Partners. Notes: 1 Couples numbered 1 4 2 3 2 Set & turn is a 'balance' set and open hand turn. The Lancers Quadrille Figure 1 (4x24) 4 1st lady, 2nd man advance & retire, 4 Adv, turn two hands, return to place. 4 1st couple lead through across set 4 2nd couple lead through back 8 all set & turn corners. 24 Repeat, 2nd lady, 1st man leading 24 Repeat 3rd lady, 4th man leading 24 Repeat, 4th lady, 3rd man leading Figure 2 (4x24) 4 1st couple advance & retire. 2 1st lady adv to centre, turn to face partner 2 1st couple honour each other. 8 1st couple set and turn then sides form top & bottom lines 4 Lines advance & retire, 4 Advance and turn partners to place. 24 Repeat with 2nd couple leading 24 Repeat with 3rd couple leading 24 Repeat with 4th couple leading Figure 3. (2x32) 4 Ladies advance, curtsey & retire. 4 Men adv, bow, turn by left, bow to partners, then join RH in centre, (ladies RH on partners left elbow). 8 Promenade round set to place. 4 Ladies adv, curtsey & retire again. 4 Men adv, bow, turn by right, bow to partners, join LH in centre, right arm behind partner. 8 Promenade round to set in place. 32 Repeat. The Lancers Quadrille. Figure 4. (4x24) 8 Top couples visit R then L 4 Right Hands around with LH couple 4 then left hands around. 8 Circle left with that couple. 24 Repeat with side couples leading. 24 repeat, top couples visit L then R. 24 Repeat, side couples visit L then R. Figure 5. (4x48 +24) 8 All grand chain 1/2 way round and honour partners. 8 Continue grand chain to place and honour partners. 8 1st couple visit, return to place, facing out with sides in behind. 2 Change places with partner, 2 All rock fwd and back 2 change places again 2 All rock fwd and back 8 Cast out reform in lines 4 Lines advance & retire 4 Advance & turn partners to place 48 Repeat with 2nd couple leading 48 Repeat with 3rd couple leading 48 Repeat with 4th couple leading. 8 Grand chain 1/2 way round and honour partners. 8 continue grand chain to place and honour partners 8 swing partners (R arm round partner, LH in air) Note: All figures walked. Set & Turn is a 'balance' set and open two hand turn. The Prince Imperial's Quadrille Figure 1. (4x24) 4 Top couples visit right, honour sides. 4 Top men retire with partner & side lady to opposite place, (ladies facing each other). 8 Ladies grand chain to places 8 All set and turn partners 24 Top couples repeat back to place. 48 Repeat with side couples. Figure 2 (4 x 24) 4 1st Lady, 2nd man adv & turn in centre finish facing 2nd lady. 2 2nd lady pass through to 1st man. 2 Both couples turn out to place. 4 top couples advance & retire. 4 Ladies chain back to place. (Nariel) 8 Chasse-croise. (4 steps past partner RH turn corner 4 steps back, LH turn with partner.) 24 Repeat with 2nd lady, 1st man leading 24 Repeat with 3rd lady, 4th man leading 24 Repeat wth 4th lady, 3rd man leading. Figure 3 (4x32) 4 1st lady to centre, curtsey to partner. (RH in RH, ACW turn in to centre) 4 2nd lady to centre, curtsey to partner. 4 3rd lady to centre, curtsey to partner.4 4th lady to centre, curtsey to partner. 8 ladies join hands, circle R, small steps after circle R, Men join circle, (giving RH to partner). 4 Balance for 4 (step lift x 4) 4 Turn partners to place, bow & curtsey. 32 Repeat, Lady 2, 1, 4 & 3 to centre 32 Repeat Lady 3, 4, 2 & 1 to centre 32 Repeat, Lady 4, 3, 1 & 2 to centre The Prince Imperial's Quadrille Figure 4 (4x32) 4 Top couples advance & retire. 4 Top couples adv, ladies move to R, as men retire to place. 8 Line of 3 adv & ret twice. 4 Single men adv, bow and retire. 4 Re-advance and turn to face partner. 4 Circle L half way round (with partner & side couple). 4 Half R & L to place. 32 Repeat with side couples leading. 32 Repeat with top couples leading (men moving to left as ladies retire) 32 Repeat with Side couple leading. (Men moving to left as ladies retire) Figure 5 (4x32 +32) 16 Ladies to the right, (RH turn with corner man then continue round to the right turning each man) 4 1st Lady, 2nd man advance & retire 4 re-advance & turn RH (finish facing partners) 8 set & turn partners (finishing in place) 32 Repeat with 2nd Lady, 1st man leading 32 repeat with 3rd lady, 4th man leading 32 Repeat with 4th Lady, 3rd man leading 16 Ladies to the right again. 4 Men turn partners to centre. 4 All bow and curtsey. 8 Promenade set ( hall) Note: Set & turn is a 'balance' set and open hand turn. The Parisienne Quadrille Figure 1 (1x32) 8 Couples R and L through. (without giving hands) 8 set & turn partners 8 Ladies chain. 4 Couples promenade across set. 4 Half R and L to place. Figure 2 (2x24) 4 Couples advance & retire. 4 Cross over (without changing places with partners) 8 Repeat back to place. 8 Set & turn partners. 24 Repeat. Figure 3 (2x32) 4 Lady 1, Man 2 adv, touch RH, retire to opposite place. 4 Lady 1, Man 2 adv, join LH, give RH to partner. 4 Line of 4 balance fwd & back twice 4 Men lead partners to opp. Place 4 Lady 1, Man 2 adv & retire 4 Lady 1, Man 2 adv, honour & ret. 4 Couples, advance & retire. 4 Half R & L to place. 32 Repeat with Lady 2, Man 1. The Parisienne Quadrille Figure 4. (2x32) 4 1st couple advance & retire. 4 1st couple adv, lady join 2nd couple. 4 Line of 3 adv. & ret, 1st man retire. 4 Line of 3 adv. Ladies cross to 1st man. 4 Line of 3 adv. & ret, 2nd man retire. 4 Re-advance, form circle with 2nd man. 4 Circle L half way round. 4 Half R & L to place. 32 Repeat with 2nd couple leading. Figure 5 (2x32) 4 Couples advance & retire 4 Cross over 8 Repeat back to place. 8 Ladies chain across & back.8 Set & turn partners. 32 Repeat Notes: 1 This 'quadrille' is similar to the first set (1st 4 figures) and is danced as two couple sets. 2 Set & turn is a 'balance' set and open hand turn. Wellington Waltz 8 Honour Partner, honour corner 8 Circle L 7 steps, then tap, tap 8 Circle R 7 steps, then tap, tap 4 Top couples, 2 side-steps to centre and back with lady turning under man's left arm. 4 Waltz across to opposite side 8 Side couples repeat. 8 Top ladies chain across. (pause in centre, turn twice with opp. Man) 8 Side ladies chain across. 8 Grand Chain half way round set. 8 Waltz to man's place. 64 Repeat with side couples leading. Waltz Cotillon 8 Honour Partner, honour corner 16 1st couple waltz the set. 8 Top ladies cross over.8 Side ladies cross over. 8 Top men cross over. 8 Side men cross over. 16 All waltz back to place. Form top & bottom lines, 8 Adv. & ret, cross over. 8 Adv. & ret, cross back. 16 Waltz chain to meet partner. 16 All waltz back to place. Form top & bottom lines, 8 Adv. & ret, cross over. 8 Adv. & ret, cross back. 16 Waltz chain to meet partner. 16 All waltz back to place. 112 Repeat with 2nd couple leading. 112 Repeat with 3rd couple leading. Side lines adv. & ret. 112 Repeat with 4th couple leading. Side lines adv. & ret. Galopade Quadrille 8 Honour Partner, honour corner 8 All galop round set. (Galop half way round set, on opp. Side change places with partner, continue galop to place.) 8 Top couples R & L through. 8 Side couples R & L through. 8 All set & swing partners. 8 All galop round set. 8 Top ladies chain. 8 Side ladies chain. 8 All set & swing partners. 8 All galop round set. 8 1st couple lead through, 2nd on return 8 3rd couple lead through, 4th on return 8 All set & swing partners. 8 All galop round set. 4 1st lady & 2nd man adv. & ret. 4 2nd lady & 1st man adv. & ret. 4 3rd lady & 4th man adv. & ret. 4 4th lady & 3rd man adv. & ret. 8 All set & swing partners. 8 All galop round set. 4 Ladies advance & retire. 4 Men advance & retire. 8 Double ladies chain. 8 All set & swing partners. 8 All galop round set. 8 Top couples waltz the set 8 Side couples waltz the set 8 All set & swing partners. 32 Waltz the hall. The Caledonians Quadrille Figure 1. (2x32) 4 Top couples R.H. across, move CW (Ladies hands joined over Mens). 4 then L.H. across, move ACW. 8 Set & swing Partners 8 Top ladies chain. 4 Top couples promenade across set. 4 Half R and L to place. 32 Side couples repeat. Figure 2. (4x24) 8 1st Man advance & retire twice. 8 Set & swing corners. 8 Promenade with corners (to men's position.) 24 2nd man repeat. 48 3rd and 4th man repeat. Figure 3. (4x32) 4 Lady 1, Man 2 advance & retire. 4 Re-advance, 2 hand turn to place. 8 1st & 2nd couples lead through and back. (1st lead through across, 2nd back) 8 Set & swing corners. 4 All advance & retire. 4 Swing partners. 32 Repeat wth Lady 2, Man 1. 32 Repeat with Lady 3, Man 4. 32 Repeat with Lady 4, Man 3. The Caledonians Quadrille Figure 4. (4x24) 2 Lady 1, Man 2 advance and stop. 2 Lady 2, Man 1 advance and stop. 4 Turn partners back to place. 2 All ladies to the right 4 steps. 2 All men to the left 4 steps. 2 All ladies to the right 4 steps. 2 All men to the left 4 steps. 4 Promenade to place. 4 Swing partners. 24 Repeat wth Lady 2, Man 1 leading. 24 Repeat wth Lady 3, Man 4 leading. 24 Repeat wth Lady 4, Man 3 leading. Figure 5. (4x48 + 16) 8 1st couple visit. 4 Ladies advance, curtsey & retire. 4 Men advance, bow & retire. 8 All set & swing partners. 8 Grand chain 1/2 way round and honour partners. 4 Promenade to place 4 and swing partners. 8 Chasse-croise, (4 steps past partner, RH to corner balance fwd & back, then 4 steps back, LH to partner balance fwd & back). 48 Repeat with 2nd couple leading. 48 Repeat wth 3rd couple leading. 48 Repeat wth 4th couple leading. 8 All promenade set. 8 Swing partners. Note: Set & swing is 'normal' set and cross hand swing. The Lancers Quadrille (BMC version) Figure 1. (4x32) 8 1st Lady, 2nd man advance & swing in centre (with ballroom hold). 4 Partners move 1/2 way across, Centres keep swinging. 4 Promenade partner to opp. Place. 8 1st couple lead through to place. 8 All swing corners. 32 Repeat with 2nd lady, 1st man. 32 Repeat with 3rd lady, 4th man. 32 Repeat with 4th lady, 3rd man. Figure 2. (4x32) 8 1st couple lead up (to 2nd) & retire. 8 1st couple swing in place Form top & bottom lines. 8 Lines adv & retire twice. 8 Swing partners. 32 Repeat with 2nd couple leading. 32 Repeat with 3rd couple leading. (Forming side lines instead) 32 Repeat with 4th couple leading. (Forming side lines instead) Figure 3. (2x32) 4 Introduction - Ladies to the centre and men form a circle around them. 8 Men circle left. 8 Men circle right. Men form a grand cross (LH) Right arm behind partners. 16 Promenade round set. Ladies return to the centre. 32 Repeat - Circle L & R, & Grand Cross. The Lancers Quadrille (BMC version) Figure 4. (2x48) 8 Top couples visit. 4 Tops RH star. 4 then LH star. 8 Tops basket Left. 8 Tops basket Right. 8 Tops circle Left. Tops circle Right. 48 Repeat with side couples leading. Figure 5. ((4x 16+32) + 24) 8 All grand chain 1/2 way round and honour partners. 8 Promenade with partners to place. 8 1st couple lead up, turn and lead out with side falling in behind. 8 Cast out, reform top & bottom lines. 4 Lines advance & retire. 4 Advance & swing partners to place. 8 Swing partners in place. 48 Repeat with 2nd couple leading. 48 Repeat with 3rd couple leading (forming side lines) 48 Repeat with 4th couple leading. (forming side lines) 8 All grand chain 1/2 way round and honour partners. 8 Promenade with partners to place. 8 Swing partners in place. Note: Normal swing here is with hands crossed. 1. The Quadrille 2.The Lancers Quadrille 3. The Prince Imperials 4. The Parisienne Quadrille 5. The Wellington Waltz 6. The Waltz Cotillon 7. The Galopade Quadrille 8. The Caledonians Quadrille 9. The Lancers Quadrille (BMC)person, individual, peter ellis oam -
 Bendigo Historical Society Inc.
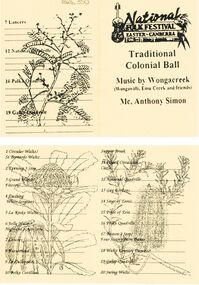
Document - PETER ELLIS COLLECTION: TRADITIONAL COLONIAL BALL
Cream coloured card. Folded in half. Black writing. Pictures of native flowers on each 'page' National Folk Festival Easter - Canberra Traditional Colonial Ball Music by Wongacreek (Wongawilli, Emu Creek and friends) Mc, Anthony Simon. 1 Circular Waltz/ St Bernards Waltz 2 Evening 3 step, 3 Grand March/ Fitzroys, 4 Dashing White Sergeant, 5 La Rinka Waltz, 6 Jolly Miller Highland Schottische, 7 Lancers, 8 Varsoviana, 9 La Gallopodes, 10 Polka Cotillion, Supper Break. 11 Ithoca Circassion Circle, 12 National Quadrille, 13 Gay Gordons, 14 Seige of Ennis, 15 Pride of Erin, 16 Polka Quadrille, 17 Bastone 2 Step/ Four Sisters Barn Dance, 18 Waltz Country Dance, 19 Galop Quadrille, 20 Swing Waltz, 7 Lancers, 12 National Quadrille, 16 Polka Quadrille, 19 Galop Quadrille.person, individual, peter ellis oam -
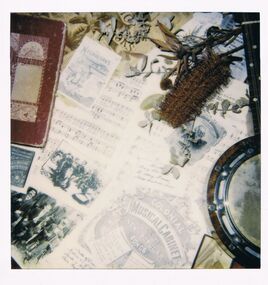
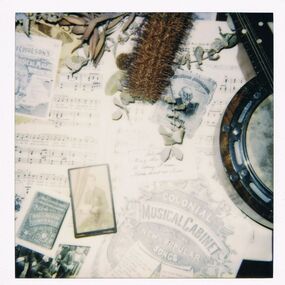 Bendigo Historical Society Inc.
Photograph - PETER ELLIS COLLECTION: MUSIC SHEET
Colour polaroid photograph. Sheet music. Banjo. Colonial Musical Cabinet containing new and popular songs. Native dried flower.entertainment, music, sheet music -
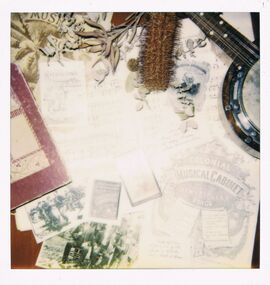 Bendigo Historical Society Inc.
Photograph - PETER ELLIS COLLECTION: MUSIC SHEET
Colour polaroid photograph. Sheet music. Banjo. Colonial Musical Cabinet containing new and popular songs. Native dried flower.entertainment, music, sheet music -
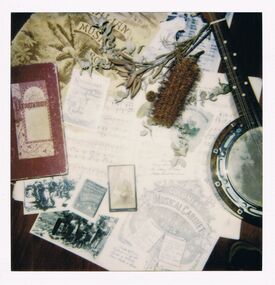 Bendigo Historical Society Inc.
Photograph - PETER ELLIS COLLECTION: MUSIC SHEET
Colour polaroid photograph. Sheet music. Banjo. Colonial Musical Cabinet containing new and popular songs. Native dried flower.entertainment, music, sheet music -
 Bendigo Historical Society Inc.
Photograph - PETER ELLIS COLLECTION: MUSIC SHEET
Colour polaroid photograph. Sheet music. Banjo. Colonial Musical Cabinet containing new and popular songs. Native dried flower.entertainment, music, sheet music -
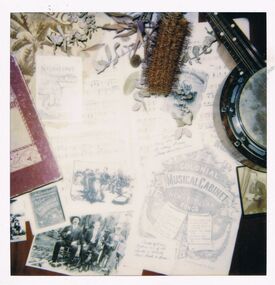
 Bendigo Historical Society Inc.
Photograph - PETER ELLIS COLLECTION: MUSIC SHEET
Colour polaroid photograph. Sheet music. Banjo. Colonial Musical Cabinet containing new and popular songs. Native dried flower.entertainment, music, sheet music -
 Bendigo Historical Society Inc.
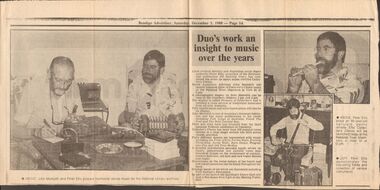
Newspaper - PETER ELLIS COLLECTION: BENDIGO ADVERTISER SATURDAY DECEMBER 3, 1998, 3rd December, 1998
Newspaper cutting from Bendigo Advertiser, dated Saturday, December 3, 1988 - Page 14. Photo on left is captioned: ABOVE: John Meredith and Peter Ellis prepare traditional dance music for the National Library archives. Top right picture is captioned: ABOVE: Peter Ellis plays and 80-year-old celluloid penny whistle. Ellis' 'Collector's Choice' will be launched today at the National Trust chambers in View St at 3 pm. LEFT: Peter Ellis demonstrates the one string fiddle and collection of various instruments. Article reads: Duo's work an insight to music over the years. Local musical identity and Australian social dance authority Peter Ellis, co-author of the Bicentennial publication 200 Dancing Years, has completed his series on dance music entitled 'Collector's Choice'. Noted Australian folklorist John Meredith will launch volume three of Collector's Choice today at the National Trust chambers in View St at 3 pm. A photographic display by John Meredith can be seen at the chambers between 2pm and 5pm. The display is called Pioneers of Performers and it exhibits a cross section of traditional musicians from all over Australia. Fifty superb black and white toned prints will also be on display. John Meredith is one of Australia's foremost folklorists and has many publications to his credit including Folk Songs of Australia, Frank the Poet and The Wild Colonial Boy. Peter and John have just returned from the third national folklore conference in Canberra. Collector's Choice has more than 300 popular tunes written in a clear single melody line with guitar chords provided. Forty different dances are represented with music including the Pride of Erin, Parma Waltz, Evening Three-step, Swing Waltz, Barn Dance, Progressive Jive and Old Time Medley. A detailed introduction provides handy advice on choice, presentation and suitable tunes plus historical details on the evolvement of colonial, modern ballroom, old time and new vogue dances and music. Illustrations on the social history of the bands and individual musicians can be found throughout the book. Bendigo bands of old which are illustrated including Cyril Sawyer's Swingsters. As part of the launch the Sandhurst Dance Club will host a free dance from 8pm at the Marong Public Hall.Bendigo advertiserperson, individual, peter ellis oam -
 Bendigo Historical Society Inc.
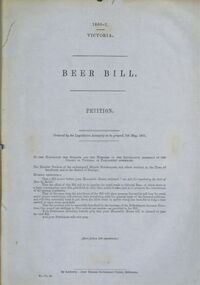
Document - BEER BILL PETITION 1860-1
Glass framed BEER BILL Petition (Victoria) 1860-1. Petition to the Honorable the Speaker and the Members of the Legislative Assembly of the Colony of Victoria, in Parliament Assembled. The undersigned Miners, Storekeepers and others resident in the town of Sandhurst, and in the district of Bendigo: Humbly Sheweth that a bill now before your Honorable House, intituled ''An Act for Regulating the Sale of Beer by Retail'' The effect of the bill will be to legalise the retail trade in Colonial Beerin other than public houses. Your petitioners humbly pray that your Honorable House will be pleased to pass the said Bill. (here follow 100 Signatures)document -
 Bendigo Historical Society Inc.
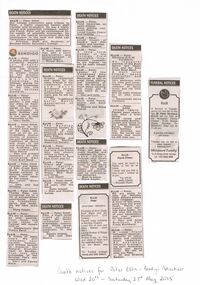
Newspaper - PETER ELLIS COLLECTION: NEWSPAPER CLIPPINGS
A4 sheet white printer paper with 8 newspaper clippings glued on. Handwritten note reads: Death notices for Peter Ellis - Bendigo Advertiser Wed 20th - Saturday 23rd May 2015. Death Notices. Ellis - Peter OAM. Our college community pays tribute to Peter, a highly respected former staff member and ex-student. He was a highly valued and supportive colleague, mentor and friend. Peter will be remembered for his wealth of scientific knowledge, his love of the natural environment and his contribution to the local and state Lab Technicians Associations. - Principal, staff and Students of Bendigo Senior Secondary College. City of Greater Bendigo. Ellis- Peter. A gentle man with a wonderful passion for Greater Bendigo's natural, built and musical heritage, Peter will be greatly missed by the Greater Bendigo Heritage Advisory Committee. He willingly shared his love and knowledge of the rich and unique heritage around us. Ellis - Peter Nicolaus OAM. You went so quickly. I will miss our trips to Festivals doing crosswords on the way. My sympathy to both families and Brian a great mate to the last. A void impossible to fill. - Mary Smith. Ellis- Peter OAM. A tribute to our intrepid band leader of 34 years who took us on an unforgettable musical journey of preserving and teaching the traditions of dance and music to old and young throughout Australia. You are irreplaceable ' Dirty Pierre' - Past and present members of the celebrated Emu Creek Bush Band. Ellis - Peter OAM. Founder and leader of Emu Creek Bush Band. Australia's largest collector of dancing history. A great friend taken far too young. Au revoir 'Dirty Pierre' - John and Sue Williams. Ellis - Peter OAM. Thanks Pete, you introduced me to a life of extraordinary experiences, amazing friendships, dance and music. We did have some fun. - Marg Hogan. Ellis - Peter. We are so saddened by your passing. Your music and great sense of humour will remain with us. - Wedderburn Old Timers Band. Ellis - Peter. A friend of many years. We will remember your warmth, humour and tireless pursuit to preserve the Natural Environment of Bendigo. Your love and knowledge of the Bendigo Flora was inspirational. - Mary and Patrick Ward. Ellis- Peter. A music and dance man with a warm appreciation and encouragement of diverse talent. - Winzar boys. Death Notices. Ellis - Peter. Greatly respected and loved by his many friends in the traditional music and dance movement across Australia. His achievements were many and he will be missed. - The Traditional Social Dance Association of Victoria. Ellis - Peter. The Bendigo Historical Society is saddened at the passing of fine musician and friend Peter Ellis. - Committee and members, Bendigo Historical Society. Ellis- Peter. A talented musician and long time friend who was always willing to help us. - Members of Euro fest Choir and Inc. Ellis - Peter. Friend and neighbour, nature's gentleman at rest. Sincere sympathy to Robyn, Rick, Ryan and Doug. - Judy Monti. Ellis- Peter OAM Fond memories of 28 years with the band. Sadly Missed. - Stan and Heather Symes. Death Notices. Ellis - Peter OAM Pete, a much loved friend of many years. We fondly remember your knowledge, humour and those great times together, especially in the bush. Deeply missed. - Rob and Glen Moors. Death Notices. Ellis- Peter. Fond memories, so sadly missed. Keep playing your music Peter. Loved cousin Cheryl and families. Ellis -Peter. Loved cousin of Sandra and Phil Jubber and families. Deeply Missed. Ellis - Peter. A long term member of the Bendigo Field Naturalist Club. Deepest sympathy to his friends, he will be sadly missed by all. Ellis - Peter. Leader of the 'Celebrated Emu Creek Bush Band' Memories of lots of great times playing and travelling all over. We learned so much about dancing and music and it just won't be the same. - Don and Julie. Ellis - Peter. Much loved friend, dancer and band leader. - Dianne and Doug Pearse. Death Notices. Ellis - Peter. Peter, you gave so much laughter and happiness to many, many people through your lovely nature and your brilliant music to listen to and dance to. You have left a legacy of music, books and dance as well as unforgettable memories. Rest in peace. - Diana Austin. Death Notices Ellis Peter 27/3/1946 - 18/5/2015 Formerly of Emu Creek Bush Band and the Wedderburn Old Timers). Passed away suddenly at Bendigo Hospice. Loved son of Joan and Allan Nielsen (both Dec). Loving brother of Robyn and Doug. Brother-in-law of Rick and Uncle of Ryan and the extended family. Let the music play on… For Funeral arrangements see later edition. Death Notices. Ellis - Peter Nicolaus O.A.M. Suddenly. An inaugural member of the Bush Dance and Music Club and the Emu Creek Bush Band. A much loved friend, dance instructor and musician. Very generous with his time and knowledge. Passionate collector of dance music and old time dances. Will be sadly missed by all who knew him. - Devastated dance members. Ellis- Peter. OAM 27/3/46 - 18/5/15 Passed away peacefully after a brief illness. Much loved and irreplaceable brother, cousin and uncle to the Lilford, Datson, Burns, Shaw and Kitch families. You enriched our lives. No words can express how much we will miss you. Ellis Pierre (Peter) You were as much a father to me as an uncle. I never told you that or how much I looked up to you. You will be sadly missed - Boswald ( Ryan). Ellis - Peter. We are going to miss our Monday night dinners before rehearsal. A lover of fine wine, good food and great music. Pierre, our Maestro and fearless band leader, we will miss the sound of your squeeze box and your passion for the music. - Paul and Alida Robinson, Emu Creek Bush Band. Ellis - Peter. A close friend colleague, musician, authority on native plants and colonial music researcher. An enormous influence in preserving early Australian dance and dance music. We will all miss you Pete. - Jill and Graeme Balaam. Funeral Notices Ellis. A service of thanksgiving for the life of the late Mr Peter Nicolaus Ellis will be held at the Mulqueen Family Chapel, 15-25 Bridge street, Bendigo on MONDAY (May 25) at 11.00am. A private cremation will follow. Tributes can be left at www.heavenaddress.com Mulqueen Family 15-25 Bridge street, Bendigo Est. 1853 5443 4455.person, individual, peter ellis oam -
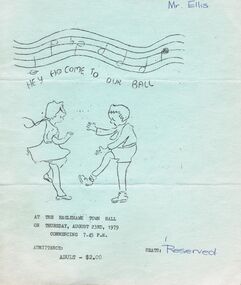 Bendigo Historical Society Inc.
Document - PETER ELLIS COLLECTION: BENDIGO NORTH PRIMARY SCHOOL BALL, 23rd August, 1979
Light blue program for the Bendigo North Primary School ball held on Thursday, August 23rd, 1979 at the Eaglehawk Town Hall. Front page has a sketch of a boy and a girl dancing. The centre has a list of 18 dances, a mixture of Colonial, Ballroom and Folk Dances. The back page is the acknowledgements to: Esme Barker, Norman Powell, Jeanette Clancy, Elizabeth Lakey, Val Lee, Maurie Raynor, Peter Ellis, Sandhurst Dance Club. Written on the back is Maree Murrell.entertainment, dance, ball, peter ellis collection, eaglehawk town hall, bendigo north primary school, esme barker, norman powell, jeanette clancy, elizabeth lakey, val lee, maurie raynor, peter ellis, sandhurst dance club, maree murrell -
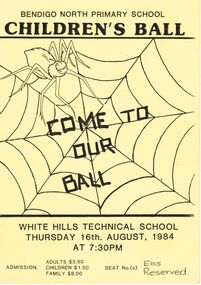 Bendigo Historical Society Inc.
Document - PETER ELLIS COLLECTION: CHILDREN'S BALL, 16th August, 1984
Yellow card, folded. Bendigo North Primary School Children's Ball held at the White Hills Technical School on Thursday 16th August, 1984. Front page has a large spider web with a big spider and printed over the web is 'Come to our ball'. Written in the bottom right corner is Ellis reserved. On the inside is the list of Ballroom, Colonial and Folk Dances and the grades performing them. Also included was a playet (sic) titled The Spirit of the Tree and a Special Item titled Charlotte's Web. The back page has the Acknowledgements to: Neil Ross, Merilyn Tatt, Heather & Noel Ridge, Greg Kaska, Brian Hillman, Lloyd George, Graham Balam, Maree Murrell, Mark Walters, Ken McKindlay, Lexie Ottrey, Peter Ellis, Faye McCaig, Viv MacDonald, Val Lee, Lesley Campbell, Margaret Gilbee, Ruth Sloan, Kaye Trimble,Jennette Price, Joy Miles, Janet Holland, Liz Rowell, Anne Gibson, Joan McColl, Joy Daniel, Elaine Carmichael, Evelyn Bruhn, Sandra Kaska, Olga Chafer, Lyn Craig, Gail Kingdom, Maureen Warren, Jenny Mollison, Coral McClure, Robyn Murphy, Helen Penna, Dale Little, John Shiel, Sandra Kaska, Glynis Goulter, Margaret Walker, Maree Walker, Bill Garvin, Stan Doye, Robyn Wetzig, Jim Lawson, Rodger O'Hara, Sue Treloar, Margaret Gregson and Di Milich.Bendigo North Primaryentertainment, dance, ball, peter ellis collection, bendigo north primary schol, white hills technical school, brenda coulter, neil ross, merilyn tatt, heather & noel ridge, greg kaska, brian hillman, lloyd george, graham balam, maree murrell, mark walters, ken mckindlay, lexie ottrey, peter ellis, faye mccaig, viv macdonald, val lee, lesley campbell, margaret gilbee, ruth sloan, kaye trimble, jennette price, joy miles, janet holland, liz rowell, anne gibson, joan mccoll, joy daniel, elaine carmichael, evelyn bruhn, sandra kaska, olga chafer, lyn craig, gail kingdom, maureen warren, jenny mollison, coral mcclure, robyn murphy, helen penna, dale little, john shiel, sandra kaska, glynis goulter, margaret walker, maree walker, bill garvin, stan doye, robyn wetzig, jim lawson, rodger o'hara, sue treloar, margaret gregson, di milich