Showing 149 items matching "diving photograph"
-
 Whitehorse Historical Society Inc.
Document, Waterholes Exhibition, 2013
Catalogue of paintings and photographs of Waterholes in Whitehorse.Catalogue of paintings and photographs of Waterholes in Whitehorse, displayed 11 September - 5 October 2013 at the Whitehorse Artspace.Catalogue of paintings and photographs of Waterholes in Whitehorse.whitehorse artspace, blackburn lake, surrey dive box hill -
 Rutherglen Historical Society
Image, c1890
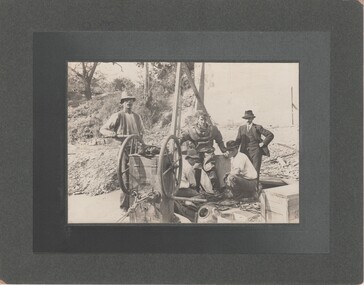
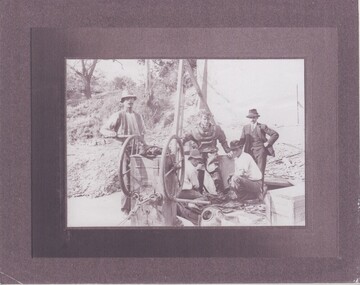
Photo taken during building of 2nd John Foord Bridge, between Wahgunyah Victoria and Corowa New South Wales. Extracts from the entry for the bridge in the Victorian Heritage Database: "The bridge is of also of historical significance for its association with the prominent local identity and pioneer businessman John Foord, who was involved in the company that erected the 1862 timber bridge on the site. ... When the new bridge was built as a replacement, it took the same name." This second bridge (the current one) was opened in January 1893, Black and white photograph, mounted on cardboard, of four men, one in old style diving suit. diving, wahgunyah, corowa, john foord, bridge construction -
 Rutherglen Historical Society
Image, c1915
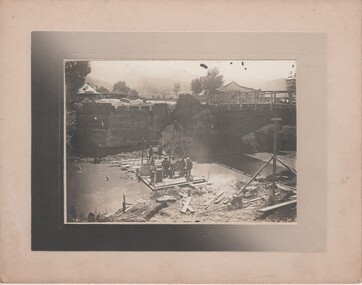
Black and white photograph, mounted on cardboard, showing a group of men working on the construction of a bridge. One of the men is wearing a diving suit.Sign on building in the background: "Buffalo View Hotel"bridge construction, mount buffalo, mt buffalo, buffalo view hotel, porepunkah bridge, bridges -
 Rutherglen Historical Society
Image
Extracts from the entry for the bridge in the Victorian Heritage Database: "The bridge is of also of historical significance for its association with the prominent local identity and pioneer businessman John Foord, who was involved in the company that erected the 1862 timber bridge on the site. ... When the new bridge was built as a replacement, it took the same name." This second bridge (the current one) was opened in January 1893, Photocopy of a photograph of four men, one in old style diving suit. Copy is mounted on board made of what appears to be a thin layer of Styrofoam sandwiched between two layers of glossy paper.Written on back of mount: "During building of 2nd John Foord Bridge"john foord, bridge construction, diving, corowa, wahgunyah -
 Ballarat Heritage Services
digital photographs, Lisa Gervasoni, Surrey Dive Pre Olypmic Swimming Pool, 2010 - 2017
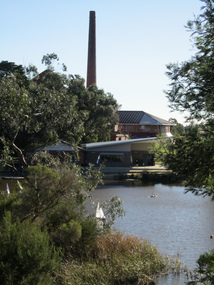
... Colour photograph of the Surrey Dive Swimming Pool.... dive quarry Colour photograph of the Surrey Dive Swimming Pool ...Colour photograph of the Surrey Dive Swimming Pool.swimming, pool, sport, pre olympic, box hill, surrey dive, quarry -
 Ballarat Heritage Services
Photograph - Photograph - Black and White, Diving Exhibition at Hepburn Springs Swimming Pool, c1936, c1936
... springs swimming pool diving Black and white photograph ...Black and white photograph of numerous people watching a diving exhibition the Hepburn Springs Swimming Pool, which is a natural swimming pool in Spring Creek.hepburn springs, swimming, swimming pool, hepburn springs swimming pool, diving -
 Brown Hill Progress Association Inc.
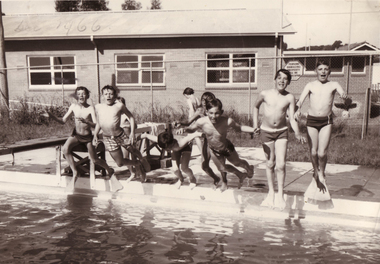
Photograph - Black and White, Brown Hill Pool, 1966, 12/1966
.1) A number of boys jump into the Brown Hill Pool. .2) The diving board at Brown Hill Pool.brown hill pool, brown hill community pool, swimming, swimming pool -
 Ballarat Heritage Services
Photograph - Photograph - Black and White, Hepburn Springs Swimming Pool
The Hepburn Pool was built in Spring Creek during the 1930s by the Zelmans of Bellinzona Guest House. Alberto Zelman paid for local workers to construct the pool to their specifications so the visitors to local guest houses could swim on hot days. The Hepburn Pool was used for the Victorian Swimming Championships, with 6 stones marked at one end for each lane. It is 50 yards long, the length required for competitions. In 1935 the Hepburn Amateur Swimming Club organised their first swimming carnival, the meeting conducted by the Victorian Amateur Swimming Association, In 1969 the Daylesford Olympic Swimming Pool was constructed so this 'old swimming pool' was neglected. Fortunately in 1993 local volunteers associated with the Savoia Hotel returned the pool to its former glory with the help of old photos and a lot of hard work. Two well known swimmers swam at the pool in the Victorian swimming Championships, they were Annette Kellerman and Frank Beaurepaire. The Pool was named Victoria's Favourite Built Place in 2004 as part of the Victorian Government's involvement in the International Year of the Built Environment. It was included on the Victorian Heritage Register following a nomination and comparative analysis of pre Olympic Swimming Pools in Victoria by Lisa Gervasoni.Black and white photograph of the Hepburn Pool in Spring Creek, including the diving board.hepburn springs swimming pool, hepburn springs, hepburn pool, pre-olympic swimming pools, albert zelman, bellinzona, annette kellerman, frank beaurepaire, victorian amateur swimming association, hepburn amateur swimming club -
 Inverloch Historical Society
000159 - Photograph - Cape Paterson - diving board on beach - S Powell
... 000159 - Photograph - Cape Paterson - diving board on beach...) Inverloch gippsland 000159 - Photograph - Cape Paterson - diving ... -
 Mt Dandenong & District Historical Society Inc.
Photograph, Kalorama Gap Under Snow 1921, 1921
View of Kalorama Gap under snow taken in 1921. Mountjoy Guest House is at top right and Beulah Tea Rooms is in the centre. This photograph has a detailed inscription on the back handwritten by John Lundy-Clarke in 1974.Kalorama Gap under snow 1921 The leafless elm trees are low in the centre and the dual nature of the nearer one can be clearly seen, two small suckers of the older farther tree being twisted together in 1898 by Fred Jeeves. The older tree was planted 1880. Mrs Hands shop can be clearly seen, which was the Mount Dandenong North Post Office. The old Main Road runs up the centre of the picture and turns to the right and disappears behind “Mountjoy” the big guest house built by Paynters in 1905 and sold to Ellis Jeeves 1908, whose family ran it till 1943. At the bend of the road behind the big pine tree and the dark blackwood can be seen faintly the gable of Price’s house that contained the first shop on the mount. Above it is H Walker’s cottage on Ridge Road that still exists, his homestead is on the left of the picture on the same level. Below this house and to the left can be seen Ted Prices hay and corn store. The present estate agency lies between these two buildings, on the road which had recently been built. This can be seen winding from the lower left corner of picture to the left of the elms. The CRB had recently fenced the road and this is clearly seen as it circles behind trees in the left centre. Barber’s Road crosses CRB Road to the left of the dray under the leafless elm and the Coach Road dives down to the right just behind the pair of blackwoods to right of the elms. The picture was taken from just above the boundary of Isaac Jeeves’s selection Crown Allotment “C” (Jeeves Saddle) which stretched across the Gap to the other side of Mrs Hand’s shop, monopolising the gap from 1871 to 1879. Price’s house remains partly as the small house – “Mirra Laken”. kalorama gap, fiveways, post office, mountjoy, guest house, snow -
 Bendigo Historical Society Inc.
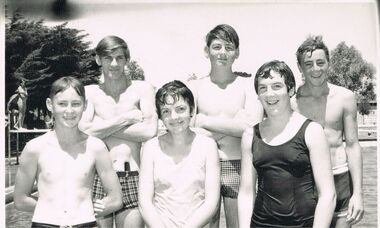
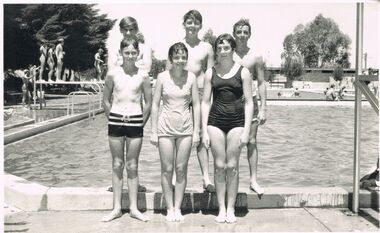
Photograph - BERT GRAHAM COLLECTION: FOUR BOYS PLUS 2 GIRLS IN SWIMMING SUITS
Photograph, Bert Graham Collection, 4 boys and 2 girls posing in front of the swimming pool, with one other on diving board watching. On the reverse are; Back, Rhett Marchioni, Anthony Buschev, John Pocock, Front; Ray Chalkley, Lesley Richardson, Julie Dole. Graham is written in red.bendigo, clubs, bendigo east swimming club -
 Bendigo Historical Society Inc.
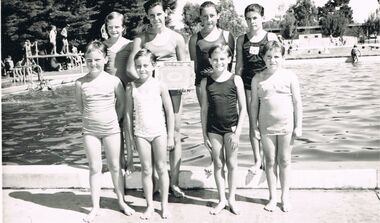
Photograph - BERT GRAHAM COLLECTION: EIGHT SWIMMERS
Black & white photograph, Bert Graham Collection, a group of eight swimmers beside the Bendigo East Swimming Pool, with one holding a certificate, in the background,are people on the diving board, and on the lawns & in the pool. On the back is the name of Graham in red ink.bendigo, clubs, bendigo east swimming club -
 Bendigo Historical Society Inc.
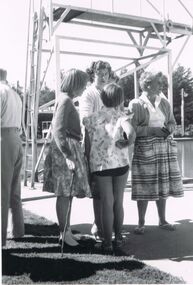
Photograph - BERT GRAHAM COLLECTION: GROUP PHOTO
Photograph black & white, Bert Graham Collection, Three women and two girls talking at the side of a diving board, at the East Bendigo Swimming Pool, one of the girls is holding a stick. A man is at left facing away.bendigo, clubs, bendigo east swimming club -
 Bendigo Historical Society Inc.
Photograph - BERT GRAHAM COLLECTION: SIX YOUNG SWIMMERAS
Black & white photograph, Bert Graham Collection, six young swimmers posing by the East Bendigo Swimming Pool, they from left to right are; Rear, Rhett Marchione, Tony Busschev, John Pocock. Front; Ray Chalkley, Lesley Richardson, Julie Dole, as named on back. To the left people on the diving boards and more at right.bendigo, clubs, bendigo east swimming club -
 Bendigo Historical Society Inc.
Photograph - BERT GRAHAM COLLECTION: BENDIGO SWIMMING POOL
... & 10 metre tower, 3 metre diving board, & slide. Photograph ...Black & white photograph, Bert Graham Collection, Bendigo East Swimming Pool , 5 metre & 10 metre tower, 3 metre diving board, & slide.bendigo, clubs, bendigo east swimming club -
 Kew Historical Society Inc
Photograph, Kew Municipal Baths, 1930s
W.D. Vaughan in 'Kew's Civic Century' (1960) has a chapter (XXII, pp.103-105) on the Kew Swimming Pool (aka Kew Baths). In the chapter he recounts debate in Council from 1912 about the need for a swimming pool. The first concrete step toward achieving this occurred in 1914 when Council purchased the Tramways Sheds on the corner of High and Disraeli Streets in 1914. Further adjoining land in High Street was compulsorily acquired in 1923. The final plans were accepted in 1925 and following public tender, Messrs. Weavill and Keast were appointed to construct the pool at a cost of 5,418/9/-. The baths were formally opened on 18 November 1925 by George Ramsay, Mayor of Kew. (The Kew Swimming Club was founded in the same year.) Vaughan notes that "mixed bathing was not permitted at the Kew Baths until January, 1928, when it was allowed every evening (except Sundays) and Friday afternoons. A few years later these restrictions were removed altogether".Small B&W photograph of two boys standing beside a diving board at the old Kew Swimming Pool while in the distance a woman dives into the pool. The photograph can be dated to the years 1929-33, as the wooden grandstand was not erected until 1929 and it was before a new high swimming platform was erected in 1933."Old Swimming Pool Kew. D4. 92"kew swimming pool - kew (vic), sport and recreation - kew (vic), kew baths - kew (vic), mayors of kew - cr. george ramsay - kew (vic), kew swimming club -
 Kew Historical Society Inc
Photograph, Kew Municipal Baths, 1929-1933
W.D. Vaughan in 'Kew's Civic Century' (1960) has a chapter (XXII, pp.103-105) on the Kew Swimming Pool (aka Kew Baths). In the chapter he recounts debate in Council from 1912 about the need for a swimming pool. The first concrete step toward achieving this occurred in 1914 when Council purchased the Tramways Sheds on the corner of High and Disraeli Streets in 1914. Further adjoining land in High Street was compulsorily acquired in 1923. The final plans were accepted in 1925 and following public tender, Messrs. Weavill and Keast were appointed to construct the pool at a cost of 5,418/9/-. The baths were formally opened on 18 November 1925 by George Ramsay, Mayor of Kew. (The Kew Swimming Club was founded in the same year.) Vaughan notes that "mixed bathing was not permitted at the Kew Baths until January, 1928, when it was allowed every evening (except Sundays) and Friday afternoons. A few years later these restrictions were removed altogether".Small B&W photograph of the old Kew Swimming Pool. Girl on diving board at left. The photograph can be dated to the years 1929-33, as the wooden grandstand was not erected until 1929 and it was before a new high swimming platform was erected in 1933."Old Swimming Pool Kew. D2. 92"kew swimming pool - kew (vic), sport and recreation - kew (vic), kew baths - kew (vic), mayors of kew - cr. george ramsay - kew (vic), kew swimming club -
 Kew Historical Society Inc
Photograph - Deep Rock Swimming Pool and Clubrooms on the Yarra, c.1925
The former Deep Rock Swimming Pool was about 500 yards [457 metres] above Dight’s Falls. It was there that the Deep Rock Swimming Club was established in 1906. This initial club was expanded in 1916 to incorporate a life-saving club. In 1918, John Wren, the president of the club offered the club £1000, and undertook to sponsor a patriotic carnival in March 1918, at which swimming champions would take part. The ‘pool’ was to achieve fame as the venue for a world record-breaking ‘swallow dive’ of 205 feet 9 inches [63 metres] by ‘Prince Wickyama’, [aka Alec Wickham], a Solomon Islander. The dive from a special platform on the west side of the Yarra was reputedly viewed by between 50,000-100,000 spectators, with funds going to the State War Council. The Herald, 25 March 1918, claimed that the wide area occupied by spectators made more precise estimates impossible. In the 1980s, the construction of the Eastern Freeway, and the consequent re-routing of the Yarra River led to the site of the Deep Rock Pool being obliterated. A small cairn and plaque on the Fairfield side of the river now marks its former site.Very rare early photograph off the Deep Rock swimming pool. The pool and its built structures are historically and socially important to the people of Collingwood, Fairfield and Kew. Small, faded, Gelatin Silver print positive photograph of the Deep Rock Swimming Pool situated on the Yarra at Collingwood and Fairfield. The famous diving tower is at the right of the photo. The built structures were constructed for the Deep Rock Swimming and Life Saving Club. People are sitting on the terraces above the river. "Bathing Club. Deep Rock on the Yarra. Studley Park Melbourne. Please credit E.J. Thomasson Collection"deep rock swimming pool, deep rock swimming club, deep rock lifesaving club, swimming -- river yarra, river yarra -
 Kew Historical Society Inc
Photograph - Children on a diving platform on the Yarra at Kew, 1940s
... . Photograph Children on a diving platform on the Yarra at Kew ...The River Yarra was a traditional place of recreation for children and adults in Kew. Often swimming in the Yarra was made from platforms attached to the bank such as this one.Original black and white photograph. Group of five children in bathing costumes on a rudimentary diving board attached to the bank of the River Yarra.Reverse: "M Holmes"river yarra, recreation --- swimming -
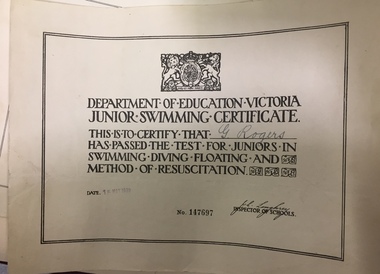 Kew Historical Society Inc
Certificate, Education Department (Victoria), Junior Swimming Certificate, 15/05/1939
This work forms part of the collection assembled by the historian Dorothy Rogers, that was donated to the Kew Historical Society by her son John Rogers in 2015. The manuscripts, photographs, maps, and documents were sourced by her from both family and local collections or produced as references for her print publications. Many were directly used by Rogers in writing ‘Lovely Old Homes of Kew’ (1961) and 'A History of Kew' (1973), or the numerous articles on local history that she produced for suburban newspapers. Most of the photographs in the collection include detailed annotations in her hand.The Rogers Collection provides a comprehensive insight into the working habits of a historian in the 1960s and 1970s. Together it forms the largest privately-donated collection within the archives of the Kew Historical Society.Printed Junior Swimming Certificate. Education Department of Victoria. Awarded to G. Rogers in 1939. The certificate records that the swimmer passed the test for juniors in swimming, diving, floating, and methods of resuscitation. No. 147697. Date: 15 May 1939george rogers, swimming certificates -
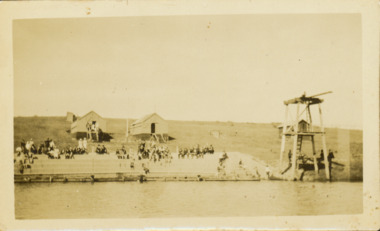
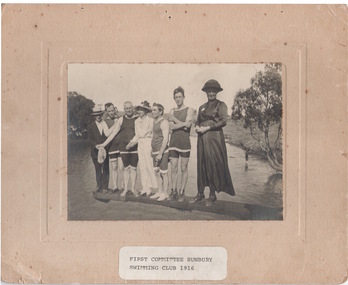 Sunbury Family History and Heritage Society Inc.
Photograph, Sunbury Swimming Club
This is a photograph of the first committee of the Sunbury Swimming Club which was formed in 1916. The club used the pool at The Nook near Eadie Street. The area had shade trees, a drink fountain, seats, change rooms and diving boards. In 1966 an Olympic size swimming pool was opened in LIgar Street, as a result of a whole community effort. The site at The Nook became a popular passive recreation area.The pool at The Nook was a popular meeting place for Sunbury residents in the hot summer months for fifty years A non-digital sepia photograph backed onto a beige board of seven people standing on a diving board that is over a natural water hole. Four men are dressed in swim wear and two ladies are in full length dresses. A man standing on the end of the board is wearing a suit. sunbury swimming club, the nook, swimming, sporting clubs -
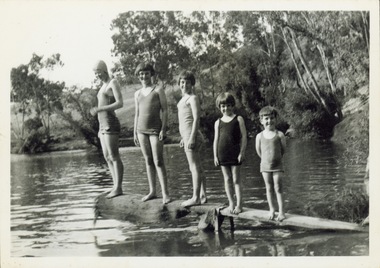
 Sunbury Family History and Heritage Society Inc.
Photograph, c1920s
The swimmers were seated on the diving board over Jacksons Creek at The Nook, which served as a swimming pool in Sunbury until 1966 when the long-awaited for swimming pool was officially opened in Ligar Street on19th January 1966. For a number of years before the official opening townspeople organised many fund raising events to pay for the new pool. The pool at The Nook served as a popular swimming place for many years in Sunbury during the summer weather.A sepia photograph with a white border of a group of eight swimmers sitting on a diving board over a river. swimming, the nook, swimming clubs -
 Surrey Hills Historical Society Collection
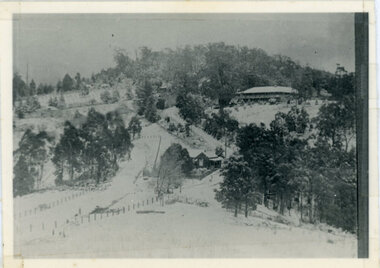
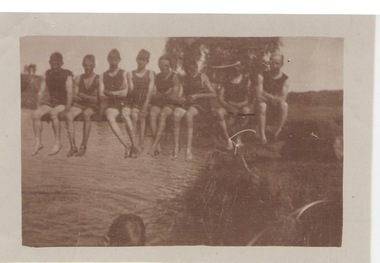
Photograph, The Surrey Dive c1909-1912
... is wearing a boater hat. The Surrey Dive c1909-1912 Photograph ...Located in Surrey Park, this photo was taken about 1909-1912. The Surrey Hills Swimming Club formed in 1906 and swimming carnivals were popular from this time. The dive was created from a clay hole formed during brick-making activity at the adjacent brick works. From 1906 Carnivals were popular events. Olympic competitors trained here until Councils built Olympic-sized pools. Photo by William V Hill of Pembroke Street. Donor Mr Bill Dempsey was his nephew.A black and white photograph of a group of 15 young men standing and sitting on diving boards and a platform near some stairs. Most are wearing long trunks covering their thighs and singlets. One person is wearing a boater hat.surrey dive, swimmers, bathing costumes, surrey hills swimming club, box hill brick works, festivals and celebrations, olympics, (mr) william v hill -
 Surrey Hills Historical Society Collection
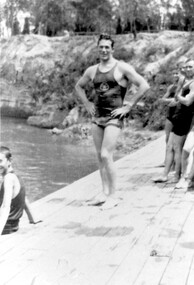
Photograph, Surrey Dive carnival, 1920
... over his swimming trunks. Surrey Dive carnival, 1920 Photograph ...Taken at the Surrey Dive on 2nd November 1920. Wycliff Church Sunday School picnic was held in the parkland at the dive. The swimmer is identified as Norman Ross, an American Olympic Swimming Champion. Frank Beaurepaire, the Australian champion of 880 yards, missed competing against Ross in 1912 as he was teaching swimming. Beaurepaire made a comeback 9 years later and at a race at St. Kilda, he beat Ross by 32 seconds.A black and white photograph of a young man standing beside a natural swimming pool with a few people looking on. He is wearing a singlet over his swimming trunks.clothing and dress, swimming, olympic champion, surrey dive, 1920, wyclif church sunday school picnic, norman ross -
 Surrey Hills Historical Society Collection
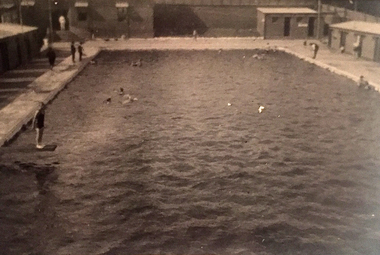
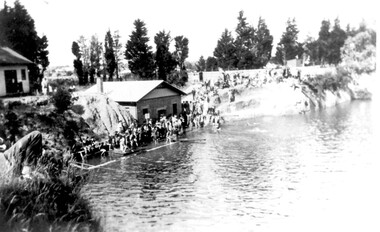
Photograph, The Surrey Dive, January 1931, 1931
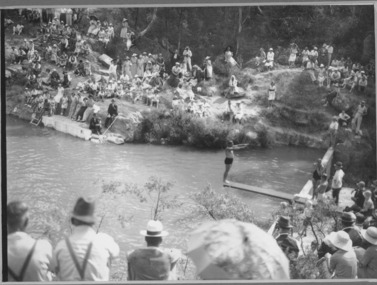
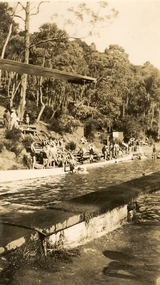
... . The Surrey Dive, January 1931 Photograph ...The Surrey Dive was formed on the site of a quarry from which clay had been extracted for brick-making. From 1905 Council was petitioned by the newly-formed Surrey Park Swimming Club to develop the site. Improvements including bathing sheds, spring boards and a 10-lane course but it remained a challenging site for inexperienced swimmers because of the sheer cliffs and the drop of 30m. The dive was the site of many swimming carnivals and attracted large spectator crowds. Frank Beaurepaire competed in the first carnival held in 1907 and won the one-mile race in record time. The dive was closed following the drought of 1967-1968 and redeveloped as an ornamental lake.The Surrey Dive was the first Olympic standard pool in Australia. Black and white photo of the Surrey Dive taken in January 1931, probably during a swimming carnival. The dive is in the foreground with 2 buildings on the LHS. One is brick with a chimney and at the water's edge; the other is of timber construction and is on the far LHS on the bank above the water. There is a large group of people in bathing costumes and a crowd which extends up the bank towards the right. There are mature conifer trees in the background. surrey dive, swimming, sports and recreations, ron falconer -
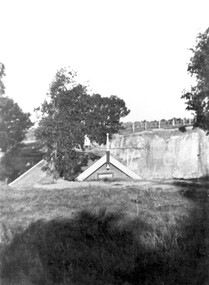 Surrey Hills Historical Society Collection
Photograph, The Surrey Dive, 1910, 1910
... perimeter. The Surrey Dive, 1910 Photograph Ken Hall ...The Dive, in Elgar Road Park was formed when water seeped into the hole from which clay had been quarried for brick-making. In 1905 the Surrey Swimming Club was formed and carnivals were held regularly. This was the venue for training Olympic swimmers prior to the Council constructing an Olympic sized pool.Black and white photo with a grassy foreground beyond which the apex of the roof only of the clubhouse is visible. Beyond this the far bank of the Surrey Dive can be seen with fencing along its perimeter.surrey dive, swimming, sports and recreation, quarries, box hill brick works, elgar road park, surrey swimming club -
 Port Fairy Historical Society Museum and Archives
Book, Gelding Street Press, Abalone pioneers : the Untold Stories of the Victorian Western Zone Divers, 2019
“Abalone Pioneers is the Australian story of the divers, deckhands, researchers and processors who established and developed the zone's abalone industry. The book chronicles the amateur fisherman of the 1950s and the hazy crazy tribe of ‘scruffy longhairs’, who were attracted by the hedonistic lifestyle and fantastic profits in the 1960s, to the professional enterprise of today. It charts the development of the Victorian Western Abalone Divers Association and it role managing and protecting the Victorian Western Zone’s resources, and explores the successful diver-led commercial processors. Illustrated with over 100 historical photographs and featuring over 50 interviews, Abalone Pioneers is an exuberant and fascinating account of the establishment of one of Australia’s valuable but little-known fisheries.”--Back cover.224 pages, 19 pages of plates : illustrations (chiefly colour), colour facsimiles, colour portraits ; 27 cm.non-fiction“Abalone Pioneers is the Australian story of the divers, deckhands, researchers and processors who established and developed the zone's abalone industry. The book chronicles the amateur fisherman of the 1950s and the hazy crazy tribe of ‘scruffy longhairs’, who were attracted by the hedonistic lifestyle and fantastic profits in the 1960s, to the professional enterprise of today. It charts the development of the Victorian Western Abalone Divers Association and it role managing and protecting the Victorian Western Zone’s resources, and explores the successful diver-led commercial processors. Illustrated with over 100 historical photographs and featuring over 50 interviews, Abalone Pioneers is an exuberant and fascinating account of the establishment of one of Australia’s valuable but little-known fisheries.”--Back cover.western abalone divers association (victoria) -- history., divers -- victoria, western -- biography., abalone fisheries -- victoria, western -- history., abalone industry -- victoria, fishers -- victoria, abalones., fisheries -- victoria., sports & active outdoor recreation., local history., abalones -- victoria, western., abalone industry -- australia., deep diving., fisheries -- australia -- victoria., victoria, victoria., australian, book -
 Surrey Hills Historical Society Collection
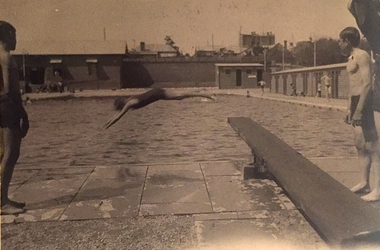
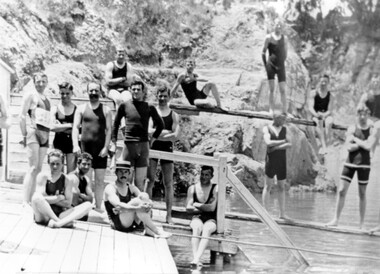
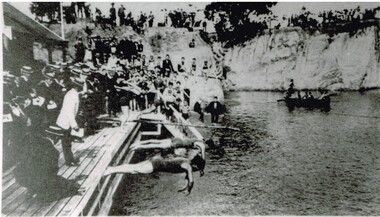
Photograph, Carnival Day at Surrey Dive, Possibly 1909
... at the Dive. / (photo: Box Hill Council)" Black and white photo ...This photo records one of the swimming carnivals held at the Surrey Dive, the first of which was organised in 1907. It was at the 1907 carnival that champion swimmer Frank Beaurepaire won the one-mile championship in record time. In the era before purpose-built municipal swimming pools, Surrey Dive was a popular destination for swimming and people came to it from many Melbourne suburbs. It operated from 1905 to 1967. It was the newly formed Surrey Park Swimming Club (established in 1905) that petitioned the Box Hill Council to purchase the former quarry site associated with the Box Hill Brick Works. A ramp, bathing sheds, springboards, and eventually a 10-lane course were developed, making the Dive the first Olympic standard pool in Australia. The carnivals attracted huge crowds. The original use as a quarry explains the notorious depth of the swimming hole and the sheer, steep cliffs surrounding it. These posed obvious safety issues, as did the water quality. Ivy Lavinia Weber, who was the second woman to be elected to the Victorian parliament (the first at a general election) and renowned for her commitment to health and physical fitness, campaigned for State government assistance to build new baths. These were built adjacent to the Dive and were opened in 1939. The Dive continued as a facility used by experienced swimmers until 1967 when it closed due to the drought causing the water to dry up. Today the site has been turned into an ornamental lake. This image was used as a mural in the refurbishment of the Box Hill Aqualink. The image has strong associations with early industry (brick making), recreation and particularly the early history of the sport of swimming.Black and white photo with a white border. Scan shows image only. It shows 3 men diving from a wooden platform into an area of water beneath higher banks. There is a boat in the background, a building to the LHS of the photo and many spectators in boater hats on the platform, some in bathing suits along a ledge and many around the top of the bank. Two men in the LH foreground may be officials.Printed long the bottom edge of the frame: "An image from history - Carnival Day at the Dive. / (photo: Box Hill Council)"surrey dive, box hill brick works, swimming, surrey park swimming club, (mr) frank beaurepaire, (mrs) ivy lavinia weber, swimming carnivals -
 Port Fairy Historical Society Museum and Archives
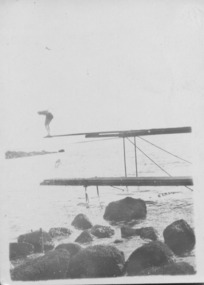
Photograph
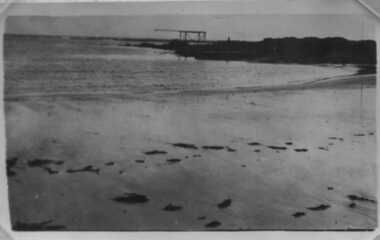
... Black and white photograph of 2 diving boards situated... photograph of 2 diving boards situated at the South Beach. (Pea Soup ...Two Diving boards at the South BeachThis image was taken at a time when health and safety rules were unknown and the public took risks we may not today. Black and white photograph of 2 diving boards situated at the South Beach. (Pea Soup)beach, sea, seascape, diving board, south beach -
 Port Fairy Historical Society Museum and Archives
Photograph
South beach diving boardsouth beach, diving, board, sea, ocean, rocks, reef