Showing 110 items
matching food processor
-
 Mont De Lancey
Cherry Stoner, Circa 1910
... -and-dandenong-ranges Food processing equipment "Logan & Strobridge" "New ...Hand-cranked cherry stoner."Logan & Strobridge" "New-Brighton. PA."food processing equipment -
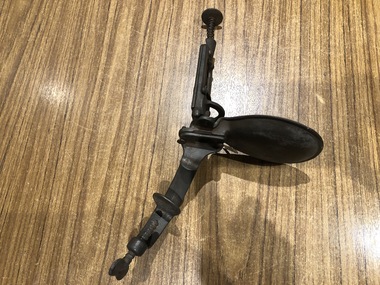
 Mont De Lancey
Cherry Stoner, Circa 1890
... -and-dandenong-ranges Food processing equipment "Goodell Co. Antrim N.H ...'Family' cherry stoner, hand operated, with split wooden knob on the handle."Goodell Co. Antrim N.H."food processing equipment -
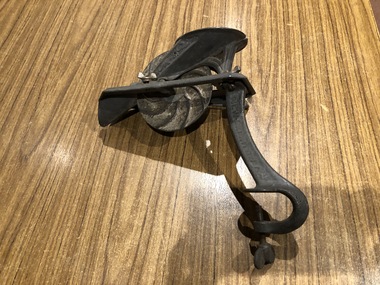
 Mont De Lancey
Cherry Stoner, Circa 1910
... . The flesh goes one way and the stone another. Food processing ...The stone is forced through the flesh of the cherry. The flesh goes one way and the stone another.Hand-punched, cherry stoner."Rollman Mfg. Co." "Mount Joy. PA. USA"food processing equipment -
 Mont De Lancey
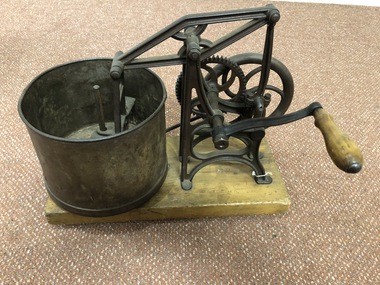
Food Chopper
... -and-dandenong-ranges Food processing equipment Cast iron assay food ...Cast iron assay food chopper with wooden handle to turn cogged wheels, to operate the guillotine mechanism. It is mounted on a wooden base.food processing equipment -
 Mont De Lancey
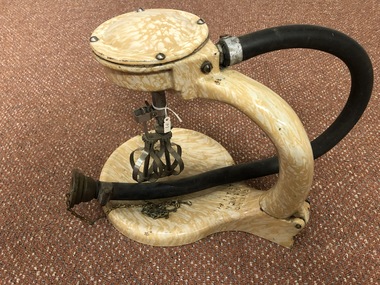
Hydro Mixer, Circa 1920
... -and-dandenong-ranges Connects to a kitchen sink tap. Whisks Food ...Connects to a kitchen sink tap.Hydro Mixer water powered whisk, with marble patterning on body of enamelled cast iron mechanism.Hydro Mixer Pat. App.whisks, food processing equipment -
 Mont De Lancey
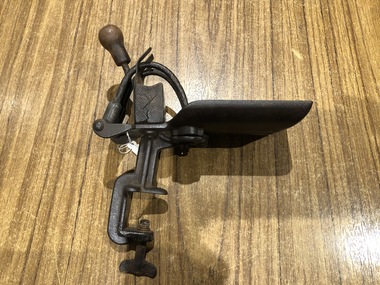
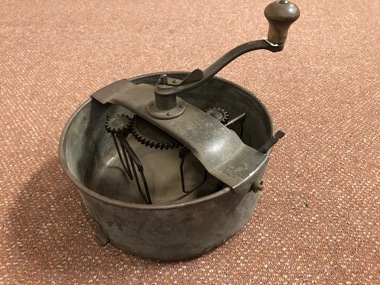
Cake Mixer, Landers, Frary & Clark, Circa 1905
... -and-dandenong-ranges Whisks Food processing equipment Tinplate round ...Tinplate round cake mixer with 2 beaters and 1 whisk, operated by hand-cranked handle with a wooden knob. Mixer attaches to a table with a screw on clamp.whisks, food processing equipment -
 Mont De Lancey
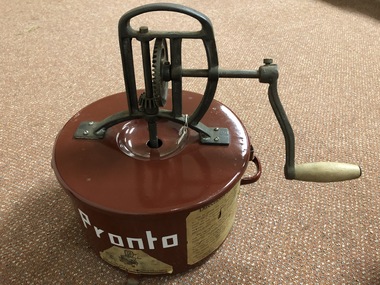
Peeling Machine, Circa 1920
... their skin. potato peelers food processing equipment Pronto ...Interior surfaces are abrasive, rather like coarse sandpaper. Turning the handle rotates the potatoes or other vegetables, causing them to rub against the surfaces and so losing their skin.'Pronto' potato or other vegetable, peeler. Burgundy enamel tin on the outside, grey abrasive interior surface.Pronto The "Pronto" Peeling Machinepotato peelers, food processing equipment -
 Royal Brighton Yacht Club
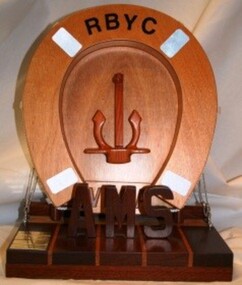
Life Ring, Vega Trophy (Mounted Wooden Life Ring)
Vega Trophy (Mounted Wooden Life Ring) Donor: Graham Noel During World War II when the Germans occupied the Channel Islands the local people went through very severe food rationing and were on the verge of starvation. Near the end of the war, the Swedish ship Vega was allowed by the Germans to deliver several shipments of food to the civilian population, easing the critical shortages of food on the islands. Further background detail can be found below. Graham Noel was born on the Islands and lived there during this harsh period. The trophy is awarded to the winner of the Combined Division AMS Aggregate Series. First Winner: Under Capricorn, P. Bedlington 2005/06 Vega – Further historical background Early in the Second World War Jersey was declared “unarmed” and the German military took over, taking quite a few lives in the process, through strafing the main harbour and a few other places which they needlessly considered threatening. A considerable number of locals evacuated to England before the Germans arrived, but more than 60% of the population remained and endured 5 years of very strict and difficult conditions. Not only was the population unable to contact relatives in the UK or elsewhere, but very quickly they found themselves subject to harsh curfews, strictly rationed foodstuffs, no fuel for vehicles, radios confiscated, and homes and hotels commandeered by the military. The military demanded first pick of all foodstuffs and kept meticulous records of all livestock forcing farmers even to show newborn calves and piglets to them, then claiming the new arrivals for their dinner tables. However there are many stories of farmers outwitting their masters when twin calves or suchlike arrived! Lawbreakers were quickly dealt with, mostly with lengthy prison terms in Jersey, but the more serious crimes were punished by being sent to some horrible French prisons, or even some of the notorious German concentration camps. All local Jews were dispatched to concentration camps, and even English born families were similarly shipped through France and on to Germany. Sadly, a considerable number of those deported did not make it back safely to Jersey. In June 1944 the locals were delighted to hear that the Allies had invaded Normandy and very soon they could hear the battles as the Allies worked their way along the French coast. Little did they know they would still have to wait another 11 months for freedom, having to put up with a very demanding German occupation force which was still determined to obey Hitler’s order to “Defend the Channel Islands to the death”. Now that France was in Allied Hands the local military commanders were unable to supplement their food supplies from France and even harsher demands were made on the local population to ensure that all branches of their still very substantial military force were reasonably well fed. As well as the military, Jersey farmers had to provide food for the Allied POWs and the many “forced labourers”, mainly of Russian, Polish and Italian backgrounds who had been directed to the island to build all the concrete bunkers. This included an underground hospital, all this complying with Hitler’s orders to ensure that the Channel Islands would never again be part of Britain. Many requests by the Jersey authorities for Red Cross assistance were rejected, but finally in December 1944 they agreed and on 30th December the Red Cross vessel “Vega” (Swedish Registry) arrived and delivered parcels to the civilian population. These parcels contained a variety of foodstuffs supplied mainly by Canadian authorities, desperately needed medical supplies, flour, oils and soaps, as well as tobacco from New Zealand. Vega made a further 3 or 4 trips and most certainly eased the desperate situation being faced by the locals. In fact, it resulted in the locals having slightly better food supplies than the military and many local farmers tell stories of having to protect their stock from marauding soldiers. Understandably Churchill was reluctant to send in an invading force to retake the Channel Islands, but by May 1945 it was clear that the Third Reich was finished and on May 9th the German Military surrendered, without a fight, to a large British landing force. On a slightly lighter note … in January 1945 Jersey stonemasons were seen in the main town square repairing flagstones … the Germans had never noticed that the name “Vega” had been formed in those flagstones! As a side note Vega is the name of the brightest star in the universe. Furthermore, throughout the occupation, despite German law that demanded confiscation of all radio sets, punishable by long prison terms or deportation to Germany, there were still many sets being listened to. The locals had a well refined news system for the dissemination of news of what was happening in the outside world. vega, graham noel, ams, combined division, aggregate -
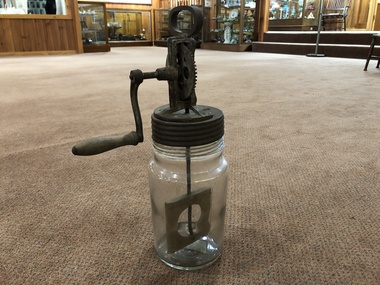 Mont De Lancey
Functional object - Butter Churn, Unknown
... people immigrated. butter churns churns Food processing equipment ...Many butter churns were brought to Australia when people immigrated.A tall glass butter churn with a metal screw top lid, a metal handle to hold it steady and a turning mechanism on the top. There is a wooden paddle inside the churn which is rotated by a wooden handle attached to the mechanism on the top of the churn. German butter churns usually appeared like this.butter churns, churns, food processing equipment, butter, milk, kitchen equipmnet -
 Phillip Island Conservation Society Inc.
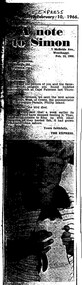
Work on paper - Photocopy of newspaper cutting, "A Note to Simon", Tuesday February 10, 1966
Written in February 1966, this is a letter from the editor or a journalist to a child who had brought a weak young Little Penguin into the office of the Express newspaper in Wonthaggi. February is the time that adult penguins have what is known as a “catastrophic moult" when they lose all of their feathers within a week or 2 and cannot go to the sea to fish. Any chicks left in the burrow will not be fed and need to go to sea themselves to feed. Some are just not strong enough or have mature feathers to do this and perish. Bert West was a Phillip Island resident and manager at the Penguin Parade, who was very knowledgeable about Little Penguins and was able to explain this to the journalist who then wrote the letter. Presumably the photograph had been in a previous edition so this item in the form of a letter to Simon would be a follow up to the original article. This cutting is significant because it indicates that this Little Penguin had been fishing in the Cape Paterson area, and possibly was not able to find sufficient food there. It also indicates that there was apparently no process in place for dealing with weak birds found by the public. Neither the child nor the photographer knew any better than to allow the child to interfere with or hold a sick Penguin as shown in the photo. That is definitely no longer recommended, as we now know that handling a sick bird in that way is very stressful to them and can contribute to poor outcomes for them. Very poor photocopy of single column with large photo of boy holding penguin under textTHE EXPRESSphillip island, penguin parade, cape paterson, bert west, wildlife care, little penguin -
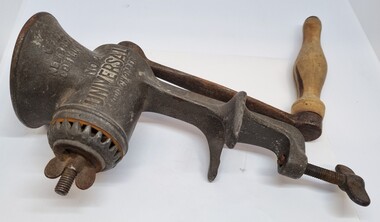 Wodonga & District Historical Society Inc
Domestic object - Meat mincer / Food chopper
The Universal Food Chopper was a common domestic item internationally and throughout Australia. It was manufactured by the Landers, Frary & Clark company ( L.F. &C.). It was first sold in 1897, and proved to be so popular that the company still featured it in their catalogue sixty years later. It was marketed as a device that not only ground meat, but also processed vegetables. The number 2 on the device referred to the size of the grinder, with the 3 model being the largest for heavy-duty use and the 00 model the smallest. This appliance was a common domestic item used throughout AustraliaA cast iron and wood domestic appliance. The food chopper has a large screw on the base which allowed it to be anchored to a table or work bench. Food items were placed in the the cavity at the top and the user wound the handle to force the food through the blade. Different attachments allowed adjustments to the size the food was chopped.On Side 1: Pat. Oct.12, 1897/ Apr. 18, 1899/ Re Sept. 5, 1899 On Side 2 : LF & Co. /New Britain / CONN USA / No 2/ UNIVERSAL FOOD CHOPPERfood chopper, kitchen appliances, food preparation -
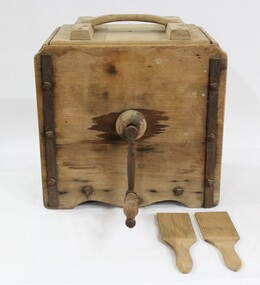 Wodonga & District Historical Society Inc
Functional object - Butter Churn c. late 1800 - early 1900s, E. Cherry & Sons
North east Victoria was a major dairy producing region in the late nineteenth century. The first iteration of the Wodonga Butter Factory Ltd was established in 1892. Dairy was sent from farmers across the district for processing at the factory in Wodonga in the 1890s. Victorian creameries regularly exported frozen butter to London, stock was transported by rail for sale in Melbourne, and of course sold and consumed locally. E.W. Mann, of the prominent local Wodonga family, was a shareholder and was closely involved in the establishment of the Wodonga Butter Company. Many families living on farms also owned their own cow, and had equipment to process their own dairy products at home. This item has strong links to the history of Wodonga and north east Victoria. It has interpretative potential in the areas of local agricultural history, and the social history of food and farming.A wooden butter churn with metal turning handle, and two butter paddles and removal lid.butter, butter churn, dairy, cream, milk, cow, agriculture, farms, farmers, farm, food, social history, food history -
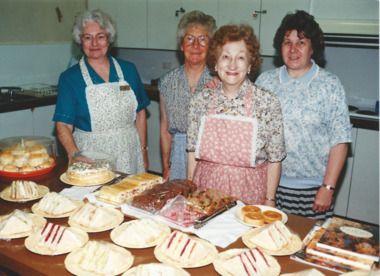 Melbourne Legacy
Photograph, Refreshments, 1996
Photos of Legacy Widows, volunteers and staff, preparing food for visitors to Legacy House. Legacy House was open Monday to Friday with many events scheduled for Widows to participate in such as Tuesday craft sessions, painting lessons, stamp sorting and a cup of tea was always available. From a Widows' Newsletter the lady on the far left is Sue Sargent a volunteer helper. The paid kitchen lady is Audrey, seen on far right in striped skirt. Some of the photos were featured in the April 1996 edition of The Answer newsletter, which mentions 'Audrey and her band of volunteer helpers serve refreshments at minimal cost to all Legacy ladies calling into the Clubrooms, Monday to Friday 10 - 3:30pm.' "Legacy house at two nine three A good place for a chat and a cup of tea Monday to Friday, week in and out Something for everyone, there is no doubt So don't be lonely, don't be shy Come to the city and give us a try!!"A record of the type of activities Legacy provided as a social outlet for widows. Colour photo of widows preparing food at Legacy HousePrinted on the back "widows, answer, activities -
 Wodonga & District Historical Society Inc
Domestic object - Small Butter Churn, E. Cherry & Sons, c1880 - 1920
North east Victoria was a major dairy producing region in the late nineteenth century. The Wodonga Butter Factory Ltd was established in 1892. Many families living in the town or on farms also owned their own cow for family needs and produced their milk and butter. This churn is representative of the equipment they used to process their own dairy products at home. This churn was made by E. Cherry & Sons which was established in Gisborne, Victoria in 1858. Edward Cherry (1830-1910) arrived in Australia from Hertfordshire, England, in 1855. The business manufactured churns and in 1875 opened a larger factory. On his death, the business was taken over by his son and continued to operate until the 1970s.This item has strong links to the history of Wodonga and north east Victoria. It has interpretative potential in the areas of local agricultural history, and the social history of food and farming.A wooden butter churn with metal turning handle and removable lid. The wooden paddle inside is attached to the turning handle which rotates to churn the butter. The model number is T1. It was probably made by E Cherry & Sons of Gisborne although the brand is blurred.On one side in black: "T 1"butter churns, dairying industry, domestic appliances, e. cherry churns -
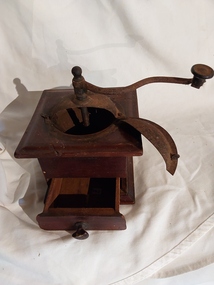 Mont De Lancey
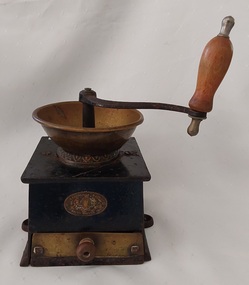
Domestic object - Coffee grinder, Japy Frere's & Co, c 1850 - 1930
... grinders Coffee accessories Coffee Food processing equipment ...Many people used their spice grinders or a mortar and pestle to grind the roasted beans into a powder. Japy Freres & Co were mostly known as watch and clock movement makers, they also manufactured coffee grinders. The company ceased in the 1930s. A square wooden and metal antique hand operated French coffee grinder mill, manufactured by Japy Freres & Co (Beaucourt Paris, France). The grinder has a wooden body and an iron lid and mechanism with a metal turning handle and knob. The metal top is attached by screws. It has a broken brass knob on the pull out wooden drawer below. The moveable lid allows the beans to be poured into the funnel to be ground by the internal mechanism.'Japy Freres & Co B.E. S.C.D.G.' is stamped on a brass plate at the front top of the grinder attached by two screws.coffee grinders, coffee accessories, coffee, food processing equipment, kitchen equipment -
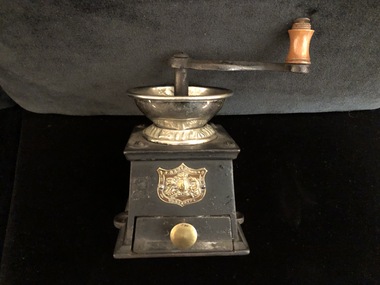 Mont De Lancey
Domestic object - Coffee Grinder, J & J Siddons, C 1890
... Coffee accessories Coffee Food processing equipment Kitchen ...Many people used their spice grinders or a mortar and pestle to grind the roasted beans into a powder. A vintage metal and brass coffee grinder with a curved shaped turning handle which has a turned wooden knob at the end. There is a brass knob on the pull out drawer at the bottom. The brass maker's crest on the front has a lion, unicorn and crown on a shield.'J & J Siddons Warranted'. Brass Maker's 'crest on the front has a lion, unicorn and a crown on a shield'.coffee grinders, coffee accessories, coffee, food processing equipment, kitchen equipment -
 Wangaratta RSL Sub Branch
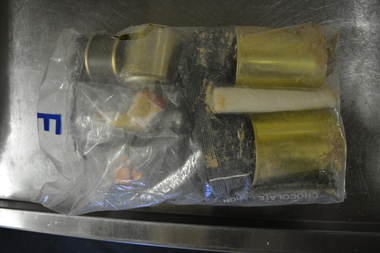
Memorabilia - Australian Defence Force Ration Pack
A field ration, combat ration or ration pack is a canned or pre-packaged meal, easily prepared and eaten, transported by military troops on the battlefield. They are distinguished from regular military rations by virtue of being designed for minimal preparation in the field, using canned, pre-cooked or freeze-dried foods, powdered beverage mixes and concentrated food bars, as well as for long shelf life.Australian Defence Force Combat Ration pack for one man. Contains 30 items: tomato soup, processed cheddar cheese, blackberry fruits spread, sweetened condensed milk, cream cracker buscuits, scotch finger biscuits, instant coffee x2, chocolate drinking powder, sugar x8, mixed berry beverage powder, Cottee's cordial powder, tropical fruit grains, salt, pepper, sweet chilli sauce, tabasco sauce, arrowmint chewing gum, tangerine lemon lollies, toothpicks, scourer, napkins, bottle opener.Australian Defence Force Combat Ration (One Man) contents list.ration pack, australian army ration pack -
 Mont De Lancey
Domestic object - Coffee Grinder, A. Kenrick & Sons, C 1880's
... , Birmingham. Coffee grinders Coffee accessories Coffee Food processing ...Many people used coffee grinders, spice grinders or mortar and pestle to grind the roasted coffee beans into a powder. It was made in England by Archibald Kenrick and Sons in about the 1880s. This firm had been established in 1791 in West Bromwich, Birmingham. A nineteenth century cast iron hand coffee grinder, with brass fittings. It has a brass plaque to the front which has the makers name 'A. KENRICK & SONS PATENT COFFEE MILL' around the Royal coat of arms with a lion and unicorn above the words 'DIEU ET MON DROIT'. It dates from c.1880. It has a curved shaped winding handle which has a turned wooden knob at the end. There is a brass knob on the pull out drawer at the bottom to collect the grinds. There are side attachments on the cast iron base sides so the grinder may be screwed to a bench or table.This has a brass plaque to the front which has the makers name 'A. KENRICK & SONS PATENT COFFEE MILL' around the Royal coat of arms with a lion and unicorn above the words 'DIEU ET MON DROIT'. On the base underneath the grinder is stamped ' A Kenrick & Sons' There is a hole in the middle with 'No 3' stamped underneath it. coffee grinders, coffee accessories, coffee, food processing equipment, kitchen equipment -
 Eltham District Historical Society Inc
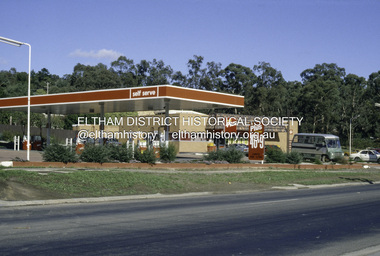
Slide - Photograph, Food Plus Service Station, cnr Main Road and Beard Street, Eltham, c.May 1988
... eltham main road beard street eltham east food plus service ...35mm colour positive transparency (1 of 23) Mount - Kodak EktachromeProcess Date MAY 88Meltham, main road, beard street, eltham east, food plus, service station -
 Flagstaff Hill Maritime Museum and Village
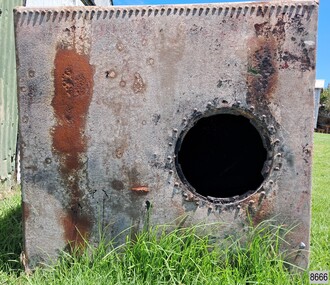
Container - Ship Tank, Early 20th century
Cubed iron ship tanks were invented by Richard Trevithich in 1808, in partnership with Robert Dickson, and the design was patented that year. The invention was an improvement on the wooden casks or barrel that were in used at the time, as the ship tanks were more secure and their shape was much more economical on storage space. The robust metal tanks were originally made to transport water, but their preserving quality enabled them to transport perishable dry goods such as grain on long voyages, as well as other forms of liquid and solid cargo. The first ship tanks were made from sheets of iron, and later mild steel sheets, with double riveted edges and corners. A round cast iron lid with handle grips was fitted snugly into the top opening, providing an air tight and water tight seal. Brass taps were often fitted into the base. Sailing ships began using the new ship tanks on Australian voyages from around the 1830s, storing ford and water for those on board, and filling them with other cargo. A large number of the ship tanks were repurposed in 1838 for the Victoria Settlement at Port Essington, N.T., as they were able to protect the food, clothing and other stores from termite and insect damage. Other ‘recycled’ ship tanks were cut in half and used as washing tubs or cookers. A 1929 catalogue from Hudson’s Tank Stores advertised square tanks that contained around 600 litres – 160 gallons – which equals internal measurement of 33.25 inches – 84.5 centimetres – per side ship tanks are still made and sold in 1952 by the Globe Tank and Foundry in Wolverhampton, England, which was incorporated in 1922. Today, ship tanks can be seen around Australia. Wilsonson’s Promontory Lightstation has the lid from a ship tank that was used on site for the storage of water. Some have been repurposed as domestic water tanks and dog kennels, others for eucalyptus distilleries. Flagstaff Hill has two ship tanks in it grounds. The Campaspe Port at Echuca, once aa bustling river port, has a ship tank beside the locomotive yard. The lids of ship tanks are collectable items. Richard Trevithick (1771-1833): - Trevithick was born in 1771 in Cornwall, England. He was a famous British engineer and inventor during the Industrial Revolution, known for his invention of first full scale working railway, high pressure steam locomotive, which he demonstrated hauling a railway train in 1804 . He set up a small workshop in 1808 at 72 Fore Street, Limehouse, London, to make iron ship tanks, and this invention was instrumental in replacing the wooden casks formerly used for storage on ships. He was involved with mining technology, iron foundering and ship equipment. Ship tanks changed the way that cargo was transported on ships and other vehicles from the 1830s and were used into the mid-20th century. The ship tanks’ advantages were that they could store more content, lasted longer, were waterproof and airtight, stackable and could be repurposed for many uses other than water, such as fuel, dry goods and domestic cargo. They have even been used aa dog kennels and cookers. Ship tanks were part of the evolving methos to transport water, food and cargo, which changed in 1956 when Malcolm McLean invented the large, rectangular shipping containers that are in use today; they speed up the process of loading on and off the ships, saving time and money. Ship tank: a cubed iron container with an offset hole on one side. The hole has cutouts for securely attaching a lid. This tank is on its side on the ground with the opening facing sideways. The side facing upwards has a wooden bung in a round hole. The ship tank is made from six square, thick iron sheets, rolled and riveted along the edges. The inside has a black sticky coating, possibly bitumen, and a strong creosote odour. There are small remnants of green paint on the outer surface.flagstaff hill, flagstaff hill maritime museum and village, warrnambool, maritime museum, maritime village, great ocean road, shipwreck coast, iron cube, water tank, shipping container, ship tank, ship's tank, ship tanks, marine container, richard trevithich, 1808, robert dickson, water transport, water storage, iron foundry, steel sheets, iron sheets, revets, victoria settlement, port essington, globe tank and foundry, wolverhampton, british engineer, british inventor, wooden casks