Showing 404 items
matching frank hills
-
 Greensborough Historical Society
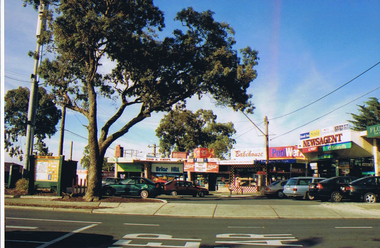
Photograph - Digital image, Frank Solomon, Briar Hill shops 2, 2012_
Briar Hill shops are on the corner of Sherbourne Road and Mountainview Road Briar Hill. These photographs were taken by Frank Solomon and depict a small local shopping strip.Digital copy of colour photographbriar hill shops, briar hill -
 Greensborough Historical Society
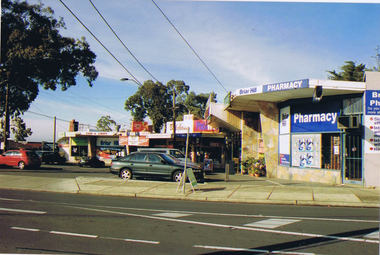
Photograph - Digital image, Frank Solomon, Briar Hill shops 3, 2012_
Briar Hill shops are on the corner of Sherbourne Road and Mountainview Road Briar Hill. These photographs were taken by Frank Solomon and depict a small local shopping strip.Digital copy of colour photographbriar hill shops, briar hill -
 Greensborough Historical Society
Photograph - Digital image, Frank Solomon, Briar Hill Shops 4, 2012_
Briar Hill shops are on the corner of Sherbourne Road and Mountainview Road Briar Hill. These photographs were taken by Frank Solomon and depict a small local shopping strip.Digital copy of colour photographbriar hill shops, briar hill -
 Greensborough Historical Society
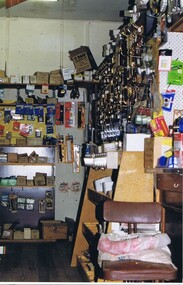
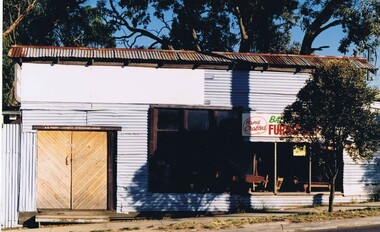
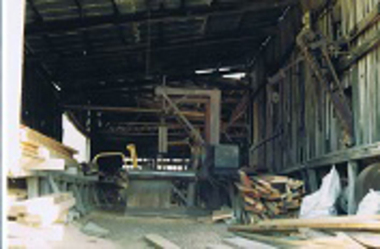
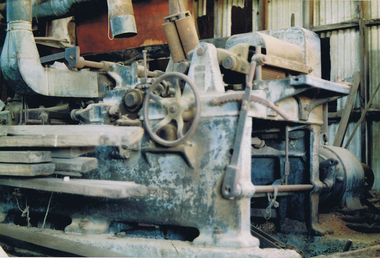
Photograph - Digital image, Frank Solomon, Briar Hill Timber 1, 2012c
Briar Hill Timber was situated on Sherbourne Road Briar Hill and operated as a timber yard for many decades from he 1950s. These photographs were taken by Frank Solomon and depict the business just prior to its closure in 2014.Digital copy of colour photographbriar hill timber -
 Greensborough Historical Society
Photograph - Digital image, Frank Solomon, Briar Hill Timber 2, 2010c
Briar Hill Timber was situated on Sherbourne Road Briar Hill and operated as a timber yard for many decades from he 1950s. These photographs were taken by Frank Solomon and depict the business just prior to its closure in 2014.Digital copy of colour photographbriar hill timber -
 Greensborough Historical Society
Photograph - Digital image, Frank Solomon, Briar Hill Timber 3, 2012c
Briar Hill Timber was situated on Sherbourne Road Briar Hill and operated as a timber yard for many decades from he 1950s. These photographs were taken by Frank Solomon and depict the business just prior to its closure in 2014.Digital copy of colour photographbriar hill timber -
 Greensborough Historical Society
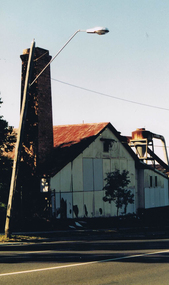
Photograph - Digital image, Frank Solomon, Briar Hill Timber 4, 2012c
Briar Hill Timber was situated on Sherbourne Road Briar Hill and operated as a timber yard for many decades from he 1950s. This photo shows the chimney, the only part of the structure still remaining. These photographs were taken by Frank Solomon and depict the business just prior to its closure in 2014.Digital copy of colour photographbriar hill timber -
 Greensborough Historical Society
Photograph - Digital image, Frank Solomon, Briar Hill Timber 5, 2012c
Briar Hill Timber was situated on Sherbourne Road Briar Hill and operated as a timber yard for many decades from he 1950s. These photographs were taken by Frank Solomon and depict the business just prior to its closure in 2014.Digital copy of colour photographbriar hill timber -
 Greensborough Historical Society
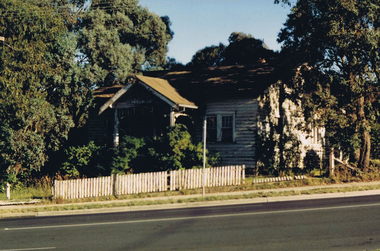
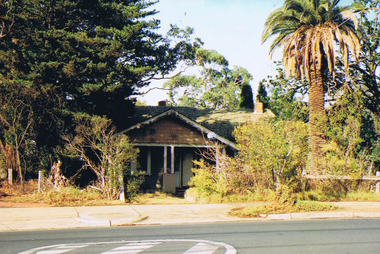
Photograph - Digital image, Frank Solomon, Mountainview Road Briar Hill: old house 1, 2010c
Old house on Mountainview Road Briar Hill.A record of the changing face of Greensborough.Digital copy of colour photographmountainview road briar hill -
 Greensborough Historical Society
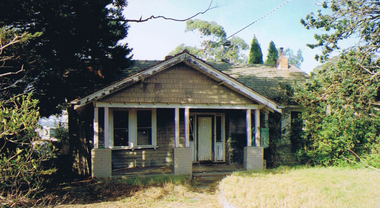
Photograph - Digital image, Frank Solomon, Mountainview Road Briar Hill: old house 2, 2010c
Old house at 113 Mountainview Road Briar Hill.A record of the changing face of Greensborough.Digital copy of colour photographmountainview road briar hill -
 Greensborough Historical Society
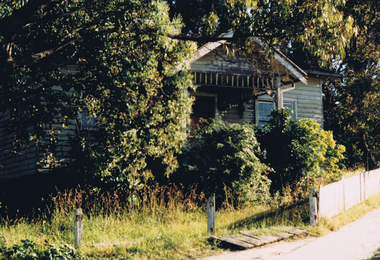
Photograph - Digital image, Frank Solomon, Mountainview Road Briar Hill: old house 3, 2010c
Old house at 113 Mountainview Road Briar Hill.A record of the changing face of Greensborough.Digital copy of colour photographmountainview road briar hill -
 Greensborough Historical Society
Photograph - Digital image, Frank Solomon, Mountainview Road Briar Hill: old house 4, 2010c
Old house on Mountainview Road Briar Hill.A record of the changing face of Greensborough.Digital copy of colour photographmountainview road briar hill -
 Greensborough Historical Society
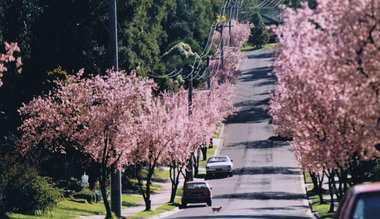
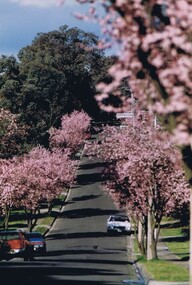
Photograph - Digital image, Frank Solomon, Prunus blossoms: Mountainview Road Briar Hill 1, 2010c
Prunus blossoms on Mountainview Road Briar Hill.Digital copy of colour photographmountainview road briar hill -
 Greensborough Historical Society
Photograph - Digital image, Frank Solomon, Prunus blossoms: Mountainview Road Briar Hill 2, 2010c
Prunus blossoms on Mountainview Road Briar Hill.Digital copy of colour photographmountainview road briar hill -
 Greensborough Historical Society
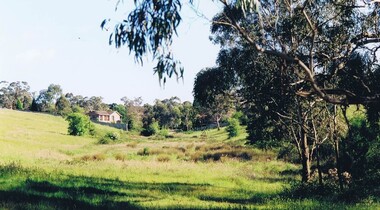
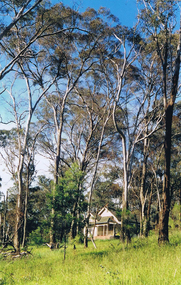
Photograph - Digital image, Frank Solomon, Open land Greensborough, 1990c
A patch of open land in Greensborough circa 1990Digital copy of colour photographbriar hill, greensborough -
 Greensborough Historical Society
Photograph - Digital image, Frank Solomon, House among the trees, Greensborough, 1990c
A patch of open land in Greensborough circa 1990Digital copy of colour photographbriar hill, greensborough -
 Glenelg Shire Council Cultural Collection
Book, The Life and Death of King John, c. 1898
Book of the William Shakespeare play ' The Life and Death of King John'. Brown hard cover, black and white illustrations taken from the designs of Frank Howard -
 Eltham District Historical Society Inc
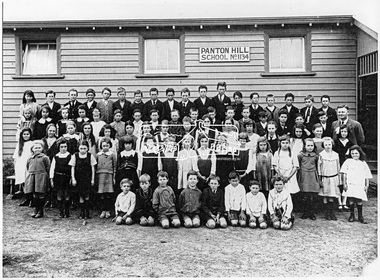
Photograph, Panton Hill School, 1924
Source: Mr. Frank Smith, "Kia-Ora", Panton Hill Also a separate list of names PANTON HILL SCHOOL 1924 (SEPP_0244) Two hand written lists of names with some conflicting information L-R Back Row: Eily O’Day, R. Foubister, E. Moore, H. Purcell, F. Peake, C. Williams, H. Hewitt, J. Coutie, D. Cracknell, F. Smith, J. Smith, A. Purcell, Bob O’Day, C. Colvin, Belfield?, K. Smith, R. Gardiner, Colin Rogers Second Row: ?, Lorraine Smith, Phyllis Howard, Jean Cracknell, Edna Williams, Ces Tosch, Charlie Peake, Les Smith, Reg Hargreaves, Ken Canty, ?, Keith Smith, ?, B. Cracknell, Ron Smith, Guy Mills (Greford), Sefton Howard, Mr. Gardiner (Head Teacher) Third Row: E. Mosely, Phillis Saville, Floss Tosch, M. Milson, Essie Howard, Ethel Smith, Jessie Sinclair, Edna Woodman, Una Saville, Ida Kennedy, Dorothy Smith, Rene Keele, Margaret Powell, L. Mosely, Una Williams, Rene Purcell Fourth Row: Hazel Mills, Gladys Stone, Ruby O’Day, Stella Tosch, Joyce Smith, Peg Powell, Ailsa Gardiner, Milly Adams, Phil Groube, M. Carter, W. Stone, D. Milsom?, D. Mills, Roma Howard, Marg Howard Front Row: Donaldson?, Doug Smith?, Len Smith?, Podge Cracknell, G Carter, A. Glennon, ?,? Alternate list L-R Back Row: Eillen O’Day, R. Foubister, Eric Moore, H. Purcell, F. Peake, C. Williams, H. Hewitt, J. Coutie, Don Cracknell, F. Smith, J. Smith, H. Purcell, B. O’Day, C. Colvin, J. Belfield, K. Smith, R. Gardiner, C. Rogers Second Row: M. Millisom, L. Smith, M. Moon, J. Cracknell, U. Williams, C. Tosch, C. Peake, L. Smith, R. Hargreaves, G. Carter, H. Stone, K. Smith, B. Moon, L. Cracknell, R. Smith, G. Mills, S. Howard, Mr. Gardiner (Head Teacher) Third Row: E. Moseley, P. Saville, F. Tosch, M. Millisom, E. Howard, E. Smith, J. Sinclair, E. Woodman, U. Saville, I. Kennedy, D. Smith, R. Keele, M. Powell, L. Mosely, E. Williams, R. Purcell First Row: H. Mills, W. Stone, R. O’Day, S. Tosch, J. Smith, P. Powell, A. Gardiner, M. Adams, P. Groube, M. Carter, G. Stone, J. Millisom, D. Millisom, D. Mills, R. Howard, M. Howard Front Row: Maisch, D. Smith, A. Belfield, L. Smith, A. Howard, A. Moseley, A. Glennon, D. Millisom This photo forms part of a collection of photographs gathered by the Shire of Eltham for their centenary project book,"Pioneers and Painters: 100 years of the Shire of Eltham" by Alan Marshall (1971). The collection of over 500 images is held in partnership between Eltham District Historical Society and Yarra Plenty Regional Library (Eltham Library) and is now formally known as the 'The Shire of Eltham Pioneers Photograph Collection.' It is significant in being the first community sourced collection representing the places and people of the Shire's first one hundred years.Digital imagesepp, shire of eltham pioneers photograph collection, panton hill, panton hill state school, state school -
 Eltham District Historical Society Inc
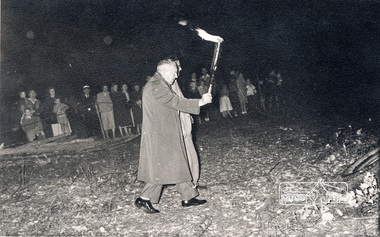
Photograph, Federal member, Frank Davis carries the torch to light the combined Briar Hill and Diamond Valley Hospital bonfire
Federal member, Frank Davis carries the torch to light the combined Briar Hill and Diamond Valley Hospital bonfire. Frank Davis was the Liberal Member for the Deakin electorate 1949-1966. black and white photographVerso: "Federal Member Frank Davis carries the torch to light fire"briar hill, bob manuell, briar hill committee, diamond valley hospital, frank davis, bonfire -
 Eltham District Historical Society Inc
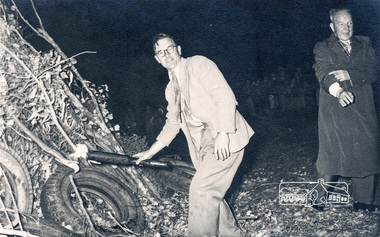
Photograph, Federal member, Frank Davis carries the torch to light the combined Briar Hill and Diamond Valley Hospital bonfire
Federal member, Frank Davis carries the torch to light the combined Briar Hill and Diamond Valley Hospital bonfire. Hot oil from the torch ran down the torch and lodged in Frank Davis' sleeve whilst carrying the torch. Bob Manuell advised that as a consequence of this event, every time he met with Frank Davis he was informed that he owed Frank a new shirt. Frank Davis was the Liberal Member for the Deakin electorate 1949-1966. black and white photographVerso: No 2 Unfortunately Hot oil from the torch ran down the torch and lodged in his sleeve consequence every day I met him I was told I owed him a new shirt.briar hill, bob manuell, briar hill committee, diamond valley hospital, frank davis, bonfire -
 Eltham District Historical Society Inc
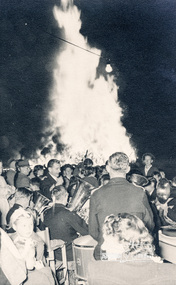
Photograph, Combined Briar Hill Committee and Diamond Valley Hospital bonfire
Bonfire for the combined Briar Hill and Diamond Valley Hospital. The bonfire was officially lit by Frank Davis Member for Deakin (1949-1966) black and white photographbriar hill, bob manuell, briar hill committee, diamond valley hospital, frank davis, bonfire -
![Photograph, [BBQ at] Combined Briar Hill Committee and Diamond Valley Hospital bonfire](/media/collectors/4f729f7b97f83e03086018a5/items/59be096821ea6a04f84aac9c/item-media/5bb40bec21ea7b11006a7ab0/item-fit-380x285.jpg) Eltham District Historical Society Inc
Eltham District Historical Society IncPhotograph, [BBQ at] Combined Briar Hill Committee and Diamond Valley Hospital bonfire
Bonfire for the combined Briar Hill and Diamond Valley Hospital, also included a community BBQ. The bonfire was officially lit by Frank Davis Member for Deakin (1949-1966) black and white photographVerso: Combined Briar Hill Committee + D V Hospital Bon firebriar hill, bob manuell, briar hill committee, diamond valley hospital, frank davis, bonfire -
4th/19th Prince of Wales's Light Horse Regiment Unit History Room
Card - Christmas Card, 1915 (exact)
Service of Frank Phillips Prior to the commencement of World War I, Frank Phillips served in the Minyip Troop of the Light Horse militia. His civilian occupation was that of clerk. On 22 August 1914 he enlisted in C Squadron 4th Light Horse Regiment. The 4th Light Horse Regiment embarked on the troop ship “Wiltshire “ for training at Mena Camp, in Egypt. During May 1915 the Regiment was deployed to the Gallipoli campaign in a dismounted role. After seven months, the Gallipoli campaigned was abandoned and the troops withdrawn. On return to Egypt the 4th Light Horse Regiment divided with one component deployed to Palestine and the other to the Western Front. Frank went on to serve in Palestine. He was promoted to Sergeant while at Gallipoli and, in Palestine, was promoted to Captain, serving as Adjutant of the Regiment. He was granted furlough to return to Australia from 14 October 1916 to 12 March 1917. On 16 January 1918 he was Mentioned in Despatches Citation: At Hill 750 near Bir El Esani on 30-4-17 he led an attack on Hill 750 under heavy rifle fire capturing the position and 7 armed Bedouins. On 23-5-17 during reconnaissance, he led and attack on 790 under very heavy rifle and machine gun fire and captured the position, inflicting losses on the Turks. He has, at all times, set a fine example of courage to his men. 22 October: 1918 he was awarded the Military Cross Recommendation of Commanding Officer – For exceptional gallantry and devotion to duty on the 28th September 1918, during the crossing of the JORDAN near EL MIN, this officer (adjutant of the Regiment) personally reconnoitred for crossings under heavy M.G. fire and led the Regiment to the only available crossing, rendering invaluable assistance during the crossing. On 3oth September when the Regiment was advanced guard on to KAUKAB, this officer’s personal reconnaissance to confirm patrol reports was of the highest order and utmost value to his C.O. culminating in the capture of KAUKAB with a mounted attack and the The 4th/19th Prince of Wales’s Light Horse Regiment has a long and distinguished history that pre-dates Federation to colonial Victoria’s mounted troops. Our history parallels that of the nation, including its active participation in some of the most inspiring events in Australian Military History including the Defence of ANZAC and the charge at Beersheba. The Regiment is based on a linkage of the two post-World War II Victorian Army Reserve RAAC units - 4th/19th Prince of Wales’ Light Horse and 8th/13th Victorian Mounted Rifles. From these units we derive our links with the six Light Horse Regiments of Victoria and Southern New South Wales (4th, 8th, 13th, 17th, 19th and 20th Light Horse Regiments.) The Regiment proudly bears the guidon of the 4th Light Horse, with the guidons of the remaining regiments being laid up in the crypt of the Melbourne Shrine of Remembrance. During World War I, the 4th Light Horse Regiment served with distinction on three fronts – Gallipoli, Palestine and the Western Front. Corporal, later Captain, Phillips was a member of the 4th Australian Light Horse Regiment. He created the post card while serving with the Regiment as a Corporal at Gallipoli. Post Card hand made and sent to familyFrom Cpl Frank Phillips, 4th Australian Light Horse Regiment. Entries in pencil Front: Addressed to Andrew Phillips (father) at Minyip, Victoria, Message: “A Merry Christmas and Happy New Year to all, Made while on my day out. Love Frank” Reverse Top Centre – 4 LH Badge Centre – cloth map of Australia stapled to card Bottom – Print of flag stapled to card, Irish green ensign, Union flag in canton, gold coloured Irish harp on fly. Notations: Broadmeadows, Wiltshire (Troop Ship), Shrapnel Gully, Suicide Gully, Courtney’s Post Mena, Mex, Heliopolis, Imbros, Gallipoli, Turkish soil underneath (flag), Australia on Turkey, Lone Pine, Leans Trench, Constantinople, All honour to our Irish comrades, To greet you 1915-16. From the shells, yells, and little Hells, of the Darda Dardenelles 0 – 0 May you enjoy your Xmas dinner as I hope to enjoy my Xmas billy in the trenches.ww1, gallipoli, 4th light horse, post card, frank phillips -
 Ringwood and District Historical Society
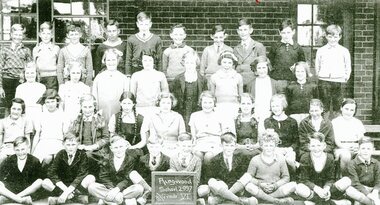
Photograph, Ringwood State School - Grade 6, 1937, 1937
Black and white photograph"Attached to photograph" Back Row- L to R: Edward Flynn, Bruce Graham, Graham Morgan, ?, ?, David Allan, Ken Ward, ?, Arthur Gillespie, Ken Manning. 2nd Row- L to R: Ellen Crouch, Val Anderson, Helen Bond, Elvie Hancy, Doreen Lloyd, Phylis Reardon, Valma Bisset, Bernice Dixon. 3rd Row- L to R: Patricia Mathews, Betty Stoney, June Parker, Lorna Hill, Betty Reed, Hazel Morgan, Betty Adolphson, Jean Smith, Kath Hamson, Dorothy Fyfe. Front Row- L to R: Frank Lloyd, Walter Hazelwood, Rupert Shearer, ?, Lloyd Holmes, Milton Blood, Bob Seeby, Don Martin, Bob Sievers, Edward Jackson. Teacher: Miss Paddock -
 Orbost & District Historical Society
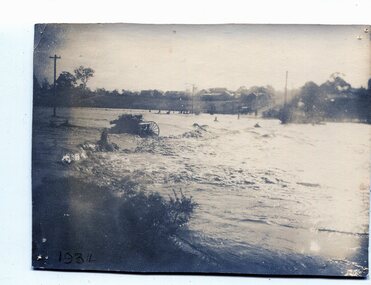
black and white photograph, January 1934
From The Argus (Melbourne) on January 10 1934 "Damage estimated at £500,000 has been caused by the floods in the Orbost district. No loss of life occurred, largely owing to the heroic efforts of rescue parties. Many families spent Monday night on the roofs of houses or in trees, surrounded by deep, rushing flood waters." This 1934 flood was devastating, destroying a section of the 1922 Orbost bridge - the centre span was washed away -. wrecking fences, bridges and roads, dumping silt and debris on the rich river flats and drowning cattle. This is a pictorial record of the 1934 flood, a significant event in the history of Orbost.A black / white photograph of floodwaters. In the middle of the water can be see debris including a large spoked wheel. In the background are houses and fences.on back - "near Hilyer's garage at foot of hill Main Street Caravan Park on right" on front at bottom left - "1934"orbost-flood-1934 flood-orbost -
 Ringwood and District Historical Society
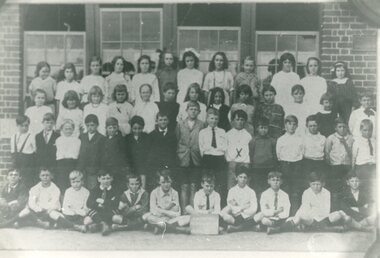
Photograph, Ringwood State School - Grade 4, 1923
Black and white photograph - Grade 4, 1923"Attached to photograph" Back Row - L to R: Betty McClelland, Thelma Wheeler, Gwen Thomas, Marie Squires, ?, Mildred Hill, Ida Wright, Diana Noble, ?, Thora Wilkins, Mary Pratt, ?. 2nd Row - L to R: Ruth Clark, Vera Reimers, Mary Stoel, Alice Cope, ?, Agnes Carpatus, Phyllis Allen, Jean Squires, Nancy Cook, Hazel Hams, Olive Brown, Marybelle McAlpine, ?. 3rd Row - L to R: ?, Bob Skerritt, Andrew Pratt, Walter Burnside, Joe Lobb, Frank Hayes, George Carmichael, Laurie Jones, Hugh Falconer, Henry Cope, (?) Burlock, George Howship, Ronald Hill, Ron Burns, Len Jones. Front Row - L to R: (?) Walters, Les Fitzell, Ken Astle, Bob Davies, Barry Martin, Merrick Northrope, Ralph Wigley, Les Paul, Albert Aird, Stan Saunders, Morry Deed. Teacher: -
 Ringwood and District Historical Society
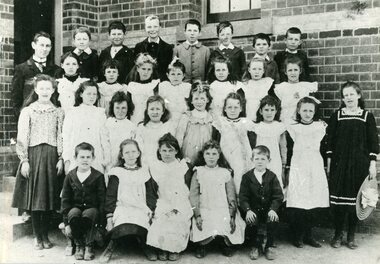
Photograph, Ringwood State School - Grade(?), 1901
Black and white photograph - Grade(?), 1901"Attached to photograph" Back Row - L to R: Mr Draper, Bert Hocking (Son of H.T.), George Tortice, Bill Knox, Fred Campbell, Alf Milne, Frank Parker 9( later Mayor of Ringwood), A Milne. 2nd Row - L to R: Edie Graham, Grace Thomas, Alice Hodgetts, ?, Ruby Saunders, Elvie Hill (Mrs McAlpin, Mayroress of Ringwood), ?. 3rd Row - L to R: ?, ?, ?, Vera Hunt, Floss Hocking (Daughter of H.T.), ?, Ethel Colcott, Winnie Thomas, Olive Porteous, Lena Williams. Front Row - L to R: (?) Wadeson, Violet McDermott, Anastasia Smith, Evlyn Blood, (?) Wadeson. Teacher: Mr Draper. -
 Flagstaff Hill Maritime Museum and Village
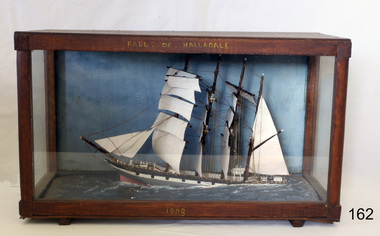
Craft - Ship Model, Falls of Halladale, 1886-1910
The Falls of Halladale was an iron-hulled, four-masted barque, used as a bulk carrier of general cargo. She left New York in August 1908 bound for Melbourne and Sydney. In her hold was general cargo consisting of roofing tiles, barb wire, stoves, oil, and benzene as well as many other manufactured items. After three months at sea and close to her destination, a navigational error caused the Falls of Halladale to be wrecked on a reef off the Peterborough headland on the 15th of November, 1908. The captain and 29 crew members survived, but her cargo was largely lost, despite two salvage attempts in 1908-09 and 1910. The Court of Marine Inquiry in Melbourne ruled that the foundering of the ship was entirely due to Captain David Wood Thomson's navigational error, not too technical failure of the Clyde-built ship. The Falls of Halladale was built in1886 by Russell & Co., at Greenock shipyards on the River Clyde, Scotland for Wright, Breakenridge & Co of Glasgow. She was one of several designs of Falls Line of ships named after waterfalls in Scotland. The company had been founded between 1870- 1873 as a partnership between Joseph Russell, Anderson Rodger, and William Todd Lithgow. During the period 1882-92 Russell & Co. standardised designs, which sped up their building process so much that they were able to build 271 ships during that time. The Falls of Halladale had a sturdy construction built to carry maximum cargo and able to maintain full sail in heavy gales, one of the last of the 'windjammers' that sailed the Trade Route. She and her sister ship, the Falls of Garry, were the first ships in the world to include fore and aft lifting bridges. Previous to this, heavily loaded vessels could have heavy seas break along the full length of the deck, causing serious injury or even death to those on deck. The new, raised catwalk-type decking allowed the crew to move above the deck in stormy conditions. The Falls of Halladale shipwreck is listed on the Victorian Heritage (No. S255). She was one of the last ships to sail the Trade Routes from Europe and the Americas. Also of significance is that the vessel was one of the first ships to have fore and aft lifting bridges as a significant safety feature still in use on modern vessels today. The subject model is an example of an International Cargo Ship used during the 19th and early 20th centuries to transport goods around the world and representing aspects of Victoria’s shipping industry. Ship mode,l Falls of Halladale, four masted ship diorama. Glass case with wood frame. Paper on back of case with inscription "Frank Davey etc" Case frame has title "Falls of Halladale" and date on base of wood frame is" 1908". It was a four-masted iron-hulled barque.On top of case frame "FALLS OF HALLADALE" and on base of case frame "1908". Paper on back of case has inscription "Frank Davey " (See note section this document for details on Frank Davey)flagstaff hill, warrnambool, shipwrecked coast, flagstaff hill maritime museum, flagstaff hill maritime village, great ocean road, shipwreck peterborough vic, ship model, fall of halladale ship, trade winds, barque, trade vessel, wright, breakenridge & co, ricer clyde -
 Flagstaff Hill Maritime Museum and Village
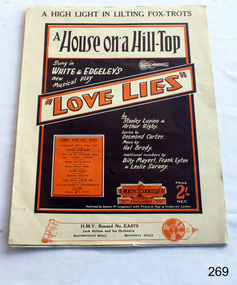
Document - Sheet Music
Sheet music A House on a Hill. Music by Billy Mayerl, words by Frank Eyton. Features orange and brown cover of various type facesflagstaff hill, warrnambool, shipwrecked-coast, flagstaff-hill, flagstaff-hill-maritime-museum, maritime-museum, shipwreck-coast, flagstaff-hill-maritime-village -
 Flagstaff Hill Maritime Museum and Village
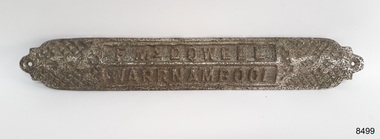
Equipment - Foot Grip, Frank McDowell, Early 20th century
This foot grip was made and owned by Frederick William McDowell (Fred) (1880 to 15-6-1967). It would be been joined to the stafe or frame of a jinker and used to step up from the ground and onto the seat. He was a wheelwright by trade. He made and repaired vehicles such gigs, buggies, jinkers, sulkeys, spring carts and farm wagons. His workshop was on the corner of Cramer Street and Raglan Parade in Warrnambool., previously the site of Fotheringhams, and after McDowell's, and still in 2023, occupied by Reece Plumbing Fred's workplace prior to retiring was at Bryant & Waterson's in Kepler Street, opposite the Criterian Hotel, making rubber tyred horse-driven farm wagons.This jinker's foot grip id part of a jinker or two-wheeled carriage. It is a rare item, made by a local wheelwright Frank McDowell who operated his buggy making and repair business in Warrnambool's CBD in the early twentieth century. It is an example of the equipment used on horse-drawn vehicles for safety and convenience.Foot grip, iron with silver plate finish. Rectangular metal plate with textured crossed over diagonal lines on the top surface and inset rectangles with impressed text. the curved and shaped ends have a drilled round hole. the length of the plate is an inverted 'v' shape towards the base. Made by F. McDowell, Warrnambool."F McDOWELL" "WARRNAMBOOL"flagstaff hill, warrnambool, flagstaff hill maritime museum, maritime museum, shipwreck coast, flagstaff hill maritime village, great ocean road, fred mcdowell, frederick mcdowell, wheelwright, gig, buggy, jinker, sulkey, spring cart, farm wagon, 2-wheeled cart, horse cart, horse cart parts, jinker buggy, transport, vehicle, horse drawn, horse jinker, bryant & waterson, jinker part, jinker foot grip, step, foot plate, horse cart part, stafe, 2-wheeled carriage