Showing 167 items matching "pall mall fountain"
-
 Bendigo Historical Society Inc.
Photograph - GERTRUDE PERRY COLLECTION: PHOTOGRAPH PALL MALL PARADE
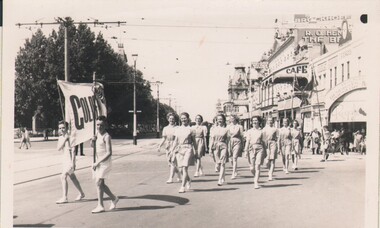
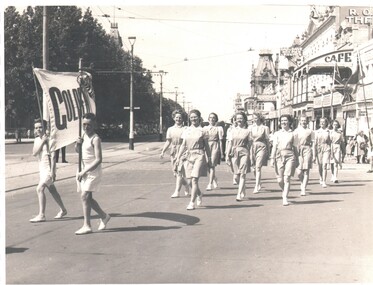
Photograph. Black & white photograph of an unknown parade taken at Fountain Intersection showing Gertrude Perry leading a group of women behind two boys bearing a banner which reads Golden. On the back: Bendigo Advertiser Photographic Service BB119.Bendigo Advertiser Photographic Servicecottage, miners -
 Bendigo Historical Society Inc.
Photograph - GERTRUDE PERRY COLLECTION: PHOTOGRAPH PALL MALL PARADE
Photograph. Black & white photograph of an unknown parade taken at Fountain Intersection showing Gertrude Perry leading a group of women behind two boys bearing a banner which reads Golden…Bendigo Advertiser Photographic Serviceperson, group, teams sports, gertrude perry collection, photograph pall mall parade -
 Bendigo Historical Society Inc.
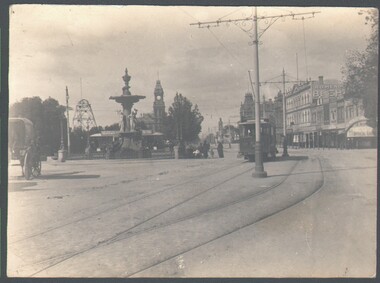
Negative - TOM PATULLO COLLECTION: ALEXANDRA FOUNTAIN,BENDIGO
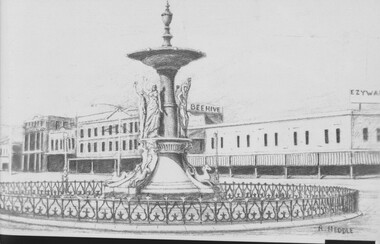
... Pall Mall,Bendigo. Printed by R.Heddle.... buildings along Pall Mall,Bendigo. Printed by R.Heddle. Negative TOM ...Negative print. Alexandra Fountain,Bendigo. Ezywalkin Shop to the right, Beehive shop behind fountain, & other buildings along Pall Mall,Bendigo. Printed by R.Heddle.cottage, miners, alexandra fountain, bendigo., alexandra fountain, bendigo. -
 Bendigo Historical Society Inc.
Postcard - BENDIGO POSTCARD BOOK
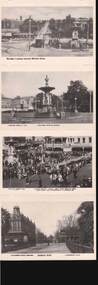
... showing Alexandra Fountain Building, Mining Bendigo, Pall Mall... Fountain Building, Mining Bendigo, Pall Mall & Law Courts, Bendigo ...Booklet of postcards: old images reproduced. , The Mall showing Alexandra Fountain Building, Mining Bendigo, Pall Mall & Law Courts, Bendigo looking towards Mitchell Street, Alexandra Fountain, Bendigo, Chinese Dragon 'Loong' 180 ft. long, made in China, Shamrock Hotel, Williamston Street, Bendigo. On rear of cards ; Rose Series De Luxe, proudly printed in Australia since 1880.. / One card has a photo of the Duchess tribute Company minebendigo, streetscape, various views, bendigo, streetscapes -
 Bendigo Historical Society Inc.
Postcard - BENDIGO - FOLD-OUT VIEW
Fold-out views of Bendigo, including a panorama from the lookout tower, Bendigo Pottery, Pall Mall, Conservatory Gardens, Poppet head Central Deborah, Cenotaph, Joss House, Alexandra Fountain, interior Chinese Joss House, Sun Loong, Easter Parade. Appears to be 1970's ?bendigo, streetscape, bendigo, postcards. -
 Bendigo Historical Society Inc.
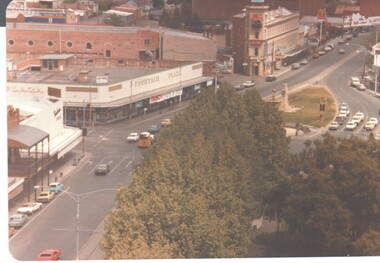
Photograph - COLOUR PHOTO OF VIEW OIF CHARING CROSS (FOUNTAIN AREA)
Colour photo taken from the Post Office tower looking toward the Charing cross (Fountain area).bendigo, streetscape, pall mall and mitchell street corne, charing cross, alexandra fountain. -
 Bendigo Historical Society Inc.
Postcard - BENDIGO POST CARD FOLDER
Bendigo post card folder '6 tear off postcards, vue pack Bendigo, Victoria's Premier gown' Coloured foldout series. Shamrock Hotel with tram outside; Bendigo Hargreaves Mall with walkway and gazebo; Bendigo Easter Parade with Sun Loong outside Law Courts Pall Mall; Fortuna ( Army Survey Regiment ) ; Central Deborah Gold Mine and talking tram ; Alexandra Fountain.NCVbendigo, streetscape, post card folder, bendigo, tourism, postcards, fortuna, alexandra fountain, central deborah gold mine, shamrock hotel, sun loong, bendigo easter fair, mall. -
 Bendigo Historical Society Inc.
Photograph - THIRTEEN COLOURED BENDIGO PHOTOGRAPHS
Foldout postcard containing Bendigo coloured photographs . Alexandra Fountain, Lake Weeroona, Sound Shell Rosalind park, Post Office & Shamrock hotel, Town Hall, Charing Cross & Cenotaph, Post Office & Law Courts, White Hills Botanic Gardens, Conservatory & Law Courts, Scene Queens Gardens Pall Mall, Lookout Tower, View from Lookout, Pall Mall View, Sacred Heart Cathedral.Nucolorvue Productions PTY Ltd, Moorabin Vicbendigo, buildings, heritage buildings -
 Bendigo Historical Society Inc.
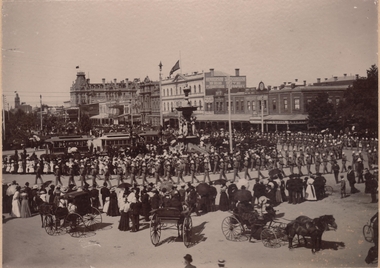
Photograph - QUEEN VICTORIA MEMORIAL PROCESSION IN PALL MALL BENDIGO
Black and white photograph showing Pall Mall with Beehive Building, Shamrock Hotel, Alexandra Fountain. Military parade. Crowd watching, some in horse drawn vehicles. Trams at Fountain. Flags at half mast. Commemorative service for death of Queen Victoria, early 1901, which was held in Rosalind Park following parade. Three horse drawn vehicles are in the foreground. One building has Henderson & Doolsson Furniture & Drapery painted on the side. There are two copies, the original glued on cardboard, the other in a black paper folder.bendigo, streetscape, pall mall -
 Bendigo Historical Society Inc.
Newspaper - JENNY FOLEY COLLECTION: MEMORIES
... : a postcard of the fountain and Pall Mall taken some time in the early... and Pall Mall taken some time in the early 1900s. Newspaper JENNY ...Bendigo Advertiser ''The way we were'' from 2004. Memories: a postcard of the fountain and Pall Mall taken some time in the early 1900s.newspaper, bendigo advertiser, the way we were -
 Bendigo Historical Society Inc.
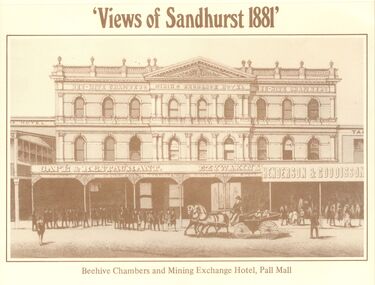
Domestic Object - VIEWS OF SANDHURST 1881 CALENDAR, 1981
A 1981 Calendar of Sandhurst (Bendigo) in 1881. The front cover has many shots of the city including the Mining Exchange, the Fountain, the train station and many more. Second page, a, for January and February is a larger photo of the front of the Beehive Chambers and Mining exchange. Second photo,b, for the months of March and April is a view from Post Office tower looking north to White Hills. Third photo ,c, for the month of May and June is a photo of the Sandhurst Post Office in Pall Mall. Fourth photo, d, for July and August is a top view of the Sandhurst Railway Station. The fifth photo, e, for September and October is shows a very busy Alexandra Fountain with many people walking around it. The sixth photo, f, for November and December shows a fine view from the Post Office tower looking south to Golden Square.bendigo, history, city history -
 Bendigo Historical Society Inc.
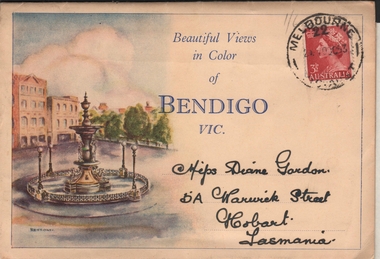
Postcard - VIEWS OF BENDIGO - FOLD OUT PHOTOS IN FOLDER
Sepia coloured folder, enclosing photos of Bendigo. On front 'Beautiful Views in Color of Bendigo Vic.' Photo of Alexandra Fountain on LH side. 3 1/2d stamp on top RH corner. Folder addressed to Miss Diane Gordon 5A Warwick Street, Hobart, Tasmania. Colour photos include : Alexandra Fountain, The City Hall, The Botanic Gardens, Hargreaves Street, The Conservatory Gardens, Rosalind Park, Pall Mall, The Upper Reserve Lake and The Conservatory Gardens. Photos appear to be from the 1940's. Enclosed letter states that the donor's grandfather 'mailed them me during his visit to your city in what appears to be 1953. Diane Palmer'Valentine Publishing Co Pty Ltdbendigo, tourism, post card folder -
 Bendigo Historical Society Inc.
Photograph - WES HARRY COLLECTION: BENDIGO LANDMARKS, 1912
... in 1912. (a) Fountain and Pall Mall, looking East, tram... PLACE Bendigo landmarks Fountain Pall Mall Hustlers royal ...Group of four photographs of Bendigo Landmarks, Taken in 1912. (a) Fountain and Pall Mall, looking East, tram in the centre of the shot and the Hustlers Royal Reserve Poppet head visible to the left, (b) The law Courts with the Conservatory gardens in the foreground, (c) Statue in the Conservatory gardens, (d) shot taken from the tower of Camp Hill School, Rosalind park in the foreground, Post office and Law Courts middle distance.place, bendigo, landmarks, fountain, pall mall, hustlers royal reserve, the beehive, law courts, cons3erveratory gardens, setae, rosalind park -
 Bendigo Historical Society Inc.
Postcard - WES HARRY COLLECTION: SUN LOONG, 1970
Coloured postcard depicting Sun Loong rounding the fountain at Charing Cross, Bendigo. Photo has been taken from a high vantage point looking across to Ezywalkin on the corner of Mitchell St. and Pall Mall.postcard, sun loong, sun loong, charing cross, ezywalkin -
 Bendigo Historical Society Inc.
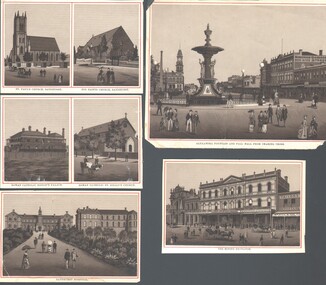
Photograph - WES HARRY COLLECTION: SANDHURST VIEWS, 1888
... ) Sandhurst Hospital, (e) Alexandra Fountain and Pall Mall from... BUILDINGS vaious Alexandra Fountain Charing Cross Pall Mall Hospital ...A collection of artists drawings cut from 'Album of Sandhurst Views' 1888. (a) St. Paul's Church, Sandhurst, All saints Church, Sandhurst, (b) Roman Catholic Bishop's Palace, Roman Catholic St. Kilian's Church, (c) The Mining Exchange, (d) Sandhurst Hospital, (e) Alexandra Fountain and Pall Mall from Charing Cross.buildings, vaious, alexandra fountain, charing cross, pall mall, hospital, mining exchange, bishops palace, st. kilian's church, st. paul's, all saints -
 Bendigo Historical Society Inc.
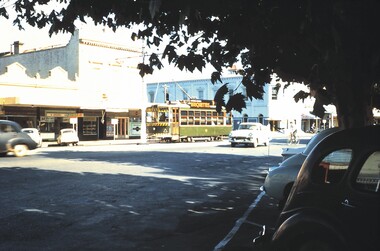
Slide - BENDIGO STREET VIEWS & FORTUNA, Apr 1962
Slide. Bendigo Street Views & Fortuna. A tram travelling along Pall Mall past Bull Street towards the Fountain.slide, bendigo, bendigo street views & fortuna., bendigo street views & fortuna. -
 Bendigo Historical Society Inc.
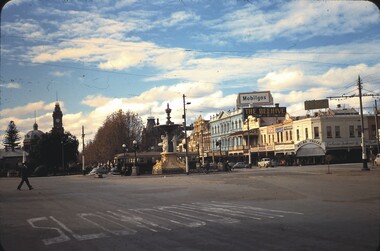
Slide - CASTLEMAINE HISTORICAL SOCIETY COLLECTION, ALEXANDRA FOUNTAIN, 1955
... Slide. Alexandra Fountain, Charing Cross, Bendigo. Pall... Fountain, Charing Cross, Bendigo. Pall Mall streetscape ...Slide. Alexandra Fountain, Charing Cross, Bendigo. Pall Mall streetscape in background. Dated 28.5.55slide, bendigo, alexandra fountain, castlemaine historical society collection alexandra fountain charring cross bendigo -
 Victorian Interpretive Projects Inc.
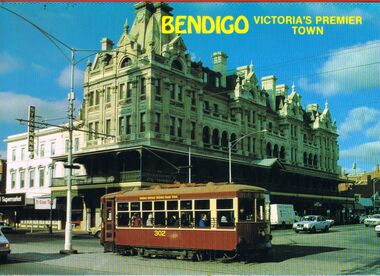
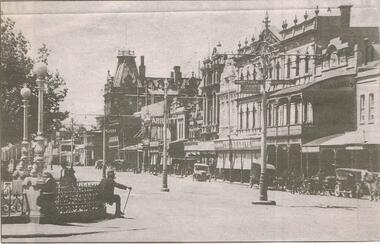
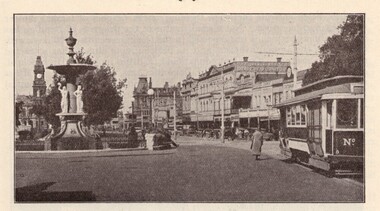
Image, Bendigo, 1934, 1934
... . Bendigo Beehive tram fountain Alexandra Fountain An image of Pall ...Bendigo is one of Victoria's great inland towns.An image of Pall Mall, Bendigo including the Alexandra Fountain, the Beehive store and a tram.bendigo, beehive, tram, fountain, alexandra fountain -
 Bendigo Historical Society Inc.
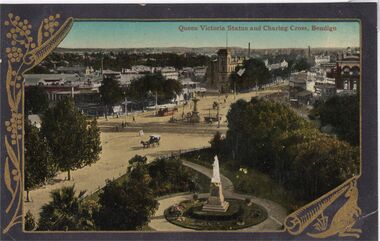
Postcard - CARWARDINE COLLECTION: QUEEN VICTORIA STATUE AND CHARING CROSS BENDIGO
Coloured postcard, grey border embellished with spray of gold wattle left side, and kangaroo in bottom RH corner. Image shows Charing Cross , Alexandra fountain in centre, Queen Victoria statue centre bottom. Horse drawn vehicles on Pall Mall and Charing Cross. City Family Hotel in background. View Point buildings on RH side. Receipt number 355/16Valentine & Sons Melbournebendigo, business, carwardine soap and candles -
 Bendigo Historical Society Inc.
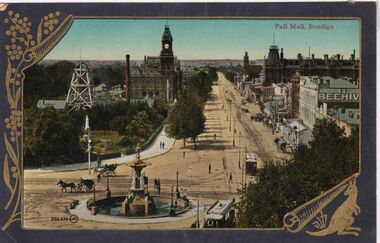
Photograph - CARWARDINE COLLECTION: PALL MALL BENDIGO
Coloured postcard, embellished with wattle left hand side, and kangaroo bottom Rh corner. Image shows Pall Mall, looking northwards. Post Office, Hustler's mine with brick chimney visible on left. Alexandra Fountain in centre bottom, horse drawn vehicles and two trams at Charing Cross. Henderson and Goode Beehive building and Shamrock Hotel on right. Receipt number 355/16bendigo, business, carwardine soap and candle -
 Bendigo Historical Society Inc.
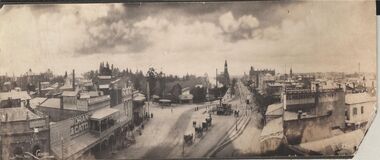
Photograph - CARWARDINE COLLECTION: STREETVIEW CHARING CROSS AND VIEW POINT, BENDIGO
Black and white photo. Image shows Charing Cross and View Point, looking northwards up Pall Mall (taken from City Family Hotel?) View Point businesses evident are : National and Mutual Life; A.M. Armstrong newsagents with 'The Argus popular daily ' on front; Moran and Cato, Warren's View Point Hotel, with two storey veranda ( on side: Cameo Cigarettes). Tram in foreground in View Street approaching fountain. Hustler's Royal Reserve poppet head and chimney on western side of Pall Mall, smoke rising from engine house? Post Office building with clock tower in distance. On RH side of image: written on verandah, Woodrow's Southern Cross Hotel; E.L. Holdsworth Chemist and Shamrock Hotel in distance. Four horse drawn taxis in centre of Charing Cross roadway, near fountain. Receipt number 355/16bendigo, business, carwardine soap and candle -
 Bendigo Historical Society Inc.
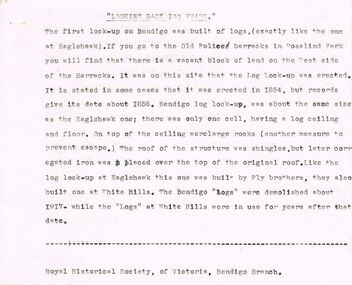
Document - SHORT ARTICLES (RHSV, BENDIGO BRANCH): ''LOOKING BACK 100 YEARS''
Typewritten short articles (RHSV, Bendigo Branch): ''Looking back 100 Years''. Possibly all authored by John O'C Hattam, Bendigo and ?? Published in the Newsletter/magazine of the Society. Titles for the articles and key points within are as follow: 1. ''Lock-ups'' in Bendigo (Rosalind Park, Eaglehawk and White Hills); 2. Curnow's Auction Rooms, corner Mitchell and Queen Streets. with mention of Goodwin’s grocer shop and ''Her Majesties Theatre''; 3. Hebrew Synagogue (sic) in Dowling St (Hopetoun St); 4. Caltex oil deport (end of Hopetoun St) with mention of Knight's Brick kiln and quarry; 5. First fire brigade (Pall Mall, near Bull St); 6. Sandhurst Flour Mills (corners Lyttleton Terrace, Myers and Bernal (now Chapel Streets). Mention of Iser home on site; 7. Article similar to article #5 re first fire brigade with some different details; 8. Sly grog selling (from Bendigo Advertiser 18/4/1874); 9. Alexandra Fountain. Mention of Mr P Finn, monumental mason and building of the fountain; 10. ''Joke'' re pyrites/gold taken from Bendigo Advertiser 7/4/1874; 11. Interesting article from Bendigo Advertiser re ''lost'' including advertisement for one child; 12. Gambling on the Reserve from Bendigo Advertiser April 1874; 13. ''Settling a dispute'' from Bendigo Advertiser 11/4/1874; 14. Articles re ''selling liquor'' and ''furious riding'' taken from Bendigo Advertiser 15/4/1874;document, names of bendigo pioneers, bendigo advertiser, mr p. finn. curnow's auction room. sandhurst flour mills. goodwin's grocer shop. -
 Ballarat Tramway Museum
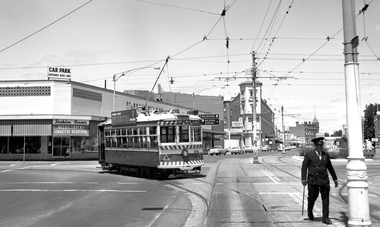
Photograph - Digital image, John Ward, 2/01/1972 12:00:00 AM
Digital image of the Bendigo tram 29 turning from Pall Mall into Mitchell St with the destination of Railway Station. In the background is the Fountain Plaza, advertising Melba Frocks and Gidgette Boutique, the City Family Hotel, Park Lane chicken shop. In the foreground is the Inspector returning the point bar to its holder on a pole. Photo by John Ward 2-1-1972. Slide title "04771 020172 7210-F SECV Birney tram 29 Pall Mall to Mitchell St at High St & View St Charing Cross Bendigo Vic"trams, tramways, bendigo, pall mall, mitchell st, charing cross, tram 29 -
 Ballarat Tramway Museum
Slide - 35mm slide/s - set of 5, Noel Simons, 19/11/1962 12:00:00 AM
Set of 5 transparencies taken on 19/11/1962 on Kodak mounts. 1186.1 - Bendigo 21 bound for Golden Square at Charing Cross with The Beehive buildings and shops in Pall Mall in the background. Trams has an ad for Cohns drinks on front bumper, SEC Best for Cooking roof ad. and Mamouney's furniture roof ad. Two women passengers boarding. 1186.2 - Bendigo 26 crossing Pall Mall from Mitchell St. bound for Eaglehawk with "Ezywalkin" shop in background. Tram has an SEC 'Electric Cooking' roof ad and a 'Streets Ice cream' ad on front dash. 1186.3 - Bendigo 7 arriving at the Charing Cross stop, bound for North Bendigo. Has a Huttons dash panel ad, a Castrol roof ad. Buildings as for 1186.1. Passengers waiting at the stop. 1186.4 - Bendigo 19 leaving Charing Cross for Golden Square with City Club Hotel alongside and other buildings as for 1186.1 in the background. Tram has Briquettes ad on front dash and SEC 'Electric Cooking' roof ad. 1186.5 - Bendigo 21in High St. at corner of Short St. heading for Charing Cross. Destination half way between Depot and Railway Station. Tram has ads for Cohns Drinks on dash panel, SEC 'Cook with Electricity' and a Sandhurst Milk roof ads.Information written on in black ink and date stamped in purple ink. 1186.1 - "No. 21 in Pall Mall at Charing Cross, Bendigo" 1186.2 - "No. 26 arriving at Alexandra Fountain, Charing Cross, Bendigo" 1186.3 - "No. 7 in Pall Mall at Charing Cross, Bendigo" 1186.4 - "No. 19 in High St., Bendigo, leaving Charing Cross for Golden Square" 1186.5 - "No. 21 in High St. Bendigo, at corner of Short St." tramways, trams, bendigo, charing cross, pall mall, high st., tram 7, tram 19, tram 21, tram 26 -
 Ballarat Tramway Museum
Slide - 35mm slide/s - set of 17, Noel Simons, 20/11/1962 12:00:00 AM
Set of 17 transparencies taken on 20/11/1962 on Kodak mounts. 1187.1 - Bendigo No. 2 at the Quarry Hill terminus, showing destination of Quarry Hill. Has Cohns Drinks and Streets Ice Cream ads on dash panel, a SEC 'electric cooking' roof ad and another roof ad. Shows the Y terminus at this location, but tram standing just before it. Overhead in position. 1187.2 - as above, but closer up. 1187.3 - as above, but from the north side, showing cemetery in the background. 1187.4 - Bendigo No.3 at Eaglehawk terminus. Tram showing destination of Quarry Hill. Has the various buildings at Eaglehawk in the background including the Foodland store. Has Streets Ice cream and White Horse Whiskey ads on the dash panel. 1187.5 - Bendigo No. 18 at Garden Gully crossing loop, in bound, with destination of Eaglehawk. Passengers waiting for an Eaglehawk tram at the stop. Has a white horse whiskey ad on dash panel and SEC roof ads. Conductor standing in doorway looking out. 1187.6 - Bendigo No. 7 inbound in Nolan St. at cnr of McCrae St. showing destination of Golden Square. Has Streets Ice cream ad on dash panel and a Castrol Roof ad. 1187.7 - Bendigo No. 19 at the North Bendigo terminus with railway level crossing in background. Tram has a Cohns Drinks ad and an SEC 'Electric Cooking' roof ad. 1187.8 - Bendigo No. 2 at the Quarry Hill terminus, looking back into Bendigo, showing destination of Eaglehawk. 1187.9 - Bendigo No. 21 in McCrae St, near Nolan St outbound for North Bendigo. Photo taken after tram has passed photographer. 1187.10 - Bendigo Nos. 4 and 26 at Charing Cross in View St. with fountain alongside and the Beehive, Ezywalkin Buildings in the background. No. 26 has a Sandhurst Milk and SEC 'Electric Cooking' roof ad. 1187.11 - close up of 22E maximum traction truck and folded footstep. 1187.12 - Bendigo No. 19 at Charing Cross terminus, after tram has passed photographer, showing destination of North Bendigo, with the Beehive building in the background and passengers boarding tram. 1187.13 - Bendigo No. 11, turning from View St. into Pall Mall, showing Special with the conductor holding point bar. Has the Beehive and Ezywalkin Buildings in the background. 1187.14 - No. 7 at Charing Cross terminus, in Pall Mall, bound for Golden Square. Has the Beehive and Ezywalkin buildings in the background and passengers waiting at the tram stop. 1187.15 - No. 18 at the Charing Cross terminus, bound for Eaglehawk. Has the Beehive and Ezywalkin buildings in the background and passengers waiting at the tram stop. Also has the 'Safety Zone' sign in the photograph. 1187.16 - No. 2 at Quarry Hill terminus, night or dusk photo. Tram showing destination of Depot. 1187.17 - No. 26 at Charing Cross, night photo. Tram has destination of Quarry Hill, but is on the line for Eaglehawk. Photo looks along Mitchell St. Also shows Safety Zone sign. Information written on in black ink and date stamped on purple ink. 1187.1 - "No. 2 at Quarry Hill terminus Bendigo" 1187.2 - "No. 2 at Quarry Hill terminus Bendigo" 1187.3 - "No. 2 at Quarry Hill terminus Bendigo" 1187.4 - "No. 3 at Eaglehawk terminus" 1187.5 - "No. 18 in Mt Korong Road, Long Gully at cnr of Havilah Road (Eaglehawk Route)" 1187.6 - "No. 7 in Nolan St. Bendigo, at Cnr of McCrae St., near lake Weeroona, (North Bendigo Route)' 1187.7 - "No. 19 at North Bendigo terminus" 1187.8 - "No. 2 at Quarry Hill terminus" 1187.9 - "No. 21 in McCrae St. Bendigo, near Nolan St. (North Bendigo Route) 1187.10 - "4 and 26 at Alexandra Fountain, Charing Cross Bendigo" 1187.11 - "Truck of Bogie Car, Bendigo Tramways" 1187.12 - "No. 19 in Pall Mall at Charing Cross, Bendigo" 1187.13 - "Birney car No. 11 entering Pall Mall from View St. at Charing Cross Bendigo" 1187.14 - "No. 7 in Pall Mall at Charing Cross, Bendigo" 1187.15 - "No. 18 at Alexandra Fountain, Charing Cross, Bendigo" 1187.16 - "No. 2 at Quarry Hill terminus, Bendigo" 1187.17 - "No. 26 at Alexandra Fountain, Charing Cross, Bendigo" tramways, trams, bendigo, quarry hill, eaglehawk, north bendigo, maximum traction, night photo, tram 2, tram 3, tram 4, tram 7, tram 11, tram 18, tram 19, tram 21, tram 26 -
 Ballarat Tramway Museum
Slide - 35mm slide/s - set of 24, Noel Simons, 20/05/1971 12:00:00 AM
Set of 24 transparencies taken on 20/5/1971 on Kodak mounts. 1195.1 - Bendigo 19 arriving at Charing Cross en route to North Bendigo with Fountain Plaza and the City Family Hotel in the background. No. 19 has two roof ads for the SEC. -'Electricity better for cooking' and 'Everything's under control in my all electric kitchen' 1195.2 - as above, but standing at the Charing cross stop, with the Beehive Stores and other buildings along the east side of Pall Mall in the background. 1195.3 - No 21 ex Golden Square crossing View St. trackwork in front of No. 25 waiting to depart for Quarry Hill. No.21 has two roof ads (as for No.19 in 1195.1) and No.25 has one SEC roof ad and another. Ezywalkin sign in the background, and Fountain Plaza. 1195.4 - as for 1195.3, but after 21 has arrived and 25 left for Quarry Hill. Has Ezywalkin store and the Beehive store in the background. 1195.5 - No. 5 at the Eaglehawk terminus. Photo taken with a cannon in foreground looking along High St. Eaglehawk. Has shops on the west side of High St. in the background. 1195.6 - No. 5 at the Eaglehawk terminus, close up of the rear of the tram - note tow bar arrangement. Has destination of Quarry Hill. 1195.7-Nos.25 and 5 crossing at the Thorpe St. Loop, California Gully. No. 25 bound for Eaglehawk (has SEC Briquette and electric cooking roof ads) and 5 en route for Quarry Hill with a SEC and Cinzano roof ad. 1195.8 - as for 1195.7, but after trams have passed each other. Has Borough Auto Service building in the background. 1195.9 - No. 5 in Mt Korong Road, towards Bamard Street, photo taken after tram has passed photographer. 1195.10 - No. 30 at the Golden Square terminus with the Milk Bar on the right hand side of the photograph. 1195.11 - No. 30 inbound at Fire Station Loop, High St. Golden Square. Has old fire station in the background. Passengers are boarding the tramcar. 1195.12 - No. 30 in High St, bound for North Bendigo between Vine and Wattle Streets. 1195.13 - No. 5 bound for Eaglehawk waits at Iron Bark Gully Loop, at Hayes St. 1195.14 - No. 5 and No. 2 crossing at Iron Bark Gully Loop. 1195.15 - No. 5 bound for Eaglehawk leaving the Manchester Loop, Long gully. 1195.16 - No. 5 passing William Street, Long Gully en route to Eaglehawk. 1195.17 - No. 5 just before the California Gully Crossing Loop. 1195.18 - Nos. 5 and 26 crossing at California Gully crossing Loop. No. 5 heading to Eaglehawk, 26, Quarry Hill. 1195.19 - No. 5 in High St. Eaglehawk with Bob Moyle's Victoria Hotel and the TAB in the background. 1195.20 - No. 5 in High St. Eaglehawk approaching the terminus. Photo taken after the tram has passed the photographer. Has Foodland store and J. Best Fruit supply in the background, along with Eaglehawk Town Hall. 1195.21 - No. 5 at the Eaglehawk terminus, photo taken along seldom used track along High St. 1195.22 - as for 1195.22 - but at the very end of the track. 1195.23 - No. 5 en route for Quarry Hill climbs High St. Eaglehawk with the Victoria Hotel and Eaglehawk Town Hall in the background. 1195.24 - No. 5 and 25 crossing at Jobs Gully Loop. Note 25 has a black on white destination roll, while No. 5 has a white on black destination roll. Information written on in black ink and date stamped on purple ink. 1195.1 - "No. 19 arrives at Charing Cross Bendigo from Golden Square" 1195.2 - "No. 19 about to leave Charing Cross for North Bendigo" 1195.3 - "No. 25 awaiting departure for Quarry Hill, watches No. 21 arrive at Charring Cross from Golden Square" 1195.4 - "No. 21 on North Bendigo service and No. 25 on Quarry Hill run await departure at Charing Cross" 1195.5 - "No. 5 at Eaglehawk terminus" 1195.6 - "No. 5 at Eaglehawk terminus" 1195.7 - "Nos. 5 and 25 crossing at Thorpe St. Loop, California". 1195.8 - "Nos. 25 and 5 crossing Thorpe St. Loop, California Gully". 1195.9 - "No. 5 descending Mt Korong Rd. towards Bamard St." 1195.10 - "Birney car No. 30 at Golden Square terminus" 1195.11 - "Birney car No. 30 in High Street near Thistle Street (Fire Station Loop)" 1195.12 - "No. 30 in High St. between vine and Wattle Streets" 1195.13 - "No. 25 at Hayes Street Loop Iron Bark". 1195.14 - "Nos. 2 and 5 crossing at Hayes Street Loop Iron Bark" 1195.15 - "No. 5 at Manchester Loop opposite Havilah Road, Long Gully" 1195.16 - "No. 5 passing William Street, Long Gully". 1195.17 - "No. 5 at California Gully" 1195,18 - "Nos. 26 and 5 at Thorpe St. Loop, California Gully". 1195.19 - "No. 5 in High St. Eaglehawk". 1195.20 - "No. 5 approaching Eaglehawk terminus" 1195.21 - "No. 5 at Eaglehawk terminus" 1195.22 - "No. 5 at Eaglehawk terminus" 1195.23 - "No. 5 in High St. Eaglehawk" tramways, trams, bendigo, charing cross, eaglehawk, california gully, golden square, iron bark gully, jobs gully, tram 2, tram 5, tram 19, tram 21, tram 25, tram 26, tram 30 -
 Ballarat Tramway Museum
Slide - 35mm slide/s - set of 32, Noel Simons, 25/02/1971 12:00:00 AM
Set of 31 transparencies taken on 25/2/1972 on Kodak mounts. 1201.1 - Bendigo No. 26 in Bond St. just after leaving Long Gully en route for Quarry Hill. Has Norris Supermarket in background. Has two SEC roof ads. 1201.2 - No. 26 climbing View St. from Charing Cross en route to Eaglehawk. Has ANZ bank and AMOCO service station in background. 1201.3 - as for 1201.3, but after tram has passed photographer. Has buildings west of Mackenzie St. in photograph. 1201.4 - Tram stop and centre of the road pole with two "CARS STOP BY REQUEST" signs mounted on pole at the corner of Mackenzie St. 1201.5 - same position as for 1201.3, but with No. 5 descending the street. 1201.6 - same position as for 1201.2, but with No. 5 descending the street. Photo taken after tram has passed photographer. 1201.7 - No. 7 in Nolan St. from across the park at Lake Weeroona. 1201.8 - No. 7 entering McCrae St from Nolan St. - distant view. Note "TRAM "sign on left hand side under tree and overhead in McCrae St. from former track that once was in this street. 1201.9 - No. 7 in High St. with Cathedral in background. Tram en route to North Bendigo. Note scaffolding around Cathedral main spire area. 1201.10 - No. 7 crossing Bendigo Creek bridge in High St. near Golden Square. Has a Caltex Service station in the background. 1201.11 - No. 7 at Golden Square terminus with Sunburst Fruit Juices and a Peters Ice cream delivery vans alongside. 1201.12 - as for 1201.11 but photo taken from behind tram, with the end of the rails in the photograph. 1201.13 - No. 7 and 21 in Pall Mall at Charing Cross with No. 5 in the background. Taken some distance away from the location. 1201.14 - No. 7 at Golden Square terminus, taken a short distance from the tram terminus. Shows Milk Bar on right hand side and the hotel on the left hand side. Taken from the south side of the roadway. 1201.15 - as from 1201.14 but taken from the north side of the roadway. 1201.16 - No 5 waiting at California Gully loop. Distant photo showing surrounds 1201.17 - No. 5 en route for Quarry Hill crossing No. 26 at California Gully. 1201.18 - No. 26 at Eaglehawk terminus with Eaglehawk Town Hall and Post Office in background. 1201.19 - No. 21 arriving at Charing Cross en route to North Bendigo. Has Alexandra Fountain in the background, ANZ bank RACV building, and other buildings on the north side of Pall Mall or Nolan St. 1201.20 - No. 26 en route for Quarry Hill at Charing Cross, with crew standing by front door. Has Colonial Mutual life building, Armstrong Tyre Service (Firestone) and a sign for Cohns Drinks in the background. 1201.21 - as for 1201.20 but with No. 5 en route to Eaglehawk now in photograph. 1201.22 - No. 26 at Quarry Hill terminus. 1201.23 - No. 26 at Quarry Hill terminus, view of front portion of tram only from a gate at the Bendigo cemetery. 1201.24 - Track at the end of the Quarry Hill line showing the point blades of the former "Y" terminus and the overhead for this. 1201.25 - No. 2 at the Quarry Hill terminus, looking along the former Trackwork. 1201.26 - as for 1201.25 1201.27 - number not used. 1201.28 - Golden Square terminus from some distance from the actual terminus, showing the Warning sign "TRAM" for motorists from the south. No. 7 at the terminus. 1201.29 - No. 7 passing through the Golden Square shopping centre. Numerous cars and pedestrians. Tram en route for North Bendigo. 1201.30 - No. 7 in High St. Golden Square, en route for North Bendigo. Photo taken after tram has passed photographer. 1201.31 - No. 7 in High St. just past Wattle St. with the Cathedral in the background. Tram has two SEC roof ads good side on photo, 'Everything's fine in my all electric kitchen' and 'Electrical cooking - clean, quick, economical'. 1201.32 - No. 7 in High St. nearing Wattle St. Has Cathedral in the background. Photo taken after tram has passed photographer.Information written on in black ink and date stamped on purple ink. 1201.1 - "No. 26 in Bond St just after leaving Long Gully" 1201.2 - "No. 26 climbing View St. from Charing Cross" 1201.3 - "No. 26 ascending View St. from Charing Cross (At Mackenzie St.)" 1201.4 - "View St. & Mackenzie St." 1201.5 - "No. 5 in View St. near Mackenzie St." 1201.6 - "No. 5 in View St. nearing Charing Cross." 1201.7 - "No. 7 in Nolan St. seen from Lake Weeroona Park." 1201.8 - "No. 7 entering McRae St. from Nolan St. Note "TRAM" warning sign on left. 1201.9 - "No. 7 in High St. passing Short St." 1201.10 - "No. 7 crossing Bendigo Creek bridge in High St. near Golden Square." 1201.11 - "No. 7 at Golden Square terminus" 1201.12 - "No. 7 at Golden Square terminus" 1201.13 - "No 7, 21 and 5 at Charing Cross" 1201.14 - "No. 7 at Golden Square terminus" 1201.15 - "No. 7 at Golden Square terminus" 1201.16 - "No 5 waiting at California Gully loop." 1201.17 - "Nos. 5 and 26 crossing at California Gully loop" 1201.18 - "No. 26 at Eaglehawk terminus" 1201.19 - "No. 21 arriving at Charing Cross from Golden Square" 1201.20 - "No. 26 at Charing Cross" 1201.21 - "Nos. 5 and 26 at Charing Cross." 1201.22 - "No. 26 at Quarry Hill terminus" 1201.23 - "No. 26 at Quarry Hill terminus seen through the gates of the Bendigo Cemetery." 1201.24 - "Quarry Hill terminus showing remains for former double track layout abandoned before 1964." 1201.25 - "No. 2 at Quarry Hill terminus" 1201.26 - "No. 2 at Quarry Hill terminus" 1201.28 - "The Southern approach to Golden Square with No. 7 standing at the terminus, "TRAM" warning sign on the left. 1201.29 - "No. 7 passing through Golden Square Shopping Centre" 1201.30 - "No. 7 in High St. Golden Square" 1201.31 - "No. 7 in High St. passing Wattle St." 1201.32 - "No. 7 in High St. nearing Wattle St."tramways, trams, bendigo, bond st., view st., nolan st., high st., eaglehawk, california gully, charing cross, quarry hill, trackwork, tram 2, tram 5, tram 7, tram 21, tram 26 -
 Ballarat Tramway Museum
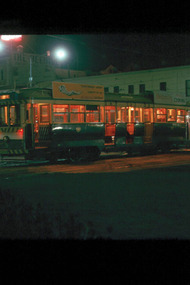
Slide - 35mm slide/s - set of 8, Noel Simons, 25/02/1972 12:00:00 AM
Set of 8 transparencies taken on 25/02/72 on Kodak mounts. 1202.1 - Night photo of Bendigo 5 at Charing Cross, waiting to depart to Quarry Hill. Tram has two SEC roof ads. Has Ezywalkin and the Beehive buildings in the background. 1202.2 - as for 1202.1 1202.3 - as for 1202.1 but further back and 7 and 21 waiting for their runs as well in Pall Mall. 1202.4 - 5 and 2 at Charing Cross, night photo, looking along Mitchell St. with Fountain Plaza on right of photo and Ezywalkin store. 1202.5 - No. 2 at Charing cross, bound for Eaglehawk. Tram has two SEC ads. 1202.6 - No. 26 at Quarry Hill terminus with the cemetery in the background. Tram has two SEC roof ads. 1202.7 - No. 26 in Mitchell St. bound for Eaglehawk, at Wills St. with the Hopetoun Hotel in the background. 1202.8 - as for 1202.6Information written on in blue ink and date stamped on purple ink. 1202.1 - "No. 5 at Charing Cross" 1202.2 - "No 5. at Charing Cross" 1202.3 - "Nos. 7, 21 and 5 at Charing Cross" 1202.4 - "Nos. 5 and 2 at Charing Cross" 1202.5 - "No. 2 at Charing Cross" 1202.6 - "No. 26 at Quarry Hill" 1202.7 - "No. 26 in Mitchell St. opposite Wills St." 1202.8 - "No. 26 at Quarry Hill" tramways, trams, bendigo, night photo, charing cross, quarry hill, mitchell st., tram 2, tram 5, tram 7, tram 21, tram 26 -
 Ballarat Tramway Museum
Slide - 35mm slide/s - set of 23, Noel Simons, 26/02/1972 12:00:00 AM
Set of 23 transparencies taken on 26/2/1972 on Kodak mounts. 1205.1 - Bendigo No. 25 on a special tour at Fire Station Loop, en route to Golden Square. 1205.2 - No. 21 and 25 crossing at Fire Station Loop, note photographers on the ground. No. 21 bound for North Bendigo. 1205.3 - as for 1205.3, but with trams departing loop and fire station in the background. 1205.4 - No. 25 at Golden Square Hotel with 'Rodda's Golden Square Hotel' in the background. Tram on a special tour, but showing destination of North Bendigo. 1205.5 - as for 1205.4 - but showing special. Has the end of the track in the photograph. 1205.6 - Nos. 7 and 25 (on a special tour) crossing at Myrtle St. Loop. 1205.7 - No. 7 leaving Myrtle St. loop with the mine poppet head in the background. Photo taken after tram has passed photographer. (Print made of this slide 10/2001 for use in the Gold Gold Gold exhibition of 10/2001 - See Reg. item 1979. 1205.8 - No. 25 entering depot. Tram showing 'special'. Tennis court on right has players. Photo taken after tram has passed photographer. 1205.9 - No. 24 (showing 'special') and No. 20 (showing 'Long Gully') at Bendigo Depot. 1205.10 - No. 24 on a special charter, leaving Bendigo depot. Tram has two 'Johnnie Walker' roof ads. 1205.11 - Bendigo depot with 29, 25 and a bogie car inside the depot doors. 1205.12 - As for 1205.11, but with 28 and 29. 1205.13 - No. 24 standing at front entrance of Bendigo depot with No. 20 in the background. 1205.14 - No. 24 running out into McCrae St showing special, with conductor on front step. 1205.15 - No. 24 in Caledonia St. at corner of Thunder St with the Gasworks in the background. 1205.16 - No. 5 en route for Quarry Hill at Charing cross with No. 26 (en route for Eaglehawk) about to arrive. Has former crossover at this location in the foreground. Has the Ezywalkin building in the background. 1205.17 - No. 5 and 26 at Charing Cross, with the Alexandra Fountain in the foreground and the Beehive and Ezywalkin buildings in the background. No.26 has two SEC roof ads. 1205.18 - Charing Cross looking along Pall Mall with trams 7 and 21 and 26 in the picture. 1205.19 - Charing Cross, with 21 departing for Golden Square and No. 5 heading for Quarry Hill. Has the Ezywalkin and the Beehive buildings in the background. 1205.20 - as for 1205.19, but a few moments later. Adjacent pole has a "NO ROAD" letter in reflectors vertically. 1205.21 - Charing Cross with Nos. 25, 21, 26 and 7, looking south from Pall Mall end. 1205.22 - No. 24 crossing Mitchell St. en route for Golden Square, showing 'special' with the Beehive and Ezywalkin buildings in the background. 1205.23 - Charing Cross with Nos. 24, 21 and 7 in the photo and Fountain Plaza in the background. Print of 1205.7 - stored in box D1.Information written on in blue ink and date stamped on purple ink. 1205.1 - "No. 25 at Fire Station Loop High Street, Golden Square." 1205.2 - "Nos. 25 and 21 crossing at Fire Station Loop, near Golden Square." 1205.3 - "Nos. 25 and 21 crossing at Fire Station Loop, near Golden Square." 1205.4 - "No. 25 at Golden Square terminus." 1205.5 - "No. 25 at Golden Square terminus." 1205.6 - "Nos. 7 and 25 crossing at Myrtle St. Loop." 1205.7 - "No. 7 leaving Myrtle St. Loop." 1205.8 - "No 25, entering Bendigo Depot." 1205.9 - "Nos. 20 and 24 at Bendigo Depot." 1205.10 - "No. 24 at Bendigo Depot." 1205.11 - "Nos. 25 and 29 at Bendigo Depot." 1205.12 - "Birney cars 29 and 28 at Bendigo Depot." 1205.13 - "No. 24 (with 20 beyond) at Bendigo Depot." 1205.14 - "No. 24 entering McCrae St. from Arnold St." 1204.15 - "No. 24 in Caledonia St. at cnr of Thunder St." 1204.16 - "No. 5 waits at Charing Cross as No. 26 arrives from Quarry Hill. Note remains of crossover abandoned on relocation in 1965." 1204.17 - "Nos. 5 and 26 at Charing Cross." 1204.18 - "Nos. 26, 7 and 21 at Charing Cross (No. 5 just visible behind No. 26)." 1204.19 - "No. 21 leaves Charing Cross for Golden Square as No. 5 starts off for Quarry Hill." 1204.20 - "No. 21 swings onto the single track Golden Square line as No. 5 heads into Mitchell St. towards Quarry Hill." 1204.21 - "Nos. 25, 21 and 26 watch No. 7 arrive at Charing Cross from Golden Square." 1204.22 - "No. 24 at Charing Cross crossing Mitchell St." 1204.23 - "Nos. 24, 21 and 7 at Charing Cross."tramways, trams, bendigo, golden square, myrtle st., fire station, depot, charing cross, tram 5, tram 7, tram 20, tram 21, tram 24, tram 25, tram 28, tram 29 -
 Ballarat Tramway Museum
Slide - 35mm slide/s - set of 12, Noel Simons, 28 Feb. 1972
Set of 12 transparencies taken on 28/2/1972 on Kodak mounts. 1207.1 - Bendigo 26 and 2 at Charing Cross. 26 en route for Eaglehawk, 2 for Quarry Hill. Has the Colonial Mutual Life, Armstrong Tyre Service, and Australian Mutual Provident Society buildings and a Cohns Drinks ad. in the background. 1207.2 - as for 1207.1 but with Alexandra fountain in the foreground. 1207.3 - No. 2 in Mitchell St. heading for Quarry Hill. Photo taken after tram has passed photographer. Has buildings on either side of Mitchell St. in the background, including the Plaza Theatre. 1207.4 - No. 6 en route for Golden Square departing Charing Cross. Has the RACV and ANZ bank in the background. 1207.5 - No. 2 crossing Pall Mall to enter Charing Cross ex Quarry Hill, with the Fountain Plaza in the background. 1207.6 - No. 6 arriving Charing Cross ex Golden Square with No. 21 alongside. No. 21 has the SEC ad. 'Everything's fine in my all electric kitchen.' Has the City Family Hotel and the Fountain Plaza shopping centre in the background. 1207.7 - No. 5 at Charing Cross en route for Quarry Hill with No. 2 behind. No. 2 has two SEC roof ads, 'Everything s fine in my all electric kitchen' and 'Electricity best for cooking'. RACV building in the background. Tram crews are discussing the day in the front of the tram. 1207. 8 - No. 21 in High St. Bendigo with the Cathedral in the background. No. 21 has two SEC roof ads, 'Everything's fine in my all electric kitchen' and 'Electricity best for cooking'. 1207.9 - No. 6 in High St. Bendigo with the Cathedral in the background. 1207.10 - No. 6 in High St. Bendigo, just past Wattle St. Photo taken after the tram has passed the photographer from within the Highway Car Sales yard. 1207.11 - No. 26 bound for Eaglehawk at the end of the double track in View St., note signal contactors, tram stop and section signs mounted on pole. 1207.12 - No. 26 turning from View St. into Barnard St.Information written on in blue ink and date stamped on purple ink. 1207. 1- "Nos. 26 and 2 at Charing Cross." 1207.2 - "Nos. 26 and 2 at Charing Cross." 1207.3 - "No. 2 in Mitchell St. just after leaving Charing Cross." 1207.4 - "No.6 leaving Charing Cross for Golden Square." 1207.5 - "No. 2 arriving at Charing Cross from Quarry Hill." 1207.6 - "No. 21 waits at Charing Cross as No. 6 arrives from Golden Square." 1207.7 - "No 5 at Charing Cross with No. 2 lurking behind." 1207.8 - "No. 21 in High St. at cnr of Wattle St." 1207.9 - "No. 6 in High St. at cnr of Wattle St." 1207.10 - "No. 6 in High St. between Wattle and Vine Sts." 1207.11 - "No. 26 at end of double track in View St. near Barnard. St. 1207.12 - "No. 26 seen at dusk turning from View St. into Barnard St."tramways, trams, bendigo, charing cross, high st, view st., tram 2, tram 5, tram 6, tram 21, tram 26