Showing 356 items
matching trams 1972
-
 Ballarat Tramway Museum
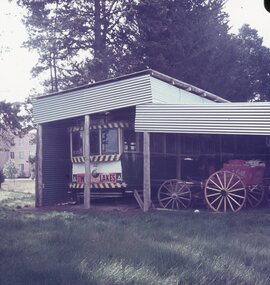
Slide - 27 mm sq slide/s - set of 2, Lilian Butler, Ballarat tram No. 33 at the Hamilton Pastoral Museum, c1971/1972
Yields information about the appearance of tram No. 33 to Hamilton after being placed there.Set of two Colour 27 x 27 mm slide in Agfachrome blue and white plastic mounts of Ballarat tram No. 33 at the Hamilton Pastoral Museum within a shed c1971/1972. Photo from the collection of Lilian Butler. ballarat, tramways, trams, preserved trams, hamilton, tram 33 -
 Ballarat Tramway Museum
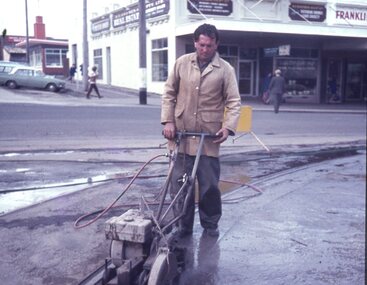
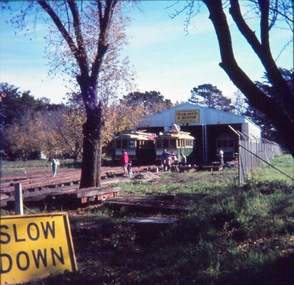
Slide - 27 mm sq slide/s - set of 7 - track removal, Lilian Butler, c1971 to 1972
Series of 7 photos showing track removal following the closure of the Ballarat Tram system.Yields information about the removal of the tram tracks in the city area.Set of 7 colour slides - 1 x Agfa blue and white plastic slide mount, 4 Hanimex cardboard mounts and 2 Kodachrome cardboard mounts of track removal works in Ballarat, c1971 to 1972 .1 - Saw cutting the road pavement at the Dawson St Crossover. .2 - Rolling the crushed rock pavement in Sturt St after track removal - near Doveton St. .3 - Track repairs or starting to remove the railway crossing at Lydiard St North - has an SEC truck in the background and the Kennedy Murray Pty Ltd General Carriers building in the background. .4 - commencing work on the Dawson St Crossover removal with St Patrick's Cathedral in the background. .5 - as for .2 .6 - L. G. Pearce excavating track near Dawson St. .7 - ditto Photo from the collection of Lilian Butler. ballarat, tramways, trams, track removal, dawson st, trackwork, sturt st, level crossings, lydiard st north -
 Ballarat Tramway Museum
Slide - 35mm slide/s - set of 3, John Theodore, 1972 - 1974
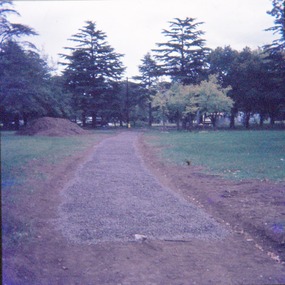
Yields information about depot activities of the BTPS in building the depot fan and access track.Set of 3 AGFA blue and white plastic mount 27mm sq slides of various works at the BTPS depot during 1972 / 1974 and an event set up with members. .1 - 26 and 40 on the fan with John Withers Landrover. - No. 1 road has been commenced. .2 - group photo of BTPS workers - in front of 27 = special event day given the flagging to the right hand side. .3 - 27 by itself.- track has been laid down the access track.Various notations by John as to the slide number and the trams in pencil and ink.tramways, trams, btps, depot, track construction, group photo, events, tram 26, tram 40, tram 27 -
 Ballarat Tramway Museum
Slide - 35mm slide/s - set of 3, John Theodore, 1972 - 1974
Yields information about depot activities of the BTPS in building the depot fan and access track.Set of 3 AGFA blue and white plastic mount 27mm sq slides of various works at the BTPS depot during 1972 / 1974 .1 - 26 and 38 on 3 road - one road has been commenced, overhead work commenced. 26 has a Trotting at Bray Raceway sign on it. .2 - Warren Doubleday on roof of 26 and Richard Gilbert with the Trolley Pole. .3 - 38 outside the depot with the spare maximum traction wheels in front.Various notations by John as to the slide number and the trams in pencil and ink.tramways, trams, btps, depot, track construction, signs, overhead, tram 26, tram 38 -
 Ballarat Tramway Museum
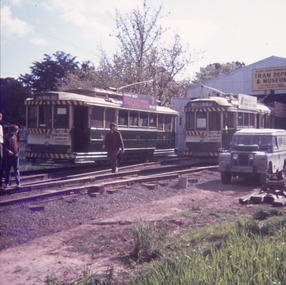
Slide - 35mm slide/s - set of 8, John Theodore, 1972 - 1974
Yields information about depot activities of the BTPS in building the depot fan and access track.Set of 8 AGFA blue and white plastic mount 27mm sq slides of various works at the BTPS depot during 1972 / 1974. .1 - View looking from roadway showing depot, and various works at the depot - 26 and 27 out front. .2 - Sawing timber sleepers to length - Noel Forster, Barry McCandlish, Bill Kingsley .3 - Ballasting the access track - Rolf Jinks and Clyde Croft .4 - working on the roof of 27 - Geoff Cargeeg and others. .5 - break time. .6 - Bob Prentice and Geoff Cargeeg? on roof of 27 .7 - ditto .8 - Interior photo of 27Various notations by John as to the slide number and the trams in pencil and ink.tramways, trams, btps, depot, track construction, trolley poles, interiors, tram 26, tram 27 -
 Ballarat Tramway Museum
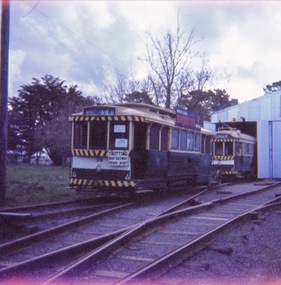
Slide - 35mm slide/s - set of 8, John Theodore, 1972 - 1974
Yields information about depot activities of the BTPS in building the depot fan and access track.Set of 4 AGFA blue and white plastic mount and one Kodachrome 27mm sq slides of various works at the BTPS depot during 1972 / 1974. .1 - Access track with ballast layer looking back to the depot. .2 - workers on top of Mt Jessup - the stockpile. .3 - 26, 27 and 40 peering out of the depot .4 - 27 on depot fan and sleepers. 27 was the display the tram Noel Gipps, Gavin Young, Bob Prentice .5 - volunteer on roof of tram - can't recall his name. .6 - access track at the level crossing .7 - view from level crossing .8 - Stewart Loddington standing by 26 - 26 has a briquettes sign.Various notations by John as to the slide number and the trams in pencil and ink.tramways, trams, btps, depot, track construction, trams, tram 26, tram 27 -
 Ballarat Tramway Museum
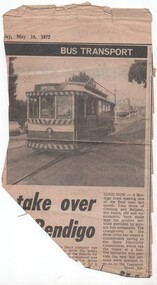
Newspaper, The Age, "Buses take over in Bendigo", 18/05/1972 12:00:00 AM
Newspaper clipping from The Age, Thursday May 18, 1972 reporting on the take over of the Bendigo trams by Buses. Has been poorly cut from newspaper, part of a section regarding bus transport in the newspaper. Has a photo of Bendigo 7.bendigo, buses, closure, tramways -
 Ballarat Tramway Museum
Document - Letter and Envelope, Tramway Museum Society of Victoria (TMSV), 1971
Envelope - preprinted in dark green ink - titled "Last Trammail Cover" - with a purple stamp in top left hand corner - "Carried by Tram between Eaglehawk and Bendigo / Sponsored by the Tramway Museum Society of Victoria Ltd.", in top right hand corner - 6c Australia stamp, featuring Sturt's Desert Rose and a Post Office Cancellation stamp "Ballarat 15 April 1972". Env7lope made by Tudor Presseal. Contains a Preprinted card - green ink titled "Last Trammail Cover", headed by TMSV's name, address and details of the TMSV, with the names of the Organisers John Fitzsimons and Bob Prentice along the lower edge. Two copies held - both addressed to Mr. G,. Breydon, 204 Carlisle St, Balaclava Vic 3183. One copy was opened to check the content, the other remains sealed. See Reg Item 2942 for the Ballarat version.trams, tramways, tmsv, bendigo, sec, tramcars -
 Ballarat Tramway Museum
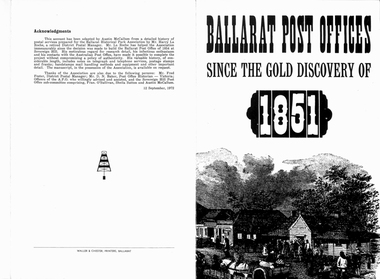
Pamphlet, Ballarat Historical Park Association (Sovereign Hill), "Ballarat Post Offices since the gold discovery of 1851", Sep. 1972
Yields information about the postal services in the Ballarat region.Pamphlet - 3 folds - printed on semi gloss paper, titled "Ballarat Post Offices since the gold discovery of 1851", outlining the history of the post offices in Ballarat, prepared for the Ballarat Historical Park Association (Sovereign Hill), 12/9/1972. Details the history of the postal services and deliveries with a background of the establishment of Victoria and Ballarat in particular, centred around the discovery of gold. Includes notes on the construction of the Ballarat post offices and their history. Has the Park Association logo on the rear.trams, tramways, post office, gold, sovereign hill -
 Ballarat Tramway Museum
Photograph - Digital image, John Ward, 1/01/1972 12:00:00 AM
Digital image of Bendigo 28, with a Lake Weeroona destination, at the corner will Williamson St with the Shamrock Hotel in the background. Has signs for Carlton Draught beer. A Stonemasons signs is next door. Photo by John Ward 1 January 1972 Slide title "00890 010172 SEC Birney tram 28 Pall Mall at Williamson St outside Shamrock Hotel Bendigo Vic"trams, tramways, bendigo, pall mall, lake weeroona, tram 28 -
 Ballarat Tramway Museum
Photograph - Digital image, John Ward, 1/01/1972 12:00:00 AM
Digital image of the Bendigo 18 to North Bendigo in Pall Mall at Williamson St with the Shamrock Hotel and the ANZ Bank in the background. Has signs for Stonemasons and Myers in the photo. Photo by John Ward 01-01-1972 Slide title "04759 010172 7208-H SECV bogie tram 18 Pall Mall at Williamson St Bendigo Vic"trams, tramways, bendigo, pall mall, north bendigo, tram 18 -
 Ballarat Tramway Museum
Photograph - Digital image, John Ward, 1/01/1972 12:00:00 AM
Digital image of the Bendigo 28 crossing No. 2 at Pinders Loop in Carpenter Loop on the Quarry Hill line. No. 28 has the destination of Quarry Hill, while No. 2 Eaglehawk. Photo by John Ward 01 - 01- 1972 Slide title "04751 010172 7207-H SECV Birney tram 28 passing bogie tram 2 in Carpenter St on Quarry Hill line Bendigo Vic"trams, tramways, bendigo, carpenter st, pinders loop, quarry hill, tram 28, tram 2 -
 Ballarat Tramway Museum
Photograph - Digital image, John Ward, 2/01/1972 12:00:00 AM
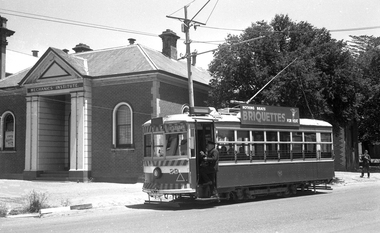
Digital image of the Bendigo 29 at the Eaglehawk terminus, with the Mechanics Institute building in the background. The tram has destination of Eaglehawk and a Briquettes roof advert. The driver is boarding the tram after turning the pole. Photo by John Ward 02 - 01- 1972 Slide title "04142 020172 7201-08 SECV Birney single truck tram 29 at terminus Sailors Gully Rd at High Eaglehawk Bendigo Vic"trams, tramways, bendigo, eaglehawk, tram 29 -
 Ballarat Tramway Museum
Photograph - Digital image, John Ward, 2/01/1972 12:00:00 AM
Digital image of the Bendigo tram 29 turning from Pall Mall into Mitchell St with the destination of Railway Station. In the background is the Fountain Plaza, advertising Melba Frocks and Gidgette Boutique, the City Family Hotel, Park Lane chicken shop. In the foreground is the Inspector returning the point bar to its holder on a pole. Photo by John Ward 2-1-1972. Slide title "04771 020172 7210-F SECV Birney tram 29 Pall Mall to Mitchell St at High St & View St Charing Cross Bendigo Vic"trams, tramways, bendigo, pall mall, mitchell st, charing cross, tram 29 -
 Ballarat Tramway Museum
Newspaper, The Courier Ballarat, "Ballarat support for tramway preservation is small: President", 25/09/1972 12:00:00 AM
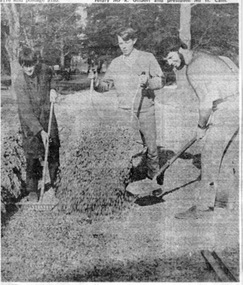
... and the 1972 Annual General Meeting. Trams tramways BTPS Construction ...Has a strong association with the people who were involved in the early formation of the BTPS and the 1972 Annual General Meeting.Newspaper clipping from The Courier of Ballarat of Monday 25/9/1972 with two photos. Article quotes BTPS President saying support for the BTPS was still small. This followed the Annual General Meeting of the Society the previous Saturday. Other items were the trams had been transferred from the old SEC depot, Incorporation was being sought, track laying and maintenance work underway. Two photos 1084i1: - Photo shows Lindsay Bounds, Clyde Croft and David Wisher spreading gravel along No. 2 road. 1084i2: - Photo shows group of Board members at meeting: Mr. G. Netherway, Mr. M. Calnin, Mr. C.W.Jessup, Mr. R.Gilbert and Mr. H.Cain (President) See Reg Item 3824 for a print of the actual photograph. Second copy added 28/10/2005.On top edge of cutting in black ink "25/9/72"trams, tramways, btps, construction, museum establishment, agm -
 Ballarat Tramway Museum
Slide - 35mm slide/s - set of 6, Noel Simons, 27/02/1972 12:00:00 AM
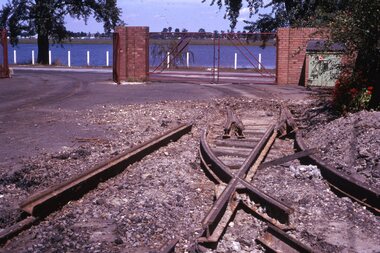
Has a strong association with the early days of the BTPS in preparing to move the tramcars from the depot and working at the former SEC depot itself. Yields information about the work done in the yard to recover materials.Set of 6 transparencies taken on 27/2/1972 on Kodak mounts. 1177.1 - photo of the dismantling of the points leading to "0" road at the SEC depot by the BTPS, looking south to Lake Wendouree. 1177.2 - view across depot front with No. 28 parked slightly outside and No. 40 inside door. Shows trackwork being dismantled and offices at front of depot. 1177.3 - view of No. 40 inside depot. 1177.4 - close up of the point blades leading to "0" road. 1177.5 - view of the front of the depot showing 40 and 28 parked outside, with dismantled point work in the foreground. 1177.6 - view of trackwork at part of Sturt and Drummond Sts. See also Reg Item 3533 for a similar series of photographs.Information written on in blue ink and date stamped on purple ink. 1177.1 - "Depot, Ballarat" 1177.2 - "Depot, Ballarat" 1177.3 - "Depot, Ballarat" 1177.4 - "Depot, Ballarat" 1177.5 - "Depot" 1177.6 - "Sturt and Drummond Sts"tramways, trams, wendouree parade, depot, sturt st, drummond st, pointwork, trackwork, o road, tram 28, tram 40 -
 Ballarat Tramway Museum
Slide - 35mm slide/s - set of 32, Noel Simons, 25/02/1971 12:00:00 AM
Set of 31 transparencies taken on 25/2/1972 on Kodak mounts. 1201.1 - Bendigo No. 26 in Bond St. just after leaving Long Gully en route for Quarry Hill. Has Norris Supermarket in background. Has two SEC roof ads. 1201.2 - No. 26 climbing View St. from Charing Cross en route to Eaglehawk. Has ANZ bank and AMOCO service station in background. 1201.3 - as for 1201.3, but after tram has passed photographer. Has buildings west of Mackenzie St. in photograph. 1201.4 - Tram stop and centre of the road pole with two "CARS STOP BY REQUEST" signs mounted on pole at the corner of Mackenzie St. 1201.5 - same position as for 1201.3, but with No. 5 descending the street. 1201.6 - same position as for 1201.2, but with No. 5 descending the street. Photo taken after tram has passed photographer. 1201.7 - No. 7 in Nolan St. from across the park at Lake Weeroona. 1201.8 - No. 7 entering McCrae St from Nolan St. - distant view. Note "TRAM "sign on left hand side under tree and overhead in McCrae St. from former track that once was in this street. 1201.9 - No. 7 in High St. with Cathedral in background. Tram en route to North Bendigo. Note scaffolding around Cathedral main spire area. 1201.10 - No. 7 crossing Bendigo Creek bridge in High St. near Golden Square. Has a Caltex Service station in the background. 1201.11 - No. 7 at Golden Square terminus with Sunburst Fruit Juices and a Peters Ice cream delivery vans alongside. 1201.12 - as for 1201.11 but photo taken from behind tram, with the end of the rails in the photograph. 1201.13 - No. 7 and 21 in Pall Mall at Charing Cross with No. 5 in the background. Taken some distance away from the location. 1201.14 - No. 7 at Golden Square terminus, taken a short distance from the tram terminus. Shows Milk Bar on right hand side and the hotel on the left hand side. Taken from the south side of the roadway. 1201.15 - as from 1201.14 but taken from the north side of the roadway. 1201.16 - No 5 waiting at California Gully loop. Distant photo showing surrounds 1201.17 - No. 5 en route for Quarry Hill crossing No. 26 at California Gully. 1201.18 - No. 26 at Eaglehawk terminus with Eaglehawk Town Hall and Post Office in background. 1201.19 - No. 21 arriving at Charing Cross en route to North Bendigo. Has Alexandra Fountain in the background, ANZ bank RACV building, and other buildings on the north side of Pall Mall or Nolan St. 1201.20 - No. 26 en route for Quarry Hill at Charing Cross, with crew standing by front door. Has Colonial Mutual life building, Armstrong Tyre Service (Firestone) and a sign for Cohns Drinks in the background. 1201.21 - as for 1201.20 but with No. 5 en route to Eaglehawk now in photograph. 1201.22 - No. 26 at Quarry Hill terminus. 1201.23 - No. 26 at Quarry Hill terminus, view of front portion of tram only from a gate at the Bendigo cemetery. 1201.24 - Track at the end of the Quarry Hill line showing the point blades of the former "Y" terminus and the overhead for this. 1201.25 - No. 2 at the Quarry Hill terminus, looking along the former Trackwork. 1201.26 - as for 1201.25 1201.27 - number not used. 1201.28 - Golden Square terminus from some distance from the actual terminus, showing the Warning sign "TRAM" for motorists from the south. No. 7 at the terminus. 1201.29 - No. 7 passing through the Golden Square shopping centre. Numerous cars and pedestrians. Tram en route for North Bendigo. 1201.30 - No. 7 in High St. Golden Square, en route for North Bendigo. Photo taken after tram has passed photographer. 1201.31 - No. 7 in High St. just past Wattle St. with the Cathedral in the background. Tram has two SEC roof ads good side on photo, 'Everything's fine in my all electric kitchen' and 'Electrical cooking - clean, quick, economical'. 1201.32 - No. 7 in High St. nearing Wattle St. Has Cathedral in the background. Photo taken after tram has passed photographer.Information written on in black ink and date stamped on purple ink. 1201.1 - "No. 26 in Bond St just after leaving Long Gully" 1201.2 - "No. 26 climbing View St. from Charing Cross" 1201.3 - "No. 26 ascending View St. from Charing Cross (At Mackenzie St.)" 1201.4 - "View St. & Mackenzie St." 1201.5 - "No. 5 in View St. near Mackenzie St." 1201.6 - "No. 5 in View St. nearing Charing Cross." 1201.7 - "No. 7 in Nolan St. seen from Lake Weeroona Park." 1201.8 - "No. 7 entering McRae St. from Nolan St. Note "TRAM" warning sign on left. 1201.9 - "No. 7 in High St. passing Short St." 1201.10 - "No. 7 crossing Bendigo Creek bridge in High St. near Golden Square." 1201.11 - "No. 7 at Golden Square terminus" 1201.12 - "No. 7 at Golden Square terminus" 1201.13 - "No 7, 21 and 5 at Charing Cross" 1201.14 - "No. 7 at Golden Square terminus" 1201.15 - "No. 7 at Golden Square terminus" 1201.16 - "No 5 waiting at California Gully loop." 1201.17 - "Nos. 5 and 26 crossing at California Gully loop" 1201.18 - "No. 26 at Eaglehawk terminus" 1201.19 - "No. 21 arriving at Charing Cross from Golden Square" 1201.20 - "No. 26 at Charing Cross" 1201.21 - "Nos. 5 and 26 at Charing Cross." 1201.22 - "No. 26 at Quarry Hill terminus" 1201.23 - "No. 26 at Quarry Hill terminus seen through the gates of the Bendigo Cemetery." 1201.24 - "Quarry Hill terminus showing remains for former double track layout abandoned before 1964." 1201.25 - "No. 2 at Quarry Hill terminus" 1201.26 - "No. 2 at Quarry Hill terminus" 1201.28 - "The Southern approach to Golden Square with No. 7 standing at the terminus, "TRAM" warning sign on the left. 1201.29 - "No. 7 passing through Golden Square Shopping Centre" 1201.30 - "No. 7 in High St. Golden Square" 1201.31 - "No. 7 in High St. passing Wattle St." 1201.32 - "No. 7 in High St. nearing Wattle St."tramways, trams, bendigo, bond st., view st., nolan st., high st., eaglehawk, california gully, charing cross, quarry hill, trackwork, tram 2, tram 5, tram 7, tram 21, tram 26 -
 Ballarat Tramway Museum
Slide - 35mm slide/s - set of 19, Noel Simons, 26/02/1972 12:00:00 AM
Set of 18 transparencies taken on 26/2/1972 on Kodak mounts. 1203.1 - Bendigo 5 at Eaglehawk terminus - with new traffic works. 1203.2 - No. 5 climbing the High St. hill Eaglehawk with the buildings on the east side in the photo. 1203.3 - No 2 descending the road over rail bridge at Job's Gully, heading for Quarry Hill. 1203.4 - as for 1202.3, but more side on. Tram has two SEC roof ads. 1203.5 - as for 1202.4 1203.6 - No. 26 entering Garden Gully Loop, Mt. Korong Road, Ironbark. Tram en route to Eaglehawk. Water column on right hand side of photograph. 1203.7 - No. 2 on the Eaglehawk route, Iron Bark area?, bound for Quarry Hill. 1203.8 - as for 1202.7, but photo taken after tram has past photographer. 1203.9 - No. 5 at Eaglehawk terminus, night photo. Tram has arrived at terminus, showing Quarry Hill, pole turned, but the tram lights have yet to be turned around. 1203.10 - as for 1202.9, but lights have been turned around. 1203.11 - No. 26 climbing the View St. Hill near the Commodore Hotel. Has Campbells Electrical Services building in the background. Photo taken after the tram has passed the photographer. 1203.12 - No. 7 end on photograph, at Golden Square, destination showing Golden Square - night photo. 1203.13 - number not used. 1203.14 - as for 1202.12, but partially side on, has a passenger looking out the tram. 1203.15 - as for 1202.12, but with hotel in the background. 1203.16 - No. 26 and 2 at Charing Cross, night photo. Tram 26 en route to Quarry Hill, 2 to Eaglehawk. 1203.17 - Interior photo of No. 26, at night. 1203.18 - No. 26 at the Quarry Hill terminus as night. 1203.19 - as for 1202.18, but central portion of the tramcar.Information written on in blue ink and date stamped on purple ink. 1203.1 - "No. 5 at Eaglehawk terminus" 1203.1 - "No. 5 in High St. Eaglehawk" 1203.3 - "No. 2" 1203.4 - "No. 2" 1203.5 - "No. 2" 1203.6 - "No. 26 at Garden Gully Loop Mt Korong Rd., Ironbark" 1203.7 - "No. 2" 1203.8 - "No. 2" 1203.9 - "No. 5 at Eaglehawk terminus" 1203.10 - "No. 5 at Eaglehawk terminus" 1203.11 - "No. 26 in View St. Near the Commodore Motel" 1203.12 - "No. 7 at Golden Square Terminus" 1203.14 - "No. 7 at Golden Square Terminus" 1203.15 - "No. 7 at Golden Square Terminus" 1203.16 - "Nos. 26 and 2 at Charing Cross" 1203.17 - "Interior of No. 26" 1203.18 - "No. 26 at the Quarry Hill terminus" 1203.19 - "No. 26 at the Quarry Hill terminus "tramways, trams, bendigo, eaglehawk, bridges, iron bark gully, night photo, quarry hill, golden square, tram 2, tram 5, tram 7, tram 26 -
 Ballarat Tramway Museum
Slide - 35mm slide/s - set of 25, Noel Simons, 26/02/1972 12:00:00 AM
Set of 25 transparencies taken on 26/2/1972 on Kodak mounts. 1204.1 - Bendigo No. 5 - just arrived at Manchester Loop near Havilah Road, Long Gully. Photo taken after tram has passed photographer. 1204.2 - No. 26 in Backhaus St. Long Gully passing William St, en route to Quarry Hill. Photo taken after tram has passed photographer. 1204.3 - No. 5 climbing the High St. Hill Eaglehawk, heading for Quarry Hill with the buildings on the West side of High St. in the background, including the Eaglehawk Town Hall. 1204.4 - as for 1204.3, but tram close up. 1204.5 - as for 1204.3, but after tram has passed photographer. 1204.6 - No. 5 at intersection of Mt Korong Road Ironbark and Calder Highway, with the AMPOL service 'station in the background. Photo taken after tram has passed photographer. 1204.7 - No. 26 en route to Quarry Hill shortly after leaving Needle Loop, passing William St., Long Gully. 1204.8 - No. 5 at California Gully Loop, picking up a passenger, with the shops at Long Gully in the background. Photo taken after tram has passed photographer. 1204.9 - No. 5 in Long Gully, en route to Quarry Hill. Photo taken after tram has passed photographer. 1204.10 - No. 2 at Eaglehawk terminus with the Eaglehawk Town Hall and Post Office in the background. Tram has two SEC roof ads. 1204.11 - No. 2 at Eaglehawk terminus, close up. 1204.12 - as for 1204.11, but through the park gates. 1204.13 - as for 1204.11, but with tram stop shelters in the foreground and buildings on the West side of High St in the background. 1204.14 - No. 2 in Mt. Korong Rd, midway between California Gully Loop and Needle Loop. Photo taken after tram has passed photographer. 1204.15 - No. 5 in Long Gully, en route to Quarry Hill. 1204.16 - as for 1204.15, but with trams departed loop. Has an ESSO service station in the background. 1204.17 - No. 26 leaves Charing Cross up View St.. Photo taken after tram has passed photographer. Has Armstrong Tyre Service, Cohns Drinks ad on a building and the T&G building in the background. Also Firestone ads on the tyre service building. 1204.18 - No. 5 waits at Charing Cross with the Alexandra Fountain in the background. Tram has two SEC roof ads, 'Everything s fine in my all electric kitchen' and 'Electricity Best for Cooking'. Has RACV, Colonial Mutual Life buildings in the background and the planting areas around Charing Cross gardens in the foreground. 1204.19 - No. 21 en route to North Bendigo arrives at Charing Cross, with passengers waiting to board. No. 5 in the background. In the background is the Fountain Gate Plaza building and the City Family Hotel. 1204.20 - as for 1204.19, but with No. 7 en route to Golden Square. 1204.21 - as for 1204.19, but closer up. 1204.22 - as for 1204.18 1204.23 - No. 25 in Nolan St. near the crossing of Bendigo Creek, running a special tram tour. 1204.24 - No. 25 on a special charter, in Weeroona Ave. at Cnr of Caledonia St. passing the Gas works. 1204.25 - Nos. 25 (showing Golden Square), 7 and 26 at Charing Cross. Has fountain in the background.Information written on in blue ink and date stamped on purple ink. 1204.1 - "No. 5 at Manchester Loop, near Havilah Rd. Long Gully." 1204.2 - "No. 26 in Backhaus St. Long Gully passing William St." 1204.3 - "No. 5 in High St. Eaglehawk." 1204.4 - "No. 5 in High St. Eaglehawk." 1204.5 - "No. 5 in High St. Eaglehawk." 1204.6 - "No. 5 in Mt. Korong Rd., Ironbark, passing Calder Highway Junctn." 1204.7 - "No. 26 shortly after leaving Needle Loop, passing William St., Long Gully. No. 5 cresting hill in distance." 1204.8 - "No. 5 at California Gully Loop." 1204.9 - "No. 5 in Long Gully" 1204.10 - "No. 2 at Eaglehawk terminus." 1204.11 - "No. 2 at Eaglehawk terminus." 1204.12 - "No. 2 at Eaglehawk terminus." 1204.13 - "No. 2 at Eaglehawk terminus." 1204.14 - "No. 2 in Mt. Korong Rd, midway between California Gully Loop and Needle Loop. 1204.15 - "Nos. 2 and 26 crossing at Long Gully." 1204.16 - "No. 26 leaves Long Gully loop for Eaglehawk as No. 2 pulls out of the far end towards Bendigo" 1204.17 - "No. 26 beginning the climb up View St. from Charing Cross." 1204.18 - "No. 5 at Charing Cross." 1204.19 - "No 21 arrives at Charing Cross from Golden Square while No. 5 awaits departure time for Eaglehawk." 1204.20 - "Nos. 7, 21, and 2 (behind which is No. 5) at Charing Cross." 1204.21 - "Nos. 7, 21, and 2 at Charing Cross." 1204.22 - "No. 5 at Charing Cross." 1204.23 - "No. 25 in Nolan St. near Bendigo creek crossing" 1204.24 - "No. 25 in Weeroona Ave. at cnr of Caledonia St." 1204.25 - "Nos. 25, 7, 26 and 2 (behind 26) at Charing Cross."tramways, trams, bendigo, eaglehawk, long gully, california gully, charing cross, north bendigo, tram 2, tram 5, tram 7, tram 21, tram 25, tram 26 -
 Ballarat Tramway Museum
Slide - 35mm slide/s - set of 23, Noel Simons, 26/02/1972 12:00:00 AM
Set of 23 transparencies taken on 26/2/1972 on Kodak mounts. 1205.1 - Bendigo No. 25 on a special tour at Fire Station Loop, en route to Golden Square. 1205.2 - No. 21 and 25 crossing at Fire Station Loop, note photographers on the ground. No. 21 bound for North Bendigo. 1205.3 - as for 1205.3, but with trams departing loop and fire station in the background. 1205.4 - No. 25 at Golden Square Hotel with 'Rodda's Golden Square Hotel' in the background. Tram on a special tour, but showing destination of North Bendigo. 1205.5 - as for 1205.4 - but showing special. Has the end of the track in the photograph. 1205.6 - Nos. 7 and 25 (on a special tour) crossing at Myrtle St. Loop. 1205.7 - No. 7 leaving Myrtle St. loop with the mine poppet head in the background. Photo taken after tram has passed photographer. (Print made of this slide 10/2001 for use in the Gold Gold Gold exhibition of 10/2001 - See Reg. item 1979. 1205.8 - No. 25 entering depot. Tram showing 'special'. Tennis court on right has players. Photo taken after tram has passed photographer. 1205.9 - No. 24 (showing 'special') and No. 20 (showing 'Long Gully') at Bendigo Depot. 1205.10 - No. 24 on a special charter, leaving Bendigo depot. Tram has two 'Johnnie Walker' roof ads. 1205.11 - Bendigo depot with 29, 25 and a bogie car inside the depot doors. 1205.12 - As for 1205.11, but with 28 and 29. 1205.13 - No. 24 standing at front entrance of Bendigo depot with No. 20 in the background. 1205.14 - No. 24 running out into McCrae St showing special, with conductor on front step. 1205.15 - No. 24 in Caledonia St. at corner of Thunder St with the Gasworks in the background. 1205.16 - No. 5 en route for Quarry Hill at Charing cross with No. 26 (en route for Eaglehawk) about to arrive. Has former crossover at this location in the foreground. Has the Ezywalkin building in the background. 1205.17 - No. 5 and 26 at Charing Cross, with the Alexandra Fountain in the foreground and the Beehive and Ezywalkin buildings in the background. No.26 has two SEC roof ads. 1205.18 - Charing Cross looking along Pall Mall with trams 7 and 21 and 26 in the picture. 1205.19 - Charing Cross, with 21 departing for Golden Square and No. 5 heading for Quarry Hill. Has the Ezywalkin and the Beehive buildings in the background. 1205.20 - as for 1205.19, but a few moments later. Adjacent pole has a "NO ROAD" letter in reflectors vertically. 1205.21 - Charing Cross with Nos. 25, 21, 26 and 7, looking south from Pall Mall end. 1205.22 - No. 24 crossing Mitchell St. en route for Golden Square, showing 'special' with the Beehive and Ezywalkin buildings in the background. 1205.23 - Charing Cross with Nos. 24, 21 and 7 in the photo and Fountain Plaza in the background. Print of 1205.7 - stored in box D1.Information written on in blue ink and date stamped on purple ink. 1205.1 - "No. 25 at Fire Station Loop High Street, Golden Square." 1205.2 - "Nos. 25 and 21 crossing at Fire Station Loop, near Golden Square." 1205.3 - "Nos. 25 and 21 crossing at Fire Station Loop, near Golden Square." 1205.4 - "No. 25 at Golden Square terminus." 1205.5 - "No. 25 at Golden Square terminus." 1205.6 - "Nos. 7 and 25 crossing at Myrtle St. Loop." 1205.7 - "No. 7 leaving Myrtle St. Loop." 1205.8 - "No 25, entering Bendigo Depot." 1205.9 - "Nos. 20 and 24 at Bendigo Depot." 1205.10 - "No. 24 at Bendigo Depot." 1205.11 - "Nos. 25 and 29 at Bendigo Depot." 1205.12 - "Birney cars 29 and 28 at Bendigo Depot." 1205.13 - "No. 24 (with 20 beyond) at Bendigo Depot." 1205.14 - "No. 24 entering McCrae St. from Arnold St." 1204.15 - "No. 24 in Caledonia St. at cnr of Thunder St." 1204.16 - "No. 5 waits at Charing Cross as No. 26 arrives from Quarry Hill. Note remains of crossover abandoned on relocation in 1965." 1204.17 - "Nos. 5 and 26 at Charing Cross." 1204.18 - "Nos. 26, 7 and 21 at Charing Cross (No. 5 just visible behind No. 26)." 1204.19 - "No. 21 leaves Charing Cross for Golden Square as No. 5 starts off for Quarry Hill." 1204.20 - "No. 21 swings onto the single track Golden Square line as No. 5 heads into Mitchell St. towards Quarry Hill." 1204.21 - "Nos. 25, 21 and 26 watch No. 7 arrive at Charing Cross from Golden Square." 1204.22 - "No. 24 at Charing Cross crossing Mitchell St." 1204.23 - "Nos. 24, 21 and 7 at Charing Cross."tramways, trams, bendigo, golden square, myrtle st., fire station, depot, charing cross, tram 5, tram 7, tram 20, tram 21, tram 24, tram 25, tram 28, tram 29 -
 Ballarat Tramway Museum
Slide - 35mm slide/s - set of 6, Noel Simons, 28 Feb. 1972
Set of 6 transparencies taken on 28/2/1972 on Kodak mounts. 1206.1 - Bendigo No. 5 at Hayes St. Loop, en route for Quarry Hill. 1206.2 - No. 5 at Garden Gully Loop, Mt. Korong road, Ironbark. en route to Quarry Hill. Note the water column in the background. 1206.3 - No. 5 in View St. Bendigo, with the Commodore Motel in the background. 1206.4 - No. 6 en route for Golden Square in Fire Station loop, with the fire station building in the background. Photo taken after tram has passed photographer. 1206.5 - No. 6 in High St., running through Golden Square Shopping Centre, en route for Golden Square. Photo taken after tram has passed photographer. 1206.6 - No. 6 arriving at Charing Cross, bound for North Bendigo, with the City Family Hotel, ANZ bank and the Cenotaph (war memorial) in the background.Information written on in blue ink and date stamped on purple ink. 1206.1 - "No. 5 at Hayes Loop, Ironbark." 1206.2 - "No. 5 at Garden Gully Loop, Mt. Korong road, Ironbark." 1206.3 - "No. 5 in View St. just after start of double track near Barnard St." 1206.4 - "No. 6 in High St. at Fire Station loop." 1206.5 - "No. 6 in High St. running through Golden Square shopping centre." 1206.6 - "No. 6 arriving at Charing Cross from Golden Square."tramways, trams, bendigo, hayes st. loop, garden gully loop, view st., golden square, charing cross, tram 5, tram 6 -
 Ballarat Tramway Museum
Slide - 35mm slide/s - set of 12, Noel Simons, 28 Feb. 1972
Set of 12 transparencies taken on 28/2/1972 on Kodak mounts. 1207.1 - Bendigo 26 and 2 at Charing Cross. 26 en route for Eaglehawk, 2 for Quarry Hill. Has the Colonial Mutual Life, Armstrong Tyre Service, and Australian Mutual Provident Society buildings and a Cohns Drinks ad. in the background. 1207.2 - as for 1207.1 but with Alexandra fountain in the foreground. 1207.3 - No. 2 in Mitchell St. heading for Quarry Hill. Photo taken after tram has passed photographer. Has buildings on either side of Mitchell St. in the background, including the Plaza Theatre. 1207.4 - No. 6 en route for Golden Square departing Charing Cross. Has the RACV and ANZ bank in the background. 1207.5 - No. 2 crossing Pall Mall to enter Charing Cross ex Quarry Hill, with the Fountain Plaza in the background. 1207.6 - No. 6 arriving Charing Cross ex Golden Square with No. 21 alongside. No. 21 has the SEC ad. 'Everything's fine in my all electric kitchen.' Has the City Family Hotel and the Fountain Plaza shopping centre in the background. 1207.7 - No. 5 at Charing Cross en route for Quarry Hill with No. 2 behind. No. 2 has two SEC roof ads, 'Everything s fine in my all electric kitchen' and 'Electricity best for cooking'. RACV building in the background. Tram crews are discussing the day in the front of the tram. 1207. 8 - No. 21 in High St. Bendigo with the Cathedral in the background. No. 21 has two SEC roof ads, 'Everything's fine in my all electric kitchen' and 'Electricity best for cooking'. 1207.9 - No. 6 in High St. Bendigo with the Cathedral in the background. 1207.10 - No. 6 in High St. Bendigo, just past Wattle St. Photo taken after the tram has passed the photographer from within the Highway Car Sales yard. 1207.11 - No. 26 bound for Eaglehawk at the end of the double track in View St., note signal contactors, tram stop and section signs mounted on pole. 1207.12 - No. 26 turning from View St. into Barnard St.Information written on in blue ink and date stamped on purple ink. 1207. 1- "Nos. 26 and 2 at Charing Cross." 1207.2 - "Nos. 26 and 2 at Charing Cross." 1207.3 - "No. 2 in Mitchell St. just after leaving Charing Cross." 1207.4 - "No.6 leaving Charing Cross for Golden Square." 1207.5 - "No. 2 arriving at Charing Cross from Quarry Hill." 1207.6 - "No. 21 waits at Charing Cross as No. 6 arrives from Golden Square." 1207.7 - "No 5 at Charing Cross with No. 2 lurking behind." 1207.8 - "No. 21 in High St. at cnr of Wattle St." 1207.9 - "No. 6 in High St. at cnr of Wattle St." 1207.10 - "No. 6 in High St. between Wattle and Vine Sts." 1207.11 - "No. 26 at end of double track in View St. near Barnard. St. 1207.12 - "No. 26 seen at dusk turning from View St. into Barnard St."tramways, trams, bendigo, charing cross, high st, view st., tram 2, tram 5, tram 6, tram 21, tram 26 -
 Ballarat Tramway Museum
Slide - 35mm slide/s set of 7, Noel Simons, 29 Feb. 1972
Set of 7 transparencies taken on 29/2/1972 on Kodak mounts. 1208.1 - Bendigo 18 (en route to Quarry Hill) and 2 (Eaglehawk) in the early morning at Charing cross with the Alexandra fountain and the Fountain Plaza building in the background. 1208.2 - No. 2 descending View St. Photo taken after tram has passed the photographer. 1208.3 - as for 1208.2 at Mackenzie St. intersection 1208.4 - No. 26 ascending View St. with the ANZ bank, T& G in the background. 1208.5 - as for 1208.4, but at Mackenzie St. intersection. Photo taken after tram has passed the photographer. 1208.6 - No. 18 in View St. seen from the lookout tower in Rosalind Park. 1208.7 - No. 7 en route to North Bendigo in Nolan St. Photographed across the Centenary Oval.Information written on in blue ink and date stamped on purple ink. 1208.1 - "Nos. 18 and 2 in the early morning sun at Charing Cross." 1208.2 - "No. 2 descending View St. towards Charing Cross." 1208.3 - "No. 2 in View St. passing Mackenzie St." 1208.4 - "No. 26 in View St. just after leaving Charing Cross." 1208.5 - "No. 26 climbing View St. past Mackenzie St." 1208.6 - "No. 18 climbing View St. seen from lookout tower in Rosalind Park." 1208.7 - "No. 7 in Nolan St. heading towards North Bendigo. / Last picture of a Bendigo tram."tramways, trams, bendigo, charing cross, view st., nolan st., tram 2, tram 7, tram 18, tram 26 -
 Ballarat Tramway Museum
Slide - 35mm slide/s - set of 4, Noel Simons, Apr. 1972
Set of 4 transparencies - copy slides - possibly ARE film strip dated March 1972. 1209.2 and 1209.4 on Kodak Readymount mounts. 1209.1 - Bendigo 5, 6 and 28 on a special tram service in bound to the City on a tour in Caledonia St. about to enter Lucan St, or White Hills Road or Weeroona Ave. (mis match in names in various maps). Gas works in the background. No. 5 has a white disk on the rear of the tram. 1209.2 - Nos 2 and 26 at Charing Cross with the Fountain Plaza in the background. Both trams have the destination of Quarry Hill, though 26 is on the Eaglehawk bound track. 1209.3 - No. 19 at the Golden Square terminus, with the conductor or driver swinging the pole and Billy Rodda's Golden Square hotel in the background. 1209.4 - No. 7 at Fire Station loop, en route to North Bendigo, picking up a passenger with a pram. Part of a set of 20 slides made by the Association of Railway Enthusiast Provincial Tramways film strip. Reference Item 2560 details the ARE Film Strip and provide references to other slides.Information written on in blue ink and date stamped on purple ink. 1209.1 - "Nos 5, 6 and 28 in Caledonia St. about to enter Weeroona Ave." 1209.2 - "Nos 2 and 26 at Charing Cross." 1209.3 - "Swinging the pole on No. 19 at Golden Square Terminus." 1209.4 - "No. 7 inward bound from Golden Square stops at Fire Station Loop."tramways, trams, bendigo, charing cross, golden square, gas works, special trams, tram 2, tram 5, tram 6, tram 7, tram 19, tram 28 -
 Ballarat Tramway Museum
Slide - 35mm slide/s - set of 4, Noel Simons, Apr. 1972
Set of 4 transparencies - copy slides - possibly ARE film strip dated April 1972. 1210.3 on Kodak Readymount mount. 1210.1 - No. 3 arriving at Quarry Hill terminus. 1210.2 - Bogie car at Long Gully Loop, in the far distance, with a Hotel and the ESSO service station in between. Has Fosters Lager and Carlton signs on hotel. Note sign on the closet pole - "No standing between Notices" 1210.3 - Nos. 26 (Quarry Hill) and 25 (Eaglehawk) at Jobs Gully Loop. 1201.4 - No. 5 showing Charing Cross in bound for Charing Cross and No. 3 en route for Eaglehawk in View St. near the end of the double track. Appears to be SEC employee at the rear of No. 3. Part of a set of 20 slides made by the Association of Railway Enthusiast Provincial Tramways film strip. Reference Item 2560 details the ARE Film Strip and provide references to other slides.Information written on in blue ink and date stamped on purple ink. 1210.1 - "No. 3 arriving at Quarry Hill terminus." 1210.2 - "Bogie car at Long Gully Loop." 1210.3 - "Nos. 26 and 25 at Jobs Gully Loop." 1210.4 - "Nos 5 and 3 in View St. near the end of the double track."tramways, trams, bendigo, long gully, quarry hill, view st., tram 3, tram 5, tram 25, tram 26 -
 Ballarat Tramway Museum
Slide - 35mm slide/s, Noel Simons, Dec. 1972
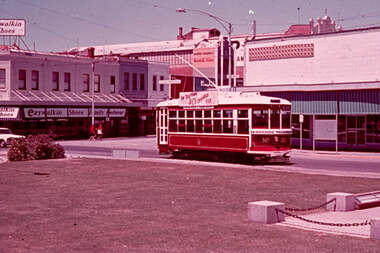
One transparency on a Kodak Readymount mount, with dark blue border. Photo of Bendigo Trust No. 30 after repainting to the Bendigo trust colour scheme. Has a BCV Television roof ad. Has Fountain Plaza and Ezywalkin buildings in the background. Slide dated Dec. 1972.Information written on in blue ink and date stamped on purple ink. "Birney No. 30 restored to former livery at Charing Cross."tramways, trams, bendigo, charing cross, tram 30 -
 Ballarat Tramway Museum
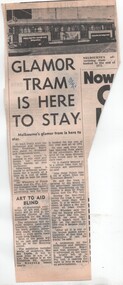
Newspaper, "Glamor tram is here to stay", 28/04/1972 12:00:00 AM
Newspaper Clipping from a Melbourne newspaper dated 28 April 1972 about the MMTB's decorated and illuminated advertising tramcar. Notes lease cost of about $4,000, Frank Mason & Co. as agents, quotes Mr. Wheelan of the company. Also notes about how far the tram travels in a four week period, that there was only one tram, that it was booked up to end of 1973 and that the "SEC set the pattern in 1970". Has a photo of the tram, advertising briquettes.In top right hard part of Clipping, "28/4/72" in blue inktrams, tramways, mmtb, advertisements, frank mason & company, sec -
 Ballarat Tramway Museum
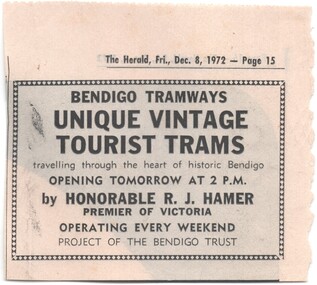
Newspaper, Herald Sun, Opening of Bendigo Tourist Trams - advertisement, 8/12/1972 12:00:00 AM
Newspaper advertisement from the Herald, Friday 8/12/1972 about the opening of the Bendigo Trust - Tourist Tram service, by the Hon. R.. J. Hamer, Premier of Victoria at 2pm the following day Notes as operating every weekend and that a project of the Bendigo Trust.trams, tramways, bendigo, opening, bendigo trust, r.. j. hamer -
 Ballarat Tramway Museum
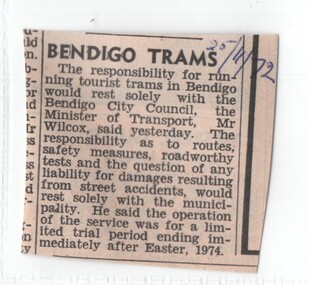
Newspaper, The Courier Ballarat, "Bendigo Trams", 8/12/1972 12:00:00 AM
Newspaper Clipping possibly from The Courier, Ballarat, 25/11/1972 about the responsibility for the trial operation of the trams in Bendigo, up to Easter 1974 was entirely with the Bendigo City Council, stated by the Minister of Transport, Mr. Wilcox. Has an item re Clunes on the back - so therefore possibly the Courier."25/11/72" in black ink in top right hand corner.trams, tramways, bendigo, safety, bendigo trust, v. wilcox -
 Ballarat Tramway Museum
Document - Correspondence, B. Prentice, 1973
1230.1 - copy of letter sent to Neville Gower from Bob Prentice enclosing a number of documents regarding submissions and other associated documents pertaining to the operation of Bendigo's trams by the Bendigo trust. Sent on the 1st March 1973. Typed onto light blue paper. 1230.2 - 14 page photocopy (Foolscap size on heat sensitive paper) of the submission prepared by the Bendigo trust - detailing the history of trams in Bendigo, types of trams in Bendigo, selection of the route, equipment and plant required, planned development, list of trams in Bendigo, their condition and financial statements of the Bendigo Trust 1972. 1230.3 - 14 pages photocopy (Foolscap size on heat sensitive paper) Appendix II - submission details projected passengers, operational details and proposals, estimated revenue, Philosophy of operation, trams required, operating budgets, how the service could be operated - internal combustion engines, batteries, stationary engine and generator or converter station and costs associated with the options. If item to be researched, copy on more stable photocopy paper to be provided.tram, trams, bendigo, bendigo trust, tourist trams, power supply