Showing 151 items matching "way of the cross"
-
 Ballarat Tramway Museum
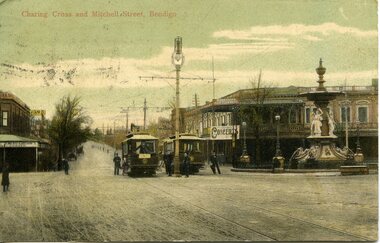
Postcard, Charing Cross Bendigo, 1906
Yields information about postcard printing, Bendigo Charing Cross in 1906 and a person who appears to have collected cards.Printed colour postcard of Charing Cross Bendigo with two trams in the view and crew men standing in front of the trams with buildings, the fountain in the background. Looks along Mitchell St. Title of the postcard is "Charing Cross and Mitchell St, Bendigo". Has in view, R. Curtains City Club Hotel with a "Concerts" sing on it and on the other corner, a building with the name "Gibsons Corner". Note the direction of the trolley poles on the trams, the wrong way around for the direction of the street. On rear of postcard is a message address to Miss Jani Baskin, San Antonio, Texas USA, post marked ex Bendigo 28.9.1906 and Seattle WA, Oct. 2? 1906, with a Victorian stamp and a two Cent (due to postage underpaid) US stamp. Centre divided postcard with spaces marked for correspondence and address. On the left hand edge is "Printed in Germany" trams, tramways, bendigo, mitchell st, charing cross, tram 14, tram 40 -
 Ballarat Tramway Museum
Newspaper, Bendigo Advertiser, "Buses were a little late at first", "Tram Museum states its case for Bgo trams", "Keep Bendigo the way it is", "Bus depot at Charing Cross", 18/04/1972 12:00:00 AM
Newspaper clipping from the Bendigo Advertiser, pages 1 and 2, Tuesday April 18, 1972, the after the commencement of bus operations following the closure of the SEC operated system. Front page has an article titled ""Buses were a little late at first" - about the late running of buses after the change over. On page two are three letters to the editor concerning trams and buses. 1 - "Tram Museum states its case for Bgo trams" - letter from L. N. Millar, Secretary of the TMSV about the actions of the Bendigo Trust and what the TMSV had planned to collect from Bendigo. 2 - "Keep Bendigo the way it is", signed "Bendigonian" about tourism in Bendigo and keeping the landscapes. 3 - "Bus Depot at Charing Cross", signed by David Drummond about bus routes and the impact on Bendigo traffic. Made a number of suggestions about bus routing. bendigo, tmsv, bendigo trust, buses, closure, bus replacement -
 Ballarat Tramway Museum
Photograph - Digital image, Wal Jack, 26/03/1951 12:00:00 AM
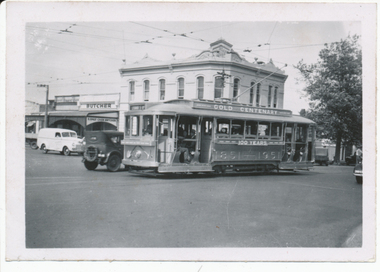
Yields information about Ballarat 's No. 23 and its use during its the celebrations.Digital image from the Wal Jack Ballarat Album of No. 23 crossing Sturt St from Sebastopol on its way to Lydiard St North, 26-3-1951, Photo Wal Jack. Has the Southern Cross Hotel and E. Daly Cash butcher in the background. See image i2 for rear of photograph.Written on rear in ink "SEC Ballarat, No.23 ex Adelaide 69, painted gold for gold centenary, Tram ex Sebastopol, Sturt and Drummond St 26-3-51" and the Wal Jack stamp in the top right hand corner, with "T725" written in.trams, tramways, gold tram, sturt st, drummond st, hospital corner, tram 23 -
 Ballarat Tramway Museum
Photograph - Digital image, 1970s
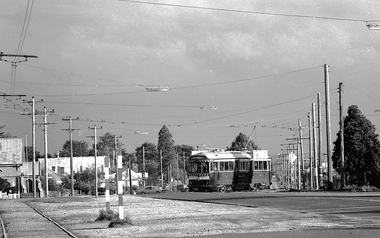
... the way the trams crossed Albert St Sebastopol. Trams tramways ...Yields information about the way the trams crossed Albert St Sebastopol.Digital image, black and white, of No. 41 crossing northbound in Albert St ex Sebastopol, the highway, from the west to the east side. Telephoto lens photos - shows both tracks and buildings. Photo taken by Peter Bruce 1970's and 1971, prior to the closure of the Ballarat tramway system. Peter's Title of image: "No. 41 crossing the highway"trams, tramways, albert st, sebastopol, tram 41 -
 Bendigo Historical Society Inc.
Document - PETER ELLIS COLLECTION: BUSH MUSIC CLUB COLONIAL BALL, 1990
Small off white coloured booklet Bush Music Club Inc. Colonial Subscription Ball 1990 Dancers Companion (A guide to the Quadrilles) The Quadrille Figure 1 (Le Pantelon) (2x32) 8 Top couples R and L through. (without giving hands). 8 Set & turn Partners 8 Top ladies chain. 4 Top couples promenade across set. 4 Half R and L to place. 32 Side couples repeat Figure 2 (Le 'Ete) (4x24) 4 Top couples advance & retire. 4 Cross over (without changing places with partner). 8 Repeat back to place. 8 Set & turn partners. 24 Sides repeat. 48 Top and Sides repeat. Figure 3 (La Poule) (4x32) 4 Lady 1, Man 2 adv, tough RH, retire to opposite place. 4 Lady 1, Man 2 adv, join LH give RH to partner 4 Line of 4 balance fwd & back twice. 4 Men lead partners to opp. Place. 4 Lady 1, Man 2 adv. & ret. 4 Lady 1, Man 2 adv, honour & ret. 4 Top couples, advance & retire. 4 Half R & L to place. 32 Repeat with Lady 2, Man !. 32 Repeat with Lady 3, Man 4. 32 Repeat with Lady 4, Man 3. The Quadrille Figure 4. (La Pastourelle) (4x32) 4 1st couple advance & retire. 4 1st couple adv, lady join 2nd couple. 4 Line of 3 adv. & ret, 1st man retire. 4 Line of 3 adv. Ladies cross to 1st man. 4 Line of 3 adv. & ret, 2nd man retire. 4 Re-advance, form circle with 2nd man. 4 Circle L half way round. 4 Half R & L to place. 32 Repeat with 2nd couple leading. 32 Repeat with 3rd couple leading. 32 Repeat with 4th couple leading. Figure 5 (La Finale) (4 x 32 + 8) 4 All advance & retire. 4 Turn partners. 4 Ladies adv, curtsey & retire. 4 Men advance, bow & retire. 8 All set & turn corners. 8 Promenade with corner. (men to original place with corner) 96 Repeat 3 times to return to partner. 4 All advance & retire. Turn Partners. Notes: 1 Couples numbered 2 Set & turn is a 'balance' set and open hand turn. The Prince Imperial's Quadrille Figure 1. (4x24) 4 Top couples visit right, honour sides. 4 Top men retire with partner & side lady to opposite place, (ladies facing each other). 8 Ladies grand chain to places 8 All set and turn partners 24 Top couples repeat back to place. 48 Repeat with side couples. Figure 2 (4 x 24) 4 1st Lady, 2nd man adv & turn in centre finish facing 2nd lady. 2 2nd lady pass through to 1st man. 2 Both couples turn out to place. 4 top couples advance & retire. 4 Ladies chain back to place. (Nariel) 8 Chasse-croise. (4 steps past partner RH turn corner 4 steps back, LH turn with partner.) 24 Repeat wth 2nd lady, 1st man leading 24 Repeat wth 3rd lady, 4th man leading 24 Repeat wth 4th lady, 3rd man leading. Figure 3 (4x32) 4 1st lady to centre, curtsey to partner. (RH in RH, ACW turn in to centre) 4 2nd lady to centre, curtsey to partner. 4 3rd lady to centre, curtsey to partner.4 4th lady to centre, curtsey to partner. 8 ladies join hands, circle R, small steps after circle R, Men join circle, (giving RH to partner). 4 Balance for 4 (step lift x 4) 4 Turn partners to place, bow & curtsey. 32 Repeat, Lady 2, 1, 4 & 3 to centre 32 Repeat Lady 3, 4, 2 & 1 to centre 32 Repeat, Lady 4, 3, 1 & 2 to centre The Prince Imperial's Quadrille Figure 4 (4x32) 4 Top couples advance & retire. 4 Top couples adv, ladies move to R, as men retire to place. 8 Line of 3 adv & ret twice. 4 Single men adv, bow and retire. 4 Re-advance and turn to face partner. 4 Circle L half way round (with partner & side couple). 4 Half R & L to place. 32 Repeat with side couples leading. 32 Repeat with top couples leading (men moving to left as ladies retire) 32 Repeat with Side couple leading. (Men moving to left as ladies retire) Figure 5 (4x32 +32) 16 Ladies to the right, (RH turn with corner man then continue round to the right turning each man) 4 1st Lady, 2nd man advance & retire 4 re-advance & turn RH (finish facing partners) 8 set & turn partners (finishing in place) 32 Repeat with 2nd Lady, 1st man leading 32 repeat with 3rd lady, 4th man leading 32 Repeat with 4th Lady, 3rd man leading 16 Ladies to the right again. 4 Men turn partners to centre. 4 All bow and curtsey. 8 Promenade set ( hall) Note: Set & turn is a 'balance' set and open hand turn. The Parisienne Quadrille Figure 1 (1x32) 8 Couples R and L through. (without giving hands) 8 set & turn partners 8 Ladies chain. 4 Couples promenade across set. 4 Half R and L to place. Figure 2 (2x24) 4 Couples advance & retire. 4 Cross over (without changing places with partners) 8 Repeat back to place. 8 Set & turn partners. 24 Repeat. Figure 3 (2x32) 4 Lady 1, Man 2 adv, touch RH, retire to opposite place. 4 Lady 1, Man 2 adv, join LH, give RH to partner. 4 Line of 4 balance fwd & back twice 4 Men lead partners to opp. Place 4 Lady 1, Man 2 adv & retire 4 Lady 1, Man 2 adv, honour & ret. 4 Couples, advance & retire. 4 Half R & L to place. 32 Repeat with Lady 2, Man 1. The Parisienne Quadrille Figure 4. (2x32) 4 1st couple advance & retire. 4 1st couple adv, lady join 2nd couple. 4 Line of 3 adv. & ret, 1st man retire. 4 Line of 3 adv. Ladies cross to 1st man. 4 Line of 3 adv. & ret, 2nd man retire. 4 Re-advance, form circle with 2nd man. 4 Circle L half way round. 4 Half R & L to place. 32 Repeat with 2nd couple leading. Figure 5 (2x32) 4 Couples advance & retire 4 Cross over 8 Repeat back to place. 8 Ladies chain across & back.8 Set & turn partners. 32 Repeat Notes: 1 This 'quadrille' is similar to the first set (1st 4 figures) and is danced as two couple sets. 2 Set & turn is a 'balance' set and open hand turn. The Lancers Quadrille Figure 1 (4x24) 4 1st lady, 2nd man advance & retire, 4 Adv, turn two hands, return to place. 4 1st couple lead through across set 4 2nd couple lead through back 8 all set & turn corners. 24 Repeat, 2nd lady, 1st man leading 24 Repeat 3rd lady, 4th man leading 24 Repeat, 4th lady, 3rd man leading Figure 2 (4x24) 4 1st couple advance & retire. 2 1st lady adv to centre, turn to face partner 2 1st couple honour each other. 8 1st couple set and turn then sides form top & bottom lines 4 Lines advance & retire, 4 Advance and turn partners to place. 24 Repeat with 2nd couple leading 24 Repeat with 3rd couple leading 24 Repeat with 4th couple leading Figure 3. (2x32) 4 Ladies advance, curtsey & retire. 4 Men adv, bow, turn by left, bow to partners, then join RH in centre, (ladies RH on partners left elbow). 8 Promenade round set to place. 4 Ladies adv, curtsey & retire again. 4 Men adv, bow, turn by right, bow to partners, join LH in centre, right arm behind partner. 8 Promenade round to set in place. 32 Repeat. The Lancers Quadrille. Figure 4. (4x24) 8 Top couples visit R then L 4 Right Hands around with LH couple 4 then left hands around. 8 Circle left with that couple. 24 Repeat with side couples leading. 24 repeat, top couples visit L then R. 24 Repeat, side couples visit L then R. Figure 5. (4x48 +24) 8 All grand chain 1/2 way round and honour partners. 8 Continue grand chain to place and honour partners. 8 1st couple visit, return to place, facing out with sides in behind. 2 Change places with partner, 2 All rock fwd and back 2 change places again 2 All rock fwd and back 8 Cast out reform in lines 4 Lines advance & retire 4 Advance & turn partners to place 48 Repeat with 2nd couple leading 48 Repeat with 3rd couple leading 48 Repeat with 4th couple leading. 8 Grand chain 1/2 way round and honour partners. 8 continue grand chain to place and honour partners 8 swing partners (R arm round partner, LH in air) Note: All figures walked. Set & Turn is a 'balance' set and open two hand turn. The Caledonians Quadrille Figure 1. (2x32) 4 Top couples R.H. across, move CW (Ladies hands joined over Mens). 4 then L.H. across, move ACW. 8 Set & swing Partners 8 Top ladies chain. 4 Top couples promenade across set. 4 Half R and L to place. 32 Side couples repeat. Figure 2. (4x24) 8 1st Man advance & retire twice. 8 Set & swing corners. 8 Promenade with corners (to men's position.) 24 2nd man repeat. 48 3rd and 4th man repeat. Figure 3. (4x32) 4 Lady 1, Man 2 advance & retire. 4 Re-advance, 2 hand turn to place. 8 1st & 2nd couples lead through and back. (1st lead through across, 2nd back) 8 Set & swing corners. 4 All advance & retire. 4 Swing partners. 32 Repeat with Lady 2, Man 1. 32 Repeat with Lady 3, Man 4. 32 Repeat with Lady 4, Man 3. The Caledonians Quadrille Figure 4. (4x24) 2 Lady 1, Man 2 advance and stop. 2 Lady 2, Man 1 advance and stop. 4 Turn partners back to place. 2 All ladies to the right 4 steps. 2 All men to the left 4 steps. 2 All ladies to the right 4 steps. 2 All men to the left 4 steps. 4 Promenade to place. 4 Swing partners. 24 Repeat with Lady 2, Man 1 leading. 24 Repeat with Lady 3, Man 4 leading. 24 Repeat with Lady 4, Man 3 leading. Figure 5. (4x48 + 16) 8 1st couple visit. 4 Ladies advance, curtsey & retire. 4 Men advance, bow & retire. 8 All set & swing partners. 8 Grand chain 1/2 way round and honour partners. 4 Promenade to place 4 and swing partners. 8 Chasse-croise, (4 steps past partner, RH to corner balance fwd & back, then 4 steps back, LH to partner balance fwd & back). 48 Repeat with 2nd couple leading. 48 Repeat with 3rd couple leading. 48 Repeat with 4th couple leading. 8 All promenade set. 8 Swing partners. Note: Set & swing is 'normal' set and cross hand swing. The Royal Irish Quadrille Figure 1. (2x32) 8 Top couples to Right, R & L through 8 Set & swing Partners. 8 Ladies chain. 4 Couples promenade across (to the other couples position). 4 Half R & L to place. 32 Repeat with tops to the left. Figure 2. (4x24) 4 Top couples to Right, adv & ret. 4 Cross over (without changing places with partner). 8 Repeat back to place. 8 Set & swing partners. 24 Repeat with top couples to the Left. 48 Tops repeat with Right and Left sides. Figure 3. (4x32) 4 Lady 1,2 and Man on Right, advance, touch RH, retire to opposite place. 4 Advance again, join LH, give RH to partner. 4 Line of 4 balance fwd & back twice. 4 Men Lead partners to opp. Place. 4 Lady 1,2 and opp. Man adv & ret. 4 Advance, honour & retire. 4 Couples, advance & retire. 4 Half R & L to place. 32 Repeat with Ladies 3,4 leading. 64 Repeat with Tops facing left. The Royal Irish Quadrille Figure 4. (4x32) 4 Top couples to Right, adv & ret. 4 Re-adv, Top Ladies join opp. Couple. 4 Line of 3 adv & ret. Top men retire. 4 Line of 3 adv, ladies join other man. 4 Line of 3 adv & ret, Side men retire. 4 Re-advance, form circle with opp. Man. 4 Circle L half way round. 4 Half R & L to place. 32 Repeat with Side ladies leading. 64 Repeat with Top couples facing left. Figure 5. (4 x 32 + 8) 4 All advance & retire. 4 Swing partners. 4 Ladies advance, curtsey & retire. 4 Men advance, bow & retire. 8 All set & swing corners. 8 Promenade with corner. (Men to original place with corner). 96 Repeat 3 times to return to partner. 4 All advance & retire. 4 Swing partners. Notes: 1. This is The Quadrille danced diagonally, with Top couples dancing first with the side couple on their right, then the left. Ie. 1-3 and 2-4 then 1-4 and 2-3. 2. Set & swing is 'normal' set and irish swing.The Eightsome Reel Numbering: Clockwise 1-2-3-4 Part A (40 Bars) 4 All join hands, circle left 4 All circle right. 4 Grand Cross, Ladies join RH. 4 Grand Cross, Men join LH. 8 Set & turn Partners 16 Grand chain right round set. Part B ( 8x48 bars) 1st Lady advance to centre, Others join hands in circle. 8 Circle left and right 4 Set once and turn partner 1st Lady sets to partner then open hand turn once with partner. 4 Set once and turn opposite 1st Lady sets to opposite man, then open hand turn once. 8 Reel of 3, 1st Lady, partner and opposite man 1st Lady remains in centre. 8 Circle left and right again 4 Set once and turn side man 1st lady and man on right. 4 Set once and turn other side man 1st lady and man on left. 8 Reel of 3, 1st lady, and two side men. 48 2nd lady repeat. 96 3rd and 4th ladies repeat. 192 Men repeat same movement. The Eightsome Reel Part C (40 Bars) 8 All circle left and right. 4 Grand cross - Ladies join RH. 4 Grand Cross - Men join LH. 8 All set and turn partners. 16 Grand Chain round set. Note: Set is 'normal' set. Turn is open hand turn. NOTES 1. The Quadrille 2. The Prince Imperials 3. The Parisienne Quadrille 4. The Lancers Quadrille 5. The Caledonians Quadrille 6. The Royal Irish Quadrille 7. The Eightsome Reelperson, individual, peter ellis oam -
 Bendigo Historical Society Inc.
Document - PETER ELLIS COLLECTION: BUSH MUSIC CLUB COLONIAL BALL, 1991
Small yellow booklet outline of a man on left of title and woman on right. Bush Music Club Inc. Colonial Subscription Ball 1991 Dancers Companion (A guide to the Quadrilles) The Quadrille Figure 1 (Le Pantelon) (2x32) 8 Top couples R and L through. (without giving hands). 8 Set & turn Partners 8 Top ladies chain. 4 Top couples promenade across set. 4 Half R and L to place. 32 Side couples repeat Figure 2 (Le 'Ete) (4x24) 4 Top couples advance & retire. 4 Cross over (without changing places with partner). 8 Repeat back to place. 8 Set & turn partners. 24 Sides repeat. 48 Top and Sides repeat. Figure 3 (La Poule) (4x32) 4 Lady 1, Man 2 adv, tough RH, retire to opposite place. 4 Lady 1, Man 2 adv, join LH give RH to partner 4 Line of 4 balance fwd & back twice. 4 Men lead partners to opp. Place. 4 Lady 1, Man 2 adv. & ret. 4 Lady 1, Man 2 adv, honour & ret. 4 Top couples, advance & retire. 4 Half R & L to place. 32 Repeat with Lady 2, Man !. 32 Repeat with Lady 3, Man 4. 32 Repeat with Lady 4, Man 3. The Quadrille Figure 4. (La Pastourelle) (4x32) 4 1st couple advance & retire. 4 1st couple adv, lady join 2nd couple. 4 Line of 3 adv. & ret, 1st man retire. 4 Line of 3 adv. Ladies cross to 1st man. 4 Line of 3 adv. & ret, 2nd man retire. 4 Re-advance, form circle with 2nd man. 4 Circle L half way round. 4 Half R & L to place. 32 Repeat with 2nd couple leading. 32 Repeat with 3rd couple leading. 32 Repeat with 4th couple leading. Figure 5 (La Finale) (4 x 32 + 8) 4 All advance & retire. 4 Turn partners. 4 Ladies adv, curtsey & retire. 4 Men advance, bow & retire. 8 All set & turn corners. 8 Promenade with corner. (men to original place with corner) 96 Repeat 3 times to return to partner. 4 All advance & retire. Turn Partners. Notes: 1 Couples numbered 1 4 2 3 2 Set & turn is a 'balance' set and open hand turn. The Lancers Quadrille Figure 1 (4x24) 4 1st lady, 2nd man advance & retire, 4 Adv, turn two hands, return to place. 4 1st couple lead through across set 4 2nd couple lead through back 8 all set & turn corners. 24 Repeat, 2nd lady, 1st man leading 24 Repeat 3rd lady, 4th man leading 24 Repeat, 4th lady, 3rd man leading Figure 2 (4x24) 4 1st couple advance & retire. 2 1st lady adv to centre, turn to face partner 2 1st couple honour each other. 8 1st couple set and turn then sides form top & bottom lines 4 Lines advance & retire, 4 Advance and turn partners to place. 24 Repeat with 2nd couple leading 24 Repeat with 3rd couple leading 24 Repeat with 4th couple leading Figure 3. (2x32) 4 Ladies advance, curtsey & retire. 4 Men adv, bow, turn by left, bow to partners, then join RH in centre, (ladies RH on partners left elbow). 8 Promenade round set to place. 4 Ladies adv, curtsey & retire again. 4 Men adv, bow, turn by right, bow to partners, join LH in centre, right arm behind partner. 8 Promenade round to set in place. 32 Repeat. The Lancers Quadrille. Figure 4. (4x24) 8 Top couples visit R then L 4 Right Hands around with LH couple 4 then left hands around. 8 Circle left with that couple. 24 Repeat with side couples leading. 24 repeat, top couples visit L then R. 24 Repeat, side couples visit L then R. Figure 5. (4x48 +24) 8 All grand chain 1/2 way round and honour partners. 8 Continue grand chain to place and honour partners. 8 1st couple visit, return to place, facing out with sides in behind. 2 Change places with partner, 2 All rock fwd and back 2 change places again 2 All rock fwd and back 8 Cast out reform in lines 4 Lines advance & retire 4 Advance & turn partners to place 48 Repeat with 2nd couple leading 48 Repeat with 3rd couple leading 48 Repeat with 4th couple leading. 8 Grand chain 1/2 way round and honour partners. 8 continue grand chain to place and honour partners 8 swing partners (R arm round partner, LH in air) Note: All figures walked. Set & Turn is a 'balance' set and open two hand turn. The Prince Imperial's Quadrille Figure 1. (4x24) 4 Top couples visit right, honour sides. 4 Top men retire with partner & side lady to opposite place, (ladies facing each other). 8 Ladies grand chain to places 8 All set and turn partners 24 Top couples repeat back to place. 48 Repeat with side couples. Figure 2 (4 x 24) 4 1st Lady, 2nd man adv & turn in centre finish facing 2nd lady. 2 2nd lady pass through to 1st man. 2 Both couples turn out to place. 4 top couples advance & retire. 4 Ladies chain back to place. (Nariel) 8 Chasse-croise. (4 steps past partner RH turn corner 4 steps back, LH turn with partner.) 24 Repeat with 2nd lady, 1st man leading 24 Repeat with 3rd lady, 4th man leading 24 Repeat wth 4th lady, 3rd man leading. Figure 3 (4x32) 4 1st lady to centre, curtsey to partner. (RH in RH, ACW turn in to centre) 4 2nd lady to centre, curtsey to partner. 4 3rd lady to centre, curtsey to partner.4 4th lady to centre, curtsey to partner. 8 ladies join hands, circle R, small steps after circle R, Men join circle, (giving RH to partner). 4 Balance for 4 (step lift x 4) 4 Turn partners to place, bow & curtsey. 32 Repeat, Lady 2, 1, 4 & 3 to centre 32 Repeat Lady 3, 4, 2 & 1 to centre 32 Repeat, Lady 4, 3, 1 & 2 to centre The Prince Imperial's Quadrille Figure 4 (4x32) 4 Top couples advance & retire. 4 Top couples adv, ladies move to R, as men retire to place. 8 Line of 3 adv & ret twice. 4 Single men adv, bow and retire. 4 Re-advance and turn to face partner. 4 Circle L half way round (with partner & side couple). 4 Half R & L to place. 32 Repeat with side couples leading. 32 Repeat with top couples leading (men moving to left as ladies retire) 32 Repeat with Side couple leading. (Men moving to left as ladies retire) Figure 5 (4x32 +32) 16 Ladies to the right, (RH turn with corner man then continue round to the right turning each man) 4 1st Lady, 2nd man advance & retire 4 re-advance & turn RH (finish facing partners) 8 set & turn partners (finishing in place) 32 Repeat with 2nd Lady, 1st man leading 32 repeat with 3rd lady, 4th man leading 32 Repeat with 4th Lady, 3rd man leading 16 Ladies to the right again. 4 Men turn partners to centre. 4 All bow and curtsey. 8 Promenade set ( hall) Note: Set & turn is a 'balance' set and open hand turn. The Parisienne Quadrille Figure 1 (1x32) 8 Couples R and L through. (without giving hands) 8 set & turn partners 8 Ladies chain. 4 Couples promenade across set. 4 Half R and L to place. Figure 2 (2x24) 4 Couples advance & retire. 4 Cross over (without changing places with partners) 8 Repeat back to place. 8 Set & turn partners. 24 Repeat. Figure 3 (2x32) 4 Lady 1, Man 2 adv, touch RH, retire to opposite place. 4 Lady 1, Man 2 adv, join LH, give RH to partner. 4 Line of 4 balance fwd & back twice 4 Men lead partners to opp. Place 4 Lady 1, Man 2 adv & retire 4 Lady 1, Man 2 adv, honour & ret. 4 Couples, advance & retire. 4 Half R & L to place. 32 Repeat with Lady 2, Man 1. The Parisienne Quadrille Figure 4. (2x32) 4 1st couple advance & retire. 4 1st couple adv, lady join 2nd couple. 4 Line of 3 adv. & ret, 1st man retire. 4 Line of 3 adv. Ladies cross to 1st man. 4 Line of 3 adv. & ret, 2nd man retire. 4 Re-advance, form circle with 2nd man. 4 Circle L half way round. 4 Half R & L to place. 32 Repeat with 2nd couple leading. Figure 5 (2x32) 4 Couples advance & retire 4 Cross over 8 Repeat back to place. 8 Ladies chain across & back.8 Set & turn partners. 32 Repeat Notes: 1 This 'quadrille' is similar to the first set (1st 4 figures) and is danced as two couple sets. 2 Set & turn is a 'balance' set and open hand turn. Wellington Waltz 8 Honour Partner, honour corner 8 Circle L 7 steps, then tap, tap 8 Circle R 7 steps, then tap, tap 4 Top couples, 2 side-steps to centre and back with lady turning under man's left arm. 4 Waltz across to opposite side 8 Side couples repeat. 8 Top ladies chain across. (pause in centre, turn twice with opp. Man) 8 Side ladies chain across. 8 Grand Chain half way round set. 8 Waltz to man's place. 64 Repeat with side couples leading. Waltz Cotillon 8 Honour Partner, honour corner 16 1st couple waltz the set. 8 Top ladies cross over.8 Side ladies cross over. 8 Top men cross over. 8 Side men cross over. 16 All waltz back to place. Form top & bottom lines, 8 Adv. & ret, cross over. 8 Adv. & ret, cross back. 16 Waltz chain to meet partner. 16 All waltz back to place. Form top & bottom lines, 8 Adv. & ret, cross over. 8 Adv. & ret, cross back. 16 Waltz chain to meet partner. 16 All waltz back to place. 112 Repeat with 2nd couple leading. 112 Repeat with 3rd couple leading. Side lines adv. & ret. 112 Repeat with 4th couple leading. Side lines adv. & ret. Galopade Quadrille 8 Honour Partner, honour corner 8 All galop round set. (Galop half way round set, on opp. Side change places with partner, continue galop to place.) 8 Top couples R & L through. 8 Side couples R & L through. 8 All set & swing partners. 8 All galop round set. 8 Top ladies chain. 8 Side ladies chain. 8 All set & swing partners. 8 All galop round set. 8 1st couple lead through, 2nd on return 8 3rd couple lead through, 4th on return 8 All set & swing partners. 8 All galop round set. 4 1st lady & 2nd man adv. & ret. 4 2nd lady & 1st man adv. & ret. 4 3rd lady & 4th man adv. & ret. 4 4th lady & 3rd man adv. & ret. 8 All set & swing partners. 8 All galop round set. 4 Ladies advance & retire. 4 Men advance & retire. 8 Double ladies chain. 8 All set & swing partners. 8 All galop round set. 8 Top couples waltz the set 8 Side couples waltz the set 8 All set & swing partners. 32 Waltz the hall. The Caledonians Quadrille Figure 1. (2x32) 4 Top couples R.H. across, move CW (Ladies hands joined over Mens). 4 then L.H. across, move ACW. 8 Set & swing Partners 8 Top ladies chain. 4 Top couples promenade across set. 4 Half R and L to place. 32 Side couples repeat. Figure 2. (4x24) 8 1st Man advance & retire twice. 8 Set & swing corners. 8 Promenade with corners (to men's position.) 24 2nd man repeat. 48 3rd and 4th man repeat. Figure 3. (4x32) 4 Lady 1, Man 2 advance & retire. 4 Re-advance, 2 hand turn to place. 8 1st & 2nd couples lead through and back. (1st lead through across, 2nd back) 8 Set & swing corners. 4 All advance & retire. 4 Swing partners. 32 Repeat wth Lady 2, Man 1. 32 Repeat with Lady 3, Man 4. 32 Repeat with Lady 4, Man 3. The Caledonians Quadrille Figure 4. (4x24) 2 Lady 1, Man 2 advance and stop. 2 Lady 2, Man 1 advance and stop. 4 Turn partners back to place. 2 All ladies to the right 4 steps. 2 All men to the left 4 steps. 2 All ladies to the right 4 steps. 2 All men to the left 4 steps. 4 Promenade to place. 4 Swing partners. 24 Repeat wth Lady 2, Man 1 leading. 24 Repeat wth Lady 3, Man 4 leading. 24 Repeat wth Lady 4, Man 3 leading. Figure 5. (4x48 + 16) 8 1st couple visit. 4 Ladies advance, curtsey & retire. 4 Men advance, bow & retire. 8 All set & swing partners. 8 Grand chain 1/2 way round and honour partners. 4 Promenade to place 4 and swing partners. 8 Chasse-croise, (4 steps past partner, RH to corner balance fwd & back, then 4 steps back, LH to partner balance fwd & back). 48 Repeat with 2nd couple leading. 48 Repeat wth 3rd couple leading. 48 Repeat wth 4th couple leading. 8 All promenade set. 8 Swing partners. Note: Set & swing is 'normal' set and cross hand swing. The Lancers Quadrille (BMC version) Figure 1. (4x32) 8 1st Lady, 2nd man advance & swing in centre (with ballroom hold). 4 Partners move 1/2 way across, Centres keep swinging. 4 Promenade partner to opp. Place. 8 1st couple lead through to place. 8 All swing corners. 32 Repeat with 2nd lady, 1st man. 32 Repeat with 3rd lady, 4th man. 32 Repeat with 4th lady, 3rd man. Figure 2. (4x32) 8 1st couple lead up (to 2nd) & retire. 8 1st couple swing in place Form top & bottom lines. 8 Lines adv & retire twice. 8 Swing partners. 32 Repeat with 2nd couple leading. 32 Repeat with 3rd couple leading. (Forming side lines instead) 32 Repeat with 4th couple leading. (Forming side lines instead) Figure 3. (2x32) 4 Introduction - Ladies to the centre and men form a circle around them. 8 Men circle left. 8 Men circle right. Men form a grand cross (LH) Right arm behind partners. 16 Promenade round set. Ladies return to the centre. 32 Repeat - Circle L & R, & Grand Cross. The Lancers Quadrille (BMC version) Figure 4. (2x48) 8 Top couples visit. 4 Tops RH star. 4 then LH star. 8 Tops basket Left. 8 Tops basket Right. 8 Tops circle Left. Tops circle Right. 48 Repeat with side couples leading. Figure 5. ((4x 16+32) + 24) 8 All grand chain 1/2 way round and honour partners. 8 Promenade with partners to place. 8 1st couple lead up, turn and lead out with side falling in behind. 8 Cast out, reform top & bottom lines. 4 Lines advance & retire. 4 Advance & swing partners to place. 8 Swing partners in place. 48 Repeat with 2nd couple leading. 48 Repeat with 3rd couple leading (forming side lines) 48 Repeat with 4th couple leading. (forming side lines) 8 All grand chain 1/2 way round and honour partners. 8 Promenade with partners to place. 8 Swing partners in place. Note: Normal swing here is with hands crossed. 1. The Quadrille 2.The Lancers Quadrille 3. The Prince Imperials 4. The Parisienne Quadrille 5. The Wellington Waltz 6. The Waltz Cotillon 7. The Galopade Quadrille 8. The Caledonians Quadrille 9. The Lancers Quadrille (BMC)person, individual, peter ellis oam -
 Ballarat Tramway Museum
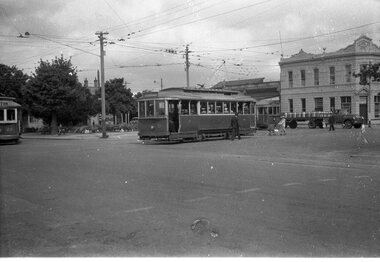
Negative, Wal Jack, late 1940's or early 1950's
Yields information about the tram services and the way they could co-ordinate at Hospital Corner and other traffic.Negative and Digital image of the Wal Jack Ballarat Negative file of three trams at Hospital corner. No. 20 has turned from Drummond North in Sturt - City No. 21 from Sturt in Drummond North - Gardens via Drummond North No. 15 in Sturt St for Gardens via Sturt St west. In the background is the Southern Cross Hotel. There is a lady with a pram and beer delivery truck.trams, tramways, hospital corner, sturt st, drummond st, tram 20 tram 21 tram 15 -
 Kew Historical Society Inc
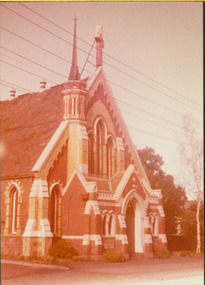
Photograph - Former Congregational Church, Walpole Street, H. Gielen, c.1977
The site of the former Kew Congregational Church was the earliest 'built' place of religion in Kew. An earlier building by Charles Vickers was replaced by a new brick church designed by Albert Purchas. Following the creation of the Uniting Church, the church at 30 Walpole Street was declared redundant and demolished to make way for the Bodalla Nursing Home (itself later demolished).Faded colour print positive of the former church in Walpole Street, Kew. The photo shows the polychrome facade at an oblique angle. The added (later) illuminated cross is at the apex of the facade."Former Church Walpole St / Gift of photo from H Gielen" -
 Kew Historical Society Inc
Journal, Kewriosity : July 1987
Kew needs more caregivers [Kew Family Day Care Service] / p1. Aquatic Centre go ahead [Kew Recreation Centre] / p1. Dates for July / p2. Holiday Program [activities] / p2. Commentary - Rewarding year almost over / Cr Joe Ormando, Mayor of Kew p3. Nominations close [Kew Council elections] / p3. Traffic Plans / p3. Streetscapes [Derby Street, Pakington Street, Mawson Street, Ridgeway Avenue upgrades] / p3. Living by faith and prudence Carmelite Sisters say / p4. Mothers mark day [Nursing Mothering Week] / p4. Volunteers [Royal Talbot Hospital Auxiliary] / p4. Kew President [Janet Stearn, Victorian Penguin Club] / p5. Art ideas/ / p5. [Kew] Library re-opens / p5. Kew [Community] Bus / p5. Kew Community House - Drop-in Centre / Janet Price / p6. Rec[reation] Program / p6. Dance class [Susan Crouch, Naomi Aitchison] / p6. [Kew Community] Action Group / Rhonda McCaw p6. Integration a two way street [Wheelchair basketball, Victorian Netball Association] / p7. Opera for Kew [Ian Lowe] / p7. Bicentennial plans [Kew Bicentennial Committee] / Gerard Petrie p7. Dance therapy [Dance Therapy Development Group] / p7. Footy news [Kew Football Club] / p8. Keeping you informed [Kew Citizens' Advice Bureau] / p8. Cheque for Red Cross [Kew Red Cross Appeal Committee] / p8. Preparing [garden] beds for Spring / Peter Davies p8.Kewriosity was a local newsletter combining Kew Council and community news. It was published between November 1983 and June 1994, replacing an earlier Kewriosity [broad] Sheet (1979-84). In producing Kewriosity, Council aimed to provide a range of interesting and informative articles covering its deliberations and decision making, together with items of general interest and importance to the Kew community and information not generally available through daily media outlets.non-fictionKew needs more caregivers [Kew Family Day Care Service] / p1. Aquatic Centre go ahead [Kew Recreation Centre] / p1. Dates for July / p2. Holiday Program [activities] / p2. Commentary - Rewarding year almost over / Cr Joe Ormando, Mayor of Kew p3. Nominations close [Kew Council elections] / p3. Traffic Plans / p3. Streetscapes [Derby Street, Pakington Street, Mawson Street, Ridgeway Avenue upgrades] / p3. Living by faith and prudence Carmelite Sisters say / p4. Mothers mark day [Nursing Mothering Week] / p4. Volunteers [Royal Talbot Hospital Auxiliary] / p4. Kew President [Janet Stearn, Victorian Penguin Club] / p5. Art ideas/ / p5. [Kew] Library re-opens / p5. Kew [Community] Bus / p5. Kew Community House - Drop-in Centre / Janet Price / p6. Rec[reation] Program / p6. Dance class [Susan Crouch, Naomi Aitchison] / p6. [Kew Community] Action Group / Rhonda McCaw p6. Integration a two way street [Wheelchair basketball, Victorian Netball Association] / p7. Opera for Kew [Ian Lowe] / p7. Bicentennial plans [Kew Bicentennial Committee] / Gerard Petrie p7. Dance therapy [Dance Therapy Development Group] / p7. Footy news [Kew Football Club] / p8. Keeping you informed [Kew Citizens' Advice Bureau] / p8. Cheque for Red Cross [Kew Red Cross Appeal Committee] / p8. Preparing [garden] beds for Spring / Peter Davies p8. publications -- city of kew (vic.), kewriosity, council newsletters, community newsletters -
 Brighton Historical Society
Clothing - Dress, c. 1974
This dress was worn by Brighton's first female mayor, Councillor Di Lopez, to a Mayoral Ball held at Brighton Technical School in 1977. Diane Margaret Lewis completed a law degree at the University of Melbourne, later marrying one of her classmates, criminal lawyer Ramon (Ray) Lopez. When she decided to run for the Brighton City Council in 1975, she was seen as an outside chance. Undeterred, she rallied a small group of friends and supporters and set out on an extensive door-knocking campaign that won voters to her side and successfully unseated former mayor Keith Devenport. She went on to serve two terms on council from 1975 to 1981. Di initiated many local projects, including the creation of a bike path along Nepean Highway and the first Brighton Festival, while balancing family life and a demanding ‘day job’ as personal assistant to Victorian Minister for Youth, Sport and Recreation Brian Dixon. She was a member of the Women’s Electoral Lobby and a champion for women’s representation, encouraging both Sally Allmand and Kate Harman to run for council (both were successfully elected). She advocated forcefully for an open, transparent local government in which ratepayers had the chance to participate and be heard. In 1976 Di became the first woman to hold the title of Mayor of Brighton, and she made it clear from the outset that she was going to do it her way. For the annual mayoral ball in 1977, ordinarily a staid traditional function, she chose a discotheque theme based on the Rod Stewart album Night on the Town, with a broad dress code of ‘black tie or jeans’: ‘You’ve got to get with the times,’ she said. ‘We want people to wear whatever they feel comfortable in.’ Di herself chose to attend in this knee-length chamois dress embellished with strings, ribbons, beads and feathers. It was both a fashion statement, exemplifying her colourful, flamboyant and forthright style, and a political one: a declaration of her intention to lead a progressive council, embracing the new and refusing to be hemmed in by dated traditions. In 2020 she was awarded an Order of Australia Medal for her service to local government and to the community of Brighton.This dress has local historical significance for its association with Brighton's first female mayor, Councillor Di Lopez, who wore it to a Mayoral Ball in 1976. The dress exemplifies her flamboyant reputation, modern outlook and willingness to break norms. At the time, the dress was a radical choice for a Mayoral Ball, where women typically wore formal evening gowns. With her choice of dress, Cr Lopez was making a public statement, breaking away from dated traditions and announcing her intention to bring the Mayor's office into the 1970s. In this way, the dress also points to the wider social and political changes taking place both in Brighton and across Australia during the mid-1970s.Three quarter length chamois dress circa 1974. Machine stitched with a v-neck and full length sleeves and an uneven raw hem, the dress is decorated with narrow thongs of chamois embellished with red beads and blue feathers. The open-fronted bodice is laced with red ribbon and the skirt is decorated with a large blue wool cross stitch and a combination of blue wool and purple ribbon cross stitch. Made in the style of an Indian 'Wild West Dress'.di lopez, chamois, brighton, brighton council, brighton technical school, mayoral ball, 1970s, feminism -
 Vision Australia
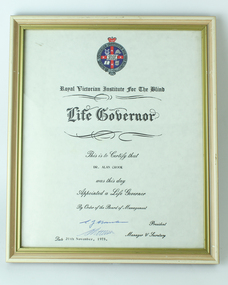
Certificate - Text, RVIB Life Governor certificates, 1969-1992
To recognise outstanding contributions to the Institution, Life Governor certificates were awarded. Signed by the President and Manager/Secretary of the day, they were worded as follows: "Royal Victorian Institution for the Blind Life Governor. This is to certify that (blank) was this day appointed a Life Governor by the Board of Management." 28th August 1969 - signed by Charles Bennett and F.G. Turley Stanley Marsden Esq. 17th April 1975 - signed by E.J. Hanlon and E. Netson (?) Mrs Phyllis Marsden 20th November 1975 - signed by E.J. Hanlon and E. Netson (?) Mrs Lurleen C. Slaney John H. Weymouth, Esq Alan J. Murphy, Esq Mrs Phyllis Crook Christopher Williams Esq Dr. Alan Crook Adrienne N. Mursell November 19, 1981 - signed by E.J. Hanlon and E. Netson (?) Mrs Phyllis Wilson June 12, 1992 - signed by L. M. McCredie and Peter (?) Donald Gordon Boyle11 certificates with RVIB crest At the head of the page, a round circle with 'Royal Victorian Institute for the Blind' in Gothic typescript, a red crown atop the circle and a red cross with four white stars divides the inside of the circle into four areas. A picture in with and black, against a blue background, rests in each of these quadrants and a banner with the words 'I will lead the blind by a way they know not' is centred in between them. The pictures are: a harp, a bee hive, an open book and a flag with the words 'A.D. 1867'.royal victorian institute for the blind, awards, stanley marsden, phyllis marsden, phyllis crook, alan crook, john weymouth, christopher williams, adrienne mursell, alan murphy, lurleen slaney, phyllis wilson, gordon boyle -
 Vision Australia
Sign - Object, Association for the Blind New Beginnings acrylic sign, 1994
In 1994 the Association for the Blind began to use the phrase 'New beginnings' to signify a shift in the way that work was undertaken. Some new signage was created with this in mind, and this sign has 'New beginnings' and the Association for the Blind symbol of a square (filled with horizontal lines crossed by two diagonal lines), in black and blue and a circle in the middle with lines inside it. This sign was previously situated on the wall of the conference room at Kooyong in the Vision Resource Centre.1 plastic sign with AFB logoAssociation for the Blind New Beginningsassociation for the blind, signs -
 Royal District Nursing Service (now known as Bolton Clarke)
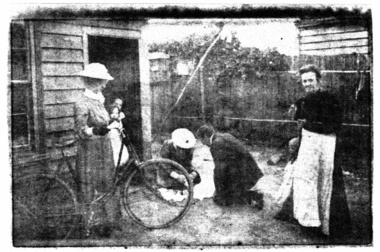
Photograph - Photograph, sepia, 1907
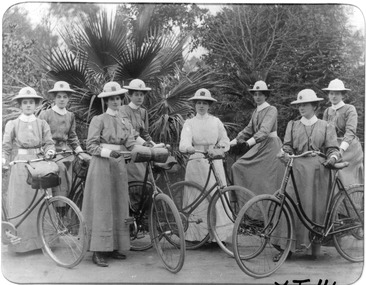
This photograph depicts the Sister-in-charge with a group of Melbourne District Nursing Society (MDNS,) Trained nurses, 'Nurses", with their bicycles, which were the first mode of transport purchased by MDNS in 1903. The bicycles enabled their Nurses to visit more patients over a wider area. They are identified as: L-R back row: Trained Nurses Taylor, Steele, Francis, Young. L-R front row: Isobel Curnow, Annie Roberts, Isabel Hawkes (Sister in Charge), Becker. Their uniforms were a grey cotton dress with white collar, cuffs and belt and their was a red Maltese cross on their pith helmets. They gave nursing care to the poor in the inner Melbourne and close surrounding areas (districts). On the 17th of February 1885, just 50 years after Melbourne was founded, a preliminary meeting of ladies and gentlemen who were anxious to form a society to provide "skilled nursing" for the sick poor in their own homes was held in Mrs William McCulloch’s home at Spring Street, Melbourne. At this meeting it was decided “that the association would be called the Melbourne District Nursing Society”, the first Society of its kind in Australia, and “that the special object of the Society shall be to secure skilled nursing for the sick poor in their own homes”. On the 16th of March a Committee was formed to “arrange for engaging one "duly qualified nurse”. On the 1st of May 1885 a Nurse, Mrs. Ferguson, was employed at £100 per annum, and a second Nurse, Mrs. Joanne Cannon, commenced six months later. In that era the term ‘Nurse’ was used even though they were ‘qualified’ i.e. ‘trained’ nurses. They worked in the now CBD, ie from Spencer Street to Spring Street and from Victoria Parade to Flinders Street. From its inception the Society was at the forefront of health care. They provided high quality Trained nursing care; educated their patients in the curing and prevention of disease; teaching the importance of cleanliness, fresh air and good nutrition, both by verbal instruction and demonstration, even supplying soup and milk when needed, as well as providing wood and coal in the winter. At that time they walked the streets and lane ways amid the slums of inner Melbourne carrying their nursing bag containing lotion, ointments, powders, liniment, bandages, dressings, a case of spirits, and the Nurse's own clean apron, soap and small towel. They supplied equipment on loan, such as earthenware hot water bottles, splints, urinals, bed pans, bed cradles, feeding mugs, and air-cushions as well as providing blankets and clean bed linen, and nightdresses as necessary. Trained midwives began home births in late 1893 taking midwifery bundles and providing clothes for the babe and mother as needed. As the work increased a third Trained nurse was employed but this was arduous work, particularly in the heat of summer and many Nurses only remained with the Society for several months. Permission to use bicycles was given to the Nurses in 1898 and the Society decided to purchase their own in 1903. A business man offered ‘new free wheel’ bicycles at £13 each which included maintenance for one year. Bells and wooden frames were added, at a cost of £5 per frame, so the Nurses could carry extra equipment. Nurses’ bags were strapped to the handlebars. Soup was made for those in need 2-3 times a week and if patients could not arrange to have it collected the soup was delivered by the Nurses on their bicycles. The use of bicycles caused a change in uniform, with white pith helmets, and veils covering them and tied under their chin, now being used. They provided high quality nursing care to a range of people, often in destitute situations, some lying on rags on the floor as they had no bed, others with just a bed and maybe a thin blanket, a chair and nothing else. Their ages ranged from babes, children, adults to the elderly. The Nurses gave medications as ordered by a Doctor, dressed wounds e.g. to the injured, and surgical cases, and to those with leg ulcers; attended to patients with ‘surgical ailments’ such as ‘hip disease’; gave care to those with acute illnesses such as bronchitis, pleurisy, pneumonia, measles, and scarlet fever, as well as those with chronic illnesses such as consumption (tuberculosis), heart disease, arthritis, cancer, debility, neuritis and paralysis. In 1913 a Nurse had her Board and residence, uniforms, bicycles and laundry expensive provided and was paid £50 a year for her first six months. At the end of a year her salary is increased by £5, and later she earns £60 a year. Over the years the nurses complained that their veils became wet in the rain and asked for a change of uniform but this did not occur until 1921. Bicycles continued to be used in inner areas until 1945. Sepia photograph of eight Melbourne District Nursing Society Trained nurses posing with their bicycles in a park; some are partly hidden. Nurse's uniforms consist of long grey dresses with white belts, cuffs and collars and white pith helmets with a Maltese cross in the centre. Oblong leather nursing bags of varying sizes are strapped to five of the bicycles. In the centre is Sister-in-charge – Mrs Hawkes (in white); to her left are 4 Nurses and to her right 3. L-R – Front row – Trained Nurses Curnow, Roberts, (Hawkes) and Becker. Back row – Nurses Taylor, Steele, Francis and Young. Trees and a palm are in the background. The bicycles have two large wire spoked wheels at either end of the black V shape bicycle frame; a rubber tyre runs around the outside of each wheel. The metal handlebars are a horizontal configuration and are attached with a central column into a black vertical column at the front of the V shape bicycle frame which has ‘fork shaped’ thin metal pierces running down either side of the wheel attaching the frame to the central hub of the wheel. The rear wheel is attached the same way to a central column at the rear of the frame which runs up to V shape solid seat. At the bottom of the V of the frame a pedal is attached with a rotating arm on either side of the bicycle and on the right side the rotating arm is attached to a sprocket which has a chain running around it back to a smaller sprocket on the hub of the back wheel. The chain has a thin metal guard over it. There are narrow thin metal mud guards running a short distance above the top of each wheel. melbourne district nursing society (1885-1957), bicycles, nurses, uniforms, mdns, mdns transport, rdns, royal district nursing service, trained nurse annie roberts, sister-in-charge isabel hawkes, trained nurse taylor, trained nurse steele, trained nurse francis, trained nurse young, trained nurse becker, trained nurse isobel curnow -
 Royal District Nursing Service (now known as Bolton Clarke)
Photograph - Photograph, black and white:, 1952
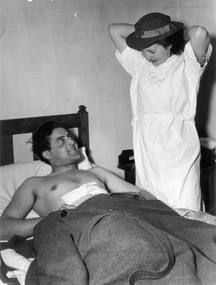
The photograph is taken in Mr. Spartel's home in St. Kilda. The MDNS uniform worn under her white gown was a dark grey cotton frock with a belt. The grey stiffened and brimmed felt hat had a light grey hatband with a red Maltese cross attached in the centre. Sister J. Faust is about to redress a wound on Mr. Spartel's abdomen. The photograph is a record of wound care being given by MDNS trained nurses in a patients home during the 1950s. This photograph appeared along with an article in The Sun newspaper Oct 17 1952.The Trained nurses (Nurses) of the Melbourne District Nursing Society (MDNS), from its inception in 1885, provided wound care to their patients, who ranged in age from the very young to the elderly. As research developed better products and dressing materials, the methods and medication applied to wounds changed. MDNS received Royal patronage in 1966 and as Royal District Nursing Service (RDNS), the Education department developed programs, such as the Wound Specialist program, and the Leg Ulcer Management Program, to provide their Trained nurses (Sisters) with methods of best quality care. The Sisters liaised with the patient’s Doctors and hospitals to provide information on the progress of patient’s wounds and to receive any change of wound care from the Doctors. When RDNS introduced Wound Care Specialists they carried out assessments and provided advice and support to the District Sisters working in the field. On the left of the black and white photograph is Mr. George Spartel, who has dark short curly hair and is lying on his bed. His shoulders and head are resting on the white pillow with his head against the wooden slatted backrest of his bed. His torso is bare and part of a white wound dressing can be seen on his upper abdominal area. A dark grey covering is over the lower portion of his body. He is smiling and looking up at Sister J. Faust from Melbourne District Nursing Society (MDNS) who is standing to the right of his bed.Sister Faust, who has dark curled hair, has her arms raised behind her neck as she reaches the ties on the white gown she is wearing over her uniform. She is wearing her grey brimmed uniform hat. Behind her is a wooden table, with a dark coloured radio on its right, and a jug with a doily over it, on the right.mdns, melbourne district nursing society (1885-1957), nurses, mdns uniforms, rdns, royal district nursing service, rdns wound care, mr george spartel, sister j. faust -
Royal District Nursing Service (now known as Bolton Clarke)
Booklet - Annual Report, Melbourne District Nursing Society. Annual report. 1949-1950, 1950
The 65th Annual report includes details of the Committee of Management and Honorary Governors . Reports from the President, Matron of the After-Care Hospital, Matron of MDNS, the Social Service Officer and Honorary Obstetricians. There are also financial, Auxiliary and donor reports. Centre pages contain black and white photos for the After-Care Hospital.MDNS published annual reports from 1885. The reports document the people, social conditions, events and achievements of the Society from that time.Grey paper cover with red cross in centre and includes title and printers details. 33 pages with black text and 6 black and white photos in centre pagesmelbourne district nursing society, annual report, 1950 -
 Royal District Nursing Service (now known as Bolton Clarke)
Photograph - Photograph, sepia, 1916
Matron Freeman and the MDNS Trained Nurses are wearing long grey coats and white pith helmets, which display a red Maltese cross.The Pith helmets are held on with a white veil. The two Bicycles with nursing bags attached to handlebars show the transport used by MDNS at that time.. Nurses - Back - L-R - O'Sullivan, Deans, Warren, Amess, Pat Lee and Jane with bicycle Front - L-R - Blanche Wilson, Matron Janie Freeman, Peake and Brown. In February 1885, 50 years after Melbourne was founded, it was recognized that nursing care was needed for the sick poor in inner Melbourne. The Melbourne District Nursing Society (MDNS) was founded with one Trained nurse (Nurse), and a second employed six months later. This was the first such service in Australia. They worked in the now CBD, ie from Spencer Street to Spring Street and from Victoria Parade to Flinders Street. From its inception the Society was at the forefront of health care. They provided high quality nursing care; educated their patients in the curing and prevention of disease; teaching the importance of cleanliness and good nutrition, both by verbal instruction and demonstration, even supplying soup and milk when needed. At that time they walked the streets and lane ways amid the slums of inner Melbourne carrying their nursing bag containing lotion ointments, powders, liniment, bandages, dressings, a case of spirits, and the Nurse's own clean apron. They loaned equipment, such as earthenware hot water bottles, splints, urinals, bed pans, bed cradles, feeding mugs, and air-cushions as well as providing clean bed linen and nightdresses as necessary. Trained Midwives began home births in August 1893 taking midwifery bundles and providing clothes for the babe as needed. This was arduous work, particularly in the heat of summer. Permission to use bicycles was given to the Nurses in 1898 and the Society decided to purchase their own in 1903. A business man offered ‘new free wheel’ bicycles at £13 each which included maintenance for one year. Bells and wooden frames were added, at a cost of £5 per frame, so the Nurses could carry extra equipment. Nurses’ bags were strapped to the handlebars. Soup was made for those in need 2-3 times a week and if patients could not arrange to have it collected the soup was delivered by the Nurses on their bicycles. The use of bicycles caused a change in uniform, with white pith helmets, and veils covering them and tied under their chin, now being used. In 1913 a Nurse had her Board and residence, uniforms, bicycles and laundry expensive provided and was paid £50 a year for her first six months. At the end of a year her salary is increased by £5, and later she earned £60 a year. Over the years the Nurses complained their veils became wet in the rain and asked for a change of uniform but this did not occur until 1921. Bicycles continued to be used in inner areas until 1945. From its inception the Society was at the forefront of health care and liaised with Doctors. They provided high quality nursing care to a range of people, often in destitute situations, some lying on rags on the floor as they had no bed, others with just a bed and maybe a thin blanket, a chair and nothing else. Their ages ranged from babes, children, adults to the elderly. The Nurses gave medications as ordered, dressed wounds e.g. to the injured, and surgical cases, and to those with leg ulcers; attended to patients with ‘surgical ailments’ such as ‘hip disease’; gave care to those with acute illnesses such as bronchitis, pleurisy, pneumonia, measles, and scarlet fever, as well as those with chronic illnesses such as consumption (tuberculosis), heart disease, arthritis, cancer, debility, neuritis and paralysis. They educated their patients, and their Carers, in the curing and prevention of disease; teaching the importance of hygiene, cleanliness, ventilation and good nutrition. They taught them, by verbal instruction and demonstration, how to make poultices, to make and apply bandages, apply medical appliances such as splints.Sepia photograph on brown card mount with 'Kirk Studio' on bottom right of the card. The photograph shows Matron Freeman and nine Melbourne District Nursing Society (MDNS) Trained nurses, (Nurses), with bicycles. The back row of six Nurses are standing and the Nurses either end are holding bicycles which have leather oblong nursing bags attached to the handlebars with two straps. The front row are seated. All are wearing the MDNS uniform of long dark coats and white helmets, with white scarves covering them and tied under their chins. A Maltese cross can be seen in the centre of the helmets. Both bicycles have two large wire spoked wheels at either end of the black V shape bicycle frame; a rubber tyre runs around the outside of each wheel. The metal handlebars are a horizontal configuration and are attached with a central column into a black vertical column at the front of the V shape bicycle frame which has 'fork shaped' thin metal pierces running down either side of the wheel attaching the frame to the central hub of the wheel. The rear wheel is attached the same way to a central column at the rear of the frame which runs up to V shape solid seat. At the bottom of the V of the frame a pedal is attached with a rotating arm on either side of the bicycle and on the right side the rotating arm is attached to a sprocket which has a chain running around it back to a smaller sprocket on the hub of the back wheel. The chain has a thin metal guard over it. There are narrow thin metal mud guards running a short distance above the top of each wheel.Photographer's embossed stampmdns, melbourne district nursing society, mdns uniforms, mdns transport, mdns matron, rdns, royal district nursing service, nurse blanche wilson, nurse pat lee, nurse deans, nurse o'sullivan, nurse warren, nurse amess, nurse peak, nurse brown, matron janie freeman -
 Royal District Nursing Service (now known as Bolton Clarke)
Photograph - Digital image, c.1922
The photograph appeared in the MDNS Annual Report of 1922 and is taken on the veranda of the Melbourne District Nursing Society (MDNS) Nurses Home at 39 Victoria Parade, Collingwood. The Sisters lived and worked out of the Nurses Home from June 1914 to 1953. They attended the disadvantaged in the inner suburbs of Melbourne. The Sisters and Matron are wearing the grey uniform and hat with a red Maltese cross is in the centre of the hatband which was introduced in 1921. These Sisters, plus two others visited 29.079 visits in the metropolitan area and in suburbs as far distant as Elwood, Glen Huntly, Deepdene, Essendon and Fairfield. Of the 1666 patients on the books 394 were midwifery patients nursed in their own homes. It is believed the Matron in the photograph is Matron Reynolds. In February 1885 it was recognized that nursing care was needed for the sick poor in inner Melbourne. The Melbourne District Nursing Society (MDNS) was founded on the 17th of February with one Trained nurse (Nurse) who qualified under the Hospital training system, commencing on the 1st of May, and a second employed six months later, both working in the now CBD, ie from Spencer Street to Spring Street and from Victoria Parade to Flinders Street. From its inception the Society was at the forefront of health care. They provided high quality nursing care; educated their patients in the curing and prevention of disease; teaching the importance of cleanliness and good nutrition, both by verbal instruction and demonstration, even supplying soup and milk when needed. At that time they walked the streets and lane ways amid the slums of inner Melbourne carrying their nursing bag containing lotion, ointments, powders, liniment, bandages, dressings, a case of spirits, and the Nurse's own clean apron. The also supplied equipment, such as earthenware hot water bottles, splints, urinals, bed pans, bed cradles, feeding mugs, and air-cushions as well as providing clean bed linen and nightdresses and clothes as necessary. In 1891 the first Nurses Home was rented for 1 year at £65 per annum at 66 Cardigan Street, Carlton; Nurses wages were now £60 per annum. A Doctor gave lectures from the Home to the public on the understanding and prevention of diseases. The Society decided to commence a Midwifery Service and Nurse Fowler, who had previously worked for the Society, was re-employed as their first trained Midwife. She began home births in August 1893 giving them Ante Natal care, taking midwifery bundles and providing clothes for the babe as needed. Following birth, she gave Post-natal care to the mother and babe twice a day for three days and then daily for a week, and longer if required. She resigned after twelve months and Nurse Wilkie was appointed to the position. As well as walking, the Nurses used Public transport in the limited areas it ran, though a taxi was used by the Nurses and Midwife in emergencies and at night. Late in 1891 the Society moved to larger rented premises at 49 Drummond Street and in 1902 moved to 188 Leicester Street, Carlton. The Nurses were becoming exhausted, particularly in the heat of summer. Permission to use bicycles was given to them in 1898 and the Society decided to purchase their own in 1903. A business man offered ‘new free wheel’ bicycles at £13 each, which included maintenance for one year. Bells and wooden frames were added at a cost of £5 per frame so the Nurses could carry extra equipment. Nurses bags were strapped to the handlebars. Soup was made for those in need 2-3 times a week, and if patients could not arrange to have it collected, the soup was delivered by the Nurses on their bicycles. Their use caused a change in uniform, with white pith helmets, and veils covering them and tied under their chins, now being used. In 1904 the Society relocated to rented premises at 5 Royal Terrace, Nicholson Street in Fitzroy. In 1913 a Nurse had her ‘board and residence, uniforms, bicycles and laundry expenses’ provided and was paid £50 a year for her first six months. At the end of a year her salary was increased by £5, and later she earned £60 a year. Over the years the Nurses complained their veils became wet in the rain and asked for a change of uniform, but this did not occur until 1921. In 1914 the Society was at last able to purchase their own premises, 'Floraston' 39 Victoria Parade in Collingwood. During the Spanish Influenza epidemic, in 1919, MDNS appealed for assistance to procure Motor vehicles so the Nurses could visit an influx of cases. Through trusts, grants and donations four 'Ford 'T Model' cars were procured which enabled the Nurses to triple their visits. It was recorded on the 21st of May, that the seven Nurses had visited 1,212 persons with influenza in the last three months, how many visits to each is not known. In the whole of 1918 the Nurses, including midwifery cases, visited 1,100 persons. It was also recorded on May 7th the Nurses were delivering 100 quarts of soup to the needy each morning. In winter they also carried wood in the cars to distribute to their destitute patients as needed. In 1921-22 many of the people nursed by the Trained nurses (Sisters) suffered from malignant and tubercular disease, often the Sister would visit to find the patient was desperately ill living in a room alone and no one there to even give them a drink. In these cases the Sister would send them to hospital, but if possible most cases were nursed in their home. During July 1921- 30 June 1922 the four Midwifery trained Sisters averaged 8 confinement cases a week and sometimes gave Post Natal care to 15 to 18 patients a day. At the time of confinement a Student from the Women's Hospital accompanied the MDNS Sister and if complications occurred the patient was transferred to the Women's Hospital. The Society often had to provide blankets, sheets, set of baby clothes and night gowns for the mother. In many instances the Society provided milk for many months. The midwifery Sisters often travelled long distances in the cars Through constant use the cars were in such a poor state they were sold in 1927 and the Sisters went back to using public transport, as well as their bicycles which continued to be used in inner areas until 1945.. The Midwives used taxis when a birth was imminent. Black and white photograph showing 9 Sisters, 5 standing at rear and Matron, in the centre, of 4 seated Sisters on a balcony wearing their Melbourne District Nursing Society (MDNS) uniforms of grey coats, with revered collars and belt, over their partly seen grey uniforms with white collars. Five of the Sisters are wearing glasses. All are wearing grey brimmed hats with a Maltese cross in the centre of the lighter colour hatband. Part of deep metal scroll work of the veranda rail can be seen. A concrete wall is behind the Sisters.mdns, mdns matron, miss reynolds, royal district nursing service, rdns, melbourne district nursing society, mdns uniforms -
 Royal District Nursing Service (now known as Bolton Clarke)
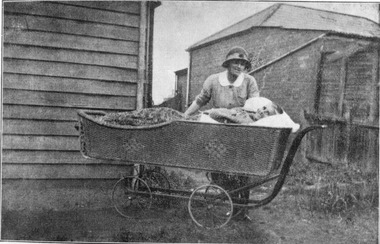
Photograph - Digital image, c.1920
This digital image is taken at the home of a Melbourne District Nursing Society (MDNS) patient, and depicts a MDNS Sister attending to a lady who is lying in a wicker bed pram in the rear garden of her home. The wicker bed pram enabled the lady to enjoy fresh air and to be moved about easily. The image shows the MDNS uniform of a grey cotton frock with white collar, and a grey brimmed hat with a red Maltese cross in the centre of the hatband. In 1885, 50 years after Melbourne was founded, it was recognized that nursing care was needed for the sick poor in inner Melbourne. The Melbourne District Nursing Society (MDNS) was founded in February 1885 with one Trained nurse, known as 'Nurse' in those days, and a second employed six months later,. The two Nurses worked in the now CBD, ie from Spencer Street to Spring Street and from Victoria Parade to Flinders Street. At that time they walked the streets and lane ways amid the slums of inner Melbourne carrying their nursing bags containing lotion, ointments, powders, liniment, bandages, dressings, a case of spirits, and the Nurse's own clean apron, soap and small towel. They supplied equipment on loan, such as earthenware hot water bottles, splints, urinals, bed pans, bed cradles, feeding mugs, and air-cushions as well as providing blankets and clean bed linen, and nightdresses as necessary. From its inception the Society was at the forefront of health care and liaised with Doctors. They provided high quality nursing care to a range of people, often in destitute situations, some lying on rags on the floor as they had no bed, others with just a bed and maybe a thin blanket, a chair and nothing else. Their ages ranged from babes, children, adults to the elderly. The Nurses gave medications as ordered, dressed wounds e.g. to the injured, and surgical cases, and to those with leg ulcers; attended to patients with ‘surgical ailments’ such as ‘hip disease’; gave care to those with acute illnesses such as bronchitis, pleurisy, pneumonia, measles, and scarlet fever, as well as those with chronic illnesses such as consumption (tuberculosis), heart disease, arthritis, cancer, debility, neuritis and paralysis. This image shows a Melbourne District Nursing Society (MDNS) Trained nurse (Sister) wearing a grey uniform with white collar, and a grey brimmed hat, which has a hatband with Maltese cross applied, standing behind and attending an elderly lady patient laying in a wicker bed pram outside her home. The Sister has her right hand resting on the pram and is looking down at the lady, and the lady, who has short grey hair, is smiling and looking toward the camera. Her body is covered with a floral cover. To the left, part of the horizontal weatherboards of a wooden house can be seen, and to the right and rear, a brick, tiled hip roof, building can be seen. The wicker bed pram has four spoked wheels and a metal frame that bends up to form a handle on its right hand side.melbourne district nursing society, mdns, mdns nurses, mdns patient care, mdns uniforms, rdns, royal district nursing service -
 Royal District Nursing Service (now known as Bolton Clarke)
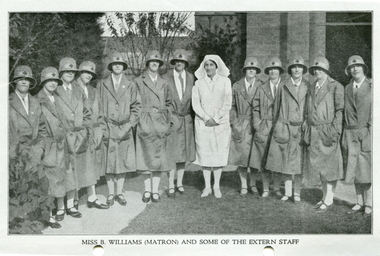
Photograph - Photograph, black and white, 1933
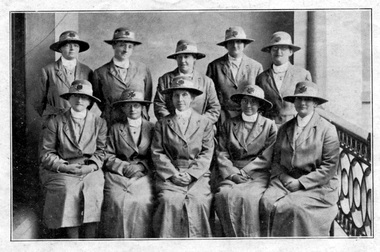
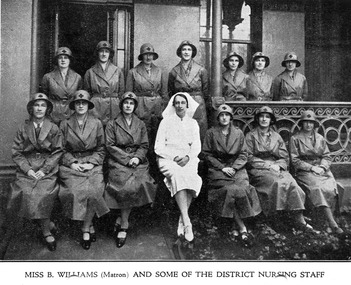
This photograph is a record of Matron Beatrice Williams with some of the Trained nurses (Sisters) who worked in the District division of Melbourne District Nursing Society After Care Home in 1933, just prior to Matron Williams resigning to be married. It was taken in front of the Nurses Home at 39 Victoria Parade, Collingwood and shows part of the District nursing uniform worn by the MDNS Sisters in the 1930s. At that time their uniform dresses, worn under their coats, were grey cotton and their brimmed hats were made of felt and had a red Maltese cross applied to the centre front of the hatband.Miss Beatrice Williams worked as a Trained Nurse (Sister) with the Melbourne District Nursing Society (MDNS) before going to England to gain her Midwifery certificate. After qualifying, she worked as a Tutor sister and a District Superintendent at the University College Hospital in London. On returning to Australia she was appointed, in April 1929, Matron of the District division of the MDNS After-Care Home (Hospital from 1934). She convinced the Committee of the need for Ante Natal care and in 1930 the Ante Natal Clinic was opened at the After-Care. She continued as Matron until 1933 when she married Dr. J.P Major, and was invited to join the Committee of Management. In the early 1950s when the Government requested the Society separate and it take over the After Care Hospital, she became President of the now named Melbourne District Nursing Service with its Headquarters and Nursing Home moving to 452 St. Kilda Road, Melbourne. Beatrice had an understanding of the poor, the sick and the aged, and was known for her kindness and sympathy. Her foresight, leadership and enthusiasm brought forth the expansion of District nursing. She died on the 15th of August 1958. The Trained nurses of the Melbourne District Nursing Society (MDNS), later known as Royal District Nursing Service (RDNS), visited patients in their home and gave best practice care in many fields of nursing, and to people of many cultures, throughout its 130 years of expansion. Initial visits not only assessed the specific nursing situation but the situation as a whole. Their patients ranged in age from babes, children, adults to the elderly and referrals were taken from Hospitals, General Practitioners and allied Health facilities. Some of the care the Sisters provided is as follows: – Post-Natal care given to mother and babe, Wound Care following various types of surgery, accidents, burns, cancer, leg ulcers etc. Supervising and teaching Diabetic Care, including teaching and supervising people with Diabetes to administer their own Insulin, and administering Insulin to those unable to give their own injections. Administering other injections and setting up weekly medication boxes. The Sisters performed Catheterizations on adults suffering from conditions such as Quadriplegia, Paraplegia, Multiple Sclerosis (MS), Motor Neurone Disease (MND) and Guillan-Barre Syndrome, and when required at school on children for e.g. those with Spina Bifida. The Sisters visited those requiring Cystic Fibrosis support and care; those requiring Haemo-Oncology care, including visiting children at school; those requiring Home Enteral Feeding care, and those requiring IV therapy at home and home Dialysis. Palliative Care was given including pain relief with the use of syringe drivers, personal care as needed, and advice and support to both patient and family. The Sisters provided Stoma management to those needing Urostomy, Ileostomy and Colostomy care and those requiring Continence care. HIV/AIDS nursing care was provided; visits to Homeless Persons were made. Personal care was given to patients ranging in age and with varying mobility problems, such as those with MS, MND, Guillan-Barre Syndrome, Quadriplegia, Paraplegia, Acquired Brain Injury, to those following a Cerebrovascular Accident (Stroke), those with severe Arthritis and those with a form of Dementia. When necessary the elderly were assisted with personal care and advice given on safety factors with the use of hand rails, bath or shower seats, and hand showers. Rehabilitation with an aim towards independence remained at the forefront of the Sister’s minds and when possible using aids and instruction on safe techniques enabled the person to become fully independent. All care included giving advice and support to the patient and their Carers. The Sisters liaised with the persons Doctor, Hospital and allied Health personal when necessary.Black and white photograph showing Matron, Miss Beatrice Williams, wearing a white uniform and veil over her short dark hair, and a group of thirteen Melbourne District Nursing Society Trained nurses (Sisters) outside the front of their Nurses Home. The Sisters are wearing grey coats over their grey uniforms and grey brimmed hats with a Maltese cross applied to the white headband. Matron is sitting in the centre of six Sisters and there are seven Sisters standing behind them on the veranda; a round column is seen to the right between the 4th and 5th Sisters. Part of the grey building behind shows an open door to the left and a long window to the right. A scrolled metal safety rail, running from the round column, is seen in front of the three nurses on the right. The seated Sisters and Matron have their legs crossed at the ankles, melbourne district nursing society, mdns nurses, mdns, rdns, royal district nursing service, mdns uniforms, matron beatrice mary williams -
 Royal District Nursing Service (now known as Bolton Clarke)
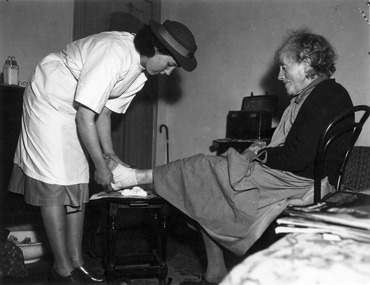
Photograph - Photograph, black and white:, 1952
Sister J. Faust has dressed a wound on the ladies ankle and is applying a blue-line bandage. The photograph is taken in the lady's home. The MDNS uniform at that time was a grey frock, and stiffened brimmed grey felt hat with a light grey band and a red Maltese cross in the centre of the band. The Trained nurses (Nurses) of the Melbourne District Nursing Society (MDNS), from its inception in 1885, provided wound care to their patients, who ranged in age from the very young to the elderly. As research developed better products and dressing materials the methods and medication applied to wounds changed. MDNS received Royal patronage in 1966 and as Royal District Nursing Service (RDNS), the Education department developed programs, such as the Leg Ulcer Management Program, to provide their Trained nurses (Sisters) with methods of best quality care. The Sisters liaised with the patient’s Doctors and hospitals to provide information on the progress of patient’s wounds and to receive any change of wound care from the Doctors. RDNS introduced a Wound Care Specialist program and these Sisters did assessments and provided advice and support to the District Sisters working in the field. Black and white photograph of Melbourne District Nursing Society (MDNS) visiting Sister J. Faust, who is wearing a white gown and a grey brimmed hat over her dark curled hair. Part of her grey uniform frock is seen below the gown. She is applying a light coloured bandage to the right ankle of an elderly female patient. The lady, who has dark curled hair, and is wearing a grey frock, apron, and black cardigan is seen seated side on, on a wooden chair to the right of the Sister. She has her right leg extended and resting on a small low table, her left leg is bent to the floor.. The Sisters open case is seen on a small table to the rear of the lady and a walking stick is to the left against the door frame. A dark curtain hangs in the doorway. A large white wash bowl is seen in the lower left of the photograph. A glass jar with scissor blades into a liquid can be seen on a cabinet to the left of.Sister Faust. To the right of the photograph a partial white covered bed can be seen with a table over it with papers and a magnifying glass. Name of Sister on rear of photograph.wound care, melbourne district nursing society, royal district nursing service, rdns, mdns, sister j. faust -
 Royal District Nursing Service (now known as Bolton Clarke)
Photograph - Photograph, black and white, c.1929
This is a photographic record of Matron Beatrice Williams and the Trained nurses, (Sisters), of the District Nursing division of the Melbourne District Nursing Society who worked in the community give nursing care to patient's in their homes. Their uniforms are grey and the Maltese cross on the Sisters hats is red.From its earliest years when Melbourne District Nursing Society (MDNS) began to wear uniforms the chosen colour was grey, though the style changed throughout the years as fashions changed from the late 1800s through to the 1970s. The Trained nurses (Nurses), firstly wore long grey frocks and a white cap with a long white tail hanging from the centre back. When bicycles were introduced in 1903 the headgear changed to a white pith helmet adorned with a red Maltese cross in the centre front. This was held on with a veil going over the hat and tied under the chin. Over the years there were complaints that the veils became wet in the rain and they asked for a change of uniform, but this did not happen until 1921. Later the Nurses complained their skirts became wet when riding their bicycles in the rain and asked, when raining, to be able to wear breeches and gaiters. This was granted provided they wore aprons when attending patients. It was not long before the uniform changed to a shorter length grey frock, red cardigan, grey coat and grey brimmed hat; later changed to a peaked grey hat. In 1966 MDNS were granted Royal patronage. Now as Royal District Nursing Service, RDNS, the uniform was redesigned and colour changed in 1971. By 1972 the Trained nurses (Sisters) were wearing the new winter uniform of a blue/grey skivvie under a V neck tunic style frock made of blue/grey herringbone winter material with the RDNS insignia on the upper left, and a beret of the same material. In summer the uniform became a royal blue V neck tunic style frock, with the RDNS insignia on the upper left, worn over a short sleeve white blouse. A royal blue peaked hat with the RDNS insignia in the centre front was worn at first and then only worn on official occasions. This uniform was worn until changed to a corporate style in the mid 1980s,Black and white photograph of Matron Beatrice Williams wearing a white uniform and veil, with a group of twelve Melbourne District Nursing Society (MDNS) trained nurses (Sisters) wearing their calf length uniforms of grey coats, and grey brimmed hats with pale grey hat band with central Maltese cross, standing in the garden of the MDNS After-Care home.No. 8526 on rear of photographmelbourne district nursing society, mdns, mdns uniforms, rdns, royal district nursing service, mdns matron, miss beatrice mary williams -
 Royal District Nursing Service (now known as Bolton Clarke)
Photograph - Photograph, black and white, c.1905
This photograph shows Melbourne District Nursing Society (MDNS) Trained Nurses (known as 'Nurse' in those days) attending to a family in the early 1900s. It also shows their uniform which had a red Maltese cross in the centre of the pith helmet. The bicycle seen is the first mode of transport purchased by MDNS in 1903. The Nurse's bag is seen strapped to the handles of the bicycle. In February 1885, 50 years after Melbourne was founded, it was recognized that nursing care was needed for the sick poor in inner Melbourne. The Melbourne District Nursing Society (MDNS), the first District Nursing Society in Australia, was founded and the decision was made to only employ fully qualified nurses who had trained in a Hospital. In those days they were known as 'Nurse'. One Trained nurse, was employed in March, and a second employed six months later. They worked in the now CBD, ie from Spencer Street to Spring Street and from Victoria Parade to Flinders Street. From its inception the Society was at the forefront of health care and only attended patients seen by a Doctor. They provided high quality nursing care; educated their patients in the curing and prevention of disease; teaching the importance of cleanliness, ventilation and good nutrition, both by verbal instruction and demonstration, even supplying soup and milk when needed. At that time they walked the streets and lane ways amid the slums of inner Melbourne carrying their nursing bag containing lotion, ointments, powders, liniment, bandages, dressings, a case of spirits, and the Nurse's own clean apron, soap and small towel. They supplied equipment on loan, such as earthenware hot water bottles, splints, urinals, bed pans, bed cradles, feeding mugs, and air-cushions as well as providing blankets and clean bed linen, and nightdresses as necessary. Trained midwives began home births in late 1893 taking midwifery bundles and providing clothes for the babe and mother as needed. This was arduous work, particularly in the heat of summer. Permission to use bicycles was given to the Nurses in 1898 and the Society decided to purchase their own in 1903. A business man offered ‘new free wheel’ bicycles at £13 each which included maintenance for one year. Bells and wooden frames were added, at a cost of £5 per frame, so the Nurses could carry extra equipment. Nurses’ bags were strapped to the handlebars. Soup was made for those in need 2-3 times a week and if patients could not arrange to have it collected the soup was delivered by the Nurses on their bicycles. The use of bicycles caused a change in uniform, with white pith helmets, and veils covering them and tied under their chin, now being used. Over the years the Nurses complained their veils became wet in the rain and asked for a change of uniform but this did not occur until 1921. Bicycles continued to be used in inner areas until 1945. The Nurses provided high quality nursing care to a range of people often in destitute situations, some lying on rags on the floor as they had no bed, others with just a bed and maybe a thin blanket, a chair and nothing else. Their ages ranged from babes, children, adults to the elderly. The Nurses gave medications as ordered by a Doctor, dressed wounds e.g. to the injured, and surgical cases, and to those with leg ulcers; attended to patients with ‘surgical ailments’ such as ‘hip disease’; gave care to those with acute illnesses such as bronchitis, pleurisy, pneumonia, measles, and scarlet fever, as well as those with chronic illnesses such as consumption (tuberculosis), heart disease, arthritis, cancer, debility, neuritis and paralysis. The Nurses liaised with the person's Doctor. They educated their patients, and their Carers, in the curing and prevention of disease; teaching the importance of hygiene, cleanliness, ventilation and good nutrition. They taught them, by verbal instruction and demonstration, how to make poultices, to make and apply bandages, apply medical appliances such as splints; and the Nurses supplied milk, beef tea and cooked soup when needed. As the work increased a third Nurse was employed but this was arduous work, particularly in the heat of summer and many Nurses only remained with the Society for several months. Black and white photograph of two Melbourne District Nursing Society (MDNS) Trained nurses, 'Nurse', wearing their full length grey uniforms, with white collar, cuffs and belt, and white pith helmets with a Maltese cross applied. One Nurse is standing and holding her bicycle, while the other is kneeling and holding a small child. They are in the garden behind a horizontal weatherboard house. A man dressed in dark clothes is also kneeling beside the child. There is a child, dressed in white, in the doorway of the home, and a lady, dressed in a full length black dress and a white apron, is standing in front of the wooden fence in the garden. The bicycle has two large wire spoked wheels at either end of the black V shape bicycle frame; a rubber tyre runs around the outside of each wheel. The metal handlebars are a horizontal configuration and are attached with a central column into a black vertical column at the front of the V shape bicycle frame which has ‘fork shaped’ thin metal pierces running down either side of the wheel attaching the frame to the central hub of the wheel. The rear wheel is attached the same way to a central column at the rear of the frame which runs up to V shape solid seat. At the bottom of the V of the frame a pedal is attached with a rotating arm on either side of the bicycle and on the right side the rotating arm is attached to a sprocket which has a chain running around it back to a smaller sprocket on the hub of the back wheel. The chain has a thin metal guard over it. There are narrow thin metal mud guards running a short distance above the top of each wheel.melbourne district nursing society, mdns, mdns uniforms, mdns transport, rdns, royal district nursing service -
 Royal District Nursing Service (now known as Bolton Clarke)
Photograph - Photograph, black and white, c.1960
This photograph shows the Melbourne District Nursing Service (MDNS), Headquarter and Nursing Home at 452 St. Kilda Road, Melbourne. The cars in front of the building are part of the MDNS fleet of cars and are Australian built Holden vehicles of the 1960s. The MDNS Trained nurses (Sisters) seen are wearing their grey uniform coats and hats which had a red Maltese cross in the centre front. Under their coats the Sisters wore grey cotton frocks. The Melbourne District Nursing Service (MDNS) building at 452 St. Kilda Road, Melbourne was originally called 'Airlie Mansion', the childhood home of Stanley Melbourne Bruce, the Prime Minister of Australia 1923-1929. 452 St. Kilda Road, Melbourne is listed on the Victorian Heritage Register. 'Airlie' was used by Queen Victoria Memorial Hospital nurses as a Nurses Home prior to Melbourne District Nursing Service (MDNS), moving into this building as their Headquarters and Nursing Home in 1953. MDNS was given Royal patronage in 1966 and continued to occupy the building as Royal District Nursing Service (RDNS) until 1996. Royal District Nursing Service (RDNS) has had various modes of transport over the last 130 plus years. At first, from 1885 as Melbourne District Nursing Society (MDNS), their Trained nurses (Nurses) walked the streets and lane ways amid the slums of central Melbourne. As the Society expanded public transport was used, and bicycles were bought by the Society in 1903 and used in inner areas until 1945. During the Spanish flu epidemic, in 1919, MDNS appealed for assistance to procure Motor vehicles so the Nurses could visit an influx of cases. Through trusts, grants and donations four 'Ford T Model' cars were procured which enabled the Nurses to triple their visits. Through constant use the cars were in such a poor state they were sold in 1927. A Motor Auxiliary was formed in 1929 to take Sisters to patients, and some Sisters used their own cars; even a motorcycle was used by one Sister in 1933. All these forms of transport were intermingled and in the early 1950s, and now as Melbourne District Nursing Service, seven Ford Prefect cars were bought followed by twelve Ford Anglia cars 1955. Having received Royal patronage; the now Royal District Nursing Service (RDNS) had its own fleet of Holden vehicles by the mid 1960s and the Motor Auxiliary ceased operating in 1971 as by then all staff employed were required to have a driving licence. Seat-belts had been introduced to Victoria in 1959 and District fitted them to their cars from 1962, even though they did not become compulsory until 1970. The Holden vehicles were replaced with grey Holden Torana vehicles. After several years the fleet was changed to white Toyota Corolla vehicles. The Melways Directory of maps was introduced in 1966, which was a boon to the Sisters though it was a few years before it went beyond Seville, so a large paper map was used by the Sisters visiting patients in the areas passed Seville. By 2009 there were 598 cars in the fleet and the Sisters travelled 9 million 200,000 kilometres – this is equivalent to 12 trips to the moon and back. Black and white photograph of two Melbourne District Nursing Service (MDNS) Holden vehicles parked outside MDNS Headquarters, which is seen in the background of the photograph. To the right is a MDNS Sister, who is wearing her grey peaked hat over her drawn back long hair. and is wearing her grey coat and carrying a square nursing case with the capital letters 'RDNS' written on it; she is standing side-on, looking to her left, and her right hand is on the door handle of the front door of the right hand car. To her left is another car, with a MDNS Sister standing on the grass behind the bonnet. She is wearing glasses and her uniform hat is worn over short dark hair. She is wearing a grey coat, scarf and both gloved hands are holding the handles of bags. On the drivers door of this car the words 'Melbourne District Nursing Service' are written in capital letters. On the far left hand side of the photograph, half of a third Holden vehicle is seen and a large tree is on the nature strip between this and the middle car. Behind the vehicles, bushes and a large tree can be seen on the left hand side behind the cast iron fence. Several other bushes and small trees are seen. In the background is MDNS Headquarters; a large white two storey Italian style building, which has three, roman column, arched Arcadia on either side of a polygon shaped bay window on the ground floor, and three long windows to the left and a three arched Arcade to the right on the second floor. Two Sisters in uniform are standing on the veranda of the 2nd floor between the far right hand arch. To the left and right of the building, parts of single storey hip roof buildings can be seen.melbourne district nursing service, mdns, rdns, royal district nursing service, rdns headquarters, rdns transport, mdns uniforms -
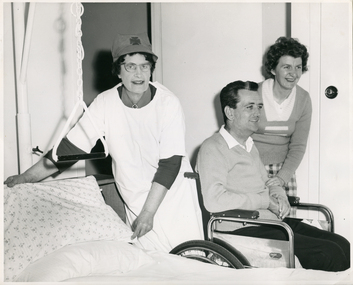 Royal District Nursing Service (now known as Bolton Clarke)
Photograph - Photograph, black and white, 30 06 1965
The MDNS Sister has given nursing care to the gentleman and has transferred him safely into the wheelchair. Whilst doing this the Sister demonstrated the transfer technique to the lady in the photograph who is probably his wife. The Sister is wearing the MDNS uniform of the day, a grey cotton dress and red cardigan, under her white gown. She has a red Maltese cross applied to the centre of her grey peaked hat.From its founding in 1885 the Hospital Trained nurses of the then named Melbourne District Nursing Society (MDNS), later named Royal District Nursing Service (RDNS) gave high quality nursing care to patients in their own homes. They nursed patients referred by Hospitals and General Practitioners giving treatments, such as injections, wound care and doing many other procedures, as well as assisting them with 'general care' when required. The Sisters needed to transfer the patients when required and also taught family members safe transferring techniques to enable them to care for their loved ones. RDNS employed a Physiotherapist who taught staff the correct techniques, not only for safety of the patient, but to reduce physical strain on patient’s family members and the RDNS nursing staff . Where possible the Sisters worked towards independence, using equipment such as shower seats, rails and hand showers. The Sisters liaised with the patient's Doctor and supported and advised the patient and Carer of any further help to assist them.On the left of the black and white photograph is a Melbourne District Nursing Service, (MDNS) Sister, who is wearing glasses and is looking at the camera. She is wearing a white gown over her uniform, with the grey collar and the dark sleeves of her cardigan in view and her grey peaked hat, with an emblazoned Maltese cross in the centre front, sits over her short dark curly hair. Both of her arms are extended and resting on either side of a pillow she is straightening. The Sister is standing next to wheelchair bound man who has short dark hair and is wearing dark trousers and a light coloured jumper. On the right hand side of the wheelchair a lady, wearing a light blouse, grey jumper and tartan skirt, is standing with her left hand resting on the left arm of the man.They are both smiling and looking slightly towards the right in the photograph A 'monkey bar hand grip' is attached to the bed by a pole and hangs on a white chair over the bed. A window covered by a blind is behind the Sister, with a light curtain to the left..Photographers stamp. Quote No. DW 84mdns, melbourne district nursing service, patient care, rdns, royal district nursing service -
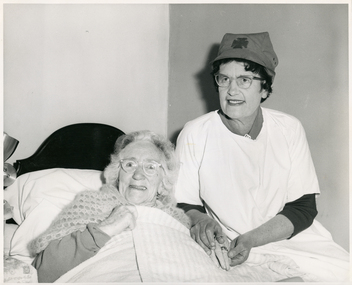 Royal District Nursing Service (now known as Bolton Clarke)
Photograph, 30 06 1965
The Melbourne District Nursing Service (MDNS) Sister is massaging the left hand of the patient. The Sister is wearing her grey cotton uniform dress and red cardigan under her white gown. A red Maltese cross emblazoned on her peaked hat. The Trained nurses of the Melbourne District Nursing Society (MDNS), later known as Royal District Nursing Service (RDNS), visited patients in their home and gave best practice care in many fields of nursing, and to people of many cultures, throughout its 130 years of expansion. Initial visits not only assessed the specific nursing situation but the situation as a whole. Their patients ranged in age from babes, children, adults to the elderly and referrals were taken from Hospitals, General Practitioners and allied Health facilities. Some of the care the Sisters provided is as follows: – Post-Natal care given to mother and babe, Wound Care following various types of surgery, accidents, burns, cancer, leg ulcers etc. Supervising and teaching Diabetic Care, including teaching and supervising people with Diabetes to administer their own Insulin, and administering Insulin to those unable to give their own injections. Administering other injections and setting up weekly medication boxes. The Sisters performed Catheterizations on adults suffering from conditions such as Quadriplegia, Paraplegia, Multiple Sclerosis (MS), Motor Neurone Disease (MND) and Guillan-Barre Syndrome, and when required at school on children for e.g. those with Spina Bifida. The Sisters visited those requiring Cystic Fibrosis support and care; those requiring Haemo-Oncology care, including visiting children at school; those requiring Home Enteral Feeding care, and those requiring IV therapy at home and home Dialysis. Palliative Care was given including pain relief with the use of syringe drivers, personal care as needed, and advice and support to both patient and family. The Sisters provided Stoma management to those needing Urostomy, Ileostomy and Colostomy care and those requiring Continence care. HIV/AIDS nursing care was provided; visits to Homeless Persons were made. Personal care was given to patients ranging in age and with varying mobility problems, such as those with MS, MND, Guillan-Barre Syndrome, Poliomyelistis, Quadriplegia, Paraplegia, Acquired Brain Injury, to those following a Cerebrovascular Accident (Stroke), those with severe Arthritis and those with a form of Dementia. When necessary the elderly were assisted with personal care and advice given on safety factors with the use of hand rails, bath or shower seats, and hand showers. Rehabilitation with an aim towards independence remained at the forefront of the Sister’s minds and when possible using aids and instruction on safe techniques enabled the person to become fully independent. All care included giving advice and support to the patient and their Carers. The Sisters liaised with the persons Doctor, Hospital and allied Health personal when necessary.On the left of the black and white photograph is a a lady laying in her bed, and to her right is a Melbourne District Nursing Service, (MDNS), Sister sitting beside her. The Sister is wearing glasses, and has a white gown over her uniform; with the grey collar of her uniform and dark sleeves of her cardigan in view. The Sister is wearing her grey peaked uniform hat, with a Maltese cross emblazoned in the centre front, over her short dark curled hair. The Sister has her hands on the left hand of the lady, who is wearing glasses, has white curly hair, and is wearing a crocheted shawl over her grey nightgown. Her head is resting on the pillow on her bed which has a dark bedhead, .Light coloured bedding covers most of her body.Photographers stamp and 'Quote No. DW 86'mdns, melbourne district nursing service, mdns patient care -
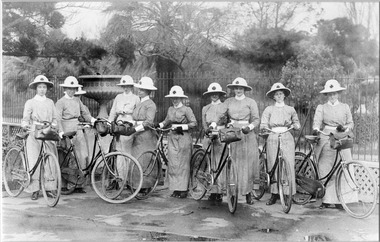 Royal District Nursing Service (now known as Bolton Clarke)
Photograph - Photograph, black and white, 1907
This photograph was taken four years after bicycles were purchased by the Melbourne District Nursing Society (MDNS) and is a record of the first mode of transport used by their Trained nurses, and a record of the change of head ware needed now bicycles were in use. The uniforms were grey with white collar, belt and cuffs and a red Maltese cross was in the centre of the pith helmet. Prior to the use of bicycles the trained nurses walked to their patients and had become exhausted, particularly in summer. The bicycles were a solution to this problem, and now they could visit more patients and the Society's areas (districts) could be extended. In February 1885, 50 years after Melbourne was founded, it was recognized that nursing care was needed for the sick poor in inner Melbourne. The Melbourne District Nursing Society (MDNS), the first such Society in Australia, was founded with one Trained nurse, called 'Nurse' in those days, and a second employed six months later. They worked in the now CBD, ie from Spencer Street to Spring Street and from Victoria Parade to Flinders Street. From its inception the Society was at the forefront of health care. They provided high quality nursing care; educated their patients in the curing and prevention of disease; teaching the importance of cleanliness and good nutrition, both by verbal instruction and demonstration, even supplying soup and milk when needed. At that time they walked the streets and lane ways amid the slums of inner Melbourne carrying their nursing bag containing lotion, ointments, powders, liniment, bandages, dressings, a case of spirits, and the Nurse's own clean apron, soap and small towel. They supplied equipment on loan, such as earthenware hot water bottles, splints, urinals, bed pans, bed cradles, feeding mugs, and air-cushions as well as providing blankets, clean bed linen, and nightdresses as necessary. Trained Midwives began home births in late 1893 taking midwifery bundles and providing clothes for the babe and mother as needed. This was arduous work, particularly in the heat of summer. Permission to use bicycles was given to the Nurses in 1898 and the Society decided to purchase their own in 1903. A business man offered ‘new free wheel’ bicycles at £13 each which included maintenance for one year. Bells and wooden frames were added, at a cost of £5 per frame, so the Nurses could carry extra equipment. Nurses’ bags were strapped to the handlebars. Soup was made for those in need 2-3 times a week and if patients could not arrange to have it collected the soup was delivered by the Nurses on their bicycles. The use of bicycles caused a change in uniform, with white pith helmets, and veils covering them and tied under their chin, now being used. The Nurses provided high quality nursing care to a range of people, often in destitute situations, some lying on rags on the floor as they had no bed, others with just a bed and maybe a thin blanket, a chair and nothing else. Their ages ranged from babes, children, adults to the elderly. The Nurses gave medications as ordered by a Doctor, dressed wounds e.g. to the injured, and surgical cases, and to those with leg ulcers; attended to patients with ‘surgical ailments’ such as ‘hip disease’; gave care to those with acute illnesses such as bronchitis, pleurisy, pneumonia, measles, and scarlet fever, as well as those with chronic illnesses such as consumption (tuberculosis), heart disease, arthritis, cancer, debility, neuritis and paralysis. Over the years the Nurses complained that their veils became wet in the rain and asked for a change of uniform but this did not occur until 1921. Bicycles continued to be used in inner areas until 1945. Black and white photo of a group of ten (one partially hidden at rear) Melbourne District Nursing Society (MDNS) trained nurses, with each standing with their bicycles in front of a spiked metal fence.The Nurses are wearing their MDNS uniform long grey frocks with white collar, cuffs and belt and white pith helmets with a central Maltese cross. Nursing bags are strapped to five of the bicycles. A large pedestal urn is seen to the left behind the fence between the 3rd and 4th nurse. Bushes and trees are seen in the background. melbourne district nursing society, mdns, nurses, uniforms, mdns transport, mdns equipment, rdns, royal district nursing service -
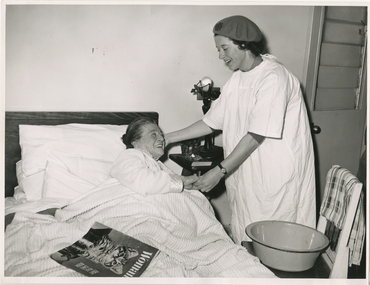 Royal District Nursing Service (now known as Bolton Clarke)
Photograph - Photograph, black and white, c.1960
A Melbourne District Nursing Service (MDNS) Sister is giving nursing care to a lady in her own home. The Sister is wearing the grey uniform dress of that era under her gown. Her grey beret has a red Maltese cross applied to its centre front. The Trained nurses of the Melbourne District Nursing Society (MDNS), later known as Melbourne District Nursing Service and from 1966 Royal District Nursing Service (RDNS), visited patients in their home and gave best practice care in many fields of nursing, and to people of many cultures, throughout its 130 years of expansion. Initial visits not only assessed the specific nursing situation but the situation as a whole. Their patients ranged in age from babes, children, adults to the elderly and referrals were taken from Hospitals, General Practitioners and allied Health facilities. Some of the care the Sisters provided is as follows: – Post-Natal care given to mother and babe, Wound Care following various types of surgery, accidents, burns, cancer, leg ulcers etc. Supervising and teaching Diabetic Care, including teaching and supervising people with Diabetes to administer their own Insulin, and administering Insulin to those unable to give their own injections. Administering other injections and setting up weekly medication boxes. The Sisters performed Catheterizations on adults suffering from conditions such as Quadriplegia, Paraplegia, Multiple Sclerosis (MS), Motor Neurone Disease (MND) and Guillan-Barre Syndrome, and when required at school on children for e.g. those with Spina Bifida. The Sisters visited those requiring Cystic Fibrosis support and care; those requiring Haemo-Oncology care, including visiting children at school; those requiring Home Enteral Feeding care, and those requiring IV therapy at home and home Dialysis. Palliative Care was given including pain relief with the use of syringe drivers, personal care as needed, and advice and support to both patient and family. The Sisters provided Stoma management to those needing Urostomy, Ileostomy and Colostomy care and those requiring Continence care. HIV/AIDS nursing care was provided; visits to Homeless Persons were made. Personal care was given to patients ranging in age and with varying mobility problems, such as those with MS, MND, Guillan-Barre Syndrome, Poliomyelitis, Quadriplegia, Paraplegia, Acquired Brain Injury, to those following a Cerebrovascular Accident (Stroke), those with severe Arthritis and those with a form of Dementia. When necessary the elderly were assisted with personal care and advice given on safety factors with the use of hand rails, bath or shower seats, and hand showers. Rehabilitation with an aim towards independence remained at the forefront of the Sister’s minds and when possible using aids and instruction on safe techniques enabled the person to become fully independent. All care included giving advice and support to the patient and their Carers. The Sisters liaised with the persons Doctor, Hospital and allied Health personal when necessary.Black and white photograph of a Melbourne District Nursing Service (MDNS), Sister attending a lady in the bedroom of her home. The Sister, who is smiling, is wearing a white gown over her grey uniform with part of the collar visible, and her grey uniform beret over her short dark hair. She is standing to the right of the bed looking at the lady, and has her right arm extended touching the pillow on the bed. With her other hand she is holding the right hand of the lady. The lady, who is smiling, has short dark swept back hair and is lying on her left side against two pillows on the bed; she is covered with light coloured bed coverings, A metal type, pale colour with dark rim, wash basin is sitting on a white wooden chair to the front of the Sister. A towel is hanging over the back of the chair. On the bottom left of the bed is a magazine with the word 'Woman' and below this a picture of a cat, on its cover. A small table with a lamp on it is behind the Sister and part of a concertina door to her rear right.Photographer Stamp. Quote No. 2568melbourne district nursing service, mdns, mdns patient care -
 Royal District Nursing Service (now known as Bolton Clarke)
Photograph - Photograph, black and white, c.1960
The occasion of the photograph is unknown, but it depicts a group of Melbourne District Nursing Service (MDNS) Sisters with Matron Tupper. She is wearing the Matron uniform of a white frock and veil and a red cape. The Sisters are wearing their grey MDNS uniforms and one is wearing a uniform red cardigan. The Sisters peaked hats have a red Maltese cross applied in the centre front.From its foundation in 1885 the Melbourne District Nursing Society (MDNS), were instrumental in giving nursing care to patients in their own homes, and to assist them if they had financial problems or resided in poor living conditions. Miss Dorothy Tupper who, as a Trained nurse, had undertaken a course in hospital housekeeping at London Prince of Wales Hospital, was contacted by MDNS in 1939 and, possessing both business and humanitarian qualities, was asked to organize their newly established Social Service Department. As the MDNS Social Service Sister, she assessed the living conditions in patient's homes. She continued in this role until being appointed Matron of the Society's District Nursing division in 1941; a role she continued in until her retirement at the end of 1962.Black and white photograph of a group of seven Melbourne District Nursing Service (MDNS) Sisters and Matron Tupper with two men and four ladies standing in two rows in front of a brick house which has a tiled roof. To the left in the back row is a gentlemen with dark hair, who is wearing a dark suit, then two MDNS Sisters, next is a lady who is wearing glasses and is dressed in a light colour coat and hat. To her right is a tall MDNS Sister wearing dark rimmed glasses, then a lady with dark curly hair looking over the shoulder of a man with grey hair who is wearing a dark suit; on his right is Matron Tupper, who is wearing her white nursing uniform, her dark cape, and white veil over her short dark curled hair. In the left front is a Sister; to her right is a lady with dark curly hair and wearing a light coloured coat over a dark skirt and jumper; then a lady with blonde curly hair who is wearing a dark coat over her light dress and is carrying a handbag. Three Sisters are to her right - the end one is wearing glasses and a dark cardigan over her grey uniform frock The other MDNS Sisters in the group are wearing their grey uniform coats over their partly seen grey uniforms. All the MDNS Sisters are wearing grey uniform peaked hats. A three storey building is to the left rear of the photograph and and parts of three other buildings behind and to the right of the house.melbourne district nursing society, mdns, mdns social service department, mdns matron, matron dorothy tupper -
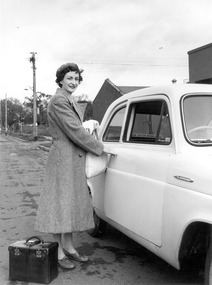 Royal District Nursing Service (now known as Bolton Clarke)
Photograph - Photograph, black and white:, 1952
This photograph depicts the style of MDNS uniform worn at that time, which was a grey cotton dress and red cardigan, over which was a woolen grey coat. The beret was of grey felt and had a red Maltese cross attached to the centre. Sister Wilson is about to enter her MDNS car, which was one of the early cars in the MDNS fleet, to drive to a patient to give nursing care.Royal District Nursing Service (RDNS) has had various modes of transport over the last 130 plus years. At first, from 1885 as Melbourne District Nursing Society (MDNS), their Trained nurses (Nurses) walked the streets and lane ways amid the slums of central Melbourne. As the Society expanded public transport was used, and bicycles were bought by the Society in 1903 and used in inner areas until 1945. During the Spanish flu epidemic, in 1919, MDNS appealed for assistance to procure Motor vehicles so the Nurses could visit an influx of cases. Through trusts, grants and donations four 'Ford T Model' cars were procured which enabled the Nurses to triple their visits. Through constant use the cars were in such a poor state they were sold in 1927. A Motor Auxiliary was formed in 1929 to take Sisters to patients, and some Sisters used their own cars; even a motorcycle was used by one Sister in 1933. All these forms of transport were intermingled and in the early 1950s, and now as Melbourne District Nursing Service, seven Ford Prefect cars were bought followed by twelve Ford Anglia cars 1955. Having received Royal patronage; the now Royal District Nursing Service (RDNS) had its own fleet of Holden vehicles by the mid 1960s and the Motor Auxiliary ceased operating in 1971 as by then all staff employed were required to have a driving licence. Seat-belts had been introduced to Victoria in 1959 and District fitted them to their cars from 1962, even though they did not become compulsory until 1970. The Holden vehicles were replaced with grey Holden Torana vehicles. After several years the fleet was changed to white Toyota Corolla vehicles. The Melways Directory of maps was introduced in 1966, which was a boon to the Sisters though it was a few years before it went beyond Seville, so a large paper map was used by the Sisters visiting patients in the areas passed Seville. By 2009 there were 598 cars in the fleet and the Sisters travelled 9 million 200,000 kilometres – this is equivalent to 12 trips to the moon and back. Black and white photograph of Sister Jill Wilson of the Melbourne District Nursing Society (MDNS) about to enter her work car. Sister Wilson is wearing her winter uniform, with a light grey beret over her short dark curled hair, and a long light grey coat which has lapels. She is standing side on, and to the left of the partially seen small white car. She is smiling and looking at the camera. Her right arm is extended with her hand on the handle of the partially opened car door and she is holding a white bag and cloth in her left hand. At her feet is her dark coloured, square shaped, nursing case which has a leather strap around the middle and two light coloured clasps each end, as well as a thick hard handle on the top. She is standing on the road and to her left, on the grass, are two lamp posts; small bushes can be seen as well as two trees in the distance. Two dark coloured buildings, one with a hip roof and one a flat roof, can be seen behind the car. rdns, motor vehicle, nurse, uniform, melbourne district nursing society, mdns, rdns transport, royal district nursing service, sister jill wilson -
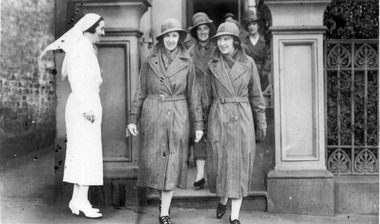 Royal District Nursing Service (now known as Bolton Clarke)
Photograph - Photograph, black and white:, 1934
The District nurses are leaving from their Melbourne District Nursing Society (MDNS) Nurses Home, which was situated at 39 Victoria Parade, Collingwood. Their MDNS uniform dresses and coats depicted are grey, and a red Maltese cross is attached to the centre of the headband on their grey brimmed hats. The Sisters will visit MDNS patients and provide nursing care to them in their homes.From its founding in 1885 until 1891 the Trained nurses (Nurses) of the Melbourne District Nursing Society (MDNS) worked from their own homes which were located in the vicinity of their areas (districts). In November 1891 MDNS was able to rent a two story terraced house at 66 Cardigan Street, Carlton, at £65 a year, which contained accommodation for three Nurses and one pupil nurse as well as being used as their Headquarters. They left from their Nurses Home each morning and returned at the end of their shift to write up their book work before retiring for the day. Three years later they moved into a larger terraced house at 49 Drummond Street Carlton which was rented at ‘a very moderate rental’. There was a Board room, apartments for the Nurses and pupil nurse, a large dispensary which patients could attend each evening to have prescriptions signed and bottles refilled with ‘homely remedies’ and elixirs, which were administered for e.g. to Consumptive cases. Doctor’s prescriptions were filled at the Pharmacy. Cupboards containing donated blankets and bedclothes for needy patients were kept in this room, and it was here where the Nurses kept their equipment and nursing bags which were refilled at the end of each shift ready for any emergency, and for the next day. A list of Doctors the Nurses could call was kept by the telephone. The home also had a kitchen where nourishing soup was made and distributed twice a week to the needy. Milk was also distributed when needed. In 1902 they moved into rented premises at 188 Leicester Street, Carlton and two years later, in 1904, to premises at 5 Royal Terrace, Nicholson Street, Fitzroy. They remained there for ten years and an Auction of furniture was held before their next move giving an idea of some of the contents: - Carpets, linoleum, walnut and oak sideboards, dining tables, walnut dining suite, Vienna chairs, walnut bedroom suite, cedar wardrobes, chests of drawers, duchess chests, bedsteads and bedding and general furnishings were for sale. In June 1914 at last the Society had sufficient funding to purchase their own terraced premises, ‘Floraston’ 39 Victoria Parade, Collingwood which was their Headquarters and Nurses Home. In 1926 the After-Care Home for recovering patients, (later called After-Care Hospital) was built by the Society next door, at 45 Victoria Parade; the District nurses continued to live at No. 39. In November 1953 the District Nursing Division moved into their new Headquarters and Nurses Home at 452 St. Kilda Road, Melbourne. In 1957 the two divisions legally separated and the District division became the Melbourne District Nursing Service. As District expanded, and now with outlying districts to service, and with a fleet of District cars, their trained nurses (Sisters) lived in their own homes and visited their closest District Centre each morning to collect their work for the day, and returned at the end of their shift to do their administrative work. A small black and white photograph showing a side on view of Matron Lydia Shaw who is smiling. She is standing outside the Nurses Home of the Melbourne District Nursing Society (MDNS), and is wearing a white long sleeved belted uniform dress, white stockings, shoes, and a veil over her short dark hair.. She is standing to the left, outside the front gate of the building watching a group of district nurses about to leave the Home. The group are on a path behind the four trained nurses (Sisters) most visible who are dressed in grey belted long sleeved coats which have lapels. They are wearing grey brimmed hats with a Maltese cross in the centre, flesh coloured stockings and black shoes. The first two Sisters are side by side and have just stepped onto the pavement; the one to the right is smiling and slightly turned toward Matron Shaw. Under their coats, both these Sisters are wearing grey scarves around their necks. There is a square concrete column behind Matron Shaw, and another to the right of the nurses. From the right column three metal vertical fence bars are seen with shrubs behind them. Part of a building and doorway can be seen behind the nurses. A brick wall and path is seen on the far left of the photograph.The date 1934 as well as the name of Matron Shaw, Sister Jones and Sister Tupper were hand written on the back of the photographnurses, matron, uniform, melbourne district nursing society, mdns, nurses home, rdns, royal district nursing service, matron lydia shaw, sister dorothy tupper, sister jones