Showing 1442 items
matching photo shop
-
 Ballarat Tramway Museum
Photograph - Digital image Set of 16, George Coop, 1968 - 1970
Yields information about the Depot and how equipment was provided in the depot and some of the tramcars.Sixteen Digital images taken by George Coop during the period 1968 - 1970, of SEC trams at the Depot and workshops in Wendouree Parade. .1 - 36 in depot with chain block, chains, jacks and other equipment in the view. .2 - view of the inspection pit on 4 road with the large jack in the pit. .3 - 39 on "0" road - photo has been "framed" with a blue line. .4 - 26 in the paint and wood shop area of the workshops. .5 - 43 in the depot. .6 - 42 and the 1 road pit. .7 - ditto, with a window cleaner - photo has been "framed" with a blue line. .8 - 35 and 36 .9 - roof top view - photo has been "framed" with a blue line. .10 - 27 and many spare wheels in the view, along with jacks. .11 41 and other trams showing the pit, spare parts and equipment - photo has been "framed" with a blue line. .12 18 at the front of the depot. .13 View of a 22E bogie with autumn leaves .14 - as for .4, - photo has been "framed" with a blue line. .15 - Scrubber car on "0" road and lots of autumn leaves. .16 - View of the depot view with 39 on "0" road and 18 on "3" road. trams, tramways, depot, workshops, scrubber tram, tram 36, tram 27, tram 41, tram 18, tram 39, scrubber, tram 39, tram 26, tram 43, tram 42, tram 35, tram 36 -
 Ballarat Tramway Museum
Photograph - Black & White Photograph/s set of 2, Charles Craig, 1950s
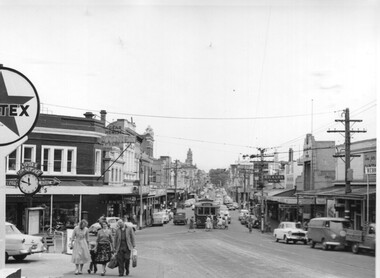
Yields information about the traffic and appearance of Bridge St during the 1950's.Set of two black and white photographs of trams in Bridge St at the intersection with Main Road and Victoria St .1 - tram at the intersection with Stones Corner and other shops in the background. Includes the Caltex services station, the Listers for Service clock and direction sign, with many people leaving the tram and walking along Victoria St. Has the Gear Chemist, Ricksha Paint and other shops in the view. .2 - No. 28 - for Gardens via Sturt St West and the intersection. Photo possibly early 1950's. Both photos by Charles Craig trams, tramways, bridge st, main road, victoria st, tram 28 -
 Ballarat Tramway Museum
Photograph - Black & White Photograph/s, Charles Craig, 1971
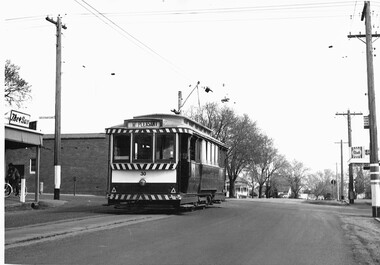
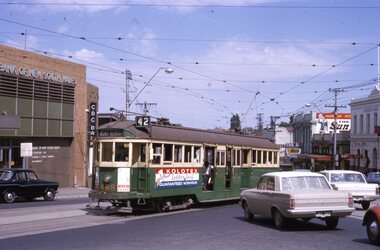
Yields information about the Mt Pleasant terminus just before the closure of the SEC operated system,Black and white photographs of No. 30 at the Mt Pleasant terminus, with the shops on each corner in the view. Adverts for The Sun, Streets Ice Cream. Pole on the right hand side has a "Car Stop Here" and "End of Section" sign. Tram has the destination of Mt. Pleasant. Photo by Charles Craig, probably August 1971.trams, tramways, barkly st, mt pleasant, signs, tram 30 -
 Ballarat Tramway Museum
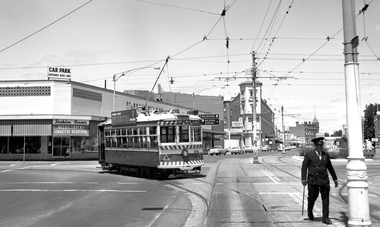
Photograph - Black & White Photograph/s, Charles Craig, Aug. 1971
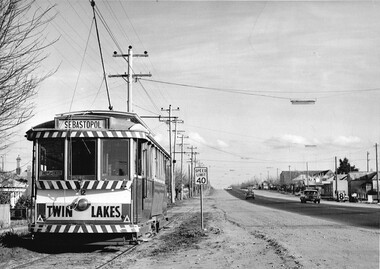
Yields information about tram operations in Albert St Sebastopol and the Grey St crossing loop.Black and white photograph of No. 12 about to enter the Grey St loop, Albert St. Alongside the tram is a 40mph speed limit sign, Albert St shops and a Forest City signal. Photo by Charles Camera, at the time of the first closure of the Ballarat system, 23/8/1971 when the Victoria St line closed.trams, tramways, albert st, grey st loop, sebastopol, tram 12 -
 Ballarat Tramway Museum
Slide - 35mm slide/s, Keith Caldwell, 8/03/1960 12:00:00 AM
Yields information about the Sturt St City tram stop in 1960 and the background buildings.Agfa colour slide, white cardboard mount, photo by Keith Caldwell on 8/3/1960 of: Tram 31 at the tram stop, Sturt and Lydiard Streets with an Inspector walking away from the stop. Has the National Mutual Association, V& L Hairdressers and Berry Anderson stationary shop in the background.Stamped on bottom of slide "8 Mar 60"tramways, trams, sturt st, city, tram 31 -
 Ballarat Tramway Museum
Slide - 35mm slide/s, Keith Caldwell, 8/03/1960 12:00:00 AM
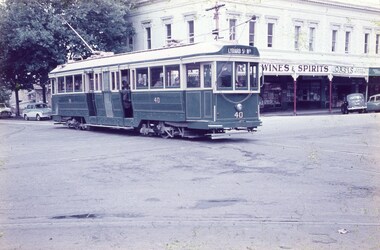
Yields information about Hospital corner and tram 40.Agfa colour slide, white cardboard mount, photo by Keith Caldwell on 8/3/1960 of: Tram 40 turning at Hospital corner from Drummed St South into Sturt St, en-route to Lydiard St North. The ?bert Wine and Spirits shop and Oasis Cake and Kitchen shop in the background.Stamped on bottom of slide "8 Mar 60".tramways, trams, sturt st, drummond st, hospital corner, tram 40 -
 Ballarat Tramway Museum
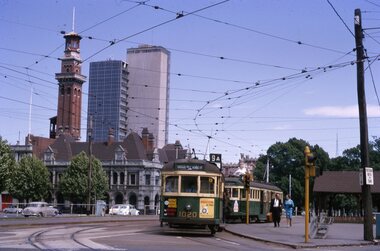
Slide - 35mm slide/s, Keith Caldwell, 12/03/1962 12:00:00 AM
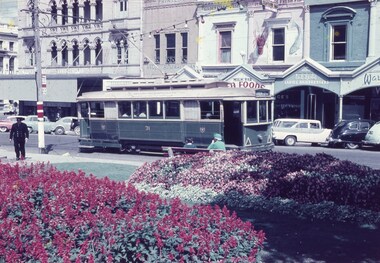
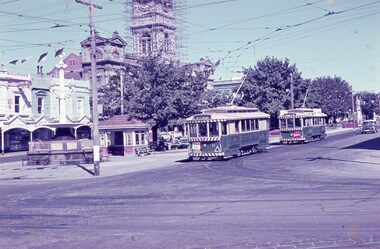
Yields information about the nature of tram services at the city terminus at Sturt and Lydiard St and the street scene at the time.Agfa colour slide, white cardboard mount, photo by Keith Caldwell on 12/3/1962 of: Trams 11 and 27 arriving at the "Tramway Centre" the city terminus. Tram 11 has the destination of Mt Pleasant and has a The Age dash canopy advertisement. No. 27 showing Victoria St and has a Briquettes dash panel advertisement. In the background is the Burke and Wills Fountain, shelter, Golden Star Chinese Cafe, Georges Sea Food shop and the Town Hall with the clock tower having scaffolding around it.In ink "Ballarat 12.3.62"tramways, trams, shelters, sturt st, lydiard st north, fountains, tram 11, tram 27 -
 Ballarat Tramway Museum
Slide - 35mm slide/s, Keith Caldwell, 12/03/1962 12:00:00 AM
Yields information about the nature of tram services and the Titanic bandstand in Sturt St.Agfa colour slide, white cardboard mount, photo by Keith Caldwell on 12/3/1962 of: Tram 18 descending the Sturt St hill to Grenville St, passing the Titanic bandstand. The tram has the destination of Mt Pleasant and roof advertisements for Whites Flower shop and a SEC Electric cooking.In ink "Ballarat 12.3.62"tramways, trams, sturt st, tram 18 -
 Ballarat Tramway Museum
Slide - 35mm slide/s, Keith Caldwell, 16/03/1963 12:00:00 AM
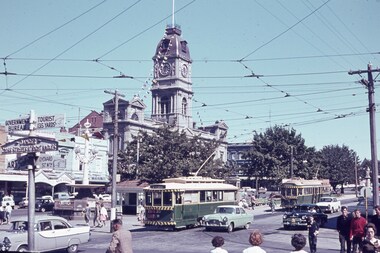
... Food shop are in the photo along with a sign on the Post Office... Hall and Georges Sea Food shop are in the photo along ...Yields information about traffic conditions at the intersection of Sturt and Lydiard St and tram operations.Agfa colour slide, white cardboard mount, photo by Keith Caldwell on 16/3/1963 of: Photo of a busy scene at the corner of Sturt and Lydiard Streets. Tram 30 for Mt Pleasant and a Twin Lakes sign is departing the City terminus while No. 36 for Lydiard St North is arriving. The Town Hall and Georges Sea Food shop are in the photo along with a sign on the Post Office steps advising the location of the Government Tourist Bureau, Art Gallery and a cast sign "Danger Cross Street at Right Angles".In ink "16.3.63"tramways, trams, sturt st, lydiard st, city, town hall, tram 30, tram 36 -
 Ballarat Tramway Museum
Slide - 35mm slide/s, Keith Caldwell, 11/03/1962 12:00:00 AM
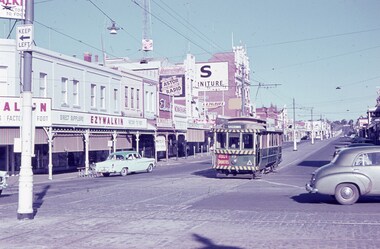
Yields information about tram 19 in Bendigo and Mitchell St and its similarities with Ballarat.Agfa colour slides, white cardboard mount, photo by Keith Caldwell 11-3-1962 of: Bendigo 19 about to cross Pall Mall in Mitchell St with the Ezywalkin shoe store in the background and other shops. Tram has the destination of Eaglehawk and has a Briquettes advert on the front dash panel. Signs include Pye, Ezywalkin, A. G. Palmers, Edmonds, Monaghans, Astor Radio and R. White.on the slide stamped in red ink "SUS23102" and in ink "Bendigo 11.3.62 Caldwell" and other pencil markings.tramways, trams, bendigo, mitchell st, tram 19 -
 Ballarat Tramway Museum
Negative, Ellis Collection?, c1950
Yields information about the appearance of the Tramway Centre stop, Town Hall and other buildings and tram 33.Negative (120 size) of the intersection of Sturt and Lydiard Streets, looking to the Town Hall with two trams at the tram stop and many motor cars. Photo c1950. Tram 33 has the destination of Mt Pleasant. In the background is the Town Hall, Berry Anderson, Fashion Shop and a wine shop advertising Penfolds Wines. Inside the shelter can be seen four clock faces - see image i3 for a crop of the original image. Item donated comprised negative 1095, Negative scanned at 3200dpi. See Reg Item 3376 for another print - noted that it was from the Ellis Collection. trams, tramways, sturt st, lydiard st, town hall, tramway centre, tram 33 -
 Ballarat Tramway Museum
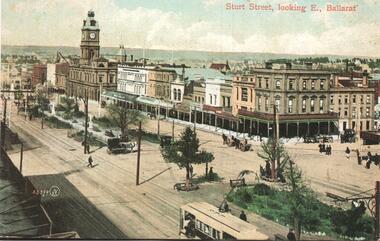
Postcard - copy, Sovereign Hill and Gold Museum, "Sturt St, looking E., Ballarat", c2000
Postcard Photo of Sturt St looking East from about Dawson St with the shops on the southern side and the Town Hall in the view. Has an ESCo tram in the bottom right hand corner. Card reproduced for Sovereign Hill Gold Mining Township by Rose Stereograph Co. of Glen Waverley c2000. Divided back type with caption, production and the Rose Co. symbol on the rear. See item 9005 for a small used black and white version with more detail of the tram.Yields information about the appearance of Sturt St following the introduction of electric trams in 1905 and has a strong association with the work of Sovereign Hill and Rose Stereograph Co.Postcard reproduction - full colour divided back unused.trams, tramways, sturt st, ballarat, esco, rose postcards -
 Ballarat Tramway Museum
Photograph - Digital image, John Ward, 2/01/1972 12:00:00 AM
Digital image of the Bendigo tram 29 turning from Pall Mall into Mitchell St with the destination of Railway Station. In the background is the Fountain Plaza, advertising Melba Frocks and Gidgette Boutique, the City Family Hotel, Park Lane chicken shop. In the foreground is the Inspector returning the point bar to its holder on a pole. Photo by John Ward 2-1-1972. Slide title "04771 020172 7210-F SECV Birney tram 29 Pall Mall to Mitchell St at High St & View St Charing Cross Bendigo Vic"trams, tramways, bendigo, pall mall, mitchell st, charing cross, tram 29 -
 Ballarat Tramway Museum
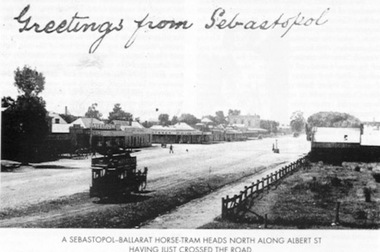
Book, E.D. Jenkins and Lloyd Jenkins, "Sebastopol Victoria - A Historical Survey of Early Sebastopol - 1864- 1964", 1989
Book - 92 pages plus card covers, a historical survey of the Sebastopol district. Originally written by E.D. Jenkins for the Borough of Sebastopol's centenary in 1964, reprinted with additional text by Lloyd Jenkins to recognise the 125th anniversary of the Borough covering the years 1965 to 1989. Book covers mining history, churches, the Borough Council, early days of the district and various points, eg cabmen, horse trams and electric trams, schools, the Mechanics Institute, various clubs, fire brigade, hotels, industries, and programme of events to celebrate the centenary. The second part of the book, covering the period is laid out in a chronological order with forward by Cr. Donald, the Mayor with many photographs. Centre page has a large map of the district showing the many mines, leads, roads and other historic locations. Tramway photos are horse tram No. 7, ESCo 17 at depot (all on file) and a photo showing a horse tram heading north along Albert St. with the shopping centre in the background - see image. Photo taken just after the tram has crossed the roadway. Copy of the horse tram heading north along Albert St. made Oct. 2001 for the "gold, Gold GOLD" temporary exhibition - colour laser print onto card, with Velcro dots on rear. Stored in box D1 (Display Box) 02/2003. See Reg Item 3883 for another print of this photograph.On page 3 in black ink "Ballarat Tramway Museum Inc. With compliments, D.L. Jenkins 14/4/1999"trams, tramways, sebastopol, local history, public transport, mining, horse trams, esco -
 Ballarat Tramway Museum
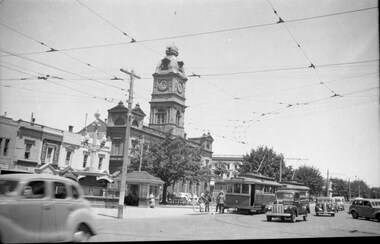
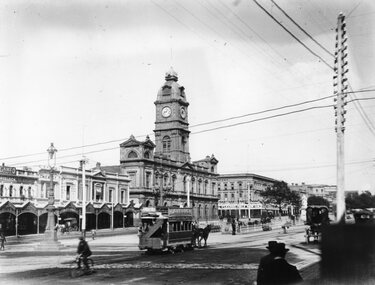
Photograph - Black & White Photograph/s, Horse Tram Sturt St, c1890
Photograph of a horse tram (possibly No. 7), with a Havelock Tobacco advertisement, travelling westbound in Sturt St. on the north side with the City of Ballaarat Town Hall (clock showing 905). Traffic in Sturt St was two-way on either side of the median strip which at the time did not extend fully between Lydiard St and Armstrong St. The photograph includes the gas street lamp in the middle of the Sturt and Lydiard Streets intersection and a telephone/telegraph pole on the right side. Several horse-drawn cabs in the photograph, along with some men. In the background are shops for Cameo Cigarettes, Tea Merchants, C Ekans? Chemist, J T Marsh Hatter, the Town Hall and Snows department store promoting a clearing sale. The photo has been taken from the Post Office Steps, c1890. State Library Multimedia Source Catalogue does not give the name of the photographer and the date of the photo. Acknowledgement of the source of the photograph is required.Yields information about Sturt St and horse trams c1890 and the use of the street in the early morning.Black and white print from the State Library of Victoria.On rear in pencil in bottom left hand corner "Copy of H92 320/106" and in centre along bottom edge "Reproduction Rights Reserved - Copied by State Library of Victoria".trams, tramways, sturt st, lydiard st. north, horse trams, ballarat town hall, two way traffic, tram 7 -
 Ballarat Tramway Museum
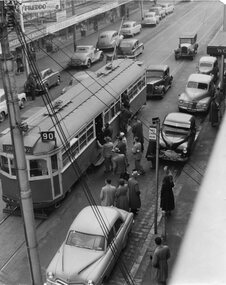
Photograph - Black & White Photograph/s, c1956
Black and white photograph of W6 994 in Smith St. Collingwood/Fitzroy, in bound on route 90 to City - Spencer St., picking up passengers at a tram stop. Pole obscuring front of tram. Tram has destination "City Spencer St" and run number "P44" Tram appears to be fairly crowded already. Photo taken c1956 with a number of motor cars in the street including some Holdens. In the background are a number of shop fronts, with signs for "Singer Sewing Machines", "Freddo frogs", "Peters Ice Cream", Davies Hardware, John Cornish. On the side of the photograph is the first part of a Woolworths store front. The address of the John Cornish, Mercer, was 205 Smith St. Fitzroy and Woolworths were at 182 -184 Smith St. Collingwood. See 1968 Sands and McDougal Director of Victoria for Smith St. details.trams, tramways, mmtb, smith st., w6 class, bourke st., tram w6 994 -
 Ballarat Tramway Museum
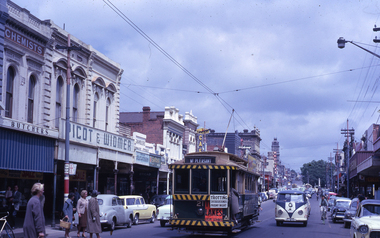
Slide - 35mm slide/s - set of 2, Noel Simons, 24/11/1962 12:00:00 AM
Set of 2 Kodachrome transparencies taken on 24/11/1962. 1163.1 - No. 21 in Bridge St., with destination of "Mt Pleasant" with a Twin Lakes advert and "Trotting Showgrounds Friday Night" auxiliary board on front dash panel. Also Picot & Widmer, chemists shop alongside tram. Tram at a stop with people boarding. 1163.2 - No. 13 and 30 crossing at the end of the double track in Sturt. St, at Grenville St. Both trams have Twin Lakes signs. Photo shows buildings either side of Sturt St.1163.1 - "No. 21 in Bridge St. Ballarat" 1163.2 - "No. 13 and 30 at foot of Sturt St. Ballarat" All have date stamp of "24 Nov. 1962" in purple ink. All black ink unless otherwise noted.tramways, trams, ballarat, bridge st, grenville st., sturt st., tram 13, tram 21, tram 30 -
 Ballarat Tramway Museum
Slide - 35mm slide/s - set of 9, Noel Simons, Sept. 1971
Set of 9 Kodak Ready-mount with slides made from the Association of Railway Enthusiast Provincial Tramways film strip. Reference Item 2560 details the ARE Film Strip, and provide references to other slides. See also Reg. item 1164. 1174.9 on plain white mount. 1174.1 - Tram 40 North bound for Lydiard St. North at the Railway Gates, with the gates closed. Tram carrying a heavy load of passengers. Railway station building and car park in background. Taken from the signal box. 1174.2 - Tram 12 bound for Gardens, photographed across the median strip plantation near Dawson St. Image i2a - adjusted 9/2021 to remove colour cast. 1174.3 - Tram 43 in bound along Wendouree Parade near Barrett Ave, passing a former tram stop and with "Warning Oncoming Trams" sign mounted on an adjacent pole. See also Reg. item 1172.1 for a photo taken in May 1971. This photo taken after the closure of the Victoria St. line, as the tram stop has been painted out. 1174.4 - Looking along the track to Sebastopol terminus on the west side of Albert St. - telephoto shot showing bogie tram in the far distance. Shows the nature of the track, poles, tram stop frequency and in the fare distance the terminus. Also show the trees that used to be along this section of the track. 1174.5 - No. 42 showing "Special" in Macarthur St. approaching Drummond St. north. Photo taken from under the verandah of a shop on the south side of the street that were many years later to become the Tramcar Restaurant. Note metal fence to cemetery. 1174.6 - Nos. 21 (Sebastopol) crossing 14 (Lydiard St. Nth) at the loop between Sayle and Grey St. Photo taken looking south. 1174.7 - No. 12 bound for Mt Pleasant, in Bridge St. about to stop at the junction for the two routes. Telephoto photo looking west along Bridge St. with many cars in the photo. Very few people on the street itself. 1174.8 - No. 30 and 17 at the City Terminus, on the north side of Sturt St. Taken from the Post Office corner with the Town Hall in the background. 1174.9 - No. 39 inbound along Sturt St. West. with many cars on the road. Bus stop on a pole on the other side of the road.1174.1 - "No. 40 on Lydiard St. North service waits at the level crossing at Ballarat Railway Station." 1174.2 - "No. 12 bound for 'Gardens' seen across the centre plantation in Sturt St." 1174.3 - "Barrett Ave." 1174.4 - "The Sebastopol route near the terminus" 1174.6 - "Nos. 21 and 14 crossing at Sayle St. Loop on Sebastopol route" 1174.7 - "No. 12 at Eastern end of Bridge St." 1174.8 - "Nos. 30 and 17 in Sturt St. at Cnr of Lydiard St." 1174.9 - "No. 39 City bound from 'Gardens" in Sturt St. West" All have date stamp of "Sep 1971" in black ink. Writing in blue ink.tramways, trams, lydiard st. nth, railway crossing, sturt st, wendouree parade, sebastopol, macarthur st., bridge st., sturt st. west, tram 12, tram 14, tram 17, tram 21, tram 30, tram 39, tram 40, tram 42, tram 43 -
 Ballarat Tramway Museum
Slide - 35mm slide/s - set of 11, Noel Simons, 23/10/1965 12:00:00 AM
Set of 11 Kodachrome transparencies taken on 23/10/1965 in Melbourne. 1178.1 - W7 1020 (on route 9A, Northcote via St Georges Road) with a W2 536 (Deepdene) behind at the corner of Victoria Parade and Brunswick St. East Melbourne or Fitzroy. Has Eastern Hill fire station and ICI building in background. 1020 has front dash panel ads for Queens Bridge Motors and Bridgestone tyres. 1178.2 - W5 759 (route 19, North Coburg) and W5 807 in Elizabeth St. Melbourne at the intersection of Bourke St. with the State Savings Bank building in the background. 759 has side ads, one of which is for CASTROL. 1178.3 -SW6 903 crossing Brunswick St. in Victoria Parade, Fitzroy bound for Deepdene, route 45. Photo taken after tram has passed photographer. 1178.4 - W7 1019 (route 96, East Brunswick Blyth St.) and W7 1010 (route 88 East Preston) in Nicholson St at intersection with Victoria Parade. A Herald newspaper truck is alongside 1019. 1178.5 - W7 1040 (route 96, East Brunswick Blyth St.) in Nicholson St at intersection with Albert St. Has Princess Theatre in the background. (High res scan added 26/10/2008 - copy to FOHTD) .1178.6 - W6 974 (route 89 East Preston Bell St.) in Bourke St. about to turn into Spring St. Has buildings on the south side of Bourke St in background, including Southern Cross Hotel. Note trees in tubs and red phone box by Windsor Hotel. 1178.7 - as for same location as 1178.6 - SW6 967 (route 96) and W6 971 (inbound - route 90 - City Spencer St.) 967 has Lucas ad on front dash. 1178.8 - W7 1013 (route 88 East Preston) photographed from W6 991 in Bourke St at corner of Russell St. Has Normans corner store, Treadways and Foys in background. 1178.9 - W2 553 (route 1 East Coburg) at the corner of Elizabeth St and Bourke St. Has the Leviathan, Roger David and Ezywalkin shops in the background. 1178.10 - W6 991 (route 88) and W7 (route 96) in Bourke St. at corner with Elizabeth St. Photo taken from the GPO steps. 991 has ads for BIC pens and CASTROL. In background are the State Savings Bank, Halls Books and McEwans shops. 1178.11 - Line up of north bound trams (3 +) lead by W2 449and southbound in Elizabeth St at corner of Collins St. Has Flinders St. station building in the background. Hi -res image of .10 added 22-12-2018All have date stamp of "23 Oct 1965" in purple ink. All black ink unless otherwise noted. 1178.1 - "W7 1020 turning into Brunswick St. from Victoria parade, East Melbourne (followed by W2 536) 1178.2 - "W5 799 and 807 in Elizabeth St. Melbourne at cnr. of Bourke St." 1178.3 - "SW6 903 entering reserved track in Victoria Parade, East Melbourne" 1178.4 - "W7 1019 and 1010 in Nicholson St. East Melbourne at Victoria Pde intersection" 1178.5 - "W7 1040 Melbourne's last tram (to date) in Nicholson St. at Albert St. intersection." 1178.6 - "W6 974 in Bourke St. Melbourne, about to turn into Spring St." 1178.7 - "W6 971 entering Bourke St. from Spring St. Melbourne, passes SW6 967 outward bound for East Brunswick" 1178.8 - "W7 1013 (seen from W6 991) in Bourke St. Melbourne crossing Russell St." 1178. 9 -"W2 553 in Elizabeth St. Melbourne at cnr of Bourke St." 1178.10 - "W6 991 and W7 1005 in Bourke St. Melbourne at cnr of Elizabeth St." 1178.11 - "W2 449 leads a line of Peak hour cars along Elizabeth St. Melbourne (at Collins St. corner)"tramways, trams, melbourne, victoria parade, nicholson st., brunswick st., bourke st, elizabeth st, tram 1020, tram 536, tram 799, tram 807, tram 903, tram 1019, tram 1010, tram 1040, tram 974, tram 967, tram 971, tram 1013, tram 553, tram 991, tram 1005, tram 449 -
 Ballarat Tramway Museum
Slide - 35mm slide/s - set of 7, Noel Simons, 23/10/1965 12:00:00 AM
Set of 7 Kodachrome transparencies taken on 23/10/1965 in Melbourne. 1179.1 - W2 488 (route 42, Mont Albert) at the corner of High St. and Cotham Road Kew. Taken from Kew Post Office, has Bank of New South Wales in the background, CBC bank and the Greyhound Hotel. Tram has ads for Kolotex stockings and Ryco oil filters. 1179.2 - SW2 436, in bound (route 45, City) leaving Cotham Road, about to join High St, Kew. Buildings on the south side of Cotham Road in photo. Tram has an ad along with others for Vincent's powders. 1179.3 - W2 545 (route 48, North Balwyn) in High St. Kew. Has Commercial bank in background along with other shops. 1179.4 - W2 648 (route 42, Mont Albert) turning from High St. South into High St at Kew Junction, with Clifton Hotel in background. Tram has an ad for Kenric clothes. Note an MFBB street fire alarm by the tram stop. 1179.5 - W2 566 (inbound route 42, City) at same location as 1179.5. Tram has a Jex and a Remy Martin Brandy ads. on front dash panel. 1179.6 - W2 572 entering Victoria Parade from Brunswick St. Fitzroy. Tram has a Jex and a Remy Martin Brandy ads. on front dash panel. Eastern Hill Fire Station and ICI building in background. 1179.7 - W2 378 (inbound, route 45, City) and W2 572, inbound, in Victoria Parade between Brunswick St and Gismo St. East Melbourne. Otherwise as for 1179.6.All have date stamp of "23 Oct 1965" in purple ink. All black ink unless otherwise noted. 1179.1 - "W2 488 Entering Cotham Rd. from High St. Kew" 1179.2 - "SW2 436 in Cotham Rd., Kew, about to enter High St." 1179.3 - "W2 545 in High Street Kew, nearly opposite Cotham Road" 1179.4 - "W2 648 entering High Street from High Street South, Kew". 1179.5 - "W2 566 entering High St. South from High St. Kew" 1179.6 - "W2 572 entering Victoria Pde from Brunswick St. East Melbourne" 1179.7 - "W2 378 and 572 in Victoria Pde between Brunswick and Gisborne Sts. East Melbourne."tramways, trams, kew, high st kew, cotham road, victoria parade, melbourne, tram 545, tram 488, tram 436, tram 648, tram 566, tram 572, tram 378 -
 Ballarat Tramway Museum
Slide - 35mm slide/s, Noel Simons, 21/11/1962 12:00:00 AM
Set of 17 transparencies taken on 21/11/1962 on Kodak mounts. 1188.1 - Bendigo No. 11 at Depot Junction McCrae and Arnold St. with driver/conductor changing points. 1188.2 - Bendigo No. 4 at Charing Cross, side on photo, with City Club Hotel and Alexandra Fountain in the background. Tram has Castrol and SEC 'Electric Cooking' ads. 1188.3 - Bendigo No. 4 climbing View St. after tram has passed photographer. Tram has Streets Ice Cream and Cohns Soft Drinks ad on rear dash panel. In the background are the buildings in View St., including the Princess Theatre. Tram has destination of Eaglehawk. 1188.4 - Trams 2 and 4 crossing at the California Gully or Thorpe St Loop. 1188.5 - Bendigo 4 in Mt Korong Road. Tram inbound with destination of Quarry Hill, just leaving Garden Gully Loop. 1188.6 - Bendigo 4 and 17 crossing at the Hayes St. or Iron Bark Gully Loop. No. 17 bound for Eaglehawk, No. 4, Quarry Hill. 17 has two SEC roof ads and a white horse whiskey ad. 1188.7 - No. 17 bound for Eaglehawk, soon after leaving California Gully. Has large mullock heap in background. 1188.8 - Bendigo 2 and 17 crossing at the Thorpe St. or California Gully Loop. Has butchers shop in background. 1188.9 - Bendigo 17 at the Eaglehawk terminus. Has destination of Quarry Hill. In background is the hotel and shops at the terminus, showing ads for "Melbourne Bitter". Tram has two SEC 'Electric Cooking' ads. Driver and conductor about to assist two lady passengers with a pram and baby. 1188.10 - No. 17 at Eaglehawk terminus, awaiting departure. Has Eaglehawk Town Hall and Post Office in background. Tram has a Whitehorse Whiskey ad on the front dash panel. 1188.11 - No. 3 in High St. Eaglehawk, with destination of Eaglehawk. Has the shops on the south side of High St. in the background, including the Eaglehawk fish shop. Tram has two roof ads, one an SEC roof ad, and Cohns Drinks and Streets Ice cream ads on front dash panel. 1188.12 - as above, but after tram has passed photographer. Note the centre of the road poles. 1188.13 - No. 2 outbound for Eaglehawk at the intersection of Mt. Korong Road and the Calder Highway. Photo taken after the tram has passed the photographer. Has an Ampol service station in the background. 1188.14 - No. 11 leaving the Bendigo depot, crossing the bridge, with the Scrubber car in the background. 1188.15 - No. 21 at the North Bendigo terminus. Tram has destination of Golden Square and Cohns drink ad on front dash and two roof ads on side. 1188.16 - No. 11 on Golden Square route, in High St. at intersection with Old High St. 1188.17 - No. 11 at the Golden Square terminus, conductor turning the pole. Hotel on the left side of the photo. Note the road works barrier and red flag behind the tram. Slide has an end of roll mark on the right hand side of the image.Information written on in black ink and date stamped on purple ink. 1188.1 - "Birney car No. 11 in McCrae St. at Cnr of Arnold about to run into depot, Bendigo" 1188.2 - "No. 4 at Alexandra Fountain, Charing Cross Bendigo" 1188.3 - "No. 4 climbing the View St. Hill from Charing Cross, Bendigo (Eaglehawk Route)" 1188.4 - "No. 4 and 2 at Thorpe St. Loop, California Gully" 1188.5 - "No. 4 in Mt Korong Rd., Long Gully, Near Havilah Rd. (Bendigo) (Eaglehawk Route)" 1188.6 - "Nos. 17 and 4 crossing on Hayes St. Loop, Ironbark, Bendigo" 1188.7 - "No. 17 soon after leaving California Gully (Eaglehawk Route)" 1188.8 - "No.2 and 17 crossing on Thorpe St. Loop, California Gully (Eaglehawk Route)" 1188.9 - "No. 17 at Eaglehawk terminus" 1188.10 - "No. 17 at Eaglehawk terminus" 1188.11 - "No. 3 in High St. Eaglehawk" 1188.12 - "No. 3 nearing Eaglehawk terminus" 1188.13 - "No. 2 in Mt. Korong Rd., Ironbark. Calder highway on left (Eaglehawk route) 1188.14 - "Birney car No. 11 leaving Bendigo depot. Scrubber car at rear" 1188.15 - "No. 21 at North Bendigo Terminus" 1188.16 - "Birney car No. 11 in High St. Bendigo at intersection with Old High Street (Golden Square Route)" 1188.17 - "Birney Car No. 11 at Golden Square terminus, High St., Bendigo". tramways, trams, bendigo, depot junction, charing cross, view st., eaglehawk, north bendigo, golden square, tram 2, tram 3, tram 4, tram 11, tram 17, tram 21, tram scrubber -
 Ballarat Tramway Museum
Slide - 35mm slide/s - set of 24, Noel Simons, 20/05/1971 12:00:00 AM
Set of 24 transparencies taken on 20/5/1971 on Kodak mounts. 1195.1 - Bendigo 19 arriving at Charing Cross en route to North Bendigo with Fountain Plaza and the City Family Hotel in the background. No. 19 has two roof ads for the SEC. -'Electricity better for cooking' and 'Everything's under control in my all electric kitchen' 1195.2 - as above, but standing at the Charing cross stop, with the Beehive Stores and other buildings along the east side of Pall Mall in the background. 1195.3 - No 21 ex Golden Square crossing View St. trackwork in front of No. 25 waiting to depart for Quarry Hill. No.21 has two roof ads (as for No.19 in 1195.1) and No.25 has one SEC roof ad and another. Ezywalkin sign in the background, and Fountain Plaza. 1195.4 - as for 1195.3, but after 21 has arrived and 25 left for Quarry Hill. Has Ezywalkin store and the Beehive store in the background. 1195.5 - No. 5 at the Eaglehawk terminus. Photo taken with a cannon in foreground looking along High St. Eaglehawk. Has shops on the west side of High St. in the background. 1195.6 - No. 5 at the Eaglehawk terminus, close up of the rear of the tram - note tow bar arrangement. Has destination of Quarry Hill. 1195.7-Nos.25 and 5 crossing at the Thorpe St. Loop, California Gully. No. 25 bound for Eaglehawk (has SEC Briquette and electric cooking roof ads) and 5 en route for Quarry Hill with a SEC and Cinzano roof ad. 1195.8 - as for 1195.7, but after trams have passed each other. Has Borough Auto Service building in the background. 1195.9 - No. 5 in Mt Korong Road, towards Bamard Street, photo taken after tram has passed photographer. 1195.10 - No. 30 at the Golden Square terminus with the Milk Bar on the right hand side of the photograph. 1195.11 - No. 30 inbound at Fire Station Loop, High St. Golden Square. Has old fire station in the background. Passengers are boarding the tramcar. 1195.12 - No. 30 in High St, bound for North Bendigo between Vine and Wattle Streets. 1195.13 - No. 5 bound for Eaglehawk waits at Iron Bark Gully Loop, at Hayes St. 1195.14 - No. 5 and No. 2 crossing at Iron Bark Gully Loop. 1195.15 - No. 5 bound for Eaglehawk leaving the Manchester Loop, Long gully. 1195.16 - No. 5 passing William Street, Long Gully en route to Eaglehawk. 1195.17 - No. 5 just before the California Gully Crossing Loop. 1195.18 - Nos. 5 and 26 crossing at California Gully crossing Loop. No. 5 heading to Eaglehawk, 26, Quarry Hill. 1195.19 - No. 5 in High St. Eaglehawk with Bob Moyle's Victoria Hotel and the TAB in the background. 1195.20 - No. 5 in High St. Eaglehawk approaching the terminus. Photo taken after the tram has passed the photographer. Has Foodland store and J. Best Fruit supply in the background, along with Eaglehawk Town Hall. 1195.21 - No. 5 at the Eaglehawk terminus, photo taken along seldom used track along High St. 1195.22 - as for 1195.22 - but at the very end of the track. 1195.23 - No. 5 en route for Quarry Hill climbs High St. Eaglehawk with the Victoria Hotel and Eaglehawk Town Hall in the background. 1195.24 - No. 5 and 25 crossing at Jobs Gully Loop. Note 25 has a black on white destination roll, while No. 5 has a white on black destination roll. Information written on in black ink and date stamped on purple ink. 1195.1 - "No. 19 arrives at Charing Cross Bendigo from Golden Square" 1195.2 - "No. 19 about to leave Charing Cross for North Bendigo" 1195.3 - "No. 25 awaiting departure for Quarry Hill, watches No. 21 arrive at Charring Cross from Golden Square" 1195.4 - "No. 21 on North Bendigo service and No. 25 on Quarry Hill run await departure at Charing Cross" 1195.5 - "No. 5 at Eaglehawk terminus" 1195.6 - "No. 5 at Eaglehawk terminus" 1195.7 - "Nos. 5 and 25 crossing at Thorpe St. Loop, California". 1195.8 - "Nos. 25 and 5 crossing Thorpe St. Loop, California Gully". 1195.9 - "No. 5 descending Mt Korong Rd. towards Bamard St." 1195.10 - "Birney car No. 30 at Golden Square terminus" 1195.11 - "Birney car No. 30 in High Street near Thistle Street (Fire Station Loop)" 1195.12 - "No. 30 in High St. between vine and Wattle Streets" 1195.13 - "No. 25 at Hayes Street Loop Iron Bark". 1195.14 - "Nos. 2 and 5 crossing at Hayes Street Loop Iron Bark" 1195.15 - "No. 5 at Manchester Loop opposite Havilah Road, Long Gully" 1195.16 - "No. 5 passing William Street, Long Gully". 1195.17 - "No. 5 at California Gully" 1195,18 - "Nos. 26 and 5 at Thorpe St. Loop, California Gully". 1195.19 - "No. 5 in High St. Eaglehawk". 1195.20 - "No. 5 approaching Eaglehawk terminus" 1195.21 - "No. 5 at Eaglehawk terminus" 1195.22 - "No. 5 at Eaglehawk terminus" 1195.23 - "No. 5 in High St. Eaglehawk" tramways, trams, bendigo, charing cross, eaglehawk, california gully, golden square, iron bark gully, jobs gully, tram 2, tram 5, tram 19, tram 21, tram 25, tram 26, tram 30 -
 Ballarat Tramway Museum
Slide - 35mm slide/s - set of 32, Noel Simons, 25/02/1971 12:00:00 AM
Set of 31 transparencies taken on 25/2/1972 on Kodak mounts. 1201.1 - Bendigo No. 26 in Bond St. just after leaving Long Gully en route for Quarry Hill. Has Norris Supermarket in background. Has two SEC roof ads. 1201.2 - No. 26 climbing View St. from Charing Cross en route to Eaglehawk. Has ANZ bank and AMOCO service station in background. 1201.3 - as for 1201.3, but after tram has passed photographer. Has buildings west of Mackenzie St. in photograph. 1201.4 - Tram stop and centre of the road pole with two "CARS STOP BY REQUEST" signs mounted on pole at the corner of Mackenzie St. 1201.5 - same position as for 1201.3, but with No. 5 descending the street. 1201.6 - same position as for 1201.2, but with No. 5 descending the street. Photo taken after tram has passed photographer. 1201.7 - No. 7 in Nolan St. from across the park at Lake Weeroona. 1201.8 - No. 7 entering McCrae St from Nolan St. - distant view. Note "TRAM "sign on left hand side under tree and overhead in McCrae St. from former track that once was in this street. 1201.9 - No. 7 in High St. with Cathedral in background. Tram en route to North Bendigo. Note scaffolding around Cathedral main spire area. 1201.10 - No. 7 crossing Bendigo Creek bridge in High St. near Golden Square. Has a Caltex Service station in the background. 1201.11 - No. 7 at Golden Square terminus with Sunburst Fruit Juices and a Peters Ice cream delivery vans alongside. 1201.12 - as for 1201.11 but photo taken from behind tram, with the end of the rails in the photograph. 1201.13 - No. 7 and 21 in Pall Mall at Charing Cross with No. 5 in the background. Taken some distance away from the location. 1201.14 - No. 7 at Golden Square terminus, taken a short distance from the tram terminus. Shows Milk Bar on right hand side and the hotel on the left hand side. Taken from the south side of the roadway. 1201.15 - as from 1201.14 but taken from the north side of the roadway. 1201.16 - No 5 waiting at California Gully loop. Distant photo showing surrounds 1201.17 - No. 5 en route for Quarry Hill crossing No. 26 at California Gully. 1201.18 - No. 26 at Eaglehawk terminus with Eaglehawk Town Hall and Post Office in background. 1201.19 - No. 21 arriving at Charing Cross en route to North Bendigo. Has Alexandra Fountain in the background, ANZ bank RACV building, and other buildings on the north side of Pall Mall or Nolan St. 1201.20 - No. 26 en route for Quarry Hill at Charing Cross, with crew standing by front door. Has Colonial Mutual life building, Armstrong Tyre Service (Firestone) and a sign for Cohns Drinks in the background. 1201.21 - as for 1201.20 but with No. 5 en route to Eaglehawk now in photograph. 1201.22 - No. 26 at Quarry Hill terminus. 1201.23 - No. 26 at Quarry Hill terminus, view of front portion of tram only from a gate at the Bendigo cemetery. 1201.24 - Track at the end of the Quarry Hill line showing the point blades of the former "Y" terminus and the overhead for this. 1201.25 - No. 2 at the Quarry Hill terminus, looking along the former Trackwork. 1201.26 - as for 1201.25 1201.27 - number not used. 1201.28 - Golden Square terminus from some distance from the actual terminus, showing the Warning sign "TRAM" for motorists from the south. No. 7 at the terminus. 1201.29 - No. 7 passing through the Golden Square shopping centre. Numerous cars and pedestrians. Tram en route for North Bendigo. 1201.30 - No. 7 in High St. Golden Square, en route for North Bendigo. Photo taken after tram has passed photographer. 1201.31 - No. 7 in High St. just past Wattle St. with the Cathedral in the background. Tram has two SEC roof ads good side on photo, 'Everything's fine in my all electric kitchen' and 'Electrical cooking - clean, quick, economical'. 1201.32 - No. 7 in High St. nearing Wattle St. Has Cathedral in the background. Photo taken after tram has passed photographer.Information written on in black ink and date stamped on purple ink. 1201.1 - "No. 26 in Bond St just after leaving Long Gully" 1201.2 - "No. 26 climbing View St. from Charing Cross" 1201.3 - "No. 26 ascending View St. from Charing Cross (At Mackenzie St.)" 1201.4 - "View St. & Mackenzie St." 1201.5 - "No. 5 in View St. near Mackenzie St." 1201.6 - "No. 5 in View St. nearing Charing Cross." 1201.7 - "No. 7 in Nolan St. seen from Lake Weeroona Park." 1201.8 - "No. 7 entering McRae St. from Nolan St. Note "TRAM" warning sign on left. 1201.9 - "No. 7 in High St. passing Short St." 1201.10 - "No. 7 crossing Bendigo Creek bridge in High St. near Golden Square." 1201.11 - "No. 7 at Golden Square terminus" 1201.12 - "No. 7 at Golden Square terminus" 1201.13 - "No 7, 21 and 5 at Charing Cross" 1201.14 - "No. 7 at Golden Square terminus" 1201.15 - "No. 7 at Golden Square terminus" 1201.16 - "No 5 waiting at California Gully loop." 1201.17 - "Nos. 5 and 26 crossing at California Gully loop" 1201.18 - "No. 26 at Eaglehawk terminus" 1201.19 - "No. 21 arriving at Charing Cross from Golden Square" 1201.20 - "No. 26 at Charing Cross" 1201.21 - "Nos. 5 and 26 at Charing Cross." 1201.22 - "No. 26 at Quarry Hill terminus" 1201.23 - "No. 26 at Quarry Hill terminus seen through the gates of the Bendigo Cemetery." 1201.24 - "Quarry Hill terminus showing remains for former double track layout abandoned before 1964." 1201.25 - "No. 2 at Quarry Hill terminus" 1201.26 - "No. 2 at Quarry Hill terminus" 1201.28 - "The Southern approach to Golden Square with No. 7 standing at the terminus, "TRAM" warning sign on the left. 1201.29 - "No. 7 passing through Golden Square Shopping Centre" 1201.30 - "No. 7 in High St. Golden Square" 1201.31 - "No. 7 in High St. passing Wattle St." 1201.32 - "No. 7 in High St. nearing Wattle St."tramways, trams, bendigo, bond st., view st., nolan st., high st., eaglehawk, california gully, charing cross, quarry hill, trackwork, tram 2, tram 5, tram 7, tram 21, tram 26 -
 Ballarat Tramway Museum
Slide - 35mm slide/s - set of 25, Noel Simons, 26/02/1972 12:00:00 AM
Set of 25 transparencies taken on 26/2/1972 on Kodak mounts. 1204.1 - Bendigo No. 5 - just arrived at Manchester Loop near Havilah Road, Long Gully. Photo taken after tram has passed photographer. 1204.2 - No. 26 in Backhaus St. Long Gully passing William St, en route to Quarry Hill. Photo taken after tram has passed photographer. 1204.3 - No. 5 climbing the High St. Hill Eaglehawk, heading for Quarry Hill with the buildings on the West side of High St. in the background, including the Eaglehawk Town Hall. 1204.4 - as for 1204.3, but tram close up. 1204.5 - as for 1204.3, but after tram has passed photographer. 1204.6 - No. 5 at intersection of Mt Korong Road Ironbark and Calder Highway, with the AMPOL service 'station in the background. Photo taken after tram has passed photographer. 1204.7 - No. 26 en route to Quarry Hill shortly after leaving Needle Loop, passing William St., Long Gully. 1204.8 - No. 5 at California Gully Loop, picking up a passenger, with the shops at Long Gully in the background. Photo taken after tram has passed photographer. 1204.9 - No. 5 in Long Gully, en route to Quarry Hill. Photo taken after tram has passed photographer. 1204.10 - No. 2 at Eaglehawk terminus with the Eaglehawk Town Hall and Post Office in the background. Tram has two SEC roof ads. 1204.11 - No. 2 at Eaglehawk terminus, close up. 1204.12 - as for 1204.11, but through the park gates. 1204.13 - as for 1204.11, but with tram stop shelters in the foreground and buildings on the West side of High St in the background. 1204.14 - No. 2 in Mt. Korong Rd, midway between California Gully Loop and Needle Loop. Photo taken after tram has passed photographer. 1204.15 - No. 5 in Long Gully, en route to Quarry Hill. 1204.16 - as for 1204.15, but with trams departed loop. Has an ESSO service station in the background. 1204.17 - No. 26 leaves Charing Cross up View St.. Photo taken after tram has passed photographer. Has Armstrong Tyre Service, Cohns Drinks ad on a building and the T&G building in the background. Also Firestone ads on the tyre service building. 1204.18 - No. 5 waits at Charing Cross with the Alexandra Fountain in the background. Tram has two SEC roof ads, 'Everything s fine in my all electric kitchen' and 'Electricity Best for Cooking'. Has RACV, Colonial Mutual Life buildings in the background and the planting areas around Charing Cross gardens in the foreground. 1204.19 - No. 21 en route to North Bendigo arrives at Charing Cross, with passengers waiting to board. No. 5 in the background. In the background is the Fountain Gate Plaza building and the City Family Hotel. 1204.20 - as for 1204.19, but with No. 7 en route to Golden Square. 1204.21 - as for 1204.19, but closer up. 1204.22 - as for 1204.18 1204.23 - No. 25 in Nolan St. near the crossing of Bendigo Creek, running a special tram tour. 1204.24 - No. 25 on a special charter, in Weeroona Ave. at Cnr of Caledonia St. passing the Gas works. 1204.25 - Nos. 25 (showing Golden Square), 7 and 26 at Charing Cross. Has fountain in the background.Information written on in blue ink and date stamped on purple ink. 1204.1 - "No. 5 at Manchester Loop, near Havilah Rd. Long Gully." 1204.2 - "No. 26 in Backhaus St. Long Gully passing William St." 1204.3 - "No. 5 in High St. Eaglehawk." 1204.4 - "No. 5 in High St. Eaglehawk." 1204.5 - "No. 5 in High St. Eaglehawk." 1204.6 - "No. 5 in Mt. Korong Rd., Ironbark, passing Calder Highway Junctn." 1204.7 - "No. 26 shortly after leaving Needle Loop, passing William St., Long Gully. No. 5 cresting hill in distance." 1204.8 - "No. 5 at California Gully Loop." 1204.9 - "No. 5 in Long Gully" 1204.10 - "No. 2 at Eaglehawk terminus." 1204.11 - "No. 2 at Eaglehawk terminus." 1204.12 - "No. 2 at Eaglehawk terminus." 1204.13 - "No. 2 at Eaglehawk terminus." 1204.14 - "No. 2 in Mt. Korong Rd, midway between California Gully Loop and Needle Loop. 1204.15 - "Nos. 2 and 26 crossing at Long Gully." 1204.16 - "No. 26 leaves Long Gully loop for Eaglehawk as No. 2 pulls out of the far end towards Bendigo" 1204.17 - "No. 26 beginning the climb up View St. from Charing Cross." 1204.18 - "No. 5 at Charing Cross." 1204.19 - "No 21 arrives at Charing Cross from Golden Square while No. 5 awaits departure time for Eaglehawk." 1204.20 - "Nos. 7, 21, and 2 (behind which is No. 5) at Charing Cross." 1204.21 - "Nos. 7, 21, and 2 at Charing Cross." 1204.22 - "No. 5 at Charing Cross." 1204.23 - "No. 25 in Nolan St. near Bendigo creek crossing" 1204.24 - "No. 25 in Weeroona Ave. at cnr of Caledonia St." 1204.25 - "Nos. 25, 7, 26 and 2 (behind 26) at Charing Cross."tramways, trams, bendigo, eaglehawk, long gully, california gully, charing cross, north bendigo, tram 2, tram 5, tram 7, tram 21, tram 25, tram 26 -
 Ballarat Tramway Museum
Slide - 35mm slide/s - set of 6, Noel Simons, 28 Feb. 1972
Set of 6 transparencies taken on 28/2/1972 on Kodak mounts. 1206.1 - Bendigo No. 5 at Hayes St. Loop, en route for Quarry Hill. 1206.2 - No. 5 at Garden Gully Loop, Mt. Korong road, Ironbark. en route to Quarry Hill. Note the water column in the background. 1206.3 - No. 5 in View St. Bendigo, with the Commodore Motel in the background. 1206.4 - No. 6 en route for Golden Square in Fire Station loop, with the fire station building in the background. Photo taken after tram has passed photographer. 1206.5 - No. 6 in High St., running through Golden Square Shopping Centre, en route for Golden Square. Photo taken after tram has passed photographer. 1206.6 - No. 6 arriving at Charing Cross, bound for North Bendigo, with the City Family Hotel, ANZ bank and the Cenotaph (war memorial) in the background.Information written on in blue ink and date stamped on purple ink. 1206.1 - "No. 5 at Hayes Loop, Ironbark." 1206.2 - "No. 5 at Garden Gully Loop, Mt. Korong road, Ironbark." 1206.3 - "No. 5 in View St. just after start of double track near Barnard St." 1206.4 - "No. 6 in High St. at Fire Station loop." 1206.5 - "No. 6 in High St. running through Golden Square shopping centre." 1206.6 - "No. 6 arriving at Charing Cross from Golden Square."tramways, trams, bendigo, hayes st. loop, garden gully loop, view st., golden square, charing cross, tram 5, tram 6 -
 Ballarat Tramway Museum
Slide - 35mm slide/s - set of 12, Noel Simons, 28 Feb. 1972
Set of 12 transparencies taken on 28/2/1972 on Kodak mounts. 1207.1 - Bendigo 26 and 2 at Charing Cross. 26 en route for Eaglehawk, 2 for Quarry Hill. Has the Colonial Mutual Life, Armstrong Tyre Service, and Australian Mutual Provident Society buildings and a Cohns Drinks ad. in the background. 1207.2 - as for 1207.1 but with Alexandra fountain in the foreground. 1207.3 - No. 2 in Mitchell St. heading for Quarry Hill. Photo taken after tram has passed photographer. Has buildings on either side of Mitchell St. in the background, including the Plaza Theatre. 1207.4 - No. 6 en route for Golden Square departing Charing Cross. Has the RACV and ANZ bank in the background. 1207.5 - No. 2 crossing Pall Mall to enter Charing Cross ex Quarry Hill, with the Fountain Plaza in the background. 1207.6 - No. 6 arriving Charing Cross ex Golden Square with No. 21 alongside. No. 21 has the SEC ad. 'Everything's fine in my all electric kitchen.' Has the City Family Hotel and the Fountain Plaza shopping centre in the background. 1207.7 - No. 5 at Charing Cross en route for Quarry Hill with No. 2 behind. No. 2 has two SEC roof ads, 'Everything s fine in my all electric kitchen' and 'Electricity best for cooking'. RACV building in the background. Tram crews are discussing the day in the front of the tram. 1207. 8 - No. 21 in High St. Bendigo with the Cathedral in the background. No. 21 has two SEC roof ads, 'Everything's fine in my all electric kitchen' and 'Electricity best for cooking'. 1207.9 - No. 6 in High St. Bendigo with the Cathedral in the background. 1207.10 - No. 6 in High St. Bendigo, just past Wattle St. Photo taken after the tram has passed the photographer from within the Highway Car Sales yard. 1207.11 - No. 26 bound for Eaglehawk at the end of the double track in View St., note signal contactors, tram stop and section signs mounted on pole. 1207.12 - No. 26 turning from View St. into Barnard St.Information written on in blue ink and date stamped on purple ink. 1207. 1- "Nos. 26 and 2 at Charing Cross." 1207.2 - "Nos. 26 and 2 at Charing Cross." 1207.3 - "No. 2 in Mitchell St. just after leaving Charing Cross." 1207.4 - "No.6 leaving Charing Cross for Golden Square." 1207.5 - "No. 2 arriving at Charing Cross from Quarry Hill." 1207.6 - "No. 21 waits at Charing Cross as No. 6 arrives from Golden Square." 1207.7 - "No 5 at Charing Cross with No. 2 lurking behind." 1207.8 - "No. 21 in High St. at cnr of Wattle St." 1207.9 - "No. 6 in High St. at cnr of Wattle St." 1207.10 - "No. 6 in High St. between Wattle and Vine Sts." 1207.11 - "No. 26 at end of double track in View St. near Barnard. St. 1207.12 - "No. 26 seen at dusk turning from View St. into Barnard St."tramways, trams, bendigo, charing cross, high st, view st., tram 2, tram 5, tram 6, tram 21, tram 26 -
 Ballarat Tramway Museum
Photograph - Black & White Photograph/s, David Endacott, 14/08/1971 12:00:00 AM
Black and white photograph and negative of an inbound single truck tram in Sturt St. just to the west of Dawson St. Photo taken from the central median strip, has the shops on the north side of Sturt St. in the photograph - such as Gear Chemist. Photo taken 14 August 1971. The Alexandra Bandstand in the foreground. Original print by David Endacott, duplicate print (1270A) by John Phillips 12/1999. Large copy print added 5/2001. Original neg scanned at hi res and updated 11/5/2020. Original neg scanned at hi res and updated 11/5/2020.On original print "Last week of full tram service before phasing out / from Cnr Sturt & Dawson Sts. / Aug 1971" in pencil.trams, tramways, ballarat, sturt st, dawson st., alexandra bandstand -
 Ballarat Tramway Museum
Photograph - Black & White Photograph/s, B. Prentice, 21/11/1970 12:00:00 AM
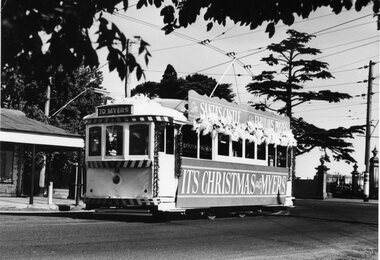
Black and white photograph of Ballarat SEC No. 14 decorated for the 1970 Myers Christmas Tram. Photographed at the corner of Macarthur St and Drummond St. North by Bob Prentice, Saturday 21 November 1970. Tram painted white except for the "tiger stripes", decorated with standard Christmas decorations, a large advertisement board on side "Its Christmas at Myers" and roof advertisement "See Santa's Castle Win Fabulous prizes". Destination box has been covered with the words "To Myers". Photographed with blue stone shop on the south west corner and the cemetery gates in the background.On rear in black ink "Ballarat / Saturday 21st November 1970 / Bob Prentice Photo"trams, tramways, myers, decorated trams, depot, christmas trams, tram 14 -
 Ballarat Tramway Museum
Poster, "Ballarat Welcomes You", 1998
Plasticised card wall hanging poster to display in local tourism centres, motels, shops etc, publicising some of the tourist features of Ballarat and District. Surround base information is a series of adverts including BTM. Gives details of weekends, public/schools holiday running, and contact details. Tram in photo is No. 26, but very dark. All ads in full colour. Other advertisers are Dulcinea, Kryal Castle, Ballarat Tenpin Bowling Centre, Gumnut Cafe, Willabaa, Swaggers Cafe, Browse Cafe, Reliv health, Ballarat Taxis Co-op, Spartans gym, Nature In Balance, Master of Class Hairdressing, Exquisite Furniture, Pinky's Pizza, Budget and Ballarat Family Care Pharmacy. Also has a item on the London Bus Co., area map, telephone numbers and visitor information centre. Has four pieces of double side tape in corners on rear.trams, tramways, btm, ballarat tourism -
 Ballarat Tramway Museum
Photograph - Colour Photograph/s, 21/11/1962 12:00:00 AM
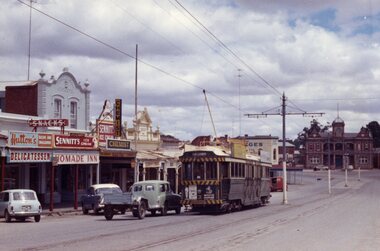
Colour print of Bendigo SECV Bendigo tram 3 travelling High St Eaglehawk towards the Eaglehawk Terminus. Photo taken after the tram has passed the photographer. On Kodacolor paper with a Kodak red ink stamp on rear. Tram has dash canopy lights, but no large white strip under the drivers windows. Photo not dated but appears to be at about the same time as 977, 21.11.1962. Has Eaglehawk Town Hall and Post office in background and shops along the south side of High St. Tram showing destination of "Eaglehawk". Tram has White Horse Whiskey ad and another on front dash panel and two roof ads. In photo are advertisements for "Hutton's Bacon" and "Sennett's Ice Cream" on shop roof advertisements.On rear top left hand corner "3"eaglehawk, bendigo, town hall., high st, tram 3