Showing 999 items matching "railway sign"
-
 Melbourne Tram Museum
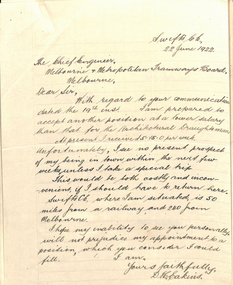
Document - Memorandum, D. H. Eakins, David Eakins appointment, Jun. 1922
Memorandum consisting of 11 quarto type and handwritten sheet or letters, appointing David Eakins as a assistant to Mr Lormer for the preparation of the General Scheme. Includes references, letter of application, and other reference material supplied by Mr. Eakins and signed by the Chief Engineer Mr Strickland. Memo to the Chairman dated 26/6/1922. Mr Eakins was to become the Chief Engineer in the 1950's. Includes a reference from Mr. Maurice Kernot chief Engineer for Railway Construction.trams, tramways, chief engineer, personnel, staff, engineers, general scheme -
 Melbourne Tram Museum
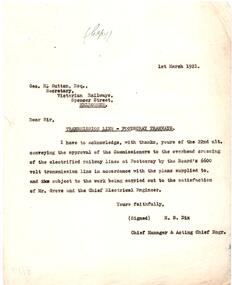
Letter, Melbourne & Metropolitan Tramways Board (MMTB), "Transmission Line - Footscray Tramways", 1/03/1921 12:00:00 AM
Letter, carbon copy, quarto sheet - to the Secretary of the Victorian Railways titled "Transmission Line - Footscray Tramways" dated 1/3/1921, regarding the crossing of the electrified railway at Footscray by the Boards 6000V transmission line to approved plans. Signed by H. S. Dix Chief Manager and Acting Chief Engineer.trams, tramways, mmtb, vr, footscray, new tramway, power supply, electrical engineering -
 Melbourne Tram Museum
Slide - Set of 9, Keith Caldwell, 17/03/1966 12:00:00 AM
Set of 8 Agfa colour blue white plastic mount slides, photo by Keith Caldwell of trams on the Royal Park line in the vicinity of the Royal Park railway line. .1 - W2 328 (West Coburg Bell St route 55) passing under the railway bridge, with another W2 (362 or 382?) behind. Tram 328 has adverts for Remy Martin and Kleenex tissues. .2 - W2 521, route 55, passing a tram stop. Note the overhead light. .3 -W2 456, route 55 West Coburg via William St, passing under the railway bridge. .4 - not used, .5 - W2 355 with railway bridge in background, Domain Road, Route 56. .6 - W2 506 climbing the hill, Domain Road, route 55. Tram has adverts for White Crow tomato sauce. .7 - W5 812, arriving at stop (Section sign), to Carnegie, route 4. The tram stop has the fares to the city (15d and 7d). In the background is a Perway box. .8 - W2 227 (Domain Road route 56) with the railway station and two other trams in the background. .9 - SW6 (Route 55) outbound with the zoo walls in the background. Tram has advert for Coffey Ford. 17/3/1966In ink "17 iii 66"trams, tramways, royal park, route 55, west coburg, w2 class, domain rd, route 56, w5 class, sw6 class, tram 328, tram 521, tram 456, tram 355, tram 506, tram 812, tram 227, tram 913 -
 Melbourne Tram Museum
Slide - Set of 2, John Webster, 21/07/1959 12:00:00 AM
Set of two Colour slides, Kodak, white cardboard of trams of the construction of the Flinders St overpass over King St from the railway viaduct over Spencer St, looking east. Shows the temporary track on the south side of the bridge and the large car park under construction from the former cool stores on this site. Also shows the former track into Spencer St. Note the cross over at the base of the bridge. .1 - possibly 357 running a route 27 to Spencer St. Has the Great Southern Hotel on the left side. .2 - similar photo taken from the viaduct, further along - has the Bushels and Penfolds Wines signs in the background.Hand writing on rear in ink; .1 and .2 - "2-4-60 - Tracks - Flinders St Melbourne" Both slides have the speed and the f reading on the left hand side.trams, tramways, trackwork, flinders st, king st, track construction, bridges, w2 class, route 27, tram 357? -
 Melbourne Tram Museum
Slide - Set of 7, John Webster, 17/10/1959 12:00:00 AM
Set of seven Colour slides, Kodak, brown cardboard of the removal of the Elsternwick Level crossing on 28-5-1960 .1 - looking down into he cutting through the old goods yard - has the platform being installed. .2 - X2 675 crossing the new bridge with the level crossing in the background. .3 - L103, to the city, route 4, with the conductor watching the trolley pole. Has an advert for white horse whiskey. .4 - W2 269, route 4 to Carnegie, on the level crossing. Has a building in the background, advertising Esquire car sales. .5 - A Tait train on the crossing no gates in operation. .6 - ditto, to Sandringham .7 - W6 965, route 4 to the City on the crossing. Has two railway hoardings in the background advertising BP Benzol petrol and Saunders Pure Malt extract and part of a sign for Penfolds. The tram has an advert for Porsche cars. Note the tram stop sign on the small post alongside the tram.Hand writing on rear in ink; .1 - 28-5-60 - Railway cutting for underpass at Elsternwick Vic. .2 - ditto, tram 675 on temporary tracks in Glenhuntly Road, Elsternwick Vic. .3 - tram 103 on temporary tracks in Glenhuntly Road, Elsternwick Vic. .4 - tram 269 on temporary tracks in Glenhuntly Road, Elsternwick Vic. .5 - Elsternwick station new crossing .6 - Temporary track Elsternwick Vic .7 - Tram 965 at temporary stop at Elsternwick Vic.trams, tramways, elsternwick, level crossings, railway squares, w2 class, l class, carnegie, south caulfield, glenhuntly rd, w6 class, vr -
 Melbourne Tram Museum
Negative, Wal Jack, 24/07/1944 12:00:00 AM
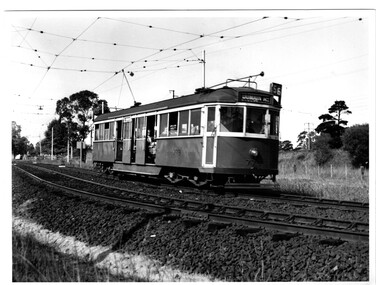
Black and white negative, by Wal Jack, of W2 365 in Whitehorse Road, crossing the outer circle railway. The tram has the destination of Balwyn. Note the sign on the level crossing requiring all trains to stop before proceeding. In the background is a Penfolds Wine billboard. Photo dated 24-7-1944 in the Wal Jack album along with details of the location and the tramcar.trams, tramways, balwyn, whitehorse road, level crossings, outer circle railway, w2 class, tram 365 -
 Melbourne Tram Museum
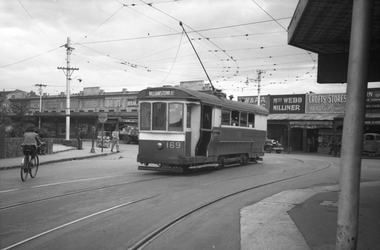
Negative, Wal Jack, 21/04/1945 12:00:00 AM
Black and white negative, by Wal Jack, of S 169, Williamstown Road turning from Irving St into Nicholson St over the railway line. In the background are Malvern Cycles, a frock shop, Footscray Fish Shop, Bancroft's Dry cleaners, Moran and Cato, Miss Webb Milliner, Crofts Grocery, A I Brown delivery truck, tram stop sign, fire alarm and a road "Major Stop Road".trams, tramways, footscray, nicholson st, irving st, williamstown road, s class, tram 169 -
 Melbourne Tram Museum
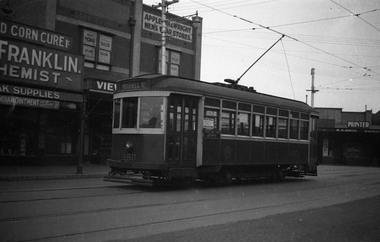
Negative, Wal Jack, late 1930's?
Black and white negative, by Wal Jack, of X1 460, at the Footscray Railway Station terminus in Leeds St. Has the destination of Russell St. Tram has a Pay as You leave sign. In the background is the Franklin Chemist, Appleton and Wright Menswear, Roy Thomas Tailor, and R. S. Smith Printer. Either late 1930's, 1940 or post 1945 no white stripe on tram.trams, tramways, footscray, leeds st, x1 class, tram 460 -
 Melbourne Tram Museum
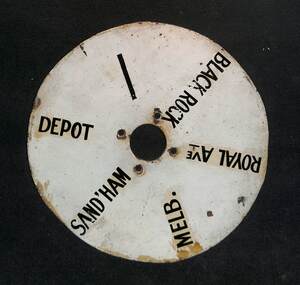
Sign - VR Sandringham Destination plate, Victorian Railways
Used on VR Sandringham Black Rock trams as part of the destination setting mechanism - told the driver or conductor what the destination was set to. Shows the destinations of: Depot Black Rock Royal Ave Melb (Melbourne) SandringhamDemonstrates a plate that would have been attached to tramcar as part of the destination box mechanism.Round plate or disc, white front, lettered in black with four drilled holes. Two copies held. Has five destination names painted in black.vr trams, sandringham to black rock, destinations -
 Melbourne Tram Museum
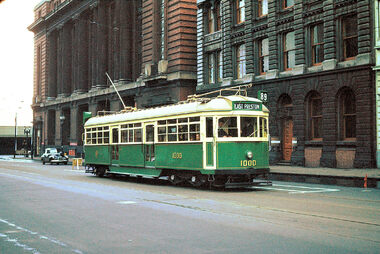
Photograph - Digital Image, W6 1000 on the opening day of the service in Bourke St, 26/06/1955 12:00:00 AM
Set of 4 digital images of W6 1000 on the opening day of the service in Bourke St via High St Northcote to East Preston on 26/6/1955. .1 - 1000 (East Preston route 89) at Spencer St, note the sign behind the tram and the newly painted safety zone. Has the Mail Exchange in the background. .2 - ditto at Spencer St with Carlyon's Hotel and the Spencer St Railway station in the background. .3 - tram arriving at the East Preston depot leads - has adverts for Milo, Kiwi boot polish and Pleshur's shoes. .4 - ditto with a Book Repairs Shop, R. P Evans, Goweville Hotel advertising Fosters Lager, and the Melody Picture theatre, In the background is Bell St with a set of clock traffic lights and two tower wagons and a Pura Milk truck just behind the tram.trams, tramways, w6 class, opening, route 89, bourke st, east preston, high st, northcote, tower trucks, traffic lights, bell st, tram 1000 -
 Melbourne Tram Museum
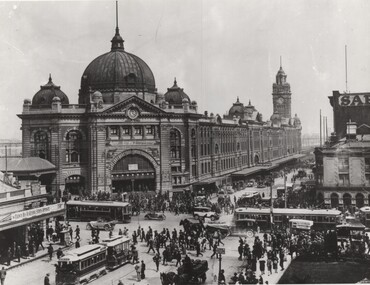
Photograph - Black and White photograph, Flinders St station cable and electric trams, c1926
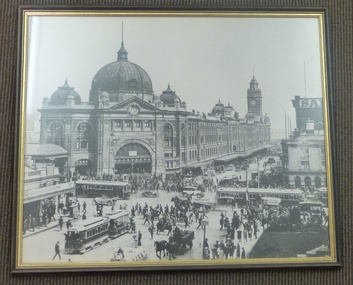
... cream, and numerous signs on the railway station. See Reg Item..., and numerous signs on the railway station. See Reg Item 5272 ...Photograph of the intersection of Flinders and Swanston Sts featuring the Flinders St Station building - c1926?? features a very busy intersection cable trams (No. 17 west bound in Flinders St), tram 160 north bound in Swanston, two W class trams, other cable trams, many motor cars, horse drawn vehicles, cyclist and pedestrians. Note the standing zone in Flinders St. In photo are Young and Jacksons Hotel, Bacchus Marsh Concentrated Milk table cream, and numerous signs on the railway station. See Reg Item 5272 for the photo on a Greetings Card and 103 for a framed photographic print.Yields information about the intersection of Flinders and Swanston St c1926 - after the conversion of Swanston St.Black and white photograph with notes on the rear. Two copies held.Has "1926 Brimson VicRail" in ink along lower edge on rear and "H4505" in the middle of the print back.trams, tramways, flinders st, swanston st, cable trams, flinders st station -
 Melbourne Tram Museum
Photograph - Black and White photographs and digital images, Victorian Railways, c1926
.1 - Black and White photo of W 324 passing under the rail over bridge in Racecourse Road Newmarket between July 1925 and Nov. 1929. Tram was converted to a W2 in November 1929. The Doutta Galla Hotel in the background. On the left of the bridge is Newmarket Station and on the right of the photo is the fence of the stockyards. The bridge has an advert for Wolfes Schnapps and Blue? Label Tea. On the embankment is a sign for Life Guard Life Insurance? A lady is waiting at the tram stop. The photo is part of the VR Advertising series, made to show advertisers where signs could go. image i2 - cropped image showing the tramcar by itself. .2 and .3 - Z3 class 209 in about the same position, with a large KIA motor vehicle advertisement. The yellow crash beams and truck parking bay are a result of too many large trucks hitting the bridge. Photo by Warren Doubleday 26/4/2021On rear in ink "ADV 202"trams, tramways, newmarket, racecourse road, flemington, w class, tram stops, advertisements, z3 class, tram 324, tram 203 -
 Melbourne Tram Museum
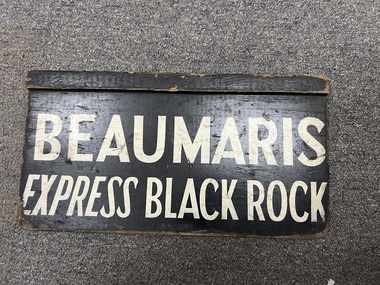
Sign - Form - Receipt docket, Victorian Railways (VR), Auxiliary Destination Board - Express - Beaumaris
Used as a destination or auxiliary board on Sandringham trams and buses that operated from the Sandringham railway station tram/bus depot. Tram and bus services were operated by the Victorian Railways. Have been letter Beaumaris Express and Beaumaris Express Black Rock which indicate more bus rather than trams.Demonstrates destination signs used by the Victorian Railways on their Sandringham services. Sign - plywood - 3 ply with a rebated timber section at the top of the sign, painted black with white letters. tramways, vr, sandringham, vr buses, buses, signs -
 Melbourne Tram Museum
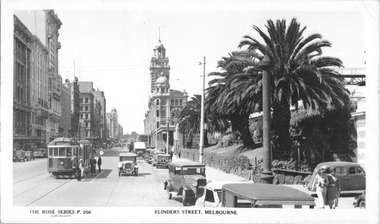
Postcard, Rose Stereograph Co, "Flinders St Melbourne", late 1930s
Rose Series postcard No. P 206, titled "Flinders St Melbourne" with W2 class tram 412 (Spencer St, route 40) westbound in Flinders St with Flinders Street Railway Station in the background. A group of ladies has alighted from the tram at the Safety Zone near Queen St. Note the "Do not park here" sign placed behind the pole on the right side of the photograph.Yields information about Flinders St late 1930sPostcard - printed real photograph with Rose Stereograph Co. name on the rear. Two copies held.tramways, w2 class, flinders st, tram 412, safety zone, trams, route 40 -
 Melbourne Tram Museum
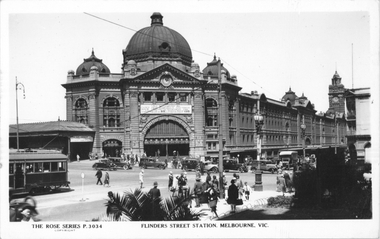
Postcard, Rose Stereograph Co, "Flinders St Railway station Melbourne", c1930's
Rose Series postcard No. P 3034 titled "Flinders St Railway station Melbourne" - with a W2 class tram about to cross Swanston Street. Some motor cars are in the view, some waiting to do their hook turns. A Policeman on point duty can be seen. The station has a large sign advertising Springtime at Mt Buffalo National Park.Yields information about the intersection of Flinders and Swanston Sts.Postcard - printed real photograph with Rose Stereograph Co. name on the rear.trams, tramways, w2 class, flinders st station, flinders st, swanston st -
 Melbourne Tram Museum
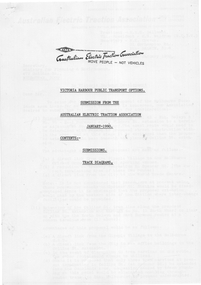
Document, Australian Electric Traction Association (AETA), "AETA submission - Victoria Harbour", Jan. 1990
Submission from Australian Electric Traction Association (AETA) dated Jan. 1990 about public transport options to Victoria Harbour, Melbourne docklands. Gives options for extension of Flinders St (tram route 48) or Collins St. Includes notes on La Trobe and Bourke St routes and suggestions re the Webb Dock railway line, ferries, monorails, and car parking. Signed by Ken Craven. Includes two diagrams.Yields information about the AETA's work and a 1990 submission re Victoria Harbour Docklands.Photocopy of a 5 page A4 document, was stapled in top left hand cornertramways, trams, aeta, docklands, new tramways, submissions, victoria harbour -
 Eltham District Historical Society Inc
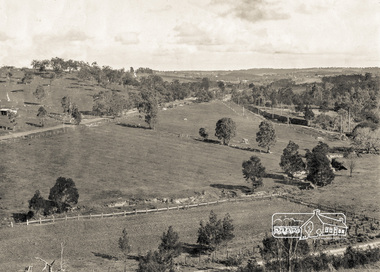
Photograph, Pepper's Paddock, Wattle Glen, c.1927, 1927c
Originally dated in pen on reverse as 1920 then crossed out to 1925 but it must be post August 1926 due to presence of an electric train. However no sign of the Sunnyside Estate development (1926?) although most of it could be over the hill out of shot. The furrows suggest that the paddock had been an orchard (probably apple).Digital copy of black and white photographelectric train, hurstbridge railway line, railway line, wattle glen, pepper's paddock, lesley mitchell (nee pepper) collection -
 Melbourne Tram Museum
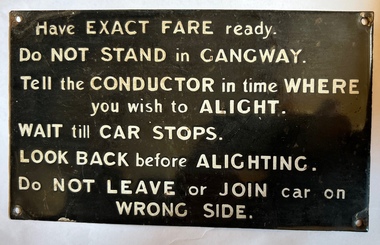
Sign - Victorian Railways - notice to passengers, Victorian Railways (VR)
... Victorian railways behaviour Sign - enamel white letters on a black ...Used by the Victorian Railways in their tramcars to advise passengers re payment of fares, standing in gangways, alighting and not leaving the tramcar on the wrong side.Demonstrates the method of advising passengers re their behaviour or duties.Sign - enamel white letters on a black background with screw holes in each corner.signs, trams, tramcars, victorian railways, behaviour -
 Melbourne Tram Museum
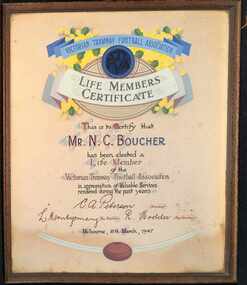
Certificate, Victorian Tramway Football Association (VFTA), Life Members Certificate - Mr N C Boucher, March 1947
Presented by the Victorian Tramway Football Association to Mr Norman Charles Boucher, Victorian Railways, Tramway Motorman for his long service to the Association. Dated 18 March 1947. Hand made with ink and water colours, with VFTA logo. Signed by C A Peterson as President, L Montgomery as Hon. Treasurer and R Hodder as Secretary. See item 7056i3.pdf for his story prepared by Noelle Jones. See item 7057 for a football team photograph which included Mr Boucher.Demonstrates a hand made illustrated Life Membership certificate.Wooden framed illustrated certificate glazed secured with nails on rear. Hand made with ink and colour wash. Has two screws in the top corners and a section of string for hanging. The wood frame is machined carved.sports, vfta, football, certificates, vr trams, motormen, n c boucher -
 Melbourne Tram Museum
Postcard, Railcard, VR53, Latrobe St Melbourne, Oct. 2006, 2007
Colour postcard of VR53, Latrobe St Melbourne, Oct. 2006. Tram showing Special. Buildings in the rear have a Hoyts advertising sign. Postcard produced by Association of Railway Enthusiasts, ARE No. 14/07. Has Railcard copyright and phone number of rear, ARE shop details and hours, space for small message, address and stamp. Two copies held.trams, tramways, melbourne, vr, are, latrobe st, tram 53 -
 Melbourne Tram Museum
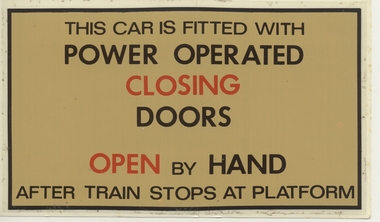
Sign, JBC, power closing doors, 1970's?
... Trams tramways Victorian Railways Melbourne Sign regarding ...Sign regarding the operation of a Melbourne suburban train door that has been fitted with power closing doors, three colours, adhesive back with the name of the manufacturer "JBC" on the rear. Has two sheets of paper split in the middle that protected the sign until use. Possibly dates from the time of the introduction of power doors on Harris Trains.trams, tramways, victorian railways, melbourne -
 Melbourne Tram Museum
Print - Framed Print, Glen Waverley Picture Framing, 1970's?
... Milk table cream, and numerous signs on the railway station... Marsh Concentrated Milk table cream, and numerous signs ...Framed, glazed, black and white photograph of the intersection of Flinders and Swanston St Melbourne, looking towards Flinders St railway station. Timber frame, painted brown and gold, with brown paper lining on rear. Has brown string stapled at rear on both sides for hanging. In the central bottom of the rear is "Glen Waverley Picture Framing, sticker, 698 High St Road, Glen Waverley with a 7 digit phone number. Photo c1926?? features a very busy intersection cable trams (No. 17 west bound in Flinders, tram 160 north bound in Swanston, two W class trams, other cable trams, many motor cars, horse drawn vehicles, cyclist and pedestrians. Note the standing zone in Flinders St. In photo are Young and Jacksons Hotel, Bacchus Marsh Concentrated Milk table cream, and numerous signs on the railway station. See Reg Item 5272 for the photo on a Greetings Card and 5217 for a photographic print.on rear top "Donated to Hawthorn Tram Museum Feb 1912 Ron Scholten" in ink.trams, tramways, flinders st station, swanston st, flinders st, melbourne, cable trams -
 Melbourne Tram Museum
Photograph - Black & White Photograph/s, early 1950's?
Black and white photograph of W5 No. 779 inbound to the City and Domain Road on route 56, on the open ballasted track just before passing under the railway line at the Zoo gardens area. Shows the open doors with the bars down. Photo of the tram slightly out of focus. Taken early 1950's by an unknown photographer. In the overhead shows a sign black cross in a circular disc and behind the tram a incandescent light suspended in the middle of the overhead. The photo shows the construction of the track at this location, dog spiked sleepers, the rail supports for the inner check rail. In the background behind the tram is the lever for the points of the crossover.On the rear in red ink "Melbourne tram shows use of Off-street tracks in an outer suburb"trams, tramways, zoo tram, reserved track, track construction, w5 class -
 Melbourne Tram Museum
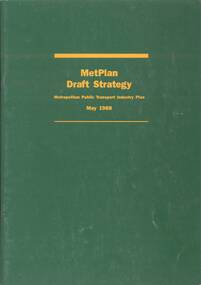
Document - Report, Metropolitan Transit Authority (MTA), "Metplan Draft Strategy - Metropolitan Public Transport Industry Plan - May 1988", May. 1988
Report - 40 pages, green card cover, centre stapled titled "Metplan Draft Strategy - Metropolitan Public Transport Industry Plan - May 1988", looking at Melbourne's transport needs over the next 15 years. Comments were to close on 15/8/1988. Produced by the MTA, signed off by K. P. Shea as Managing Director. Has an index, looks at the Task, heavy, light rail, tram, bus, taxis, ticketing systems, management, and the various regions including funding and budget.trams, tramways, discussion paper, transport, light rail, tramways, railways, road transport, minister for transport, mta, metplan -
 Melbourne Tram Museum
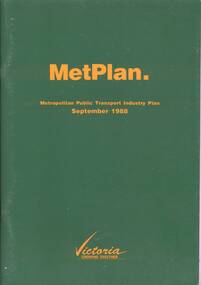
Document - Report, Metropolitan Transit Authority (MTA), "Metplan Metropolitan Public Transport Industry Plan - September 1988", May. 1988
Report - 64 pages, green card cover, centre stapled titled "Metplan Metropolitan Public Transport Industry Plan - September 1988", looking at Melbourne's transport needs over the next 15 years. Produced by the MTA, signed off by Jim Kennan Minister for Transport . Has an index, looks at the Task, heavy, light rail, tram, bus, taxis, ticketing systems, management, and the various regions including funding and budget.trams, tramways, transport, light rail, tramways, railways, road transport, minister for transport, mta, metplan -
 Bendigo Historical Society Inc.
Document - VICTORIA HILL - THE RICH VICTORIA HILL AND IT'S HISTORICAL ASSOCIATION
Two copies of document : nineteen handwritten pages of notes on 'The Rich Victoria Hill and Its Historical Association' Signed by A Richardson and dated 30 - 8 - 1971. and a typed copy of same. Notes include: Introduction, Hotels, Mines, Mining History and descriptions of features where the signposts are. Mines mentioned in the text are: North Old Chum. Ballerstedt's first open cut, Lansell's Big 180. 20 head stamper, Lansell's Cleopatra Needle, Victoria Quartz Mine. Cleopatra's Needle was a square sectioned brick chimney with this four sided pyramidal chimney top with four vents to allow the smoke to escape whatever the direction of the wind. It was demolished in the 1950's as it had a bend in it and it was considered unsafe. Lansell had two other mines with similar chimneys, the '222' in Chum Street and his 'Sandhurst' or 'Needle' mine near the Bendigo, Eaglehawk boundary. Notes prepared by Albert Richardson.mine, gold, victoria hill, victoria hill, the rich victoria hill and it's historical association, j. n. macartney, quartz miner's arms hotel, ironbark methodist church, greek orthodox church, john brown knitwear factory, little 180 mine, geo lansell, conrad heinz, british & american hotel, victoria reef gold mining coy, manchester arms hotel, housing commission homes, ironbark (victoria reef gold mines, hercules and energetic, midway, wittscheibe, gt central victoria, wm rae, mr & mrs conroy, wm rae jr, central nell gwynne, moorhead's shop, gill family, gold mines hotel, david chaplin sterry, pioneer, new chum and victoria, burrowes and sterry, new chum and victoria tribute, rotary club of bendigo south, big 180, victoria quartz mines, jeweller's shop, bendigo and district tourist association, north old chum mine, john wybrandt, ballerstedt's first open-cut, j c t christopher ballerstedt, ballerstedt's mine, bendigo cemetry, lansell's 'cleopatra nedle' type chimney, 222 mine, sandhurst or 'needle' mine, victoria quartz mine, victoria reef quartz company, mr e j dunn, eureka ext'd, new chum railway, pearl, bendigo advertiser 16 june 1910, victoria consols, shamrock, shenandoah, victoria quartz dams, rae's open cut, prospecting tunnels, floyd's small 5 head crushing battery, gt central victoria (midway) shaft, midway no 2, midway north, ballerstedt's small 24 yard claim, the humboldt, the tribute coy, advance, luffsman and sterry's claim, a round shaft, chinese joss house, lansell's fortuna, p m g repeater station, a richardson -
 Bendigo Historical Society Inc.
Document - VICTORIA HILL - NOTES ON VICTORIA HILL (SIGNS)
Twelve handwritten copied pages (a & b) of notes with typed copy of same, regarding the signs for Victoria Hill. Signs indicate the feature and a description including Prospecting Shafts, dams, engine beds, Lansell's Big 180 Shaft, stampers, Victoria Quartz Mine, Victoria Quartz Dams, Rae's Open Cut, Anticlinal Arch, small primitive tunnels, Engine-bed for Great Central Victoria known as 'Midway' mine, prospecting tunnels, floyd's small 5 Head Crushing Battery, Ballerstedt's Small 24 Yard Claim, The Humboldt 1856 to 1861, Luffsman and Sterry's Claim, and A Round Shaft.document, memo, victoria hill, victoria hill, notes on victoria hill (signs), lansell's big 180, ballerstedt senior, george lansell, victoria quartz mine, victoria reef quartz coy, wm rae, a roberts & sons, mr e j dunn, new chum drainage scheme, eureka extended, new chum railway, pearl, bendigo advertiser, inrush of water at the victoria quartz, victoria consols, shamrock, shenandoah, victoria quartz dams, rae's open cut. prospecting tunnel, floyd's small 5 head crushing battery, great central victoria (midway), midway no 2, midway north, ballerstedt's small 24 yard claim, the humboldt, wittscheibe, the adventure, advance, george lansell, luffsman & sterry's claim, david sterry, gold mines hotel, city of sandhurst, lansell's fortuna, a richardson -
 Melbourne Tram Museum
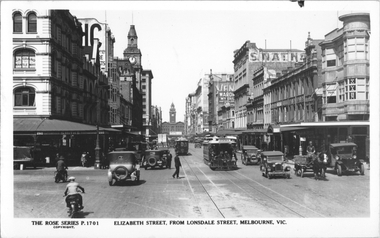
Postcard, Rose Stereograph Co, "Elizabeth Street from Lonsdale Street Melbourne", c1934
Rose Series postcard No. P 1701 titled "Elizabeth Street from Lonsdale Street Melbourne". Has a number of cable trams in the view, the closest one being a Brunswick tram. There is a policeman on point duty. In the view are signs for G A Grano Mantle manufacturers, Smiths Pawnbroker, State Savings Bank, MIchaels Camera store, one horse-drawn cart, and motor vehicles. On the west side footpath under an awning is a "Keep to the left" for pedestrians. Flinders St Railway Station can be seen in the far distance. The Brunswick cable tram line was closed Sept. 1935.Yields information about Elizabeth St, c1930Postcard - printed real photograph with Rose Stereograph Co. name on the rear.On rear in pencil "KM-M-076" and a Ken Magor stamp.trams, tramways, flinders st station, cable trams, elizabeth st -
 Flagstaff Hill Maritime Museum and Village
Vehicle - Tip Dray, Prior to 1930s
A Dray is a type of dead axle wagon that was used to transport heavy loads or objects. They had a flat level floor and while some had no sides, others had box bodies and sides. Tip Drays (also known as Tip Carts, Muck Cart, Scotch Cart, Tumbrel or Putt in different parts of England) were smaller than other drays as their loads were heavy and usually only pulled by one horse. Their basic design included two wheels, a tipping body and shafts. The Tip Dray has a unique mechanism that allows the top to tip backwards to tip the load out of the back of the dray. The tipper was activated by a handle at the front allowing the driver to operate it while still having control over the horse. A Tip Dray was an indispensable piece of equipment in the days before tractors and mechanical trucks. They were used by farmers and carters to transport hay, rocks, bricks, gravel and rubbish etc. and because they were useful for dumping loads, they were favoured for use in road and railway construction. A photo in the collection of the Lorne Historical Society shows a tipping dray being used during the construction of the Great Ocean Road. They were part of the daily street traffic in towns and cities around Australia from the early days of settlement. In Australia in the early 1900's, carters began to join unions to protect their jobs and pay. N.S.W. had a "Trolley, Draymen and Carters Union", Queensland had a "Tip Dray Men's Association" and in W. A. the "Top Dray Driver's Union" had a "cessation of work" in 1911 when they were fighting for an increase in their day's wages. In 1910 a meeting of Tip Carters was held in Geelong at the Trades Hall to discuss the formation of a union (The Geelong Tip Dray Carters) which was a success and a schedule of rates for all carting, whether by contract or day labor, was fixed. By 1912 they had "labelled" more than 50 drays and had representatives on the "Trades Hall and Eight Hours Committee". By the mid 1930's and early 1940's, tip drays were being superseded by mechanical trucks and utes. However tip drays continued to be used in some circumstances. They were a practical solution to the problem of petrol rationing during W. W. 2. It was noted in a letter to the editor in the "Sunshine Advocate" in 1938 that a positive argument for continued use of Tip Drays for rubbish collection related to the idea that a horse drawn vehicle involved with lots of stops and starts at different houses (very like a milkman's delivery route) often involved the horse "driving itself" while the driver picked up the rubbish - something a motor truck was unable to do! Another article written in August 1935 and published in the Age in a parliamentary report into the rubber industry noted "tip drays had almost disappeared and in their place, metal was carted in 5 ton motor trucks" but the report went on to say that as a part of the Government relief work (during the Great Depression) the Government had "to some extent reintroduced the tip drays so that a greater number of men would be employed". This particular tip dray was owned by Mr. Oswald (Jack) Bourke. He used it to deliver dry goods from Sunbury to the Queen Victoria Market in Melbourne several times a week in the 1930's and then (between 1945 and 1962) Mr. Bourke used it on the garbage round in Springvale Victoria for the Springvale Council. The Council owned three drays and the "No. 3" painted on this dray is in recognition of its original number. After the death of Mr. Bourke in 1990, one of Mr. Bourke's sons (Andy) found the dray in a shed and restored it. The sign writing on the back and side panels were added during the restoration. This Tipping Dray is a significant example of a horse drawn vehicle that was used by workers from the early days of white settlement through to the 1940's and even into the early 1960's. It was used in a range of "working class" occupations - road construction, railway construction, carting goods, rubbish collection etc. and would have been found in cities, country towns and on farms.A wooden and metal tipping dray with a box body and four sides. It has two iron and wooden wheels (with 14 spokes), two wooden shafts and a metal tipping mechanism. The back panel folds down to allow loads to be dumped out. It is painted in green and cream with sign writing on one of the sides and on the front and back panels. It features decorative painted lines and designs in burgundy, cream and light blue on most of the wooden parts. The tipping mechanism is on the front of the dray's left side and consists of a metal pin secured with a metal ring, and a lever.Front of dray - "No. 3" Side of dray - "A. & M. BOURKE / Contractors / LONGWARRY" Back of dray - "G.T. ANDREWS / QUEEN VICTORIA MARKET - Stand C23 / Phone DANDENONG 225"flagstaff hill maritime museum and village, warrnambool, shipwreck coast, tipping dray, dray, tip dray, tip cart, vehicles, horse drawn vehicle, springvale council, jack bourke, muck cart, scotch cart, tumbrel, putt, box body, oswald bourke, sunbury, queen victoria market, melbourne, no. 3 -
 Flagstaff Hill Maritime Museum and Village
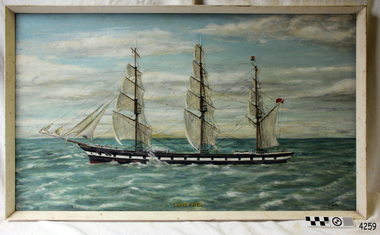
Painting - Vessel, Sailing Ship, C Smith, artist, Loch Ard, late 20th century
HISTORY OF THE LOCH ARD The LOCH ARD belonged to the famous Loch Line which sailed many ships from England to Australia. Built in Glasgow by Barclay, Curdle and Co. in 1873, the LOCH ARD was a three-masted square rigged iron sailing ship. The ship measured 262ft 7" (79.87m) in length, 38ft (11.58m) in width, 23ft (7m) in depth and had a gross tonnage of 1693 tons. The LOCH ARD's main mast measured a massive 150ft (45.7m) in height. LOCH ARD made three trips to Australia and one trip to Calcutta before its final voyage. LOCH ARD left England on March 2, 1878, under the command of Captain Gibbs, a newly married, 29 year old. She was bound for Melbourne with a crew of 37, plus 17 passengers and a load of cargo. The general cargo reflected the affluence of Melbourne at the time. On board were straw hats, umbrella, perfumes, clay pipes, pianos, clocks, confectionary, linen and candles, as well as a heavier load of railway irons, cement, lead and copper. There were items included that intended for display in the Melbourne International Exhibition in 1880. The voyage to Port Phillip was long but uneventful. At 3am on June 1, 1878, Captain Gibbs was expecting to see land and the passengers were becoming excited as they prepared to view their new homeland in the early morning. But LOCH ARD was running into a fog which greatly reduced visibility. Captain Gibbs was becoming anxious as there was no sign of land or the Cape Otway lighthouse. At 4am the fog lifted. A man aloft announced that he could see breakers. The sheer cliffs of Victoria's west coast came into view, and Captain Gibbs realised that the ship was much closer to them than expected. He ordered as much sail to be set as time would permit and then attempted to steer the vessel out to sea. On coming head on into the wind, the ship lost momentum, the sails fell limp and LOCH ARD's bow swung back. Gibbs then ordered the anchors to be released in an attempt to hold its position. The anchors sank some 50 fathoms - but did not hold. By this time LOCH ARD was among the breakers and the tall cliffs of Mutton Bird Island rose behind the ship. Just half a mile from the coast, the ship's bow was suddenly pulled around by the anchor. The captain tried to tack out to sea, but the ship struck a reef at the base of Mutton Bird Island, near Port Campbell. Waves broke over the ship and the top deck was loosened from the hull. The masts and rigging came crashing down knocking passengers and crew overboard. When a lifeboat was finally launched, it crashed into the side of LOCH ARD and capsized. Tom Pearce, who had launched the boat, managed to cling to its overturned hull and shelter beneath it. He drifted out to sea and then on the flood tide came into what is now known as LOCH ARD Gorge. He swam to shore, bruised and dazed, and found a cave in which to shelter. Some of the crew stayed below deck to shelter from the falling rigging but drowned when the ship slipped off the reef into deeper water. Eva Carmichael had raced onto deck to find out what was happening only to be confronted by towering cliffs looming above the stricken ship. In all the chaos, Captain Gibbs grabbed Eva and said, "If you are saved Eva, let my dear wife know that I died like a sailor". That was the last Eva Carmichael saw of the captain. She was swept off the ship by a huge wave. Eva saw Tom Pearce on a small rocky beach and yelled to attract his attention. He dived in and swam to the exhausted woman and dragged her to shore. He took her to the cave and broke open case of brandy which had washed up on the beach. He opened a bottle to revive the unconscious woman. A few hours later Tom scaled a cliff in search of help. He followed hoof prints and came by chance upon two men from nearby Glenample Station three and a half miles away. In a state of exhaustion, he told the men of the tragedy. Tom returned to the gorge while the two men rode back to the station to get help. By the time they reached LOCH ARD Gorge, it was cold and dark. The two shipwreck survivors were taken to Glenample Station to recover. Eva stayed at the station for six weeks before returning to Ireland, this time by steamship. In Melbourne, Tom Pearce received a hero's welcome. He was presented with the first gold medal of the Royal Humane Society of Victoria and a £1000 cheque from the Victorian Government. Concerts were performed to honour the young man's bravery and to raise money for those who lost family in the LOCH ARD disaster. Of the 54 crew members and passengers on board, only two survived: the apprentice, Tom Pearce and the young woman passenger, Eva Carmichael, who lost all of her family in the tragedy. Ten days after the LOCH ARD tragedy, salvage rights to the wreck were sold at auction for £2,120. Cargo valued at £3,000 was salvaged and placed on the beach, but most washed back into the sea when another storm developed. The wreck of LOCH ARD still lies at the base of Mutton Bird Island. Much of the cargo has now been salvaged and some was washed up into what is now known as LOCH ARD Gorge. Cargo and artefacts have also been illegally salvaged over many years before protective legislation was introduced. One of the most unlikely pieces of cargo to have survived the shipwreck was a Minton porcelain peacock - one of only nine in the world. The peacock was destined for the Melbourne International Exhibition in 1880. It had been well packed, which gave it adequate protection during the violent storm. Today, the Minton peacock can be seen at the Flagstaff Hill Maritime Museum in Warrnambool. From Australia's most dramatic shipwreck it has now become Australia's most valuable shipwreck artefact and is one of very few 'objects' on the Victorian State Heritage Register. Flagstaff Hill’s collection of artefacts from LOCH ARD is significant for being one of the largest collections of artefacts from this shipwreck in Victoria. It is significant for its association with the shipwreck, which is on the Victorian Heritage Register (VHR S417). The collection is significant because of the relationship between the objects, as together they have a high potential to interpret the story of the LOCH ARD. The LOCH ARD collection is archaeologically significant as the remains of a large international passenger and cargo ship. The LOCH ARD collection is historically significant for representing aspects of Victoria’s shipping history and its potential to interpret sub-theme 1.5 of Victoria’s Framework of Historical Themes (living with natural processes). The collection is also historically significant for its association with the LOCH ARD, which was one of the worst and best known shipwrecks in Victoria’s history. Painting of 1873 sailing ship the "Loch Ard". Oil painting on board behind glass, framed in white painted timber. Artist is C Smith. Inscription on back. "Loch Ard launched 1873, sunk near Pt Campbell, with loss of 52 lives 1878" "C. Smith" "Loch Ard" flagstaff hill, warrnambool, shipwrecked coast, flagstaff hill maritime museum, maritime museum, shipwreck coast, flagstaff hill maritime village, great ocean road, loch line, loch ard, captain gibbs, eva carmichael, tom pearce, loch ard gorge, maritime oil painting, c. smith, sailing vessel