Showing 1026 items matching "tramways geelong"
-
 Ballarat Tramway Museum
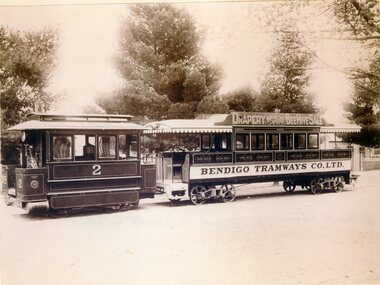
Photograph - Bendigo steam tram No 2 Mollison St, William H Robinson, 1892/1895
Copy print of a sepia toned image of a Bendigo Tramways Co. Ltd steam tram motor (No. 2) and trailer No. 6, possibly on the depot access track. Shown as a W. H. Robinson photograph, was scanned from a block mounted print. Has in pencil "1892 - 1902" reproduced on the photograph. Trailer No. 6 has a roof advertising board "Drapery half price Beehive Sale". shows in detail the presentation of the trams, painting scheme, bogie arrangements. Two copies held. 4369.2 - Black and White copy print contained within the Wal Jack Bendigo and Geelong Album, see Reg Item 5003 for more details. Added 30/6/2013. Has 'WJ T168" written in ink on the front of the photograph. See item 9464 for a glass plate negative of this image and 987 and 1439 for other images.Yields information about Bendigo steam tram and their trailers.Black and White reproduction printCopy 1 - Has "17)" in the top left hand corner of the front of the photograph. On the rear "(8)" in pencil in the top left hand corner. In pencil and ink "Bendigo Tramways (steam system) 1892", "Copied from William H Robinson / Leonard C. Bennetts Collection" and a "William F Scott" address label in the bottom right hand corner. Also has cropping instructions and other marks. Copy 2 - In pencil "Bendigo / William H Robinson / Leonard C. Bennett Collection" 4369.1 - on rear in ink "Bendigo No. 2 Motor, No. 6 Car, Mollison St. 1895" Motor No. 2 by Baldwin B/No. 12242 of 1891" Has Wal Jack copyright stamp on rear and number T168 written in.trams, tramways, bendigo, mollison st, steam trams, trailers, tram 2, tram 6 -
 Ballarat Tramway Museum
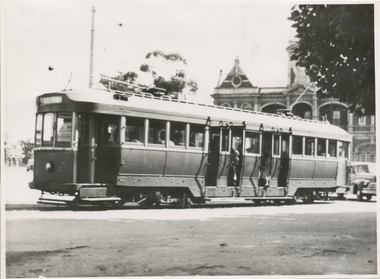
Photograph - Bendigo tram 26 Eaglehawk, Keith Kings, 8/04/1950
Photograph of No. 26 the Eaglehawk terminus, 8-4-1950, photo by Keith Kings. Has the Eaglehawk Town Hall in the background. See item 9463 for a glass plate negative.Yields information about tram 26 and the Eaglehawk Destination.Black and White print contained within the Wal Jack Bendigo and Geelong Album, see Reg Item 5003 for more details.In ink on rear "SEC Victoria, Bendigo, Bogie car No.26 at Eaglehawk". Date "8/4/1950" in bottom right hand corner. Keith Kings copyright stamp in top left hand corner with "D(k)(vi)" and "enlargement" written in.trams, tramways, bendigo, bogie trams, tram 26 -
 Ballarat Tramway Museum
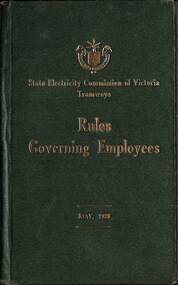
Booklet, State Electricity Commission of Victoria (SECV), "Rules Governing Employees", 1940
Gives details with an index of the rules for Motorman, Conductors, and both types of employees together. Has an "Issued to" form inside the front cover - no entries. Has printer details on inside title sheet and on rear sheet and print stock details "FTY 18-8,-1507/40 on inside front only." Printed by the Government Printer H.E. Daw. Glued into the rear of the book is SEC By-Law No. 1, brown covers giving definitions, fares and charges, regulations re passengers, behaviour, smoking, dangerous goods, luggage, and behaviour of crews. Gives a schedule of fares and charges for Ballarat, Bendigo, and Geelong. Fares applied from 1937 to 1949. (See also item 3110). Printed by the Government Printer H Green. Details names of SEC Commissioners, Minister in Charge of Electrical Undertakings.Demonstrates aspects of the way the SEC issued rules to employees on how they should behave and perform their duties safely. Yields information on particular items and operations.Booklet with green cloth covers, titled in gold block "State Electricity Commission of Victoria - Tramways - Rules Governing Employees - May 1936"on heavy card with inside paper covers on heavy paper and 24 pages printed both sides, with stitched pages with white cotton. By-Law 1 dated 9/3/1937 has been glued into the back of the book.tramways, ballarat, secv rules, by-laws, tickets, fares, motormen, conductors -
 Ballarat Tramway Museum
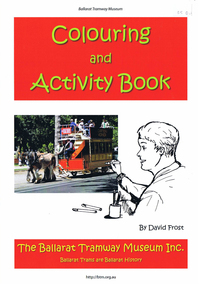
Booklet - Colouring Book, David Frost, "The Ballarat Tramway Colouring and Activity Book", 2014
The second edition comprises eight drawings to be coloured in or other activities prepared by David Frost and Peter Waugh. Added coloured photos of some of our trams on the rear cover. See items 2250 for the first edition and 9539 for the third edition. Printed by Desktop Dynamics, Geelong.Demonstrates a BTM produced Sales item.Book - 16 pages colour outside covers, centre stapled.tram, trams, btps, colouring book, sales items -
 Melbourne Tram Museum
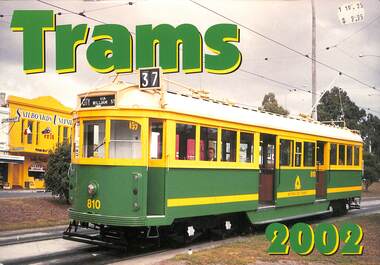
Document - Calendar, Trams 2002
Containing full colour photographs of Adelaide, Melbourne, Ballarat, Melbourne, Fremantle, Sydney, Brisbane, Perth, Geelong, Launceston and Dunedin. Provides dates for holidays, school holidays and phases of the moon. Produced by Topmill Pty Ltd and distributed by Gordon & Gotch Pty Ltd. Has photos of Melbourne trams SW5 810, PCC 1041, Melbourne tram strike in Swanston St and W2 223. Photos by Arthur Perry, Les Horsburgh, Ken Smith, Warren Doubleday and Barrie Hitchens. Demonstrates production of calendars featuring tram photographs, containing many historic photographs of closed tramway systems.Wall Calendar - heavy card covers, 16 gloss art pages inside, titled "Trams - 2004" with a punched hole along the top edge to enable wall use.Has a $9.95 price label.tramways, trams, melbourne, adelaide, perth, fremantle, ballarat, geelong, launceston, brisbane, tram 810, tram 1041, tram 223 -
 Melbourne Tram Museum
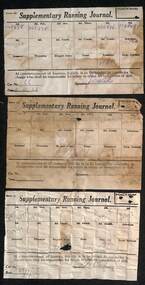
Document - Form, Melbourne & Metropolitan Tramways Board (MMTB), "Supplementary Running Journal", 1926
Set of three ""Supplementary Running Journal", used by Conductors to enable the checking of tickets by Examiners. Was to be filled out prior to the commencement of journey and placed in the clip provided. Has space for date, punch mark, each fare value or type, time Signature and Number. All have punch marks. All sheets recovered from trams 66 and 64 (became Geelong 28 and 26 respectively) by the donor when recovering seats for use in Geelong 2. .1 - has been used, but undated. .2 - date 26-7-1926 - has been filled out .3 - best example - dated - 11-11-26 for use on tram 66 Both trams were sold to Geelong in 1928.Demonstrates the methods of advising Ticket Examiner or Inspectors tickets sold by a previous conductor on the tram."Supplementary Running Journal" - printed - Form 22 - set of 3.tramways, tramcars, tickets, conductors, revenue journal, inspectors -
 Ballarat Tramway Museum
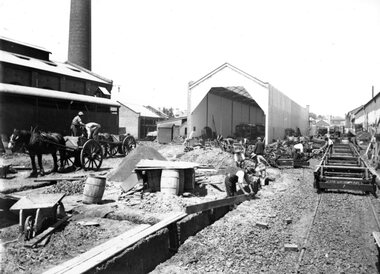
Photograph - Geelong Tram Depot, Melbourne Electric Supply Co. (MESCo), c.1910
... Geelong Tramway Depot Shed... the early development of tramway infrastructure in Geelong. Geelong ...Completed depot shed with trams being assembled from parts railed to Geelong from Duncan and Fraser, coachbuilders, Adelaide, and trucks supplied by the Brush Electrical Engineering Company of Loughborough, England. Chimney to the left is part of the Melbourne Electric Supply Company's coal-fired power station at the SW corner of Corio Tce. and Yarra St. 1911Yields information regarding the early development of tramway infrastructure in Geelong.Black and white print on paperPlate 3-2 Spare written in ink on the back of the photograph.geelong tramway depot shed, duncan and fraser, brush electrical engineering company, mesco power station -
 Ballarat Tramway Museum
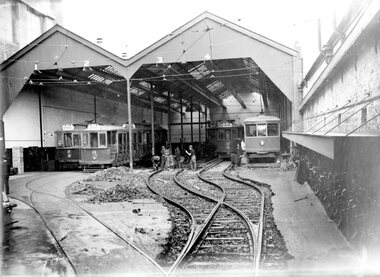
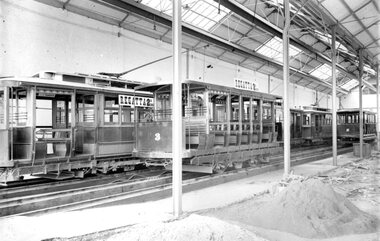
Photograph - Geelong Tram Depot, Melbourne Electric Supply Co. (MESCo), c1924
... . 1924 Yeilds information about the Geelong tramways buildings ...Shows a near complete Birney car to the right, with cars 2,11, a trailer and car 12 in roads 1-4. The tracks to roads 3 and 4 are being realigned to accommodate a new track to road 5. 1924Yeilds information about the Geelong tramways buildings, cars and track realignment in 1924.Black and white print on paper.Plate 1-9 hand-written on back of photo.birney car, tram cars, track realignment geelong tram shed -
 Ballarat Tramway Museum
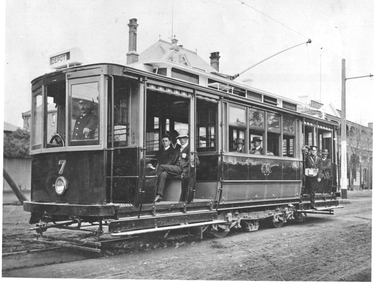
Photograph - Geelong MESCo tram 7, Melbourne Electric Supply Co. (MESCo), 3/1912
The photograph shows Geelong 7 as built, understood to be a test tram prior to the opening of the system. Photo taken in the then Corio Terrace, now Brougham Street Geelong 1912. Has a number of men on board the tram - depot workers for the photograph? See Item 4314 for another photo looking the other way and item 8612 for a framed version.Shows Geelong tram No. 7 as built.Black and White photograph with details on rearHas SEC Publicity photo stamp on the rear and number 9/274 and a pencil note "Corio Terrace before opening In March 1912"geelong, mesco, tram 7, corio terrace, opening, tramways -
 Ballarat Tramway Museum
Photograph - Geelong Tramway Trailers 2 and 3
... Geelong Tramway Trailers 2 and 3....Geelong Tramway Trailers No. 2 & 3... whose detailed sections were irrelevant. Geelong Tramway ...The remaining trailers 2 and 3 (after Nos 1 and 4 had been motorised) and a line of Duncan & Fraser tramcars in the depot. The broken paving and heaps of sand suggest that the tram shed is being extended to add roads 3 and 4 to the west. That would date the photo as 1914. Regattas were held on the Barwon River at the terminus of the South tramline which was linked directly to the other suburban destinations, Newtown and West Geelong. The standard fare was 3d cash or, for some shorter "sectional" journeys, pre-paid 2d tickets. The sign advertising an event on the river indicates that no matter where passengers alighted, the concession fare was 2d, to be paid in cash rather than by ticket whose detailed sections were irrelevant.Black and white print on paper.No. 3 inside a circle written on reverse in pen. 13-13 and GRS710/17/1/13 written on the reverse in pencil.geelong tramway trailers no. 2 & 3, tram fares in geelong 1914 -
 Ballarat Tramway Museum
Photograph - Geelong Esplanade Tramline Construction, Melbourne Electric Supply Co. (MESCo), 1928
... of Tramways infrastructure in Geelong. Geelong Esplanade Grooved ...Construction of the North tram route along The Esplanade, looking north. New grooved rail is laid out on the slope down to Corio Bay. 1928Yields information on the development of Tramways infrastructure in Geelong.Black and white print on paper.Repeat 8-14, 24/25 - 36, written in pencil on the rear of the photograph.geelong esplanade, grooved tramway rail, corio bay -
 Ballarat Tramway Museum
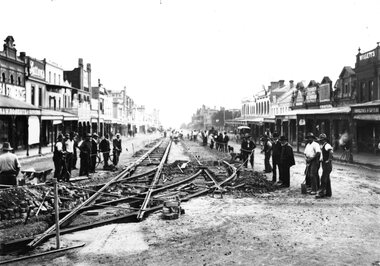
Photograph - Geelong Streetscape, Melbourne Electric Supply Co. (MESCo), c.1911
... in early Geelong. Tramways track development Moorabool and Ryrie ...Tram tracks being laid in Moorabool St., looking North. Curved track heads back into Ryrie St. 1911.Yields information re the development of commerce and tramways infrastructure in early Geelong.Black and white print on paper.8-13 written in biro on rear of photograph.tramways track development, moorabool and ryrie sts geelong -
 Ballarat Tramway Museum
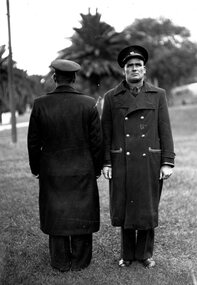
Photograph - Geelong Tramway Senior Traffic Inspector, Melbourne Electric Supply Co. (MESCo)
... Geelong Tramway Senior Traffic Inspector....Geelong tramway uniforms... uniform Geelong tramway uniforms MESCo 11/4 and No. 2 in a circle ...Senior Traffic Inspector.Black and white print on paper11/4 and No. 2 in a circle written on reverse in pen. GRS710/11/1/4 written on reverse in pencil.senior traffic inspector, tramway uniform, geelong tramway uniforms, mesco -
 Ballarat Tramway Museum
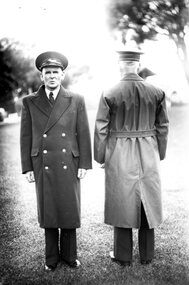
Photograph - Geelong Tramway Inspector Winter Uniform, Melbourne Electric Supply Co. (MESCo)
... Geelong Tramway Inspector Winter Uniform... Photograph Geelong Tramway Inspector Winter Uniform Melbourne ...MESCo Inspector in Winter Uniform.Yields information on winter apparrel for MESCo Tramways staff.Black and white print on paper11-1 written in red pencil on the rear of the photograph.inspector uniform mesco, mesco uniform front and rear view -
 Ballarat Tramway Museum
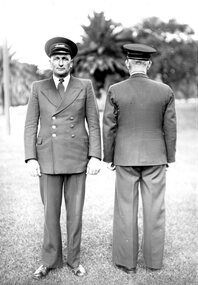
Photograph - Geelong Tramway Winter Uniform, Melbourne Electric Supply Co. (MESCo)
... Geelong Tramway Winter Uniform.... Photograph Geelong Tramway Winter Uniform Melbourne Electric Supply ...The Motorman or Conductor in winter uniform with SEC type number on his hat and a 3-button coat. The change in coat design would suggest that these photographs were taken in the late 1930s or in the 40s when uniforms would have been standardized across the three regional tramways in Victoria.Black and white print on paper.11-3 and GRS710/11/1/3 written on the reverse in pencil. No. 3 in a circle written on the reverse in pen.motorman, conductor, sec uniform c1930, tramway winter uniform c1930 -
 Melbourne Tram Museum
Album - Charles Craig - part 1 of 2, 1950s to 1970s
Photo - see pdf file for further information. Number Brief Description CC1 S178 at Elsternwick level crossing track works CC2 Building East Preston Depot 1955 CC3 Camberwell depot – post WW2 – lots of trams and a black cat CC4 W2 584 and SW6 958 northbound – Chapel St and Brighton Road CC5 W2 357 – southbound, Chapel St Brighton Road CC6 Pascoe Vale Road, Raceday working – note the signal CC7 The Preston Workshops - The Argus, post WW2, 223, 647 et al CC8 923 or is it 922 being built at Preston – The Argus photo - CC8A 832 being positioned onto trucks at Preston after an overhaul – Argus Photo – see also CC306 CC9 Footscray depot` CC10 W5 797 in St Kilda Road during track works – 1950s CC11 W2 457 at Kew Post Office CC12 Wellington Parade – W2 432, 492 and 337 – special event CC13 Swan St line up of trams – football? Or other special event – Sinclair’s bus on the right side. CC14 W2 630 being washed at a depot – The Argus photo CC15 Royal Park line at Flemington Road – W2 355 and W5 786 CC16 Nicholson St track construction from a tram cab CC17 T181 on tour at Gordon St CC18 T181 on Maribyrnong Bridge CC19 Ditto at River St just off bridge CC20 As for CC18 CC21 At Raleigh Rd CC22 T181 at Footscray depot CC23 Track construction, Nicholson, just north of Gertrude CC24 Commissioning overhead Bourke St tram 988 CC25 Queens Parade – 997 and 994 CC26 Swapping trolley wheel to skid – commissioning CC27 Track construction in Gertrude St CC28 985 in Queens Parade running special CC29 997 in Queens Parade CC30 1033 at North Fitzroy – AETA Special CC31 Bourke St at Elizabeth St – has passengers on board CC32 W6 985, 996 Queens Parade, Mk 3 bus 333 CC33 As above CC34 Showing construction at Nicholson & Gertrude – Bourke St CC35 W2 223 on Burnley temporary bridge – VR track expansion CC36 W5 823 – ditto CC37 Tram on old bridge prior to removal CC38 W2 433 on temporary bridge with new bridge beams and old track CC39 Looking down showing temporary single track – Swan St CC40 Tait train passing under tram bridge CC41 SW6 on single line – off loading CC42 W2 547 at City Road Junction CC43 City Road Jtn – 1969 – 596 and 771 CC44 City Road Jtn – 1969 – 596 and 771 (same as CC45 438 in Flinders St CC46 355 somewhere CC47 552 somewhere CC47A 364 at Preston Workshops? CC48 W2 334 on Traverser – Preston Workshops CC49 Wellington pade – large line up of trams, c1950 925, and 611 CC50 W2 493 Franklin st – advertising for Savings Certificates CC51 Possibly 551 with advertising for fund raising for Blind institute CC52 249 at Hawthorn – Riversdale Junction – with a Tally Ho and Village Fair Aux. board CC53 MMTB Postcard of 511 CC54 Wattle Park terminus with Single line warning sign CC55 Wattle Park Duplication CC56 36 at Domain Junction – 833 CC57 36 at Domain Junction CC58 36 at Domain Junction with 810 and 833 CC59 36 in Swanston by Flinders St Station CC60 36 in Spencer St at A’Beckett CC61 36 crossing Collins St CC62 36 crossing Collins St CC63 36 northbound in St Kilda Road with Shrine in background CC64 36 northbound in Swanston St at Flinders St CC65 Postcard – Ballarat 36 in Domain Road CC66 Postcard - Stampshow – Hawthorn Horse tram CC67 Postcard - Stampshow – Peace cable tram CC68 Postcard - 1041 and cable car set 1 at Preston CC69 Postcard - Colins & Elizabeth – greetings from old Melbourne CC70 Postcard - Cable car set at Preston CC71 Postcard - Twentyman’s cable cars CC72 Postcard - Nu-color-vue – horse tram 256 CC73 Cable car set – Market & Flinders CC74 Cable trams at Twentymans’ in their shed CC75 Cable tram track at Bourke & Spencer prior to removal CC76 Cable tram bogie at Preston Workshops – used as a dolly CC77 Cable trams at Twentymans’ CC78 Postcard - Valentines – Bourke looking west from Swanston CC79 Postcard - Rose 3938 – Bourke at Swanston – the Leviathan building CC80 Postcard - Valentines – Elizabeth St looking south from Collins – No. 19 CC81 Postcard - Rose P4765 – Bourke St Melbourne CC82 Postcard - Rose 4090 – cable tram passing Parliament house CC83 Postcard - Valentines – GPO Elizabeth St CC84 Interior of cable trailer with clothing on a set CC85 Elizabeth St looking north CC86 Cigarette card - Collins St No. 41- WD HO Wills CC87 Postcard - Rialto building with cable set CC88 Postcard - Valentines - Swanston at Flinders looking north CC89 CC90 Q 150 Hanna St – dated on rear CC91 176 turning – photo ex Alan Jungworth CC92 161 on Princes Bridge – minimum fare 4d sign and Inspector CC93 459 at Point Ormond CC94 158 at Gordon St – side on view CC95 X 217 in Swanston St CC96 X 217 in Swanston St with an East Brighton destination CC97 T177 CC98 T177 Peel St – no destination roll – being transferred? CC99 X1 462 in Glenhuntly Road to Point Ormond CC100 X1 462 in Glenhuntly Road to Elsternwick Rly Station CC101 X1 462 in Glenhuntly Road to Point Ormond CC102 Q 150 Hanna St CC103 190 at Camberwell Depot CC104 T182 at Footscray CC105 X1 466 and W2 at Footscray CC106 190 at Camberwell Depot CC107 X1 467 Barkly St Footscray CC108 X2 679 turning into William St from La Trobe St CC109 X2 677 Glenhuntly Road with Point Ormond Destination CC110 Postcard T180 CC111 Postcard format – X1 467 on a truck – see also CC178 CC112 Postcard format – X1 467 at Wantirna South CC113 Q200 and SW6 896 at Thornbury – has labels on rear CC114 T177, Ballarat Road – has labels on rear CC115 T178 at Point Ormond CC116 Postcard X1 465 and 466 CC117 Postcard – X2 676 CC118 Postcard – TMSV X2 217 CC119 810 on temporary bridging – 24-12-67 CC120 W2 575 – Queens Parade junction in, still temporary bridging, substation under construction CC121 Forming Queens Parade Junction base slab CC122 W2 596 prior to tramway works – all tracks still in position CC123 It’s a mass of reinforcing – bridging being formed CC124 Looking north with substation being built CC125 Looking east with some rather tight curves, Wellington St still in use CC126 SW6 958 ex Wellington St with all tracks and signal box and buildings. CC127 Victoria Pde at Gisborne looking east – at least 4 cars CC128 SW6 893? With dash canopy lights and SW6 862 and a man with a newspaper CC129 SW6 894 on the S curves, with tram in Wellington St CC130 Similar photo CC131 W2 564 turning into Wellington St – the concrete tracks are not that old CC132 W2 552 running out of Wellington St CC133 W5 732 from Fitzroy St into St Kilda Road with next iteration in position – very wonky CC134 W5 764 turning into Fitzroy St CC135 SW6 947 turning from Wellington St CC136 W2 586 running out of High St CC137 W2 500 turning into Wellington St CC138 W2 543 in Wellington St inbound CC139 L103 with St Kilda Junction destination, and a tower truck on right CC140 Workmen – new track in Queensway in use CC141 Ditto CC142 L103 in Queensway, and another car in bound CC143 Looking east along Wellington St which has been taken out of use. Also a MMTB Roller CC144 W5 824 and a W2 and all types of wobbly temporary track CC145 W2 354 to High St CC146 Sw6 947 on the S bends CC147 W2 500 looking north – tram on the S bends CC148 SW6 896 leaving the S bend CC149 W2 357 and a MMTB City bus with trees/gardens on the side CC150 W5 817 Elliot Ave – see also CC302 CC151 W2 552 – note the large trolley bridge CC152 W2 550 at depot or workshops CC153 1B truck CC154 SW2 432 CC155 W2 155 at Glenhuntly CC156 SW6 937 on AETA tour? CC157 X2 677 on Footscray service – Ballarat Rd? CC158 W2 641 – High St Kew? CC159 SW6 847 – Power St Hawthorn CC160 Simpson St – big line up CC161 W2 546 truck No. 1? CC162 W2s at Glenhuntly depot CC163 No. 15 truck under 899 CC164 206 and other junk at Preston Workshops CC165 W in Swanston St Melbourne – Rose series card CC166 Y1 613 Batman Ave?? or William St at Collins CC167 Tram plans CC168 X 217 Swanston St – see also 95 and 96 CC169 217 in Swanston St – same as 95 CC169A 192 in St Kilda Road at Princes bridge CC170 192 in St Kilda Road at Princes bridge CC171 Bendigo 3 arriving Malvern depot – being unloaded CC172 Ditto CC173 T180 at a depot CC174 X1 463 wheel set CC175 C30 – dog car side view – close up CC176 C30 dog car CC177 206 and 30 at Preston Workshops CC178 X1 467 on a truck – see CC111 also CC179 42 CC180 42 at a depot, no destination box CC181 W2 556 1A type truck CC182 Flinders St Station – Rose Series CC183 W7 1035 Spring – Nicholson St CC184 W7 1022 MMTB Post Card CC185 Adelaide 178 – has on rear – R. Lilburn 4/82 CC186 Adelaide 175 – has on rear – R. Lilburn 4/82 CC187 Y1 610 on AETA tour CC188 Y1 610 on AETA tour with large group – Point Ormond CC189 AETA display – has GH55-32 in pencil on rear CC190 AETA display – has GH55-29 in pencil on rear CC191 Y1 610 on AETA tour with large group – Point Ormond CC192 VR 53 at Footscray CC193 VR cars 40 and 34 at Elwood wash dock CC194 W7 1024 as the 1970 Christmas tram CC195 Geelong – loading a set of 22E trucks CC196 Geelong 10 and 23 running an AETA special CC197 Geelong – AETA special CC198 Geelong 7 at Junction CC199 Geelong 10, in the city CC200 Geelong 33 with Belmont destination CC201 Geelong 15 Eastern Park destination 29-3-1948 CC202 Geelong 23 at Railway Station – 29-3-1948 CC203 Geelong 23 at Railway Station – 29-3-1948 CC204 Geelong – loading a bogie tram CC205 Geelong – loading a bogie tram CC206 Geelong 40 – loaded on truck CC207 Geelong 40 – on jacks CC208 Geelong 40 on jacks – 19 behind CC209 Geelong 38 with two workers on either side CC210 – 214 Australian Historic Tramways stamp folder and set CC215 Bendigo 17 at depot – has dup JBS on rear CC216 Bendigo 20, 29 bogie and straight sill car at Charing Cross CC217 Bendigo one man bogie Pall Mall CC218 Bendigo – Bogie 23, other cars and welding truck at depot CC219 Bendigo 7 with Quarry Hill destination CC220 Bendigo 21 with Lake Weerona destination CC221 ESCo 18 Ballarat CC222 Ballarat bogie 22 on AETA special CC223 Ditto CC224 Ballarat 34 at Stones Corner – R Lilburn CC225 Ballarat 15 in Bridge St – R Lilburn CC226 Ballarat 40 at Gardens – R Lilburn CC227 Ballarat 37 running out of depot – R Lilburn CC228 Postcard – Valentines – Sturt St with loaded horse tram trailer CC229 AETA Geelong tram tour ticket – 29-3-1948 CC230 Postcard – Geelong – Valentine 2114 – T&G building CC231 Postcard – PMTT ! – High St Malvern CC232 Postcard – Empire – Glenferrie Road, Malvern at Wattletree Rd CC233 Postcard Y469, MMTB CC234 Postcard Z2 Spring St CC235 Postcard – Z1 MMTB CC236 Postcard – Stamp Show W1 431 CC237 Postcard – Stamp show B2005 CC238 Postcard – Stamp show W6 982 CC239 Postcard – Valentines 1264 – Johnstone Park with tram in distance CC240 Postcard – Rose 10711 – Swanston and Lonsdale – Hospital and W232 CC241 Postcard – Rose 4827 – Fitzroy St St Kilda W2 362 and 548 CC242 Postcard – Valentines – 939 – St Kilda War Memorial, W and a R? CC243 Postcard – Valentines – 572 – St Kilda War Memorial, W 413 and 140? CC244 Postcard – Valentines – 938 – Uper and Lower Esplanade – L 104 CC245 Postcard – St Kilda Rd at Princes Bridge Y1 and W CC246 Postcard – Biscay BG82 – W5 814 - CC247 Postcard – Biscay 796112 – Bourke St looking west CC248 Postcard – Biscay 796109 – Bourke St looking east CC249 Postcard – Biscay 2AUS58 – Z5 Bourke St CC250 Postcard – Biscay BG 249 – Swanston St CC251 Postcard – National View – St Kilda Rd – shrine and Prince Henrys W2 405 CC252 Postcard – Nu color vue – 11 ML 156 – St Kilda Rd CC253 Postcard – Nu color vue – 11 ML 153 – Swanston St CC254 Postcard – Nu Color vue – Collins St 442 CC255 Postcard – Pitt card – Adelaide – H 364 at Victoria St CC256 Postcard – SPER L/P 154 CC257 Postcard – BTMS – 550 CC258 Postcard – SPER – Brisbane 295 CC259 Adelaide 131 at Burnside – has R Lilburn on card, c1911 CC260 Adelaide 194 CC261 Adelaide 235, with two crew, The News photo CC262 Rockhampton, outside post office – has source of photo details CC263 Sydney – 2086 and 2062 arriving Circular Quay CC264 Sydney – P class – Pitt St? CC265 Sydney – 1610 at Circular Quay CC266 Brisbane 99 and 468 CC267 Sydney with bridge behind CC268 Steam tram Paramatta Park – 103 CC269 Sydney – Museum Station =- Elizabeth St CC270 Sydney – weed burner 137S at a loop Demonstrates the work of Charles Craig in photography and collection of prints.Assembled album in a black presentation folder of 270 photographs from the Charles Craig Collection - 86 sleeves - part 1 of 2. All photographs have been scanned and placed on the Museum's G drive. A list of all photographs with details where possible has been compiled. Victorian Provincial, Launceston, Hobart and Sydney tram photos have been transferred to other Museums, image files retained.melbourne, tramways, tramcars, trams, charles craig, st kilda junction, trackworks -
 Ballarat Tramway Museum
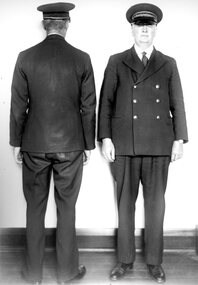
Photograph - Geelong Tramway Standard Inspector Uniform, Melbourne Electric Supply Co. (MESCo)
... Geelong Tramway Standard Inspector Uniform.... Photograph Geelong Tramway Standard Inspector Uniform. Melbourne ...Inspector in standard uniform demonstrating the style of the uniforms. Note the cap badge.Demonstrates the style of MESCo Inspector Uniforms. Black and white print on paper11/5 and the number 1 in a circle written on reverse in ink. GRS710/11/1/5 written in pencil on the reverse.geelong trams, uniform, inspector, mesco -
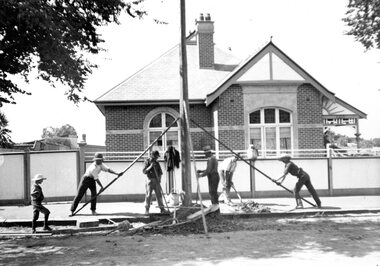 Ballarat Tramway Museum
Photograph - Geelong Tramway Pole Raising
... Geelong Tramway Pole Raising.... print on paper. Photograph Geelong Tramway Pole Raising ...Supporting a pole, probably for the tram overhead with pykes (round poles with 2 spikes at the end) to make it vertical. Location and date unknown.Black and white print on paper.No. 2 inside a circle written in pen on the reverse. 18-4 and GRS710/18/1/4 written in pencil on the reverse.,installation of tramway overhead pole, pykes -
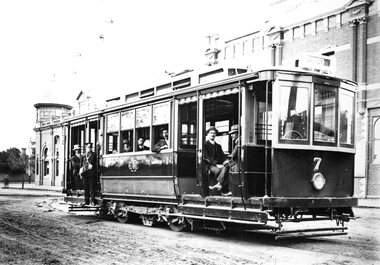 Ballarat Tramway Museum
Photograph - Geelong Tramway Car 7
... Geelong Tramway Car 7....Geelong Tramway Car No. 7... with a set of four coloured lights above. Geelong Tramway Car No. 7 ...One of a pair of posed photographs of Car 7 in Corio Tce. prior to opening day. The tramline curves to the right into the depot whose entrance lies between Blakiston & Co on the right and the MESCo's offices on the corner of Yarra St., to the left. Note its ornamental turret, removed in the 20s. The carefully arranged poseurs are employees of the Company, recognisable from the other photographs. The second photograph (Item No. 8617 - large print on wall in board room) shows the opposite end of the tram with the Geelong Club and Mac's Hotel in the background. The same characters are aboard, differently arranged. Early 1912. Note also the front destination box (mechanism unknown) that was replaced with roller destination blinds with a set of four coloured lights above.Black and white print on paperNoi. 1 inside a circle and 13-9 written on the reverse in ink. GRS710/13/1/9 written on the reverse in pencilgeelong tramway car no. 7, geelong streetscape c.1912 -
 Ballarat Tramway Museum
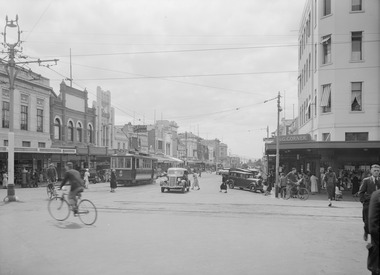
Photograph - Digital image of Geelong tram No. 2 at T&G Corner Geelong, c1938
The photograph was taken from a Victorian Railways glass negative held at the State Library of Victoria. The photo shows Geelong No. 2 in Moorabool St at the intersection with Ryrie St. The tram has the destination of North. The tram is in its modified form that provides for one-man operation. In the photo are Edments, Savoia Cafe, Commercial Bank of Australia, and the T&G building. The photo has been dated between 1935 when the tram was converted and 1939 when the bar neon traffic lights were installed at the intersection. For reference to the SLV photograph - see http://handle.slv.vic.gov.au/10381/97173. See item 9075 for a copy print. This tram is now part of the collection of the Ballarat Tramway Museum.Yields information about Geelong No.2 and the intersection of Ryrie and Moorabool Streets Geelong.Digital image of Geelong tram No. 2 in Moorabool St at the intersection with Ryrie St, c1938. geelong, geelong 2, ryrie st, moorabool st, trams, tramways, temperance & general -
 Ballarat Tramway Museum
Photograph - Geelong Tramway - relaying tram tracks in Aphrasia St., Newtown
... Geelong Tramway - relaying tram tracks in Aphrasia St...Geelong Tramway... wagon, or less so by ladder., Geelong Tramway Relaying tram ...Relaying tram tracks at the eastern end of Aphrasia St., Newtowwn, looking east. The location is immediately west of the Pleasant St. intersection, soon after Aphrasia St. was extended from Pleasant St. to Pakington St., so that the three sharp curves for trams into Retreat Road, Pleasant St., and then Aphrasia St., were reduced to one, from Pakington into Aphrasia St. May 1914. Note that sleepers are being used in the construction, as seen in items 9271 and 9214, with tie bars and continuous concrete about 50cm wide under each rail. The overhead is being worked on in two ways; safely with the horse drawn tower wagon, or less so by ladder.,Black and white print on paper.GRS710/.25/1/7 and 25-7 written on the reverse in pencil. The No. 1 in a circle written on reverse in ink.geelong tramway, relaying tram tracks in geelong, sleeper and concrete tram track base -
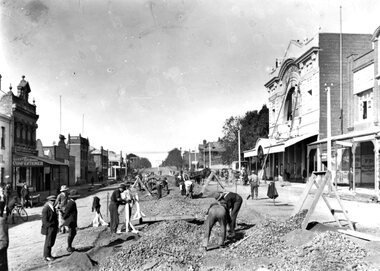 Ballarat Tramway Museum
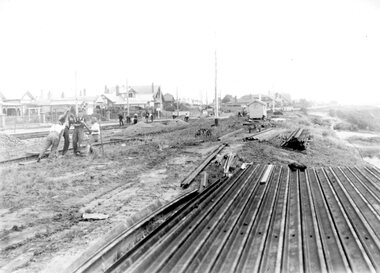
Photograph - Commencing construction of the East tramline in Geelong
... Geelong East tramway construction... tramway construction Geelong Tramway East line commenced Geelong ...Commencement of construction of the East tramline along Ryrie Street. Photographer is a few hundred metres east of the Moorabo9ol St. intersection facing east. The Geelong Theatre is on the right, opened in 1913 and facade preserved. 1922.Black and white print on paper.GRS710/25/1/7 and 55-7, written in pencil on the reverse. The number 1 within a circle written on the reverse in ink.geelong east tramway construction, geelong tramway east line commenced, geelong theatre -
 Ballarat Tramway Museum
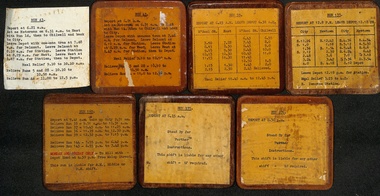
Document - Table Cards (Sheets), State Electricity Commission of Victoria (SECV), Geelong Trams Runs, 1950's
... tramways SECV Forms Timetables Geelong BTM Set of six Typed table ...Table cards gives details for the Motorman and Conductor, starting times, meal times, relief and taken by details. Not known when made - 1950's? .1 - Run 43 - Chilwell, Belmont and West - includes a loose sheet of paper. .2 - Run 59 - Chilwell and East .3 - Run 135 - Newtown - city .4 - Run 169 - Relive various runs .5 - Run 175 - Standby shift commencing 6.15am .6 - Run 176 - Standby shift commencing 2.30pm See also Reg Item 3155, 6270 and 8134 for other examples and 8135 for a Bendigo example.Demonstrates the method of advising tram crew their shift work. Set of six Typed table card or run card, for Geelong Trams Runs glued and varnished onto a sheet of three ply timber - plywood boards and one typed paper sheet.trams, tramways, secv, forms, timetables, geelong, btm -
 Melbourne Tram Museum
Document - Report, Metlink, "Metlink 2007 in review", 2007 and 2008
.1 - Report - 24 pages + card cover, printed in full colour on gloss paper, centre stapled landscape format titled "Metlink 2007 in review" with table of contents, including message from CEO Bernie Carolan, provides details about the bodies activities, campaigns, events, fare evasion, the public transport challenge, celebrity Metcards, marketing and customer services. .2 - Report - 42 pages + card cover, printed in full colour on semi gloss paper, centre stapled, portrait format titled "Metlink Annual Review 2008" as above, but with details of Southern Cross station, website and Geelong stations - includes VLine.trams, tramways, metlink, annual reports, reports, melbourne, connex, yarra trams, buses, metcard, vline -
 Ballarat Tramway Museum
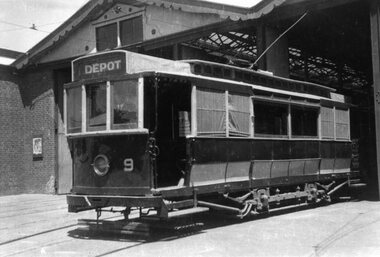
Photograph - ESCo Bendigo tram 9 - set of 2, Peter Duckett, c1945
Photograph of Bendigo ESCo No. 9, at the Depot, during the 1940's following "modernisation" scheme. Tram has the destination of "Depot". See page 28 of Destination Eaglehawk for the same photograph and page 30 for notes regarding the "modernisation", undertaken in 1945, but not liked by the Union and subsequently scrapped in 1947. See Reg Item 4341 and 9110 for photographs of the same tram before modernization Peter Duckett Collection. 4342.1 - Black and White print contained within the Wal Jack Bendigo and Geelong Album, see Reg Item 5003 for more details. Added 2/7/2013. See Destination Eaglehawk.Yields information about the appearance of Bendigo's ESCo bogie trams during the 1940's.Black and White photograph with notes on the rear.On the front, top left hand corner of the print "27" in ink within a circle. On rear, stamped in black ink "Photo supplied from P.W. Duckett Collection, All Rights Reserved, 69 Howitt Rd. Nth Caulfield 3161." In the bottom right hand corner, a "William F Scott" address label in the bottom left hand corner. 4342.1 - Bendigo - No. 9 as rebuilt @ bard. Mr. McNaught (Manager) at Master Controller.trams, tramways, bendigo, depot, secv, unions, esco, tram 9 -
 Ballarat Tramway Museum
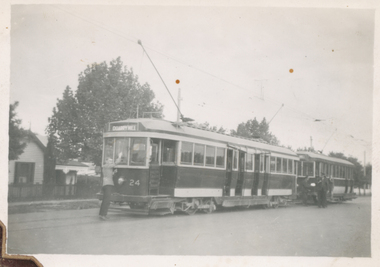
Photograph - Black & White Photograph/s, Peter Duckett, 1946
Black and White print contained within the Wal Jack Bendigo and Geelong Album, see Reg Item 5003 for more details. Photograph of No. 24 at the Quarry Hill terminus, with No. 22 behind. Poles are being reversed. Tram has the destination of Quarry Hill. Photo by Peter Duckett, 1946. See Keith Kings "Bendigo Tramways" for the tram number. In pencil on rear "SEC Bendigo No. 24, ex M&MTB 138" and "Peter Duckett" in bottom right hand corner.trams, tramways, bendigo, bogie trams, quarry hill, tram 138, tram 24 -
 Bendigo Historical Society Inc.
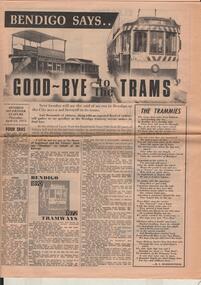
Document - BASIL MILLER COLLECTION: BENDIGO SAYS GOOD-BYE TO THE TRAMS, c1972
13 April 1972. Bendigo Says Good-bye to the Trams. A1 sheet - double sided. Tramway history 1890 - 1972, 2 copies. At the stroke of 5 pm from Eaglehawk Town Hall clock 82 years of history will end as the last tram makes its sentimental journey to the city, while at the Bendigo Cemetery - the Quarry Hill line terminus - another tram will be leaving for its last resting place. Other articles include: Four Eras, of trams. The Trammies, covering Ballarat, Geelong in the form of a poem. 1927 and all that, by Basil Miller, remembering his 45 years of service with the trams. How it all started, The twin communities of Sandhurst and Eaglehawk were relatively early in considering the possibility of operating street tramways within their boundaries. Cabs, Battery Cars, Construction, Strikes, Bendigo 1890 to 1972 - Tramways. Man and his Mates, continued from previous page, Explosion, Touchy Task, A Quickey, Horrors. Electric in 1903, There was excitement galore in the City during April, 1903 - and the Advertiser recorded the progress of the new-fangled electric machine. One man's Memories, Tough times, humour, tragedy and comradeship - they all came flooding back as former Bendigo tramway-man Tom Griffiths recently turned the clock back. Keb Sir Keb Sir? 'Keg sir? Tram off the line,' was the call of the cabbies when a train pulled in at the Bendigo railway station. Altered Shopping Trend, With advent of the electric tram in Bendigo came change in shopping habits.bendigo trams -
 Ballarat Tramway Museum
Photograph - Black & White Photograph/s, Bob Lilburn, Nov. 1956
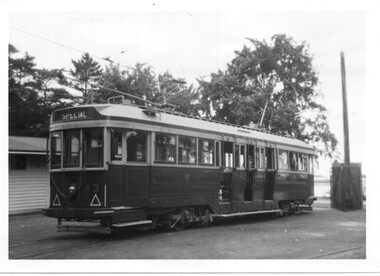
Yields information about an ex Geelong tram at the SEC depot, possibly soon after it entered service in Ballarat.Black and white photograph of SEC tram 43 in the depot yard, November 1956, prior to the tram entering service. Photograph from the Bob Lilburn Collection. Inscription in Bob's handwriting. Based on the 2nd print, photo taken 11/1956.On rear in ink "43 at Ballarat Depot, Ex Geelong 40, Ex 40 MMTB PMTT" Has stamped on the rear "Print by Vergolia" and date stamp "17.2.70". Two copies held. In the second print, has "Ballarat 43 at depot prior entering service" and "Ex Geelong 40 Ex 40 MMTB, PMTT".trams, tramways, sec depot, bogie trams, tram 43 -
 Ballarat Tramway Museum
Photograph - Black & White Photograph/s, Bob Lilburn, mid to late 1950's
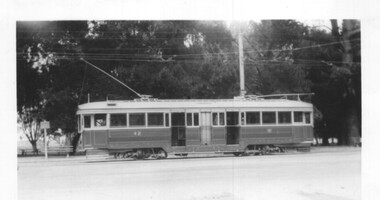
Yields information about an ex Geelong tram at Gardens loop.Black and white photograph of SEC tram 42 at Gardens Loop, side on photo prior to the dash canopy lighting mid to late 1950's. Photograph from the Bob Lilburn Collection. Inscription in Bob's handwriting.On rear in ink "42 at the Gardens, Ballarat"trams, tramways, gardens loop, wendouree parade, tram 42 -
 Ballarat Tramway Museum
Photograph - Black & White Photograph/s, Bob Lilburn, 17/01/1969 12:00:00 AM
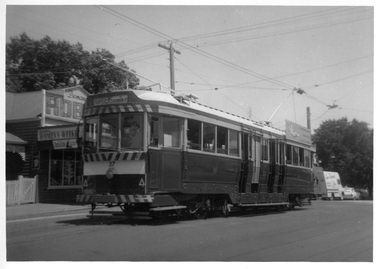
Black and white photograph of Ballarat tram No. 37 at the Mt Pleasant terminus. Tram has destination of "Gardens via Drummond Nth.", roof advertisement for the SEC "Everything's under control in my all electric kitchen". Shop on the left hand side of the photo has Robur Tea company, Coca Cola and Women's Weekly advertisements. High Res image added 8/5/2019 from Peter Lambert. 2nd print - dates the photo as 17-1-1969 a photo by Bob Lilburn.On rear of 2nd image - "2nd Ballarat 37, Mt Pleasant, Ex Bendigo 1, Ex Geelong 35" and "ex MMTB 119, 17-1-69"trams, tramways, mt pleasant, barkly st, tram 37