Showing 2563 items matching " photo notes"
-
 Ballarat Tramway Museum
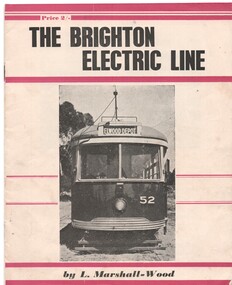
Book, Leon Marshall -Wood, "The Brighton Electric Line", 1956, 1958
.1 - Twenty page booklet on the history of the Brighton Electric Line by Leon Marshall-Wood, published 1956. Gives a brief history of the electric tramway operated by the Victorian Railways between St. Kilda Station and the Brighton Beach railway station, that commenced operation in 1905. The booklet was priced 2/-, published by the Traction Publications. Has 18 photographs, map 1905 and present day (when printed), rolling stock roster and notes and on the rear cover has details of the AETA. Front cover has horizontal crimson stripes. Has details of the AETA on the back cover and listing of some publications. Second copy from Ian Stanley added 24-1-2016. .2 - as for above - second edition, 1958, similar text, different photo layout and different front cover photo. See Reg Item 7631i for a scan of the 1966 edition.On front cover of first copy of .1 - top right hand corner; "N.Z.R.L.S / with compliments" and initials. Under title of book, "Price to Society 18/- Aust. per doz. / Retails 2/-" On page 3 of second copy of .1 - "Ian J Stanley 28 Park Road, South Camberwell, SE6, BK3746" On page 3 of .2 - "Ian J Stanley" in ink.trams, tramways, vr, melbourne, brighton, st kilda -
 Ballarat Tramway Museum
Slide - 35mm slide/s - set of 9, Noel Simons, Sept. 1971
Set of 9 Kodak Ready-mount with slides made from the Association of Railway Enthusiast Provincial Tramways film strip. Reference Item 2560 details the ARE Film Strip, and provide references to other slides. See also Reg. item 1164. 1174.9 on plain white mount. 1174.1 - Tram 40 North bound for Lydiard St. North at the Railway Gates, with the gates closed. Tram carrying a heavy load of passengers. Railway station building and car park in background. Taken from the signal box. 1174.2 - Tram 12 bound for Gardens, photographed across the median strip plantation near Dawson St. Image i2a - adjusted 9/2021 to remove colour cast. 1174.3 - Tram 43 in bound along Wendouree Parade near Barrett Ave, passing a former tram stop and with "Warning Oncoming Trams" sign mounted on an adjacent pole. See also Reg. item 1172.1 for a photo taken in May 1971. This photo taken after the closure of the Victoria St. line, as the tram stop has been painted out. 1174.4 - Looking along the track to Sebastopol terminus on the west side of Albert St. - telephoto shot showing bogie tram in the far distance. Shows the nature of the track, poles, tram stop frequency and in the fare distance the terminus. Also show the trees that used to be along this section of the track. 1174.5 - No. 42 showing "Special" in Macarthur St. approaching Drummond St. north. Photo taken from under the verandah of a shop on the south side of the street that were many years later to become the Tramcar Restaurant. Note metal fence to cemetery. 1174.6 - Nos. 21 (Sebastopol) crossing 14 (Lydiard St. Nth) at the loop between Sayle and Grey St. Photo taken looking south. 1174.7 - No. 12 bound for Mt Pleasant, in Bridge St. about to stop at the junction for the two routes. Telephoto photo looking west along Bridge St. with many cars in the photo. Very few people on the street itself. 1174.8 - No. 30 and 17 at the City Terminus, on the north side of Sturt St. Taken from the Post Office corner with the Town Hall in the background. 1174.9 - No. 39 inbound along Sturt St. West. with many cars on the road. Bus stop on a pole on the other side of the road.1174.1 - "No. 40 on Lydiard St. North service waits at the level crossing at Ballarat Railway Station." 1174.2 - "No. 12 bound for 'Gardens' seen across the centre plantation in Sturt St." 1174.3 - "Barrett Ave." 1174.4 - "The Sebastopol route near the terminus" 1174.6 - "Nos. 21 and 14 crossing at Sayle St. Loop on Sebastopol route" 1174.7 - "No. 12 at Eastern end of Bridge St." 1174.8 - "Nos. 30 and 17 in Sturt St. at Cnr of Lydiard St." 1174.9 - "No. 39 City bound from 'Gardens" in Sturt St. West" All have date stamp of "Sep 1971" in black ink. Writing in blue ink.tramways, trams, lydiard st. nth, railway crossing, sturt st, wendouree parade, sebastopol, macarthur st., bridge st., sturt st. west, tram 12, tram 14, tram 17, tram 21, tram 30, tram 39, tram 40, tram 42, tram 43 -
 Ballarat Tramway Museum
Slide - 35mm slide/s - set of 7, Noel Simons, 23/10/1965 12:00:00 AM
Set of 7 Kodachrome transparencies taken on 23/10/1965 in Melbourne. 1179.1 - W2 488 (route 42, Mont Albert) at the corner of High St. and Cotham Road Kew. Taken from Kew Post Office, has Bank of New South Wales in the background, CBC bank and the Greyhound Hotel. Tram has ads for Kolotex stockings and Ryco oil filters. 1179.2 - SW2 436, in bound (route 45, City) leaving Cotham Road, about to join High St, Kew. Buildings on the south side of Cotham Road in photo. Tram has an ad along with others for Vincent's powders. 1179.3 - W2 545 (route 48, North Balwyn) in High St. Kew. Has Commercial bank in background along with other shops. 1179.4 - W2 648 (route 42, Mont Albert) turning from High St. South into High St at Kew Junction, with Clifton Hotel in background. Tram has an ad for Kenric clothes. Note an MFBB street fire alarm by the tram stop. 1179.5 - W2 566 (inbound route 42, City) at same location as 1179.5. Tram has a Jex and a Remy Martin Brandy ads. on front dash panel. 1179.6 - W2 572 entering Victoria Parade from Brunswick St. Fitzroy. Tram has a Jex and a Remy Martin Brandy ads. on front dash panel. Eastern Hill Fire Station and ICI building in background. 1179.7 - W2 378 (inbound, route 45, City) and W2 572, inbound, in Victoria Parade between Brunswick St and Gismo St. East Melbourne. Otherwise as for 1179.6.All have date stamp of "23 Oct 1965" in purple ink. All black ink unless otherwise noted. 1179.1 - "W2 488 Entering Cotham Rd. from High St. Kew" 1179.2 - "SW2 436 in Cotham Rd., Kew, about to enter High St." 1179.3 - "W2 545 in High Street Kew, nearly opposite Cotham Road" 1179.4 - "W2 648 entering High Street from High Street South, Kew". 1179.5 - "W2 566 entering High St. South from High St. Kew" 1179.6 - "W2 572 entering Victoria Pde from Brunswick St. East Melbourne" 1179.7 - "W2 378 and 572 in Victoria Pde between Brunswick and Gisborne Sts. East Melbourne."tramways, trams, kew, high st kew, cotham road, victoria parade, melbourne, tram 545, tram 488, tram 436, tram 648, tram 566, tram 572, tram 378 -
 Ballarat Tramway Museum
Slide - 35mm slide/s - set of 24, Noel Simons, 20/05/1971 12:00:00 AM
Set of 24 transparencies taken on 20/5/1971 on Kodak mounts. 1195.1 - Bendigo 19 arriving at Charing Cross en route to North Bendigo with Fountain Plaza and the City Family Hotel in the background. No. 19 has two roof ads for the SEC. -'Electricity better for cooking' and 'Everything's under control in my all electric kitchen' 1195.2 - as above, but standing at the Charing cross stop, with the Beehive Stores and other buildings along the east side of Pall Mall in the background. 1195.3 - No 21 ex Golden Square crossing View St. trackwork in front of No. 25 waiting to depart for Quarry Hill. No.21 has two roof ads (as for No.19 in 1195.1) and No.25 has one SEC roof ad and another. Ezywalkin sign in the background, and Fountain Plaza. 1195.4 - as for 1195.3, but after 21 has arrived and 25 left for Quarry Hill. Has Ezywalkin store and the Beehive store in the background. 1195.5 - No. 5 at the Eaglehawk terminus. Photo taken with a cannon in foreground looking along High St. Eaglehawk. Has shops on the west side of High St. in the background. 1195.6 - No. 5 at the Eaglehawk terminus, close up of the rear of the tram - note tow bar arrangement. Has destination of Quarry Hill. 1195.7-Nos.25 and 5 crossing at the Thorpe St. Loop, California Gully. No. 25 bound for Eaglehawk (has SEC Briquette and electric cooking roof ads) and 5 en route for Quarry Hill with a SEC and Cinzano roof ad. 1195.8 - as for 1195.7, but after trams have passed each other. Has Borough Auto Service building in the background. 1195.9 - No. 5 in Mt Korong Road, towards Bamard Street, photo taken after tram has passed photographer. 1195.10 - No. 30 at the Golden Square terminus with the Milk Bar on the right hand side of the photograph. 1195.11 - No. 30 inbound at Fire Station Loop, High St. Golden Square. Has old fire station in the background. Passengers are boarding the tramcar. 1195.12 - No. 30 in High St, bound for North Bendigo between Vine and Wattle Streets. 1195.13 - No. 5 bound for Eaglehawk waits at Iron Bark Gully Loop, at Hayes St. 1195.14 - No. 5 and No. 2 crossing at Iron Bark Gully Loop. 1195.15 - No. 5 bound for Eaglehawk leaving the Manchester Loop, Long gully. 1195.16 - No. 5 passing William Street, Long Gully en route to Eaglehawk. 1195.17 - No. 5 just before the California Gully Crossing Loop. 1195.18 - Nos. 5 and 26 crossing at California Gully crossing Loop. No. 5 heading to Eaglehawk, 26, Quarry Hill. 1195.19 - No. 5 in High St. Eaglehawk with Bob Moyle's Victoria Hotel and the TAB in the background. 1195.20 - No. 5 in High St. Eaglehawk approaching the terminus. Photo taken after the tram has passed the photographer. Has Foodland store and J. Best Fruit supply in the background, along with Eaglehawk Town Hall. 1195.21 - No. 5 at the Eaglehawk terminus, photo taken along seldom used track along High St. 1195.22 - as for 1195.22 - but at the very end of the track. 1195.23 - No. 5 en route for Quarry Hill climbs High St. Eaglehawk with the Victoria Hotel and Eaglehawk Town Hall in the background. 1195.24 - No. 5 and 25 crossing at Jobs Gully Loop. Note 25 has a black on white destination roll, while No. 5 has a white on black destination roll. Information written on in black ink and date stamped on purple ink. 1195.1 - "No. 19 arrives at Charing Cross Bendigo from Golden Square" 1195.2 - "No. 19 about to leave Charing Cross for North Bendigo" 1195.3 - "No. 25 awaiting departure for Quarry Hill, watches No. 21 arrive at Charring Cross from Golden Square" 1195.4 - "No. 21 on North Bendigo service and No. 25 on Quarry Hill run await departure at Charing Cross" 1195.5 - "No. 5 at Eaglehawk terminus" 1195.6 - "No. 5 at Eaglehawk terminus" 1195.7 - "Nos. 5 and 25 crossing at Thorpe St. Loop, California". 1195.8 - "Nos. 25 and 5 crossing Thorpe St. Loop, California Gully". 1195.9 - "No. 5 descending Mt Korong Rd. towards Bamard St." 1195.10 - "Birney car No. 30 at Golden Square terminus" 1195.11 - "Birney car No. 30 in High Street near Thistle Street (Fire Station Loop)" 1195.12 - "No. 30 in High St. between vine and Wattle Streets" 1195.13 - "No. 25 at Hayes Street Loop Iron Bark". 1195.14 - "Nos. 2 and 5 crossing at Hayes Street Loop Iron Bark" 1195.15 - "No. 5 at Manchester Loop opposite Havilah Road, Long Gully" 1195.16 - "No. 5 passing William Street, Long Gully". 1195.17 - "No. 5 at California Gully" 1195,18 - "Nos. 26 and 5 at Thorpe St. Loop, California Gully". 1195.19 - "No. 5 in High St. Eaglehawk". 1195.20 - "No. 5 approaching Eaglehawk terminus" 1195.21 - "No. 5 at Eaglehawk terminus" 1195.22 - "No. 5 at Eaglehawk terminus" 1195.23 - "No. 5 in High St. Eaglehawk" tramways, trams, bendigo, charing cross, eaglehawk, california gully, golden square, iron bark gully, jobs gully, tram 2, tram 5, tram 19, tram 21, tram 25, tram 26, tram 30 -
 Ballarat Tramway Museum
Slide - 35mm slide/s - set of 20, Noel Simons, 21/05/1971 12:00:00 AM
Set of 20 transparencies taken on 21/5/1971 on Kodak mounts. 1197.1 - Bendigo No. 5 en route to Eaglehawk at Creeth St Long Gully. Tram has a SEC roof ad and Cinzano roof ad. 1197.2 - No 5 approaching Needle Loop between Long Gully and California Gully. On left hand side is the City of Bendigo sign, indicating city boundary. 1197.3 - As for 1197.2 but actually entering loop. Photo taken after tram has passed photographer. 1197.4 - No. 26 bound for Eaglehawk descending the railway bridge near Eaglehawk, at Jobs Gully. 1197.5 - as for 1197.4, but after crossing bridge, now ascending a hill. Photo taken after tram has passed photographer. 1197.6 - No. 26 climbing High St. hill Eaglehawk, nearing end of Double track, bound for Quarry Hill. Shows centre of the road poles. 1197.7 - As for 1197.6, with tram entering single track section. Photo taken after tram has passed photographer. Has a BP service station in the background. 1197.8 - No. 26 (bound for Quarry Hill) crossing No. 17 (Eaglehawk) at Job's Gully Loop. 1197.9 - No. 17 climbing railway bridge at Job's Gully, en route to Eaglehawk. Photo taken after tram has passed photographer. 1197.10 - No.26 bound for Quarry Hill, leaving Long Gully Loop? Has the Creeth St. church in l197.l in the far background. Photo taken after tram has passed photographer. 1197.11 - Tramway Point work at the northern end of Long Gully Loop. 1197.12 - No. 17 en route for Quarry Hill turning into View St. from Bamard St. Tram has SEC roof ads "Everything fine in my all electric Kitchen' and 'Electric Cooking is Matchless'. 1197.13 - as for 1197.12, but tram has turned into View St and about to enter the double line track. Photo taken after tram has passed photographer. 1197.14 - No. 21 enters Nolan St after turning from MacRae St. en route to Bendigo. Note sign on its own post noting tram turns "Beware Tram Turns" and stop sign on adjacent pole "Trams stop on Request". No. 21 has two SEC roof ads. 1197.15 - No. 21 in Nolan St. after turning from Bridge St. (White Hills Road). Note signal light for Bridge St. loop on pole corner of street. Photo taken after tram has passed photographer. 1197.16 - No. 2 bound for Eaglehawk at unknown location. 1197.17 - Tram stop sign on a pole "CARS STOP BY REQUEST" 1197.18 - No. 5 in Carpenter St.? en route to Quarry Hill. 1197.19 - No. 28 has just arrive at Golden Square terminus, passengers are disembarking and the trolley pole is being turned. Golden Square Hotel in the background. 1197.20 - No. 28 at Golden Square terminus. Has a "Nothing beats Briquettes for hear roof ad. Information written on in black ink and date stamped on purple ink. 1197.1 - "No. 5 at Creeth St. Long Gully" 1197.2 - "No. 5 approaching Needle Loop between Long Gully and California Gully" 1197.3 - "No. 5 at Needle Loop between Long Gully and California Gully" 1197.4 - "No. 26 crossing railway bridge at Job's Gully near Eaglehawk" 1197.5 - "No. 26 just after crossing railway bridge at Job's Gully near Eaglehawk/ 1197.6 - "No. 26 in High St. Eaglehawk" 1197.7 - "No. 26 at end of double track in High St. Eaglehawk" 1197.8 - "Nos. 26 and 17 crossing at Job's Gully Loop" 1197.9 - "No. 17 crossing railway bridge at Job's Gully near Eaglehawk". 1197.10 - "No. 26 at Long Gully" 1197.11 - 'Northern end of points at Long Gully Loop". 1197.12 - "No. 17 turning into View St. from Bamard St. Bendigo". 1197.13 -'No. 17 at beginning of double track in View St. after leaving Bamard St. Bendigo. 1197.14 - "No. 21 enters Nolan St. from MacRae St. Bendigo." 1197.15 - "No. 21 in Nolan St. Bendigo just after leaving White Hills Road." 1197.16 - "No. 2" 1197.18 - "No. 5" 1197.19 - "Birney car No. 28 at Golden Square Terminus" 1197.20 "Birney car No. 28 at Golden Square Terminus" tramways, trams, bendigo, long gully, railway bridge, jobs gully, trackwork, nolan st, quarry hill, tram stops, golden square, tram 2, tram 5, tram 17, tram 21, tram 26, tram 28 -
 Ballarat Tramway Museum
Slide - 35mm slide/s - set of 32, Noel Simons, 25/02/1971 12:00:00 AM
Set of 31 transparencies taken on 25/2/1972 on Kodak mounts. 1201.1 - Bendigo No. 26 in Bond St. just after leaving Long Gully en route for Quarry Hill. Has Norris Supermarket in background. Has two SEC roof ads. 1201.2 - No. 26 climbing View St. from Charing Cross en route to Eaglehawk. Has ANZ bank and AMOCO service station in background. 1201.3 - as for 1201.3, but after tram has passed photographer. Has buildings west of Mackenzie St. in photograph. 1201.4 - Tram stop and centre of the road pole with two "CARS STOP BY REQUEST" signs mounted on pole at the corner of Mackenzie St. 1201.5 - same position as for 1201.3, but with No. 5 descending the street. 1201.6 - same position as for 1201.2, but with No. 5 descending the street. Photo taken after tram has passed photographer. 1201.7 - No. 7 in Nolan St. from across the park at Lake Weeroona. 1201.8 - No. 7 entering McCrae St from Nolan St. - distant view. Note "TRAM "sign on left hand side under tree and overhead in McCrae St. from former track that once was in this street. 1201.9 - No. 7 in High St. with Cathedral in background. Tram en route to North Bendigo. Note scaffolding around Cathedral main spire area. 1201.10 - No. 7 crossing Bendigo Creek bridge in High St. near Golden Square. Has a Caltex Service station in the background. 1201.11 - No. 7 at Golden Square terminus with Sunburst Fruit Juices and a Peters Ice cream delivery vans alongside. 1201.12 - as for 1201.11 but photo taken from behind tram, with the end of the rails in the photograph. 1201.13 - No. 7 and 21 in Pall Mall at Charing Cross with No. 5 in the background. Taken some distance away from the location. 1201.14 - No. 7 at Golden Square terminus, taken a short distance from the tram terminus. Shows Milk Bar on right hand side and the hotel on the left hand side. Taken from the south side of the roadway. 1201.15 - as from 1201.14 but taken from the north side of the roadway. 1201.16 - No 5 waiting at California Gully loop. Distant photo showing surrounds 1201.17 - No. 5 en route for Quarry Hill crossing No. 26 at California Gully. 1201.18 - No. 26 at Eaglehawk terminus with Eaglehawk Town Hall and Post Office in background. 1201.19 - No. 21 arriving at Charing Cross en route to North Bendigo. Has Alexandra Fountain in the background, ANZ bank RACV building, and other buildings on the north side of Pall Mall or Nolan St. 1201.20 - No. 26 en route for Quarry Hill at Charing Cross, with crew standing by front door. Has Colonial Mutual life building, Armstrong Tyre Service (Firestone) and a sign for Cohns Drinks in the background. 1201.21 - as for 1201.20 but with No. 5 en route to Eaglehawk now in photograph. 1201.22 - No. 26 at Quarry Hill terminus. 1201.23 - No. 26 at Quarry Hill terminus, view of front portion of tram only from a gate at the Bendigo cemetery. 1201.24 - Track at the end of the Quarry Hill line showing the point blades of the former "Y" terminus and the overhead for this. 1201.25 - No. 2 at the Quarry Hill terminus, looking along the former Trackwork. 1201.26 - as for 1201.25 1201.27 - number not used. 1201.28 - Golden Square terminus from some distance from the actual terminus, showing the Warning sign "TRAM" for motorists from the south. No. 7 at the terminus. 1201.29 - No. 7 passing through the Golden Square shopping centre. Numerous cars and pedestrians. Tram en route for North Bendigo. 1201.30 - No. 7 in High St. Golden Square, en route for North Bendigo. Photo taken after tram has passed photographer. 1201.31 - No. 7 in High St. just past Wattle St. with the Cathedral in the background. Tram has two SEC roof ads good side on photo, 'Everything's fine in my all electric kitchen' and 'Electrical cooking - clean, quick, economical'. 1201.32 - No. 7 in High St. nearing Wattle St. Has Cathedral in the background. Photo taken after tram has passed photographer.Information written on in black ink and date stamped on purple ink. 1201.1 - "No. 26 in Bond St just after leaving Long Gully" 1201.2 - "No. 26 climbing View St. from Charing Cross" 1201.3 - "No. 26 ascending View St. from Charing Cross (At Mackenzie St.)" 1201.4 - "View St. & Mackenzie St." 1201.5 - "No. 5 in View St. near Mackenzie St." 1201.6 - "No. 5 in View St. nearing Charing Cross." 1201.7 - "No. 7 in Nolan St. seen from Lake Weeroona Park." 1201.8 - "No. 7 entering McRae St. from Nolan St. Note "TRAM" warning sign on left. 1201.9 - "No. 7 in High St. passing Short St." 1201.10 - "No. 7 crossing Bendigo Creek bridge in High St. near Golden Square." 1201.11 - "No. 7 at Golden Square terminus" 1201.12 - "No. 7 at Golden Square terminus" 1201.13 - "No 7, 21 and 5 at Charing Cross" 1201.14 - "No. 7 at Golden Square terminus" 1201.15 - "No. 7 at Golden Square terminus" 1201.16 - "No 5 waiting at California Gully loop." 1201.17 - "Nos. 5 and 26 crossing at California Gully loop" 1201.18 - "No. 26 at Eaglehawk terminus" 1201.19 - "No. 21 arriving at Charing Cross from Golden Square" 1201.20 - "No. 26 at Charing Cross" 1201.21 - "Nos. 5 and 26 at Charing Cross." 1201.22 - "No. 26 at Quarry Hill terminus" 1201.23 - "No. 26 at Quarry Hill terminus seen through the gates of the Bendigo Cemetery." 1201.24 - "Quarry Hill terminus showing remains for former double track layout abandoned before 1964." 1201.25 - "No. 2 at Quarry Hill terminus" 1201.26 - "No. 2 at Quarry Hill terminus" 1201.28 - "The Southern approach to Golden Square with No. 7 standing at the terminus, "TRAM" warning sign on the left. 1201.29 - "No. 7 passing through Golden Square Shopping Centre" 1201.30 - "No. 7 in High St. Golden Square" 1201.31 - "No. 7 in High St. passing Wattle St." 1201.32 - "No. 7 in High St. nearing Wattle St."tramways, trams, bendigo, bond st., view st., nolan st., high st., eaglehawk, california gully, charing cross, quarry hill, trackwork, tram 2, tram 5, tram 7, tram 21, tram 26 -
 Ballarat Tramway Museum
Slide - 35mm slide/s - set of 23, Noel Simons, 26/02/1972 12:00:00 AM
Set of 23 transparencies taken on 26/2/1972 on Kodak mounts. 1205.1 - Bendigo No. 25 on a special tour at Fire Station Loop, en route to Golden Square. 1205.2 - No. 21 and 25 crossing at Fire Station Loop, note photographers on the ground. No. 21 bound for North Bendigo. 1205.3 - as for 1205.3, but with trams departing loop and fire station in the background. 1205.4 - No. 25 at Golden Square Hotel with 'Rodda's Golden Square Hotel' in the background. Tram on a special tour, but showing destination of North Bendigo. 1205.5 - as for 1205.4 - but showing special. Has the end of the track in the photograph. 1205.6 - Nos. 7 and 25 (on a special tour) crossing at Myrtle St. Loop. 1205.7 - No. 7 leaving Myrtle St. loop with the mine poppet head in the background. Photo taken after tram has passed photographer. (Print made of this slide 10/2001 for use in the Gold Gold Gold exhibition of 10/2001 - See Reg. item 1979. 1205.8 - No. 25 entering depot. Tram showing 'special'. Tennis court on right has players. Photo taken after tram has passed photographer. 1205.9 - No. 24 (showing 'special') and No. 20 (showing 'Long Gully') at Bendigo Depot. 1205.10 - No. 24 on a special charter, leaving Bendigo depot. Tram has two 'Johnnie Walker' roof ads. 1205.11 - Bendigo depot with 29, 25 and a bogie car inside the depot doors. 1205.12 - As for 1205.11, but with 28 and 29. 1205.13 - No. 24 standing at front entrance of Bendigo depot with No. 20 in the background. 1205.14 - No. 24 running out into McCrae St showing special, with conductor on front step. 1205.15 - No. 24 in Caledonia St. at corner of Thunder St with the Gasworks in the background. 1205.16 - No. 5 en route for Quarry Hill at Charing cross with No. 26 (en route for Eaglehawk) about to arrive. Has former crossover at this location in the foreground. Has the Ezywalkin building in the background. 1205.17 - No. 5 and 26 at Charing Cross, with the Alexandra Fountain in the foreground and the Beehive and Ezywalkin buildings in the background. No.26 has two SEC roof ads. 1205.18 - Charing Cross looking along Pall Mall with trams 7 and 21 and 26 in the picture. 1205.19 - Charing Cross, with 21 departing for Golden Square and No. 5 heading for Quarry Hill. Has the Ezywalkin and the Beehive buildings in the background. 1205.20 - as for 1205.19, but a few moments later. Adjacent pole has a "NO ROAD" letter in reflectors vertically. 1205.21 - Charing Cross with Nos. 25, 21, 26 and 7, looking south from Pall Mall end. 1205.22 - No. 24 crossing Mitchell St. en route for Golden Square, showing 'special' with the Beehive and Ezywalkin buildings in the background. 1205.23 - Charing Cross with Nos. 24, 21 and 7 in the photo and Fountain Plaza in the background. Print of 1205.7 - stored in box D1.Information written on in blue ink and date stamped on purple ink. 1205.1 - "No. 25 at Fire Station Loop High Street, Golden Square." 1205.2 - "Nos. 25 and 21 crossing at Fire Station Loop, near Golden Square." 1205.3 - "Nos. 25 and 21 crossing at Fire Station Loop, near Golden Square." 1205.4 - "No. 25 at Golden Square terminus." 1205.5 - "No. 25 at Golden Square terminus." 1205.6 - "Nos. 7 and 25 crossing at Myrtle St. Loop." 1205.7 - "No. 7 leaving Myrtle St. Loop." 1205.8 - "No 25, entering Bendigo Depot." 1205.9 - "Nos. 20 and 24 at Bendigo Depot." 1205.10 - "No. 24 at Bendigo Depot." 1205.11 - "Nos. 25 and 29 at Bendigo Depot." 1205.12 - "Birney cars 29 and 28 at Bendigo Depot." 1205.13 - "No. 24 (with 20 beyond) at Bendigo Depot." 1205.14 - "No. 24 entering McCrae St. from Arnold St." 1204.15 - "No. 24 in Caledonia St. at cnr of Thunder St." 1204.16 - "No. 5 waits at Charing Cross as No. 26 arrives from Quarry Hill. Note remains of crossover abandoned on relocation in 1965." 1204.17 - "Nos. 5 and 26 at Charing Cross." 1204.18 - "Nos. 26, 7 and 21 at Charing Cross (No. 5 just visible behind No. 26)." 1204.19 - "No. 21 leaves Charing Cross for Golden Square as No. 5 starts off for Quarry Hill." 1204.20 - "No. 21 swings onto the single track Golden Square line as No. 5 heads into Mitchell St. towards Quarry Hill." 1204.21 - "Nos. 25, 21 and 26 watch No. 7 arrive at Charing Cross from Golden Square." 1204.22 - "No. 24 at Charing Cross crossing Mitchell St." 1204.23 - "Nos. 24, 21 and 7 at Charing Cross."tramways, trams, bendigo, golden square, myrtle st., fire station, depot, charing cross, tram 5, tram 7, tram 20, tram 21, tram 24, tram 25, tram 28, tram 29 -
 Ballarat Tramway Museum
Slide - 35mm slide/s - set of 6, Noel Simons, 28 Feb. 1972
Set of 6 transparencies taken on 28/2/1972 on Kodak mounts. 1206.1 - Bendigo No. 5 at Hayes St. Loop, en route for Quarry Hill. 1206.2 - No. 5 at Garden Gully Loop, Mt. Korong road, Ironbark. en route to Quarry Hill. Note the water column in the background. 1206.3 - No. 5 in View St. Bendigo, with the Commodore Motel in the background. 1206.4 - No. 6 en route for Golden Square in Fire Station loop, with the fire station building in the background. Photo taken after tram has passed photographer. 1206.5 - No. 6 in High St., running through Golden Square Shopping Centre, en route for Golden Square. Photo taken after tram has passed photographer. 1206.6 - No. 6 arriving at Charing Cross, bound for North Bendigo, with the City Family Hotel, ANZ bank and the Cenotaph (war memorial) in the background.Information written on in blue ink and date stamped on purple ink. 1206.1 - "No. 5 at Hayes Loop, Ironbark." 1206.2 - "No. 5 at Garden Gully Loop, Mt. Korong road, Ironbark." 1206.3 - "No. 5 in View St. just after start of double track near Barnard St." 1206.4 - "No. 6 in High St. at Fire Station loop." 1206.5 - "No. 6 in High St. running through Golden Square shopping centre." 1206.6 - "No. 6 arriving at Charing Cross from Golden Square."tramways, trams, bendigo, hayes st. loop, garden gully loop, view st., golden square, charing cross, tram 5, tram 6 -
 Ballarat Tramway Museum
Slide - 35mm slide/s - set of 12, Noel Simons, 28 Feb. 1972
Set of 12 transparencies taken on 28/2/1972 on Kodak mounts. 1207.1 - Bendigo 26 and 2 at Charing Cross. 26 en route for Eaglehawk, 2 for Quarry Hill. Has the Colonial Mutual Life, Armstrong Tyre Service, and Australian Mutual Provident Society buildings and a Cohns Drinks ad. in the background. 1207.2 - as for 1207.1 but with Alexandra fountain in the foreground. 1207.3 - No. 2 in Mitchell St. heading for Quarry Hill. Photo taken after tram has passed photographer. Has buildings on either side of Mitchell St. in the background, including the Plaza Theatre. 1207.4 - No. 6 en route for Golden Square departing Charing Cross. Has the RACV and ANZ bank in the background. 1207.5 - No. 2 crossing Pall Mall to enter Charing Cross ex Quarry Hill, with the Fountain Plaza in the background. 1207.6 - No. 6 arriving Charing Cross ex Golden Square with No. 21 alongside. No. 21 has the SEC ad. 'Everything's fine in my all electric kitchen.' Has the City Family Hotel and the Fountain Plaza shopping centre in the background. 1207.7 - No. 5 at Charing Cross en route for Quarry Hill with No. 2 behind. No. 2 has two SEC roof ads, 'Everything s fine in my all electric kitchen' and 'Electricity best for cooking'. RACV building in the background. Tram crews are discussing the day in the front of the tram. 1207. 8 - No. 21 in High St. Bendigo with the Cathedral in the background. No. 21 has two SEC roof ads, 'Everything's fine in my all electric kitchen' and 'Electricity best for cooking'. 1207.9 - No. 6 in High St. Bendigo with the Cathedral in the background. 1207.10 - No. 6 in High St. Bendigo, just past Wattle St. Photo taken after the tram has passed the photographer from within the Highway Car Sales yard. 1207.11 - No. 26 bound for Eaglehawk at the end of the double track in View St., note signal contactors, tram stop and section signs mounted on pole. 1207.12 - No. 26 turning from View St. into Barnard St.Information written on in blue ink and date stamped on purple ink. 1207. 1- "Nos. 26 and 2 at Charing Cross." 1207.2 - "Nos. 26 and 2 at Charing Cross." 1207.3 - "No. 2 in Mitchell St. just after leaving Charing Cross." 1207.4 - "No.6 leaving Charing Cross for Golden Square." 1207.5 - "No. 2 arriving at Charing Cross from Quarry Hill." 1207.6 - "No. 21 waits at Charing Cross as No. 6 arrives from Golden Square." 1207.7 - "No 5 at Charing Cross with No. 2 lurking behind." 1207.8 - "No. 21 in High St. at cnr of Wattle St." 1207.9 - "No. 6 in High St. at cnr of Wattle St." 1207.10 - "No. 6 in High St. between Wattle and Vine Sts." 1207.11 - "No. 26 at end of double track in View St. near Barnard. St. 1207.12 - "No. 26 seen at dusk turning from View St. into Barnard St."tramways, trams, bendigo, charing cross, high st, view st., tram 2, tram 5, tram 6, tram 21, tram 26 -
 Ballarat Tramway Museum
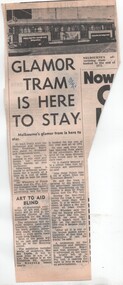
Newspaper, "Glamor tram is here to stay", 28/04/1972 12:00:00 AM
Newspaper Clipping from a Melbourne newspaper dated 28 April 1972 about the MMTB's decorated and illuminated advertising tramcar. Notes lease cost of about $4,000, Frank Mason & Co. as agents, quotes Mr. Wheelan of the company. Also notes about how far the tram travels in a four week period, that there was only one tram, that it was booked up to end of 1973 and that the "SEC set the pattern in 1970". Has a photo of the tram, advertising briquettes.In top right hard part of Clipping, "28/4/72" in blue inktrams, tramways, mmtb, advertisements, frank mason & company, sec -
 Ballarat Tramway Museum
Photograph - Colour Photograph/s, David Endacott, 1971
Colour print of Ballarat No. 11 outside the Ballarat Town Hall during Winter 1971. Tram showing destination of "Victoria St." in the rear destination box. Has an SEC Briquettes roof advertisement and Twin Lakes dash advertisement. Photo taken from behind the tram. Also Myer building in the background. On Kodak paper. Original film image scanned at 3200dpi 12/5/2020.On rear in blue ink "Sturt St." and in top left hand corner "1971". A previous note has been partially rubbed out.ballarat, town hall, myer, victoria st, tram 11 -
 Ballarat Tramway Museum
Book, David J. O'Neil, "History of the Geelong Electric Tramways", Jul. 1994
Eighty page book with heavy card covers A4 size. Colour covers with colour photo of No. 31 at Moorabool and Little Malop Streets, 1950. Contains index, notes on early Geelong Transport, Tramways, opening, decorated trams, Football and trams, People of the tramways, Conductresses, Tramway's staff, Yarns and Truthful (?) stories, The Tramway's Union, Closure, Tram car fleet disposal. Contains many black and white photos, stories and one map and plan of depot. Written by David (Dave) J. O'Neil On rear cover has a "Highton Newsagency" label with price of $24.95. Item scanned 28/4/2019 - btm1293i1.pdf to btm1293i3.pdf - three sections - text searchable when opened using a pdf editor.trams, tramways, geelong, provincial tramways, conductresses -
 Ballarat Tramway Museum
Book, Campbell Duncan, "Ballarat's Tramway Preservation Project", 1978?
Sixteen page book or booklet printed on A4 white paper, folded to A5 with saddle bound staples, titled "Ballarat's Tramway Preservation Project". Written by Campbell Duncan for the BTPS c1978, giving details of the history of Ballarat's tramways, and a brief history of Geelong and Bendigo, the formation and operations of the BTPS and the tramcar fleet. Has 10 photographs, 1 sketch of the front of a maximum traction tramcar and a map of the BTPS location on the rear. Map drawn by G. Inglis 2.73. Note no credits for photographs. See image files for photos used in book. Second edition - notes tram 28 has been repaired by the BTPS and this did not occur until 1978 - only gives 6 tramcars in list - we had others stored off site at the time. second copy added 1/1/12trams, tramways, btps, museum directory, car fleet, map -
 Ballarat Tramway Museum
Postcard, Bascands Ltd. Christchurch NZ, SECV Ballarat trams 27 and 38, 1980-1981
Colour postcard of SECV Ballarat trams 27 and 38 crossing at Gardens Loop in Wendouree Parade during the early 1980's by John Phillips for a BTPS postcard. Tram 27 has a "Brambles" advertisement and a "TWIN LAKES" sign. Both trams showing St Aidans Drive destination and "TRAM RIDES" signs. Trams in SECV livery. See also Reg. item 2787 for a similar photograph taken at the same time. On rear is a note regarding the trams, the tramway operations, printers name, logo and number (M508) and photographers name, with place for stamp and address. Four copies held. BTPS Annual Report 1980-1981. Used in postcard display 2017-2018 See image i1 for a copy of the original photo - refer to Reg Item 8193 for an associated email.trams, tramways, wendouree parade, btps, postcards, gardens loop, tram 913, tram 345 -
 Ballarat Tramway Museum
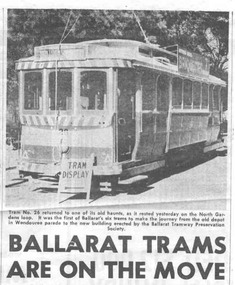
Newspaper, The Courier Ballarat, "Ballarat Trams are on the move", 17/06/1972 12:00:00 AM
Newspaper cutting from The Courier, Ballarat 17/6/1972 of the moving of tram 26 into the depot the previous day. Has photo of tram 26 at Gardens Loop with a "TRAM DISPLAY" sign at the end. Caption notes as being moved from the old to the new depot. Quotes BTPS Vice President, Mr. M. Calnin about the move, the future plans and interest created during the move. Article also mentions that the old depot is to be auctioned by the SEC that day (17/6/1972). Demolition commenced within one month - see Reg. item 1791. Gives details of the move arrangements. See Reg. item 1788 and 1792 for further references and Information for Members (BTPS) - June-July 1972 and Sept. 1972. btps, moving trams, gardens loop -
 Ballarat Tramway Museum
Ephemera - Ticket/s, Victorian Railways (VR), BTPS Mirboo North tour, 1974
Edmondson pasteboard railway ticket, No. 14, dated 25 April 1974, for use on a Ballarat Tramway Preservation Society special train from Morwell to Mirboo North and return. See Reg. item 1819 for S circular or Special Train Notice for the tour. Ticket base is off white with eight light orange vertical bands equally spaced along the ticket, which is printed in landscape format. Notes as being "Available by Goods Train each way on day of issue only.", for Adult - Economy and Adult - Economy. Ticket number in reverse printing. See Reg Item 4676 for a group photo.trams, tramways, tickets, btps, morwell - mirboo north, tours -
 Ballarat Tramway Museum
Ephemera - Tour Notes, Victorian Railways (VR), Apr. 1974
... on foolscap size paper. See Reg Item 4676 for a group photo ...Victorian Railways "S" circular, number S.839/74 advising of a BTPS excursion from Morwell to Mirboo North on Thursday 25/4/1974 (Anzac Day). Noted that a BW carriage to be attached to the Mirboo North goods at Traralgon at the rear in front of the brake van, pick up passengers at Morwell, the train to Mirboo North would have an altered schedule, passengers would travel to Morwell by the 7.20am passenger ex Melbourne and return by the Gippslander ex Morwell, that passengers would have specially printed tickets (See Reg. Item 1817) and signed by J. C. Crute as Chief Traffic Manager. Issued on 10/4/1974. Printed on foolscap size paper. See Reg Item 4676 for a group photo.btps, tours, morwell - mirboo north, special trains -
 Ballarat Tramway Museum
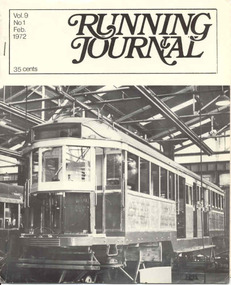
Magazine, Tramway Museum Society of Victoria (TMSV), "Running Journal Vol 9, No. 1, Feb. 1972", Feb. 1972
Demonstrates aspects of publication of material in an enthusiast based magazine for a Melbourne based organisation, with a detailed article on the overhaul of trams at Preston workshops for Melbourne.Feb. 1972 issue of "Running Journal", consisting of formally printed cover on glossy paper which has been folded, containing seven wax stencil cut, duplicated sheets, pages 3 to 16. Published by the Tramway Museum Society of Victoria. Sheets have been stapled into the folded covers. See condition notes also. Cover has W2 277 undergoing a "O2" overhaul at Preston workshops Page 2 - photos of 928, 733 and 921 undergoing various overhaul stages Pages 3 to 9 - article by Norm Cross on MMTB tramcar overhauls at Preston Workshops Page 9 - News from Ballarat (BTPS - foundations for new shed) Page 10 - 11 - Tramway Quiz Page 12 - 14 - TMSV Museum news (muses) Page 15 - Answers to quiz Page 16 - Back issues of Running Journal Page 17 - Photos of 980 and Museum activities Page 18 (back cover) - 18 in Sturt St., July 1970, Ballarat 18 - in Vickers St. Sebastopol shed, trams 31, 30 and 32 stored at the SEC Ballarat North Power station grounds awaiting transport, in October 1971 and MMTB 469 arriving as the last Footscray tram. Loose sheet - duplicated, advertising, Last Mail Covers - Bendigo Tramways, prior to closure on 16/4/1972. Second copy ex ARHS 9/2003 added 21/09/2006. 3rd copy added 28/10/2007, ex Graeme Breydon Collection.Has Graeme Breydon address stamp on front cover.trams, tramways, tmsv, running journal, ballarat, overhauls, preston, mmtb -
 Ballarat Tramway Museum
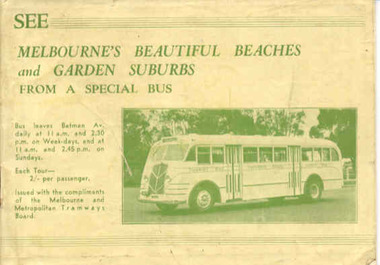
Book, Melbourne and Metropolitan Tramways Board (MMTB), "See Melbourne's Beautiful Beaches and Garden Suburbs from a Special Bus", 1939
Thirty two page landscape booklet on semi gloss white paper with off white cover and single supplementary white sheet tipped onto the inside of the front cover titled "See Melbourne's Beautiful Beaches and Garden Suburbs from a Special Bus". Saddle stapled, printed letterpress. Text printed in black and green ink. Cover green ink only. The book advertising MMTB's Special tourist bus, giving overall tour details on page 1, including fares, time of departures and reservations. Each tour has a map showing the route, details of the tour route with notes and photographs. Page 14 shows a maximum traction tram on the reserved track in Dandenong road and page 30, W2 488 outbound in Victoria Parade. Page 32 has an advertisement for the Round Trip by Tram 1/-. Front cover has details of the departure times and fares and a photo of the Tourist Bus. The supplementary sheet has been prepared for the tours that operated daily from Sun Sept. 17 to Friday May 31, except Anzac Day. Melbourne Tram Museum has a similar book - different bus - Reg Item 99 - 1938-39 version..trams, tramways, mmtb, bus tours, melbourne, sightseeing -
 Ballarat Tramway Museum
Newspaper, The Courier Ballarat, "Pieces of Tram History", Sept. 1971
Yields information about the presentation of a set of tickets that were presented to the City of Ballarat at the time of closure of the system.Newspaper clipping from The Courier, Ballarat, 22 September 1971 of tickets and passes being given to the City of Ballarat by Mr. Denmead. Shows close up photo of ESCo 1 1/2d tokens, a photograph of a presentation sheets of sample tickets dated 1906 and Mr. Denmead holding metal passes and two tokens. Notes the items as being passed to Council for safe keeping. Article notes that the tokens in the close up photo was owned by Mr. Lyle Kay of 5A Finch St. Ballarat. See Reg Item 3775 for a Courier print of the photograph of the tickets. 1846.1 - added 23/10/2004 - duplicate cutting. Original item replaced by a better condition cutting 13/6/2017, from donation of Ruth Nelson. See Reg Item 8000 for the actual framed set of tickets.tickets, passes, tokens, closure -
 Ballarat Tramway Museum
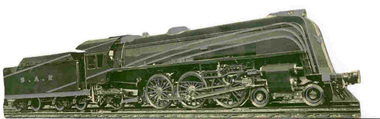
Drawing - Illustration/s, South Australian Railways, SAR locomotive card, 1936
Photographic illustration of South Australian Railways Locomotive No. 620, the has been printed onto card and then cut out in the form of outline of the locomotive. Printed in green ink and then over printed in a silver ink to highlight the locomotive. On the rear of the illustration has been printed details of the locomotive (Light Pacific Engine), designed and built at SAR's Islington Workshops. Gives details of the locomotive, SAR's service. Notes that SAR has given 80 years of service. Printed by the Government Printer Adelaide. Reference -"Kings of the Iron Horse" by David Burke, page 164 -5 - gives details of the launch of the locomotive, 'Sir Winston Dugan', then Governor of South Australia. Photo of the launch and locomotive on opposite page 196. Would probably have been made for the launch of locomotive or soon after. Part of the centenary celebrations of the founding of South Australia. See "Kings of the Iron Horse" - A.E. Smith and F. J. Shea by David Burke.trams, tramways, sar, locomotives -
 Ballarat Tramway Museum
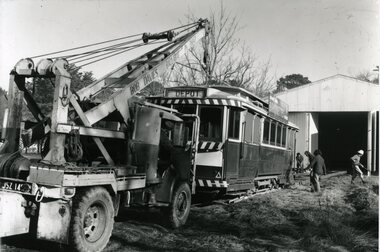
Photograph - Black & White Photograph/s, The Courier Ballarat, 17/06/1972 12:00:00 AM
Black and white photograph print of a photo that appeared in The Courier, Ballarat 19/6/1972 of the moving of tram 26 into the depot. Note use of steel channels and rails on their side. Assisting is Bob Davies' crane. See Reg. Item 1788 for further details and of the newspaper cutting that the photo appeared in. Taken on Sat. 17 June 1972. See Information for Members (BTPS) - June - July 1972 and Sept. 1972.On rear in purple stamp "Copyright, The Ballarat Courier Proprietary Limited"trams, tramways, btps, moving trams, tram 26 -
 Ballarat Tramway Museum
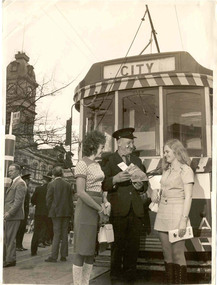
Photograph - Black & White Photograph/s - set of 3, State Electricity Commission of Victoria (SECV), Sept. 1971?
Set of three black and white photographs taken at the time of the launch of the four postcard set of the trams, shortly before closure. See also Reg. item 1699, SEC News - similar photo to that of 1863.2 used on the front cover of the Oct. 1971 issue, which detailed:- "SEC News", house magazine of the State Electricity Commission of Victoria, October 1971 issue, No. 150, following closure of the SEC Ballarat tramways. Has front cover photo of Lew Walker (Ballarat Motorman) receiving a kiss from Glenda Martin and Janice Greed (left), in front of a bogie tram with the town hall in the background. - see Reg Item 1699 and btm1699i1" 1863.1 - above details, with Lew holding the post card set. Note Mr. L. Denmead standing by the tram stop pole. 1863.2 - photo similar to that at 1699i1, but with Mr. Denmead approach crews on the left hand side. 1863.3 - above, but with Lew Walker standing in cab door and the two ladies, looking up at the driver. Has Post Office tower in background. Assumed photos taken by SEC Photographer. See Reg. item 1699trams, tramways, ballarat, postcards, sec news, closure -
 Ballarat Tramway Museum
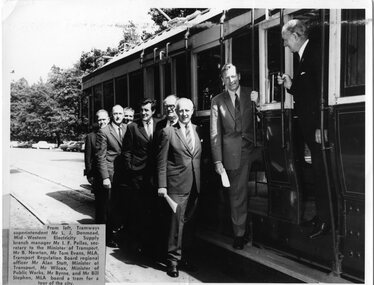
Photograph - Black & White Photograph/s, The Courier Ballarat, mid to late 1970's
Black and white photograph of a Ministerial / government inspection party boarding a bogie tram at Gardens Loop. Attached to the bottom left hand corner of the photo is part of a cutting from the Courier, giving the name of the people boarding the tram. Photograph and cutting undated - possibly late 1960's. Attachment with a piece of 'sticky tape' On rear of photograph is a Ballarat Courier Copyright stamp. Name of people in photograph are given as: Tramways Superintendent - Mr. L. J. Denmead, Mid-Western Electricity Supply branch manager, Mr. I. F. Pellas, Secretary to the Minister of Transport, Mr. B. Newton Mr. Tom Evans MLA Transport Regulation Board, regional officer, Mr. Alan Stott Minister of Transport, Mr. Wilcox, Minster of Public Works, Mr Byrne Mr. Bill Stephen, MLA. Note: Murray Byrne was Minister of Public Works from June 1970 until August 1972. This would narrow down the photo to between June 1970 and September 1971 and probably in 1970. (Research note from Peter Winspur 14-12-2012). From the shadows etc, probably late 1970, very early 1971.On rear of photograph, in black ink is stamped "Ballarat Courier / Press Photograph / - copyright -"trams, tramways, closure, ballarat, gardens loop, ministerial visit, transport -
 Ballarat Tramway Museum
Photograph - Black & White Photograph/s - set of 3, W.C. Meyer and Photographer, 1955
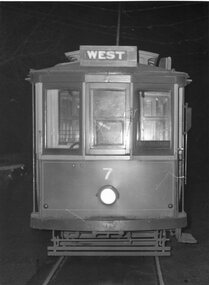
Set of three photographs of Geelong single trams, one of the same type of tram (No. 7) prior to fitting with marker lights and No. 4 after fitting with marker lights, one during daylight and one at night. Three photographs taken by W.C. Meyer, Photographer, 333 Myers St. East Geelong, Phone 3289. Photo of one end of the tram only. Note top marker lights, not repeated on any other cars shown in photographs in Destination Eaglehawk. Shows as well, arrangements for tow bars, mirror and handrails. 1872.1 - Before fitting with additional lights, at night with 'flash' - showing destination 'West' - tram No. 7 1872.2 - after fitting with lights and stripes, during daylight - showing destination 'CITY' - tram No. 4 1872.3 - ditto at night, showing destination of 'CITY'. - tram No. 4 1872i4 - close up of the mirror and light on the roof - right hand side of i2. Note all lights illuminated in the night photo. Destination Eaglehawk, page 44, notes tram 4 as being fitted with dash canopy lighting and zebra stripes in 1955. No mention of No. 7 being so fitted. For date of photograph, assumed early 1955 at this time (14/11/2001) See Destination EaglehawkAll stamped with black ink stamp " W.C. Meyer, Photographer, 333 Myers St. East Geelong, Phone 3289" and on rear of photos in dark blue ink, handwriting, 1872.1 - Night - with 'flash' photo. 1872.2 - Daylight 1872.3 - Night - with 'flash' photo. This tram has supplementary lights trams, tramways, geelong, dash canopy lights, lights, mirrors, tram 7, tram 4 -
 Ballarat Tramway Museum
Photograph - Black & White Photograph/s, Mal Rowe, 29/06/1968 12:00:00 AM
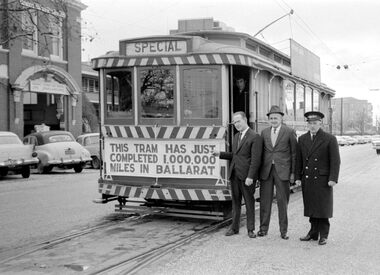
Yields information about the purported achievement of tram 27 reaching 1,000,000 miles and the TMSV Tour, and has a strong association with the people shown in the photograph.Black and white photograph of Tram 27 completing its "millionth" mile in Ballarat on Saturday 29 June 1968 at Hospital Corner. Tram in Drummond St. North. Tram showing "Special", has banner "This tram has just completed 1,000,000 (million) miles in Ballarat" on the front of the tram. Ballarat Base Hospital in background. Standing alongside is Les Denmead, pointing to the sign, ? and Inspector. Photo by Malcolm Rowe. See also Reg Item 1847 and 1850 for details of the event and press clipping. On stippled paper. 2nd copy added 29/5/05 See also Reg Items 7990 to 7995 for other photos of the day by Mal Rowe. Note: A review of the tram car mileages by Dave Macartney, showed that it was actually 900,000, due to a carryover error.On rear in blue ink " Tram No. 27, completed 1,000,000 miles at 3.10p.m. Saturday 29 June 1968 - Hospital Corner" and in black ink "Malcolm Rowe Photograph / T.M.S.V. member".trams, tramways, million miles, hospital corner, tmsv, million miles, tram 27 -
 Ballarat Tramway Museum
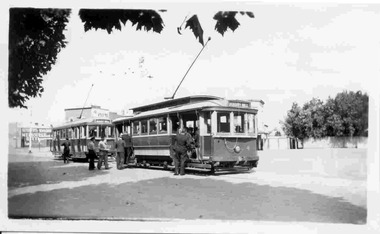
Photograph - Black & White Photograph/s, Harvey Studios, 18/02/1953 12:00:00 AM
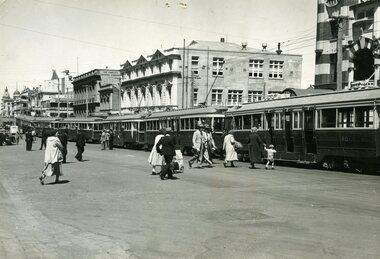
Yields information about the tram arrangements for a large group from Geelong and the Geelong wharfies made for their picnic - probably at the Gardens. Demonstrates transport arrangements in the 1950's.Black and white photograph of seven bogie trams lined up with passengers boarding in Lydiard St. North, between Mair St and the Railway Station for the Geelong Waterside Workers picnic day on Wednesday 18/2/1953. Closest tram is No. 40. Photo taken from the Railway Station car park entrance. Provincial Hotel and other buildings on west side of Lydiard St. in photo. Published in the Courier 19/2/1953 - advised by Alan Bradley - 15/3/2003. 1880.1 - Digital image of the same photo from the Wal Jack Album. See images i2 and i3 for details, i3 for the rear of the photograph. Wal Jack notes identifies the trams as Nos. 15, 35, 39, 38, 34, 37, 40"On rear in blue ink "10 - Special trams chartered to convey Geelong Waterside Workers Picnic participants from Railway Station to Lake Wendouree Botanical Gardens o Wednesday 18 Feby '53". Under writing is word "Ballarat" in pencil. In top right hand corner, in a purple ink hand stamp is "N.L. Harvey (Photo Press Service) A.M.P. Chambers Lydiard St. N Ballarat" On rear of .1 is the N.L.Harvey stamp and Wal's notes "SEC Ballarat Geelong Wharfies Specials, Lydiard St Nth at 11.5am, 18-2-53, Nos. 15, 35, 39, 38, 34, 37, 40"trams, tramways, picnics, lydiard st. nth, geelong waterside workers, charters, tram hire, tram 40 -
 Ballarat Tramway Museum
Photograph - Miscellaneous Images, Set of 15 (Only three photos in archive, .5, .6 and .7. Location of remaining 12 photos under investigation), 1960s
Set of 15 items personally collected or given to Les Denmead by visiting Tramway enthusiasts or other interested people to Ballarat. Retained as a sample of images or other mementoes given by people though not directly of Ballarat. The following items are a summary only: 1901.1 - Postcard from South Pacific Electric Railway of L/P class tram No. 154 on SPER track , SPER-1 - Nucolorvue. 1901.2 - Photograph of Brisbane FM 440? and drop centre behind - CBD area Brisbane. Has 'Brisbane' written on back. 1901.3 - Photograph of Brisbane FM 473, showing Grange, as for 1901.2. 1901.4 - Photograph of Brisbane FM 422, showing Chermside, Brisbane CBD area, has "Brisbane May 1955' written on front of photo. 1901.5 - Illustration of Christchurch Horse Tram, Tramway Historical Society / Shell Oil company produced card, full details on rear. 1901.6 - Illustration of Wellington 'Fiducia' tram No. 238, operating on Wellington Tramway Museum track. Produced by Museum, with full details on rear. 1901.7 - Colour illustration of Wellington tram No. 257, central or downtown Wellington, outside the Parliament grounds. Full details on rear of card - produced by Shell Oil Company? 1901.8 - Photo of four H class trams at Victoria Sq. Adelaide, 25/3/1967. Taken by Douglas A. Colquhoun. On left hand side is a single car 378 and on the other track a three car set 366, 367 and 368. 1901.9 - Photo of Adelaide E1 111, crossing the Holland St. Bridge, 24.10.1953. Photo by Douglas A. Colquhoun. 1901.10 - Photo of Adelaide A 82, Wayville Junction, Feb. 1952. Photo by Douglas A. Colquhoun. 1901.11 - Photo of Adelaide A 10, later SEC Ballarat 21, in Adelaide CBD, with Ferors Gresham Hotel alongside. Has written note on background re tram. 1901.12 - Two prints of the front vestibule of a Toronto PCC tram, with operator (driver) seated. 1901.13 - Two prints of Toronto PCC 4400 and 4404, coupled together, 9/8/1949 with a depot? or carbarn building in the background. Has caption on the base of the photograph - copy photograph. 1901.14 - Two prints of a close up photograph of the coupling between the two cars in 1901.13. 1901.15 - Photograph of a Fare Box on a Toronto Streetcar. (1901.13 to .14) have "Canada" written on the back. 1trams, tramways, sydney, brisbane, adelaide, wellington, christchurch, toronto, pcc, victoria sq., tram 21 -
 Ballarat Tramway Museum
Photograph - Black & White Photograph/s, Keith Kings, Apr. 1949
Black and White photograph contained with Reg. Item 1902 - Photo Album from Keith Kings to Les Denmead 1970. Photograph of SEC Bendigo trams 22 and 4 at the Eaglehawk terminus, Easter Monday April 1949. Notes as both cars in "unaltered" condition. Keith Kings No. B(z)(1) Scanning: i - image file, p - presentation file, b - back of photograph. Has buildings at terminus in background, with Plume and Melbourne Bitter beer signs.Stamp in top left hand corner and handwritten number with "K.S. Kings No. B(z)(1) Copyright reserved". In blue ink "Bendigo / No. 22 - unaltered closed combination car / No. 4 - unaltered open combination car. / Eaglehawk terminus / Easter Monday, 4/49"trams, tramways, eaglehawk, bendigo, tram 22, tram 4 -
 Ballarat Tramway Museum
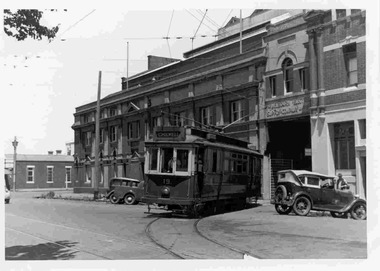
Photograph - Black & White Photograph/s, Keith Kings, 8/01/1956 12:00:00 AM
Black and White photograph contained with Reg. Item 1902 - Photo Album from Keith Kings to Les Denmead 1970. Photograph of SEC Geelong No. 19, leaving the depot, with the main office part of the depot building in the background. A number of motor vehicles on either side of the depot entrance. Tram has destination of "Chilwell". On rear of photo is stamped "ll317A and 28.5.70", possibly indicating print manufacture dates. Keith Kings No. Q(u)(3) Scanning: i - image file, p - presentation file, b - back of photograph.Stamp in top left hand corner and handwritten number with "K.S. Kings No. Q(u)(3) Copyright reserved". In blue ink "Geelong "Pengelley" No. 19 leaving the Depot. / Note:- MESCo Ltd. name above entrance / 8/1/56".trams, tramways, geelong, mesco, depot, tram 19