Showing 1785 items
matching tram signs
-
 Ballarat Tramway Museum
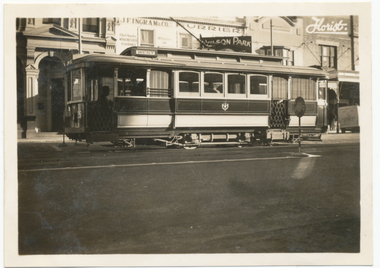
Photograph - Digital image, Late 1950's
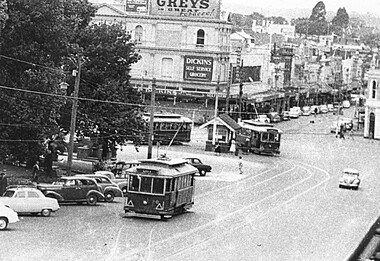
Yields information the appearance and details about the Grenville St intersection in the background in particular the shops on the corner in the late 1950's.Digital scan from the Ben Parle collection of SEC trams tram 30 in the loop and two other single truckers at the Grenville St stop. Photo 1950's or early 1960 prior to introduction of dash canopy lighting. Note the SE Dickins store on the north side, with the hotel on south side. Dickins later moved to the south side. Morsheads sign in photo as well as Grey's cigarettes. Photo received with the Ben Parle slides 09/2004. trams, tramways, grenville st, sturt st, bridge st, city loop, tram 30 -
 Ballarat Tramway Museum
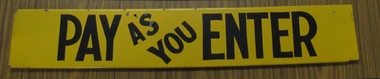
Sign, State Electricity Commission of Victoria (SECV), "Pay as you Enter", 1960's
... . Trams tramways Signs Sec Tramcars Folded metal and painted "Pay ...Demonstrates how the SEC used painted signs to advise passengers about fare payment arrangements.Folded metal and painted "Pay as you Enter" sign used on Ballarat single truckers until 1971. Black lettering on a yellow front with a Yellow back. Sign has been manufactured to fit the timber holders that were provided on each side of each door. Painted by the SEC Ballarat painter George Wright at the tram depot. (Advised by Bill Llewellyn to Richard Gilbert at the time of donation)trams, tramways, signs, sec, tramcars -
 Ballarat Tramway Museum
Sign, State Electricity Commission of Victoria (SECV), "Passengers Must Not Obstruct the Entrances", 1960's
... the advice of the conductor and how enamel signs were made. Trams ...Demonstrates how the SEC used enamel signs to convey instructions to passengers or to confirm the advice of the conductor and how enamel signs were made. Enamel sign, black capital letters and lines on white background, titled "Passengers Must Not Obstruct the Entrances". Sign has a black enamel backing, with marks from the enamelling process. Four screw holes in each corner to secure the sign. 4563i1 - Similar sign but different layout and smaller in length "Passengers Must Not Obstruct tram Entrance." Two screw holes in sides.trams, tramways, signs, sec, tramcars -
 Ballarat Tramway Museum
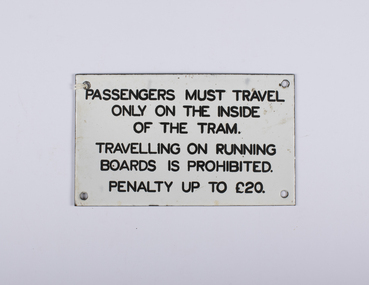
Sign - Warning Sign - Passengers must travel only, State Electricity Commission of Victoria (SECV), "Passengers must travel only on the inside of the tram. Travelling on Running Boards is Prohibited Penalty up to L20", 1960's
... the advice of the conductor and how enamel signs were made. Trams ...Demonstrates how the SEC used enamel signs to convey instructions to passengers or to confirm the advice of the conductor and how enamel signs were made.Enamel sign, black capital letters and lines on white background, titled "Passengers must travel only on the inside of the tram. Travelling on Running Boards is Prohibited Penalty up to L20"". Sign has a black enamel backing, with marks from the enamelling process and screw holes in each corner. 2nd copy added 4/7/2017 from donation of Wendy Hunt.trams, tramways, signs, sec, passengers, btm, ballarat tramways -
 Ballarat Tramway Museum
Photograph - Digital image, 1970s
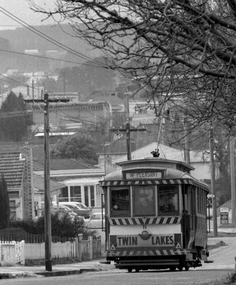
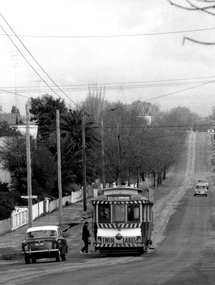
Yields information about the Mt Pleasant route and Barkly St.Digital image, black and white, of No. 11 in bound in Barkly St Mount Pleasant about to turn into Main St. Tram has a Twin Lakes Sign. Photo taken by Peter Bruce 1970's and 1971, prior to the closure of the Ballarat tramway system. Peter's Title of image: "No. 11 Barkly St"trams, tramways, barkly st, mt pleasant, tram 11 -
 Ballarat Tramway Museum
Photograph - Digital image, Peter Bruce, "No. 11 Mt Pleasant", 1970s
Yields information about the Mt Pleasant route and Barkly St.Digital image, black and white, of No. 11 in Barkly St, out bound to Mt Pleasant. Tram has a Twin Lakes sign. Photo taken by Peter Bruce 1970's and 1971, prior to the closure of the Ballarat tramway system. Peter's Title of image: "No. 11 Mt Pleasant" trams, tramways, barkly st, mt pleasant, tram 11 -
 Ballarat Tramway Museum
Photograph - Digital image, Peter Bruce, "No. 11 Setting down.", 1970s
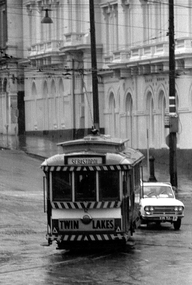
Yields information about the Mt Pleasant route and Barkly St.Digital image, black and white, of No. 11 in Barkly St, out bound to Mt Pleasant setting down passengers. Tram has a Twin Lakes sign. Mini Minor motor car in the front of the tramcar. Photo taken by Peter Bruce 1970's and 1971, prior to the closure of the Ballarat tramway system. Peter's Title of image: "No. 11 Setting down."trams, tramways, barkly st, mt pleasant, tram 11 -
 Ballarat Tramway Museum
Photograph - Digital image, 1970s
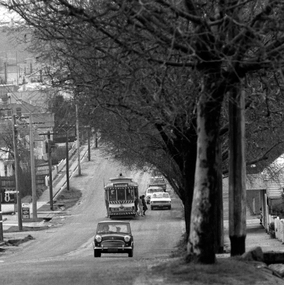
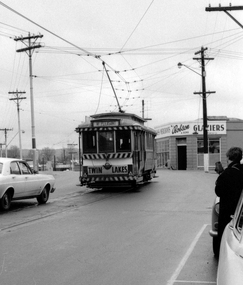
Yields information about the Mt Pleasant route and Main St.Digital image, black and white, of No. 11 in Main St Ballarat, running out to Mt Pleasant. Tram has a Twin Lakes sign. Robson Glaziers shop in the background. Photo taken by Peter Bruce 1970's and 1971, prior to the closure of the Ballarat tramway system. Peter's Title of image: "No. 11 turns out of Barkly St" (not correct location)trams, tramways, mt pleasant, main st, tram 11 -
 Ballarat Tramway Museum
Photograph - Digital image Set of 2, Peter Bruce, No. 11 "Wendouree Parade", 1970s
Yields information about Wendouree Parade and the Hamilton Ave area and Sturt St West..Digital image, black and white, of No. 11, with a Twin Lakes sign running a Mt Pleasant service. .1 - In Sturt St west between Hamilton Ave and Russell St loop. .2 - In Wendouree Parade about to turn into Hamilton Ave. Note the Tram timetable on the pole on the right hand side of the photograph. Photo taken by Peter Bruce 1970's and 1971, prior to the closure of the Ballarat tramway system. Peter's Title of images: No. 11 "Wendouree Parade"trams, tramways, wendouree parade, sturt st west, mt pleasant, timetables, hamilton ave, tram 11 -
 Ballarat Tramway Museum
Photograph - Digital image, Peter Bruce, "No. 12 Lydiard St", 1970s
Yields information about the Sturt and Lydiard St intersection.Digital image, black and white, of No. 12 turning from Lydiard St Nth into Sturt St, enroute to Sebastopol, with the Post Office in the background. Tram has a Twin Lakes sign. Photo taken by Peter Bruce 1970's and 1971, prior to the closure of the Ballarat tramway system. Peter's Title of image: "No. 12 Lydiard St"trams, tramways, lydiard st nth, sturt st, post office, tram 12 -
 Ballarat Tramway Museum
Photograph - Digital image, 1970s
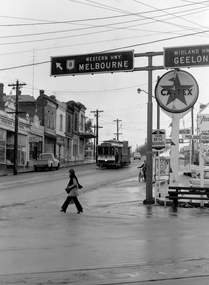
Yields information about the Bakery Hill Victoria St and the Caltex Service Station.Digital image, black and white, of No. 26 descending Bakery Hill to Stone's Corner, Victoria and Main St with the Caltex service station in the foreground. Has a lady with slacks walking across the road and a boy wheeling a bike down the footpath. Note the Highway direction signs and service station signage. O'Brien Motors and a book and record shop on the north side Bakery Hill Victoria St. shops. See Reg 4603 for the subsequent photo at this location. Photo taken by Peter Bruce 1970's and 1971, prior to the closure of the Ballarat tramway system. Peter's Title of image: "No. 26 Bridge and Vic1"trams, tramways, victoria st, main st, stones corner, bakery hill, tram 26 -
 Ballarat Tramway Museum
Photograph - Digital image, 1970s
Yields information about the Mt Pleasant route and Barkly St.Digital image, black and white, of No. 30 in bound along Barkly St, Mt Pleasant. Tram has a Twin Lakes sign and destination of Gardens via Drummond Nth. Tram picking up passenger at rear door, while a Vanguard motor car waits. Photo taken by Peter Bruce 1970's and 1971, prior to the closure of the Ballarat tramway system. Peter's Title of image: "No. 31 and Vanguard"trams, tramways, barkly st, mt pleasant, tram 31 -
 Ballarat Tramway Museum
Photograph - Digital image, Peter Bruce, "Tram Times", 1970s
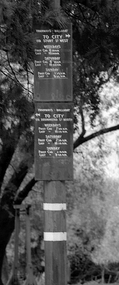
Yields information about timetable board at the Gardens Loop.Digital image, black and white, of the two timetable signs at the Gardens Loop in Wendouree Parade. Photo taken by Peter Bruce 1970's and 1971, prior to the closure of the Ballarat tramway system. Peter's Title of image: "Tram Times"trams, tramways, timetables, gardens loop -
 Ballarat Tramway Museum
Photograph - Digital image, 1970s
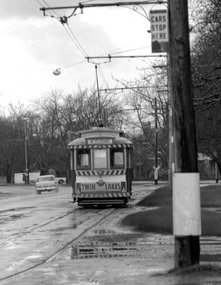
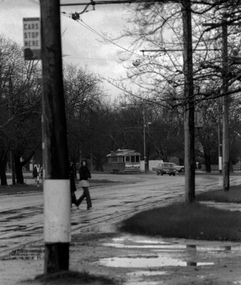
Yields information about Sturt St west track near Hamilton Ave with pedestrians.Digital image, black and white, of a single truck tram, with a Twin Lakes sign, outbound in Sturt St West, near the Hamilton Ave stop, with two girls walking across the road after it has rained. Photo taken by Peter Bruce 1970's and 1971, prior to the closure of the Ballarat tramway system. Peter's Title of image: "Two girls and tram"trams, tramways, sturt st west, hamilton ave -
 Ballarat Tramway Museum
Photograph - BTPS depot steel frame and members, 6/5/1972
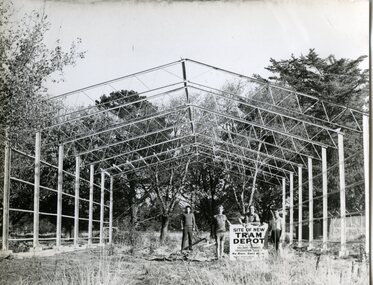
... at the Gardens with four members holding up the sign for the new tram... up the sign for the new tram depot. Shows the steel framework ...Photograph of the construction of the BTPS Depot at the Gardens with four members holding up the sign for the new tram depot. Shows the steel framework for the BTPS depot in the south Gardens reserve. See Reg Item 3819 for a similar Courier Newspaper photograph, published 16 May 1972 along with items 2203 and 9434. Published possibly in the June 1972 issue of Trolley Wire, dated 6/5/1972. Paul Nicholson advised 12/4/2020 - that left to right: Bill Jessup, Paul Nicholson, Neville Gower? and John Fitzsimons. Photograph by Paul's father. Yields information about the construction of the BTPS depot, mid 1972.Black and white photograph with reproduction details on the rear. On rear is a BTPS stamp with a PO box and details written in pencil "Photo No. 21, reduce to 3 7/8" wide" and in ink "85%".trams, tramways, depot, construction, gardens, buildings, btps -
 Ballarat Tramway Museum
Photograph - Black & White Photograph/s - set of 4, May to June 1973
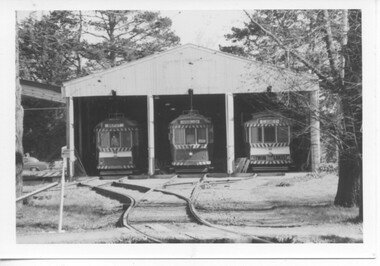
Yields information about the construction of the BPTS depot in early 1974 and its appearance.Set of four Black and white photographs of how the BTPS operated during the early days of the BTPS. Based on the troughing being placed for No. 2 road only, photo dated by a list in the 1972-73 Annual Report at May to June 1973. .1 - ? Bounds standing alongside No. 27, which was operated as a Museum display. .2 - Just the tram itself - was pushed out of the shed by hand. .3 - A general scene with visitors and workers. .4 - pushing the tram back in again at the end of the day. Note the sign is different in the front of No. 27, or no sign, indicating different days. See 1972 - 1973 Annual Report which has a list of dates on page 3 of events at the depot.trams, tramways, depot fan, btps, operations, tram 27 -
 Ballarat Tramway Museum
Photograph - Colour Print/s, c1979
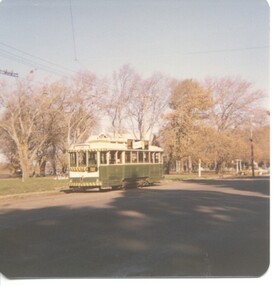
Yields information the appearance of No. 27 in Wendouree Parade c1979.Colour print of No. 27 in Wendouree Parade, c1979. Tram has a APM Roof advertising signs. See dated through Reg item 4673.trams, tramways, wendouree parade, btps, tram 27 -
 Ballarat Tramway Museum
Photograph - Colour Print/s, c1979
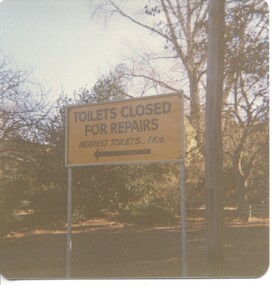
Yields information the issues that occasionally struck BTPS workers - facilities closed and a long walk.Colour print of a sign advising that the toilets (this is from Warren's memory) that BTPS workers used was closed and we had to go elsewhere. At the time, the BTPS had yet to install an internal toilet to the depot. Photo c1979. See dated through Reg item 4673.trams, tramways, wendouree parade, btps, tram 27 -
 Ballarat Tramway Museum
Photograph - Black & White Photograph/s - set of 8, late 1978, early 1978
Yields information the construction of the depot fan and access track to Wendouree Parade and has a strong association with the workers in the photograph.Set of eight Black and white photographs of the extensions to the tram depot and commencement of the trackwork to lay the King points, late 1978, early 1979. .1 - View from south of the level crossing showing the depot front - note the road numbers and sign at the front have been taken down. The steelwork for the depot extension has been erected. .2 - site for the King points with the track materials lay roughly out alongside . .3 - No. 27 in front of 40 on 3 road. .4 - sleepers interlaced for the King Points .5 - all the future materials laid out on the avenue - was like this for a long time .6 - King point materials looking with the mound of earth in the background. .7 - close up of the site of the King point, with the trolley in the background. .8 - rear view of the depot showing the steelwork that had erected. trams, tramways, depot construction, btps, operations, trackwork, tram 27 -
 Ballarat Tramway Museum
Photograph - Colour Photograph/s, Jun. 1982
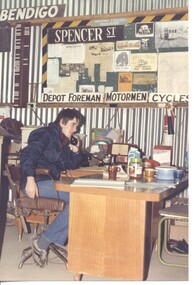
Yields information about the BTPS depot facilities prior the construction of the office and one its workers.Colour print of Stephen Butler, June 1982 in the BTPS depot prior to the construction of the office with many signs and photos on the rear and table which acted as a multipurpose facility - mess room, office etc. Printed on Kodak paper.On the rear in ink is the date "June 1982"trams, tramways, btps, volunteers, depot -
 Ballarat Tramway Museum
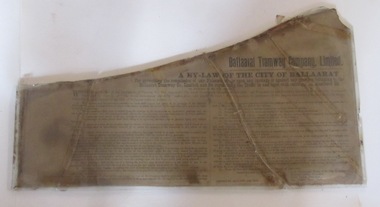
Poster, Ballaarat Tramway Co. Ltd, "Ballaarat Tramway Company, Limited. A by-law of the City of Ballaarat", 1887
Yields information about how the Ballaarat Tramway Company by-laws were displayed to the public and the users of the tramways. Has a strong association with the horse tram era and demonstrates methods of display.Printed original Ballaarat Tramway Co. horse tram by laws placed on a cut sheet of glass, for use in the trams themselves. Printed onto heavy paper/card. Facsimile (Reg Item 773) made from the item recovered from Horse Tram No. 1 in 1986. Gives details of the Acts under which the by-law was made. By Law made by the City of Ballaarat, dated 6th April 1889. Gazetted 5 April 1889. Signed by the Mayor, J. G. McDonald, two Councillors William Little and David Cooke, and Town Clerk Geo. Perry. The sheet of glass has been rough cut in places. To be stored and handled with great care. trams, tramways, city of ballarat, by laws, horse trams -
 Ballarat Tramway Museum
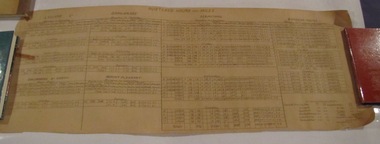
Document - Roster, Electric Supply Co. of Vic (ESCo), "Rostered hours and Miles", 1910's?
Yields information about the details the rosters for crews during the ESCo era and how the tram service operated. Further work on the sign on / off times and knowledge of timetables could determine the date.Single large rolled sheets which has been hand written detailing the Rostered Hours and Miles for crews during the ESCo era. Gives details for the Lydiard St, Drummond St North, Orphanage, Mount Please, Sebastopol and Gardens routes for Monday to Thursday, Fridays, Saturdays and Sundays rosters listing run number, sign on/off, rostered hours, total, number of trips, rostered miles, garden miles total miles and average speed. In the bottom right hand corner is a list of distances for the Gardens routes. Possible 1910's given Reg Item 4738, which can in the same set of donations. trams, tramways, ballarat, rosters, employees, shifts, timetables, esco -
 Ballarat Tramway Museum
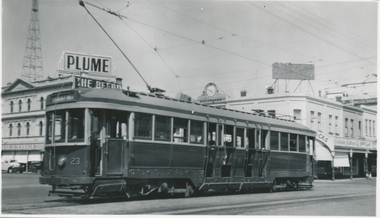
Photograph, Wal Jack, Bendigo No. 23 at Charing Cross, 3/01/1954
Photo of No. 23 at Charing Cross with the destination of Quarry Hill, photo by Wal Jack 3-1-1954. Has the Beehive in the background, a Plume petrol sign and the watchmaker's clock in the background. Printed on Ilford paper. Two prints held. See image i2 for rear of photograph. See image i3 for hi res scan of negative Yields information about Bendigo tram 23 in 1954 and Charing Cross.Black and White print contained within the Wal Jack Bendigo and Geelong Album, see Reg Item 5003 for more details. On the rear in blue ink "SEC Bendigo No 23 bogie to Quarry Hill at Fountain (Charing Cross) Bendigo 3-1-54" with Wal Jack copyright stamp in the top right hand corner and the number "T59PC" written in.trams, tramways, bendigo, charing cross, tram 23 -
 Ballarat Tramway Museum
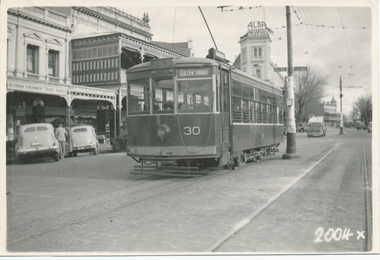
Photograph - Black & White Photograph/s, Jun. 1949
Black and White print contained within the Wal Jack Bendigo and Geelong Album, see Reg Item 5003 for more details. Photo of Bendigo Birney No. 30 in High St Bendigo at the end of the double track line en route to Golden Square. Wal's album notes date the photo as June 1949. In the background is the Victorian Government Tourist Bureau and an advertising sign for "Alba Motor Spirit" Has the number "2004X" written in white ink on the negative. Printed on Ilford paper. On rear in pencil "468"trams, tramways, bendigo, birney, high st, tram 30 -
 Ballarat Tramway Museum
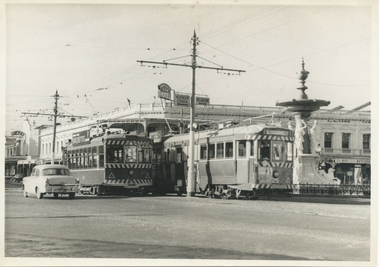
Photograph - Black & White Photograph/s, 25/09/1961 12:00:00 AM
Black and White print contained within the Wal Jack Bendigo and Geelong Album, see Reg Item 5003 for more details. Photo of Birney No. 28 and Bogie tram No. 25 Bendigo, at Charing Cross with the fountain in the background along with the City Club Hotel). No. 28 has the destination of Special and a SEC roof advertisement for Briquettes, No. 25 Eaglehawk? and has a white disk showing a tram following. Note the direction signs on the pole between the tram for Heathcote and Echuca and Melbourne. Photo by Jim Seletto, 25/9/1961. On rear in ink "No. 28 Birney, No. 25 Bogie", Jim Seletto stamp, with date stamp of "25 Sep 1951" and "Bendigo" in red ink.trams, tramways, bendigo, charing cross, birney, tram 25, tram 28 -
 Ballarat Tramway Museum
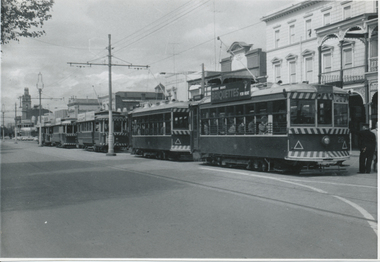
Photograph - Black & White Photograph/s - set of 7, Keith Kings, 20/10/1962 12:00:00 AM
Black and White print contained within the Wal Jack Bendigo and Geelong Album, see Reg Item 5003 for more details. Set of seven images of the ARHS Special tour of Bendigo on 20-10-1962. .1 - Trams 28, 30, 21, 7 and 19 in Pall Mall .2 - 18, 26, 29, 11 and 5 at the Bridge St loop on the North Bendigo line. .3 - 28, 30, 21, 7, 19 on "down" line and 18, 26, 29, 11, 5 and service car 3 on "up" line, View St Opposite Oval .4 - 28, 30, 21, 7, and 19 at Eaglehawk .5 - 28, 30, 21 in North Bendigo siding and 7 and 9 in Thunder St - photo taken in Thunder St. .6 - ditto photo taking from vacant land on the south side of the terminus, along with No. 6 the service tram. .7 - 28, 30, 21, 7, 19 in View St with Goodyear and Caltex signs in the photo and the Commercial Banking Company of Australia building in the background. Most printed on Ilford paper.On rear in ink. .1 - "28, 30, 21, 7, 19 Pall Mall 20-10-62" .2 - "Bendigo ARHS Convoy "A" on Bridge St loop, Nos. 18, 26, 29, 11, 5 20/10/62" with Keith Kings copy right stamp printed in top right hand corner and number "N(y)(12)" written in. .3 - "18, 26, 29, 11, 5 and service car 3 on "up" line, 28, 30, 21, 7, 19 on "down" View St 20-8-62" .4 - "28, 30, 21, 7, and 19 Eaglehawk 20-10-62" .5 - "19, 7 in, 28, 30, 21 in spur siding Nth Bendigo 20/10/62" .6 - "28, 30, 21, 7, 19 plus No. 6 service car Nth B/go 20/10/62" .7 - "Bendigo ARHS Convoy "B" - 28, 30, 21, 7, 19 Charing Cross, 20/10/62" with Keith Kings copy right stamp printed in top right hand corner and number "N(y)(14)" written in.trams, tramways, bendigo, arhs, tours, eaglehawk, north bendigo, view st, tram 28, tram 30, tram 21, tram 7, tram 19, tram 6, tram 18, tram 26, tram 29, tram 11, tram 3 -
 Ballarat Tramway Museum
Photograph - Black & White Photograph/s, 1940
Black and White print contained within the Wal Jack Bendigo and Geelong Album, see Reg Item 5003 for more details. Photo of Geelong No. 3 in Moorabool St. 1940. No details of photographer on rear. Tram has the destination of East. In the background is a sign for Berger Paints and F&M Ritchie? Wal's album notes provides the date of 1940. Printed on Kodak Velox Paper. On rear in ink "84 Geelong Tramways, State Electricity Commission, No. 3 One of their original trams I believe. They ride very steady and smooth. Duncan and Fraser body. The Brush Electrical Engineering Co. Ltd, Loughborough England, long wheel base truck."trams, tramways, geelong, moorabool st, tram 3 -
 Ballarat Tramway Museum
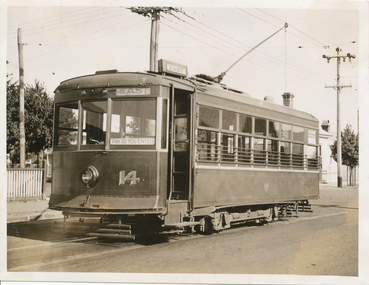
Photograph - Black & White Photograph/s, Wal Jack, 1940
Black and White print contained within the Wal Jack Bendigo and Geelong Album, see Reg Item 5003 for more details. Photo of Geelong Birney 14 at the Chilwell terminus, 1940. Wal notes it is No. 11 on the Bendigo system. The tram has the destination of East and has a "Pay as you Enter" sign on the door. i1 - scan of print in the album i2 - rear of image i3 - scan of negative at 3200dpi added 18/6/2020.On the rear in ink "Geelong Tramways No. 14 Birney Car, bought new 1924"trams, tramways, geelong, chilwell, birney, tram 14 -
 Ballarat Tramway Museum
Photograph - Black & White Photograph/s, Leon Marshall Wood, 29/03/1948 12:00:00 AM
Black and White print contained within the Wal Jack Bendigo and Geelong Album, see Reg Item 5003 for more details. Photo of No. 24 in Aberdeen St, 29-3-1948. Wal's album notes that the tram is in the new colour (all green) scheme. Printed on Velox Paper. Tram has the destination of East. Note the "Pay as you enter" sign. Has on the rear in ink "Aberdeen St, Geelong 29-3-48" and the L. M. Wood copyright stamp.trams, tramways, geelong, aberdeen st, east, tram 24 -
 Ballarat Tramway Museum
Photograph - Black & White Photograph/s, Wal Jack, Jun. 1939
Black and White print contained within the Wal Jack Bendigo and Geelong Album, see Reg Item 5003 for more details. Photo of 25 in Ryrie St Geelong , June 1939. Tram has the destination of West. Note the Safety Zone sign. Printed on Kodak Velox paper. In the background is J. F Ingram & Co, Furrier i1 - scan of print in the album i2 - rear of image i3 - scan of negative at 3200dpi added 6/6/2020. trams, tramways, geelong, ryrie st, tram 25