Showing 2010 items
matching tram routes
-
 Melbourne Tram Museum
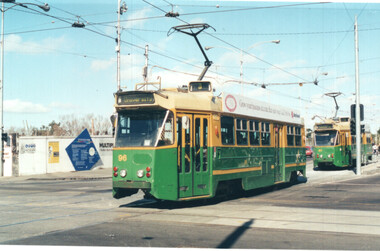
Photograph - Set of 6 colour prints of trams at Corner of Flinders and Swanston Streets, George Bishop, c1999
Set of six colour photographs of trams at the corner of Swanston and Flinders Streets. In the background can be seen the construction of the Federation Square project which commenced in 1999. 1 - Z 96 (Route 3, University) at Flinders and Swanston Streets. 2 - Z 37 (University route 5) 3 - SW6 888, City Circle, westbound. 4 - Z3 140 (East Coburg Route 1) - would appear that the car is not doing their hook turn properly 5 - B2 2037 westbound (Route 70, City Flinders St) 6 - Z 41 (Route 72, University)Yields information about the operation of Melbourne trams during the late 1990s.Set of six Colour prints printed on Kodak paperDetails of the photograph and photographer on the rear in ink.trams, tramways, z3 class, z class, tram 96, tram 37, city circle, tram 888, hook turns, tram 140, b2 class, tram 2037 -
 Melbourne Tram Museum
Album - David Frost Slide Collection, David Frost
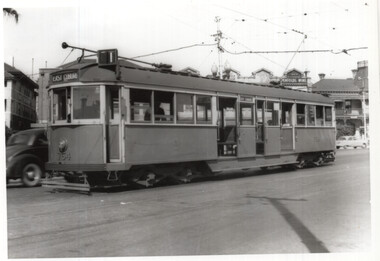
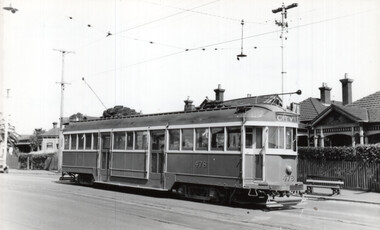
Photo - see pdf file for further information. Number Brief Description date DFC1 A general view from the former railway platform at Port Melb Station looking towards Station Pier on opening day 20-12-1987 DFC2 A2 285 in the Tramway Platform at Port Melbourne Station on opening Day 20-12-1987 DFC3 A2 285 in the Tramway Platform at Port Melbourne Station on opening Day 20-12-1987 DFC4 A2 285 in the Tramway Platform at Port Melbourne Station on opening Day 20-12-1987 DFC5 A2 273 at St Kilda Tramway Station on opening day 22-11-1987 DFC6 A2 273 turning from Fitzroy St into St Kilda Tramway Station on opening day 22-11-1987 DFC7 B1 2001 at St Kilda Tramway Station turning into Fitzroy St on opening day 22-11-1987 DFC8 B1 2002 enters St Kilda Tramway Station on opening day 22-11-1987 DFC9 An A2 approaches St Kilda Tramway Station on opening day 22-11-1987 DFC10 Concreting the connecting curve from Fitroy St into St Kilda Station c July 1987 DFC11 An MTA AEC MKVI bus in Grey St St Kilda at Dalgety St with Tramway works in the background c July 1987 DFC12 Grey St St Kilda at Dalgety St with Tramway works in the background in Fitzroy St c July 1987 DFC13 Concreting the connecting curve from Fitroy St into St Kilda Station c July 1987 DFC14 Restaurant Tram 442 in Fitzroy St at Grey St Passing MTA bus 59 outside St Kilda Station c1986 DFC15 Former VR tram stop sign painted on a pole at Glenhuntly Rd & Broadway DFC16 Former VR Elwood Tram Depot under demolition 1996 DFC17 Former VR Elwood Tram Depot under demolition 1996 DFC18 Former VR Elwood Tram Depot under demolition 1996 DFC19 Former VR Elwood Tram Depot under demolition 1996 DFC20 Former VR Elwood Tram Depot under demolition 1996 DFC21 Former VR Elwood Tram Depot under demolition 1996 DFC22 Former VR Elwood Tram Depot under demolition 1996 DFC23 Former VR Elwood Tram Depot under demolition 1996 DFC24 MTS Tower waggon in use at the former VR Elwood Tram Depot under demolition 1996 DFC25 A Sign advertising the sale of the Former VR Elwood Tram Depot – 10/8/1996 1996 DFC26 Former VR Elwood Tram Depot under demolition 1996 DFC27 Interior of a shed at the former VR Elwood Tram Depot under demolition 1996 DFC28 Former VR Elwood Tram Depot under demolition 1996 DFC29 Former VR Elwood Tram Depot under demolition 1996 DFC30 Former VR Elwood Tram Depot under demolition 1996 DFC31 VR 20, former breakdown car in Bob Prentice’s Back Yard Jan 1974 DFC32 VR 20 on a low loader en route to Bob Prentice’s for preservation 1959 DFC33 VR 20 as the breakdown car on the St Kilda Electric Street Railway c1955 DFC34 VR 39 waits in St Kilda St as breakdown car 20 enters Elwood Depot c1955 DFC35 VR 54 and 50 in the rear yard of Elwood Depot c1958 DFC36 VR 50 in the rear yard of Elwood Depot c1958 DFC37 VR 50 in the rear yard of Elwood Depot c1958 DFC38 VR 28 in St Kilda St outside Elwood depot after the line had been cut back to this point c1958 DFC39 VR 29 in St Kilda St outside Elwood depot after the line had been cut back to this point c1958 DFC40 VR 35 passes 28 on the St Kilda Electric Street Railway c1955 DFC41 VR 39 on the St Kilda Electric Street Railway c1955 DFC42 Y1 613 on a tour c1970 DFC43 VR 54 in St Kilda St outside Elwood Depot c1955 DFC44 VR 28 at Brighton Beach Terminus c1955 DFC45 VR 33 being washed in the wash bay at the rear of Elwood Depot c1955 DFC46 VR 20 breakdown car running into Elwood Depot c1955 DFC47 VR 3 in the rear yard at Elwood Depot c1955 DFC48 VR 51 on an AETA Tour running out of Elwood Depot c1958 DFC49 VR 28 on the St Kilda Electric Street Railway c1955 DFC50 VR 28 with crew in St Kilda St outside Elwood depot after the line had been cut back to this point 1959 DFC51 VR 52 in Grey St near Fitzroy St c1958 DFC52 VR 51 on a AETA Tour passes 33 in Grey St near Fitzroy St c1958 DFC53 VR 29 in Grey St near Fitzroy St c1958 DFC54 VR51 on an AETA Tour shunts as 52 waits on the St Kilda Electric Street Railway c1958 DFC55 VR 51 on the Black Rock Electric Street Railway c1955 DFC56 VR 28 in St Kilda St outside Elwood depot after the line had been cut back to this point c1958 DFC57 Combined Rail-Tram Tickets of the Black Rock Electric Street Railway Feb 1975 DFC58 Combined Rail-Tram Tickets of the St Kilda Electric Street Railway Feb 1975 DFC59 Electric Street Railway & Motor Coach Paper Tear off Tickets Feb 1975 DFC60 VR 52 & 53 on Rt 82 pass in Cordite Ave near Wests Rd Sept 1975 DFC61 Z 68 & 52 in East Preston Depot in M&MTB Livery c1977 DFC62 Copy photo of VR 18 in Elwood Depot c1910 DFC63 VR 51 as a one man car at Black Rock Terminus c1955 DFC64 VR 53 on Rt 82 in Droop St Footscray Jan 1974 DFC65 B2 2027 on Rt 96 in South Melb Station c1988 DFC66 VR 20 as preserved in Bob Prentice’s backyard High St Prahran Jan 1974 DFC67 VR 700 on Rt 82 in Droop St Footsray c1978 DFC68 VR 28 as the last car from ST Kilda Station 28-2-1959 DFC69 VR 700 at the Rt 82 Moonee Ponds Terminus c1978 DFC70 VR 52 waiting time at the Rt 82 Footscray Terminus, the driver intently stares at the bundy clock as the Braid and the Connie gossip Jul 1972 DFC71 VR 54 shunting outside Elwood Depot to return to St Kilda Station 1959 DFC72 SW6 969 in MTA Livery blocking the entrance to South Melb Depot presumably during the scratch ticket dispute Jan 1990 DFC73 VR 52 & 53 on Rt 82 pass in Droop St Footscray Sept 1975 DFC74 VR 700 after withdrawl in the Newport Railway museum in the process of a repaint c1985 DFC75 VR 700 after withdrawl in the Newport Railway museum in the process of a repaint c1985 DFC76 VR 700 on Rt 82 in Droop St Footsray at The Cresent c1978 DFC77 VR 700 on Rt 82 in Droop St Footsray c1978 DFC78 Former VR tram depot in use as an MTA Bus depot c1990 DFC79 VR 52 waiting time at the Rt 82 Footscray Terminus Jul 1972 DFC80 VR 52 waiting time at the Rt 82 Footscray Terminus with Connie changing the pole Jul 1972 DFC81 VR 52 at the Rt 82 Moonee Ponds Terminus with the crew chatting 7-12-1974 DFC82 VR 52 on Rt 82 on the reserved track in Raleigh Rd Ascot Vale Jan 1974 DFC83 VR 53 on Rt 82 in Leeds St Footscray about to turn into Hopkins St April 1976 DFC84 VR 53 on Rt 82 in Droop St Footsray Jan 1974 DFC85 VR 700 on Rt 82 in Droop St Footsray at Hopkins St c1978 DFC86 Z 52 in MTA livery on Rt 19 in Elizabeth St near Bourke St c1985 DFC87 VR 52 at the Rt 82 Moonee Ponds Terminus Jul 1972 DFC88 VR 53 at the Rt 82 Footscray Terminus Jan 1974 DFC89 VR 52 freshly outshopped from the workshops and W7 1011 at the Bourke St Terminus with 52 on display for the 1968 railway exhibition 1968 DFC90 Painting of W class 369 in Chocolate & Cream c1930 DFC91 Charing Cross, Bendigo at night c1965 DFC92 Ballarat ? c1965 DFC93 Bendigo 18 on an AETA tour in McCrae St near Tramway Ave c1965 DFC94 View from the roof of a tram in the body shop at Preston Workshops 1977 DFC95 View from the roof of a tram in the body shop at Preston Workshops 1977 DFC96 View from the roof of a tram in the body shop at Preston Workshops showing the panto on 546 1977 DFC97 Interior view of Carlton Control Centre showing desk and wall panel c1968 DFC98 W2 493 on Rt 55 in Kingsway outside South Melb Depot Aug 1973 DFC99 W2 496 in Sturt St at Kingsway on Rt 1 Jul 1973 DFC100 Z class truck c1975 DFC101 Z3 116 in Bourke St at King St as new c1979 DFC102 Bob Prentice on tour c1968 DFC103 SW6 900 as an advertising tram for Newsday at night 1969 DFC104 597 Jul 1973 DFC105 W2 480 on Rt 3 passing under the railway bridge at Caulfield Oct 1972 DFC106 Interior view of Carlton Control Centre showing desk c1968 DFC107 SW6 856 on Rt 77 at night Jul 1973 DFC108 W2 496 in Sturt St at Kingsway on Rt 1 Jul 1973 DFC109 PCC 980 on a tour at South Melb Depot c1968 DFC110 SW6 856 on Rt 77 at night Jul 1973 DFC111 View from the roof of a tram in the body shop at Preston Workshops showing the panto on 546 1977 DFC112 Dandenong Rd from Chapel St Nov 1968 DFC113 A Z class car turns from Gertrude into Nicholson St c1990 DFC114 SW6 900 as an advertising tram for Newsday at night 1969 DFC115 Port Melbourne Station showing Centennial bridge and station building prior to closure. 10-1987 DFC116 Port Melbourne station with train prior to closure, looking south 10-1987 Demonstrates the work of David Frost in photography and or collecting slides.Assembled album in a black presentation folder of 116 colour slides, 6 slide sleeves, collected or photographed by David Frost. Many are TMSV or Windsor Publications slides. All photographs have been scanned and placed on the Museum's G drive. A list of all photographs with details has been compiled. melbourne, tramways, trams, vr trams, elwood, st kilda light rail, port melbourne, opening, elwood depot, buses -
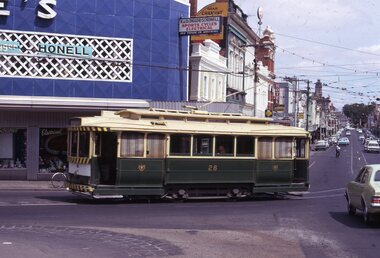
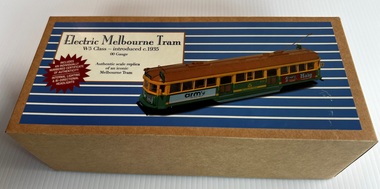
 Melbourne Tram Museum
Photograph - W5 754 at Beaconsfield Parade terminus, Keith Kings, 3/4/1953
... Beaconsfield Parade St Kilda Fitzroy St W5 class tram 754 Route 1 Has ...Photograph shows W5 754 (East Coburg Route 1) at the former Beaconsfield Parade terminus at the intersection with Fitzroy St Kilda. The photographer notes the square windscreen windows on the tram.Yields information about tram 754 in 1953 in Beaconsfield Parade.Black and white photograph - W5 754 at Beaconsfield Parade terminus photo number G(y)(7)Has details and date written on the rear.tramways, beaconsfield parade, st kilda, fitzroy st, w5 class, tram 754, route 1 -
 Melbourne Tram Museum
Photograph - Black and White SW2 478 Riversdale Road Hawthorn, Keith Kings, 3/11/1956
... Melbourne Tram Museum 8 Wallen Road Hawthorn melbourne ...Photograph shows SW2 478 (City Route 70) in Riversdale Road at Tooronga Rd Hawthorn. The photographer notes the metal fascias on the tram. Note the lenses fitted to one side of the street lights to indicate a tram stop to the tram drivers.Yields information about tram 478 in 1956.Black and White SW2 478 Riversdale Road Hawthorn photo number N(m)(i)Has details and date written on the rear.tramways, trams, sw2 class, tram 478, riversdale road, route 70 -
 Ballarat Tramway Museum
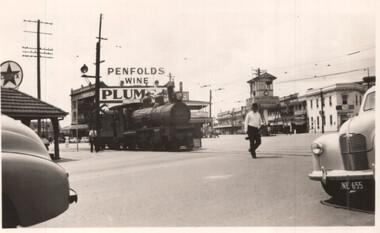
Photograph - QGR locomotive at Woolloongabba Brisbane, Keith Kings, 10/1/1951
Wal Jack swapped photographs with his correspondents. This photo by Keith Kings, a railway photograph of QGR locomotive 748 crossing the complex arrangements of tracks at Woolloongabba - three tram tracks, one trolley bus route. The photographer noted that trains could block all tram lines at times. Trains were always proceeded by a man carrying a red flag and ringing a bell. Has the tramway signal box in the background and a large Penfolds Wines advert on a building, a Caltex service station and an advert for Plume petrol.Demonstrates a photograph that would have been sent to Wal Jack by Keith Kings.Black and white photograph of QGR locomotive 748Has extensive details of the photograph on the rear. Keith Kings photo number E(k)(vii)letter, wal jack, keith kings, qgr, railways, woolloongabba -
 Melbourne Tram Museum
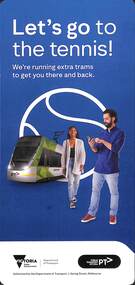
Pamphlet - Hanging strip type notice, Public Transport Victoria (PTV), Let's go to the tennis!, January 2023
... Melbourne Tram Museum 8 Wallen Road Hawthorn melbourne ...Provides tram information for Australian Open 2023Provides tram and timetable information for catching trams to the Australian Open. Contains a QR code for further information,hanging strip type notice australian open, trams, special event services, route 70, route 70a, tramways -
 Melbourne Tram Museum
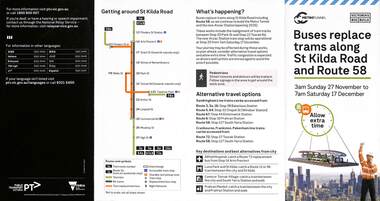
Pamphlet, Public Transport Victoria (PTV), Buses replace trams along St Kilda Road and Route 58, Oct. 2022
Pamphlet - Buses replace trams along St Kilda Road and Route 58 - issued for the track relocation at Domain Junction / Anzac station during the period 27-11-2022 to 17-12-2022. Actual work took a day longer due to weather. Similar pamphlets would have been issued for other routes that used St Kilda Road. Includes maps, alternative routes. Issued by Public Transport Victoria. Part of the Metro tunnel works.Yields information about the reconstruction of Domain Junction for the future Anzac station.Pamphlet - four fold DL - full colour on semi gloss paper. Two copies held.tramways, route 58, anzac station, domain interchange, track work, bus replacement -
 Melbourne Tram Museum
Photograph - Queen Elizabeth Royal Tram Z3 158 - set of 8, David Frost, 26-10-2011
The photos show Z3 158 dressed for the Royal Visit of 26-10-2011, to transport Queen Elizabeth II from Federation Square to Government House Drive. The 3rd photo shows the Breakdown / recovery truck R10 alongside the tram at one point. Photos also show interior posters and of it running a route 55 Domain Interchange in William St after the event. Image 9 - The Age report about the tram and the nominated driver - 25-10-2011 - Z-class a tram fit for a Queen.Provides a series of photographs of the Queen's visit to Melbourne in 2011.Set of 8 colour prints of Z3 158 as the Royal tram, printed on Kodak Royal Papertrams, tramways, royal visit, royal tram, z3 class, tram 158, princes bridge, r10, domain interchange, route 55, the age -
 Ballarat Tramway Museum
Document, Tramways of Plymouth & District UK, c1950
Wal Jack maintained lists of Australian tramcars and information on tramways, often provided by his correspondents. This document provides a short history of the Plymouth and District tramways which had closed by 1945 along with a list of routes, and tramcars.Yields information about Wal Jack's records.Typed document - foolscap sheet, quarto and part of a cut foolscap sheet about the Tramways of Plymouth & District UKletters, wal jack, trams, lists, plymouth uk -
 Ballarat Tramway Museum
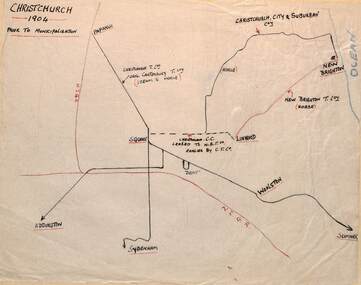
Drawing - Christchurh NZ - Plan and Notes, Wal Jack, 1947
Wal Jack had an extensive range of correspondents throughout Australia and the world who often provided him with detailed drawings and notes on various tramway systems. This set of notes on the Christchurch tramway system, provides details of the tram system prior to being taken over by the City and afterwards. Plan dated 30-6-1947. The hand written sheets provide details of the routes and the rolling stock. Based on the handwriting, prepared by Wal Jack himself. Yields information about Wal Jack's extensive recording and research work.Set of two drawings - black, red and blue ink on quarto size paper and three sheets of notes on the Christchurch tramway system 1947tramways, christchurch nz, wal jack, drawings, maps, tramcars -
 Melbourne Tram Museum
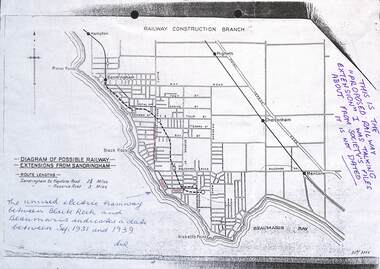
Drawing, "Possible railway extensions from Sandringham"
Drawing, photocopied from the Sandringham and District Historical Society's files showing possible route and station locations of an extension from the Sandringham station. Prepared by the Railway Construction Branch of the Victorian Railways. Shows the tram lines. Possibly late 1930s.Yields information about a possible extension of the Sandringham railway line to Beaumaris.Drawing - photocopied with hand written notes - A4 sheetExtensive notes in ink.trams, railways, sandringham, beaumaris, new railways, railway construction branch -
 Ballarat Tramway Museum
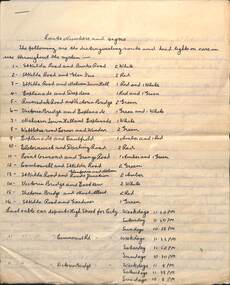
Document - cable trams, "Route Numbers and Signs"
... or book, such as Bradshaws. Provides notes on route numbers.... Provides notes on route numbers, connecting electric trams, a round ...Handwritten notes, appears to have been copied from a guide or book, such as Bradshaws. Provides notes on route numbers, connecting electric trams, a round trip by cable and electric trams (9d), penny sections, through fares and details of 15 different through routes. c1918?Demonstrates copying historic information from publications.Document - 7 quarto sheets - ruled, handwritten, stapled in top left hand corner.cable trams, electric trams, melbourne, round trips, guide books, penny sections -
 Ballarat Tramway Museum
Photograph - BTM W4 671 at South Melbourne Beach, David Frost, 13/4/1996
Colour print of BTM W4 class tram 671 in the City of Ballarat colours on an BTM organised tour in conjunction with the Rail Tourist Association. Photographed by David Frost at the South Melbourne Beach, route 1 terminus with the Bleak House hotel in the background. Date 13-4-1996. Z3 149 is at the terminus as well.Demonstrates the work of BTM and the City of Ballarat tram.Colour photograph print on Kodak paper.btm, tram 671, w4 class, tramways, trams, tours, south melbourne beach -
 Ballarat Tramway Museum
Photograph - BTM W3 661 on tour at Carlisle St, David Frost, 9-12-1989
Colour print of BTM W3 661 on tour at Carlisle St terminus of route 96/16 route - 9-12-1989 by David Frost.Demonstrates the work of BTM and its tours.Colour photograph printbtm, w3 class, tram 661, st kilda, carlisle st -
 Ballarat Tramway Museum
Slide - Tram 28 Stones Corner, Richard Jones, Mar. 1970
Image shows Ballarat 28 at Stones corner en route to Mt Pleasant in Main St. The weather blinds, fully drawn are showing their age. In the background is Stones Corner store, a sign board K&O (Digger) Schonell Sports Cycles and Electrical and Gear Chemist.Yields information about Stones Corner and tram 28.Digital image of a Kodachrome slideballarat, trams, tramways, tram 28, main st, stones corner -
 Ballarat Tramway Museum
Album, Brian Andrews, UR1 - 300 Photo - Bendigo, Ballarat trams, 1968
Album compiled by the photographer containing generally 89 x 124mm of: • Bendigo – 151 black and white prints • Ballarat – 119 black and white prints and some colour • Melbourne – 20 colour and black and white prints - featuring Queensway, the Hump, Royal Park, route 82, Dandenong Road, Glenferrie Road, Barkers Road and Hawthorn Bridge. • Rome, Hong Kong and Toronto – 14 prints See items 8638 to 8642 for negatives of the Ballarat and Bendigo photos and related image files held on the BTM Demonstrates the work of the photographer.Album - heavy plastic covered covers, with 100 sewn and glued paper sheets each side with three plastic sleeves for photographs with a negative pocket page at the rear. See list of btm8637 - Ballarat list.doc for a location listing of the Ballarat photographs.trams, tramways, ballarat, bendigo, melbourne, hong kong, toronto, rome, brian andrews -
 Melbourne Tram Museum
Ephemera - Christmas card, SW5 750 St Kilda Road
Christmas greetings card featuring SW5 750 (East Brighton route 64) in St Kilda Road with the Shrine of Remembrance in the background. The tram was converted from W5 to SW5 (with sliding doors) in 1985. Yields information about St Kilda Road, late 1980s.Printed Greetings card, folded with a Christmas message.tramways, tramcars, tram 750, sw5 class, st kilda road, shrine of remembrance -
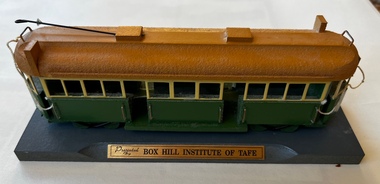 Melbourne Tram Museum
Leisure object - Wooden model of a Melbourne W2 tram, George Kob, 1990s
Label on rear advises made from Australian timber by George Kob. Item has been labelled for the Box Hill Institute of TAFE. Given the route number, made prior the extension of Route 42 to Box Hill which took place in 2003.Demonstrates model making.Wood model with wire handrails, one trolley pole and light string trolley pole ropes. Painted green, cream with a stone roof colour. Has route number of 42 and one destination "Box Hill". Has on the base details of the maker and that it was presented by Box Hill Institute of TAFE.models, box hill, w2 class, george kob -
 Melbourne Tram Museum
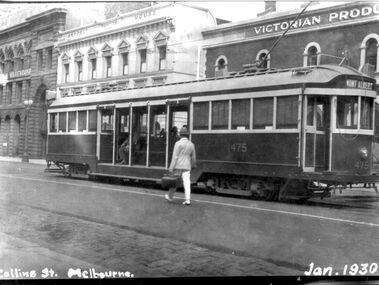
Photograph - Tram W1 475 in Collins St, 1930
Photo shows W1 class tram 475 in Collins St near Spencer Street, with a Mont Albert destination on a very hot day. All the sun louvers in saloons are drawn. The tram has been fitted with route number boxes which is painted the same colour as the roof. A gentlemen in a white suit is walking across to the tram carrying a Gladstone Bag. In the background are Victorian Producers, Sepplet House and a warehouse. The photo is dated January 1930. Yields information the use of W1 class trams.Black and white copy print on paper.tramways, trams, gladstone bag, w1 class, tram 475, collins st, mont albert, summer -
 Melbourne Tram Museum
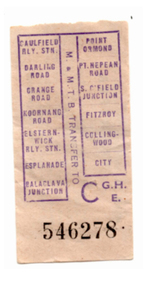
Ephemera - MMTB Transfer ticket - Caulfield area, Melbourne & Metropolitan Tramways Board (MMTB), 1950s
MMTB paper transfer ticket that was issued by the conductor / or bus driver to enable a transfer between tram and bus services. Has the transfer points or routes listed with the conditions of use listed on the rear. Number C GH E 546278 - issued by the Glen Huntly depot.Yields information about the Transfer tickets used by the Glen Huntly tram depot.Paper flimsy ticket MMTB with purple and black printing.tramways, tickets, melbourne, mmtb, transfer tickets, glen huntly, glenhuntly depot -
 Melbourne Tram Museum
Document - List of Melbourne Buses, Bus and Coach Society of Victoria (BCSV), "Publication M3", August 1982
Provides a detailed list of buses operated in Melbourne by both the MMTB and the Victorian railways and the many private operators at the time. Details the chassis, body builders, operator, depot, fleet number, registration, body date, seating code, seating capacity and bus ownership history. Provides a publication date of of August 1982 on page 3. Yields extensive information about Melbourne's suburban bus fleet in 1982 with details of the Government and Privately owned fleet.Duplicated document - originally a 55 page A4 document - missing page 54 and covers. Page 55 loose. mmtb, buses, melbourne, route numbers, lists, fleet list, victorian railways, vr buses, bcsv -
 Melbourne Tram Museum
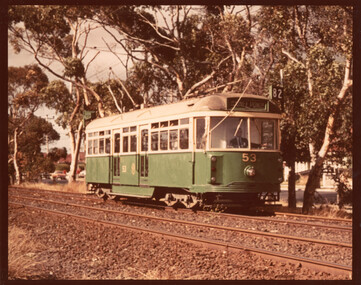
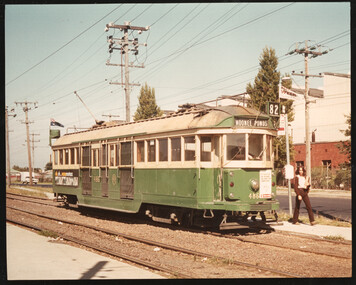
Photograph - VR class tram 53 River St Maribyrnong, c1975
... route 82 VR class tram 53 Colour print on Kodak paper with black ...Photograph of Victorian Railways built tram No. 53 which was sold to the MMTB following closure of the St Kilda - Brighton Beach line in 1959. Modified by the MMTB, as VR class tram No. 53 and generally used on the Moonee Ponds to Footscray route 82. This photo shows the tram in River St after being fitted with tail lights in Feb. 1973 and before being renumbered to tram 700 in Oct. 1976Yields information about VR class tram 53Colour print on Kodak paper with black borders. trams, tramways, river st, route 82, vr class, tram 53 -
 Melbourne Tram Museum
Photograph - W2 486 Route 82, Rosamond Road, c1975
... information about W2 486. trams tramways W2 class tram 486 Route 82 ...Colour photograph of W2 486 Route 82 Moonee Ponds, Rosamond Road, just before turning into Williamson Road, Maribyrnong.Yields information about W2 486.Colour print on Kodak paper with black borders. trams, tramways, w2 class, tram 486, route 82, moonee ponds -
 Melbourne Tram Museum
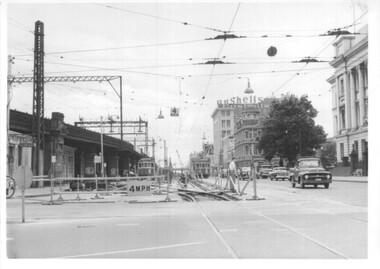
Photograph - Set of 12 - construction of King St overpass in Flinders St, 1959
Photos show the construction of King St overpass in Flinders St which was part of the project to construct a bridge over the Yarra River and provide a new southern outlet road between the city and eventually St Kilda Junction. The overpass construction was commenced in 1959 with tramway works first commencing. It was demolished in 2005. 1 - looking west at Market St. 2 - looking east from Spencer and Flinders St with the railway viaduct behind. 3 - Tram lines diverted onto the new overpass. Note the hand-powered overhead tower on the left behind the compressor. 4 - Tracks partially diverted. 5 - Looking east at Spencer and Flinders St with a Dunlop tyre truck in the view. 6 - prior to the diversion onto the new bridge. 7 - Looking east near William St. with W2 451 (Route 48, North Balwyn) in the view. 8 - Bridge works near King St. Original tracks still in use. 9 - Looking east prior to the introduction of the temporary tracks on the south side of the new overpass. 10 - SW6 852 and a W2 on new overpass trackwork - old trackwork being demolished. 11 - Cross over at Spencer St in Flinders St, prior to change over. 12 - Looking west at Flinders and Spencer St with SW6 853 turning into Spencer St.Yields information about the construction of the King St overpass in Flinders St during 1959.Set of 12 black and white prints of the construction of the King St overpass in Flinders St.trams, tramways, flinders st, king st overpass, construction, bridges, w2 class, sw6 class, tram 451, tram 853, tram 852 -
 Melbourne Tram Museum
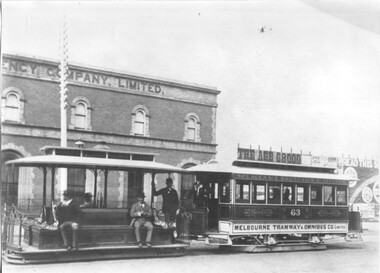
Photograph - Black and white - cable tram Collins St at Spencer St, John William Lindt, c1890
Photo of a cable tram set - saloon trailer No. 63 in Collins St at Spencer St. The grip car is not fitted with staunchions and there are no destination signs on it. The trailer is lettered for the "Spencer & Brunswick St Fitzroy" route with its rocker panel highly decorated. In the background are a building for the Agency Company Limited and an advert on a hoarding for The Age newspaper. The grip man and conductor are standing on their respective platforms. Photo possibly soon after the line opened on 2-10-1886. Photo by John William Lindt c1890 - see reference. Yields information about cable trams in Collins St.Black and white photograph on paper.trams, tramways, cable trams, collins st, spencer st, tram 63, j w lindt -
 Melbourne Tram Museum
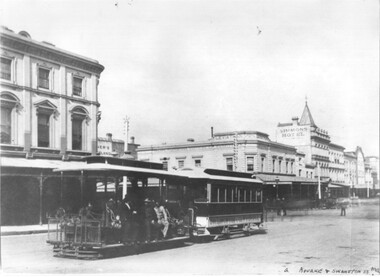
Photograph - Black and white - cable tram Bourke & Swanston Sts
Photo of a cable tram set - at the corner of Swanston and Bourke St. The saloon trailer is possibly No. 162 and is lettered for the Collingwood and Clifton Hill route. The grip car is yet to be fitted with staunchions on its sides or destination signs. In the background is the Leviathan store, Simons Hotel and Coles Book Arcade. Photo possibly soon after the line opened on 10-8-1887.Yields information about cable trams in Bourke St.Black and white photograph on paper."Bourke & Swanston Mel" in bottom right hand corner.trams, tramways, cable trams, bourke st, swanston st, leviathan store -
 Ballarat Tramway Museum
Model - Model Melbourne SW5 tram and presentation case, Cooee Concepts Pty Ltd, 2008
Detailed in The Met colour scheme of the 1980s with the logo of the early 1980s. Demonstrates an operable model of a Melbourne SW5 class tram.Model of Melbourne Melbourne tram W5 (actually an SW5) No. 812, electric model, made by Cooee Concepts Pty Ltd in China. The model is packaged in a wooden packing case with a blue felt base, contained within a cardboard outer case. The cardboard cover or case has a printed sheet giving details of the model and the history of the W5 Class tramcar. The wooden case has a brass plate detailing the contents. Scale 00 or 1:76. Model made from plastic and metal, with operable lights and motors with operable trolley poles, swiveling bogies, the destination of St Kilda, showing route 16. Headlights function in the direction of travel. The package has a manufacturing date of 2008 printed on it. Contains a plastic cover strip, a plastic holder for the tram, a plastic lift-out strip, a printed Certificate of Authenticity, No. 553 of 700, and a folded sheet giving instructions for the use of the tram on a model tramway - up to 15V DC.models, the met, tramcars, w5 class, sw5 class, tram 812, cooee, cooee collectables -
 Ballarat Tramway Museum
Model - Model Melbourne / Bendigo tram and presentation case, Cooee Concepts Pty Ltd, 2008
Detailed in Bendigo Tramways livery of their Restaurant Tram "Ninesevensix". Demonstrates an operable model of a former Melbourne W6 tram as a Bendigo Restaurant tram.Model of Melbourne Melbourne tram W6 976 dressed as the Bendigo Tramways Restaurant / Cafe tram "ninesevensix", electric model, made by Cooee Concepts Pty Ltd in China. The model is packaged in a wooden presentation case with a black felt base, contained within a cardboard outer case. The cardboard cover or case has a printed sheet giving details of the model and the history of the tramcar. The wooden case has a brass plate detailing the contents. Scale 00 or 1:76. Model made from plastic and metal, with operable lights and motors with operable trolley poles, swiveling bogies, a destination of "Special" and showing route 01. Headlights function in the direction of travel. The package has a manufacturing date of 2008 printed on it. Contains a plastic cover strip, a plastic holder for the tram, and a plastic lift-out strip.models, tramcars, cooee, cooee collectables, bendigo tramways, tram 976, restaurant tram -
 Melbourne Tram Museum
Photograph - Black and white - SW6 850 Chapel St - Brighton Road Prahran, c1939
Photograph of SW6 850 (Route 77) at the Prahran terminus, Chapel St and Brighton Road, probably soon after its construction and entry into traffic on 31-3-1939, although the roof appears weathered. The tram has a sign promoting off peak travel, dash canopy lights and a tail light. In the background are the shops at this location. The tram was the first of its class and was considered a luxurious car compared to the W2's and W5s.Yields information about SW6 850 and the Prahran terminus.Black and white photograph on paper.trams, tramways, chapel st, prahran, brighton road, sw6 class, tram 850 -
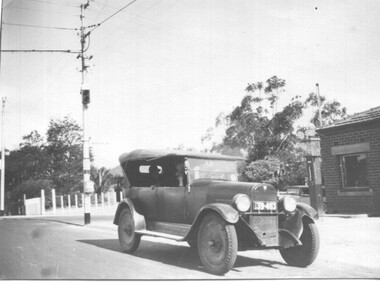 Melbourne Tram Museum
Photograph - 1926 Hudson Super 6 - Riversdale and Warragul Roads, Ray Pearson, 1930s
Photograph of a 1926 Hudson Super 6 parked at the tea room/kiosk on the intersection of Riversdale Road and Warragul Road. Distinguishing features of the car include the triangular badge on the radiator and the unusual disc wheels. The 1926 Hudson also had horizontal radiator shutters. On this vehicle, a finer mesh has been attached in front of the shutters. This is normal practice when insects such as locusts are in plague. At the time, Warragul Road was known as East Boundary Road. Behind the car on the tramway pole is a colour light tramway signal for the single-line section between Warragul Road and the terminus. On 1 July 1928, the Wattle Park line was extended from Boundary Road via Riversdale Road to Elgar Road. It was built as a single track with a passing loop about halfway along, plus a passing loop at the former Boundary Road terminus. The tramway pole has a stop sign and a telephone box as well. In a box of negatives received is an envelope noting the car was owned by Ray Pearson and photo taken during the 1930s. Inside the motor car are two people, the driver, and a lady. In the background is part of the tea rooms located at this corner with a Shell gravity-fed petrol bowser. At the time, petrol was not sold at Service Stations on a Sunday - Sunday trading laws, but they allowed Tea Rooms or kiosks to be open.Yields information the intersection of Warragul and Riversdale Road and MMTB single line signals.Black and white photograph on Velox paper.On rear in pencil "Colour light signal Wattle Park Route, down end loop line, corner of Riversdale and East Boundary Roads".trams, tramways, riversdale road, wattle park, warragul road, motor cars, hudson super 6, shell fuel, signalling, single line, ray pearson