Showing 13727 items
matching no 7
-
 Flagstaff Hill Maritime Museum and Village
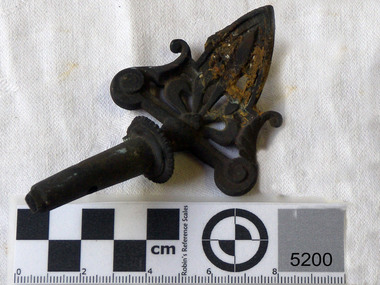
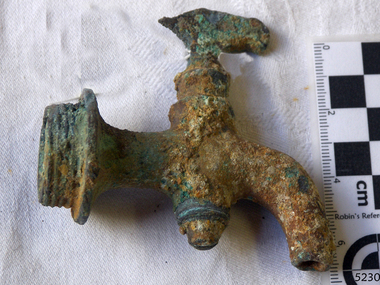
Functional object - Gas Tap, ca 1878
History of the Loch Ard: The Loch Ard got it’s name from ”Loch Ard” a loch which lies to the west of Aberfoyle, and to the east of Loch Lomond. It means "high lake" in Scottish Gaelic.The vessel belonged to the famous Loch Line which sailed many vessels from England to Australia. The Loch Ard was built in Glasgow by Barclay, Curdle and Co. in 1873, the vessel was a three-masted square-rigged iron sailing ship that measured 79.87 meters in length, 11.58 m in width, and 7 m in depth with a gross tonnage of 1693 tons with a mainmast that measured a massive 45.7 m in height. Loch Ard made three trips to Australia and one trip to Calcutta before its fateful voyage. Loch Ard left England on March 2, 1878, under the command of 29-year-old Captain Gibbs, who was newly married. The ship was bound for Melbourne with a crew of 37, plus 17 passengers. The general cargo reflected the affluence of Melbourne at the time. Onboard were straw hats, umbrella, perfumes, clay pipes, pianos, clocks, confectionery, linen and candles, as well as a heavier load of railway irons, cement, lead and copper. There were other items included that were intended for display in the Melbourne International Exhibition of 1880. The voyage to Port Phillip was long but uneventful. Then at 3 am on June 1, 1878, Captain Gibbs was expecting to see land. But the Loch Ard was running into a fog which greatly reduced visibility. Captain Gibbs was becoming anxious as there was no sign of land or the Cape Otway lighthouse. At 4 am the fog lifted and a lookout aloft announced that he could see breakers. The sheer cliffs of Victoria's west coast came into view, and Captain Gibbs realised that the ship was much closer to them than expected. He ordered as much sail to be set as time would permit and then attempted to steer the vessel out to sea. On coming head-on into the wind, the ship lost momentum, the sails fell limp and Loch Ard's bow swung back towards land. Gibbs then ordered the anchors to be released in an attempt to hold its position. The anchors sank some 50 fathoms - but did not hold. By this time the ship was among the breakers and the tall cliffs of Mutton Bird Island rose behind. Just half a mile from the coast, the ship's bow was suddenly pulled around by the anchor. The captain tried to tack out to sea, but the ship struck a reef at the base of Mutton Bird Island, near Port Campbell. Waves subsequently broke over the ship and the top deck became loosened from the hull. The masts and rigging came crashing down knocking passengers and crew overboard. When a lifeboat was finally launched, it crashed into the side of Loch Ard and capsized. Tom Pearce, who had launched the boat, managed to cling to its overturned hull and shelter beneath it. He drifted out to sea and then on the flood tide came into what is now known as Loch Ard Gorge. He swam to shore, bruised and dazed, and found a cave in which to shelter. Some of the crew stayed below deck to shelter from the falling rigging but drowned when the ship slipped off the reef into deeper water. Eva Carmichael a passenger had raced onto the deck to find out what was happening only to be confronted by towering cliffs looming above the stricken ship. In all the chaos, Captain Gibbs grabbed Eva and said, "If you are saved Eva, let my dear wife know that I died like a sailor". That was the last Eva Carmichael saw of the captain. She was swept off the ship by a huge wave. Eva saw Tom Pearce on a small rocky beach and yelled to attract his attention. He dived in and swam to the exhausted woman and dragged her to shore. He took her to the cave and broke the open case of brandy which had washed up on the beach. He opened a bottle to revive the unconscious woman. A few hours later Tom scaled a cliff in search of help. He followed hoof prints and came by chance upon two men from nearby Glenample Station three and a half miles away. In a complete state of exhaustion, he told the men of the tragedy. Tom then returned to the gorge while the two men rode back to the station to get help. By the time they reached Loch Ard Gorge, it was cold and dark. The two shipwreck survivors were taken to Glenample Station to recover. Eva stayed at the station for six weeks before returning to Ireland by steamship. In Melbourne, Tom Pearce received a hero's welcome. He was presented with the first gold medal of the Royal Humane Society of Victoria and a £1000 cheque from the Victorian Government. Concerts were performed to honour the young man's bravery and to raise money for those who lost family in the disaster. Of the 54 crew members and passengers on board, only two survived: the apprentice, Tom Pearce and the young woman passenger, Eva Carmichael, who lost her family in the tragedy. Ten days after the Loch Ard tragedy, salvage rights to the wreck were sold at auction for £2,120. Cargo valued at £3,000 was salvaged and placed on the beach, but most washed back into the sea when another storm developed. The wreck of Loch Ard still lies at the base of Mutton Bird Island. Much of the cargo has now been salvaged and some items were washed up into Loch Ard Gorge. Cargo and artefacts have also been illegally salvaged over many years before protective legislation was introduced in March 1982. One of the most unlikely pieces of cargo to have survived the shipwreck was a Minton majolica peacock- one of only nine in the world. The peacock was destined for the Melbourne 1880 International Exhibition in. It had been well packed, which gave it adequate protection during the violent storm. Today the Minton peacock can be seen at the Flagstaff Hill Maritime Museum in Warrnambool. From Australia's most dramatic shipwreck it has now become Australia's most valuable shipwreck artifact and is one of very few 'objects' on the Victorian State Heritage Register.The shipwreck of the Loch Ard is of significance for Victoria and is registered on the Victorian Heritage Register ( S 417). Flagstaff Hill has a varied collection of artefacts from Loch Ard and its collection is significant for being one of the largest accumulation of artefacts from this notable Victorian shipwreck. The collections object is to also give us a snapshot into history so we are able to interpret the story of this tragic event. The collection is also archaeologically significant as it represents aspects of Victoria's shipping history that allows us to interpret Victoria's social and historical themes of the time. The collections historically significance is that it is associated unfortunately with the worst and best-known shipwreck in Victoria's history. Brass gas light tap fitting has fancy metal work at the end. Recovered from the Loch Ard wreck. Noneflagstaff hill, warrnambool, shipwrecked coast, flagstaff hill maritime museum, maritime museum, shipwreck coast, flagstaff hill maritime village, great ocean road, loch line, loch ard, captain gibbs, eva carmichael, tom pearce, glenample station, mutton bird island, loch ard gorge, gas tap, brass gas tap -
 Flagstaff Hill Maritime Museum and Village
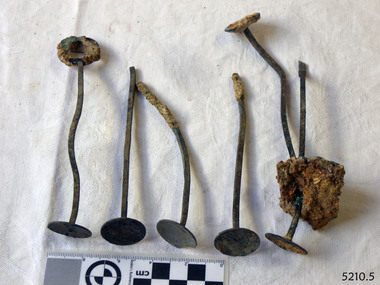
Domestic object - Drink Stirrers, Before 1878
History of the Loch Ard: The Loch Ard got it’s name from ”Loch Ard” a loch which lies to the west of Aberfoyle, and to the east of Loch Lomond. It means "high lake" in Scottish Gaelic.The vessel belonged to the famous Loch Line which sailed many vessels from England to Australia. The Loch Ard was built in Glasgow by Barclay, Curdle and Co. in 1873, the vessel was a three-masted square-rigged iron sailing ship that measured 79.87 meters in length, 11.58 m in width, and 7 m in depth with a gross tonnage of 1693 tons with a mainmast that measured a massive 45.7 m in height. Loch Ard made three trips to Australia and one trip to Calcutta before its fateful voyage. Loch Ard left England on March 2, 1878, under the command of 29-year-old Captain Gibbs, who was newly married. The ship was bound for Melbourne with a crew of 37, plus 17 passengers. The general cargo reflected the affluence of Melbourne at the time. Onboard were straw hats, umbrella, perfumes, clay pipes, pianos, clocks, confectionery, linen and candles, as well as a heavier load of railway irons, cement, lead and copper. There were other items included that were intended for display in the Melbourne International Exhibition of 1880. The voyage to Port Phillip was long but uneventful. Then at 3 am on June 1, 1878, Captain Gibbs was expecting to see land. But the Loch Ard was running into a fog which greatly reduced visibility. Captain Gibbs was becoming anxious as there was no sign of land or the Cape Otway lighthouse. At 4 am the fog lifted and a lookout aloft announced that he could see breakers. The sheer cliffs of Victoria's west coast came into view, and Captain Gibbs realised that the ship was much closer to them than expected. He ordered as much sail to be set as time would permit and then attempted to steer the vessel out to sea. On coming head-on into the wind, the ship lost momentum, the sails fell limp and Loch Ard's bow swung back towards land. Gibbs then ordered the anchors to be released in an attempt to hold its position. The anchors sank some 50 fathoms - but did not hold. By this time the ship was among the breakers and the tall cliffs of Mutton Bird Island rose behind. Just half a mile from the coast, the ship's bow was suddenly pulled around by the anchor. The captain tried to tack out to sea, but the ship struck a reef at the base of Mutton Bird Island, near Port Campbell. Waves subsequently broke over the ship and the top deck became loosened from the hull. The masts and rigging came crashing down knocking passengers and crew overboard. When a lifeboat was finally launched, it crashed into the side of Loch Ard and capsized. Tom Pearce, who had launched the boat, managed to cling to its overturned hull and shelter beneath it. He drifted out to sea and then on the flood tide came into what is now known as Loch Ard Gorge. He swam to shore, bruised and dazed, and found a cave in which to shelter. Some of the crew stayed below deck to shelter from the falling rigging but drowned when the ship slipped off the reef into deeper water. Eva Carmichael a passenger had raced onto the deck to find out what was happening only to be confronted by towering cliffs looming above the stricken ship. In all the chaos, Captain Gibbs grabbed Eva and said, "If you are saved Eva, let my dear wife know that I died like a sailor". That was the last Eva Carmichael saw of the captain. She was swept off the ship by a huge wave. Eva saw Tom Pearce on a small rocky beach and yelled to attract his attention. He dived in and swam to the exhausted woman and dragged her to shore. He took her to the cave and broke the open case of brandy which had washed up on the beach. He opened a bottle to revive the unconscious woman. A few hours later Tom scaled a cliff in search of help. He followed hoof prints and came by chance upon two men from nearby Glenample Station three and a half miles away. In a complete state of exhaustion, he told the men of the tragedy. Tom then returned to the gorge while the two men rode back to the station to get help. By the time they reached Loch Ard Gorge, it was cold and dark. The two shipwreck survivors were taken to Glenample Station to recover. Eva stayed at the station for six weeks before returning to Ireland by steamship. In Melbourne, Tom Pearce received a hero's welcome. He was presented with the first gold medal of the Royal Humane Society of Victoria and a £1000 cheque from the Victorian Government. Concerts were performed to honour the young man's bravery and to raise money for those who lost family in the disaster. Of the 54 crew members and passengers on board, only two survived: the apprentice, Tom Pearce and the young woman passenger, Eva Carmichael, who lost her family in the tragedy. Ten days after the Loch Ard tragedy, salvage rights to the wreck were sold at auction for £2,120. Cargo valued at £3,000 was salvaged and placed on the beach, but most washed back into the sea when another storm developed. The wreck of Loch Ard still lies at the base of Mutton Bird Island. Much of the cargo has now been salvaged and some items were washed up into Loch Ard Gorge. Cargo and artefacts have also been illegally salvaged over many years before protective legislation was introduced in March 1982. One of the most unlikely pieces of cargo to have survived the shipwreck was a Minton majolica peacock- one of only nine in the world. The peacock was destined for the Melbourne 1880 International Exhibition in. It had been well packed, which gave it adequate protection during the violent storm. Today the Minton peacock can be seen at the Flagstaff Hill Maritime Museum in Warrnambool. From Australia's most dramatic shipwreck it has now become Australia's most valuable shipwreck artifact and is one of very few 'objects' on the Victorian State Heritage Register.The shipwreck of the Loch Ard is of significance for Victoria and is registered on the Victorian Heritage Register ( S 417). Flagstaff Hill has a varied collection of artefacts from Loch Ard and its collection is significant for being one of the largest accumulation of artefacts from this notable Victorian shipwreck. The collections object is to also give us a snapshot into history so we are able to interpret the story of this tragic event. The collection is also archaeologically significant as it represents aspects of Victoria's shipping history that allows us to interpret Victoria's social and historical themes of the time. The collections historically significance is that it is associated unfortunately with the worst and best-known shipwreck in Victoria's history. Brass drink stirrers or swizzle sticks, set of six. One is complete with a narrow shank, loop handle on top, and disc on base. Others have the handle missing, and a block of concretion joins two. Surfaces have encrustatio. Recovered from the Loch Ard.flagstaff hill, warrnambool, shipwrecked coast, flagstaff hill maritime museum, maritime museum, shipwreck coast, flagstaff hill maritime village, great ocean road, loch line, loch ard, captain gibbs, eva carmichael, tom pearce, glenample station, mutton bird island, loch ard gorge, brass drink stirrers, swizzle-sticks, beverage accessory -
 Flagstaff Hill Maritime Museum and Village
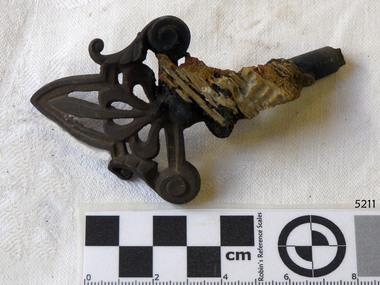
Functional object - Gas Tap, Before 1878
History of the Loch Ard: The Loch Ard got it’s name from ”Loch Ard” a loch which lies to the west of Aberfoyle, and to the east of Loch Lomond. It means "high lake" in Scottish Gaelic.The vessel belonged to the famous Loch Line which sailed many vessels from England to Australia. The Loch Ard was built in Glasgow by Barclay, Curdle and Co. in 1873, the vessel was a three-masted square-rigged iron sailing ship that measured 79.87 meters in length, 11.58 m in width, and 7 m in depth with a gross tonnage of 1693 tons with a mainmast that measured a massive 45.7 m in height. Loch Ard made three trips to Australia and one trip to Calcutta before its fateful voyage. Loch Ard left England on March 2, 1878, under the command of 29-year-old Captain Gibbs, who was newly married. The ship was bound for Melbourne with a crew of 37, plus 17 passengers. The general cargo reflected the affluence of Melbourne at the time. Onboard were straw hats, umbrella, perfumes, clay pipes, pianos, clocks, confectionery, linen and candles, as well as a heavier load of railway irons, cement, lead and copper. There were other items included that were intended for display in the Melbourne International Exhibition of 1880. The voyage to Port Phillip was long but uneventful. Then at 3 am on June 1, 1878, Captain Gibbs was expecting to see land. But the Loch Ard was running into a fog which greatly reduced visibility. Captain Gibbs was becoming anxious as there was no sign of land or the Cape Otway lighthouse. At 4 am the fog lifted and a lookout aloft announced that he could see breakers. The sheer cliffs of Victoria's west coast came into view, and Captain Gibbs realised that the ship was much closer to them than expected. He ordered as much sail to be set as time would permit and then attempted to steer the vessel out to sea. On coming head-on into the wind, the ship lost momentum, the sails fell limp and Loch Ard's bow swung back towards land. Gibbs then ordered the anchors to be released in an attempt to hold its position. The anchors sank some 50 fathoms - but did not hold. By this time the ship was among the breakers and the tall cliffs of Mutton Bird Island rose behind. Just half a mile from the coast, the ship's bow was suddenly pulled around by the anchor. The captain tried to tack out to sea, but the ship struck a reef at the base of Mutton Bird Island, near Port Campbell. Waves subsequently broke over the ship and the top deck became loosened from the hull. The masts and rigging came crashing down knocking passengers and crew overboard. When a lifeboat was finally launched, it crashed into the side of Loch Ard and capsized. Tom Pearce, who had launched the boat, managed to cling to its overturned hull and shelter beneath it. He drifted out to sea and then on the flood tide came into what is now known as Loch Ard Gorge. He swam to shore, bruised and dazed, and found a cave in which to shelter. Some of the crew stayed below deck to shelter from the falling rigging but drowned when the ship slipped off the reef into deeper water. Eva Carmichael a passenger had raced onto the deck to find out what was happening only to be confronted by towering cliffs looming above the stricken ship. In all the chaos, Captain Gibbs grabbed Eva and said, "If you are saved Eva, let my dear wife know that I died like a sailor". That was the last Eva Carmichael saw of the captain. She was swept off the ship by a huge wave. Eva saw Tom Pearce on a small rocky beach and yelled to attract his attention. He dived in and swam to the exhausted woman and dragged her to shore. He took her to the cave and broke the open case of brandy which had washed up on the beach. He opened a bottle to revive the unconscious woman. A few hours later Tom scaled a cliff in search of help. He followed hoof prints and came by chance upon two men from nearby Glenample Station three and a half miles away. In a complete state of exhaustion, he told the men of the tragedy. Tom then returned to the gorge while the two men rode back to the station to get help. By the time they reached Loch Ard Gorge, it was cold and dark. The two shipwreck survivors were taken to Glenample Station to recover. Eva stayed at the station for six weeks before returning to Ireland by steamship. In Melbourne, Tom Pearce received a hero's welcome. He was presented with the first gold medal of the Royal Humane Society of Victoria and a £1000 cheque from the Victorian Government. Concerts were performed to honour the young man's bravery and to raise money for those who lost family in the disaster. Of the 54 crew members and passengers on board, only two survived: the apprentice, Tom Pearce and the young woman passenger, Eva Carmichael, who lost her family in the tragedy. Ten days after the Loch Ard tragedy, salvage rights to the wreck were sold at auction for £2,120. Cargo valued at £3,000 was salvaged and placed on the beach, but most washed back into the sea when another storm developed. The wreck of Loch Ard still lies at the base of Mutton Bird Island. Much of the cargo has now been salvaged and some items were washed up into Loch Ard Gorge. Cargo and artefacts have also been illegally salvaged over many years before protective legislation was introduced in March 1982. One of the most unlikely pieces of cargo to have survived the shipwreck was a Minton majolica peacock- one of only nine in the world. The peacock was destined for the Melbourne 1880 International Exhibition in. It had been well packed, which gave it adequate protection during the violent storm. Today the Minton peacock can be seen at the Flagstaff Hill Maritime Museum in Warrnambool. From Australia's most dramatic shipwreck it has now become Australia's most valuable shipwreck artifact and is one of very few 'objects' on the Victorian State Heritage Register.The shipwreck of the Loch Ard is of significance for Victoria and is registered on the Victorian Heritage Register ( S 417). Flagstaff Hill has a varied collection of artefacts from Loch Ard and its collection is significant for being one of the largest accumulation of artefacts from this notable Victorian shipwreck. The collections object is to also give us a snapshot into history so we are able to interpret the story of this tragic event. The collection is also archaeologically significant as it represents aspects of Victoria's shipping history that allows us to interpret Victoria's social and historical themes of the time. The collections historically significance is that it is associated unfortunately with the worst and best-known shipwreck in Victoria's history. Brass gas light tap with fancy metalwork end, recovered from the wreck of the Loch Ard. flagstaff hill, warrnambool, shipwrecked coast, flagstaff hill maritime museum, maritime museum, shipwreck coast, flagstaff hill maritime village, great ocean road, loch line, loch ard, captain gibbs, eva carmichael, tom pearce, glenample station, mutton bird island, loch ard gorge, brass gas tap, brass light fitting, gas fitting -
 Flagstaff Hill Maritime Museum and Village
Bell
Ref: LA 3-32-281 HISTORY OF THE LOCH ARD The LOCH ARD belonged to the famous Loch Line which sailed many ships from England to Australia. Built in Glasgow by Barclay, Curdle and Co. in 1873, the LOCH ARD was a three-masted square rigged iron sailing ship. The ship measured 262ft 7" (79.87m) in length, 38ft (11.58m) in width, 23ft (7m) in depth and had a gross tonnage of 1693 tons. The LOCH ARD's main mast measured a massive 150ft (45.7m) in height. LOCH ARD made three trips to Australia and one trip to Calcutta before its final voyage. LOCH ARD left England on March 2, 1878, under the command of Captain Gibbs, a newly married, 29 year old. She was bound for Melbourne with a crew of 37, plus 17 passengers and a load of cargo. The general cargo reflected the affluence of Melbourne at the time. On board were straw hats, umbrella, perfumes, clay pipes, pianos, clocks, confectionary, linen and candles, as well as a heavier load of railway irons, cement, lead and copper. There were items included that intended for display in the Melbourne International Exhibition in 1880. The voyage to Port Phillip was long but uneventful. At 3am on June 1, 1878, Captain Gibbs was expecting to see land and the passengers were becoming excited as they prepared to view their new homeland in the early morning. But LOCH ARD was running into a fog which greatly reduced visibility. Captain Gibbs was becoming anxious as there was no sign of land or the Cape Otway lighthouse. At 4am the fog lifted. A man aloft announced that he could see breakers. The sheer cliffs of Victoria's west coast came into view, and Captain Gibbs realised that the ship was much closer to them than expected. He ordered as much sail to be set as time would permit and then attempted to steer the vessel out to sea. On coming head on into the wind, the ship lost momentum, the sails fell limp and LOCH ARD's bow swung back. Gibbs then ordered the anchors to be released in an attempt to hold its position. The anchors sank some 50 fathoms - but did not hold. By this time LOCH ARD was among the breakers and the tall cliffs of Mutton Bird Island rose behind the ship. Just half a mile from the coast, the ship's bow was suddenly pulled around by the anchor. The captain tried to tack out to sea, but the ship struck a reef at the base of Mutton Bird Island, near Port Campbell. Waves broke over the ship and the top deck was loosened from the hull. The masts and rigging came crashing down knocking passengers and crew overboard. When a lifeboat was finally launched, it crashed into the side of LOCH ARD and capsized. Tom Pearce, who had launched the boat, managed to cling to its overturned hull and shelter beneath it. He drifted out to sea and then on the flood tide came into what is now known as LOCH ARD Gorge. He swam to shore, bruised and dazed, and found a cave in which to shelter. Some of the crew stayed below deck to shelter from the falling rigging but drowned when the ship slipped off the reef into deeper water. Eva Carmichael had raced onto deck to find out what was happening only to be confronted by towering cliffs looming above the stricken ship. In all the chaos, Captain Gibbs grabbed Eva and said, "If you are saved Eva, let my dear wife know that I died like a sailor". That was the last Eva Carmichael saw of the captain. She was swept off the ship by a huge wave. Eva saw Tom Pearce on a small rocky beach and yelled to attract his attention. He dived in and swam to the exhausted woman and dragged her to shore. He took her to the cave and broke open case of brandy which had washed up on the beach. He opened a bottle to revive the unconscious woman. A few hours later Tom scaled a cliff in search of help. He followed hoof prints and came by chance upon two men from nearby Glenample Station three and a half miles away. In a state of exhaustion, he told the men of the tragedy. Tom returned to the gorge while the two men rode back to the station to get help. By the time they reached LOCH ARD Gorge, it was cold and dark. The two shipwreck survivors were taken to Glenample Station to recover. Eva stayed at the station for six weeks before returning to Ireland, this time by steamship. In Melbourne, Tom Pearce received a hero's welcome. He was presented with the first gold medal of the Royal Humane Society of Victoria and a £1000 cheque from the Victorian Government. Concerts were performed to honour the young man's bravery and to raise money for those who lost family in the LOCH ARD disaster. Of the 54 crew members and passengers on board, only two survived: the apprentice, Tom Pearce and the young woman passenger, Eva Carmichael, who lost all of her family in the tragedy. Ten days after the LOCH ARD tragedy, salvage rights to the wreck were sold at auction for £2,120. Cargo valued at £3,000 was salvaged and placed on the beach, but most washed back into the sea when another storm developed. The wreck of LOCH ARD still lies at the base of Mutton Bird Island. Much of the cargo has now been salvaged and some was washed up into what is now known as LOCH ARD Gorge. Cargo and artefacts have also been illegally salvaged over many years before protective legislation was introduced. One of the most unlikely pieces of cargo to have survived the shipwreck was a Minton porcelain peacock - one of only nine in the world. The peacock was destined for the Melbourne International Exhibition in 1880. It had been well packed, which gave it adequate protection during the violent storm. Today, the Minton peacock can be seen at the Flagstaff Hill Maritime Museum in Warrnambool. From Australia's most dramatic shipwreck it has now become Australia's most valuable shipwreck artefact and is one of very few 'objects' on the Victorian State Heritage Register. Flagstaff Hill’s collection of artefacts from LOCH ARD is significant for being one of the largest collections of artefacts from this shipwreck in Victoria. It is significant for its association with the shipwreck, which is on the Victorian Heritage Register (VHR S417). The collection is significant because of the relationship between the objects, as together they have a high potential to interpret the story of the LOCH ARD. The LOCH ARD collection is archaeologically significant as the remains of a large international passenger and cargo ship. The LOCH ARD collection is historically significant for representing aspects of Victoria’s shipping history and its potential to interpret sub-theme 1.5 of Victoria’s Framework of Historical Themes (living with natural processes). The collection is also historically significant for its association with the LOCH ARD, which was one of the worst and best known shipwrecks in Victoria’s history. Part of the base of a small bronze bell. Green corrosion and some traces of bronze disease. . Artefact Reg no LA/106. Recovered from the wreck of the Loch Ard.flagstaff hill, warrnambool, shipwrecked coast, flagstaff hill maritime museum, maritime museum, shipwreck coast, flagstaff hill maritime village, great ocean road, loch line, loch ard, captain gibbs, eva carmichael, tom pearce, glenample station, mutton bird island, loch ard gorge, bell, bronze bell -
 Flagstaff Hill Maritime Museum and Village
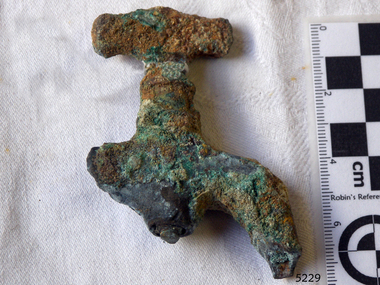
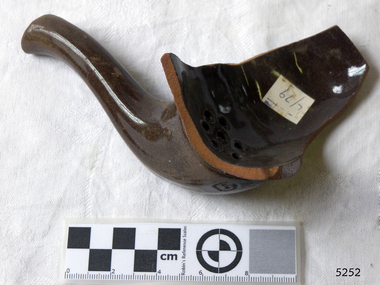
Tap
HISTORY OF THE LOCH ARD The LOCH ARD belonged to the famous Loch Line which sailed many ships from England to Australia. Built in Glasgow by Barclay, Curdle and Co. in 1873, the LOCH ARD was a three-masted square rigged iron sailing ship. The ship measured 262ft 7" (79.87m) in length, 38ft (11.58m) in width, 23ft (7m) in depth and had a gross tonnage of 1693 tons. The LOCH ARD's main mast measured a massive 150ft (45.7m) in height. LOCH ARD made three trips to Australia and one trip to Calcutta before its final voyage. LOCH ARD left England on March 2, 1878, under the command of Captain Gibbs, a newly married, 29 year old. She was bound for Melbourne with a crew of 37, plus 17 passengers and a load of cargo. The general cargo reflected the affluence of Melbourne at the time. On board were straw hats, umbrella, perfumes, clay pipes, pianos, clocks, confectionary, linen and candles, as well as a heavier load of railway irons, cement, lead and copper. There were items included that intended for display in the Melbourne International Exhibition in 1880. The voyage to Port Phillip was long but uneventful. At 3am on June 1, 1878, Captain Gibbs was expecting to see land and the passengers were becoming excited as they prepared to view their new homeland in the early morning. But LOCH ARD was running into a fog which greatly reduced visibility. Captain Gibbs was becoming anxious as there was no sign of land or the Cape Otway lighthouse. At 4am the fog lifted. A man aloft announced that he could see breakers. The sheer cliffs of Victoria's west coast came into view, and Captain Gibbs realised that the ship was much closer to them than expected. He ordered as much sail to be set as time would permit and then attempted to steer the vessel out to sea. On coming head on into the wind, the ship lost momentum, the sails fell limp and LOCH ARD's bow swung back. Gibbs then ordered the anchors to be released in an attempt to hold its position. The anchors sank some 50 fathoms - but did not hold. By this time LOCH ARD was among the breakers and the tall cliffs of Mutton Bird Island rose behind the ship. Just half a mile from the coast, the ship's bow was suddenly pulled around by the anchor. The captain tried to tack out to sea, but the ship struck a reef at the base of Mutton Bird Island, near Port Campbell. Waves broke over the ship and the top deck was loosened from the hull. The masts and rigging came crashing down knocking passengers and crew overboard. When a lifeboat was finally launched, it crashed into the side of LOCH ARD and capsized. Tom Pearce, who had launched the boat, managed to cling to its overturned hull and shelter beneath it. He drifted out to sea and then on the flood tide came into what is now known as LOCH ARD Gorge. He swam to shore, bruised and dazed, and found a cave in which to shelter. Some of the crew stayed below deck to shelter from the falling rigging but drowned when the ship slipped off the reef into deeper water. Eva Carmichael had raced onto deck to find out what was happening only to be confronted by towering cliffs looming above the stricken ship. In all the chaos, Captain Gibbs grabbed Eva and said, "If you are saved Eva, let my dear wife know that I died like a sailor". That was the last Eva Carmichael saw of the captain. She was swept off the ship by a huge wave. Eva saw Tom Pearce on a small rocky beach and yelled to attract his attention. He dived in and swam to the exhausted woman and dragged her to shore. He took her to the cave and broke open case of brandy which had washed up on the beach. He opened a bottle to revive the unconscious woman. A few hours later Tom scaled a cliff in search of help. He followed hoof prints and came by chance upon two men from nearby Glenample Station three and a half miles away. In a state of exhaustion, he told the men of the tragedy. Tom returned to the gorge while the two men rode back to the station to get help. By the time they reached LOCH ARD Gorge, it was cold and dark. The two shipwreck survivors were taken to Glenample Station to recover. Eva stayed at the station for six weeks before returning to Ireland, this time by steamship. In Melbourne, Tom Pearce received a hero's welcome. He was presented with the first gold medal of the Royal Humane Society of Victoria and a £1000 cheque from the Victorian Government. Concerts were performed to honour the young man's bravery and to raise money for those who lost family in the LOCH ARD disaster. Of the 54 crew members and passengers on board, only two survived: the apprentice, Tom Pearce and the young woman passenger, Eva Carmichael, who lost all of her family in the tragedy. Ten days after the LOCH ARD tragedy, salvage rights to the wreck were sold at auction for £2,120. Cargo valued at £3,000 was salvaged and placed on the beach, but most washed back into the sea when another storm developed. The wreck of LOCH ARD still lies at the base of Mutton Bird Island. Much of the cargo has now been salvaged and some was washed up into what is now known as LOCH ARD Gorge. Cargo and artefacts have also been illegally salvaged over many years before protective legislation was introduced. One of the most unlikely pieces of cargo to have survived the shipwreck was a Minton porcelain peacock - one of only nine in the world. The peacock was destined for the Melbourne International Exhibition in 1880. It had been well packed, which gave it adequate protection during the violent storm. Today, the Minton peacock can be seen at the Flagstaff Hill Maritime Museum in Warrnambool. From Australia's most dramatic shipwreck it has now become Australia's most valuable shipwreck artefact and is one of very few 'objects' on the Victorian State Heritage Register. Flagstaff Hill’s collection of artefacts from LOCH ARD is significant for being one of the largest collections of artefacts from this shipwreck in Victoria. It is significant for its association with the shipwreck, which is on the Victorian Heritage Register (VHR S417). The collection is significant because of the relationship between the objects, as together they have a high potential to interpret the story of the LOCH ARD. The LOCH ARD collection is archaeologically significant as the remains of a large international passenger and cargo ship. The LOCH ARD collection is historically significant for representing aspects of Victoria’s shipping history and its potential to interpret sub-theme 1.5 of Victoria’s Framework of Historical Themes (living with natural processes). The collection is also historically significant for its association with the LOCH ARD, which was one of the worst and best known shipwrecks in Victoria’s history. Brass tap, has heavy encrustation and has been broken from fitting. Recovered from the wreck of the Loch Ard.flagstaff hill, warrnambool, shipwrecked coast, flagstaff hill maritime museum, maritime museum, shipwreck coast, flagstaff hill maritime village, great ocean road, loch line, loch ard, captain gibbs, eva carmichael, tom pearce, glenample station, mutton bird island, loch ard gorge, brass tap, tap -
 Flagstaff Hill Maritime Museum and Village
Tap
HISTORY OF THE LOCH ARD The LOCH ARD belonged to the famous Loch Line which sailed many ships from England to Australia. Built in Glasgow by Barclay, Curdle and Co. in 1873, the LOCH ARD was a three-masted square rigged iron sailing ship. The ship measured 262ft 7" (79.87m) in length, 38ft (11.58m) in width, 23ft (7m) in depth and had a gross tonnage of 1693 tons. The LOCH ARD's main mast measured a massive 150ft (45.7m) in height. LOCH ARD made three trips to Australia and one trip to Calcutta before its final voyage. LOCH ARD left England on March 2, 1878, under the command of Captain Gibbs, a newly married, 29 year old. She was bound for Melbourne with a crew of 37, plus 17 passengers and a load of cargo. The general cargo reflected the affluence of Melbourne at the time. On board were straw hats, umbrella, perfumes, clay pipes, pianos, clocks, confectionary, linen and candles, as well as a heavier load of railway irons, cement, lead and copper. There were items included that intended for display in the Melbourne International Exhibition in 1880. The voyage to Port Phillip was long but uneventful. At 3am on June 1, 1878, Captain Gibbs was expecting to see land and the passengers were becoming excited as they prepared to view their new homeland in the early morning. But LOCH ARD was running into a fog which greatly reduced visibility. Captain Gibbs was becoming anxious as there was no sign of land or the Cape Otway lighthouse. At 4am the fog lifted. A man aloft announced that he could see breakers. The sheer cliffs of Victoria's west coast came into view, and Captain Gibbs realised that the ship was much closer to them than expected. He ordered as much sail to be set as time would permit and then attempted to steer the vessel out to sea. On coming head on into the wind, the ship lost momentum, the sails fell limp and LOCH ARD's bow swung back. Gibbs then ordered the anchors to be released in an attempt to hold its position. The anchors sank some 50 fathoms - but did not hold. By this time LOCH ARD was among the breakers and the tall cliffs of Mutton Bird Island rose behind the ship. Just half a mile from the coast, the ship's bow was suddenly pulled around by the anchor. The captain tried to tack out to sea, but the ship struck a reef at the base of Mutton Bird Island, near Port Campbell. Waves broke over the ship and the top deck was loosened from the hull. The masts and rigging came crashing down knocking passengers and crew overboard. When a lifeboat was finally launched, it crashed into the side of LOCH ARD and capsized. Tom Pearce, who had launched the boat, managed to cling to its overturned hull and shelter beneath it. He drifted out to sea and then on the flood tide came into what is now known as LOCH ARD Gorge. He swam to shore, bruised and dazed, and found a cave in which to shelter. Some of the crew stayed below deck to shelter from the falling rigging but drowned when the ship slipped off the reef into deeper water. Eva Carmichael had raced onto deck to find out what was happening only to be confronted by towering cliffs looming above the stricken ship. In all the chaos, Captain Gibbs grabbed Eva and said, "If you are saved Eva, let my dear wife know that I died like a sailor". That was the last Eva Carmichael saw of the captain. She was swept off the ship by a huge wave. Eva saw Tom Pearce on a small rocky beach and yelled to attract his attention. He dived in and swam to the exhausted woman and dragged her to shore. He took her to the cave and broke open case of brandy which had washed up on the beach. He opened a bottle to revive the unconscious woman. A few hours later Tom scaled a cliff in search of help. He followed hoof prints and came by chance upon two men from nearby Glenample Station three and a half miles away. In a state of exhaustion, he told the men of the tragedy. Tom returned to the gorge while the two men rode back to the station to get help. By the time they reached LOCH ARD Gorge, it was cold and dark. The two shipwreck survivors were taken to Glenample Station to recover. Eva stayed at the station for six weeks before returning to Ireland, this time by steamship. In Melbourne, Tom Pearce received a hero's welcome. He was presented with the first gold medal of the Royal Humane Society of Victoria and a £1000 cheque from the Victorian Government. Concerts were performed to honour the young man's bravery and to raise money for those who lost family in the LOCH ARD disaster. Of the 54 crew members and passengers on board, only two survived: the apprentice, Tom Pearce and the young woman passenger, Eva Carmichael, who lost all of her family in the tragedy. Ten days after the LOCH ARD tragedy, salvage rights to the wreck were sold at auction for £2,120. Cargo valued at £3,000 was salvaged and placed on the beach, but most washed back into the sea when another storm developed. The wreck of LOCH ARD still lies at the base of Mutton Bird Island. Much of the cargo has now been salvaged and some was washed up into what is now known as LOCH ARD Gorge. Cargo and artefacts have also been illegally salvaged over many years before protective legislation was introduced. One of the most unlikely pieces of cargo to have survived the shipwreck was a Minton porcelain peacock - one of only nine in the world. The peacock was destined for the Melbourne International Exhibition in 1880. It had been well packed, which gave it adequate protection during the violent storm. Today, the Minton peacock can be seen at the Flagstaff Hill Maritime Museum in Warrnambool. From Australia's most dramatic shipwreck it has now become Australia's most valuable shipwreck artefact and is one of very few 'objects' on the Victorian State Heritage Register. Flagstaff Hill’s collection of artefacts from LOCH ARD is significant for being one of the largest collections of artefacts from this shipwreck in Victoria. It is significant for its association with the shipwreck, which is on the Victorian Heritage Register (VHR S417). The collection is significant because of the relationship between the objects, as together they have a high potential to interpret the story of the LOCH ARD. The LOCH ARD collection is archaeologically significant as the remains of a large international passenger and cargo ship. The LOCH ARD collection is historically significant for representing aspects of Victoria’s shipping history and its potential to interpret sub-theme 1.5 of Victoria’s Framework of Historical Themes (living with natural processes). The collection is also historically significant for its association with the LOCH ARD, which was one of the worst and best known shipwrecks in Victoria’s history. Brass tap, has encrustation. Tap is complete. Recovered from the wreck of the Loch Ard.flagstaff hill, warrnambool, shipwrecked coast, flagstaff hill maritime museum, maritime museum, shipwreck coast, flagstaff hill maritime village, great ocean road, loch line, loch ard, captain gibbs, eva carmichael, tom pearce, glenample station, mutton bird island, loch ard gorge, brass tap, tap -
 Flagstaff Hill Maritime Museum and Village
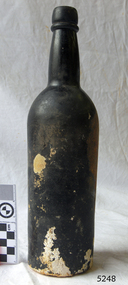
Bottle
HISTORY OF THE LOCH ARD The LOCH ARD belonged to the famous Loch Line which sailed many ships from England to Australia. Built in Glasgow by Barclay, Curdle and Co. in 1873, the LOCH ARD was a three-masted square rigged iron sailing ship. The ship measured 262ft 7" (79.87m) in length, 38ft (11.58m) in width, 23ft (7m) in depth and had a gross tonnage of 1693 tons. The LOCH ARD's main mast measured a massive 150ft (45.7m) in height. LOCH ARD made three trips to Australia and one trip to Calcutta before its final voyage. LOCH ARD left England on March 2, 1878, under the command of Captain Gibbs, a newly married, 29 year old. She was bound for Melbourne with a crew of 37, plus 17 passengers and a load of cargo. The general cargo reflected the affluence of Melbourne at the time. On board were straw hats, umbrella, perfumes, clay pipes, pianos, clocks, confectionary, linen and candles, as well as a heavier load of railway irons, cement, lead and copper. There were items included that intended for display in the Melbourne International Exhibition in 1880. The voyage to Port Phillip was long but uneventful. At 3am on June 1, 1878, Captain Gibbs was expecting to see land and the passengers were becoming excited as they prepared to view their new homeland in the early morning. But LOCH ARD was running into a fog which greatly reduced visibility. Captain Gibbs was becoming anxious as there was no sign of land or the Cape Otway lighthouse. At 4am the fog lifted. A man aloft announced that he could see breakers. The sheer cliffs of Victoria's west coast came into view, and Captain Gibbs realised that the ship was much closer to them than expected. He ordered as much sail to be set as time would permit and then attempted to steer the vessel out to sea. On coming head on into the wind, the ship lost momentum, the sails fell limp and LOCH ARD's bow swung back. Gibbs then ordered the anchors to be released in an attempt to hold its position. The anchors sank some 50 fathoms - but did not hold. By this time LOCH ARD was among the breakers and the tall cliffs of Mutton Bird Island rose behind the ship. Just half a mile from the coast, the ship's bow was suddenly pulled around by the anchor. The captain tried to tack out to sea, but the ship struck a reef at the base of Mutton Bird Island, near Port Campbell. Waves broke over the ship and the top deck was loosened from the hull. The masts and rigging came crashing down knocking passengers and crew overboard. When a lifeboat was finally launched, it crashed into the side of LOCH ARD and capsized. Tom Pearce, who had launched the boat, managed to cling to its overturned hull and shelter beneath it. He drifted out to sea and then on the flood tide came into what is now known as LOCH ARD Gorge. He swam to shore, bruised and dazed, and found a cave in which to shelter. Some of the crew stayed below deck to shelter from the falling rigging but drowned when the ship slipped off the reef into deeper water. Eva Carmichael had raced onto deck to find out what was happening only to be confronted by towering cliffs looming above the stricken ship. In all the chaos, Captain Gibbs grabbed Eva and said, "If you are saved Eva, let my dear wife know that I died like a sailor". That was the last Eva Carmichael saw of the captain. She was swept off the ship by a huge wave. Eva saw Tom Pearce on a small rocky beach and yelled to attract his attention. He dived in and swam to the exhausted woman and dragged her to shore. He took her to the cave and broke open case of brandy which had washed up on the beach. He opened a bottle to revive the unconscious woman. A few hours later Tom scaled a cliff in search of help. He followed hoof prints and came by chance upon two men from nearby Glenample Station three and a half miles away. In a state of exhaustion, he told the men of the tragedy. Tom returned to the gorge while the two men rode back to the station to get help. By the time they reached LOCH ARD Gorge, it was cold and dark. The two shipwreck survivors were taken to Glenample Station to recover. Eva stayed at the station for six weeks before returning to Ireland, this time by steamship. In Melbourne, Tom Pearce received a hero's welcome. He was presented with the first gold medal of the Royal Humane Society of Victoria and a £1000 cheque from the Victorian Government. Concerts were performed to honour the young man's bravery and to raise money for those who lost family in the LOCH ARD disaster. Of the 54 crew members and passengers on board, only two survived: the apprentice, Tom Pearce and the young woman passenger, Eva Carmichael, who lost all of her family in the tragedy. Ten days after the LOCH ARD tragedy, salvage rights to the wreck were sold at auction for £2,120. Cargo valued at £3,000 was salvaged and placed on the beach, but most washed back into the sea when another storm developed. The wreck of LOCH ARD still lies at the base of Mutton Bird Island. Much of the cargo has now been salvaged and some was washed up into what is now known as LOCH ARD Gorge. Cargo and artefacts have also been illegally salvaged over many years before protective legislation was introduced. One of the most unlikely pieces of cargo to have survived the shipwreck was a Minton porcelain peacock - one of only nine in the world. The peacock was destined for the Melbourne International Exhibition in 1880. It had been well packed, which gave it adequate protection during the violent storm. Today, the Minton peacock can be seen at the Flagstaff Hill Maritime Museum in Warrnambool. From Australia's most dramatic shipwreck it has now become Australia's most valuable shipwreck artefact and is one of very few 'objects' on the Victorian State Heritage Register. Flagstaff Hill’s collection of artefacts from LOCH ARD is significant for being one of the largest collections of artefacts from this shipwreck in Victoria. It is significant for its association with the shipwreck, which is on the Victorian Heritage Register (VHR S417). The collection is significant because of the relationship between the objects, as together they have a high potential to interpret the story of the LOCH ARD. The LOCH ARD collection is archaeologically significant as the remains of a large international passenger and cargo ship. The LOCH ARD collection is historically significant for representing aspects of Victoria’s shipping history and its potential to interpret sub-theme 1.5 of Victoria’s Framework of Historical Themes (living with natural processes). The collection is also historically significant for its association with the LOCH ARD, which was one of the worst and best known shipwrecks in Victoria’s history. Bottle, Black glass with some encrustation and iron stain, recovered from the wreck of the Loch Ard. Artefact Rego No LA/80. -
 Flagstaff Hill Maritime Museum and Village
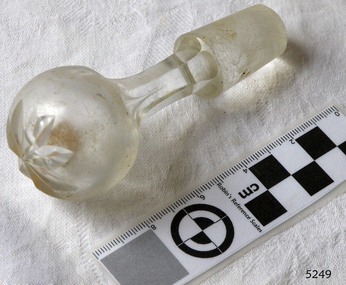
Domestic object - Glass Decanter Stopper, 1850+
History of the Loch Ard: The Loch Ard got it’s name from ”Loch Ard” a loch which lies to the west of Aberfoyle, and to the east of Loch Lomond. It means "high lake" in Scottish Gaelic.The vessel belonged to the famous Loch Line which sailed many vessels from England to Australia. The Loch Ard was built in Glasgow by Barclay, Curdle and Co. in 1873, the vessel was a three-masted square-rigged iron sailing ship that measured 79.87 meters in length, 11.58 m in width, and 7 m in depth with a gross tonnage of 1693 tons with a mainmast that measured a massive 45.7 m in height. Loch Ard made three trips to Australia and one trip to Calcutta before its fateful voyage. Loch Ard left England on March 2, 1878, under the command of 29-year-old Captain Gibbs, who was newly married. The ship was bound for Melbourne with a crew of 37, plus 17 passengers. The general cargo reflected the affluence of Melbourne at the time. Onboard were straw hats, umbrella, perfumes, clay pipes, pianos, clocks, confectionery, linen and candles, as well as a heavier load of railway irons, cement, lead and copper. There were other items included that were intended for display in the Melbourne International Exhibition of 1880. The voyage to Port Phillip was long but uneventful. Then at 3 am on June 1, 1878, Captain Gibbs was expecting to see land. But the Loch Ard was running into a fog which greatly reduced visibility. Captain Gibbs was becoming anxious as there was no sign of land or the Cape Otway lighthouse. At 4 am the fog lifted and a lookout aloft announced that he could see breakers. The sheer cliffs of Victoria's west coast came into view, and Captain Gibbs realised that the ship was much closer to them than expected. He ordered as much sail to be set as time would permit and then attempted to steer the vessel out to sea. On coming head-on into the wind, the ship lost momentum, the sails fell limp and Loch Ard's bow swung back towards land. Gibbs then ordered the anchors to be released in an attempt to hold its position. The anchors sank some 50 fathoms - but did not hold. By this time the ship was among the breakers and the tall cliffs of Mutton Bird Island rose behind. Just half a mile from the coast, the ship's bow was suddenly pulled around by the anchor. The captain tried to tack out to sea, but the ship struck a reef at the base of Mutton Bird Island, near Port Campbell. Waves subsequently broke over the ship and the top deck became loosened from the hull. The masts and rigging came crashing down knocking passengers and crew overboard. When a lifeboat was finally launched, it crashed into the side of Loch Ard and capsized. Tom Pearce, who had launched the boat, managed to cling to its overturned hull and shelter beneath it. He drifted out to sea and then on the flood tide came into what is now known as Loch Ard Gorge. He swam to shore, bruised and dazed, and found a cave in which to shelter. Some of the crew stayed below deck to shelter from the falling rigging but drowned when the ship slipped off the reef into deeper water. Eva Carmichael a passenger had raced onto the deck to find out what was happening only to be confronted by towering cliffs looming above the stricken ship. In all the chaos, Captain Gibbs grabbed Eva and said, "If you are saved Eva, let my dear wife know that I died like a sailor". That was the last Eva Carmichael saw of the captain. She was swept off the ship by a huge wave. Eva saw Tom Pearce on a small rocky beach and yelled to attract his attention. He dived in and swam to the exhausted woman and dragged her to shore. He took her to the cave and broke the open case of brandy which had washed up on the beach. He opened a bottle to revive the unconscious woman. A few hours later Tom scaled a cliff in search of help. He followed hoof prints and came by chance upon two men from nearby Glenample Station three and a half miles away. In a complete state of exhaustion, he told the men of the tragedy. Tom then returned to the gorge while the two men rode back to the station to get help. By the time they reached Loch Ard Gorge, it was cold and dark. The two shipwreck survivors were taken to Glenample Station to recover. Eva stayed at the station for six weeks before returning to Ireland by steamship. In Melbourne, Tom Pearce received a hero's welcome. He was presented with the first gold medal of the Royal Humane Society of Victoria and a £1000 cheque from the Victorian Government. Concerts were performed to honour the young man's bravery and to raise money for those who lost family in the disaster. Of the 54 crew members and passengers on board, only two survived: the apprentice, Tom Pearce and the young woman passenger, Eva Carmichael, who lost her family in the tragedy. Ten days after the Loch Ard tragedy, salvage rights to the wreck were sold at auction for £2,120. Cargo valued at £3,000 was salvaged and placed on the beach, but most washed back into the sea when another storm developed. The wreck of Loch Ard still lies at the base of Mutton Bird Island. Much of the cargo has now been salvaged and some items were washed up into Loch Ard Gorge. Cargo and artefacts have also been illegally salvaged over many years before protective legislation was introduced in March 1982. One of the most unlikely pieces of cargo to have survived the shipwreck was a Minton majolica peacock- one of only nine in the world. The peacock was destined for the Melbourne 1880 International Exhibition in. It had been well packed, which gave it adequate protection during the violent storm. Today the Minton peacock can be seen at the Flagstaff Hill Maritime Museum in Warrnambool. From Australia's most dramatic shipwreck it has now become Australia's most valuable shipwreck artifact and is one of very few 'objects' on the Victorian State Heritage Register. The shipwreck of the Loch Ard is of significance for Victoria and is registered on the Victorian Heritage Register ( S 417). Flagstaff Hill has a varied collection of artefacts from Loch Ard and its collection is significant for being one of the largest accumulation of artefacts from this notable Victorian shipwreck. The collections object is to also give us a snapshot into history so we are able to interpret the story of this tragic event. The collection is also archaeologically significant as it represents aspects of Victoria's shipping history that allows us to interpret Victoria's social and historical themes of the time. The collections historically significance is that it is associated unfortunately with the worst and best-known shipwreck in Victoria's history. Glass decanter stopper; hand blown. The bulbous glass head has floral motif, neck is six-sided, base has textured surface. The stopper was, recovered from the wreck of the Loch Ard. flagstaff hill, warrnambool, shipwrecked coast, flagstaff hill maritime museum, maritime museum, shipwreck coast, flagstaff hill maritime village, great ocean road, loch line, loch ard, captain gibbs, eva carmichael, tom pearce, glenample station, mutton bird island, loch ard gorge, decanter stopper, stopper, hand blown, bottle stopper -
 Flagstaff Hill Maritime Museum and Village
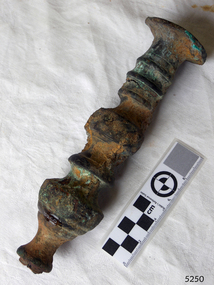
Light Fitting
HISTORY OF THE LOCH ARD The LOCH ARD belonged to the famous Loch Line which sailed many ships from England to Australia. Built in Glasgow by Barclay, Curdle and Co. in 1873, the LOCH ARD was a three-masted square rigged iron sailing ship. The ship measured 262ft 7" (79.87m) in length, 38ft (11.58m) in width, 23ft (7m) in depth and had a gross tonnage of 1693 tons. The LOCH ARD's main mast measured a massive 150ft (45.7m) in height. LOCH ARD made three trips to Australia and one trip to Calcutta before its final voyage. LOCH ARD left England on March 2, 1878, under the command of Captain Gibbs, a newly married, 29 year old. She was bound for Melbourne with a crew of 37, plus 17 passengers and a load of cargo. The general cargo reflected the affluence of Melbourne at the time. On board were straw hats, umbrella, perfumes, clay pipes, pianos, clocks, confectionary, linen and candles, as well as a heavier load of railway irons, cement, lead and copper. There were items included that intended for display in the Melbourne International Exhibition in 1880. The voyage to Port Phillip was long but uneventful. At 3am on June 1, 1878, Captain Gibbs was expecting to see land and the passengers were becoming excited as they prepared to view their new homeland in the early morning. But LOCH ARD was running into a fog which greatly reduced visibility. Captain Gibbs was becoming anxious as there was no sign of land or the Cape Otway lighthouse. At 4am the fog lifted. A man aloft announced that he could see breakers. The sheer cliffs of Victoria's west coast came into view, and Captain Gibbs realised that the ship was much closer to them than expected. He ordered as much sail to be set as time would permit and then attempted to steer the vessel out to sea. On coming head on into the wind, the ship lost momentum, the sails fell limp and LOCH ARD's bow swung back. Gibbs then ordered the anchors to be released in an attempt to hold its position. The anchors sank some 50 fathoms - but did not hold. By this time LOCH ARD was among the breakers and the tall cliffs of Mutton Bird Island rose behind the ship. Just half a mile from the coast, the ship's bow was suddenly pulled around by the anchor. The captain tried to tack out to sea, but the ship struck a reef at the base of Mutton Bird Island, near Port Campbell. Waves broke over the ship and the top deck was loosened from the hull. The masts and rigging came crashing down knocking passengers and crew overboard. When a lifeboat was finally launched, it crashed into the side of LOCH ARD and capsized. Tom Pearce, who had launched the boat, managed to cling to its overturned hull and shelter beneath it. He drifted out to sea and then on the flood tide came into what is now known as LOCH ARD Gorge. He swam to shore, bruised and dazed, and found a cave in which to shelter. Some of the crew stayed below deck to shelter from the falling rigging but drowned when the ship slipped off the reef into deeper water. Eva Carmichael had raced onto deck to find out what was happening only to be confronted by towering cliffs looming above the stricken ship. In all the chaos, Captain Gibbs grabbed Eva and said, "If you are saved Eva, let my dear wife know that I died like a sailor". That was the last Eva Carmichael saw of the captain. She was swept off the ship by a huge wave. Eva saw Tom Pearce on a small rocky beach and yelled to attract his attention. He dived in and swam to the exhausted woman and dragged her to shore. He took her to the cave and broke open case of brandy which had washed up on the beach. He opened a bottle to revive the unconscious woman. A few hours later Tom scaled a cliff in search of help. He followed hoof prints and came by chance upon two men from nearby Glenample Station three and a half miles away. In a state of exhaustion, he told the men of the tragedy. Tom returned to the gorge while the two men rode back to the station to get help. By the time they reached LOCH ARD Gorge, it was cold and dark. The two shipwreck survivors were taken to Glenample Station to recover. Eva stayed at the station for six weeks before returning to Ireland, this time by steamship. In Melbourne, Tom Pearce received a hero's welcome. He was presented with the first gold medal of the Royal Humane Society of Victoria and a £1000 cheque from the Victorian Government. Concerts were performed to honour the young man's bravery and to raise money for those who lost family in the LOCH ARD disaster. Of the 54 crew members and passengers on board, only two survived: the apprentice, Tom Pearce and the young woman passenger, Eva Carmichael, who lost all of her family in the tragedy. Ten days after the LOCH ARD tragedy, salvage rights to the wreck were sold at auction for £2,120. Cargo valued at £3,000 was salvaged and placed on the beach, but most washed back into the sea when another storm developed. The wreck of LOCH ARD still lies at the base of Mutton Bird Island. Much of the cargo has now been salvaged and some was washed up into what is now known as LOCH ARD Gorge. Cargo and artefacts have also been illegally salvaged over many years before protective legislation was introduced. One of the most unlikely pieces of cargo to have survived the shipwreck was a Minton porcelain peacock - one of only nine in the world. The peacock was destined for the Melbourne International Exhibition in 1880. It had been well packed, which gave it adequate protection during the violent storm. Today, the Minton peacock can be seen at the Flagstaff Hill Maritime Museum in Warrnambool. From Australia's most dramatic shipwreck it has now become Australia's most valuable shipwreck artefact and is one of very few 'objects' on the Victorian State Heritage Register. Flagstaff Hill’s collection of artefacts from LOCH ARD is significant for being one of the largest collections of artefacts from this shipwreck in Victoria. It is significant for its association with the shipwreck, which is on the Victorian Heritage Register (VHR S417). The collection is significant because of the relationship between the objects, as together they have a high potential to interpret the story of the LOCH ARD. The LOCH ARD collection is archaeologically significant as the remains of a large international passenger and cargo ship. The LOCH ARD collection is historically significant for representing aspects of Victoria’s shipping history and its potential to interpret sub-theme 1.5 of Victoria’s Framework of Historical Themes (living with natural processes). The collection is also historically significant for its association with the LOCH ARD, which was one of the worst and best known shipwrecks in Victoria’s history. Section of ornate light fitting, brass stem is cracked. Slight encrustation and verdigris. Recovered from the wreck of the Loch Ard. Artefact Rego No LA/??.flagstaff hill, warrnambool, shipwrecked coast, flagstaff hill maritime museum, maritime museum, shipwreck coast, flagstaff hill maritime village, great ocean road, loch line, loch ard, captain gibbs, eva carmichael, tom pearce, glenample station, mutton bird island, loch ard gorge, light fitting -
 Flagstaff Hill Maritime Museum and Village
Teapot Spout
HISTORY OF THE LOCH ARD The LOCH ARD belonged to the famous Loch Line which sailed many ships from England to Australia. Built in Glasgow by Barclay, Curdle and Co. in 1873, the LOCH ARD was a three-masted square rigged iron sailing ship. The ship measured 262ft 7" (79.87m) in length, 38ft (11.58m) in width, 23ft (7m) in depth and had a gross tonnage of 1693 tons. The LOCH ARD's main mast measured a massive 150ft (45.7m) in height. LOCH ARD made three trips to Australia and one trip to Calcutta before its final voyage. LOCH ARD left England on March 2, 1878, under the command of Captain Gibbs, a newly married, 29 year old. She was bound for Melbourne with a crew of 37, plus 17 passengers and a load of cargo. The general cargo reflected the affluence of Melbourne at the time. On board were straw hats, umbrella, perfumes, clay pipes, pianos, clocks, confectionary, linen and candles, as well as a heavier load of railway irons, cement, lead and copper. There were items included that intended for display in the Melbourne International Exhibition in 1880. The voyage to Port Phillip was long but uneventful. At 3am on June 1, 1878, Captain Gibbs was expecting to see land and the passengers were becoming excited as they prepared to view their new homeland in the early morning. But LOCH ARD was running into a fog which greatly reduced visibility. Captain Gibbs was becoming anxious as there was no sign of land or the Cape Otway lighthouse. At 4am the fog lifted. A man aloft announced that he could see breakers. The sheer cliffs of Victoria's west coast came into view, and Captain Gibbs realised that the ship was much closer to them than expected. He ordered as much sail to be set as time would permit and then attempted to steer the vessel out to sea. On coming head on into the wind, the ship lost momentum, the sails fell limp and LOCH ARD's bow swung back. Gibbs then ordered the anchors to be released in an attempt to hold its position. The anchors sank some 50 fathoms - but did not hold. By this time LOCH ARD was among the breakers and the tall cliffs of Mutton Bird Island rose behind the ship. Just half a mile from the coast, the ship's bow was suddenly pulled around by the anchor. The captain tried to tack out to sea, but the ship struck a reef at the base of Mutton Bird Island, near Port Campbell. Waves broke over the ship and the top deck was loosened from the hull. The masts and rigging came crashing down knocking passengers and crew overboard. When a lifeboat was finally launched, it crashed into the side of LOCH ARD and capsized. Tom Pearce, who had launched the boat, managed to cling to its overturned hull and shelter beneath it. He drifted out to sea and then on the flood tide came into what is now known as LOCH ARD Gorge. He swam to shore, bruised and dazed, and found a cave in which to shelter. Some of the crew stayed below deck to shelter from the falling rigging but drowned when the ship slipped off the reef into deeper water. Eva Carmichael had raced onto deck to find out what was happening only to be confronted by towering cliffs looming above the stricken ship. In all the chaos, Captain Gibbs grabbed Eva and said, "If you are saved Eva, let my dear wife know that I died like a sailor". That was the last Eva Carmichael saw of the captain. She was swept off the ship by a huge wave. Eva saw Tom Pearce on a small rocky beach and yelled to attract his attention. He dived in and swam to the exhausted woman and dragged her to shore. He took her to the cave and broke open case of brandy which had washed up on the beach. He opened a bottle to revive the unconscious woman. A few hours later Tom scaled a cliff in search of help. He followed hoof prints and came by chance upon two men from nearby Glenample Station three and a half miles away. In a state of exhaustion, he told the men of the tragedy. Tom returned to the gorge while the two men rode back to the station to get help. By the time they reached LOCH ARD Gorge, it was cold and dark. The two shipwreck survivors were taken to Glenample Station to recover. Eva stayed at the station for six weeks before returning to Ireland, this time by steamship. In Melbourne, Tom Pearce received a hero's welcome. He was presented with the first gold medal of the Royal Humane Society of Victoria and a £1000 cheque from the Victorian Government. Concerts were performed to honour the young man's bravery and to raise money for those who lost family in the LOCH ARD disaster. Of the 54 crew members and passengers on board, only two survived: the apprentice, Tom Pearce and the young woman passenger, Eva Carmichael, who lost all of her family in the tragedy. Ten days after the LOCH ARD tragedy, salvage rights to the wreck were sold at auction for £2,120. Cargo valued at £3,000 was salvaged and placed on the beach, but most washed back into the sea when another storm developed. The wreck of LOCH ARD still lies at the base of Mutton Bird Island. Much of the cargo has now been salvaged and some was washed up into what is now known as LOCH ARD Gorge. Cargo and artefacts have also been illegally salvaged over many years before protective legislation was introduced. One of the most unlikely pieces of cargo to have survived the shipwreck was a Minton porcelain peacock - one of only nine in the world. The peacock was destined for the Melbourne International Exhibition in 1880. It had been well packed, which gave it adequate protection during the violent storm. Today, the Minton peacock can be seen at the Flagstaff Hill Maritime Museum in Warrnambool. From Australia's most dramatic shipwreck it has now become Australia's most valuable shipwreck artefact and is one of very few 'objects' on the Victorian State Heritage Register. Flagstaff Hill’s collection of artefacts from LOCH ARD is significant for being one of the largest collections of artefacts from this shipwreck in Victoria. It is significant for its association with the shipwreck, which is on the Victorian Heritage Register (VHR S417). The collection is significant because of the relationship between the objects, as together they have a high potential to interpret the story of the LOCH ARD. The LOCH ARD collection is archaeologically significant as the remains of a large international passenger and cargo ship. The LOCH ARD collection is historically significant for representing aspects of Victoria’s shipping history and its potential to interpret sub-theme 1.5 of Victoria’s Framework of Historical Themes (living with natural processes). The collection is also historically significant for its association with the LOCH ARD, which was one of the worst and best known shipwrecks in Victoria’s history. Ceramic teapot spout from the wreck of the Loch Ard. Brown in colour. Length 5¼". Artefact Reg No LA/79.flagstaff hill, warrnambool, shipwrecked coast, flagstaff hill maritime museum, maritime museum, shipwreck coast, flagstaff hill maritime village, great ocean road, loch line, loch ard, captain gibbs, eva carmichael, tom pearce, glenample station, mutton bird island, loch ard gorge, ceramic teapot, teapot -
 Flagstaff Hill Maritime Museum and Village
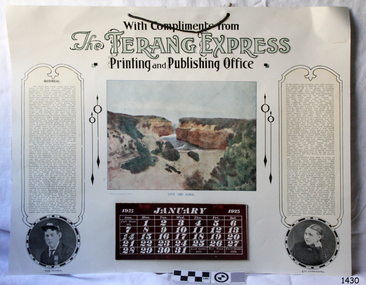
Calendar, T.S. McInnes, August 1923
HISTORY OF THE LOCH ARD The LOCH ARD belonged to the famous Loch Line which sailed many ships from England to Australia. Built in Glasgow by Barclay, Curdle and Co. in 1873, the LOCH ARD was a three-masted square rigged iron sailing ship. The ship measured 262ft 7" (79.87m) in length, 38ft (11.58m) in width, 23ft (7m) in depth and had a gross tonnage of 1693 tons. The LOCH ARD's main mast measured a massive 150ft (45.7m) in height. LOCH ARD made three trips to Australia and one trip to Calcutta before its final voyage. LOCH ARD left England on March 2, 1878, under the command of Captain Gibbs, a newly married, 29 year old. She was bound for Melbourne with a crew of 37, plus 17 passengers and a load of cargo. The general cargo reflected the affluence of Melbourne at the time. On board were straw hats, umbrella, perfumes, clay pipes, pianos, clocks, confectionary, linen and candles, as well as a heavier load of railway irons, cement, lead and copper. There were items included that intended for display in the Melbourne International Exhibition in 1880. The voyage to Port Phillip was long but uneventful. At 3am on June 1, 1878, Captain Gibbs was expecting to see land and the passengers were becoming excited as they prepared to view their new homeland in the early morning. But LOCH ARD was running into a fog which greatly reduced visibility. Captain Gibbs was becoming anxious as there was no sign of land or the Cape Otway lighthouse. At 4am the fog lifted. A man aloft announced that he could see breakers. The sheer cliffs of Victoria's west coast came into view, and Captain Gibbs realised that the ship was much closer to them than expected. He ordered as much sail to be set as time would permit and then attempted to steer the vessel out to sea. On coming head on into the wind, the ship lost momentum, the sails fell limp and LOCH ARD's bow swung back. Gibbs then ordered the anchors to be released in an attempt to hold its position. The anchors sank some 50 fathoms - but did not hold. By this time LOCH ARD was among the breakers and the tall cliffs of Mutton Bird Island rose behind the ship. Just half a mile from the coast, the ship's bow was suddenly pulled around by the anchor. The captain tried to tack out to sea, but the ship struck a reef at the base of Mutton Bird Island, near Port Campbell. Waves broke over the ship and the top deck was loosened from the hull. The masts and rigging came crashing down knocking passengers and crew overboard. When a lifeboat was finally launched, it crashed into the side of LOCH ARD and capsized. Tom Pearce, who had launched the boat, managed to cling to its overturned hull and shelter beneath it. He drifted out to sea and then on the flood tide came into what is now known as LOCH ARD Gorge. He swam to shore, bruised and dazed, and found a cave in which to shelter. Some of the crew stayed below deck to shelter from the falling rigging but drowned when the ship slipped off the reef into deeper water. Eva Carmichael had raced onto deck to find out what was happening only to be confronted by towering cliffs looming above the stricken ship. In all the chaos, Captain Gibbs grabbed Eva and said, "If you are saved Eva, let my dear wife know that I died like a sailor". That was the last Eva Carmichael saw of the captain. She was swept off the ship by a huge wave. Eva saw Tom Pearce on a small rocky beach and yelled to attract his attention. He dived in and swam to the exhausted woman and dragged her to shore. He took her to the cave and broke open case of brandy which had washed up on the beach. He opened a bottle to revive the unconscious woman. A few hours later Tom scaled a cliff in search of help. He followed hoof prints and came by chance upon two men from nearby Glenample Station three and a half miles away. In a state of exhaustion, he told the men of the tragedy. Tom returned to the gorge while the two men rode back to the station to get help. By the time they reached LOCH ARD Gorge, it was cold and dark. The two shipwreck survivors were taken to Glenample Station to recover. Eva stayed at the station for six weeks before returning to Ireland, this time by steamship. In Melbourne, Tom Pearce received a hero's welcome. He was presented with the first gold medal of the Royal Humane Society of Victoria and a £1000 cheque from the Victorian Government. Concerts were performed to honour the young man's bravery and to raise money for those who lost family in the LOCH ARD disaster. Of the 54 crew members and passengers on board, only two survived: the apprentice, Tom Pearce and the young woman passenger, Eva Carmichael, who lost all of her family in the tragedy. Ten days after the LOCH ARD tragedy, salvage rights to the wreck were sold at auction for £2,120. Cargo valued at £3,000 was salvaged and placed on the beach, but most washed back into the sea when another storm developed. The wreck of LOCH ARD still lies at the base of Mutton Bird Island. Much of the cargo has now been salvaged and some was washed up into what is now known as LOCH ARD Gorge. Cargo and artefacts have also been illegally salvaged over many years before protective legislation was introduced. One of the most unlikely pieces of cargo to have survived the shipwreck was a Minton porcelain peacock - one of only nine in the world. The peacock was destined for the Melbourne International Exhibition in 1880. It had been well packed, which gave it adequate protection during the violent storm. Today, the Minton peacock can be seen at the Flagstaff Hill Maritime Museum in Warrnambool. From Australia's most dramatic shipwreck it has now become Australia's most valuable shipwreck artefact and is one of very few 'objects' on the Victorian State Heritage Register. Flagstaff Hill’s collection of artefacts from LOCH ARD is significant for being one of the largest collections of artefacts from this shipwreck in Victoria. It is significant for its association with the shipwreck, which is on the Victorian Heritage Register (VHR S417). The collection is significant because of the relationship between the objects, as together they have a high potential to interpret the story of the LOCH ARD. The LOCH ARD collection is archaeologically significant as the remains of a large international passenger and cargo ship. The LOCH ARD collection is historically significant for representing aspects of Victoria’s shipping history and its potential to interpret sub-theme 1.5 of Victoria’s Framework of Historical Themes (living with natural processes). The collection is also historically significant for its association with the LOCH ARD, which was one of the worst and best known shipwrecks in Victoria’s history. Calendar printed by Terang Express for August 1923 with picture of Loch Ard Gorge and survivors of wreck and also story of the episode. flagstaff hill, warrnambool, shipwrecked coast, flagstaff hill maritime museum, maritime museum, shipwreck coast, flagstaff hill maritime village, great ocean road, loch line, loch ard, captain gibbs, eva carmichael, tom pearce, glenample station, mutton bird island, terang express, calendar, 1923, calendar 1923, printer, newspaper, loch ard gorge -
 Flagstaff Hill Maritime Museum and Village
Print, Loch Ard
HISTORY OF THE LOCH ARD The LOCH ARD belonged to the famous Loch Line which sailed many ships from England to Australia. Built in Glasgow by Barclay, Curdle and Co. in 1873, the LOCH ARD was a three-masted square rigged iron sailing ship. The ship measured 262ft 7" (79.87m) in length, 38ft (11.58m) in width, 23ft (7m) in depth and had a gross tonnage of 1693 tons. The LOCH ARD's main mast measured a massive 150ft (45.7m) in height. LOCH ARD made three trips to Australia and one trip to Calcutta before its final voyage. LOCH ARD left England on March 2, 1878, under the command of Captain Gibbs, a newly married, 29 year old. She was bound for Melbourne with a crew of 37, plus 17 passengers and a load of cargo. The general cargo reflected the affluence of Melbourne at the time. On board were straw hats, umbrella, perfumes, clay pipes, pianos, clocks, confectionary, linen and candles, as well as a heavier load of railway irons, cement, lead and copper. There were items included that intended for display in the Melbourne International Exhibition in 1880. The voyage to Port Phillip was long but uneventful. At 3am on June 1, 1878, Captain Gibbs was expecting to see land and the passengers were becoming excited as they prepared to view their new homeland in the early morning. But LOCH ARD was running into a fog which greatly reduced visibility. Captain Gibbs was becoming anxious as there was no sign of land or the Cape Otway lighthouse. At 4am the fog lifted. A man aloft announced that he could see breakers. The sheer cliffs of Victoria's west coast came into view, and Captain Gibbs realised that the ship was much closer to them than expected. He ordered as much sail to be set as time would permit and then attempted to steer the vessel out to sea. On coming head on into the wind, the ship lost momentum, the sails fell limp and LOCH ARD's bow swung back. Gibbs then ordered the anchors to be released in an attempt to hold its position. The anchors sank some 50 fathoms - but did not hold. By this time LOCH ARD was among the breakers and the tall cliffs of Mutton Bird Island rose behind the ship. Just half a mile from the coast, the ship's bow was suddenly pulled around by the anchor. The captain tried to tack out to sea, but the ship struck a reef at the base of Mutton Bird Island, near Port Campbell. Waves broke over the ship and the top deck was loosened from the hull. The masts and rigging came crashing down knocking passengers and crew overboard. When a lifeboat was finally launched, it crashed into the side of LOCH ARD and capsized. Tom Pearce, who had launched the boat, managed to cling to its overturned hull and shelter beneath it. He drifted out to sea and then on the flood tide came into what is now known as LOCH ARD Gorge. He swam to shore, bruised and dazed, and found a cave in which to shelter. Some of the crew stayed below deck to shelter from the falling rigging but drowned when the ship slipped off the reef into deeper water. Eva Carmichael had raced onto deck to find out what was happening only to be confronted by towering cliffs looming above the stricken ship. In all the chaos, Captain Gibbs grabbed Eva and said, "If you are saved Eva, let my dear wife know that I died like a sailor". That was the last Eva Carmichael saw of the captain. She was swept off the ship by a huge wave. Eva saw Tom Pearce on a small rocky beach and yelled to attract his attention. He dived in and swam to the exhausted woman and dragged her to shore. He took her to the cave and broke open case of brandy which had washed up on the beach. He opened a bottle to revive the unconscious woman. A few hours later Tom scaled a cliff in search of help. He followed hoof prints and came by chance upon two men from nearby Glenample Station three and a half miles away. In a state of exhaustion, he told the men of the tragedy. Tom returned to the gorge while the two men rode back to the station to get help. By the time they reached LOCH ARD Gorge, it was cold and dark. The two shipwreck survivors were taken to Glenample Station to recover. Eva stayed at the station for six weeks before returning to Ireland, this time by steamship. In Melbourne, Tom Pearce received a hero's welcome. He was presented with the first gold medal of the Royal Humane Society of Victoria and a £1000 cheque from the Victorian Government. Concerts were performed to honour the young man's bravery and to raise money for those who lost family in the LOCH ARD disaster. Of the 54 crew members and passengers on board, only two survived: the apprentice, Tom Pearce and the young woman passenger, Eva Carmichael, who lost all of her family in the tragedy. Ten days after the LOCH ARD tragedy, salvage rights to the wreck were sold at auction for £2,120. Cargo valued at £3,000 was salvaged and placed on the beach, but most washed back into the sea when another storm developed. The wreck of LOCH ARD still lies at the base of Mutton Bird Island. Much of the cargo has now been salvaged and some was washed up into what is now known as LOCH ARD Gorge. Cargo and artefacts have also been illegally salvaged over many years before protective legislation was introduced. One of the most unlikely pieces of cargo to have survived the shipwreck was a Minton porcelain peacock - one of only nine in the world. The peacock was destined for the Melbourne International Exhibition in 1880. It had been well packed, which gave it adequate protection during the violent storm. Today, the Minton peacock can be seen at the Flagstaff Hill Maritime Museum in Warrnambool. From Australia's most dramatic shipwreck it has now become Australia's most valuable shipwreck artefact and is one of very few 'objects' on the Victorian State Heritage Register. Flagstaff Hill’s collection of artefacts from LOCH ARD is significant for being one of the largest collections of artefacts from this shipwreck in Victoria. It is significant for its association with the shipwreck, which is on the Victorian Heritage Register (VHR S417). The collection is significant because of the relationship between the objects, as together they have a high potential to interpret the story of the LOCH ARD. The LOCH ARD collection is archaeologically significant as the remains of a large international passenger and cargo ship. The LOCH ARD collection is historically significant for representing aspects of Victoria’s shipping history and its potential to interpret sub-theme 1.5 of Victoria’s Framework of Historical Themes (living with natural processes). The collection is also historically significant for its association with the LOCH ARD, which was one of the worst and best known shipwrecks in Victoria’s history. Reproduction 0620 of 1000 taken from the original painting of the Loch Ard by Neil Savage.flagstaff hill, warrnambool, shipwrecked coast, flagstaff hill maritime museum, maritime museum, shipwreck coast, flagstaff hill maritime village, great ocean road, loch line, loch ard, captain gibbs, eva carmichael, tom pearce, glenample station, mutton bird island, loch ard gorge, photograph, neil savage -
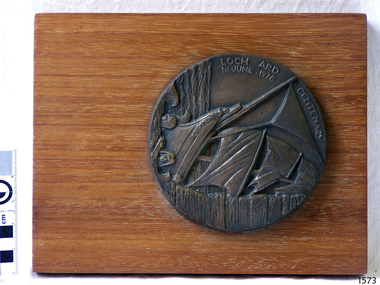 Flagstaff Hill Maritime Museum and Village
Plaque, Loch Ard
HISTORY OF THE LOCH ARD The LOCH ARD belonged to the famous Loch Line which sailed many ships from England to Australia. Built in Glasgow by Barclay, Curdle and Co. in 1873, the LOCH ARD was a three-masted square rigged iron sailing ship. The ship measured 262ft 7" (79.87m) in length, 38ft (11.58m) in width, 23ft (7m) in depth and had a gross tonnage of 1693 tons. The LOCH ARD's main mast measured a massive 150ft (45.7m) in height. LOCH ARD made three trips to Australia and one trip to Calcutta before its final voyage. LOCH ARD left England on March 2, 1878, under the command of Captain Gibbs, a newly married, 29 year old. She was bound for Melbourne with a crew of 37, plus 17 passengers and a load of cargo. The general cargo reflected the affluence of Melbourne at the time. On board were straw hats, umbrella, perfumes, clay pipes, pianos, clocks, confectionary, linen and candles, as well as a heavier load of railway irons, cement, lead and copper. There were items included that intended for display in the Melbourne International Exhibition in 1880. The voyage to Port Phillip was long but uneventful. At 3am on June 1, 1878, Captain Gibbs was expecting to see land and the passengers were becoming excited as they prepared to view their new homeland in the early morning. But LOCH ARD was running into a fog which greatly reduced visibility. Captain Gibbs was becoming anxious as there was no sign of land or the Cape Otway lighthouse. At 4am the fog lifted. A man aloft announced that he could see breakers. The sheer cliffs of Victoria's west coast came into view, and Captain Gibbs realised that the ship was much closer to them than expected. He ordered as much sail to be set as time would permit and then attempted to steer the vessel out to sea. On coming head on into the wind, the ship lost momentum, the sails fell limp and LOCH ARD's bow swung back. Gibbs then ordered the anchors to be released in an attempt to hold its position. The anchors sank some 50 fathoms - but did not hold. By this time LOCH ARD was among the breakers and the tall cliffs of Mutton Bird Island rose behind the ship. Just half a mile from the coast, the ship's bow was suddenly pulled around by the anchor. The captain tried to tack out to sea, but the ship struck a reef at the base of Mutton Bird Island, near Port Campbell. Waves broke over the ship and the top deck was loosened from the hull. The masts and rigging came crashing down knocking passengers and crew overboard. When a lifeboat was finally launched, it crashed into the side of LOCH ARD and capsized. Tom Pearce, who had launched the boat, managed to cling to its overturned hull and shelter beneath it. He drifted out to sea and then on the flood tide came into what is now known as LOCH ARD Gorge. He swam to shore, bruised and dazed, and found a cave in which to shelter. Some of the crew stayed below deck to shelter from the falling rigging but drowned when the ship slipped off the reef into deeper water. Eva Carmichael had raced onto deck to find out what was happening only to be confronted by towering cliffs looming above the stricken ship. In all the chaos, Captain Gibbs grabbed Eva and said, "If you are saved Eva, let my dear wife know that I died like a sailor". That was the last Eva Carmichael saw of the captain. She was swept off the ship by a huge wave. Eva saw Tom Pearce on a small rocky beach and yelled to attract his attention. He dived in and swam to the exhausted woman and dragged her to shore. He took her to the cave and broke open case of brandy which had washed up on the beach. He opened a bottle to revive the unconscious woman. A few hours later Tom scaled a cliff in search of help. He followed hoof prints and came by chance upon two men from nearby Glenample Station three and a half miles away. In a state of exhaustion, he told the men of the tragedy. Tom returned to the gorge while the two men rode back to the station to get help. By the time they reached LOCH ARD Gorge, it was cold and dark. The two shipwreck survivors were taken to Glenample Station to recover. Eva stayed at the station for six weeks before returning to Ireland, this time by steamship. In Melbourne, Tom Pearce received a hero's welcome. He was presented with the first gold medal of the Royal Humane Society of Victoria and a £1000 cheque from the Victorian Government. Concerts were performed to honour the young man's bravery and to raise money for those who lost family in the LOCH ARD disaster. Of the 54 crew members and passengers on board, only two survived: the apprentice, Tom Pearce and the young woman passenger, Eva Carmichael, who lost all of her family in the tragedy. Ten days after the LOCH ARD tragedy, salvage rights to the wreck were sold at auction for £2,120. Cargo valued at £3,000 was salvaged and placed on the beach, but most washed back into the sea when another storm developed. The wreck of LOCH ARD still lies at the base of Mutton Bird Island. Much of the cargo has now been salvaged and some was washed up into what is now known as LOCH ARD Gorge. Cargo and artefacts have also been illegally salvaged over many years before protective legislation was introduced. One of the most unlikely pieces of cargo to have survived the shipwreck was a Minton porcelain peacock - one of only nine in the world. The peacock was destined for the Melbourne International Exhibition in 1880. It had been well packed, which gave it adequate protection during the violent storm. Today, the Minton peacock can be seen at the Flagstaff Hill Maritime Museum in Warrnambool. From Australia's most dramatic shipwreck it has now become Australia's most valuable shipwreck artefact and is one of very few 'objects' on the Victorian State Heritage Register. Flagstaff Hill’s collection of artefacts from LOCH ARD is significant for being one of the largest collections of artefacts from this shipwreck in Victoria. It is significant for its association with the shipwreck, which is on the Victorian Heritage Register (VHR S417). The collection is significant because of the relationship between the objects, as together they have a high potential to interpret the story of the LOCH ARD. The LOCH ARD collection is archaeologically significant as the remains of a large international passenger and cargo ship. The LOCH ARD collection is historically significant for representing aspects of Victoria’s shipping history and its potential to interpret sub-theme 1.5 of Victoria’s Framework of Historical Themes (living with natural processes). The collection is also historically significant for its association with the LOCH ARD, which was one of the worst and best known shipwrecks in Victoria’s history. Plaque to commemorate the centenary of the wreck of the Loch Ard. Circular piece of bronze depicting a scene of the wreck set in a rectangular piece of varnished wood. Plaque is 9/50. Artist Michael Meszarosflagstaff hill, warrnambool, shipwrecked coast, flagstaff hill maritime museum, maritime museum, shipwreck coast, flagstaff hill maritime village, great ocean road, loch line, loch ard, captain gibbs, eva carmichael, tom pearce, glenample station, mutton bird island, loch ard gorge, plaque, loch ard, michael meszaros -
 Old Colonists' Association of Ballarat Inc.
Photograph - Image, The History of Charles Anderson and Charles Anderson Grove, Ballarat
Information relating to Charles Anderson and Charles Anderson Grove, Lake Gardens, Ballarat. The Old Colonists' Association Ballarat Inc. is a not for profit charitable organisation providing accommodation for elderly people. It manages a 27 Home retirement village at Charles Anderson Grove, Ballarat. Accommodation is offered at significantly below market rates. It has been providing low cost accommodation to the elderly since the 1920s. The Association Council overseas the running of this facility on a voluntary basis. HISTORY OF THE BALLARAT OLD COLONISTS' ASSOCIATION HOMES AT CHARLES ANDERSON GROVE, LAKE GARDENS One of the original objectives of the Association was “to provide the shelter of a house for those Pioneers of the Goldfields whom the reverses of fortune have deprived of the means of procuring the comforts of life in their declining years.” While the first home at Charles Anderson Grove was built in 1925 the Association had previously provided relief for needy pioneers from the time it was formed in 1883. Relief included monthly monetary payments, loads of firewood, medical assistance and distribution of Christmas boxes of groceries to deserving pensioners and in some cases payment of burial costs. Records indicate that in September 1922 three of the pensioners being assisted by the Association were accepted as residents in the newly erected Hassell Homes in Gillies Street (now demolished-opposite the High School). The first site for an Asylum for Indigent Members of the Old Colonists' Association was temporarily reserved from sale in October 1891. The site was approximately 28 acres in area in Mt Clear nearly opposite Midvale Shopping Centre in Main Road. The site was heavily timbered and when cleared over 260 tons of wood was sold to the Woah Hawp Gold Mining Company. A set of gates were erected but no homes built, although a plan for this reserve was drawn which showed twenty buildings ranging from one to four unit per building. The reserve was revoked in November 1909. The second site temporarily reserved in November 1909 as an Asylum was in Alfredton and consisted of some 7 acres and was adjacent to land reserved for an Abattoirs for the Ballarat Council. The reserve was revoked in February 1912 as it was deemed more appropriate to be added to the Abattoir site. Council suggested four (4) other sites in exchange for this land and they were inspected by the President, Vice President and Secretary on 22 December 1912. The first site inspected was land on the west side of Creswick Road opposite the brick kilns (now occupied by the showgrounds and oval). The land was described as being good quality, well fenced, no trees, good drainage and ample acreage but some distance from trams. The second site was Perry Park which was described as being good land, well fenced, having frontage to Gillies Street, good drainage and about 26 acres (but subsequently reduced to 10 acres). It was closely planted with Pinus Insignias and Wattle and had easy access from the Botanic Gardens tram. The third site was the North West portion of Victoria Park (corner of Sturt and Gillies Street) and was described as good land, well fenced and drained and well located. The fourth site was the South West corner of Victoria Park and known as Pound Paddock (corner of Winter Street and Gillies Street). It was considered to be low lying and too close to the Abattoir, and was also a considerable distance from trams. While the third site was recommended as the most suitable for the erection of homes it was considered unwise from the point of view as citizens to reduce the acreage of the park and therefore it was recommended that the Perry Park site be asked for as the most acceptable to the Association for the building of homes. The site was eventually temporarily reserved for an Asylum for Indigent Members of the Association in April 1914 with the gates from Mt Clear having been removed to the site a year earlier and eventually erected in 1917 for £12.10.0. In the same year the first 290 pine trees were advertised for removal in July and sold for £16. A sign indicating that the site was reserved for the erection of cottages was erected in September 1917. Stripping of the wattle bark (for tanning) and the cutting of the wood occurred in November 1918 with the land then being leased until it was required for the construction of the first homes in 1924. While the site was the third to be reserved it was the only one which was used for its intended purpose. It was named as Charles Anderson Grove in honour of Charles Anderson who joined the Association in 1918 and was President of the Association from 1942 to 1944. CHARLES HENRY GRATTAN ANDERSON C.H.G. Anderson (Electoral Returning Officer) was elected to membership of the Old Colonists' Association, Ballarat, in October 1918. He was elected to the Association Committee in 1926, and appointed Treasurer of the Association on the resignation of F. Ellis until the end of the financial year in 1933. In 1936 Charles Anderson indicated he would not be available for the President's Chair and that he would retire from the Committee owing to pressure of work. C.H.G. Anderson was welcomed as a new member of the Association in 1938, and served as President of the Old Colonists' Association from 1942-1944. Midway through 1949 Charles Anderson was appointed Members Secretary and Manager of the Ballarat Old Colonists' Club at £5.0.0 per week and 10/- for entertainment, to commence work prior to 01 August 1949. He was to do 30 hours per week and be present on Friday and generally on Saturday nights. In 1957 a minute of sympathy was extended to Club Manager Charles Anderson on the loss of his son. In 1958 a bonus of £20.0.0 was paid to Charles Anderson in recognition of his service in assisting the Secretary/Manager taking over under difficult conditions. In March 1964 the Shire of Ballarat would not permit a private road to be named Anderson Grove as Anderson Street already existed in Ballarat but Charles Anderson Grove was deemed acceptable. A recommendation of the Committee was put to the AGM in 1967 that Charles Anderson be made a Life Member. In 1969 an Association meeting observed a minutes silence in memory of Chas Anderson. Charles Anderson was also a Committee member of Ballarat Mechanics' Institute from February 1940 to February 1970. He was President in 1948. Black and white photographic portrait of Charles Anderson.charles anderson, charles anderson grove, ballarat old colonists' club, old colonists' association, ballarat, ballarat mechanics' institute, hassell homes, woah hawp gold mining company, firewood, retirement village -
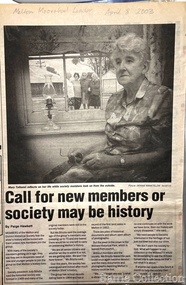 Melton City Libraries
Newspaper, 'Call for new members or society maybe be history, 2003
Mary Tolhurst M&DHS - March 29th Dunvegan Willows Park Melton 1992 Ladies Oral History Day Graham Minns President Ray Radford MC Sound recording transfer to CD 2011 by Tom Wood Edited typescript by Wendy Barrie 2013 I was born in Rockbank, and when I was five years old moved to Toolern Vale and started and finished school there. Toolern Vale only consisted of the Store, Post Office and shop, where you could buy your fodder, and pollard supplies, the Hall, the little Church and the bluestone School. The School changed shape three times from the 1800s[1869] til the time I went there. There was four generations of my family that went there and it was destroyed by fire in 1965. Marjorie nee Myers Butler. Yes, I remember along with it your lovely Ronisch piano. Mary, quite true! Marj what you say about the Ronisch piano. When I came the age to learn music my mum and dad couldn’t really afford it, but still what parents do for their children. They had Marj go along with them and pick this lovely Ronisch piano. It was known round the district. Everyone commented about the loss that lovely piano. After leaving school it was war time, 1939, then it was work, When I was 7 year old I was put out into the cow yard. In 1940 when the soldiers were going away our milk was confiscated it had to go to Bacchus Marsh. It used to go the Sunbury to be brine cooled and then go to Melbourne. Then they took it then to the Lifeguard Milk Factory at Bacchus Marsh. It had to go as condensed milk to the soldiers. This year is 50 years of the Land Army. I was an unofficial Land Army but they still kept check on me. I went onto married life and I followed the cows right through [howls of laughter] and we went on until the 1965 fire. That’s when we got out of the cows. Marjorie asks, was Granny Watts your grandmother or great grandmother? Mary: She was my great grandmother, the midwife of Melton. The 1965 fire started ¾ of a mile above our place, Frank Ryan’s sheds were burnt and his house was saved, then it wiped the School out, the Hall, the Church the Post Office and Store and little house that was Charlie Charlton’s in the early days. Mrs Wilson’s place was saved by the Fire Brigade by pulling boards off the side, and from there it went over the hill and it was stopped at the Rockbank Railway Station. If it had of got over the railway they said it would have gone into Werribee. A lot was burnt out in that strip. Mary nee Nixon Collins: 18 houses burnt that day. Audience question, did Melton get burnt that day? Ray: No. It came down through the Toolern Vale road and cut across about a mile and a half from the cross roads at Toolern Vale from north westerly to the south east and cut through over the Keilor road. Mary: It came in across the creek at Funstons in Toolern, then through Jim Minns. Dorothy was it your place then [nee Knox Beaty] to Ken Beatty’s and from there it went through to Doug McIntosh’s and to Cockbills and the wind changed and it came across to the railway line, and that is where they stopped it. [the cause of the fire was controversial, they had been burning off the night before and there was some talk of someone starting it. It was very hot and very strong wind, it was a terrible day] Ray: When the fire went through McIntosh’s they had a haystack on the north side of their house and the haystack got caught and the fire burnt a hole through the side of the house and the boys pyjamas on the bed. The house was saved. It came through like and express train roaring at you, I was at McIntosh’s when it went roaring past. You couldn’t see, dust and ash and tremendous heat. The fire started about 12 o’clock Jack [husband] said to me, fire, I said where, where? Just up the road, what have I got to do? and he went out and he had gone to the fire and left me. I tried to get the animals and I put out buckets of water, putting the buckets of water out saved my life. Chas Jones and another friend of his came in and they picked up the buckets of water, I thought I had better get out because the fire was on the haystack up the paddock and when I went to go out through the north side of the house and couldn’t get out, I’ll go through the front gate so I went around the other side of the house. I got caught there and Chassy Jones and his friend came round carrying the bucket of water and I panicked. He threw the bucket of water over me. Well that is what saved my life because I was damp, whenever we tried to leave the ball of fire came over me and over my shoulder and my hair was scorched. Chassy Jones lost his truck and Keith Watt his big truck because he had the water tank on it and they couldn’t get out of the yard. Granny Watt’s house, the first private hospital had condemned and Jack and I pulled it down and had it moved up to Toolern and had it in the yard a fortnight and it was all burnt and we didn’t get the shed we wanted. Every 13 years right up until Ash Wednesday fires, there has always been fire close at hand. The 1952 fire went down the back of the house, the 1965 fire took the house, and the house that I live in now, it is the third house that has been on that spot. When the Hunters owned it, Mrs Hunter was nearly burnt in her bed. They had a 13 roomed house. In 1924 the house burnt down, and there was another house was built there and that was the one that burnt down. Edna: So Mary built a brick veneer house. Marjorie: like the three little pigs [laughter] Mary Tolhurst member of the Melton & District Historical Society in the Melton and Moorabool Leader local identities, local special interest groups -
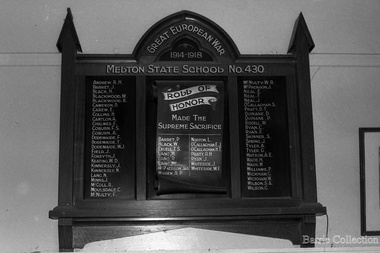 Melton City Libraries
Photograph, Melton State School 430 honour board, 1970
HONOR BOARD Melton State School No 430 Supreme Sacrifice • BARRET, P Peter Maurice Barrett Number 5051 Rank: Private Unit: Private Date of death 18th August 1918 of wounds age 21 St Sever Cemetery Extension, Rouen, France Started school August 1904 5 years 10 months Previous school St Michaels Nth Melb Son of Maurice Barrett labourer Melton Brother of John Barrett • BLACK, William William M • EXELL, T S Number 2758 Rank: Trooper 3rd Battalion Imperial Camel Corps Date of death 30th November 1917 of wounds aged 20 years Cairo War Memorial Cemetery Egypt Started school September 1907 aged 10 Previous school Boisdale 3017 Son of George, farmer Melton Railway Station (Melton South) Year of 1918 • LANG, Horace Thomas Number 903 Rank: Corporal Unit: 24th Battalion Date of death: 5th May 1917. Court if enquiry confirmed Dec 1917. Aged 24 Date of birth 27th April 1893 Spring Hill – Kyneton Commemorated Villers-Bretonneux France Started school November 1997. Father: Thomas Lang Teacher Melton 430 Brother of Thomas Lang died 18th July 1918 buried Cairo • LANG, R William Roy Number 2818 Rank: Driver Unit: 1st Australian Light Horse Machine Gen Squadron Date of death 31st October 1917 of wounds Beersheba War Cemetery Israel Started school October 1899 Aged 9 Previous school Camperdown SS 114 Date of Birth: 24th Jan 1890 Son of William John and Mary Lang of Langlands Jandowae Queensland Nephew of Thomas Lang Melton • LANG, Thomas John Thomas NZ CC M Number 15/118 Rank: Lieutenant Unit: Army Pay Department Date of death 18th July 1918 of disease Cairo War Memorial Cemetery Started school November 1896 aged 16 years - Previous school Coliban 1920 Son of Thomas Lang, teacher Melton No 430 • McPHERSON Jas Mrs M: James Sept 1897 Previous Graham St Port Melb Son of Alexander farmer Melton • MISSEN, A P Frederick M Started school August 1899 age 7 years Son of Frederick, fruiterer Melton His sister Adelaide May 11years Previous Ascot Vale 2608 • NORTON, Lewis Thomas CC M Number 1809 Rank: Private Unit: 29th Battalion (Infantry) Date of death 30th September 1918 Cemetery Bellicourt British Cemetery, France Started school March 1901 age 9 years Previous school Galaquil Son of Thomas Norton of Parwan • O’CALLAGHAN, EJ Edward Edward M • O’CALLAGHAN, HT Thomas .. M Number 3859 Rank: Private Unit: 57th Battalion (Infanrty) Date of death 26th September 1917 Bedford House Cemetery, Belgium Started school 11th March 1901 Aged 10 years Father: John O’Callaghan farmer of Melton • PRATT, R H Robert Henry Number: 2203 Rank: Private Unit: 46th Battalion (Infantry) Date of death, 12th April 1917 Favreuil British Cemetery, France Started school in May 1903 aged 6 years Father: Matthew Pratt, Labourer Melton • RYAN J James or John David: RYAN J ? Started August 1896 Previous Christian Brother St Kilda John 11-5 or James 9-11 Charles 6-11 returned from WW1 Frank 8-5 returned Father Daniel Publican • WHITESIDE, John Edward M Number 2182 Rank: Trooper Unit 13th Light Horse Date of death 4th September 1918 of illness aged 29 years Alexandria (Hadra) War Memorial Cemetery, Egypt Started school July 1897 age 8 Son of Edward Whiteside Labourer Melton Brother of Edward. • WHITESIDE, W F Number: 3995 Rank: Private Unit: 22nd Battlion Date of death, 28th July 1916, died of wounds aged 21 years Puchevillers British Cemetery, France Started school in 1901 Year of birth circa 1895 Brother Edward died 4th September 1918 Father: Edward Whiteside. Labourer Year of 1917 • ANDREW. R H • BARRETT, J John Maurice • BLACK, Harold David • BLACKWOOD, Maxwell James A • BLACKWOOD, Roy .. • CAMERON David or (Donald) William M • CAREW, Edward Edward M • COLLINS, H John Henry H Thomas CC M • CANTLON, A Alfred CC • CHALMER, Frank Ernest CC M • COBURN, A Frederick CC M • COBURN, FS CC M • DODEMAIDE, Frank William • DODEMAIDE, Thomas .. • DODEMAIDE, W J William John M • FIELD, J • FORSYTH J • KEATING, WD William Edward M • KINNERSLY James Edward CC • KINNERSLY Norman Chas Edward CC • LANG Norman William • MINNS, J CC M • McCOLL R Alex R J. McColl • MOULSDALE Charles William M • McNULTY, Frederick James CC • McNULTY, W R CC • McPHERSON J which one? • NEAL, Elvine J Neal M • NEAL, Frank John M • NEAL, John William John M (husband of Isabella) • O’CALLAGHAN, Stephen Edward M • PRATT, David T Matthew CC M • QUINANE, David Peter • QUINANE, Peter .. • RIDDELL, William M • RYAN, Charles Daniel • RYAN Frank .. • SKINNER, Stanley John S’John CC M • SPRING, James George • TYLER, A • TYLER, George George • WATSON, Albert Ernest Alexander M • WADE, Howard James • WADE, Walter .. might be connected with CC • WILLIAMS, Percy Mr Williams • WICKHAM, George George M • WICKHAM, W M • WILSON, Stanley [ Alfred and Maude] M • WILSON, Gordon .. M SUPREME SACRIFICE Roll of Honor Melton State School No 430 Years of 1916,1917 and 1918 -
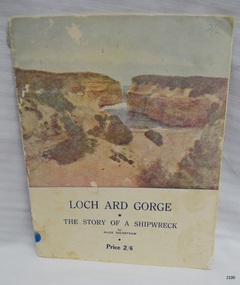 Flagstaff Hill Maritime Museum and Village
Book - Reference - history, Terang Express, Loch Ard Gorge, 1954
HISTORY OF THE LOCH ARD The LOCH ARD belonged to the famous Loch Line which sailed many ships from England to Australia. Built in Glasgow by Barclay, Curdle and Co. in 1873, the LOCH ARD was a three-masted square rigged iron sailing ship. The ship measured 262ft 7" (79.87m) in length, 38ft (11.58m) in width, 23ft (7m) in depth and had a gross tonnage of 1693 tons. The LOCH ARD's main mast measured a massive 150ft (45.7m) in height. LOCH ARD made three trips to Australia and one trip to Calcutta before its final voyage. LOCH ARD left England on March 2, 1878, under the command of Captain Gibbs, a newly married, 29 year old. She was bound for Melbourne with a crew of 37, plus 17 passengers and a load of cargo. The general cargo reflected the affluence of Melbourne at the time. On board were straw hats, umbrella, perfumes, clay pipes, pianos, clocks, confectionary, linen and candles, as well as a heavier load of railway irons, cement, lead and copper. There were items included that intended for display in the Melbourne International Exhibition in 1880. The voyage to Port Phillip was long but uneventful. At 3am on June 1, 1878, Captain Gibbs was expecting to see land and the passengers were becoming excited as they prepared to view their new homeland in the early morning. But LOCH ARD was running into a fog which greatly reduced visibility. Captain Gibbs was becoming anxious as there was no sign of land or the Cape Otway lighthouse. At 4am the fog lifted. A man aloft announced that he could see breakers. The sheer cliffs of Victoria's west coast came into view, and Captain Gibbs realised that the ship was much closer to them than expected. He ordered as much sail to be set as time would permit and then attempted to steer the vessel out to sea. On coming head on into the wind, the ship lost momentum, the sails fell limp and LOCH ARD's bow swung back. Gibbs then ordered the anchors to be released in an attempt to hold its position. The anchors sank some 50 fathoms - but did not hold. By this time LOCH ARD was among the breakers and the tall cliffs of Mutton Bird Island rose behind the ship. Just half a mile from the coast, the ship's bow was suddenly pulled around by the anchor. The captain tried to tack out to sea, but the ship struck a reef at the base of Mutton Bird Island, near Port Campbell. Waves broke over the ship and the top deck was loosened from the hull. The masts and rigging came crashing down knocking passengers and crew overboard. When a lifeboat was finally launched, it crashed into the side of LOCH ARD and capsized. Tom Pearce, who had launched the boat, managed to cling to its overturned hull and shelter beneath it. He drifted out to sea and then on the flood tide came into what is now known as LOCH ARD Gorge. He swam to shore, bruised and dazed, and found a cave in which to shelter. Some of the crew stayed below deck to shelter from the falling rigging but drowned when the ship slipped off the reef into deeper water. Eva Carmichael had raced onto deck to find out what was happening only to be confronted by towering cliffs looming above the stricken ship. In all the chaos, Captain Gibbs grabbed Eva and said, "If you are saved Eva, let my dear wife know that I died like a sailor". That was the last Eva Carmichael saw of the captain. She was swept off the ship by a huge wave. Eva saw Tom Pearce on a small rocky beach and yelled to attract his attention. He dived in and swam to the exhausted woman and dragged her to shore. He took her to the cave and broke open case of brandy which had washed up on the beach. He opened a bottle to revive the unconscious woman. A few hours later Tom scaled a cliff in search of help. He followed hoof prints and came by chance upon two men from nearby Glenample Station three and a half miles away. In a state of exhaustion, he told the men of the tragedy. Tom returned to the gorge while the two men rode back to the station to get help. By the time they reached LOCH ARD Gorge, it was cold and dark. The two shipwreck survivors were taken to Glenample Station to recover. Eva stayed at the station for six weeks before returning to Ireland, this time by steamship. In Melbourne, Tom Pearce received a hero's welcome. He was presented with the first gold medal of the Royal Humane Society of Victoria and a £1000 cheque from the Victorian Government. Concerts were performed to honour the young man's bravery and to raise money for those who lost family in the LOCH ARD disaster. Of the 54 crew members and passengers on board, only two survived: the apprentice, Tom Pearce and the young woman passenger, Eva Carmichael, who lost all of her family in the tragedy. Ten days after the LOCH ARD tragedy, salvage rights to the wreck were sold at auction for £2,120. Cargo valued at £3,000 was salvaged and placed on the beach, but most washed back into the sea when another storm developed. The wreck of LOCH ARD still lies at the base of Mutton Bird Island. Much of the cargo has now been salvaged and some was washed up into what is now known as LOCH ARD Gorge. Cargo and artefacts have also been illegally salvaged over many years before protective legislation was introduced. One of the most unlikely pieces of cargo to have survived the shipwreck was a Minton porcelain peacock - one of only nine in the world. The peacock was destined for the Melbourne International Exhibition in 1880. It had been well packed, which gave it adequate protection during the violent storm. Today, the Minton peacock can be seen at the Flagstaff Hill Maritime Museum in Warrnambool. From Australia's most dramatic shipwreck it has now become Australia's most valuable shipwreck artefact and is one of very few 'objects' on the Victorian State Heritage Register. Flagstaff Hill’s collection of artefacts from LOCH ARD is significant for being one of the largest collections of artefacts from this shipwreck in Victoria. It is significant for its association with the shipwreck, which is on the Victorian Heritage Register (VHR S417). The collection is significant because of the relationship between the objects, as together they have a high potential to interpret the story of the LOCH ARD. The LOCH ARD collection is archaeologically significant as the remains of a large international passenger and cargo ship. The LOCH ARD collection is historically significant for representing aspects of Victoria’s shipping history and its potential to interpret sub-theme 1.5 of Victoria’s Framework of Historical Themes (living with natural processes). The collection is also historically significant for its association with the LOCH ARD, which was one of the worst and best known shipwrecks in Victoria’s history. Book, Loch Ard Gorge: The Story of a Shipwreck by Alice Goldstraw. First published 1948, Third printing November 1954. Inscription inside front cover in blue pen, signed by the author. Soft covered book containing the story of the wreck of the Loch Ard, written in poetry. Each page has a decorative border. One page has photographs, black and white, of people and the Loch Ard Gorge cavesInside front cover, script in blue ink "To Mrs Slade, with kind regards, from Alice Goldstraw"flagstaff hill, warrnambool, shipwrecked coast, flagstaff hill maritime museum, maritime museum, shipwreck coast, flagstaff hill maritime village, great ocean road, loch line, loch ard, captain gibbs, eva carmichael, tom pearce, glenample station, mutton bird island, loch ard gorge, the story of a shipwreck, book, alice goldstraw, terang express press, loch ard gorge whipwreck, ship loch ard -
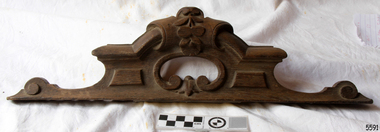 Flagstaff Hill Maritime Museum and Village
Furniture - Decorative Mount, ca. 1873
This hand carved wooden pediment may have originated from a mirror, cabinet, desk or similar piece of furniture. The LOCH ARD: - The Loch Ard got its name from ”Loch Ard” a loch which lies to the west of Aberfoyle, and the east of Loch Lomond. It means "high lake" in Scottish Gaelic. The vessel belonged to the famous Loch Line which sailed many vessels from England to Australia. The Loch Ard was built in Glasgow by Barclay, Curdle and Co. in 1873, the vessel was a three-masted square-rigged iron sailing ship that measured 79.87 meters in length, 11.58 m in width, and 7 m in depth with a gross tonnage of 1693 tons with a mainmast that measured a massive 45.7 m in height. Loch Ard made three trips to Australia and one trip to Calcutta before its fateful voyage. Loch Ard left England on March 2, 1878, under the command of 29-year-old Captain Gibbs, who was newly married. The ship was bound for Melbourne with a crew of 37, plus 17 passengers. The general cargo reflected the affluence of Melbourne at the time. Onboard were straw hats, umbrella, perfumes, clay pipes, pianos, clocks, confectionery, linen and candles, as well as a heavier load of railway irons, cement, lead and copper. There were other items included that were intended for display in the Melbourne International Exhibition of 1880. The voyage to Port Phillip was long but uneventful. Then at 3 am on June 1, 1878, Captain Gibbs was expecting to see land. But the Loch Ard was running into a fog which greatly reduced visibility. Captain Gibbs was becoming anxious as there was no sign of land or the Cape Otway lighthouse. At 4 am the fog lifted and a lookout aloft announced that he could see breakers. The sheer cliffs of Victoria's west coast came into view, and Captain Gibbs realised that the ship was much closer to them than expected. He ordered as much sail to be set as time would permit and then attempted to steer the vessel out to sea. On coming head-on into the wind, the ship lost momentum, the sails fell limp and Loch Ard's bow swung back towards land. Gibbs then ordered the anchors to be released in an attempt to hold its position. The anchors sank some 50 fathoms - but did not hold. By this time the ship was among the breakers and the tall cliffs of Mutton Bird Island rose behind. Just half a mile from the coast, the ship's bow was suddenly pulled around by the anchor. The captain tried to tack out to sea, but the ship struck a reef at the base of Mutton Bird Island, near Port Campbell. Waves subsequently broke over the ship and the top deck became loosened from the hull. The masts and rigging came crashing down knocking passengers and crew overboard. When a lifeboat was finally launched, it crashed into the side of Loch Ard and capsized. Tom Pearce, who had launched the boat, managed to cling to its overturned hull and shelter beneath it. He drifted out to sea and then on the flood tide came into what is now known as Loch Ard Gorge. He swam to shore, bruised and dazed, and found a cave in which to shelter. Some of the crew stayed below deck to shelter from the falling rigging but drowned when the ship slipped off the reef into deeper water. Eva Carmichael a passenger had raced onto the deck to find out what was happening only to be confronted by towering cliffs looming above the stricken ship. In all the chaos, Captain Gibbs grabbed Eva and said, "If you are saved Eva, let my dear wife know that I died like a sailor". That was the last Eva Carmichael saw of the captain. She was swept off the ship by a huge wave. Eva saw Tom Pearce on a small rocky beach and yelled to attract his attention. He dived in and swam to the exhausted woman and dragged her to shore. He took her to the cave and broke the open case of brandy which had washed up on the beach. He opened a bottle to revive the unconscious woman. A few hours later Tom scaled a cliff in search of help. He followed hoof prints and came by chance upon two men from nearby Glenample Station three and a half miles away. In a complete state of exhaustion, he told the men of the tragedy. Tom then returned to the gorge while the two men rode back to the station to get help. By the time they reached Loch Ard Gorge, it was cold and dark. The two shipwreck survivors were taken to Glenample Station to recover. Eva stayed at the station for six weeks before returning to Ireland by steamship. In Melbourne, Tom Pearce received a hero's welcome. He was presented with the first gold medal of the Royal Humane Society of Victoria and a £1000 cheque from the Victorian Government. Concerts were performed to honour the young man's bravery and to raise money for those who lost family in the disaster. Of the 54 crew members and passengers on board, only two survived: the apprentice, Tom Pearce and the young woman passenger, Eva Carmichael, who lost her family in the tragedy. Ten days after the Loch Ard tragedy, salvage rights to the wreck were sold at auction for £2,120. Cargo valued at £3,000 was salvaged and placed on the beach, but most washed back into the sea when another storm developed. The wreck of Loch Ard still lies at the base of Mutton Bird Island. Much of the cargo has now been salvaged and some items were washed up into Loch Ard Gorge. Cargo and artefacts have also been illegally salvaged over many years before protective legislation was introduced in March 1982. One of the most unlikely pieces of cargo to have survived the shipwreck was a Minton majolica peacock- one of only nine in the world. The peacock was destined for the Melbourne 1880 International Exhibition in. It had been well packed, which gave it adequate protection during the violent storm. Today the Minton peacock can be seen at the Flagstaff Hill Maritime Museum in Warrnambool. From Australia's most dramatic shipwreck, it has now become Australia's most valuable shipwreck artifact and is one of very few 'objects' on the Victorian State Heritage Register. Ref: LA 6 64 264 The shipwreck of the Loch Ard is of significance for Victoria and is registered on the Victorian Heritage Register ( S 417). Flagstaff Hill has a varied collection of artefacts from Loch Ard and its collection is significant for being one of the largest accumulation of artefacts from this notable Victorian shipwreck. The collections object is to also give us a snapshot into history so we can interpret the story of this tragic event. The collection is also archaeologically significant as it represents aspects of Victoria's shipping history that allows us to interpret Victoria's social and historical themes of the time. The collections historically significance is that it is associated unfortunately with the worst and best-known shipwreck in Victoria's history. Carved wooden furniture pediment or mount, recovered from the wreck of the Loch Ard. Inscribed plaque on underside. Handwriting on round sticker on edge.Plaque inscription "From Loch Ard wreck Port Campbell 1878 given by Haworth Bros to James Martin Snr Scarsdale" Diagonally on round sticker in pen "R 222A" flagstaff hill, warrnambool, shipwrecked coast, flagstaff hill maritime museum, maritime museum, shipwreck coast, flagstaff hill maritime village, great ocean road, loch line, loch ard, captain gibbs, eva carmichael, tom pearce, glenample station, mutton bird island, loch ard gorge, carved headpiece, furniture, haworth bros, james martin snr, scarsdale, pediment, decorative mount -
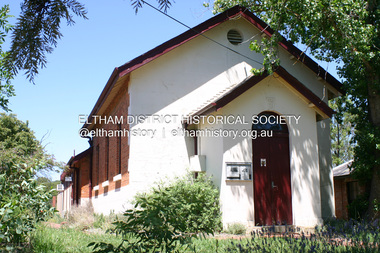 Eltham District Historical Society Inc
Photograph - Digital Photograph, Alan King, Eltham Court House, 730 Main Road, Eltham, 28 December 2007
The Eltham Court House is Eltham's oldest public building. It was classified by the National Trust in 1977. In 1857 five Eltham residents petitioned the licensing magistrates of the Heidelberg district asking for better police protection, including from itinerant gold prospectors who turned to crime when their quest was unsuccessful. In response the Eltham Courthouse was constructed in 1860. Over the years it has also been used for other activities, including for electoral polling purposes, inquests, early meetings of the Eltham Roads Board and even as an overflow classroom. This type of localised solution is characteristic of the self-reliance preserved in Eltham today. The court house is an important symbol of the spirit which makes Eltham distinctive as a community. The Eltham Courthouse is historically significant because its construction was intended to emphasise the centralised control over law and order in the Colony of Victoria in the wake of the 1852 Snodgrass committee report on the Victorian police force and the resulting Police Regulation Act (1853). The nature of the Court House planning and use of architectural devices make the building's function easily interpreted. The arrangement of rooms, with public entry and clerical rooms to the rear, and the use of raised floor levels throughout these spaces to signify relative rank is easily perceived. The distinction in entries, public, magistrate and person-in-custody, and the existing court furniture enhances appreciation of this building. The Eltham Court House is one of only two intact examples in the state of this simple design with projecting entry. The building is of architectural significance because it retains intact early features. These include use of handmade bricks, simple decoration, roof trusses, timber ceiling boards, original windows, doors and associated hardware and a collection of court furniture. Additions to the court house have been done in a manner which did not interfere with the fabric of the original building. Typical cases heard before the Court of Petty Sessions included financial debt, straying livestock, theft, assault, drunkenness, public disorder, truancy, motor vehicle offences, unregistered animals and failing to have children attend school, or be vaccinated. The courthouse operated for over 120 years before it closed in 1985. In April 2021, Nillumbik Shire Council authorised restoration of the building and furnishings. The extensive works required for the total restoration of this highly valued heritage building was undertaken by Ducon Building Solutions and other specialist contractors. Covered under Heritage Overlay, Nillumbik Planning Scheme. Victorian Heritage National Trust of Australia (Victoria) State significance Published: Nillumbik Now and Then / Marguerite Marshall 2008; photographs Alan King with Marguerite Marshall.; p65 A demand for better police protection resulted in the building of the Eltham Courthouse and the police residence beside it. In 1857 five Eltham residents petitioned the Heidelberg district licensing magistrates. They pointed out that Eltham had two hotels, a population of about 1000, and many strangers employed on the public roads. Yet the nearest police were at Heidelberg eight miles (12.8km) away, or at the Caledonia Diggings 21 miles (33.7km) away.1 Subsequently the courthouse and then the police residence, near the corner of Main Road and Brougham Street, were built in 1859/60. The courthouse is Eltham’s oldest public building and the National Trust classified it in 1977. It ceased operation in 1984 and has since been used by local groups. There are only six other known examples of similar small brick country courthouses in Victoria . For £536, a Mr Duncan built the courthouse – a neat, narrow, oblong building with handmade orange bricks. Its gabled roof and porch are covered with brown slate tiles and it has 12-paned windows. Inside, the roof is peaked and the courthouse is still ventilated by oblong slits near the ceiling. Most of the fine carved timber and upholstered furniture is original. The original prisoners’ door, now permanently closed, led from the police station to the dock. Builders, Langridge Wright and Witney built a timber police station (since demolished) and a brick residence to its north,2 for £1150/7/-. Built around the same time were the lock-up behind the residence, also later demolished, and the two-storey orange brick stables. The former police residence also has a brown slate roof and handmade bricks. The front veranda roof is made of corrugated iron, as is the roof of the back weatherboard extension. The application for police protection was approved within a few months and police operated from a cottage rented at ten shillings a week and owned by William Jarrold. This was probably the one at the corner of Main Road and Dalton Street called Jarrold or White Cloud Cottage. In 1858 a second constable was appointed to Eltham following a fight at the hotel. The timber police office a replica of which was built in the early 1990s is at the building’s side. The lock-up was demolished following the relocation of the police to a new station in about 1952. The residence has been used as the Eltham District Historical Society centre since 1997. Records show court cases were held at Eltham before the courthouse was built, but the location is unknown. Some court cases were not very different from those today. In 1891 a man was charged with being drunk while in charge of a horse and was fined ten shillings. The courthouse was used for other purposes during its long history. It was probably used as a polling place as indicated by old photographs of election-day crowds outside. The Eltham Road Board met there from the early 1860s until 1868 when the Board transferred to Kangaroo Ground. During the same period the Road Board Secretary used the courthouse as an office until 1867 when it was transferred to his home at Wingrove Cottage. The courthouse was also used as an overflow classroom for the Dalton Street school in 1875. The two buildings can further link us with Eltham’s early days through Police Department correspondence. The first constable-in-charge was George Reid. In 1860 a letter to The Argus newspaper signed ‘A Sufferer’ declared the Eltham police were not active enough in their duties. The writer suggested that the ‘very snug’ police quarters were too comfortable, and he detailed various incidents including one of an alleged break-in to the Road Board Secretary’s home. But the Board Secretary, C S Wingrove, wrote to the Police Department refuting The Argus letter saying he had received full co-operation from Sen. Constable Peter Lawler.This collection of almost 130 photos about places and people within the Shire of Nillumbik, an urban and rural municipality in Melbourne's north, contributes to an understanding of the history of the Shire. Published in 2008 immediately prior to the Black Saturday bushfires of February 7, 2009, it documents sites that were impacted, and in some cases destroyed by the fires. It includes photographs taken especially for the publication, creating a unique time capsule representing the Shire in the early 21st century. It remains the most recent comprehenesive publication devoted to the Shire's history connecting local residents to the past. nillumbik now and then (marshall-king) collection, eltham, eltham court house, main road -
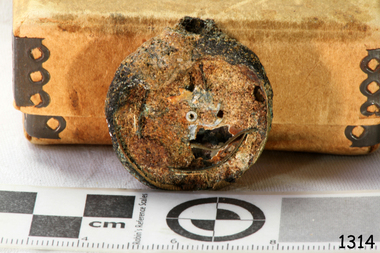 Flagstaff Hill Maritime Museum and Village
Instrument - Watch, ca 1878
HISTORY OF THE LOCH ARD The LOCH ARD belonged to the famous Loch Line which sailed many ships from England to Australia. Built in Glasgow by Barclay, Curdle and Co. in 1873, the LOCH ARD was a three-masted square rigged iron sailing ship. The ship measured 262ft 7" (79.87m) in length, 38ft (11.58m) in width, 23ft (7m) in depth and had a gross tonnage of 1693 tons. The LOCH ARD's main mast measured a massive 150ft (45.7m) in height. LOCH ARD made three trips to Australia and one trip to Calcutta before its final voyage. LOCH ARD left England on March 2, 1878, under the command of Captain Gibbs, a newly married, 29 year old. She was bound for Melbourne with a crew of 37, plus 17 passengers and a load of cargo. The general cargo reflected the affluence of Melbourne at the time. On board were straw hats, umbrella, perfumes, clay pipes, pianos, clocks, confectionary, linen and candles, as well as a heavier load of railway irons, cement, lead and copper. There were items included that intended for display in the Melbourne International Exhibition in 1880. The voyage to Port Phillip was long but uneventful. At 3am on June 1, 1878, Captain Gibbs was expecting to see land and the passengers were becoming excited as they prepared to view their new homeland in the early morning. But LOCH ARD was running into a fog which greatly reduced visibility. Captain Gibbs was becoming anxious as there was no sign of land or the Cape Otway lighthouse. At 4am the fog lifted. A man aloft announced that he could see breakers. The sheer cliffs of Victoria's west coast came into view, and Captain Gibbs realised that the ship was much closer to them than expected. He ordered as much sail to be set as time would permit and then attempted to steer the vessel out to sea. On coming head on into the wind, the ship lost momentum, the sails fell limp and LOCH ARD's bow swung back. Gibbs then ordered the anchors to be released in an attempt to hold its position. The anchors sank some 50 fathoms - but did not hold. By this time LOCH ARD was among the breakers and the tall cliffs of Mutton Bird Island rose behind the ship. Just half a mile from the coast, the ship's bow was suddenly pulled around by the anchor. The captain tried to tack out to sea, but the ship struck a reef at the base of Mutton Bird Island, near Port Campbell. Waves broke over the ship and the top deck was loosened from the hull. The masts and rigging came crashing down knocking passengers and crew overboard. When a lifeboat was finally launched, it crashed into the side of LOCH ARD and capsized. Tom Pearce, who had launched the boat, managed to cling to its overturned hull and shelter beneath it. He drifted out to sea and then on the flood tide came into what is now known as LOCH ARD Gorge. He swam to shore, bruised and dazed, and found a cave in which to shelter. Some of the crew stayed below deck to shelter from the falling rigging but drowned when the ship slipped off the reef into deeper water. Eva Carmichael had raced onto deck to find out what was happening only to be confronted by towering cliffs looming above the stricken ship. In all the chaos, Captain Gibbs grabbed Eva and said, "If you are saved Eva, let my dear wife know that I died like a sailor". That was the last Eva Carmichael saw of the captain. She was swept off the ship by a huge wave. Eva saw Tom Pearce on a small rocky beach and yelled to attract his attention. He dived in and swam to the exhausted woman and dragged her to shore. He took her to the cave and broke open case of brandy which had washed up on the beach. He opened a bottle to revive the unconscious woman. A few hours later Tom scaled a cliff in search of help. He followed hoof prints and came by chance upon two men from nearby Glenample Station three and a half miles away. In a state of exhaustion, he told the men of the tragedy. Tom returned to the gorge while the two men rode back to the station to get help. By the time they reached LOCH ARD Gorge, it was cold and dark. The two shipwreck survivors were taken to Glenample Station to recover. Eva stayed at the station for six weeks before returning to Ireland, this time by steamship. In Melbourne, Tom Pearce received a hero's welcome. He was presented with the first gold medal of the Royal Humane Society of Victoria and a £1000 cheque from the Victorian Government. Concerts were performed to honour the young man's bravery and to raise money for those who lost family in the LOCH ARD disaster. Of the 54 crew members and passengers on board, only two survived: the apprentice, Tom Pearce and the young woman passenger, Eva Carmichael, who lost all of her family in the tragedy. Ten days after the LOCH ARD tragedy, salvage rights to the wreck were sold at auction for £2,120. Cargo valued at £3,000 was salvaged and placed on the beach, but most washed back into the sea when another storm developed. The wreck of LOCH ARD still lies at the base of Mutton Bird Island. Much of the cargo has now been salvaged and some was washed up into what is now known as LOCH ARD Gorge. Cargo and artefacts have also been illegally salvaged over many years before protective legislation was introduced. One of the most unlikely pieces of cargo to have survived the shipwreck was a Minton porcelain peacock - one of only nine in the world. The peacock was destined for the Melbourne International Exhibition in 1880. It had been well packed, which gave it adequate protection during the violent storm. Today, the Minton peacock can be seen at the Flagstaff Hill Maritime Museum in Warrnambool. From Australia's most dramatic shipwreck it has now become Australia's most valuable shipwreck artefact and is one of very few 'objects' on the Victorian State Heritage Register. Flagstaff Hill’s collection of artefacts from LOCH ARD is significant for being one of the largest collections of artefacts from this shipwreck in Victoria. It is significant for its association with the shipwreck, which is on the Victorian Heritage Register (VHR S417). The collection is significant because of the relationship between the objects, as together they have a high potential to interpret the story of the LOCH ARD. The LOCH ARD collection is archaeologically significant as the remains of a large international passenger and cargo ship. The LOCH ARD collection is historically significant for representing aspects of Victoria’s shipping history and its potential to interpret sub-theme 1.5 of Victoria’s Framework of Historical Themes (living with natural processes). The collection is also historically significant for its association with the LOCH ARD, which was one of the worst and best known shipwrecks in Victoria’s history. Ladies fob watch, gold, covered in encrustation (small section has broken off to reveal the engraved surface). Face and hands are missing, revealing the workings. Found in the Loch Ard gorge and said to have been from the Loch Ard.flagstaff hill, warrnambool, shipwrecked coast, flagstaff hill maritime museum, maritime museum, shipwreck coast, flagstaff hill maritime village, great ocean road, loch line, loch ard, captain gibbs, eva carmichael, tom pearce, glenample station, mutton bird island, loch ard gorge, ladies fob watch, gold watch, fob watch, pocket watch, horology, accessory, time keeping, scientific instrument -
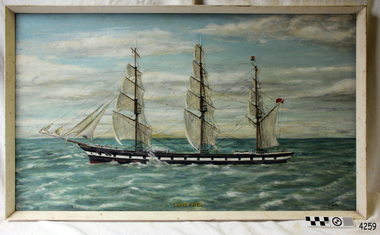 Flagstaff Hill Maritime Museum and Village
Painting - Vessel, Sailing Ship, C Smith, artist, Loch Ard, late 20th century
HISTORY OF THE LOCH ARD The LOCH ARD belonged to the famous Loch Line which sailed many ships from England to Australia. Built in Glasgow by Barclay, Curdle and Co. in 1873, the LOCH ARD was a three-masted square rigged iron sailing ship. The ship measured 262ft 7" (79.87m) in length, 38ft (11.58m) in width, 23ft (7m) in depth and had a gross tonnage of 1693 tons. The LOCH ARD's main mast measured a massive 150ft (45.7m) in height. LOCH ARD made three trips to Australia and one trip to Calcutta before its final voyage. LOCH ARD left England on March 2, 1878, under the command of Captain Gibbs, a newly married, 29 year old. She was bound for Melbourne with a crew of 37, plus 17 passengers and a load of cargo. The general cargo reflected the affluence of Melbourne at the time. On board were straw hats, umbrella, perfumes, clay pipes, pianos, clocks, confectionary, linen and candles, as well as a heavier load of railway irons, cement, lead and copper. There were items included that intended for display in the Melbourne International Exhibition in 1880. The voyage to Port Phillip was long but uneventful. At 3am on June 1, 1878, Captain Gibbs was expecting to see land and the passengers were becoming excited as they prepared to view their new homeland in the early morning. But LOCH ARD was running into a fog which greatly reduced visibility. Captain Gibbs was becoming anxious as there was no sign of land or the Cape Otway lighthouse. At 4am the fog lifted. A man aloft announced that he could see breakers. The sheer cliffs of Victoria's west coast came into view, and Captain Gibbs realised that the ship was much closer to them than expected. He ordered as much sail to be set as time would permit and then attempted to steer the vessel out to sea. On coming head on into the wind, the ship lost momentum, the sails fell limp and LOCH ARD's bow swung back. Gibbs then ordered the anchors to be released in an attempt to hold its position. The anchors sank some 50 fathoms - but did not hold. By this time LOCH ARD was among the breakers and the tall cliffs of Mutton Bird Island rose behind the ship. Just half a mile from the coast, the ship's bow was suddenly pulled around by the anchor. The captain tried to tack out to sea, but the ship struck a reef at the base of Mutton Bird Island, near Port Campbell. Waves broke over the ship and the top deck was loosened from the hull. The masts and rigging came crashing down knocking passengers and crew overboard. When a lifeboat was finally launched, it crashed into the side of LOCH ARD and capsized. Tom Pearce, who had launched the boat, managed to cling to its overturned hull and shelter beneath it. He drifted out to sea and then on the flood tide came into what is now known as LOCH ARD Gorge. He swam to shore, bruised and dazed, and found a cave in which to shelter. Some of the crew stayed below deck to shelter from the falling rigging but drowned when the ship slipped off the reef into deeper water. Eva Carmichael had raced onto deck to find out what was happening only to be confronted by towering cliffs looming above the stricken ship. In all the chaos, Captain Gibbs grabbed Eva and said, "If you are saved Eva, let my dear wife know that I died like a sailor". That was the last Eva Carmichael saw of the captain. She was swept off the ship by a huge wave. Eva saw Tom Pearce on a small rocky beach and yelled to attract his attention. He dived in and swam to the exhausted woman and dragged her to shore. He took her to the cave and broke open case of brandy which had washed up on the beach. He opened a bottle to revive the unconscious woman. A few hours later Tom scaled a cliff in search of help. He followed hoof prints and came by chance upon two men from nearby Glenample Station three and a half miles away. In a state of exhaustion, he told the men of the tragedy. Tom returned to the gorge while the two men rode back to the station to get help. By the time they reached LOCH ARD Gorge, it was cold and dark. The two shipwreck survivors were taken to Glenample Station to recover. Eva stayed at the station for six weeks before returning to Ireland, this time by steamship. In Melbourne, Tom Pearce received a hero's welcome. He was presented with the first gold medal of the Royal Humane Society of Victoria and a £1000 cheque from the Victorian Government. Concerts were performed to honour the young man's bravery and to raise money for those who lost family in the LOCH ARD disaster. Of the 54 crew members and passengers on board, only two survived: the apprentice, Tom Pearce and the young woman passenger, Eva Carmichael, who lost all of her family in the tragedy. Ten days after the LOCH ARD tragedy, salvage rights to the wreck were sold at auction for £2,120. Cargo valued at £3,000 was salvaged and placed on the beach, but most washed back into the sea when another storm developed. The wreck of LOCH ARD still lies at the base of Mutton Bird Island. Much of the cargo has now been salvaged and some was washed up into what is now known as LOCH ARD Gorge. Cargo and artefacts have also been illegally salvaged over many years before protective legislation was introduced. One of the most unlikely pieces of cargo to have survived the shipwreck was a Minton porcelain peacock - one of only nine in the world. The peacock was destined for the Melbourne International Exhibition in 1880. It had been well packed, which gave it adequate protection during the violent storm. Today, the Minton peacock can be seen at the Flagstaff Hill Maritime Museum in Warrnambool. From Australia's most dramatic shipwreck it has now become Australia's most valuable shipwreck artefact and is one of very few 'objects' on the Victorian State Heritage Register. Flagstaff Hill’s collection of artefacts from LOCH ARD is significant for being one of the largest collections of artefacts from this shipwreck in Victoria. It is significant for its association with the shipwreck, which is on the Victorian Heritage Register (VHR S417). The collection is significant because of the relationship between the objects, as together they have a high potential to interpret the story of the LOCH ARD. The LOCH ARD collection is archaeologically significant as the remains of a large international passenger and cargo ship. The LOCH ARD collection is historically significant for representing aspects of Victoria’s shipping history and its potential to interpret sub-theme 1.5 of Victoria’s Framework of Historical Themes (living with natural processes). The collection is also historically significant for its association with the LOCH ARD, which was one of the worst and best known shipwrecks in Victoria’s history. Painting of 1873 sailing ship the "Loch Ard". Oil painting on board behind glass, framed in white painted timber. Artist is C Smith. Inscription on back. "Loch Ard launched 1873, sunk near Pt Campbell, with loss of 52 lives 1878" "C. Smith" "Loch Ard" flagstaff hill, warrnambool, shipwrecked coast, flagstaff hill maritime museum, maritime museum, shipwreck coast, flagstaff hill maritime village, great ocean road, loch line, loch ard, captain gibbs, eva carmichael, tom pearce, loch ard gorge, maritime oil painting, c. smith, sailing vessel -
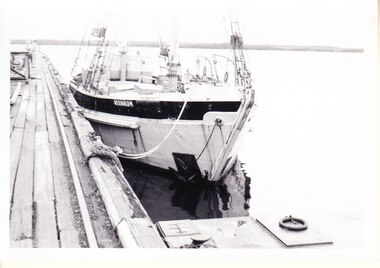 Flagstaff Hill Maritime Museum and Village
Photograph - Vessels, Sail and Steam Ships, c. 1972-1975
Andy Clapham owned and operated a boat yard on the Maribyrnong River in Footscray, Victoria. The river runs into Port Phillip Bay (sometimes known as Hobson’s bay) at Williamstown, an area with a history of trades associated with the shipping and construction industry. Andy Clapham’s photographs include those of the Reginald M and one of Polly Woodside, another vessel restored and used as a maritime exhibition. Andy Clapham’s letter of 1972 was posted in a and envelope with an early Australian decimal currency stamp showing the profile portrait of Queen Elizabeth II, and valued at 7 cent. Andy offered invaluable advice to the Flagstaff Hill Historic Park Planning Board regarding the purchase a vessel suitable for use as an exhibit once Flagstaff Hill was opened. The Planning Board was set up by the Warrnambool Chamber of Commerce and approved by the City Council and State Government. Flagstaff Hill was investigating vessels in Adelaide and Tasmania as well as Melbourne. Andy looked at several vessels in 1972-1973. He also serviced the Reginald M among other vessels belonging to Captain Julian Dyson of Yarra Ferries, who had casually offered the vessel to Flagstaff Hill as a price that was unattainable at the time. Flagstaff Hill later requested photographs of the hull to discern the dimensions and also the condition of the timbers as well as wanting advice on its seafaring capability. In 1972 the Flagstaff Hill Historic Park Planning Board – Chairman J. (John) S. Lindsay (1972-1980), Secretary J. (James) Mark – wrote a letter of appreciation to Mr A. (Andy) Clapham of 3 Charles Street Footscray ... “Dear Mr. Clapham, The Board has asked me to write to you to express our appreciation for the assistance you have offered us through our Chairman John Lindsay. The information you have already given us has been invaluable, in that is shows us that we have not been setting out to do something that is impossible. We look forward to receiving further information from you as it becomes available and we appreciate that you must be busy enough without our problems. Members of our Board hope to call and see you on a trip to Melbourne in the near future. The Board is optimistic about the future of Flagstaff Hill as a Maritime Museum and look forward to you visiting Warrnambool to examine what we believe will be an ideal site. Yours faithfully, James Mark.” ABOUT the vessel “Reginald M” The vessel “Reginald M” was a two-masted, timber coastal vessel built by John Henry Murch in Birkenhead, Port of Adelaide, South Australia. It was named after Reginald Murch. (It was occasionally referred to as the Reginald “Emm”). Its construction took approximately 6 months using many materials and fittings from salvage yards. It is believed that the keep was hewn from two telegraph poles! Reginald M was launched at Largs Bay in 1922. Reginald M was approximately 30 metres long and was fore-to-aft ketch rigged with an ‘auxiliary’ motor to support any loss of sail power. The Reginald M was built to service the coastal ports of South Australia to Port Victoria on the York Peninsular, Spencer Gulf. It freighted cargo from port to port cheaply and efficiently. It had a very shallow draft and a flat bottom, enabling it to come close to shore and sit high and dry at low tide, or to be beached on the sand. It could easily skim over reefs due to its flat bottom. Wagons could be loaded and unloaded directly from the side of the vessel. Over the years her cargo included guano, barley, wool, horses, cattle, timber, explosives, potatoes, shell grit and gypsum. The Murch brothers from Port Adelaide were owners of the Reginald M and Richard Murch as the Captain. On April 9, 1931, Reginald M weathered a large storm in St. Vincents Gulf, SA, suffering much damage; the mast snapped and the crew laboured for four hours to free it up by severing the mast and rigging. The crew patched it up and slowly returned to Port Adelaide with only a portion of the insured cargo being damaged. The crew members at that time were owner Mr John Henry Murch of Wells Street Largs Bay, Skipper Mr R Murch – John’s brother, Murray – son of Captain Murch and Seaman John Smith. At some stage it seems that the Reginald M was used as a Customs vessel “H.M.C. No. 3, Pt Adelaide” as shown in a photograph in Flagstaff Hill’s collection. In 1969 Reginald M’s last freight trip left Marion Bay, carrying grain, wool and explosives. In late 1970 it was sold to the Mount Lyall Mining and Railway Clompany and used as a barge to carry explosives. In 1972 The Navy League of Strahan, Tasmania, purchased the vessel for use by the Strahan Sea Cadet Unit at Macquarie Harbour; it was renamed “T.S. Macquarie”. (This plan did not come to pass.) In 1974 Mr Andrew Rennie of East Brighton, Melbourne, brought Reginald M for shipping purposes, He sailed it from Strahan to Melbourne, planning to use it for pleasure sailing. The Reginald M was later sold at auction to Captain Julian Dyson, owner of Yarra Passenger Ferries in Melbourne. Later in 1975 funds became available to Flagstaff Hill Maritime Village to purchase the Reginald M. It was then restored and used as an exhibit here for many hears. Flagstaff Hill’s collection also includes various objects related to the Reginald M: - Photographs of Reginald M over the years in various aspects of its use - a life buoy with the inscription of “Pt. Adelaide” - helm section that was removed and replaced during restoration - a bullet found in pieces of timber during the 1979 restoration ABOUT THE POLLY WOODSIDE On the bow in the Polly Woodside's photograph is the word "RONA". the Polly Woodside was built at Belfast in 1885. In 1904 the vessel was sold to A.H. Turnbull of New Zealand and renamed "RONA". The letter and photographs are significant for their association with the Reginald M, an Australian built coastal trader now on the Australian Register of Historic Vessels (number HV000562). The letter and photographs are also significant as part of both the history of Flagstaff Hill and the history of the vessel “Reginald M” that has been on display in the lake for many years. Objects retained from this boat are included in Flagstaff Hill’s collection of maritime history.Packet with photographs and negatives in a KODAK envelope. The photographs are of two sail and steam vessels; twelve (12) black and white photographs of the 'Reginald M', and one (1) colour photograph of the Polly Woodside, plus six (6) negative strips. Included int he packet is a letter in stamped and postmarked envelope addressed to Mr A Clapham of Footscray. The envelope postmarked 9 Dec 1972, with the Warrnambool postcode 3280, A 7c Australian postage stamp in attached to the envelope. They are associated with Flagstaff Hill’s acquisition of the vessel “Reginald M”. Envelope "9 DEC 1972 / 3280" Postage stamp "7c" "Australia" Inscriptions on one Reginald M;; "REGINALD M" and "Pt ADELAIDE H.M.C. No. 3" Inscriptions of the Polly Woodside; "RONA / MSC" "MHI / NO. 1" Ball point ink, reverse of photograph "POLLY WOODSIDE"flagstaff hill, warrnambool, shipwrecked coast, flagstaff hill maritime museum, maritime museum, shipwreck coast, flagstaff hill maritime village, great ocean road, vessel reginald m, reginald emm, t. s. macquarie, h.m.c. no. 3, pt adelaide, australian register of historic vessels (number hv000562), boat building trade, jack murch, john henry murch, birkenhead, port adelaide sa, largs bay sa, coastal trader south australia, 1920 ketch reginald m, marion bay produce, mount lyall mining and railway company, navy league of strahan, tasmania, melbourne ferry company, flagstaff hill historic park planning board, john lindsay, james mark, andy clapham of footscray, andy clapham boat builder, kodak photograph packet envelope, kodak super-size prints, kodak australia pty ltd, australian postage stamp 1972 - 7c -
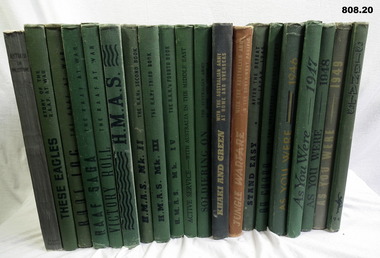 Bendigo Military Museum
Literary work - BOOK SET, Australian War Memorial Set of 20, 1) 1919; .2) & .6) 1942; .3) & .12) 1943; .4), .7), 8), &.16) 1953; .5), .9) & .14) 1945; .10) 1941; .11) & .20) 1954. .13) & .14) 1944;
Set of Books commonly called 'As You Were' from WW1 and WW2. Green cloth. .1) Australia in Palestine (WWI) Book, hard cover, cardboard in centre of cover is silhouette of a Light Horseman & horse. Print is black ink, 153 pages. Illustrated with photos, drawings & maps. .2) These Eagles. Story of the RAAF at War. Book, green hard buckram cover, 200 pages. Front cover has black print with outline drawing of an eagle. Illustrated with photos, drawings. .3) RAAF Log - The RAAF at War. Book, green buckram hard cover. Front has profile of a pilot, black print, 200 pages, illustrated with photos, maps. paintings & drawings. .4) RAAF SAAG - The RAAF at War. Front cover has drawing of 2 Fighter Pilots in black ink, black print. 200 pages, illustrated with photos, drawings & paintings. Book, green buckram hard cover. Front cover has drawing of 2 Fighter pilots, black print, 200 pages, photos, drawings & paintings. .5) Victory Roll - The RAAF at War. Book, green buckram, black print, 200 pages, photos, drawings & charts. .6) HMAS Green buckram hard cloth cover, cloth cover with black text. 200 pages, black & white print, black text on white paper. .7) HMAS Mk II. Book, green buckram hard cover, black & white text on white paper. 200 pages, illustrated colour prints. .8) HMAS Mk III Book , green buckram hard cover, black text on white paper. 200 pages, illustrated colour prints. .9) HMAS Mk IV Book, green buckram hard cover, black text on white paper. Illustrated colour prints. .10) Active Service with Australia in the Middle East. Book, green buckram hard cover, black text on white paper, 129 pages. .11) Soldering on the Australian Army at Home & Overseas. Book, green buckram hard cover, black text on white paper, 200 pages. Rising Sun badge at bottom right hand corner. Illustrated with black & white photos, paintings, maps & drawings. .12) Khaki & Green with the Australian Army at Home & Overseas. Book, green buckram hard cover, black text on white paper, 204 pages. Front cover has a layout of words khaki & green, 2nd tone in light yellow. Illustrated with black & white photos, paintings, & drawings. .13) Jungle Warfare with the Australian Army in the South West Pacific. Book, brown buckram hard cover, light brown ink. Image at bottom of Australian soldier in jungle, 208 pages. Illustrated with photos, paintings, maps & drawings. .14) Stand Easy. After the Defeat of Japan, 1945. Book, light green buckram hard cover, black text on white paper, 208 pages. Image of soldier, both arms outstretched, smiling. Illustrated with photos, maps, paintings, & drawings. .15 On Guard with the Volunteer Defence Corps. Book, green & black buckram hard cover, black text on white paper, 172 pages. Illustrated with colour prints, & black & white photos. .16) As You Were. A Cavalcade of Events with The Australian Services from 1788 to 1946. Book, green buckram hard cover, tan & black text on white paper, 202 pages. Illustrated with black & white photos & colour prints. .17) As You Were. A Cavalcade of Events with The Australian Services from 1788 to 1947. Book, green buckram hard cover, black text on white paper, 202 pages. Illustrated with black & white photos & colour prints. .18) As You Were. A Cavalcade of Events with The Australian Services from 1788 to 1948. Book, green buckram hard cover, black text on white paper, 202 pages. Illustrated with black & white photos & colour prints. .19) As You Were. A Cavalcade of Events with The Australian Services from 1788 to 1949. Book, green buckram hard cover, green text on white paper, red & green diagram, 194 pages. Illustrated with black & white photos & colour prints. .20) Signals. Story of the Australian Corps of Signals. Book, green buckram hard cover, black text on white paper, 196 pages. In the corner of the front cover is the badge with motif of the Australian Corps of Signals. Illustrated with photos & drawings..1) 4214 TPR J E Neilson Year 1919 F E Addlem 1962 .books-military, museums, history -
 Federation University Historical Collection
Magazine - Emagazine, Fedpress Magazine, 2016-2019
Formerly known as Hotch Potch, FedPress is the student publication of Federation University Australia. FedPress is a space for students to showcase their written and visual talents. The editorial team aim to inform, inspire, and entertain. We are looking for a range of different creative individuals — journalists, reviewers, poets, designers, artists, and photographers — to submit content. FedPress Magazine prints four issues a year and is distributed across FedUni's Ballarat, Wimmera and Gippsland campuses. PDFs of the Federation University Magazine 'fedpress'. Hardcopy of the following years: Issue No 3, October 2014 (Rianh Silvertree, Mathew Lambrou, India McGee, Kayla Elizabeth Stone, Amber Dance, Australian University Games,Amphipipolis Tomb) Issue 4, February 2015 (Kayla Elizabeth Stone. Clubs and Societies, Monash University Gippsland Student Union, Federation University Football Club, Student Senate, Student Connect, Kaitlyn Ashmore, Issue 5, April 2015 (Ellen Sabo, Sexual Education, Gippsland Campus, Monash Campus, Sammy Desai, Zach Mullane, Feduni Living Kakoda Trek) Issue 6, 2015 (Southern University Games, Student Senate, Memories of War Project, Survivors of Suicide, Gippsland Campus, Lucinda Horrocks, Exam Information For Students, Tania McMullenNational Student Leadership Workshop, Mining Games, AUSIMM, The History of MMO, FEdUnied Soccer) Issue 7, July 2015 (PASS - Peer Assisted Study Sessions, Mad Swan Productions, Student Senate, Adam Bignold, Rainh Silvertree, Rebecca Fletcher, Pietro Angeli) Issue 9, October 2015 (Student Senate, Jeannie King, Australian Space Agency, S. Hooley, Rebecca Fletcher, Animal Rights, Breanna Alexander, Pietro Angeli, Jody Dontje, Amanda Mill, Frank Gartlan. Joel King) Issue No 10, 2016 (Unibar, Stone Cutters, Australian Hospitality, Jogy Dontje, Jess Kelly, Pietro Angeli, Getting Through Semester One, Online Student understanding, Liana Skewes, Brianna MacDonald, Student Services, Student Senate, S. Hooley, HECS Help, Ashleigh Dyer, Six things that can cost you easy marks, Laura McLachlan, Surviving grief, Theahna CoburnTenneill Pearl, Rochelle Jardine, Zach Mullane, Dakota Richards, Survival Guide, Scarlette Baum) Issue No 11, May 2016 (Rebecca Fletcher, Joshua Paddon, Hooliganism, Catherine Elliott, Fedpress School of Rock, Dakota Richards, Zach Mullane, Scalette Baum, Clubs, Societies, Sport, FedUni Ultimate Frisbie Club, Geolgoy, Dean DiQuinzio, FedUni Geology Society, Sebastian Wolfe) Issue No 12, 2016 (Crows, Joshua Paddon, Sarah McLean, Fandom, Learn Another Language, Laura McLachlan, Planes, Pietro Angel, Cover Co, mpetition, Megan Corder, Jess Kelly, The Secret Life of Post-Grad Students, Cale Hellyer, What I hate about Facebook, Damian Brown, National Student Vounteer Week, Premnath Chakarvarty, Selin Kasif, Brendan Caffrey, Senate Six, Fed United, Awards, Ultimate Frisbee, Ashleigh Dyer, Cassandra Lovett, Rochelle Jardine, Dakota Richards, Freya Fogliani) Issue No 13, 2016 Issue No. 14, February 2017 Issue No. 15, May 2017 (James Charlton, Rebecca Fletcher, Timothy Kirkham, Mohammad Sami Baardarani, Lajan Maharjan, Jennifer Pont, Kate Williams, Damian Brown, Matthew James, Zoe Ormiston, Freya Fogliani, Myles Hema, Jess Powell) Issue No. 17, October 2017 (Jack Barnes, Damian, Syed Zain Ali, Molly Irvine, Rebecca Fletcher) Issue No. 18, February 2018 (Submission Dates, Guidance for the Shell-Shocked Graduates, Pills, Shark, How to be a Writer, Climate Summit) Issue No. 21, October 2018 (Bianca Bedford, Kelsey Knight, Laura Benney, Rainbow Collective, Smartphone, Sarah McLean, Monique Stephens, Clare Hartigan, Liam Carter) Issue No. 22, March (2018) 2019 (Elizabeth McCracken, Troy Anthony Platt, Liam Carter, O.R. Brayne, Dakota Powell, Elizabeth McCracken, Dan Schweinzer, Jordyn Presley, Sarah McLean, Bianca Bedford, Bronwyn Nel, Beck Small, Tara Parada) Issue No. 23, July 2019 (Beck Small, Jasmyne Tziziras, Jodie Flower-Russell, Maxwell Waterhouse, Dhogaluxmi Chemen, Alisha Hendrick, Elizabeth McCraken, Trent Bowes, Will La Grue, Laura Benney, Sir Troy Anthony Platt, Harrod Boadie, Kathryn Drum, Jordyn Presley, Bianca Bedford, Bronwyn Nel, Olly Brayne, Cherise Oosthuizen, Chloe Waddell, Nyalat Pel Kun, Autism Issue No 25 (April 2021) (Jesse Noonan-Wade, Laura Wilson, Chloe Hopkins, Jordyn Presley, Ruby Sait, Lauren Johnson, Kymberley Loats, Darren Rout, Maddison Gill, Baklava, Covid-19 pandemic, exercisefedpress, brad paisley, selin kasif, dakota richards, emma gamble, damian brown, clare hartigan, tanya bird, freya fogliani, scarlett baum, amanda mill, jess powell, feduni quidditch, rebecca fletcher, bridget o'brien, lisa tops, jordyn presley, jack barnes, emma-lee winters, brook forrest, bianca bedford, jessica rae, laura wilson, laura benney, monique stephens, kelsey knight, sarah mclean, liam carter, bronwynn nel, olly brayne, cherise oosthuizen, chloe waddell, nyalet pel kun, trent bowes, elizabeth mccracken, beck small, jasmine tzaitziras, jodi flower-russell, will la grue, laura benny, maxwell waterhouse, sir troy anthony platt, dhogaluxmi chemen, jarrod boadle, alisha hendrick, autism -
Moorabbin Air Museum
Document (item) - Roland Jahne Collection - See Description for details
-
 Ballarat Tramway Museum
Magazine, Jack Richardson, "Tram Tracks - The Electric Traction Monthly", July to Dec 1948
Three issues of "Tram Tracks - The Electric Traction Monthly" of the Australian Electric Traction Association. Each issue has a standard cover, of the magazine name etc, and featuring a front end photo of Victorian Railways tram No. 52 with the destination of Elwood but are in different colours, all have been saddled stapled with a single staple. The Volume and date details have been over printed. Back covers inside covers have the same advertisements. The three issues contain advertisements for the Wee Folks productions, Wattle Park, G&R model railway parts, Richard Noble model electric motors, Hobbyco, Fleet scale model railway equipment, Masseys Sports, Lloyd's Hobbycraft, John Martin Ltd, Johnson's Variety Store, the ARLHS, Barnes Tennis Centre, The Model Dockyard, the American Subscription Agency, Robilt Models, Meadmore Model Engineering and Austral Bronze Pty Ltd, Hearns Hobbies, Christie Scale Model Railway Products and Traction Publications. 2466.1 - Vol. 3 No. 10 - 20 pages, Oct. 1948, with cover printed in red ink. Has articles on anti-tram propaganda, Alphington - Heidelberg duplication and Sydney's early electric trams - C and D class. Also has news items on Brisbane, Newcastle, Sydney, Melbourne, Sandringham - Black Rock, Hobart, Launceston, Perth, Sydney and Melbourne electric trains, Launceston Trolley Buses, AETA notes, and a caricature of the Editor, Jack Richardson. 2466.2 - Vol. 3 No. 11 - 24 pages, Nov. 1948, with cover printed in blue ink. Has articles on construction of tram track in Melbourne (Victoria Parade), Bourke St., tram-bus controversy, (Reg Ansett, Noel Gipps and USNR Commander Quinby), Sydney's early electric trams - C and D class continued. Also news items on Last tram to Mayfield, Sydney, Latrobe St. Melbourne, Adelaide, opening to Alamein, Melbourne show traffic, VR Trams and AETA notes. 2466.3 - Vol. 3 No. 12 - 16 pages, Dec. 1948, with cover printed in green ink. Has articles on Sydney's electric railways, Brisbane Tramways and an AETA Melbourne tour. News items cover Sydney, Newcastle, Melbourne, Geelong, Bendigo, Kalgoorlie, Melbourne and Sydney trains and AETA news. 2466.4 - Vol 3 - No. 7 - 20 pages - July 1948 with cover printed in red ink. Has articles on cost of building trams for Brisbane, Sydney and Melbourne, abandonment of VR trams, Newcastle, Sydney, centre page photo of Y1 611, Sydney Electric train system including map and AETA news. 2466.5 - Vol 3 - No. 9 - 20 pages - Sep 1948 with cover printed in blue ink. Has articles on Mr. T. G. Patterson, Acting Director of Commonwealth Road Transport and Chairman of Federal Road Safety Council (very anti tram), news from Brisbane, Launceston, Sydney, Newcastle, Burwood, cost of trams, impressions of transport in Europe and North America, Melbourne and Sydney electric trains, tramways of Newcastle and model notes and AETA news. 2466.6 - Vol. 3, No. 1 - Jan 1948 - 16 pages with photo of Brisbane 407, political news, direct Melbourne to Footscray line proposal, new trams, bogie trams in Ballarat, article on Melbourne cable trams, electric trains, AETA outing in Melbourne and various adverts for model railways. 2466.7 - Vol 3 No. 2 - Feb. 1948 - 16 pages - political news, Ballarat news, traffic in Sturt St and new bogie cars, Christchurch closure, cartoon by Mercier on Sydney Honesty box, Brisbane suburban electrification, general tramway and electric railway news and various adverts for model railways. 2466.8 - Vol. 3 No. 3 - March 1948, with photo of VR 52 on front cover, 16 pages, political news, closures, Reg Ansett offer to buy the Melbourne bus system, Newcastle News, SEC Transfer of cars between the three systems, tramways in the Maribyrnong area, map of Melbourne trams, cartoon by Mercier, Brisbane train electrification and general news. 2466.9 - Vol. 3 No. 6 - June 1948 - 12 pages - MMTB political news, new trams for Sydney, tramways of Newcastle, Invercargill, Sydney Suburban trains, and AETA General news. .6 to .9 added 24-3-18 - from consolidation of Melbourne Tram Museum and BTM collections - ex AETA. trams, tramways, electric traction, aeta, models, australian tramways, melbourne, sydney, brisbane, newcastle, costs, ballarat, footscray -
 Bendigo Military Museum
Photograph - Military Funeral for SSGT Peter Dew, Army Survey Regiment, Fortuna, Bendigo, 1977
This is a set of 29 black & white photographs of troops from the Army Headquarters Survey Regiment undertaking ceremonial drill at the military funeral for SSGT Peter Dew on the 28th of September 1977. The location of the funeral service was at Fortuna, Bendigo. He was buried at Bendigo Cemetery in Quarry Hill. Peter Dew died in a tragic accident at home. He was fondly remembered as one of Lithographic Squadron’s colourful personalities. See item 6243.7P for photos of Peter Dew at work in Lithographic Squadron. The "Super Animal of the Year" Peter Dew Memorial Award was an award presented to a member of the squadron for a crude act. To view a photo of this award, refer to item 6230 of the Victorian Collections. Some photos in this set were also printed on photo paper and catalogued under item 6335.5P.This is a set of 29 black & white photographs of troops from the Army Headquarters Survey Regiment undertaking ceremonial drill at the military funeral for SSGT Peter held in 1977. The photographs are on 35mm negative film and scanned at 96 dpi. They are part of the Army Survey Regiment’s Collection. .1) - Photo, black & white, 1977. Rifle party commander: CPL Greg Kidman. Right file right marker: SPR Russ Mollenhauer, unidentified soldiers and civilians. .2) - Photo, black & white, 1977. Unidentified soldiers and civilians. .3) - Photo, black & white, 1977. R to L: SSGT Alan Adsett, WO2 John McCulloch, SGT Graeme Jeffers in foreground holding hats. Remainder unidentified. .4) to .6) - Photo, black & white, 1977. Unidentified soldiers and civilians. R to L: SSGT Alan Adsett, WO2 John McCulloch, unidentified soldiers and civilians. .7) - Photo, black & white, 1977. Pall bearers position the coffin onto the gun carriage. Rifle party commander: CPL Greg Kidman. Right file right marker: SPR Russ Mollenhauer. Seen in background to the right of pall bearers: L to R: CPL Ian Belmont, unidentified, facing away- PTE Le-anne (Smallshaw) Shirley, CPL Di Chalmers, unidentified soldiers and civilians. .8) - Photo, black & white, 1977. Rifle party rear rank right marker: Russ Mollenhauer. Front rank rifle party commander next to right marker: Greg Kidman. Pall bearers in front of vehicle L to R: Dave Miles, Dick Barwald. Remainder unidentified. .9) - Photo, black & white, 1977. In position at beginning of funeral procession, unidentified soldiers and civilians. .10) & .11) - Photo, black & white, 1977. Rifle party commander: CPL Greg Kidman and the rifle party slow march past the front of Fortuna Villa. .12) - Photo, black & white, 1977. The rifle party slow march past the front of Fortuna Villa. Rifle party commander: Greg Kidman. Right file front to back: SPR Russ Mollenhauer, SPR Peter Breukel, SPR Bill Jones, SPR John Anderson. Remainder unidentified. Left file front to back: SPR Jeff Willey, unidentified, SPR Rhys De Laine, SPR Frank Lenane, SPR Josh Degroot, SPR Gary Drummond. .13) - Photo, black & white, 1977. The rifle party slow march past the front of Fortuna Villa. Rifle party commander: Greg Kidman. Right file: SPR Russ Mollenhauer, Left file: SPR Jeff Willey, remainder unidentified. .14) - Photo, black & white, 1977. The rifle party march at quick time towards the entry gate. .15) - Photo, black & white, 1977. The rifle party march at quick time past the front of Fortuna Villa. Rifle party commander: Greg Kidman. Right file: SPR Russ Mollenhauer, Left file: SPR Jeff Willey, remainder unidentified. .16) - Photo, black & white, 1977. The procession marches at quick time towards the entry gate. .17) - Photo, black & white, 1977. The procession departs the entry gate. .18) to .21)- Photo, black & white, 1977. The procession passes through the cemetery. .22) - Photo, black & white, 1977. The procession passes through the cemetery. RSM Wo1 Aub Harvey at far left. Remainder unidentified. .23) - Photo, black & white, 1977. Pallbearers carry Peter Dew’s coffin to the grave site. .24) - Photo, black & white, 1977. The rifle party in position at ‘rest on arms reverse’. .25) - Photo, black & white, 1977. Service at grave site. Left of minister: SGT Alan Toogood. On right of tree L to R: WO2 Max Neil, WO2 Bob Hayden, WO1 Dave Malligan, PTE Le-Anne (Smallshaw) Shirley, CAPT Stan Vote. Remainder unidentified. .26) - Photo, black & white, 1977. The rifle party fire volleys. .27) - Photo, black & white, 1977. The rifle party presents arms. .28) - Photo, black & white, 1977. Service at grave site. SGT Greg Francis-Wright 4th from right. .29) - Photo, black & white, 1977. Outside Litho’s proofing hut at Fortuna. WO1 Darby Munro stands in contemplation next to the collection of flowers.There are no personnel identified. royal australian survey corps, rasvy, army survey regiment, army svy regt, fortuna, asr, litho sqn -
Bendigo Historical Society Inc.
Document - SPECIMEN COTTAGE COLLECTION: VARIOUS DOCUMENTS
In 1853, Bendigo Miners protested against the 30 shilling miners licence the had to pay the government. They wore red ribbons to show their protest and shopkeepers hung red ribbons outside their premises in support. Thousands of miners signed a petition to Governor LaTrobe to no avail. A protest gathering in Pall Mall marched to the Government camp on Camp Hill but this was a peaceful event again to no real avail.Various documents. The topics are: 1. Public donations and organised charities in Bendigo (1850's to 1900's by Carol Holsworth. 2. The spirit of Bendigo R711 and the loco driver on the return trip from Bendigo by Rod Giri, also several photographs of the train. 3. Diary of a new chum - Johnny Greenfield Gill. 4. Family history by Pat Hocking. 5. The story of the Gaylards as told by Ella Gaylard. 6. Journalism- History first draft by Wayne Gregson. 7. List of residents of Thistle Street, Bendigo approx. 1950's compiled by Cynthia Stringer. 8. Sandhurst club history by David Cotton. 9. Sandhurst boys centre compiled by Brian Dillon. 10. Lily Street Walk 24/04/2018 notes by Jim Evans. 11. Document - All things Bendigo, wine food and music fest. 12. White Hills Sandhurst copies of maps and two pages of district directory1908. 13. Draft report of interview with Noel Smith of 5 Summit Drive, Kennington. 14. Three brothers from Scotland by Rae Alexander Anderson. Also, seven newspaper articles by James Lerk on William, Alexander Rae and John Rae. 15. St. John Presbyterian church, Bendigo. Historical record. 16. Journal of Thomas Llewellyn Raston. 17. Recollections of Sandhurst in the 1850's - Joseph Anderson Panton, 22 segments from Panton manuscript by Terry Davidson. Also, a photographs of a portrait of Joseph Panton. 18. Photocopy of letter of Chinese storekeepers, miners and residents to Joseph Anderson Panton esquire, resident warden of Bendigo dated August 28th, 1858, with transcription and the reply from Esquire Panton dated 29 August, 1858. 19. View street reborn, tours of inspection ''welcome to View Street'' view Street properties part of stage 1 of the project: National Trust Chambers, Temperance Hall, Art Gallery Annexe, Trades Hall, Bendigo Regional Arts Centre, Bendigo Regional Performing Arts Centre, Dudley House. 20. View Street early 1900's in between and now. From handwritten notes by Mr. Bob Carr written in 1989. The handwriting has been transcribed by Beverly Ellis. 21. Transcription of ''Diary of a voyage to the colony of Victoria and back'' June1856-September 1858 by Charles Groves. 22. Adelaide Vale historic homestead built by Cr. John Harney. Tour notes prepared by the Central Victorian Branch of the National Trust. 23. Four pages essay titled Spanish Tomato Growers. 24. Eight pages of notes compiled by Leonard Henderson title: Trade token issuers of Bendigo district. The issuers mentioned are: Grieve, Hodgson, Stead and Williams. 25. City of Bendigo tourist promotion Committee. Eight pages document describing the formation of committee for the promotion of tourism in the City of Bendigo. 26. Article ''The Birdman of Bendigo'' Bendigo Advertiser 17th January 1968 detailing the life of Mr. Redvers James Eddy. 27. Speech presented by Miss Margaret Brennan on the occasion of the Drechsler family reunion, Sunday 5th April 1987. 28. Robert Gray Ford - A man before his time! Talk by James Lerk to the Bendigo Historical Society 3 February 2006. 29. Copy of an article from The Bendigonian Annual from November 16, 1910. The demand for good music, how a Bendigo firm has met it. The article is about the life of Oscar Flight. 30. Five photocopies of the Bendigonian masthead showing the changes through the years, plus the notice of the final issue on April 8th, 1920. 31. The red ribbon rebellion & the Bendigo petition, a proposal to commemorate a significant event in Bendigo. Also three different sizes poster for the August 26, 2016 re-enactment and two invitations to join the red ribbon agitation memorial. 32. Two handwritten pages of notes on the red ribbon rebellion. 33. Three pages of typewritten notes on the Creeth and Howie families. 34. An Australian Edward Medallist - Joseph Davies honoured by Paul Street. 35. A. H. Chisholm obituary. 36. Catalogue auction sale of the entire collection of antique furniture, objects d'art etc of Mr. and Mrs S. Cragg. 37. two coloured photographs of Cherry Tree Hotel in Melbourne Road just north of Tuckerman's lane, Big Hill. Photos taken March 2000 by Joan Paynter. -
 Bendigo Military Museum
Photograph - 4th Field Survey Squadron OC’s Parades and Defence Force Service Medal Presentations, Keswick Barracks, Adelaide SA, 1987
This is a set of 12 photographs of a 4th Field Survey Squadron OC’s parade at Keswick Barracks, Adelaide SA in 1987. The OC - MAJ Peter Cates presented the Defence Force Service Medal to personnel in recognition of 15 years of efficient remunerated service, or the Clasp for 5 years of additional service. This is a set of 12 photographs of a 4th Field Survey Squadron OC’s parade and the presentation of the Defence Force Service Medal, at Keswick Barracks, Adelaide SA in 1987. The colour photographs are on 35mm negative film and are part of the Army Survey Regiment’s Collection. The photographs were scanned at 96 dpi. .1) - Photo, colour, 1987. At left – SSM WO1 Bill Griggs. Front rank L to R: SPR Todd Hayley, CPL Roger Graf, CPL Jamie McRae, CPL Dave Irving, SPR Richard Cocker, LCPL Peter McCurdy, SPR Steve Ellis, CPL John Ratcliffe. Centre rank L to R: CPL Terry ‘TJ’ Wicker, SPR Perry Langeberg, unidentified, CPL Jeff Prince, SPR Bruce Graham. Rear rank L to R: SPR Shaun Hynes, SGT H. ‘Jock’ Young. Supernumerary on right: WO2 Brett ‘Dutchy’ Van Leeuwen. .2) - Photo, colour, 1987. Inspection L to R: SSM WO1 Bill Griggs, 2IC CAPT Terry Lord, OC MAJ Peter Cates. Front rank L to R: CPL Jamie McRae, SPR Richard Cocker, LCPL Peter McCurdy, SPR Steve Ellis. Centre rank L to R: SPR Perry Langeberg, CPL Peter Hardy, SPR Steve Nokes. Rear rank: SPR Damien Killeen. .3) & .4) - Photo, colour, 1987. Presentations: OC MAJ Peter Cates presents the Defence Force Service Medal to WO2 Brett ‘Dutchy’ Van Leeuwen. Background L to R: SSM WO1 Bill Griggs, SPR Todd Hayley, CPL Jamie McRae. .5) - Photo, colour, 1987. WO2 Brett ‘Dutchy’ Van Leeuwen departs with his Defence Force Service Medal. At far left – SSM WO1 Bill Griggs. Front rank L to R: SPR Todd Hayley, CPL Roger Graf, CPL Jamie McRae, CPL Dave Irving, SPR Richard Cocker. Centre rank L to R: CPL Terry ‘TJ’ Wicker, CPL Dave Longbottom, unidentified, Rear rank L to R: SGT Mick Hogan, SGT Stu Symonds. .6) & .7) - Photo, colour, 1987. Presentations: OC MAJ Peter Cates presents the Defence Force Service Medal to SGT H. ‘Jock’ Young. Background L to R: SSM WO1 Bill Griggs, SPR Todd Hayley, CPL Roger Graf, CPL Jamie McRae. .8) - Photo, colour, 1987. SGT H. ‘Jock’ Young departs with his Defence Force Service Medal. At far left – SSM WO1 Bill Griggs. Front rank L to R: SPR Todd Hayley, CPL Roger Graf, CPL Jamie McRae, CPL Dave Irving, SPR Richard Cocker. Centre rank L to R: CPL Terry ‘TJ’ Wicker, CPL Dave Longbottom, unidentified, Rear rank L to R: SGT Mick Hogan, SGT Stu Symonds. 9) - Photo, colour, 1987. Presentations: OC MAJ Peter Cates presents the Defence Force Service Medal to CPL John Ratcliffe. Background L to R: SSM WO1 Bill Griggs, SPR Todd Hayley, CPL Roger Graf, CPL Jamie McRae. 10) - Photo, colour, 1987. Presentations: OC MAJ Peter Cates presents the Defence Force Service Medal to CPL John Ratcliffe. Background L to R: SSM WO1 Bill Griggs, SPR Todd Hayley, CPL Roger Graf. .11) - Photo, colour, 1987. CPL John Ratcliffe departs with his Defence Force Service Medal. At far left – SSM WO1 Bill Griggs. Front rank L to R: SPR Todd Hayley, CPL Roger Graf, CPL Jamie McRae, CPL Dave Irving, SPR Richard Cocker. Centre rank L to R: CPL Terry ‘TJ’ Wicker, CPL Dave Longbottom, unidentified, Rear rank L to R: SGT Mick Hogan, SGT Stu Symonds. .12) - Photo, colour, 1987. Parade handover L to R: 2IC CAPT Terry Lord, OC MAJ Peter Cates. Background L to R: SSM WO1 Bill Griggs, Front rank: SPR Todd Hayley, CPL Roger Graf, CPL Jamie McRae..1P to .12P – There are no personnel identified. ‘Medal Presentation 1987 WO2 VAN LEEUWEN SGT YOUNG CPL RATCLIFFE’ annotated on negatives sleeve.royal australian survey corps, rasvy, 4 fd svy sqn -
 University of Melbourne, Burnley Campus Archives
Photograph - Black and white prints, Publicity Branch Victorian Department of Agriculture et al, Plants, 1957-1963
Black and white photographs, many labelled. Flowers, trees, propagation, signs, etc. Some for Journal articles. Publicity Branch Victorian Department of Agriculture: (1) 2 copies, C.1768A "Camellias Geraniums." (2) c.1262D "Anemone japonica." ((4) c.1262K "Hibiscus Wilder's White." (5) "Peace." (7) D521A Fruit tree. (8) c.1262E "Helenium autumnale." (9) c.1262I "Gerri Hock?" (12) c.1262F "Golden Ash. " (13) Struck cuttings 05 7.6.57. (14) "Kumquat." (15) Path to Principal's Residence. (16) A479 "Thujopsis dolobrata. Make an excellent tub specimen of the spreading type." (17) A477 "Aucuba japonica variegata. A very good foliage shrub for tubs. Sept '63 Jnl." (18) Struck cutting. (19-22) Arum, different views. (23) 2 copies ? (24) "June garden notes," small tree with roots. (25, 26) Different views ? (27)Pittosporum crassifolium. (28) "For Dec article (This is the one to use) Polyanthus are attractive & easily managed pot plants. (29) 2 copies ? (30) ? (31) Tubers. (32) "Oct Jnl" "Dividing the tubers. This is necessary to ensure that one eye is left etc." (33) Divided tuber. (34) Aucuba in pot. (35) ? (36) "Thuja plicata aurea a good tub plant of pyramid form." (37) "Buxus sempervirens. he English Box makes a neat, compact, low hedge." (38) "Cupressus torulosa is useful for a high narrow hedge for screening." (39) Sign giving information about different fertilizer treatments. (40) Sign comparing yield of Jonathons & Democrats with fertilzers. (41) "Russell Lupins." (42, 43) Different views ? (44) Soil profile in hole. (45) "Cyclamen is a good subject flowering over winter period." (46) "Cyclamen." (47) "Chabbads? & Malmaisons are suitable for bedding & make good cut flowers." (48) A478 "Seedlings." (49) A487 2 copies Roses in vase. (50) C.1767.E "Angophora 5-6 years." (51) C.1769.C "Jan '60 Jul. Ginko biloba Maidenhair Tree." (52) C.1768.C "Thuja plicata aurea, Golden Willow, Pinus radiata." (53) C.1762.I Vegetables. (54) A512 ?. (55) C.1767.C 2 copies "Eucalyptus torquata." (56) C.1769C 2 copies "Eucalyptus ficifolia." (57) C.1769.C 2 copies "Callistemon lanceolata( Bottle Brush.) (59) C.1769.B 2 copies "Pepperomias." (58) C.1769.F 2 copies "Melaleuca styphelioides (Paper Bark Tree.) (60) C.1769.D 2 copies "African Violets." (61) C.1768.F 2 copies "Pelargonium." (62) C.1768.B 2 copies "Tilia europea (Linden Tree.) Department of Agriculture Biology Branch: (6) Neg No 06 24.11.59 "A struck cutting of Rhododendron var. Alice. For a rhododendron this popular & beautiful variety strikes readily." (13) 05 5.6.57 Struck cuttings. No provenance: (3) "Araucaria excelsa, ?, ?, Metrosideros tomentosa." (10) "Thuja rheingold." (11) "Border of Geraniums (zonal Pelargoniums." (14) "Kumquat." (15) Path to Principal's Residence." (18) Struck cuttings. (19-22) Different views of Arum. (23) 2 copies ? (24-26) "June garden notes." Small tree with roots. (27) "Pittosporum crassifolium." (28) "For Dec article (This is the one to use) Polyanthus are attractive & easily managed pot plants." (29) 2 copies ? (30) ? (31) Tubers. (32) "Oct Jnl Dividing the the tubers. This is necessary to ensure that one eye is left etc." (33) Divided tuber. (34) Aucuba in pot. (35) ? (36) "Thuja plicata aurea a good tub plant of pyramid form. (37) "Buxus sempervirens. The English Box makes a neat, compact, low hedge." (38) Cupressus torulosa is useful for a high narrow hedge for screening." (39) Sign in Orchard giving information about different fertilizer treatments. (40) Sign in Orchard comparing yield of Jonathans and Democrats with fertilizers used. (41) "Russell lupins. (42-43) Different views ? (44) Soil profile in hole. (45) "Cyclamen is a good subject flowering over Winter period." (46) Cyclamen. (47) "Chabbads? & Malmaisons are suitable for bedding & make good cut flowers." flowers, trees, propagation, signs, camellias, geraniums, anemone japonica, hibiscus, fruit trees, principal's residence