Showing 1305 items
matching hawthorn railway
-
 Melbourne Tram Museum
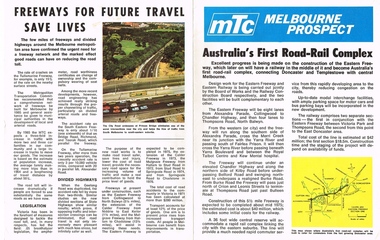
Pamphlet, Metropolitan Transport Committee, "MTC - Melbourne Prospect - Australia's First Road-Rail Complex", 1972?
Folded gloss full colour sheet to quarto size, pamphlet titled "MTC - Melbourne Prospect - Australia's First Road-Rail Complex", the Doncaster - Eastern Freeway. Front cover article reports on the construction of the freeway which will later have a railway to Doncaster. Reports also on flexibility of the MTC (Metropolitan Transport Committee) planning for transport, new suburban trains (Silver), the Underground loop, flyovers at Richmond Station and freeways in general.trams, tramways, melbourne, traffic control, transportation, doncaster, railways, mtc, metropolitan transport committee -
 Melbourne Tram Museum
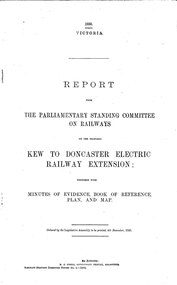
Document - Report, Victorian Parliament, "Report - The Parliamentary Standing Committee on the Proposed Kew to Doncaster Electric Railway Extension", Dec. 1930
Printed - 12 page foolscap, stapled on left hand side, 2 sections, Victorian State Parliamentary Report titled "Report - The Parliamentary Standing Committee on Railways on the Proposed Kew to Doncaster Electric Railway Extension", together with minutes of evidence, book of reference, plan and map, dated 4/12/1930. References a 1928 document, looks at construction costs, sites for railway stations, estimated revenue and expenditure, existing Kew line financials, town planning, bus services, MMTB input, tram services, alternatives, committee views, recommendations and a map of proposed routes, showing roads and tram services. Includes references to the Kodak estate and APM proposals at Fairfield. See Reg Item 2102.3 for the 1928 report.trams, tramways, doncaster, railways, public transport, kew -
 Melbourne Tram Museum
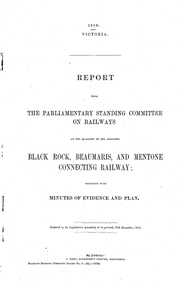
Document - Report, Victorian Parliament, "Report - The Parliamentary Standing Committee on the Proposed Black Rock, Beaumaris and Mentone Connecting Railway.", Dec. 1910
Printed - 10 page foolscap, stapled on left hand side, 2 sections, Victorian State Parliamentary Report titled "Report - The Parliamentary Standing Committee on Railways on the Proposed Black Rock, Beaumaris and Mentone Connecting Railway.", together with minutes of evidence, dated 19/12/1910 References the Black Rock tramway, background of the district, evidence, tramway or railway service, land acquisition, cost of railways or tramways, report from Traffic Officers, costs and recommendations.trams, tramways, sandringham, mentone, beaumaris, railways, tramways, proposals -
 Melbourne Tram Museum
Document - Report, Victorian Parliament, "Report - The Parliamentary Standing Committee re the Beaumaris Electric Street Railway.", Dec. 1916
Printed - 6 page foolscap, stapled on left hand side, 2 sections, Victorian State Parliamentary Report titled "Report - The Parliamentary Standing Committee on Railways on the question of the Beaumaris Electric Street Railway." - dated 22 December 1916. References previous reports, Black Rock, Beaumaris, residential development, routes and costs of the proposed tramway, costs provided by the Chief Engineer for Railway Construction, E. Kernot, and Committee recommendations - tempered by the War.trams, tramways, sandringham, black rock, beaumaris, railways, tramways, proposals -
 Melbourne Tram Museum
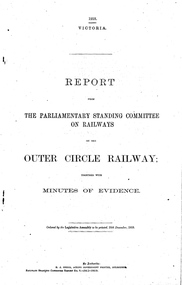
Document - Report, Victorian Parliament, "Report - The Parliamentary Standing Committee on Railways on Outer Circle Railway", Dec. 1918
Printed - 8 page foolscap, centre stapled, Victorian State Parliamentary Report titled "Report - The Parliamentary Standing Committee on Railways on the Outer Circle Railway.", together with minutes of evidence, dated 20/12/1918. Provides a history of the railway, financial results, tramway competition, fare comparison, goods traffic, Kodak and APM Developments, Railway views, committee recommendations including railway closure and dismantling.trams, tramways, outer circle railway, kew, railways, tramways, proposals, burwood -
 Melbourne Tram Museum
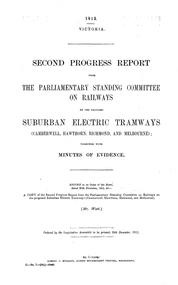
Document - Report, Victorian Parliament, "Report - The Parliamentary Standing Committee re Proposed Suburban Electric Tramways, Dec. 1912
Printed - 10 page foolscap, stapled on left hand side, 2 sections, Victorian State Parliamentary Report titled "Report - The Parliamentary Standing Committee on Railways on the Proposed Suburban Electric Tramways (Camberwell, Hawthorn, Richmond and Melbourne)"", together with minutes of evidence, dated 20 December 1912. Background, the existing Hawthorn Horse Tramway, acquisition of the horse tramway, area served by the proposed tramways, costs, possible loss, views of the committee, railway commissioners, conclusion, vote for and against, future of Melbourne tramways in general.trams, tramways, tramways, htt, camberwell, hawthorn, richmond -
 Melbourne Tram Museum
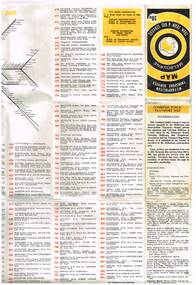
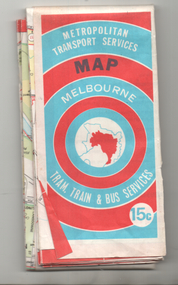
Map, Ministry of Transport, "Metropolitan Transport Services Map - Melbourne Tram, Train and Bus Services", 10/1971
Fold out map (27 sections 9 across x 3 deep), coloured of Melbourne's Tram and Bus routes, route numbers, rail lines, detailed for the central part of Melbourne. On rear description of routes, private bus routes and map of Melbourne metro lines. Has contact details for bookings and lost property etc. Priced at 10c. Launched in a newspaper advert 26/10/1971. Has map scale in miles. 2nd copy added 16/7/2014On front cover in ink "#1" in top right hand corner and "4 G 33" along bottom edge.trams, tramways, melbourne, map, tram & bus services, railways, mmtb, minister for transport -
 Melbourne Tram Museum
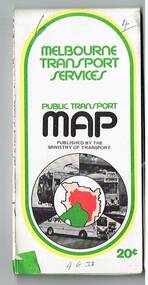
Map, Ministry of Transport, "Melbourne Transport Services Map - Tram, Train and Bus Services", c1975
Fold out map (27 sections 9 across x 3 deep), coloured of Melbourne's Tram and Bus routes, route numbers, rail lines, detailed for the central part of Melbourne and insert section for Frankston. On rear description of routes, private bus routes and map of Melbourne metro lines. Has contact details for bookings and lost property etc. Not priced. Not dated, but circa 1975 - has map scale in kms and route 59 to Essendon Airport still extends into Airport. 2nd copy added 16/7/2014. See Reg Item 521 for issue No.. 2, 1974.On front cover in ink "issue #3" in top right hand corner and "4 G 33" along bottom edge.trams, tramways, melbourne, map, tram & bus services, railways, mmtb, minister for transport -
 Melbourne Tram Museum
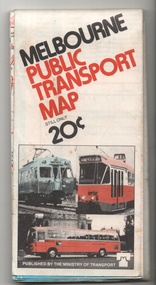
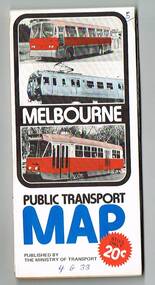
Map, Ministry of Transport, "Melbourne Public Transport Map", c1977
Fold out map (27 sections 9 across x 3 deep), coloured of Melbourne's Tram and Bus routes, route numbers, rail lines, detailed for the central part of Melbourne and insert section for Frankston. On rear description of routes, private bus routes and map of Melbourne metro lines. Has contact details for bookings and lost property etc. Priced 20c Dated 1977, says No. 6 on bottom of rear cover. Note shows route 59 being cut back to the highway.trams, tramways, melbourne, map, tram & bus services, railways, mmtb, minister for transport -
 Melbourne Tram Museum
Ephemera - Timetable/s, Victorian Railways, "Tram Timetables - St Kilda - Elwood Depot", Jul. 1957
Victorian Railways St Kilda Station to Elwood Depot timetable, printed on card that could be folded, providing details of tram times leaving St Kilda Station for Dickens and Vautier Streets or Elwood Depot and return. Advises which trams does not connect with trains. Gives running times and Section Details. Dated 15/7/1957. VR Printed 2484-57 on manila colour card. 8 Copies held..trams, tramways, vr, victorian railways, st kilda, elwood depot, timetables, melbourne -
 Melbourne Tram Museum
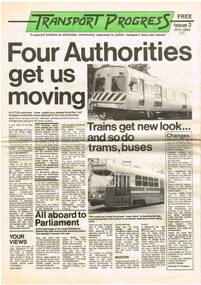
Newspaper, Ministry of Transport, "Transport Progress", Jul. 1983
Eight page newsprint Newspaper, titled "Transport Progress", issued by the Ministry of Transport, July 1983, Issue 2, about the formation of the new transport authorities, STA, Metropolitan Transport Authority, new trams and trains, extensions to Bundoora, railways, Ministry of Transport..trams, tramways, melbourne, mmtb, metropolitan transit authority, the met, state transport authority, sta -
 Melbourne Tram Museum
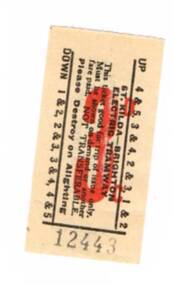
Ephemera - Ticket/s, Australian Railway Historical Society (Vic Div) (ARHS), Reproduction of a Victorian Railways 3d St Kilda Brighton electric tramway ticket, Jul. 1994
Reproduction of a Victorian Railways 3d St Kilda Brighton electric tramway ticket for use on a Australian Railway Historical Society tour (ARHS) 15/7/1994 to inspect the closed system using two MMTB buses, Mk 3 No.592 and Mk 6 No. 759. On the lower edge is ticket number "12443"..trams, tramways, arhs, tours, st kilda brighton, tram 171 -
 Melbourne Tram Museum
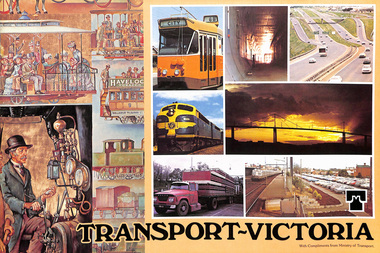
Pamphlet, Minister of Transport, "Transport Victoria", 1977 and 1978
453.1 - Sixteen page, full colour printed on glossy paper, centre stapled pamphlet, titled "Transport Victoria", with part of the Harold Freedman on the front cover, detailing the structure and the authorities of the Ministry of Transport, c1977. Foreword by Hon. J. Rafferty Transport Minister (1976 to 1978 - State Parliament website biography). Provides information on: MMTB Victorian Railways - VicRail Railway Construction Board Melbourne Underground Rail Loop Authority - MURLA Country Roads Board - CRB Transport Regulation Board - TRB Westgate Bridge Authority and who's who in the transport in Victoria - Board members - with photos. 453.2 - as above but with foreword by Robert Maclellan MLA as minister (see image 9) and revision of the "Who's who" on page 15 - see image 10. Maclellan was the Minister was 1978 to 1982 - parliamentary web site. Not imaged..trams, tramways, mmtb, minister for transport, vicrail, crb, murla -
 Melbourne Tram Museum
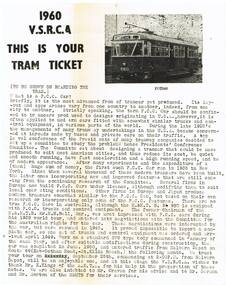
Document - Tour Notes, Victorian Schools Railway Club Association, "1960 VSRCA This is your tram ticket", 1960
Duplicated quarto sheet for the Victorian Schools Railway Club Association, VSRCA, tour during 1960 using MMTB PCC tram 980. Provides details of the tramcar and its Melbourne operation. On the rear is a typed note thanking the person for the book and that it will be departing Malvern at 2pm. No date on the circular.trams, tramways, vsrca, pcc, tours -
 Melbourne Tram Museum
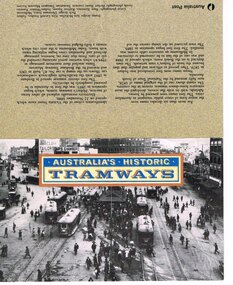
Administrative record - Folder stamps, Australia Post, "Australian Historic Tramways", 1989
Presentation folder of five stamps, 41c, to celebrate the launch of series of "Australian Historic Tramways" 11 October 1989 by Australia Post. Features a photograph of Hobart Electric trams on the inside cover, with the five stamps behind a plastic sheet. On the front is a photo of Railway Square Sydney, the rear cover has a description of the trams and of Australian tramways. Five stamps, all 41c: Adelaide Horse Tram Sydney Steam Tram Melbourne Cable Tram Hobart electric Tram Brisbane Electric Tram. See also Reg Item 471 to 474 for other examples and associated materials and 510 for a Poster. Second copy from donation of Shirley Ramsay, Hawthorn Historical Society added 15-1-2018. See Reg Item 4701 for a set of five blocks (4 stamps) of each.trams, tramways, stamps, australia post, cable trams, horse trams -
 Melbourne Tram Museum
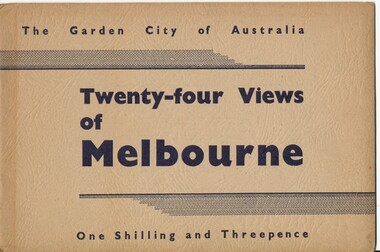
Book, Victorian Government Information Bureau?, "The Garden City of Australia / Twenty-four views of Melbourne", c1950
Book, brown cover patterned (Deer skin?), titled "The Garden City of Australia / Twenty-four views of Melbourne" with 24 pages (smaller than cover) printed pages stapled inside. Inside front cover is a map of Melbourne, with specific buildings marked, inside rear cover - Where to go in Melbourne, General Information and Sight seeing tours. On rear cover is printer details. Page Photo details by 1 Skyline of the City of Melbourne from Yarra Bank Victorian Railways 2 Collins St from Spring St (with trams) ditto 3 Princes Bridge, River Yarra ditto 4 St Kilda Rd from Flinders St Station ditto 5 St Pauls Cathedral ditto 6 Bourke St Shopping Centre - with double deck buses no details of photographer 7 Elizabeth St - with trams and buses Victorian Railways 8 Swanston St with modern skyscrapers (Collins) ditto 9 Aerial view, city of Melbourne ditto 10 Parliament House ditto 11 Public Library, Museum and Art Gallery ditto 12 St Kilda Rd, Looking towards the City trams 772 and W2 ditto 13 Kings Domain - Pioneer Monument ditto 14 Royal Melbourne Hospital - with back view inset ditto 15 Alexandra Gardens and the Shrine of Remembrance ditto 16 Alexandra Gardens and Government House ditto 17 Captain Cook's House - Fitzroy Gardens ditto 18 Albert Park Lake no details of photographer 19 Melbourne Boys School, MacRobertson's Girls High School and Melbourne Uni - no details of photographer 20 Scene in the Botanical Gardens Victorian Railways 21 Aerial view of St Kilda with Brighton in background Victorian Railways 22 Melbourne Cricket ground, taken during the testimonial match to Sir Donald Bradman - no details 23 Queen Victoria Memorial Hospital and Exhibition Buildings and Aquarium - Victorian Railways 24 Dandenong - Showing Silvan Dam Victorian Railways The testimonial match took place in Melbourne during December 1948 (Reference Sir Donald Bradman Museum). Possibly arranged by the Victorian Government Information Bureau given the number of Victorian Railways photographs.trams, tramways, melbourne, st kilda rd, swanston st, bourke st, victorian railways, flinders st station, gardens -
 Melbourne Tram Museum
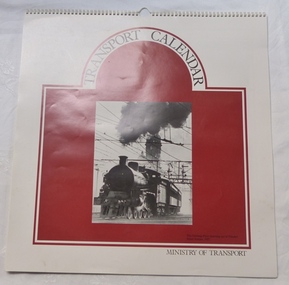
Ephemera - Calendar, Victorian Ministry of Transport, "Victorian Ministry of Transport - Transport Calendar - 1984", 1983
... Melbourne Tram Museum 8 Wallen Road Hawthorn melbourne ...Wall Calendar - wire spiral bound along top edge with hanger, gloss paper, with cover and each month featuring various transport related photographs. Includes photo of Flinders St station, cable tram in Bridge Road and horse drawn vehicles delivering cable from the port to Brunswick, including a number of railway photographs. Titled "Victorian Ministry of Transport - Transport Calendar - 1984", featuring photographs from the VR heritage collection. Two copies held.trams, tramways, railways, tramways, cable trams, flinders st station, calendar -
 Melbourne Tram Museum
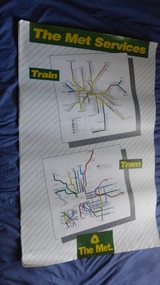
Poster, The Met, "The Met Services", mid 1990's
Poster - full colour on semi gloss paper titled "The Met Services" showing in a diagrammatic form the Melbourne tram and rail routes. For the tram section, (similar to Reg Item 509), shows major street names, route numbers, principal suburbs, terminal names, central area (pre Docklands, post light rail to St Kilda and Port Melbourne) and ticket zones. The rail map section shows the Neighbourhood ticket zones, the rail line via Altona (the direct route is not shown) and shows the St Kilda and Port Melbourne light rail lines. Has The Met logo and the Public Transport Corporation names on the bottom. Mid 1990's, Batman Ave still shown. See also Reg Items 696 and 696 for maps of the time.trams, tramways, melbourne, tramways, tram routes, railways, map, posters, tickets, neighbourhood tickets -
 Melbourne Tram Museum
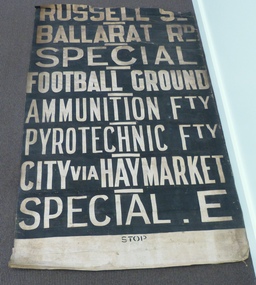
Functional object - Destination Roll, Melbourne & Metropolitan Tramways Board (MMTB), "Footscray Depot", 1950's
Destination roll - white lettering on black background. Destination roll used at the MMTB Footscray depot. Has stencil words "STOP" on bottom, stencilled miniature destinations on rear to assist drivers to locate the destination. Roll has a short unpainted section at the bottom. Destinations in order from top are: ; RUSSELL ST; BALLARAT RD; SPECIAL; FOOTBALL GROUND; AMMUNITION FACTORY; PYROTECHNIC FACTORY; CITY VIA HAYMARKET; SPECIAL E. The roll is missing a top section, possibly (based on a Footscray roll held in the BTM Archives), DEPOT; WILLIAMSTOWN RD; RAILWAY STATION. SPECIAL E - thought to be for the Explosives Factory. Through running to City from May 1954 when track extended and connected to main system. Image 3 - Photo of Bob Wilson standing alongside taken 27/7/14 by Warren Doubleday, added 28/7/14.trams, tramways, mmtb, destination roll, footscray depot -
 Melbourne Tram Museum
Map, Ministry of Transport, "Melbourne Transport Services Map - Tram, Train and Bus Services", c1974
Fold out map (27 sections 9 across x 3 deep), coloured of Melbourne's Tram and Bus routes, route numbers, rail lines, detailed for the central part of Melbourne and insert section for Frankston. On rear description of routes, private bus routes and map of Melbourne metro lines. Has contact details for bookings and lost property etc. Priced 15c Inscription dates the map as 1974. Two copies held.On front cover in ink "#3" in top right hand corner and "4 G 33 1974" along bottom edge of the first copy.trams, tramways, melbourne, map, tram & bus services, railways, mmtb, minister for transport -
 Melbourne Tram Museum
Map, Ministry of Transport, "Melbourne Transport Services Map - Tram, Train and Bus Services", 1975-1976
Fold out map (27 sections 9 across x 3 deep), coloured of Melbourne's Tram and Bus routes, route numbers, rail lines, detailed for the central part of Melbourne and insert section for Frankston. On rear description of routes, private bus routes and map of Melbourne metro lines. Has contact details for bookings and lost property etc. Priced 20c possible 1975-1976 - has 1041 and silver train on front cover.On front cover in ink "3" in top right hand corner and "4 G 33 " along bottom edge.trams, tramways, melbourne, map, tram & bus services, railways, mmtb, minister for transport -
 Melbourne Tram Museum
Map, Ministry of Transport, "Melbourne Transport Services Map - Tram, Train and Bus Services", 1976
Fold out map (27 sections 9 across x 3 deep), coloured of Melbourne's Tram and Bus routes, route numbers, rail lines, detailed for the central part of Melbourne and insert section for Frankston. On rear description of routes, private bus routes and map of Melbourne metro lines. Has contact details for bookings and lost property etc. Priced 20c Has a bus, silver train and a Z class tram on the cover. On bottom of outside cover, "No. 5 1976"On front cover in ink "5" in top right hand corner and "4 G 33 " along bottom edge.trams, tramways, melbourne, map, tram & bus services, railways, mmtb, minister for transport -
 Melbourne Tram Museum
Map, Ministry of Transport, "Melbourne Transport Services Map - Tram, Train and Bus Services", 1977
Fold out map (27 sections 9 across x 3 deep), coloured of Melbourne's Tram and Bus routes, route numbers, rail lines, detailed for the central part of Melbourne and insert section for Frankston. On rear description of routes, private bus routes and map of Melbourne metro lines. Map No. 7, 1977. Has contact details for bookings and lost property etc. Priced 20c. 1977, route 59 showing as terminating opposite Essendon Airport.On front cover in ink "" in top right hand corner and "4 G 33 " along bottom edge.trams, tramways, melbourne, map, tram & bus services, railways, mmtb, minister for transport -
 Melbourne Tram Museum
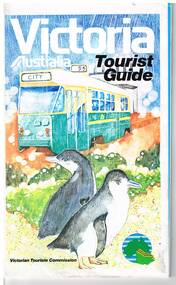
Map, Surveyor General for the Victorian Tourism Commission, "Victoria Australia Tourist Guide", 1985
Folded map of Victoria, showing in colour relief Victorian area, national parks, highways, towns, railways, airport, wine growing areas, towns with information centres, historic parks, ski fields. NSW and SA show major towns and highways. Front cover includes an image of a Z class tram and two penguins. Has town index. Folded 7 folds horizontally by 3 folds deep. On rear is a listing of locations with major tourist destinations provided. Provides location of VicTour offices. Prepared by the Surveyor General for the Victorian Tourism Commission, printed by the Government Printer, 4th edition 1985.trams, tramways, victoria, map, victour, tourism -
 Melbourne Tram Museum
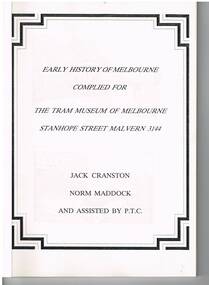
Document - Report, Jack Cranston, "Early History of Melbourne compiled for The Tram Museum of Melbourne - Stanhope St Malvern", c1990
Perfect bound, approx. 60 page document, clear plastic front cover, card rear cover, titled "Early History of Melbourne compiled for The Tram Museum of Melbourne - Stanhope St Malvern", prepared by Jack Cranston, Norm Maddock and assist by the PTC, undated, believed to be c 1990. Photocopied version with low quality B&W photos, extracts from Broadbents Melbourne Guide c 1912, with an index to Melbourne streets, cable, horse and electric tramways, railways, clubs, hospitals, hotels, maps, city sights. Includes notes on George Broadbent and his involvement with the RACV.trams, tramways, melbourne, maps, tramways, guides, cable trams, horse trams -
 Melbourne Tram Museum
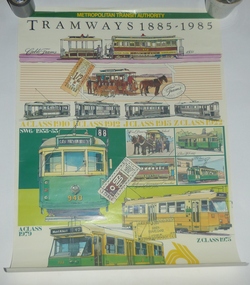
Poster, Metropolitan Transit Authority (MTA), "Tramways 1885 - 1985", "Railways 1854 - 1985" "Buses 1925 - 1985", 1985
Set of three transport posters issued by the Metropolitan Transit Authority, in 1985 featuring trams, trains and buses. See also Reg Item 151 for a laminated version of the tramways poster. .1 - Poster titled "Tramways 1885 - 1985" featuring drawings of cable tram set with a bogie trailer (472), horse drawn tram black and white drawings of A, F, J and S class trams, though the last one printed with a Z. SW6 940, horse, U 205, W2 348, Z 223 and A 233. Has two Metropolitan Transit Authority tram tickets and an Inner Travel Card, with the MTA logo in the bottom right hand corner. .2 - Poster titled "Railways 1854 - 1985", featuring drawings of the first train for Hobsons Bay Railway Company, various trains, staff drawings, Tait, Harris, Hitachi and Comeng trains with a first class all lines tick, Collingwood Edmondson and a Metro and Travel cards. Has part of the suburban train map. .3 - Poster titled "Buses 1925 - 19856", featuring drawings of 1925 MMTB Tilling Stevens, Munitions, Thornycroft, Leyland, double deck buses, AEC Regal Mk 3, Mk 6, 1975 Leyland, 1977 Volvo and MAN buses, along with a Day Tripper and other travel card tickets.trams, tramways, posters, melbourne, mmtb, mta, tram & bus services, buses, railways, tilling stevens, thornycroft, leyland, aec, volvo, man -
 Melbourne Tram Museum
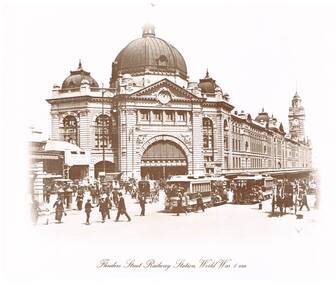
Photograph - Black & White Photograph/s, "Flinders Street Railway Station, World War 1 Era", 1980's?
Reproduced photograph, sepia toned of "Flinders St Railway Station, World War 1 Era, taken from St Paul's Cathedral steps. Has part of the Princes Bridge Station building on the left hand side. The Swanston St canopy of Flinders St station has the words "Enlist and Fight for the Dear Old Flag". Two Richmond line cable trams in Flinders St along with horse drawn vehicles. One of a series of four photographs produced by an unknown person/company. Two sizes of prints held, one large, two small. See also Reg Item 1883 for a 1944 photograph.On the rear of 587 "Cable Tram prints $10/set"trams, tramways, melbourne, flinders st station, world war 1, cable trams -
 Melbourne Tram Museum
Letter, Ross Wilson, bus route numbers and opening dates, 19/04/1996 12:00:00 AM
Letter - two pages, stapled in the top left hand corner from Ross Wilson of Canberra to Keith Kings regarding bus route numbers and opening dates, in particular the Sorrento line, the HTT extensions to Wattle Valley Road and closure of railway / tramway level crossings.trams, tramways, routes, level crossings, sorrento, htt -
 Melbourne Tram Museum
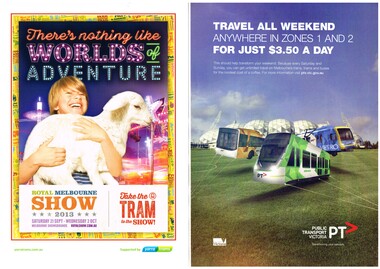
Pamphlet, Various, Travel all weekend anywhere in Zones 1 and 2 for $3.50/day, 2013 - 2014
Set of four pamphlets A4 size, for distribution or display on trams/tram, railway stations stops etc. .1 - Travel all weekend anywhere in Zones 1 and 2 for $3.50/day .2 - Royal show 2013 - take the tram to the show. .3 - Breathe Easy - tram shelters and platforms will be smoke free from 1/3/14. .4 - Victorian Seniors Festival for 2013 and free public transport. .5 - Reporting taggers to the Police or crime stoppers - Graffititrams, tramways, yarra trams, tickets, royal show, festival program, smoking, ptv, graffiti -
 Melbourne Tram Museum
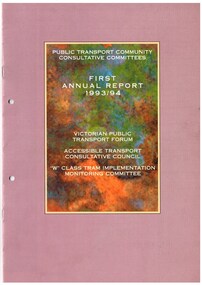
Document - Report, Victorian Government, "Public Transport community consultative Committee - First Annual Report 1993/94", 1997 Annual Report", 1994
.1 Full colour, A4 report printed on gloss paper, 16 pages, centre stapled titled "Public Transport community consultative Committee - First Annual Report 1993/94", reporting on the Victorian Public Transport Forum, Accessible Transport Consultative Council and the "W class tram implementation monitoring committee". Has a foreword by Alan Brown, provides membership of each Committee, meetings, Consultation, major issues, public transport safety, Upfield railway line, sponsorship of tram shelters and signage, Metcard, fares, public relations, on-train refreshment, First class fares, accessible travel, driver-only trains and trams. The W class committee look at the major issues, tram livery, advertising on the trams, deployment, storage and alternative uses for stored trams. .2 - Full colour, A4 report printed on gloss paper, 16 pages, centre stapled titled "Public Transport community consultative Committee - Annual Report 1997", reporting on the Victorian Public Transport Forum, Accessible Transport Consultative Council, City Circle tram promotion committee and public transport heritage advisory committee. Has forward from Robin Cooper, lists membership of every committee and gives detail of their work and project outcomes.trams, tramways, minister for transport, accessible transport, w class, advertisements, city circle, heritage