Showing 2010 items
matching tram routes
-
 Ballarat Tramway Museum
Photograph - Digital image, Peter Bruce, "No. 39 approaching Sebas", 1970s
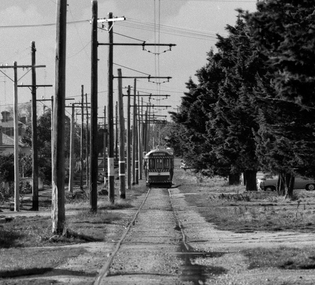
Yields information about the Sebastopol route and area near the terminus.Digital image, black and white, of No. 39 in Albert St Sebastopol, north of the Sebastopol terminus. Shows the condition of the track and the number of poles in the section. Taken with a telephoto lens. Photo taken by Peter Bruce 1970's and 1971, prior to the closure of the Ballarat tramway system. Peter's Title of image: "No. 39 approaching Sebas"trams, tramways, sebastopol, tram 38 -
 Ballarat Tramway Museum
Photograph - Digital image, State Electricity Commission of Victoria (SECV), "Official Timetable Bendigo June 1940"
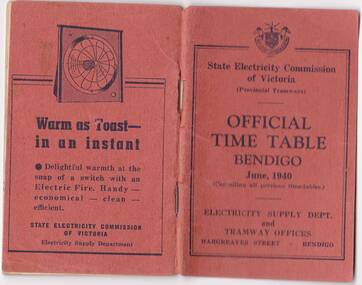
Yields information about the Bendigo Tram services.Digital image or copy of the SEC "Official Timetable Bendigo June 1940", 22 image files - 44 pages, giving details of the fares, transfers, luggage or parcels, lost property, times of each tram on the Quarry Hill, Eaglehawk, Lake Weeroona and Golden Square for both directions and Monday to Thursday, Friday, Saturday and Sunday. Has a number of advertisements for SEC home equipment, cookers, toasters, refrigerator, electric radiators and hot water. In the middle page is a map of the Tramway Routes, which has been hand drawn to shown North Bendigo and the depot location. Inside the rear cover, on a sheet headed "Memorandum" is a photograph, taped in of a conductor loading a pram onto a Birney tram. Under the photograph is in ink "Len Smith (Geelong)" See item3127 for an original copy and pdf scan. trams, tramways, bendigo, timetables -
 Ballarat Tramway Museum
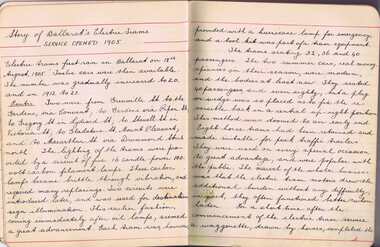
Document - Handwritten Notes, Wal Jack, "Story of Ballarat's Electric Trams", 1930-1940's
Has a strong association with a Ballarat Tramway and its early electric trams - a handwritten copy of an article in The Courier.Handwritten copy of a H.P. James, article that appeared in The Courier, 24-9-1937, titled "Story of Ballarat's Electric Trams" 15 pages, covering the routes, tramcars, fare boxes, Sebastopol, managers, wages, union, arbitration, strikes, events of interest, Contained within Reg Item 5485 - Service Exercise Book, black covers, with label, red binding titled "No. 2 - Ballarat Tramways & S.E.C. Systems". trams, tramways, ballarat, esco -
 Ballarat Tramway Museum
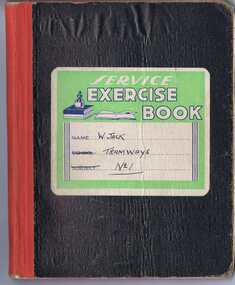
Document - Exercise Book, Wal Jack, "W. Jack Tramways No. 1", 1950s
Contains notes on the following tram systems. Brisbane - includes notes on photographs Rockhampton steam Sydney Tram Depots NSW Tramways tramcars - notes on each class and work vehicles Birmingham including two cuttings about the closure of Birmingham dated 31-3-1939 London Passenger Transport Board - one page Bristol - closure and damage. Sheffield History of the Tramcar Victorian Railways - St Kilda Brighton Electric Street Railway Sandringham to Black Rock MMTB Cable trams and opening dates Opening dates for the tramway routes in Melbourne to 1921 News Paper cuttings on Doncaster Newspaper cutting - cable trams "Cable Trams.....clang into history" by Hugh Murphy History and Development to 1943 - Brisbane Trams by G. R. Steel (half page only) Perth Tramways Adelaide Municipal Tramways Trust notes South Africa Trams Wellington Corporation Tramways (NZ) Tramways in Soviet Russia World's Largest Tram Systems - July 1938Demonstrates the work of Wal Jack in recording tramway information.Service Exercise Book, black covers, with label, red binding titled "W. Jack Tramways No. 1" lined pages, four sections each of 10 sheets, (80 pages), stitched bound. trams, tramways, tramways, sydney, brisbane, vr, melbourne, cable trams -
 Ballarat Tramway Museum
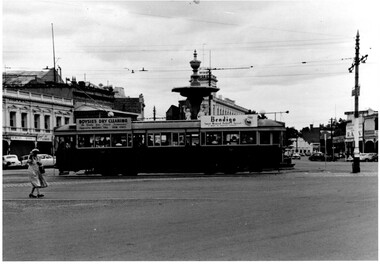
Photograph - Black & White Photograph/s, Bendigo 18 crossing Charing Cross, late 1950's
Black and White photograph, of Bendigo 18 crossing Charing Cross en route to Eaglehawk. Has roof ads for Boysies Dry Cleaning and Bendigo Sweet Mustard, Pickles spread. In the background is the fountain, Club Hotel, RACV and Neilors Wines Hotel? Printed on Fujicolour paper. Two copies held. "TMSV Sales" stamp on rear. On rear of in ink "PM & MM E45 = Bend 18" trams, tramways, bendigo, charing cross, tram 18 -
 Ballarat Tramway Museum
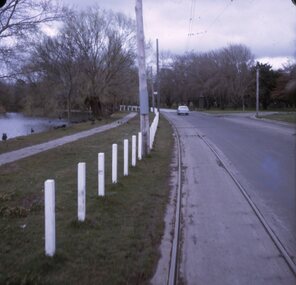
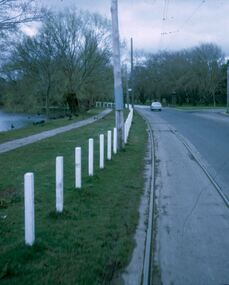
Slide - 27 mm sq slide/s - set of 9 - tram tracks - Gardens to the City, Lilian Butler, Aug. 1971
Yields information about the streetscapes of Ballarat on the Gardens to Victoria St route and in particular buildings and people that crewed the trams.Set of nine Colour 27 x 27 mm slide in a Kodachrome cardboard mount of a series of photographs taken from Wendouree Parade in the Gardens to the City tramway - taken from the front or rear window of the tram. .1 - Carlton St loop looking north .2 - Wendouree Parade, north of the Windmill Drive north intersection - has a tram stop pole. .3 - Sturt St - in bound just past Pleasant St - has passengers waiting at the tram stop. .4 - at Ascot St. .5 - at Drummond St with Shell garage in the view and a track worker. .6 - at Talbot St? with track workers repairing the road surface. .7 - at Dawson St showing the tram stop and End of Section signs. .8 - nearing the intersection with Armstrong St. .9 - nearing Lydiard St. Slide mount date cannot be read - possibly August 1971. Photo from the collection of Lilian Butler.ballarat, tramways, trams, wendouree parade, sturt st, drummond st, trackwork, tram stops, carlton st loop -
 Ballarat Tramway Museum
Slide - 27 mm sq slide/s set of 6, Lilian Butler, Tram No. 38 at the Victoria St terminus, Aug. 1971
Yields information about the streetscapes of Ballarat on the Gardens to Victoria St route and in particular buildings and people that crewed the trams.Set of six Colour 27 x 27 mm slide in a Kodachrome cardboard mount. .1 - Tram No. 38 at the Victoria St terminus, with the destination of Gardens via Sturt St West. Note the red traffic cone in the overhead by the trolley wheel positioning location device. .2 - crew of No. 30 by the tram - R. Knight (57) and Conductor W. Nancarrow (8) .3 - No. 30 at Gardens Loop .4 - as for .2 - see Also Reg item 6455. .5 - view from tram at intersection of Wendouree Parade and MacArthur St, View Point. .6 - view of trackwork at intersection of Drummond and Sturt Streets with the Southern Cross Hotel in the background. Slide mount date August 1971. Photo from the collection of Lilian Butler.ballarat, tramways, trams, victoria st, crews, gardens loop, view point, hospital corner, tram 30 -
 Ballarat Tramway Museum
Slide - 27 mm sq slide/s - set of 8 - tram tracks - Victoria St, Lilian Butler, Aug. 1971
Yields information about the streetscapes of Ballarat on the Gardens to Victoria St route and in particular buildings and people that crewed the trams.Set of eight Colour 27 x 27 mm slide in a Kodachrome cardboard mount. .1 - view of the Sturt and Lydiard St intersection from the front of the tram car with the Robbie Burns statue in the view and the Big W store. .2 - ditto at the corner of Sturt and Grenville St with the tramway shelter and the Dickins store. .3 - setting the signals for the Bridge St route. .4 - View looking east along Bridge St with Big W store and Faull's shoe shop. .5 - At intersection with Main Road, looking up the hill towards Victoria St. On the right is the advert for Viscount Ambassador Caravans. .6 - Looking along Victoria St, towards the East at E St, with the biscuit factory on the left. .7 - tram shelter at Queen St. .8 - View of the terminus looking east, showing the median strip Slide mount date August 1971. Photo from the collection of Lilian Butler.ballarat, tramways, trams, sturt st, grenville st, shelters, bridge st, signals, victoria st -
 Ballarat Tramway Museum
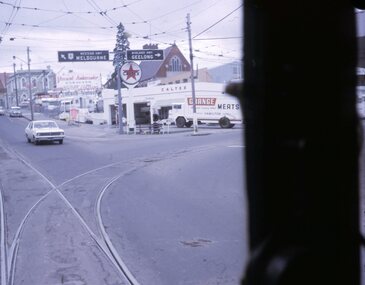
Slide - 27 mm sq slide/s - set of 9 - Victoria St and crews, Lilian Butler, Aug. 1971
Yields information about the streetscapes of Ballarat on the Gardens to Victoria St route and in particular buildings and people that crewed the trams.Set of nine Colour 27 x 27 mm slide in a Kodachrome cardboard mount. .1 - R. Williams (Motorman) and Danny Powell (badge 30) standing in front of a tram at Victoria St. The tram has the destination of Gardens via Sturt St West. .2 - view of No. 113 Victoria St - now Ardenlee B&B. .3 - Sunshine Biscuit Factory .4 - Mack's Hotel .5 - Stones Corner - intersection of Victoria and Mt Pleasant routes .6 - Crossing Grenville St .7 - No. 30 at the City terminus, Lydiard St with Racey's and the SEC office in the background. .8 - as for .5, but looking east with the Caltex service station in the background. .9 - No. 30 at the Victoria St terminus. Slide mount date August 1971. Photo from the collection of Lilian Butler.ballarat, tramways, trams, victoria st, bridge st, stones corner, tram 30 -
 Ballarat Tramway Museum
Slide - 27 mm sq slide/s - set of 11, Lilian Butler, Wendouree Parade and Sturt St West, Sep. 1971
Yields information about the streetscapes of Ballarat depot to Pleasant St route and in particular buildings and people that crewed the trams.Set of eleven Colour 27 x 27 mm slide in a Kodachrome cardboard mount. .1 - Wendouree Parade looking west towards St Aidans Drive - the gate pillars can be seen. .2 - ditto looking west - Fairyland .3 - ditto looking towards Gardens Loop .4 - No. 41 at Gardens Loop, with destination of Gardens via Drummond North .5 - ditto showing Mt Pleasant .6 - ditto, just past the now BTM Depot Junction. .7 - Carlton St - showing the gates .8 - Looking towards Hamilton Ave from within Carlton St loop with the signal showing red. .9 - Turning from Hamilton Ave into Sturt St West. .10 - Sturt St west looking east with the Loreto convent walls on the left hand side. .11 - Sturt St - Pleasant St intersection - showing road surface, a tram coming towards the intersection and buildings on either side. Slide mount date September 1971. Photo from the collection of Lilian Butler.ballarat, tramways, trams, wendouree parade, st aidans drive, gardens loop, depot junction, carlton st, carlton st loop, signals, sturt st west, pleasant st, tram 41 -
 Ballarat Tramway Museum
Slide - 27 mm sq slide/s - set of 7, Lilian Butler, Mt Pleasant line, Sep. 1971
Yields information about the streetscapes of Stones Corner to Mt Pleasant route and in particular buildings and people that crewed the trams.Set of seven Colour 27 x 27 mm slide in a Kodachrome cardboard mount. .1 - Tram turning onto the Mt Pleasant line at Stones Corner - Bridge St, Main Road .2 - Main Road looking south with Inland Body Works building on the left and Ampol Service Station .3 - Mt Pleasant terminus with the butcher shop on the left and the diary on the right - shows the terminating tram track .4 - Conductor changing pole. .5 - Putting pole on the overhead .6 - Conductor (D O'Leary - No. 38) standing in front of tram and Motorman or driver (N. Hall - No. 43) .7 - ditto with number visible. See Reg item 3425 for crew lists. Slide mount date September 1971. Photo from the collection of Lilian Butler.ballarat, tramways, trams, stones corner, main road, mt pleasant, crews, drivers, conductors, trolley poles, tram 41 -
 Ballarat Tramway Museum
Photograph - Digital image, Dick Jones, W3 661 outbound in St Kilda Road, Dec. 1964
Demonstrates one of the Museum's trams in service in Melbourne.Digital Image of MMTB tram W3 661 outbound in St Kilda Road, approaching Doman Junction. Tram has destination of East Brighton, Route 64 and an advertisement for Proofkote (rain wear protection?) BP House in the background. Photo December 1964. Photo reference from Dick Jones - 661_StKildaRd_DickJones_6412MIns.23.04trams, tramways, w3 class, st kilda road, east brighton, tram 661 -
 Ballarat Tramway Museum
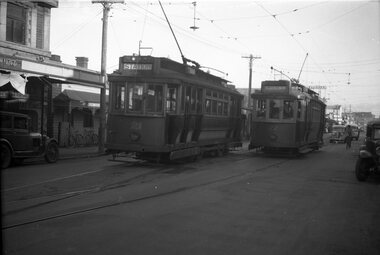
Negative, Wal Jack, Geelong 21 and 22 crossing at the Albert St loop in Pakington St, 23/6/1949
Geelong 21 and 22 crossing at the Albert St loop, the second loop in Pakington St. Tram 21 has the destination of Station, and 22 the destination of West. See item 9053 for details of the location and date - 23-6-1949. Refer to "Twenty five years ago, the Closure of the Geelong Tramways", by Ken McCarthy, April 1981 issue of Trolley Wire page 10 for routing information. Yields information about tram operations in Pakington St.Negative and Digital images of the Wal Jack Geelong Negative file.trams, tramways, geelong, pakington st, west, station, tram 21 tram 22 -
 Ballarat Tramway Museum
Document - Report, Wal Jack, "History of Ballarat Tramways - 1887 - 1953", Original c1953, copy 2020
Part 1 - Ballarat Horse Trams - notes that much of the details was supplied by the late Inspector James. Part 2 - Electric Trams - gives dates for the withdrawal of the ESCo cars, routes, SEC and extensions, including the Forest City signals. 11 pages of a typed article or research report on foolscap paper titled "History of Ballarat Tramways - 1887 - 1953", written by Wal Jack, Gestetner printed. With the file is a set of A3 size laminated photocopies, provided by the donor. See also Reg Item 6419 for another copy.trams, tramways, sec, esco, ballarat, sec, horse trams, tramcars -
 Ballarat Tramway Museum
Photograph - Digital image, Electric Street Railway Journal, "Improved one-man Operation in Australia", "The Principals of Differential Wages in Awards", "One Man cars in Australia"
Yields information about the operation of one man trams in Ballarat and Bendigo and the provision of information to the American tramway or Street car press. Has a strong association with the Author - Mr Pringle.Series of five digital images of items from the Electric Street Railway Journal about one-man tram operations and wages in Ballarat, written by the ESCo Manager, Mr P J Pringle, Chief Engineer and General Manager. Images i1 and i2 - pages 172 and 173 - letter titled "Improved one-man Operation in Australia", Vol 47 No. 4, 22/1/1916 - describing the operation, and how it operates. Reference to the use in other places in made by the author and the magazine. image i3 - general comment making possible reference to a UK magazine - and how one man tram are worked and their routes, including tickets and wages. From Vol 46, page 23, 4/12/1915. image i4 - "The Principals of Differential Wages in Awards" - Vol 56, No. 19., 6/11/1920 page 965, looking at wages based on locations, arbitration, over WW1, including cost of living and renting. image i5 - "One Man cars in Australia" - Vol 55, No. 24, 12/6/2020 - page 1206, looking at the accident rates between one and two man cars.trams, tramways, one man trams, electric street railway journal, ballarat, bendigo, esco, wages, fares, accidents -
 Melbourne Tram Museum
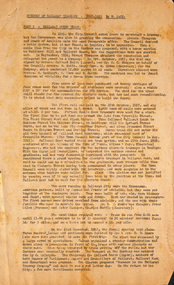
Ephemera, Sydney Rd Accessible Transport, "Rally Accessible tram stops - make Sydney Road accessible for all", June 2023
Flyer, distributed for a Rally on 17/6/2023 to protest/support accessible tram stops in Sydney Road on route 19. Has a drawing of W class tram 935 and people needing accessibility. Has the City of Merri-bek logo and the name of the organisation - "Sydney Rd Accessible Transport", email and QR code. The rally did take place. Yields information about a rally for accessible tram stops in Sydney Road Brunswick.Flyer - A5 single sided sheet full colour.tramways, sydney road, accessibility, rally, tram 935, tram stops -
 Ballarat Tramway Museum
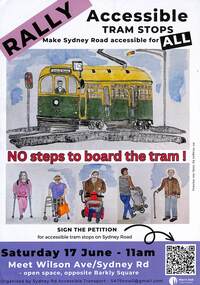
Document, Melbourne and Metropolitan Tramways Board (MMTB), "Tender Schedule for 100 Electric Trams Contract No. 3000", 1977
Compiled and published by the Melbourne and Metropolitan Tramways Board, closing Monday 10 May 1977. Details the conditions of tender, conditions of contract, notes, specifications, gives background information about Melbourne, dimensions, performance, drivers and conductors, trucks, wheels, brakes, electrical equipment, control panels and drawings. The drawings give a map of the system, typical city route, Glenferrie Road route (grade diagram), concrete track construction, min. radius curves, loading gauge, all-electric tram and mounting details for the trolley base, schedule of prices, tender form, form of contract, and schedule of information to be provided by the tenderer. Includes an Alphabetical Index. Includes a drawing for a single-ended version of the tramcar. Became the Z3 class following the addition of a rear or 3rd door. Yields information about the 1977 tender for 100 electric tramcars that became the Melbourne Z3 class tram.Comb bound (white plastic) specification or tender document, approx 180 pages, with glossy card orange covers, titled "Tender Schedule for Electric Trams" and "Contract 3000". "1977" on front cover in ink.tramways, tramcars, z3 class, specification, tenders, mmtb, melbourne, single ended tramcars -
 Ballarat Tramway Museum
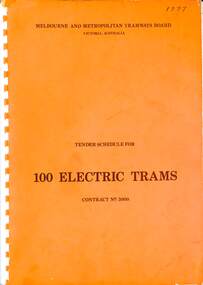
Model - Model Melbourne W2 class No. 522 - partly assembled, Weico Models
Model of a Melbourne W2 class tram, No. 522 partly assembled with some parts in a plastic bag. Fitted with one bogie or truck, but not the wheels. Does not have a route number box Painted in Melbourne colours of green and cream showing the destination of Depot. Model built by Weico. Has drop centre seats, the two saloons are left empty for motors to be fitted.Demonstrates a model that represented a successful Melbourne bogie tram.Model Melbourne W2 class No. 522 - partly assembled with some parts in packing.models, tramcars, weico models, melbourne, w2 class, tram 522 -
 Melbourne Tram Museum
Photograph - SW5.806 at Flinders Street Station, Michael McLeod, c. 1980s
Photograph shows SW5 No. 806 (with "Special" indicated on the route banner) on Victoria Parade, on Flinders Street with Flinders Street Station in the background. Trolley poles are visible and in use. The tram is painted in a livery of the Transporting Art program, as a so-called "Art Tram." The artwork is by Elizabeth Gower, sponsored by Canon Australia. Photo by Michael McLeod.Shows a now-withdrawn tram with obsolete equipment (i.e., trolley poles) and livery representing a culturally important event in Melbourne's transit history.Colour Photograph - SW5.806 at Flinders Street Stationtrams, tramways, sw5 class, sw5 class tram, art trams, transporting art, public transport, tram 896 -
 Melbourne Tram Museum
Photograph - Z1.8 at Preston Workshops, Michael McLeod, c. 1989
Photograph shows Z1 No. 8 (with "Special" indicated on the route banner and "1" on the route number box) at Preston Workshops. The tram is in an all-over advertising livery advertising libraries in Melbourne, with the slogan "Libraries are for everyone" printed across the length of the tram above the windows. The tram also had trolley poles installed. Photo by Michael McLeod.Shows a now-withdrawn tram with obsolete equipment (i.e., trolley poles) and livery that advertised city services.Colour Photograph - Z1.8 at Preston Workshopstrams, tramways, z1 class, public transport, tram 8, decorated trams -
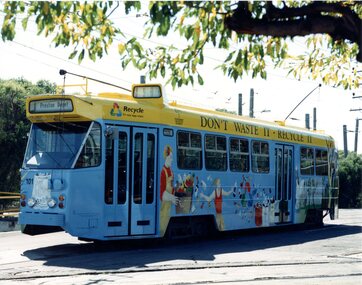 Melbourne Tram Museum
Photograph - Z2.101 at Preston Workshops, Michael McLeod, c. 1990
The photograph shows Z2 No. 101 (with "Preston Depot" indicated on the route banner and the route number box blank) at Preston Workshops. The tram is in an all-over advertising livery with a PSA on recycling by the Environment Protection Authority, with the slogan "DON'T WASTE IT - RECYCLE IT" printed across the length of the tram above the windows. The tram also had trolley poles installed. Photo by Michael McLeod.Shows a now-withdrawn tram with obsolete equipment (i.e., trolley poles) and livery that contains a PSA in the past.Colour Photograph - Z2.101 at Preston Workshopstrams, tramways, z2 class, public transport, tram 101, decorated trams, preston workshops -
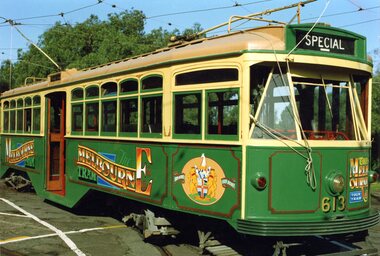 Melbourne Tram Museum
Photograph - Y1.613 at Preston Workshops, June 1992
Photograph shows Y1 No. 613 (with "Special" indicated on the route banner) at Preston Workshops. The tram is in a "Melbourne Tour Tram" livery. The tram also had trolley poles installed. This specially painted tram was formally launched during June 1992, but did not operate as such. See items 539, 627 and 669 for other related documents.Shows a now-preserved tram with obsolete equipment (i.e., trolley poles). This specially decorated tram was launched but did not operate as such,Colour Photograph - Y1.613 at Preston Workshopstrams, tramways, y1 class, public transport, tram 613, the melbourne tram, tourist trams -
 Melbourne Tram Museum
Pamphlet - The Ansair "Transett" Model 9, Ansair Pty. Ltd, c.1940s
A pamplet/brochure by Ansair advertising its "Transett" model 9 bus in the late 1940s. It contains information on the design, general specifications, internal systems, seating configurations, styling, servicing information and contact information of Ansair. In the background is a tram with dash canopy lighting about to turn from Collins St into Macarthur Street. The bus has been "photoshopped" into the image. The tram has the destination of Kew Depot, route 47.An advertisement from the 1940s/50s regarding the newest bus model at the time.Pamphlet - The Ansair "Transett" Model 9 - 8 pages centre stapled.public transport, buses, ansair, collins st, route 47 -
 Melbourne Tram Museum
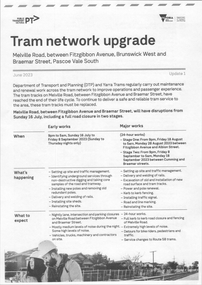
Ephemera - Route 58, "Tram Network upgrade", June 2023
... Pascoe Vale South route 58 Five A4 page document - printed. "Tram ...Provides details of track replacement work on route 58 in Melville Road, Pascoe Vale south / Brunswick West between 18/8/2023 to 18/9/2023.Yields information about track replacement work in Melville Road.Five A4 page document - printed.tramways, trackwork, melville road, brunswick west, pascoe vale south, route 58 -
 Melbourne Tram Museum
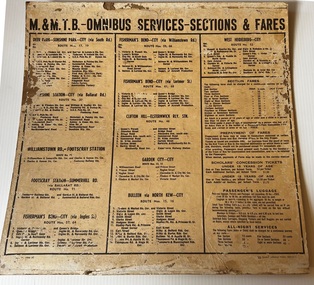
Poster, Melbourne & Metropolitan Tramways Board (MMTB), "M&MTB - Omnibus Services - Sections & Fares", 1966
Provides details of fares for each section, and location of sections for all bus routes. Notes prepayment of fares, children fares, and passengers' luggage including All-night services. Dated 1966, following the introduction of decimal currency. Yields information about bus routes, sections and fares in 1966.Poster, paper mounted or glued to cardboard sheet for use in buses - titled "M&MTB - Omnibus Services - Sections & Fares"public transport, buses, fares, mmtb, posters, routes -
 Melbourne Tram Museum
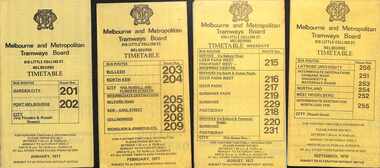
Ephemera - Timetables - MMTB Buses - set of 9, Melbourne & Metropolitan Tramways Board (MMTB), 1976 to 1978
Timetables - provide information on ticketing, fares, timing points, with a description of the route and a map. Not all services had been allocated a route number at the time. 1 - Garden City - Port Melbourne - City - routes 201 and 202 - Jan. 1977 2 - Bulleen - North Kew City - Routes 203, 204, 205, 206, 208 and 209 - Feb. 1977 3 - Deer Park West - Sunshine - Footscray - City - routes 215, 216, 217, 219. 218, 220, 231 with a Saturdays and Sundays timetable sheet printed on green paper - Aug. 1977 4 - La Trobe University - Northland - West Heidelberg - City - routes 256, 251, 253, 254, 252, 255 - Sept. 1978 5- Warrandyte - Park Orchards - Ringwood - routes 273, 274, 275 - June 1976 6 - Warrandyte - Donvale - Templestowe - Shoppingtown - City - routes 276, 277, 278, 294, 278, 280, 299, 268 - July 1976 7 - Box Hill - Mitcham, East Doncaster, Ringwood - routes 287, 286, 288, 282, 283, 272 - June 1976 8 - Box Hill - North Blackburn - route 290 - June 1976 9 - Box Hill - Heidelberg, East Doncaster, Shopping town - routes 291, 297, 296, 293, 271 and 269 - Sept. 1976Yields information about MMTB Bus services during the mid 1970s. Set of nine MMTB Bus timetables - multifolded printed on yellow paper, unless noted otherwise. timetable, mmtb, buses, port melbourne, garden city, deer park, fisherman's bend, west heidelberg, box hill, doncaster, shoppingtown, mitcham, ringwood, blackburn, templestowe, lower templestowe -
 Melbourne Tram Museum
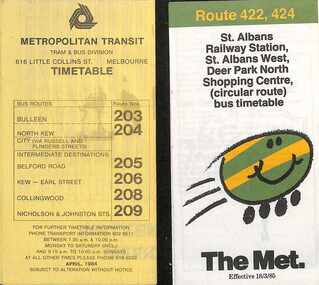
Ephemera - Timetables - The Met - buses - set of 2, The Met, 1984 and 1985
Timetables - provide information on ticketing, fares, timing points, with a description of the route and a map. 1 - Bulleen - North Kew - City, Belford Rd, Collingwood - routes 203, 204, 205, 206, 208, 209 - with the first "The Met" logo - April 1984 2 - St Albans - Deer Park North Shopping Centre - circular route - with the smiley face on wheels logo - dated 18/3/1985.Yields information about MMTB Bus services during the mid 1980s. Set of two The Met timetables, one printed on the folded sheet of yellow paper and the other on white paper.timetable, bulleen, north kew, collingwood, the met, deer park, st albans -
 Melbourne Tram Museum
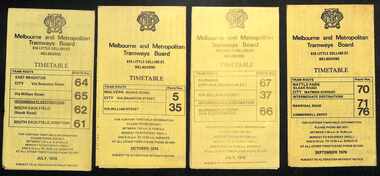
Ephemera - Timetables - MMTB trams - set of 8, Melbourne & Metropolitan Tramways Board (MMTB), 1976
Timetables - provide information on ticketing, fares, and timing points, with a description of the route and a map. Not all services had been allocated a route number at the time. 1 - East Brighton - City and via William St - routes 64, 65, 62 and 61 - July 1976 2 - Malvern (Burke Rd) to City and via Wiliam St - routes 5 and 35 - Oct. 1976 3 - Carnegie - City and via William St - routes 67, 37, and 66 - July 1976 4 - Wattle Parke - City and Camberwell depot - routes 70, 71 and 76 - Sept. 1976 5 - Kew - Cotham Road to St Kilda Beach - route 69 - August 1976 6 - East Preston - via Bourke or La Trobe, and East Brunswick - routes 88, 14, 89. 90, 96, 95, and 97 - Feb. 1976 7 - Toorak - City and via William St - routes 8 and 38 - August 1976 8 - St Kilda Beach and South Melbourne Beach and via William St - routes 15, 16, 53, 55, 1, 2 and 4 - Sept. 1976 Yields information about MMTB tram services during the 1970s. Set of 8 MMTB tram timetables - multifolded printed on yellow paper.timetable, mmtb, wattle park, east brighton, malvern, carnegie, kew, east brunswick, toorak, st kilda beach, south melbourne beach, route 64, route 65, route 62, route 61, roure 5, route 35, route 67, route 37, route 66, route 70, route 71, route 76, route 69, route 88, route 96, route 8, route 38, route 15, route 1, route 2, route 55, route 53 -
 Ballarat Tramway Museum
Photograph - Black and White - tram 17 Victoria St and East St, A T Miles, 30/1/1968
... the Victoria St route. Tramways trams tram 17 Victoria St East St A T ...Black and White - tram 17 (Victoria St) at the intersection with East St, looking west. Shows the curve in Victoria St, just before the descent to Bridge St, Taken by A T Miles 30/1/1968.Yields information about the Victoria St route.Photograph - black and white print with notes on rear. Printed on Ilford paper.A T Miles stamp and location and date notes.tramways, trams, tram 17, victoria st, east st -
 Melbourne Tram Museum
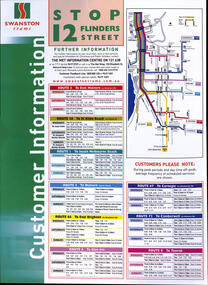
Poster, Swanston Trams, "Swanston Trams - Stop 12 Flinders Street", 1999
Poster - "Swanston Trams - Stop 12 Flinders Street" - giving frequency information for routes 3, 16, 1, 5, 64, 6, 67, 72 and 8 - all the Swanston St routes. Has a map insert showing these routes and interchanges with rail lines. Gives The Met information centre contact details, along with Swanston's website. Understood this was a proposal, but not actually used. Demonstrates timetable information board layouts - not actually used.Special size sheet printed in full colour and laminated.tramways, swanston trams, timetables, poster, stop information, signs, swanston st