Showing 12910 items matching "warrnambool"
-
 Flagstaff Hill Maritime Museum and Village
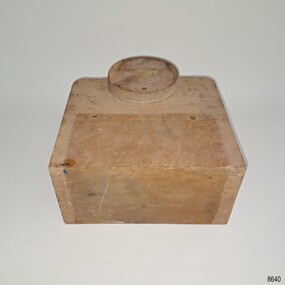
Equipment - Pattern, Briggs Brass Foundry, Early 20th century
The wooden pattern is part of a set that are stored in a strong wooden crate. It was used at Briggs’ Brass Foundry for making sand casts. It may fit together with one of the other patterns with a similar outline. The traditional craft of sand casting is over 2000 years old. The handcrafted process produces brass and copper alloy goods that are well suited to marine use; bells, boat hooks, cowls, propellers, handles, lids, rowlocks, hooks, letters, bolts, rail holders, brackets, deck plates, flanges, rudder guides, portholes and covers. Briggs’ Bronze mixture is a copper-based alloy made from local ingots of copper, tin, zinc and lead in carefully measured quantities. The finished product is non-ferrous and can last indefinitely. The crate of patterns was donated by the Briggs family in the early years of Flagstaff Hill, along with other related items such as brassware, tools and machinery. The donated items were displayed in a simulated Brass Foundry in the Village along with other working crafts, trades and services found in a Maritime town. The items were on show from the completion of the building in 1986 until 1994 when the building was repurposed. The patterns represent the trades of foundering and metalwork, both supporting maritime industries such as shipwrights and boatbuilders. Farmers, manufacturers and other local industries also needed the castings made by foundries. The Brass Foundry included a historic Cornish chimney set up as a working model, to tell the story of smelted metal heated in furnaces then be poured into the sand moulds. This chimney was made from specially curved bricks and is now about two-thirds of its full height when originally located at the Grassmere Cheese factory. The craft of sand-casting from carved wooden patterns to create metal is an example of skills from the past that are still used today. The foundry pattern set is significant for its association with brass foundries locally and generally in coastal areas of Victoria. Marine industries such as ship and boat building rely on good quality castings for their machinery, equipment and fittings. Briggs Brass was especially formulated using non-ferrous metals to ensure their longevity. The patterns are associated with the long-running firm Briggs Brass Foundry that specialised in cast goods for the marine industry, ready to supply the needs for once-off or mass-produced items. Their products would have been fitted to sail and steam vessels along coastal Victoria including Warrnambool. Briggs Marine was also a bell-founder specialist and is also associated with the Schomberg Bell at Flagstaff Hill, having restored it to is former state as a fine example of the bell from a luxury migrant vessel from the mid-19th century.Pattern; thick square mostly unopainted wooden block with a solid half-cylinder added to the top, which has rounded shoulders. A disc is added to the front, aligned with the curve at the top. The top curve has orange paint and the dial is pink. Three holes are drilled in the back, in a triangular configuration. It is similar in shape to a mantle clock or an early-style radio. The pattern is part of a set of foundry patterns from Briggs Brass Foundry.flagstaff hill, flagstaff hill maritime museum and village, warrnambool, maritime museum, maritime village, great ocean road, shipwreck coast, briggs' bronze, traditional method, trade, sand cast, cast, brass alloy, copper alloy, pattern, mould, foundry, brass foundry, metal foundry, casting, sand mould, sand casting, marine equipment, marine tools, marine fittings, copper tin zinc lead, non-ferrous, non-corrosive, brassware, metalware, foundering, metalwork, maritime, bell founders, ship chandlers, marine products, biggs, briggs family, herbert harrison briggs, h h briggs, george edward briggs, cyril falkiner mckinnon briggs, cyril briggs, briggs & son brass foundry, h h briggs & sons foundry, briggs marine, alliance casting & engineering solutions, grassmere cheese factory, cornish chimney, curved bricks, collingwood, moorabbin, collingwood foundry, moorabbin foundry, 1912 -
 Flagstaff Hill Maritime Museum and Village
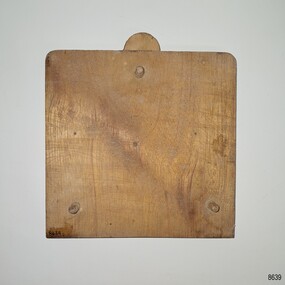
Equipment - Pattern, Briggs Brass Foundry, Early 20th century
The wooden pattern is part of a set that is stored in a strong wooden crate and may be part of another similar pattern. It was used at Briggs’ Brass Foundry for making sand casts. The traditional craft of sand casting is over 2000 years old. The handcrafted process produces brass and copper alloy goods that are well suited to marine use; bells, boat hooks, cowls, propellers, handles, lids, rowlocks, hooks, letters, bolts, rail holders, brackets, deck plates, flanges, rudder guides, portholes and covers. Briggs’ Bronze mixture is a copper-based alloy made from local ingots of copper, tin, zinc and lead in carefully measured quantities. The finished product is non-ferrous and can last indefinitely. The crate of patterns was donated by the Briggs family in the early years of Flagstaff Hill, along with other related items such as brassware, tools and machinery. The donated items were displayed in a simulated Brass Foundry in the Village along with other working crafts, trades and services found in a Maritime town. The items were on show from the completion of the building in 1986 until 1994 when the building was repurposed. The patterns represent the trades of foundering and metalwork, both supporting maritime industries such as shipwrights and boatbuilders. Farmers, manufacturers and other local industries also needed the castings made by foundries. The Brass Foundry included a historic Cornish chimney set up as a working model, to tell the story of smelted metal heated in furnaces then be poured into the sand moulds. This chimney was made from specially curved bricks and is now about two-thirds of its full height when originally located at the Grassmere Cheese factory. The craft of sand-casting from carved wooden patterns to create metal is an example of skills from the past that are still used today. The foundry pattern set is significant for its association with brass foundries locally and generally in coastal areas of Victoria. Marine industries such as ship and boat building rely on good quality castings for their machinery, equipment and fittings. Briggs Brass was especially formulated using non-ferrous metals to ensure their longevity. The patterns are associated with the long-running firm Briggs Brass Foundry that specialised in cast goods for the marine industry, ready to supply the needs for once-off or mass-produced items. Their products would have been fitted to sail and steam vessels along coastal Victoria including Warrnambool. Briggs Marine was also a bell-founder specialist and is also associated with the Schomberg Bell at Flagstaff Hill, having restored it to is former state as a fine example of the bell from a luxury migrant vessel from the mid-19th century. Pattern; unpainted, square wooden block with a semi-circle of dowel added to the centre of the side with rounded corners. Three short dowel pegs are inserted on one flat side; one below the semi-circle and one near the lower corners in an overall triangle configuration. The pattern is part of a set of foundry patterns from Briggs Brass Foundry.flagstaff hill, flagstaff hill maritime museum and village, warrnambool, maritime museum, maritime village, great ocean road, shipwreck coast, briggs' bronze, traditional method, trade, sand cast, cast, brass alloy, copper alloy, pattern, mould, foundry, brass foundry, metal foundry, casting, sand mould, sand casting, marine equipment, marine tools, marine fittings, copper tin zinc lead, non-ferrous, non-corrosive, brassware, metalware, foundering, metalwork, maritime, bell founders, ship chandlers, marine products, biggs, briggs family, herbert harrison briggs, h h briggs, george edward briggs, cyril falkiner mckinnon briggs, cyril briggs, briggs & son brass foundry, h h briggs & sons foundry, briggs marine, alliance casting & engineering solutions, grassmere cheese factory, cornish chimney, curved bricks, collingwood, moorabbin, collingwood foundry, moorabbin foundry, 1912 -
 Flagstaff Hill Maritime Museum and Village
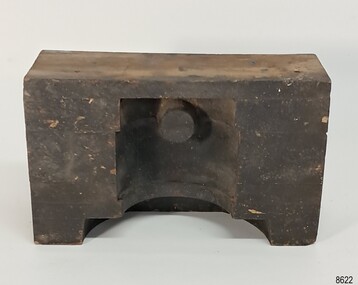
Equipment - Pattern, Briggs Brass Foundry, Early 20th century
The wooden pattern is part of a set that are stored in a strong wooden crate. It was used at Briggs’ Brass Foundry for making sand casts. The traditional craft of sand casting is over 2000 years old. The handcrafted process produces brass and copper alloy goods that are well suited to marine use; bells, boat hooks, cowls, propellers, handles, lids, rowlocks, hooks, letters, bolts, rail holders, brackets, deck plates, flanges, rudder guides, portholes and covers. Briggs’ Bronze mixture is a copper-based alloy made from local ingots of copper, tin, zinc and lead in carefully measured quantities. The finished product is non-ferrous and can last indefinitely. The crate of patterns was donated by the Briggs family in the early years of Flagstaff Hill, along with other related items such as brassware, tools and machinery. The donated items were displayed in a simulated Brass Foundry in the Village along with other working crafts, trades and services found in a Maritime town. The items were on show from the completion of the building in 1986 until 1994 when the building was repurposed. The patterns represent the trades of foundering and metalwork, both supporting maritime industries such as shipwrights and boatbuilders. Farmers, manufacturers and other local industries also needed the castings made by foundries. The Brass Foundry included a historic Cornish chimney set up as a working model, to tell the story of smelted metal heated in furnaces then be poured into the sand moulds. This chimney was made from specially curved bricks and is now about two-thirds of its full height when originally located at the Grassmere Cheese factory. The craft of sand-casting from carved wooden patterns to create metal is an example of skills from the past that are still used today. The foundry pattern set is significant for its association with brass foundries locally and generally in coastal areas of Victoria. Marine industries such as ship and boat building rely on good quality castings for their machinery, equipment and fittings. Briggs Brass was especially formulated using non-ferrous metals to ensure their longevity. The patterns are associated with the long-running firm Briggs Brass Foundry that specialised in cast goods for the marine industry, ready to supply the needs for once-off or mass-produced items. Their products would have been fitted to sail and steam vessels along coastal Victoria including Warrnambool. Briggs Marine was also a bell-founder specialist and is also associated with the Schomberg Bell at Flagstaff Hill, having restored it to is former state as a fine example of the bell from a luxury migrant vessel from the mid-19th century. Pattern; rectangular wooden block made from laminated sections of wood painted black. A half-cylinder shape was carved into the long side, and a dowel shape was placed at the lower side. The pattern is part of a set of foundry patterns from Briggs Brass Foundry.flagstaff hill, flagstaff hill maritime museum and village, warrnambool, maritime museum, maritime village, great ocean road, shipwreck coast, briggs' bronze, traditional method, trade, sand cast, cast, brass alloy, copper alloy, pattern, mould, foundry, brass foundry, metal foundry, casting, sand mould, sand casting, marine equipment, marine tools, marine fittings, copper tin zinc lead, non-ferrous, non-corrosive, brassware, metalware, foundering, metalwork, maritime, bell founders, ship chandlers, marine products, biggs, briggs family, herbert harrison briggs, h h briggs, george edward briggs, cyril falkiner mckinnon briggs, cyril briggs, briggs & son brass foundry, h h briggs & sons foundry, briggs marine, alliance casting & engineering solutions, grassmere cheese factory, cornish chimney, curved bricks, collingwood, moorabbin, collingwood foundry, moorabbin foundry, 1912 -
 Flagstaff Hill Maritime Museum and Village
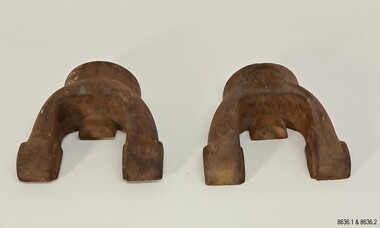
Equipment - Pattern, Briggs Brass Foundry, Early 20th century
The wooden pattern is part of a set that are stored in a strong wooden crate. It was used at Briggs’ Brass Foundry for making sand casts. The traditional craft of sand casting is over 2000 years old. The handcrafted process produces brass and copper alloy goods that are well suited to marine use; bells, boat hooks, cowls, propellers, handles, lids, rowlocks, hooks, letters, bolts, rail holders, brackets, deck plates, flanges, rudder guides, portholes and covers. Briggs’ Bronze mixture is a copper-based alloy made from local ingots of copper, tin, zinc and lead in carefully measured quantities. The finished product is non-ferrous and can last indefinitely. The crate of patterns was donated by the Briggs family in the early years of Flagstaff Hill, along with other related items such as brassware, tools and machinery. The donated items were displayed in a simulated Brass Foundry in the Village along with other working crafts, trades and services found in a Maritime town. The items were on show from the completion of the building in 1986 until 1994 when the building was repurposed. The patterns represent the trades of foundering and metalwork, both supporting maritime industries such as shipwrights and boatbuilders. Farmers, manufacturers and other local industries also needed the castings made by foundries. The Brass Foundry included a historic Cornish chimney set up as a working model, to tell the story of smelted metal heated in furnaces then be poured into the sand moulds. This chimney was made from specially curved bricks and is now about two-thirds of its full height when originally located at the Grassmere Cheese factory. The craft of sand-casting from carved wooden patterns to create metal is an example of skills from the past that are still used today. The foundry pattern set is significant for its association with brass foundries locally and generally in coastal areas of Victoria. Marine industries such as ship and boat building rely on good quality castings for their machinery, equipment and fittings. Briggs Brass was especially formulated using non-ferrous metals to ensure their longevity. The patterns are associated with the long-running firm Briggs Brass Foundry that specialised in cast goods for the marine industry, ready to supply the needs for once-off or mass-produced items. Their products would have been fitted to sail and steam vessels along coastal Victoria including Warrnambool. Briggs Marine was also a bell-founder specialist and is also associated with the Schomberg Bell at Flagstaff Hill, having restored it to is former state as a fine example of the bell from a luxury migrant vessel from the mid-19th century. Pattern; pair of U-shaped carved blocks, unpainted. The blocks have opposing metal pins and holes to hold them together. One block has a disc shape carved into the base. The pattern is part of a set of foundry patterns from Briggs Brass Foundry.flagstaff hill, flagstaff hill maritime museum and village, warrnambool, maritime museum, maritime village, great ocean road, shipwreck coast, briggs' bronze, traditional method, trade, sand cast, cast, brass alloy, copper alloy, pattern, mould, foundry, brass foundry, metal foundry, casting, sand mould, sand casting, marine equipment, marine tools, marine fittings, copper tin zinc lead, non-ferrous, non-corrosive, brassware, metalware, foundering, metalwork, maritime, bell founders, ship chandlers, marine products, biggs, briggs family, herbert harrison briggs, h h briggs, george edward briggs, cyril falkiner mckinnon briggs, cyril briggs, briggs & son brass foundry, h h briggs & sons foundry, briggs marine, alliance casting & engineering solutions, grassmere cheese factory, cornish chimney, curved bricks, collingwood, moorabbin, collingwood foundry, moorabbin foundry, 1912 -
 Flagstaff Hill Maritime Museum and Village
Equipment - Pattern, Briggs Brass Foundry, Early 20th century
The wooden pattern is part of a set that are stored in a strong wooden crate. It was used at Briggs’ Brass Foundry for making sand casts. The traditional craft of sand casting is over 2000 years old. The handcrafted process produces brass and copper alloy goods that are well suited to marine use; bells, boat hooks, cowls, propellers, handles, lids, rowlocks, hooks, letters, bolts, rail holders, brackets, deck plates, flanges, rudder guides, portholes and covers. Briggs’ Bronze mixture is a copper-based alloy made from local ingots of copper, tin, zinc and lead in carefully measured quantities. The finished product is non-ferrous and can last indefinitely. The crate of patterns was donated by the Briggs family in the early years of Flagstaff Hill, along with other related items such as brassware, tools and machinery. The donated items were displayed in a simulated Brass Foundry in the Village along with other working crafts, trades and services found in a Maritime town. The items were on show from the completion of the building in 1986 until 1994 when the building was repurposed. The patterns represent the trades of foundering and metalwork, both supporting maritime industries such as shipwrights and boatbuilders. Farmers, manufacturers and other local industries also needed the castings made by foundries. The Brass Foundry included a historic Cornish chimney set up as a working model, to tell the story of smelted metal heated in furnaces then be poured into the sand moulds. This chimney was made from specially curved bricks and is now about two-thirds of its full height when originally located at the Grassmere Cheese factory. The craft of sand-casting from carved wooden patterns to create metal is an example of skills from the past that are still used today. The foundry pattern set is significant for its association with brass foundries locally and generally in coastal areas of Victoria. Marine industries such as ship and boat building rely on good quality castings for their machinery, equipment and fittings. Briggs Brass was especially formulated using non-ferrous metals to ensure their longevity. The patterns are associated with the long-running firm Briggs Brass Foundry that specialised in cast goods for the marine industry, ready to supply the needs for once-off or mass-produced items. Their products would have been fitted to sail and steam vessels along coastal Victoria including Warrnambool. Briggs Marine was also a bell-founder specialist and is also associated with the Schomberg Bell at Flagstaff Hill, having restored it to is former state as a fine example of the bell from a luxury migrant vessel from the mid-19th century.Pattern; hexagonal wooden shape painted orange. The thick carved wooden shape is in halves forming a hole when locked together with the dowel pegs and opposing drilled holes. The pattern is part of a set of foundry patterns from Briggs Brass Foundry.flagstaff hill, flagstaff hill maritime museum and village, warrnambool, maritime museum, maritime village, great ocean road, shipwreck coast, briggs' bronze, traditional method, trade, sand cast, cast, brass alloy, copper alloy, pattern, mould, foundry, brass foundry, metal foundry, casting, sand mould, sand casting, marine equipment, marine tools, marine fittings, copper tin zinc lead, non-ferrous, non-corrosive, brassware, metalware, foundering, metalwork, maritime, bell founders, ship chandlers, marine products, biggs, briggs family, herbert harrison briggs, h h briggs, george edward briggs, cyril falkiner mckinnon briggs, cyril briggs, briggs & son brass foundry, h h briggs & sons foundry, briggs marine, alliance casting & engineering solutions, grassmere cheese factory, cornish chimney, curved bricks, collingwood, moorabbin, collingwood foundry, moorabbin foundry, 1912 -
 Flagstaff Hill Maritime Museum and Village
Equipment - Pattern, Briggs Brass Foundry, Early 20th century
The wooden pattern is part of a set that are stored in a strong wooden crate. It was used at Briggs’ Brass Foundry for making sand casts. The traditional craft of sand casting is over 2000 years old. The handcrafted process produces brass and copper alloy goods that are well suited to marine use; bells, boat hooks, cowls, propellers, handles, lids, rowlocks, hooks, letters, bolts, rail holders, brackets, deck plates, flanges, rudder guides, portholes and covers. Briggs’ Bronze mixture is a copper-based alloy made from local ingots of copper, tin, zinc and lead in carefully measured quantities. The finished product is non-ferrous and can last indefinitely. The crate of patterns was donated by the Briggs family in the early years of Flagstaff Hill, along with other related items such as brassware, tools and machinery. The donated items were displayed in a simulated Brass Foundry in the Village along with other working crafts, trades and services found in a Maritime town. The items were on show from the completion of the building in 1986 until 1994 when the building was repurposed. The patterns represent the trades of foundering and metalwork, both supporting maritime industries such as shipwrights and boatbuilders. Farmers, manufacturers and other local industries also needed the castings made by foundries. The Brass Foundry included a historic Cornish chimney set up as a working model, to tell the story of smelted metal heated in furnaces then be poured into the sand moulds. This chimney was made from specially curved bricks and is now about two-thirds of its full height when originally located at the Grassmere Cheese factory. The craft of sand-casting from carved wooden patterns to create metal is an example of skills from the past that are still used today. The foundry pattern set is significant for its association with brass foundries locally and generally in coastal areas of Victoria. Marine industries such as ship and boat building rely on good quality castings for their machinery, equipment and fittings. Briggs Brass was especially formulated using non-ferrous metals to ensure their longevity. The patterns are associated with the long-running firm Briggs Brass Foundry that specialised in cast goods for the marine industry, ready to supply the needs for once-off or mass-produced items. Their products would have been fitted to sail and steam vessels along coastal Victoria including Warrnambool. Briggs Marine was also a bell-founder specialist and is also associated with the Schomberg Bell at Flagstaff Hill, having restored it to is former state as a fine example of the bell from a luxury migrant vessel from the mid-19th century. Pattern; round wooden shape with a wide concave centre and a round flat handle in the middle, painted dark brown. The underside has a large wooden disc added to the centre. The pattern is part of a set of foundry patterns from Briggs Brass Foundry.flagstaff hill, flagstaff hill maritime museum and village, warrnambool, maritime museum, maritime village, great ocean road, shipwreck coast, briggs' bronze, traditional method, trade, sand cast, cast, brass alloy, copper alloy, pattern, mould, foundry, brass foundry, metal foundry, casting, sand mould, sand casting, marine equipment, marine tools, marine fittings, copper tin zinc lead, non-ferrous, non-corrosive, brassware, metalware, foundering, metalwork, maritime, bell founders, ship chandlers, marine products, biggs, briggs family, herbert harrison briggs, h h briggs, george edward briggs, cyril falkiner mckinnon briggs, cyril briggs, briggs & son brass foundry, h h briggs & sons foundry, briggs marine, alliance casting & engineering solutions, grassmere cheese factory, cornish chimney, curved bricks, collingwood, moorabbin, collingwood foundry, moorabbin foundry, 1912 -
 Flagstaff Hill Maritime Museum and Village
Equipment - Pattern, Briggs Brass Foundry, Early 20th century
The wooden pattern is part of a set that are stored in a strong wooden crate. It was used at Briggs’ Brass Foundry for making sand casts. The traditional craft of sand casting is over 2000 years old. The handcrafted process produces brass and copper alloy goods that are well suited to marine use; bells, boat hooks, cowls, propellers, handles, lids, rowlocks, hooks, letters, bolts, rail holders, brackets, deck plates, flanges, rudder guides, portholes and covers. Briggs’ Bronze mixture is a copper-based alloy made from local ingots of copper, tin, zinc and lead in carefully measured quantities. The finished product is non-ferrous and can last indefinitely. The crate of patterns was donated by the Briggs family in the early years of Flagstaff Hill, along with other related items such as brassware, tools and machinery. The donated items were displayed in a simulated Brass Foundry in the Village along with other working crafts, trades and services found in a Maritime town. The items were on show from the completion of the building in 1986 until 1994 when the building was repurposed. The patterns represent the trades of foundering and metalwork, both supporting maritime industries such as shipwrights and boatbuilders. Farmers, manufacturers and other local industries also needed the castings made by foundries. The Brass Foundry included a historic Cornish chimney set up as a working model, to tell the story of smelted metal heated in furnaces then be poured into the sand moulds. This chimney was made from specially curved bricks and is now about two-thirds of its full height when originally located at the Grassmere Cheese factory. The craft of sand-casting from carved wooden patterns to create metal is an example of skills from the past that are still used today. The foundry pattern set is significant for its association with brass foundries locally and generally in coastal areas of Victoria. Marine industries such as ship and boat building rely on good quality castings for their machinery, equipment and fittings. Briggs Brass was especially formulated using non-ferrous metals to ensure their longevity. The patterns are associated with the long-running firm Briggs Brass Foundry that specialised in cast goods for the marine industry, ready to supply the needs for once-off or mass-produced items. Their products would have been fitted to sail and steam vessels along coastal Victoria including Warrnambool. Briggs Marine was also a bell-founder specialist and is also associated with the Schomberg Bell at Flagstaff Hill, having restored it to is former state as a fine example of the bell from a luxury migrant vessel from the mid-19th century. Pattern; an unpainted, rectangular wooden frame with a top and sides, similar to a small rectangular stool. A solid half-cylinder shape was added under the horizontal 'seat' with another smaller half-cylinder attached to it, end-to-end. A string is tied between two metal loops attached to the back. There are two X marks stamped into the back. The pattern is part of a set of foundry patterns from Briggs Brass Foundry.Stamped: "X" "X"flagstaff hill, flagstaff hill maritime museum and village, warrnambool, maritime museum, maritime village, great ocean road, shipwreck coast, briggs' bronze, traditional method, trade, sand cast, cast, brass alloy, copper alloy, pattern, mould, foundry, brass foundry, metal foundry, casting, sand mould, sand casting, marine equipment, marine tools, marine fittings, copper tin zinc lead, non-ferrous, non-corrosive, brassware, metalware, foundering, metalwork, maritime, bell founders, ship chandlers, marine products, biggs, briggs family, herbert harrison briggs, h h briggs, george edward briggs, cyril falkiner mckinnon briggs, cyril briggs, briggs & son brass foundry, h h briggs & sons foundry, briggs marine, alliance casting & engineering solutions, grassmere cheese factory, cornish chimney, curved bricks, collingwood, moorabbin, collingwood foundry, moorabbin foundry, 1912 -
 Flagstaff Hill Maritime Museum and Village
Equipment - Pattern, Briggs Brass Foundry, Early 20th century
The wooden patterns are part of a set that are stored in a strong wooden crate. It was used at Briggs’ Brass Foundry for making sand casts. It may fit together with one of the other patterns with a similar outline. The traditional craft of sand casting is over 2000 years old. The handcrafted process produces brass and copper alloy goods that are well suited to marine use; bells, boat hooks, cowls, propellers, handles, lids, rowlocks, hooks, letters, bolts, rail holders, brackets, deck plates, flanges, rudder guides, portholes and covers. Briggs’ Bronze mixture is a copper-based alloy made from local ingots of copper, tin, zinc and lead in carefully measured quantities. The finished product is non-ferrous and can last indefinitely. The crate of patterns was donated by the Briggs family in the early years of Flagstaff Hill, along with other related items such as brassware, tools and machinery. The donated items were displayed in a simulated Brass Foundry in the Village along with other working crafts, trades and services found in a Maritime town. The items were on show from the completion of the building in 1986 until 1994 when the building was repurposed. The patterns represent the trades of foundering and metalwork, both supporting maritime industries such as shipwrights and boatbuilders. Farmers, manufacturers and other local industries also needed the castings made by foundries. The Brass Foundry included a historic Cornish chimney set up as a working model, to tell the story of smelted metal heated in furnaces then be poured into the sand moulds. This chimney was made from specially curved bricks and is now about two-thirds of its full height when originally located at the Grassmere Cheese factory. The craft of sand-casting from carved wooden patterns to create metal is an example of skills from the past that are still used today. The foundry pattern set is significant for its association with brass foundries locally and generally in coastal areas of Victoria. Marine industries such as ship and boat building rely on good quality castings for their machinery, equipment and fittings. Briggs Brass was especially formulated using non-ferrous metals to ensure their longevity. The patterns are associated with the long-running firm Briggs Brass Foundry that specialised in cast goods for the marine industry, ready to supply the needs for once-off or mass-produced items. Their products would have been fitted to sail and steam vessels along coastal Victoria including Warrnambool. Briggs Marine was also a bell-founder specialist and is also associated with the Schomberg Bell at Flagstaff Hill, having restored it to is former state as a fine example of the bell from a luxury migrant vessel from the mid-19th century. Pattern; a pair of blocks that form a rectangle with a carved centre hole and disc shape inside. The block is made from laminated pieces of wood with cut corners. Both sides have four drilled holes in a square configuration but in different positions. The cut faces and the space carved into them are painted red; one piece has two dowel pins that fit into two drilled holes on the other. The pattern is part of a set of foundry patterns from Briggs Brass Foundry.flagstaff hill, flagstaff hill maritime museum and village, warrnambool, maritime museum, maritime village, great ocean road, shipwreck coast, briggs' bronze, traditional method, trade, sand cast, cast, brass alloy, copper alloy, pattern, mould, foundry, brass foundry, metal foundry, casting, sand mould, sand casting, marine equipment, marine tools, marine fittings, copper tin zinc lead, non-ferrous, non-corrosive, brassware, metalware, foundering, metalwork, maritime, bell founders, ship chandlers, marine products, biggs, briggs family, herbert harrison briggs, h h briggs, george edward briggs, cyril falkiner mckinnon briggs, cyril briggs, briggs & son brass foundry, h h briggs & sons foundry, briggs marine, alliance casting & engineering solutions, grassmere cheese factory, cornish chimney, curved bricks, collingwood, moorabbin, collingwood foundry, moorabbin foundry, 1912 -
 Flagstaff Hill Maritime Museum and Village
Equipment - Stevenson Screen, Thomas Stevenson, ca. 1910
Stevenson screens were first introduced in Australia in the 1880s and were widely installed by 1910. The screens have been used to shelter and protect thermometers and other meteorological instruments from rain and direct heat while the holes and double-louvre walls allowed air to flow around them. Sometimes other meteorological instruments were included in the weather stations, so there were different Stevenson Screen sizes. This authentic, original Stevenson screen was previously owned by the Australian Bureau of Meteorology and was used for many years for weather readings at the Cape Otway Light Station in southwest Victoria. The Lighthouse Keepers recorded the readings for minimum and maximum temperatures at 9 a.m. every day from January 1865 until April 1994. The equipment was sheltered in a Stevenson Screen from 1902 until April 15 1994, when the mercury thermometer was replaced by a platinum resistance probe within an Automatic Weather Station (AWS). This Stevenson screen is one of the two screens that then became redundant. The other Stevenson screen was kept to display to visitors. Lightkeepers were no longer required at the Cape Otway Light station either, due to the automated system. The meteorological instruments donated with the screen were used for measuring temperature and humidity. They are mounted on a metal bracket that fits across the screw holes on the screen’s internal frame. The glass-covered Relative Humidity (RH) sensor was made by the renowned precision instrument maker, Rotronic AG of Switzerland, which was founded in 1965. The firm made its first electronic temperature and humidity instrument in 1967. Meteorological records have been collected in Australia from the 1800s. The records were collated, published and used as a basis for weather forecasts. Many sectors, such as maritime and agriculture industries, have relied on these figures for making important decisions. The quality and placement of the meteorological instruments used to measure temperature and humidity are of utmost importance for accuracy. In early colonial times, there were no national standards for meteorological instruments that would allow for accurate figures and comparisons. Once the Bureau of Meteorology was established (around 1908 to 1910) the department installed Stevenson screens throughout Australia, many at lighthouses and light stations, and the measuring instruments were standardised. The Stevenson Screen was named after its inventor, Scottish Civil Engineer Thomas Stevenson (1818-1887) who was also the father of Robert Louis Stevenson, author. Stevenson developed the small thermometer screen around 1867. It had double-louvred walls around the sides and a top of two asbestos sheets with an air space between them and was thickly painted with a white coating that reflected the sun’s rays. This design was modified in 1884 by Edward Mawley of the Royal Meteorological Society. Standards were set for the locations of the screens and instruments, including their distance above ground level and the direction the door faced.Stevenson screens played a significant part in providing a standardised shelter for all meteorological instruments used by the Australian Bureau of Meteorology from about 1910 until 1994. The readings from the instruments gave the meteorological statistics on which weather forecasts throughout Australia were based. This Stevenson screen was used locally at Cape Otway, along the Great Ocean Road in southwest Victoria, so contributed towards our local forecasts and weather warnings.Stevenson screen, original, from the Australian Bureau of Meteorology’s weather station at the Cape Otway Lighthouse. The screen is a white wooden cupboard with a slanted cover raised above the top. The top has ten drilled ventilation holes, and the sides and door are made of downward-slanting double louvres. Two brass hinges join the door to the lower edge of the screen and a metal fitting at the top edge allows for a padlock closure. The screen is supported on four short legs, each with a hole drilled from side to side for fitting to a frame. Inside the screen are two wooden frames fitted with hooks and screws. The floor has three boards; one across the back and one across the front at the same level, and a board wider than the space between these boards is fitted higher, overlapping them slightly. Inside the screen, a pair of electronic instruments with short electric cables is mounted on a metal bracket with drilled holes in it. One of the instruments is a Relative Humidity (RH) probe. It is 26 cm long and is a glass tube with a filter on one end and an electrical connection on the other. It has inscriptions on its label, showing that was made by Rotronic AG, Switzerland. The other instrument is a Resistance Temperature Device (RTD) thermometer. It is 22.5 cm long and has a narrow metal probe joined to a hexagonal metal fitting. A brass plate on the front of the screen has impressed inscriptions. The screen is Serial Number 01/C0032, Catalogue Number 235862.Stamped into brass plate "CAT. NO. / 253862 / SERIAL NO. 01/C0032" On instrument’s electrical fitting; “CD2” [within oval ‘+’ above S] “Serie693 op65 / 220/380V~16A” On instrument’s glass; “rotronic ag” “SWISS MADE” “CE / CH-8303 / Bassersdorf” Symbol for [BARCODE] “ART NO MP 101A_T4-W4W” “POWER 4.8.30VDC“ “OP. RANGE: 0-100%RH/-40+60° C” “OUT H 0-100% 0-1V” “OUT T -40+60°C -0.4..+0.6V” “SERIE NO 19522 009”flagstaff hill maritime museum and village, warrnambool, maritime museum, maritime village, great ocean road, shipwreck coast, cotton region shelter, instrument shelter, thermometer shelter, thermoscreen, thermometer screen, measuring instruments, meteorological instrument, weather recording, weather station, lighthouse equipment, light station equipment, stevenson screen, marine instruments, mercury thermometer, platinum resistance probe, aws, automatic weather station, rotronic ag, swiss made, meteorological device, weather forecast, weather prediction, weather records, meteorological forecast, meteorological record, australian bureau of meteorology, bureau of meteorology, bureau, bom, relative humidity, rh, relative humidity probe, resistance temperature device, rtd, thermometer, temperature, humidity, cape otway, cape otway lighthouse, cape otway light station, rotronic, switzerland, swiss instrument, thomas stevenson, double-louvered walls, edward mawley, royal meteorological society, 01/c0032, serial number, cat. no. 235862, serial no. 01/c00323 -
 Flagstaff Hill Maritime Museum and Village
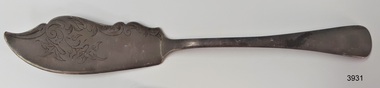
Domestic object - Butter Knife, Barker Brothers, Ca. 1885-1895
This butter or cheese knife is a decorative example of electroplated cutlery that had become an affordable alternative to more expensive silver cutlery in the late 1800s to early 1900s. The knife has stamp marks in the back of its handle that are a combination of letters and symbols used by British silversmiths to identify their workmanship. The design and type of this knife was not normally used by everyday people but rather those of a higher social class with time and money to have a particular decorative knife to serve butter or cheese. The marks on the handle tell that it was made of nickel silver, and electroplated with superior quality Stirling silver. The Barker Brothers of Birmingham made the knife between 1885 and 1907, but most likely before 1895. It was made for the British, or British colonial, people, connected with a government department such as the navy or defence. This story may be slightly inaccurate, as some silversmiths added extra ‘pseudo marks’ to their wares to disguise the quality. THE MARKS and their meaning – - ‘A1’ The silver used in electroplating this knife was the highest level, ‘superior quality’, measured in grams of silver per table spoon or table fork, with ‘A1’ being 2 2/3 grams, and ‘D’ being 0 1/2 grams of silver. - ‘BB’ The Baker Brothers used these initials from 1885 to 1907. - ‘[crown symbol]’ – This symbol is used for Sterling silver but this knife is a metal alloy. The crown is also the town mark of Sheffield (appointed by the Sheffield Assay Office) but this knife was made in Birmingham, which has the town mark of an anchor. The Barker Brothers may have added the crown mark to this electroplated silverware as a ‘pseudo hallmark’, leading the buyer to think that it was actual Sterling silver. The use of pseudo hallmarks by electroplaters of the Victorian era was common practice but it was illegal. In 1895 the unlawful practice was seen as imitating the Sheffield Silver Mark and the law was firmly applied to eradicate the deception, so items with this mark probably date before 1895. - [EPNS] Electro Plated Nickel Silver, called nickel silver or German silver, is a metal alloy that usually combines copper, nickel and zinc (60 percent copper, 20 percent nickel, 20 percent zinc). It has a silver-white appearance and is sometimes referred to as ‘white ware’. It does not contain any silver but is often used as a base for electroplating, when the item is covered with a thin layer of silver to give it the polished appearance of pure silver. It became popular in the late 19th and early 20th century as an affordable substitute for sterling silver. - Broad Arrow - an official stamp that indicates it was once the property of Britain government, either in Britain or one of its colonies, and used in the defence force. In Great Britain, from an 1875 government act, it was, and still, is a crime to forge or wrongfully use, the broad arrow symbol. The BARKER BROTHERS of Birmingham - Barker Brothers were one of the earlies firms of Birmingham silversmiths, established in 1801 by Mary Barker. They became Barker & Creed, then William and Matthias Barker, then from 1885 they were the Barker Brothers. They were operating in Paradise Street in 1871 until in 1903 they moved to Unity Works, Constitution Hill, in Birmingham. The firm also had a showroom at 292 High Holborn, London, from the early 1900s to the 1980s. In 1907 the firm became Barker Brothers Silversmiths Ltd, then in the 1960s they merged with Ellis & Co, becoming Barker Ellis Silver Co. Ltd. In 1979 they were registered in USA as Ellis & Co., Barker Ellis, and Ellis Barker. The business went into administration in 1992, after almost 200 years of production. The firm advertised as specialists in electroplating, and used the trademarks BRITANOID, UNITY PLATE and THE HYGENIA.This knife is historically significant, dated from 1885 to 1907 but most likely pre-1895, and made by the longstanding Birmingham silversmiths, the Barker Brothers, established in 1801. The knife is an example of decorative flatware used by people of ’class’. It also has the broad arrow stamp, connecting it to the British government, in particular the ordinance department. The stamp also connects it to other items in our collection with that stamp. It may have been connected to pre-Federation government organisations and officials such as the army Garrison, government naval vessel, police, lighthouse keepers, harbour masters. The knife is the only example of its kind in our collection, being a decorative silver butter or cheese knife, made by the Barker Brothers of Birmingham. Butter knife, or cheese knife, electroplated nickel silver (EPNS). Upper blade edge has decorative shape and engraved motifs, lower blade edge is bevelled to a cutting edge, and narrow plain handle flares out to a wide, rounded end. Maker’s marks are stamped on the reverse. Made by Barker Brothers of Birmingham in the late-19th century. Stamps: “flagstaff hill, warrnambool, maritime village, maritime museum, flagstaff hill maritime museum & village, shipwreck coast, great ocean road, butter knife, cheese knife, electroplate, electro plate, nickel silver, nickel alloy, alloy composition, copper nickel zinc, german silver, epns, barker brothers, birmingham, london, silversmiths, victorian era, 19th century, a1, bb, crown inside square, broad arrow, flatware, tableware, cutlery, cutler, dining utensils, eating utensils, superior quality, pseudo hallmark, stirling silver, silver-white metal, mary barker, barker & creed, william barker, matthias barker, barker brothers silversmiths, barker ellis silver co, ellis & co, barker ellis, ellis barker, britanoid, unity plate, the hygenia, british, colonial, government use, defence department use, naval use, knife, serving knife -
 Flagstaff Hill Maritime Museum and Village
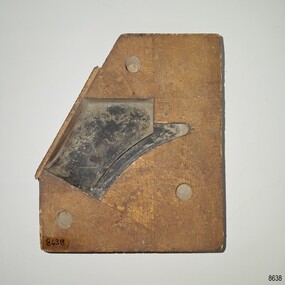
Equipment - Pattern, Briggs Brass Foundry, Early 20th century
The wooden pattern was possibly made for casting a part for Craftman Marine, makers of engines for boats and other machines. It is part of a set that is stored in a strong wooden crate. It was used at Briggs’ Brass Foundry for making sand casts. The traditional craft of sand casting is over 2000 years old. The handcrafted process produces brass and copper alloy goods that are well suited to marine use; bells, boat hooks, cowls, propellers, handles, lids, rowlocks, hooks, letters, bolts, rail holders, brackets, deck plates, flanges, rudder guides, portholes and covers. Briggs’ Bronze mixture is a copper-based alloy made from local ingots of copper, tin, zinc and lead in carefully measured quantities. The finished product is non-ferrous and can last indefinitely. The crate of patterns was donated by the Briggs family in the early years of Flagstaff Hill, along with other related items such as brassware, tools and machinery. The donated items were displayed in a simulated Brass Foundry in the Village along with other working crafts, trades and services found in a Maritime town. The items were on show from the completion of the building in 1986 until 1994 when the building was repurposed. The patterns represent the trades of foundering and metalwork, both supporting maritime industries such as shipwrights and boatbuilders. Farmers, manufacturers and other local industries also needed the castings made by foundries. The Brass Foundry included a historic Cornish chimney set up as a working model, to tell the story of smelted metal heated in furnaces then be poured into the sand moulds. This chimney was made from specially curved bricks and is now about two-thirds of its full height when originally located at the Grassmere Cheese factory. The craft of sand-casting from carved wooden patterns to create metal is an example of skills from the past that are still used today. The foundry pattern set is significant for its association with brass foundries locally and generally in coastal areas of Victoria. Marine industries such as ship and boat building rely on good quality castings for their machinery, equipment and fittings. Briggs Brass was especially formulated using non-ferrous metals to ensure their longevity. The patterns are associated with the long-running firm Briggs Brass Foundry that specialised in cast goods for the marine industry, ready to supply the needs for once-off or mass-produced items. Their products would have been fitted to sail and steam vessels along coastal Victoria including Warrnambool. Briggs Marine was also a bell-founder specialist and is also associated with the Schomberg Bell at Flagstaff Hill, having restored it to is former state as a fine example of the bell from a luxury migrant vessel from the mid-19th century. Pattern; rectangular wooden block with a corner cut diagonally. A five-sided shape has been carved into the centre, with one side curved inwards and slightly shallower than the other sides. The cut-out area is painted black. Three holes are drilled in the cut-out side to align the pattern with another piece of work. A wooden slat is fixed across the diagonal side. The back of the pattern has a handwritten inscription, possibly by two writers. The pattern is part of a set of foundry patterns from Briggs Brass Foundry and is connected to Craftman Marine.In black handwriting: "1 # H AL" Handwritten in a different hand: "CRAFTMAN MARINE" Written the the first hand: BRIGGS" (or "BRICK")flagstaff hill, flagstaff hill maritime museum and village, warrnambool, maritime museum, maritime village, great ocean road, shipwreck coast, briggs' bronze, traditional method, trade, sand cast, cast, brass alloy, copper alloy, pattern, mould, foundry, brass foundry, metal foundry, casting, sand mould, sand casting, marine equipment, marine tools, marine fittings, copper tin zinc lead, non-ferrous, non-corrosive, brassware, metalware, foundering, metalwork, maritime, bell founders, ship chandlers, marine products, biggs, briggs family, herbert harrison briggs, h h briggs, george edward briggs, cyril falkiner mckinnon briggs, cyril briggs, briggs & son brass foundry, h h briggs & sons foundry, briggs marine, alliance casting & engineering solutions, grassmere cheese factory, cornish chimney, curved bricks, collingwood, moorabbin, collingwood foundry, moorabbin foundry, 1912, craftman marine, craftsman marine -
 Flagstaff Hill Maritime Museum and Village
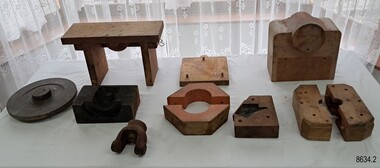
Equipment - Foundry Patterns set, Briggs Brass Foundry, Early 20th century
The wooden crate contains a set of patterns or moulds that were once used at Briggs’ Brass Foundry for making sand moulds. The traditional method of sand casting is over 2000 years old. It is part of a crafted process used to make brass and copper alloy goods suited to marine use; bells, boat hooks, cowls, propellers, handles, lids, rowlocks, hooks, letters, bolts, rail holders, brackets, deck plates, flanges, rudder guides, portholes and covers. Briggs’ Bronze is a copper-based alloy made from local ingots of copper, tin, zinc and lead in carefully measured quantities. The finished product is non-corrosive and can last indefinitely. The crate of patterns was donated by the Briggs family in the early years of Flagstaff Hill, along with other related items such as brassware, tools and machinery. The donated items were displayed in a simulated Brass Foundry in the Village. The items were on show from the completion of the building in 1986 until 1994 when the building was repurposed. The patterns represent the trades of foundering and metalwork, both supporting maritime industries such as shipwrights and boatbuilders. Farmers, manufacturers and other local industries also needed the castings made by foundries. The Brass Foundry display was one of the early ‘working craft’ shops at Flagstaff Hill. It included a historic Cornish chimney that was set up as a working model, telling the story of heat from furnaces to smelt metal, which would then be poured into the sand moulds. This chimney is made from specially curved bricks and is about two-thirds of its full height when originally located at the Grassmere Cheese factory. HISTORY of BRIGGS BRASS FOUNDRY: - The family business was founded in 1912 by Herbert Harrison Briggs (1963-1931) with his son George Edward Briggs, trading as Briggs & Son Foundry at 70 Wellington Street, Collingwood. Younger son Cyril Falkiner McKinnon Briggs joined the foundry in 1922, and it was renamed H H Briggs & Sons Foundry. Both sons ran the firm after Herbert’s death in 1931, making products mainly for marine purposes. They became Bell Founders in 1936 and were known for their specialty of high-quality ship bells. They produced miniature varieties of these and other decorative items such as small propellers. The firm became known as Briggs Marine Foundry. The great-granddaughter of Herbert Briggs inherited the Briggs Brass Bell, similar to the one at Flagstaff Hill. Cyril became the sole family member of the firm in 1965. The Briggs Marine was an exhibitor at the 1965 Boat Show, where he advertised as “non-ferrous founders” and “Bell Specialists”. The foundry relocated to Chesterville Rd, Moorabbin. Cyril passed away in 1967. It is thought that either Cyril or his business partner Frank Lee donated the objects from the Briggs’ Foundry around the time when the business moved to Moorabbin. However, Flagstaff Hill hadn’t been thought about until 1972. The donated items were registered in the Collection in 1986 but they could have been in storage from an earlier date. In October of that same year, Briggs Marine restored Schomberg Bell, a shipwreck artefact from the collection at Flagstaff Hill. Peter Oram, who had worked for the previous owners of Briggs Marine as a fitter and turner, took over the firm in 2014, reviving some of the old casts for current use. The business is now located at Seaford in Victoria and is part of Alliance Casting & Engineering Solutions (Alliance Casting Pty Ltd). In 2016 the original Collingwood Foundry building was repurposed as a thriving business hub named The Foundry. The crate and its patterns are significant for their association with brass foundries locally and generally in coastal areas of Victoria. Marine industries such as ship and boat building rely on good quality castings for their machinery, equipment and fittings. The patterns are associated with the long-running firm, Briggs Brass Foundry, that specialised in cast goods for the marine industry, ready to supply the needs for once-off or mass-produced items. Their products would have been fitted to sail and steam vessels along coastal Victoria including Warrnambool. Briggs Marine is also associated with the Schomberg Bell in Flagstaff Hill, restoring the bell to is former state to show an example of the bell from a luxury mid-19th century vessel. The craft of sand-casting from carved wooden patterns to create metal is an example of skills from the past that are still used today. Wooden rectangular crate with removable wooden lid. Inside is a set of wooden patterns of various shapes and sizes for making sand moulds in a metal foundry. The crate is made from thick wooden planks nailed together. The extended wooden struts on the long sides form a frame to hold the wooden lid. A pair of metal handles are at each short end of the crate, fixed with strong metal bolds. Between each pair of handles is an inscription stamped into the wood. The underside of the crate has red paint splashes. There are insect holes in the wood but no sign of current infestation. Stamped: "H.33 / II" (H may be N or a square B)flagstaff hill maritime museum and village, great ocean road, shipwreck coast, pattern, mould, foundry, brass foundry, metal foundry, crate, box, wooden container, briggs, traditional method, trade, sand cast, cast, brass alloy, copper alloy, marine equipment, marine tools, marine fittings, briggs' bronze, copper tin zinc lead, non-corrosive, briggs family, brassware, metalware, foundering, metalwork, maritime, casting, cornish chimney, curved bricks, grassmere cheese factory, 1912, herbert harrison briggs, h h briggs, george edward briggs, briggs & son foundry, collingwood, cyril falkiner mckinnon briggs, cyril briggs, h h briggs & sons foundry, bell founders, schomberg bell, alliance casting & engineering solutions, collingwood foundry, ship chandlers, marine products, flagstaff hill, warrnambool, maritime museum, maritime village, briggs & son brass foundry, briggs marine, moorabbin -
 Flagstaff Hill Maritime Museum and Village
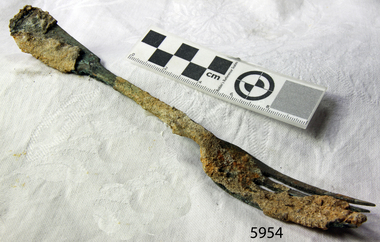
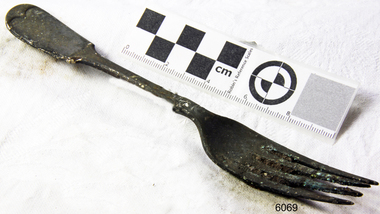
Domestic object - Fork
HISTORY OF THE LOCH ARD The LOCH ARD belonged to the famous Loch Line which sailed many ships from England to Australia. Built in Glasgow by Barclay, Curdle and Co. in 1873, the LOCH ARD was a three-masted square rigged iron sailing ship. The ship measured 262ft 7" (79.87m) in length, 38ft (11.58m) in width, 23ft (7m) in depth and had a gross tonnage of 1693 tons. The LOCH ARD's main mast measured a massive 150ft (45.7m) in height. LOCH ARD made three trips to Australia and one trip to Calcutta before its final voyage. LOCH ARD left England on March 2, 1878, under the command of Captain Gibbs, a newly married, 29 year old. She was bound for Melbourne with a crew of 37, plus 17 passengers and a load of cargo. The general cargo reflected the affluence of Melbourne at the time. On board were straw hats, umbrella, perfumes, clay pipes, pianos, clocks, confectionary, linen and candles, as well as a heavier load of railway irons, cement, lead and copper. There were items included that intended for display in the Melbourne International Exhibition in 1880. The voyage to Port Phillip was long but uneventful. At 3am on June 1, 1878, Captain Gibbs was expecting to see land and the passengers were becoming excited as they prepared to view their new homeland in the early morning. But LOCH ARD was running into a fog which greatly reduced visibility. Captain Gibbs was becoming anxious as there was no sign of land or the Cape Otway lighthouse. At 4am the fog lifted. A man aloft announced that he could see breakers. The sheer cliffs of Victoria's west coast came into view, and Captain Gibbs realised that the ship was much closer to them than expected. He ordered as much sail to be set as time would permit and then attempted to steer the vessel out to sea. On coming head on into the wind, the ship lost momentum, the sails fell limp and LOCH ARD's bow swung back. Gibbs then ordered the anchors to be released in an attempt to hold its position. The anchors sank some 50 fathoms - but did not hold. By this time LOCH ARD was among the breakers and the tall cliffs of Mutton Bird Island rose behind the ship. Just half a mile from the coast, the ship's bow was suddenly pulled around by the anchor. The captain tried to tack out to sea, but the ship struck a reef at the base of Mutton Bird Island, near Port Campbell. Waves broke over the ship and the top deck was loosened from the hull. The masts and rigging came crashing down knocking passengers and crew overboard. When a lifeboat was finally launched, it crashed into the side of LOCH ARD and capsized. Tom Pearce, who had launched the boat, managed to cling to its overturned hull and shelter beneath it. He drifted out to sea and then on the flood tide came into what is now known as LOCH ARD Gorge. He swam to shore, bruised and dazed, and found a cave in which to shelter. Some of the crew stayed below deck to shelter from the falling rigging but drowned when the ship slipped off the reef into deeper water. Eva Carmichael had raced onto deck to find out what was happening only to be confronted by towering cliffs looming above the stricken ship. In all the chaos, Captain Gibbs grabbed Eva and said, "If you are saved Eva, let my dear wife know that I died like a sailor". That was the last Eva Carmichael saw of the captain. She was swept off the ship by a huge wave. Eva saw Tom Pearce on a small rocky beach and yelled to attract his attention. He dived in and swam to the exhausted woman and dragged her to shore. He took her to the cave and broke open case of brandy which had washed up on the beach. He opened a bottle to revive the unconscious woman. A few hours later Tom scaled a cliff in search of help. He followed hoof prints and came by chance upon two men from nearby Glenample Station three and a half miles away. In a state of exhaustion, he told the men of the tragedy. Tom returned to the gorge while the two men rode back to the station to get help. By the time they reached LOCH ARD Gorge, it was cold and dark. The two shipwreck survivors were taken to Glenample Station to recover. Eva stayed at the station for six weeks before returning to Ireland, this time by steamship. In Melbourne, Tom Pearce received a hero's welcome. He was presented with the first gold medal of the Royal Humane Society of Victoria and a £1000 cheque from the Victorian Government. Concerts were performed to honour the young man's bravery and to raise money for those who lost family in the LOCH ARD disaster. Of the 54 crew members and passengers on board, only two survived: the apprentice, Tom Pearce and the young woman passenger, Eva Carmichael, who lost all of her family in the tragedy. Ten days after the LOCH ARD tragedy, salvage rights to the wreck were sold at auction for £2,120. Cargo valued at £3,000 was salvaged and placed on the beach, but most washed back into the sea when another storm developed. The wreck of LOCH ARD still lies at the base of Mutton Bird Island. Much of the cargo has now been salvaged and some was washed up into what is now known as LOCH ARD Gorge. Cargo and artefacts have also been illegally salvaged over many years before protective legislation was introduced. One of the most unlikely pieces of cargo to have survived the shipwreck was a Minton porcelain peacock - one of only seven in the world. The peacock was destined for the Melbourne International Exhibition in 1880. It had been well packed, which gave it adequate protection during the violent storm. Today, the Minton peacock can be seen at the Flagstaff Hill Maritime Museum in Warrnambool. From Australia's most dramatic shipwreck it has now become Australia's shipwreck artefact and is one of very few 'objects' on the Victorian State Heritage Register most valuable. The LOCH ARD shipwreck is of State significance – Victorian Heritage Register S 417 Flagstaff Hill’s collection of artefacts from LOCH ARD is significant for being one of the largest collections of artefacts from this shipwreck in Victoria. It is significant for its association with the shipwreck, which is on the Victorian Heritage Register (VHR S417). The collection is significant because of the relationship between the objects, as together they have a high potential to interpret the story of the LOCH ARD. The LOCH ARD collection is archaeologically significant as the remains of a large international passenger and cargo ship. The LOCH ARD collection is historically significant for representing aspects of Victoria’s shipping history and its potential to interpret sub-theme 1.5 of Victoria’s Framework of Historical Themes (living with natural processes). The collection is also historically significant for its association with the LOCH ARD, which was one of the worst and best known shipwrecks in Victoria’s history. Silver plated copper alloy table fork from the wreck of the Loch Ard. Some verdigris and large amount of encrustation covers fork.flagstaff hill maritime museum, maritime museum, shipwreck coast, great ocean road, loch line, loch ard, mutton bird island, loch ard gorge, fork -
 Flagstaff Hill Maritime Museum and Village
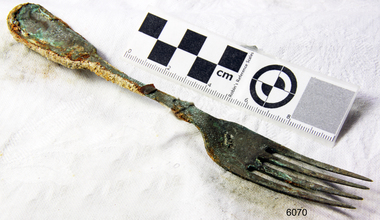
Domestic object - Fork, c. 19th century
HISTORY OF THE LOCH ARD The LOCH ARD belonged to the famous Loch Line which sailed many ships from England to Australia. Built in Glasgow by Barclay, Curdle and Co. in 1873, the LOCH ARD was a three-masted square rigged iron sailing ship. The ship measured 262ft 7" (79.87m) in length, 38ft (11.58m) in width, 23ft (7m) in depth and had a gross tonnage of 1693 tons. The LOCH ARD's main mast measured a massive 150ft (45.7m) in height. LOCH ARD made three trips to Australia and one trip to Calcutta before its final voyage. LOCH ARD left England on March 2, 1878, under the command of Captain Gibbs, a newly married, 29 year old. She was bound for Melbourne with a crew of 37, plus 17 passengers and a load of cargo. The general cargo reflected the affluence of Melbourne at the time. On board were straw hats, umbrella, perfumes, clay pipes, pianos, clocks, confectionary, linen and candles, as well as a heavier load of railway irons, cement, lead and copper. There were items included that intended for display in the Melbourne International Exhibition in 1880. The voyage to Port Phillip was long but uneventful. At 3am on June 1, 1878, Captain Gibbs was expecting to see land and the passengers were becoming excited as they prepared to view their new homeland in the early morning. But LOCH ARD was running into a fog which greatly reduced visibility. Captain Gibbs was becoming anxious as there was no sign of land or the Cape Otway lighthouse. At 4am the fog lifted. A man aloft announced that he could see breakers. The sheer cliffs of Victoria's west coast came into view, and Captain Gibbs realised that the ship was much closer to them than expected. He ordered as much sail to be set as time would permit and then attempted to steer the vessel out to sea. On coming head on into the wind, the ship lost momentum, the sails fell limp and LOCH ARD's bow swung back. Gibbs then ordered the anchors to be released in an attempt to hold its position. The anchors sank some 50 fathoms - but did not hold. By this time LOCH ARD was among the breakers and the tall cliffs of Mutton Bird Island rose behind the ship. Just half a mile from the coast, the ship's bow was suddenly pulled around by the anchor. The captain tried to tack out to sea, but the ship struck a reef at the base of Mutton Bird Island, near Port Campbell. Waves broke over the ship and the top deck was loosened from the hull. The masts and rigging came crashing down knocking passengers and crew overboard. When a lifeboat was finally launched, it crashed into the side of LOCH ARD and capsized. Tom Pearce, who had launched the boat, managed to cling to its overturned hull and shelter beneath it. He drifted out to sea and then on the flood tide came into what is now known as LOCH ARD Gorge. He swam to shore, bruised and dazed, and found a cave in which to shelter. Some of the crew stayed below deck to shelter from the falling rigging but drowned when the ship slipped off the reef into deeper water. Eva Carmichael had raced onto deck to find out what was happening only to be confronted by towering cliffs looming above the stricken ship. In all the chaos, Captain Gibbs grabbed Eva and said, "If you are saved Eva, let my dear wife know that I died like a sailor". That was the last Eva Carmichael saw of the captain. She was swept off the ship by a huge wave. Eva saw Tom Pearce on a small rocky beach and yelled to attract his attention. He dived in and swam to the exhausted woman and dragged her to shore. He took her to the cave and broke open case of brandy which had washed up on the beach. He opened a bottle to revive the unconscious woman. A few hours later Tom scaled a cliff in search of help. He followed hoof prints and came by chance upon two men from nearby Glenample Station three and a half miles away. In a state of exhaustion, he told the men of the tragedy. Tom returned to the gorge while the two men rode back to the station to get help. By the time they reached LOCH ARD Gorge, it was cold and dark. The two shipwreck survivors were taken to Glenample Station to recover. Eva stayed at the station for six weeks before returning to Ireland, this time by steamship. In Melbourne, Tom Pearce received a hero's welcome. He was presented with the first gold medal of the Royal Humane Society of Victoria and a £1000 cheque from the Victorian Government. Concerts were performed to honour the young man's bravery and to raise money for those who lost family in the LOCH ARD disaster. Of the 54 crew members and passengers on board, only two survived: the apprentice, Tom Pearce and the young woman passenger, Eva Carmichael, who lost all of her family in the tragedy. Ten days after the LOCH ARD tragedy, salvage rights to the wreck were sold at auction for £2,120. Cargo valued at £3,000 was salvaged and placed on the beach, but most washed back into the sea when another storm developed. The wreck of LOCH ARD still lies at the base of Mutton Bird Island. Much of the cargo has now been salvaged and some was washed up into what is now known as LOCH ARD Gorge. Cargo and artefacts have also been illegally salvaged over many years before protective legislation was introduced. One of the most unlikely pieces of cargo to have survived the shipwreck was a Minton porcelain peacock - one of only seven in the world. The peacock was destined for the Melbourne International Exhibition in 1880. It had been well packed, which gave it adequate protection during the violent storm. Today, the Minton peacock can be seen at the Flagstaff Hill Maritime Museum in Warrnambool. From Australia's most dramatic shipwreck it has now become Australia's shipwreck artefact and is one of very few 'objects' on the Victorian State Heritage Register most valuable. The LOCH ARD shipwreck is of State significance – Victorian Heritage Register S 417 Flagstaff Hill’s collection of artefacts from LOCH ARD is significant for being one of the largest collections of artefacts from this shipwreck in Victoria. It is significant for its association with the shipwreck, which is on the Victorian Heritage Register (VHR S417). The collection is significant because of the relationship between the objects, as together they have a high potential to interpret the story of the LOCH ARD. The LOCH ARD collection is archaeologically significant as the remains of a large international passenger and cargo ship. The LOCH ARD collection is historically significant for representing aspects of Victoria’s shipping history and its potential to interpret sub-theme 1.5 of Victoria’s Framework of Historical Themes (living with natural processes). The collection is also historically significant for its association with the LOCH ARD, which was one of the worst and best known shipwrecks in Victoria’s history. Silver plated copper alloy dessert fork from the wreck of the Loch Ard. , Covered in Silver oxide. Light encrustation on fork between tines.flagstaff hill maritime museum, shipwreck coast, great ocean road, loch line, loch ard, mutton bird island, loch ard gorge, electroplated cutlery, fork, dessert fork -
 Flagstaff Hill Maritime Museum and Village
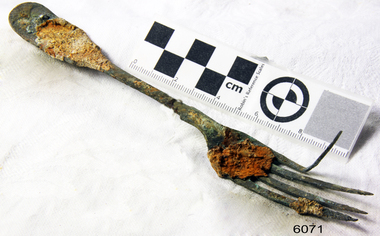
Domestic object - Fork, c. 19th century
HISTORY OF THE LOCH ARD The LOCH ARD belonged to the famous Loch Line which sailed many ships from England to Australia. Built in Glasgow by Barclay, Curdle and Co. in 1873, the LOCH ARD was a three-masted square rigged iron sailing ship. The ship measured 262ft 7" (79.87m) in length, 38ft (11.58m) in width, 23ft (7m) in depth and had a gross tonnage of 1693 tons. The LOCH ARD's main mast measured a massive 150ft (45.7m) in height. LOCH ARD made three trips to Australia and one trip to Calcutta before its final voyage. LOCH ARD left England on March 2, 1878, under the command of Captain Gibbs, a newly married, 29 year old. She was bound for Melbourne with a crew of 37, plus 17 passengers and a load of cargo. The general cargo reflected the affluence of Melbourne at the time. On board were straw hats, umbrella, perfumes, clay pipes, pianos, clocks, confectionary, linen and candles, as well as a heavier load of railway irons, cement, lead and copper. There were items included that intended for display in the Melbourne International Exhibition in 1880. The voyage to Port Phillip was long but uneventful. At 3am on June 1, 1878, Captain Gibbs was expecting to see land and the passengers were becoming excited as they prepared to view their new homeland in the early morning. But LOCH ARD was running into a fog which greatly reduced visibility. Captain Gibbs was becoming anxious as there was no sign of land or the Cape Otway lighthouse. At 4am the fog lifted. A man aloft announced that he could see breakers. The sheer cliffs of Victoria's west coast came into view, and Captain Gibbs realised that the ship was much closer to them than expected. He ordered as much sail to be set as time would permit and then attempted to steer the vessel out to sea. On coming head on into the wind, the ship lost momentum, the sails fell limp and LOCH ARD's bow swung back. Gibbs then ordered the anchors to be released in an attempt to hold its position. The anchors sank some 50 fathoms - but did not hold. By this time LOCH ARD was among the breakers and the tall cliffs of Mutton Bird Island rose behind the ship. Just half a mile from the coast, the ship's bow was suddenly pulled around by the anchor. The captain tried to tack out to sea, but the ship struck a reef at the base of Mutton Bird Island, near Port Campbell. Waves broke over the ship and the top deck was loosened from the hull. The masts and rigging came crashing down knocking passengers and crew overboard. When a lifeboat was finally launched, it crashed into the side of LOCH ARD and capsized. Tom Pearce, who had launched the boat, managed to cling to its overturned hull and shelter beneath it. He drifted out to sea and then on the flood tide came into what is now known as LOCH ARD Gorge. He swam to shore, bruised and dazed, and found a cave in which to shelter. Some of the crew stayed below deck to shelter from the falling rigging but drowned when the ship slipped off the reef into deeper water. Eva Carmichael had raced onto deck to find out what was happening only to be confronted by towering cliffs looming above the stricken ship. In all the chaos, Captain Gibbs grabbed Eva and said, "If you are saved Eva, let my dear wife know that I died like a sailor". That was the last Eva Carmichael saw of the captain. She was swept off the ship by a huge wave. Eva saw Tom Pearce on a small rocky beach and yelled to attract his attention. He dived in and swam to the exhausted woman and dragged her to shore. He took her to the cave and broke open case of brandy which had washed up on the beach. He opened a bottle to revive the unconscious woman. A few hours later Tom scaled a cliff in search of help. He followed hoof prints and came by chance upon two men from nearby Glenample Station three and a half miles away. In a state of exhaustion, he told the men of the tragedy. Tom returned to the gorge while the two men rode back to the station to get help. By the time they reached LOCH ARD Gorge, it was cold and dark. The two shipwreck survivors were taken to Glenample Station to recover. Eva stayed at the station for six weeks before returning to Ireland, this time by steamship. In Melbourne, Tom Pearce received a hero's welcome. He was presented with the first gold medal of the Royal Humane Society of Victoria and a £1000 cheque from the Victorian Government. Concerts were performed to honour the young man's bravery and to raise money for those who lost family in the LOCH ARD disaster. Of the 54 crew members and passengers on board, only two survived: the apprentice, Tom Pearce and the young woman passenger, Eva Carmichael, who lost all of her family in the tragedy. Ten days after the LOCH ARD tragedy, salvage rights to the wreck were sold at auction for £2,120. Cargo valued at £3,000 was salvaged and placed on the beach, but most washed back into the sea when another storm developed. The wreck of LOCH ARD still lies at the base of Mutton Bird Island. Much of the cargo has now been salvaged and some was washed up into what is now known as LOCH ARD Gorge. Cargo and artefacts have also been illegally salvaged over many years before protective legislation was introduced. One of the most unlikely pieces of cargo to have survived the shipwreck was a Minton porcelain peacock - one of only seven in the world. The peacock was destined for the Melbourne International Exhibition in 1880. It had been well packed, which gave it adequate protection during the violent storm. Today, the Minton peacock can be seen at the Flagstaff Hill Maritime Museum in Warrnambool. From Australia's most dramatic shipwreck it has now become Australia's shipwreck artefact and is one of very few 'objects' on the Victorian State Heritage Register most valuable. The LOCH ARD shipwreck is of State significance – Victorian Heritage Register S 417 Flagstaff Hill’s collection of artefacts from LOCH ARD is significant for being one of the largest collections of artefacts from this shipwreck in Victoria. It is significant for its association with the shipwreck, which is on the Victorian Heritage Register (VHR S417). The collection is significant because of the relationship between the objects, as together they have a high potential to interpret the story of the LOCH ARD. The LOCH ARD collection is archaeologically significant as the remains of a large international passenger and cargo ship. The LOCH ARD collection is historically significant for representing aspects of Victoria’s shipping history and its potential to interpret sub-theme 1.5 of Victoria’s Framework of Historical Themes (living with natural processes). The collection is also historically significant for its association with the LOCH ARD, which was one of the worst and best known shipwrecks in Victoria’s history. Silver plated copper alloy dessert fork from the wreck of the Loch Ard. Some verdigris. Encrustation on fork.flagstaff hill maritime museum, shipwreck coast, great ocean road, loch line, loch ard, mutton bird island, loch ard gorge, electroplated cutlery, fork, dessert fork -
 Flagstaff Hill Maritime Museum and Village
Domestic object - Fork, c. 19th century
HISTORY OF THE LOCH ARD The LOCH ARD belonged to the famous Loch Line which sailed many ships from England to Australia. Built in Glasgow by Barclay, Curdle and Co. in 1873, the LOCH ARD was a three-masted square rigged iron sailing ship. The ship measured 262ft 7" (79.87m) in length, 38ft (11.58m) in width, 23ft (7m) in depth and had a gross tonnage of 1693 tons. The LOCH ARD's main mast measured a massive 150ft (45.7m) in height. LOCH ARD made three trips to Australia and one trip to Calcutta before its final voyage. LOCH ARD left England on March 2, 1878, under the command of Captain Gibbs, a newly married, 29 year old. She was bound for Melbourne with a crew of 37, plus 17 passengers and a load of cargo. The general cargo reflected the affluence of Melbourne at the time. On board were straw hats, umbrella, perfumes, clay pipes, pianos, clocks, confectionary, linen and candles, as well as a heavier load of railway irons, cement, lead and copper. There were items included that intended for display in the Melbourne International Exhibition in 1880. The voyage to Port Phillip was long but uneventful. At 3am on June 1, 1878, Captain Gibbs was expecting to see land and the passengers were becoming excited as they prepared to view their new homeland in the early morning. But LOCH ARD was running into a fog which greatly reduced visibility. Captain Gibbs was becoming anxious as there was no sign of land or the Cape Otway lighthouse. At 4am the fog lifted. A man aloft announced that he could see breakers. The sheer cliffs of Victoria's west coast came into view, and Captain Gibbs realised that the ship was much closer to them than expected. He ordered as much sail to be set as time would permit and then attempted to steer the vessel out to sea. On coming head on into the wind, the ship lost momentum, the sails fell limp and LOCH ARD's bow swung back. Gibbs then ordered the anchors to be released in an attempt to hold its position. The anchors sank some 50 fathoms - but did not hold. By this time LOCH ARD was among the breakers and the tall cliffs of Mutton Bird Island rose behind the ship. Just half a mile from the coast, the ship's bow was suddenly pulled around by the anchor. The captain tried to tack out to sea, but the ship struck a reef at the base of Mutton Bird Island, near Port Campbell. Waves broke over the ship and the top deck was loosened from the hull. The masts and rigging came crashing down knocking passengers and crew overboard. When a lifeboat was finally launched, it crashed into the side of LOCH ARD and capsized. Tom Pearce, who had launched the boat, managed to cling to its overturned hull and shelter beneath it. He drifted out to sea and then on the flood tide came into what is now known as LOCH ARD Gorge. He swam to shore, bruised and dazed, and found a cave in which to shelter. Some of the crew stayed below deck to shelter from the falling rigging but drowned when the ship slipped off the reef into deeper water. Eva Carmichael had raced onto deck to find out what was happening only to be confronted by towering cliffs looming above the stricken ship. In all the chaos, Captain Gibbs grabbed Eva and said, "If you are saved Eva, let my dear wife know that I died like a sailor". That was the last Eva Carmichael saw of the captain. She was swept off the ship by a huge wave. Eva saw Tom Pearce on a small rocky beach and yelled to attract his attention. He dived in and swam to the exhausted woman and dragged her to shore. He took her to the cave and broke open case of brandy which had washed up on the beach. He opened a bottle to revive the unconscious woman. A few hours later Tom scaled a cliff in search of help. He followed hoof prints and came by chance upon two men from nearby Glenample Station three and a half miles away. In a state of exhaustion, he told the men of the tragedy. Tom returned to the gorge while the two men rode back to the station to get help. By the time they reached LOCH ARD Gorge, it was cold and dark. The two shipwreck survivors were taken to Glenample Station to recover. Eva stayed at the station for six weeks before returning to Ireland, this time by steamship. In Melbourne, Tom Pearce received a hero's welcome. He was presented with the first gold medal of the Royal Humane Society of Victoria and a £1000 cheque from the Victorian Government. Concerts were performed to honour the young man's bravery and to raise money for those who lost family in the LOCH ARD disaster. Of the 54 crew members and passengers on board, only two survived: the apprentice, Tom Pearce and the young woman passenger, Eva Carmichael, who lost all of her family in the tragedy. Ten days after the LOCH ARD tragedy, salvage rights to the wreck were sold at auction for £2,120. Cargo valued at £3,000 was salvaged and placed on the beach, but most washed back into the sea when another storm developed. The wreck of LOCH ARD still lies at the base of Mutton Bird Island. Much of the cargo has now been salvaged and some was washed up into what is now known as LOCH ARD Gorge. Cargo and artefacts have also been illegally salvaged over many years before protective legislation was introduced. One of the most unlikely pieces of cargo to have survived the shipwreck was a Minton porcelain peacock - one of only seven in the world. The peacock was destined for the Melbourne International Exhibition in 1880. It had been well packed, which gave it adequate protection during the violent storm. Today, the Minton peacock can be seen at the Flagstaff Hill Maritime Museum in Warrnambool. From Australia's most dramatic shipwreck it has now become Australia's shipwreck artefact and is one of very few 'objects' on the Victorian State Heritage Register most valuable. The LOCH ARD shipwreck is of State significance – Victorian Heritage Register S 417 Flagstaff Hill’s collection of artefacts from LOCH ARD is significant for being one of the largest collections of artefacts from this shipwreck in Victoria. It is significant for its association with the shipwreck, which is on the Victorian Heritage Register (VHR S417). The collection is significant because of the relationship between the objects, as together they have a high potential to interpret the story of the LOCH ARD. The LOCH ARD collection is archaeologically significant as the remains of a large international passenger and cargo ship. The LOCH ARD collection is historically significant for representing aspects of Victoria’s shipping history and its potential to interpret sub-theme 1.5 of Victoria’s Framework of Historical Themes (living with natural processes). The collection is also historically significant for its association with the LOCH ARD, which was one of the worst and best known shipwrecks in Victoria’s history. Silver plated copper alloy dessert fork from the wreck of the Loch Ard. Some verdigris. Encrustation on fork. One fork tine bent up.flagstaff hill maritime museum, shipwreck coast, great ocean road, loch line, loch ard, mutton bird island, loch ard gorge, electroplated cutlery, fork, dessert fork -
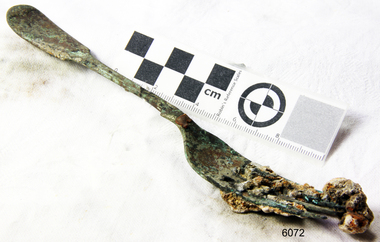 Flagstaff Hill Maritime Museum and Village
Domestic object - Fork, c. 19th century
HISTORY OF THE LOCH ARD The LOCH ARD belonged to the famous Loch Line which sailed many ships from England to Australia. Built in Glasgow by Barclay, Curdle and Co. in 1873, the LOCH ARD was a three-masted square rigged iron sailing ship. The ship measured 262ft 7" (79.87m) in length, 38ft (11.58m) in width, 23ft (7m) in depth and had a gross tonnage of 1693 tons. The LOCH ARD's main mast measured a massive 150ft (45.7m) in height. LOCH ARD made three trips to Australia and one trip to Calcutta before its final voyage. LOCH ARD left England on March 2, 1878, under the command of Captain Gibbs, a newly married, 29 year old. She was bound for Melbourne with a crew of 37, plus 17 passengers and a load of cargo. The general cargo reflected the affluence of Melbourne at the time. On board were straw hats, umbrella, perfumes, clay pipes, pianos, clocks, confectionary, linen and candles, as well as a heavier load of railway irons, cement, lead and copper. There were items included that intended for display in the Melbourne International Exhibition in 1880. The voyage to Port Phillip was long but uneventful. At 3am on June 1, 1878, Captain Gibbs was expecting to see land and the passengers were becoming excited as they prepared to view their new homeland in the early morning. But LOCH ARD was running into a fog which greatly reduced visibility. Captain Gibbs was becoming anxious as there was no sign of land or the Cape Otway lighthouse. At 4am the fog lifted. A man aloft announced that he could see breakers. The sheer cliffs of Victoria's west coast came into view, and Captain Gibbs realised that the ship was much closer to them than expected. He ordered as much sail to be set as time would permit and then attempted to steer the vessel out to sea. On coming head on into the wind, the ship lost momentum, the sails fell limp and LOCH ARD's bow swung back. Gibbs then ordered the anchors to be released in an attempt to hold its position. The anchors sank some 50 fathoms - but did not hold. By this time LOCH ARD was among the breakers and the tall cliffs of Mutton Bird Island rose behind the ship. Just half a mile from the coast, the ship's bow was suddenly pulled around by the anchor. The captain tried to tack out to sea, but the ship struck a reef at the base of Mutton Bird Island, near Port Campbell. Waves broke over the ship and the top deck was loosened from the hull. The masts and rigging came crashing down knocking passengers and crew overboard. When a lifeboat was finally launched, it crashed into the side of LOCH ARD and capsized. Tom Pearce, who had launched the boat, managed to cling to its overturned hull and shelter beneath it. He drifted out to sea and then on the flood tide came into what is now known as LOCH ARD Gorge. He swam to shore, bruised and dazed, and found a cave in which to shelter. Some of the crew stayed below deck to shelter from the falling rigging but drowned when the ship slipped off the reef into deeper water. Eva Carmichael had raced onto deck to find out what was happening only to be confronted by towering cliffs looming above the stricken ship. In all the chaos, Captain Gibbs grabbed Eva and said, "If you are saved Eva, let my dear wife know that I died like a sailor". That was the last Eva Carmichael saw of the captain. She was swept off the ship by a huge wave. Eva saw Tom Pearce on a small rocky beach and yelled to attract his attention. He dived in and swam to the exhausted woman and dragged her to shore. He took her to the cave and broke open case of brandy which had washed up on the beach. He opened a bottle to revive the unconscious woman. A few hours later Tom scaled a cliff in search of help. He followed hoof prints and came by chance upon two men from nearby Glenample Station three and a half miles away. In a state of exhaustion, he told the men of the tragedy. Tom returned to the gorge while the two men rode back to the station to get help. By the time they reached LOCH ARD Gorge, it was cold and dark. The two shipwreck survivors were taken to Glenample Station to recover. Eva stayed at the station for six weeks before returning to Ireland, this time by steamship. In Melbourne, Tom Pearce received a hero's welcome. He was presented with the first gold medal of the Royal Humane Society of Victoria and a £1000 cheque from the Victorian Government. Concerts were performed to honour the young man's bravery and to raise money for those who lost family in the LOCH ARD disaster. Of the 54 crew members and passengers on board, only two survived: the apprentice, Tom Pearce and the young woman passenger, Eva Carmichael, who lost all of her family in the tragedy. Ten days after the LOCH ARD tragedy, salvage rights to the wreck were sold at auction for £2,120. Cargo valued at £3,000 was salvaged and placed on the beach, but most washed back into the sea when another storm developed. The wreck of LOCH ARD still lies at the base of Mutton Bird Island. Much of the cargo has now been salvaged and some was washed up into what is now known as LOCH ARD Gorge. Cargo and artefacts have also been illegally salvaged over many years before protective legislation was introduced. One of the most unlikely pieces of cargo to have survived the shipwreck was a Minton porcelain peacock - one of only seven in the world. The peacock was destined for the Melbourne International Exhibition in 1880. It had been well packed, which gave it adequate protection during the violent storm. Today, the Minton peacock can be seen at the Flagstaff Hill Maritime Museum in Warrnambool. From Australia's most dramatic shipwreck it has now become Australia's shipwreck artefact and is one of very few 'objects' on the Victorian State Heritage Register most valuable. The LOCH ARD shipwreck is of State significance – Victorian Heritage Register S 417 Flagstaff Hill’s collection of artefacts from LOCH ARD is significant for being one of the largest collections of artefacts from this shipwreck in Victoria. It is significant for its association with the shipwreck, which is on the Victorian Heritage Register (VHR S417). The collection is significant because of the relationship between the objects, as together they have a high potential to interpret the story of the LOCH ARD. The LOCH ARD collection is archaeologically significant as the remains of a large international passenger and cargo ship. The LOCH ARD collection is historically significant for representing aspects of Victoria’s shipping history and its potential to interpret sub-theme 1.5 of Victoria’s Framework of Historical Themes (living with natural processes). The collection is also historically significant for its association with the LOCH ARD, which was one of the worst and best known shipwrecks in Victoria’s history. Silver plated copper alloy dessert fork from the wreck of the Loch Ard. Some verdigris and silver oxide. Concretion on fork. Hallmark partly visible.flagstaff hill maritime museum, shipwreck coast, great ocean road, loch line, loch ard, mutton bird island, loch ard gorge, electroplated cutlery, fork, dessert fork -
 Flagstaff Hill Maritime Museum and Village
Domestic object - Fork, c. 19th century
HISTORY OF THE LOCH ARD The LOCH ARD belonged to the famous Loch Line which sailed many ships from England to Australia. Built in Glasgow by Barclay, Curdle and Co. in 1873, the LOCH ARD was a three-masted square rigged iron sailing ship. The ship measured 262ft 7" (79.87m) in length, 38ft (11.58m) in width, 23ft (7m) in depth and had a gross tonnage of 1693 tons. The LOCH ARD's main mast measured a massive 150ft (45.7m) in height. LOCH ARD made three trips to Australia and one trip to Calcutta before its final voyage. LOCH ARD left England on March 2, 1878, under the command of Captain Gibbs, a newly married, 29 year old. She was bound for Melbourne with a crew of 37, plus 17 passengers and a load of cargo. The general cargo reflected the affluence of Melbourne at the time. On board were straw hats, umbrella, perfumes, clay pipes, pianos, clocks, confectionary, linen and candles, as well as a heavier load of railway irons, cement, lead and copper. There were items included that intended for display in the Melbourne International Exhibition in 1880. The voyage to Port Phillip was long but uneventful. At 3am on June 1, 1878, Captain Gibbs was expecting to see land and the passengers were becoming excited as they prepared to view their new homeland in the early morning. But LOCH ARD was running into a fog which greatly reduced visibility. Captain Gibbs was becoming anxious as there was no sign of land or the Cape Otway lighthouse. At 4am the fog lifted. A man aloft announced that he could see breakers. The sheer cliffs of Victoria's west coast came into view, and Captain Gibbs realised that the ship was much closer to them than expected. He ordered as much sail to be set as time would permit and then attempted to steer the vessel out to sea. On coming head on into the wind, the ship lost momentum, the sails fell limp and LOCH ARD's bow swung back. Gibbs then ordered the anchors to be released in an attempt to hold its position. The anchors sank some 50 fathoms - but did not hold. By this time LOCH ARD was among the breakers and the tall cliffs of Mutton Bird Island rose behind the ship. Just half a mile from the coast, the ship's bow was suddenly pulled around by the anchor. The captain tried to tack out to sea, but the ship struck a reef at the base of Mutton Bird Island, near Port Campbell. Waves broke over the ship and the top deck was loosened from the hull. The masts and rigging came crashing down knocking passengers and crew overboard. When a lifeboat was finally launched, it crashed into the side of LOCH ARD and capsized. Tom Pearce, who had launched the boat, managed to cling to its overturned hull and shelter beneath it. He drifted out to sea and then on the flood tide came into what is now known as LOCH ARD Gorge. He swam to shore, bruised and dazed, and found a cave in which to shelter. Some of the crew stayed below deck to shelter from the falling rigging but drowned when the ship slipped off the reef into deeper water. Eva Carmichael had raced onto deck to find out what was happening only to be confronted by towering cliffs looming above the stricken ship. In all the chaos, Captain Gibbs grabbed Eva and said, "If you are saved Eva, let my dear wife know that I died like a sailor". That was the last Eva Carmichael saw of the captain. She was swept off the ship by a huge wave. Eva saw Tom Pearce on a small rocky beach and yelled to attract his attention. He dived in and swam to the exhausted woman and dragged her to shore. He took her to the cave and broke open case of brandy which had washed up on the beach. He opened a bottle to revive the unconscious woman. A few hours later Tom scaled a cliff in search of help. He followed hoof prints and came by chance upon two men from nearby Glenample Station three and a half miles away. In a state of exhaustion, he told the men of the tragedy. Tom returned to the gorge while the two men rode back to the station to get help. By the time they reached LOCH ARD Gorge, it was cold and dark. The two shipwreck survivors were taken to Glenample Station to recover. Eva stayed at the station for six weeks before returning to Ireland, this time by steamship. In Melbourne, Tom Pearce received a hero's welcome. He was presented with the first gold medal of the Royal Humane Society of Victoria and a £1000 cheque from the Victorian Government. Concerts were performed to honour the young man's bravery and to raise money for those who lost family in the LOCH ARD disaster. Of the 54 crew members and passengers on board, only two survived: the apprentice, Tom Pearce and the young woman passenger, Eva Carmichael, who lost all of her family in the tragedy. Ten days after the LOCH ARD tragedy, salvage rights to the wreck were sold at auction for £2,120. Cargo valued at £3,000 was salvaged and placed on the beach, but most washed back into the sea when another storm developed. The wreck of LOCH ARD still lies at the base of Mutton Bird Island. Much of the cargo has now been salvaged and some was washed up into what is now known as LOCH ARD Gorge. Cargo and artefacts have also been illegally salvaged over many years before protective legislation was introduced. One of the most unlikely pieces of cargo to have survived the shipwreck was a Minton porcelain peacock - one of only seven in the world. The peacock was destined for the Melbourne International Exhibition in 1880. It had been well packed, which gave it adequate protection during the violent storm. Today, the Minton peacock can be seen at the Flagstaff Hill Maritime Museum in Warrnambool. From Australia's most dramatic shipwreck it has now become Australia's shipwreck artefact and is one of very few 'objects' on the Victorian State Heritage Register most valuable. The LOCH ARD shipwreck is of State significance – Victorian Heritage Register S 417 Flagstaff Hill’s collection of artefacts from LOCH ARD is significant for being one of the largest collections of artefacts from this shipwreck in Victoria. It is significant for its association with the shipwreck, which is on the Victorian Heritage Register (VHR S417). The collection is significant because of the relationship between the objects, as together they have a high potential to interpret the story of the LOCH ARD. The LOCH ARD collection is archaeologically significant as the remains of a large international passenger and cargo ship. The LOCH ARD collection is historically significant for representing aspects of Victoria’s shipping history and its potential to interpret sub-theme 1.5 of Victoria’s Framework of Historical Themes (living with natural processes). The collection is also historically significant for its association with the LOCH ARD, which was one of the worst and best known shipwrecks in Victoria’s history. Silver plated copper alloy dessert fork from the wreck of the Loch Ard. Some verdigris. Concretion on fork.flagstaff hill maritime museum, shipwreck coast, flagstaff hill maritime village, great ocean road, loch line, loch ard, mutton bird island, loch ard gorge, electroplated cutlery, fork, dessert fork -
 Flagstaff Hill Maritime Museum and Village
Forks, c. 19th century
HISTORY OF THE LOCH ARD The LOCH ARD belonged to the famous Loch Line which sailed many ships from England to Australia. Built in Glasgow by Barclay, Curdle and Co. in 1873, the LOCH ARD was a three-masted square rigged iron sailing ship. The ship measured 262ft 7" (79.87m) in length, 38ft (11.58m) in width, 23ft (7m) in depth and had a gross tonnage of 1693 tons. The LOCH ARD's main mast measured a massive 150ft (45.7m) in height. LOCH ARD made three trips to Australia and one trip to Calcutta before its final voyage. LOCH ARD left England on March 2, 1878, under the command of Captain Gibbs, a newly married, 29 year old. She was bound for Melbourne with a crew of 37, plus 17 passengers and a load of cargo. The general cargo reflected the affluence of Melbourne at the time. On board were straw hats, umbrella, perfumes, clay pipes, pianos, clocks, confectionary, linen and candles, as well as a heavier load of railway irons, cement, lead and copper. There were items included that intended for display in the Melbourne International Exhibition in 1880. The voyage to Port Phillip was long but uneventful. At 3am on June 1, 1878, Captain Gibbs was expecting to see land and the passengers were becoming excited as they prepared to view their new homeland in the early morning. But LOCH ARD was running into a fog which greatly reduced visibility. Captain Gibbs was becoming anxious as there was no sign of land or the Cape Otway lighthouse. At 4am the fog lifted. A man aloft announced that he could see breakers. The sheer cliffs of Victoria's west coast came into view, and Captain Gibbs realised that the ship was much closer to them than expected. He ordered as much sail to be set as time would permit and then attempted to steer the vessel out to sea. On coming head on into the wind, the ship lost momentum, the sails fell limp and LOCH ARD's bow swung back. Gibbs then ordered the anchors to be released in an attempt to hold its position. The anchors sank some 50 fathoms - but did not hold. By this time LOCH ARD was among the breakers and the tall cliffs of Mutton Bird Island rose behind the ship. Just half a mile from the coast, the ship's bow was suddenly pulled around by the anchor. The captain tried to tack out to sea, but the ship struck a reef at the base of Mutton Bird Island, near Port Campbell. Waves broke over the ship and the top deck was loosened from the hull. The masts and rigging came crashing down knocking passengers and crew overboard. When a lifeboat was finally launched, it crashed into the side of LOCH ARD and capsized. Tom Pearce, who had launched the boat, managed to cling to its overturned hull and shelter beneath it. He drifted out to sea and then on the flood tide came into what is now known as LOCH ARD Gorge. He swam to shore, bruised and dazed, and found a cave in which to shelter. Some of the crew stayed below deck to shelter from the falling rigging but drowned when the ship slipped off the reef into deeper water. Eva Carmichael had raced onto deck to find out what was happening only to be confronted by towering cliffs looming above the stricken ship. In all the chaos, Captain Gibbs grabbed Eva and said, "If you are saved Eva, let my dear wife know that I died like a sailor". That was the last Eva Carmichael saw of the captain. She was swept off the ship by a huge wave. Eva saw Tom Pearce on a small rocky beach and yelled to attract his attention. He dived in and swam to the exhausted woman and dragged her to shore. He took her to the cave and broke open case of brandy which had washed up on the beach. He opened a bottle to revive the unconscious woman. A few hours later Tom scaled a cliff in search of help. He followed hoof prints and came by chance upon two men from nearby Glenample Station three and a half miles away. In a state of exhaustion, he told the men of the tragedy. Tom returned to the gorge while the two men rode back to the station to get help. By the time they reached LOCH ARD Gorge, it was cold and dark. The two shipwreck survivors were taken to Glenample Station to recover. Eva stayed at the station for six weeks before returning to Ireland, this time by steamship. In Melbourne, Tom Pearce received a hero's welcome. He was presented with the first gold medal of the Royal Humane Society of Victoria and a £1000 cheque from the Victorian Government. Concerts were performed to honour the young man's bravery and to raise money for those who lost family in the LOCH ARD disaster. Of the 54 crew members and passengers on board, only two survived: the apprentice, Tom Pearce and the young woman passenger, Eva Carmichael, who lost all of her family in the tragedy. Ten days after the LOCH ARD tragedy, salvage rights to the wreck were sold at auction for £2,120. Cargo valued at £3,000 was salvaged and placed on the beach, but most washed back into the sea when another storm developed. The wreck of LOCH ARD still lies at the base of Mutton Bird Island. Much of the cargo has now been salvaged and some was washed up into what is now known as LOCH ARD Gorge. Cargo and artefacts have also been illegally salvaged over many years before protective legislation was introduced. One of the most unlikely pieces of cargo to have survived the shipwreck was a Minton porcelain peacock - one of only seven in the world. The peacock was destined for the Melbourne International Exhibition in 1880. It had been well packed, which gave it adequate protection during the violent storm. Today, the Minton peacock can be seen at the Flagstaff Hill Maritime Museum in Warrnambool. From Australia's most dramatic shipwreck it has now become Australia's shipwreck artefact and is one of very few 'objects' on the Victorian State Heritage Register most valuable. The LOCH ARD shipwreck is of State significance – Victorian Heritage Register S 417 Flagstaff Hill’s collection of artefacts from LOCH ARD is significant for being one of the largest collections of artefacts from this shipwreck in Victoria. It is significant for its association with the shipwreck, which is on the Victorian Heritage Register (VHR S417). The collection is significant because of the relationship between the objects, as together they have a high potential to interpret the story of the LOCH ARD. The LOCH ARD collection is archaeologically significant as the remains of a large international passenger and cargo ship. The LOCH ARD collection is historically significant for representing aspects of Victoria’s shipping history and its potential to interpret sub-theme 1.5 of Victoria’s Framework of Historical Themes (living with natural processes). The collection is also historically significant for its association with the LOCH ARD, which was one of the worst and best known shipwrecks in Victoria’s history. Silver plated copper alloy dessert forks from the wreck of the Loch Ard. Some very little verdigris. Heavy concretion on forks. 2 forks in group.maritime museum, shipwreck coast, great ocean road, loch line, loch ard, mutton bird island, loch ard gorge, electroplated cutlery, fork, dessert fork -
 Flagstaff Hill Maritime Museum and Village
Domestic object - Fork
HISTORY OF THE LOCH ARD The LOCH ARD belonged to the famous Loch Line which sailed many ships from England to Australia. Built in Glasgow by Barclay, Curdle and Co. in 1873, the LOCH ARD was a three-masted square rigged iron sailing ship. The ship measured 262ft 7" (79.87m) in length, 38ft (11.58m) in width, 23ft (7m) in depth and had a gross tonnage of 1693 tons. The LOCH ARD's main mast measured a massive 150ft (45.7m) in height. LOCH ARD made three trips to Australia and one trip to Calcutta before its final voyage. LOCH ARD left England on March 2, 1878, under the command of Captain Gibbs, a newly married, 29 year old. She was bound for Melbourne with a crew of 37, plus 17 passengers and a load of cargo. The general cargo reflected the affluence of Melbourne at the time. On board were straw hats, umbrella, perfumes, clay pipes, pianos, clocks, confectionary, linen and candles, as well as a heavier load of railway irons, cement, lead and copper. There were items included that intended for display in the Melbourne International Exhibition in 1880. The voyage to Port Phillip was long but uneventful. At 3am on June 1, 1878, Captain Gibbs was expecting to see land and the passengers were becoming excited as they prepared to view their new homeland in the early morning. But LOCH ARD was running into a fog which greatly reduced visibility. Captain Gibbs was becoming anxious as there was no sign of land or the Cape Otway lighthouse. At 4am the fog lifted. A man aloft announced that he could see breakers. The sheer cliffs of Victoria's west coast came into view, and Captain Gibbs realised that the ship was much closer to them than expected. He ordered as much sail to be set as time would permit and then attempted to steer the vessel out to sea. On coming head on into the wind, the ship lost momentum, the sails fell limp and LOCH ARD's bow swung back. Gibbs then ordered the anchors to be released in an attempt to hold its position. The anchors sank some 50 fathoms - but did not hold. By this time LOCH ARD was among the breakers and the tall cliffs of Mutton Bird Island rose behind the ship. Just half a mile from the coast, the ship's bow was suddenly pulled around by the anchor. The captain tried to tack out to sea, but the ship struck a reef at the base of Mutton Bird Island, near Port Campbell. Waves broke over the ship and the top deck was loosened from the hull. The masts and rigging came crashing down knocking passengers and crew overboard. When a lifeboat was finally launched, it crashed into the side of LOCH ARD and capsized. Tom Pearce, who had launched the boat, managed to cling to its overturned hull and shelter beneath it. He drifted out to sea and then on the flood tide came into what is now known as LOCH ARD Gorge. He swam to shore, bruised and dazed, and found a cave in which to shelter. Some of the crew stayed below deck to shelter from the falling rigging but drowned when the ship slipped off the reef into deeper water. Eva Carmichael had raced onto deck to find out what was happening only to be confronted by towering cliffs looming above the stricken ship. In all the chaos, Captain Gibbs grabbed Eva and said, "If you are saved Eva, let my dear wife know that I died like a sailor". That was the last Eva Carmichael saw of the captain. She was swept off the ship by a huge wave. Eva saw Tom Pearce on a small rocky beach and yelled to attract his attention. He dived in and swam to the exhausted woman and dragged her to shore. He took her to the cave and broke open case of brandy which had washed up on the beach. He opened a bottle to revive the unconscious woman. A few hours later Tom scaled a cliff in search of help. He followed hoof prints and came by chance upon two men from nearby Glenample Station three and a half miles away. In a state of exhaustion, he told the men of the tragedy. Tom returned to the gorge while the two men rode back to the station to get help. By the time they reached LOCH ARD Gorge, it was cold and dark. The two shipwreck survivors were taken to Glenample Station to recover. Eva stayed at the station for six weeks before returning to Ireland, this time by steamship. In Melbourne, Tom Pearce received a hero's welcome. He was presented with the first gold medal of the Royal Humane Society of Victoria and a £1000 cheque from the Victorian Government. Concerts were performed to honour the young man's bravery and to raise money for those who lost family in the LOCH ARD disaster. Of the 54 crew members and passengers on board, only two survived: the apprentice, Tom Pearce and the young woman passenger, Eva Carmichael, who lost all of her family in the tragedy. Ten days after the LOCH ARD tragedy, salvage rights to the wreck were sold at auction for £2,120. Cargo valued at £3,000 was salvaged and placed on the beach, but most washed back into the sea when another storm developed. The wreck of LOCH ARD still lies at the base of Mutton Bird Island. Much of the cargo has now been salvaged and some was washed up into what is now known as LOCH ARD Gorge. Cargo and artefacts have also been illegally salvaged over many years before protective legislation was introduced. One of the most unlikely pieces of cargo to have survived the shipwreck was a Minton porcelain peacock - one of only seven in the world. The peacock was destined for the Melbourne International Exhibition in 1880. It had been well packed, which gave it adequate protection during the violent storm. Today, the Minton peacock can be seen at the Flagstaff Hill Maritime Museum in Warrnambool. From Australia's most dramatic shipwreck it has now become Australia's shipwreck artefact and is one of very few 'objects' on the Victorian State Heritage Register most valuable. The LOCH ARD shipwreck is of State significance – Victorian Heritage Register S 417 Flagstaff Hill’s collection of artefacts from LOCH ARD is significant for being one of the largest collections of artefacts from this shipwreck in Victoria. It is significant for its association with the shipwreck, which is on the Victorian Heritage Register (VHR S417). The collection is significant because of the relationship between the objects, as together they have a high potential to interpret the story of the LOCH ARD. The LOCH ARD collection is archaeologically significant as the remains of a large international passenger and cargo ship. The LOCH ARD collection is historically significant for representing aspects of Victoria’s shipping history and its potential to interpret sub-theme 1.5 of Victoria’s Framework of Historical Themes (living with natural processes). The collection is also historically significant for its association with the LOCH ARD, which was one of the worst and best known shipwrecks in Victoria’s history. Silver plated copper alloy table fork - entrèe from the wreck of the Loch Ard. Some verdigris and silver oxide. Some encrustation on fork.flagstaff hill maritime museum, maritime museum, shipwreck coast, flagstaff hill maritime village, great ocean road, loch line, loch ard, mutton bird island, loch ard gorge, electroplated cutlery, fork -
 Federation University Historical Collection
Photograph, Richards & co, Ballarat Junior Technical School Senior Cadet Team, 1918
In 1918 the Ballarat Junior Technical School Cadets were the champions of the Maryborough, St Arnaud, Mildura, Colac and Ballarat Districts. According to Neil Leckie, Manager of the Ballarat Ranger Military Museum: * Originally 12 – 14 year olds went to Junior Cadets attached to their school. * From age 14 – 17 they were Senior Cadets attached to the local militia unit. * After 1 July of the year a Cadet turned 18, the Cadet left the Senior Cadets and became a member of the Citizen Military Force. * In October 1918 the AIF, Militia and Cadets were renamed to give some connection to the AIF battalion raised in the area. Ballarat saw: 8th Australian Infantry Regiment comprising: * 8th Battalion AIF renamed 1st Battalion 8th Australian Infantry Regiment * 70th Infantry Militia renamed 2nd Battalion 8th Australian Infantry Regiment * 70th Infantry Cadets renamed 3rd B, 8th Australian Infantry. 39th Australian Infantry Regiment comprising: * 39th Battalion AIF renamed 1st Battalion 39th Australian Regiment * 71st Infantry Militia renamed 2nd Bn, 39th Australian Infantry Regiment * 71st Infantry Cadets renamed 3rd Bn, 39th Australian Infantry Regiment Prior to the reorganisation in 1918 the 18th Brigade was the 70th, 71st and 73rd Infantry. It is thought that the 18th Brigade Cadet units in 1920 were those that came from the old: * 69th Infantry (Geelong/Queenscliff) * 70th Infantry (Ballarat/Colac) * 71st Infantry (Ballarat West) * 72nd Infantry Warrnambool) * 73rd Infantry (NW Vic) The next name change came in 1921! The Ballarat Star, Saturday 22 June 1918, Page 4 Junior Technical School Cadet Team. The Ballarat Junior Technical School Cadet Team, which was very successful in the competitions recently held at Colac, hopes to be able to compete in similar events at Maryborough. Mildura, and St. Arnaud, but unfortunately they have no funds available for the purpose. An appeal is to be made to the citizens of Ballarat to assist them in defraying the cost of their participation in the competitions at the places mentioned. The Ballarat Star, Saturday 6 July 1918, Page 3 MARYBOROUGH MILITARY SPORTS SUCCESS OF BALLARAT CADETS Maryborough, Friday, The following were the principal results of the events held here on the occasion of the handing over of' the 1900 quota of cadets to the Citizens' Forces, the ceremony in connection with which' was supplemented by arranging a programme of military events. Rifle Exercises, - Ballarat Technical School (85 pts:). l; St: Arnaud (75 pts.). 2; Maryborough High School (68 pts.). 3. Maryborough (66 pts), also competed. Despatch Race. 400 yards— Maryborough (No. 1); 1; Ballarat Technical School, 2. Squad Drill with Arms — Ballarat Technical. School (85. pts): 1; St. Arnaud (72 pts.) 2; Maryborough High School (70- pts), 3. Maryborough No. 1 (68 pts.) 3. Night Alarm: — Ballarat Technical School (3 min. 35. sees), 1; Maryborough High School (4 min. 4 secs), 2; Maryborough No. I (3- min 50 secs), 3. St. Arnaud (4 min. 10 secs). Placing Indian Club. — Maryborough No. 1,1; Ballarat Technical School, 2 Physical Training. Ballarat Technical School (85 pts), 1 ; Maryborough High School, (76 pts). 2; St. Arnaud (70. pts), .3. Tunnel Ball: Maryborough No. 2, 1'; Ballarat Technical School, 2; St. Arnaud; 3. Chase Ball in Two Lines.— Ballarat Technical School. 1; Maryborough; 2. Obstacle Race.. — Sergeant C. F. W. Krahnert (Ballarat), 1; T. Brown (High School) 2; Aggregate Points — Following are the aggregate points scored by the four leading teams :— Ballarat Technical School; 21; Maryborough. 9; Maryborough High School, 6; St. Arnaud 6. The Ballarat Star, Monday 28 October 1918, Page 4. Junior Technical School Cadet Team. —The Junior Technical School's cadet team, which won the championship at the South street competitions this year, was tendered a dinner by the staff in appreciation of the honor they had brought to the school. The function was held at Miss Brazenor's tea rooms, and a most dainty repast was served, the tables being arranged in the artistic fashion which is characteristic of these ladies. Mr W. H. Middleton (president of the School of Mines), Mr H. Smith (principal of the Art School), Lieut. P. Miller (instructor of the High School team), and Sgt. S. Fry were also present. Mr A. W. Steane (head master of The Junior Technical School) presided. After the toast of the King, Mr Middleton proposed, and Mr H. Smith supported, the health of the team and their instructor, Lieut. H. Wakeling, who suitably responded. The toast of the High School team was proposed by Mr. R. Cutler.; and Lieut D. Miller responded. The cup won at the recent competitions was then handed over to Mr - Steane; in accepting the trophy, said he was pleased to see swell a clean, sportsmanlike spirit between the rival teams. He hoped it would continue. He was proud to accept the cup from the team for the school. The Ballarat Star, Monday 12 April 1920 SENIOR CADET COMPETITION. 18th BRIGADE CHAMPIONSHIP. WON BY HIGH SCHOOL. On Saturday afternoon the championship of the 18th Brigade was decided as a preliminary to the State Championship, which will be held on the M.C.C. ground, Melbourne, on Anzac Day. Results, after a keen contest : Ballarat High School .... 1, Junior Technical School .. 2 As a result of this competition, High School will represent the 18th Brigade which embraces Ballarat, Geelong, Colac and the Western District, in the State event. Black and white photograph of 23 men in military uniform. Most wear a slouch hat, with the number 71 on the hat band. Two trophies are positioned in the front. Four men in the front row hold rifles. Back: R. Hirt; Percy Trompf; J. Nicholls; Robert Serjeant; J. Jones; A. Hannah; A. Duncan; L. Lindsay. Centre: H. Ashley; H. Beanland; J. Finlayson; F. Larkin; G. Chambers; A. McCallum; T. Shattock; E. Rowsell. Front: Sergeant A. Roe; John Dulfer, Major Tucker; Lieutenant Harold Wakeling; Sergeant-Major Reeves; Sergeant K. Krahnert; W. Middleton. .1) Mount and frame are wood grain. Top right hand corner of frame is chipped. .5) Framed black and white print of 1918 Ballarat Junior Technical School senior cadet team. 23 men in uniform. The St Arnaud event was for boys born in 1900 (the Quota). They would turn 18 in 1918..2) Reverse of photograph - "Ballarat Tech School Cadet Corp, 1918 / H Wakeling in charge / Photo property of H. Beanland / A Williams not in photo / H Wakeling & A Williams completed teacher training courses as I did but were 3 or 4 years my senior." .5) Top of mount - "Ballarat Junior Technical School Senior Cadet Team / champions 1918" Bottom of mount - "Winners of Following Competitions:- Stawell Colac Maryborough St Arnaud Mildura South Street "A" Grade" r hirt, percy trompf, j nicholls, robert serjeant, j jones, a hannah, a duncan, l lindsay, h ashley, h beanland, j finlayson, f larkin, g chambers, a mccallum, t shattock, e rowsell, a roe, john dulfer, tucker, harold gordon wakeling, reeves, krahnert, w middleton, world war 1, world war i, world war one, ballarat junior technical school, ballarat school of mines, wakeling, harold wakeling, royal south street competitions, 71st regiment, howard beanland -
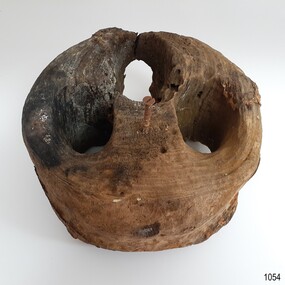 Flagstaff Hill Maritime Museum and Village
Functional object - Deadeye, Barclay Curle & Co shipbuilders, 1873
This example of a sailing ship’s ‘dead-eye’ is from the wreck of the Loch Ard, which sank near Port Campbell in 1878. The Loch Ard got its name from ”Loch Ard” a loch which lies to the west of Aberfoyle, and the east of Loch Lomond. It means "high lake" in Scottish Gaelic. The vessel belonged to the famous Loch Line which sailed many vessels from England to Australia. The Loch Ard was built in Glasgow by Barclay, Curle and Co. in 1873, the vessel was a three-masted square-rigged iron sailing ship that measured 79.87 meters in length, 11.58 m in width, and 7 m in depth with a gross tonnage of 1693 tons with a mainmast that measured a massive 45.7 m in height. Loch Ard made three trips to Australia and one trip to Calcutta before its fateful voyage. Loch Ard left England on March 2, 1878, under the command of 29-year-old Captain Gibbs, who was newly married. The ship was bound for Melbourne with a crew of 37, plus 17 passengers. The general cargo reflected the affluence of Melbourne at the time. Onboard were straw hats, umbrella, perfumes, clay pipes, pianos, clocks, confectionery, linen and candles, as well as a heavier load of railway irons, cement, lead and copper. There were other items included that were intended for display in the Melbourne International Exhibition of 1880. The voyage to Port Phillip was long but uneventful. Then at 3 am on June 1, 1878, Captain Gibbs was expecting to see land. But the Loch Ard was running into a fog which greatly reduced visibility. Captain Gibbs was becoming anxious as there was no sign of land or the Cape Otway lighthouse. At 4 am the fog lifted and a lookout aloft announced that he could see breakers. The sheer cliffs of Victoria's west coast came into view, and Captain Gibbs realised that the ship was much closer to them than expected. He ordered as much sail to be set as time would permit and then attempted to steer the vessel out to sea. On coming head-on into the wind, the ship lost momentum, the sails fell limp and Loch Ard's bow swung back towards land. Gibbs then ordered the anchors to be released in an attempt to hold its position. The anchors sank some 50 fathoms - but did not hold. By this time the ship was among the breakers and the tall cliffs of Mutton Bird Island rose behind. Just half a mile from the coast, the ship's bow was suddenly pulled around by the anchor. The captain tried to tack out to sea, but the ship struck a reef at the base of Mutton Bird Island, near Port Campbell. Waves subsequently broke over the ship and the top deck became loosened from the hull. The masts and rigging came crashing down knocking passengers and crew overboard. When a lifeboat was finally launched, it crashed into the side of Loch Ard and capsized. Tom Pearce, who had launched the boat, managed to cling to its overturned hull and shelter beneath it. He drifted out to sea and then on the flood tide came into what is now known as Lochard Gorge. He swam to shore, bruised and dazed, and found a cave in which to shelter. Some of the crew stayed below deck to shelter from the falling rigging but drowned when the ship slipped off the reef into deeper water. Eva Carmichael a passenger had raced onto the deck to find out what was happening only to be confronted by towering cliffs looming above the stricken ship. In all the chaos, Captain Gibbs grabbed Eva and said, "If you are saved Eva, let my dear wife know that I died like a sailor". That was the last Eva Carmichael saw of the captain. She was swept off the ship by a huge wave. Eva saw Tom Pearce on a small rocky beach and yelled to attract his attention. He dived in and swam to the exhausted woman and dragged her to shore. He took her to the cave and broke the open case of brandy which had washed up on the beach. He opened a bottle to revive the unconscious woman. A few hours later Tom scaled a cliff in search of help. He followed hoof prints and came by chance upon two men from nearby Glenample Station three and a half miles away. In a complete state of exhaustion, he told the men of the tragedy. Tom then returned to the gorge while the two men rode back to the station to get help. By the time they reached Loch Ard Gorge, it was cold and dark. The two shipwreck survivors were taken to Glenample Station to recover. Eva stayed at the station for six weeks before returning to Ireland by steamship. In Melbourne, Tom Pearce received a hero's welcome. He was presented with the first gold medal of the Royal Humane Society of Victoria and a £1000 cheque from the Victorian Government. Concerts were performed to honour the young man's bravery and to raise money for those who lost family in the disaster. Of the 54 crew members and passengers on board, only two survived: the apprentice, Tom Pearce and the young woman passenger, Eva Carmichael, who lost her family in the tragedy. Ten days after the Lochard tragedy, salvage rights to the wreck were sold at auction for £2,120. Cargo valued at £3,000 was salvaged and placed on the beach, but most washed back into the sea when another storm developed. The wreck of Lochard still lies at the base of Mutton Bird Island. Much of the cargo has now been salvaged and some items were washed up into Lochard Gorge. Cargo and artefacts have also been illegally salvaged over many years before protective legislation was introduced in March 1982. One of the most unlikely pieces of cargo to have survived the shipwreck was a Minton majolica peacock- one of only nine in the world. The peacock was destined for the Melbourne 1880 International Exhibition in. It had been well packed, which gave it adequate protection during the violent storm. Today the Minton peacock can be seen at the Flagstaff Hill Maritime Museum in Warrnambool. From Australia's most dramatic shipwreck it has now become Australia's most valuable shipwreck artifact and is one of very few 'objects' on the Victorian State Heritage Register.The shipwreck of the Loch Ard is of significance for Victoria and is registered on the Victorian Heritage Register ( S 417). Flagstaff Hill has a varied collection of artefacts from Loch Ard and its collection is significant for being one of the largest accumulation of artefacts from this notable Victorian shipwreck of which the subject items are a small part. The collections objects give us a snapshot of how we can interpret the story of this tragic event. The collection is also archaeologically significant as it represents aspects of Victoria's shipping history that allows us to interpret Victoria's social and historical themes of the time. Through is associated with the worst and best-known shipwreck in Victoria's history.A weathered ship’s rigging deadeye, showing signs of submersion and erosion in sea water. The flat sides of this thick wooden disc have three holes drilled through in a triangular configuration.Noneflagstaff hill maritime museum, shipwreck coast, loch line, loch ard, captain gibbs, eva carmichael, tom pearce, glenample station, mutton bird island, loch ard gorge, deadeye, rigging -
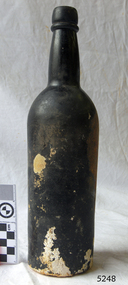 Flagstaff Hill Maritime Museum and Village
Bottle
HISTORY OF THE LOCH ARD The LOCH ARD belonged to the famous Loch Line which sailed many ships from England to Australia. Built in Glasgow by Barclay, Curdle and Co. in 1873, the LOCH ARD was a three-masted square rigged iron sailing ship. The ship measured 262ft 7" (79.87m) in length, 38ft (11.58m) in width, 23ft (7m) in depth and had a gross tonnage of 1693 tons. The LOCH ARD's main mast measured a massive 150ft (45.7m) in height. LOCH ARD made three trips to Australia and one trip to Calcutta before its final voyage. LOCH ARD left England on March 2, 1878, under the command of Captain Gibbs, a newly married, 29 year old. She was bound for Melbourne with a crew of 37, plus 17 passengers and a load of cargo. The general cargo reflected the affluence of Melbourne at the time. On board were straw hats, umbrella, perfumes, clay pipes, pianos, clocks, confectionary, linen and candles, as well as a heavier load of railway irons, cement, lead and copper. There were items included that intended for display in the Melbourne International Exhibition in 1880. The voyage to Port Phillip was long but uneventful. At 3am on June 1, 1878, Captain Gibbs was expecting to see land and the passengers were becoming excited as they prepared to view their new homeland in the early morning. But LOCH ARD was running into a fog which greatly reduced visibility. Captain Gibbs was becoming anxious as there was no sign of land or the Cape Otway lighthouse. At 4am the fog lifted. A man aloft announced that he could see breakers. The sheer cliffs of Victoria's west coast came into view, and Captain Gibbs realised that the ship was much closer to them than expected. He ordered as much sail to be set as time would permit and then attempted to steer the vessel out to sea. On coming head on into the wind, the ship lost momentum, the sails fell limp and LOCH ARD's bow swung back. Gibbs then ordered the anchors to be released in an attempt to hold its position. The anchors sank some 50 fathoms - but did not hold. By this time LOCH ARD was among the breakers and the tall cliffs of Mutton Bird Island rose behind the ship. Just half a mile from the coast, the ship's bow was suddenly pulled around by the anchor. The captain tried to tack out to sea, but the ship struck a reef at the base of Mutton Bird Island, near Port Campbell. Waves broke over the ship and the top deck was loosened from the hull. The masts and rigging came crashing down knocking passengers and crew overboard. When a lifeboat was finally launched, it crashed into the side of LOCH ARD and capsized. Tom Pearce, who had launched the boat, managed to cling to its overturned hull and shelter beneath it. He drifted out to sea and then on the flood tide came into what is now known as LOCH ARD Gorge. He swam to shore, bruised and dazed, and found a cave in which to shelter. Some of the crew stayed below deck to shelter from the falling rigging but drowned when the ship slipped off the reef into deeper water. Eva Carmichael had raced onto deck to find out what was happening only to be confronted by towering cliffs looming above the stricken ship. In all the chaos, Captain Gibbs grabbed Eva and said, "If you are saved Eva, let my dear wife know that I died like a sailor". That was the last Eva Carmichael saw of the captain. She was swept off the ship by a huge wave. Eva saw Tom Pearce on a small rocky beach and yelled to attract his attention. He dived in and swam to the exhausted woman and dragged her to shore. He took her to the cave and broke open case of brandy which had washed up on the beach. He opened a bottle to revive the unconscious woman. A few hours later Tom scaled a cliff in search of help. He followed hoof prints and came by chance upon two men from nearby Glenample Station three and a half miles away. In a state of exhaustion, he told the men of the tragedy. Tom returned to the gorge while the two men rode back to the station to get help. By the time they reached LOCH ARD Gorge, it was cold and dark. The two shipwreck survivors were taken to Glenample Station to recover. Eva stayed at the station for six weeks before returning to Ireland, this time by steamship. In Melbourne, Tom Pearce received a hero's welcome. He was presented with the first gold medal of the Royal Humane Society of Victoria and a £1000 cheque from the Victorian Government. Concerts were performed to honour the young man's bravery and to raise money for those who lost family in the LOCH ARD disaster. Of the 54 crew members and passengers on board, only two survived: the apprentice, Tom Pearce and the young woman passenger, Eva Carmichael, who lost all of her family in the tragedy. Ten days after the LOCH ARD tragedy, salvage rights to the wreck were sold at auction for £2,120. Cargo valued at £3,000 was salvaged and placed on the beach, but most washed back into the sea when another storm developed. The wreck of LOCH ARD still lies at the base of Mutton Bird Island. Much of the cargo has now been salvaged and some was washed up into what is now known as LOCH ARD Gorge. Cargo and artefacts have also been illegally salvaged over many years before protective legislation was introduced. One of the most unlikely pieces of cargo to have survived the shipwreck was a Minton porcelain peacock - one of only nine in the world. The peacock was destined for the Melbourne International Exhibition in 1880. It had been well packed, which gave it adequate protection during the violent storm. Today, the Minton peacock can be seen at the Flagstaff Hill Maritime Museum in Warrnambool. From Australia's most dramatic shipwreck it has now become Australia's most valuable shipwreck artefact and is one of very few 'objects' on the Victorian State Heritage Register. Flagstaff Hill’s collection of artefacts from LOCH ARD is significant for being one of the largest collections of artefacts from this shipwreck in Victoria. It is significant for its association with the shipwreck, which is on the Victorian Heritage Register (VHR S417). The collection is significant because of the relationship between the objects, as together they have a high potential to interpret the story of the LOCH ARD. The LOCH ARD collection is archaeologically significant as the remains of a large international passenger and cargo ship. The LOCH ARD collection is historically significant for representing aspects of Victoria’s shipping history and its potential to interpret sub-theme 1.5 of Victoria’s Framework of Historical Themes (living with natural processes). The collection is also historically significant for its association with the LOCH ARD, which was one of the worst and best known shipwrecks in Victoria’s history. Bottle, Black glass with some encrustation and iron stain, recovered from the wreck of the Loch Ard. Artefact Rego No LA/80. -
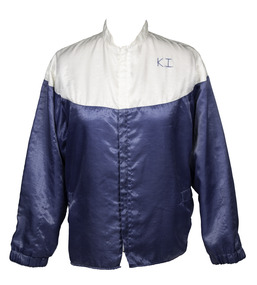 Victorian Harness Racing Heritage Collection at Lord's Raceway Bendigo
Clothing - Race Colours, Kevin Innes
KEVIN ‘BOOFA’ INNES By Lucy McCormick Kevin was a member of the celebrated Innes clan from Inglewood, in Central Victoria. “I think the first Innes’ came to Inglewood in 1851. My daughter used to say she can’t marry anyone from Inglewood, because she’s related to them all,” says Kevin. ‘Boofa’ is enjoying some well-earned relaxation on the couch after breaking a kneecap six or seven months ago in a track work incident. Not that it seems to be bothering him too much; he’s got plenty of time to keep up with the trots on television. “I do follow them,” Kevin says. “I don’t miss many, and I do have a bet. I like to sit in the chair and drive a race as much as anyone.” With an illustrious career both as a trainer and in the sulky, it’s a safe bet that Kevin Innes is a more than handy ‘grandstand driver’. His name is associated as a trainer/driver with many handy horses, including Lea Sands, Imatoff and Stormy Morn to name a few. Kevin is typically circumspect about his bigger triumphs, however that doesn’t seem to be what interests him the most. “I’ll tell you something,” he declares, doing just that, “I like winning with the horses that were no good. Some people never get a good horse. Imagine that. Luck is a very, very important thing. You have to have luck to buy a good horse at the sales, to get it going, keep it sound, find a race for it, find and owner and get a draw. And they still make a liar of you.” Funny, interesting or quirky stories seem to be of greater interest to Kevin, such as the time he had a strong chance in a standing start race – the favourite in the race being his only worry. “I told the owner it only had a 20-metre handicap – I couldn’t beat it off that,” he remembers. “So I was leading, waiting for the favourite to run past me. Toward the finish, I heard it coming, and it ran straight past all right – minus the driver. He’d fallen out of the cart and I won the race. Just lucky.” The Innes family have always been heavily involved in one sporting pursuit or another – Kevin himself being a champion bike rider of his time. “My Uncle Roy was a good bike rider, so he dared me to have a go. It turned out I was quite good at it as well.” So good, in fact that for many years Kevin was able to make a living from bike riding, riding the ‘board track’ for many years. “We trained hard. Bike riding was very big back then, we’d train and ride three or four times a week.” Kevin’s riding career spanned four Herald Sun Tours, a Warrnambool to Melbourne and a Sydney to Melbourne race, to name a few. “It definitely gets you in – it was long hours,” he muses. “But like anything, horse racing included, you only get back what you put in. We trained hard. I never drank, and I still don’t. I’ve seen that many athletes, great ones too, brought down by alcohol.” Lucky with injury too, Kevin can only remember a sore ankle – as well as the requisite scrapes and abrasions from tumbles on the wooden boards of the velodromes. He still enjoys watching all the big bike races when he can. “You can watch them race all over the world – France, Sweden, Germany. “To be honest I sit up and watch them with my son and we get just as much of a kick looking at the countryside than anything else. It’s so different to when I was racing.” Betting on the bike racing was big in Kevin’s day as well, and some of the bookies Kevin saw betting on the bike racing, he saw at the Showgrounds betting on the trots on a Friday or Saturday night. “Racing was different back then. There would be twelve thousand people at the showgrounds – they don’t have to come anymore, it’s just as easy to watch it on the TV.” Kevin remembers in those days that drivers had to ‘weigh in’ as well – everyone who drove needed to weigh ten stone (just under 65 kilograms). It’s something he remembers fondly. “I know not everyone will.” Kevin won’t be drawn on the subject of favourite drivers, either. “Look. Driving is different now. No disrespect to current drivers, but you had to think a lot more on a three furlong track than they do now on the bigger tracks. You had to drive with brains. And I really believe that good horses make good drivers. The horses are very good these days. Today’s drivers – your Gavin Langs, Chris Alfords – they’re thinkers, and brains will beat brawn every time. The girls are just as good now too. You only have to look at Kerryn Manning.” A garrulous and popular character, Kevin has trained horses for the likes of legendary Richmond player Jack Dyer, and also spent his fair share of time hosting sportsman’s nights, holding his own with the likes of Ron Barassi. On one such night, they had flown in a light aircraft to their destination. During their show, Kevin noticed their pilot, sitting in the front row, laughing appreciatively. There was one problem. He had a beer in his hand, and was consuming it with some enthusiasm. As the night wore on, the pilot became more and more inebriated, and Kevin became more and more disturbed, knowing that this was the same pilot who was to fly them home when they finished. Unbeknownst to Kevin, however, the flight had been cancelled and the pilot hadn’t told anyone, instead deciding to take full advantage of his client’s hospitality. For now, Kevin is happy living in Inglewood with partner Barbara. Son Grant and daughter Carla aren’t far away (both work at the Bendigo Harness track, and Carla has held both a trainer and driver’s licence). His granddaughter, Barclay Sands, was born on the same day of the demise of their star performer, Lea Sands, and may give the biggest hint yet just how important the world of harness racing is to Kevin ‘Boofa’ Innes. Blue with white yolkKevin Innes embroidered on left side chestkevin innes, k innes, bendigo harness racing club, bhrc, bendigo, horses, race colours, trotting, pacing, harness racing -
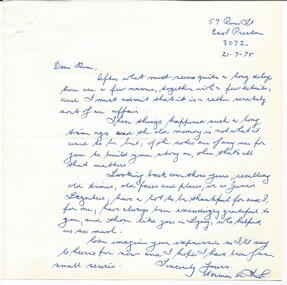 Melbourne Legacy
Letter, Intermediate Legacy Club, 1975
A letter written by Norm Smith and addressed to Kem Kemsley on 21 July 1975. It outlines recollections compiled by Norm Smith about the Intermediate Legacy Club (ILC) and individual members. His letter mentions 'Looking back over those years, recalling old time, old faces and places, we as Junior Legatees have a lot to be thankful for and I, for one, have always been exceedingly grateful to you, and those like you in legacy, who helped us so much.' Graham Billiet's letter dated 23 Mar 1974, mentions taking Frank Doolan to the reunion in 1974. Graham felt the ILC was winding down and was only running on half steam. He gives ILC members' addresses. Norm Smith's letter includes: Ted Kennedy, was the first president of the ILC, he was 'tall rangy lad with fiery red hair' who worked for United Distillers Ltd for 40 years (mostly in Brisbane where he joined Brisbane Legacy). Had been a keen junior legatee and taken part in Literary and Debating group and the Dramatic group where he met his future wife, Florence Pittard - which was the first marriage between junior legatees. He had been a naval cadet in the 1928 compulsory training and later joined the CMF where he was closely associated with L/ Stan Savige. He rose to rank of Major in AIF. Jack and Tom Kennedy, his brothers were in the Lacrosse team and his sister Molly in the JLC for years. G Billiet, a first nighter, very well known to legatees of the time. Bill Johnston, a studious type, went to MHS and university, became a Solicitor. Served in the RAAF as a Flight Lieut. Frank Corrie, prominent Junior Legatee in the Literary and Debating group, a fitter and turner by trade, was on JLC cricket and lacrosse teams, joined the AIF. Fred Hollingsworth, a motor mechanic, he joined CIG. He joined the AIF and served in the Middle East, and was one of the Rats of Tobruk as a sergeant. Bert Hollingsworth (brother of Fred) also in AIF and rank of Lieut. Is a past president of ILC. Bert Wood, a past president, worked for Victorian Railways, moved to Coolangatta. Dan Fitzgerald, active in the Drama group of JLC, worked as an announcer at the ABC. Alan Davidson, keen gymnast - particularly wrestling, helped with Alan Beattie (instructor of boys classes). Roy Davidson (brother of Alan) joined the AIF, afterwards joined M&MTB as a driver, married a Junior Legacy girl. Their younger brother Arthur was also in the lacrosse team. Roy Gilbert, keen junior legatee took part in Literary and Debating group and the Dramatic group and lacrosse team. Worked for Vacuum Oil Co., a past president of ILC and also married a Junior Legatee, Miss Lil Edmunds. Served in the AIF and was a Lieutenant in the Middle East. 'Jimmy' MacGregor, a colourful and handsome Junior Legatee, born in Collingwood, was one of L/ Stan Savige original contacts. Keen JLC gymnast and member of the football team. Worked at the Ret. Soldiers Woollen Mills in Geelong and was in the Geelong ILC. Frank 'Happy' Holliday, was in the lacrosse team, foundation member of ILC and past president. Served with the RAAF as an air frame fitter. Worked for L/ Con Fahle in the printing workshop for 40 years. Howard Auterey, joined the RAAF during the war and returned work for the State Saving bank before retiring in Warrnambool. Norman Smith, was working as an apprentice with M&MTB, took interest in Literary and Debating group and was in the lacrosse team. Was ILC president in 1946. Enliseted in the RAAF as airframe fitter. Retired from M&MTB after serving 50 years, married for 40 years to a daughter of an original Anzac who has also been an active member of the Ladies ILC for many years. Background: The ILC was formed in 1929. The idea of the club sprang from those boys who had outgrown the Junior Legacy Club. In the early days it fielded a lacrosse team and it was this that mainly held the members together (formed under guidance of L/ Jimmy Downing). Enthusiasm wained after a few years as it lacked a solid objective. The answer came from one of its members and in 1938 they founded the Don Esses Club. This was a club for the children of incapacitated ex-servicemen which met every Thursday night at 7.30 run by the ILC members. The name came from the signallers' code Disabled Servicemen's Sons. During the second world war 80% of the members of the ILC enlisted in the services. Leaving only 8 members that could not join due to ill health or reserved occupations. They continued the Don Esses and whatever aid they could to Legacy. ILC members had always helped Legacy where possible including being camp leaders or camp staff, with the annual demonstrations, and coffee stalls at the ANZAC dawn service. Post second world war some ILC members were nominated into Legacy, others drifted away in civil occupations. It was found difficult to recruit new blood into the ILC and eventually membership waned when the boys from the Don Esses clubs found other youth activities to join. The ILC ceased to meet regularly in the mid fifties. However a strong comradeship still existed between members and they would meet in one anothers homes. Members were always ready to help the senior Legacy Club in any way in their power and still helped at Christmas parties and summer camps. ILC was a service rendering organisation and was self governing. Non-sectarian and non-political, the members were ex-junior legatees over 18 years of age. After serving in World War 2 members were eligible to become members of Legacy. Was in a folder of material collated about the ILC by an early archive committee. A record of a Junior Legatee recording what he knew about ILC members and their life outside of Legacy in response to a request from L/ Kem Kemsley. It could have been part of the early archive committee working to capture Legacy history.White note paper x 18 pages handwritten by Norm Smith about the ILC members and a handwritten letter x 3 pages from Graham Billiet about ILC members with addresses.ilc, membership, junior legatee -
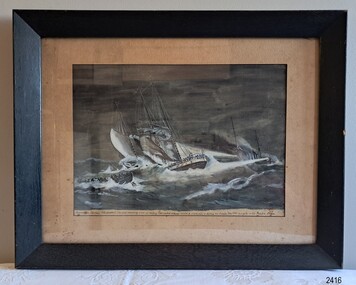 Flagstaff Hill Maritime Museum and Village
Print - Lithograph, sea rescue, R.N. Duffield, Australian cruiser “MELBOURNE” (Tons 5600) rescuing crew of sinking four-masted schooner “HELEN B. STERLING” of Halifax NS Canada, Tons 1343 in a gale in the Pacific Ocean, 19-11-1924
This framed lithograph print in watercolour and gouache was produced on November 19th, 1924, by 20th-century marine artist, Mr R.N. Duffield. It depicts the event of a sea rescue that took place two years earlier. The framer was A.L. Frith of Footscray, Melbourne, who actively advertised from 1933 to 1935. The now disbanded Shiplovers' Society of Victoria (1930-2018) donated the print, and it seems likely that this print was framed for that organisation. This graphic image shows the conditions in which the rescue from the wrecked Helen B. Sterling happened. Captain George Harris was master of the American-owned, four-masted windjammer. His wife Edith and their ten-year-old son Leslie were on board, along with a crew of fifteen seamen. The ship set off from Newcastle, NSW, on January 5th, 1922, loaded with a cargo of coal to deliver to the Society Islands and on to San Francisco. Young Leslie later wrote a lively school composition for his teacher about his experiences on board the Helen B Sterling. He tells of a fire that broke out the day after they departed and burned a hole in a beam. Then another troublesome time on the 9th, when a strong gale blew a sail off the ship. Finally, he tells of the highlight of his voyage when, on the 18th January, the ship was right in the path of a strong cyclone, which broke the mainmast. Huge waves crashed over both sides of the deck, meeting in the middle, and the ship began to sink. The rescue from the wreck was an exciting time for the young boy, and even more so when one of his cats survived after being carefully wrapped in a pillowcase and thrown down from the ship for the boy. Reporters later wrote about Leslie’s comments, “... what had grieved him most was the thought that he might never see his two little sisters again”. Captain Harris said in a published statement, “… the gale was the worst he had met in his 12 years’ experience at sea. All went well for the first week. We then encountered a strong blow from the south-east. We tried the gasoline pump, but the engine broke down, and we had to do the pumping by hand. We at once shortened sail, but the sea increased in fury to such an extent that men were washed from the pumps. I was below at 5:30 on Sunday morning [January 22nd, 1922] when the main mast went over the side, … I at once sent out SOS signals, and got word that HMAS Melbourne was coming to our assistance. I had made a mistake with regard to our position, but did not know it until 11:30 o’clock, when I sent out the correct location. This was picked up by the Melbourne and I received the following reply: “We will reach you about 2 am. Keep a good heart. The Melbourne will do all she can.” Our ship was practically awash when we were taken off.” (Ref: the ‘Helen B. Sterling Disaster’, Maitland Weekly Mercury, NSW, 4-2-1922.) Officers from the Royal Australian Navy, Captain Henry J Feakes (later Rear-Admiral) and Commander Wilfrid Ward Hunt, were on board the light cruiser, HMAS Melbourne (1913-1928), when it left Sydney for New Zealand. After the SOS was received, the ship sped at full steam towards the sinking Helen B. Sterling. They found the vessel at about midnight and shone bright search lights on the distressed ship to illuminate the desperate scene. The Melbourne was unable to move close to the schooner, so sixteen seamen, including Commander Hunt, volunteered to man the Melbourne’s lifesaving 12-oared cutter. They rowed the sea boat with great urgency towards the victims of the sinking ship, keen to save lives no matter what the conditions. When the cutter was close to the Sterling, a line was secured between the Sterling and the cutter. The weary, waterlogged and anxious men on board could be rescued, one at a time, in the breeches buoy equipment, which looked like canvas shorts with a lifesaving ring in the waistband. The victims were hauled along the line and pulled aboard by many willing hands. All eighteen crew and passengers were saved, including Captain Harris and his family. The seamen of the Melbourne received a heroes’ welcome when they arrived in New Zealand. The grateful survivors were taken to Auckland, where they received the care and comfort they needed. Melbourne’s Lord Mayor, Cr. Swanston, on behalf of the citizens of Melbourne, formally recognised the heroic rescue efforts of the seamen of the HMAS Melbourne on March 2nd, 1922, at a special presentation. Two large flags, a White Ensign and an Australian “Jack" Flag, were presented to the Captain of HMAS Melbourne, and souvenirs were awarded to the sea boat’s crew and its Commander, Wilfred Ward Hunt. Commander Hunt was also presented with an original watercolour depicting the heroic rescue from the wreck of the Helen B. Sterling, painted just after the event by renowned marine artist Arthur V Gregory (1867-1957), and he received a silver cigarette case bearing the City’s coat of arms and the inscription, "To Commander Ward Hunt from the Citizens of Melbourne as a memento of the rescue of the crew of Helen B. Stirling by H.M.A.S. Melbourne, on 23.1.22". Both the painting and the cigarette case are now treasured items inherited by his grandson; a reminder of “… a very fine naval gentleman who believed in leading by example." R.N. DUFFIELD: - The Lithograph print in our collection by 20th-century English artist R.N. Duffield is dated Nov. 19, 1924. It is very similar to, and possibly created from, the original A V Gregory watercolour presented to Commander Hunt and dated 1922. Mr R.N. Duffield has art works in the Yarmouth Museums, Norfolk Museums Collection; “Orient Liner Otranto …,” and "Convoy of six ships at sea", both painted in watercolour and gouache during the 1940s. Some of his other works, also painted in watercolour and gouache, have been advertised for sale on Internet sites. Some details differ between the original A.V. Gregory and this Lithograph Print: - -the words on the bow on the original watercolour are “Helen B. Sterling, Blain”, which is in Washington, USA, where the Sterling Shipping Company was registered from around 1919; the words on the print are “Helen B. Sterling, Halifax, N S”, for Nova Scotia, Canada, which is the hometown of Sterling Shipping Company founder’s wife, Helen B Sterling. -The watercolour is coloured and has fine details; the print is monochrome - The A V Gregory signed the watercolour in 1922, on the lower left; the print is signed with the Lithographer’s name on the lower right; “R N Duffield, Nov. 19. 1924” ARTHUR VICTOR GREGORY (1867-1957): - A.V. Gregory is a renowned marine artist who worked in watercolour and gouache. He painted actively between 1899 and 1932, creating over 3o0 works. South Melbourne, Victoria, was where he lived and worked. This Lithograph print is significant in that it depicts the rescuing of the passengers and crew of the schooner “Helen B Stirling”. At the time this was a significant event that made most Australian and New Zealand papers because of the involvement of the Australian cruiser “Melbourne”. The image demonstrates the perilous conditions experienced by seafarers. It includes an example of the line and breeches buoy method used to save lives at sea from the 1860s and into the 20th century. It reflects a time in our history when sail and steam ships cruised the world’s seas together, the former trading with a cargo of coal from Newcastle, the latter defending our country in World War I. The print is part of Flagstaff Hill Maritime Museum’s Collection of maritime artworks that depict famous events, vessels and locations, showing the evolution of sea craft, and aiding the interpretation of our maritime history. The Lithograph print is behind glass in a black painted timber frame and mounted under a cream matte. The vivid image depicts a sea rescue in progress. The night scene is illuminated by a light beaming from a steamship, the Cruiser HMAS Melbourne. It reveals figures on the deck of a sinking sailing ship, the schooner Helen B. Sterling, as foaming waves roll across it. The stricken ship has a broken main mast, and a sail has been detached. A small figure is floating in the choppy sea, secured in a breeches buoy that is attached to a rescue line between a lifesaving cutter and the sailing ship. The crewmen in the cutter are ready to haul the shipwrecked victim aboard, while the figures on the foundering ‘Sterling’ watch them. The print’s paper-covered wooden backboard is attached to the frame with small tacks. A metal hanging wire is secured to two dissimilar eyelet screws. Inscriptions include text on the bow of the sinking vessel, a handwritten title below the picture, and a handwritten name in the print’s lower right corner. On the reverse are two oval, black ink stamps and a round cream label with printed text. The hand-painted print was reproduced from a lithograph, signed in the lower right, by R.N. Duffield of England, on November 19th, 1924. A Frith of Footscray, Melbourne framed it. Painted on the ship’s bow: “HELEN B. STERLING / HALIFAX N S” [Nova Scotia, Canada] Handwritten below the print: “AUSTRALIAN CRUISER “MEMBOURNE” (Tons 5600) rescuing crew of sinking four-masted schooner “HELEN B. STERLING” of Halifax NS Canada, Tons 1343 in a gale in the Pacific Ocean.” Handwritten on lower right: “R.N. DUFFIELD / Nov. 19. 1924” (underlined) On paper label: “Phone: / Footscray 398 [some of the text has torn off] / “A. FRITH / PICTURE FRAMER / Manufacturer / 17 Paisley Street / Footscray.“ On both oval stamps: “SHIPLOVERS SOCIETY OF VICTORIA / LIBRARY” flagstaff hill, flagstaff hill maritime museum and village, warrnambool, maritime museum, maritime village, great ocean road, shipwreck coast, lithograph, lithograph print, reproduction print, helen b. sterling, the sterling, american owned schooner, halifax, halifax n s, halifax nova scotia, nova scotia, halifax n s canada, schooner, windjammer, sailing ship, four-masted ship, captain george harris, george harris, edith harris, leslie harris, sterling shipping line, hmas melbourne, hmas melbourne (1), cruiser hmas melbourne, the melbourne, australian cruiser, captain henry j feakes, commander wilfred ward hunt, sinking ship, shipwreck, sea rescue, gale, cyclone, 1922 rescue, shipwreck rescue, breeches buoy, line rescue, rescue line, lifesaving, cutter, cutter melbourne, sea boat, lifesaving crew, 12-oar cutter, shipwreck victim, r.n. duffield, marine artist, nov. 19. 1924, 20th century artist, a frith, footscray picture framer, shiplovers’ society of victoria, shiplovers’ society library, watercolour, a v gregory, arthur victor gregory, melbourne artist, newcastle coal, newcastle nsw, society islands, san fracisco, aukland new zealand, school composition, ship’s cat, sos signal, lord mayor cr. swanston, heroes, cigarette case -
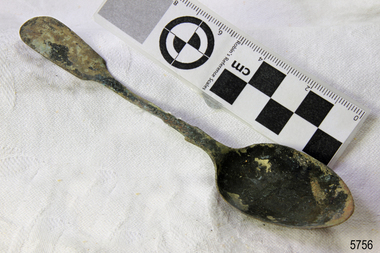 Flagstaff Hill Maritime Museum and Village
Domestic object - Spoon, c. 1878
Unrestored tea spoon from the wreck of the LOCH ARD. The spoon design has a flattened fiddle-back handle, with a thin stem or shank, flared collar, and elongated bowl. The spoons metallic composition is a thin layer of brass alloy which has partially corroded back to a nickel-silver base metal. HISTORY OF THE LOCH ARD The LOCH ARD belonged to the famous Loch Line which sailed many ships from England to Australia. Built in Glasgow by Barclay, Curdle and Co. in 1873, the LOCH ARD was a three-masted square rigged iron sailing ship. The ship measured 262ft 7" (79.87m) in length, 38ft (11.58m) in width, 23ft (7m) in depth and had a gross tonnage of 1693 tons. The LOCH ARD's main mast measured a massive 150ft (45.7m) in height. LOCH ARD made three trips to Australia and one trip to Calcutta before its final voyage. LOCH ARD left England on March 2, 1878, under the command of Captain Gibbs, a newly married, 29 year old. She was bound for Melbourne with a crew of 37, plus 17 passengers and a load of cargo. The general cargo reflected the affluence of Melbourne at the time. On board were straw hats, umbrella, perfumes, clay pipes, pianos, clocks, confectionary, linen and candles, as well as a heavier load of railway irons, cement, lead and copper. There were items included that intended for display in the Melbourne International Exhibition in 1880. The voyage to Port Phillip was long but uneventful. At 3am on June 1, 1878, Captain Gibbs was expecting to see land and the passengers were becoming excited as they prepared to view their new homeland in the early morning. But LOCH ARD was running into a fog which greatly reduced visibility. Captain Gibbs was becoming anxious as there was no sign of land or the Cape Otway lighthouse. At 4am the fog lifted. A man aloft announced that he could see breakers. The sheer cliffs of Victoria's west coast came into view, and Captain Gibbs realised that the ship was much closer to them than expected. He ordered as much sail to be set as time would permit and then attempted to steer the vessel out to sea. On coming head on into the wind, the ship lost momentum, the sails fell limp and LOCH ARD's bow swung back. Gibbs then ordered the anchors to be released in an attempt to hold its position. The anchors sank some 50 fathoms - but did not hold. By this time LOCH ARD was among the breakers and the tall cliffs of Mutton Bird Island rose behind the ship. Just half a mile from the coast, the ship's bow was suddenly pulled around by the anchor. The captain tried to tack out to sea, but the ship struck a reef at the base of Mutton Bird Island, near Port Campbell. Waves broke over the ship and the top deck was loosened from the hull. The masts and rigging came crashing down knocking passengers and crew overboard. When a lifeboat was finally launched, it crashed into the side of LOCH ARD and capsized. Tom Pearce, who had launched the boat, managed to cling to its overturned hull and shelter beneath it. He drifted out to sea and then on the flood tide came into what is now known as LOCH ARD Gorge. He swam to shore, bruised and dazed, and found a cave in which to shelter. Some of the crew stayed below deck to shelter from the falling rigging but drowned when the ship slipped off the reef into deeper water. Eva Carmichael had raced onto deck to find out what was happening only to be confronted by towering cliffs looming above the stricken ship. In all the chaos, Captain Gibbs grabbed Eva and said, "If you are saved Eva, let my dear wife know that I died like a sailor". That was the last Eva Carmichael saw of the captain. She was swept off the ship by a huge wave. Eva saw Tom Pearce on a small rocky beach and yelled to attract his attention. He dived in and swam to the exhausted woman and dragged her to shore. He took her to the cave and broke open case of brandy which had washed up on the beach. He opened a bottle to revive the unconscious woman. A few hours later Tom scaled a cliff in search of help. He followed hoof prints and came by chance upon two men from nearby Glenample Station three and a half miles away. In a state of exhaustion, he told the men of the tragedy. Tom returned to the gorge while the two men rode back to the station to get help. By the time they reached LOCH ARD Gorge, it was cold and dark. The two shipwreck survivors were taken to Glenample Station to recover. Eva stayed at the station for six weeks before returning to Ireland, this time by steamship. In Melbourne, Tom Pearce received a hero's welcome. He was presented with the first gold medal of the Royal Humane Society of Victoria and a £1000 cheque from the Victorian Government. Concerts were performed to honour the young man's bravery and to raise money for those who lost family in the LOCH ARD disaster. Of the 54 crew members and passengers on board, only two survived: the apprentice, Tom Pearce and the young woman passenger, Eva Carmichael, who lost all of her family in the tragedy. Ten days after the LOCH ARD tragedy, salvage rights to the wreck were sold at auction for £2,120. Cargo valued at £3,000 was salvaged and placed on the beach, but most washed back into the sea when another storm developed. The wreck of LOCH ARD still lies at the base of Mutton Bird Island. Much of the cargo has now been salvaged and some was washed up into what is now known as LOCH ARD Gorge. Cargo and artefacts have also been illegally salvaged over many years before protective legislation was introduced. One of the most unlikely pieces of cargo to have survived the shipwreck was a Minton porcelain peacock - one of only seven in the world. The peacock was destined for the Melbourne International Exhibition in 1880. It had been well packed, which gave it adequate protection during the violent storm. Today, the Minton peacock can be seen at the Flagstaff Hill Maritime Museum in Warrnambool. From Australia's most dramatic shipwreck it has now become Australia's most valuable shipwreck artefact and is one of very few 'objects' on the Victorian State Heritage Register. The LOCH ARD shipwreck is of State significance – Victorian Heritage Register S 417. Flagstaff Hill’s collection of artefacts from LOCH ARD is significant for being one of the largest collections of artefacts from this shipwreck in Victoria. It is significant for its association with the shipwreck, which is on the Victorian Heritage Register (VHR S417). The collection is significant because of the relationship between the objects, as together they have a high potential to interpret the story of the LOCH ARD. The LOCH ARD collection is archaeologically significant as the remains of a large international passenger and cargo ship. The LOCH ARD collection is historically significant for representing aspects of Victoria’s shipping history and its potential to interpret sub-theme 1.5 of Victoria’s Framework of Historical Themes (living with natural processes). The collection is also historically significant for its association with the LOCH ARD, which was one of the worst and best known shipwrecks in Victoria’s history. Unrestored tea spoon from the wreck of the LOCH ARD. The spoon design has a flattened fiddle-back handle, with a thin stem or shank, flared collar, and elongated bowl. The spoons metallic composition is a thin layer of brass alloy which has partially corroded back to a nickel-silver base metal. Approximately 35% of original electroplating remains, with some verdigris. Outlines of three makers marks are visible on the lower rear of handle (Circle, Circle, Diamond) and details of one are legible (Maltese Cross).flagstaff hill maritime museum, shipwreck coast, great ocean road, loch line, loch ard, mutton bird island, electroplated cutlery, loch ard shipwreck, nickel silver, william page & co, birmingham, brass plating, makers marks -
 Melton City Libraries
Photograph, Martha (Watson) Myers, 1907, c.1930 and 1953
Martha Watson was born on 17 October 1888 in Ballarat, Victoria, Australia as the first child of Robina (Ruby) WATSON. She died on 23 March 1976 in Geelong, Victoria, Australia. Memories of Martha by Valcia nee Twigg Lowrie, granddaughter of Arthur Watson. My memories and recollections as told to me my Grandmother ‘Mum’ Myers. As a child she had scarlet fever and did not attend school during the illness and missed a lot of school (Macarthur Street State School). When she was meant to return to school having fallen behind her classmates, confused and behind with the school work, she instead spent her time wandering around Lake Wendouree feeling too ashamed to attend school. Her uncle Arthur, born in 1874, whom she idealized, was a type of father/mentor figure who played and important part in her early life. He moved to Queensland in the early 1900’s and they did not meet again until he visited Melton in 1949, he died in 1954. He was a champion rower in Victoria and Queensland and a noted cyclist who rode in three Warrnambool to Melbourne races, and footballer. Her mother’s death certificate reveals her place of death as the Ballarat Hospital on 8th September 1903 aged 36. Martha was not told of the death of her mother, it was some time later when she found out her mother had died. She was greatly distressed when she eventually found out. The grief and the circumstance of her mothers death and her unfortunate life had a permanent effect on Martha’s life. Robina was buried in Open Ground at the New Cemetery Ballarat. Marjorie likened to this to the death of Mozart at the age of 35 who was also buried in a common grave. Martha also told me the stories about how as a child she played at the cemetery, taking the oranges placed as offerings on the Chinese graves and being chased away in fright when caught by a Chinese man. Her description left a vivid impression on my mind. The Burnbank street house was just across the road from the cemetery. The pieces of this story I had heard made sense when I visited the location in recent years. Martha’s described how Nanna would sing on the front verandah, and send her off to t get drink for her. This situation might help explain the reason for Martha’s strong aversion to alcohol. As a young girl it had been distressing to her. Nanna was a colourful and theatrical personality and danced with the Duke when he visited Ballarat. She was also known to have stated that she would marry a man who could give her a bucket of gold, possibly around the time after her first husband, Charles death, she had her young boy Edward to bring up. Martha was about 13 years old when Nanna Watson left Ballarat going to Queensland to visit her son Arthur. Martha slept that night afraid and alone in the empty house. The person who was meant to collect her did not come until the next day. She went to work for a family, a woman with children, they took most of the money that Nanna had left with Martha. There was a new baby in the house and the Scottish man in the house behaved suspiciously towards Martha. She was afraid of him and would hide from him under the bed. At this young age she managed to survive on her wits and sense of self preservation. It is not known how long she worked with this family. The place was from my impression, away from the town of Ballarat. Her very difficult formative years are testament to her strength of character and determination to succeed in life and ambition to provide the best opportunities for her own children. In 1905 Martha received a post card from Uncle Arthur in Brisbane addressed – c/o Mrs Styles 14 High Street Ballarat. Dolly Styles was a Ballarat friend and she kept in contact with her for many years. A letter reveals her living in Minyip in her older years. Martha is thought to have spent a few years working before she arrived in Melton. Miss Shebler hired Martha to help her in the care of her father and to assist with work in the Golden Fleece Hotel. Mr Shebler was a nice old man and mostly confined to his room and somewhat childlike as described by Martha. [The elderly Mr August Shebler died in February 1908]. Martha’s exact arrival in Melton is not known, but could be estimated as late 1906 to early 1907. In her room at the hotel she could hear the spring cart of Mr Minns going on the milk delivery rounds in the very early hours of the morning after coming across the creek from his house When she was 19, she married Frederick Thomas MYERS, son of Henri MIERS and Ann DOWLING, on 30 April 1908 ( Fitzroy, Victoria, Australia). Frederick Thomas MYERS and Martha Mary WATSON had the following children: 1. Frederick John Watson MYERS was born on 01 October 1908 in Melton, Victoria, Australia.He died on 07 February 2001.He married Mary June BATTYE on 18 September 1948 in Victoria, Australia. 2. Marjorie Gretchen MYERS was born on 21 February 1912 in Melton, Victoria, Australia.She died on 10 September 2004 in Frankston, Victoria, Australia.She married Herbert Vivian BUTLER on 07 January 1939 in Victoria, Australia. 3. Eva Edna MYERS was born on 15 October 1918 in Melton, Victoria, Australia.She died on 31 January 2008 in Bacchus Marsh, Victoria, Australia.She married Ernest Wesley BARRIE on 25 October 1941 in Melton, Victoria, Australia. 4. Arthur Bruce MYERS was born on 29 April 1925 in Melton, Victoria, Australia.He died on 26 March 2015 in Melbourne, Victoria, Australia.He married Olive Irene NORTON in April 1953 in Balliang, Victoria, Australia (or Church of Christ Footscray? (WB)). 5. Maxwell Douglas MYERS was born on 10 August 1927 in Melton, Victoria, Australia.He died on 03 May 2005 in Geelong, Victoria, Australia.He married Rosemary Rebecca BARRIE on 31 August 1951 in Melton, Victoria, Australia. Valcia nee Twigg Lowrie granddaughter of Arthur Watson, daughter of Mercia and Val Twigg did extensive research on the Marshall family of Lerwick Shetland Isle obtaining birth information of the Scottish forebears. She also got the birth/marriage and death certificates of the Ballarat connection of Robina’s husbands and children. Copies were sent to Edna and Wendy during the early 1990’s. Bruce and Irene also obtained certificates and Myers family information. Wendy applied for certificates at this time.Photographs of Martha (Watson) Myers taken at different times of her life -
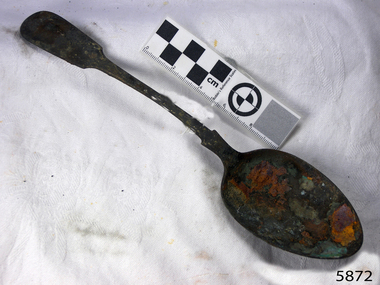 Flagstaff Hill Maritime Museum and Village
Domestic object - Spoon, circa 1878
This table spoon is from the wreck of the LOCH ARD, a Loch Line ship of 1,693 tons which sailed from Gravesend, London, on 2 March 1878 with 17 passengers and a crew of 36 under Captain George Gibbs. “The intention was to discharge cargo in Melbourne, before returning to London via the Horn with wool and wheat”. Instead, on 1 June 1878, after 90 days at sea, she struck the sandstone cliffs of Mutton Bird Island on the south west coast of Victoria, and sank with the loss of 52 lives and all her cargo. The manifest of the LOCH ARD listed an array of manufactured goods and bulk metals being exported to the Colony of Victoria, with a declared value of £53,700. (202 bills of lading show an actual invoice value of £68, 456, with insurance underwriting to £30,000 of all cargo). Included in the manifest is the item of “Tin hardware & cutlery £7,530”. This table spoon is one of 482 similar items of electro-plated cutlery from the LOCH ARD site, comprising spoons and forks of various sizes but all sharing the same general shape or design and metallic composition. 49 of these pieces display a legible makers’ mark — the initials “W” and “P” placed within a raised diamond outline, which is in turn contained within a sunken crown shape — identifying the manufacturer as William Page & Co of Birmingham. An electroplater’s makers’ marks, unlike sterling silver hallmarks, are not consistent identifiers of quality or date and place of manufacture. A similar line of five impressions was usually made to impress the consumer with an implication of industry standards, but what each one actually signified was not regulated and so they varied according to the whim of the individual foundry. In this case, the maker’s marks are often obscured by sedimentary accretion or removed by corrosion after a century of submersion in the ocean. However sufficient detail has survived to indicate that these samples of electro-plated cutlery probably originated from the same consignment in the LOCH ARD’s cargo. The generally common range of marks are drawn from 255 tea spoons, 125 dessert spoons, and 99 table forks. These marks are clearly visible in 66 instances, while the same sequence of general outlines, or depression shapes, is discernible in another 166 examples. Suggested trade names for William Page & Co’s particular blend of brass plating are ‘roman silver’ or ‘silverite’. This copper alloy polishes to a lustrous gold when new, discolouring to a murky grey with greenish hue when neglected. HISTORY OF THE LOCH ARD The LOCH ARD belonged to the famous Loch Line which sailed many ships from England to Australia. Built in Glasgow by Barclay, Curdle and Co. in 1873, the LOCH ARD was a three-masted square rigged iron sailing ship. The ship measured 262ft 7" (79.87m) in length, 38ft (11.58m) in width, 23ft (7m) in depth and had a gross tonnage of 1693 tons. The LOCH ARD's main mast measured a massive 150ft (45.7m) in height. LOCH ARD made three trips to Australia and one trip to Calcutta before its final voyage. LOCH ARD left England on March 2, 1878, under the command of Captain Gibbs, a newly married, 29 year old. She was bound for Melbourne with a crew of 37, plus 17 passengers and a load of cargo. The general cargo reflected the affluence of Melbourne at the time. On board were straw hats, umbrella, perfumes, clay pipes, pianos, clocks, confectionary, linen and candles, as well as a heavier load of railway irons, cement, lead and copper. There were items included that intended for display in the Melbourne International Exhibition in 1880. The voyage to Port Phillip was long but uneventful. At 3am on June 1, 1878, Captain Gibbs was expecting to see land and the passengers were becoming excited as they prepared to view their new homeland in the early morning. But LOCH ARD was running into a fog which greatly reduced visibility. Captain Gibbs was becoming anxious as there was no sign of land or the Cape Otway lighthouse. At 4am the fog lifted. A man aloft announced that he could see breakers. The sheer cliffs of Victoria's west coast came into view, and Captain Gibbs realised that the ship was much closer to them than expected. He ordered as much sail to be set as time would permit and then attempted to steer the vessel out to sea. On coming head on into the wind, the ship lost momentum, the sails fell limp and LOCH ARD's bow swung back. Gibbs then ordered the anchors to be released in an attempt to hold its position. The anchors sank some 50 fathoms - but did not hold. By this time LOCH ARD was among the breakers and the tall cliffs of Mutton Bird Island rose behind the ship. Just half a mile from the coast, the ship's bow was suddenly pulled around by the anchor. The captain tried to tack out to sea, but the ship struck a reef at the base of Mutton Bird Island, near Port Campbell. Waves broke over the ship and the top deck was loosened from the hull. The masts and rigging came crashing down knocking passengers and crew overboard. When a lifeboat was finally launched, it crashed into the side of LOCH ARD and capsized. Tom Pearce, who had launched the boat, managed to cling to its overturned hull and shelter beneath it. He drifted out to sea and then on the flood tide came into what is now known as LOCH ARD Gorge. He swam to shore, bruised and dazed, and found a cave in which to shelter. Some of the crew stayed below deck to shelter from the falling rigging but drowned when the ship slipped off the reef into deeper water. Eva Carmichael had raced onto deck to find out what was happening only to be confronted by towering cliffs looming above the stricken ship. In all the chaos, Captain Gibbs grabbed Eva and said, "If you are saved Eva, let my dear wife know that I died like a sailor". That was the last Eva Carmichael saw of the captain. She was swept off the ship by a huge wave. Eva saw Tom Pearce on a small rocky beach and yelled to attract his attention. He dived in and swam to the exhausted woman and dragged her to shore. He took her to the cave and broke open case of brandy which had washed up on the beach. He opened a bottle to revive the unconscious woman. A few hours later Tom scaled a cliff in search of help. He followed hoof prints and came by chance upon two men from nearby Glenample Station three and a half miles away. In a state of exhaustion, he told the men of the tragedy. Tom returned to the gorge while the two men rode back to the station to get help. By the time they reached LOCH ARD Gorge, it was cold and dark. The two shipwreck survivors were taken to Glenample Station to recover. Eva stayed at the station for six weeks before returning to Ireland, this time by steamship. In Melbourne, Tom Pearce received a hero's welcome. He was presented with the first gold medal of the Royal Humane Society of Victoria and a £1000 cheque from the Victorian Government. Concerts were performed to honour the young man's bravery and to raise money for those who lost family in the LOCH ARD disaster. Of the 54 crew members and passengers on board, only two survived: the apprentice, Tom Pearce and the young woman passenger, Eva Carmichael, who lost all of her family in the tragedy. Ten days after the LOCH ARD tragedy, salvage rights to the wreck were sold at auction for £2,120. Cargo valued at £3,000 was salvaged and placed on the beach, but most washed back into the sea when another storm developed. The wreck of LOCH ARD still lies at the base of Mutton Bird Island. Much of the cargo has now been salvaged and some was washed up into what is now known as LOCH ARD Gorge. Cargo and artefacts have also been illegally salvaged over many years before protective legislation was introduced. One of the most unlikely pieces of cargo to have survived the shipwreck was a Minton porcelain peacock - one of only seven in the world. The peacock was destined for the Melbourne International Exhibition in 1880. It had been well packed, which gave it adequate protection during the violent storm. Today, the Minton peacock can be seen at the Flagstaff Hill Maritime Museum in Warrnambool. From Australia's most dramatic shipwreck it has now become Australia's shipwreck artefact and is one of very few 'objects' on the Victorian State Heritage Register most valuable. HISTORY OF THE LOCH ARD The LOCH ARD belonged to the famous Loch Line which sailed many ships from England to Australia. Built in Glasgow by Barclay, Curdle and Co. in 1873, the LOCH ARD was a three-masted square rigged iron sailing ship. The ship measured 262ft 7" (79.87m) in length, 38ft (11.58m) in width, 23ft (7m) in depth and had a gross tonnage of 1693 tons. The LOCH ARD's main mast measured a massive 150ft (45.7m) in height. LOCH ARD made three trips to Australia and one trip to Calcutta before its final voyage. LOCH ARD left England on March 2, 1878, under the command of Captain Gibbs, a newly married, 29 year old. She was bound for Melbourne with a crew of 37, plus 17 passengers and a load of cargo. The general cargo reflected the affluence of Melbourne at the time. On board were straw hats, umbrella, perfumes, clay pipes, pianos, clocks, confectionary, linen and candles, as well as a heavier load of railway irons, cement, lead and copper. There were items included that intended for display in the Melbourne International Exhibition in 1880. The voyage to Port Phillip was long but uneventful. At 3am on June 1, 1878, Captain Gibbs was expecting to see land and the passengers were becoming excited as they prepared to view their new homeland in the early morning. But LOCH ARD was running into a fog which greatly reduced visibility. Captain Gibbs was becoming anxious as there was no sign of land or the Cape Otway lighthouse. At 4am the fog lifted. A man aloft announced that he could see breakers. The sheer cliffs of Victoria's west coast came into view, and Captain Gibbs realised that the ship was much closer to them than expected. He ordered as much sail to be set as time would permit and then attempted to steer the vessel out to sea. On coming head on into the wind, the ship lost momentum, the sails fell limp and LOCH ARD's bow swung back. Gibbs then ordered the anchors to be released in an attempt to hold its position. The anchors sank some 50 fathoms - but did not hold. By this time LOCH ARD was among the breakers and the tall cliffs of Mutton Bird Island rose behind the ship. Just half a mile from the coast, the ship's bow was suddenly pulled around by the anchor. The captain tried to tack out to sea, but the ship struck a reef at the base of Mutton Bird Island, near Port Campbell. Waves broke over the ship and the top deck was loosened from the hull. The masts and rigging came crashing down knocking passengers and crew overboard. When a lifeboat was finally launched, it crashed into the side of LOCH ARD and capsized. Tom Pearce, who had launched the boat, managed to cling to its overturned hull and shelter beneath it. He drifted out to sea and then on the flood tide came into what is now known as LOCH ARD Gorge. He swam to shore, bruised and dazed, and found a cave in which to shelter. Some of the crew stayed below deck to shelter from the falling rigging but drowned when the ship slipped off the reef into deeper water. Eva Carmichael had raced onto deck to find out what was happening only to be confronted by towering cliffs looming above the stricken ship. In all the chaos, Captain Gibbs grabbed Eva and said, "If you are saved Eva, let my dear wife know that I died like a sailor". That was the last Eva Carmichael saw of the captain. She was swept off the ship by a huge wave. Eva saw Tom Pearce on a small rocky beach and yelled to attract his attention. He dived in and swam to the exhausted woman and dragged her to shore. He took her to the cave and broke open case of brandy which had washed up on the beach. He opened a bottle to revive the unconscious woman. A few hours later Tom scaled a cliff in search of help. He followed hoof prints and came by chance upon two men from nearby Glenample Station three and a half miles away. In a state of exhaustion, he told the men of the tragedy. Tom returned to the gorge while the two men rode back to the station to get help. By the time they reached LOCH ARD Gorge, it was cold and dark. The two shipwreck survivors were taken to Glenample Station to recover. Eva stayed at the station for six weeks before returning to Ireland, this time by steamship. In Melbourne, Tom Pearce received a hero's welcome. He was presented with the first gold medal of the Royal Humane Society of Victoria and a £1000 cheque from the Victorian Government. Concerts were performed to honour the young man's bravery and to raise money for those who lost family in the LOCH ARD disaster. Of the 54 crew members and passengers on board, only two survived: the apprentice, Tom Pearce and the young woman passenger, Eva Carmichael, who lost all of her family in the tragedy. Ten days after the LOCH ARD tragedy, salvage rights to the wreck were sold at auction for £2,120. Cargo valued at £3,000 was salvaged and placed on the beach, but most washed back into the sea when another storm developed. The wreck of LOCH ARD still lies at the base of Mutton Bird Island. Much of the cargo has now been salvaged and some was washed up into what is now known as LOCH ARD Gorge. Cargo and artefacts have also been illegally salvaged over many years before protective legislation was introduced. One of the most unlikely pieces of cargo to have survived the shipwreck was a Minton porcelain peacock - one of only seven in the world. The peacock was destined for the Melbourne International Exhibition in 1880. It had been well packed, which gave it adequate protection during the violent storm. Today, the Minton peacock can be seen at the Flagstaff Hill Maritime Museum in Warrnambool. From Australia's most dramatic shipwreck it has now become Australia's shipwreck artefact and is one of very few 'objects' on the Victorian State Heritage Register most valuable. The LOCH ARD shipwreck is of State significance – Victorian Heritage Register S 417. Flagstaff Hill’s collection of artefacts from LOCH ARD is significant for being one of the largest collections of artefacts from this shipwreck in Victoria. It is significant for its association with the shipwreck, which is on the Victorian Heritage Register (VHR S417). The collection is significant because of the relationship between the objects, as together they have a high potential to interpret the story of the LOCH ARD. The LOCH ARD collection is archaeologically significant as the remains of a large international passenger and cargo ship. The LOCH ARD collection is historically significant for representing aspects of Victoria’s shipping history and its potential to interpret sub-theme 1.5 of Victoria’s Framework of Historical Themes (living with natural processes). The collection is also historically significant for its association with the LOCH ARD, which was one of the worst and best known shipwrecks in Victoria’s history. Unrestored table spoon from the wreck of the LOCH ARD. The spoon design has a flattened fiddle-back handle, with a thin stem or shank, flared collar, and a shallow rounded bowl. The spoons metallic composition is a thin layer of brass alloy which has partially corroded back to a nickel-silver base metal. Minimal original plate remains. Some verdigris (15%) and concretion (40%) on front and back of spoon. Spoon is bent and balance is covered in Silver Oxide.flagstaff hill maritime museum, shipwreck coast, great ocean road, loch line, loch ard, mutton bird island, loch ard gorge, electroplated cutlery, loch ard shipwreck, william page and co, birmingham brass plating, table spoons -
 Federation University Historical Collection
Reports, Big Cat sightings (dates), 1989
Research of dated sightngs of Big cats in Victoria from 1868-1989. australian mythical animals collection, david waldron, dse, big cats, panthers pumas, nuggety, gippsland, black cats, tasmanian tiger, marysville, wood's point, thylacine, south gippsland, felid, gippsland big cat, kelvin healey, peter hall, sherbrooke forest, woodside, walaces flat, mountain lion, heyfield, mt taylor, walhalla, mt selma, warrnambool, kyneton, korumburra, canadian forest, grampians, panton hill, beaconsfield, apollo bay, forrest, victoria valley, rapanyup, dargo, inglewood, doncaster east, tidal river, cape bridgewater, walkerville, dooen, st arnaud, lake bung bong, mitta mitta, moliagul, emerald, kinglake, cape otway, dereel, leonard's hill, daylesford, korweinguboora, lal lal, noojee, eltham, lancefield, trentham, daisy hill, tanjil south, wonthaggi, cockatoo, warrenheip, greendale, howqua, lake buchan, melville caves, portland, mt elephant, morwell, navarre, yarram, yandoit, moonambel, maryborough, taravale, coghill's creek, trentham, carisbrook, inglewood, warrenmang, yarragon, creswick, emerald, stawel, clunes, majorca, heathcote, talbot, daylesford, newham, broadford, peter chapple