Showing 3175 items
matching destinations
-
 Melbourne Tram Museum
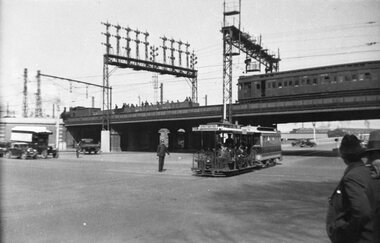
Negative, 1936
Negative of cable tram crossing from Queensbridge Road into Market St after passing under the railway underpass, along Flinders St. In the background is a the bridge with a Tait train crossing, a work or ballast train on the bridge and the signal gantry. There is a policeman on point duty. The cable tram has the destination of Collins St.trams, tramways, cable trams, flinders st, market st, collins st, railways -
 Melbourne Tram Museum
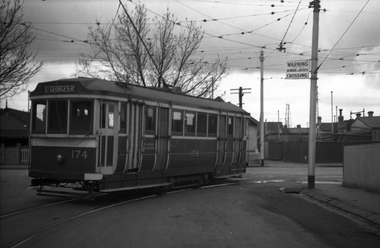
Negative, Wal Jack, 5/08/1943 12:00:00 AM
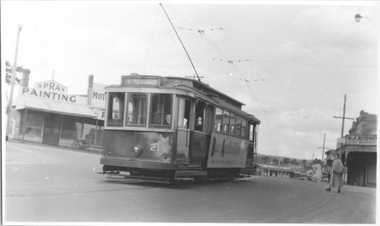
Black and white negative, by Wal Jack, of S174 turning from Pilkington St into Barkly St with the destination of St Georges Road. Shows the nature of the corner after the removal of the second track and the warning sign. Photo dated 5-8-1943 in the Wal Jack album along with details of the location and the tramcars.trams, tramways, holden st, barkly st, st georges road, pilkington st, s class, tram 174 -
 Melbourne Tram Museum
Negative, Wal Jack, c1946
Black and white negative, by Wal Jack, of W5 811 using the cross over in Mt Alexander Road in front of Essendon tram depot, c1946. Tram has the destination of Racecourse. The trams in the depot still have white fronts. Photo taken prior the construction of the new tracks on the north side of the depot.trams, tramways, essendon depot, w5 class, mount alexander road, tram 811 -
 Melbourne Tram Museum
Ephemera - Badge, Tramway Museum Society of Victoria (TMSV), c1990
Metal badges - relief (flat) of a Melbourne Z class No. 50 in an orange colour scheme. with an enamel gloss finish with a pin on the rear. Has the destination of City and showing route 74. Has a imprint of a stamp of the rear - difficult to read. .1 - Tie clip - spring loaded metal clip using the badge,trams, tramways, badges, z class, route 74, souvenirs -
 Melbourne Tram Museum
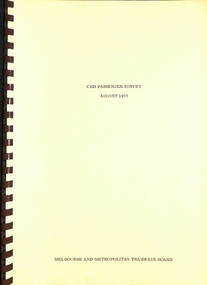
Document - Report, Melbourne & Metropolitan Tramways Board (MMTB), "CBD Passenger Survey - August 1977", Aug. 1977
Report - A4, 58 pages + card coves with brown comb bound, titled "CBD Passenger Survey - August 1977". Has table of contents, tables, figures and notes on the cards. Provides origin and destination information on passengers entering the CBD. Conducted over a two week period using university students.Has "3-10-78" on inside front cover.trams, tramways, surveys, city of melbourne, passengers, mmtb -
 Melbourne Tram Museum
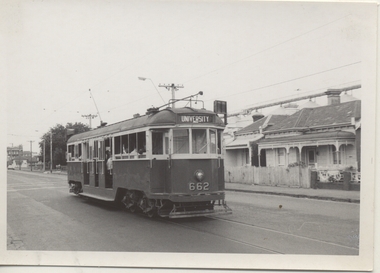
Photograph - Black & White Photograph/s, Chris Phillips, Feb. 1969
Black and white photograph of W3 662 in Holden St between Bryne and Brunswick Streets, with the North Fitzroy grain silos in the background during a special tram tour, 9/2/1969. Photo by Chris Phillips. Showing Destination of University. ARE Tour ex South Melbourne depot. Printed on Kodak Paper.On rear in red ink "W3 662 Holden St 9/2/69"trams, tramways, mmtb, special trams, holden st, tram 662 -
 Melbourne Tram Museum
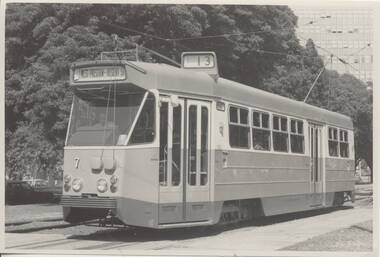
Photograph - Black & White Photograph/s, Melbourne & Metropolitan Tramways Board (MMTB), c1975
Black and white photograph of Z 7, Victoria Parade crossover, near Nicholson St, c1975, with the destination "West Preston - Regent St" and route No. 13. Has the old "Green Latrine", Commonwealth Government Office building in the background. MMTB photo, probably soon after entering traffic in June 1975Has a MMTB stamp on rear.trams, tramways, z class, mmtb, victoria parade, tram z 7 -
 Bendigo Historical Society Inc.
Document - BASIL MILLER COLLECTION: ELECTRICITY SUPPLY DEPARTMENT, NORTHERN BRANCH
Typed fools cap Document, 2 copies of 2 pages. Sections - Increased Fares and Check Identifications - Bendigo (for Trams). Numbers in the 'In' and 'Out' columns denote destination points. Instructions regarding ticketing and fare pricing, includes prams, suitcases and shopping carriages. Adult and child fare. Lists street names.organization, business, bendigo trams -
 Ballarat Tramway Museum
Photograph - Digital Image, Greg Triplett, No. 40 prior to departure from Lydiard St North, 19-9-1971
No. 40 prior to departure from Lydiard St North - Greg Triplett. The destination showing depot is incorrect - the tram ran through to Sebastopol. Two conductors are standing in the front of the tram, with many photos being taken at the time. Taken on the last day of operation of the SEC Ballarat tramway system - 19-9-1971. Yields information about the last day of operation of the Ballarat SEC tramways.Digital image - 120 negative tramways, tramcars, ballarat, last day, closure, lydiard st nth, tram 40 -
 Ballarat Tramway Museum
Photograph - Black and White - tram 11 Victoria St, A T Miles, 26/11/1969
Black and White - tram 11 in Victoria St crossing over the Eureka line bridge - former Buninyong railway line. Taken by A T Miles 26/11/1969. The tram has a Twin Lakes advert on the front. The destination has been changed for the return trip to the Gardens via Sturt St West.Yields information about services to Victoria St.Photograph - black and white print with notes on rear. A T Miles stamp and location and date notes.tramways, trams, tram 11, victoria st, eureka line, bridge, buninyong -
 Ballarat Tramway Museum
Photograph - Bendigo tram No. 6 at depot, Wal Jack, 7/07/1954
Photo of No. 6 outside the depot with the bridge and depot building in the background. Has a driver standing by the front of the tram. Tram has the destination of Eaglehawk. Taken by Wal Jack on 7-3-1954. See image i2 for rear of photograph. Two copies held. See image i3 for hi-res scan of negativeYields information about Bendigo tram No. 6Black and White print contained within the Wal Jack Bendigo and Geelong Album, see Reg Item 5003 for more details.On the rear in ink "SEC Bendigo, No. 6 outside depot 7-3-54". Has the Wal Jack copyright stamp in the top right hand corner with number "T69PC" written in.trams, tramways, bendigo, depot, tram 6 -
 Melbourne Tram Museum
Photograph - Four color slides - tram W2 412 and tour ticket, 9-8-1970
Set of four colour slides taken during the Monash Railway club tour on 9-8-1970 using W2 412. The route number and destinations are for show only. Photography by Warren Doubleday. Ticket - No. 0004, printed on yellow card detailing the event. Date stamped on the rear using and Edmondson ticket dater.Yields information on Monash Railway club tour, the trams used, the ticket and the locations.Set of four Anscochrome colour slides, of Melbourne tram W2 412 on a Monash Railway Club tour - 9-8-1970 .1 - Shuntiing at Leura Grove Crossover in Burke Road .2 - Shunting at the crossover in Riversdale Road, near Glenferrie Road .3 - at the Burwood terminus .4 - Outside 412 Toorak Road. Since changed to 1412 Toorak Road .5 - Edmondson style ticket for the tourHas photographers slide numbers on each slide.monash railway club, w2 class, tram 412, toorak road, burwood, burke road, riversdale road, trams, tramways, tickets, edmondson tickets -
 Melbourne Tram Museum
Photograph - Black and White - Trams 349 & 661, Truganini Road Carnegie, John Alfred
Photo shows W2 349 and W3 661 in Glenhuntly Road / Truganini Road Carnegie (route 4) at the start of the single line to the terminus, with the drivers "exchanging the staff" for the section. The destination of 349 has already been changed. Note the warning sign above the drivers of the Single line section. Photo possibly 1950s.Yields information about the use of the short single line just before the Carnegie terminus.Photograph - Black and White - Trams 349 & 661, Truganini Road CarnegieHas details on rear in ink and John Alfred Stamp.tramways, tramcars, carnegie, truganini road, single line, staff, w2 class, w3 class, tram 661, tram 349, glenhuntly road -
 Ballarat Tramway Museum
Photograph - SEC Geelong 16 at Chilwell, Wal Jack, 23-6-1949
Photograph of Geelong No. 16 at the Chilwell terminus 23/6/1949, with the J. Cahill Milk bar, shop in the background. Would appear the driver / motorman has just entered the end to drive back into town. Both poles are still on the overhead. Tram has the destination of Chilwell. See item 7117 for the original negative.Yields information about the Chilwell terminus and Geelong 16.Black and white photograph, with hand written details on rear.See rear image. tramways, trams, geelong, tram 16, chilwell -
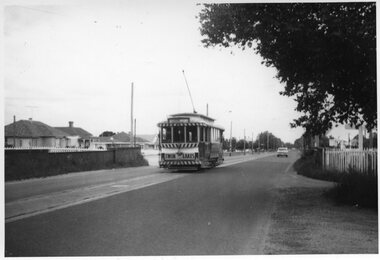
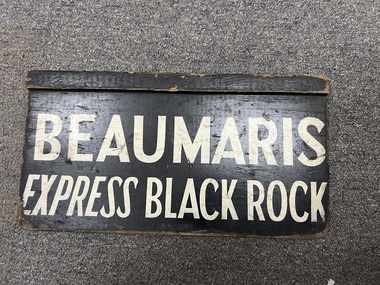 Melbourne Tram Museum
Sign - Form - Receipt docket, Victorian Railways (VR), Auxiliary Destination Board - Express - Beaumaris
Used as a destination or auxiliary board on Sandringham trams and buses that operated from the Sandringham railway station tram/bus depot. Tram and bus services were operated by the Victorian Railways. Have been letter Beaumaris Express and Beaumaris Express Black Rock which indicate more bus rather than trams.Demonstrates destination signs used by the Victorian Railways on their Sandringham services. Sign - plywood - 3 ply with a rebated timber section at the top of the sign, painted black with white letters. tramways, vr, sandringham, vr buses, buses, signs -
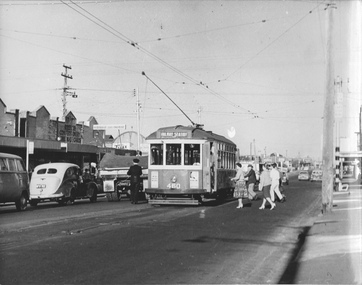 Melbourne Tram Museum
Photograph - X1 460 Ballarat Rd, Jim Seletto, c1960
Photograph shows X1 class tram 460 with destination Railway Station at the corner of Ballarat Rd and Summerhill Rd. The road is busy with cars and trucks and a number of men and women are walking from the curb to board the tram. The single male crew member (driver/conductor) is swinging the single trolley pole to the rear of the tram.Yields information about MMTB X1 and the final years of the short Footscray lines before their closure in 1962Black and white with photograph's note on rearIn biro on rear: '460 Ballarat Rd, J Seletto Photo JSE 11'trams, ballarat rd, footscray, x1 class, tram 460, one man operations, tramways -
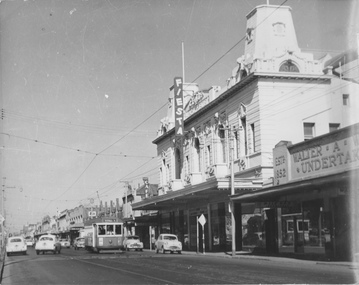 Melbourne Tram Museum
Photograph - X1 465 Barkly St, Jim Seletto, c1962
The photograph shows X1 class tram No. 465 with destination "Russell St." in Barkly Street, Footscray outside the recently closed cinema that had just reopened as the Fiesta Cabaret and Reception Room in 1962 - the year the tramway closed. The tram is small in a scene that shows the full height of Fiesta Room, many shops and cars.Yields information about MMTB X1 and Footscray linesBlack and white photograph with photographer's notes on rearRed stamp and biro on rear: 'Photograph by J Seletto. Photo 38 JSE 12'trams, footscray, barkly st, x1 class, tram 465, fiesta, tramways -
 Melbourne Tram Museum
Document, The Met, "Notice to one person tram operators", 26/1/1990
Notice to one-person tram operators about operating tram services such as destinations, trolley poles, shunting, tram insulated, derailment or split points, fire on tram, front door loading, announcements, leaving the vehicle unattended and handover, Dated 26/1/1990. Issued at the time of the introduction of one - person trams.Yields information about the operation of one person trams.Set of 6 A4 sheets stapled in top left hand corner.tramcars, tramways, operations, one man trams, one person, instructions -
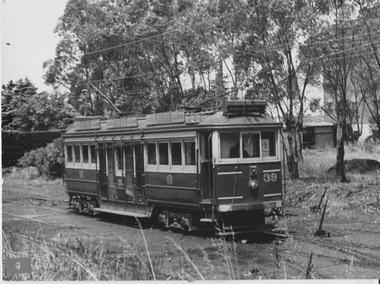 Melbourne Tram Museum
Photograph - VR tram 39
Photograph shows bogie car VR tram 39 with destination Elwood Depot, most likely on an outside track in the depot yard. The tram sits at a turnout surrounded by vegetation with trolley pole raised and all weather blinds down on the off-side. Male with hat ,perhaps workshop staff, appears to be in driver cabin. Yields information of Railways tramcar 39 and Elwood Depot Black and white photograph with letter G showing in lower left corner of print from previous collection. No notes on rear.victorian railways, elwood depot, vr tram 39 -
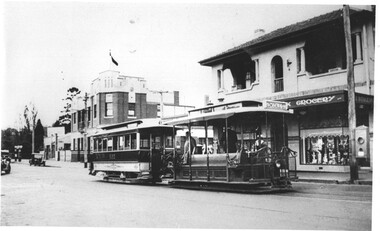 Melbourne Tram Museum
Photograph - Cable tram 520 Collingwood terminus, c1939
Photograph shows cable trailer 520 and grip car at the Johnston St terminus of the Collingwood line. The grip car has a destination box showing Lonsdale St. In the background is a service station, a hotel and a grocery shop. On the pole in front of the tram is a Cincinnati-type Bundy clock. From the C B Thomas Collection.Yields information about the Collingwood cable tram services and the Lonsdale St services.Black and white photograph with notes on rear.In ink "14" and "K McC"tramcars, tramways, cable trams, lonsdale st, collingwood, tram 520 -
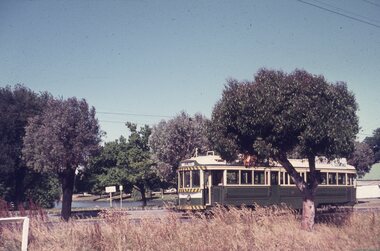
 Ballarat Tramway Museum
Slide - 35mm slide/s - set of 7, Noel Simons, 22/11/1962 12:00:00 AM
Set of 7 Kodachrome transparencies taken on 22/11/1962. 1161.1 - trams 38 and 20 in Sturt St. West at the Russell St. loop. No. 20 has possibly terminated and is showing "CITY" while 38 is showing "Mt Pleasant" Both trams fitted with dash canopy lighting, but no large white stripe. 20 has a Twin Lakes sign. 1161.2 - tram 33 just before Gardens Loop in Wendouree Parade, with destination of "Victoria St." Has a Twin Lakes sign. 1161.3 - tram 39 at corner of Lydiard St. North and Sturt St. with Post Office in background. 1161.4 - tram 40 turning from Sturt St into Lydiard St. North with Post Office in background and showing destination of Lydiard St. North. A blue Holden with red stripes for the Radio Cabs co. is in the foreground, along with pedestrians. 1161.5 - tram 41 in Sturt St. at the City terminus, showing destination of Mt Pleasant with Post Office and ANZ Bank buildings in background. Numerous people waiting on the seats at the tram stop. 1161.6 - tram 13 in Sturt St. near Doveton St. showing destination of Bell St. Many cars and pedestrians on the south side of Sturt St. Note the Austin motor car by the tram showing a stop signal. Tram 13 has a Twin Lakes sign. 1161.7 - trams 13, 26, and 39 in the City Loop near Bridge St. Has Morseheads and Grenville St. tram shelter in the background.1161.1 - "38 and 20 crossing in Sturt St. Ballarat near Russell Street" - in blue and black ink. The "Russell St" is a later addition, over white out. 1161.2 - "33 near Botanic Gardens terminus, Wendouree Parade, Ballarat" 1161.3 - "No. 39 in Lydiard St. Ballarat at Cnr. of Sturt St." 1161.4 - "No. 40 entering Lydiard St. from Sturt St. Ballarat" 1161.5 - "No. 41 in Sturt St. Ballarat at cnr of Lydiard St." 1161.6 - "No. 13 in Sturt St. Ballarat, at Cnr. of Doveton St." 1161.7 - "Nos. 13, 26, and 39 in Sturt St. Ballarat near Bridge St." All have date stamp of "22 Nov. 1962" in purple ink. All black ink unless otherwise noted.tramways, trams, ballarat, sturt st. west, wendouree parade, lydiard st., city loop, taxis, radio cabs, tram 13, tram 20, tram 26, tram 33, tram 38, tram 39, tram 40, tram 41 -
 Ballarat Tramway Museum
Photograph - Digital image Set of 10, Tony Smith, 1971
Yields information about Ballarat Tramways and trams prior to the closure of the tramway system.Set of 10 digital images of Ballarat trams prior to closure, scanned from original slides by Tony Smith, 1971 prior to closure of the system. .1 - 27 crossing Lydiard St North level crossing, with Reids Coffee Palace in the background. .2 - 11 and 26? crossing at the Bell St loop - 11 has destination of Lydiard St North, Twin Lakes sign and a SEC Briquette advert. 26 - enroute to Lydiard St North. .3 - 13 in Bridge St, at Stones Corner. Tram has a Twin Lakes advertisement. Has the Bank of NSW, ? Hotel, with a JP Howard sign on the building. .4 - 26 and 27 crossing at Bell St loop. 26 has a Briquettes roof advert. .5 - 13 and 12? crossing at the Parker St loop. 13 has a Twin Lakes advert. .6 - 13 at Carlton St loop, Wendouree Parade. Has the Olympic rings in the background. .7 - 17 in Wendouree Parade, with destination of Gardens via Drummond St North, near the depot. Tram has a Twin Lakes advert. .8 - 31 turning from Wendouree Parade into Macarthur St at View point, with a shelter in the background. Tram is showing Special. .9 - 31 in Macarthur St at View Point - has destination of Victoria St. .10 - 21 enroute to Victoria St, about to cross Grenville St. Tram has the destination of Victoria St. Has the signal control box on the adjacent pole.trams, tramways, level crossings, lydiard st gates, lydiard st nth, drummond st sth, bridge st, stones corner, bell st, parker st loop, wendouree parade, carlton st, view point, macarthur st, grenville st, sturt st, tram 27, tram 11, tram 26, tram 13, tram 21, tram 31, tram 12, tram 17 -
 Ballarat Tramway Museum
Slide - 35mm slide/s - set of 11, Eldon Hogan, mid 1960's to early 1970's
Set of 11 Agfa Plastic mounted slides - from the Eldon Hogan collection - possibly on an ARE Bendigo tours - mid 1960's (black destination rolls) and late 1960's or early 1970's. Scanned on the Canon scanner at the depot 15/12/1971 at the time of the installation of the scanner. .1 - No 18 with Lake Weeroona in the background - possibly at the same time as the tour with No. 18, though showing destination of Charing Cross. .2 - ditto .3 - No. 25 and two following trams on a special tour, note the white disc - Quarry Hill line? .4 - No. 29 on the Eaglehawk line at the Mt. Korong Road and the Calder Highway, with the Ampol Service station in the background. .5 - No. 29 passing Lake Weeroona with Destination of Nth Bendigo - has a Briquettes Roof Advertisement., .6 - No. 26 ditto - with two SEC Roof Advertisements. .7 - No. 24 leaving Charing Cross for Golden Square with The Beehive building, Ezywalkin, Coca Cola and the Fountain Shopping Centre in the background. .8 - No. 29 and a bogie tram at the Golden Square terminus with Golden Square Hotel and Victoria Bitter fence in the background. No. 29 has a SEC Briquettes roof advertisement. .9 - No. 29, with the Cathedral in background. Tram has a SEC Briquettes roof advertisement and destination of Golden Square. .10 - side view of a bogie tram on the Eaglehawk line? Tram has a Electric cooking roof advertisement. Photo has been over exposed. .11 - Single trucker, Violet St with the Central Deborah mine head in the background. Tram has two SEC Electric Cooking roof advertisements. tramways, trams, bendigo, lake weeroona, eaglehawk, golden square, charing cross, central deborah, tram 18, tram 25, tram 29, tram 24 -
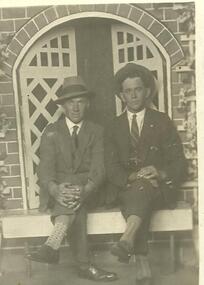 Streatham and District Historical Society
Post Card, Jack Kerr Luna Park
Luna Park in St Kilda has been a popular tourist destination thoughout the times and Jack Kerr and friend visited the theme Park during a visit to Melbourne at some stage. At this stage it appears that a photographer studio was in place at the park. It was common for people to get photos done of their adventures to show friends and relatives and for a photographic memory.Shows the popular destinations during the time. Demonstrates typical dress in the period.Rectangular, Black & white. Jack Kerr & friend sitting on a bench seat both wearing hats, suits and ties.Back: In black ink stamped, Luna Park, St Kilda. Electric Studio M. D. True, Manager. Photos Finished while you wait. Day or Night. Written inpancil the word Kerr. park, jack, photography, st, kilda, luna, kerr -
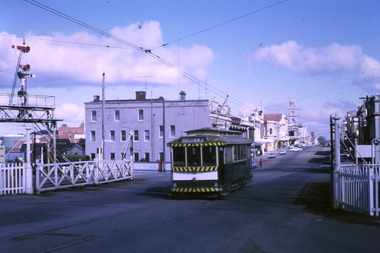
 Ballarat Tramway Museum
Photograph - No. 21 outbound in Main Road Ballarat East, Wal Jack, 15-9-1953
Print of No.No. 21 outbound in Main Road Ballarat East at the intersection with Humffray St. Tram has a large "Buy Australia" panel on the side and destination of Mt Pleasant. See Reg Item 5333 for another photo of the tram. In the background is a motor body workshops and Robson's Glass shop. See item 7869 for a negative.Yields information about celebrations about Buy Australia and the intersection of Main Road and Humffray St and Ballarat 21.Photograph, black and white - plain black with Wal Jack's note on rearWal Jack number stamp and number T55PC.tramways, trams, grant st, mt pleasant, tram 21, humffray st, main road, decorated tram, buy australia -
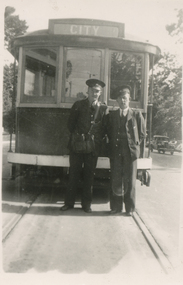 Ballarat Tramway Museum
Photograph - Bill Sewell and Joe Smerdon in front of tram, 1940s
Photograph of Dad who was Robert William Sewell (Bill) and Joe Smerdon standing in front of a four wheel tram, possibly in Wendouree Parade at Gardens Loop. Bill has a conductor's bag. The tram has a white bumper indicating that it was taken during or just after the Second World War. The tram has a destination of 'City'.Yields information about World War 2 tram crews and their uniforms.Black and white photograph Dad and Joe Smerdon on a working dayballarat tramways, tram crews, conductor, motorman, drivers, bill sewell, joe smerdon, world war 2, uniforms -
 Melbourne Tram Museum
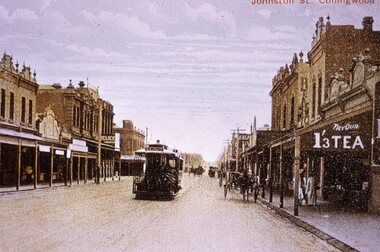
Slide - Colour - reproduction - Johnston St Collingwood c1900
Reproduction slide of a coloured postcard showing a cable tram in Johnston St Collingwood. Tram has the destination of Carlton. Looking west from Hoddle St on a quiet day with some horse drawn vehicles. There are signs for E. Sutcliffe chemist, Havelock Tobacco and sign advertising 1/3d tea. Photo around 1900.Yields information about Johnston St Collingwood.Kodachrome cardboard duplicate slide - Colour slide - reproduction from a postcard - Johnston St Carlton "CB16" in penciltrams, tramways, cable cars, cable trams, carlton, johnston st, collingwood -
 Melbourne Tram Museum
Photograph - W1 class 423 Swanston St, c1930
The photograph shows W1 class tram 423 in Swanston St about to turn into Victoria St shunts. The tram has the return destination of Eslternwick and is showing route 4E. The tram entered service in March 1927 and was converted to a W2 class tram in August 1936. In the background is the Melbourne baths buildings and a W2 class tram.Yields information about the operation of W1 class trams c1930.Black and White Photograph with notes on rear.In pencil on rear "W1 class, Parallel seat in centre, Swanston St."tramways, trams, w1 class, tram 423, swanston st, route 4e -
 Bendigo Military Museum
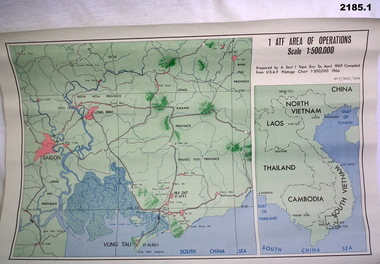
Map - MAPS, VIETNAM, April 1969
1.) Paper map, colour with black print, scale 1:500,000 area covers Saigon, Long Bin, Nui Dat, Vung Tau. .2) Laminated paper map showing city of Vung Tau with details of tourist destinations, hotels, churches, black & red print, scale 1:12,500 approx.documents - maps - military & tourist, vietnam -
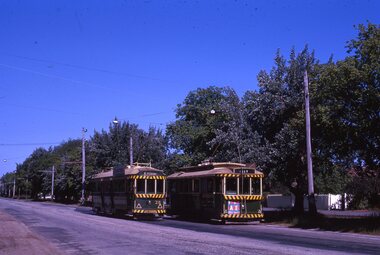
 Ballarat Tramway Museum
Photograph - Digital image, Chris Phillips, c1970
Yields information about the use of trams, destinations and shunting in Lydiard St North prior to closure.Digital image of two trams in Lydiard St north near Sturt St. Both trams have the destination of City Oval (may have been taken just prior to that of Reg Item 7023). and No. 26 may be about to shunt on the crossover. Has the Post Office, the Mining Exchange and other buildings in the background.trams, tramways, lydiard st north, city oval, tram 26, tram 27