Showing 183 items matching "drinking water"
-
 Bendigo Historical Society Inc.
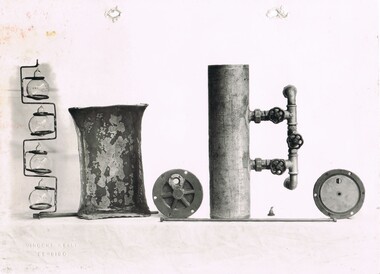
Photograph - BILL ASHMAN COLLECTION: FOUR BUOY HOUSE UNIT
Black and white photo by Vincent Kelly. Typed on the back: Four Buoy house unit. Dish in picture is an old iron dish which has been used for fowls to drink out of. The photo speaks for it self. After a few weeks treatment by pouring in a dipper full of Scalebuoy Water daily the results of the process can be seen. Note the patches where the scale formations have been removed. The photographer's name - Vincent Kelly Bendigo is imprinted in the bottom left corner.sciences, instruments - general, scalebuoy, bill ashman collection - correspondence, four buoy house unit, vincent kelly -
 Coal Creek Community Park & Museum
Punch
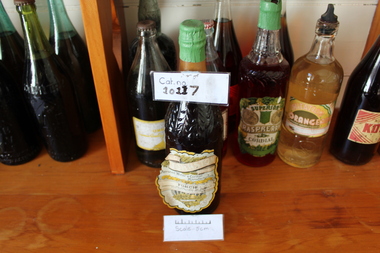
Yellow Bordered Label with white and Black writing, Seems to be falling off Green SealA.G johnston Limited Aerated Water Cordial Manufcatures Punch Preservatised - this drink contains not more than 2 grains sulphur Dioxide to the Pint Trade Mark -
 Bendigo Historical Society Inc.
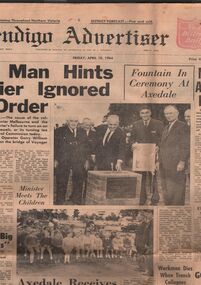
Newspaper - AILEEN AND JOHN ELLISON COLLECTION: BENDIGO ADVERTISER FRIDAY, APRIL 10, 1964
Bendigo advertiser from Friday, April 10, 1964. On the front page two photos and an article 'Axedale receives piped water after 19 year struggle' one photo shows the State opposition leader Mr. Stoneham operating a drinking fountain at the opening of the Axedale water reticulation system. At right the Minister for water supply Mr. Mibus. Others in the picture are: from left Councillors T. H. Grigg and J. Mills of Strathfieldsaye Shire and Mr. L. J. Ellison chairman of the Axedale Water trust. The other photo show Minister Mibus meeting with local children.newspaper, bendigo advertiser, axedale -
 Bendigo Historical Society Inc.
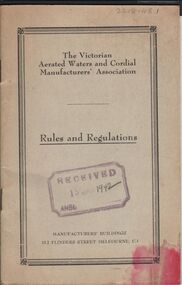
Document - COHN BROTHERS COLLECTION: BUSINESS PAPERS, 1924 - 1951
Document. Cohn Bros. Collection. 1 - Black exercise book containing business papers and notes from meetings. 2 - Price list and zones for drinks and deposits on containers/bottles. 3 - The Victorian Aerated Waters and Cordial Manufacturer's Association Rules & Regulations (received 15 Jan 1942). 4 - Buff folder containing papers relating to business and price of drinks.organization, business, cohn bros, cohn bros. collection, brewers, cordial & aerated water manufacturers, the victorian aerated waters and cordial manufacturer's association -
 Bendigo Historical Society Inc.
Document - COHN BROTHERS COLLECTION: WHERE IS IT BOOK
Document. Cohn Bros. Collection. Black covered notebook with red, blue, lt blue, cream & black marbled pattern on the inside front & back covers. Alphabet index book contains information relating to business, number of drinks to a hogshead, cost of running a motor lorry & Municipal Rates to 30/9/22. Hand written in blue ink inside front cover is: Agency Agreement, Fire Insurance, The Coy only to undertake all risks for Stocks in Store & the (sic) and on the oposite pageis: Magnus Cohn on Bent Newell.organization, business, cohn bros, cohn bros. collection, brewers, cordial & aerated water manufacturers, index book -
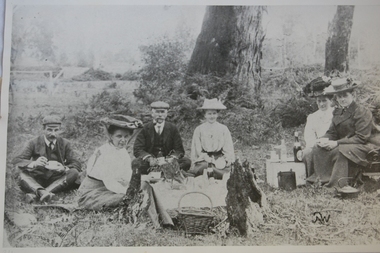 Stanley Athenaeum & Public Room
Photograph, Picnic Group at Stanley
Taken at Stanley about 1900 in a local bush setting. There are 3 sets of couples, 2 men and 4 women. Picnics were a popular pastime, the group are drinking tea, there is the basket, the billy to boil the water, kettle and cups and saucers for a cup of tea This is representative of the leisure activities enjoyed by of people in Stanley around 1900Black and white photograph AW in lower right cornerstanley landscape leisure picnic -
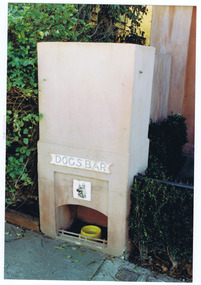 St Kilda Historical Society
Photograph, Dog Water Bowl at the Dogs Bar, c. 1991
The Dog’s Bar was opened in 1989 by the late Donlevy Fitzpatrick, who is credited with creating St Kilda’s bar culture. In the 1970s and 1980s he campaigned successfully against liquor licensing laws that prevented customers from sitting outside or ordering drinks without food. The Dog's Bar was a significant live music venue, where local and international acts performed through the week without a cover charge. It has since had a succession of owners. colour photograph, unmountedDog Water Bowl at the Dogs Bar, Acland street, St Kildadog's bar, st kilda, 1970s, 1980s, donlevy fitzpatrick -
 Tatura Irrigation & Wartime Camps Museum
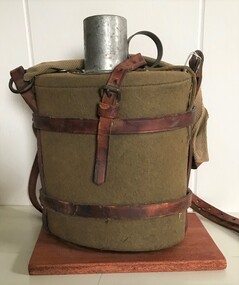
Water bottle (WW1), 1915 - 1918
Issued to and used by James Rose during WW1. He served in 8th field Ambulance Co 1915 - 18 with Fredrick Webb.metal drink container with bakelite lid. Thick material cover held in place with press studs. Wire clips to attach unit to uniform. Approx 1 litre capacity.world war 1, james rose, ww1 water bottles, frederick webb -
 Tatura Irrigation & Wartime Camps Museum
Folio, Camp 3
Material collected and donated Material relating to Camp 3 and the Internees from Palestine. Sketch map of Camp 3 Memorium to Dieter Ruff, former Head of the Temple Society. Photo of steam passenger train at Rushworth Station. Various group photos. Copy of sketch of hut by Winkler. "in the Internment Camp Tatura" by K.M. Pfander Copy of talk given to her former pupils by Gudrun Gollong, in 1978. Poem written in Camp by Annie Lorenz. Poem by unknown writer "Life's Daily Routine" Interview with Babette Kirsch. Copy of children's learning book in German. Photos of toys and craft made for Kaltenbach family. Copy of Kaltenbach barracks by Cesare Vagarini. Story of Wilhelm Kuebler. Photos of wooden boxes made for Sgt. Cubbin. Copy of letter in German confirming the death in Camp of the two Stuerzenhofecker children. Copy of records Theo Stoll. School records Waltraud Doster Copy of Marriage Certificate Vollmer/Zollinger, August 1946. Recollections of Private Ashworth, guard at Camp 3. Photo taken 2001 by John Wepner of pump which supplied water to Camps 3 & 4 from No. 9 channel. Sketch of canoe made in camp from a sheep drinking trough by the Haering family. "From the Holy Land to the Home of the Kangaroo", by Hedwig Schnerring, translated by Peter Hornung, donor- Guenther Schnerring. "The Long Arm of the Third Reich" by Christine Winter. Photocopied extract of Walter Odorich Stenner's diary account of the transportation from Haifa to Australia. Research - Tatura WW2 Internment Camp 3, Annie Leschen Copy of map showing pump sites for water for Camps 3 and 4 Copy (laser) of a painting donated by Frieder Vollmer, artist "D 1943"? Adalbert Stern, Sir Nicholas - Son of Dunera boy "Adalbert Stern Copies of photos (4) of 2 cakes of Lux soap with pictures of "Roll Call, Tatura 1941" on one side and "Lux Toilet Soap" on the other Newspaper Article from "The Age" 14/04/1999 re Vagarini Exhibition Camp 3TaturaBlack 3 ring folder with printed matter and photos in plastic sleeves.documents, reports -
 Clunes Museum
Container - BOTTLE
.1 BLUE ENAMEL DRINK BOTTLE .2 CORK HAS METAL TOP WITH EYE. STRING THREADED THROUGH EYE.RIDER & BELLlocal history, military, water bottle, army -
Stawell Historical Society Inc
Container - Realia, Gray's Aerated Water, Stawell (Logo)
Local Soft Drink Manufacturer Clear Glass BottleThis bottle is the property of T. Gray Stawell and cannot be legally be used by others -
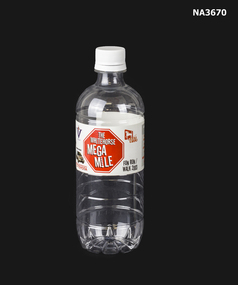 Whitehorse Historical Society Inc.
Souvenir - MEGAMILE WATER BOTTLE, circa 2003
... Food & Drink Consumption Plastic water bottle inscribed ...The area between Springvale Road and Blackburn Road (along Whitehorse Road) Nunawading is defined as the 'Megamile. Well known for it's Homemaker stores.'Plastic water bottle inscribed with the words 'The Whitehorse Mega Mile Fun Run 2003'.domestic items, food & drink consumption -
Rutherglen Historical Society
Soda siphon, D. Fevre
... -country For making and dispensing soda water Soda water Drink ...For making and dispensing soda waterHeavy glass hour-glass shaped container, silver frosted, lattice wire cover. Siphon top missing, metal lipped.Around neck: "Veritable Seltzogene D. Fevre / Paris" "5" / "Fevre / Marque Depos�e"soda water, drink accessories -
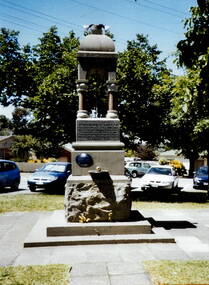
 Rutherglen Historical Society
Image, Alf L. Bowden, The Studio
Water fountain monument built to the memory of the brothers and sisters of Roy Ready. The Ready family were an early pioneering family of the district. Roy Ready was the undertaker for some years.Black and white photograph of a monument with water fountain, memorial plaque, and weather vane on topOn back of photo: "With R. Ready's complements. W.J. Williams"monument, memorial, ready family, drinking fountains -
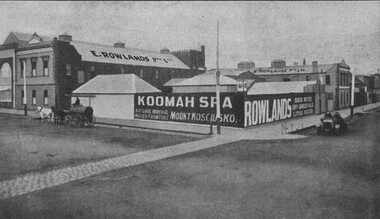 City of Ballarat Libraries
Photograph - Card Box Photographs, E. Rowlands Pty Ltd Soft Drink Factory 1916. From Citizens & Sports publication
The factory was situated at the corner of Dana and Doveton Streets. Huge advertising for Rowlands and Koomah Spa natural mineral water from Mt Kosciusko. e.r. rowlands, e.r. rowlands aerated waters, koomah spa, building, manufacturing, vehicle, dana street, doveton street south -
 Hume City Civic Collection
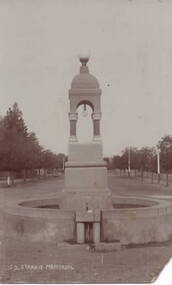
Photograph, Starkie fountain
The Starkie drinking fountain was erected to commemorate the work done by Joseph Starkie to formation of the Sunbury Waterworks Trust in 1905. This later led to the establishment of a water supply system in Sunbury. Originally the fountain was at the intersection of O'Shanassy and Brook Streets. As the shopping centre expanded, the fountain was moved to a reserve in the Village Green. The establishment of a town water supply system in Sunbury in the early years of the nineteenth century was quite an achievement.A coloured photograph of a drinking fountain set in a grassed area. Parked cars can be seen in the background.sunbury waterworks trust, joseph starkie -
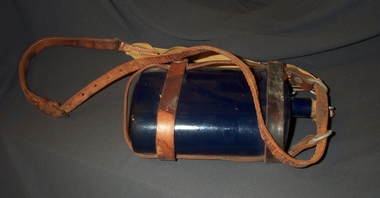
 8th/13th Victorian Mounted Rifles Regimental Collection
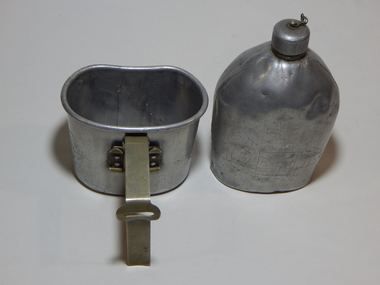
Functional object - water bottle
This water bottle was carried by stretcher bearers in the Light Horse Field Ambulance. The cup/cap was used to give a drink to a wounded soldier who could not hold a water bottle to his lips. A light horse field ambulance was an Australian World War I military unit whose purpose was to provide medical transport and aid to the wounded and sick soldiers of an Australian Light Horse brigade. Typically a Lieutenant Colonel commanded each ambulance. All officers of the ambulance were medical doctors or surgeons. Dental units were often attached to the ambulance as well. A Field Ambulance consisted of two sections, the Mobile and the Immobile. The Mobile Section travel with its brigade into combat, where it would establish a Dressing Station. It use stretchers or carts to retrieve the wounded and transport them to the Dressing Station. The Immobile Section established and operated a Receiving Station, which received the wounded the Dressing Station sent on. The ambulance's surgeons would operate on the wounded at the Receiving Station. From the Receiving Station, the sick and wounded would go first to the Casualty Clearing Station and ultimately to a Base Hospital. Representative of a water bottle which differed from the regular water bottle and was used for a specific purpose.Water bottle, felt coated, with small metal cup over spout, all held in leather carrier. Strapped to a wooden stand.military, water, medical, light horse, ambulance, stretcher bearer -
 8th/13th Victorian Mounted Rifles Regimental Collection
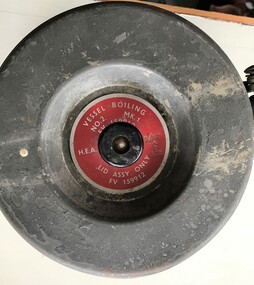
Functional object - Boiling vessel
The vessels boiling electrical was used by soldiers of 8/13 Victorian Mounted Rifles when it was equipped with Centurion tanks 1966-71. A boiling vessel fitted to British armoured fighting vehicles that permit the crew to heat water and cook food by drawing power from the vehicle electrical supply. It is often referred to by crewmembers (not entirely in jest) as the most important piece of equipment in a British armoured vehicle. The "Vessel Boiling Electric" or "BV" was an innovation at the very end of World War II, when the Centurion tank was introduced with the device fitted inside the turret. Previously, British tank crews had disembarked when they wanted to "brew-up" (make tea), using a petrol cooker improvised from empty fuel cans[4] called a "Tommy cooker". Use of the BV enabled the crew to stay safely inside the tank and reduced the time taken for breaks. The first version, known as VBE No 1, began to be replaced in the early 1950s by the stainless steel No 2 version. A VBE No 3 had improved electrical sockets and was less prone to leakage. The principal use of the BV is to heat ration pouches or tins; the hot water is then used for making drinks or washing. The BV is cuboid and accommodates four tins; typically matching the crew numbers of an armoured fighting vehicle. Ration tins are supplied without adhesive labels so the surrounding water is not contaminated. A vehicle with a defective BV is declared unfit for purpose. It is common practice for a junior member of a vehicle crew to be unofficially appointed "BV Commander", responsible for making hot drinks for the other soldiers. Example of article which improved efficiency and well-being of tank soldiers.Cilinderical metal vessel with close fitting lid, folding handle and electrical socket on side.military, tank, centurion, meals, boiling -
 Bendigo Historical Society Inc.
Slide - DIGGERS & MINING: THE DIGGINGS - THE DIGGERS, c1950s
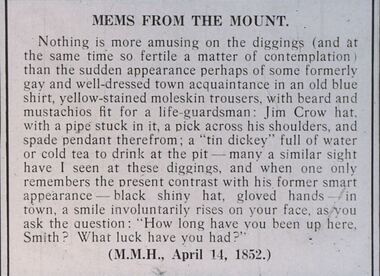
Diggers & Mining: The Digging - The Diggers. Slide is a clipping from the paper; MEMS FROM THE MOUNT, and refers to the way the diggers dress, and that they go to the pit with a 'tin dicky' full of water or cold tea to drink at the pit. Also makes reference to the smart appearance - black shiny hats, gloved hands - in town. Markings: 53 994.LIF:6. Used as a teaching aid.hanimounteducation, tertiary, goldfields -
 Ballarat Tramway Museum
Ephemera - Ballarat, Electric Supply Co. of Vic (ESCo), "Official Time table", 1914
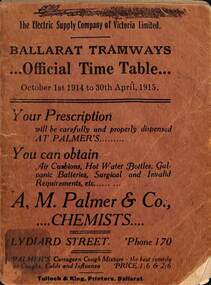
Timetable published by the Electric Supply Co of Victoria (ESCo) for Ballarat Tramways - dated 1/10/1914 to 30/4/1915. Provides times for each route, ticket prices, school tickets, fare box routes, fares, transfer tickets, and route colours both for day and night. Also has notes to passengers and places of interest for each route. Has contact phone numbers for the Company. Manager Mr Pringle. See item 9131 for a 1915 Winter timetable. Has many adverts - from the front page: A M Palmer Chemist Hodgson - optical Snows - department store Summerscales - postcards W E Thomas - Dentist L Casper - optician E Jermyn - feed merchant Standsfield & Smith - Decorators Briant's Red shop tea rooms A E White - tailor Ellingsen & Co - furniture Southern Cross Hotel H P Stevens & Co - fur coats Frank Williams - painter and decorator Longhurst's bread factory G Buchanan - metal ceilings Robert Hutchinson - electrical engineer and contractor G Ludbrook - furnishing undertaker A Cant - plumber, gasfitter and ironmonger Huddart Parker and Howard Smith coal merchants Precision Big 4 - motor cycles and bicycles H W Channing - Tram drivers' training school T H Richards - butcher C Ellis - furniture exchange Levecke's motor garage Frank Penhalluriack - electrical work Nankervis - store Taffy King Fred A Reed - tobacconist F & J W Gower - builder E E Hobson - decorator Walter Cornell - liver pills Irvines - wines G Warner - Ironmonger J A Reynolds - Wall papers W J Robson - leadlights Porter's - boots and shoes Holman & Fiscalini - stables and motor garage Butler & Co - blinds Mrs Kerby - clothing reseller Rose Cosmetic - H Binzer & Co Mrs Busfield - laundry Mrs J H Dogson - registry office for servants B G Tucker's Water Cure Electric Supply Co Rowlands drinks On the bottom of most pages - Sidar products and on the top the Coliseum Picture Palace. Demonstrates and ESCo timetable and provides information about fare systems and local businesses.Time table - booklet - 40 pages + brown light card covers centre stapled with tabbed or cut pages.tramways, ballarat, timetables, esco, advertisements, fares, tickets, fare boxes -
 Ballarat Tramway Museum
Ephemera - Ballarat, Electric Supply Co. of Vic (ESCo), "Official Time table", 1915
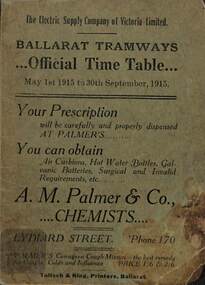
Timetable published by the Electric Supply Co of Victoria (ESCo) for Ballarat Tramways - dated 1/5/1915 to 30/9/1915 - winter. Provides times for each route, ticket prices, school tickets, issue and use of tokens, fares, transfer tickets, and route colours both for day and night. Also has notes to passengers and places of interest for each route. Has contact phone numbers for the Company. Manager Mr Pringle. See item 9132 for a 1914 Summer timetable. Has many adverts - from the front page: A M Palmer Chemist Hodgson - optical Snows - department store ESCo - show room in Sturt St L Casper - optician E Jermyn - feed merchant Standsfield & Smith - Decorators Briant's Red shop tea rooms A E White - tailor Ellingsen & Co - furniture Southern Cross Hotel H P Stevens & Co - fur coats Frank Williams - painter and decorator Longhurst's bread factory G Buchanan - metal ceilings Robert Hutchinson - electrical engineer and contractor G Ludbrook - furnishing undertaker A Cant - plumber, gasfitter and ironmonger Huddart Parker and Howard Smith coal merchants Precision Big 4 - motor cycles and bicycles H W Channing - Tram drivers' training school T H Richards - butcher C Ellis - furniture exchange Levecke's motor garage Frank Penhalluriack - electrical work Nankervis - store Taffy King Fred A Reed - tobacconist F & J W Gower - builder E E Hobson - decorator Walter Cornell - liver pills Irvines - wines G Warner - Ironmonger J A Reynolds - Wall papers ESCo Electric lighting Holman & Fiscalini - stables and motor garage Butler & Co - blinds Mrs Kerby - clothing reseller Rose Cosmetic - H Binzer & Co Mrs Busfield - laundry Mrs J H Dogson - registry office for servants Summerscales - stationary and postcards W J Robson - glass Porter's Boots and Shoes B G Tucker's Water Cure Electric Supply Co Rowlands drinks On the bottom of most pages - Sidar products and on the top the Coliseum Picture Palace. Demonstrates and ESCo timetable and provides information about fare systems and local businesses.Time table - booklet - 40 pages + green light card covers centre stapled with tabbed or cut pages.tramways, ballarat, timetables, esco, advertisements, fares, tickets, tokens -
 Clayton RSL Sub Branch
Memorabilia - Metal water bottle and drinking vessel, Water bottle is dated 1918. Nothing shown on drinking vessel
... Metal water bottle and drinking vessel ... handle Memorabilia Metal water bottle and drinking vessel ...Used by Lance Corporal W. B. Ashweirth - Signalman in the Australian Army who was held at Changi and later transferred to Osaka in Japan as a slave labourer.Combination military water bottle and panakin with [base metal] fold-away metal handleAustralian Coat of Arms and RIP 'Sig" mascot of 6th Line Section - Signals Regiment - Died at Changi Barracks on 27th February 1942. Also a 'love heart' showing WBA / EHAchangi, changi pow camp, pow, water bottle, world war two, second world war, wwii, ww2, changi barracks -
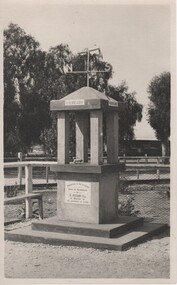
 Sunbury Family History and Heritage Society Inc.
Photograph, C1916
Joseph Starkie was the Chairman of the Sunbury Waterworks Trust from 1905 to 1913. During that time he was instrumental in getting a permanent water supply installed for the town of Sunbury. After his death in April 1913, the townspeople erected a memorial which stood at the intersection of Brook and Stawell Street. It was unveiled on 26 January 1915 by Terence O'Brien. The original memorial included a drinking fountain and horse trough. As traffic increased within the town, the centre section of the fountain, without the horse trough, was resited in a reserve opposite the Memorial Hall. The photograph shows the monument on its original site. The installation of a reliable and permanent water supply for Sunbury was an important achievement for the town in the early years of the twentieth century.A sepia photograph in post card format of a water fountain and trough in a street in front of an avenue of trees.J. D. STARKIE MEMORIALstarkie, joseph daniel., water fountain, j.d.starkie memorial -
 Sunbury Family History and Heritage Society Inc.
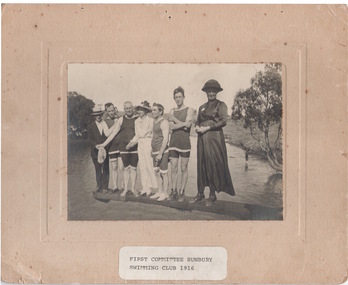
Photograph, Sunbury Swimming Club
This is a photograph of the first committee of the Sunbury Swimming Club which was formed in 1916. The club used the pool at The Nook near Eadie Street. The area had shade trees, a drink fountain, seats, change rooms and diving boards. In 1966 an Olympic size swimming pool was opened in LIgar Street, as a result of a whole community effort. The site at The Nook became a popular passive recreation area.The pool at The Nook was a popular meeting place for Sunbury residents in the hot summer months for fifty years A non-digital sepia photograph backed onto a beige board of seven people standing on a diving board that is over a natural water hole. Four men are dressed in swim wear and two ladies are in full length dresses. A man standing on the end of the board is wearing a suit. sunbury swimming club, the nook, swimming, sporting clubs -
 Sunbury Family History and Heritage Society Inc.
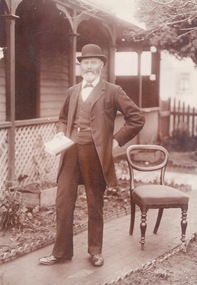
Photograph, c1900s
... was instrumental in Sunbury gaining a permanent water supply. A drinking... in Sunbury gaining a permanent water supply. A drinking fountain has ...The man photograph in a garden is Joseph David Starkie, who was a Bulla Shire councillor for more than twenty years and during that time he was elected Shire President four times. He was also a member of the Sunbury Waterworks Trust and served as the chairman from 1905 - 1908. While serving on the water board he was instrumental in Sunbury gaining a permanent water supply. A drinking fountain has been erected on a reserve at the Village Green to honour the arrival of the permanent water supply to the town. The installation of a permanent water supply benefitted the town and contributed to a more reliable rail service as steam trains refilled their tanks with water at Sunbury Station. Prior to this the water was transported by horse and cart from nearby Jacksons Creek.A sepia photograph of a well-dressed man who is holding a book and is standing in a front garden of a weatherboard house.starkie, joseph daniel. -
Stawell Historical Society Inc
Memorabilia - Realia, 1970's
Hemley's Soft drink Bottle from Callawadda. Hemley's Aerated Water stawell -
 National Wool Museum
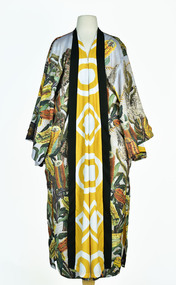
Textile - Cloak, Dr Deanne Gilson, Banksia Tree Cloak (water and fire business), 2022
Standing proud, still here, the spirit of ten ancestral matriarchs adorned in contemporary ceremonial cloaks. Representing our women past, present and future, her Spirit, our culture, our Country (spelt with a capital for its importance and this is part of First Peoples protocols on acknowledging Country, our strength, our resilience and healing towards a sustainable future).The sacred banksia tree was a favourite for Wadawurrung people. Flowering before deep Winter, the banksia was used for spear making and other wooden tools. The sap was drunk as a sweet drink and the seed pods used for water straining and fire sticks. The banksia tree flowers at the time when fire sticks farming is practiced marking the days before the coldest days and nights and the hotter days.White, orange, and yellow banksia design on outer cloak, yellow and white circle and diamond design in lining. Solid black trimming. Cloak is machine sewn and handstitched with hand stitching on shoulder seam.deanne gilson, wadawurrung dja, first nations art, cloak -
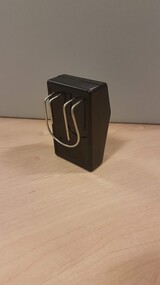
 Vision Australia
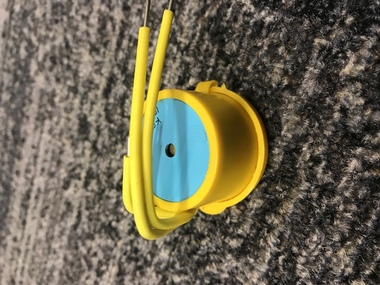
Functional object - Object, PSB Engineering, Yellow liquid sensor
The Liquid 2 Level Sensor is an aid for people with vision impairment to fill cups and glasses with 2 levels of liquid. The unit simply hangs over the side of a cup or glass with the probes on the inside. Ideal for making a cup of tea or coffee with milk. Simply pour in your hot water stopping when a pulsating tone is heard. Pour in milk stopping when a continuous tone is heard. Your cup is now filled to approximately 15mm from the top and ready to drink. Can also be used as a single level sensor such as for non-mixed drinks. Handy magnets on the back of the unit allow for easy storage on fridge or other metal object.Yellow plastic round container with blue base and four yellow wiresassistive devices, equipment -
 Vision Australia
Functional object - Object, Liquid level sensor: 2 level
This two level Liquid Level Sensor is an aid which prevents cups from being overfilled with 2 levels of liquid. The unit simply hangs over the side of a cup or glass with the probes on the inside. Ideal for making a cup of tea or coffee with milk. Simply pour in the hot water stopping when a pulsating tone is heard then pour in milk stopping when a continuous tone is heard. Can also be used as a single level sensor such as for non mixed drinks. Handy magnets on the back of the unit allow for easy storage on fridge or other metal object. Uses a 12V battery. 1 black liquid sensor with 2 magnets assistive devices, equipment -
 Melbourne Legacy
Slide, Operation Float 1957, 1957
A colour slide of children getting soft drinks from an ice filled Coca-Cola tub from a legatee at an outing in 1957. It was Operation Float which was an event run by Melbourne Legacy to take Junior legatees on a boat outing. It could have been to naval boats such as HMAS Cerberus or to a Yacht club. It gave the junior legatees the opportunity to see a naval boat in action, spend time on the water or try sailing. In 1957 it appears to be several smaller boats taking small groups of children out on the bay. Was with many other slides taken in the 1950s and 1960s. The slides have been photographed to make digital images and moved to archive quality sleeves. In many cases the original images were not well focussed and the digital image the best available.A record of outings being organised for children.Colour slide of children being given drinks in a red edged Kodachrome cardboard mount.Printed on reverse in red ink 'Kodachrome Transparency / Processed by Kodak'. Handwritten in blue ink 'Have a Koke 12'. Imprinted in black ink '4'operation float, junior legatee outings