Showing 150 items matching "dry cleaning"
-
 Montmorency–Eltham RSL Sub Branch
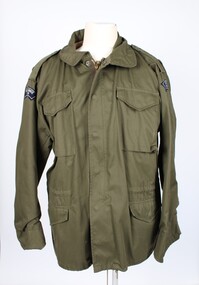
Uniform - Coat, US Cold Weather, M-65, US Cold Weather Coat
In 1951 - in the context of the Cold War - the Menzies government established the 'National Service Act 1951', which called-up men for compulsory military training for a period of 176 days. The 14th Battallion was located in Victoria. The coat has historic significance in the wider context of Australia’s involvement in the Cold War (particularly in Vietnam) and in the establishment of a National Service Scheme. Olive green army man coat with four outside pockets - two on the chest, two at the bottom; each pocket has one metallic button attached. Coat has a metallic zip as well as metallic buttons; two velcro scratches at the wrist level. Extra removable padding inside, which is attached with plastic buttons. Two identical inscriptions on right and left shoulder reading '14 National Service Battalion'. Two identical inscriptions on right and left shoulder - reading '14 National Service Battalion' Manufacturing details on the inside reading: Coat, Cold weather, Man's, Field M-65. Olive green colour. Style 8120/8542 DSA 102-81-C1204. 1. Wear as outer garment or as under-layer in cold-dry climate. 2. Wear button-in liner for added insulation. 3. Adjust closures and drawcords to ventilate; avoid over-heating of body. 4. When hood is used, lower extension shall be worn over neck opening, preventing water. 5. Brush snow or frost from garments before entering opening. 6. For fast drying, remove liner from coat. 7. Do not expose to high temperature of a stove. 8. Lubricate slide fasteners with wax. 9. For cleaning and restoring of water repellency return to laundry for machine washing in accordance with established procedures for quarpel garments. 10. Do not starch. Do not remove this label. Black ink pen inscription on manufacturing label reading '3/715875' and 'N.Wain'war, army, coat, man's coat, australian army, military uniform, national service scheme, cold war, vietnam war -
 Kiewa Valley Historical Society
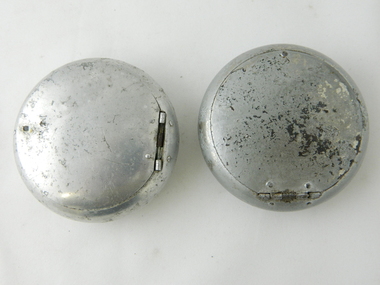
Ash Tray Pocket, Circa mid to late 1900s
This flip top pocket steel ash tray was at the beginning of the social "cleaning up" of cigarette ash and related products. This cigarette waste container was for those occasions when it was polite not to throw the cigarette ash and used up cigarettes "buts" on the ground, or if working in any rural area during a dry fire prone season, when discarding burning cigarette waste could set up a severe "bush" fire. It was also at the beginning of an intensive look at the affects of smoking upon the health of users. Later in the 1900s was a time when medical evidence supported a ground swell of the anti smoking movement which resulted in further restrictions of the use cigarette smoking in public places. Before the anti cigarette smoking revolution, it was both fashionable and manly to either roll your own cigarette or open up a packet of "tailor made's". In the rural and man's man environment the roll your own provided a visual acknowledgement that the user was "true blue" Aussie male and not a city boy. The cycle of use of cigarettes has drastically changed from when this item was first used. Today's society (post 2000) has produced a ground swell of government and non government organisations whose aim is provide a cigarette "ash" free environment and society. This is highlighted in the beginning of the 2000 millennium by a cigarette "Free" Australia campaign, and the pocket flip top personal ash tray as a practical solution for butt litter disposal.This pocket ash tray not only was used when social graces required it to, but also provided a container for any unfinished cigarettes or stogies (cheap half used cigars). In rural areas (open fresh air countryside), where time was always made available for the "smoko" (Australian rest period), at any time, especially after some hard physical work, the ability to have a self contained ashing apparatus, not to offend the gentler folk, was a pre-requisite . The rural environment, in the days of these cigarette ash containers,was one which could range from harsh and unforgiving to mild and relaxing. Smoking could be enjoyed anywhere and at any time without too much "fussing" around. This ash tray was mobile, convenient, unobtrusive and regarded by the user as being considerate to those around. It also eliminated the tell tale evidence that the "no smoking" signs had been ignored. The Kiewa Valley was like many rural ares that found it hard for smokers to come to grips with a governmental "non smoking policy" to indoor recreational and other "confined space" environments. Tin plated mild steel round container with a lid. The opening lid is spring loaded, hinged top, circular and fixed by a clasp, pop- riveted (4) onto the main housing. Opposite the hinge the lid is held closed by a small metal ball fitting tightly to the top wall of the container. The lid is opened by the use of a fingernail positioned at junction of lid to body. This edge is bevelled to allow access. personal effects, tobacco waste products, smoking accessories -
 Kiewa Valley Historical Society
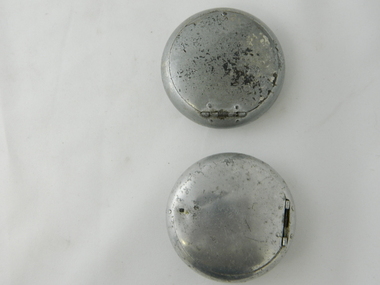
Ash Tray Pocket
This flip top pocket aluminium ash tray was at the beginning of the social "cleaning up" of cigarette ash and related products. This cigarette waste container was for those occasions when it was polite not to throw the cigarette ash and used up cigarettes "buts" on the ground, or if working in any rural area during a dry fire prone season, when discarding burning cigarette waste could set up a severe "bush" fire. It was also at the beginning of an intensive look at the affects of smoking upon the health of users. Later in the 1900s was a time when medical evidence supported a ground swell of the anti smoking movement which resulted in further restrictions of the use cigarette smoking in public places. Before the anti cigarette smoking revolution, it was both fashionable and manly to either roll your own cigarette or open up a packet of "tailor made's". In the rural and man's man environment the roll your own provided a visual acknowledgement that the user was "true blue" Aussie male and not a city boy. The cycle of use of cigarettes has drastically changed from when this item was first used. Today's society (post 2000) has produced a ground swell of government and non government organisations whose aim is provide a cigarette "ash" free environment and society. This is highlighted in the beginning of the 2000 millennium by a cigarette "Free" Australia campaign, and the pocket flip top personal ash tray as a practical solution for butt litter disposal.This light weight aluminium pocket ash tray not only was used when social graces required it to, but also provided a container for any unfinished cigarettes or stogies (cheap half used cigars). In rural areas (open fresh air countryside), where time was always made available for the "smoko" (Australian rest period), at any time, especially after some hard physical work, the ability to have a self contained ashing apparatus, not to offend the gentler folk, was a pre-requisite . The rural environment, in the days of these cigarette ash containers,was one which could range from harsh and unforgiving to mild and relaxing. Smoking could be enjoyed anywhere and at any time without too much "fussing" around. This ash tray was mobile, convenient, unobtrusive and regarded by the user as being considerate to those around. It also eliminated the tell tale evidence that the "no smoking" signs had been ignored. The Kiewa Valley was like many rural ares that found it hard for smokers to come to grips with a governmental "non smoking policy" to indoor recreational and other "confined space" environments. The covered lid reduces odors and eliminates ashes from being blown around.Aluminium round container with a lid. The opening lid is spring loaded, hinged top, circular and fixed by a clasp, pop- riveted (4) onto the main housing. Opposite the hinge the lid is held closed by a small metal ball fitting tightly to the top wall of the container. The lid is opened by the use of a fingernail positioned at junction of lid to body. This edge is bevelled to allow access.personal effects, tobacco waste products, smoking accessories, tobacco -
 Orbost & District Historical Society
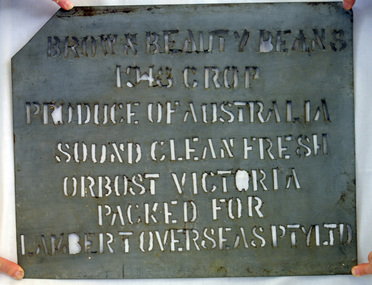
stencil, 1948
This stencil was used to mark bags of dried bean seed, in this case Brown Beauty bean seeds, produced by farmers in the Orbost district and clean and bagged by Fisher Bros., seed bean merchants of Orbost. This stencil is significant because it was specially made for the seed bean industry which was a major industry in the Orbost district for the first half of the 20th century. A galvanised iron sheet from which words have been cut out to form a stencil. BROWN BEAUTY BEANS 1948 CROP PRODUCE OF AUSTRALIA SOUND, CLEAN, FRESH ORBOST, VICTORIA, AUSTRALIA PACKED FOR LAMBERT OVERSEAS PTY LTDseed-beans bag-stencil farming -
 Flagstaff Hill Maritime Museum and Village
Domestic object - Bowl, Late 19th or early 20th Century
The Process of Making Pottery Decorating, Firing, Glazing, Making, Technical There is a rhythm and flow to clay. It can’t be done all at once! Even the making process! It can take weeks to get everything done, especially if you can only work on your pottery once a week! Even though we have three hour classes, it’s often just not enough time! Here is an overview of some of the processes so you have a bit more grasp on some of the technical stuff! Step One – Design There are SO many ideas out there for making stuff in clay! From delicate porcelain jewellery, through to heavy sculptural work and everything in between. Deciding your direction is sometimes not that easy – when you first start, try everything, you will naturally gravitate to the style that you enjoy! The options and variations are endless and can get a wee bit overwhelming too! Check in with me before you start to ensure your ideas will work, what order you might do things, how you could achieve the look you are seeking and any other technical data required! Step Two – Making Clay is thixotropic. This means that as you work with it, the clay first gets sloppier and wetter, before is begins to dry in the atmosphere. For most things, you simply can’t do all parts of the project at once. An example of work order might look like: Get last weeks work out from the shelves Prepare clay for today’s work – roll your clay, prepare balls for throwing, make the first stage of a pinch pot) Clean up last week’s work and put it on the shelf for bisque firing Check that you have any glazing to do – and do enough of it that you will have time to finish your main project Do the next step of your next project – there might be a further step that can’t be complete immediately, in that case, wrap your work well and put onto the shelves. Letting your work rest for a while can really help keep your work clean and professional looking. Many things require bagging under plastic to keep it ready for work the next week – put your name on the outside of the bag so you can find your work easily. We have stickers and markers. Consider how you want to decorate your work – coloured slip can be applied at a fairly wet stage (remembering that it will make your work even wetter!). Trying to apply slip to dry clay won’t work! If you want to do sgraffito – you will need to keep the work leather hard (a state of dryness where you can still work the clay with a little effort and a little water and care). Step Three – Drying Most of the time your work can go into the rack uncovered to let it dry out for the following week. If you want to continue forming or shaping you will need to double bag your work – put your work on a suitable sized bat and put the bat in a bag so the base of the bag is under the bat, then put another bag over the top of the work and tuck the top of the bag under the bat. If you want to trim (or turn) your thrown work the following week, it should also be double bagged. If your work is large, delicate, or of uneven thicknesses, you should lightly cover your work for drying. When considering the drying process, bare in mind the weather, humidity and wind! The hotter and dryer, the faster things dry and work can dry unevenly in the shelves – this can lead to cracking – another time to lightly cover your work for drying. Step Four – Trimming and Cleaning Up Your work is dry! It is called greenware now and it is at it’s most fragile! Handle everything with two hands. I often refer to soft hands – keep everything gentle and with your fingers spread as much as possible. Try to not pick up things like plates too much, and always with both hands! Before your work can be bisque fired it should be “cleaned up”. You work won’t go into the kiln if it has sharp edges – when glazed, sharp edges turn into razor blades! Use a piece of fly wire to rub the work all over – this will scratch a little so be light handed. Use a knife or metal kidney to scrape any areas that require a bit more dynamic treatment than the fly wire offers! Finally, a very light wipe over with a slightly damp sponge can help soften and soothe all of your edges and dags! Trimming thrown work: If you are planning to trim (or turn) your thrown work (and you should be), make sure you bag it well – your work should be leather hard to almost dry for easiest trimming. Use this step to finish the work completely – use a metal kidney to polish the surface, or a slightly damp sponge to give a freshly thrown look. Wipe the sponge around the rim after trimming, and check the inside of the pot for dags! Trimming slip cast work: Usually I will trim the rims of your work on the wheel the following day to make that stage easier, however you will still need to check your work for lumps and bumps. Last but not least – check that your name is still clearly on the bottom of your work. Step Five – Bisque Firing When the work is completely dry it can go into the bisque kiln. The bisque kiln is fired to 1000°C. This process burns off the water in the clay as well as some of the chemically bound water. The structure of the clay is not altered that much at this temperature. Inside the bisque kiln, the work is stacked a little, small bowl inside a larger bowl and onto a heavy plate. Smaller items like decorations or drink coasters might get stacked several high. Consideration is paid to the weight of the stack and shape of the work. A bisque kiln can fire about one and a half times the amount of work that the glaze kiln can fire. The firing takes about 10 hours to complete the cycle and about two days to cool down. Once it has been emptied the work is placed in the glaze room ready for you to decorate! Step Six – Glazing Decorating your work with colour can be a lot of fun – and time consuming! There are three main options for surface treatment at this stage: Oxide Washes Underglazes Glazes Washes and underglazes do not “glaze” the work – It will still need a layer of glaze to fully seal the clay (washes don’t need glaze on surfaces not designed for food or liquid as they can gloss up a little on their own). Underglazes are stable colourants that turn out pretty much how they look in the jar. They can be mixed with each other to form other colours and can be used like water colours to paint onto your work. Mostly they should have a clear glaze on top to seal them. Oxides are a different species – the pink oxide (cobalt) wash turns out bright blue for instance. They don’t always need a glaze on top, and some glazes can change the colour of the wash! The glazes need no other “glaze” on top! Be careful of unknown glaze interactions – you can put any combination of glaze in a bowl or on a plate, but only a single glaze on the outside of any vertical surface! Glazes are a chemical reaction under heat. We don’t know the exact chemicals in the Mayco glazes we use. I can guess by the way they interact with each other, however, on the whole, you need to test every idea you have, and not run the test on a vertical surface! Simply put, glaze is a layer of glass like substance that bonds with the clay underneath. Clay is made of silica, alumina and water. Glaze is made of mostly silica. Silica has a melting point of 1700°C and we fire to 1240°C. The silica requires a “flux” to help it melt at the lower temperature. Fluxes can be all sorts of chemicals – a common one is calcium – calcium has a melting point of 2500°C, however, together they both melt at a much lower temperature! Colourants are metal oxides like cobalt (blue), chrome (green through black), copper (green, blue, even red!), manganese (black, purple and pink) iron (red brown), etc. Different chemicals in the glaze can have dramatic effects. for example, barium carbonate (which we don’t use) turns manganese bright pink! Other elements can turn manganese dioxide brown, blue, purple and reddish brown. Manganese dioxide is a flux in and of itself as well. So, glazes that get their black and purple colours, often interact with other glazes and RUN! Our mirror black is a good example – it mixes really well with many glazes because it fluxes them – causes them to melt faster. It will also bring out many beautiful colours in the glazes because it’s black colouring most definitely comes from manganese dioxide! Glaze chemistry is a whole subject on it’s own! We use commercial Mayco glazes on purpose – for their huge range of colour possibilities, stability, cool interactions, artistic freedom with the ability to easily brush the glazes on and ease of use. We currently have almost 50 glazes on hand! A major project is to test the interactions of all glazes with each other. That is 2,500 test tiles!!!! I’m going to make the wall behind the wheels the feature wall of pretty colours! Step Seven – Glaze (Gloss or sometimes called “Glost”) Firing Most of the time this is the final stage of making your creation (but not always!) The glaze kiln goes to 1240°C. This is called cone 6, or midrange. It is the low end of stoneware temperatures. Stoneware clays and glazes are typically fired at cone 8 – 10, that is 1260 – 1290°C. The energy requirement to go from 1240°C to 1280°C is almost a 30% more! Our clay is formulated to vitrify (mature, turn “glass-like”) at 1240°, as are our glazes. A glaze kiln take around 12 hours to reach temperature and two to three days to cool down. Sometimes a third firing process is required – this is for decoration that is added to work after the glaze firing. For example – adding precious metals and lustres. this firing temperature is usually around 600 – 800°C depending upon the techniques being used. There are many students interested in gold and silver trims – we will be doing this third type of firing soon! After firing your work will be in the student finished work shelves. Remember to pay for it before you head out the door! There is a small extra charge for using porcelain clay (it’s more than twice the price of regular clay), and for any third firing process! Once your work has been fired it can not turn back into clay for millennia – so don’t fire it if you don’t like it! Put it in the bucket for recycling. https://firebirdstudios.com.au/the-process-of-making-pottery/ The bowl is an example of kitchenware used in the 19th century and still in use today.Bowl white ceramic. Crack on side. Badly stained.Backstamp very faint and unable to be read.flagstaff hill, warrnambool, shipwrecked-coast, flagstaff-hill, flagstaff-hill-maritime-museum, maritime-museum, shipwreck-coast, flagstaff-hill-maritime-village, mixing bowl, food preparation, kitchen equipment, ceramic -
 Flagstaff Hill Maritime Museum and Village
Domestic object - Bowl
The Process of Making Pottery Decorating, Firing, Glazing, Making, Technical There is a rhythm and flow to clay. It can’t be done all at once! Even the making process! It can take weeks to get everything done, especially if you can only work on your pottery once a week! Even though we have three hour classes, it’s often just not enough time! Here is an overview of some of the processes so you have a bit more grasp on some of the technical stuff! Step One – Design There are SO many ideas out there for making stuff in clay! From delicate porcelain jewellery, through to heavy sculptural work and everything in between. Deciding your direction is sometimes not that easy – when you first start, try everything, you will naturally gravitate to the style that you enjoy! The options and variations are endless and can get a wee bit overwhelming too! Check in with me before you start to ensure your ideas will work, what order you might do things, how you could achieve the look you are seeking and any other technical data required! Step Two – Making Clay is thixotropic. This means that as you work with it, the clay first gets sloppier and wetter, before is begins to dry in the atmosphere. For most things, you simply can’t do all parts of the project at once. An example of work order might look like: Get last weeks work out from the shelves Prepare clay for today’s work – roll your clay, prepare balls for throwing, make the first stage of a pinch pot) Clean up last week’s work and put it on the shelf for bisque firing Check that you have any glazing to do – and do enough of it that you will have time to finish your main project Do the next step of your next project – there might be a further step that can’t be complete immediately, in that case, wrap your work well and put onto the shelves. Letting your work rest for a while can really help keep your work clean and professional looking. Many things require bagging under plastic to keep it ready for work the next week – put your name on the outside of the bag so you can find your work easily. We have stickers and markers. Consider how you want to decorate your work – coloured slip can be applied at a fairly wet stage (remembering that it will make your work even wetter!). Trying to apply slip to dry clay won’t work! If you want to do sgraffito – you will need to keep the work leather hard (a state of dryness where you can still work the clay with a little effort and a little water and care). Step Three – Drying Most of the time your work can go into the rack uncovered to let it dry out for the following week. If you want to continue forming or shaping you will need to double bag your work – put your work on a suitable sized bat and put the bat in a bag so the base of the bag is under the bat, then put another bag over the top of the work and tuck the top of the bag under the bat. If you want to trim (or turn) your thrown work the following week, it should also be double bagged. If your work is large, delicate, or of uneven thicknesses, you should lightly cover your work for drying. When considering the drying process, bare in mind the weather, humidity and wind! The hotter and dryer, the faster things dry and work can dry unevenly in the shelves – this can lead to cracking – another time to lightly cover your work for drying. Step Four – Trimming and Cleaning Up Your work is dry! It is called greenware now and it is at it’s most fragile! Handle everything with two hands. I often refer to soft hands – keep everything gentle and with your fingers spread as much as possible. Try to not pick up things like plates too much, and always with both hands! Before your work can be bisque fired it should be “cleaned up”. You work won’t go into the kiln if it has sharp edges – when glazed, sharp edges turn into razor blades! Use a piece of fly wire to rub the work all over – this will scratch a little so be light handed. Use a knife or metal kidney to scrape any areas that require a bit more dynamic treatment than the fly wire offers! Finally, a very light wipe over with a slightly damp sponge can help soften and soothe all of your edges and dags! Trimming thrown work: If you are planning to trim (or turn) your thrown work (and you should be), make sure you bag it well – your work should be leather hard to almost dry for easiest trimming. Use this step to finish the work completely – use a metal kidney to polish the surface, or a slightly damp sponge to give a freshly thrown look. Wipe the sponge around the rim after trimming, and check the inside of the pot for dags! Trimming slip cast work: Usually I will trim the rims of your work on the wheel the following day to make that stage easier, however you will still need to check your work for lumps and bumps. Last but not least – check that your name is still clearly on the bottom of your work. Step Five – Bisque Firing When the work is completely dry it can go into the bisque kiln. The bisque kiln is fired to 1000°C. This process burns off the water in the clay as well as some of the chemically bound water. The structure of the clay is not altered that much at this temperature. Inside the bisque kiln, the work is stacked a little, small bowl inside a larger bowl and onto a heavy plate. Smaller items like decorations or drink coasters might get stacked several high. Consideration is paid to the weight of the stack and shape of the work. A bisque kiln can fire about one and a half times the amount of work that the glaze kiln can fire. The firing takes about 10 hours to complete the cycle and about two days to cool down. Once it has been emptied the work is placed in the glaze room ready for you to decorate! Step Six – Glazing Decorating your work with colour can be a lot of fun – and time consuming! There are three main options for surface treatment at this stage: Oxide Washes Underglazes Glazes Washes and underglazes do not “glaze” the work – It will still need a layer of glaze to fully seal the clay (washes don’t need glaze on surfaces not designed for food or liquid as they can gloss up a little on their own). Underglazes are stable colourants that turn out pretty much how they look in the jar. They can be mixed with each other to form other colours and can be used like water colours to paint onto your work. Mostly they should have a clear glaze on top to seal them. Oxides are a different species – the pink oxide (cobalt) wash turns out bright blue for instance. They don’t always need a glaze on top, and some glazes can change the colour of the wash! The glazes need no other “glaze” on top! Be careful of unknown glaze interactions – you can put any combination of glaze in a bowl or on a plate, but only a single glaze on the outside of any vertical surface! Glazes are a chemical reaction under heat. We don’t know the exact chemicals in the Mayco glazes we use. I can guess by the way they interact with each other, however, on the whole, you need to test every idea you have, and not run the test on a vertical surface! Simply put, glaze is a layer of glass like substance that bonds with the clay underneath. Clay is made of silica, alumina and water. Glaze is made of mostly silica. Silica has a melting point of 1700°C and we fire to 1240°C. The silica requires a “flux” to help it melt at the lower temperature. Fluxes can be all sorts of chemicals – a common one is calcium – calcium has a melting point of 2500°C, however, together they both melt at a much lower temperature! Colourants are metal oxides like cobalt (blue), chrome (green through black), copper (green, blue, even red!), manganese (black, purple and pink) iron (red brown), etc. Different chemicals in the glaze can have dramatic effects. for example, barium carbonate (which we don’t use) turns manganese bright pink! Other elements can turn manganese dioxide brown, blue, purple and reddish brown. Manganese dioxide is a flux in and of itself as well. So, glazes that get their black and purple colours, often interact with other glazes and RUN! Our mirror black is a good example – it mixes really well with many glazes because it fluxes them – causes them to melt faster. It will also bring out many beautiful colours in the glazes because it’s black colouring most definitely comes from manganese dioxide! Glaze chemistry is a whole subject on it’s own! We use commercial Mayco glazes on purpose – for their huge range of colour possibilities, stability, cool interactions, artistic freedom with the ability to easily brush the glazes on and ease of use. We currently have almost 50 glazes on hand! A major project is to test the interactions of all glazes with each other. That is 2,500 test tiles!!!! I’m going to make the wall behind the wheels the feature wall of pretty colours! Step Seven – Glaze (Gloss or sometimes called “Glost”) Firing Most of the time this is the final stage of making your creation (but not always!) The glaze kiln goes to 1240°C. This is called cone 6, or midrange. It is the low end of stoneware temperatures. Stoneware clays and glazes are typically fired at cone 8 – 10, that is 1260 – 1290°C. The energy requirement to go from 1240°C to 1280°C is almost a 30% more! Our clay is formulated to vitrify (mature, turn “glass-like”) at 1240°, as are our glazes. A glaze kiln take around 12 hours to reach temperature and two to three days to cool down. Sometimes a third firing process is required – this is for decoration that is added to work after the glaze firing. For example – adding precious metals and lustres. this firing temperature is usually around 600 – 800°C depending upon the techniques being used. There are many students interested in gold and silver trims – we will be doing this third type of firing soon! After firing your work will be in the student finished work shelves. Remember to pay for it before you head out the door! There is a small extra charge for using porcelain clay (it’s more than twice the price of regular clay), and for any third firing process! Once your work has been fired it can not turn back into clay for millennia – so don’t fire it if you don’t like it! Put it in the bucket for recycling. https://firebirdstudios.com.au/the-process-of-making-pottery/ This bowl is an example of kitchenware used in the 19th century and still in use today.Bowl white ceramic plain that has two sets of edging around lip. Inside bowl has plaster designed to look like cooking mixture.flagstaff hill, warrnambool, shipwrecked-coast, flagstaff-hill, flagstaff-hill-maritime-museum, maritime-museum, shipwreck-coast, flagstaff-hill-maritime-village, kitchen equipment, ceramic -
 Flagstaff Hill Maritime Museum and Village
Domestic object - Bowl, J & G Meakin, Late 19th or early 20th Century
The Process of Making Pottery Decorating, Firing, Glazing, Making, Technical There is a rhythm and flow to clay. It can’t be done all at once! Even the making process! It can take weeks to get everything done, especially if you can only work on your pottery once a week! Even though we have three hour classes, it’s often just not enough time! Here is an overview of some of the processes so you have a bit more grasp on some of the technical stuff! Step One – Design There are SO many ideas out there for making stuff in clay! From delicate porcelain jewellery, through to heavy sculptural work and everything in between. Deciding your direction is sometimes not that easy – when you first start, try everything, you will naturally gravitate to the style that you enjoy! The options and variations are endless and can get a wee bit overwhelming too! Check in with me before you start to ensure your ideas will work, what order you might do things, how you could achieve the look you are seeking and any other technical data required! Step Two – Making Clay is thixotropic. This means that as you work with it, the clay first gets sloppier and wetter, before is begins to dry in the atmosphere. For most things, you simply can’t do all parts of the project at once. An example of work order might look like: Get last weeks work out from the shelves Prepare clay for today’s work – roll your clay, prepare balls for throwing, make the first stage of a pinch pot) Clean up last week’s work and put it on the shelf for bisque firing Check that you have any glazing to do – and do enough of it that you will have time to finish your main project Do the next step of your next project – there might be a further step that can’t be complete immediately, in that case, wrap your work well and put onto the shelves. Letting your work rest for a while can really help keep your work clean and professional looking. Many things require bagging under plastic to keep it ready for work the next week – put your name on the outside of the bag so you can find your work easily. We have stickers and markers. Consider how you want to decorate your work – coloured slip can be applied at a fairly wet stage (remembering that it will make your work even wetter!). Trying to apply slip to dry clay won’t work! If you want to do sgraffito – you will need to keep the work leather hard (a state of dryness where you can still work the clay with a little effort and a little water and care). Step Three – Drying Most of the time your work can go into the rack uncovered to let it dry out for the following week. If you want to continue forming or shaping you will need to double bag your work – put your work on a suitable sized bat and put the bat in a bag so the base of the bag is under the bat, then put another bag over the top of the work and tuck the top of the bag under the bat. If you want to trim (or turn) your thrown work the following week, it should also be double bagged. If your work is large, delicate, or of uneven thicknesses, you should lightly cover your work for drying. When considering the drying process, bare in mind the weather, humidity and wind! The hotter and dryer, the faster things dry and work can dry unevenly in the shelves – this can lead to cracking – another time to lightly cover your work for drying. Step Four – Trimming and Cleaning Up Your work is dry! It is called greenware now and it is at it’s most fragile! Handle everything with two hands. I often refer to soft hands – keep everything gentle and with your fingers spread as much as possible. Try to not pick up things like plates too much, and always with both hands! Before your work can be bisque fired it should be “cleaned up”. You work won’t go into the kiln if it has sharp edges – when glazed, sharp edges turn into razor blades! Use a piece of fly wire to rub the work all over – this will scratch a little so be light handed. Use a knife or metal kidney to scrape any areas that require a bit more dynamic treatment than the fly wire offers! Finally, a very light wipe over with a slightly damp sponge can help soften and soothe all of your edges and dags! Trimming thrown work: If you are planning to trim (or turn) your thrown work (and you should be), make sure you bag it well – your work should be leather hard to almost dry for easiest trimming. Use this step to finish the work completely – use a metal kidney to polish the surface, or a slightly damp sponge to give a freshly thrown look. Wipe the sponge around the rim after trimming, and check the inside of the pot for dags! Trimming slip cast work: Usually I will trim the rims of your work on the wheel the following day to make that stage easier, however you will still need to check your work for lumps and bumps. Last but not least – check that your name is still clearly on the bottom of your work. Step Five – Bisque Firing When the work is completely dry it can go into the bisque kiln. The bisque kiln is fired to 1000°C. This process burns off the water in the clay as well as some of the chemically bound water. The structure of the clay is not altered that much at this temperature. Inside the bisque kiln, the work is stacked a little, small bowl inside a larger bowl and onto a heavy plate. Smaller items like decorations or drink coasters might get stacked several high. Consideration is paid to the weight of the stack and shape of the work. A bisque kiln can fire about one and a half times the amount of work that the glaze kiln can fire. The firing takes about 10 hours to complete the cycle and about two days to cool down. Once it has been emptied the work is placed in the glaze room ready for you to decorate! Step Six – Glazing Decorating your work with colour can be a lot of fun – and time consuming! There are three main options for surface treatment at this stage: Oxide Washes Underglazes Glazes Washes and underglazes do not “glaze” the work – It will still need a layer of glaze to fully seal the clay (washes don’t need glaze on surfaces not designed for food or liquid as they can gloss up a little on their own). Underglazes are stable colourants that turn out pretty much how they look in the jar. They can be mixed with each other to form other colours and can be used like water colours to paint onto your work. Mostly they should have a clear glaze on top to seal them. Oxides are a different species – the pink oxide (cobalt) wash turns out bright blue for instance. They don’t always need a glaze on top, and some glazes can change the colour of the wash! The glazes need no other “glaze” on top! Be careful of unknown glaze interactions – you can put any combination of glaze in a bowl or on a plate, but only a single glaze on the outside of any vertical surface! Glazes are a chemical reaction under heat. We don’t know the exact chemicals in the Mayco glazes we use. I can guess by the way they interact with each other, however, on the whole, you need to test every idea you have, and not run the test on a vertical surface! Simply put, glaze is a layer of glass like substance that bonds with the clay underneath. Clay is made of silica, alumina and water. Glaze is made of mostly silica. Silica has a melting point of 1700°C and we fire to 1240°C. The silica requires a “flux” to help it melt at the lower temperature. Fluxes can be all sorts of chemicals – a common one is calcium – calcium has a melting point of 2500°C, however, together they both melt at a much lower temperature! Colourants are metal oxides like cobalt (blue), chrome (green through black), copper (green, blue, even red!), manganese (black, purple and pink) iron (red brown), etc. Different chemicals in the glaze can have dramatic effects. for example, barium carbonate (which we don’t use) turns manganese bright pink! Other elements can turn manganese dioxide brown, blue, purple and reddish brown. Manganese dioxide is a flux in and of itself as well. So, glazes that get their black and purple colours, often interact with other glazes and RUN! Our mirror black is a good example – it mixes really well with many glazes because it fluxes them – causes them to melt faster. It will also bring out many beautiful colours in the glazes because it’s black colouring most definitely comes from manganese dioxide! Glaze chemistry is a whole subject on it’s own! We use commercial Mayco glazes on purpose – for their huge range of colour possibilities, stability, cool interactions, artistic freedom with the ability to easily brush the glazes on and ease of use. We currently have almost 50 glazes on hand! A major project is to test the interactions of all glazes with each other. That is 2,500 test tiles!!!! I’m going to make the wall behind the wheels the feature wall of pretty colours! Step Seven – Glaze (Gloss or sometimes called “Glost”) Firing Most of the time this is the final stage of making your creation (but not always!) The glaze kiln goes to 1240°C. This is called cone 6, or midrange. It is the low end of stoneware temperatures. Stoneware clays and glazes are typically fired at cone 8 – 10, that is 1260 – 1290°C. The energy requirement to go from 1240°C to 1280°C is almost a 30% more! Our clay is formulated to vitrify (mature, turn “glass-like”) at 1240°, as are our glazes. A glaze kiln take around 12 hours to reach temperature and two to three days to cool down. Sometimes a third firing process is required – this is for decoration that is added to work after the glaze firing. For example – adding precious metals and lustres. this firing temperature is usually around 600 – 800°C depending upon the techniques being used. There are many students interested in gold and silver trims – we will be doing this third type of firing soon! After firing your work will be in the student finished work shelves. Remember to pay for it before you head out the door! There is a small extra charge for using porcelain clay (it’s more than twice the price of regular clay), and for any third firing process! Once your work has been fired it can not turn back into clay for millennia – so don’t fire it if you don’t like it! Put it in the bucket for recycling. https://firebirdstudios.com.au/the-process-of-making-pottery/This bowl was made by renowned pottery company J & G Meakin of England. The firm was established in the mid-1800's. The bowl is an example of kitchenware used in the 19th century and still in use today.Bowl; white ceramic, round and tapering inwards towards base. Made by J and G Meakin England.On base, 'Ironstone China Reg SOL 391413' with symbolflagstaff hill, flagstaff hill maritime museum and village, warrnambool, maritime museum, maritime village, great ocean road, shipwreck coast, mixing bowl, food preparation, j & g meakin, pottery, stoke-on-trent, kitchen equipment, ceramic -
 Flagstaff Hill Maritime Museum and Village
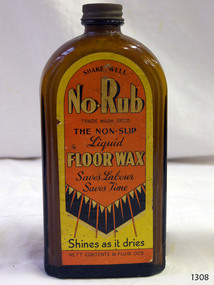
Container - Bottle, J R Alexander & Sons Ltd, c. 1936
This bottle labelled No Rub liquid wax proclaims the wonders of No-Rub, no-slip, and shines as it dries. The bottle still contains some of the liquid floor wax, made by J R Alexander & Sons Limited. The company was registered as a limited company from 1924 to 1975. However, the firm's advertisement and referrals from satisfied Melbourne customers, printed in The Argus, Melbourne, on Mach 19th, 1954, states that it made the first shoe polish, Supreme, in Australia as long ago as 1900. The firm made a range of household cleaning products such as floor wax, shoe polish and fabric starch. The J R Alexander & Sons Ltd. No-Rub liquid wax was advertised in various states of Australia from around 1936 until the 1950s. Later advertisements show sketches of the wax containers, which were round bottles or metal cans. The bottle in our collection is likely to be made around the 1960s.Bottle; brown glass with metal cap and yellow, orange and black label on the front. Flat rectangular-shaped bottle with a short neck and rounded shoulders The bottle has a black metal screw top lid and contents inside. There are inscriptions on the label. The bottle contains No Rub Floor Wax. Made by J R Alexander and Sons, of Adelaide, Melbourne, Sydney and BrisbanePrinted on the label: "SHAKE WELL" "No-Rub" TRADE MARK REGD." "THE NON-SLIP / Liquid / FLOOR WAX / Saves Labour / Saves Time" "Shines as it dries" "NETT CONTENTS 15 FLUID OZS"flagstaff hill, flagstaff hill maritime museum and village, warrnambool, maritime museum, maritime village, great ocean road, shipwreck coast, glass technology, bottle, glass bottle, brown glass, cleaning product, floor cleaner, floor polish, domestic cleaner, no-rub, floor wax, non-slip, flat bottle, bottle contents, liquid wax, j r alexander & sons, household cleaning, cleaning products, zippy starch, zippy window cleaner, liquid floor wax, no rub floor wax, supreme shoe polish, rectangular bottle -
 Flagstaff Hill Maritime Museum and Village
Domestic object - Plate
The Process of Making Pottery Decorating, Firing, Glazing, Making, Technical There is a rhythm and flow to clay. It can’t be done all at once! Even the making process! It can take weeks to get everything done, especially if you can only work on your pottery once a week! Even though we have three hour classes, it’s often just not enough time! Here is an overview of some of the processes so you have a bit more grasp on some of the technical stuff! Step One – Design There are SO many ideas out there for making stuff in clay! From delicate porcelain jewellery, through to heavy sculptural work and everything in between. Deciding your direction is sometimes not that easy – when you first start, try everything, you will naturally gravitate to the style that you enjoy! The options and variations are endless and can get a wee bit overwhelming too! Check in with me before you start to ensure your ideas will work, what order you might do things, how you could achieve the look you are seeking and any other technical data required! Step Two – Making Clay is thixotropic. This means that as you work with it, the clay first gets sloppier and wetter, before is begins to dry in the atmosphere. For most things, you simply can’t do all parts of the project at once. An example of work order might look like: Get last weeks work out from the shelves Prepare clay for today’s work – roll your clay, prepare balls for throwing, make the first stage of a pinch pot) Clean up last week’s work and put it on the shelf for bisque firing Check that you have any glazing to do – and do enough of it that you will have time to finish your main project Do the next step of your next project – there might be a further step that can’t be complete immediately, in that case, wrap your work well and put onto the shelves. Letting your work rest for a while can really help keep your work clean and professional looking. Many things require bagging under plastic to keep it ready for work the next week – put your name on the outside of the bag so you can find your work easily. We have stickers and markers. Consider how you want to decorate your work – coloured slip can be applied at a fairly wet stage (remembering that it will make your work even wetter!). Trying to apply slip to dry clay won’t work! If you want to do sgraffito – you will need to keep the work leather hard (a state of dryness where you can still work the clay with a little effort and a little water and care). Step Three – Drying Most of the time your work can go into the rack uncovered to let it dry out for the following week. If you want to continue forming or shaping you will need to double bag your work – put your work on a suitable sized bat and put the bat in a bag so the base of the bag is under the bat, then put another bag over the top of the work and tuck the top of the bag under the bat. If you want to trim (or turn) your thrown work the following week, it should also be double bagged. If your work is large, delicate, or of uneven thicknesses, you should lightly cover your work for drying. When considering the drying process, bare in mind the weather, humidity and wind! The hotter and dryer, the faster things dry and work can dry unevenly in the shelves – this can lead to cracking – another time to lightly cover your work for drying. Step Four – Trimming and Cleaning Up Your work is dry! It is called greenware now and it is at it’s most fragile! Handle everything with two hands. I often refer to soft hands – keep everything gentle and with your fingers spread as much as possible. Try to not pick up things like plates too much, and always with both hands! Before your work can be bisque fired it should be “cleaned up”. You work won’t go into the kiln if it has sharp edges – when glazed, sharp edges turn into razor blades! Use a piece of fly wire to rub the work all over – this will scratch a little so be light handed. Use a knife or metal kidney to scrape any areas that require a bit more dynamic treatment than the fly wire offers! Finally, a very light wipe over with a slightly damp sponge can help soften and soothe all of your edges and dags! Trimming thrown work: If you are planning to trim (or turn) your thrown work (and you should be), make sure you bag it well – your work should be leather hard to almost dry for easiest trimming. Use this step to finish the work completely – use a metal kidney to polish the surface, or a slightly damp sponge to give a freshly thrown look. Wipe the sponge around the rim after trimming, and check the inside of the pot for dags! Trimming slip cast work: Usually I will trim the rims of your work on the wheel the following day to make that stage easier, however you will still need to check your work for lumps and bumps. Last but not least – check that your name is still clearly on the bottom of your work. Step Five – Bisque Firing When the work is completely dry it can go into the bisque kiln. The bisque kiln is fired to 1000°C. This process burns off the water in the clay as well as some of the chemically bound water. The structure of the clay is not altered that much at this temperature. Inside the bisque kiln, the work is stacked a little, small bowl inside a larger bowl and onto a heavy plate. Smaller items like decorations or drink coasters might get stacked several high. Consideration is paid to the weight of the stack and shape of the work. A bisque kiln can fire about one and a half times the amount of work that the glaze kiln can fire. The firing takes about 10 hours to complete the cycle and about two days to cool down. Once it has been emptied the work is placed in the glaze room ready for you to decorate! Step Six – Glazing Decorating your work with colour can be a lot of fun – and time consuming! There are three main options for surface treatment at this stage: Oxide Washes Underglazes Glazes Washes and underglazes do not “glaze” the work – It will still need a layer of glaze to fully seal the clay (washes don’t need glaze on surfaces not designed for food or liquid as they can gloss up a little on their own). Underglazes are stable colourants that turn out pretty much how they look in the jar. They can be mixed with each other to form other colours and can be used like water colours to paint onto your work. Mostly they should have a clear glaze on top to seal them. Oxides are a different species – the pink oxide (cobalt) wash turns out bright blue for instance. They don’t always need a glaze on top, and some glazes can change the colour of the wash! The glazes need no other “glaze” on top! Be careful of unknown glaze interactions – you can put any combination of glaze in a bowl or on a plate, but only a single glaze on the outside of any vertical surface! Glazes are a chemical reaction under heat. We don’t know the exact chemicals in the Mayco glazes we use. I can guess by the way they interact with each other, however, on the whole, you need to test every idea you have, and not run the test on a vertical surface! Simply put, glaze is a layer of glass like substance that bonds with the clay underneath. Clay is made of silica, alumina and water. Glaze is made of mostly silica. Silica has a melting point of 1700°C and we fire to 1240°C. The silica requires a “flux” to help it melt at the lower temperature. Fluxes can be all sorts of chemicals – a common one is calcium – calcium has a melting point of 2500°C, however, together they both melt at a much lower temperature! Colourants are metal oxides like cobalt (blue), chrome (green through black), copper (green, blue, even red!), manganese (black, purple and pink) iron (red brown), etc. Different chemicals in the glaze can have dramatic effects. for example, barium carbonate (which we don’t use) turns manganese bright pink! Other elements can turn manganese dioxide brown, blue, purple and reddish brown. Manganese dioxide is a flux in and of itself as well. So, glazes that get their black and purple colours, often interact with other glazes and RUN! Our mirror black is a good example – it mixes really well with many glazes because it fluxes them – causes them to melt faster. It will also bring out many beautiful colours in the glazes because it’s black colouring most definitely comes from manganese dioxide! Glaze chemistry is a whole subject on it’s own! We use commercial Mayco glazes on purpose – for their huge range of colour possibilities, stability, cool interactions, artistic freedom with the ability to easily brush the glazes on and ease of use. We currently have almost 50 glazes on hand! A major project is to test the interactions of all glazes with each other. That is 2,500 test tiles!!!! I’m going to make the wall behind the wheels the feature wall of pretty colours! Step Seven – Glaze (Gloss or sometimes called “Glost”) Firing Most of the time this is the final stage of making your creation (but not always!) The glaze kiln goes to 1240°C. This is called cone 6, or midrange. It is the low end of stoneware temperatures. Stoneware clays and glazes are typically fired at cone 8 – 10, that is 1260 – 1290°C. The energy requirement to go from 1240°C to 1280°C is almost a 30% more! Our clay is formulated to vitrify (mature, turn “glass-like”) at 1240°, as are our glazes. A glaze kiln take around 12 hours to reach temperature and two to three days to cool down. Sometimes a third firing process is required – this is for decoration that is added to work after the glaze firing. For example – adding precious metals and lustres. this firing temperature is usually around 600 – 800°C depending upon the techniques being used. There are many students interested in gold and silver trims – we will be doing this third type of firing soon! After firing your work will be in the student finished work shelves. Remember to pay for it before you head out the door! There is a small extra charge for using porcelain clay (it’s more than twice the price of regular clay), and for any third firing process! Once your work has been fired it can not turn back into clay for millennia – so don’t fire it if you don’t like it! Put it in the bucket for recycling. https://firebirdstudios.com.au/the-process-of-making-pottery/Ceramics have evolved over thousands of years.White earthenware dinner plate. Crazing evident all over.Backstamped ‘Made in England S LTD’flagstaff hill, warrnambool, shipwrecked-coast, flagstaff-hill, flagstaff-hill-maritime-museum, maritime-museum, shipwreck-coast, flagstaff-hill-maritime-village, ceramics, tableware -
 Flagstaff Hill Maritime Museum and Village
Domestic object - Plate, Johnson Bros
The Process of Making Pottery Decorating, Firing, Glazing, Making, Technical There is a rhythm and flow to clay. It can’t be done all at once! Even the making process! It can take weeks to get everything done, especially if you can only work on your pottery once a week! Even though we have three hour classes, it’s often just not enough time! Here is an overview of some of the processes so you have a bit more grasp on some of the technical stuff! Step One – Design There are SO many ideas out there for making stuff in clay! From delicate porcelain jewellery, through to heavy sculptural work and everything in between. Deciding your direction is sometimes not that easy – when you first start, try everything, you will naturally gravitate to the style that you enjoy! The options and variations are endless and can get a wee bit overwhelming too! Check in with me before you start to ensure your ideas will work, what order you might do things, how you could achieve the look you are seeking and any other technical data required! Step Two – Making Clay is thixotropic. This means that as you work with it, the clay first gets sloppier and wetter, before is begins to dry in the atmosphere. For most things, you simply can’t do all parts of the project at once. An example of work order might look like: Get last weeks work out from the shelves Prepare clay for today’s work – roll your clay, prepare balls for throwing, make the first stage of a pinch pot) Clean up last week’s work and put it on the shelf for bisque firing Check that you have any glazing to do – and do enough of it that you will have time to finish your main project Do the next step of your next project – there might be a further step that can’t be complete immediately, in that case, wrap your work well and put onto the shelves. Letting your work rest for a while can really help keep your work clean and professional looking. Many things require bagging under plastic to keep it ready for work the next week – put your name on the outside of the bag so you can find your work easily. We have stickers and markers. Consider how you want to decorate your work – coloured slip can be applied at a fairly wet stage (remembering that it will make your work even wetter!). Trying to apply slip to dry clay won’t work! If you want to do sgraffito – you will need to keep the work leather hard (a state of dryness where you can still work the clay with a little effort and a little water and care). Step Three – Drying Most of the time your work can go into the rack uncovered to let it dry out for the following week. If you want to continue forming or shaping you will need to double bag your work – put your work on a suitable sized bat and put the bat in a bag so the base of the bag is under the bat, then put another bag over the top of the work and tuck the top of the bag under the bat. If you want to trim (or turn) your thrown work the following week, it should also be double bagged. If your work is large, delicate, or of uneven thicknesses, you should lightly cover your work for drying. When considering the drying process, bare in mind the weather, humidity and wind! The hotter and dryer, the faster things dry and work can dry unevenly in the shelves – this can lead to cracking – another time to lightly cover your work for drying. Step Four – Trimming and Cleaning Up Your work is dry! It is called greenware now and it is at it’s most fragile! Handle everything with two hands. I often refer to soft hands – keep everything gentle and with your fingers spread as much as possible. Try to not pick up things like plates too much, and always with both hands! Before your work can be bisque fired it should be “cleaned up”. You work won’t go into the kiln if it has sharp edges – when glazed, sharp edges turn into razor blades! Use a piece of fly wire to rub the work all over – this will scratch a little so be light handed. Use a knife or metal kidney to scrape any areas that require a bit more dynamic treatment than the fly wire offers! Finally, a very light wipe over with a slightly damp sponge can help soften and soothe all of your edges and dags! Trimming thrown work: If you are planning to trim (or turn) your thrown work (and you should be), make sure you bag it well – your work should be leather hard to almost dry for easiest trimming. Use this step to finish the work completely – use a metal kidney to polish the surface, or a slightly damp sponge to give a freshly thrown look. Wipe the sponge around the rim after trimming, and check the inside of the pot for dags! Trimming slip cast work: Usually I will trim the rims of your work on the wheel the following day to make that stage easier, however you will still need to check your work for lumps and bumps. Last but not least – check that your name is still clearly on the bottom of your work. Step Five – Bisque Firing When the work is completely dry it can go into the bisque kiln. The bisque kiln is fired to 1000°C. This process burns off the water in the clay as well as some of the chemically bound water. The structure of the clay is not altered that much at this temperature. Inside the bisque kiln, the work is stacked a little, small bowl inside a larger bowl and onto a heavy plate. Smaller items like decorations or drink coasters might get stacked several high. Consideration is paid to the weight of the stack and shape of the work. A bisque kiln can fire about one and a half times the amount of work that the glaze kiln can fire. The firing takes about 10 hours to complete the cycle and about two days to cool down. Once it has been emptied the work is placed in the glaze room ready for you to decorate! Step Six – Glazing Decorating your work with colour can be a lot of fun – and time consuming! There are three main options for surface treatment at this stage: Oxide Washes Underglazes Glazes Washes and underglazes do not “glaze” the work – It will still need a layer of glaze to fully seal the clay (washes don’t need glaze on surfaces not designed for food or liquid as they can gloss up a little on their own). Underglazes are stable colourants that turn out pretty much how they look in the jar. They can be mixed with each other to form other colours and can be used like water colours to paint onto your work. Mostly they should have a clear glaze on top to seal them. Oxides are a different species – the pink oxide (cobalt) wash turns out bright blue for instance. They don’t always need a glaze on top, and some glazes can change the colour of the wash! The glazes need no other “glaze” on top! Be careful of unknown glaze interactions – you can put any combination of glaze in a bowl or on a plate, but only a single glaze on the outside of any vertical surface! Glazes are a chemical reaction under heat. We don’t know the exact chemicals in the Mayco glazes we use. I can guess by the way they interact with each other, however, on the whole, you need to test every idea you have, and not run the test on a vertical surface! Simply put, glaze is a layer of glass like substance that bonds with the clay underneath. Clay is made of silica, alumina and water. Glaze is made of mostly silica. Silica has a melting point of 1700°C and we fire to 1240°C. The silica requires a “flux” to help it melt at the lower temperature. Fluxes can be all sorts of chemicals – a common one is calcium – calcium has a melting point of 2500°C, however, together they both melt at a much lower temperature! Colourants are metal oxides like cobalt (blue), chrome (green through black), copper (green, blue, even red!), manganese (black, purple and pink) iron (red brown), etc. Different chemicals in the glaze can have dramatic effects. for example, barium carbonate (which we don’t use) turns manganese bright pink! Other elements can turn manganese dioxide brown, blue, purple and reddish brown. Manganese dioxide is a flux in and of itself as well. So, glazes that get their black and purple colours, often interact with other glazes and RUN! Our mirror black is a good example – it mixes really well with many glazes because it fluxes them – causes them to melt faster. It will also bring out many beautiful colours in the glazes because it’s black colouring most definitely comes from manganese dioxide! Glaze chemistry is a whole subject on it’s own! We use commercial Mayco glazes on purpose – for their huge range of colour possibilities, stability, cool interactions, artistic freedom with the ability to easily brush the glazes on and ease of use. We currently have almost 50 glazes on hand! A major project is to test the interactions of all glazes with each other. That is 2,500 test tiles!!!! I’m going to make the wall behind the wheels the feature wall of pretty colours! Step Seven – Glaze (Gloss or sometimes called “Glost”) Firing Most of the time this is the final stage of making your creation (but not always!) The glaze kiln goes to 1240°C. This is called cone 6, or midrange. It is the low end of stoneware temperatures. Stoneware clays and glazes are typically fired at cone 8 – 10, that is 1260 – 1290°C. The energy requirement to go from 1240°C to 1280°C is almost a 30% more! Our clay is formulated to vitrify (mature, turn “glass-like”) at 1240°, as are our glazes. A glaze kiln take around 12 hours to reach temperature and two to three days to cool down. Sometimes a third firing process is required – this is for decoration that is added to work after the glaze firing. For example – adding precious metals and lustres. this firing temperature is usually around 600 – 800°C depending upon the techniques being used. There are many students interested in gold and silver trims – we will be doing this third type of firing soon! After firing your work will be in the student finished work shelves. Remember to pay for it before you head out the door! There is a small extra charge for using porcelain clay (it’s more than twice the price of regular clay), and for any third firing process! Once your work has been fired it can not turn back into clay for millennia – so don’t fire it if you don’t like it! Put it in the bucket for recycling. https://firebirdstudios.com.au/the-process-of-making-pottery/Ceramics have evolved over thousands of years.A white earthenware side plate with a gadroon edge. Has water marks and chips on front.‘Johnson Bros England Reg No 15587’flagstaff hill, warrnambool, shipwrecked-coast, flagstaff-hill, flagstaff-hill-maritime-museum, maritime-museum, shipwreck-coast, flagstaff-hill-maritime-village, johnson bros, ceramics, tableware -
 Flagstaff Hill Maritime Museum and Village
Domestic object - Plate, Alfred Meakin
The Process of Making Pottery Decorating, Firing, Glazing, Making, Technical There is a rhythm and flow to clay. It can’t be done all at once! Even the making process! It can take weeks to get everything done, especially if you can only work on your pottery once a week! Even though we have three hour classes, it’s often just not enough time! Here is an overview of some of the processes so you have a bit more grasp on some of the technical stuff! Step One – Design There are SO many ideas out there for making stuff in clay! From delicate porcelain jewellery, through to heavy sculptural work and everything in between. Deciding your direction is sometimes not that easy – when you first start, try everything, you will naturally gravitate to the style that you enjoy! The options and variations are endless and can get a wee bit overwhelming too! Check in with me before you start to ensure your ideas will work, what order you might do things, how you could achieve the look you are seeking and any other technical data required! Step Two – Making Clay is thixotropic. This means that as you work with it, the clay first gets sloppier and wetter, before is begins to dry in the atmosphere. For most things, you simply can’t do all parts of the project at once. An example of work order might look like: Get last weeks work out from the shelves Prepare clay for today’s work – roll your clay, prepare balls for throwing, make the first stage of a pinch pot) Clean up last week’s work and put it on the shelf for bisque firing Check that you have any glazing to do – and do enough of it that you will have time to finish your main project Do the next step of your next project – there might be a further step that can’t be complete immediately, in that case, wrap your work well and put onto the shelves. Letting your work rest for a while can really help keep your work clean and professional looking. Many things require bagging under plastic to keep it ready for work the next week – put your name on the outside of the bag so you can find your work easily. We have stickers and markers. Consider how you want to decorate your work – coloured slip can be applied at a fairly wet stage (remembering that it will make your work even wetter!). Trying to apply slip to dry clay won’t work! If you want to do sgraffito – you will need to keep the work leather hard (a state of dryness where you can still work the clay with a little effort and a little water and care). Step Three – Drying Most of the time your work can go into the rack uncovered to let it dry out for the following week. If you want to continue forming or shaping you will need to double bag your work – put your work on a suitable sized bat and put the bat in a bag so the base of the bag is under the bat, then put another bag over the top of the work and tuck the top of the bag under the bat. If you want to trim (or turn) your thrown work the following week, it should also be double bagged. If your work is large, delicate, or of uneven thicknesses, you should lightly cover your work for drying. When considering the drying process, bare in mind the weather, humidity and wind! The hotter and dryer, the faster things dry and work can dry unevenly in the shelves – this can lead to cracking – another time to lightly cover your work for drying. Step Four – Trimming and Cleaning Up Your work is dry! It is called greenware now and it is at it’s most fragile! Handle everything with two hands. I often refer to soft hands – keep everything gentle and with your fingers spread as much as possible. Try to not pick up things like plates too much, and always with both hands! Before your work can be bisque fired it should be “cleaned up”. You work won’t go into the kiln if it has sharp edges – when glazed, sharp edges turn into razor blades! Use a piece of fly wire to rub the work all over – this will scratch a little so be light handed. Use a knife or metal kidney to scrape any areas that require a bit more dynamic treatment than the fly wire offers! Finally, a very light wipe over with a slightly damp sponge can help soften and soothe all of your edges and dags! Trimming thrown work: If you are planning to trim (or turn) your thrown work (and you should be), make sure you bag it well – your work should be leather hard to almost dry for easiest trimming. Use this step to finish the work completely – use a metal kidney to polish the surface, or a slightly damp sponge to give a freshly thrown look. Wipe the sponge around the rim after trimming, and check the inside of the pot for dags! Trimming slip cast work: Usually I will trim the rims of your work on the wheel the following day to make that stage easier, however you will still need to check your work for lumps and bumps. Last but not least – check that your name is still clearly on the bottom of your work. Step Five – Bisque Firing When the work is completely dry it can go into the bisque kiln. The bisque kiln is fired to 1000°C. This process burns off the water in the clay as well as some of the chemically bound water. The structure of the clay is not altered that much at this temperature. Inside the bisque kiln, the work is stacked a little, small bowl inside a larger bowl and onto a heavy plate. Smaller items like decorations or drink coasters might get stacked several high. Consideration is paid to the weight of the stack and shape of the work. A bisque kiln can fire about one and a half times the amount of work that the glaze kiln can fire. The firing takes about 10 hours to complete the cycle and about two days to cool down. Once it has been emptied the work is placed in the glaze room ready for you to decorate! Step Six – Glazing Decorating your work with colour can be a lot of fun – and time consuming! There are three main options for surface treatment at this stage: Oxide Washes Underglazes Glazes Washes and underglazes do not “glaze” the work – It will still need a layer of glaze to fully seal the clay (washes don’t need glaze on surfaces not designed for food or liquid as they can gloss up a little on their own). Underglazes are stable colourants that turn out pretty much how they look in the jar. They can be mixed with each other to form other colours and can be used like water colours to paint onto your work. Mostly they should have a clear glaze on top to seal them. Oxides are a different species – the pink oxide (cobalt) wash turns out bright blue for instance. They don’t always need a glaze on top, and some glazes can change the colour of the wash! The glazes need no other “glaze” on top! Be careful of unknown glaze interactions – you can put any combination of glaze in a bowl or on a plate, but only a single glaze on the outside of any vertical surface! Glazes are a chemical reaction under heat. We don’t know the exact chemicals in the Mayco glazes we use. I can guess by the way they interact with each other, however, on the whole, you need to test every idea you have, and not run the test on a vertical surface! Simply put, glaze is a layer of glass like substance that bonds with the clay underneath. Clay is made of silica, alumina and water. Glaze is made of mostly silica. Silica has a melting point of 1700°C and we fire to 1240°C. The silica requires a “flux” to help it melt at the lower temperature. Fluxes can be all sorts of chemicals – a common one is calcium – calcium has a melting point of 2500°C, however, together they both melt at a much lower temperature! Colourants are metal oxides like cobalt (blue), chrome (green through black), copper (green, blue, even red!), manganese (black, purple and pink) iron (red brown), etc. Different chemicals in the glaze can have dramatic effects. for example, barium carbonate (which we don’t use) turns manganese bright pink! Other elements can turn manganese dioxide brown, blue, purple and reddish brown. Manganese dioxide is a flux in and of itself as well. So, glazes that get their black and purple colours, often interact with other glazes and RUN! Our mirror black is a good example – it mixes really well with many glazes because it fluxes them – causes them to melt faster. It will also bring out many beautiful colours in the glazes because it’s black colouring most definitely comes from manganese dioxide! Glaze chemistry is a whole subject on it’s own! We use commercial Mayco glazes on purpose – for their huge range of colour possibilities, stability, cool interactions, artistic freedom with the ability to easily brush the glazes on and ease of use. We currently have almost 50 glazes on hand! A major project is to test the interactions of all glazes with each other. That is 2,500 test tiles!!!! I’m going to make the wall behind the wheels the feature wall of pretty colours! Step Seven – Glaze (Gloss or sometimes called “Glost”) Firing Most of the time this is the final stage of making your creation (but not always!) The glaze kiln goes to 1240°C. This is called cone 6, or midrange. It is the low end of stoneware temperatures. Stoneware clays and glazes are typically fired at cone 8 – 10, that is 1260 – 1290°C. The energy requirement to go from 1240°C to 1280°C is almost a 30% more! Our clay is formulated to vitrify (mature, turn “glass-like”) at 1240°, as are our glazes. A glaze kiln take around 12 hours to reach temperature and two to three days to cool down. Sometimes a third firing process is required – this is for decoration that is added to work after the glaze firing. For example – adding precious metals and lustres. this firing temperature is usually around 600 – 800°C depending upon the techniques being used. There are many students interested in gold and silver trims – we will be doing this third type of firing soon! After firing your work will be in the student finished work shelves. Remember to pay for it before you head out the door! There is a small extra charge for using porcelain clay (it’s more than twice the price of regular clay), and for any third firing process! Once your work has been fired it can not turn back into clay for millennia – so don’t fire it if you don’t like it! Put it in the bucket for recycling. https://firebirdstudios.com.au/the-process-of-making-pottery/Ceramics have evolved over thousands of years.Earthenware dessert plate, cream colour. Made by Alfred Meakin, England. Backstamped ‘Alfred Meakin England’. flagstaff hill, warrnambool, shipwrecked-coast, flagstaff-hill, flagstaff-hill-maritime-museum, maritime-museum, shipwreck-coast, flagstaff-hill-maritime-village, alfred meakin, ceramics, earthenware, kitchenware -
 Flagstaff Hill Maritime Museum and Village
Domestic object - Jug
The Process of Making Pottery Decorating, Firing, Glazing, Making, Technical There is a rhythm and flow to clay. It can’t be done all at once! Even the making process! It can take weeks to get everything done, especially if you can only work on your pottery once a week! Even though we have three hour classes, it’s often just not enough time! Here is an overview of some of the processes so you have a bit more grasp on some of the technical stuff! Step One – Design There are SO many ideas out there for making stuff in clay! From delicate porcelain jewellery, through to heavy sculptural work and everything in between. Deciding your direction is sometimes not that easy – when you first start, try everything, you will naturally gravitate to the style that you enjoy! The options and variations are endless and can get a wee bit overwhelming too! Check in with me before you start to ensure your ideas will work, what order you might do things, how you could achieve the look you are seeking and any other technical data required! Step Two – Making Clay is thixotropic. This means that as you work with it, the clay first gets sloppier and wetter, before is begins to dry in the atmosphere. For most things, you simply can’t do all parts of the project at once. An example of work order might look like: Get last weeks work out from the shelves Prepare clay for today’s work – roll your clay, prepare balls for throwing, make the first stage of a pinch pot) Clean up last week’s work and put it on the shelf for bisque firing Check that you have any glazing to do – and do enough of it that you will have time to finish your main project Do the next step of your next project – there might be a further step that can’t be complete immediately, in that case, wrap your work well and put onto the shelves. Letting your work rest for a while can really help keep your work clean and professional looking. Many things require bagging under plastic to keep it ready for work the next week – put your name on the outside of the bag so you can find your work easily. We have stickers and markers. Consider how you want to decorate your work – coloured slip can be applied at a fairly wet stage (remembering that it will make your work even wetter!). Trying to apply slip to dry clay won’t work! If you want to do sgraffito – you will need to keep the work leather hard (a state of dryness where you can still work the clay with a little effort and a little water and care). Step Three – Drying Most of the time your work can go into the rack uncovered to let it dry out for the following week. If you want to continue forming or shaping you will need to double bag your work – put your work on a suitable sized bat and put the bat in a bag so the base of the bag is under the bat, then put another bag over the top of the work and tuck the top of the bag under the bat. If you want to trim (or turn) your thrown work the following week, it should also be double bagged. If your work is large, delicate, or of uneven thicknesses, you should lightly cover your work for drying. When considering the drying process, bare in mind the weather, humidity and wind! The hotter and dryer, the faster things dry and work can dry unevenly in the shelves – this can lead to cracking – another time to lightly cover your work for drying. Step Four – Trimming and Cleaning Up Your work is dry! It is called greenware now and it is at it’s most fragile! Handle everything with two hands. I often refer to soft hands – keep everything gentle and with your fingers spread as much as possible. Try to not pick up things like plates too much, and always with both hands! Before your work can be bisque fired it should be “cleaned up”. You work won’t go into the kiln if it has sharp edges – when glazed, sharp edges turn into razor blades! Use a piece of fly wire to rub the work all over – this will scratch a little so be light handed. Use a knife or metal kidney to scrape any areas that require a bit more dynamic treatment than the fly wire offers! Finally, a very light wipe over with a slightly damp sponge can help soften and soothe all of your edges and dags! Trimming thrown work: If you are planning to trim (or turn) your thrown work (and you should be), make sure you bag it well – your work should be leather hard to almost dry for easiest trimming. Use this step to finish the work completely – use a metal kidney to polish the surface, or a slightly damp sponge to give a freshly thrown look. Wipe the sponge around the rim after trimming, and check the inside of the pot for dags! Trimming slip cast work: Usually I will trim the rims of your work on the wheel the following day to make that stage easier, however you will still need to check your work for lumps and bumps. Last but not least – check that your name is still clearly on the bottom of your work. Step Five – Bisque Firing When the work is completely dry it can go into the bisque kiln. The bisque kiln is fired to 1000°C. This process burns off the water in the clay as well as some of the chemically bound water. The structure of the clay is not altered that much at this temperature. Inside the bisque kiln, the work is stacked a little, small bowl inside a larger bowl and onto a heavy plate. Smaller items like decorations or drink coasters might get stacked several high. Consideration is paid to the weight of the stack and shape of the work. A bisque kiln can fire about one and a half times the amount of work that the glaze kiln can fire. The firing takes about 10 hours to complete the cycle and about two days to cool down. Once it has been emptied the work is placed in the glaze room ready for you to decorate! Step Six – Glazing Decorating your work with colour can be a lot of fun – and time consuming! There are three main options for surface treatment at this stage: Oxide Washes Underglazes Glazes Washes and underglazes do not “glaze” the work – It will still need a layer of glaze to fully seal the clay (washes don’t need glaze on surfaces not designed for food or liquid as they can gloss up a little on their own). Underglazes are stable colourants that turn out pretty much how they look in the jar. They can be mixed with each other to form other colours and can be used like water colours to paint onto your work. Mostly they should have a clear glaze on top to seal them. Oxides are a different species – the pink oxide (cobalt) wash turns out bright blue for instance. They don’t always need a glaze on top, and some glazes can change the colour of the wash! The glazes need no other “glaze” on top! Be careful of unknown glaze interactions – you can put any combination of glaze in a bowl or on a plate, but only a single glaze on the outside of any vertical surface! Glazes are a chemical reaction under heat. We don’t know the exact chemicals in the Mayco glazes we use. I can guess by the way they interact with each other, however, on the whole, you need to test every idea you have, and not run the test on a vertical surface! Simply put, glaze is a layer of glass like substance that bonds with the clay underneath. Clay is made of silica, alumina and water. Glaze is made of mostly silica. Silica has a melting point of 1700°C and we fire to 1240°C. The silica requires a “flux” to help it melt at the lower temperature. Fluxes can be all sorts of chemicals – a common one is calcium – calcium has a melting point of 2500°C, however, together they both melt at a much lower temperature! Colourants are metal oxides like cobalt (blue), chrome (green through black), copper (green, blue, even red!), manganese (black, purple and pink) iron (red brown), etc. Different chemicals in the glaze can have dramatic effects. for example, barium carbonate (which we don’t use) turns manganese bright pink! Other elements can turn manganese dioxide brown, blue, purple and reddish brown. Manganese dioxide is a flux in and of itself as well. So, glazes that get their black and purple colours, often interact with other glazes and RUN! Our mirror black is a good example – it mixes really well with many glazes because it fluxes them – causes them to melt faster. It will also bring out many beautiful colours in the glazes because it’s black colouring most definitely comes from manganese dioxide! Glaze chemistry is a whole subject on it’s own! We use commercial Mayco glazes on purpose – for their huge range of colour possibilities, stability, cool interactions, artistic freedom with the ability to easily brush the glazes on and ease of use. We currently have almost 50 glazes on hand! A major project is to test the interactions of all glazes with each other. That is 2,500 test tiles!!!! I’m going to make the wall behind the wheels the feature wall of pretty colours! Step Seven – Glaze (Gloss or sometimes called “Glost”) Firing Most of the time this is the final stage of making your creation (but not always!) The glaze kiln goes to 1240°C. This is called cone 6, or midrange. It is the low end of stoneware temperatures. Stoneware clays and glazes are typically fired at cone 8 – 10, that is 1260 – 1290°C. The energy requirement to go from 1240°C to 1280°C is almost a 30% more! Our clay is formulated to vitrify (mature, turn “glass-like”) at 1240°, as are our glazes. A glaze kiln take around 12 hours to reach temperature and two to three days to cool down. Sometimes a third firing process is required – this is for decoration that is added to work after the glaze firing. For example – adding precious metals and lustres. this firing temperature is usually around 600 – 800°C depending upon the techniques being used. There are many students interested in gold and silver trims – we will be doing this third type of firing soon! After firing your work will be in the student finished work shelves. Remember to pay for it before you head out the door! There is a small extra charge for using porcelain clay (it’s more than twice the price of regular clay), and for any third firing process! Once your work has been fired it can not turn back into clay for millennia – so don’t fire it if you don’t like it! Put it in the bucket for recycling. https://firebirdstudios.com.au/the-process-of-making-pottery/The form of the jug has been in use for many centuries.Stoneware jug. Two tone brown glaze with pierced lip behind spout. Spout chipped.None.flagstaff hill, warrnambool, shipwrecked-coast, flagstaff-hill, flagstaff-hill-maritime-museum, maritime-museum, shipwreck-coast, flagstaff-hill-maritime-village, jug, ceramic jug -
 City of Moorabbin Historical Society (Operating the Box Cottage Museum)
Equipment - BRASSO, Reckitt and Colman Ltd, Metal Polish, 20thC
Reckitt & Sons' opened a branch in Sydney in1886. Brasso was developed by Reckitt & Sons in 1905. In 1938 Reckitt and Sons merged with J. and J. Colman to become Reckitt and Colman Ltd.Brasso was used by most Housewives for cleaning and polishing Kitchen Equipment in the City of Moorabbin during 20thC Metal container with blue sun burst effect, with a red circle with 'BRASSO' printed, in white and blue, inside. The instructions are printed on the back. FRONT: 'BRASSO' Back: Picture of the Royal Coat of Arms - By appointment to Her Majesty Queen ElizabethII. Suppliers of Metal Polish Reckitt & Colman Ltd. BRASSO Metal Polish for polishing Brass, Copper, Zinc, Steel, Pewter etc. SHAKE WELL Apply with a soft cloth. Polish off with a dry, soft cloth preferably before the polish has completely dried. DO NOT PLACE THIS TIN CLOSE TO THE FIRE Made in Australia by Reckitt & Colman (Australia) Ltd. No. 6 - Contents 6½ Fl oz when packed. brasso, metal polish -
 City of Moorabbin Historical Society (Operating the Box Cottage Museum)
Domestic object - Watkins Polish, J. R. Watkins Co (USA), 20thC
The J. R. Watkins Co. opened its first overseas branch in Australia in 1935. The J. R. Watkins built a large factory at Highett on a six acres on the east side of Nepean Highway (no. 1123) in 1954. The J. R. Watkins company was founded in 1868 in Plainview, Minnesota USA, moving to Winona in 1885, by J. R. Watkins.Example of industry in the City of Moorabbin.Amber glass bottle with a metal screw on lid. A paper label is on the front of the bottle 'Watkins Polish" printed in yellow, black and white.PRINTED ON LABEL: 11 Fluid ounces - WATKINS POLISH - Gives a hard dry lustre excellent for Dusting For cleaning, dusting and polishing furniture, pianos, woodwork, linoleum, hardwood floors and all polished surfaces. Directions: If the article to be polished is dirty or gummy, clean it by washing with mild soap and warm water. Apply Watkins Polish with a damp, soft cloth (Dampened with water and wrung almost dry). The Polish may be poured on the damp cloth or on the surface to be polished. In either case rub it all with a dry cloth to obtain a high polish. When dusting, dampen the cloth with Watkins Polish - it keeps down the dust and gives a lustre which is neither greasy not gummy. The J. R. Watkins Co. Melbourne - Sydney - Adelaide - Kogarah EMBOSED ON BOTTLE: "The J.R.Watkins co. Made in Australia" the j. r. watkins co, highett, polish -
 Anglesea and District Historical Society
Tin - Leather Dressing, Charles Markell Company Pty. Ltd, Estimated 1880-1930
Coacholine leather dressing used as softener, preservative, cleaning and preventing rust and waterproofing.Front: Coacholine Leather Dressing (coach - trademark) / Proprietors - Charles Markell Company Pty. Ltd. / Sydney NSW Back: Coacholine - a quality leather dressing / Coacholine softens and preserves / Coacholine will prevent rust. Directions: Wipe surface and apply freely. Rub thoroughly into leather and allow to dry for a few hours / 9-1/2 oz - Net when packed / Norton Can / (trademark removed 1966).leather dressing, coachline, charles markell company pty ltd -
 Rutherglen Historical Society
Tin. Boot Polish, Wm Day & Son
Used for polishing & preserving boot leatherRound green tin of boot polish with printing in black & gilt paint"Liddy's OBB Boot Polish / Do Not Use Too Much On Brush / Keep Lid On Tightly" On side: "Liddy's OBB Boot Polish 5 1/2 ozs Netweight When Packed." On bottom: "Directions / apply small quantity / with tip of clean brush and / polish off with a soft brush. Finish / by rubbing lightly with a soft dry / cloth. This polish preserves the / leather and gives the boot / longer life / Sole proprietors / Wm. Day & Son / Fitzroy melbourne / Nett Contents / 5 1/2 ozs."boot polish, liddy, leather care -
 Ballarat Heritage Services
Digital photographs, L.J. Gervasoni, Prof McIntyre and Philip Slobom, c2009
Environmental approach to preserving Kew Court House 4 June 2010 Paint stripping from older buildings can be a hazardous task. The City of Boroondara has found an environmentally sustainable solution for the works at local heritage icon, the Kew Police Station and Court House. Council used an organic based paint stripping alternative as part of the repairs to the rendering on the building facade. Over nearly three months, the damaged and unsound render was removed, the paint was stripped and the render was repainted. Usually, paint is removed via high pressure water cleaning or sandblasting. This is a harsh method and involves combining extreme high amounts of pressure, water and sand and is highly toxic. It also creates high noise levels. In this 'green' project, Council used a soy bean paint stripper. The process uses a paste-like substance, which is highly effective, non toxic and biodegradable, and applied by hand. Initially, a bandage is applied (much like a leg waxing strip) over the top of paste. It is allowed to dry and then the bandage is stripped off. Noise was kept to a minimum by using the paint stripping alternative. Scrapings and bandages are then bagged and sent to the tip as landfill, so it does not end up in our water supply. The waste and debris don’t run-off into drains, and the bags and bi-products are biodegradable. Studley Ward Councillor Phillip Healey explained that soy bean paint removal is not greatly used in Melbourne or the local government sector. "We know of special cases where it has been used, such as high profile projects like Sydney Harbour Bridge, but Boroondara is one of the first in Victoria to employ this natural plant-based paint-stripping treatment to a large-scale building," Cr Healey said. "What this means is that no harmful substances were used and no injury was caused, soy paint removal also preserves, protects and restores the heritage integrity and decorative stone masonry features of the historic building. "This is a terrific example of our commitment to 'enhancing the environment' which is one of our key directions in the 2010–15 Council Plan." The restoration of the Kew Court House and Police Station is expected to be completed in the year ahead. Council purchased the heritage building in 2007 with the intention for it to be restored and used for the community. The building required extensive renovation including repair of the slate roof and ventilation dome, and the renovation plans include a new foyer, bathrooms and kitchen to ensure the venue meets a broad range of community needs. Heritage Victoria helped fund the cost of the roof repairs with a grant of $250,000, along with the Australian Government contributing $330,000 through its Regional and Local Community Infrastructure Program. Restoration Underway Concept plans for a new performance and exhibition space at the Kew Court House and Police Station have been developed by the City of Boroondara. Two years ago, Council Purchased the Kew Court House and Police Station from the State Government for $825,000 with the intention for it to be restored and used for the community. The building requires extensive renovation including repair of the slate roof and ventilation dome. The renovation plans include a new foyer, bathrooms and kitchen to ensure the venue meets a broad range of community needs. The restoration has been assisted with a Federal Government grant of $330,000 under the Regional and Local Community Infrastructure Program. In 2008, Council was also successful in obtaining a Heritage Victoria Grant of $250,000 towards the costs of the roof repairs. Having satisfied the necessary permit requirements, works are about to commence using slate of a similar quality to the original. The City of Boroondara would like to thank all residents and businesses who have contributed to the Kew Court House Restoration Appeal which has raised $650,000. Special thanks go to a private donor who donated $250,000 and the Kew Senior Citizens Club which contributed $50,000. NEWS FLASH 14th March “Council moves to provide certainty for the restoration of the courthouse”. In a historic meeting last night 13th March 07 at Boroondara Council voted overwhelmingly to complete the purchase of the Kew Court House. The partnership continues between the Kew Court House Restoration Appeal and the Council to see this project through. The project now has the overwhelming support of Council. “It is no longer about “if” it is about “when” the doors will re open” said Prof Peter McIntyre. With the property secured the fundraising can now be completed without the encumbrances and we know the restoration will be undertaken as the funds become available from the appeal. Work can commence as soon as significant fund raising is achieved. “The community, philanthropists and corporations can now enter this project with certainty. 7th March At the Council meeting on 5th March, following many hours of debate a motion was passed by 5 to 4 vote to purchase the Kew Court House and Police Station outright. As of 7th March Cr Dick Menting lodged a rescission notice. This means that there was another Council meeting at 6pm, Tuesday 13th March at Council Chambers. MEDIA RELEASE - Kew, 3rd December 2006 APPEAL LAUNCHED TO SAVE A NATIONAL TREASURE On the morning of Saturday 18th. November 2006 the people of Kew were aroused by the triumphant sound of the Boroondara Brass which had assembled outside the former Kew Police Station. After four long years of neglect, the precinct was being heralded back to life, and what a heartwarming sound it was for all those early shoppers who gathered to hear Cr. Phillip Healey introduce Patrons and supporters of the Save the Court House campaign. Following the speeches, the "Thermometer" was unveiled and the Appeal was formally under way. The various committees have worked very hard during these past weeks. The Kew Court House Arts Association Inc. has been formed under the leadership of Graeme McCoubrie. This organization brings all the amateur theatre groups in the City of Boroondara together with a view to providing them with a permanent performing space within the former Court House. As well as intimate theatre, there will be provision for the staging of instrumental and choral performances before an audience of 40 to 50 people. The Police Station will compliment the function of the Court House by providing a venue for artist groups to exhibit their work, for the Historical Societies of Boroondara to meet, and for study groups to meet, for activities such as play and poetry readings. It will be a Hub for the Arts in Kew. Of course none of this can happen unless the money to pay for restoration of the buildings is raised, and we only have until March 2007 in which to do this. The City of Boroondara, Kew Historical Society and the East Kew Community Bank are working together as a team to make this dream a reality, but WE NEED YOUR HELP. This is a fantastic one-off opportunity, and it must not be wasted. Donations to the Appeal can be made through the Kew East Kew Community Bank or any branch of the Bendigo Bank, or through the Kew Historical Society Inc., P.O. Box 175 Kew Vic 3101. All donations over $2 are tax deductible through the Community Enterprise Foundation. End Media Release Kew Courthouse future looks bright The State Government has accepted an offer from the local government of Boroondara to purchase the former Kew Courthouse and Police Station, Minister for Finance John Lenders said today. In a joint statement with the Mayor of Boroondara, Councillor Jack Wegman, Mr Lenders said he was pleased that agreement had been reached and the contract of sale document finalised. “I welcome the Council making this step towards purchasing this property after recent negotiations,” Mr Lenders said. “The settlement date for the purchase of the property is March 2007. The State government sold the property to Council at a reduced cost of $825,000 for community use. The full value of the buildings on the commercial marketplace was estimated to be about $2million,” he said. Cr Wegman said the Contract of Sale provides that if the funds cannot be raised to restore the property for use as community buildings then they will be returned to the State government. In relation to this additional funding to restore and modernise the buildings, Council and the community will work together over the next eight months, with the encouragement of the State government, Cr Wegman said. Mr Lenders said both he and the Premier had advised the Council of fundraising opportunities to help the Council convert the property for its future use. Cr Wegman noted that applications for funding from the Community Support Fund and for State government heritage grants were being processed. “Council has agreed to a Memorandum of Understanding with the Kew Historical Society outlining arrangements for the Kew Court House Restoration Appeal and Council is delighted with the level of support shown by the community and is confident of a bright future for these historic buildings.” Mr Lenders said the Bracks Government is committed to securing the best outcome when buildings that have once served the community outlive their original purpose. “There is a responsibility for Governments to practice good financial management and achieve the best possible price when an asset is longer used by the State,” he said. “There is also a responsibility to consider the local community. The Government and City of Boroondara have worked hard to achieve a balance between these two interests.” The building ceased to operate as a courthouse in 1971 and as a police station in 2002. Part of the building was also used as a post office and this section of the building was sold by the Commonwealth in 1992 to a private owner and is currently run as a licensed restaurant. It is listed on the State's Heritage Register as a place of historical and architectural significance and is protected by the Victorian Heritage Act. Created: 30 August 2006 Last Update: 10 January 2007 kew, kew court house, phillip slobom, town crier, professor peter mcintyre -
 Ballarat Heritage Services
Photograph - Digital photographs, L.J. Gervasoni, Kew Historical Society in the Former Kew Court House, c2009
Environmental approach to preserving Kew Court House 4 June 2010 Paint stripping from older buildings can be a hazardous task. The City of Boroondara has found an environmentally sustainable solution for the works at local heritage icon, the Kew Police Station and Court House. Council used an organic based paint stripping alternative as part of the repairs to the rendering on the building facade. Over nearly three months, the damaged and unsound render was removed, the paint was stripped and the render was repainted. Usually, paint is removed via high pressure water cleaning or sandblasting. This is a harsh method and involves combining extreme high amounts of pressure, water and sand and is highly toxic. It also creates high noise levels. In this 'green' project, Council used a soy bean paint stripper. The process uses a paste-like substance, which is highly effective, non toxic and biodegradable, and applied by hand. Initially, a bandage is applied (much like a leg waxing strip) over the top of paste. It is allowed to dry and then the bandage is stripped off. Noise was kept to a minimum by using the paint stripping alternative. Scrapings and bandages are then bagged and sent to the tip as landfill, so it does not end up in our water supply. The waste and debris don’t run-off into drains, and the bags and bi-products are biodegradable. Studley Ward Councillor Phillip Healey explained that soy bean paint removal is not greatly used in Melbourne or the local government sector. "We know of special cases where it has been used, such as high profile projects like Sydney Harbour Bridge, but Boroondara is one of the first in Victoria to employ this natural plant-based paint-stripping treatment to a large-scale building," Cr Healey said. "What this means is that no harmful substances were used and no injury was caused, soy paint removal also preserves, protects and restores the heritage integrity and decorative stone masonry features of the historic building. "This is a terrific example of our commitment to 'enhancing the environment' which is one of our key directions in the 2010–15 Council Plan." The restoration of the Kew Court House and Police Station is expected to be completed in the year ahead. Council purchased the heritage building in 2007 with the intention for it to be restored and used for the community. The building required extensive renovation including repair of the slate roof and ventilation dome, and the renovation plans include a new foyer, bathrooms and kitchen to ensure the venue meets a broad range of community needs. Heritage Victoria helped fund the cost of the roof repairs with a grant of $250,000, along with the Australian Government contributing $330,000 through its Regional and Local Community Infrastructure Program. Restoration Underway Concept plans for a new performance and exhibition space at the Kew Court House and Police Station have been developed by the City of Boroondara. Two years ago, Council Purchased the Kew Court House and Police Station from the State Government for $825,000 with the intention for it to be restored and used for the community. The building requires extensive renovation including repair of the slate roof and ventilation dome. The renovation plans include a new foyer, bathrooms and kitchen to ensure the venue meets a broad range of community needs. The restoration has been assisted with a Federal Government grant of $330,000 under the Regional and Local Community Infrastructure Program. In 2008, Council was also successful in obtaining a Heritage Victoria Grant of $250,000 towards the costs of the roof repairs. Having satisfied the necessary permit requirements, works are about to commence using slate of a similar quality to the original. The City of Boroondara would like to thank all residents and businesses who have contributed to the Kew Court House Restoration Appeal which has raised $650,000. Special thanks go to a private donor who donated $250,000 and the Kew Senior Citizens Club which contributed $50,000. NEWS FLASH 14th March “Council moves to provide certainty for the restoration of the courthouse”. In a historic meeting last night 13th March 07 at Boroondara Council voted overwhelmingly to complete the purchase of the Kew Court House. The partnership continues between the Kew Court House Restoration Appeal and the Council to see this project through. The project now has the overwhelming support of Council. “It is no longer about “if” it is about “when” the doors will re open” said Prof Peter McIntyre. With the property secured the fundraising can now be completed without the encumbrances and we know the restoration will be undertaken as the funds become available from the appeal. Work can commence as soon as significant fund raising is achieved. “The community, philanthropists and corporations can now enter this project with certainty. 7th March At the Council meeting on 5th March, following many hours of debate a motion was passed by 5 to 4 vote to purchase the Kew Court House and Police Station outright. As of 7th March Cr Dick Menting lodged a rescission notice. This means that there was another Council meeting at 6pm, Tuesday 13th March at Council Chambers. MEDIA RELEASE - Kew, 3rd December 2006 APPEAL LAUNCHED TO SAVE A NATIONAL TREASURE On the morning of Saturday 18th. November 2006 the people of Kew were aroused by the triumphant sound of the Boroondara Brass which had assembled outside the former Kew Police Station. After four long years of neglect, the precinct was being heralded back to life, and what a heartwarming sound it was for all those early shoppers who gathered to hear Cr. Phillip Healey introduce Patrons and supporters of the Save the Court House campaign. Following the speeches, the "Thermometer" was unveiled and the Appeal was formally under way. The various committees have worked very hard during these past weeks. The Kew Court House Arts Association Inc. has been formed under the leadership of Graeme McCoubrie. This organization brings all the amateur theatre groups in the City of Boroondara together with a view to providing them with a permanent performing space within the former Court House. As well as intimate theatre, there will be provision for the staging of instrumental and choral performances before an audience of 40 to 50 people. The Police Station will compliment the function of the Court House by providing a venue for artist groups to exhibit their work, for the Historical Societies of Boroondara to meet, and for study groups to meet, for activities such as play and poetry readings. It will be a Hub for the Arts in Kew. Of course none of this can happen unless the money to pay for restoration of the buildings is raised, and we only have until March 2007 in which to do this. The City of Boroondara, Kew Historical Society and the East Kew Community Bank are working together as a team to make this dream a reality, but WE NEED YOUR HELP. This is a fantastic one-off opportunity, and it must not be wasted. Donations to the Appeal can be made through the Kew East Kew Community Bank or any branch of the Bendigo Bank, or through the Kew Historical Society Inc., P.O. Box 175 Kew Vic 3101. All donations over $2 are tax deductible through the Community Enterprise Foundation. End Media Release Kew Courthouse future looks bright The State Government has accepted an offer from the local government of Boroondara to purchase the former Kew Courthouse and Police Station, Minister for Finance John Lenders said today. In a joint statement with the Mayor of Boroondara, Councillor Jack Wegman, Mr Lenders said he was pleased that agreement had been reached and the contract of sale document finalised. “I welcome the Council making this step towards purchasing this property after recent negotiations,” Mr Lenders said. “The settlement date for the purchase of the property is March 2007. The State government sold the property to Council at a reduced cost of $825,000 for community use. The full value of the buildings on the commercial marketplace was estimated to be about $2million,” he said. Cr Wegman said the Contract of Sale provides that if the funds cannot be raised to restore the property for use as community buildings then they will be returned to the State government. In relation to this additional funding to restore and modernise the buildings, Council and the community will work together over the next eight months, with the encouragement of the State government, Cr Wegman said. Mr Lenders said both he and the Premier had advised the Council of fundraising opportunities to help the Council convert the property for its future use. Cr Wegman noted that applications for funding from the Community Support Fund and for State government heritage grants were being processed. “Council has agreed to a Memorandum of Understanding with the Kew Historical Society outlining arrangements for the Kew Court House Restoration Appeal and Council is delighted with the level of support shown by the community and is confident of a bright future for these historic buildings.” Mr Lenders said the Bracks Government is committed to securing the best outcome when buildings that have once served the community outlive their original purpose. “There is a responsibility for Governments to practice good financial management and achieve the best possible price when an asset is longer used by the State,” he said. “There is also a responsibility to consider the local community. The Government and City of Boroondara have worked hard to achieve a balance between these two interests.” The building ceased to operate as a courthouse in 1971 and as a police station in 2002. Part of the building was also used as a post office and this section of the building was sold by the Commonwealth in 1992 to a private owner and is currently run as a licensed restaurant. It is listed on the State's Heritage Register as a place of historical and architectural significance and is protected by the Victorian Heritage Act. Created: 30 August 2006 Last Update: 10 January 2007 Colour photograph of the Kew Historical Society holding an event in the Former Kew Court House.kew, kew court house, kew historical society, meeting, city of boroondara -
 Mont De Lancey
Tin, Bostocks
... tins containers cleaning products Bostocks - dry suede cleaner ...On Loan from Mrs. K. Bourke c/o Mrs. H. N. LordDecorative round tin with lady on lid.Bostocks - dry suede cleaner. White - 2oz. Contents - Black 1 oz.tins, containers, cleaning products -
 National Wool Museum
Textile - Children's Jumper, Kathryn Knitwear, c.1962-1966
Kathryn Knitwear, founded by Robert Blake, manufactured high quality children’s knitwear in Melbourne from the 1940s – 1980s. Robert Blake began manufacturing children’s knitwear in his bedroom in Strathmore using a hand powered machine in the late 1940s. The operation moved to Ascot Vale and Essendon, before eventually establishing a factory in Moonee Ponds in the early 1950s. The business continued to expand, necessitating a move to a new factory in Broadmeadows. By 1962, the Broadmeadows factory was producing an average of 20,000 garments per month, which increased to 24,000 by 1964. Robert Blake’s Son, Brendan recalls that “The Kathryn brand was famous around Australia, anywhere children needed to keep warm and dress smartly. It also won a number of wool fashion awards”, including the 1969 Wool Awards, which was held by the Australian Wool Bureau and published in Women’s Weekly. The Kathryn range was designed for durability, comfort and care, without sacrificing style. They used patterning techniques that increase stretchiness, comfort and fit, as well as integrating decorative elements into the fabric to prevent them from being bulky, uncomfortable or tight. Making longevity of style a priority, Brendan Blake remembers that “there was one particular garment that was in the range for at least thirty years”. The colourwork dogs from this design are a very popular motif, and were available in both wool and Orlon in multiple styles from at least 1961-1972, including a cardigan and a pullover, selling 4346 of these in winter 1961. This example most likely dates from 1962-1966. An Illustration depicting this style is catalogued under NWM-09026. He also recalls “In the past, when women have found out that I was associated with Kathryn Knitwear, they would often relate to me the story of a garment they had purchased or received as a gift and, when their child had grown out of it, they would hand it on to another child. Several ladies have told me of purchasing garments for their daughters’ glory box, or saving a particular garment after their daughter had grown out of it. Brendan Blake: “At the peak of their operation they employed approximately two hundred people, mainly women and girls. A family would often seek to send their daughter to work in this company because they knew they would be looked after and safe. One lady wrote to me telling me that working at the Moonee Ponds Factory prior to getting married was the happiest time of her life.” In 1963, workers at the Kathryn factory earned £13 per week, which was 8 shillings and 8 pence higher than the minimum weekly wage for female workers in the textile manufacturing industry (£12 11s 4d). By 1970, the Kathryn Knitwear brand expanded from children’s knitwear into womenswear under the brand name ‘Lady Kathryn’, and for boys and men under ‘Robert Blake’. Continuing to diversify their distribution, they also began exporting ‘Kathryn’ garments to New Zealand, the Pacific Islands, and Japan. ‘Kathryn Knitwear’ was well-known for their early adoption of modern materials and techniques that had broad appeal to their customer base. This is shown in their early use of the acrylic fibre ‘Orlon’ in the 50s and 60s and ‘Superwash’ wool in the 1970s. Many of Kathryn Knitwear’s styles, particularly those that were long running staples of the brand, were available in both wool and Orlon to suit the consumer’s preference. Orlon was developed by DuPont in the 1940s and became the first commercially successful acrylic fibre in the 1950s and 1960s. The development of Orlon coincided with an increase in availability of washing machines in everyday Australian homes. The great appeal of Orlon was that while wool garments still had to be hand-washed, Orlon’s shrink-resistant nature made it machine washable and dryable. This was a very appealing prospect, especially for the seemingly unending task of cleaning active children’s clothing. Machine washable wool would not be available until the development of the ‘Superwash’ treatment by the Australian Wool Board and CSIRO in 1970. Far from the humble origins of one man in his bedroom with a hand-cranked machine; at its closure in 1980, the Broadmeadows factory of ‘Kathryn’ housed more than 100 machines, including 53 sewing machines and 45 knitting machines. Robert Blake was “a passionate advocate for wool and Australian Made” throughout his whole life. A strong thread that ties through the lifespan of Robert Blake and Kathryn Knitwear is a balance between adopting new innovations without sacrificing the core values of durability, comfort, care and style that had made the brand so well known. Their legacy forms an integral part of both Australian social and manufacturing history.Red children’s machine-knit jumper with white dog motif and green grass colourwork, closes with three red plastic buttons at left shoulder .2 and .3 are sample tags with manufacturing information, including sizes and colours available .4 is a swing tag with manufacturer care instructions.1) [label stitched at back neck] KATHRYN REGD. / 100% ORLON / 24 .2) STYLE: 44/OP – ORLON PULLOVER – ANIMAL MOTIF / SIZE: 18” 20” 22” 24”/ PRICE: 18/6 21/3 25/- 27/6 / COLOR: 18” PALE BLUE. LEMON. WHITE. / 20” – 24” SKY BLUE. LEMON. WHITE. REDCOAT. BOTANY BLUE. SULTRY GREEN. NUTTY BROWN. OATMEAL .3) STYLE: 44/PW – WOOL PULLOVER – ANIMAL MOTIF / SIZE: 18” 20” 22” 24”/ PRICE: 18/6 21/3 25/- 27/6 / COLOR: 18” PALE BLUE. LEMON. / 20” – 24” SKY BLUE. LEMON. REDCOAT. BOTANY BLUE. / SULTRY GREEN. NUTTY BROWN. NED KELLY GREEN. / .4) Obverse: [handwritten] 5/10 (unintelligible) Kathryn / ORLON KNITWEAR / Style : 44/OP / DESIGNED & MANUFACTURED BY / Robert Blake / MELBOURNE Reverse: STANDARD MEASUREMENTS / FIT EXACTLY / LAUNDER PERFECTLY / HOT WATER WILL DAMAGE / THIS GARMENT / WASHING INSTRUCTIONS / 1. Use lukewarm water and mild soap. / 2. Squeeze water out by hand – DO / NOT WRING. / 3. DO NOT ROLL. Hang on / Clothes hanger to dry. / To keep brushed garments like / new, brush frequently with / Nylon brush. / IRONING [m (handwritten)] ORLON garments require little / or no ironing if drip-dried. If / ironing is necessary, it may be done damp or dry, using / a warm iron. / DO NOT USE / STEAM IRON /knitwear, clothing, children's knitwear, children's clothing, manufacturing, fashion textile production, machine knitting, clothing set, dog motif, animal motif, colourwork -
 National Wool Museum
Textile - Children's Jumper, Kathryn Knitwear, c.1970
Kathryn Knitwear, founded by Robert Blake, manufactured high quality children’s knitwear in Melbourne from the 1940s – 1980s. Robert Blake began manufacturing children’s knitwear in his bedroom in Strathmore using a hand powered machine in the late 1940s. The operation moved to Ascot Vale and Essendon, before eventually establishing a factory in Moonee Ponds in the early 1950s. The business continued to expand, necessitating a move to a new factory in Broadmeadows. By 1962, the Broadmeadows factory was producing an average of 20,000 garments per month, which increased to 24,000 by 1964. Robert Blake’s Son, Brendan recalls that “The Kathryn brand was famous around Australia, anywhere children needed to keep warm and dress smartly. It also won a number of wool fashion awards”, including the 1969 Wool Awards, which was held by the Australian Wool Bureau and published in Women’s Weekly. The Kathryn range was designed for durability, comfort and care, without sacrificing style. They used patterning techniques that increase stretchiness, comfort and fit, as well as integrating decorative elements into the fabric to prevent them from being bulky, uncomfortable or tight. Making longevity of style a priority, Brendan Blake remembers that “there was one particular garment that was in the range for at least thirty years”. He also recalls “In the past, when women have found out that I was associated with Kathryn Knitwear, they would often relate to me the story of a garment they had purchased or received as a gift and, when their child had grown out of it, they would hand it on to another child. Several ladies have told me of purchasing garments for their daughters’ glory box, or saving a particular garment after their daughter had grown out of it. Brendan Blake: “At the peak of their operation they employed approximately two hundred people, mainly women and girls. A family would often seek to send their daughter to work in this company because they knew they would be looked after and safe. One lady wrote to me telling me that working at the Moonee Ponds Factory prior to getting married was the happiest time of her life.” In 1963, workers at the Kathryn factory earned £13 per week, which was 8 shillings and 8 pence higher than the minimum weekly wage for female workers in the textile manufacturing industry (£12 11s 4d). By 1970, the Kathryn Knitwear brand expanded from children’s knitwear into womenswear under the brand name ‘Lady Kathryn’, and for boys and men under ‘Robert Blake’. Continuing to diversify their distribution, they also began exporting ‘Kathryn’ garments to New Zealand, the Pacific Islands, and Japan. ‘Kathryn Knitwear’ was well-known for their early adoption of modern materials and techniques that had broad appeal to their customer base. This is shown in their early use of the acrylic fibre ‘Orlon’ in the 50s and 60s and ‘Superwash’ wool in the 1970s. Many of Kathryn Knitwear’s styles, particularly those that were long running staples of the brand, were available in both wool and Orlon to suit the consumer’s preference. Orlon was developed by DuPont in the 1940s and became the first commercially successful acrylic fibre in the 1950s and 1960s. The development of Orlon coincided with an increase in availability of washing machines in everyday Australian homes. The great appeal of Orlon was that while wool garments still had to be hand-washed, Orlon’s shrink-resistant nature made it machine washable and dryable. This was a very appealing prospect, especially for the seemingly unending task of cleaning active children’s clothing. Machine washable wool would not be available until the development of the ‘Superwash’ treatment by the Australian Wool Board and CSIRO in 1970. Far from the humble origins of one man in his bedroom with a hand-cranked machine; at its closure in 1980, the Broadmeadows factory of ‘Kathryn’ housed more than 100 machines, including 53 sewing machines and 45 knitting machines. Robert Blake was “a passionate advocate for wool and Australian Made” throughout his whole life. A strong thread that ties through the lifespan of Robert Blake and Kathryn Knitwear is a balance between adopting new innovations without sacrificing the core values of durability, comfort, care and style that had made the brand so well known. Their legacy forms an integral part of both Australian social and manufacturing history.Forest Green Childrens jumper with geometric ‘alpine’ pattern with long sleeves and ribbed cuffs and round neck collar. Textured geometric pattern is created with purl stitches and extends both on the front and back of the jumper, as well as down the sleeves.[white label at back neck printed with blue ink] KATHRYN REGD SIZE 1 / LENGTH 84cm / WEIGHT 12kg / Made in Australia ACRYLIC/WOOLchildren's knitwear, knitwear, clothing, children's clothing, jumper, manufacturing, fashion textile production, machine knitting -
 National Wool Museum
Textile - Children's Jumper, Kathryn Knitwear, c.1964-1970
Kathryn Knitwear, founded by Robert Blake, manufactured high quality children’s knitwear in Melbourne from the 1940s – 1980s. Robert Blake began manufacturing children’s knitwear in his bedroom in Strathmore using a hand powered machine in the late 1940s. The operation moved to Ascot Vale and Essendon, before eventually establishing a factory in Moonee Ponds in the early 1950s. The business continued to expand, necessitating a move to a new factory in Broadmeadows. By 1962, the Broadmeadows factory was producing an average of 20,000 garments per month, which increased to 24,000 by 1964. Robert Blake’s Son, Brendan recalls that “The Kathryn brand was famous around Australia, anywhere children needed to keep warm and dress smartly. It also won a number of wool fashion awards”, including the 1969 Wool Awards, which was held by the Australian Wool Bureau and published in Women’s Weekly. The Kathryn range was designed for durability, comfort and care, without sacrificing style. They used patterning techniques that increase stretchiness, comfort and fit, as well as integrating decorative elements into the fabric to prevent them from being bulky, uncomfortable or tight. Making longevity of style a priority, Brendan Blake remembers that “there was one particular garment that was in the range for at least thirty years”. He also recalls “In the past, when women have found out that I was associated with Kathryn Knitwear, they would often relate to me the story of a garment they had purchased or received as a gift and, when their child had grown out of it, they would hand it on to another child. Several ladies have told me of purchasing garments for their daughters’ glory box, or saving a particular garment after their daughter had grown out of it. Brendan Blake: “At the peak of their operation they employed approximately two hundred people, mainly women and girls. A family would often seek to send their daughter to work in this company because they knew they would be looked after and safe. One lady wrote to me telling me that working at the Moonee Ponds Factory prior to getting married was the happiest time of her life.” In 1963, workers at the Kathryn factory earned £13 per week, which was 8 shillings and 8 pence higher than the minimum weekly wage for female workers in the textile manufacturing industry (£12 11s 4d). By 1970, the Kathryn Knitwear brand expanded from children’s knitwear into womenswear under the brand name ‘Lady Kathryn’, and for boys and men under ‘Robert Blake’. Continuing to diversify their distribution, they also began exporting ‘Kathryn’ garments to New Zealand, the Pacific Islands, and Japan. ‘Kathryn Knitwear’ was well-known for their early adoption of modern materials and techniques that had broad appeal to their customer base. This is shown in their early use of the acrylic fibre ‘Orlon’ in the 50s and 60s and ‘Superwash’ wool in the 1970s. Many of Kathryn Knitwear’s styles, particularly those that were long running staples of the brand, were available in both wool and Orlon to suit the consumer’s preference. Far from the humble origins of one man in his bedroom with a hand-cranked machine; at its closure in 1980, the Broadmeadows factory of ‘Kathryn’ housed more than 100 machines, including 53 sewing machines and 45 knitting machines. Robert Blake was “a passionate advocate for wool and Australian Made” throughout his whole life. A strong thread that ties through the lifespan of Robert Blake and Kathryn Knitwear is a balance between adopting new innovations without sacrificing the core values of durability, comfort, care and style that had made the brand so well known. Their legacy forms an integral part of both Australian social and manufacturing history.White short-sleeved jumper with all-over pattern of aqua blue diamonds. Blue floated threads slightly show through white on main body, leading to an overall pale blue effect on body, with white collar and cuffs. Closes with three pearlescent plastic buttons at back neck. .2 is a retail tag marked with the style code, and includes generic information on care for garments of different material composition..1) [label stitched into back neck of garment] KATHRYN REGD CREATED BY ROBERT BLAKE .2) [retail tag, intended to be folded in three, printed on both sides] [OBVERSE] KATHRYN Children’s Knitwear STYLE: [blue pen] S/35B SIZE: PRICE: / KATHRYN Garments are… • PRE-SHRUNK • STANDARD MEASUREMENTS • FIT EXACTLY • LAUNDER PERFECTLY / NOW .. KATHRYN GOES TO . . SCHOOL Ask your retailer for SCHOOL PULLOVERS by KATHRYN [REVERSE] WASHING INSTRUCTIONS WOOL Wash frequently to AVOID HEAVY SOILING Wash garment BY HAND, in lukewarm Velvet Soap suds. ON NO ACCOUNT RUB SOAP ON GARMENT. Squeeze suds gently through garment but DO NOT RUB. Rubbing will cause garment to thicken. RINSE AT LEAST TWICE IN CLEAN WATER TO REMOVE ALL SOAP. TO dry, roll garment in a towel to remove excess moisture, turn garment inside out and pull it lengthwise, DRY IN SHADE… AVOID SUNLIGHT. When dry, place brown paper or pressing cloth over garment and press with iron at correct heat. ORLON Wash as wool Lay flat to dry but DO NOT IRON. To keep brushed suits like new, brush frequently with nylon brush supplied. COTTON Wash by hand for preference in Velvet Soap suds. Rinse thoroughly in cold water and remove all excess water before drying on line. Please do not use any harsh detergent or bleach. Designed and manufactured by ROBERT BLAKE Pty. Ltd., MELB. (handwritten in pencil) S35 (untintelligible)/5 / NOW KATHRYN GOES TO SCHOOL Ask your retailer for SCHOOL PULLOVERS by KATHRYNknitwear, children's knitwear, clothing, children's clothing, jumper, manufacturing, fashion textile production, machine knitting, colourwork -
 National Wool Museum
Textile - Children's Lace Jumper, Kathryn Knitwear, c.1970
Kathryn Knitwear, founded by Robert Blake, manufactured high quality children’s knitwear in Melbourne from the 1940s – 1980s. Robert Blake began manufacturing children’s knitwear in his bedroom in Strathmore using a hand powered machine in the late 1940s. The operation moved to Ascot Vale and Essendon, before eventually establishing a factory in Moonee Ponds in the early 1950s. The business continued to expand, necessitating a move to a new factory in Broadmeadows. By 1962, the Broadmeadows factory was producing an average of 20,000 garments per month, which increased to 24,000 by 1964. Robert Blake’s Son, Brendan recalls that “The Kathryn brand was famous around Australia, anywhere children needed to keep warm and dress smartly. It also won a number of wool fashion awards”, including the 1969 Wool Awards, which was held by the Australian Wool Bureau and published in Women’s Weekly. The Kathryn range was designed for durability, comfort and care, without sacrificing style. They used patterning techniques that increase stretchiness, comfort and fit, as well as integrating decorative elements into the fabric to prevent them from being bulky, uncomfortable or tight. Making longevity of style a priority, Brendan Blake remembers that “there was one particular garment that was in the range for at least thirty years”. He also recalls “In the past, when women have found out that I was associated with Kathryn Knitwear, they would often relate to me the story of a garment they had purchased or received as a gift and, when their child had grown out of it, they would hand it on to another child. Several ladies have told me of purchasing garments for their daughters’ glory box, or saving a particular garment after their daughter had grown out of it. Brendan Blake: “At the peak of their operation they employed approximately two hundred people, mainly women and girls. A family would often seek to send their daughter to work in this company because they knew they would be looked after and safe. One lady wrote to me telling me that working at the Moonee Ponds Factory prior to getting married was the happiest time of her life.” In 1963, workers at the Kathryn factory earned £13 per week, which was 8 shillings and 8 pence higher than the minimum weekly wage for female workers in the textile manufacturing industry (£12 11s 4d). By 1970, the Kathryn Knitwear brand expanded from children’s knitwear into womenswear under the brand name ‘Lady Kathryn’, and for boys and men under ‘Robert Blake’. Continuing to diversify their distribution, they also began exporting ‘Kathryn’ garments to New Zealand, the Pacific Islands, and Japan. ‘Kathryn Knitwear’ was well-known for their early adoption of modern materials and techniques that had broad appeal to their customer base. This is shown in their early use of the acrylic fibre ‘Orlon’ in the 50s and 60s and ‘Superwash’ wool in the 1970s. Many of Kathryn Knitwear’s styles, particularly those that were long running staples of the brand, were available in both wool and Orlon to suit the consumer’s preference. Orlon was developed by DuPont in the 1940s and became the first commercially successful acrylic fibre in the 1950s and 1960s. The development of Orlon coincided with an increase in availability of washing machines in everyday Australian homes. The great appeal of Orlon was that while wool garments still had to be hand-washed, Orlon’s shrink-resistant nature made it machine washable and dryable. This was a very appealing prospect, especially for the seemingly unending task of cleaning active children’s clothing. Machine washable wool would not be available until the development of the ‘Superwash’ treatment by the Australian Wool Board and CSIRO in 1970. Far from the humble origins of one man in his bedroom with a hand-cranked machine; at its closure in 1980, the Broadmeadows factory of ‘Kathryn’ housed more than 100 machines, including 53 sewing machines and 45 knitting machines. Robert Blake was “a passionate advocate for wool and Australian Made” throughout his whole life. A strong thread that ties through the lifespan of Robert Blake and Kathryn Knitwear is a balance between adopting new innovations without sacrificing the core values of durability, comfort, care and style that had made the brand so well known. Their legacy forms an integral part of both Australian social and manufacturing history.Cream short sleeved jumper with overall open lace design, front yoke with accent lacework and applied lace ruffle edging .2 is a retail tag with style code and size, reverse has washing instructions for acrylic and cotton.1) [white tag back neck, printed blue letters] KATHRYN REGD POLYESTER/VISCOSE MADE IN AUSTRALIA .2 [retail swing tag, numbers handwritten in blue ink] KATHRYN Children’s Knitwear STYLE [handwritten] 363 PRICE SIZE [handwritten] 6children's knitwear, children's clothing, knitwear, clothing, manufacturing, fashion textile production, machine knitting, machine lace -
 National Wool Museum
Textile - Diaper Set, Kathryn Knitwear, c.1960
Kathryn Knitwear, founded by Robert Blake, manufactured high quality children’s knitwear in Melbourne from the 1940s – 1980s. Robert Blake began manufacturing children’s knitwear in his bedroom in Strathmore using a hand powered machine in the late 1940s. The operation moved to Ascot Vale and Essendon, before eventually establishing a factory in Moonee Ponds in the early 1950s. The business continued to expand, necessitating a move to a new factory in Broadmeadows. By 1962, the Broadmeadows factory was producing an average of 20,000 garments per month, which increased to 24,000 by 1964. Robert Blake’s Son, Brendan recalls that “The Kathryn brand was famous around Australia, anywhere children needed to keep warm and dress smartly. It also won a number of wool fashion awards”, including the 1969 Wool Awards, which was held by the Australian Wool Bureau and published in Women’s Weekly. The Kathryn range was designed for durability, comfort and care, without sacrificing style. They used patterning techniques that increase stretchiness, comfort and fit, as well as integrating decorative elements into the fabric to prevent them from being bulky, uncomfortable or tight. Making longevity of style a priority, Brendan Blake remembers that “there was one particular garment that was in the range for at least thirty years”. He also recalls “In the past, when women have found out that I was associated with Kathryn Knitwear, they would often relate to me the story of a garment they had purchased or received as a gift and, when their child had grown out of it, they would hand it on to another child. Several ladies have told me of purchasing garments for their daughters’ glory box, or saving a particular garment after their daughter had grown out of it. Brendan Blake: “At the peak of their operation they employed approximately two hundred people, mainly women and girls. A family would often seek to send their daughter to work in this company because they knew they would be looked after and safe. One lady wrote to me telling me that working at the Moonee Ponds Factory prior to getting married was the happiest time of her life.” In 1963, workers at the Kathryn factory earned £13 per week, which was 8 shillings and 8 pence higher than the minimum weekly wage for female workers in the textile manufacturing industry (£12 11s 4d). By 1970, the Kathryn Knitwear brand expanded from children’s knitwear into womenswear under the brand name ‘Lady Kathryn’, and for boys and men under ‘Robert Blake’. Continuing to diversify their distribution, they also began exporting ‘Kathryn’ garments to New Zealand, the Pacific Islands, and Japan. ‘Kathryn Knitwear’ was well-known for their early adoption of modern materials and techniques that had broad appeal to their customer base. This is shown in their early use of the acrylic fibre ‘Orlon’ in the 50s and 60s and ‘Superwash’ wool in the 1970s. Many of Kathryn Knitwear’s styles, particularly those that were long running staples of the brand, were available in both wool and Orlon to suit the consumer’s preference. Cotton is a common material for knitwear worn in the warmer months, as it is very breathable and absorbs moisture easily. While we mostly associate knitwear with keeping us warm in the cold, the market for Australian knitwear would be very limited without options to wear all year round. The decoration on this garment was embroidered by hand by a skilled worker at the Kathryn Knitwear factory. Far from the humble origins of one man in his bedroom with a hand-cranked machine; at its closure in 1980, the Broadmeadows factory of ‘Kathryn’ housed more than 100 machines, including 53 sewing machines and 45 knitting machines. Robert Blake was “a passionate advocate for wool and Australian Made” throughout his whole life. A strong thread that ties through the lifespan of Robert Blake and Kathryn Knitwear is a balance between adopting new innovations without sacrificing the core values of durability, comfort, care and style that had made the brand so well known. Their legacy forms an integral part of both Australian social and manufacturing history.White diaper set. Short sleeved white top with two inverted box pleats along whole length, stitched at shoulder and mid chest. Embroidered in half cross stitch with two blue dogs on front. Closes in centre back with three plastic pearlescent buttons. White baby diaper shorts with ribbing at waist and leg holes .3 is a sample tag with manufacturing information, including price, size and colours available .4 is a swing tag with manufacturer care instructions.1 [label at back neck of top] Kathryn Reg’d / All Cotton / 18 .3 [sample label] [Obverse] STYLE: 314. Diaper Sat [sic] – Emb top. Combed Cotton. SIZE: 18” PRICE: 26/- COLOR: BLUE. LEMON. WHITE. [reverse] KATHRYN Garments are •PRE-SHRUNK •STANDARD MEASUREMENTS •FIT EXACTLY •LAUNDER PERFECTLY Designed and Manufactured by ROBERT BLAKE, MELBOURNE .4 [retail label] [obverse] Kathryn PRE-SHRUNK KNITWEAR Style: 314 [handwritten] DESIGNED & MANUFACTURED BY Robert Blake MELBOURNE [reverse] IMPORTANT. Special care should be taken with white and pastel shades. Rinse thoroughly. Do NOT dry in sunlight. WASHING INSTRUCTIONS 1.Wash frequently to AVOID HEAVY SOILING 2.Wash garment BY HAND, in lukewarm Velvet Soap suds. ON NO ACCOUNT RUB SOAP ON GARMENT. 3.Squeeze suds gently through garment but DO NOT RUB. Rubbing will cause garment to thicken. 4.RINSE AT LEAST TWICE IN CLEAN WATER TO REMOVE ALL SOAP. 5.To dry, roll garment in a towel to remove excess moisture, turn garment inside out and pull it lengthwise, then safety-pin to line through shoulder tape. 6.To keep Brushed Wool garments like new brush frequently with nylon brush.children's knitwear, children's clothing, knitwear, clothing, manufacturing, fashion textile production, embroidery, embroiderer, hand embroidery, dog embroidery, animal embroidery, animal motif, dog motif, dog, animal, baby clothes, baby knitwear, baby clothing -
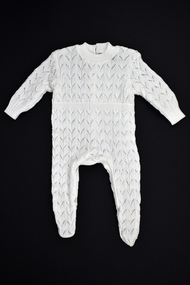 National Wool Museum
Textile - Baby Romper Suit, Kathryn Knitwear, c.1970
Kathryn Knitwear, founded by Robert Blake, manufactured high quality children’s knitwear in Melbourne from the 1940s – 1980s. Robert Blake began manufacturing children’s knitwear in his bedroom in Strathmore using a hand powered machine in the late 1940s. The operation moved to Ascot Vale and Essendon, before eventually establishing a factory in Moonee Ponds in the early 1950s. The business continued to expand, necessitating a move to a new factory in Broadmeadows. By 1962, the Broadmeadows factory was producing an average of 20,000 garments per month, which increased to 24,000 by 1964. Robert Blake’s Son, Brendan recalls that “The Kathryn brand was famous around Australia, anywhere children needed to keep warm and dress smartly. It also won a number of wool fashion awards”, including the 1969 Wool Awards, which was held by the Australian Wool Bureau and published in Women’s Weekly. The Kathryn range was designed for durability, comfort and care, without sacrificing style. They used patterning techniques that increase stretchiness, comfort and fit, as well as integrating decorative elements into the fabric to prevent them from being bulky, uncomfortable or tight. Making longevity of style a priority, Brendan Blake remembers that “there was one particular garment that was in the range for at least thirty years”. He also recalls “In the past, when women have found out that I was associated with Kathryn Knitwear, they would often relate to me the story of a garment they had purchased or received as a gift and, when their child had grown out of it, they would hand it on to another child. Several ladies have told me of purchasing garments for their daughters’ glory box, or saving a particular garment after their daughter had grown out of it. Brendan Blake: “At the peak of their operation they employed approximately two hundred people, mainly women and girls. A family would often seek to send their daughter to work in this company because they knew they would be looked after and safe. One lady wrote to me telling me that working at the Moonee Ponds Factory prior to getting married was the happiest time of her life.” In 1963, workers at the Kathryn factory earned £13 per week, which was 8 shillings and 8 pence higher than the minimum weekly wage for female workers in the textile manufacturing industry (£12 11s 4d). By 1970, the Kathryn Knitwear brand expanded from children’s knitwear into womenswear under the brand name ‘Lady Kathryn’, and for boys and men under ‘Robert Blake’. Continuing to diversify their distribution, they also began exporting ‘Kathryn’ garments to New Zealand, the Pacific Islands, and Japan. ‘Kathryn Knitwear’ was well-known for their early adoption of modern materials and techniques that had broad appeal to their customer base. This is shown in their early use of the acrylic fibre ‘Orlon’ in the 50s and 60s and ‘Superwash’ wool in the 1970s. Many of Kathryn Knitwear’s styles, particularly those that were long running staples of the brand, were available in both wool and Orlon to suit the consumer’s preference. Orlon was developed by DuPont in the 1940s and became the first commercially successful acrylic fibre in the 1950s and 1960s. The development of Orlon coincided with an increase in availability of washing machines in everyday Australian homes. The great appeal of Orlon was that while wool garments still had to be hand-washed, Orlon’s shrink-resistant nature made it machine washable and dryable. This was a very appealing prospect, especially for the seemingly unending task of cleaning active children’s clothing. Machine washable wool would not be available until the development of the ‘Superwash’ treatment by the Australian Wool Board and CSIRO in 1970. Far from the humble origins of one man in his bedroom with a hand-cranked machine; at its closure in 1980, the Broadmeadows factory of ‘Kathryn’ housed more than 100 machines, including 53 sewing machines and 45 knitting machines. Robert Blake was “a passionate advocate for wool and Australian Made” throughout his whole life. A strong thread that ties through the lifespan of Robert Blake and Kathryn Knitwear is a balance between adopting new innovations without sacrificing the core values of durability, comfort, care and style that had made the brand so well known. Their legacy forms an integral part of both Australian social and manufacturing history.White lacework baby romper suit with long sleeves and legs, and enclosed feet. Closes at centre back with two plastic buttons. Zips open around leg inseam. Size 00 .2 is a retail tag marked with the price and size, and refers to the label sewn into the garment for washing instructions..2 [Retail Swing Tag] [Obverse] KATHRYN Children’s Knitwear STYLE PRICE [handwritten] $18 SIZE [handwritten] 00 [Reverse] WASHING INSTRUCTIONS Refer to label sewn in Garment Designed and manufactured by ROBERT BLAKE PTY. LTD., Melb., Aust.children's knitwear, children's clothing, baby clothing, baby knitwear, clothing, knitwear, romper, jumpsuit, manufacturing, fashion textile production, machine knitting, machine lace, baby clothes -
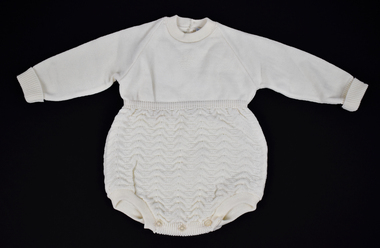 National Wool Museum
Textile - Baby Romper Suit, Kathryn Knitwear, c.1960
Kathryn Knitwear, founded by Robert Blake, manufactured high quality children’s knitwear in Melbourne from the 1940s – 1980s. Robert Blake began manufacturing children’s knitwear in his bedroom in Strathmore using a hand powered machine in the late 1940s. The operation moved to Ascot Vale and Essendon, before eventually establishing a factory in Moonee Ponds in the early 1950s. The business continued to expand, necessitating a move to a new factory in Broadmeadows. By 1962, the Broadmeadows factory was producing an average of 20,000 garments per month, which increased to 24,000 by 1964. Robert Blake’s Son, Brendan recalls that “The Kathryn brand was famous around Australia, anywhere children needed to keep warm and dress smartly. It also won a number of wool fashion awards”, including the 1969 Wool Awards, which was held by the Australian Wool Bureau and published in Women’s Weekly. The Kathryn range was designed for durability, comfort and care, without sacrificing style. They used patterning techniques that increase stretchiness, comfort and fit, as well as integrating decorative elements into the fabric to prevent them from being bulky, uncomfortable or tight. Making longevity of style a priority, Brendan Blake remembers that “there was one particular garment that was in the range for at least thirty years”. He also recalls “In the past, when women have found out that I was associated with Kathryn Knitwear, they would often relate to me the story of a garment they had purchased or received as a gift and, when their child had grown out of it, they would hand it on to another child. Several ladies have told me of purchasing garments for their daughters’ glory box, or saving a particular garment after their daughter had grown out of it. Brendan Blake: “At the peak of their operation they employed approximately two hundred people, mainly women and girls. A family would often seek to send their daughter to work in this company because they knew they would be looked after and safe. One lady wrote to me telling me that working at the Moonee Ponds Factory prior to getting married was the happiest time of her life.” In 1963, workers at the Kathryn factory earned £13 per week, which was 8 shillings and 8 pence higher than the minimum weekly wage for female workers in the textile manufacturing industry (£12 11s 4d). By 1970, the Kathryn Knitwear brand expanded from children’s knitwear into womenswear under the brand name ‘Lady Kathryn’, and for boys and men under ‘Robert Blake’. Continuing to diversify their distribution, they also began exporting ‘Kathryn’ garments to New Zealand, the Pacific Islands, and Japan. ‘Kathryn Knitwear’ was well-known for their early adoption of modern materials and techniques that had broad appeal to their customer base. This is shown in their early use of the acrylic fibre ‘Orlon’ in the 50s and 60s and ‘Superwash’ wool in the 1970s. Many of Kathryn Knitwear’s styles, particularly those that were long running staples of the brand, were available in both wool and Orlon to suit the consumer’s preference. Orlon was developed by DuPont in the 1940s and became the first commercially successful acrylic fibre in the 1950s and 1960s. The development of Orlon coincided with an increase in availability of washing machines in everyday Australian homes. The great appeal of Orlon was that while wool garments still had to be hand-washed, Orlon’s shrink-resistant nature made it machine washable and dryable. This was a very appealing prospect, especially for the seemingly unending task of cleaning active children’s clothing. Machine washable wool would not be available until the development of the ‘Superwash’ treatment by the Australian Wool Board and CSIRO in 1970. Far from the humble origins of one man in his bedroom with a hand-cranked machine; at its closure in 1980, the Broadmeadows factory of ‘Kathryn’ housed more than 100 machines, including 53 sewing machines and 45 knitting machines. Robert Blake was “a passionate advocate for wool and Australian Made” throughout his whole life. A strong thread that ties through the lifespan of Robert Blake and Kathryn Knitwear is a balance between adopting new innovations without sacrificing the core values of durability, comfort, care and style that had made the brand so well known. Their legacy forms an integral part of both Australian social and manufacturing history.Long sleeved cream baby romper suit with patterned stitch on bottom half and diamond emblem on chest. Closes with two pearlescent plastic buttons at centre back and with three pearlescent plastic buttons at crotch.Kathryn Reg’d / 100% orlon / 20 [handwritten]children's clothing, children's knitwear, clothing, knitwear, romper, jumpsuit, baby clothing, baby clothes, manufacturing, fashion textile production, machine knitting -
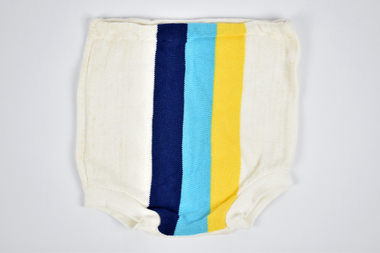 National Wool Museum
Textile - Baby Swimwear, Kathryn Knitwear, c.1960
Kathryn Knitwear, founded by Robert Blake, manufactured high quality children’s knitwear in Melbourne from the 1940s – 1980s. Robert Blake began manufacturing children’s knitwear in his bedroom in Strathmore using a hand powered machine in the late 1940s. The operation moved to Ascot Vale and Essendon, before eventually establishing a factory in Moonee Ponds in the early 1950s. The business continued to expand, necessitating a move to a new factory in Broadmeadows. By 1962, the Broadmeadows factory was producing an average of 20,000 garments per month, which increased to 24,000 by 1964. Robert Blake’s Son, Brendan recalls that “The Kathryn brand was famous around Australia, anywhere children needed to keep warm and dress smartly. It also won a number of wool fashion awards”, including the 1969 Wool Awards, which was held by the Australian Wool Bureau and published in Women’s Weekly. The Kathryn range was designed for durability, comfort and care, without sacrificing style. They used patterning techniques that increase stretchiness, comfort and fit, as well as integrating decorative elements into the fabric to prevent them from being bulky, uncomfortable or tight. Making longevity of style a priority, Brendan Blake remembers that “there was one particular garment that was in the range for at least thirty years”. He also recalls “In the past, when women have found out that I was associated with Kathryn Knitwear, they would often relate to me the story of a garment they had purchased or received as a gift and, when their child had grown out of it, they would hand it on to another child. Several ladies have told me of purchasing garments for their daughters’ glory box, or saving a particular garment after their daughter had grown out of it. Brendan Blake: “At the peak of their operation they employed approximately two hundred people, mainly women and girls. A family would often seek to send their daughter to work in this company because they knew they would be looked after and safe. One lady wrote to me telling me that working at the Moonee Ponds Factory prior to getting married was the happiest time of her life.” In 1963, workers at the Kathryn factory earned £13 per week, which was 8 shillings and 8 pence higher than the minimum weekly wage for female workers in the textile manufacturing industry (£12 11s 4d). By 1970, the Kathryn Knitwear brand expanded from children’s knitwear into womenswear under the brand name ‘Lady Kathryn’, and for boys and men under ‘Robert Blake’. Continuing to diversify their distribution, they also began exporting ‘Kathryn’ garments to New Zealand, the Pacific Islands, and Japan. ‘Kathryn Knitwear’ was well-known for their early adoption of modern materials and techniques that had broad appeal to their customer base. This is shown in their early use of the acrylic fibre ‘Orlon’ in the 50s and 60s and ‘Superwash’ wool in the 1970s. Many of Kathryn Knitwear’s styles, particularly those that were long running staples of the brand, were available in both wool and Orlon to suit the consumer’s preference. Orlon was developed by DuPont in the 1940s and became the first commercially successful acrylic fibre in the 1950s and 1960s. The development of Orlon coincided with an increase in availability of washing machines in everyday Australian homes. The great appeal of Orlon was that while wool garments still had to be hand-washed, Orlon’s shrink-resistant nature made it machine washable and dryable. This was a very appealing prospect, especially for the seemingly unending task of cleaning active children’s clothing. Machine washable wool would not be available until the development of the ‘Superwash’ treatment by the Australian Wool Board and CSIRO in 1970. Far from the humble origins of one man in his bedroom with a hand-cranked machine; at its closure in 1980, the Broadmeadows factory of ‘Kathryn’ housed more than 100 machines, including 53 sewing machines and 45 knitting machines. Robert Blake was “a passionate advocate for wool and Australian Made” throughout his whole life. A strong thread that ties through the lifespan of Robert Blake and Kathryn Knitwear is a balance between adopting new innovations without sacrificing the core values of durability, comfort, care and style that had made the brand so well known. Their legacy forms an integral part of both Australian social and manufacturing history.White baby’s swimming shorts with stripes on front in navy, cyan and yellowchildren's knitwear, children's clothing, knitwear, clothing, manufacturing, fashion textile production, machine knitting, colourwork, swimwear, baby swimwear -
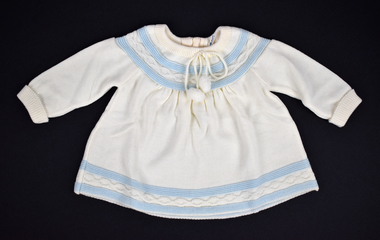 National Wool Museum
Textile - Children's Dress, Kathryn Knitwear, c.1960
Kathryn Knitwear, founded by Robert Blake, manufactured high quality children’s knitwear in Melbourne from the 1940s – 1980s. Robert Blake began manufacturing children’s knitwear in his bedroom in Strathmore using a hand powered machine in the late 1940s. The operation moved to Ascot Vale and Essendon, before eventually establishing a factory in Moonee Ponds in the early 1950s. The business continued to expand, necessitating a move to a new factory in Broadmeadows. By 1962, the Broadmeadows factory was producing an average of 20,000 garments per month, which increased to 24,000 by 1964. Robert Blake’s Son, Brendan recalls that “The Kathryn brand was famous around Australia, anywhere children needed to keep warm and dress smartly. It also won a number of wool fashion awards”, including the 1969 Wool Awards, which was held by the Australian Wool Bureau and published in Women’s Weekly. The Kathryn range was designed for durability, comfort and care, without sacrificing style. They used patterning techniques that increase stretchiness, comfort and fit, as well as integrating decorative elements into the fabric to prevent them from being bulky, uncomfortable or tight. Making longevity of style a priority, Brendan Blake remembers that “there was one particular garment that was in the range for at least thirty years”. He also recalls “In the past, when women have found out that I was associated with Kathryn Knitwear, they would often relate to me the story of a garment they had purchased or received as a gift and, when their child had grown out of it, they would hand it on to another child. Several ladies have told me of purchasing garments for their daughters’ glory box, or saving a particular garment after their daughter had grown out of it. Brendan Blake: “At the peak of their operation they employed approximately two hundred people, mainly women and girls. A family would often seek to send their daughter to work in this company because they knew they would be looked after and safe. One lady wrote to me telling me that working at the Moonee Ponds Factory prior to getting married was the happiest time of her life.” In 1963, workers at the Kathryn factory earned £13 per week, which was 8 shillings and 8 pence higher than the minimum weekly wage for female workers in the textile manufacturing industry (£12 11s 4d). By 1970, the Kathryn Knitwear brand expanded from children’s knitwear into womenswear under the brand name ‘Lady Kathryn’, and for boys and men under ‘Robert Blake’. Continuing to diversify their distribution, they also began exporting ‘Kathryn’ garments to New Zealand, the Pacific Islands, and Japan. ‘Kathryn Knitwear’ was well-known for their early adoption of modern materials and techniques that had broad appeal to their customer base. This is shown in their early use of the acrylic fibre ‘Orlon’ in the 50s and 60s and ‘Superwash’ wool in the 1970s. Many of Kathryn Knitwear’s styles, particularly those that were long running staples of the brand, were available in both wool and Orlon to suit the consumer’s preference. Orlon was developed by DuPont in the 1940s and became the first commercially successful acrylic fibre in the 1950s and 1960s. The development of Orlon coincided with an increase in availability of washing machines in everyday Australian homes. The great appeal of Orlon was that while wool garments still had to be hand-washed, Orlon’s shrink-resistant nature made it machine washable and dryable. This was a very appealing prospect, especially for the seemingly unending task of cleaning active children’s clothing. Machine washable wool would not be available until the development of the ‘Superwash’ treatment by the Australian Wool Board and CSIRO in 1970. Far from the humble origins of one man in his bedroom with a hand-cranked machine; at its closure in 1980, the Broadmeadows factory of ‘Kathryn’ housed more than 100 machines, including 53 sewing machines and 45 knitting machines. Robert Blake was “a passionate advocate for wool and Australian Made” throughout his whole life. A strong thread that ties through the lifespan of Robert Blake and Kathryn Knitwear is a balance between adopting new innovations without sacrificing the core values of durability, comfort, care and style that had made the brand so well known. Their legacy forms an integral part of both Australian social and manufacturing history.Cream baby dress with long sleeves, blue stripe and cream faux cable textured details at yoke and hem. Body is gathered and attaches at yoke. Dress has a drawstring tie at neck accented with cream pompoms and closes at centre back with three pearlescent plastic buttons. Back opening is reinforced with grosgrain ribbon. .2 is a sample tag with manufacturing information, including sizes and colours available .3 is a retail tag with style, care instructions and brand marketing[label stitched into back neck] KATHRYN 100% Orlon .2 [sample label] [Obverse] 802/F – BABIES ORLON FROCK. 16” – LENGTH 24/6 BLUE/WHT LEMON/WHT PINK/WHT WHT/BLUE WHT/LEMON WHT/PINK .3 [Obverse] KATHRYN Children’s Knitwear STYLE [handwritten] 802/F SIZE PRICE [reverse] KATHRYN Garments are •PRE-SHRUNK •STANDARD MEASUREMENTS •FIT EXACTLY •LAUNDER PERFECTLYclothing, children's clothing, knitwear, children's knitwear, manufacturing, fashion textile production, colourwork, pom-pom, pom poms -
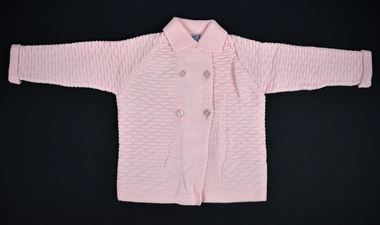 National Wool Museum
Textile - Children's Clothing Set, Kathryn Knitwear, c.1962-1964
Kathryn Knitwear, founded by Robert Blake, manufactured high quality children’s knitwear in Melbourne from the 1940s – 1980s. Robert Blake began manufacturing children’s knitwear in his bedroom in Strathmore using a hand powered machine in the late 1940s. The operation moved to Ascot Vale and Essendon, before eventually establishing a factory in Moonee Ponds in the early 1950s. The business continued to expand, necessitating a move to a new factory in Broadmeadows. By 1962, the Broadmeadows factory was producing an average of 20,000 garments per month, which increased to 24,000 by 1964. Robert Blake’s Son, Brendan recalls that “The Kathryn brand was famous around Australia, anywhere children needed to keep warm and dress smartly. It also won a number of wool fashion awards”, including the 1969 Wool Awards, which was held by the Australian Wool Bureau and published in Women’s Weekly. The Kathryn range was designed for durability, comfort and care, without sacrificing style. They used patterning techniques that increase stretchiness, comfort and fit, as well as integrating decorative elements into the fabric to prevent them from being bulky, uncomfortable or tight. Making longevity of style a priority, Brendan Blake remembers that “there was one particular garment that was in the range for at least thirty years”. He also recalls “In the past, when women have found out that I was associated with Kathryn Knitwear, they would often relate to me the story of a garment they had purchased or received as a gift and, when their child had grown out of it, they would hand it on to another child. Several ladies have told me of purchasing garments for their daughters’ glory box, or saving a particular garment after their daughter had grown out of it. Brendan Blake: “At the peak of their operation they employed approximately two hundred people, mainly women and girls. A family would often seek to send their daughter to work in this company because they knew they would be looked after and safe. One lady wrote to me telling me that working at the Moonee Ponds Factory prior to getting married was the happiest time of her life.” In 1963, workers at the Kathryn factory earned £13 per week, which was 8 shillings and 8 pence higher than the minimum weekly wage for female workers in the textile manufacturing industry (£12 11s 4d). By 1970, the Kathryn Knitwear brand expanded from children’s knitwear into womenswear under the brand name ‘Lady Kathryn’, and for boys and men under ‘Robert Blake’. Continuing to diversify their distribution, they also began exporting ‘Kathryn’ garments to New Zealand, the Pacific Islands, and Japan. ‘Kathryn Knitwear’ was well-known for their early adoption of modern materials and techniques that had broad appeal to their customer base. This is shown in their early use of the acrylic fibre ‘Orlon’ in the 50s and 60s and ‘Superwash’ wool in the 1970s. Many of Kathryn Knitwear’s styles, particularly those that were long running staples of the brand, were available in both wool and Orlon to suit the consumer’s preference. Orlon was developed by DuPont in the 1940s and became the first commercially successful acrylic fibre in the 1950s and 1960s. The development of Orlon coincided with an increase in availability of washing machines in everyday Australian homes. The great appeal of Orlon was that while wool garments still had to be hand-washed, Orlon’s shrink-resistant nature made it machine washable and dryable. This was a very appealing prospect, especially for the seemingly unending task of cleaning active children’s clothing. Machine washable wool would not be available until the development of the ‘Superwash’ treatment by the Australian Wool Board and CSIRO in 1970. Far from the humble origins of one man in his bedroom with a hand-cranked machine; at its closure in 1980, the Broadmeadows factory of ‘Kathryn’ housed more than 100 machines, including 53 sewing machines and 45 knitting machines. Robert Blake was “a passionate advocate for wool and Australian Made” throughout his whole life. A strong thread that ties through the lifespan of Robert Blake and Kathryn Knitwear is a balance between adopting new innovations without sacrificing the core values of durability, comfort, care and style that had made the brand so well known. Their legacy forms an integral part of both Australian social and manufacturing history.Pink three piece legging suit, consisting of cardigan, lettings and beanie. Cardigan is knitted with textured stitch and has stocking stitch panel bordered with garter stitch at centre front. Two rows of buttons on garter stitch tab, with a fifth button under left collar. Leggings are plain garter stitch with an elastic waistband and a flap that extends onto the top of the foot with elastic to keep it held under the sole. Hat is in same patterned stitch as cardigan, has ear flaps with ties and a white pompom.1) [Label at back neck with blue lettering woven into label] KATHRYN REGD ORLON / 20 /CREATED BY ROBERT BLAKE [sample label] [OBVERSE] STYLE LS/PWO – 3 PCS – LEGGING SUIT – PEARL PATT. – 80% ORLON 20% WOOL SIZE 18” 20” PRICE 48/6 51/6 COLOR BLUE. LEMON. PINK. WHITE. [REVERSE] KATHRYN Garments are • PRE-SHRUNK • STANDARD MEASUREMENTS • FIT EXACTLY • LAUNDER PERFECTLY Designed and Manufactured by ROBERT BLAKE, MELBOURNEknitwear, clothing, children's knitwear, children's clothing, manufacturing, fashion textile production, machine knitting, clothing set, pom poms -
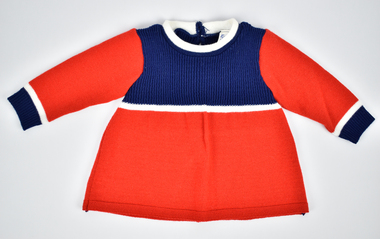 National Wool Museum
Textile - Children's Clothing Set, Kathryn Knitwear, c.1970
Kathryn Knitwear, founded by Robert Blake, manufactured high quality children’s knitwear in Melbourne from the 1940s – 1980s. Robert Blake began manufacturing children’s knitwear in his bedroom in Strathmore using a hand powered machine in the late 1940s. The operation moved to Ascot Vale and Essendon, before eventually establishing a factory in Moonee Ponds in the early 1950s. The business continued to expand, necessitating a move to a new factory in Broadmeadows. By 1962, the Broadmeadows factory was producing an average of 20,000 garments per month, which increased to 24,000 by 1964. Robert Blake’s Son, Brendan recalls that “The Kathryn brand was famous around Australia, anywhere children needed to keep warm and dress smartly. It also won a number of wool fashion awards”, including the 1969 Wool Awards, which was held by the Australian Wool Bureau and published in Women’s Weekly. The Kathryn range was designed for durability, comfort and care, without sacrificing style. They used patterning techniques that increase stretchiness, comfort and fit, as well as integrating decorative elements into the fabric to prevent them from being bulky, uncomfortable or tight. Making longevity of style a priority, Brendan Blake remembers that “there was one particular garment that was in the range for at least thirty years”. He also recalls “In the past, when women have found out that I was associated with Kathryn Knitwear, they would often relate to me the story of a garment they had purchased or received as a gift and, when their child had grown out of it, they would hand it on to another child. Several ladies have told me of purchasing garments for their daughters’ glory box, or saving a particular garment after their daughter had grown out of it. Brendan Blake: “At the peak of their operation they employed approximately two hundred people, mainly women and girls. A family would often seek to send their daughter to work in this company because they knew they would be looked after and safe. One lady wrote to me telling me that working at the Moonee Ponds Factory prior to getting married was the happiest time of her life.” In 1963, workers at the Kathryn factory earned £13 per week, which was 8 shillings and 8 pence higher than the minimum weekly wage for female workers in the textile manufacturing industry (£12 11s 4d). By 1970, the Kathryn Knitwear brand expanded from children’s knitwear into womenswear under the brand name ‘Lady Kathryn’, and for boys and men under ‘Robert Blake’. Continuing to diversify their distribution, they also began exporting ‘Kathryn’ garments to New Zealand, the Pacific Islands, and Japan. ‘Kathryn Knitwear’ was well-known for their early adoption of modern materials and techniques that had broad appeal to their customer base. This is shown in their early use of the acrylic fibre ‘Orlon’ in the 50s and 60s and ‘Superwash’ wool in the 1970s. Many of Kathryn Knitwear’s styles, particularly those that were long running staples of the brand, were available in both wool and Orlon to suit the consumer’s preference. Orlon was developed by DuPont in the 1940s and became the first commercially successful acrylic fibre in the 1950s and 1960s. The development of Orlon coincided with an increase in availability of washing machines in everyday Australian homes. The great appeal of Orlon was that while wool garments still had to be hand-washed, Orlon’s shrink-resistant nature made it machine washable and dryable. This was a very appealing prospect, especially for the seemingly unending task of cleaning active children’s clothing. Machine washable wool would not be available until the development of the ‘Superwash’ treatment by the Australian Wool Board and CSIRO in 1970. Far from the humble origins of one man in his bedroom with a hand-cranked machine; at its closure in 1980, the Broadmeadows factory of ‘Kathryn’ housed more than 100 machines, including 53 sewing machines and 45 knitting machines. Robert Blake was “a passionate advocate for wool and Australian Made” throughout his whole life. A strong thread that ties through the lifespan of Robert Blake and Kathryn Knitwear is a balance between adopting new innovations without sacrificing the core values of durability, comfort, care and style that had made the brand so well known. Their legacy forms an integral part of both Australian social and manufacturing history.Children’s two-piece outfit set, consisting of a top and leggings. Knitted in colour blocks of navy, red and white. Top has ribbed navy bodice section with white stripe separating red skirt and closes at back neck with two navy plastic buttons. Leggings are primarily red, with a white stripe at the ankle and navy-blue feet. Leggings are constructed primarily as one piece and seamed up at centre back and inseam, with additional gusset piece..1) [tag stitched into back neck of top] KATHRYN REGD 100% ACRYLIC FIBRE SIZE 0 WEIGHT 10 LENGTH 76 MADE IN AUSTRALIA .3) [blue sample label] STYLE 574/ Pop Top and B’tts S.26. Acrylic. SIZES: 00 0 PRICE: $8.95 COLORS: Navy/Wht/Red Red/Wht/Navy P.Blue/Wht/Navy Dec on Del.knitwear, clothing, children's knitwear, children's clothing, manufacturing, fashion textile production, machine knitting, clothing set