Showing 171 items
matching long gully road
-
 Bendigo Historical Society Inc.
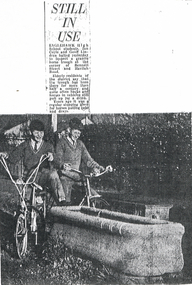
Newspaper - LONG GULLY HISTORY GROUP COLLECTION: GRANITE HORSE TROUGH
Copy of a newspaper article titled Still in Use mentions a granite horse trough at the corner of Bennett Street and Havilah Road. Accompanying photo shows two Eaglehawk High School students, Ian Coyle and Geoff Lindrea inspecting the trough.bendigo, history, long gully history group, the long gully history group - granite horse trough, eaglehawk high school, ian coyle, geoff lindrea -
 Bendigo Historical Society Inc.
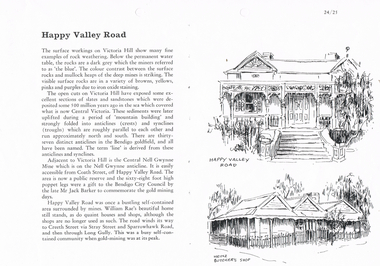
Document - LONG GULLY HISTORY GROUP COLLECTION: HAPPY VALLEY ROAD
Titled Happy Valley Road. Describes surface workings on Victoria Hill and the different colours of the rocks, the formation of the anticlines and the synclines which are roughly parallel and run approximately north and south. They are all named and make the lines on the Bendigo Goldfield. Adjacent to Victoria Hill is the Central Nell Gwynne Mine which is on the Nell Gwynne anticline. There were quaint houses and shops in Happy Valley Road, although the shops are no longer used as such. On the right are two sketches, one an old house and below it is Heinz Butcher's Shop.bendigo, history, long gully history group, the long gully history group - happy valley road, victoria hill, central nell gwynne mine, bendigo city council, mr jack barker, william rae, heinz butcher's shop -
 Stawell Historical Society Inc
Realia, 2 Bricks from Pe-existing structure in Mt. William Creek
From 370 Long Gully Rd. Jallukar/ Pomonal, near Redmans RoadOne Large red fired brick shaped with a curve. One broken half brick with T Taylor stamped into FrogImpressed in Frog of Brick T Taylor -
 Mt Dandenong & District Historical Society Inc.
Photograph, Jim Woolrich
Jim Woolrich, brother of Ted and son of George Woolrich dressed in a suit, tie and hat. In 1917 Jim started a passenger car service from Ferntree Gully to Olinda with his father, George. This did not last long. Around 1919 Jim had started a nursery on part of his father's land in Olinda. He produced and sold flowers and foliage to shops.Jim Woolrichjim woolrich, woolrich, olinda -
 Ballarat Tramway Museum
Slide - 35mm slide/s - set of 17, Noel Simons, 20/11/1962 12:00:00 AM
... at Eaglehawk terminus" 1187.5 - "No. 18 in Mt Korong Road, Long Gully... terminus" 1187.5 - "No. 18 in Mt Korong Road, Long Gully at cnr ...Set of 17 transparencies taken on 20/11/1962 on Kodak mounts. 1187.1 - Bendigo No. 2 at the Quarry Hill terminus, showing destination of Quarry Hill. Has Cohns Drinks and Streets Ice Cream ads on dash panel, a SEC 'electric cooking' roof ad and another roof ad. Shows the Y terminus at this location, but tram standing just before it. Overhead in position. 1187.2 - as above, but closer up. 1187.3 - as above, but from the north side, showing cemetery in the background. 1187.4 - Bendigo No.3 at Eaglehawk terminus. Tram showing destination of Quarry Hill. Has the various buildings at Eaglehawk in the background including the Foodland store. Has Streets Ice cream and White Horse Whiskey ads on the dash panel. 1187.5 - Bendigo No. 18 at Garden Gully crossing loop, in bound, with destination of Eaglehawk. Passengers waiting for an Eaglehawk tram at the stop. Has a white horse whiskey ad on dash panel and SEC roof ads. Conductor standing in doorway looking out. 1187.6 - Bendigo No. 7 inbound in Nolan St. at cnr of McCrae St. showing destination of Golden Square. Has Streets Ice cream ad on dash panel and a Castrol Roof ad. 1187.7 - Bendigo No. 19 at the North Bendigo terminus with railway level crossing in background. Tram has a Cohns Drinks ad and an SEC 'Electric Cooking' roof ad. 1187.8 - Bendigo No. 2 at the Quarry Hill terminus, looking back into Bendigo, showing destination of Eaglehawk. 1187.9 - Bendigo No. 21 in McCrae St, near Nolan St outbound for North Bendigo. Photo taken after tram has passed photographer. 1187.10 - Bendigo Nos. 4 and 26 at Charing Cross in View St. with fountain alongside and the Beehive, Ezywalkin Buildings in the background. No. 26 has a Sandhurst Milk and SEC 'Electric Cooking' roof ad. 1187.11 - close up of 22E maximum traction truck and folded footstep. 1187.12 - Bendigo No. 19 at Charing Cross terminus, after tram has passed photographer, showing destination of North Bendigo, with the Beehive building in the background and passengers boarding tram. 1187.13 - Bendigo No. 11, turning from View St. into Pall Mall, showing Special with the conductor holding point bar. Has the Beehive and Ezywalkin Buildings in the background. 1187.14 - No. 7 at Charing Cross terminus, in Pall Mall, bound for Golden Square. Has the Beehive and Ezywalkin buildings in the background and passengers waiting at the tram stop. 1187.15 - No. 18 at the Charing Cross terminus, bound for Eaglehawk. Has the Beehive and Ezywalkin buildings in the background and passengers waiting at the tram stop. Also has the 'Safety Zone' sign in the photograph. 1187.16 - No. 2 at Quarry Hill terminus, night or dusk photo. Tram showing destination of Depot. 1187.17 - No. 26 at Charing Cross, night photo. Tram has destination of Quarry Hill, but is on the line for Eaglehawk. Photo looks along Mitchell St. Also shows Safety Zone sign. Information written on in black ink and date stamped on purple ink. 1187.1 - "No. 2 at Quarry Hill terminus Bendigo" 1187.2 - "No. 2 at Quarry Hill terminus Bendigo" 1187.3 - "No. 2 at Quarry Hill terminus Bendigo" 1187.4 - "No. 3 at Eaglehawk terminus" 1187.5 - "No. 18 in Mt Korong Road, Long Gully at cnr of Havilah Road (Eaglehawk Route)" 1187.6 - "No. 7 in Nolan St. Bendigo, at Cnr of McCrae St., near lake Weeroona, (North Bendigo Route)' 1187.7 - "No. 19 at North Bendigo terminus" 1187.8 - "No. 2 at Quarry Hill terminus" 1187.9 - "No. 21 in McCrae St. Bendigo, near Nolan St. (North Bendigo Route) 1187.10 - "4 and 26 at Alexandra Fountain, Charing Cross Bendigo" 1187.11 - "Truck of Bogie Car, Bendigo Tramways" 1187.12 - "No. 19 in Pall Mall at Charing Cross, Bendigo" 1187.13 - "Birney car No. 11 entering Pall Mall from View St. at Charing Cross Bendigo" 1187.14 - "No. 7 in Pall Mall at Charing Cross, Bendigo" 1187.15 - "No. 18 at Alexandra Fountain, Charing Cross, Bendigo" 1187.16 - "No. 2 at Quarry Hill terminus, Bendigo" 1187.17 - "No. 26 at Alexandra Fountain, Charing Cross, Bendigo" tramways, trams, bendigo, quarry hill, eaglehawk, north bendigo, maximum traction, night photo, tram 2, tram 3, tram 4, tram 7, tram 11, tram 18, tram 19, tram 21, tram 26 -
 Ballarat Tramway Museum
Slide - 35mm slide/s - set of 24, Noel Simons, 20/05/1971 12:00:00 AM
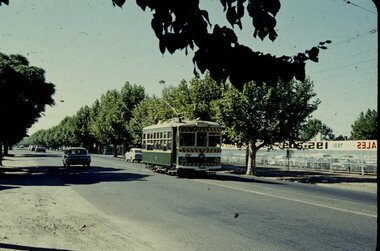
... opposite Havilah Road, Long Gully" 1195.16 - "No. 5 passing... opposite Havilah Road, Long Gully" 1195.16 - "No. 5 passing ...Set of 24 transparencies taken on 20/5/1971 on Kodak mounts. 1195.1 - Bendigo 19 arriving at Charing Cross en route to North Bendigo with Fountain Plaza and the City Family Hotel in the background. No. 19 has two roof ads for the SEC. -'Electricity better for cooking' and 'Everything's under control in my all electric kitchen' 1195.2 - as above, but standing at the Charing cross stop, with the Beehive Stores and other buildings along the east side of Pall Mall in the background. 1195.3 - No 21 ex Golden Square crossing View St. trackwork in front of No. 25 waiting to depart for Quarry Hill. No.21 has two roof ads (as for No.19 in 1195.1) and No.25 has one SEC roof ad and another. Ezywalkin sign in the background, and Fountain Plaza. 1195.4 - as for 1195.3, but after 21 has arrived and 25 left for Quarry Hill. Has Ezywalkin store and the Beehive store in the background. 1195.5 - No. 5 at the Eaglehawk terminus. Photo taken with a cannon in foreground looking along High St. Eaglehawk. Has shops on the west side of High St. in the background. 1195.6 - No. 5 at the Eaglehawk terminus, close up of the rear of the tram - note tow bar arrangement. Has destination of Quarry Hill. 1195.7-Nos.25 and 5 crossing at the Thorpe St. Loop, California Gully. No. 25 bound for Eaglehawk (has SEC Briquette and electric cooking roof ads) and 5 en route for Quarry Hill with a SEC and Cinzano roof ad. 1195.8 - as for 1195.7, but after trams have passed each other. Has Borough Auto Service building in the background. 1195.9 - No. 5 in Mt Korong Road, towards Bamard Street, photo taken after tram has passed photographer. 1195.10 - No. 30 at the Golden Square terminus with the Milk Bar on the right hand side of the photograph. 1195.11 - No. 30 inbound at Fire Station Loop, High St. Golden Square. Has old fire station in the background. Passengers are boarding the tramcar. 1195.12 - No. 30 in High St, bound for North Bendigo between Vine and Wattle Streets. 1195.13 - No. 5 bound for Eaglehawk waits at Iron Bark Gully Loop, at Hayes St. 1195.14 - No. 5 and No. 2 crossing at Iron Bark Gully Loop. 1195.15 - No. 5 bound for Eaglehawk leaving the Manchester Loop, Long gully. 1195.16 - No. 5 passing William Street, Long Gully en route to Eaglehawk. 1195.17 - No. 5 just before the California Gully Crossing Loop. 1195.18 - Nos. 5 and 26 crossing at California Gully crossing Loop. No. 5 heading to Eaglehawk, 26, Quarry Hill. 1195.19 - No. 5 in High St. Eaglehawk with Bob Moyle's Victoria Hotel and the TAB in the background. 1195.20 - No. 5 in High St. Eaglehawk approaching the terminus. Photo taken after the tram has passed the photographer. Has Foodland store and J. Best Fruit supply in the background, along with Eaglehawk Town Hall. 1195.21 - No. 5 at the Eaglehawk terminus, photo taken along seldom used track along High St. 1195.22 - as for 1195.22 - but at the very end of the track. 1195.23 - No. 5 en route for Quarry Hill climbs High St. Eaglehawk with the Victoria Hotel and Eaglehawk Town Hall in the background. 1195.24 - No. 5 and 25 crossing at Jobs Gully Loop. Note 25 has a black on white destination roll, while No. 5 has a white on black destination roll. Information written on in black ink and date stamped on purple ink. 1195.1 - "No. 19 arrives at Charing Cross Bendigo from Golden Square" 1195.2 - "No. 19 about to leave Charing Cross for North Bendigo" 1195.3 - "No. 25 awaiting departure for Quarry Hill, watches No. 21 arrive at Charring Cross from Golden Square" 1195.4 - "No. 21 on North Bendigo service and No. 25 on Quarry Hill run await departure at Charing Cross" 1195.5 - "No. 5 at Eaglehawk terminus" 1195.6 - "No. 5 at Eaglehawk terminus" 1195.7 - "Nos. 5 and 25 crossing at Thorpe St. Loop, California". 1195.8 - "Nos. 25 and 5 crossing Thorpe St. Loop, California Gully". 1195.9 - "No. 5 descending Mt Korong Rd. towards Bamard St." 1195.10 - "Birney car No. 30 at Golden Square terminus" 1195.11 - "Birney car No. 30 in High Street near Thistle Street (Fire Station Loop)" 1195.12 - "No. 30 in High St. between vine and Wattle Streets" 1195.13 - "No. 25 at Hayes Street Loop Iron Bark". 1195.14 - "Nos. 2 and 5 crossing at Hayes Street Loop Iron Bark" 1195.15 - "No. 5 at Manchester Loop opposite Havilah Road, Long Gully" 1195.16 - "No. 5 passing William Street, Long Gully". 1195.17 - "No. 5 at California Gully" 1195,18 - "Nos. 26 and 5 at Thorpe St. Loop, California Gully". 1195.19 - "No. 5 in High St. Eaglehawk". 1195.20 - "No. 5 approaching Eaglehawk terminus" 1195.21 - "No. 5 at Eaglehawk terminus" 1195.22 - "No. 5 at Eaglehawk terminus" 1195.23 - "No. 5 in High St. Eaglehawk" tramways, trams, bendigo, charing cross, eaglehawk, california gully, golden square, iron bark gully, jobs gully, tram 2, tram 5, tram 19, tram 21, tram 25, tram 26, tram 30 -
 Ballarat Tramway Museum
Slide - 35mm slide/s - set of 20, Noel Simons, 21/05/1971 12:00:00 AM
Set of 20 transparencies taken on 21/5/1971 on Kodak mounts. 1197.1 - Bendigo No. 5 en route to Eaglehawk at Creeth St Long Gully. Tram has a SEC roof ad and Cinzano roof ad. 1197.2 - No 5 approaching Needle Loop between Long Gully and California Gully. On left hand side is the City of Bendigo sign, indicating city boundary. 1197.3 - As for 1197.2 but actually entering loop. Photo taken after tram has passed photographer. 1197.4 - No. 26 bound for Eaglehawk descending the railway bridge near Eaglehawk, at Jobs Gully. 1197.5 - as for 1197.4, but after crossing bridge, now ascending a hill. Photo taken after tram has passed photographer. 1197.6 - No. 26 climbing High St. hill Eaglehawk, nearing end of Double track, bound for Quarry Hill. Shows centre of the road poles. 1197.7 - As for 1197.6, with tram entering single track section. Photo taken after tram has passed photographer. Has a BP service station in the background. 1197.8 - No. 26 (bound for Quarry Hill) crossing No. 17 (Eaglehawk) at Job's Gully Loop. 1197.9 - No. 17 climbing railway bridge at Job's Gully, en route to Eaglehawk. Photo taken after tram has passed photographer. 1197.10 - No.26 bound for Quarry Hill, leaving Long Gully Loop? Has the Creeth St. church in l197.l in the far background. Photo taken after tram has passed photographer. 1197.11 - Tramway Point work at the northern end of Long Gully Loop. 1197.12 - No. 17 en route for Quarry Hill turning into View St. from Bamard St. Tram has SEC roof ads "Everything fine in my all electric Kitchen' and 'Electric Cooking is Matchless'. 1197.13 - as for 1197.12, but tram has turned into View St and about to enter the double line track. Photo taken after tram has passed photographer. 1197.14 - No. 21 enters Nolan St after turning from MacRae St. en route to Bendigo. Note sign on its own post noting tram turns "Beware Tram Turns" and stop sign on adjacent pole "Trams stop on Request". No. 21 has two SEC roof ads. 1197.15 - No. 21 in Nolan St. after turning from Bridge St. (White Hills Road). Note signal light for Bridge St. loop on pole corner of street. Photo taken after tram has passed photographer. 1197.16 - No. 2 bound for Eaglehawk at unknown location. 1197.17 - Tram stop sign on a pole "CARS STOP BY REQUEST" 1197.18 - No. 5 in Carpenter St.? en route to Quarry Hill. 1197.19 - No. 28 has just arrive at Golden Square terminus, passengers are disembarking and the trolley pole is being turned. Golden Square Hotel in the background. 1197.20 - No. 28 at Golden Square terminus. Has a "Nothing beats Briquettes for hear roof ad. Information written on in black ink and date stamped on purple ink. 1197.1 - "No. 5 at Creeth St. Long Gully" 1197.2 - "No. 5 approaching Needle Loop between Long Gully and California Gully" 1197.3 - "No. 5 at Needle Loop between Long Gully and California Gully" 1197.4 - "No. 26 crossing railway bridge at Job's Gully near Eaglehawk" 1197.5 - "No. 26 just after crossing railway bridge at Job's Gully near Eaglehawk/ 1197.6 - "No. 26 in High St. Eaglehawk" 1197.7 - "No. 26 at end of double track in High St. Eaglehawk" 1197.8 - "Nos. 26 and 17 crossing at Job's Gully Loop" 1197.9 - "No. 17 crossing railway bridge at Job's Gully near Eaglehawk". 1197.10 - "No. 26 at Long Gully" 1197.11 - 'Northern end of points at Long Gully Loop". 1197.12 - "No. 17 turning into View St. from Bamard St. Bendigo". 1197.13 -'No. 17 at beginning of double track in View St. after leaving Bamard St. Bendigo. 1197.14 - "No. 21 enters Nolan St. from MacRae St. Bendigo." 1197.15 - "No. 21 in Nolan St. Bendigo just after leaving White Hills Road." 1197.16 - "No. 2" 1197.18 - "No. 5" 1197.19 - "Birney car No. 28 at Golden Square Terminus" 1197.20 "Birney car No. 28 at Golden Square Terminus" tramways, trams, bendigo, long gully, railway bridge, jobs gully, trackwork, nolan st, quarry hill, tram stops, golden square, tram 2, tram 5, tram 17, tram 21, tram 26, tram 28 -
 Ballarat Tramway Museum
Slide - 35mm slide/s - set of 32, Noel Simons, 25/02/1971 12:00:00 AM
Set of 31 transparencies taken on 25/2/1972 on Kodak mounts. 1201.1 - Bendigo No. 26 in Bond St. just after leaving Long Gully en route for Quarry Hill. Has Norris Supermarket in background. Has two SEC roof ads. 1201.2 - No. 26 climbing View St. from Charing Cross en route to Eaglehawk. Has ANZ bank and AMOCO service station in background. 1201.3 - as for 1201.3, but after tram has passed photographer. Has buildings west of Mackenzie St. in photograph. 1201.4 - Tram stop and centre of the road pole with two "CARS STOP BY REQUEST" signs mounted on pole at the corner of Mackenzie St. 1201.5 - same position as for 1201.3, but with No. 5 descending the street. 1201.6 - same position as for 1201.2, but with No. 5 descending the street. Photo taken after tram has passed photographer. 1201.7 - No. 7 in Nolan St. from across the park at Lake Weeroona. 1201.8 - No. 7 entering McCrae St from Nolan St. - distant view. Note "TRAM "sign on left hand side under tree and overhead in McCrae St. from former track that once was in this street. 1201.9 - No. 7 in High St. with Cathedral in background. Tram en route to North Bendigo. Note scaffolding around Cathedral main spire area. 1201.10 - No. 7 crossing Bendigo Creek bridge in High St. near Golden Square. Has a Caltex Service station in the background. 1201.11 - No. 7 at Golden Square terminus with Sunburst Fruit Juices and a Peters Ice cream delivery vans alongside. 1201.12 - as for 1201.11 but photo taken from behind tram, with the end of the rails in the photograph. 1201.13 - No. 7 and 21 in Pall Mall at Charing Cross with No. 5 in the background. Taken some distance away from the location. 1201.14 - No. 7 at Golden Square terminus, taken a short distance from the tram terminus. Shows Milk Bar on right hand side and the hotel on the left hand side. Taken from the south side of the roadway. 1201.15 - as from 1201.14 but taken from the north side of the roadway. 1201.16 - No 5 waiting at California Gully loop. Distant photo showing surrounds 1201.17 - No. 5 en route for Quarry Hill crossing No. 26 at California Gully. 1201.18 - No. 26 at Eaglehawk terminus with Eaglehawk Town Hall and Post Office in background. 1201.19 - No. 21 arriving at Charing Cross en route to North Bendigo. Has Alexandra Fountain in the background, ANZ bank RACV building, and other buildings on the north side of Pall Mall or Nolan St. 1201.20 - No. 26 en route for Quarry Hill at Charing Cross, with crew standing by front door. Has Colonial Mutual life building, Armstrong Tyre Service (Firestone) and a sign for Cohns Drinks in the background. 1201.21 - as for 1201.20 but with No. 5 en route to Eaglehawk now in photograph. 1201.22 - No. 26 at Quarry Hill terminus. 1201.23 - No. 26 at Quarry Hill terminus, view of front portion of tram only from a gate at the Bendigo cemetery. 1201.24 - Track at the end of the Quarry Hill line showing the point blades of the former "Y" terminus and the overhead for this. 1201.25 - No. 2 at the Quarry Hill terminus, looking along the former Trackwork. 1201.26 - as for 1201.25 1201.27 - number not used. 1201.28 - Golden Square terminus from some distance from the actual terminus, showing the Warning sign "TRAM" for motorists from the south. No. 7 at the terminus. 1201.29 - No. 7 passing through the Golden Square shopping centre. Numerous cars and pedestrians. Tram en route for North Bendigo. 1201.30 - No. 7 in High St. Golden Square, en route for North Bendigo. Photo taken after tram has passed photographer. 1201.31 - No. 7 in High St. just past Wattle St. with the Cathedral in the background. Tram has two SEC roof ads good side on photo, 'Everything's fine in my all electric kitchen' and 'Electrical cooking - clean, quick, economical'. 1201.32 - No. 7 in High St. nearing Wattle St. Has Cathedral in the background. Photo taken after tram has passed photographer.Information written on in black ink and date stamped on purple ink. 1201.1 - "No. 26 in Bond St just after leaving Long Gully" 1201.2 - "No. 26 climbing View St. from Charing Cross" 1201.3 - "No. 26 ascending View St. from Charing Cross (At Mackenzie St.)" 1201.4 - "View St. & Mackenzie St." 1201.5 - "No. 5 in View St. near Mackenzie St." 1201.6 - "No. 5 in View St. nearing Charing Cross." 1201.7 - "No. 7 in Nolan St. seen from Lake Weeroona Park." 1201.8 - "No. 7 entering McRae St. from Nolan St. Note "TRAM" warning sign on left. 1201.9 - "No. 7 in High St. passing Short St." 1201.10 - "No. 7 crossing Bendigo Creek bridge in High St. near Golden Square." 1201.11 - "No. 7 at Golden Square terminus" 1201.12 - "No. 7 at Golden Square terminus" 1201.13 - "No 7, 21 and 5 at Charing Cross" 1201.14 - "No. 7 at Golden Square terminus" 1201.15 - "No. 7 at Golden Square terminus" 1201.16 - "No 5 waiting at California Gully loop." 1201.17 - "Nos. 5 and 26 crossing at California Gully loop" 1201.18 - "No. 26 at Eaglehawk terminus" 1201.19 - "No. 21 arriving at Charing Cross from Golden Square" 1201.20 - "No. 26 at Charing Cross" 1201.21 - "Nos. 5 and 26 at Charing Cross." 1201.22 - "No. 26 at Quarry Hill terminus" 1201.23 - "No. 26 at Quarry Hill terminus seen through the gates of the Bendigo Cemetery." 1201.24 - "Quarry Hill terminus showing remains for former double track layout abandoned before 1964." 1201.25 - "No. 2 at Quarry Hill terminus" 1201.26 - "No. 2 at Quarry Hill terminus" 1201.28 - "The Southern approach to Golden Square with No. 7 standing at the terminus, "TRAM" warning sign on the left. 1201.29 - "No. 7 passing through Golden Square Shopping Centre" 1201.30 - "No. 7 in High St. Golden Square" 1201.31 - "No. 7 in High St. passing Wattle St." 1201.32 - "No. 7 in High St. nearing Wattle St."tramways, trams, bendigo, bond st., view st., nolan st., high st., eaglehawk, california gully, charing cross, quarry hill, trackwork, tram 2, tram 5, tram 7, tram 21, tram 26 -
 Ballarat Tramway Museum
Slide - 35mm slide/s, Graham Evans, Apr. 1972
White cardboard mount, 35mm slide, from the Association of Railway Enthusiast's film strip titled "Provincial Tramway Film Strip" of a Bogie car at Long Gully Loop, in the far distance, with a Hotel and the ESSO service station in between. Has Fosters Lager and Carlton signs on hotel. Note sign on the closet pole - "No standing between Notices". The film strip notes (Reg. Item 2560), provided the following caption details: "Meandering roadway and centre road track were a feature of the long "EAGLEHAWK" line. Here an inbound car negotiates the Long Gully Loop. - April '72 (Graham Evans)" See image btm2593p.tif for high level scan of image. Stamped on base of slide "11803" and written in ink on top edge "Eaglehawk line"tramways, trams, are, film strip, long gully, eaglehawk -
 Ballarat Tramway Museum
Slide - 35mm slide/s - set of 10, Campbell Duncan, Jan. 1971
Set of 10 Ferraniacolor slides - cardboard mounts taken on either 10/1/71 or 16/1/71. .1 - Birney No. 30, Golden Square line, inbound near Cathedral with car yard in background. .2 - ditto, with Cathedral gardens in background. .3 - single trucker, with two SEC roof adverts, entering Nolan St enroute to North Bendigo. Shows the driver sitting in a side on shot. A 4 square store in the background, with a fading advert for "Peeled Tomatoes". .4 - No. 6 turning from Nolan St into McCrae St with 4 square store in background. .5 - No. 26 at Quarry Hill with cemetery in background. .6 - No. 6 at the North Bendigo Terminus .7 - No. 26 outbound to Eaglehawk on the Railway Overbridge, Mt Korong Road. .8 - No. 17 (inbound to City and Quarry Hill) and another bogie crossing at a loop on the Eaglehawk line. Both trams have SEC roof adverts. The driver of the outbound car is boarding the tram. Based on .9, it is No. 3 at Long Gully. .9 - No. 3 waiting at Long Gully Loop . .10 - No. 26 at Quarry Hill terminus, with destination of Eaglehawk.In ink on slide: .1 - "1/2 mile out on Golden Square line - 10/1/71 (Sun)." .2 - "1/2 mile out on Golden Square line - 10/1/71" .3 - "Has just rounded curve near lake Weeroona on North Bendigo line - 10/1/71 (Sun)." .4 - "16/1/71" .5 - " 10/1/71 (Sun)." .6 - "North Bendigo terminus, 16/1/71 (Sat)" .7 - "10/1/71 (Sun) c 3pm" .8 - "Cross Eaglehawk line - 10/1/71 (Sun)." .9 - "Jackson St Loop on E'Hk line awaiting up - 10/1/71 " .10 - "Quarry Hill terminus Bendigo - - 10/1/71"tramways, trams, bendigo, golden square, high st, nolan st, north bendigo, quarry hill, long gully, railway bridge, tram 30, tram 6, tram 26, tram 17, tram 3 -
Running Rabbits Military Museum operated by the Upwey Belgrave RSL Sub Branch
Long Tan Cross Badge
Long Tan Cross Badge (sold as fund raiser)badge/buttons, general -
 Running Rabbits Military Museum operated by the Upwey Belgrave RSL Sub Branch
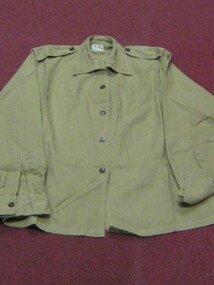
Shirt
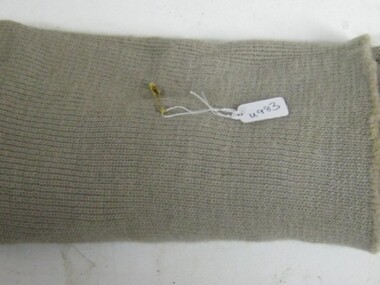
Khaki, women's long sleeve. -RAANC Belonged to L. Steinberg AANCuniform, ww2, army -
 Running Rabbits Military Museum operated by the Upwey Belgrave RSL Sub Branch
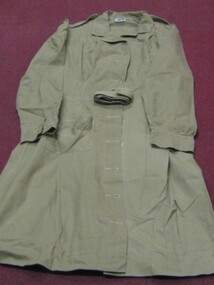
Dress
Khaki, women's long sleeved- AANC - Belonged to L. Steinberguniform, ww2, army -
 Running Rabbits Military Museum operated by the Upwey Belgrave RSL Sub Branch
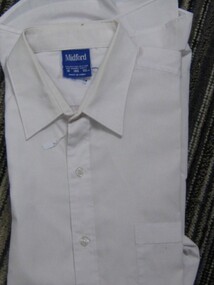
Shirt
Shirt white long sleeveuniform, ran -
 Running Rabbits Military Museum operated by the Upwey Belgrave RSL Sub Branch
Photo (size 3)
Blackhawk helicopter with long range fuel tanks.photo, c2000, army -
 Running Rabbits Military Museum operated by the Upwey Belgrave RSL Sub Branch
Shirt
Polyester long sleeveuniform, 1986, army -
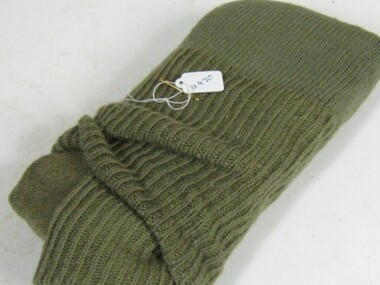 Running Rabbits Military Museum operated by the Upwey Belgrave RSL Sub Branch
Socks
Socks khaki longuniform, army -
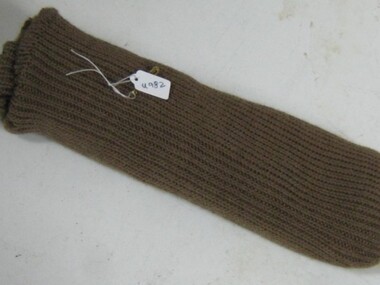
 Running Rabbits Military Museum operated by the Upwey Belgrave RSL Sub Branch
Socks
Socks khaki longuniform, army -
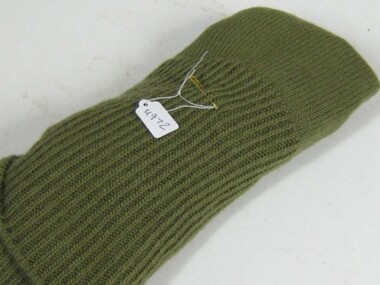 Running Rabbits Military Museum operated by the Upwey Belgrave RSL Sub Branch
Socks
Socks khaki longuniform, army -
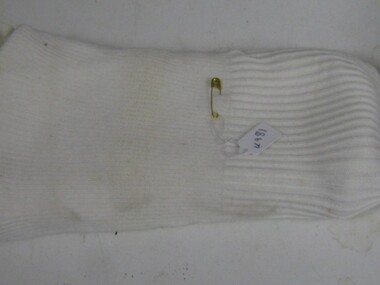 Running Rabbits Military Museum operated by the Upwey Belgrave RSL Sub Branch
Socks
Socks cotton white longuniform, ran -
 Running Rabbits Military Museum operated by the Upwey Belgrave RSL Sub Branch
Leggings
Leggings wool khaki longuniform, army -
 Running Rabbits Military Museum operated by the Upwey Belgrave RSL Sub Branch
Leggings
Leggings cotton light khaki longuniform, army -
 Bendigo Historical Society Inc.
Document - VICTORIA REEF GOLD MINES COMPANY BENDIGO PLAN
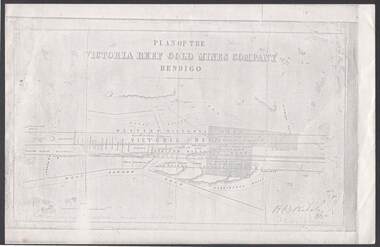
Photocopy of a Plan of the Victoria Reef Gold Mines Company, Bendigo. Shaded area is the Victoria Reef Gold Mines Company Lease No. 2 and Lease No. 3. The gullies are named Happy Valley, Long, Derwent, Providence and Ironbark Gullies. The reefs are: Western Victoria, Victoria, Eastern Victoria and Prince Albert Reef. Between the Eastern Victoria Reef and the Prince Albert Reef is the White Lead. Mount Korong Road is at the bottom of the plan. Other Leaseholders are: Burrows, Wybrant, Ballerstedt, Jackson,Roberts & Co, Ashley, Grant, ?rpe, ?eau, Woodward, Coath, Taylor, Cranshaw, Roberts, Gould & Co, Midway, Witscheibe, Endeavour Co, Albert Co, Ballerstedt & Son, Late Iron Bark Quartz Mining Co, McDougall, Specimen Hill Co, Hygrect?, Wheadon, Evans and Bannerman. Signed by H. B. Nicholas. Location of Ballerstedt, Luffsman, Midway Co, Witscheibe and Rae & Co engine locations. Hills are shown as hatch shading. Written at the bottom left ocrner is: Accompanying prospectus issued in Nov. 1859. Signed H.B. Nicholas.plan, bendigo, victoria reef gold mines company, victoria reef gold mines company bendigo - plan, h b nicholas, burrows, wybrant, ballerstedt, jackson, roberts & co, ashley, grant, ?rpe, ?eau, woodward, coath, taylor, cra-shaw, roberts, gou-d & co, midway, witscheibe, endeavour co, albert co, ballerstedt & son, late iron bark quartz mining co, mcdougall, specimen hill co, hyo?, wheadon, evans, bannerman. -
Bendigo Historical Society Inc.
Document - Former Conrad Heinze Butcher's Shop, 1872
... Happy Valley Road Long Gully... and Wells Street, Long Gully, now demolished. Various letters... bendigo Happy Valley Road Long Gully Butcher's Shop Bendigo Conrad ...Source National Trust: Conrad Heinz Butchers Shop - Happy Valley Road. This building was a weatherboard cottage evidently built in three stages with the front door in the central part, planked by three paned double casements, six-paned sash windows in the rear section; front section and timber veradah with scrolled vallance. The architect and builders are unknown. The outside doors to the cellar and the simple chimney breast remain a notable feature. The original owner was Conrad Heinz a former mayor of Bendigo who with two brothers opened a butcher's shop in the building in 1872. In 1883 he moved to Mt Korong Road Iron Bark, where he carried on another thriving business and built a substantial house close by. When Conrad Heinz left Happy Valley Road, one brother had died, but his widow carried on the first butchering business with the help of a lad and one of her three daughters. The little shop and residence stood for over a century on the spot, almost untouched by modern progress. The shop was closed for 70 years at most. It was demolished about 1982.Data Forms on the house on Corner of Happy Valley Road and Wells Street, Long Gully, now demolished. Various letters to and between the Bendigo Council, the National Trust and the owners of the house.history, national trust bendigo collection, bendigo, happy valley road long gully, butcher's shop bendigo, conrad heinze -
 Bendigo Historical Society Inc.
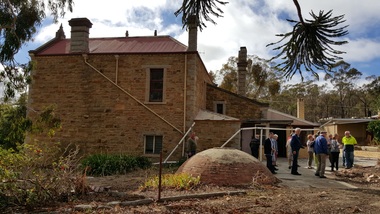
Photograph - Rocky Vale Villa, April 2016
The Beebe name was well-known in Bendigo in the last quarter of the 19th and the early part of the 20th centuries. From 1875, William Beebe senior, monumental mason, occupied a site in the centre on the city, in Mitchell Street opposite King Street. Death was more part of life in those days, and the Beebes were there to provide the burial monuments. Later, he took his sons into the business, which grew as Beebe and Son. Many examples of their work can be found in the local cemeteries. William Beebe senior (1830-1891) was born in Rutland, the smallest English county in 1830, to stonemason Chamberlain Beebe and Susannah Clements. William emigrated to Victoria in 1854 and after engaging on unknown works in Port Fairy, Dunkeld, and Melbourne arrived in Bendigo. His obituary records that he commenced work here on the site of the Bank of Australasia (opposite the Shamrock Hotel), which would have been no later than 1856. He took up a 13 acre selection on the site of Rocky Vale Villa in 1864 and continued to select or purchase further parcels of adjoining land until he owned some 150 acres, much of it unfit for cultivation. He was a keen gardener and had a garden and orchard around the house. William took over 20 years to build the two-story sandstone and granite house "Rocky Vale Villa". The house was constructed from sandstone sourced "from an adjacent ridge of rocks" (Bendigo Advertiser 28/9/1891). Granite from Harcourt was used for lintels and quoins. Not long before he died, William was still adding to the house. In the Codicil to his will, he states that "I have just built and completed two additional rooms to my Dwelling house situe at Inglewood Road aforesaid" (dated 19/9/1891). William died one week later on the 26th September 1891.Photographs of a field trip to Rocky Vale Villa, 7 Wicks Road, Maiden Gully, Bendigo by the Bendigo Historical Society.history, bendigo, rocky vale villa maiden gully, william beebe stonemason bendigo -
 Bendigo Historical Society Inc.
Document - RESEARCH PAPERS: MANCHESTER ARMS HOTEL
A 5 page document detailing the history behind Long Gully's Manchester Arms Hotel founder Mr William Henry French and the United Pyrite Company located on Marong Road -
Bendigo Historical Society Inc.
Document - LYDIA CHANCELLOR COLLECTION: BENDIGO METHODIST CHURCHES PLAN 1905 AND CHURCH OFFICIALS, 1905
LYDIA CHANCELLOR COLLECTION: Bendigo Methodist Churches Plan 1905 and church officials Quarterly Pastoral Visitation of Classes Circuit plan for Forest St, Golden square, Eaglehawk West, Eaglehawk East, California Hill, California Gully, Long Gully, McKenzie St, Galvin St, Rowan St, Arnold St, Iron Bark, Buckly St, Specimen Hill, Quarry Hill, Bridge St, Retreat Road, Kangaroo Flat, Lockwood, East Shelbourne, White Hills, Epsom, Huntly, Bagshot, fosterville, Strathfieldsaye, Axe Creek, sheepwash, Nerring, Leichardt, Leichardt East, Marong, Golden Fleece, Golden Gully, Dowling St Mission, Benevolent Asylum, Hospital Income and Expenditure List of stewards Notices Pastorates Evangelistic Bandsbendigo, history, schooling -
![The Township of Walhalla / [by] Nicholas Caire, circa 1876](/media/collectors/550653872162f11fb04854aa/items/57825a89d0cdd1176ce3295a/item-media/57825aefd0cdd1176ce34515/item-fit-380x285.jpg) Kew Historical Society Inc
Kew Historical Society IncPhotograph, Anglo-Australasian Photographic Company, The Township of Walhalla, c. 1876
Nicholas Caire was born on Guernsey in the Channel Islands in 1837. He arrived in Adelaide with his parents in about 1860. In 1867, following photographic journeys in Gippsland, he opened a studio in Adelaide. From 1870 to 1876 he lived and worked in Talbot in Central Victoria. In 1876 he purchased T. F. Chuck's studios in the Royal Arcade Melbourne. In 1885, following the introduction of dry plate photography, he began a series of landscape series, which were commercially successful. As a photographer, he travelled extensively through Victoria, photographing places few of his contemporaries had previously seen. He died in 1918. Reference: Jack Cato, 'Caire, Nicholas John (1837–1918)', Australian Dictionary of Biography.An original, rare photograph from the series 'Views of Victoria: General Series' by the photographer, Nicholas Caire (1837-1918). The series of 60 photographs that comprise the series was issued c. 1876 and reinforced a neo-Romantic view of the Australian landscape to which a growing nationalist movement would respond. Nicholas Caire was active as a photographer in Australia from 1858 until his death in 1918. His vision of the Australian bush and pioneer life had a counterpart in the works of Henry Lawson and other nationalist poets, authors and painters.‘The Township of Walhalla’ : Views of Victoria (General Series) No.37 : Albumen silver photograph | Photo on card with Title and Description on reverse | Mounted 24 x 30 cm; Photo 12 x 17 cm.On Reverse: ‘This romantic Township is situated near Stringer’s Creek in Gipps Land, not far from the celebrated Baw-Baw Mountains. The Long Tunnel Gold Claim has proved a great source of wealth to this small out-of-the-way place, yielding sometimes between 2,000 and 3,000 ounces of gold per month. The population, which is mostly a mining one, reaches nearly 2,000 inhabitants, and are scattered about among the creeks and gullies of the neighbourhood. Until recently, the road traffic was limited to pack-horses, in consequence of the precipitous hills which surround the Town.‘nicholas caire (1837-1918), walhalla, landscape photography -
 Surrey Hills Historical Society Collection
Photograph, Miss Lille Louisa (Lil) Willaton
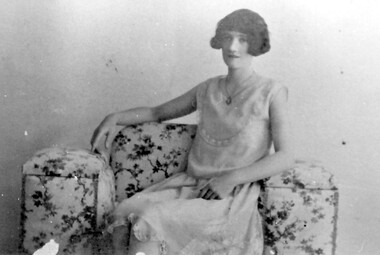
Lil was born in Long Gully, Bendigo in 1904 daughter of Herbert Charles Leopold Willaton and Lillie Jenkins. She had 3 brothers and 3 sisters, one brother dying in infancy. The family lived in Lille Street, Surrey Hills. Both her parents and one sister died in Surrey Hills. In the 1920s Lil gained her A.L.C.M. (Australian London College of Music) in singing and made a career of teaching gymnastics with calisthenics, rhythmic movement etc. She arranged the music and lyrics for items and also designed the costumes, as well as conducting the physical training which culminated in annual concerts held in Box Hill and other town halls. Lil married Leslie Reginald Stephenson in 1934 and they lived at 36 Union Road, Surrey Hills. She died in July 1995 and is buried in Box Hill Cemetery - CE-126-0001. A black and white photograph of a young lady sitting in a lounge chair.(miss) lil willaton, (mrs) lil stephenson, entertainer, singers, teacher, gymnastics, calesthenics, (miss) lille louisa willaton, (mrs) lille louisa stephenson, box hill cemetery), lille street, union road -
 Surrey Hills Historical Society Collection
Photograph, Miss Lille Louisa (Lil) Willaton at time of graduation
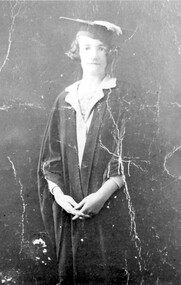
Lil was born in Long Gully, Bendigo in 1904 daughter of Herbert Charles Leopold Willaton and Lillie Jenkins. She had 3 brothers and 3 sisters, one brother dying in infancy. The family lived in Lille Street, Surrey Hills. Both her parents and one sister died in Surrey Hills. In the 1920s Lil gained her A.L.C.M. (Australian London College of Music) in singing and made a career of teaching gymnastics with calisthenics, rhythmic movement etc. She arranged the music and lyrics for items and also designed the costumes, as well as conducting the physical training which culminated in annual concerts held in Box Hill and other town halls. Lil married Leslie Reginald Stephenson in 1934 and they lived at 36 Union Road, Surrey Hills. She died in July 1995 and is buried in Buried Box Hill Cemetery - CE-126-0001. A black and white photograph of a young lady dressed in a graduation gown and wearing a mortarboard on her head.(miss) lil willaton, (mrs) lil stephenson, entertainers, singers, gymnastics, calesthenics, teacher, lille street, union road, (miss) lille louisa willaton, (mrs) lille louisa stephenson, box hill cemetery