Showing 178 items
matching one man trams
-
 Ballarat Tramway Museum
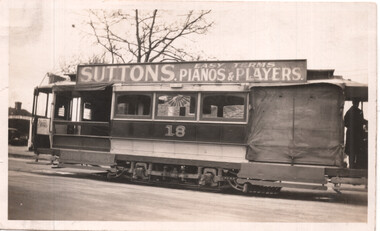
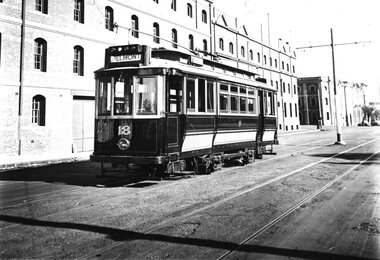
Photograph - ESCo Ballarat No. 18, 1920s?
... fitted and tram converted for one man operation. Does not appear... for the driver have been fitted and tram converted for one man operation ...Black and white photograph of ESCo. tram No. 18. Date unknown, but post 1912, as windscreens for the driver have been fitted and tram converted for one man operation. Does not appear to have track brakes. Has "Suttons Pianos & Players." advertisement on roof side. This ad was used as the basis for the roof ads on the Horse Tram. Weather blinds - one in rolled up position, the other rolled down. Photo taken to illustrate this? See Item 753 for another print, which is poorer in quality and has been cropped on both ends.Yields information about ESCo 18, c1920sBlack and White photograph of ESCo Ballarat No. 18In pencil in bottom right hand corner "634"ballarat, tramways, trams, esco, tram 18, weather blinds, suttons -
 Ballarat Tramway Museum
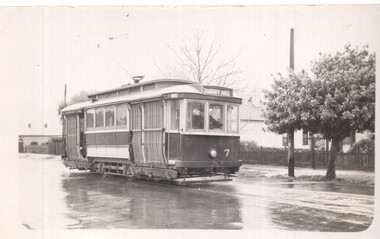
Photograph - Bendigo - Tram 7 - (2nd)
Photo shows the second Bendigo tram to carry the number 7. It has the destination of Quarry Hill. Most of the weather blinds are drawn. The tram was former MMTB No. 90, purchased in 1931, scrapped in 1951. The tram was not converted for one-man operation. Reference Destination Eaglehawk. Photo c1940.Yields information about Bendigo tramways operations and tram 7.Black and white photograph of the 2nd Bendigo No. 7tramways, trams, sec tramways, tram 7, quarry hill -
 Ballarat Tramway Museum
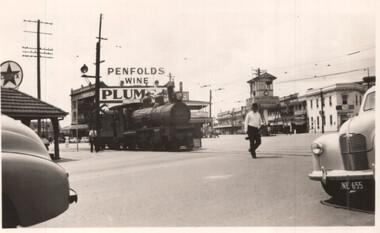
Photograph - QGR locomotive at Woolloongabba Brisbane, Keith Kings, 10/1/1951
Wal Jack swapped photographs with his correspondents. This photo by Keith Kings, a railway photograph of QGR locomotive 748 crossing the complex arrangements of tracks at Woolloongabba - three tram tracks, one trolley bus route. The photographer noted that trains could block all tram lines at times. Trains were always proceeded by a man carrying a red flag and ringing a bell. Has the tramway signal box in the background and a large Penfolds Wines advert on a building, a Caltex service station and an advert for Plume petrol.Demonstrates a photograph that would have been sent to Wal Jack by Keith Kings.Black and white photograph of QGR locomotive 748Has extensive details of the photograph on the rear. Keith Kings photo number E(k)(vii)letter, wal jack, keith kings, qgr, railways, woolloongabba -
 Ballarat Tramway Museum
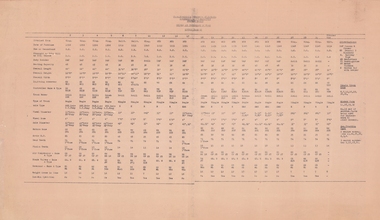
Document - List, State Electricity Commission of Victoria (SECV), "Numbers and Particulars of Trams" - Bendigo, c1964
Gives details for each tram at that time, where from, date of purchase, New or second hand (all ), Straight or drop sill or drop centre, Body builder, Seating capacity, overall length, overall height, overall width, Lightning arrester, controller make and type, Truck Maker and type, type of truck, axle type, wheel diameters, wheel base, axle diameter, motors type and maker, Motor horsepower, Gear Teeth, Air compressor make and type, Brake Valves make and type, Governor make and type, Weight in tons and whether suitable for one man operation. Side list gives details of abbreviations, list of tram types and note on Birney 15. List of trams include "Cleaner Car". Undated. See item 3430 for Ballarat version and 8721 and 8722.Yields detailed information about Bendigo trams -c1964Dyeline print from a typed list.2nd copy has in ink "BTPS 613" in the top right hand corner.tramcars, bendigo, equipment, lists, data -
 Ballarat Tramway Museum
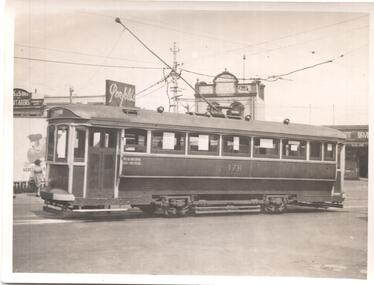
Photograph - Black & White Photograph/s, Wal Jack, 23/02/1942 12:00:00 AM
Black & white photograph of M&MTB T class 178 in Glenhuntly Road Elsternwick Railway station, 23-2-1942. Tram modified as a 1 man tram. Has shops in background. Tram possibly fitted with war time blackout mask. See Inscriptions for further details. Reimaged 17/7/2017 both front and back.On rear in ink, 'T308, M&MTB 'T' class No. 178 rebuilt as one man car. Glenhuntly Road Elsternwick (near Rly stn.) 23-2-42. Ex Melb. Brunswick & Coburg Tramways' car. W.Jack Photo.'trams, tramways, mmtb, t class, mbctt, elsternwick , tram 178 -
 Kew Historical Society Inc
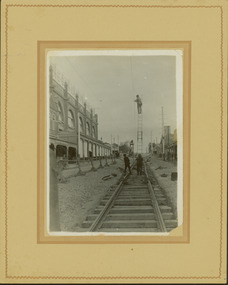
Photograph - Construction of the electric tram line in Glenferrie Road, Glenferrie, E.J. Dower, 1914
One of a series of photographs, taken by Edgar James Dower in the second decade of the twentieth century. Born and raised in Olinda, his family later moved to Surrey Hills. He worked as an adult as a clerk in the city office of the Metropolitan Gas Company, and in his role as a 'collector', he was able to photograph scenes including the construction of tramlines and associated buildings in Kew, Hawthorn, Camberwell and Surrey Hills. Later he established a real estate agency with his brother - the E.J. Dower Real Estate Agency, Dandenong Office.The image is an historically significant record of the development of transport infrastructure which was used to connect Victorians in the first two decades of the twentieth century. This development resulted from increases in population and the consequent extension of Melbourne's suburbs. The photographs, both individually and collectively, richly detail the labour of workers and the tools and machinery used to create and extend Melbourne's public transport network in the years preceding and during World War 1.Digital copy of an original mounted photograph showing a worker standing on a ladder in Glenferrie Road, Hawthorn, working on the overhead electric cables that would be used to power trams on the New Kew tramline.Other railway workers are working on platforms or viewing the man on the ladder. The ladder appears to be only supported by one other worker. "The Don Store" at left is immediately behind the old railway level crossing which can be seen in the distance to the south.Annotated verso: "Preparing for electric trams in Glenferrie Road, near Glenferrie Station, showing railway gates / Taken by E.J. Dower 1914"theme --- travelling by tram, theme -- connecting victorians by transport and communications, glenferrie road -- hawthorn (vic.), railways -- hawthorn -
 Ballarat Tramway Museum
Photograph - Geelong Tram No. 18
Geelong Tramcar No. 18, freshly painted, in Corio Tce. with Strachan & Co's wool store in the background. The car has been converted for one man operation but retains the MESCo's double lineouts that were replaced by single yellow lines in the 1940s. It is likely that the photographs were taken to display the conversion in 1939. See also Item 9242.Black and white print on paper12-6 and GRS170/12/1/6 printed on reverse in pencil. No. 1 in a circle printed on the reverse in pen.geelong tramcar, geelong tramcar no. 18, strachan and co. wool store, geelong, tramcar one-man operator conversion -
 Ballarat Tramway Museum
Document - Instruction, Melbourne Electric Supply Co. (MESCo), " Geelong Tramways July 1924 Instructions to Motormen in Charge of Birney Safety Cars", 14/08/1924 12:00:00 AM
... of the new Birney Safety car, which allowed one man operation ...Demonstrates and instruction issued by the operator of the Geelong tramways (MESCo) at the time of the introduction of the new Birney Safety car, which allowed one man operation of trams. Gives details of the operating procedures of the tram.Two page typed foolscap document titled " Geelong Tramways July 1924 Instructions to Motormen in Charge of Birney Safety Cars" and dated 14-8-1924. Gives simple instructions on the Birney Safety Cars which were new to Geelong at the time. Includes notes electrical and air systems, procedures for running out, passenger capacity (max 60), testing equipment and running in. Original was pinned together in top left hand corner.In top right hand corner in ink "BTPS 401"trams, tramways, birney, geelong, instructions, safety -
 Ballarat Tramway Museum
Photograph - Geelong Tram No. 18
Geelong Tramcar No. 18, freshly painted, in Corio Tce. with Strachan & Co's wool store in the background. The car has been converted for one man operation but retains the MESCo's double lineouts that were replaced by single yellow lines in the 1940s. It is likely that the photographs were taken to display the conversion in 1939. See also Item 9230.Black and white print on paper.No. 1 inside a circle and 13-8 printed on the reverse in ink. GSR710/13/1/8 printed on the reverse in pencil.geelong tramcar no. 18, geelong tramcar conversion to one man operation, mesco lineouts -
 Ballarat Tramway Museum
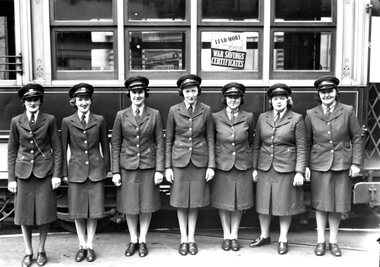
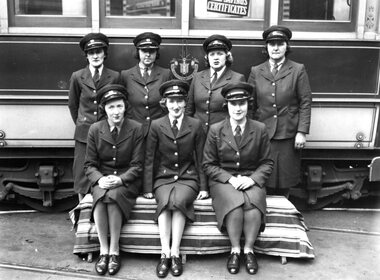
Photograph - Geelong Tramway first Conductresses
Set of photographs taken of the first women employed on SEC tramways in Geelong; as conductresses in 1942 (Also see Item 9258 and 9261). They are standing in front of a Duncan & Fraser tramcar that, perversely, was modified for 'one man' operation about ten years previous. On the tram saloon window behind then, people are being encouraged to lend to the war effort through War Savings Certificates. Note the four button jackets.Black and white print on paper.GRS710/21/1/4 and 21-4 Repeat, written on the reverse in pencil. Spare written on reverse in ink.geelong tramways conductresses, sec tramways geelong, duncan and frazer tramcar -
 Ballarat Tramway Museum
Photograph - Geelong Tramway first female employees
Set of photographs taken of the first women employed on SEC tramways in Geelong; as conductresses in 1942. (See also Item 9260 and 9261). They are standing in front of a Duncan and Fraser tramcar that, perversely, was modified for 'one man' operation about ten years previously. On the tram saloon window behind them, people are being encouraged to lend to the war effort through War Savings Certificates. Note the four button coats.Black and white print on paper.The No. 2 inside a circle and 21-1 printed in ink on the reverse. GSR710/21/1/1 printed on the reverse in pencil.geelong tramways, duncan and fraser tramcar, first geelong female conductresses, tramway four button uniform jacket -
 Ballarat Tramway Museum
Photograph
Set of photographs taken of the first women employed on SEC tramways in Geelong: as conductresses in 1942 (Also see items 1958 and 1960). They are standing in front of a Duncan & Fraser tramcar that, perversely, was modified for 'one man' operation about ten years previously. On the tram saloon window behind them, people are being encouraged to lend to the war effort through War Savings Certificates. Note the four button coats.Black and white print on paper.The No. 1 in a circle written on the reverse in ink. GRS710/21/1/5 and 21-5, written in pencil on the reverse.geelong tramway first conductresses, duncan and fraser tramcar, geelong tramway uniform four button jacket -
 Surrey Hills Historical Society Collection
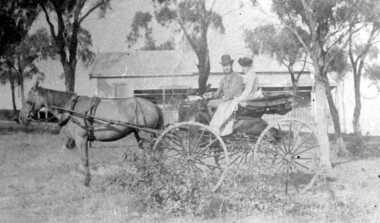
Photograph, 'Hillsboro' or "Hillsborough' - 6a Thistle Street, Surrey Hills, pre-1890
The photo was found behind a mantelpiece in the house at 6A Thistle Street while it was being renovated. It is thought to be of the first owner, Mrs Rachel Sweetnam (nee Lewis) and her husband, Thomas Edward Sweetnam. They were married on 24 September 1884 at St John's Church, Camberwell. REF: THE ARGUS 4 Oct 1884 Thomas second eldest surviving son of Matthew Sweetnam married to Rachel (Ray) third eldest daughter of Captain T.D. Lewis, Culm Haven, Camberwell. Thomas was active in land sales and variously described as a land agent, real estate agent and auctioneer. The property - Hillsboro or Hillsborough - was originally a house on a farm of 10 acres owned by her. It became 6A Thistle Street. According to the Alan Holt property register Rachel Sweetnam owned the property prior to 1890 and a family tree on Ancestry.com has that it was owned by her in c1886. It is likely that it was an investment rather than a family residence. Thomas Sweetnam was President of the Boroondara Shire 1888/89 and a councillor from 1886-1891. During his time as Shire councillor in 1887 he was charged with assaulting Charles A. Chandler, a window blind manufacturer, in response to an ‘insulting note’ left at Sweetnam’s house. Sweetnam was fined two guineas and 31 shillings. Sweetnam was also President of the Camberwell Gun Club from around 1890 – 91. In 1893 he relocated to Ferntree Gully, where he contested for the municipality’s North Riding council seat. Multiple references can be found on Trove. Note that the gentleman in this photo does bear a resemblance to Thomas Sweetman, President of Boroondara Shire in 1888-1889 found in the City of Boroondara Library Service mayoral portrait collection. No known photo of Rachel Sweetnam. Other property owners or residents are: 1890 Selina Gaylor 1900 Stephen Pullen 1910 William Murray (draftsman) 1920 George C Hughes 1930 Arthur Leslie Austin (tram driver) 1980 Mrs Lillian Evelyn Austin Sold in 1983 for $87,000. The house is still extant (January 2025). Note that we also have material / photos regarding George Hughes and family.This photo is one of the earliest photos of residences of Surrey Hills.Black and white photo of a woman and man in a buggy behind which is a simple house with a verandah at one end, surrounded by eucalypt trees.hillsboro, house names, thistle street, horse-drawn vehicle, clothing and dress, hillsborough, rachel sweetnam, rachel lewis, thomas sweetnam, selina gaylor, stephen pullen, william murray, george hughes, arthur austin, lillian austin -
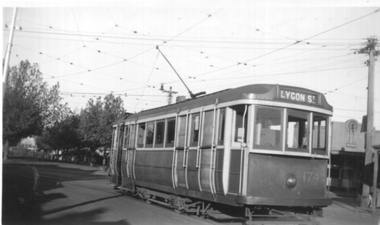 Melbourne Tram Museum
Photograph - Tram 174 - Holden St service in Barkly St, Ken Winney, May 1947
Black and white photograph showing G class No. 174 with the destination of Lygon St, in Barkly St North Fitzroy looking towards St Georges Road. The curve into St Georges Road can be seen behind the tram Photo by Ken Winney May 1947.Yields information about the trams used on the Holden St shuttle between Lygon St and St Georges Road in 1947Photograph with typed details on the rear.Typed "MMTB G class car No. 174 (one man operated) on Lygon St - St Georges Rd line, May 1947 " and the K J Magor stamp with "K Winney" typed in. trams, tramways, g class, tram 174, holden st, lygon st, barkly st -
 Ballarat Tramway Museum
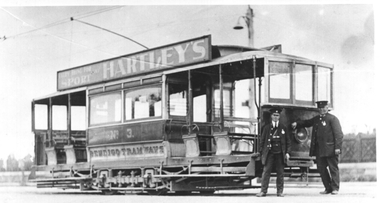
Photograph - Bendigo 3 and crew, 1920s?
The photograph shows ESCo Bendigo No. 3 with the conductor and driver standing at the front of the tram. Tram has a Hartley's sporting goods roof advertisement. Taken at the Bendigo Cemetery, Carpenter St Bendigo. The tram has been fitted with windscreens but not converted for one-man operation. Provides information about the uniforms of the time. Photo during the 1920s?Yields information about Bendigo tram No. 3 and the crew uniformsBlack and white photograph on plain papertramcars, trams, bendigo, tram 3, uniforms -
 Melbourne Tram Museum
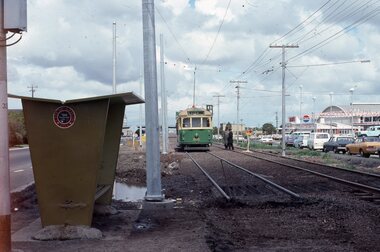
Photograph - Changing the Location of the Essendon Airport terminus, Ron Scholten, 7-10-1976
The original line to the Essendon Aerodrome was constructed in 1943 to serve the airport and aircraft construction. It was funded by the Commonwealth Government. By 1976, patronage to the airport terminus in Vaughan St had dropped, the crossing of the highway to the Tullamarine Airport opened in 1970, was dangerous, and the highway needed to be widened. The new terminus was a short distance to the north between Mathews Ave and the Highway. This series of photographs show the operation of a tram service during the changeover. Trams ran from the Niddrie crossover near Keilor Road to a temporary terminus just short of the worksite, with cars running "bang" road or the wrong way for one trip along either line. This would have been controlled by an Inspector at the Niddrie end. The work was done over a 7-hour period, including changing the overhead over. Work would have been completed after the changeover period. .1 - W5 800 at “temporary” Essendon Airport terminus, Cnr Mathews Ave, Vaughan St. after running “bang” road or the wrong way to this point from the Niddrie or Keilor Road crossover. Curves have been removed.. Has an Inspector chatting to a man with a hat standing alongside the tram. The shelter has a City of Keilor logo on it. .2 - W5 684, taken from the overbridge at the TAA stop - during the changeover of the tracks. Tram running “bang” road from Niddrie to the temporary terminus. .3 - SW5 787, temporary terminus in Mathews Ave, about to return to Niddrie as an “up” car on the “down” line. .4 - MMTB Track gang commissioning and placing rails at the new terminus with scrubber 10 waiting. Overhead in position with overhead for the curves partly removed. Mobile Crane on the left-hand side moving a formwork piece into position .5 - 10W cleaning new track at the new terminus. .6 - Rail Scrubber 10W at work cleaning head of rails where new concrete section. Has a TAA bus on the right side. .7 - W5 783 is about to be the first passenger tram to the terminus, at 3.50 pm About 20 workmen are completing the inbound or up track. .8 - W5 783 about to be the first passenger tram to the terminus, at 3.50 pm About 20 workmen are completing the inbound or up track.Yields information about the last day of the operation of the original Essendon Airport tram line and the works done for the new terminus.Set of 8 Kodachrome cardboard mount colour slides of the relocation of the Essendon Airport tram terminus 7-10-1976, by Ron Scholten. All slides have detailed descriptions on the rear trams, tramways, essendon aerodrome, essendon airport, closure, new tramways, route 59, mmtb, trackwork, w5 800, w5 684, sw5 787, scrubber 10w, w5 783, w5 class, sw5 class, taa airlines, city of keilor -
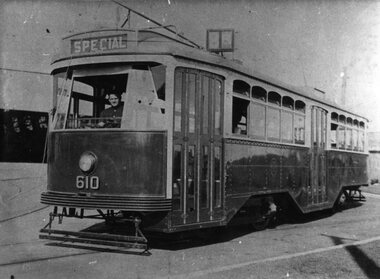
 Melbourne Tram Museum
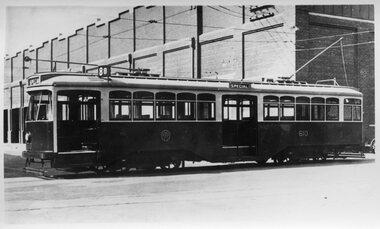
Photograph - Melbourne Y1 Class Tram 610 Photo, Melbourne & Metropolitan Tramways Board (MMTB), 1930
Photo shows the first build of the upgraded Y class design classified Y1 Class 610. Four of these Trams were built in the MMTB Preston Workshops in 1930, 610 to 613. There was one solitary Y Class tram 469. They were built with the intention of evaluating one-man operation. Due to their higher cost and Union resentment, the MMTB resorted to the proven W Class tram design. It is fitted with a route number box. The tram entered service 26/3/1930. It is now at Bendigo Tramways.Yields information about the first Y1 tram built by Preston WorkshopsPhotograph of Y1 610 at Preston WorkshopsThe inscription on the rear of 610 is " MMTB Y1-610 with Route No. Boxes. Preston Workshops.tramways, y1 class, tram 610, preston workshops, trams, mmtb -
 Melbourne Tram Museum
Photograph - Black and White - Tram Y1 610, Early 1930s
Photo shows the first build of the upgraded Y class design classified Y1 Class 610. Four of these Trams were built in the MMTB Preston Workshops in 1930, 610 to 613. There was one solitary Y Class tram 469. They were built with the intention of evaluating one-man operation. Due to their higher cost and Union resentment, the MMTB resorted to the proven W Class tram design. All Y and Y1 classes were withdrawn from regular passenger service in 1965 and transferred to the Driver training school at Hawthorn Depot. All cars are preserved in various museums in Australia. Tram 610 is operable at the Bendigo Tram Museum.Black and White photograph of MMTB Y1 610 at South Melbourne Depot, as originally built with destination route number box and centre sash of windshield dropped. tramways, trams, tram 610, south melbourne depot, y1 class -
 Melbourne Tram Museum
Magazine, Victorian Railways (VR), "Railwaymen as Tramwaymen", June 1930
Page 9 to 10 has an article titled "Railwaymen as Tramwaymen", written by S. C. Weetman, looking at the St Kilda Brighton Electric Railway, notes Elwood Depot, Tramway Inspector, James Griffiths, number of trams, operations, drivers and conductors, maintenance, safeworking. Has a short section on the Sandringham Black Rock tramway. Photos - three photos looking out the front of the tram with the driver's arm on the controller and one of a maintenance man checking the underside of a tramcar. - See Reg Items 6414 and 6416 for prints of the original photos.Yields information about the VR St Kilda Brighton tramway system from a Railway perspective.Victorian Railways Magazine, June 1930, (52 pages, centre stapled), with a single colour cover of tradesmen at Newport Workshop feeding a round billet into a furnace.trams, tramways, vr trams, victorian railways, st kilda brighton electric tramway, sandringham, elwood depot -
 Melbourne Tram Museum
Newspaper, The Age Newspaper, "A push to get the trams back on the track", 30-7-1976
... , MMTB Chairman, about fares, bus costs, income, and one man ...Reports on Federal and State Transport Ministers conference, the need to push public transport. Reports on the new Z class trams, extensions to Burwood Road and East Preston. Quotes Dudley Snell, MMTB Chairman, about fares, bus costs, income, and one man buses,use of barriers in Nicholson St, underground trams not useful. Written by Stephen Nisbet Transport Reporter.Yields information about the outlook and issues of trams and buses in Melbourne in the mid 1970s.Newspaper clipping - "A push to get the trams back on the track" - The Age 30-7-1976tramways, trams, melbourne, public transport, one man buses, extensions, east preston, burwood road, dudley snell, bus costs, underground tramways, z class trams -
 Ballarat Tramway Museum
Photograph - Black & White Photograph/s, ESCo tram No. 8 in Wendouree Parade, c1913
... by rear, though tram set up for one man operation. Good detailed... by rear, though tram set up for one man operation. Good detailed ...Photo of ESCo No. 8 - side on view of tram. Has Driver standing by front of tram, a person, possibly conductor standing by rear, though tram set up for one man operation. Good detailed side view of tram, showing arrangements of blinds, seats etc. Has "Suttons Pianos" advertisement on side and "Pictures Coliseum tonight" ad on the inside middle window. Tram has been converted to have windscreens. Three ladies on the front seat section of the tramcar. Date unknown. Post 1912. Tram still has magnetic brakes. The step section by the seats has not been covered over with sheet metal to prevent people standing on the steps, as shown in later photographs. Photo taken in Wendouree Parade with the Garden's Kiosk in the background. The tram began its life as a Sydney C class tram possibly No. 16 being sold to Ballarat in 1905.Yields information about former Sydney C class tram after its sale to Ballarat in 1905.Black and white (slightly sepia toned) photo.trams, tramways, esco, suttons pianos, ballarat, tram 8 -
 Melbourne Tram Museum
Album - Charles Craig - part 1 of 2, 1950s to 1970s
Photo - see pdf file for further information. Number Brief Description CC1 S178 at Elsternwick level crossing track works CC2 Building East Preston Depot 1955 CC3 Camberwell depot – post WW2 – lots of trams and a black cat CC4 W2 584 and SW6 958 northbound – Chapel St and Brighton Road CC5 W2 357 – southbound, Chapel St Brighton Road CC6 Pascoe Vale Road, Raceday working – note the signal CC7 The Preston Workshops - The Argus, post WW2, 223, 647 et al CC8 923 or is it 922 being built at Preston – The Argus photo - CC8A 832 being positioned onto trucks at Preston after an overhaul – Argus Photo – see also CC306 CC9 Footscray depot` CC10 W5 797 in St Kilda Road during track works – 1950s CC11 W2 457 at Kew Post Office CC12 Wellington Parade – W2 432, 492 and 337 – special event CC13 Swan St line up of trams – football? Or other special event – Sinclair’s bus on the right side. CC14 W2 630 being washed at a depot – The Argus photo CC15 Royal Park line at Flemington Road – W2 355 and W5 786 CC16 Nicholson St track construction from a tram cab CC17 T181 on tour at Gordon St CC18 T181 on Maribyrnong Bridge CC19 Ditto at River St just off bridge CC20 As for CC18 CC21 At Raleigh Rd CC22 T181 at Footscray depot CC23 Track construction, Nicholson, just north of Gertrude CC24 Commissioning overhead Bourke St tram 988 CC25 Queens Parade – 997 and 994 CC26 Swapping trolley wheel to skid – commissioning CC27 Track construction in Gertrude St CC28 985 in Queens Parade running special CC29 997 in Queens Parade CC30 1033 at North Fitzroy – AETA Special CC31 Bourke St at Elizabeth St – has passengers on board CC32 W6 985, 996 Queens Parade, Mk 3 bus 333 CC33 As above CC34 Showing construction at Nicholson & Gertrude – Bourke St CC35 W2 223 on Burnley temporary bridge – VR track expansion CC36 W5 823 – ditto CC37 Tram on old bridge prior to removal CC38 W2 433 on temporary bridge with new bridge beams and old track CC39 Looking down showing temporary single track – Swan St CC40 Tait train passing under tram bridge CC41 SW6 on single line – off loading CC42 W2 547 at City Road Junction CC43 City Road Jtn – 1969 – 596 and 771 CC44 City Road Jtn – 1969 – 596 and 771 (same as CC45 438 in Flinders St CC46 355 somewhere CC47 552 somewhere CC47A 364 at Preston Workshops? CC48 W2 334 on Traverser – Preston Workshops CC49 Wellington pade – large line up of trams, c1950 925, and 611 CC50 W2 493 Franklin st – advertising for Savings Certificates CC51 Possibly 551 with advertising for fund raising for Blind institute CC52 249 at Hawthorn – Riversdale Junction – with a Tally Ho and Village Fair Aux. board CC53 MMTB Postcard of 511 CC54 Wattle Park terminus with Single line warning sign CC55 Wattle Park Duplication CC56 36 at Domain Junction – 833 CC57 36 at Domain Junction CC58 36 at Domain Junction with 810 and 833 CC59 36 in Swanston by Flinders St Station CC60 36 in Spencer St at A’Beckett CC61 36 crossing Collins St CC62 36 crossing Collins St CC63 36 northbound in St Kilda Road with Shrine in background CC64 36 northbound in Swanston St at Flinders St CC65 Postcard – Ballarat 36 in Domain Road CC66 Postcard - Stampshow – Hawthorn Horse tram CC67 Postcard - Stampshow – Peace cable tram CC68 Postcard - 1041 and cable car set 1 at Preston CC69 Postcard - Colins & Elizabeth – greetings from old Melbourne CC70 Postcard - Cable car set at Preston CC71 Postcard - Twentyman’s cable cars CC72 Postcard - Nu-color-vue – horse tram 256 CC73 Cable car set – Market & Flinders CC74 Cable trams at Twentymans’ in their shed CC75 Cable tram track at Bourke & Spencer prior to removal CC76 Cable tram bogie at Preston Workshops – used as a dolly CC77 Cable trams at Twentymans’ CC78 Postcard - Valentines – Bourke looking west from Swanston CC79 Postcard - Rose 3938 – Bourke at Swanston – the Leviathan building CC80 Postcard - Valentines – Elizabeth St looking south from Collins – No. 19 CC81 Postcard - Rose P4765 – Bourke St Melbourne CC82 Postcard - Rose 4090 – cable tram passing Parliament house CC83 Postcard - Valentines – GPO Elizabeth St CC84 Interior of cable trailer with clothing on a set CC85 Elizabeth St looking north CC86 Cigarette card - Collins St No. 41- WD HO Wills CC87 Postcard - Rialto building with cable set CC88 Postcard - Valentines - Swanston at Flinders looking north CC89 CC90 Q 150 Hanna St – dated on rear CC91 176 turning – photo ex Alan Jungworth CC92 161 on Princes Bridge – minimum fare 4d sign and Inspector CC93 459 at Point Ormond CC94 158 at Gordon St – side on view CC95 X 217 in Swanston St CC96 X 217 in Swanston St with an East Brighton destination CC97 T177 CC98 T177 Peel St – no destination roll – being transferred? CC99 X1 462 in Glenhuntly Road to Point Ormond CC100 X1 462 in Glenhuntly Road to Elsternwick Rly Station CC101 X1 462 in Glenhuntly Road to Point Ormond CC102 Q 150 Hanna St CC103 190 at Camberwell Depot CC104 T182 at Footscray CC105 X1 466 and W2 at Footscray CC106 190 at Camberwell Depot CC107 X1 467 Barkly St Footscray CC108 X2 679 turning into William St from La Trobe St CC109 X2 677 Glenhuntly Road with Point Ormond Destination CC110 Postcard T180 CC111 Postcard format – X1 467 on a truck – see also CC178 CC112 Postcard format – X1 467 at Wantirna South CC113 Q200 and SW6 896 at Thornbury – has labels on rear CC114 T177, Ballarat Road – has labels on rear CC115 T178 at Point Ormond CC116 Postcard X1 465 and 466 CC117 Postcard – X2 676 CC118 Postcard – TMSV X2 217 CC119 810 on temporary bridging – 24-12-67 CC120 W2 575 – Queens Parade junction in, still temporary bridging, substation under construction CC121 Forming Queens Parade Junction base slab CC122 W2 596 prior to tramway works – all tracks still in position CC123 It’s a mass of reinforcing – bridging being formed CC124 Looking north with substation being built CC125 Looking east with some rather tight curves, Wellington St still in use CC126 SW6 958 ex Wellington St with all tracks and signal box and buildings. CC127 Victoria Pde at Gisborne looking east – at least 4 cars CC128 SW6 893? With dash canopy lights and SW6 862 and a man with a newspaper CC129 SW6 894 on the S curves, with tram in Wellington St CC130 Similar photo CC131 W2 564 turning into Wellington St – the concrete tracks are not that old CC132 W2 552 running out of Wellington St CC133 W5 732 from Fitzroy St into St Kilda Road with next iteration in position – very wonky CC134 W5 764 turning into Fitzroy St CC135 SW6 947 turning from Wellington St CC136 W2 586 running out of High St CC137 W2 500 turning into Wellington St CC138 W2 543 in Wellington St inbound CC139 L103 with St Kilda Junction destination, and a tower truck on right CC140 Workmen – new track in Queensway in use CC141 Ditto CC142 L103 in Queensway, and another car in bound CC143 Looking east along Wellington St which has been taken out of use. Also a MMTB Roller CC144 W5 824 and a W2 and all types of wobbly temporary track CC145 W2 354 to High St CC146 Sw6 947 on the S bends CC147 W2 500 looking north – tram on the S bends CC148 SW6 896 leaving the S bend CC149 W2 357 and a MMTB City bus with trees/gardens on the side CC150 W5 817 Elliot Ave – see also CC302 CC151 W2 552 – note the large trolley bridge CC152 W2 550 at depot or workshops CC153 1B truck CC154 SW2 432 CC155 W2 155 at Glenhuntly CC156 SW6 937 on AETA tour? CC157 X2 677 on Footscray service – Ballarat Rd? CC158 W2 641 – High St Kew? CC159 SW6 847 – Power St Hawthorn CC160 Simpson St – big line up CC161 W2 546 truck No. 1? CC162 W2s at Glenhuntly depot CC163 No. 15 truck under 899 CC164 206 and other junk at Preston Workshops CC165 W in Swanston St Melbourne – Rose series card CC166 Y1 613 Batman Ave?? or William St at Collins CC167 Tram plans CC168 X 217 Swanston St – see also 95 and 96 CC169 217 in Swanston St – same as 95 CC169A 192 in St Kilda Road at Princes bridge CC170 192 in St Kilda Road at Princes bridge CC171 Bendigo 3 arriving Malvern depot – being unloaded CC172 Ditto CC173 T180 at a depot CC174 X1 463 wheel set CC175 C30 – dog car side view – close up CC176 C30 dog car CC177 206 and 30 at Preston Workshops CC178 X1 467 on a truck – see CC111 also CC179 42 CC180 42 at a depot, no destination box CC181 W2 556 1A type truck CC182 Flinders St Station – Rose Series CC183 W7 1035 Spring – Nicholson St CC184 W7 1022 MMTB Post Card CC185 Adelaide 178 – has on rear – R. Lilburn 4/82 CC186 Adelaide 175 – has on rear – R. Lilburn 4/82 CC187 Y1 610 on AETA tour CC188 Y1 610 on AETA tour with large group – Point Ormond CC189 AETA display – has GH55-32 in pencil on rear CC190 AETA display – has GH55-29 in pencil on rear CC191 Y1 610 on AETA tour with large group – Point Ormond CC192 VR 53 at Footscray CC193 VR cars 40 and 34 at Elwood wash dock CC194 W7 1024 as the 1970 Christmas tram CC195 Geelong – loading a set of 22E trucks CC196 Geelong 10 and 23 running an AETA special CC197 Geelong – AETA special CC198 Geelong 7 at Junction CC199 Geelong 10, in the city CC200 Geelong 33 with Belmont destination CC201 Geelong 15 Eastern Park destination 29-3-1948 CC202 Geelong 23 at Railway Station – 29-3-1948 CC203 Geelong 23 at Railway Station – 29-3-1948 CC204 Geelong – loading a bogie tram CC205 Geelong – loading a bogie tram CC206 Geelong 40 – loaded on truck CC207 Geelong 40 – on jacks CC208 Geelong 40 on jacks – 19 behind CC209 Geelong 38 with two workers on either side CC210 – 214 Australian Historic Tramways stamp folder and set CC215 Bendigo 17 at depot – has dup JBS on rear CC216 Bendigo 20, 29 bogie and straight sill car at Charing Cross CC217 Bendigo one man bogie Pall Mall CC218 Bendigo – Bogie 23, other cars and welding truck at depot CC219 Bendigo 7 with Quarry Hill destination CC220 Bendigo 21 with Lake Weerona destination CC221 ESCo 18 Ballarat CC222 Ballarat bogie 22 on AETA special CC223 Ditto CC224 Ballarat 34 at Stones Corner – R Lilburn CC225 Ballarat 15 in Bridge St – R Lilburn CC226 Ballarat 40 at Gardens – R Lilburn CC227 Ballarat 37 running out of depot – R Lilburn CC228 Postcard – Valentines – Sturt St with loaded horse tram trailer CC229 AETA Geelong tram tour ticket – 29-3-1948 CC230 Postcard – Geelong – Valentine 2114 – T&G building CC231 Postcard – PMTT ! – High St Malvern CC232 Postcard – Empire – Glenferrie Road, Malvern at Wattletree Rd CC233 Postcard Y469, MMTB CC234 Postcard Z2 Spring St CC235 Postcard – Z1 MMTB CC236 Postcard – Stamp Show W1 431 CC237 Postcard – Stamp show B2005 CC238 Postcard – Stamp show W6 982 CC239 Postcard – Valentines 1264 – Johnstone Park with tram in distance CC240 Postcard – Rose 10711 – Swanston and Lonsdale – Hospital and W232 CC241 Postcard – Rose 4827 – Fitzroy St St Kilda W2 362 and 548 CC242 Postcard – Valentines – 939 – St Kilda War Memorial, W and a R? CC243 Postcard – Valentines – 572 – St Kilda War Memorial, W 413 and 140? CC244 Postcard – Valentines – 938 – Uper and Lower Esplanade – L 104 CC245 Postcard – St Kilda Rd at Princes Bridge Y1 and W CC246 Postcard – Biscay BG82 – W5 814 - CC247 Postcard – Biscay 796112 – Bourke St looking west CC248 Postcard – Biscay 796109 – Bourke St looking east CC249 Postcard – Biscay 2AUS58 – Z5 Bourke St CC250 Postcard – Biscay BG 249 – Swanston St CC251 Postcard – National View – St Kilda Rd – shrine and Prince Henrys W2 405 CC252 Postcard – Nu color vue – 11 ML 156 – St Kilda Rd CC253 Postcard – Nu color vue – 11 ML 153 – Swanston St CC254 Postcard – Nu Color vue – Collins St 442 CC255 Postcard – Pitt card – Adelaide – H 364 at Victoria St CC256 Postcard – SPER L/P 154 CC257 Postcard – BTMS – 550 CC258 Postcard – SPER – Brisbane 295 CC259 Adelaide 131 at Burnside – has R Lilburn on card, c1911 CC260 Adelaide 194 CC261 Adelaide 235, with two crew, The News photo CC262 Rockhampton, outside post office – has source of photo details CC263 Sydney – 2086 and 2062 arriving Circular Quay CC264 Sydney – P class – Pitt St? CC265 Sydney – 1610 at Circular Quay CC266 Brisbane 99 and 468 CC267 Sydney with bridge behind CC268 Steam tram Paramatta Park – 103 CC269 Sydney – Museum Station =- Elizabeth St CC270 Sydney – weed burner 137S at a loop Demonstrates the work of Charles Craig in photography and collection of prints.Assembled album in a black presentation folder of 270 photographs from the Charles Craig Collection - 86 sleeves - part 1 of 2. All photographs have been scanned and placed on the Museum's G drive. A list of all photographs with details where possible has been compiled. Victorian Provincial, Launceston, Hobart and Sydney tram photos have been transferred to other Museums, image files retained.melbourne, tramways, tramcars, trams, charles craig, st kilda junction, trackworks -
 Melbourne Tram Museum
Album - David Frost Slide Collection, David Frost
Photo - see pdf file for further information. Number Brief Description date DFC1 A general view from the former railway platform at Port Melb Station looking towards Station Pier on opening day 20-12-1987 DFC2 A2 285 in the Tramway Platform at Port Melbourne Station on opening Day 20-12-1987 DFC3 A2 285 in the Tramway Platform at Port Melbourne Station on opening Day 20-12-1987 DFC4 A2 285 in the Tramway Platform at Port Melbourne Station on opening Day 20-12-1987 DFC5 A2 273 at St Kilda Tramway Station on opening day 22-11-1987 DFC6 A2 273 turning from Fitzroy St into St Kilda Tramway Station on opening day 22-11-1987 DFC7 B1 2001 at St Kilda Tramway Station turning into Fitzroy St on opening day 22-11-1987 DFC8 B1 2002 enters St Kilda Tramway Station on opening day 22-11-1987 DFC9 An A2 approaches St Kilda Tramway Station on opening day 22-11-1987 DFC10 Concreting the connecting curve from Fitroy St into St Kilda Station c July 1987 DFC11 An MTA AEC MKVI bus in Grey St St Kilda at Dalgety St with Tramway works in the background c July 1987 DFC12 Grey St St Kilda at Dalgety St with Tramway works in the background in Fitzroy St c July 1987 DFC13 Concreting the connecting curve from Fitroy St into St Kilda Station c July 1987 DFC14 Restaurant Tram 442 in Fitzroy St at Grey St Passing MTA bus 59 outside St Kilda Station c1986 DFC15 Former VR tram stop sign painted on a pole at Glenhuntly Rd & Broadway DFC16 Former VR Elwood Tram Depot under demolition 1996 DFC17 Former VR Elwood Tram Depot under demolition 1996 DFC18 Former VR Elwood Tram Depot under demolition 1996 DFC19 Former VR Elwood Tram Depot under demolition 1996 DFC20 Former VR Elwood Tram Depot under demolition 1996 DFC21 Former VR Elwood Tram Depot under demolition 1996 DFC22 Former VR Elwood Tram Depot under demolition 1996 DFC23 Former VR Elwood Tram Depot under demolition 1996 DFC24 MTS Tower waggon in use at the former VR Elwood Tram Depot under demolition 1996 DFC25 A Sign advertising the sale of the Former VR Elwood Tram Depot – 10/8/1996 1996 DFC26 Former VR Elwood Tram Depot under demolition 1996 DFC27 Interior of a shed at the former VR Elwood Tram Depot under demolition 1996 DFC28 Former VR Elwood Tram Depot under demolition 1996 DFC29 Former VR Elwood Tram Depot under demolition 1996 DFC30 Former VR Elwood Tram Depot under demolition 1996 DFC31 VR 20, former breakdown car in Bob Prentice’s Back Yard Jan 1974 DFC32 VR 20 on a low loader en route to Bob Prentice’s for preservation 1959 DFC33 VR 20 as the breakdown car on the St Kilda Electric Street Railway c1955 DFC34 VR 39 waits in St Kilda St as breakdown car 20 enters Elwood Depot c1955 DFC35 VR 54 and 50 in the rear yard of Elwood Depot c1958 DFC36 VR 50 in the rear yard of Elwood Depot c1958 DFC37 VR 50 in the rear yard of Elwood Depot c1958 DFC38 VR 28 in St Kilda St outside Elwood depot after the line had been cut back to this point c1958 DFC39 VR 29 in St Kilda St outside Elwood depot after the line had been cut back to this point c1958 DFC40 VR 35 passes 28 on the St Kilda Electric Street Railway c1955 DFC41 VR 39 on the St Kilda Electric Street Railway c1955 DFC42 Y1 613 on a tour c1970 DFC43 VR 54 in St Kilda St outside Elwood Depot c1955 DFC44 VR 28 at Brighton Beach Terminus c1955 DFC45 VR 33 being washed in the wash bay at the rear of Elwood Depot c1955 DFC46 VR 20 breakdown car running into Elwood Depot c1955 DFC47 VR 3 in the rear yard at Elwood Depot c1955 DFC48 VR 51 on an AETA Tour running out of Elwood Depot c1958 DFC49 VR 28 on the St Kilda Electric Street Railway c1955 DFC50 VR 28 with crew in St Kilda St outside Elwood depot after the line had been cut back to this point 1959 DFC51 VR 52 in Grey St near Fitzroy St c1958 DFC52 VR 51 on a AETA Tour passes 33 in Grey St near Fitzroy St c1958 DFC53 VR 29 in Grey St near Fitzroy St c1958 DFC54 VR51 on an AETA Tour shunts as 52 waits on the St Kilda Electric Street Railway c1958 DFC55 VR 51 on the Black Rock Electric Street Railway c1955 DFC56 VR 28 in St Kilda St outside Elwood depot after the line had been cut back to this point c1958 DFC57 Combined Rail-Tram Tickets of the Black Rock Electric Street Railway Feb 1975 DFC58 Combined Rail-Tram Tickets of the St Kilda Electric Street Railway Feb 1975 DFC59 Electric Street Railway & Motor Coach Paper Tear off Tickets Feb 1975 DFC60 VR 52 & 53 on Rt 82 pass in Cordite Ave near Wests Rd Sept 1975 DFC61 Z 68 & 52 in East Preston Depot in M&MTB Livery c1977 DFC62 Copy photo of VR 18 in Elwood Depot c1910 DFC63 VR 51 as a one man car at Black Rock Terminus c1955 DFC64 VR 53 on Rt 82 in Droop St Footscray Jan 1974 DFC65 B2 2027 on Rt 96 in South Melb Station c1988 DFC66 VR 20 as preserved in Bob Prentice’s backyard High St Prahran Jan 1974 DFC67 VR 700 on Rt 82 in Droop St Footsray c1978 DFC68 VR 28 as the last car from ST Kilda Station 28-2-1959 DFC69 VR 700 at the Rt 82 Moonee Ponds Terminus c1978 DFC70 VR 52 waiting time at the Rt 82 Footscray Terminus, the driver intently stares at the bundy clock as the Braid and the Connie gossip Jul 1972 DFC71 VR 54 shunting outside Elwood Depot to return to St Kilda Station 1959 DFC72 SW6 969 in MTA Livery blocking the entrance to South Melb Depot presumably during the scratch ticket dispute Jan 1990 DFC73 VR 52 & 53 on Rt 82 pass in Droop St Footscray Sept 1975 DFC74 VR 700 after withdrawl in the Newport Railway museum in the process of a repaint c1985 DFC75 VR 700 after withdrawl in the Newport Railway museum in the process of a repaint c1985 DFC76 VR 700 on Rt 82 in Droop St Footsray at The Cresent c1978 DFC77 VR 700 on Rt 82 in Droop St Footsray c1978 DFC78 Former VR tram depot in use as an MTA Bus depot c1990 DFC79 VR 52 waiting time at the Rt 82 Footscray Terminus Jul 1972 DFC80 VR 52 waiting time at the Rt 82 Footscray Terminus with Connie changing the pole Jul 1972 DFC81 VR 52 at the Rt 82 Moonee Ponds Terminus with the crew chatting 7-12-1974 DFC82 VR 52 on Rt 82 on the reserved track in Raleigh Rd Ascot Vale Jan 1974 DFC83 VR 53 on Rt 82 in Leeds St Footscray about to turn into Hopkins St April 1976 DFC84 VR 53 on Rt 82 in Droop St Footsray Jan 1974 DFC85 VR 700 on Rt 82 in Droop St Footsray at Hopkins St c1978 DFC86 Z 52 in MTA livery on Rt 19 in Elizabeth St near Bourke St c1985 DFC87 VR 52 at the Rt 82 Moonee Ponds Terminus Jul 1972 DFC88 VR 53 at the Rt 82 Footscray Terminus Jan 1974 DFC89 VR 52 freshly outshopped from the workshops and W7 1011 at the Bourke St Terminus with 52 on display for the 1968 railway exhibition 1968 DFC90 Painting of W class 369 in Chocolate & Cream c1930 DFC91 Charing Cross, Bendigo at night c1965 DFC92 Ballarat ? c1965 DFC93 Bendigo 18 on an AETA tour in McCrae St near Tramway Ave c1965 DFC94 View from the roof of a tram in the body shop at Preston Workshops 1977 DFC95 View from the roof of a tram in the body shop at Preston Workshops 1977 DFC96 View from the roof of a tram in the body shop at Preston Workshops showing the panto on 546 1977 DFC97 Interior view of Carlton Control Centre showing desk and wall panel c1968 DFC98 W2 493 on Rt 55 in Kingsway outside South Melb Depot Aug 1973 DFC99 W2 496 in Sturt St at Kingsway on Rt 1 Jul 1973 DFC100 Z class truck c1975 DFC101 Z3 116 in Bourke St at King St as new c1979 DFC102 Bob Prentice on tour c1968 DFC103 SW6 900 as an advertising tram for Newsday at night 1969 DFC104 597 Jul 1973 DFC105 W2 480 on Rt 3 passing under the railway bridge at Caulfield Oct 1972 DFC106 Interior view of Carlton Control Centre showing desk c1968 DFC107 SW6 856 on Rt 77 at night Jul 1973 DFC108 W2 496 in Sturt St at Kingsway on Rt 1 Jul 1973 DFC109 PCC 980 on a tour at South Melb Depot c1968 DFC110 SW6 856 on Rt 77 at night Jul 1973 DFC111 View from the roof of a tram in the body shop at Preston Workshops showing the panto on 546 1977 DFC112 Dandenong Rd from Chapel St Nov 1968 DFC113 A Z class car turns from Gertrude into Nicholson St c1990 DFC114 SW6 900 as an advertising tram for Newsday at night 1969 DFC115 Port Melbourne Station showing Centennial bridge and station building prior to closure. 10-1987 DFC116 Port Melbourne station with train prior to closure, looking south 10-1987 Demonstrates the work of David Frost in photography and or collecting slides.Assembled album in a black presentation folder of 116 colour slides, 6 slide sleeves, collected or photographed by David Frost. Many are TMSV or Windsor Publications slides. All photographs have been scanned and placed on the Museum's G drive. A list of all photographs with details has been compiled. melbourne, tramways, trams, vr trams, elwood, st kilda light rail, port melbourne, opening, elwood depot, buses -
 Bendigo Historical Society Inc.
Photograph - BASIL MILLER COLLECTION: NO 28 TRAM, 1971
Colour photo of No 28 tram in green and gold livery, one man standing in door of tram, six men standing on roadside in front of tram. Tram is stopped on Pall Mall between Bull Street and Mundy Street. On back written, 'Bendigo Cup Day 1971 (L to R) Basil Miller (inspector), John Frost, John Betjeman - BBC LONDON, Tom McCaw, Charles Craig, George Sang, Michael Schnader. Also, a black and white copy.basil miller, bendigo trams -
 Ballarat Tramway Museum
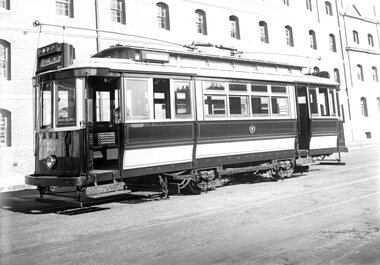
Photograph - Digital image of Geelong tram No. 2 at T&G Corner Geelong, c1938
The photograph was taken from a Victorian Railways glass negative held at the State Library of Victoria. The photo shows Geelong No. 2 in Moorabool St at the intersection with Ryrie St. The tram has the destination of North. The tram is in its modified form that provides for one-man operation. In the photo are Edments, Savoia Cafe, Commercial Bank of Australia, and the T&G building. The photo has been dated between 1935 when the tram was converted and 1939 when the bar neon traffic lights were installed at the intersection. For reference to the SLV photograph - see http://handle.slv.vic.gov.au/10381/97173. See item 9075 for a copy print. This tram is now part of the collection of the Ballarat Tramway Museum.Yields information about Geelong No.2 and the intersection of Ryrie and Moorabool Streets Geelong.Digital image of Geelong tram No. 2 in Moorabool St at the intersection with Ryrie St, c1938. geelong, geelong 2, ryrie st, moorabool st, trams, tramways, temperance & general -
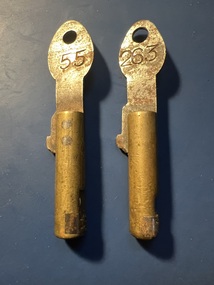 Ballarat Tramway Museum
Functional object - MMTB Cincinnati "bundy" clock keys, Cincinnati Time Recorder Co. of Ohio, 1930s
Item used to operate and record the time in the Cincinnati Time Recording clock. This type of clock was used by the MMTB in the 1930s. The key would be issued by the depot staff to crews for use in the clock to record times so that they could be matched up against the timetable to see whether tram or bus services were running on time. Understood that this style of key was last used on the Port Melbourne bus route. The Museum has one of these clocks at its depot which was obtained from The Met in? The second photo shows the key in position before turning the handle around it. By the 1960's (or earlier) they were only used on the M&MTB bus routes. All the tram routes had M&MTB copies with a very different style of key. Only used on two man bus routes and the conductor held the key due to the half-cab bus design. On the tram routes the driver was responsible for the key and recording the time. The key number represented the crew's shift number. For a while towards the end of their use on the trams they were the Run number. This change led to many lost keys! See item 9568 for an example of the time recording clock itself.Demonstrates a Cincinnati "Bundy" time recording clock key.Key - or Bundy Clock key made for a Cincinnati Time Recording Clock comprising a circular brass section with a key number section secured by a screw at one end and a flat steel strip inserted into the brass section, with a hole at one end that could be placed on a hook. The steel strip is riveted into the brass round section. Two keys held.Steel section stamped "tramways" and "55" and "263"tramcars, tramways, bundy clock, cincinnati, time recorder clocks -
 Bendigo Historical Society Inc.
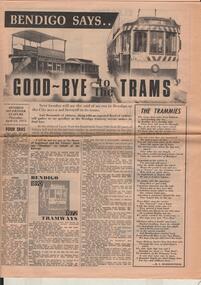
Document - BASIL MILLER COLLECTION: BENDIGO SAYS GOOD-BYE TO THE TRAMS, c1972
13 April 1972. Bendigo Says Good-bye to the Trams. A1 sheet - double sided. Tramway history 1890 - 1972, 2 copies. At the stroke of 5 pm from Eaglehawk Town Hall clock 82 years of history will end as the last tram makes its sentimental journey to the city, while at the Bendigo Cemetery - the Quarry Hill line terminus - another tram will be leaving for its last resting place. Other articles include: Four Eras, of trams. The Trammies, covering Ballarat, Geelong in the form of a poem. 1927 and all that, by Basil Miller, remembering his 45 years of service with the trams. How it all started, The twin communities of Sandhurst and Eaglehawk were relatively early in considering the possibility of operating street tramways within their boundaries. Cabs, Battery Cars, Construction, Strikes, Bendigo 1890 to 1972 - Tramways. Man and his Mates, continued from previous page, Explosion, Touchy Task, A Quickey, Horrors. Electric in 1903, There was excitement galore in the City during April, 1903 - and the Advertiser recorded the progress of the new-fangled electric machine. One man's Memories, Tough times, humour, tragedy and comradeship - they all came flooding back as former Bendigo tramway-man Tom Griffiths recently turned the clock back. Keb Sir Keb Sir? 'Keg sir? Tram off the line,' was the call of the cabbies when a train pulled in at the Bendigo railway station. Altered Shopping Trend, With advent of the electric tram in Bendigo came change in shopping habits.bendigo trams -
 Melbourne Tram Museum
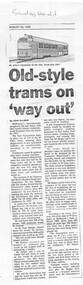
Newspaper, John Gillman, Sunday Herald, "old-style trams on way out", Aug. 1989
... of W class trams to a one man and more modern looking version... class trams to a one man and more modern looking version ...Photocopy of a newspaper clipping reduced to A4 size from the Sunday Herald, August 20, 1989 about the conversion of the Melbourne tram system from conductors to ticket machines, conversion of W class trams to a one man and more modern looking version, phasing out of W class trams. Quotes Mr Jim Harper, Secretary of the union and spokesman for the Transport Minister, Mr. Jim Kennan. Gives some numbers regarding vehicle requirements. Written by John Gillman.trams, tramways, w class, tickets, conversion, unions, ticket machines -
 Melbourne Tram Museum
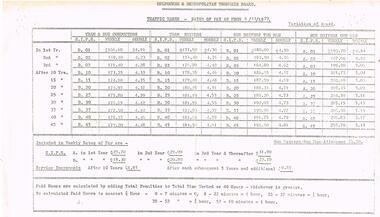
Document - Instruction, The Met, "Traffic Wages - Rates of Pay", 1979 and 1984
Instruction - two foolscap sheets - titled "Traffic Wages - Rates of Pay", listing rates the various components of the pay, including weekly and hourly rates for Tram and Bus conductors, tram drivers, bus drivers two man and bus drivers one many. Gives details of service increments and how paid hours are calculated. Sheet 1 dated 4/11/1979 and sheet 2 - 1/7/1984.trams, tramways, mmtb, mta, wages, payroll, conductors, drivers, buses -
 Melbourne Tram Museum
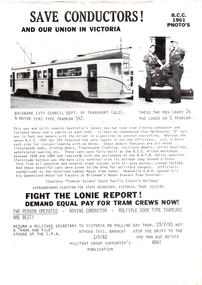
Pamphlet, ATMOEA Militant Group supporters, "Save Conductors! and our Union in Victoria", 1/06/1981 12:00:00 AM
Pamphlet - A4 photocopied sheet, two sided titled "Save Conductors! and our Union in Victoria", asking Union members to vote for a Militant Secretary. Gives date of election of 23/7/1981. Written around the Brisbane FM tramcars that require two men to operate. Describes the tramcar and why it is better than a Melbourne tram. Also notes the Lonie Report and one man bus depots. Includes photograph of the Brisbane tramcar. Published by "ATMOEA Militant Group supporters", dated 1/6/1981.trams, tramways, atmoea, unions, elections, lonie report, brisbane, conductors, tram 506, tram 541