Showing 198 items
matching white hills station
-
 Ballarat Tramway Museum
Slide - 35mm slide/s set of 7, Noel Simons, 1972
Set of 7 transparencies undated on PAKON mounts - appear to be early 1970's. 1212.1 - No. 18 about to enter the Long Gully loop with ESSO service station on the right hand side. 1212.2 - No. 6 in Mitchell Street bound for Charing Cross. Tram has destination of "Rly Station". Has buildings on the east side of Mitchell St. in the background. 1212.3 - No. 7 (North Bendigo) and 29 (Golden Square) crossing. Actual location? 1212.4 - "No 6 showing 'SPECIAL' at Eaglehawk terminus. Has the Foodland store and Fruit shop in the background. 1212.5 - No. 19 at Eaglehawk terminus, on the extension to the normal Eaglehawk terminus. Tram has showing 'Eaglehawk'. Tram has two SEC roof ads. 1212.6 - No. 25 and another Bogie car at Quarry Hill terminus on last day. 1212.7 - No. 18 and 29 at Quarry Hill terminus. No.. 18 showing 'Quarry Hill' - has two SEC roof ads 'Electric Cooking - Matchless' and 'Everything's fine in my all electric kitchen' and No. 29 has a briquettes roof ad.Information typed onto a white label stuck on the slide. 1212.1 - "No. 18 at Long Gully" 1212.2 - "No. 6 in Mitchell Street." 1212.3 - "7 and 29 Lake View Hotel" 1212.4 - "No. 6 at Eaglehawk" 1212.5 - "No. 19 at Eaglehawk Term." 1212.6 - "Last cars Quarry Hill." 1212.7 - "18 & 29 Quarry Hill"tramways, trams, bendigo, long gully, mitchell st., eaglehawk, quarry hill, last tram, tram 6, tram 7, tram 18, tram 19, tram 25, tram 29 -
 Ballarat Tramway Museum
Photograph - Black & White Photograph/s, Peter Bruce, c1970
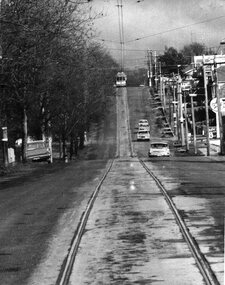
Black and white photograph of Barkly St. Mt Pleasant taken with a long telephoto lens. Single truck Tram on the top of a hill at terminus, with the photographer on or near the top of the`next hill in centre of track. Four cars travelling towards photographer. Sign of Caltex Service station on right side of photograph. with trees on left. Shows nature of street construction - deep gutters with "bridge" crossings. See also item No. 559, possibly tram No. 31. Would appear to be taken at about the same time, not parked Holden station wagon on left hand side of photo.trams, tramways, ballarat, barkly st, mt pleasant -
 Ballarat Tramway Museum
Postcard - Folder set, Set of nine Black and white postcards, from drawings
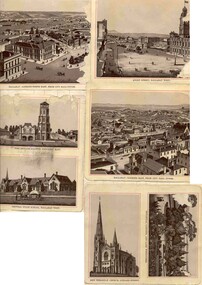
Set of nine Black and white postcards, from drawings, contained within Reg. Item 2526, pages 4 and 6 of early Ballarat, glued or pasted into the book. A lot of the postcards have edge damage. Include Sturt St., Black Hill, Ballarat Fire Station, Central State School, Wesley Church and Botanical Gardens, Mechanics Institute, Benevolent Asylum, Orphan Asylum, Ballarat East Town Hall, Academy of Music. Date of drawings - prior to 1870's?. trams, tramways, ballarat, sturt st, fire station, schools, wesley church, mechanics institute, orphanage -
 Ballarat Tramway Museum
Book, Nu-color-vue or Nucolorvue Productions, "Victoria The Land of Enchantment", c1950
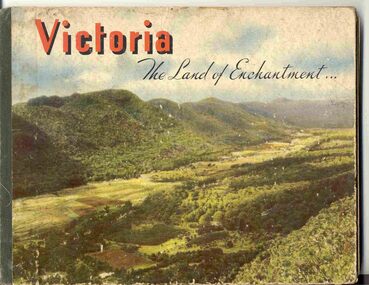
Book with hardcovers, 48 pages titled "Victoria The Land of Enchantment". Sewn in three sections, with a green strip of cloth and self end papers and printed outer paper, sides glued onto board covers. Consists of 43 colour photographs (full and half page) with captions, detailed text, and two black and white photos printed in blue on end covers. Photos of Mt Buffalo, Gippsland lakes, Mornington Beach, Yarra River, Flinders St. station from the Yarra, Collins and Spring St (with two W2's - see image No. 2), Parliament House, Kiewa Hydro scheme, Eildon Weir, Swan Hill Murray River Bridge, Bendigo Post Office, Melbourne Botanical Gardens, Ballarat - Grenville and Sturt St (No. 22 - see image No. 3), Lorne, Yallourn Power Station, Hume Weir, Maroondah Weir, Great Ocean Road, Warrnambool, Portland Beach, A timber train (see image No. 4), Mildura, flax mills, Eastern Geelong and the Prime Ministers Ave, Ballarat. Produced by Nucolorvue Productions, c1950. See also Reg Item 2925 for the same photo of No. 22 and Reg Item 5354 for a postcard. Purchased via eBay site - see attached sheets and packing slip. Purchased 10/2/2005 for A$12.50 including postage, from Virginia Georgopoulos of West Brunswick. eBay sheets and envelope with worksheet file. Has Swains 123 Pitt St, Sydney sticker on bottom left hand corner page 2trams, tramways, ballarat, sturt st, grenville st, bogie trams, geelong, bendigo, melbourne -
 Ballarat Tramway Museum
Document - Report, Melbourne and Metropolitan Tramways Board (MMTB), MMTB Reports 1979 to 1981, 1980 to 1982
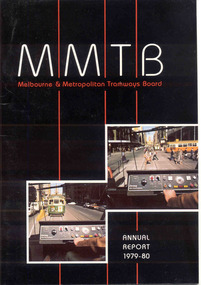
Three copies of the Annual report of the MMTB for the years end 1980, 1981 and 1982 3953.1 - "Annual Report 1979-80" - white gloss paper with colour card covers with 36 pages, gloss, on inside giving details of the MMTB Board, Officers, Operations report, schedule of debenture, investments, Auditors reports, record of Annual traffic receipts, passengers, miles etc, tram and bus routes operated, statistical information, graphs and photographs. Photos include; Z 117 in Bourke St, Z 31 Burwood terminus, new safety tower wagon, Z118 in Bourke St, W2 528 High St Kew, reconstruction of High St Kew, Z3 120, cable and electric trams at Flemington Bridge, Z3 117, fitting trams to bogies at Preston workshops, Queens Bridge roundabout, MAN bus, Burwood substation, Z111 in Bourke St and Z's enter Elizabeth St service and Z3 129 on rear cover at night. 3953.2 - "Annual Report 1980-81" - white gloss paper with colour card covers with 36 pages, on inside giving details of the MMTB Board, Officers, Operations report, schedule of debenture, investments, Auditors reports, record of Annual traffic receipts, passengers, miles etc, tram and bus routes operated, statistical information, graphs and photographs. Photos include; image of Park St, Domain Road Jtn before changes, Museum station entrance, Flinders and Swanston St, CDB City Ring bus service, Swanston St, Westgate bus route, Park St, new substation, Swanston and Flinders St, Flinders land, and give way to buses pulling out of stops. 3953.2 - "Annual Report 1981-82" - white gloss paper with colour card covers with 36 pages, on inside giving details of the MMTB Board, Officers, Operations report, schedule of debenture, investments, Auditors reports, record of Annual traffic receipts, passengers, miles etc, tram and bus routes operated, statistical information, graphs and photographs. Photos include images of a z class crossing the Maribyrnong bridge, Footscray bus workshops, track renewals, a wedding at Wattle Park, a W2 arriving at Museum Station, Clifton Hill interchange, buses, Z class in Elizabeth St (Nos 158 and 43), Z89 in Mt Alexander Road North Essendon and a W2 loaded on a truck for New Zealand.3951.1 - has Graeme Breydon's address stamp on front cover., 3951.2 - ditto, 3951.3 - ditto and on inside of front cover., 3951.6 - "G. Breydon" in pencil on front cover and pencil comments on balance sheet., 3951.7 - dittotrams, tramways, mmtb, melbourne, annual reports, operations, trackwork -
 Ballarat Tramway Museum
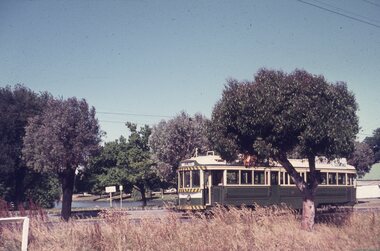
Slide - 35mm slide/s - set of 4, Campbell Duncan, 1971 or 1972
Set of four colour slide on Agfacolour - black and white plastic mounts. .1 - Bendigo No. 3 on a Quarry Hill service .2 - Bendigo No. 5, in High St Eaglehawk, inbound to Quarry Hill. Has a former Masonic Hall? in the background - now part of the Eaglehawk Primary School. .3. - Bendigo 26, en route to Quarry Hill, on Quarry hill line? with a BP service station in the background. .4 - Bendigo 5, descending View St to Charing Cross.tramways, trams, bendigo, quarry hill, eaglehawk, view st, tram 3, tram 5, tram 26 -
 Ballarat Tramway Museum
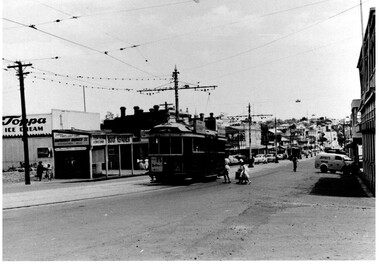
Photograph - Black & White, Bendigo 3 climbing Mitchell St, late 1950's
Black and White photograph, of Bendigo 3 climbing Mitchell St, near the Railway Station with the Destination of Quarry Hill. Has a Hutton's Ham ad on the front drivers panel and two rood ads. In the background are Sandhurst Dairies shop advertising Toppa Ice Cream, a boot repairer and a van marked Jeffreys Bread parked on the north side of Mitchell St. Nearing the point where the double track became single - see the signal wire insulators in the overhead. Printed on Fujichrome paper. Two copies held."TMSV Sales" stamp on rear. On rear of in ink 'HTT16 = MM N 102 = Geel 32 = BED 3"trams, tramways, bendigo, mitchell st, quarry hill, overhead, tram 3 -
 Ballarat Tramway Museum
Slide - 35mm slide/s - set of 11, Eldon Hogan, mid 1960's to early 1970's
Set of 11 Agfa Plastic mounted slides - from the Eldon Hogan collection - possibly on an ARE Bendigo tours - mid 1960's (black destination rolls) and late 1960's or early 1970's. Scanned on the Canon scanner at the depot 15/12/1971 at the time of the installation of the scanner. .1 - No 18 with Lake Weeroona in the background - possibly at the same time as the tour with No. 18, though showing destination of Charing Cross. .2 - ditto .3 - No. 25 and two following trams on a special tour, note the white disc - Quarry Hill line? .4 - No. 29 on the Eaglehawk line at the Mt. Korong Road and the Calder Highway, with the Ampol Service station in the background. .5 - No. 29 passing Lake Weeroona with Destination of Nth Bendigo - has a Briquettes Roof Advertisement., .6 - No. 26 ditto - with two SEC Roof Advertisements. .7 - No. 24 leaving Charing Cross for Golden Square with The Beehive building, Ezywalkin, Coca Cola and the Fountain Shopping Centre in the background. .8 - No. 29 and a bogie tram at the Golden Square terminus with Golden Square Hotel and Victoria Bitter fence in the background. No. 29 has a SEC Briquettes roof advertisement. .9 - No. 29, with the Cathedral in background. Tram has a SEC Briquettes roof advertisement and destination of Golden Square. .10 - side view of a bogie tram on the Eaglehawk line? Tram has a Electric cooking roof advertisement. Photo has been over exposed. .11 - Single trucker, Violet St with the Central Deborah mine head in the background. Tram has two SEC Electric Cooking roof advertisements. tramways, trams, bendigo, lake weeroona, eaglehawk, golden square, charing cross, central deborah, tram 18, tram 25, tram 29, tram 24 -
 Ballarat Tramway Museum
Album - Photo Album, c1970
Set of 16 photos of Ballarat tram system taken 1970c on a tour by an unknown Qld based person.Photo album containing 16 colour prints. Photo album has heavy card covers, covered in black textured plastic containing 12 clear plastic photo sleeves held with a white comb binder. Photos of Ballarat prior to closure, c1970. Photographer unknown. Donated by Peter Hyde of Brisbane Tramway Museum to BTM 3/2/2010, from a deceased estate. Photos apparently taken on a tram tour. .1 - No. 42 and a single trucker inbound in Sturt St. .2 - taken from tram ascending Bakery St hill in Victoria St. .3 - End of No. 42, with the destination "Haddon St via Drummond Nth" .4 - No. 11 and 42 in Lydiard St Nth, near the railway station. No. 11 showing special. .5 - photo of three people on the tour. .6 - Trams reversing at the Victoria St terminus .7 - ditto .8 - 11, 42 and 12? in Lydiard St North by railway station. .9 - Three trams at Sebastopol terminus. .10 - View in Albert St Sebastopol looking north along the track on the side of the road. .11 - View of the tram crossing in Albert St. .12 - 27 and 42 crossing Albert St Sebastopol. .13 - View of Albert St from the tram, north of the crossing looking at the reserved track 14. - Lydiard St North looking south .15 - 42 at the railway level crossing. .16 - View south of the railway level crossing, three trams, with passengers alighting.trams, tramways, ballarat, albert st, sebastopol, victoria st, sturt st, lydiard st nth, railway crossing -
 Ballarat Tramway Museum
Photograph - Digital image, 1970s
Yields information about the Bakery Hill Victoria St and the Caltex Service Station.Digital image, black and white, of No. 26 descending Bakery Hill to Stone's Corner, Victoria and Main St with the Caltex service station in the foreground. Has a lady with slacks walking across the road and a boy wheeling a bike down the footpath. Note the Highway direction signs and service station signage. O'Brien Motors and a book and record shop on the north side Bakery Hill Victoria St. shops. See Reg 4603 for the subsequent photo at this location. Photo taken by Peter Bruce 1970's and 1971, prior to the closure of the Ballarat tramway system. Peter's Title of image: "No. 26 Bridge and Vic1"trams, tramways, victoria st, main st, stones corner, bakery hill, tram 26 -
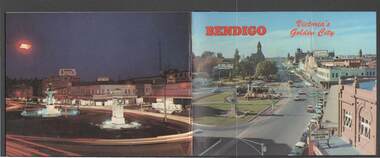 Bendigo Historical Society Inc.
Book - BENDIGO: VICTORIA'S GOLDEN CITY
Coloured booklet of various scenes and buildings in and around Bendigo, titled Bendigo Victoria's Golden City. The front cover has a scene of Charing Cross looking towards Pall Mall. Inside the front cover is a very brief history and some Historical Buildings are mentioned. They are: Fortuna, Shamrock Hotel, Gold Mines Hotel, City Hall, Post Office, Law Courts, the Home for the Aged, Sacred Heart Cathedral, St. Paul's, Specimen Cottage, Log Lock-up and the Chinese Joss House. The coloured pictures inside are: The Central Deborah Gold Mine, Fortuna, Miner's Cottage, The Gold Mines Hotel, Victoria Hill, Bendigo Law Courts, Eaglehawk Log Lock-up, Look-out Tower Rosalind Park, Alexandra Fountain - Charing Cross, Conservatory Gardens with Law Courts in background, Inside the Conservatory, Bendigo Home & Hospital for the Aged - Victoria's 'White House', Sacred Heart Cathedral, Chinese Joss House, Chinese Joss House - Interior of the Main Temple, Bendigo Pottery - Potter at work, Bendigo Municipal Offices, Bendigo Institute of Technology at Flora Hill, Mt. Alvernia Hospital, Cobb & Co Coach, R Class Locomotive, Bendigo Tramcar, Lake Weeroona and Lake Eppalock Pumping Station. Some more attractions are mentioned inside the back cover. On the back cover is the Cenotaph - the only scale replica of the Whitehall Cenotaph - and Alexandra Fountain by night.Nucolorvue Productions Pty Ltdbendigo, tourism, photographs of bendigo icons, bendigo - victoria's golden city, fortuna, shamrock hotel, gold mines hotel, city hall, post office, law courts, home for the aged, victoria's 'white house', sacred heart cathedral, st paul's, specimen cottage, log lock-up, chinese joss house, charing cross, cenotaph, alexandra fountain, centra deborah gold mine, army cartographic unit, miner's cottage, harvey town, victoria hill, look-out tower rosalind park, conservatory gardens, conservatory, bendigo pottery, bendigo municipal offices, bendigo institute of technology, mt alvernia hospital, cobb & co coach, r class locomotive, bendigo railway station, bendigo tramcar, lake weeroona, lake eppalock pumping station, art gallery, historical museum eaglehawk, melville's caves, whitehall cenotaph, nucolorvue productins pty ltd, national library of australia -
 Bendigo Historical Society Inc.
Photograph - HILDA HILL COLLECTION: BLACK AND WHITE PHOTOS, 1921
Hilda Hill Collection. Black and White Photos Total of 7 in subset, 3 containing images of Victorian Coastline in particular Pt Lonsdale and Queenscliff in 1921. Another has a family group on a property owned in Kyneton Victoria known as 'Durvol' in October 1920. Ken wearing a grey suit and sitting on a large stone in the garden stargazing, to his left is a short section of a picket fence and ornate corner post, large trees in the background. Four ladies standing on the rock as the seaside, Doreen, Nora, Lila, and Rita, all dressed in white, the second and third are carrying darker coloured coats on their arms, Queenscliff 1921.Leonie dressed in white and holding a black hat with both hands, background shows trellis and weather boards, left foreground may be heap of cut wood. Frank is sitting on steps dressed in white shirt, dark waistcoat, and dark trousers, background is brick wall and handrail attached to the steps. Four ladies in four wheel tourist coach owned by J. L. Priddle, the two at the front are both wearing white, lady to the left also is wearing a dark coat and scarf, the ladies at the rear are both wearing dark tops and the lady on the outer is wearing a white dress. The background appears to be covered on shrubbery. Four ladies sitting on the rocks at Queenscliff February 1921, Three of the ladies are dressed in white, one in a darker colour, all are wearing hats of similar design either black or white. Pone man dressed in a black suit with a white shirt and black tie, the three ladies are all wearing white blouses and darker dresses, the child at the front is dressed entirely in white, Merry??? Durvol October 1920.Hilda Hill Persdonal Collectionaustralia, history, port londsdale & queenscliff, hilda hill ? realted to frank a hill, stock and station agent and hill family real estate. family owned property out at eppalock. could this be where 'the ranch' property was located? -
 Ballarat Tramway Museum
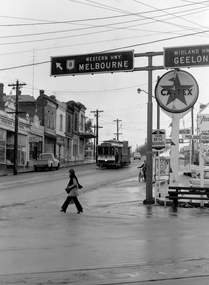
Slide - 35mm slide/s, early 1960's
Bendigo Charing Cross, looking east towards railway station, with SEC No. 7 about to depart for Eaglehawk. A Birney tram in background heading for Quarry Hill. Photo shows 'Ezywalkin' and 'Fountain Plaza' buildings, has large white with black lettering road signs on left. On centre pole in front of tram is smaller road direction signs (yellow with black letters) for Echuca, Heathcote and Melbourne. Tram has dash canopy lights, early 1960's.niltramways, trams, bendigo, charing cross, quarry hill, eaglehawk, tram 7 -
 Kew Historical Society Inc
Photograph - Farewell to 'Our Lady of Fatima'. Xavier College 22/4/51
The Kew railway was opened in 1887, and diverged from the main (Box Hill–Lilydale) line about half-way between Hawthorn and Glenferrie. From the point of divergence the line was slightly less than one mile long, and it had only one intermediate station — Barker. There were four road over-bridges and two level crossings, including one over the busy Barkers Road. The line supported a passenger and goods service, and was electrified in December 1922, at the same time as the main line to Box Hill. There were a number of peak hour services which ran from Flinders Street station (Melbourne) to Kew, but in 1938 all but one of these were diverted to the Ashburton line, where traffic was growing. This had an adverse effect on Kew traffic, as passengers from Kew needed to cross over a footbridge at Hawthorn to change trains, and the main line trains were usually already crowded by the time they reached Hawthorn. At about the same time the off-peak trains were replaced by road buses. In 1952 all passenger trains were withdrawn, but the road bus service continued for many years. Goods trains were finally withdrawn in 1957, and the railway was dismantled in 1958-59. (Source: Frank Stamford, 'The Hawthorn - Kew Railway')Small black and white snapshot of a train leaving Kew Station with the Xavier Chapel on the hill in the background, hence the ironic title provided by the photographer. The photograph, one of 12, is part of a larger album of newspaper clippings, timetables, tickets and photos relating to the Kew Railway Line, taken and compiled by Lachlan Richardson, while a resident of Kew. The album dates from the 1950s. The album is part of a larger subject file on the Kew Line, compiled over time by members of the Kew Historical Society."Farewell to 'Our Lady of Fatima'. Xavier College 22/4/51"kew railway line, transport -- railways -- kew (vic.), kew branch line, xavier college, kew railway station -
 Surrey Hills Historical Society Collection
Photograph, Surrey Hills Mounted Police Station (Dem.)
Surrey Hills Mounted Police Station was located at 5 Suffolk Road (dem.) from 1889-1914. It was a police residence with two rooms as the police office and workshop. There were stables on the back fence. The property adjoined Wyclif Church in Norfolk Road. Gilbert McCallum rented from c.1914-1923 when he built a home in Westminster Street. It is his son Archie who can just be seen on the front steps. Archie remembers the 2 storied stables with a gantry for hauling feed sacks up with a block and tackle, then a polished wood slide to send the feed down. The McCallum children and local friends found this to be a marvellous slide. David McPhie, ex-police force, lived here with his family from 1923-c.1950. A black and white photograph showing a mid to late Victorian style weatherboard house with decorative brackets under the eaves. The verandah is of timber with decorative timber fretwork.surrey hills mounted police, suffolk road, surrey hills, wyclif church, (mr) gilbert mccallum, (mr) david mcphie, police, (master) archie mccallum -
 Surrey Hills Historical Society Collection
Photograph, Denholm's Garage, 209 Union Road, Surrey Hills
Fred Lyons (cab driver) and Dave Denholm (garage proprietor) worked together in a business servicing cars and providing vehicles for weddings etc. The photo came as part of a donation of photos related to Fred Lyons, his family and business. The building and automotive business was taken over and became J & V Warren-Smith Auto Service. In 2018 it is managed by John and Val's son Phillip and is believed to be the only business in the Union Road shops with a continuous history of use.A back and white photograph of a garage called Union Motor Garage. It has a brick facade, with an arched window either side of the driveway. A petrol bowser stands in front of each window. There is a car in the driveway.On small card: Union Motor Garage / D. B. Denholm, Proptr. / 209 UNION ROAD, SURREY HILLS / Phone Box Hill 959 / AUSTIN OAKLAND / PONTIAC DOUGLAS.::denholm's garage, union motor garage, union road, surrey hills, (mr) dave b. denholm, (mr) fred lyons, petrol stations, petrol pumps, j & v warren-smith auto service -
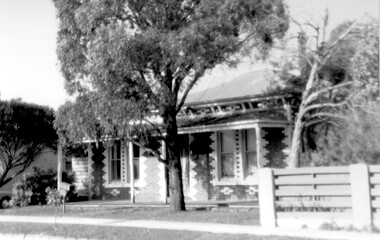 Surrey Hills Historical Society Collection
Photograph, 1 Russell Street, Surrey Hills in 1988
1 Russell Street was built in 1888 and from 1888–1905 (maybe 1911, as his death notice says he died at Russell Street) it was the home of James Burrell, a blacksmith. His smithy was on the corner of Canterbury Road. In 1893 a block of land (No.3 ) was bought to establish the fire station and James Burrell acted as fire officer and stored the reel and hose until the station was built. From 1911–1928 it was the fire station residence, as the brigade gained status. James Burrell (1860-1911) married Elizabeth Wilson (1862-1925). She was daughter of Edward Wilson. They had 4 children: James Herbert, known as Bert (1888-1953); Aleck (1890-1951); William Spencer, known as Bill, (1893-1976) and Elsie May (1898-1990). Both James and Elizabeth Burrell are buried in Burwood Cemetery. From 1930–1943 Michael Ginnane, retired station master, and members of his family lived in the house. Michael Ginnane (1864-1935) married Annie Mary Brock (1868-1945). Both were born in the Ballarat area. They had 10 children. From 1913-1917 he was station master at Woodend. In the 1925 electoral rolls the family is listed as living at Surrey Hills station. There was a station master's house adjacent to the station (demolished and the site now part of the car park accessed off Blackburn Street). They are again listed here in the 1925 electoral roll. By 1931 they are at 1 Russell Street and he is listed as a retired station master. The following children lived in Surrey Hills: John James (Clerk) - 1922 Mary Ellen (HD) - 1922, 1925, 1931 Michael Thomas (labourer) - 1922 Annie Florence (dressmaker) - 1925, 1931 William Patrick (railwayman) - 1925 Elizabeth Catherine (sales) - 1931 Patrick Leo (postman) - 1931. A black and white photograph taken on an angle from across the street of a mid-late Victorian style cottage with multi-coloured brickwork. There is a large tree in the front garden, no fence and a letterbox on a lean.(mr) james burrell, blacksmiths, canterbury road, surrey hills, fire officers, (mr) michael ginnane, station masters, fire stations, mid-victorian style, (miss) elizabeth wilson, (mrs) elizabeth burrell, james herbert burrell, aleck burrell, william (bill) spencer burrell, elsie may burrell, (miss) annie mary brock, (mrs) annie mary ginnane, john james ginnane, (miss) mary ellen ginnane, michael thomas ginnane; (miss) annie florence ginnane; william patrick ginnane; elizabeth catherine ginnane; patrick leo ginnanean), late-victorian style, russell street -
 Surrey Hills Historical Society Collection
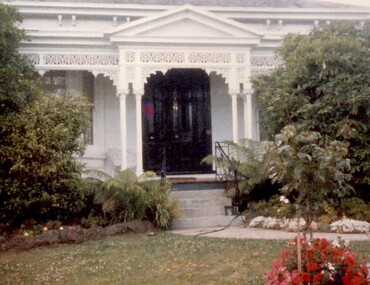
Photograph, 101 Guildford Road, Surrey Hills
The house was built in 1883, possibly to encourage development of housing on the first urban land subdivision in Surrey Hills, the Windsor Park Estate (in the Windsor Crescent area). This coincided with the opening of the Surrey Hills Railway station. The first occupant was John Brown Nicholson, police magistrate. In 1884 the foundation meeting of the Wyclif Congregational Church was held in the house.Colour photo of the front door and verandah of 101 Guildford Road taken from the street. The house is Victorian in style with ornate lacework along the verandah. It is painted white and has a slate roof. There is a well-maintained garden with flower beds and shrubs, which partially obscure the house.victorian style, wyclif church, houses, guildford road, john brown nicholson -
 Surrey Hills Historical Society Collection
Photograph, Churchill Street, Mont Albert and Mont Albert Station, looking towards Hamilton Street, 1919, 1919
The railway extended through to Mont Albert in 1882, but it wasn't until 1890 that a station was built with funds raised by a syndicate of local landowners.The buildings on the south side of the railway were built in 1910-1911 in the Arts and Crafts style by architect, K W Hardy. The land occupied by the Hamilton Street shops was subdivided in the 1880s and the first purpose-built shop was 'Pope and Moran, Grocers'. This shop later became Tom Morris' Grocery. By 1930 shops stretched along both sides of Hamilton Street and part way along Churchill Street. The donor, the late Norman Carter held a significant collection of photos taken around Mont Albert and Surrey Hills, in particular subjects related to the Church of England.Black and white photo taken from the centre of the road in Churchill Street, Mont Albert. Mont Albert station is on the RHS fenced off by a post and rail fence. Shops can be seen at the intersection of Hamilton and Churchill Streets. There do not appear to be any shops in Churchill Street. There are newly planted street trees within paling guards on the LHS. There does not appear to be any curb and channelling at the side of the road.Rear in blue biro in Jocelyn Hall's handwriting "Mont Albert Station 1919".mont albert station, railways, hamilton street, churchill street, shops, arts and crafts style, norman carter -
 Surrey Hills Historical Society Collection
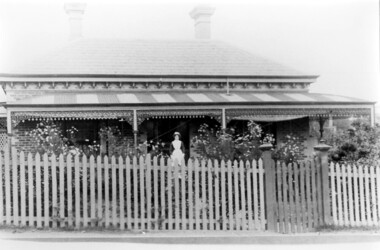
Photograph, Dr Blakie's home and surgery, 171 Union Road, Surrey Hills
The photo would have been taken prior to 1913 as Dr Blakie moved across the road to 174 Union Road to a purpose-built home/surgery designed by architect Arthur Plaisted. He practised at 171 Union Road joining or taking over from Dr Percy Liddle in 1905. The property was rented from the Zeplin family who built the house in 1890, which was known as 'Edgeware', and originally owned all the land bound by the railway, Union Road, Wilson Street and Montrose Street. in the 1920s to 1930s. 1906 became the home of Dr James Blakie, surgery was to the left of house. In 1912 Blakie had house built opposite (now Medical Centre). In 1920s-30s 'Edgeware' became Surrey Hills Police Station. Family details: James Blakie was born in New Zealand to a farming family of Scottish origin. He trained at Otago University with additional study at Cambridge. He married Catherine Miller Martin in 1906. They had 4 children: Geoffrey Noel (1906-1955); Raymond James (1907-1989); Theodore (1913-1913) and a daughter.Black and white photo of a Victorian style home with a slate roof, 2 chimneys, and a striped corrugated iron front veranda to 2 sides with decorative iron fretwork. It has a picket fence and an established garden with a central path leading to the front door. A woman, identified as Nurse Jones, is standing on the veranda.victorian style, homes, edgeware, house names, union road, montrose street, surrey hills, police station, zeplin family, professor zeplin, doctors, medical services, nurses, nurse jones, dr james landells blakie, dr percy liddle, mrs catherine miller blakie, raymond james blakie, geoffrey noel blakie, surrey hills police station, arthur plaisted, architects, edgeware, house names, 1890-1900 -
 Surrey Hills Historical Society Collection
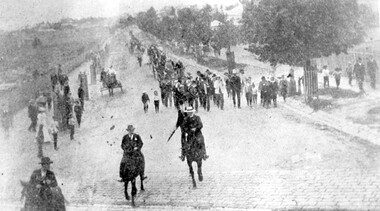
Photograph, Parade in celebration of King Edward VII's birthday, 1902, 1902
The parade was held in celebration of King Edward VII's birthday on 4 July 1902. This was the first public appearance of the German Band formed on 30 May 1902. The leading horseman is Mr Rowland Coe. He is followed by Mr George Robinson, a butcher of Canterbury Road. The man in the white hat is Mr Sam Kellett, businessman of Erasmus Street. Behind him on foot and partly obscured is Mr Alexander McNeill of the Surrey Family Hotel. Band master is Harry Pollard, painter and paper-hanger, and next to him is Constable Hill. The small boy in the sailor suit is Perc Venman of Essex Road and in the buggy near the footpath is Mr and Mrs William Maling. Information came from David Staig senior. Further research: William Saunders Maling, a son of John Butler Maling, was a builder who lived at 17 Balwyn Road, Canterbury. Rowland Coe, a butcher and son of James and Elizabeth Coe of Sunbury Crescent enlisted in AIF in WW1. He later lived at 233 Elgar Road, Box Hill. William Percival Reginald (Perc) Venman was born in Surrey Hills in 1894; he died in Surrey Hills in 1951 and lived at 27 Essex Street for much of his life. He and his wife are buried in Box Hill Cemetery. The identity of Sam Kellett of Erasmus Street is questioned. Edward Kellett built 'Yielma' in Erasmus Street but was deceased by 1902. He had 3 sons: Edward Allan (1854-1932); George Henry (1858-1921) and William John (1865-1945).Black and white photo of a number of men on horses leading a parade down Station Street (Windsor Crescent) to Union Road. Street trees on the RHS are mature whilst the ones on the LHS look to be newly planted. They have wooden guards around them. The area to the left is blurry but would be the railway line and station surrounds. Roads are well formed with bluestone channels.parades and processions, bands, german band, windsor crescent, william saunders maling, mrs hannah maling, miss hannah miller, constable hill, perc venman, george robinson, sam kellett, alexander mcneill, rowland coe, harry pollard, william percival reginald venman -
 Surrey Hills Historical Society Collection
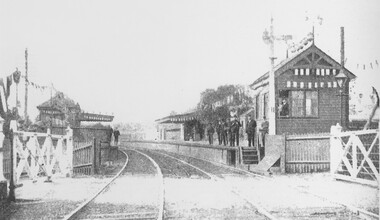
Photograph, Surrey Hills railway station on Empire Day in 1909
Man in the signal box is believed to be Mr J Rasmussan and the assistant stationmaster, Mr Tom Keating. Published in book 'Surrey Hills in Celebration of its Centenary: 1883-1983', compiled by the History Nook and edited by William Chandler.Black and white photo of Surrey Hills railway station on Empire Day in 1909. Signal box and station are decorated with bunting and lanterns. Gates are closed and there is a man in the signal box. There are approximately 9 men on the platforms including the stationmaster, assistant stationmaster, Mr Tom Keating and other railway officials.transport, empire day, railways, surrey hills station, mr tom keating, mr j rasmussan -
 Surrey Hills Historical Society Collection
Photograph, Fred Lyons' hansom cab, c1916, 1916
This is one of a series of photos donated by Arthur Lyons. From 1907 a cab service operated from near the railway gates in Union Road. It was established and maintained by Mr C Fraser until c1916. George Rea either took over then or set up in opposition; he retired in 1945. Fred Lyons initially worked for George until he set up his own business. In time he changed over to a motor vehicle and continued his service until 1960. Frederick Adolphus Lyons (1891-1980) was born in Surrey Hills, son of Thomas and Catherine Lyons. He married Elizabeth Ruby Hall in 1918. They lived just around the corner at 55 Sunbury Crescent. The Lyons’ home in Sunbury Crescent was called ‘Knopshambury’ - this was probably a misspelling of Knockshanbally in Co Kilkenny, the birth place of Fred’s father, Thomas Edmund Josias Lyons (1846-1915). Arthur Lyons was born in Surrey Hills on 12 Jun 1920. He became a motor mechanic / welder and lived at 55 Sunbury Crescent. W T Nisbe... is probably William Thomson Nisbet, traveller of 'Maroona', Brenbeal Street, Balwyn listed in 1903, 1914, 1919 electoral rolls. His wife was Mary Grace Nisbet, son was William Thomson Nisbet Jnr (clerk) and daughter was Olive Thomson Nisbet (dressmaker). The donation was made while he was in hospital. He died shortly afterwards (23 Sep 1990). Donation was finalised by a neighbour, Mrs Florence Ann Armitstead, wife of Glen Victor Armitstead. Glen was a local hairdresser. They moved to 11 Sunbury Crescent after their marriage in 1939. Arthur had no relatives to distribute the material to.Black and white photo of Fred Lyons in one of his hansom cabs with his horse 'Barney' taken near Surrey Hills railway station. Another hansom cab is to the right of the photo and there is another man standing on the footpath. In the background are shops and the partial hoarding of W T Nisbe... is visible. The photo was taken between 1916-1927. On rear of the duplicate print in pencil in Jocelyn Hall's handwriting : "NO 59 / and 89 / Spare ? / perhaps better than enlargement"transport, horse drawn vehicles, businesses, fred lyons, frederick adolphus lyons, william thomas nisbet -
 Surrey Hills Historical Society Collection
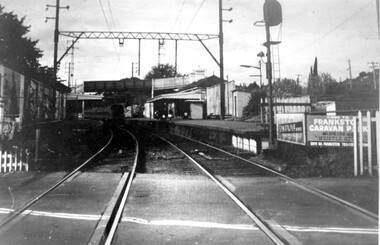
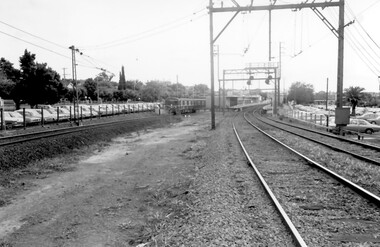
Photograph, Surrey Hills railway station, 1973, 1973
... hills railway station Black and white photo of Surrey Hills ...This would have been taken shortly before the station was demolished.Black and white photo of Surrey Hills railway station taken from the tracks near the gates in 1973. It shows the wooden pedestrian overpass and the original station buildings with extended shelters over the platforms.There is a newspaper kiosk on the southern platform. The train is coming into the platform and there is a small group of passengers waiting. Advertising hoarding for Spaceline Homes and the Frankston Caravan Park are mounted at the end of the southern platform. railways, land transport, surrey hills railway station -
 Surrey Hills Historical Society Collection
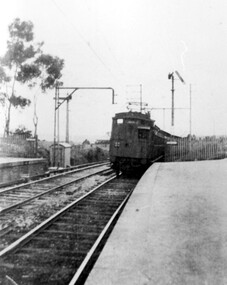
Photograph, Early electric train at Mont Albert Station, c1926, 1926
Date is approximate. Electric trains replaced steam locomotives in 1922. Mr William Holmes of 'Lugano', Mont Albert Road was in charge of the design and introduction of the electrification of the Melbourne rail system.Black and white photo of an early electric train approaching the platform at Mont Albert station. A couple of spindly eucalyptus trees can be seen beyond the picket fence marking the boundary of the platform.Black and white photo mounted on card; measures 16.3 cm x 23.4 cm.mont albert station, railways, trains, norman carter -
 Surrey Hills Historical Society Collection
Photograph, Surrey Hills Station and car park
There are 3 tracks; the third track was built in 1971, which gives an approximate date for the photo. At this time the original station buildings were demolished and replaced by buildings constructed from concrete bricks and a second subway replaced the overhead footbridge. According to Roderick Smith, a local railway enthusiast, originally there had been 3 railway houses at the Mont Albert end of the northern car park. These were demolished to extend the car park. Certainly 8 Bedford Avenue, built as the station master's house was demolished at this time. The palm tree had been planted in the station master's front garden and was retained in a small garden bed within the car park. A black and white photograph of a station with cars parked on both sides of the 3 tracks. A Harris train is departing the station heading towards Mont Albert. A palm tree is prominent in the station car park to the north.1971, surrey hills station, railway stations, car parks, public transport, trains, railway lines, palm tree -
 Surrey Hills Historical Society Collection
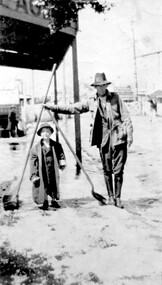
Photograph, Fred Lyons and his son Arthur after a hail storm, 1924, 1924
Lyons family history: Frederick Adolphus (Fred) Lyons operated a cab / taxi service in Union Road for several decades. Arthur was the only son of Frederick Adolphus Lyons (1891-1980) who was born in Surrey Hills, son of Thomas and Catherine Lyons. He married Elizabeth Ruby Hall in 1918. They lived at 55 Sunbury Crescent. The Lyons’ home was called ‘Knopshambury’ - this was probably a misspelling of Knockshanbally in Co Kilkenny, the birth place of Fred’s father, Thomas Edmund Josias Lyons (1846-1915).Arthur Lyons was born in Surrey Hills on 12 Jun 1920. He became a motor mechanic / welder and lived his whole life at 55 Sunbury Crescent. This is one of a series of photos donated by Arthur Lyons. The donation was made while he was in hospital. He died shortly afterwards (23 Sep 1990). Donation was finalised by a neighbour, Mrs Florence Ann Armitstead, wife of Glen Victor Armitstead. Glen was a local hairdresser. They moved to 11 Sunbury Crescent after their marriage in 1939. Arthur had no relatives to distribute the material to. The hail storm occurred on 2 December 1924.Despite the poor condition, this is significant because of the clear detail of the Union Road buildings and railway crossing in the background in 1924.Black and white photo of cab driver Fred Lyons with his son Arthur taken at the cab rank near the Surrey Hills station, clearing up after a hail storm in 1924. Fred balances 2 large shovels; Arthur has an over-sized jacket on. The railway gates and overhead lines can be clearly seen in the background. Despite the poor condition, it is a relatively significant photo as it details Union Road buildings and the railway crossing clearly behind it.On back of photo is written in pencil "copied 1996" and in blue pen "2/12/24"railway crossings, hail storms, frederick adolphus lyons, fred lyons, arthur frederick lyons, arthur lyons -
 Surrey Hills Historical Society Collection
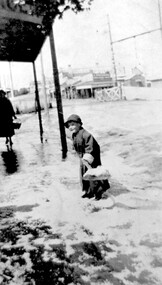
Photograph, Arthur Lyons in Union Road after a hail storm, 1924, 1924
The hail storm occurred on 2 December 1924. This is one in a series from the Lyons' photo collection. This was gifted to the SHNCHC by Arthur Frederick Lyons, son of Frederick Alphonsus (Fred) Lyons and Elizabeth Ruby Hall, who married in 1918. Fred Lyons died 4/10/1980. The Lyons’ home in Sunbury Crecent was called ‘Knopshambury’ - this was probably a misspelling of Knockshanbally in Co Kilkenny, the birth place of Fred’s father, Thomas Edmund Josias Lyons (1846-1915). Arthur was born in Surrey Hills on 12 Jun 1920. He became a motor mechanic / welder and lived at 55 Sunbury Crescent. The donation was made while he was in hospital. He died shortly afterwards (23 Sep 1990). Donation was finalised by a neighbour, Mrs Florence Ann Armitstead, wife of Glen Victor Armitstead. Glen was a local hairdresser. They moved to 11 Sunbury Crescent after their marriage in 1939. Arthur had no relatives to distribute the material to.Historically significant as it shows clearly the buildings and railway crossing in Union Road.Black and white photo of Arthur Lyons as a child with a shovel in hand taken at the cab rank near the Surrey Hills station, clearing up after a hail storm in 1924. The railway gates and overhead lines can be seen in the background. On back in pencil was "Copied 1996" and also "2/12/1924"railway crossings, hail storms, arthur lyons -
 Surrey Hills Historical Society Collection
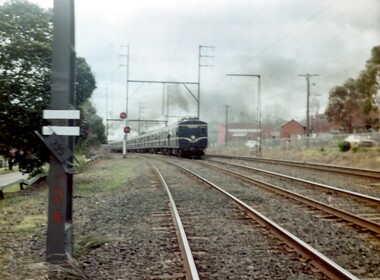
Photograph, A blue Harris electric train heads towards Union Road, Surrey Hills
The Harris blue electric trains were introduced in c1955 and followed the 'Red Rattlers'. They had a long life and were named after Norman Charles Harris, Chairman of Commissioners of the Victorian Railways, between 1940 and 1950. The first 30 7-carriage trains, known as the first series, were constructed in the United Kingdom by Gloucester Railway Carriage and Wagon Company, and delivered between 1956 and 1959. Another 30, the second series, were built by Martin & King in Melbourne, and delivered between 1961 and 1967. The trains had either two or three sets of hand-operated dual sliding doors per carriage side. Later they were fitted with power doors. Initially, until late 1978, the interiors were split into smoking and no-smoking compartments. In 1978 smoking on trains was abolished. Carriages were also designated as First or Second class until 1958, when one class travel was introduced. they had florescent lights but no heating. Most of the early carriages did not have end doors and gangways between carriages, but safety concerns led these being incorporated in the sets delivered from mid-1966. With the exceptions of the last few carriages built, all Harris trains contained asbestos insulation. The first sets contained blue asbestos, and the later sets contained white asbestos in the linings for insulation of noise and temperature. Due to the presence of asbestos, they began to be withdrawn from the mid-1980s and most were disposed of in the 1990s, by being buried at Talbot Quarry in Clayton, some having been wrapped in plastic. No original Harris trailer cars remain. A coloured photograph of a blue Harris electric train heading towards Surrey Hills station from Mont Albert station. The electricity sub-station and Lorne Parade are on the RHS of the photo and Beresford Street on the LHS. The grey, smoggy appearance of the sky suggests a winter's morning.surrey hills, trains, lorne parade, beresford street, norman charles harris, gloucester railway carriage and wagon company, martin & king, talbot quarry, harris blue train -
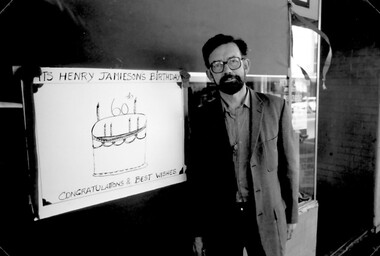 Surrey Hills Historical Society Collection
Photograph, Exterior of Henry Jamieson Radio Business, 145 Union Road, Surrey Hills
Henry was born in View Street and then Newton Street. He went to Box Hill Grammar School. Before his marriage he lived in Mont Albert Road. Adrian Knowles had started a radio shop at 145 Union Road in the 1940s and Henry joined him later continuing the business in his own name. Henry always had an interest in music and became involved in getting the radio station 3MBS established in Kew. For some years Henry and a co-producer presented a prime time Saturday evening programme and also an early morning one.A black and white photograph of a man with dark hair, wearing dark rimmed glasses and a suit coat, is standing beside a white board someone has decorated for Henry Jamieson's 60th birthday.(mr) henry jamieson, view street, newton street, box hill grammar school, mont albert road, union road, surrey hills, 3mbs, adrian knowles