Showing 1702 items
matching concreting
-
 Bendigo Historical Society Inc.
Document - STATE RIVERS AND WATER SUPPLY COMMISSION VICTORIA : CENTRAL PLANT WORKSHOPS
State Rivers and Water Supply Commission of Victoria. Brochure titled 'Central Plant Workshops'. Double-sided, three pages on each. Information about the workshops (CPW for short) and the setting up of the Bendigo site from 1946. There is a map of the layout of the site, and information given under the following headings - Central Plant Workshops, Work of the CPW, Meter Wheels, Pump Station Equipment, Steel Fabrication, Precast Concrete, and the Area and its Equipment. The brochure is dated June, 1968.state infrastructure, water supply, coliban system, state rivers and water supply commission of victoria. coliban system. central plant workshops. -
 Bendigo Historical Society Inc.
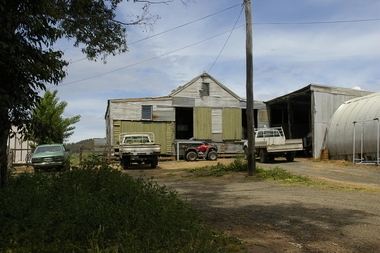
Photograph - Historical Society Field Trip to the Springs at Sedgwick, Abt 2009
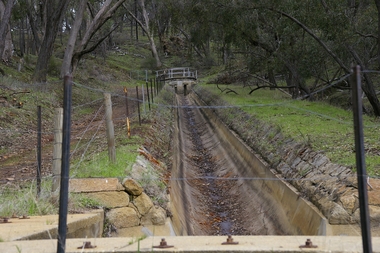
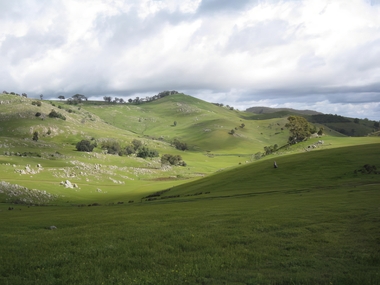
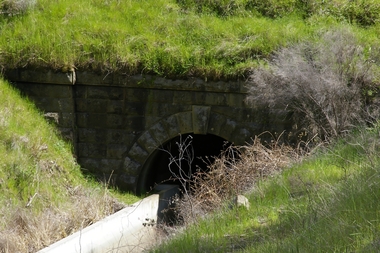
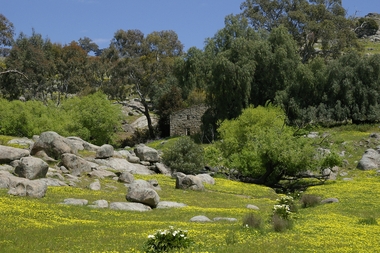
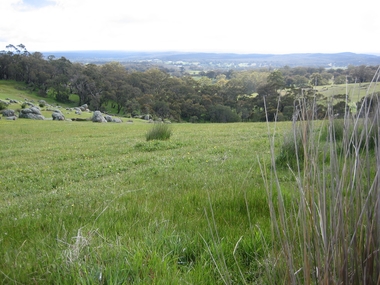
The Phil Wilkin Collection contains a series of 11 Items. The related items can be found by clicking on the reference link below. The following history of the Young family and their descendants who lived at the Springs is provided by Phil Wilkin. His Great Grandparents were Frances Young and August Wirth. Phil has also provided notes on the Wilkin Family and some history of the gold mining in Sedgwick. Frances Young's parents Joseph and Margaret Young owned the property called "The Old Place, Preston Vale or Wellington Flat" at Sedgwick near the Springs. Joseph Young owned and Managed the Standard Brewery which was located at Campbells Creek during the late 1800’s early 1900’s. Joseph and Margaret are buried in the Harcourt cemetery. In 1880 August Wirth lived at Mosquito Creek (Lake Eppalock, Victoria) when he married Frances Young. In 1902 they moved to part of Joseph Young's property. They milked cows and sold cattle for a living. One of their children Charles Wirth (Phil Wilkin's Grandfather) bought the land in 1935 after his parents had died. Charles Wirth was a councillor and also was president of the Shire of Strathfieldsaye. The "Old Place" was part of the property owned by members of the family. The old house at the Springs was burnt out by bushfire in January 1944 and much of the stonework was later vandalized by campers. The original Coliban Water Works were designed in 1863 by the Irish engineer Joseph Brady. The system included 70 kilometres of open water channels, aqueducts, syphons and tunnels to carry water (by gravity) from the Coliban River at Malmsbury, north to Castlemaine and Bendigo. Sedgwick is a locality in Central Victoria, Australia. It is located in the City of Greater Bendigo. Facilities include a public hall that opened in 1958 and CFA Rural fire station. It was named Upper Emu Creek until 1901 when it was renamed as Sedgwick after British geologist Adam Sedgwick.Twenty nine photos taken on a field trip by the Bendigo Historical Society to "The Springs" on the main Coliban water channel from Malmsbury to the Sandhurst Reservoir in Bendigo. The water race descends through a concrete chute, and continues sharply around the contour of the hills. Once it descended into a syphon across the gully. The are 182 photos in this series and can be found at 8683.1 to 8683.11. The series also includes photos of the surrounding farming land and the remains of an old house. There are also some notes on the pioneers of the district.history, bendigo, coliban water, joseph brady, irrigation, the springs, sedgwick -
 Bendigo Historical Society Inc.
Photograph - Historical Society Field Trip to the Springs at Sedgwick, Abt 2009
The Phil Wilkin Collection contains a series of 11 Items. The related items can be found by clicking on the reference link below. The following history of the Young family and their descendants who lived at the Springs is provided by Phil Wilkin. His Great Grandparents were Frances Young and August Wirth. Phil has also provided notes on the Wilkin Family and some history of the gold mining in Sedgwick. Frances Young's parents Joseph and Margaret Young owned the property called "The Old Place, Preston Vale or Wellington Flat" at Sedgwick near the Springs. Joseph Young owned and Managed the Standard Brewery which was located at Campbells Creek during the late 1800’s early 1900’s. Joseph and Margaret are buried in the Harcourt cemetery. In 1880 August Wirth lived at Mosquito Creek (Lake Eppalock, Victoria) when he married Frances Young. In 1902 they moved to part of Joseph Young's property. They milked cows and sold cattle for a living. One of their children Charles Wirth (Phil Wilkin's Grandfather) bought the land in 1935 after his parents had died. Charles Wirth was a councillor and also was president of the Shire of Strathfieldsaye. The "Old Place" was part of the property owned by members of the family. The old house at the Springs was burnt out by bushfire in January 1944 and much of the stonework was later vandalized by campers. The original Coliban Water Works were designed in 1863 by the Irish engineer Joseph Brady. The system included 70 kilometres of open water channels, aqueducts, syphons and tunnels to carry water (by gravity) from the Coliban River at Malmsbury, north to Castlemaine and Bendigo. Sedgwick is a locality in Central Victoria, Australia. It is located in the City of Greater Bendigo. Facilities include a public hall that opened in 1958 and CFA Rural fire station. It was named Upper Emu Creek until 1901 when it was renamed as Sedgwick after British geologist Adam Sedgwick.Twenty five photos taken on a field trip by the Bendigo Historical Society to "The Springs" on the main Coliban water channel from Malmsbury to the Sandhurst Reservoir in Bendigo. The water race descends through a concrete chute, and continues sharply around the contour of the hills. Once it descended into a syphon across the gully. The are 182 photos in this series and can be found at 8683.1 to 8683.11. The series also includes photos of the surrounding farming land and the remains of an old house. There are also some notes on the pioneers of the district.history, bendigo, coliban water, joseph brady, irrigation, the springs, sedgwick -
 Bendigo Historical Society Inc.
Photograph - Historical Society Field Trip to the Springs at Sedgwick, Abt 2009
The Phil Wilkin Collection contains a series of 11 Items. The related items can be found by clicking on the reference link below. The following history of the Young family and their descendants who lived at the Springs is provided by Phil Wilkin. His Great Grandparents were Frances Young and August Wirth. Phil has also provided notes on the Wilkin Family and some history of the gold mining in Sedgwick. Frances Young's parents Joseph and Margaret Young owned the property called "The Old Place, Preston Vale or Wellington Flat" at Sedgwick near the Springs. Joseph Young owned and Managed the Standard Brewery which was located at Campbells Creek during the late 1800’s early 1900’s. Joseph and Margaret are buried in the Harcourt cemetery. In 1880 August Wirth lived at Mosquito Creek (Lake Eppalock, Victoria) when he married Frances Young. In 1902 they moved to part of Joseph Young's property. They milked cows and sold cattle for a living. One of their children Charles Wirth (Phil Wilkin's Grandfather) bought the land in 1935 after his parents had died. Charles Wirth was a councillor and also was president of the Shire of Strathfieldsaye. The "Old Place" was part of the property owned by members of the family. The old house at the Springs was burnt out by bushfire in January 1944 and much of the stonework was later vandalized by campers. The original Coliban Water Works were designed in 1863 by the Irish engineer Joseph Brady. The system included 70 kilometres of open water channels, aqueducts, syphons and tunnels to carry water (by gravity) from the Coliban River at Malmsbury, north to Castlemaine and Bendigo. Sedgwick is a locality in Central Victoria, Australia. It is located in the City of Greater Bendigo. Facilities include a public hall that opened in 1958 and CFA Rural fire station. It was named Upper Emu Creek until 1901 when it was renamed as Sedgwick after British geologist Adam Sedgwick.Twenty six photos taken on a field trip by the Bendigo Historical Society to "The Springs" on the main Coliban water channel from Malmsbury to the Sandhurst Reservoir in Bendigo. The water race descends through a concrete chute, and continues sharply around the contour of the hills. Once it descended into a syphon across the gully. The are 182 photos in this series and can be found at 8683.1 to 8683.11. The series also includes photos of the surrounding farming land and the remains of an old house. There are also some notes on the pioneers of the district.history, bendigo, coliban water, joseph brady, irrigation, the springs, sedgwick -
 Bendigo Historical Society Inc.
Photograph - Historical Society Field Trip to the Springs at Sedgwick, Abt 2009
The Phil Wilkin Collection contains a series of 11 Items. The related items can be found by clicking on the reference link below. The following history of the Young family and their descendants who lived at the Springs is provided by Phil Wilkin. His Great Grandparents were Frances Young and August Wirth. Phil has also provided notes on the Wilkin Family and some history of the gold mining in Sedgwick. Frances Young's parents Joseph and Margaret Young owned the property called "The Old Place, Preston Vale or Wellington Flat" at Sedgwick near the Springs. Joseph Young owned and Managed the Standard Brewery which was located at Campbells Creek during the late 1800’s early 1900’s. Joseph and Margaret are buried in the Harcourt cemetery. In 1880 August Wirth lived at Mosquito Creek (Lake Eppalock, Victoria) when he married Frances Young. In 1902 they moved to part of Joseph Young's property. They milked cows and sold cattle for a living. One of their children Charles Wirth (Phil Wilkin's Grandfather) bought the land in 1935 after his parents had died. Charles Wirth was a councillor and also was president of the Shire of Strathfieldsaye. The "Old Place" was part of the property owned by members of the family. The old house at the Springs was burnt out by bushfire in January 1944 and much of the stonework was later vandalized by campers. The original Coliban Water Works were designed in 1863 by the Irish engineer Joseph Brady. The system included 70 kilometres of open water channels, aqueducts, syphons and tunnels to carry water (by gravity) from the Coliban River at Malmsbury, north to Castlemaine and Bendigo. Sedgwick is a locality in Central Victoria, Australia. It is located in the City of Greater Bendigo. Facilities include a public hall that opened in 1958 and CFA Rural fire station. It was named Upper Emu Creek until 1901 when it was renamed as Sedgwick after British geologist Adam Sedgwick.Twenty five photos taken on a field trip by the Bendigo Historical Society to "The Springs" on the main Coliban water channel from Malmsbury to the Sandhurst Reservoir in Bendigo. The water race descends through a concrete chute, and continues sharply around the contour of the hills. Once it descended into a syphon across the gully. The are 182 photos in this series and can be found at 8683.1 to 8683.11. The series also includes photos of the surrounding farming land and the remains of an old house. There are also some notes on the pioneers of the district.history, bendigo, coliban water, joseph brady, irrigation, the springs, sedgwick -
 Stawell Historical Society Inc
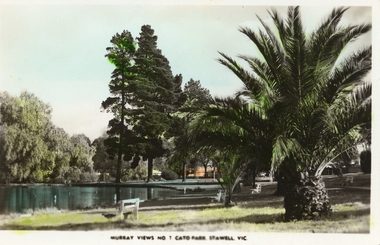
Photograph, Cato Lake -- with palms & trees -- Coloured
Coloured Postcard Murray Views No. 7. Cato Park Stawell Victoria. The three black and white photos are missing the larger palm tree on the right in the foreground. The view is of the lake surrounded by trees and bench seating. One colour post card Murray View No 7 Cato Park Stawell Victoria plus two similar black & white photos one smaller the other an enlargement. Also a small B&W photograph in Album 14, p28. The post card is a view of a section of the lake surrounded by willows, 2 tall pine trees and one large palm tree on the right. The lake is also surrounded by 3 concrete & wood bench seats with maybe a 4th in the distance. Murray View No 7 Cato Park Stawell Vic. On the back "Post Card Real Photograph produced in Australia by Murray View, Gympie, Q".stawell -
 Stawell Historical Society Inc
Photograph, Cato Lake with the Swimming Pool c 1950's
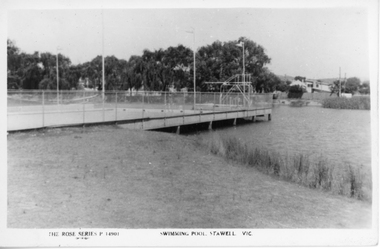
Two black and white post cards of the Olympic swimming pool in Cato lake c 1950's. The Rose Series P 14901 shows the swimming pool and lake with the swimming pool dominating the photograph. Four flag posts are clearly visible and the pool connected to the edge of the lake. The Rose Series P 14012 also shows the Olympic pool but more of the lake and boundary. with seating around the lake. In March 1957 Cato Lake was emptied for construction of the Olympic pool and officially opened on 15.11.1958. Twenty seven years later In January 1985 the pool was found to be leaking and Borough Council in February banned further use of the Olympic pool. Eventually the Olympic pool was demolished in April 1988.Two black & white Rose series post cards of Cato Olympic swimming pool Stawell Vic. c 1950's. Series P 14901 is nearly a complete view of the Olympic pool with four flag posts in view and trees and buildings in the distance. Series P 14012 has only a small section of the Olympic pool in the photograph with just 3 flag poles in view. There are 2 concrete and timber seats in the foreground and Cato lake is very still, reflecting the distance trees.The Rose Series P 14901 Swimming Pool Stawell Vic. and The Rose Series P 14912 Cato Park and swimming pool Stawell, Vic. Both post cards were Published by Rose Stereograph Co., Armadale, Victoria. The "Rose" series De Luxe.stawell -
 Lakes Entrance Regional Historical Society (operating as Lakes Entrance History Centre & Museum)
Postcard, 1917c
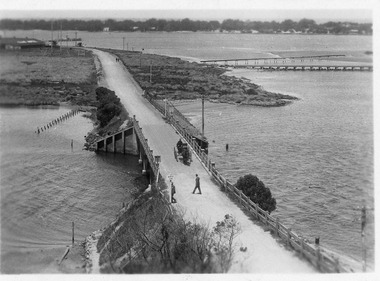
Also sepia toned photographic print 10cmx15cm, good condition old cat No 310 or 318? (Club Hotel and Hummocks area cropped from top) also Black and white photographic print 12.5cmx18cm, good condition- 2 copies 'Original T-Beam bridge opened Sept 1917 on reverse P01151-3.Black and white photographic miniature postcard showing the concrete bridge over the North Arm, showing the extended abutments, and shortened bridge length compared to previous bridge, causing restriction of waterway. Two walkers and horse drawn vehicle, buggy, on bridge. Remaining piles of wooden bridge upstream of bridge, telegraph poles upstream of bridge and across mudflats. Bridge to Bullock Island from mudflat, Club Hotel, Cunninghame Arm, and sand hummocks in distance. Lakes Entrance Victoriabridges, waterways, coast, transport, hotels -
 Ballarat Tramway Museum
Photograph - Colour Print/s - set of 5, Carolyn Dean, Nov. 1978
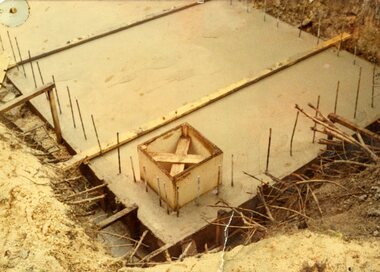
Set of five colour print of the construction of the foundation and pit of the "new shed" Nov. 1978. On Kodak paper. Date from printing date on rear of photograph. Photographer unknown. .1 - No. 4 road pit base with formwork for pump pit. .2 - Pits excavated 4 and 5 road and sand base installed. .3 - Excavating pits etc from South West corner of shed. .4 - No. 4 road pit poured. .5 - Placing concrete in No. 4 road pit. btm depot, construction, buildings -
 Bendigo Historical Society Inc.
Document - IAN DYETT COLLECTION: AUCTION CATALOGUE - COLIBAN WATER
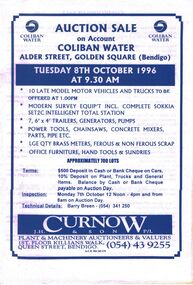
White catalogue with blue printing for a sale on the 8th October, 1996 on account of Coliban Water, Golden Square. For sale were motor vehicles and trucks, survey equipment, trailers, generators, pumps, power tools, chainsaws, concrete mixers, parts, pipe, brass meters, ferrous & non ferrous scrap, office furniture, hand tools and sundries. J. H. Curnow & Son P/L were the auctioneers. Directions how to get to the Coliban Water Depot on the back cover.business, auctioneers, j h curnow & son pty ltd, ian dyett collection - auction catalogue - coliban water, barry breen, j h curnow & son p/l -
 Ballarat Tramway Museum
Equipment - Tram Track Materials, Pandrol Australia, Sydney
Tramway Track materials used to reconstruct or replace Ballarat Tramway Museum track between Carlton St and Depot Junction Sept 2019. Follows the current practice in Melbourne.Demonstrates the materials used to replace BTM Tramway Track during 2019. Same materials used during the reconstruction of 2022.Group of rail fittings used during 2019 track relay by Fulton Hogan between Carlton St and Depot Junction. .1 - Section of tram rail - Ri57A - cut from an 18m long rail section. Rolled by voestalpine Railway Systems, Austria .2 - Group of three different sized Pandrol Rail insulators used between the rail and the clip. .3 - Pandrol resilient pad used between the concrete sleeper and the rail .4 - Pandrol clip used to secure the rail to the sleeper.tramways, ballarat, btm, trackwork, tramway rails, pandrol, voestalpine -
 Wodonga & District Historical Society Inc
Album - Hume Reservoir Australia Album - Plans and Progress Photos - River Murray Water Scheme, Department of Public Works, N.S.W, 1927
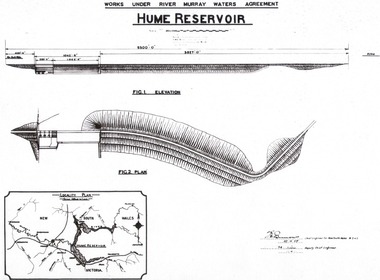
This set of photos is from a leather bound album bearing the inscription "HUME RESERVOIR AUSTRALIA" plus 'The Rt. Hon. L. C. M. S. Amery, P. C., M .P.' all inscribed in gold. It was presented to The Rt. Hon. L. C. M. S. Amery, P. C., M. P, Secretary of State for Dominion Affairs on the occasion of his visit to the Hume Reservoir on 2nd November 1927. This album is of local and national significance as it documents the planning and development of the Hume Reservoir up to 1927. It was the largest water reservoir in the British Empire. The album records the pioneering engineering work that went into its construction.1. Locality Plan and Plan of Dam. The dam is about ten miles by road upstream from Albury and about three-quarters of a mile below the confluence of the Mitta Mitta River and the Murray River. Its main features consist of a concrete portion across the bed of the river with earth embankment at both ends. The foundations throughout are on hard granite, found at an average depth of about 40 feet below the surface, the centre line being located to take advantage of the most favourable rock levels.Heading on page "WORKS UNDER RIVER MURRAY WATERS AGREEMENT/HUME RESERVOIR" Beneath top diagram "FIG. 1. ELEVATION" Beneath second diagram "FIG. 2. PLAN" On map "LOCALITY PLAN"hume reservoir australia, river murray waters scheme, hume weir diagrams, hume weir location -
 Wodonga & District Historical Society Inc
Album - Hume Reservoir Australia Album - Earth embankment, Victoria, August 1927, 1927
This set of photos is from a leather bound album bearing the inscription "HUME RESERVOIR AUSTRALIA" plus 'The Rt. Hon. L. C. M. S. Amery, P. C., M .P.' all inscribed in gold. It was presented to The Rt. Hon. L. C. M. S. Amery, P. C., M. P, Secretary of State for Dominion Affairs on the occasion of his visit to the Hume Reservoir on 2nd November 1927. This album is of local and national significance as it documents the planning and development of the Hume Reservoir up to 1927. It was the largest water reservoir in the British Empire. The album records the pioneering engineering work that went into its construction.DEPARTMENT OF PUBLIC WORKS, N.S.W. RIVER MURRAY WATERS SCHEME. HUME RESERVOIR. 32. Earth Embankment, Victoria. Looking down on the earth embankment and core wall. The earth is conveyed to the bank by rail, tipped out and then put in place by wheeled scoops, the horses and wheels treading and rolling the material into a very compact form while hoses play water on the mass to keep it moist. The concrete pillar with Tail Tower, and North Wing Wall, look very small in the distance. August 1927.hume reservoir australia, river murray waters scheme, hume reservoir construction -
 Melbourne Tram Museum
Document - Report, Melbourne & Metropolitan Tramways Board (MMTB), "Trial Installation of Barrier Kerbing, Nicholson Street - Fitzroy", Nov. 197
Report, manila covers, A4 paper, white comb binder, 30 pages, 1 photograph page of Nicholson St, looking north with a Z class tram in the distance, tables of traffic timing, looking at the impact of concrete barrier kerbs laid along the eastern side of Nicholson St Fitzroy between Alexandra Parade and Victoria Parade, 12 month trial. Report dated November 1976. Includes impact on traffic and tram services. 2nd copy added 23/10/2014.Marked number "85" in top right hand corner and stamped on cover and inside cover page "Discarded from PTC Library 22 Oct 1989". 2nd copy ex AETA marked "4E13" in top right hand corner of cover.trams, tramways, mmtb, nicholson st, fitzroy, traffic control -
 Lakes Entrance Regional Historical Society (operating as Lakes Entrance History Centre & Museum)
Postcard - Lakes Entrance, Bulmer H D, 1940c
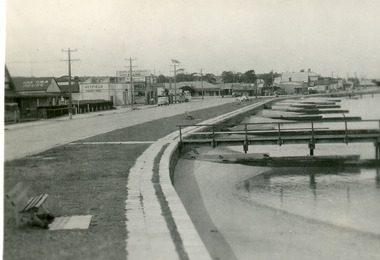
From a wallet of minitiature postcards published by Bulmer for sale to tourists. Also enlarged black and white copy 18.5 x 25 cm,Black and white mini postcard of Esplanade, showing timber groynes for sand control at edge of lake at walking path of concrete slabs. Across the highway from left to right is Kia-Ora House, Heyfield House, Coate Bros Garage, Robin Hood Inn, Vizes Cafe, Vic Carstairs, Miss Brown's (subagent for Statebank), Methodist Church, Bellevue Guest House, Police Station, Maranui Guest House, Glenara Guest House. Lakes Entrance Victoriatownship, waterfront, accommodation -
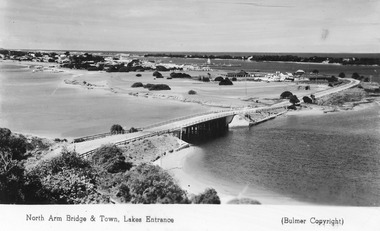 Lakes Entrance Regional Historical Society (operating as Lakes Entrance History Centre & Museum)
Postcard, Bulmer H D, 1950c
Township of Lakes Entrance from Jemmys PointColour tinted postcard of township showing bridge across North Arm; town buildings including Club Hotel, Methodist Church, Maranui Guest House; tower of Central Hotel; jetties in Cunninghame Arm, and sand dunes. Caravan parked beside concrete brick constructed toilet block opposite road to Bullock Island. Footbridge across Cunninghame Arm in distance, also lookout tower on Esplanade, and Life Saving tower over hummocks. Lakes Entrance VictoriaNorth Arm Bridge and Town, Lakes Entrancetownship, jetties, guesthouses, islands, hotels -
 Bendigo Historical Society Inc.
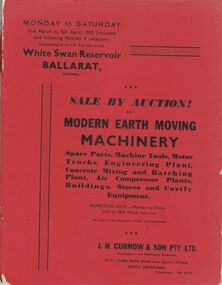
Document - IAN DYETT COLLECTION: AUCTION CATALOGUE - WHITE SWAN RESERVOIR
Three auction catalogues, two with red covers and the third is missing the cover. Sale of Earth Moving Machinery. Spare Parts, Machine Tools, Motor Trucks, Engineering Plant, Concrete Mixing and Batching Plant, Air Compressor Plants, Buildings, Stores and Costly Equipment on 31st March to 5th April 1952 (inclusive) at the White Swan Reservoir, Ballarat, Victoria. J. H. Curnow & Son Pty. Ltd. Were the auctioneers. Included in the catalogue is a Locality Plan showing location of lot areas - access roads, etc. Page 4 has a black and white photo showing Super c Tournapull, Lot 63 and Tractor hauling 12-15 cub. Yd. capacity scoop. Page 9 photo is Lot 209, a Sheep's Foot Roller, Page 12 photo is Lots 258, 259 & 260 - Class 1 tractor hauling two 12-15 c yd Te Tourneau Scrapers, and page 68 has a black & white photo of Lot 2377, the Concrete Batching Plant.business, auctioneers, j h curnow & son pty ltd, ian dyett collection - auction catalogue - white swan reservoir, the ballarat water commissioners, j h curnow & son pty ltd, prahran telegraph printing co -
 Eltham District Historical Society Inc
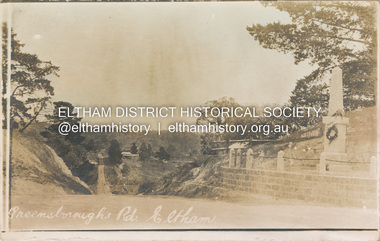
Postcard - Photograph postcard, Greensborough Road, Eltham, c.1925
Rare postcard showing view looking down Bridge Street with the Eltham Obelisk in situ in its original location. The Obelisk War Memorial was unveiled 3 August 1919. Subsequent to the unveiling provision was made of a stone retaining wall topped with a chain link and granite stone boundary. Along with the use of the name Obelisk Corner, the Bridge Street bridge was also known as Obelisk Bridge. The Obelisk was relocated to the fornt garden of the Eltham RSL sub-branch in the mid 1950s as a result of road widening and corner improvements. The Bridge Street Bridge was replaced with a new concrete bridge in 1956-1957.Digital file only Postcards scanned from the collection of Michael Aitken on loan to EDHS, 2 Sep. 2022michael aitken collection, eltham, postcards, bridge street, bridge street bridge, obelisk, obelisk corner, eltham cenotaph, eltham obelisk, war memorial, main road -
 Eltham District Historical Society Inc
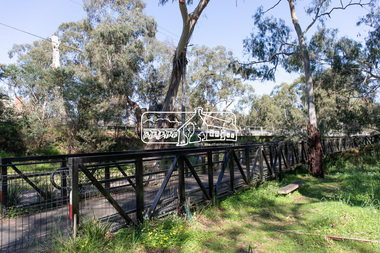
Photograph, Peter Pidgeon, Manna Gum, Main Road Bridge, Eltham South, 8 Sep. 2021
This significant tree located near the Main Road Bridge and Diamond Creek Trail footbridge over the Diamond Creek at Eltham dates back to the early 1900s. The original timber bridge over the Diamond Creek was built around 1840. It was destroyed by floodwaters in October 1923. A temporary bridge was rigged up but further damaged in April 1924. A new concrete bridge was built and opened in October 1926. The bridge decking was widened along with Main Road to Dalton Street by the Road Construction Authority in 1984., The uygraded bridge was opened in October 1984, 78 years after its original opening.These trees are not only significant for the natural environment but also present a navigational beacon back in time as the environmental landscape is developed around them.Born Digitaleltham south, main road bridge, manna gum, significant tree, diamond creek trail -
 Eltham District Historical Society Inc
Photograph, Peter Pidgeon, Manna Gum, Main Road Bridge, Eltham South, 8 Sep. 2021
This significant tree located near the Main Road Bridge and Diamond Creek Trail footbridge over the Diamond Creek at Eltham dates back to around 1870-1880. The original timber bridge over the Diamond Creek was built around 1840. It was destroyed by floodwaters in October 1923. A temporary bridge was rigged up but further damaged in April 1924. A new concrete bridge was built and opened in October 1926. The bridge decking was widened along with Main Road to Dalton Street by the Road Construction Authority in 1984., The uygraded bridge was opened in October 1984, 78 years after its original opening.These trees are not only significant for the natural environment but also present a navigational beacon back in time as the environmental landscape is developed around them.Born Digitaleltham south, main road bridge, manna gum, significant tree, diamond creek trail -
 Eltham District Historical Society Inc
Photograph, Peter Pidgeon, Manna Gum, Main Road Bridge, Eltham South, 8 Sep. 2021
This significant tree located near the Main Road Bridge and Diamond Creek Trail footbridge over the Diamond Creek at Eltham dates back to around 1870-1880. The original timber bridge over the Diamond Creek was built around 1840. It was destroyed by floodwaters in October 1923. A temporary bridge was rigged up but further damaged in April 1924. A new concrete bridge was built and opened in October 1926. The bridge decking was widened along with Main Road to Dalton Street by the Road Construction Authority in 1984., The upgraded bridge was opened in October 1984, 78 years after its original opening.These trees are not only significant for the natural environment but also present a navigational beacon back in time as the environmental landscape is developed around them.Born Digitaleltham south, main road bridge, manna gum, significant tree, diamond creek trail -
 Eltham District Historical Society Inc
Photograph, Peter Pidgeon, Manna Gum, Main Road Bridge, Eltham South, 8 Sep. 2021
This significant tree located near the Main Road Bridge and Diamond Creek Trail footbridge over the Diamond Creek at Eltham dates back to the early 1900s. The original timber bridge over the Diamond Creek was built around 1840. It was destroyed by floodwaters in October 1923. A temporary bridge was rigged up but further damaged in April 1924. A new concrete bridge was built and opened in October 1926. The bridge decking was widened along with Main Road to Dalton Street by the Road Construction Authority in 1984., The uygraded bridge was opened in October 1984, 78 years after its original opening.These trees are not only significant for the natural environment but also present a navigational beacon back in time as the environmental landscape is developed around them.Born Digitaleltham south, main road bridge, manna gum, significant tree, diamond creek trail -
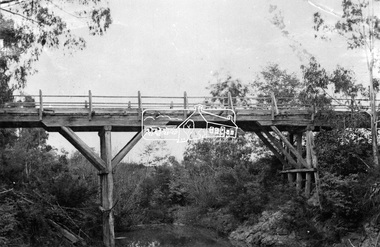 Eltham District Historical Society Inc
Photograph, Hurst's Bridge, c.1912
The area of Hurstbridge was originally known as Hurst’s-bridge after the timber bridge built over the Diamond Creek near Hurst’s station in late 1881/early 1882 on Hurstbridge-Arthurs Creek Road, Hurstbridge. It was built by John McDonald, of Arthur's Creek and was demolished and replaced in 1917 by a reinforced concrete arch bridge designed by John Monash. Part of a slide show presentation "Bridges & Waterways of the Shire" by Russell Yeoman to the 13 September 1989 Society meeting. The presentation included slides of historic photos from the Shire of Eltham Pioneers collections as well as several recent views. This photo forms part of a collection of photographs gathered by the Shire of Eltham for their centenary project book, Pioneers and Painters: 100 years of the Shire of Eltham" by Alan Marshall (1971). The collection of over 500 images is held in partnership between Eltham District Historical Society and Yarra Plenty Regional Library (Eltham Library) and is now formally known as 'The Shire of Eltham Pioneers Photograph Collection.' It is significant in being the first community sourced collection representing the places and people of the Shire's first one hundred years.Digital imageshire of eltham pioneers photograph collection, 1912, bridge, diamond creek (creek), hurstbridge, hurst's bridge -
 Federation University Historical Collection
Photograph - Photograph - Black and White, Ballarat Civic Hall, c1965
The City of Ballarat unanimously resolved to erect a Civic Hall in 1951. The architects, Gordon Murphy, of Melbourne, and H.L. and L.J. Colburn, of Ballarat, were commissioned in 1952. The Council constructed the foundations and footings for the building under the supervision of the former City engineer, Mr L.H. Finch, in 1953. These footings are of massed concrete. The design for the building took advantage of the cross fall of the land, providing for the Small Hall to be entered from the Doveton Street frontage through a foyer under the Main Stage, the structure is steel with brick panels, with accommodation for 1,592 persons in the Main Hall and 440 persons in the Lower Hall. Black and white photograph of a brick building known as Ballarat Civic Hall. It is located on the corner of Mair Street and Doveton Street North. The Shakespeare statue out the front of the building was unveiled on 17 November 1960. ballarat civic hall, civic hall, colburn, finch -
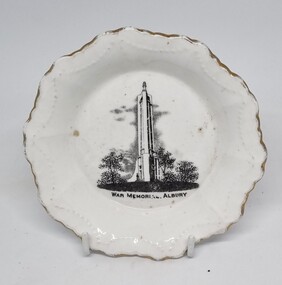 Wodonga & District Historical Society Inc
Souvenir - Souvenir Butter Dish - War Memorial, Albury, c1930 -1950s
This item is from a collection donated by descendants of John Francis Turner of Wodonga It is one of many souvenirs produced to represent landmarks in the Albury-Wodonga district. The Albury and District War Memorial was opened on Anzac Day 1925 by General Paine. Designed by the Architect Louis Harrison, the site was chosen by the town planner Charles Reade. The monument is a white ferro concrete tower, in the form of a tapered lighthouse painted stark white and surmounted by a 'torch of liberty'. This torch is 1.8 meters high and faced with 40 panes of prismatic glass. During the day sunlight plays through this glazing giving the torch the illusion it is lit.This item comes from a collection used by a prominent citizen of Wodonga. It is representative of a items produced to represent historic landmarks or features of the district.A small butter bone china butter dish with scalloped edge with gilt edge trim.It features a black and white image of the War' Memorial in Albury.Below image: "WAR MEMORIAL ALBURY"domestic items, albury souvenirs, war memorial albury