Showing 1499 items
matching no. 3/13
-
 Glen Eira Historical Society
Article - Cosy Gum Road, 5, Carnegie
Three real estate ads of different sizes for this property with varying photos, all relating to the auction on 06/08/2011: 1/ An undated article from the Melbourne Weekly regarding the auction of the house at 5 Cosy Gum Road, Carnegie to be held 06/08. The article describes details and features of the house. It includes three colour photographs. 2/ Ad dated 13/17/2011 from the Melbourne Weekly Bayside - Your Community Voice with a full page colour photo of the front exterior plus one of the rear exterior, one of the living / dining room and one of the billiards room. 3/ Ad dated 03/08/2011 from the Melbourne Weekly Bayside - Your Community Voice with large colour photo of front exterior plus living / dining room plus kitchen interior photos.house, auctions, cosy gum road, carnegie -
Clunes Museum
Newspaper, The Argus Magazine Supplement of the Argus, 6 Jul 1951
.1 Original publication pages 13-16 dated 6 Jul 1951 .2 .3 Photocopies of originalthe argus magazine, gold rush, 1951 -
 University of Melbourne, Burnley Campus Archives
Photograph - Black and white print, Information Branch Victorian Department of Agriculture, Staff Group Photograph 1977, 1977
... (462-13)." 3 copies black and white photograph. Staff group ...3 copies black and white photograph. Staff group photograph 1977, seated and standing in the Gardens.On reverse, "Photograph by Information Branch Victorian Department Of Agriculture Ref. No. 1977(462-13)."1977, staff, staff group -
 Bendigo Historical Society Inc.
Document - MISS G ALICE JONES COLLECTION: ACCOUNT
The Liquidator, Bendigo Amalgamated Goldfields Ltd. To Miss G. Alice Jones. Re Hamilton. Pink paper dated Nov. 1, 2, 4, 8-9, 11, 14, 19, 20, 21, 26, 29, Dec., Jan. 29, Feb. 1, 1930, Dec 17, 19, 21 to 24 1929, July 13, 21, 24, 29, 30, 31, Feb. 1, 2, 3, 4, 5, 6, 7, 8, 10, 26 1930 and 28/3/30. Items include write to Hamilton for £8 damages for trespass to engine house on lease from Horwoods, interviewing people, writing letters to various people and attending court. "R516 Posted 28/3/30 by BF?" written in the top left corner.the miss g. alice jones collection - account, bendigo amalgamated goldfields ltd, hamilton, mr stanfield, horwoods, mr. ;hyett, mr w j stephens, leggo & co, mr c curnow, mr h m leggo, mr clarkson, mr ennor, church of england, mrs frew, horwoods foundry -
 Bendigo Historical Society Inc.
Document - MISS G ALICE JONES COLLECTION: ACCOUNT
Carlisle Gold Mining Company No Liability to Miss G. Alice Jones. Pink paper dated Feby. 29, March 5, 11, 13, Nov. 7, 14, 25, Dec. 3, 5, 10, 11, 19 1924, Jany 30, 31, Feby 2, 19, 1925. Account details work and costs re: Kirby, B.A.G. Ltd. To you. Transfer of G. M. Lease, B.A.G. Ltd. To you Machinery Lease. Total Cost 10.10.0. "Posted 7/7/25" written in top left corner.miss g. alice jones collection - account, carlisle gold mining company no liability, kirby, mr stanfield, b.a.g. ltd. -
 Bendigo Historical Society Inc.
Document - MISS G ALICE JONES COLLECTION: ACCOUNT
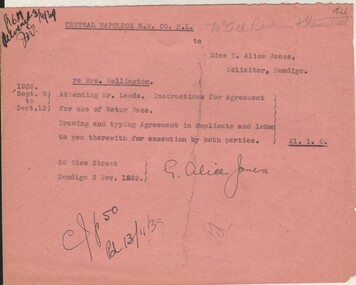
Central Napoleon G. M. Co N. L. to Miss G. Alice Jones. Pink paper dated Sept. 9 to Sept. 13, 1939. re Mrs. Wellington. Account details costs and work involved for Agreement for use of Water Race. Cost £1.1.0. R681 delivered 3/11/39 written in top left corner.miss g. alice jones collection - account, central napoleon g m co n. l, mrs wellington -
 Bendigo Military Museum
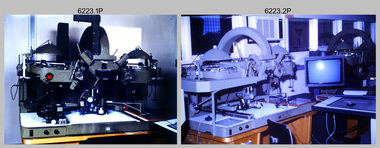
Photograph - Aerotriangulation Production – Army Survey Regiment, Fortuna, Bendigo, c1970s to 1980s
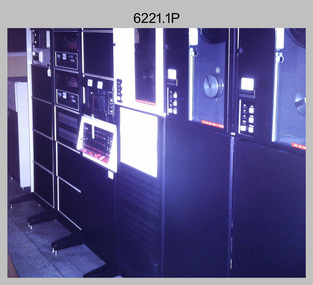
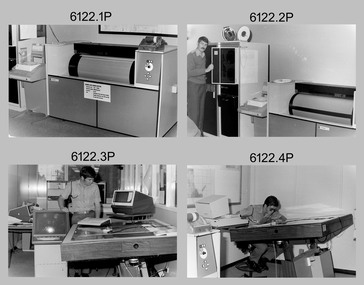
This collection of 14 photos was most likely taken in the 1970s and 1980s in Air Survey Squadron. The PDP 11/70 minicomputer shown in photo .1P was the operating system introduced in 1977 as the mainframe system for the control of the APC4, aerial triangulation block adjustments, SORA OP Analytical Orthophoto control, APR Analytical Terrain Profile Recorder computation, graphics, and general computing. Technicians used the Wild A9 Stereocomparator shown in photo .2P to accurately measure between pass, tie, and survey control points on aerial photographs. The Zeiss D2 Planimat Stereoplotter shown in photos .3P to .4P was used for analytical orthophoto control. It was introduced in 1972-1973 The Zeiss (Jena) Stecometer analytic stereocomparator for air photography shown in photos .5P to .11P and .14P was introduced at Air Survey Squadron in 1963. Aerotriangulation production was expedited using computers for analytical photogrammetric processes. The technician accurately measured between pass, tie, and survey control points on aerial photographs. Wild PUG4 point transfer devices shown in photos .12P to .13P were introduced in c1968 superseding the PUG2 devices. PUG4 devices were used by technicians to stereoscopically view the photography containing the survey control points and the mapping aerial photography. The Control points were transferred from the control photography to the mapping diapositives of aerial photography by drilling their locations into the photographic emulsion.This is a set of 14 photographs of Air Survey Squadron personnel operating aerotriangulation equipment at the Army Survey Regiment at Fortuna, Bendigo, c1970s to 1980s. Photographs .1P to .13P were on 35mm colour slide film and scanned at 96 dpi. Photograph.14P was printed on photographic paper and was scanned at 300 dpi. They are part of the Army Survey Regiment’s Collection. .1) - Photo, colour, c1979, PDP-11 minicomputer. .2) - Photo, colour, c1970s, Unidentified technician operating a Wild A9 Stereocomparator. .3) - Photo, colour, c1970s, Zeiss D2 Planimat Stereoplotter. .4) - Photo, colour, c1970s, Zeiss D2 Planimat Stereoplotter, unidentified technicians. .5) - Photo, colour, c1970s, Zeiss D2 Planimat Stereoplotter, SGT Christopher Wardley. .6) - Photo, colour, c1970s, Zeiss D2 Planimat Stereoplotter. .7) to.9) - Photo, colour, c1970, Zeiss (Jena) Stecometer, unidentified technicians. .10) to.11) - Photo, colour, c1988, SPR Toni Wright operating a Zeiss (Jena) Stecometer. .12) - Photo, colour, c1970s, Wild PUG4 point transfer device, SPR John Shepard. .13) - Photo, colour, c1970s, Wild PUG4 point transfer device, SPR David Edwards. .13) - Photo, colour, c1970s, Wild PUG4 point transfer device, SPR David Edwards. .14) - Photo, colour, c1980, Zeiss (Jena) Stecometer, SGT Bruce Hammond.Some of the equipment is annotated on the frame of the 35mm slides.royal australian survey corps, rasvy, army survey regiment, army svy regt, fortuna, asr, aerotrig, photogrammetry -
 Ballarat Tramway Museum
Album - Postcards & Photographs - Vic Solomons and others - Australian Tramways, Vic Solomons, 2023
Contains 184 images of postcards and photographs collected primarily by Vic Solomons of Sydney, with others from the collection of Wal Jack and Warren Doubleday. Covers almost all of Australia's tramway systems. 1 Post Card Hay St Perth Looking East No 3 Unknown Perth 2 Post Card Cars 30 & 90 both on Route 19 pass in Barrack St looking South Perth WA 1935.02.18 Perth 3 Post Card Hay St Looking East Perth WA Unknown Perth 4 Post Card William St Perth WA Unknown Perth 5 Post Card Perth from Shaftsbury Hotel Unknown Perth 6 Post Card Hay St Perth WA Looking East Unknown Perth 7 Post Card Barrack St Perth Unknown Perth 8 Post Card Murray Views No 3 High St Showing Town Hall Fremantle WA Unknown Fremantle 9 Post Card High St Fremantle WA Unknown Fremantle 10 Post Card View of Bolder City Golden Mile in the Background (Section No 1) 1908.08.20 Kalgoolie 11 Post Card Hannan St Kalgoolie 1900.08.19 Kalgoolie 12 Post Card Hannan St Kalgoolie WA (No 2) Unknown Kalgoolie 13 Post Card Intersection Hannan & Maritana Sts Kalgoolie WA Unknown Kalgoolie 14 Post Card Hannan St Kalgoolie Unknown Kalgoolie 15 Post Card Lane Street Bolder City Unknown Kalgoolie 16 Post Card Hobart Double Deck Tram Unknown Hobart 17 Post Card Macquarie St Hobart Unknown Hobart 18 Photo Liverpool Street Hobart Unknown Hobart 19 Photo Hobart 21 Unknown Hobart 20 Photo Hobart 14 in Elizabeth St Hobart Unknown Hobart 21 Post Card Macquarie St Hobart Unknown Hobart 22 Post Card Macquarie St Hobart Tas Unknown Hobart 23 Photo Double Decker Tram 3 at G.P.O. Hobart Tas No 31 Unknown Hobart 24 Post Card Double Decker Tram 19 Hobart Tas A B Series No 24 Unknown Hobart 25 Photo Hobart Municipal Tramways Tas No 95 Unknown Hobart 26 Post Card Elizabeth St Hobart Unknown Hobart 27 Post Card Elizabeth St Hobart Unknown Hobart 28 Post Card Elizabeth St Hobart Unknown Hobart 29 Post Card Elizabeth St Hobart Tas Unknown Hobart 30 Post Card HMT 21 with crew at Beach Road Terminus Unknown Hobart 31 Post Card HMT 9 & another with crew at Beach Road Terminus. Front cover photo of Destination GPO 1921.01.00 Hobart 32 Post Card Cascade Road and Mount Wellington Hobart Unknown Hobart 33 Post Card Elizabeth St Hobart Unknown Hobart 34 Post Card Elizabeth St Hobart Unknown Hobart 35 Post Card Elizabeth St Hobart 1915.04.07 Hobart 36 Post Card Macquarie St Hobart Tas Unknown Hobart 37 Post Card Macquarie St showing Post Office Hobart 1908.03.12 Hobart 38 Post Card Hobart Municipal Tramways 21 Unknown Hobart 39 Post Card Elizabeth St Hobart Tas Unknown Hobart 40 Post Card Liverpool Street Hobart Unknown Hobart 41 Post Card Electric Tram Launceston Tas 446 W J Little Photo 1919.02.08 Launbceston 42 Post Card Launceston Tram no 3 1911.08.30 Launbceston 43 Post Card Launceston Tram no 3 passes tram No 1 Unknown Launbceston 44 Post Card Tram 6 at Trevallyn a popular suburb Launceston Tasmania Unknown Launbceston 45 Post Card Tram 7 at Trevallyn Road Terminus Launceston Tasmania Unknown Launbceston 46 Post Card Tram 4 in Brisbane St Launceston Unknown Launbceston 47 Post Card Tram 9 in Brisbane St Launceston Tasmania Unknown Launbceston 48 Post Card Camerom Street Launceston Tasmania Unknown Launbceston 49 Post Card Murray Views No 15 Jetty Road Glenelg Terminus 1962-02-08 Adelaide 50 Post Card Bay Tram at Jetty Road Terminus Glenelg SA Unknown Adelaide 51 Post Card Tram 3 in King William Street Adelaide S Aust Unknown Adelaide 52 Post Card Valentine Series No 3065 The Old Horse Tram Victor Harbour Unknown Victor Harbour 53 Post Card Bourke Street Melbourne with Cable Car Looking East 1904.04.25 Melbourne 54 Post Card Opening of New Electric Tramway Elsternwick 1913-11-13 Melbourne 55 Post Card Cable trams in Clarendon St Sth Melb Unknown Melbourne 56 Post Card Pall Mall from Charing Cross Bendigo Unknown Bendigo 57 Post Card Tram 4 & 7 pass at The Fountain and Mitchell Street Bendigo Vic Rose Series P 3198 Unknown Bendigo 58 Post Card M&MTB 133 at Charing Cross bound for Eaglehawk Bendigo Vic Murray Views No 45 Unknown Bendigo 59 Post Card Pall Mall Bendigo Vic Unknown Bendigo 60 Post Card Charing Cross & Mitchell St Bendigo Trams passing 1919.00.00 Bendigo 61 Post Card Pall Mall Looking East Unknown Bendigo 62 Post Card Electric Trams and City Hotel Bendigo Vic Unknown Bendigo 63 Post Card Moorabool Street Geelong V 23 Unknown Geelong 64 Post Card Murray Views No 3 Moorabool Street Geelong Vic Unknown Geelong 65 Post Card The Rose Series P 2487 Ryrie Street Geelong Vic Unknown Geelong 66 Post Card Southern Cross Series 2696 Ryrie Stret Geelong Vic Unknown Geelong 67 Post Card The Rose Series P 1490 Ryrie Street Geelong Vic 1920-03-04 Geelong 68 Post Card Valentine Series No 1568 Lower Sturt Street Ballarat Unknown Ballarat 69 Post Card Rose Series P 1710 Sturt Street Ballarat Victoria Unknown Ballarat 70 Post Card Sturt Street Ballarat Victoria Unknown Ballarat 71 Post Card Horse Tram In Sturt Street Ballarat 1905.11.10 Ballarat 72 Post Card Sturt Street Ballarat Looking North-West Unknown Ballarat 73 Post Card Shoppes Square Sturt Street Ballarat Looking North Unknown Ballarat 74 Post Card Junction Sturt and Lydiard Streets Ballarat 1909-09-01 Ballarat 75 Post Card The Electric Supply Co Souvenir Tram Ticket No 3085of the opening of Electric System August 18 1905 1905.08.18 Ballarat 76 Post Card Sturt Street Ballarat Victoria 1907.11.25 Ballarat 77 Post Card Off to the Gardens Electric Tram Ballarat Unknown Ballarat 78 Post Card Sturt Street Ballarat 1907.04.16 Ballarat 79 Post Card Sturt Street Ballarat Looking East Electric tram with Double Deck Trailer 1911.04.17 Ballarat 80 Post Card Sturt Street Ballarat Looking East Unknown Ballarat 81 Post Card Sturt Street Ballarat Looking West 1911.03.01 Ballarat 82 Post Card Town Hall and Sturt Street Ballarat Unknown Ballarat 83 Post Card Lydiard Street Ballarat 1906.11.23 Ballarat 84 Post Card Looking North along Adelaide Street from George Street Brisbane Sidues Series No 764 Unknown Brisbane 85 Post Card Looking South along Queen Street from the Creek Street Intersection Brisbane Qld Sirues Series No 1379 Unknown Brisbane 86 Post Card George Street from near Supreme Court Brisbane Unknown Brisbane 87 Post Card Queen and Eagle Streets Brisbane 1907.07.04 Brisbane 88 Post Card Queen Street showing His Majesty’s Theatre Brisbane Unknown Brisbane 89 Post Card Queen Street Treasury Building 1908.01.20 Brisbane 90 Post Card G P O and Queen Street Brisbane Unknown Brisbane 91 Post Card Queen Street Brisbane Looking from Wharf Street Unknown Brisbane 92 Post Card Customs House Brisbane 1905.02.16 Brisbane 93 Post Card Queen St Brisbane 1905.09.16 Brisbane 94 Post Card Queen St Brisbane 1907.11.19 Brisbane 95 Post Card Treasury Buildings Brisbane Unknown Brisbane 96 Post Card Queen and Eagle Streets Brisbane Unknown Brisbane 97 Post Card The Valley Corner Brisbane Unknown Brisbane 98 Post Card Brisbane Queen Street opposite General Post Office Unknown Brisbane 99 Post Card North Quay and Milton Beach Brisbane Q Unknown Brisbane 100 Post Card Victoria Bridge Brisbane South Side 1907.08.14 Brisbane 101 Post Card Victoria Bridge Brisbane Unknown Brisbane 102 Post Card Breakfast Creek Bridge Brisbane Q Unknown Brisbane 103 Post Card Melbourne Street Station South Brisbane Queensland Unknown Brisbane 104 Post Card General Post Office Queen Street Brisbane 1955.09.23 Brisbane 105 Post Card Customs House Brisbane 1904.11.04 Brisbane 106 Post Card Queen St Brisbane 1919.11.00 Brisbane 107 Post Card Queen St Brisbane Sidues Series No 627 Unknown Brisbane 108 Post Card Creek Street Brisbane Queensland Unknown Brisbane 109 Post Card Customs House and Garden Reach Brisbane Queensland 1910.00.08 Brisbane 110 Post Card Queen and Creek Streets Brisbane 1909.06.07 Brisbane 111 Post Card Queensland National Bank andd Queen Street Brisbane Queensland Unknown Brisbane 112 Post Card Queen Street and Treasury Buildings Brisbane 0000.09.07 Brisbane 113 Post Card Queen Street showing “Courier” Buildings Brisbane Unknown Brisbane 114 Post Card Intersection George & Roma Streets Brisbane Q 1916.05.11 Brisbane 115 Post Card Adelaide Street Brisbane Q Unknown Brisbane 116 Post Card G P O Queen Street Brisbane Q Unknown Brisbane 117 Post Card Treasury Building Brisbane 1906.03-20 Brisbane 118 Post Card Queen and Eagle Streets Brisbane 1907.02.01 Brisbane 119 Post Card Queen St Brisbane Unknown Brisbane 120 Post Card Queen St Brisbane Q Unknown Brisbane 121 Post Card Victoria Bridge Brisbane 1906.07.30 Brisbane 122 Post Card An Unusual View showing Head of Queen Street Victoria Bridge & South SideSuburbs Brisbane Q Unknown Brisbane 123 Post Card Petries Bight Brisbane Q Unknown Brisbane 124 Post Card South End Victoria Bridge Brisbane Q Unknown Brisbane 125 Post Card Customs House Brisbane Unknown Brisbane 126 Post Card Photo of toastrack car circa 1910 Unknown Brisbane 127 Post Card Treasury Buildings Brisbane Unknown Brisbane 128 Post Card East Street Rockhampton with Steam Tram & trailer Unknown Rockhampton 129 Post Card Post Office Rockhampton with steam tram Unknown Rockhampton 130 Post Card East Street Rockhampton with Steam Trams Rose Series P 7154 Unknown Rockhampton 131 Post Card William Street Rockhampton Rose Series P 7156 Unknown Rockhampton 132 Post Card Central East Street Rockhampton Q with Steam Trams Unknown Rockhampton 133 Photo Sturt St Ballarat Unknown Ballarat 134 Photo Bridge Street Ballarat Unknown Ballarat 135 Post Card George St Sydney Unknown Sydney 136 Post Card Elizabeth St Sydney Unknown Sydney 137 Post Card Railway Square Unknown Sydney 138 Post Card Sydney Harbor Bridge - pending receipt 139 Post Card Kings Cross - Mowbray Series with description on rear from C Roy G Field Unknown Sydney 140 Post Card Kings Cross - Mowbray Series with description on rear from C Roy G Field Unknown Sydney 141 Post Card Central Railway Station Sydney - Rose Series P6033 1954-01-26 Sydney 142 Post card William Street Darlinghurst looking towards City - Rose Series P6602 unknown Sydney 143 Post Card Circular Quay Sydney - Rose Series P6680 Unknown Sydney 144 Post Card View at Manly NSW - Rose Series B1003 Unknown Sydney 145 Post Card Hunter St Newcastle NSW - Rose Series P7843 Unknown Newcastle 146 Post Card Bank Corner Newcastle NSW - Mowbray Series No. 155 Unknown Newcastle 147 Post Card Hunter St Newcastle NSW Unknown Newcastle 148 Post Card Criterion Hotel Hunter St Newcastle NSW Unknown Newcastle 149 Photo Horse tram at Newtown Station 1894 to 1898 - PTC photo c1894 Newtown 150 Photo Steam tram motor No 3 at Railway Square 1879 1879 Sydney 151 Photo Railway steam tram c1900 with a horse drawn double deck bus c1900 Sydney 152 Photo Steam motor 5A and doubled deck bus Unknown Sydney 153 Photo Steam motor 53A with detail notes on rear 1922 Sydney 154 Photo Cable tram set at Milsons Point ferry terminal c1900 Sydney 155 Photo Early Sydney electric car - Ocean St - Rose Bay Unknown Sydney 156 Photo George St looking souoth c1905 c1905 Sydney 157 Photo Tram 165 at Circular Quay Unknown Sydney 158 Photo Tramcar ferry or transporter at The Spit Unknown Sydney 159 Photo tram 882 George St at Marti Place, 1937 1937 Sydney 160 Photo Tram 826 Railway Sq area Unknown Sydney 161 Photo Railway Sq in background, Broadway with double decker bus and toastrack car late 1930s Sydney 162 Photo Coupled St Pitt St? - photo Ben Parle Feb. 1950 Sydney 163 Photo Electric tram No. 2 - North Sydney with side trolley pole running Unknown Sydney 164 Photo George St - Horden's Corner Unknown Sydney 165 Photo George St at Martin Place c1920 Sydney 166 Photo Castlereagh St Sydney c1928 c1928 Sydney 167 Photo Railway Sqare c1920 c1920 Sydney 168 Photo Darling St Countereweight Unknown Sydney 169 Photo Trolley bus depot Unknown Sydney 170 Photo Trolley bus No. 14 Unknown Sydney 171 Photo Newcastle Railway Station with steam tram - Wharf Road?? Unknown Newcastle 172 Photo High St West Maitland - steam tram Unknown Maitland 173 Photo High St West Maitland - steam tram Unknown Maitland 174 Post Card Argent St near tram terminal Broken Hill NSW c1900 Broken Hill 175 postcard Argent St looking south Broken Hill - with Ken Magor's notes on rear Unknown Broken Hill 176 Photo Toronto - steam tram 61A Unknown Toronto 177 Photo 124A trial run 1911? Sutherland - Cronulla line 1911 Sutherland 178 Photo 103A at a tram stop Unknown Sydney 179 Photo Cable tram set at Crows Nest terminus grip car 12, trailer 22 Unknown Sydney 180 Photo Cable tram Queens Square Sydney 1903 Sydney 181 Photo cars 2078 and 2077 Chatswood late 1950s Sydney 182 Photo car 1877 Balmain area late 1950s Sydney 183 Photo Trolley bus - Rockdale destination Late 1950s Sydney 184 Photo Broken Hill steam tram - motor 18A North Tram Unknown Broken Hill 185 Photo Millars Point Sydney NSW - ferry/tram interchange, unknown Sydney All items imaged including the rear or back where there was writing of information. All files stored on the Museum's Photo Collections directory. Demonstrates through the medium of many images, Australian tramway systems and Ballarat's place in them.Album - heavy card covers, plastic lined with postcard or 6x4 photo sleeves.australia, tramways, postcards, photographs, steam trams, horse trams, cable trams, trolley buses -
 Bendigo Military Museum
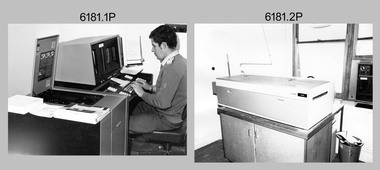
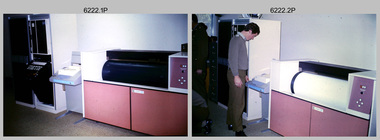
Photograph - Personnel and Equipment, Army Survey Regiment, Fortuna, Bendigo. c1979, c1979
This is a set of 23 photographs of cartographic, aero-triangulation and lithographic equipment, and personnel at the Army Survey Regiment, Fortuna, Bendigo circa 1979. Photos .8P to .23P were taken in Lithographic Squadron’s printing, Camera, proofing rooms and external buildings. Cartographic Squadron’s SGT Jim McDonald operated the Editwriter type setting machine, as shown in photo .2P for a couple years in a room on the top floor of Fortuna Villa. This is a set of 23 photographs of cartographic, aero-triangulation and lithographic equipment, and personnel at the Army Survey Regiment, Fortuna, Bendigo, c1979. Black and white photos are on photographic paper and mounted on manilla card. They were scanned at 300 dpi. .1) - Photo, black & white, c1979, Typesetting machine, ‘Editwriter’ Model 7500, SGT Jim McDonald. .2) - Photo, black & white, c1979, Processor Model ACP101 & dual disk module (attached to Editwriter). .3) - Photo, black & white, c1979, Duplicating machine, stencil process electric ‘Gestetner’. .4) - Photo, black & white, c1979, Comparator photogrammetric stecometer, modified ‘Carl Zeiss’, CPL Jack Elverd. .5) - Photo, black & white, c1979, Point transfer device ‘Wild PUG IV. .6) - Photo, black & white, c1979, Zoom transfer scope, stereo ‘Bausch & Lomb’ .7) - Photo, black & white, c1979, Stereoplotter analytical automatic, ‘APC/3-1’. .8) - Photo, black & white, c1979, Prophylaxis unit, ‘Densply/Cavtron’ .9) - Photo, black & white, c1979, Machine punch register (made by Bendigo Ordnance Factory). .10) - Photo, black & white, c1979, Plan printer 122cm (48”) wide. ‘Admel Bruning’ Model - 5003A. .11) - Photo, black & white, c1979, Metal halide printing lamp. ‘Violight 5000 HV’ .12) - Photo, black & white, c1979, Densitometer transmission or reflection, ‘Macbeth’ Model – TR 524 MD. .13) - Photo, black & white, c1979, Machine whirling vertical type ‘Payne VLW’. .14) - Photo, black & white, c1979, Densitometer reflection, ‘Macbeth’ Model – RD917. .15) - Photo, black & white, c1979, Densitometer reflection, 240V ‘Cosar’ .16) - Photo, black & white, c1979, Printer contact ‘Hohlux’ Model RP-II, LCPL Martin Van der Maele. .17) - Photo, black & white, c1979, Frame printing vacuum vertical. .18) - Photo, black & white, c1979, Frame printing vacuum flip top 91cm x 117cm. .19) - Photo, black & white, c1979, Printer reduction stereo plotter diapositive ‘Wild’ Model – U3A modified and U4A modified to U4A plus. .20) - Photo, black & white, c1979, Printing press offset rotary lithographic 3 colour ‘Ultra-MAN-III’ .21) to. 23) - Photo, black & white, c1979, Camera cartographic consolidated super 100 32” x 32”The three personnel appearing in this set are identified. Most items have a full description, NSN, serial number, and the Repairer’s name, address and phone details and contact name. Just the full description is documented.royal australian survey corps, rasvy, army survey regiment, army svy regt, fortuna, asr -
 Bendigo Military Museum
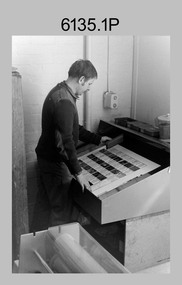
Photograph - Print Troop – Lithographic Squadron – Army Survey Regiment, Fortuna, Bendigo
This collection of 23 photos was most likely taken in Lithographic Squadron, Army Survey Regiment, Fortuna, Bendigo, in 1988. In photos .1P and .2P the technician is preparing a Chromalin map proof for supporting information that would be printed on the reverse side of a topographic map. This map was commonly referred to as a ‘snack’ map, with photos of edible indigenous plants and descriptions endemic to that region printed on the reverse side to assist soldiers living off the land in survival situations. The authoritative information was provided by Major Leslie James (Les) Hiddins aka ‘the Bush Tucker Man’ He is a retired Australian Army soldier and war veteran, who is best known for his love and knowledge of the Australian bush. See item 6190.6P for more information on the Chomalin proof production process. In the remaining photos, Print Troop’s technicians were most likely operating the Komoni, Planeta or Ultra-MAN-III offset printing presses, as well as working in the map despatch dock. Although these photos are not annotated most personnel are positively identified. This is a set of 23 photographs of Print Troop personnel and equipment from Lithographic Squadron at the Army Survey Regiment, Fortuna, Bendigo, 1988. The photographs were on 35mm negative film and were scanned at 96 dpi. They are part of the Army Survey Regiment’s Collection. .1) - Photo, black & white, 1988, Chromalin Proof laminating, Terry King. .2) - Photo, black & white, 1988, Chromalin Proof laminating, Terry King. .3) to .6) - Photo, black & white, 1988, Ultra-MAN-III Printing Press, Colin Yeats. .7) - Photo, black & white, 1988, Ultra-MAN-III Printing Press, L to R: Greg Rowe, SPR Mark ‘Dogs’ Doherty. .8) - Photo, black & white, 1988, Ultra-MAN-III Printing Press, SPR Mark ‘Dogs’ Doherty. .9) to .10) - Photo, black & white, 1988, Ultra-MAN-III Printing Press, John Bateman. .11) - Photo, black & white, 1988, Ultra-MAN-III Printing Press. .12) - Photo, black & white, 1988, Map laminator? L to R: SGT Dale Hudson, SGT Gary Kerr. .13) - Photo, black & white, 1988, Newkoni Komori Printing Press, Peter Hamilton. .14) to .17) - Photo, black & white, 1988, Original Heidelberg Printing Press, Peter Hamilton. .18) to .19) - Photo, black & white, 1988, Map Despatch area, SPR Steve Wright. .20) - Photo, black & white, 1988, Map Despatch area, L to R: unidentified, SGT Gary Kerr. .21) - Photo, black & white, 1988, Printing Presses - foreground: Ultra-MAN-III (x2), centre: Newkoni Komori and background: Planeta Polygraph. .22) - Photo, black & white, 1988, Ultra-MAN-III Printing Presses (x2). .23) - Photo, black & white, 1988, L to R: Daryl South, Mark McCulloch.No personnel are identifiedroyal australian survey corps, rasvy, army survey regiment, army svy regt, fortuna, asr, litho, printing -
 Bendigo Military Museum
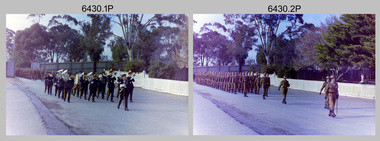
Photograph - Army Headquarters (AHQ) Survey Regiment Freedom of Entry Parade, Bendigo CBD, 1970
The Freedom of Entry to the City was an honour conferred by the Bendigo City Council to the AHQ Survey Regiment on the 20th of April 1970. The unit was granted for the first time the privilege of marching into the city with swords drawn, bayonets fixed and drums beating. The honour is usually bestowed upon local regiments, in recognition of their dedicated service, and it is common for military units to periodically exercise their freedom by arranging a parade through the city. The Freedom of Entry Parade occurred on the 14th of June 1970 led by the Regiment’s CO – LTCOL Bill Sprenger MID, MBE; the unit marched up View St in the CBD to the Queen Elizabeth II Oval. The ceremonial parade followed with a march past the guests of honour, Mayor of Bendigo Councillor Clark Jeffrey and military dignitaries. The parade concluded after formal inspections of the troops. A ceremonial scroll was presented to the Bendigo City Council to the AHQ Survey Regiment citing the occasion and was proudly displayed in the entry foyer to Fortuna Villa up to October 2008. The Regiment continued to exercise its Freedom of Entry with anniversary parades in 1977, 1980, 1985, 1990 and 1995. Refer to item 6020.8P for another set of photos of this event scanned from photographic prints.This set of 39 colour photographs were taken on the occasion of the Army Headquarters (AHQ) Survey Regiment’s Freedom of Entry parade to the City of Bendigo on the 14th of June 1970. The photographs are on 35mm negative film. They are part of the Army Survey Regiment’s Collection. The photographic negatives were scanned at 96 dpi. .1) to .2) - Photo, colour, 1970. AHQ Survey Regiment marches to Queen Elizabeth Oval entry, led by CO LTCOL Lionel Sprenger MBE, MID, unidentified 2IC and RSM WO1 John Hogan. .3) to .4) - Photo, colour, 1970. AHQ Survey Regiment at entry to Queen Elizabeth Oval, exercising its right of entry to City of Bendigo. .5) to .6) - Photo, colour, 1970. AHQ Survey Regiment marches down View St in the City of Bendigo. .7) to .11) - Photo, colour, 1970. AHQ Survey Regiment marches up View St in the City of Bendigo. .12) to .13) - Photo, colour, 1970. AHQ Survey Regiment enters Queen Elizabeth Oval, led by CO LTCOL Lionel Sprenger MBE, MID, unidentified 2IC and RSM WO1 John Hogan. .14) - Photo, colour, 1970. One of AHQ Survey Regiment’s squadrons enters Queen Elizabeth Oval. .15) to .19) - Photo, colour, 1970. AHQ Survey Regiment forms up on Queen Elizabeth Oval awaiting arrival of dignitaries. .20) - Photo, colour, 1970. AHQ Survey Regiment inspected by dignitaries. L to R: Director of the Survey Corps COL Frank Buckland OBE, MID; Colonel Commandant BRIG Don Macdonald AM, MID; unidentified General, CO LTCOL Lionel Sprenger MBE, MID, Mayor of Bendigo Councillor Clark Jeffrey, unidentified personnel. .21) to .23) - Photo, colour, 1970. AHQ Survey Regiment inspected by dignitaries. Director of the Survey Corps COL Frank Buckland OBE, MID; Colonel Commandant BRIG Don Macdonald AM, MID; unidentified General, CO LTCOL Lionel Sprenger MBE, MID, Mayor of Bendigo Councillor Clark Jeffrey. WRAAC personnel centre rank - PTE Desi Asaris, rear rank L to R: unidentified, PTE Pat Lumsden, PTE Heather (Turnbull) Slater, SGT Irene (Rankins) Saunders. .24) to .27) - Photo, colour, 1970. Band inspected by dignitaries. Director of the Survey Corps COL Frank Buckland OBE, MID; Colonel Commandant BRIG Don Macdonald AM, MID; unidentified General, CO LTCOL Lionel Sprenger MBE, MID, Mayor of Bendigo Councillor Clark Jeffrey. .28) to .30) - Dignitaries return to dias. Director of the Survey Corps COL Frank Buckland OBE, MID; Colonel Commandant BRIG Don Macdonald AM, MID; unidentified General, CO LTCOL Lionel Sprenger MBE, MID, Mayor of Bendigo Councillor Clark Jeffrey.Director of the Survey Corps COL Frank Buckland OBE, MID; Colonel Commandant BRIG Don Macdonald AM, MID; unidentified General, CO LTCOL Lionel Sprenger MBE, MID, Mayor of Bendigo Councillor Clark Jeffrey. .31) - Photo, colour, 1970. Unidentified Padre’s Freedom of Entry parade address. .32) - Photo, colour, 1970. AHQ Survey Regiment during the unidentified Padre’s Freedom of Entry parade address. .33) to .35) - Photo, colour, 1970. AHQ Survey Regiment led by CO LTCOL Lionel Sprenger MBE, MID, unidentified 2IC and RSM WO1 John Hogan march past the dais to salute the parade dignitaries. .36) - Photo, colour, 1970. Parade dignitaries at the dais: unidentified councillor, Mayor of Bendigo Councillor Clark Jeffrey. Colonel Commandant BRIG Don Macdonald AM, MID; unidentified General. .37) to .38) - Photo, colour, 1970. AHQ Survey Regiment squadrons march past the dais to salute the parade dignitaries. .39) - Photo, colour, 1970. AHQ Survey Regiment WRAAC personnel march past the dais to salute the parade dignitaries. L to R: unidentified (x2), CPL Beryl Parkinson, unidentified (x2), PTE Robyn (Marsh) Kemsley, unidentified, WO2 Marj Knight, PTE Desi Asaris, PTE Heather (Turnbull) Slater, SGT Irene (Rankins) Saunders..1P to .3P – no annotationsroyal australian survey corps, rasvy, army survey regiment, army svy regt, fortuna, asr -
 Bendigo Military Museum
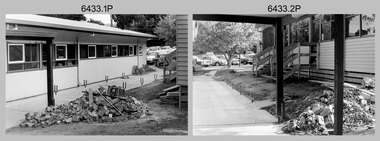
Photograph - Air Survey Squadron building refurbishment - Army Survey Regiment Fortuna, Bendigo, c1982
This set of 20 black & white photographs of the refurbishment of Air Survey Squadron’s production areas, was taken in circa 1982. These refurbishments were most likely in preparation of the AUTOMAP 2 production system and to accommodate the expansion of the Army Survey Regiment’s work force. This photo set also includes the exterior and interior of a new building - 16A, a modular building of several sections transported in and joined together as part of the expansion. Another modular building - 16B was added later in the 1980s to accommodate Technical Services. The two buildings eventually were removed after Fortuna was sold by Defence in 2008.This set of 20 black & white photographs of the refurbishment of Air Survey Squadron’s production areas, was taken in circa 1982. The photographs are on 35mm negative film. They are part of the Army Survey Regiment’s Collection. The photographic negatives were scanned at 96 dpi. .1) to .2) - Photo, black & white, c1982. Air Survey Squadron building refurbishment. Pathway between Building 16 and Building 16A. .3) to .4) - Photo, black & white, c1982. Air Survey Squadron Building 16 refurbishment. .5) - Photo, black & white, c1982. Air Survey Squadron’s CAPT Chris ‘Monty’ Gehrmann. .6) - Photo, black & white, c1982. AUTOMAP 1 system, L to R: SGT Jim Gill, unidentified. .7) - Photo, black & white, c1982. AUTOMAP 1 system, SGT Bruce Bowers. .8) - Photo, black & white, c1982. AUTOMAP 1 system, unidentified staff. .9) - Photo, black & white, c1982. Technical Services - L to R: Tony Spurling, Joe Farrrington. .10) - Photo, black & white, c1982. Technical Services - Tony Spurling. .11) to .12) - Photo, black & white, c1982. Technical Services, unidentified staff. .13) - Photo, black & white, c1982. Air Survey Squadron, L to R: SPR Nick Van Dalen, SSGT Les Dixon, unidentified. .14) - Photo, black & white, c1982. Air Survey Squadron, L to R: SGT Greg Byers, WO1 Graeme Birrell. .15) - Photo, black & white, c1982. Air Survey Squadron, L to R: SSGT Bruce Gordon, CPL Dave Irving, SGT Phil Meagher, SSGT Brett ‘Dutchy’ Van Leeuwin. .16) - Photo, black & white, c1982. Air Survey Squadron, L to R: SGT Mick Hogan, CPL John Gilbert, SPR Lorraine (Daly) Talbot-Smith, SPR Santina (Argetto) Straube. .17) - Photo, black & white, c1982. Air Survey Squadron, L to R: CPL Dave Irving, SSGT Bruce Gordon, SGT Phil Meagher, SSGT Brett ‘Dutchy’ Van Leeuwin. .18) - Photo, black & white, c1982. Air Survey Squadron, L to R: CPL Dave Irving, SGT Phil Meagher. .19) - Photo, black & white, c1982. Air Survey Squadron, L to R: SPR Lorraine (Daly) Talbot-Smith, SGT Mick Hogan, CPL Dave Irving. .20) - Photo, black & white, c1982. Air Survey Squadron, L to R: SGT Phil Meagher, CPL Dave Irving, SSGT Brett ‘Dutchy’ Van Leeuwin, SSGT Bruce Gordon,.1P to .20P – no annotationsroyal australian survey corps, rasvy, army survey regiment, army svy regt, fortuna, asr, photogrammetry, automap 1 -
 Bendigo Military Museum
Photograph - Army Survey Regiment Officers Group Photos, Fortuna Villa, Bendigo, c1986
This is a set of 13 photographs of officers posted to the Army Survey Regiment, Fortuna Villa, Bendigo Victoria in circa 1986. The photos were taken in the gardens next to the front steps of Fortuna Villa. LTCOL Don Swiney MBE was appointed as CO of the Army Survey Regiment from 1985 to 1987. He was subsequently promoted to Colonel and was Director of the Royal Australian Survey Corp from November 1988 to January 1991, and the honorary position as Colonel Commandant from January 1993 to January 1996.This is a set of 13 photographs of officers posted to the Army Survey Regiment, Fortuna Villa, Bendigo Victoria in circa 1986. The photographs are on 35mm negative film and were scanned at 96 dpi. They are part of the Army Survey Regiment’s Collection. .1) - Photo, colour, c1986. L to R: CAPT Peter ‘Blue’ Blaskett, CAPT Danny Galbraith, CAPT John South, MAJ Doug Campbell – US Exchange. .2) - Photo, colour, c1986. MAJ Doug Campbell – US Exchange. .3) - Photo, colour, c1986. L to R: unidentified (x2), CAPT Roger Rix, CAPT Andrew McLeod, CAPT Laurie Newton (civvies), MAJ Kim Weston, MAJ Doug Campbell – US Exchange. .4) - Photo, colour, c1986. L to R: CO LTCOL Don Swiney MBE, MAJ Rene van den Tol, MAJ Alex McLennon, CAPT Roger Rix, LT Greg Oaten, MAJ Kim Weston, CAPT Andrew McLeod, CAPT Laurie Newton (civvies). .5) - Photo, colour, c1986. L to R: CAPT Peter ‘Blue’ Blaskett, CO LTCOL Don Swiney MBE, MAJ Rene van den Tol, MAJ Alex McLennon, CAPT Roger Rix. .6) - Photo, colour, 1986. L to R: unidentified, MAJ Kim Weston, MAJ Rene van den Tol, CO LTCOL Don Swiney MBE, MAJ Alex McLennon. .7) - Photo, colour, c1986. L to R: Mr Tony Spurling, CAPT Peter ‘Blue’ Blaskett, MAJ Daryl Hockings CSM, MAJ Kim Weston, LT Brenton McDonald. .8) - Photo, colour, c1986. L to R: Mr Tony Spurling, LT Carol Dunstan, CAPT Peter ‘Blue’ Blaskett, MAJ Daryl Hockings CSM, MAJ Kim Weston. .9) - Photo, colour, c1986. L to R: MAJ Rene van den Tol, LT Brenton McDonald, CO LTCOL Don Swiney MBE, MAJ Bob McHenry, MAJ Alex McLennon, CAPT Roger Rix, CAPT Andrew McLeod, LT Greg Oaten. .10) - Photo, colour, c1986. Mr Tony Spurling, CAPT Peter ‘Blue’ Blaskett, LT Carol Dunstan, MAJ Daryl Hockings CSM, MAJ Rene van den Tol, MAJ Mick Byrne, MAJ Bob McHenry, CO LTCOL Don Swiney MBE. .11) - Photo, colour, c1986. L to R: Mr Tony Spurling, Mr Pat Thwaites, CAPT Peter ‘Blue’ Blaskett, LT Carol Dunstan, MAJ Daryl Hockings CSM, MAJ Rene van den Tol, MAJ Mick Byrne, LT Brenton McDonald, CO LTCOL Don Swiney MBE, CAPT Andrew McLeod, MAJ Alex McLennon, unidentified, LT Greg Oaten, CAPT Roger Rix, CAPT Danny Galbraith, CAPT Laurie Newton (civvies). .12) & .13) - Photo, colour, c1986. L to R: MAJ Doug Campbell – US Exchange, Mr Pat Thwaites, Mr Tony Spurling, MAJ Daryl Hockings CSM, MAJ Mick Byrne, CAPT John South, LT Carol Dunstan, CAPT Danny Galbraith, CO LTCOL Don Swiney MBE, MAJ Rene van den Tol, MAJ Bob McHenry, LT Brenton McDonald, LT Vicky Thompson, CAPT Roger Rix, MAJ Alex McLennon, MAJ Kim Weston, CAPT Peter Cates, CAPT Peter ‘Blue’ Blaskett, LT Greg Oaten, CAPT Andrew McLeod, CAPT Laurie Newton (civvies). .1P to .13P – no annotations. No personnel are identified.royal australian survey corps, rasvy, army survey regiment, army svy regt, fortuna, asr -
 Bendigo Military Museum
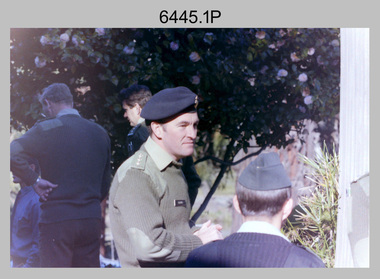
Photograph - Army Survey Regiment Summer Ball - Warrant Officer and Sergeant and Guests Arrival, 1995
This is a set of 25 photographs taken at the combined Officer, Warrant Officer and Sergeant’s Mess Summer Ball held at the Army Survey Regiment (ASR), Fortuna Villa on the 25th of February, 1995. The Summer Ball was one of the last large scale formal functions held at Fortuna Villa before ASR’s closure the following year. Photos of personnel and their guests was taken on their arrival near the Pompeii Fountain in the gardens at the front of the main building. The Ball and Dinner was held at the rear of Fortuna Villa in temporary 20’ x 30’ Army tents set up on the roadway in front of the transport compound. SERCO contract staff provided the catering and the ASR’s Other Ranks performed stewarding and kitchen hand duties. Refer to item 6347 for information on the administrative file held in the collection and items 6370.23P, 6371.33P and 6373.36P for additional photographs taken at the Summer Ball.This is a set of 25 photographs taken at the Officer, Warrant Officer and Sergeant’s Summer Ball held at the Army Survey Regiment, Fortuna Villa on the 25th of February 1995. The colour photographs are on 35mm negative film and are part of the Army Survey Regiment’s Collection. The photographs were scanned at 96 dpi. .1) - Photo, colour, 1995. Brian Johnson and partner. .2) - Photo, colour, 1995. Doug Willis and partner. .3) - Photo, colour, 1995. Craig Kellet and partner. .4) - Photo, colour, 1995. Barry and Jenny Hogan. .5) - Photo, colour, 1995. Mick and Margaret Ellis. .6) - Photo, colour, 1995. Peter Tuddenham and partner. .7) - Photo, colour, 1995. Peter and Jo Peterson. .8) - Photo, colour, 1995. Pat and Jeanette Dury-Lane .9) - Photo, colour, 1995. Kevin and Joy Kennedy. .10) - Photo, colour, 1995. Stuart Symonds and his partner Caroline. .11) - Photo, colour, 1995. Jim and Tracy Ash. .12) - Photo, colour, 1995. Graham Wybar and partner. .13) - Photo, colour, 1995. L to R: Graham Wybar and partner, Jan and Kevin Doyle, unidentified guests. .14) - Photo, colour, 1995. Peter and Annette Curtis. .15) - Photo, colour, 1995. John and Tracey Phillips. .16) - Photo, colour, 1995, Barrie Craymer and partner. .17) - Photo, colour, 1995. Rod and Kristin Skidmore. .18) - Photo, colour, 1995. Dale Hudson and partner. .19) - Photo, colour, 1995, Bob Garritty and partner. .20) - Photo, colour, 1995. Steve and Sherri Burke. .21) - Photo, colour, 1995. Brett and Juana Van Leeuwen. .22) - Photo, colour, 1995. Bob and Margaret Thrower. .23) - Photo, colour, 1995. Steve and Helen Drummond. .24) - Photo, colour, 1995. Rhys and Joanne De Laine. .25) - Photo, colour, 1995. Mr & Mrs Townshend, Ken Cugley and partner..1P to .25P There are no personnel or civilians identified.royal australian survey corps, rasvy, army survey regiment, army svy regt, fortuna, asr -
Clunes Museum
Photograph - PHOTOGRAPHS
23 X COLOURED PHOTOGRAPHS OF THE 2010 FLOODING OF CRESWICK CREEK IN CLUNES .1QUEENS PARK .2 BLACKMORE ROAD .3 BOWLING GREEN .4 LIGAR STREET .5 QUEENS PARK .6 TOWARDS BOWLING GREEN .7 QUEENS PARK .8 BOWLING GREEN .9 SENIOR CITIZENS .10 THE OVAL .11 33 ANGUS STREET .12 WATER CURRENTS .13 LOOKING TOWARDS FORMER TONY BAILEY'S HOUSE .14 ANGUS STREET .15 LOWER FRASER STREET .16 CORNER CAMERON STREETS - FLOOD PEAK AT 5PM .17 AT GOVERNMENT BRIDGE .18 LOOKING DOWN CAMP HILL .19 FORD .20 BUTTER FACTORY BRIDGE .21 BESIDE BOWLING GREEN .22 BUTTER FACTORY BRIDGE .23 DAMAGE AT FORD clunes floods 2010, creswick creek flood -
Bialik College
Mixed media (Item) - 2000 Bialik College Born to Shine
Recording created as part of Bialik College's music program, in 2000. Included primary and senior school students. Please contact [email protected] to request access to this record.Bialik College Born to Shine1. Guajira- Funk Band with Amazon Rhythms 2. Old Fashioned- Highly Strung, 3. Az Der Rabbe- Weenyboppers, 4. Tumbalalaika- Weenyboppers, 5. Ostinato- Jungle Juice, 6. For Whom the Bell Tolls, Year 10 Band, 7. Live Wire- Highly Strung, 8. Hello Goodbye- Pipsqueakers, 9. Obladi Oblada- Pipsqueakers, 10. Born to Shine- Year 9 Band (1), 11. Saturn- Amazon Rythms, 12. Gabrielle- Teenyboppers, 13. When eh Sun Goes Down, Senior Band, 14. Foolish Games- Year 9 Band (2), 15. Cherish- Senior Vocal Ensemble, 16. Fade to Black - Year 10 Band, 17. Hard to Say I'm Sorry- Senior Vocal Ensemble, 18. I'm Not Talking to You- Pipsqueakers. 2000s, 2000, primary school, year 10, year 9, music, assessment, bialik college -
 Eltham District Historical Society Inc
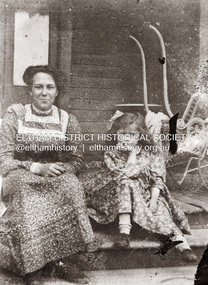
Photograph, Believed to be Fanny Withers and daughter Margery, c.1900
Fanny Flinn married artist Walter Withers in London, England in 1887/1888. Margery Pitt Withers was their daughter who was born January 13, 1890 at Handsworth, Warwickshire, England during a visit by her mother Fanny to her parents. Walter Withers became associated with the Heidelberg School of Artists. Withers and his family lived in Eltham from 1903. Many items in this collection have suffered from significant water damage and black mouldjohn withers collection, heidelberg, 1900, fanny withers (nee flinn), scan - 3¼ × 4¼ inch quarter-plate glass neg, margery pitt withers -
 Eltham District Historical Society Inc
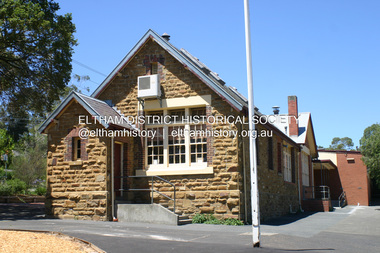
Photograph - Digital Photograph, Alan King, Eltham Primary School No. 209, Dalton Street, Eltham, 28 December 2007
This building is the earliest building remaining on site today. It was built in 1875 and was the second school building replacing the original 1856 building of stone walls with wooden shingles on the roof. That building needed to be replaced after the stone walls collapsed outwards. In August 1912 the school issued a requisition for remodelling of the school concerned with replacement of the existing windows with larger and wider windows to allow additional light into the school rooms and the erection of a wooden partition in the centre of the room. An extension to the building at rear and skylights in the roof were added in 1921. Only two low wooden stairs were originally provided to enter the porch. These were rebuilt by 1928. A steel mud grate was introduced 1930s/1940s and an infant shelter shed circa 1945. Covered under Heritage Overlay, Nillumbik Planning Scheme. Published: Nillumbik Now and Then / Marguerite Marshall 2008; photographs Alan King with Marguerite Marshall.; p49 Eltham Primary School at Dalton Street, bustling with hundreds of students, has changed dramatically since it began in July 1855.1 A reminder of its early days is the building in local sandstone with a slate roof. First head teacher was David G Clark who was officially in charge from June 1856 until 1889.2 This school was not the settlement’s first. That was the Church of England Little Eltham School, west of Diamond Creek in 1853 and closed in 1872. In 1855 David Clark and his sister Catherine, opened what was to become the present school, with eight students. The school operated elsewhere in a temporary slab building, also used for worship by the Wesleyans,3 which allowed the wind and rain easy access. As well as having to endure such Spartan conditions, the students paid one penny a week for the privilege. But in June 1856 the patrons objected to the conditions, and they and the Clarks wrote to the National Schools Board, asking for a suitable school. They asked for a grant to buy land for a school, and to appoint the Clarks. As a result, inspector Mr A B Orlebar visited the school. He found 33 children aged from four to 13 and noted, among other things: ‘There is no attempt at classification, and this is owing chiefly to the want of books, every child bringing with it any spelling or reading book he or she may find at home,4 and partly to the master and mistress having little idea of anything but individual instruction.’ Of Mr Clark, Mr Orlebar said: ‘I cannot pass him as coming up to the full standard of a probationer. He promises however to pursue a course….if the commissioners take him into their service.’ Of Catherine: ‘She makes a promise similar to that of her brother. Pupils were orderly and the school seemed well conducted. I cannot therefore hesitate to recommend them both personally as probationers.’ Later at a public meeting, Mr Orlebar pledged the commissioners would give £150 for a school, if this was matched by local residents. The meeting decided the commissioners would acquire two acres (0.8ha) for the school site. The building, constructed with local sandstone, was completed in December 1857, measuring 40 feet x 16 feet (12mx5m) and 10 feet (3m) high. It was divided into two rooms – one for the school and the other for teacher accommodation. So the Eltham school was born, in an area regarded as ‘one of the poorest in the colony’. Excerpts from inspectors’ reports in the following years, show that in some ways school has not changed that much since then: ‘Discipline only moderate. Too much chattering!’ (1873); ‘Several slates were cleaned with saliva applied by the hand! Damp rags would be much nicer.’(1891).5 In 1863 the Board of Education took over the school giving it its current name and number, Eltham Primary School No 209. Overcrowding has dogged the school over much of its history. In 1875 overcrowding spilled part of the school into the local courthouse. But that year the sandstone building, which is still standing, was built for 100 children, costing £553 and replacing the National School building. Now, this section, even following renovations, still bears part of its original graciousness, with lofty timber ceilings, tall vertical windows and original floors.This collection of almost 130 photos about places and people within the Shire of Nillumbik, an urban and rural municipality in Melbourne's north, contributes to an understanding of the history of the Shire. Published in 2008 immediately prior to the Black Saturday bushfires of February 7, 2009, it documents sites that were impacted, and in some cases destroyed by the fires. It includes photographs taken especially for the publication, creating a unique time capsule representing the Shire in the early 21st century. It remains the most recent comprehenesive publication devoted to the Shire's history connecting local residents to the past. nillumbik now and then (marshall-king) collection, dalton street, eltham primary school, state school no. 209 -
Bialik College
Audio (Item) - Bialik College 'Bialik Ensembles'
No date. Recording created as part of a student assessment. Please contact [email protected] to request access to this record. Track list 1. Guajilo 2.Old Fashioned 3.Az Der Rebbe 4. Tumbelika 5. Ostinato 6. For Whom the Bell Tolls 7. Live Wire 8. Hello Goodbye 9. Oblida Oblada 10. Born to Shine 11. Katum 12. Gabrielle 13. When the Sun Goes Down 14. Foolish games 15. Cherish 16. Fade to Black 17. Hard to Say I'm Sorry 18. I'm Not Talking. Please contact [email protected] to request access to this record.music, bialik, secondary school, jewish school, student work -
 Eltham District Historical Society Inc
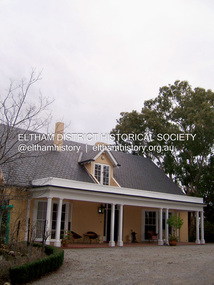
Photograph - Digital Photograph, Marguerite Marshall, 'Landscape', 60 Lavender Park Road, Eltham South, 24 June 2008
Built by artist and cartoonist Percy Leason in 1927 in what was then New Street but renamed Lavender Park Road in the late 1950s/early 1960s. Covered under Heritage Overlay, Nillumbik Planning Scheme. Published: Nillumbik Now and Then / Marguerite Marshall 2008; photographs Alan King with Marguerite Marshall.; p121 Said to be a genius, cartoonist Percy Leason’s career was at its peak when in 1925 to 1926 he built his home at New Street (now Lavender Park Road) Eltham. The Herald newspaper owner, Sir Keith Murdoch, had hired Leason for his newly acquired Melbourne Punch magazine at a salary of £1750, making him ‘one of the highest paid cartoonists in the world’.1 With this salary and financial help from Murdoch, Leason was able to build his lovely home in Eltham. At the crest of a sweeping drive, the home now two-storey in white brick with a gabled grey slate roof and dormer windows is flanked by an extension built by another owner in the 1980s. Leason lived in the home with his wife, Isabel and children, until 1937, when he left for the United States of America, where he lived until his death in 1959. The four-bedroom house and garden would have been well-suited to bringing up his family and to entertaining their friends in style. Large airy rooms have high ceilings with moulded plaster, timber floors and several are brightened with bay windows. Leason made friends with many of the artists and personalities who gravitated to Eltham. Around 1931 Justus Jörgensen, founder of the Montsalvat Artists’ Colony, helped Leason build his large studio at the back of the house. Another friend was journalist Mervyn Skipper, father of jeweller and sculptor Matcham, and artists Helen and Sonia. Leason’s teacher, artist Max Meldrum, also visited and rented accommodation in Eltham, opposite Wingrove Park. Punch folded in 1925, but Leason continued as cartoonist for Table Talk. In 1926 Leason began the cartoons of a mythical Australian town Wiregrass, which were inspired by Kaniva, his home town. The art gallery in Main Road Eltham was named Wiregrass in Leason’s honour. Leason completed 1000 drawings from 1919 to 1937, which author Garrie Hutchinson claimed, were technically unsurpassed and had regional and universal interest. Leason’s acute observations of country life stemmed from his childhood in Kaniva in Victoria’s western Wimmera, where he was born, the son of a selector, in 1889. Meldrum claimed that Leason could name every plant and the habits of every animal.2 Leason also painted 28 portraits of the last full-blooded aboriginals in Victoria at Lake Tyers in Gippsland, most of which are in a private collection. In Sydney Leason illustrated Henry Lawson’s Selected Poems and worked for The Bulletin. Leason had begun his career at 13 as an apprentice lithographic artist at Sands and MacDougall. He attended night classes at the National Gallery and the Victorian Artists Society. Leason first visited Eltham in 1910 to paint with fellow artist William ‘Jock’ Frater. They camped near Bible and Pitt Streets and along the Diamond Creek on the site of the present Eltham Retirement Centre. Despite his success as a cartoonist, Leason wanted to be recognised as a serious painter and for his anthropological work.3 He was also conservative and felt uncomfortable with the modern art scene in Melbourne.4 So he left for the United States of America to work as a painter. Ironically his time in New York saw the burgeoning of modern art, notably by artists such as Jackson Pollock. But Leason found his niche by running an art school, painting society portraits and illustrating books and magazines.This collection of almost 130 photos about places and people within the Shire of Nillumbik, an urban and rural municipality in Melbourne's north, contributes to an understanding of the history of the Shire. Published in 2008 immediately prior to the Black Saturday bushfires of February 7, 2009, it documents sites that were impacted, and in some cases destroyed by the fires. It includes photographs taken especially for the publication, creating a unique time capsule representing the Shire in the early 21st century. It remains the most recent comprehenesive publication devoted to the Shire's history connecting local residents to the past. nillumbik now and then (marshall-king) collection, landscape, lavender park road, percy leason, new street -
 Eltham District Historical Society Inc
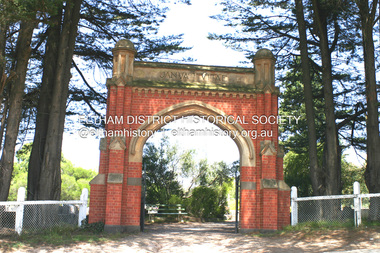
Photograph - Digital Photograph, Alan King, Memorial Arch Gateway, Nillumbik Cemetery, Diamond Creek, 23 January 2008
The Nillumbik Cemetery is of historical, architectural, aesthetic and social significance at a Regional level (North-east Melbourne). The memorial arch is of State significance. Nillumbik Cemetery, which was established in 1867, is of historical and social significance for its association with the early history of Diamond Creek and as a record of the pioneering families of the district. Significant graves include those of the famous writer Alan Marshall, author of 'I Can Jump Puddles', footballer Gordon Coventry, and William Ellis, notable early settler and benefactor. The 1897 Tudor/Gothic revival memorial arch, bequeathed by William Ellis, is a rare design in ornamental gateways and is relatively large for the size of the cemetery. It is unique in Victoria as a cemetery gateway arch. The burial ground has associated structures, such as the hexagonal timber sexton's office, post and wire fence and picket hand gate along Main Street, all probably built in the early twentieth century. Covered under Heritage Overlay, Nillumbik Planning Scheme. National Trust of Australia (Victoria) - Regional significance Published: Nillumbik Now and Then / Marguerite Marshall 2008; photographs Alan King with Marguerite Marshall.; p83 Entering Nillumbik Cemetery through an ornamental gateway and shaded by the Monterey Cypress hedge helps one leave the busy world outside and contemplate yesterday’s Diamond Creek. The gateway, classified by the National Trust of Australia (Victoria), and inscribed with ‘JANVA VITAE’ (gate of life), was a gift from a distinguished pioneer, William Ellis. Ellis, who was an original trustee of the Nillumbik Cemetery representing the Primitive Methodists and a successful farmer, bequeathed £100 to build the red-brick and carved stone gateway in 1887. In 1867 surveyor Edward Bage had set aside two acres (0.8ha) now 35 Main Street, for this cemetery, in what was then called the village of Nillumbik. Several earlier burials on private lands in the district might have been exhumed and re-interred in the new cemetery. The first burials in the cemetery are thought to be of ‘a Chinaman who hanged himself from a tree behind the Church of England’ and ‘another man who was drowned in a water-hole behind the same church’.1 The 1000 or so graves in the cemetery are grouped into five denominational sections: two Anglican and one each for the Methodist (the largest), Catholic and Presbyterian Churches. It is believed that several unmarked graves are of Aborigines and Chinese miners.2 Perhaps the most famous person buried in the cemetery was author Alan Marshall, who died in 1984 and wrote, among other books, I Can Jump Puddles. Surprisingly his grave is particularly modest consisting of only a grassed plot with a tiny boulder and a simple bronze plaque. It lies about halfway down the main path, at the west and third row back. The first European, interred at the cemetery on July 9, 1869, was Hannah, aged 13 years eight months, daughter of local orchardist John Lawrey and wife Honor.3 Each grave has a story which reflects a rich history. Phillip Cummings, who died in 1884, provided the barn for Diamond Creek’s first school, run by the Primitive Methodist Church. The barn stood at the corner of Phipps Crescent and the main road.4 Former Eltham Shire councillor George Stebbings, who died in 1896, built several prominent buildings in the district, including Shillinglaw Cottage in Eltham.5 The grave of miner James Joseph Whyte, who died in 1908, is a reminder of Diamond Creek’s gold mining history. At age 51, Whyte died from a rock fall in the Diamond Mine, Diamond Creek. Diamond Creek’s first butcher, Patrick Ryan, became President of the Shire of Heidelberg and Chairman of the Eltham Hurstbridge Railway Trust. A former gold miner, he was grandfather of local historian Reverend Jock Ryan. He was buried in an unmarked grave halfway down the central path. His son John Lawrence, who is buried elsewhere, had been a Mayor of the City of Heidelberg. George Martin Pizzey gave a hall, for what was to become The St John’s Anglican Church in Diamond Creek. He was a Crimean War veteran, mason and leather goods manufacturer in Melbourne, who died in 1915. The two world wars took a heavy toll of locals with 54 personnel buried here, two thirds of whom served in World War One. A sporting pioneer was Greensborough District Cricket Club founder, Andrew Webb, who was buried in 1971. Politician Roy Mountford Vale (Monte), who died in 1977, was a Member of the Legislative Assembly of Greensborough, and a founding councillor and president of the Diamond Valley Shire. Modern-day residents are also remembered in this cemetery. The tragic Ash Wednesday bushfires took their toll on the district: William Marsden of Panton Hill CFA died, aged 39, fighting bushfires at Upper Beaconsfield in 1983.6 Several graves tell of those who held distinguished positions overseas, including William Constable, who died in 1989. Constable was artistic director of a ballet company, art director of more than 30 films for London-based film productions, and was awarded best Film Art Director at the Moscow Film Festival in 1960.This collection of almost 130 photos about places and people within the Shire of Nillumbik, an urban and rural municipality in Melbourne's north, contributes to an understanding of the history of the Shire. Published in 2008 immediately prior to the Black Saturday bushfires of February 7, 2009, it documents sites that were impacted, and in some cases destroyed by the fires. It includes photographs taken especially for the publication, creating a unique time capsule representing the Shire in the early 21st century. It remains the most recent comprehenesive publication devoted to the Shire's history connecting local residents to the past. nillumbik now and then (marshall-king) collection, diamond creek, memorial arch, gateway, nillumbik cemetery, william ellis -
 Eltham District Historical Society Inc
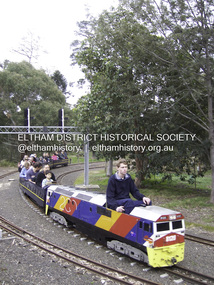
Photograph - Digital Photograph, Marguerite Marshall, Diamond Valley Railway, Eltham Lower Park, 7 September 2008
Kids of all ages enjoy the Miniature Railway. Published: Nillumbik Now and Then / Marguerite Marshall 2008; photographs Alan King with Marguerite Marshall.; p163 On Sundays in Eltham thousands of children, mums, dads and grandparents can be seen travelling around Lower Eltham Park in tiny trains. They are among the two and half million passengers who have travelled on the Diamond Valley Railway since it officially began in 1961. The miniature railway originally operated from the 1940s at Chelsworth Park, Ivanhoe, until flooding caused it to be moved to the Eltham Lower Park in 1959. The railway is modelled on the 1920s era – the heyday of passenger rail travel – and the trains are built on a scale of two inches to the foot (1/6). Although not exact replicas, trains include models of the Spirit of Progress, Puffing Billy, The Overland, Dog Boxes, Vic Rail S class, G class and a NSW 81 Class. The three and a half kilometres of track is set amongst native plants and picnic areas. A friendly hoot or the clang of a bell occasionally punctuates the tranquillity as a train emerges from a treed bend with passengers excitedly waving to onlookers. For $3 the train takes you on a 13-minute two-kilometre ride. Passengers sit in single file in the narrow train, which clatters along tracks built to the scale of the Australian narrow gauge of three feet six inches (1.1m). These are used in Queensland, South Australia, Tasmania and Western Australia. Safety standards are stringently kept. Even before you buy a ticket notices tell you that you must wear closed shoes. You can even borrow these, and you are given a pair of socks for the ride! Blue-overalled volunteers check tickets, see you aboard, and drive the train. They are mainly retired men who can at last devote their time to what little boys dream of – playing with trains. Passengers are instructed in safe behaviour, then the station master waves a white flag and off we go. The guard sits at the back with his whistle and green flag at the ready. The winding track, fringed by native trees and bushes planted by volunteers, stands on crown land managed by Nillumbik Council. The train clatters along the track and crosses a bridge over a drain elevated by name to The Blow Fly Creek. We pass by Meadmore Junction at a speed of three kilometres an hour. Then on through a tunnel, accompanied by squeals of delight, and after a few moments of blackness, light glimmers at the end. On we go, past the original platform, along another route past busy Main Road through Pine Creek Station, over a bridge and through another tunnel with more screams of delight.Then a signal stops us before the ‘all clear’ to return to our original point of departure. The railway services its passengers – the largest number of any miniature railway in Australia – with a fleet including: six diesel locomotives, three steam locomotives, eight sets of passenger cars and one battery electric Dog Box set. Members also privately own 20 locomotives and powered carriage sets as well as four carriage sets.1 All the trains are stored on-site in workshops, sheds and a tunnel. The railway is entirely run by volunteers, so that all ticket money is used for maintenance and extensions, and some goes to local charities. Since 1991, the entire railway has been rebuilt, including an upgraded signalling system. About half of the 120 volunteer members are active with about 35 working each Sunday, and a dozen or so working every Wednesday. Members are trained to positions of station assistant, booking officer, train guard, train driver or signalman. Members construct new carriages and locomotives as well as maintaining track, signalling and rolling stock.This collection of almost 130 photos about places and people within the Shire of Nillumbik, an urban and rural municipality in Melbourne's north, contributes to an understanding of the history of the Shire. Published in 2008 immediately prior to the Black Saturday bushfires of February 7, 2009, it documents sites that were impacted, and in some cases destroyed by the fires. It includes photographs taken especially for the publication, creating a unique time capsule representing the Shire in the early 21st century. It remains the most recent comprehenesive publication devoted to the Shire's history connecting local residents to the past. nillumbik now and then (marshall-king) collection, diamond valley railway, eltham lower park -
 Ballarat Tramway Museum
Memorabilia - Set of 17 reproduction Sydney Destination Rolls, 1965
Set of 9 replica destination rolls produced by the AETA, mid-1960s to give details of each destination roll of Sydney tram or trolley buses. 1 - Western suburbs - AETA No 1 - 1250mm long 2 - Eastern suburbs - AETA No. 2 - 1150mm long 3 - North Sydney - Manly - AETA No. 3 - 1040mm long 4 - Watsons Bay - AETA No. 4 - 700mm long 5 - Newcastle - AETA No. 5 - 620mm long 6 - Enfield Depot - AETA No. 6 - 363mm long 7 - Wylde St Trolley Bus AETA No. 8 - 112mm long x 71mm wide 8 - Kogarah Trolley bus - AETA No. 9 - 305mm long x 71 mm wide 9 - North Sydney - Manly AETA No. 12 - 690mm long x 50mm wide 10 - Eastern Suburbs - AETA No. 14 - 770mm long x 50mm wide 11 - Western Suburbs - AETA No. 16 - 1270 long x 50mm wide 12 - North Sydney / Manly side - AETA No.17 - 519mm long x 80mm wide 13 - Western Suburbs side - AETA No. 18 - 665mm long x 80mm wide 14 - Watsons Bay - AETA No. 20 - 1160mm long x 48mm wide 15 - Eastern Suburbs - AETA No. 21 - 11540mm long x 48mm wide 16 - North Sydney - AETA No. 22 - 750mm long x 48mm wide 17 - Eastern Suburbs Side - AETA No. 23 - 523mm long x 87mm wide The envelope in which they were received by the donor - preprinted for the Electric Traction magazine with a 2/5d stamp, Registered mail has been retained. Date stamped 30 Aug. 1965. Yields information about Sydney tramcar and trolley bus destination rolls.Set of 18 paper rolls of varying length, printed and joined by glueing.tramways, destination rolls, sydney, aeta, destination roll, buses, trolley buses -
 Bendigo Military Museum
Photograph - AUTOMAP 2 Production - Army Survey Regiment, Fortuna, Bendigo, c1986
This collection of 23 photos of map production on the AUTOMAP 2 computer-based system in Air Survey and Cartographic Squadrons, was most likely taken in 1986. The AUTOMAP 2 system was an upgrade to the AUTOMAP 1 system, comprising Intergraph graphic edit workstation terminals networked to VAX 750/785 main frame computers. Unlike AUTOMAP 1, operators could display digital topographic features on monitors for editing. Successful adaptation of this system meant RASvy was at the forefront of digital mapping/cartographic systems in Australia and overseas. The system comprised Input (Wild B8 Aviograph feature extraction) Raster Scanning (digitising from compilation sheets, Graphic Edit (cartographic completion) and Plot Verification Sub Systems. The system was operational from 1984 to its ‘Newheart’ upgrade in 1993. Throughout its life, the system was progressively refined with productivity gains, achieved from award winning technical development in-house by talented and innovative Army Survey Regiment personnel.This is a set of 23 photograph of AUTOMAP 2 production at the Army Survey Regiment at Fortuna, Bendigo, c1986. The photographs were on 35mm colour slides and were scanned at 96 dpi. Photos .5P and .6P are also printed on photographic and scanned at 300 dpi. They are part of the Army Survey Regiment’s Collection. .1) - Photo, colour, c1986, AUTOMAP 2 Production - Army Survey Regiment, Fortuna, Bendigo. c1986. .2) - Photo, colour, c1986, AUTOMAP 2 Wild B8 Aviograph stereoplotter. .3) - Photo, colour, c1986, AUTOMAP 2 Wild B8 Aviograph stereoplotter feature extraction, unidentified technician. .4) - Photo, colour, c1986, Wild B8 Aviograph stereoplotter feature extraction, LCPL Raelene (Munting) Brodie. .5) - Photo, colour, c1986, AUTOMAP 2 computer tape maintenance, SPR Steve Linane. .6) - Photo, colour, c1986, AUTOMAP 2 Graphic Edit Workstation, SPR Steve Linane. .7) to .8) - Photo, colour, c1986, AUTOMAP 2 Graphic Edit Workstation, unidentified technician. .9 to .10) - Photo, colour, c1986, AUTOMAP 2 Graphic Edit Workstation. .11) - Photo, colour, c1986, AUTOMAP 2 Graphic Edit Workstation feature coding and command menu. .12) - Photo, colour, c1986, AUTOMAP 2 high resolution computer monitor. .13) to .16) - Photo, colour, c1986, AUTOMAP 2 production output comparison to AUTOMAP 1. .17) to .18) - Photo, colour, c1986, AUTOMAP 2 computer system components. .19) - Photo, colour, c1986, AUTOMAP 2 Intergraph 7596 verification plotter. .20) - Photo, colour, c1986, AUTOMAP 2 Benson verification plotter, SPR Steve Coulson. .21) - Photo, colour, c1986, AUTOMAP 2 drainage, contour, roads and cultural digital data verification plot. .22) - Photo, colour, c1986, AUTOMAP 2 drainage, contour, roads and cultural digital data on computer monitor. .23) - Photo, colour, c1986, AUTOMAP 2 3D digital terrain model on computer monitor. .1P to .23P - Some of the equipment is annotated on the frame of the 35mm slides. .5P & .6P prints annotated incorrectly ‘Steve Lenane’. Correct spelling is - ‘Steve Linane’ royal australian survey corps, rasvy, army survey regiment, army svy regt, fortuna, asr, automap 2 -
 Bendigo Military Museum
Photograph - AUTOMAP 1 Production – Army Survey Regiment, Fortuna, Bendigo, c1978-1980
This collection of 17 photos was most likely taken in c1978-1980. The AUTOMAP 1 computer assisted cartography and mapping system was introduced in 1975. The components of AUTOMAP 1 were the Input Sub-System of four Wild B8s stereoplotters and three Gradicon digitising tables, the Optical Line Following Sub-System – Gerber OLF, the Verification Sub-System – Gerber 1442 drum plotter, the General Purpose Sub-system – HP21MX computer and the Output Sub-System – Gerber 1232 flatbed plotter). The first map was published in 1978 (Strickland 3665-3, 1:50,000). AUTOMAP 1 was the first computer assisted cartography and mapping system utilised by the Survey Corps and was the first system used by Australian mapping organisations. The history of the AUTOMAP 1 system is covered in more detail with additional historic photographs, in pages 116-118 of Valerie Lovejoy’s book 'Mapmakers of Fortuna – A history of the Army Survey Regiment’ ISBN: 0-646-42120-4. See items 6122.20P, 6410.24P, 6183.19P, 6184.20P, and 6200.5P for additional photographs of the AUTOMAP 1 system.This is a set of 17 photographs of Air Survey Squadron military and civilian personnel operating AUTOMAP 1 equipment at the Army Survey Regiment at Fortuna, Bendigo, c1978-1980. The photographs were on 35mm colour slides and were scanned at 96 dpi. They are part of the Army Survey Regiment’s Collection. .1) - Photo, colour, c1978-1980, Gerber 1442 verification drum plotter. .2) - Photo, colour, c1978-1980, Gerber 1442 verification drum plotter, SPR Garry Ames. In background - Hewlett Packard (HP) 2100A Minicomputer Input Subsystem controlling Wild B8 Aviograph stereo plotters. .3) - Photo, colour, c1978-1980, Gerber 1442 verification drum plotter. .4) - Photo, colour, c1978-1980, digitising topographic features with a Wild B8 Aviograph stereo plotter, CPL Adrian Rynberk. .5) to .6) - Photo, colour, c1978-1980, Wild PEB8 stereo profiler. .7) - Photo, colour, c1980, HP 9640A Programming System. .8) - Photo, colour, c1980, HP 9640A Programming System, L to R: unidentified, SGT Alan Toogood. .9) - Photo, colour, c1978-1980, Gerber Optical Line Follow (OLF), CAPT Rob Bridge. .10) - Photo, colour, c1978-1980, Gerber OLF. .11.) to .12) - Photo, colour, c1978-1980, Gerber OLF, SPR Gerry Gunn. .13) - Photo, colour, c1978-1980, Gerber OLF. .14) - Photo, colour, c1979, Gradicon edit table. .15) to .16) - Photo, colour, c1981, Gradicon edit table, SPR Chris Gordon. .17) - Photo, colour, c1981, Gradicon edit table, L to R: SPR Chris Brown, unidentified..1P to .17P - Some of the equipment is annotated on the frame of the 35mm slides.royal australian survey corps, rasvy, army survey regiment, army svy regt, fortuna, asr, automap 1 -
 Bendigo Military Museum
photograph - AUTOMAP 1 Production – Army Survey Regiment, Fortuna, Bendigo, c1980
This collection of 20 photos was most likely taken in 1980. The AUTOMAP 1 computer assisted cartography and mapping system was introduced in 1975. The components of AUTOMAP 1 were the Input Sub-System of four Wild B8s stereoplotters and three Gradicon digitising tables, the Optical Line Following Sub-System – Gerber OLF, the Verification Sub-System – Gerber 1442 drum plotter, the General Purpose Sub-system – HP21MX computer and the Output Sub-System – Gerber 1232 flatbed plotter). The first map was published in 1978 (Strickland 3665-3, 1:50,000). AUTOMAP 1 was the first computer assisted cartography and mapping system utilised by the Survey Corps and was the first system used by Australian mapping organisations. The history of the AUTOMAP 1 system is covered in more detail with additional historic photographs, in pages 116-118 of Valerie Lovejoy’s book 'Mapmakers of Fortuna – A history of the Army Survey Regiment’ ISBN: 0-646-42120-4. See items 6410.24P, 6183.19P, 6184.20P, 6200.5P, and 6222.17P for additional photographs of the AUTOMAP 1 system.This is a set of 20 photographs of Air Survey Squadron military and civilian personnel operating AUTOMAP 1 equipment at the Army Survey Regiment at Fortuna, Bendigo, c1980. The photographs were on 35mm negative film and were scanned at 96 dpi. They are part of the Army Survey Regiment’s Collection. Photos .19P and .20P are printed on photographic and scanned at 300 dpi. .1) - Photo, black & white, c1980, Gerber plotter. .2) - Photo, black & white, c1980, Gerber plotter, LT Rob John .3) - Photo, black & white, c1980, Gradicon edit table, SPR Jamie McRae .4) - Photo, black & white, c1980, Gradicon edit table, SPR Steve Linane .5) - Photo, black & white, c1980, 1130 System administration, unidentified. .6) - Photo, black & white, c1980, Wild B8 stereo plotter, SPR Van Dalen? .7) - Photo, black & white, c1980, Wild B8 stereo plotter, SPR Van Dalen? .8) - Photo, black & white, c1980, Gerber Optical Line Follower (OLF). .9) - Photo, black & white, c1980, Gerber OLF. .10) - Photo, black & white, c1980, Gerber OLF. .11) - Photo, black & white, c1980, Gerber OLF. .12) - Photo, black & white, c1980, Gerber OLF. .13) - Photo, black & white, c1980, Data management, CPL Greg Gilbert. .14) - Photo, black & white, c1980, Data management, CPL Greg Gilbert. .15) - Photo, black & white, c1980, 1130 Operating System administration, SGT Denis Marshall. .16) - Photo, black & white, c1980, Programming System, L to R: unidentified, SGT Alan Toogood. .17) - Photo, black & white, c1980, Programming System, L to R: Robert Cox, WO1 Bob Mason, John Dean. .18) - Photo, black & white, c1980, Programming System, L to R: Robert Cox, WO1 Bob Mason, John Dean. .19) - Photo, black & white, c1980, Gradicon edit table, CPL Chris Carter. .20) - Photo, black & white, c1980, Gerber plotter, LT Rob John..1P to .18P - No personnel are identified .19P - ‘CPL Chris Carter’ annotated on backroyal australian survey corps, rasvy, army survey regiment, army svy regt, fortuna, asr, air survey, automap -
Clunes Museum
Plan - CONCEPT DRAWINGS/PLANS, JOHN ALKEMADE & ASSOC, CLUNES COMMUNITY AND INTERPRETIVE CENTRE, 2012
CONCEPT DRAWINGS BY 3 ARCHITECTS AND EXPLANATORY INFORMATION. ALL LAMINATED ARCHITECT JOHN ALKEMADE & ASSOC. .1 PROPOSED FLOOR PLAN .2 SITE PLAN - PHOTOCOPY OF 1 AND 3 .3 SOUTH EAST VIEW ARCHITECT R. BRAMELL 2006 .4 LONGITUDINAL SECTION .5 FLOOR PLAN .6 FACADE ARCHITECT MORTON DUNN 2012 .7 GROUND FLOOR PLAN .8 SITE PLAN .9 FIRST FLOOR PLAN 10 CONCEPT DRAWING OF OUTCOME .11 WHAT IS THE CCIC .12 COMMUNITY REFERENCE GROUP .13 THE BUDGET .14 PROJECTED TIMELINE clunes community and interpretive centre concept, william barkell -
 Melbourne Tram Museum
Ephemera - Metcards - fund raising - set of 6, Metlink, 2005 - 2009
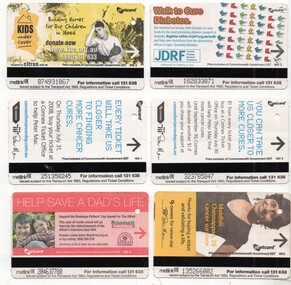
Set of six Metcards with the Metcard logo and transport Mode icons. Tickets were used to promote fundraising for medical treatments Two copies of each ticket held except for item 6. 1 - 2005 - "Kids under cover" - building homes for children - Full Fare - August 2005 2 - 2007 - "Walk to cure Diabetes" - Off peak daily - 13-9-2007 and 2 hour concession - 4-10-2007 3 - 2008 - "Peter Mac connexforcancerday" - sponsored by connex - Daily concession - 14-7-2008 and 2 hour concession - 3 -7-2008 4 - 2009 - "Peter Mac connexforcancerday" - sponsored by connex - Daily concession - 12-8-2009 and 2 hour concession - 5-8-2009 5 - 2007 - "Help save a dad's life" - sponsored by Bunnings for Alfred Intensive Care unit - Off Peak Daily - 26-9-2007 and 17-9-2007 6 - 2006 - "Maidhill Chinnappan - cancer survivor - sponsored by Connex for Peter Mac, 2 Hour Concession - 12-8-2006 Demonstrates one of many different types of Metcards issued during the period of used in Melbourne from 1996 to 2013Set of six Metcard tickets - printed on light card with a magnetic stripe. Has the ticket number and contact details, Metcard and Metlink logo on the front of the card.trams, tramways, tickets, metcard, metlink, kids under cover, walk to cure diabetes, peter mac, connex, bunnings, alfred hospital, maidhill chinnappan -
 Ringwood and District Historical Society
Flyer - Land Sale, Preplanned Development - Woodland Ridge Estate Stages 1, 2 and 3, Ringwood North, Vic. - circa 1972
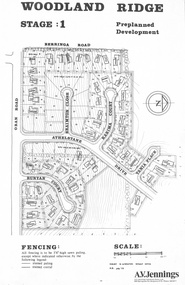
Subdivison maps of Woodland Ridge Estate. Stage 1 includes Berringa Road, Oban Road, Athelstane Drive, Braimton Close, Karima Court, Tania Place, Runyan Court. Stage 2 includes Athelstane Drive, Cormiston Road, Linda Place, Casula Place, Oban Road. State 3 includes Williams Road, Athelstane Drive, Tania Place and Cormiston Road. Developer - A.V. Jennings Industries (Aust) Ltd., 690 Springvale Road, Mulgrave, 3170. Phone 560 8411. Supplementary page with early 2000s sale prices for eight addresses - 16 Athelstane Drive Ringwood 3134 $210,000 4/4/2000 19 Athelstane Drive Ringwood 3134 $235,000 14/1/2000 27 Cormiston Road Ringwood 3134 $246,000 28/10/2000 1 Runyan Court Ringwood 3134 $183,000 2/5/2001 4 Runyan Court Ringwood 3134 $179,000 14/8/2000 11 Runyan Court Ringwood 3134 $193,000 28/4/2000 7 Runyan Court Ringwood 3134 $187,500 14/1/2000 4 Casula Place Ringwood 3134 $216,000 13/2/2001 Accompanying handwritten notation by Richard Carter R.E.S.I. - "Purchaser of 'Pre-planned Development' lots also agreed to purchase the house planned for the lot. Bramton Court "Witheld" for display homes. Stage 3 one acre sites drained north therefore not readily sewered." -
 Melbourne Tram Museum
Ephemera - Victorian Railways - Motor Coach tickets - set of 15, Victorian Railways (VR), 1966
Tickets used by the Victorian Railways from the time of introduction of decimal currency (1966). At the time, 3c was the lowest fare in use. 1 and 2c were printed, but not issued. A 2c ticket was printed but a copy has not survived. Understood to be used until the introduction of time based tickets in the early 80s. Demonstrates tickets printed by the Victorian Railways for their bus or coach services.Victorian Railways - Motor Coach (buses) tickets - set of 15 ticket blocks - two hundred in each block, stapled onto a heavy cardboard sheet with a white "keeper" piece. 1 – 1c – 001000 to 001199 2 – 3c – 031400 to 031599 3 – 4c – 051400 to 051599 4 – 5c – 011000 to 011199 5 – 6c – 081400 to 081599 6 – 7c – 021400 to 021599 7 – 8c – 051800 to 051999 8 – 9c – 040000 to 040199 9 – 11c – 011000 to 011199 10 – 12c – 021600 to 021799 11 – 13c – 031200 to 031399 12 – 14c – 011400 to 011599 13 – 16c – 011800 to 011999 14 – 17c – 041600 to 041799 15 – 21c - 001400 to 001599 Tickets were received in an Addressograph cardboard box with a lable for the Association of Railway Enthusiasts. victorian railways, tickets, buses, motor coaches