Showing 2195 items
matching tram, bendigo.
-
 Ballarat Tramway Museum
Photograph - Digital image, John Ward, 31/12/1971 12:00:00 AM
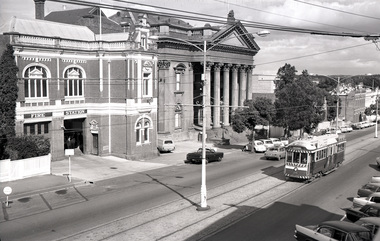
... Parade Ballarat Ballarat goldfields Trams tramways Bendigo Pall ...Digital image of the Bendigo 26 in Pall Mall passing the Bendigo Fire Station and the Court House. The tram has the destination of Eaglehawk. Photo by John Ward 31-12-1971 Slide title "004742 311271 71103-G SEC Vic Bogie tram 26 View St near Rowan St Bendigo Vic"trams, tramways, bendigo, pall mall, tram 26 -
 Ballarat Tramway Museum
Slide - 35mm slide/s - set of 5, Noel Simons, 19/11/1962 12:00:00 AM
... Parade Ballarat Ballarat goldfields Tramways trams Bendigo ...Set of 5 transparencies taken on 19/11/1962 on Kodak mounts. 1186.1 - Bendigo 21 bound for Golden Square at Charing Cross with The Beehive buildings and shops in Pall Mall in the background. Trams has an ad for Cohns drinks on front bumper, SEC Best for Cooking roof ad. and Mamouney's furniture roof ad. Two women passengers boarding. 1186.2 - Bendigo 26 crossing Pall Mall from Mitchell St. bound for Eaglehawk with "Ezywalkin" shop in background. Tram has an SEC 'Electric Cooking' roof ad and a 'Streets Ice cream' ad on front dash. 1186.3 - Bendigo 7 arriving at the Charing Cross stop, bound for North Bendigo. Has a Huttons dash panel ad, a Castrol roof ad. Buildings as for 1186.1. Passengers waiting at the stop. 1186.4 - Bendigo 19 leaving Charing Cross for Golden Square with City Club Hotel alongside and other buildings as for 1186.1 in the background. Tram has Briquettes ad on front dash and SEC 'Electric Cooking' roof ad. 1186.5 - Bendigo 21in High St. at corner of Short St. heading for Charing Cross. Destination half way between Depot and Railway Station. Tram has ads for Cohns Drinks on dash panel, SEC 'Cook with Electricity' and a Sandhurst Milk roof ads.Information written on in black ink and date stamped in purple ink. 1186.1 - "No. 21 in Pall Mall at Charing Cross, Bendigo" 1186.2 - "No. 26 arriving at Alexandra Fountain, Charing Cross, Bendigo" 1186.3 - "No. 7 in Pall Mall at Charing Cross, Bendigo" 1186.4 - "No. 19 in High St., Bendigo, leaving Charing Cross for Golden Square" 1186.5 - "No. 21 in High St. Bendigo, at corner of Short St." tramways, trams, bendigo, charing cross, pall mall, high st., tram 7, tram 19, tram 21, tram 26 -
 Ballarat Tramway Museum
Slide - 35mm slide/s - set of 4, Noel Simons, Apr. 1967
... Parade Ballarat Ballarat goldfields Tramways trams North Bendigo ...Set of 2 slides made from the Association of Railway Enthusiast Provincial Tramways film strip, possibly during April 1967. 1192.1 and 1192.3 mounted in Kodak Ready Mounts. The others in plain white mounts. Slides dated Dec. 1968. 1192.1 - No. 21 out bound to Golden Square in High St., between Wattle and Vine Streets. Photo taken after tram has passed photographer. Has a sign for "Reid's Furnituorium" in the background. 1192.2 - Bendigo No. 28 dressed up as Myers Christmas tram, passing the Post Office and Courts in Pall Mall. 1192.3 - Bendigo No. 23 at Needle Loop en route to Eaglehawk. Tram has two SEC roof ads, one "Electric Cooking" and the other "Everything fine in my all electric kitchen". 1192.4 - Bendigo scrubber parked at the end of the main depot lead, alongside the depot office buildings.Details in blue ink, date hand stamped in purple ink. 1192.1 - "No. 21 heads along High St for Golden Square between Wattle and Vine Streets." 1192.2 - "Birney No. 28 in Christmas Garb, traverses Pall Mall en route to North Bendigo". 1192.3 - "No. 23 at Needle Loop on its run to Eaglehawk". 1192.4 - "Scrubber car at Bendigo Depot".tramways, trams, north bendigo, bendigo, bridge st loop, depot, tram 21, tram 23, tram 28, tram scrubber -
 Ballarat Tramway Museum
Slide - 35mm slide/s - set of 24, Noel Simons, 20/05/1971 12:00:00 AM
... Parade Ballarat Ballarat goldfields Tramways trams Bendigo ...Set of 24 transparencies taken on 20/5/1971 on Kodak mounts. 1195.1 - Bendigo 19 arriving at Charing Cross en route to North Bendigo with Fountain Plaza and the City Family Hotel in the background. No. 19 has two roof ads for the SEC. -'Electricity better for cooking' and 'Everything's under control in my all electric kitchen' 1195.2 - as above, but standing at the Charing cross stop, with the Beehive Stores and other buildings along the east side of Pall Mall in the background. 1195.3 - No 21 ex Golden Square crossing View St. trackwork in front of No. 25 waiting to depart for Quarry Hill. No.21 has two roof ads (as for No.19 in 1195.1) and No.25 has one SEC roof ad and another. Ezywalkin sign in the background, and Fountain Plaza. 1195.4 - as for 1195.3, but after 21 has arrived and 25 left for Quarry Hill. Has Ezywalkin store and the Beehive store in the background. 1195.5 - No. 5 at the Eaglehawk terminus. Photo taken with a cannon in foreground looking along High St. Eaglehawk. Has shops on the west side of High St. in the background. 1195.6 - No. 5 at the Eaglehawk terminus, close up of the rear of the tram - note tow bar arrangement. Has destination of Quarry Hill. 1195.7-Nos.25 and 5 crossing at the Thorpe St. Loop, California Gully. No. 25 bound for Eaglehawk (has SEC Briquette and electric cooking roof ads) and 5 en route for Quarry Hill with a SEC and Cinzano roof ad. 1195.8 - as for 1195.7, but after trams have passed each other. Has Borough Auto Service building in the background. 1195.9 - No. 5 in Mt Korong Road, towards Bamard Street, photo taken after tram has passed photographer. 1195.10 - No. 30 at the Golden Square terminus with the Milk Bar on the right hand side of the photograph. 1195.11 - No. 30 inbound at Fire Station Loop, High St. Golden Square. Has old fire station in the background. Passengers are boarding the tramcar. 1195.12 - No. 30 in High St, bound for North Bendigo between Vine and Wattle Streets. 1195.13 - No. 5 bound for Eaglehawk waits at Iron Bark Gully Loop, at Hayes St. 1195.14 - No. 5 and No. 2 crossing at Iron Bark Gully Loop. 1195.15 - No. 5 bound for Eaglehawk leaving the Manchester Loop, Long gully. 1195.16 - No. 5 passing William Street, Long Gully en route to Eaglehawk. 1195.17 - No. 5 just before the California Gully Crossing Loop. 1195.18 - Nos. 5 and 26 crossing at California Gully crossing Loop. No. 5 heading to Eaglehawk, 26, Quarry Hill. 1195.19 - No. 5 in High St. Eaglehawk with Bob Moyle's Victoria Hotel and the TAB in the background. 1195.20 - No. 5 in High St. Eaglehawk approaching the terminus. Photo taken after the tram has passed the photographer. Has Foodland store and J. Best Fruit supply in the background, along with Eaglehawk Town Hall. 1195.21 - No. 5 at the Eaglehawk terminus, photo taken along seldom used track along High St. 1195.22 - as for 1195.22 - but at the very end of the track. 1195.23 - No. 5 en route for Quarry Hill climbs High St. Eaglehawk with the Victoria Hotel and Eaglehawk Town Hall in the background. 1195.24 - No. 5 and 25 crossing at Jobs Gully Loop. Note 25 has a black on white destination roll, while No. 5 has a white on black destination roll. Information written on in black ink and date stamped on purple ink. 1195.1 - "No. 19 arrives at Charing Cross Bendigo from Golden Square" 1195.2 - "No. 19 about to leave Charing Cross for North Bendigo" 1195.3 - "No. 25 awaiting departure for Quarry Hill, watches No. 21 arrive at Charring Cross from Golden Square" 1195.4 - "No. 21 on North Bendigo service and No. 25 on Quarry Hill run await departure at Charing Cross" 1195.5 - "No. 5 at Eaglehawk terminus" 1195.6 - "No. 5 at Eaglehawk terminus" 1195.7 - "Nos. 5 and 25 crossing at Thorpe St. Loop, California". 1195.8 - "Nos. 25 and 5 crossing Thorpe St. Loop, California Gully". 1195.9 - "No. 5 descending Mt Korong Rd. towards Bamard St." 1195.10 - "Birney car No. 30 at Golden Square terminus" 1195.11 - "Birney car No. 30 in High Street near Thistle Street (Fire Station Loop)" 1195.12 - "No. 30 in High St. between vine and Wattle Streets" 1195.13 - "No. 25 at Hayes Street Loop Iron Bark". 1195.14 - "Nos. 2 and 5 crossing at Hayes Street Loop Iron Bark" 1195.15 - "No. 5 at Manchester Loop opposite Havilah Road, Long Gully" 1195.16 - "No. 5 passing William Street, Long Gully". 1195.17 - "No. 5 at California Gully" 1195,18 - "Nos. 26 and 5 at Thorpe St. Loop, California Gully". 1195.19 - "No. 5 in High St. Eaglehawk". 1195.20 - "No. 5 approaching Eaglehawk terminus" 1195.21 - "No. 5 at Eaglehawk terminus" 1195.22 - "No. 5 at Eaglehawk terminus" 1195.23 - "No. 5 in High St. Eaglehawk" tramways, trams, bendigo, charing cross, eaglehawk, california gully, golden square, iron bark gully, jobs gully, tram 2, tram 5, tram 19, tram 21, tram 25, tram 26, tram 30 -
 Ballarat Tramway Museum
Slide - 35mm slide/s - set of 2, Noel Simons, 20/05/1971 12:00:00 AM
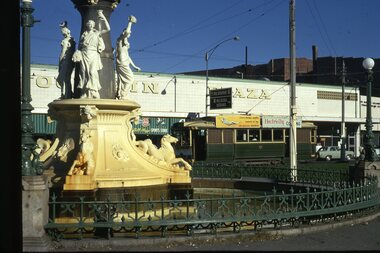
... Bendigo Alexandra Fountain Tram stops tram 21 tram 30 1196.1 ...Set of 2 slides mounted in Kodak Ready Mounts. Slides dated 20 May 1971. 1196.1 - Bendigo No. 21 arriving at Charing Cross from Golden Square with the Alexandria Fountain in the foreground. In the background is the Fountain Plaza building. Tram has 2 SEC roof ads. 1196.2 - No. 30 at Charing Cross from North Bendigo. On a pole in front of the tram are two signs "All cars stop here" in white printing on a red background and "Cars Stop by Request" in white lettering on a black background.1196.1 - "No. 21 passing Alexandra Fountain on arrival at Charing Cross from Golden Square" 1196.2 - "No. 30 at Charing Cross"tramways, trams, charing cross, bendigo, alexandra fountain, tram stops, tram 21, tram 30 -
 Ballarat Tramway Museum
Slide - 35mm slide/s - set of 20, Noel Simons, 21/05/1971 12:00:00 AM
... Parade Ballarat Ballarat goldfields Tramways trams Bendigo Long ...Set of 20 transparencies taken on 21/5/1971 on Kodak mounts. 1197.1 - Bendigo No. 5 en route to Eaglehawk at Creeth St Long Gully. Tram has a SEC roof ad and Cinzano roof ad. 1197.2 - No 5 approaching Needle Loop between Long Gully and California Gully. On left hand side is the City of Bendigo sign, indicating city boundary. 1197.3 - As for 1197.2 but actually entering loop. Photo taken after tram has passed photographer. 1197.4 - No. 26 bound for Eaglehawk descending the railway bridge near Eaglehawk, at Jobs Gully. 1197.5 - as for 1197.4, but after crossing bridge, now ascending a hill. Photo taken after tram has passed photographer. 1197.6 - No. 26 climbing High St. hill Eaglehawk, nearing end of Double track, bound for Quarry Hill. Shows centre of the road poles. 1197.7 - As for 1197.6, with tram entering single track section. Photo taken after tram has passed photographer. Has a BP service station in the background. 1197.8 - No. 26 (bound for Quarry Hill) crossing No. 17 (Eaglehawk) at Job's Gully Loop. 1197.9 - No. 17 climbing railway bridge at Job's Gully, en route to Eaglehawk. Photo taken after tram has passed photographer. 1197.10 - No.26 bound for Quarry Hill, leaving Long Gully Loop? Has the Creeth St. church in l197.l in the far background. Photo taken after tram has passed photographer. 1197.11 - Tramway Point work at the northern end of Long Gully Loop. 1197.12 - No. 17 en route for Quarry Hill turning into View St. from Bamard St. Tram has SEC roof ads "Everything fine in my all electric Kitchen' and 'Electric Cooking is Matchless'. 1197.13 - as for 1197.12, but tram has turned into View St and about to enter the double line track. Photo taken after tram has passed photographer. 1197.14 - No. 21 enters Nolan St after turning from MacRae St. en route to Bendigo. Note sign on its own post noting tram turns "Beware Tram Turns" and stop sign on adjacent pole "Trams stop on Request". No. 21 has two SEC roof ads. 1197.15 - No. 21 in Nolan St. after turning from Bridge St. (White Hills Road). Note signal light for Bridge St. loop on pole corner of street. Photo taken after tram has passed photographer. 1197.16 - No. 2 bound for Eaglehawk at unknown location. 1197.17 - Tram stop sign on a pole "CARS STOP BY REQUEST" 1197.18 - No. 5 in Carpenter St.? en route to Quarry Hill. 1197.19 - No. 28 has just arrive at Golden Square terminus, passengers are disembarking and the trolley pole is being turned. Golden Square Hotel in the background. 1197.20 - No. 28 at Golden Square terminus. Has a "Nothing beats Briquettes for hear roof ad. Information written on in black ink and date stamped on purple ink. 1197.1 - "No. 5 at Creeth St. Long Gully" 1197.2 - "No. 5 approaching Needle Loop between Long Gully and California Gully" 1197.3 - "No. 5 at Needle Loop between Long Gully and California Gully" 1197.4 - "No. 26 crossing railway bridge at Job's Gully near Eaglehawk" 1197.5 - "No. 26 just after crossing railway bridge at Job's Gully near Eaglehawk/ 1197.6 - "No. 26 in High St. Eaglehawk" 1197.7 - "No. 26 at end of double track in High St. Eaglehawk" 1197.8 - "Nos. 26 and 17 crossing at Job's Gully Loop" 1197.9 - "No. 17 crossing railway bridge at Job's Gully near Eaglehawk". 1197.10 - "No. 26 at Long Gully" 1197.11 - 'Northern end of points at Long Gully Loop". 1197.12 - "No. 17 turning into View St. from Bamard St. Bendigo". 1197.13 -'No. 17 at beginning of double track in View St. after leaving Bamard St. Bendigo. 1197.14 - "No. 21 enters Nolan St. from MacRae St. Bendigo." 1197.15 - "No. 21 in Nolan St. Bendigo just after leaving White Hills Road." 1197.16 - "No. 2" 1197.18 - "No. 5" 1197.19 - "Birney car No. 28 at Golden Square Terminus" 1197.20 "Birney car No. 28 at Golden Square Terminus" tramways, trams, bendigo, long gully, railway bridge, jobs gully, trackwork, nolan st, quarry hill, tram stops, golden square, tram 2, tram 5, tram 17, tram 21, tram 26, tram 28 -
 Ballarat Tramway Museum
Slide - 35mm slide/s - set of 2, Noel Simons, 21/05/1971 12:00:00 AM
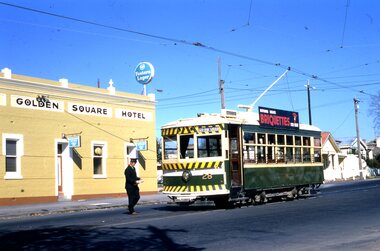
... Parade Ballarat Ballarat goldfields Tramways trams Bendigo Golden ...Set of 2 transparencies taken on 21/5/1971 on Kodak mounts. 1198.1 - Bendigo No. 28 at the Golden Square terminus with the Golden Square Hotel in the background. Driver walking across road to join tram. Tram has a SEC briquettes roof ad. 1198.2 - as for 1198.1 - but further back showing nature of the terminus and the Calder Highway or High St. behind the tram. Information written on in black ink and date stamped on purple ink. 1198.1 - "Birney car No. 28 at Golden Square terminus". 1198.2 - "Birney car No. 28 at Golden Square terminus" tramways, trams, bendigo, golden square, high st., tram 28 -
 Ballarat Tramway Museum
Slide - 35mm slide/s - set of 4, Noel Simons, 24/05/1971 12:00:00 AM
... Parade Ballarat Ballarat goldfields Tramways trams Bendigo ...Set of 4 transparencies taken on 24/5/1971 on Kodak mounts. 1199.1 - No. 21 in High St. at junction with old High St., near Fire Station Loop. Tram has two SEC roof ads. 1199.2 - No. 21 in High St. between Shamrock and Thistle Sts. Photo taken after the tram has passed the photographer. 1199.3 - Photo of a green box containing timetables for the four Bendigo routes. Located at Charing Cross. 1199.4 - Bendigo No. 23 en route to Eaglehawk at Charing Cross, with two SEC roof ads 'Everything's fine in my all electric kitchen' and "Switch to electric cooking'. Has the Ezywalkin building and the Beehive building in the background. Information written on in black ink and date stamped on purple ink. 1199.1 - "No. 21 in High St. at junction with old High St., near Fire Station Loop." 1199.2 - "No. 21 in High St. between Shamrock and Thistle Sts." 1199.3 - "Bendigo Tramways timetable at Alexandra Fountain Charing Cross." 1199.4 - "No. 23 at Alexandra Fountain Charing Cross, Bendigo." tramways, trams, bendigo, timetables, charing cross, high st., tram 21, tram 23 -
 Ballarat Tramway Museum
Slide - 35mm slide/s - set of 32, Noel Simons, 25/02/1971 12:00:00 AM
... portion of tram only from a gate at the Bendigo cemetery. 1201.24... Parade Ballarat Ballarat goldfields Tramways trams Bendigo Bond ...Set of 31 transparencies taken on 25/2/1972 on Kodak mounts. 1201.1 - Bendigo No. 26 in Bond St. just after leaving Long Gully en route for Quarry Hill. Has Norris Supermarket in background. Has two SEC roof ads. 1201.2 - No. 26 climbing View St. from Charing Cross en route to Eaglehawk. Has ANZ bank and AMOCO service station in background. 1201.3 - as for 1201.3, but after tram has passed photographer. Has buildings west of Mackenzie St. in photograph. 1201.4 - Tram stop and centre of the road pole with two "CARS STOP BY REQUEST" signs mounted on pole at the corner of Mackenzie St. 1201.5 - same position as for 1201.3, but with No. 5 descending the street. 1201.6 - same position as for 1201.2, but with No. 5 descending the street. Photo taken after tram has passed photographer. 1201.7 - No. 7 in Nolan St. from across the park at Lake Weeroona. 1201.8 - No. 7 entering McCrae St from Nolan St. - distant view. Note "TRAM "sign on left hand side under tree and overhead in McCrae St. from former track that once was in this street. 1201.9 - No. 7 in High St. with Cathedral in background. Tram en route to North Bendigo. Note scaffolding around Cathedral main spire area. 1201.10 - No. 7 crossing Bendigo Creek bridge in High St. near Golden Square. Has a Caltex Service station in the background. 1201.11 - No. 7 at Golden Square terminus with Sunburst Fruit Juices and a Peters Ice cream delivery vans alongside. 1201.12 - as for 1201.11 but photo taken from behind tram, with the end of the rails in the photograph. 1201.13 - No. 7 and 21 in Pall Mall at Charing Cross with No. 5 in the background. Taken some distance away from the location. 1201.14 - No. 7 at Golden Square terminus, taken a short distance from the tram terminus. Shows Milk Bar on right hand side and the hotel on the left hand side. Taken from the south side of the roadway. 1201.15 - as from 1201.14 but taken from the north side of the roadway. 1201.16 - No 5 waiting at California Gully loop. Distant photo showing surrounds 1201.17 - No. 5 en route for Quarry Hill crossing No. 26 at California Gully. 1201.18 - No. 26 at Eaglehawk terminus with Eaglehawk Town Hall and Post Office in background. 1201.19 - No. 21 arriving at Charing Cross en route to North Bendigo. Has Alexandra Fountain in the background, ANZ bank RACV building, and other buildings on the north side of Pall Mall or Nolan St. 1201.20 - No. 26 en route for Quarry Hill at Charing Cross, with crew standing by front door. Has Colonial Mutual life building, Armstrong Tyre Service (Firestone) and a sign for Cohns Drinks in the background. 1201.21 - as for 1201.20 but with No. 5 en route to Eaglehawk now in photograph. 1201.22 - No. 26 at Quarry Hill terminus. 1201.23 - No. 26 at Quarry Hill terminus, view of front portion of tram only from a gate at the Bendigo cemetery. 1201.24 - Track at the end of the Quarry Hill line showing the point blades of the former "Y" terminus and the overhead for this. 1201.25 - No. 2 at the Quarry Hill terminus, looking along the former Trackwork. 1201.26 - as for 1201.25 1201.27 - number not used. 1201.28 - Golden Square terminus from some distance from the actual terminus, showing the Warning sign "TRAM" for motorists from the south. No. 7 at the terminus. 1201.29 - No. 7 passing through the Golden Square shopping centre. Numerous cars and pedestrians. Tram en route for North Bendigo. 1201.30 - No. 7 in High St. Golden Square, en route for North Bendigo. Photo taken after tram has passed photographer. 1201.31 - No. 7 in High St. just past Wattle St. with the Cathedral in the background. Tram has two SEC roof ads good side on photo, 'Everything's fine in my all electric kitchen' and 'Electrical cooking - clean, quick, economical'. 1201.32 - No. 7 in High St. nearing Wattle St. Has Cathedral in the background. Photo taken after tram has passed photographer.Information written on in black ink and date stamped on purple ink. 1201.1 - "No. 26 in Bond St just after leaving Long Gully" 1201.2 - "No. 26 climbing View St. from Charing Cross" 1201.3 - "No. 26 ascending View St. from Charing Cross (At Mackenzie St.)" 1201.4 - "View St. & Mackenzie St." 1201.5 - "No. 5 in View St. near Mackenzie St." 1201.6 - "No. 5 in View St. nearing Charing Cross." 1201.7 - "No. 7 in Nolan St. seen from Lake Weeroona Park." 1201.8 - "No. 7 entering McRae St. from Nolan St. Note "TRAM" warning sign on left. 1201.9 - "No. 7 in High St. passing Short St." 1201.10 - "No. 7 crossing Bendigo Creek bridge in High St. near Golden Square." 1201.11 - "No. 7 at Golden Square terminus" 1201.12 - "No. 7 at Golden Square terminus" 1201.13 - "No 7, 21 and 5 at Charing Cross" 1201.14 - "No. 7 at Golden Square terminus" 1201.15 - "No. 7 at Golden Square terminus" 1201.16 - "No 5 waiting at California Gully loop." 1201.17 - "Nos. 5 and 26 crossing at California Gully loop" 1201.18 - "No. 26 at Eaglehawk terminus" 1201.19 - "No. 21 arriving at Charing Cross from Golden Square" 1201.20 - "No. 26 at Charing Cross" 1201.21 - "Nos. 5 and 26 at Charing Cross." 1201.22 - "No. 26 at Quarry Hill terminus" 1201.23 - "No. 26 at Quarry Hill terminus seen through the gates of the Bendigo Cemetery." 1201.24 - "Quarry Hill terminus showing remains for former double track layout abandoned before 1964." 1201.25 - "No. 2 at Quarry Hill terminus" 1201.26 - "No. 2 at Quarry Hill terminus" 1201.28 - "The Southern approach to Golden Square with No. 7 standing at the terminus, "TRAM" warning sign on the left. 1201.29 - "No. 7 passing through Golden Square Shopping Centre" 1201.30 - "No. 7 in High St. Golden Square" 1201.31 - "No. 7 in High St. passing Wattle St." 1201.32 - "No. 7 in High St. nearing Wattle St."tramways, trams, bendigo, bond st., view st., nolan st., high st., eaglehawk, california gully, charing cross, quarry hill, trackwork, tram 2, tram 5, tram 7, tram 21, tram 26 -
 Ballarat Tramway Museum
Slide - 35mm slide/s - set of 8, Noel Simons, 25/02/1972 12:00:00 AM
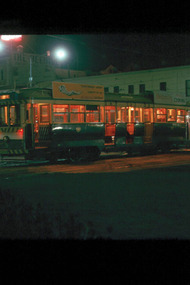
... Parade Ballarat Ballarat goldfields Tramways trams Bendigo Night ...Set of 8 transparencies taken on 25/02/72 on Kodak mounts. 1202.1 - Night photo of Bendigo 5 at Charing Cross, waiting to depart to Quarry Hill. Tram has two SEC roof ads. Has Ezywalkin and the Beehive buildings in the background. 1202.2 - as for 1202.1 1202.3 - as for 1202.1 but further back and 7 and 21 waiting for their runs as well in Pall Mall. 1202.4 - 5 and 2 at Charing Cross, night photo, looking along Mitchell St. with Fountain Plaza on right of photo and Ezywalkin store. 1202.5 - No. 2 at Charing cross, bound for Eaglehawk. Tram has two SEC ads. 1202.6 - No. 26 at Quarry Hill terminus with the cemetery in the background. Tram has two SEC roof ads. 1202.7 - No. 26 in Mitchell St. bound for Eaglehawk, at Wills St. with the Hopetoun Hotel in the background. 1202.8 - as for 1202.6Information written on in blue ink and date stamped on purple ink. 1202.1 - "No. 5 at Charing Cross" 1202.2 - "No 5. at Charing Cross" 1202.3 - "Nos. 7, 21 and 5 at Charing Cross" 1202.4 - "Nos. 5 and 2 at Charing Cross" 1202.5 - "No. 2 at Charing Cross" 1202.6 - "No. 26 at Quarry Hill" 1202.7 - "No. 26 in Mitchell St. opposite Wills St." 1202.8 - "No. 26 at Quarry Hill" tramways, trams, bendigo, night photo, charing cross, quarry hill, mitchell st., tram 2, tram 5, tram 7, tram 21, tram 26 -
 Ballarat Tramway Museum
Slide - 35mm slide/s - set of 19, Noel Simons, 26/02/1972 12:00:00 AM
... Parade Ballarat Ballarat goldfields Tramways trams Bendigo ...Set of 18 transparencies taken on 26/2/1972 on Kodak mounts. 1203.1 - Bendigo 5 at Eaglehawk terminus - with new traffic works. 1203.2 - No. 5 climbing the High St. hill Eaglehawk with the buildings on the east side in the photo. 1203.3 - No 2 descending the road over rail bridge at Job's Gully, heading for Quarry Hill. 1203.4 - as for 1202.3, but more side on. Tram has two SEC roof ads. 1203.5 - as for 1202.4 1203.6 - No. 26 entering Garden Gully Loop, Mt. Korong Road, Ironbark. Tram en route to Eaglehawk. Water column on right hand side of photograph. 1203.7 - No. 2 on the Eaglehawk route, Iron Bark area?, bound for Quarry Hill. 1203.8 - as for 1202.7, but photo taken after tram has past photographer. 1203.9 - No. 5 at Eaglehawk terminus, night photo. Tram has arrived at terminus, showing Quarry Hill, pole turned, but the tram lights have yet to be turned around. 1203.10 - as for 1202.9, but lights have been turned around. 1203.11 - No. 26 climbing the View St. Hill near the Commodore Hotel. Has Campbells Electrical Services building in the background. Photo taken after the tram has passed the photographer. 1203.12 - No. 7 end on photograph, at Golden Square, destination showing Golden Square - night photo. 1203.13 - number not used. 1203.14 - as for 1202.12, but partially side on, has a passenger looking out the tram. 1203.15 - as for 1202.12, but with hotel in the background. 1203.16 - No. 26 and 2 at Charing Cross, night photo. Tram 26 en route to Quarry Hill, 2 to Eaglehawk. 1203.17 - Interior photo of No. 26, at night. 1203.18 - No. 26 at the Quarry Hill terminus as night. 1203.19 - as for 1202.18, but central portion of the tramcar.Information written on in blue ink and date stamped on purple ink. 1203.1 - "No. 5 at Eaglehawk terminus" 1203.1 - "No. 5 in High St. Eaglehawk" 1203.3 - "No. 2" 1203.4 - "No. 2" 1203.5 - "No. 2" 1203.6 - "No. 26 at Garden Gully Loop Mt Korong Rd., Ironbark" 1203.7 - "No. 2" 1203.8 - "No. 2" 1203.9 - "No. 5 at Eaglehawk terminus" 1203.10 - "No. 5 at Eaglehawk terminus" 1203.11 - "No. 26 in View St. Near the Commodore Motel" 1203.12 - "No. 7 at Golden Square Terminus" 1203.14 - "No. 7 at Golden Square Terminus" 1203.15 - "No. 7 at Golden Square Terminus" 1203.16 - "Nos. 26 and 2 at Charing Cross" 1203.17 - "Interior of No. 26" 1203.18 - "No. 26 at the Quarry Hill terminus" 1203.19 - "No. 26 at the Quarry Hill terminus "tramways, trams, bendigo, eaglehawk, bridges, iron bark gully, night photo, quarry hill, golden square, tram 2, tram 5, tram 7, tram 26 -
 Ballarat Tramway Museum
Slide - 35mm slide/s - set of 6, Noel Simons, 28 Feb. 1972
... Parade Ballarat Ballarat goldfields Tramways trams Bendigo Hayes ...Set of 6 transparencies taken on 28/2/1972 on Kodak mounts. 1206.1 - Bendigo No. 5 at Hayes St. Loop, en route for Quarry Hill. 1206.2 - No. 5 at Garden Gully Loop, Mt. Korong road, Ironbark. en route to Quarry Hill. Note the water column in the background. 1206.3 - No. 5 in View St. Bendigo, with the Commodore Motel in the background. 1206.4 - No. 6 en route for Golden Square in Fire Station loop, with the fire station building in the background. Photo taken after tram has passed photographer. 1206.5 - No. 6 in High St., running through Golden Square Shopping Centre, en route for Golden Square. Photo taken after tram has passed photographer. 1206.6 - No. 6 arriving at Charing Cross, bound for North Bendigo, with the City Family Hotel, ANZ bank and the Cenotaph (war memorial) in the background.Information written on in blue ink and date stamped on purple ink. 1206.1 - "No. 5 at Hayes Loop, Ironbark." 1206.2 - "No. 5 at Garden Gully Loop, Mt. Korong road, Ironbark." 1206.3 - "No. 5 in View St. just after start of double track near Barnard St." 1206.4 - "No. 6 in High St. at Fire Station loop." 1206.5 - "No. 6 in High St. running through Golden Square shopping centre." 1206.6 - "No. 6 arriving at Charing Cross from Golden Square."tramways, trams, bendigo, hayes st. loop, garden gully loop, view st., golden square, charing cross, tram 5, tram 6 -
 Ballarat Tramway Museum
Slide - 35mm slide/s - set of 12, Noel Simons, 28 Feb. 1972
... Parade Ballarat Ballarat goldfields Tramways trams Bendigo ...Set of 12 transparencies taken on 28/2/1972 on Kodak mounts. 1207.1 - Bendigo 26 and 2 at Charing Cross. 26 en route for Eaglehawk, 2 for Quarry Hill. Has the Colonial Mutual Life, Armstrong Tyre Service, and Australian Mutual Provident Society buildings and a Cohns Drinks ad. in the background. 1207.2 - as for 1207.1 but with Alexandra fountain in the foreground. 1207.3 - No. 2 in Mitchell St. heading for Quarry Hill. Photo taken after tram has passed photographer. Has buildings on either side of Mitchell St. in the background, including the Plaza Theatre. 1207.4 - No. 6 en route for Golden Square departing Charing Cross. Has the RACV and ANZ bank in the background. 1207.5 - No. 2 crossing Pall Mall to enter Charing Cross ex Quarry Hill, with the Fountain Plaza in the background. 1207.6 - No. 6 arriving Charing Cross ex Golden Square with No. 21 alongside. No. 21 has the SEC ad. 'Everything's fine in my all electric kitchen.' Has the City Family Hotel and the Fountain Plaza shopping centre in the background. 1207.7 - No. 5 at Charing Cross en route for Quarry Hill with No. 2 behind. No. 2 has two SEC roof ads, 'Everything s fine in my all electric kitchen' and 'Electricity best for cooking'. RACV building in the background. Tram crews are discussing the day in the front of the tram. 1207. 8 - No. 21 in High St. Bendigo with the Cathedral in the background. No. 21 has two SEC roof ads, 'Everything's fine in my all electric kitchen' and 'Electricity best for cooking'. 1207.9 - No. 6 in High St. Bendigo with the Cathedral in the background. 1207.10 - No. 6 in High St. Bendigo, just past Wattle St. Photo taken after the tram has passed the photographer from within the Highway Car Sales yard. 1207.11 - No. 26 bound for Eaglehawk at the end of the double track in View St., note signal contactors, tram stop and section signs mounted on pole. 1207.12 - No. 26 turning from View St. into Barnard St.Information written on in blue ink and date stamped on purple ink. 1207. 1- "Nos. 26 and 2 at Charing Cross." 1207.2 - "Nos. 26 and 2 at Charing Cross." 1207.3 - "No. 2 in Mitchell St. just after leaving Charing Cross." 1207.4 - "No.6 leaving Charing Cross for Golden Square." 1207.5 - "No. 2 arriving at Charing Cross from Quarry Hill." 1207.6 - "No. 21 waits at Charing Cross as No. 6 arrives from Golden Square." 1207.7 - "No 5 at Charing Cross with No. 2 lurking behind." 1207.8 - "No. 21 in High St. at cnr of Wattle St." 1207.9 - "No. 6 in High St. at cnr of Wattle St." 1207.10 - "No. 6 in High St. between Wattle and Vine Sts." 1207.11 - "No. 26 at end of double track in View St. near Barnard. St. 1207.12 - "No. 26 seen at dusk turning from View St. into Barnard St."tramways, trams, bendigo, charing cross, high st, view st., tram 2, tram 5, tram 6, tram 21, tram 26 -
 Ballarat Tramway Museum
Slide - 35mm slide/s - set of 4, Noel Simons, Apr. 1972
... Parade Ballarat Ballarat goldfields Tramways trams Bendigo ...Set of 4 transparencies - copy slides - possibly ARE film strip dated March 1972. 1209.2 and 1209.4 on Kodak Readymount mounts. 1209.1 - Bendigo 5, 6 and 28 on a special tram service in bound to the City on a tour in Caledonia St. about to enter Lucan St, or White Hills Road or Weeroona Ave. (mis match in names in various maps). Gas works in the background. No. 5 has a white disk on the rear of the tram. 1209.2 - Nos 2 and 26 at Charing Cross with the Fountain Plaza in the background. Both trams have the destination of Quarry Hill, though 26 is on the Eaglehawk bound track. 1209.3 - No. 19 at the Golden Square terminus, with the conductor or driver swinging the pole and Billy Rodda's Golden Square hotel in the background. 1209.4 - No. 7 at Fire Station loop, en route to North Bendigo, picking up a passenger with a pram. Part of a set of 20 slides made by the Association of Railway Enthusiast Provincial Tramways film strip. Reference Item 2560 details the ARE Film Strip and provide references to other slides.Information written on in blue ink and date stamped on purple ink. 1209.1 - "Nos 5, 6 and 28 in Caledonia St. about to enter Weeroona Ave." 1209.2 - "Nos 2 and 26 at Charing Cross." 1209.3 - "Swinging the pole on No. 19 at Golden Square Terminus." 1209.4 - "No. 7 inward bound from Golden Square stops at Fire Station Loop."tramways, trams, bendigo, charing cross, golden square, gas works, special trams, tram 2, tram 5, tram 6, tram 7, tram 19, tram 28 -
 Ballarat Tramway Museum
Slide - 35mm slide/s - set of 4, Noel Simons, Apr. 1972
... Parade Ballarat Ballarat goldfields Tramways trams Bendigo Long ...Set of 4 transparencies - copy slides - possibly ARE film strip dated April 1972. 1210.3 on Kodak Readymount mount. 1210.1 - No. 3 arriving at Quarry Hill terminus. 1210.2 - Bogie car at Long Gully Loop, in the far distance, with a Hotel and the ESSO service station in between. Has Fosters Lager and Carlton signs on hotel. Note sign on the closet pole - "No standing between Notices" 1210.3 - Nos. 26 (Quarry Hill) and 25 (Eaglehawk) at Jobs Gully Loop. 1201.4 - No. 5 showing Charing Cross in bound for Charing Cross and No. 3 en route for Eaglehawk in View St. near the end of the double track. Appears to be SEC employee at the rear of No. 3. Part of a set of 20 slides made by the Association of Railway Enthusiast Provincial Tramways film strip. Reference Item 2560 details the ARE Film Strip and provide references to other slides.Information written on in blue ink and date stamped on purple ink. 1210.1 - "No. 3 arriving at Quarry Hill terminus." 1210.2 - "Bogie car at Long Gully Loop." 1210.3 - "Nos. 26 and 25 at Jobs Gully Loop." 1210.4 - "Nos 5 and 3 in View St. near the end of the double track."tramways, trams, bendigo, long gully, quarry hill, view st., tram 3, tram 5, tram 25, tram 26 -
 Ballarat Tramway Museum
Slide - 35mm slide/s, Noel Simons, Dec. 1972
... Parade Ballarat Ballarat goldfields Tramways trams Bendigo ...One transparency on a Kodak Readymount mount, with dark blue border. Photo of Bendigo Trust No. 30 after repainting to the Bendigo trust colour scheme. Has a BCV Television roof ad. Has Fountain Plaza and Ezywalkin buildings in the background. Slide dated Dec. 1972.Information written on in blue ink and date stamped on purple ink. "Birney No. 30 restored to former livery at Charing Cross."tramways, trams, bendigo, charing cross, tram 30 -
 Ballarat Tramway Museum
Slide - 35mm slide/s set of 7, Noel Simons, 1972
... Parade Ballarat Ballarat goldfields Tramways trams Bendigo Long ...Set of 7 transparencies undated on PAKON mounts - appear to be early 1970's. 1212.1 - No. 18 about to enter the Long Gully loop with ESSO service station on the right hand side. 1212.2 - No. 6 in Mitchell Street bound for Charing Cross. Tram has destination of "Rly Station". Has buildings on the east side of Mitchell St. in the background. 1212.3 - No. 7 (North Bendigo) and 29 (Golden Square) crossing. Actual location? 1212.4 - "No 6 showing 'SPECIAL' at Eaglehawk terminus. Has the Foodland store and Fruit shop in the background. 1212.5 - No. 19 at Eaglehawk terminus, on the extension to the normal Eaglehawk terminus. Tram has showing 'Eaglehawk'. Tram has two SEC roof ads. 1212.6 - No. 25 and another Bogie car at Quarry Hill terminus on last day. 1212.7 - No. 18 and 29 at Quarry Hill terminus. No.. 18 showing 'Quarry Hill' - has two SEC roof ads 'Electric Cooking - Matchless' and 'Everything's fine in my all electric kitchen' and No. 29 has a briquettes roof ad.Information typed onto a white label stuck on the slide. 1212.1 - "No. 18 at Long Gully" 1212.2 - "No. 6 in Mitchell Street." 1212.3 - "7 and 29 Lake View Hotel" 1212.4 - "No. 6 at Eaglehawk" 1212.5 - "No. 19 at Eaglehawk Term." 1212.6 - "Last cars Quarry Hill." 1212.7 - "18 & 29 Quarry Hill"tramways, trams, bendigo, long gully, mitchell st., eaglehawk, quarry hill, last tram, tram 6, tram 7, tram 18, tram 19, tram 25, tram 29 -
 Ballarat Tramway Museum
Newspaper, Herald Sun, Opening of Bendigo Tourist Trams - advertisement, 8/12/1972 12:00:00 AM
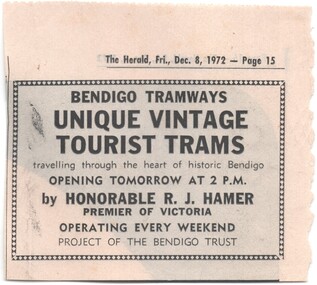
... about the opening of the Bendigo Trust - Tourist Tram service... Parade Ballarat Ballarat goldfields Trams tramways Bendigo ...Newspaper advertisement from the Herald, Friday 8/12/1972 about the opening of the Bendigo Trust - Tourist Tram service, by the Hon. R.. J. Hamer, Premier of Victoria at 2pm the following day Notes as operating every weekend and that a project of the Bendigo Trust.trams, tramways, bendigo, opening, bendigo trust, r.. j. hamer -
 Ballarat Tramway Museum
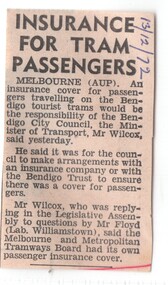
Newspaper, The Courier Ballarat, "Insurance for Tram Passengers", 13/12/1972 12:00:00 AM
... Parade Ballarat Ballarat goldfields Trams tramways Bendigo ...Newspaper Clipping possibly from The Courier, Ballarat, 13/12/1972 about the Bendigo City Council or the Trust being responsible for arranging Insurance cover for passengers. Item follows a question in the Legislative Assembly from Mr. Floyd, Labour Williamstown, answered by the Minister of Transport, Mr. V. Wilcox. Appears to be from the Courier, as starts with "MELBOURNE - (AUP)" credit."13/12/72" in top right hand corner in black ink.trams, tramways, bendigo, insurance, bendigo trust, v. wilcox -
 Ballarat Tramway Museum
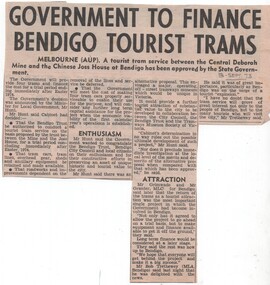
Newspaper, "Government to finance Bendigo Tourist Trams", 13/9/1973?
... Parade Ballarat Ballarat goldfields Trams tramways Bendigo ...Newspaper Clipping possibly from a newspaper dated 13/9/1973 (should this be 1972 given item 1236?)about the State Government approval of a tourist tram service as a trail between the Central Deborah Mine and the Chinese Joss House for a period ending Easter 1974. Quotes the Minister for Local Government, Mr Hunt. Also mentions local member Mr. Bob Tretherwey MLA and MLC's for Bendigo. Does not appear to be a Melbourne paper, as it gives AUP as the source."13.Sept.73" in pencil in top right hand corner.trams, tramways, bendigo, tourist trams, mr. hunt, bendigo trust -
 Ballarat Tramway Museum
Document - Report, Perth Electric Tramway Society, "Proceedings of the Eleventh Conference of COTMA", 1994
86 page A4 sized bound document - Proceedings of the Eleventh Conference of Australasian Tramway Museums, Whiteman Park, Perth W.A. 29 May to 4 June 1992. Has heavy card covers, wire bound with printed title details in blue on the front cover. Has ISSN number. Prepared by the Perth Electric Tramway Society. See item 1254 for photo of conference delegates. - notes should be on page 3. Arrived loose. See also the COTMA website for a full pdf copy of this document. Contents: Acknowledgements Participants Conference Programme keynote Address - Urban Transport: What does the past tell use about the future? Papers W class Status Report - L. Jean The place of Tram Museums in the International and Australian Tram Movement Our Cultural Heritage Management of Rolling Stock Driver Training at Bendigo Tramways "Trolley Wire" Collection Policies Occupational Health & Safety Relationships with Local Government Corrosion - Electrolysis Promotion Accreditation and Its effect on Tramway Museums in NSW Workshops COTMA - what is Needed? Membership for the Young Archives Conservation Management Review COTMA Electrical Operations Rules Visits and Tours Reports Museum Directory.Inside front cover has BTPS stamp and Mail received - 14/11/1994 and item no. "5154" in blue ink.trams, tramways, cotma, perth, proceedings, conferences -
 Ballarat Tramway Museum
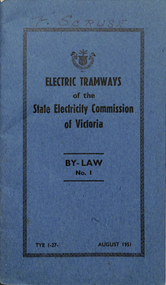
Book, State Electricity Commission of Victoria (SECV), "Electric Tramways of the State Electricity Commission of Victoria - By-Law No. 1 - August 1951", Aug. 1951
Booklet with blue heavy paper cover and 20 pages inside giving details of the by-laws operating for the SEC tramways in Ballarat, Bendigo and Geelong. Gives details of the definitions, fares and charges, special tram rates, sale of tickets, regulating number of passengers, stopping places, nuisances, smoking, dangerous goods, luggage and goods, general matters and fares applicable in each section in three formal schedules for both Adults and Children. On last page gives details of the SEC Commissioners, Minister for Electrical Undertakings and Clerk of the Executive Council who authorised the document.On front cover "F.Scruse" in blue ink.trams, tramways, secv rules, by-laws, tickets, fares -
 Ballarat Tramway Museum
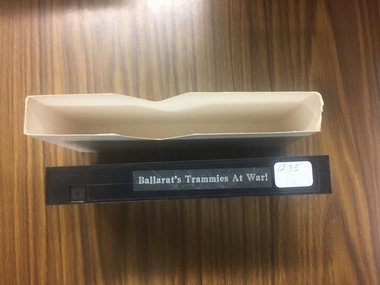
Film - Video cassette tape and box, John Phillips and Warren Doubleday and Bruce McLean and Richard Gilbert, "Ballarat Trammies at War", 1995
... charged for tram services in Ballarat, Bendigo and Geelong. Issued ...Demonstrates aspects of the SEC governance system in issuing By-laws for the travelling public, as part of their Act. Yields information about fares charged for tram services in Ballarat, Bendigo and Geelong. Issued to crews.Video Tape titled "Ballarat's Trammies and War" in white cardboard slip box. Features the 1930's rehabilitation of the system, the huge patronage increase due to WW2, conductresses, Most Popular Conductress competition, Brownout conditions and modifications made to the trams, interviews with Jean Maxwell and Norm Lorensini. Made from parts of the Ballarat Tramways tape. Gives credits, shows the "Australia Remembers" logo. Approx 4 mins running time - 6 copies on the 25 min. tape.video tape, world war ii, conductresses, australia remembers` -
 Ballarat Tramway Museum
Book, Campbell Duncan, "Ballarat's Tramway Preservation Project", 1978?
Sixteen page book or booklet printed on A4 white paper, folded to A5 with saddle bound staples, titled "Ballarat's Tramway Preservation Project". Written by Campbell Duncan for the BTPS c1978, giving details of the history of Ballarat's tramways, and a brief history of Geelong and Bendigo, the formation and operations of the BTPS and the tramcar fleet. Has 10 photographs, 1 sketch of the front of a maximum traction tramcar and a map of the BTPS location on the rear. Map drawn by G. Inglis 2.73. Note no credits for photographs. See image files for photos used in book. Second edition - notes tram 28 has been repaired by the BTPS and this did not occur until 1978 - only gives 6 tramcars in list - we had others stored off site at the time. second copy added 1/1/12trams, tramways, btps, museum directory, car fleet, map -
 Ballarat Tramway Museum
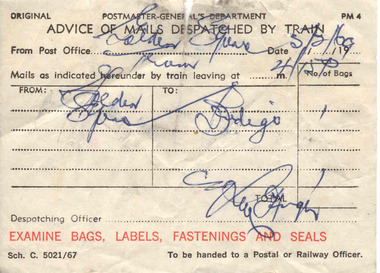
Document - Form/s, Post Master Generals Department, "Advice of Mails Despatched by Train", 1967
Original of a Post Master's General Department (PMG), "Advice of Mails Despatched by Train" form filled in for 8/8/1969 (date and month are questionable) for the despatch of one bag of mail from Golden Square to the Bendigo Post Office at 4.15pm. the word "tram" appears above the word train . Has a number of initials or signatures. Form number PM4 or Sch. C 5021/67. Black printing on white paper except for the instruction "Examine Bags, labels, Fastenings and Seals" which is in red ink and capitals. Perforations on left indicate ticket is torn from butt leaving duplicate in the book. Has been filled in - see image file.trams, tramways, mails, trams, golden square, post office, bendigo -
 Ballarat Tramway Museum
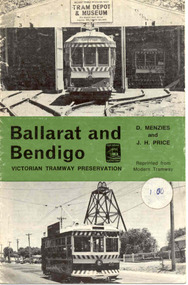
Book, Light Railway Transport League, "Ballarat and Bendigo, Victorian Tramway Preservation", 1975
... Bendigo LRTL Tram Preservation Price sticker as noted above Twelve ...Twelve page booklet, titled "Ballarat and Bendigo, Victorian Tramway Preservation" written by D. Menzies and J.H. Price, reprinted from Modern Tramway. Front cover has BTPS tram 38 on original depot fan, green banner centrally with title, and Bendigo Birney No. 28. A circular white sticker with "1.00" written on is stuck on the right hand side, centrally. Saddle stapled print in black ink on 120gsm art paper. Written material covers background history of both Ballarat and Bendigo tramways, tramcars, closure, the formation of the BTPS and the Bendigo Trust tramways and their operational history up to about mid 1975 as it mentions the first COTMA meeting. Also has 12 photos inside. On rear cover is an advertisement for the TMSV and the Light Railway Transport League (UK) (LRTL) PDF copy of book added 16-3-2017 Price sticker as noted abovetrams, tramways, ballarat, bendigo, lrtl, tram preservation -
 Ballarat Tramway Museum
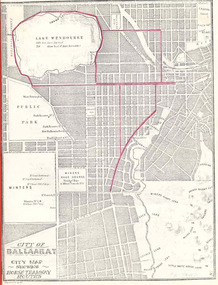
Book, City of Ballaarat, "Mayors Special Report Ballarat Tramways", Sep. 1971
Historically significant for at the time it demonstrated aspects of the evolution of Ballarat Tramways and yields information about the formation of the tramways, the Councils viewpoint and has a strong association with the Mayor of the time.Twenty two page book, produced by photocopying, side stapled and bound with a red plastic binding, titled "Mayor's Special Report Ballarat Tramways", dated 20 September 1971 for presentation to the City of Ballaarat Council Meeting 27 Sept. 1971 and signed by the Mayor, J.A.Chisholm. Note pages 18 and 19 have been reversed. Comprises: Page 1 - map (image 1829i1) - of Ballarat (Ballaarat) showing the horse tram routes in red (appear to have been drawn in with a red pencil). Note the Sebastopol route terminates at Rubicon St. Page 3 - letter to the City Councillors from the Mayor Page 4 - Outline of the "The Ballarat Tramway System" Pages 5 - 7 - Conditions for tendering the horse tram system within the City of Ballarat" Pages 8 - 11 - Specifications and Agreement for the Ballaarat Tramways (horse trams). pages 12 - 19 - Memorandum of Agreement with the British Insulated Wire Company (later ESCo) Page 20 - Copy of letter from the Secretary of the SEC to the Minister of Fuel and Power, dated 10 Sept. 1971 advising of the formal abandonment of the Ballarat and Bendigo tramway systems. Page 21 - five photos (image 1829i3) of trams in Ballarat, including the bogie tram decorated for the Queens visit, courtesy of Mr. L. J. Denmead, Tramways Superintendent. Page 22 - Plan (image 1829i2) of Ballarat Bus Services, showing route numbers, destinations and existing tramway routes. 3rd copy added 16/7/2010trams, tramways, city of ballaarat, mayor's reports, ballaarat tramway company, british insulated wire company, esco, bus services, sec -
 Ballarat Tramway Museum
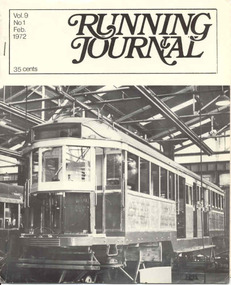
Magazine, Tramway Museum Society of Victoria (TMSV), "Running Journal Vol 9, No. 1, Feb. 1972", Feb. 1972
Demonstrates aspects of publication of material in an enthusiast based magazine for a Melbourne based organisation, with a detailed article on the overhaul of trams at Preston workshops for Melbourne.Feb. 1972 issue of "Running Journal", consisting of formally printed cover on glossy paper which has been folded, containing seven wax stencil cut, duplicated sheets, pages 3 to 16. Published by the Tramway Museum Society of Victoria. Sheets have been stapled into the folded covers. See condition notes also. Cover has W2 277 undergoing a "O2" overhaul at Preston workshops Page 2 - photos of 928, 733 and 921 undergoing various overhaul stages Pages 3 to 9 - article by Norm Cross on MMTB tramcar overhauls at Preston Workshops Page 9 - News from Ballarat (BTPS - foundations for new shed) Page 10 - 11 - Tramway Quiz Page 12 - 14 - TMSV Museum news (muses) Page 15 - Answers to quiz Page 16 - Back issues of Running Journal Page 17 - Photos of 980 and Museum activities Page 18 (back cover) - 18 in Sturt St., July 1970, Ballarat 18 - in Vickers St. Sebastopol shed, trams 31, 30 and 32 stored at the SEC Ballarat North Power station grounds awaiting transport, in October 1971 and MMTB 469 arriving as the last Footscray tram. Loose sheet - duplicated, advertising, Last Mail Covers - Bendigo Tramways, prior to closure on 16/4/1972. Second copy ex ARHS 9/2003 added 21/09/2006. 3rd copy added 28/10/2007, ex Graeme Breydon Collection.Has Graeme Breydon address stamp on front cover.trams, tramways, tmsv, running journal, ballarat, overhauls, preston, mmtb -
 Ballarat Tramway Museum
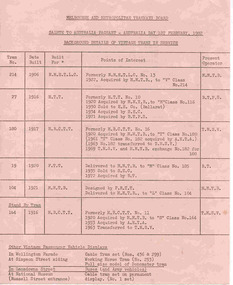
Document - List, Melbourne and Metropolitan Tramways Board (MMTB), "Salute to Australia Pageant - Australia Day 1st February 1982", Jan. 1982
List of tramcars used in the Australia Day Pageant, 1982. Prepared by the MMTB, titled "Salute to Australia Pageant - Australia Day 1st February 1982", "Background details of Vintage Trams in Service" for use on 1/2/1982. Printed on both sides of pink sheet of foolscap paper, using a wax stencil and duplicator. Gives details of MMTB 214 (V), Ballarat 27, MMTB 180 (T), Bendigo 19, MMTB 104 (L) and standby tram MMTB 164 (S). Details tram number, date built, for built for, points of interest and present operator. Also lists other vintage passenger vehicle displays in Wellington Parade, abbreviations and list of significant events concerning Melbourne tramways. 2nd copy added 22/08/04 - has had bottom section of sheet torn off. Images of this item shown.australia day, mmtb, melbourne, tramcars, pageant -
 Ballarat Tramway Museum
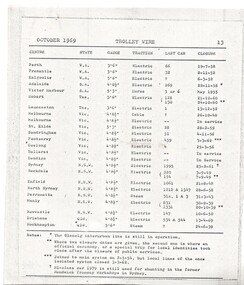
Document - Photocopy, Closure Dates of Australian Tramway Systems, c1970
Photocopy of part of page 13 of 'Trolley Wire', October 1969 listing the closure dates of the various Australian tramway systems and if known, the 'last tramcar' to operate, the gauge and the form of traction power. List 24 systems, shows Melbourne, Ballarat and Bendigo as still being in service and the Glenelg interurban as well. Has been photocopied and then trimmed with a ruler. Three copies held.trams, tramways, tramways, closure, australian tramways, gauge