Showing 13346 items
matching p-morrow
-
 Flagstaff Hill Maritime Museum and Village
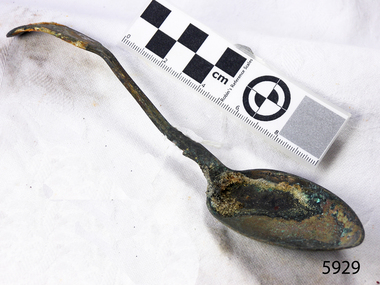
Spoon, circa 1878
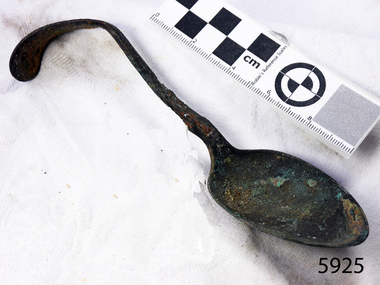
This medium-sized dessert spoon is from the wreck of the LOCH ARD, a Loch Line ship of 1,693 tons which sailed from Gravesend, London, on 2 March 1878 with 17 passengers and a crew of 36 under Captain George Gibbs. “The intention was to discharge cargo in Melbourne, before returning to London via the Horn with wool and wheat”. Instead, on 1 June 1878, after 90 days at sea, she struck the sandstone cliffs of Mutton Bird Island on the south west coast of Victoria, and sank with the loss of 52 lives and all her cargo. The manifest of the LOCH ARD listed an array of manufactured goods and bulk metals being exported to the Colony of Victoria, with a declared value of £53,700. (202 bills of lading show an actual invoice value of £68, 456, with insurance underwriting to £30,000 of all cargo). Included in the manifest is the item of “Tin hardware & cutlery £7,530”. This dessert spoon is one of 482 similar items of electro-plated cutlery from the LOCH ARD site, comprising spoons and forks of various sizes but all sharing the same general shape or design and metallic composition. 49 of these pieces display a legible makers’ mark — the initials “W” and “P” placed within a raised diamond outline, which is in turn contained within a sunken crown shape — identifying the manufacturer as William Page & Co of Birmingham. An electroplater’s makers’ marks, unlike sterling silver hallmarks, are not consistent identifiers of quality or date and place of manufacture. A similar line of five impressions was usually made to impress the consumer with an implication of industry standards, but what each one actually signified was not regulated and so they varied according to the whim of the individual foundry. In this case, the maker’s marks are often obscured by sedimentary accretion or removed by corrosion after a century of submersion in the ocean. However sufficient detail has survived to indicate that these samples of electro-plated cutlery probably originated from the same consignment in the LOCH ARD’s cargo. The generally common range of marks are drawn from 255 tea spoons, 125 dessert spoons, and 99 table forks. These marks are clearly visible in 66 instances, while the same sequence of general outlines, or depression shapes, is discernible in another 166 examples. Suggested trade names for William Page & Co’s particular blend of brass plating are ‘roman silver’ or ‘silverite’. This copper alloy polishes to a lustrous gold when new, discolouring to a murky grey with greenish hue when neglected. HISTORY OF THE LOCH ARD The LOCH ARD belonged to the famous Loch Line which sailed many ships from England to Australia. Built in Glasgow by Barclay, Curdle and Co. in 1873, the LOCH ARD was a three-masted square rigged iron sailing ship. The ship measured 262ft 7" (79.87m) in length, 38ft (11.58m) in width, 23ft (7m) in depth and had a gross tonnage of 1693 tons. The LOCH ARD's main mast measured a massive 150ft (45.7m) in height. LOCH ARD made three trips to Australia and one trip to Calcutta before its final voyage. LOCH ARD left England on March 2, 1878, under the command of Captain Gibbs, a newly married, 29 year old. She was bound for Melbourne with a crew of 37, plus 17 passengers and a load of cargo. The general cargo reflected the affluence of Melbourne at the time. On board were straw hats, umbrella, perfumes, clay pipes, pianos, clocks, confectionary, linen and candles, as well as a heavier load of railway irons, cement, lead and copper. There were items included that intended for display in the Melbourne International Exhibition in 1880. The voyage to Port Phillip was long but uneventful. At 3am on June 1, 1878, Captain Gibbs was expecting to see land and the passengers were becoming excited as they prepared to view their new homeland in the early morning. But LOCH ARD was running into a fog which greatly reduced visibility. Captain Gibbs was becoming anxious as there was no sign of land or the Cape Otway lighthouse. At 4am the fog lifted. A man aloft announced that he could see breakers. The sheer cliffs of Victoria's west coast came into view, and Captain Gibbs realised that the ship was much closer to them than expected. He ordered as much sail to be set as time would permit and then attempted to steer the vessel out to sea. On coming head on into the wind, the ship lost momentum, the sails fell limp and LOCH ARD's bow swung back. Gibbs then ordered the anchors to be released in an attempt to hold its position. The anchors sank some 50 fathoms - but did not hold. By this time LOCH ARD was among the breakers and the tall cliffs of Mutton Bird Island rose behind the ship. Just half a mile from the coast, the ship's bow was suddenly pulled around by the anchor. The captain tried to tack out to sea, but the ship struck a reef at the base of Mutton Bird Island, near Port Campbell. Waves broke over the ship and the top deck was loosened from the hull. The masts and rigging came crashing down knocking passengers and crew overboard. When a lifeboat was finally launched, it crashed into the side of LOCH ARD and capsized. Tom Pearce, who had launched the boat, managed to cling to its overturned hull and shelter beneath it. He drifted out to sea and then on the flood tide came into what is now known as LOCH ARD Gorge. He swam to shore, bruised and dazed, and found a cave in which to shelter. Some of the crew stayed below deck to shelter from the falling rigging but drowned when the ship slipped off the reef into deeper water. Eva Carmichael had raced onto deck to find out what was happening only to be confronted by towering cliffs looming above the stricken ship. In all the chaos, Captain Gibbs grabbed Eva and said, "If you are saved Eva, let my dear wife know that I died like a sailor". That was the last Eva Carmichael saw of the captain. She was swept off the ship by a huge wave. Eva saw Tom Pearce on a small rocky beach and yelled to attract his attention. He dived in and swam to the exhausted woman and dragged her to shore. He took her to the cave and broke open case of brandy which had washed up on the beach. He opened a bottle to revive the unconscious woman. A few hours later Tom scaled a cliff in search of help. He followed hoof prints and came by chance upon two men from nearby Glenample Station three and a half miles away. In a state of exhaustion, he told the men of the tragedy. Tom returned to the gorge while the two men rode back to the station to get help. By the time they reached LOCH ARD Gorge, it was cold and dark. The two shipwreck survivors were taken to Glenample Station to recover. Eva stayed at the station for six weeks before returning to Ireland, this time by steamship. In Melbourne, Tom Pearce received a hero's welcome. He was presented with the first gold medal of the Royal Humane Society of Victoria and a £1000 cheque from the Victorian Government. Concerts were performed to honour the young man's bravery and to raise money for those who lost family in the LOCH ARD disaster. Of the 54 crew members and passengers on board, only two survived: the apprentice, Tom Pearce and the young woman passenger, Eva Carmichael, who lost all of her family in the tragedy. Ten days after the LOCH ARD tragedy, salvage rights to the wreck were sold at auction for £2,120. Cargo valued at £3,000 was salvaged and placed on the beach, but most washed back into the sea when another storm developed. The wreck of LOCH ARD still lies at the base of Mutton Bird Island. Much of the cargo has now been salvaged and some was washed up into what is now known as LOCH ARD Gorge. Cargo and artefacts have also been illegally salvaged over many years before protective legislation was introduced. One of the most unlikely pieces of cargo to have survived the shipwreck was a Minton porcelain peacock - one of only seven in the world. The peacock was destined for the Melbourne International Exhibition in 1880. It had been well packed, which gave it adequate protection during the violent storm. Today, the Minton peacock can be seen at the Flagstaff Hill Maritime Museum in Warrnambool. From Australia's most dramatic shipwreck it has now become Australia's shipwreck artefact and is one of very few 'objects' on the Victorian State Heritage Register most valuable. The LOCH ARD shipwreck is of State significance – Victorian Heritage Register S 417. Flagstaff Hill’s collection of artefacts from LOCH ARD is significant for being one of the largest collections of artefacts from this shipwreck in Victoria. It is significant for its association with the shipwreck, which is on the Victorian Heritage Register (VHR S417). The collection is significant because of the relationship between the objects, as together they have a high potential to interpret the story of the LOCH ARD. The LOCH ARD collection is archaeologically significant as the remains of a large international passenger and cargo ship. The LOCH ARD collection is historically significant for representing aspects of Victoria’s shipping history and its potential to interpret sub-theme 1.5 of Victoria’s Framework of Historical Themes (living with natural processes). The collection is also historically significant for its association with the LOCH ARD, which was one of the worst and best known shipwrecks in Victoria’s history. Unrestored dessert spoon from the wreck of the LOCH ARD. The spoon design has a flattened fiddle-back handle, with a thin stem or shank, flared collar, and a shallow rounded bowl. The spoons metallic composition is a thin layer of brass alloy which has partially corroded back to a nickel-silver base metal. Some verdigris and very little encrustation. Spoon handle and stem is badly bent. Outlines of five makers marks - Crown, Circle, Small circle, Circle, Diamond.flagstaff hill, warrnambool, shipwrecked coast, flagstaff hill maritime museum, maritime museum, shipwreck coast, flagstaff hill maritime village, great ocean road, loch line, loch ard, captain gibbs, eva carmichael, tom pearce, glenample station, mutton bird island, loch ard gorge, electroplated cutlery, loch ard shipwreck, william page and co, birmingham brass plating, dessert spoons -
 Flagstaff Hill Maritime Museum and Village
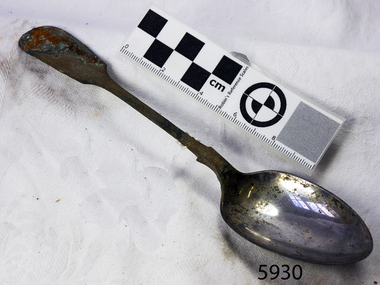
Spoon, circa 1878
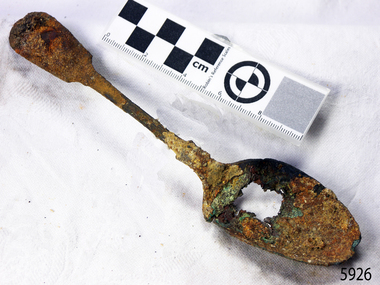
This medium-sized dessert spoon is from the wreck of the LOCH ARD, a Loch Line ship of 1,693 tons which sailed from Gravesend, London, on 2 March 1878 with 17 passengers and a crew of 36 under Captain George Gibbs. “The intention was to discharge cargo in Melbourne, before returning to London via the Horn with wool and wheat”. Instead, on 1 June 1878, after 90 days at sea, she struck the sandstone cliffs of Mutton Bird Island on the south west coast of Victoria, and sank with the loss of 52 lives and all her cargo. The manifest of the LOCH ARD listed an array of manufactured goods and bulk metals being exported to the Colony of Victoria, with a declared value of £53,700. (202 bills of lading show an actual invoice value of £68, 456, with insurance underwriting to £30,000 of all cargo). Included in the manifest is the item of “Tin hardware & cutlery £7,530”. This dessert spoon is one of 482 similar items of electro-plated cutlery from the LOCH ARD site, comprising spoons and forks of various sizes but all sharing the same general shape or design and metallic composition. 49 of these pieces display a legible makers’ mark — the initials “W” and “P” placed within a raised diamond outline, which is in turn contained within a sunken crown shape — identifying the manufacturer as William Page & Co of Birmingham. An electroplater’s makers’ marks, unlike sterling silver hallmarks, are not consistent identifiers of quality or date and place of manufacture. A similar line of five impressions was usually made to impress the consumer with an implication of industry standards, but what each one actually signified was not regulated and so they varied according to the whim of the individual foundry. In this case, the maker’s marks are often obscured by sedimentary accretion or removed by corrosion after a century of submersion in the ocean. However sufficient detail has survived to indicate that these samples of electro-plated cutlery probably originated from the same consignment in the LOCH ARD’s cargo. The generally common range of marks are drawn from 255 tea spoons, 125 dessert spoons, and 99 table forks. These marks are clearly visible in 66 instances, while the same sequence of general outlines, or depression shapes, is discernible in another 166 examples. Suggested trade names for William Page & Co’s particular blend of brass plating are ‘roman silver’ or ‘silverite’. This copper alloy polishes to a lustrous gold when new, discolouring to a murky grey with greenish hue when neglected. HISTORY OF THE LOCH ARD The LOCH ARD belonged to the famous Loch Line which sailed many ships from England to Australia. Built in Glasgow by Barclay, Curdle and Co. in 1873, the LOCH ARD was a three-masted square rigged iron sailing ship. The ship measured 262ft 7" (79.87m) in length, 38ft (11.58m) in width, 23ft (7m) in depth and had a gross tonnage of 1693 tons. The LOCH ARD's main mast measured a massive 150ft (45.7m) in height. LOCH ARD made three trips to Australia and one trip to Calcutta before its final voyage. LOCH ARD left England on March 2, 1878, under the command of Captain Gibbs, a newly married, 29 year old. She was bound for Melbourne with a crew of 37, plus 17 passengers and a load of cargo. The general cargo reflected the affluence of Melbourne at the time. On board were straw hats, umbrella, perfumes, clay pipes, pianos, clocks, confectionary, linen and candles, as well as a heavier load of railway irons, cement, lead and copper. There were items included that intended for display in the Melbourne International Exhibition in 1880. The voyage to Port Phillip was long but uneventful. At 3am on June 1, 1878, Captain Gibbs was expecting to see land and the passengers were becoming excited as they prepared to view their new homeland in the early morning. But LOCH ARD was running into a fog which greatly reduced visibility. Captain Gibbs was becoming anxious as there was no sign of land or the Cape Otway lighthouse. At 4am the fog lifted. A man aloft announced that he could see breakers. The sheer cliffs of Victoria's west coast came into view, and Captain Gibbs realised that the ship was much closer to them than expected. He ordered as much sail to be set as time would permit and then attempted to steer the vessel out to sea. On coming head on into the wind, the ship lost momentum, the sails fell limp and LOCH ARD's bow swung back. Gibbs then ordered the anchors to be released in an attempt to hold its position. The anchors sank some 50 fathoms - but did not hold. By this time LOCH ARD was among the breakers and the tall cliffs of Mutton Bird Island rose behind the ship. Just half a mile from the coast, the ship's bow was suddenly pulled around by the anchor. The captain tried to tack out to sea, but the ship struck a reef at the base of Mutton Bird Island, near Port Campbell. Waves broke over the ship and the top deck was loosened from the hull. The masts and rigging came crashing down knocking passengers and crew overboard. When a lifeboat was finally launched, it crashed into the side of LOCH ARD and capsized. Tom Pearce, who had launched the boat, managed to cling to its overturned hull and shelter beneath it. He drifted out to sea and then on the flood tide came into what is now known as LOCH ARD Gorge. He swam to shore, bruised and dazed, and found a cave in which to shelter. Some of the crew stayed below deck to shelter from the falling rigging but drowned when the ship slipped off the reef into deeper water. Eva Carmichael had raced onto deck to find out what was happening only to be confronted by towering cliffs looming above the stricken ship. In all the chaos, Captain Gibbs grabbed Eva and said, "If you are saved Eva, let my dear wife know that I died like a sailor". That was the last Eva Carmichael saw of the captain. She was swept off the ship by a huge wave. Eva saw Tom Pearce on a small rocky beach and yelled to attract his attention. He dived in and swam to the exhausted woman and dragged her to shore. He took her to the cave and broke open case of brandy which had washed up on the beach. He opened a bottle to revive the unconscious woman. A few hours later Tom scaled a cliff in search of help. He followed hoof prints and came by chance upon two men from nearby Glenample Station three and a half miles away. In a state of exhaustion, he told the men of the tragedy. Tom returned to the gorge while the two men rode back to the station to get help. By the time they reached LOCH ARD Gorge, it was cold and dark. The two shipwreck survivors were taken to Glenample Station to recover. Eva stayed at the station for six weeks before returning to Ireland, this time by steamship. In Melbourne, Tom Pearce received a hero's welcome. He was presented with the first gold medal of the Royal Humane Society of Victoria and a £1000 cheque from the Victorian Government. Concerts were performed to honour the young man's bravery and to raise money for those who lost family in the LOCH ARD disaster. Of the 54 crew members and passengers on board, only two survived: the apprentice, Tom Pearce and the young woman passenger, Eva Carmichael, who lost all of her family in the tragedy. Ten days after the LOCH ARD tragedy, salvage rights to the wreck were sold at auction for £2,120. Cargo valued at £3,000 was salvaged and placed on the beach, but most washed back into the sea when another storm developed. The wreck of LOCH ARD still lies at the base of Mutton Bird Island. Much of the cargo has now been salvaged and some was washed up into what is now known as LOCH ARD Gorge. Cargo and artefacts have also been illegally salvaged over many years before protective legislation was introduced. One of the most unlikely pieces of cargo to have survived the shipwreck was a Minton porcelain peacock - one of only seven in the world. The peacock was destined for the Melbourne International Exhibition in 1880. It had been well packed, which gave it adequate protection during the violent storm. Today, the Minton peacock can be seen at the Flagstaff Hill Maritime Museum in Warrnambool. From Australia's most dramatic shipwreck it has now become Australia's shipwreck artefact and is one of very few 'objects' on the Victorian State Heritage Register most valuable. The LOCH ARD shipwreck is of State significance – Victorian Heritage Register S 417. Flagstaff Hill’s collection of artefacts from LOCH ARD is significant for being one of the largest collections of artefacts from this shipwreck in Victoria. It is significant for its association with the shipwreck, which is on the Victorian Heritage Register (VHR S417). The collection is significant because of the relationship between the objects, as together they have a high potential to interpret the story of the LOCH ARD. The LOCH ARD collection is archaeologically significant as the remains of a large international passenger and cargo ship. The LOCH ARD collection is historically significant for representing aspects of Victoria’s shipping history and its potential to interpret sub-theme 1.5 of Victoria’s Framework of Historical Themes (living with natural processes). The collection is also historically significant for its association with the LOCH ARD, which was one of the worst and best known shipwrecks in Victoria’s history. Unrestored dessert spoon from the wreck of the LOCH ARD. The spoon design has a flattened fiddle-back handle, with a thin stem or shank, flared collar, and a shallow rounded bowl. The spoons metallic composition is a thin layer of brass alloy which has partially corroded back to a nickel-silver base metal. Some verdigris and encrustation. Spoon bowl is cracked and has a hole in it. Spoon is generally badly corroded, fragile and bent.flagstaff hill, warrnambool, shipwrecked coast, flagstaff hill maritime museum, maritime museum, shipwreck coast, flagstaff hill maritime village, great ocean road, loch line, loch ard, captain gibbs, eva carmichael, tom pearce, glenample station, mutton bird island, loch ard gorge, electroplated cutlery, loch ard shipwreck, william page and co, birmingham brass plating, dessert spoons -
 Flagstaff Hill Maritime Museum and Village
Spoon, circa 1878
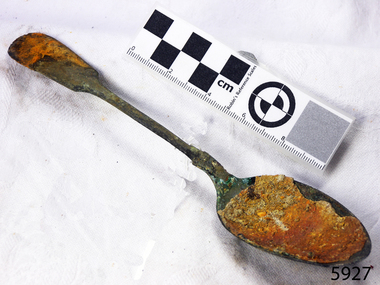
This medium-sized dessert spoon is from the wreck of the LOCH ARD, a Loch Line ship of 1,693 tons which sailed from Gravesend, London, on 2 March 1878 with 17 passengers and a crew of 36 under Captain George Gibbs. “The intention was to discharge cargo in Melbourne, before returning to London via the Horn with wool and wheat”. Instead, on 1 June 1878, after 90 days at sea, she struck the sandstone cliffs of Mutton Bird Island on the south west coast of Victoria, and sank with the loss of 52 lives and all her cargo. The manifest of the LOCH ARD listed an array of manufactured goods and bulk metals being exported to the Colony of Victoria, with a declared value of £53,700. (202 bills of lading show an actual invoice value of £68, 456, with insurance underwriting to £30,000 of all cargo). Included in the manifest is the item of “Tin hardware & cutlery £7,530”. This dessert spoon is one of 482 similar items of electro-plated cutlery from the LOCH ARD site, comprising spoons and forks of various sizes but all sharing the same general shape or design and metallic composition. 49 of these pieces display a legible makers’ mark — the initials “W” and “P” placed within a raised diamond outline, which is in turn contained within a sunken crown shape — identifying the manufacturer as William Page & Co of Birmingham. An electroplater’s makers’ marks, unlike sterling silver hallmarks, are not consistent identifiers of quality or date and place of manufacture. A similar line of five impressions was usually made to impress the consumer with an implication of industry standards, but what each one actually signified was not regulated and so they varied according to the whim of the individual foundry. In this case, the maker’s marks are often obscured by sedimentary accretion or removed by corrosion after a century of submersion in the ocean. However sufficient detail has survived to indicate that these samples of electro-plated cutlery probably originated from the same consignment in the LOCH ARD’s cargo. The generally common range of marks are drawn from 255 tea spoons, 125 dessert spoons, and 99 table forks. These marks are clearly visible in 66 instances, while the same sequence of general outlines, or depression shapes, is discernible in another 166 examples. Suggested trade names for William Page & Co’s particular blend of brass plating are ‘roman silver’ or ‘silverite’. This copper alloy polishes to a lustrous gold when new, discolouring to a murky grey with greenish hue when neglected. HISTORY OF THE LOCH ARD The LOCH ARD belonged to the famous Loch Line which sailed many ships from England to Australia. Built in Glasgow by Barclay, Curdle and Co. in 1873, the LOCH ARD was a three-masted square rigged iron sailing ship. The ship measured 262ft 7" (79.87m) in length, 38ft (11.58m) in width, 23ft (7m) in depth and had a gross tonnage of 1693 tons. The LOCH ARD's main mast measured a massive 150ft (45.7m) in height. LOCH ARD made three trips to Australia and one trip to Calcutta before its final voyage. LOCH ARD left England on March 2, 1878, under the command of Captain Gibbs, a newly married, 29 year old. She was bound for Melbourne with a crew of 37, plus 17 passengers and a load of cargo. The general cargo reflected the affluence of Melbourne at the time. On board were straw hats, umbrella, perfumes, clay pipes, pianos, clocks, confectionary, linen and candles, as well as a heavier load of railway irons, cement, lead and copper. There were items included that intended for display in the Melbourne International Exhibition in 1880. The voyage to Port Phillip was long but uneventful. At 3am on June 1, 1878, Captain Gibbs was expecting to see land and the passengers were becoming excited as they prepared to view their new homeland in the early morning. But LOCH ARD was running into a fog which greatly reduced visibility. Captain Gibbs was becoming anxious as there was no sign of land or the Cape Otway lighthouse. At 4am the fog lifted. A man aloft announced that he could see breakers. The sheer cliffs of Victoria's west coast came into view, and Captain Gibbs realised that the ship was much closer to them than expected. He ordered as much sail to be set as time would permit and then attempted to steer the vessel out to sea. On coming head on into the wind, the ship lost momentum, the sails fell limp and LOCH ARD's bow swung back. Gibbs then ordered the anchors to be released in an attempt to hold its position. The anchors sank some 50 fathoms - but did not hold. By this time LOCH ARD was among the breakers and the tall cliffs of Mutton Bird Island rose behind the ship. Just half a mile from the coast, the ship's bow was suddenly pulled around by the anchor. The captain tried to tack out to sea, but the ship struck a reef at the base of Mutton Bird Island, near Port Campbell. Waves broke over the ship and the top deck was loosened from the hull. The masts and rigging came crashing down knocking passengers and crew overboard. When a lifeboat was finally launched, it crashed into the side of LOCH ARD and capsized. Tom Pearce, who had launched the boat, managed to cling to its overturned hull and shelter beneath it. He drifted out to sea and then on the flood tide came into what is now known as LOCH ARD Gorge. He swam to shore, bruised and dazed, and found a cave in which to shelter. Some of the crew stayed below deck to shelter from the falling rigging but drowned when the ship slipped off the reef into deeper water. Eva Carmichael had raced onto deck to find out what was happening only to be confronted by towering cliffs looming above the stricken ship. In all the chaos, Captain Gibbs grabbed Eva and said, "If you are saved Eva, let my dear wife know that I died like a sailor". That was the last Eva Carmichael saw of the captain. She was swept off the ship by a huge wave. Eva saw Tom Pearce on a small rocky beach and yelled to attract his attention. He dived in and swam to the exhausted woman and dragged her to shore. He took her to the cave and broke open case of brandy which had washed up on the beach. He opened a bottle to revive the unconscious woman. A few hours later Tom scaled a cliff in search of help. He followed hoof prints and came by chance upon two men from nearby Glenample Station three and a half miles away. In a state of exhaustion, he told the men of the tragedy. Tom returned to the gorge while the two men rode back to the station to get help. By the time they reached LOCH ARD Gorge, it was cold and dark. The two shipwreck survivors were taken to Glenample Station to recover. Eva stayed at the station for six weeks before returning to Ireland, this time by steamship. In Melbourne, Tom Pearce received a hero's welcome. He was presented with the first gold medal of the Royal Humane Society of Victoria and a £1000 cheque from the Victorian Government. Concerts were performed to honour the young man's bravery and to raise money for those who lost family in the LOCH ARD disaster. Of the 54 crew members and passengers on board, only two survived: the apprentice, Tom Pearce and the young woman passenger, Eva Carmichael, who lost all of her family in the tragedy. Ten days after the LOCH ARD tragedy, salvage rights to the wreck were sold at auction for £2,120. Cargo valued at £3,000 was salvaged and placed on the beach, but most washed back into the sea when another storm developed. The wreck of LOCH ARD still lies at the base of Mutton Bird Island. Much of the cargo has now been salvaged and some was washed up into what is now known as LOCH ARD Gorge. Cargo and artefacts have also been illegally salvaged over many years before protective legislation was introduced. One of the most unlikely pieces of cargo to have survived the shipwreck was a Minton porcelain peacock - one of only seven in the world. The peacock was destined for the Melbourne International Exhibition in 1880. It had been well packed, which gave it adequate protection during the violent storm. Today, the Minton peacock can be seen at the Flagstaff Hill Maritime Museum in Warrnambool. From Australia's most dramatic shipwreck it has now become Australia's shipwreck artefact and is one of very few 'objects' on the Victorian State Heritage Register most valuable. The LOCH ARD shipwreck is of State significance – Victorian Heritage Register S 417. Flagstaff Hill’s collection of artefacts from LOCH ARD is significant for being one of the largest collections of artefacts from this shipwreck in Victoria. It is significant for its association with the shipwreck, which is on the Victorian Heritage Register (VHR S417). The collection is significant because of the relationship between the objects, as together they have a high potential to interpret the story of the LOCH ARD. The LOCH ARD collection is archaeologically significant as the remains of a large international passenger and cargo ship. The LOCH ARD collection is historically significant for representing aspects of Victoria’s shipping history and its potential to interpret sub-theme 1.5 of Victoria’s Framework of Historical Themes (living with natural processes). The collection is also historically significant for its association with the LOCH ARD, which was one of the worst and best known shipwrecks in Victoria’s history. Unrestored dessert spoon from the wreck of the LOCH ARD. The spoon design has a flattened fiddle-back handle, with a thin stem or shank, flared collar, and a shallow rounded bowl. The spoons metallic composition is a thin layer of brass alloy which has partially corroded back to a nickel-silver base metal. 50% red/cream encrustation, 20% dulled grey original plate, 5% verdigris, and balance darkened base metal.flagstaff hill, warrnambool, shipwrecked coast, flagstaff hill maritime museum, maritime museum, shipwreck coast, flagstaff hill maritime village, great ocean road, loch line, loch ard, captain gibbs, eva carmichael, tom pearce, glenample station, mutton bird island, loch ard gorge, electroplated cutlery, loch ard shipwreck, william page and co, birmingham brass plating, dessert spoons -
 Flagstaff Hill Maritime Museum and Village
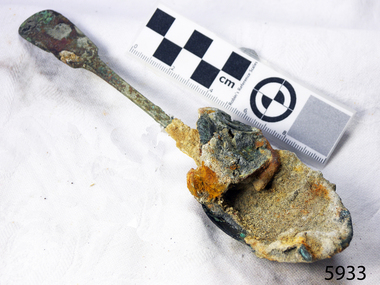
Spoon, circa 1878
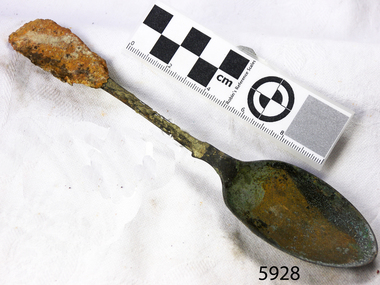
This medium-sized dessert spoon is from the wreck of the LOCH ARD, a Loch Line ship of 1,693 tons which sailed from Gravesend, London, on 2 March 1878 with 17 passengers and a crew of 36 under Captain George Gibbs. “The intention was to discharge cargo in Melbourne, before returning to London via the Horn with wool and wheat”. Instead, on 1 June 1878, after 90 days at sea, she struck the sandstone cliffs of Mutton Bird Island on the south west coast of Victoria, and sank with the loss of 52 lives and all her cargo. The manifest of the LOCH ARD listed an array of manufactured goods and bulk metals being exported to the Colony of Victoria, with a declared value of £53,700. (202 bills of lading show an actual invoice value of £68, 456, with insurance underwriting to £30,000 of all cargo). Included in the manifest is the item of “Tin hardware & cutlery £7,530”. This dessert spoon is one of 482 similar items of electro-plated cutlery from the LOCH ARD site, comprising spoons and forks of various sizes but all sharing the same general shape or design and metallic composition. 49 of these pieces display a legible makers’ mark — the initials “W” and “P” placed within a raised diamond outline, which is in turn contained within a sunken crown shape — identifying the manufacturer as William Page & Co of Birmingham. An electroplater’s makers’ marks, unlike sterling silver hallmarks, are not consistent identifiers of quality or date and place of manufacture. A similar line of five impressions was usually made to impress the consumer with an implication of industry standards, but what each one actually signified was not regulated and so they varied according to the whim of the individual foundry. In this case, the maker’s marks are often obscured by sedimentary accretion or removed by corrosion after a century of submersion in the ocean. However sufficient detail has survived to indicate that these samples of electro-plated cutlery probably originated from the same consignment in the LOCH ARD’s cargo. The generally common range of marks are drawn from 255 tea spoons, 125 dessert spoons, and 99 table forks. These marks are clearly visible in 66 instances, while the same sequence of general outlines, or depression shapes, is discernible in another 166 examples. Suggested trade names for William Page & Co’s particular blend of brass plating are ‘roman silver’ or ‘silverite’. This copper alloy polishes to a lustrous gold when new, discolouring to a murky grey with greenish hue when neglected. HISTORY OF THE LOCH ARD The LOCH ARD belonged to the famous Loch Line which sailed many ships from England to Australia. Built in Glasgow by Barclay, Curdle and Co. in 1873, the LOCH ARD was a three-masted square rigged iron sailing ship. The ship measured 262ft 7" (79.87m) in length, 38ft (11.58m) in width, 23ft (7m) in depth and had a gross tonnage of 1693 tons. The LOCH ARD's main mast measured a massive 150ft (45.7m) in height. LOCH ARD made three trips to Australia and one trip to Calcutta before its final voyage. LOCH ARD left England on March 2, 1878, under the command of Captain Gibbs, a newly married, 29 year old. She was bound for Melbourne with a crew of 37, plus 17 passengers and a load of cargo. The general cargo reflected the affluence of Melbourne at the time. On board were straw hats, umbrella, perfumes, clay pipes, pianos, clocks, confectionary, linen and candles, as well as a heavier load of railway irons, cement, lead and copper. There were items included that intended for display in the Melbourne International Exhibition in 1880. The voyage to Port Phillip was long but uneventful. At 3am on June 1, 1878, Captain Gibbs was expecting to see land and the passengers were becoming excited as they prepared to view their new homeland in the early morning. But LOCH ARD was running into a fog which greatly reduced visibility. Captain Gibbs was becoming anxious as there was no sign of land or the Cape Otway lighthouse. At 4am the fog lifted. A man aloft announced that he could see breakers. The sheer cliffs of Victoria's west coast came into view, and Captain Gibbs realised that the ship was much closer to them than expected. He ordered as much sail to be set as time would permit and then attempted to steer the vessel out to sea. On coming head on into the wind, the ship lost momentum, the sails fell limp and LOCH ARD's bow swung back. Gibbs then ordered the anchors to be released in an attempt to hold its position. The anchors sank some 50 fathoms - but did not hold. By this time LOCH ARD was among the breakers and the tall cliffs of Mutton Bird Island rose behind the ship. Just half a mile from the coast, the ship's bow was suddenly pulled around by the anchor. The captain tried to tack out to sea, but the ship struck a reef at the base of Mutton Bird Island, near Port Campbell. Waves broke over the ship and the top deck was loosened from the hull. The masts and rigging came crashing down knocking passengers and crew overboard. When a lifeboat was finally launched, it crashed into the side of LOCH ARD and capsized. Tom Pearce, who had launched the boat, managed to cling to its overturned hull and shelter beneath it. He drifted out to sea and then on the flood tide came into what is now known as LOCH ARD Gorge. He swam to shore, bruised and dazed, and found a cave in which to shelter. Some of the crew stayed below deck to shelter from the falling rigging but drowned when the ship slipped off the reef into deeper water. Eva Carmichael had raced onto deck to find out what was happening only to be confronted by towering cliffs looming above the stricken ship. In all the chaos, Captain Gibbs grabbed Eva and said, "If you are saved Eva, let my dear wife know that I died like a sailor". That was the last Eva Carmichael saw of the captain. She was swept off the ship by a huge wave. Eva saw Tom Pearce on a small rocky beach and yelled to attract his attention. He dived in and swam to the exhausted woman and dragged her to shore. He took her to the cave and broke open case of brandy which had washed up on the beach. He opened a bottle to revive the unconscious woman. A few hours later Tom scaled a cliff in search of help. He followed hoof prints and came by chance upon two men from nearby Glenample Station three and a half miles away. In a state of exhaustion, he told the men of the tragedy. Tom returned to the gorge while the two men rode back to the station to get help. By the time they reached LOCH ARD Gorge, it was cold and dark. The two shipwreck survivors were taken to Glenample Station to recover. Eva stayed at the station for six weeks before returning to Ireland, this time by steamship. In Melbourne, Tom Pearce received a hero's welcome. He was presented with the first gold medal of the Royal Humane Society of Victoria and a £1000 cheque from the Victorian Government. Concerts were performed to honour the young man's bravery and to raise money for those who lost family in the LOCH ARD disaster. Of the 54 crew members and passengers on board, only two survived: the apprentice, Tom Pearce and the young woman passenger, Eva Carmichael, who lost all of her family in the tragedy. Ten days after the LOCH ARD tragedy, salvage rights to the wreck were sold at auction for £2,120. Cargo valued at £3,000 was salvaged and placed on the beach, but most washed back into the sea when another storm developed. The wreck of LOCH ARD still lies at the base of Mutton Bird Island. Much of the cargo has now been salvaged and some was washed up into what is now known as LOCH ARD Gorge. Cargo and artefacts have also been illegally salvaged over many years before protective legislation was introduced. One of the most unlikely pieces of cargo to have survived the shipwreck was a Minton porcelain peacock - one of only seven in the world. The peacock was destined for the Melbourne International Exhibition in 1880. It had been well packed, which gave it adequate protection during the violent storm. Today, the Minton peacock can be seen at the Flagstaff Hill Maritime Museum in Warrnambool. From Australia's most dramatic shipwreck it has now become Australia's shipwreck artefact and is one of very few 'objects' on the Victorian State Heritage Register most valuable. The LOCH ARD shipwreck is of State significance – Victorian Heritage Register S 417. Flagstaff Hill’s collection of artefacts from LOCH ARD is significant for being one of the largest collections of artefacts from this shipwreck in Victoria. It is significant for its association with the shipwreck, which is on the Victorian Heritage Register (VHR S417). The collection is significant because of the relationship between the objects, as together they have a high potential to interpret the story of the LOCH ARD. The LOCH ARD collection is archaeologically significant as the remains of a large international passenger and cargo ship. The LOCH ARD collection is historically significant for representing aspects of Victoria’s shipping history and its potential to interpret sub-theme 1.5 of Victoria’s Framework of Historical Themes (living with natural processes). The collection is also historically significant for its association with the LOCH ARD, which was one of the worst and best known shipwrecks in Victoria’s history. Unrestored dessert spoon from the wreck of the LOCH ARD. The spoon design has a flattened fiddle-back handle, with a thin stem or shank, flared collar, and a shallow rounded bowl. The spoons metallic composition is a thin layer of brass alloy which has partially corroded back to a nickel-silver base metal. 30% red/cream concretion (handle) and balance worn plate, some verdigris and blackened base metal. Spoon is bent.flagstaff hill, warrnambool, shipwrecked coast, flagstaff hill maritime museum, maritime museum, shipwreck coast, flagstaff hill maritime village, great ocean road, loch line, loch ard, captain gibbs, eva carmichael, tom pearce, glenample station, mutton bird island, loch ard gorge, electroplated cutlery, loch ard shipwreck, william page and co, birmingham brass plating, dessert spoons -
 Flagstaff Hill Maritime Museum and Village
Spoon, circa 1878
This medium-sized dessert spoon is from the wreck of the LOCH ARD, a Loch Line ship of 1,693 tons which sailed from Gravesend, London, on 2 March 1878 with 17 passengers and a crew of 36 under Captain George Gibbs. “The intention was to discharge cargo in Melbourne, before returning to London via the Horn with wool and wheat”. Instead, on 1 June 1878, after 90 days at sea, she struck the sandstone cliffs of Mutton Bird Island on the south west coast of Victoria, and sank with the loss of 52 lives and all her cargo. The manifest of the LOCH ARD listed an array of manufactured goods and bulk metals being exported to the Colony of Victoria, with a declared value of £53,700. (202 bills of lading show an actual invoice value of £68, 456, with insurance underwriting to £30,000 of all cargo). Included in the manifest is the item of “Tin hardware & cutlery £7,530”. This dessert spoon is one of 482 similar items of electro-plated cutlery from the LOCH ARD site, comprising spoons and forks of various sizes but all sharing the same general shape or design and metallic composition. 49 of these pieces display a legible makers’ mark — the initials “W” and “P” placed within a raised diamond outline, which is in turn contained within a sunken crown shape — identifying the manufacturer as William Page & Co of Birmingham. An electroplater’s makers’ marks, unlike sterling silver hallmarks, are not consistent identifiers of quality or date and place of manufacture. A similar line of five impressions was usually made to impress the consumer with an implication of industry standards, but what each one actually signified was not regulated and so they varied according to the whim of the individual foundry. In this case, the maker’s marks are often obscured by sedimentary accretion or removed by corrosion after a century of submersion in the ocean. However sufficient detail has survived to indicate that these samples of electro-plated cutlery probably originated from the same consignment in the LOCH ARD’s cargo. The generally common range of marks are drawn from 255 tea spoons, 125 dessert spoons, and 99 table forks. These marks are clearly visible in 66 instances, while the same sequence of general outlines, or depression shapes, is discernible in another 166 examples. Suggested trade names for William Page & Co’s particular blend of brass plating are ‘roman silver’ or ‘silverite’. This copper alloy polishes to a lustrous gold when new, discolouring to a murky grey with greenish hue when neglected. HISTORY OF THE LOCH ARD The LOCH ARD belonged to the famous Loch Line which sailed many ships from England to Australia. Built in Glasgow by Barclay, Curdle and Co. in 1873, the LOCH ARD was a three-masted square rigged iron sailing ship. The ship measured 262ft 7" (79.87m) in length, 38ft (11.58m) in width, 23ft (7m) in depth and had a gross tonnage of 1693 tons. The LOCH ARD's main mast measured a massive 150ft (45.7m) in height. LOCH ARD made three trips to Australia and one trip to Calcutta before its final voyage. LOCH ARD left England on March 2, 1878, under the command of Captain Gibbs, a newly married, 29 year old. She was bound for Melbourne with a crew of 37, plus 17 passengers and a load of cargo. The general cargo reflected the affluence of Melbourne at the time. On board were straw hats, umbrella, perfumes, clay pipes, pianos, clocks, confectionary, linen and candles, as well as a heavier load of railway irons, cement, lead and copper. There were items included that intended for display in the Melbourne International Exhibition in 1880. The voyage to Port Phillip was long but uneventful. At 3am on June 1, 1878, Captain Gibbs was expecting to see land and the passengers were becoming excited as they prepared to view their new homeland in the early morning. But LOCH ARD was running into a fog which greatly reduced visibility. Captain Gibbs was becoming anxious as there was no sign of land or the Cape Otway lighthouse. At 4am the fog lifted. A man aloft announced that he could see breakers. The sheer cliffs of Victoria's west coast came into view, and Captain Gibbs realised that the ship was much closer to them than expected. He ordered as much sail to be set as time would permit and then attempted to steer the vessel out to sea. On coming head on into the wind, the ship lost momentum, the sails fell limp and LOCH ARD's bow swung back. Gibbs then ordered the anchors to be released in an attempt to hold its position. The anchors sank some 50 fathoms - but did not hold. By this time LOCH ARD was among the breakers and the tall cliffs of Mutton Bird Island rose behind the ship. Just half a mile from the coast, the ship's bow was suddenly pulled around by the anchor. The captain tried to tack out to sea, but the ship struck a reef at the base of Mutton Bird Island, near Port Campbell. Waves broke over the ship and the top deck was loosened from the hull. The masts and rigging came crashing down knocking passengers and crew overboard. When a lifeboat was finally launched, it crashed into the side of LOCH ARD and capsized. Tom Pearce, who had launched the boat, managed to cling to its overturned hull and shelter beneath it. He drifted out to sea and then on the flood tide came into what is now known as LOCH ARD Gorge. He swam to shore, bruised and dazed, and found a cave in which to shelter. Some of the crew stayed below deck to shelter from the falling rigging but drowned when the ship slipped off the reef into deeper water. Eva Carmichael had raced onto deck to find out what was happening only to be confronted by towering cliffs looming above the stricken ship. In all the chaos, Captain Gibbs grabbed Eva and said, "If you are saved Eva, let my dear wife know that I died like a sailor". That was the last Eva Carmichael saw of the captain. She was swept off the ship by a huge wave. Eva saw Tom Pearce on a small rocky beach and yelled to attract his attention. He dived in and swam to the exhausted woman and dragged her to shore. He took her to the cave and broke open case of brandy which had washed up on the beach. He opened a bottle to revive the unconscious woman. A few hours later Tom scaled a cliff in search of help. He followed hoof prints and came by chance upon two men from nearby Glenample Station three and a half miles away. In a state of exhaustion, he told the men of the tragedy. Tom returned to the gorge while the two men rode back to the station to get help. By the time they reached LOCH ARD Gorge, it was cold and dark. The two shipwreck survivors were taken to Glenample Station to recover. Eva stayed at the station for six weeks before returning to Ireland, this time by steamship. In Melbourne, Tom Pearce received a hero's welcome. He was presented with the first gold medal of the Royal Humane Society of Victoria and a £1000 cheque from the Victorian Government. Concerts were performed to honour the young man's bravery and to raise money for those who lost family in the LOCH ARD disaster. Of the 54 crew members and passengers on board, only two survived: the apprentice, Tom Pearce and the young woman passenger, Eva Carmichael, who lost all of her family in the tragedy. Ten days after the LOCH ARD tragedy, salvage rights to the wreck were sold at auction for £2,120. Cargo valued at £3,000 was salvaged and placed on the beach, but most washed back into the sea when another storm developed. The wreck of LOCH ARD still lies at the base of Mutton Bird Island. Much of the cargo has now been salvaged and some was washed up into what is now known as LOCH ARD Gorge. Cargo and artefacts have also been illegally salvaged over many years before protective legislation was introduced. One of the most unlikely pieces of cargo to have survived the shipwreck was a Minton porcelain peacock - one of only seven in the world. The peacock was destined for the Melbourne International Exhibition in 1880. It had been well packed, which gave it adequate protection during the violent storm. Today, the Minton peacock can be seen at the Flagstaff Hill Maritime Museum in Warrnambool. From Australia's most dramatic shipwreck it has now become Australia's shipwreck artefact and is one of very few 'objects' on the Victorian State Heritage Register most valuable. The LOCH ARD shipwreck is of State significance – Victorian Heritage Register S 417. Flagstaff Hill’s collection of artefacts from LOCH ARD is significant for being one of the largest collections of artefacts from this shipwreck in Victoria. It is significant for its association with the shipwreck, which is on the Victorian Heritage Register (VHR S417). The collection is significant because of the relationship between the objects, as together they have a high potential to interpret the story of the LOCH ARD. The LOCH ARD collection is archaeologically significant as the remains of a large international passenger and cargo ship. The LOCH ARD collection is historically significant for representing aspects of Victoria’s shipping history and its potential to interpret sub-theme 1.5 of Victoria’s Framework of Historical Themes (living with natural processes). The collection is also historically significant for its association with the LOCH ARD, which was one of the worst and best known shipwrecks in Victoria’s history. Unrestored dessert spoon from the wreck of the LOCH ARD. The spoon design has a flattened fiddle-back handle, with a thin stem or shank, flared collar, and a shallow rounded bowl. The spoons metallic composition is a thin layer of brass alloy which has partially corroded back to a nickel-silver base metal. Some verdigris and 15% encrustation on handle and bowl of spoon. Balance is worn plate and blackish base metal. Spoon handle is badly bent.flagstaff hill, warrnambool, shipwrecked coast, flagstaff hill maritime museum, maritime museum, shipwreck coast, flagstaff hill maritime village, great ocean road, loch line, loch ard, captain gibbs, eva carmichael, tom pearce, glenample station, mutton bird island, loch ard gorge, electroplated cutlery, loch ard shipwreck, william page and co, birmingham brass plating, dessert spoons -
 Flagstaff Hill Maritime Museum and Village
Spoon, circa 1878
This medium-sized dessert spoon is from the wreck of the LOCH ARD, a Loch Line ship of 1,693 tons which sailed from Gravesend, London, on 2 March 1878 with 17 passengers and a crew of 36 under Captain George Gibbs. “The intention was to discharge cargo in Melbourne, before returning to London via the Horn with wool and wheat”. Instead, on 1 June 1878, after 90 days at sea, she struck the sandstone cliffs of Mutton Bird Island on the south west coast of Victoria, and sank with the loss of 52 lives and all her cargo. The manifest of the LOCH ARD listed an array of manufactured goods and bulk metals being exported to the Colony of Victoria, with a declared value of £53,700. (202 bills of lading show an actual invoice value of £68, 456, with insurance underwriting to £30,000 of all cargo). Included in the manifest is the item of “Tin hardware & cutlery £7,530”. This dessert spoon is one of 482 similar items of electro-plated cutlery from the LOCH ARD site, comprising spoons and forks of various sizes but all sharing the same general shape or design and metallic composition. 49 of these pieces display a legible makers’ mark — the initials “W” and “P” placed within a raised diamond outline, which is in turn contained within a sunken crown shape — identifying the manufacturer as William Page & Co of Birmingham. An electroplater’s makers’ marks, unlike sterling silver hallmarks, are not consistent identifiers of quality or date and place of manufacture. A similar line of five impressions was usually made to impress the consumer with an implication of industry standards, but what each one actually signified was not regulated and so they varied according to the whim of the individual foundry. In this case, the maker’s marks are often obscured by sedimentary accretion or removed by corrosion after a century of submersion in the ocean. However sufficient detail has survived to indicate that these samples of electro-plated cutlery probably originated from the same consignment in the LOCH ARD’s cargo. The generally common range of marks are drawn from 255 tea spoons, 125 dessert spoons, and 99 table forks. These marks are clearly visible in 66 instances, while the same sequence of general outlines, or depression shapes, is discernible in another 166 examples. Suggested trade names for William Page & Co’s particular blend of brass plating are ‘roman silver’ or ‘silverite’. This copper alloy polishes to a lustrous gold when new, discolouring to a murky grey with greenish hue when neglected. HISTORY OF THE LOCH ARD The LOCH ARD belonged to the famous Loch Line which sailed many ships from England to Australia. Built in Glasgow by Barclay, Curdle and Co. in 1873, the LOCH ARD was a three-masted square rigged iron sailing ship. The ship measured 262ft 7" (79.87m) in length, 38ft (11.58m) in width, 23ft (7m) in depth and had a gross tonnage of 1693 tons. The LOCH ARD's main mast measured a massive 150ft (45.7m) in height. LOCH ARD made three trips to Australia and one trip to Calcutta before its final voyage. LOCH ARD left England on March 2, 1878, under the command of Captain Gibbs, a newly married, 29 year old. She was bound for Melbourne with a crew of 37, plus 17 passengers and a load of cargo. The general cargo reflected the affluence of Melbourne at the time. On board were straw hats, umbrella, perfumes, clay pipes, pianos, clocks, confectionary, linen and candles, as well as a heavier load of railway irons, cement, lead and copper. There were items included that intended for display in the Melbourne International Exhibition in 1880. The voyage to Port Phillip was long but uneventful. At 3am on June 1, 1878, Captain Gibbs was expecting to see land and the passengers were becoming excited as they prepared to view their new homeland in the early morning. But LOCH ARD was running into a fog which greatly reduced visibility. Captain Gibbs was becoming anxious as there was no sign of land or the Cape Otway lighthouse. At 4am the fog lifted. A man aloft announced that he could see breakers. The sheer cliffs of Victoria's west coast came into view, and Captain Gibbs realised that the ship was much closer to them than expected. He ordered as much sail to be set as time would permit and then attempted to steer the vessel out to sea. On coming head on into the wind, the ship lost momentum, the sails fell limp and LOCH ARD's bow swung back. Gibbs then ordered the anchors to be released in an attempt to hold its position. The anchors sank some 50 fathoms - but did not hold. By this time LOCH ARD was among the breakers and the tall cliffs of Mutton Bird Island rose behind the ship. Just half a mile from the coast, the ship's bow was suddenly pulled around by the anchor. The captain tried to tack out to sea, but the ship struck a reef at the base of Mutton Bird Island, near Port Campbell. Waves broke over the ship and the top deck was loosened from the hull. The masts and rigging came crashing down knocking passengers and crew overboard. When a lifeboat was finally launched, it crashed into the side of LOCH ARD and capsized. Tom Pearce, who had launched the boat, managed to cling to its overturned hull and shelter beneath it. He drifted out to sea and then on the flood tide came into what is now known as LOCH ARD Gorge. He swam to shore, bruised and dazed, and found a cave in which to shelter. Some of the crew stayed below deck to shelter from the falling rigging but drowned when the ship slipped off the reef into deeper water. Eva Carmichael had raced onto deck to find out what was happening only to be confronted by towering cliffs looming above the stricken ship. In all the chaos, Captain Gibbs grabbed Eva and said, "If you are saved Eva, let my dear wife know that I died like a sailor". That was the last Eva Carmichael saw of the captain. She was swept off the ship by a huge wave. Eva saw Tom Pearce on a small rocky beach and yelled to attract his attention. He dived in and swam to the exhausted woman and dragged her to shore. He took her to the cave and broke open case of brandy which had washed up on the beach. He opened a bottle to revive the unconscious woman. A few hours later Tom scaled a cliff in search of help. He followed hoof prints and came by chance upon two men from nearby Glenample Station three and a half miles away. In a state of exhaustion, he told the men of the tragedy. Tom returned to the gorge while the two men rode back to the station to get help. By the time they reached LOCH ARD Gorge, it was cold and dark. The two shipwreck survivors were taken to Glenample Station to recover. Eva stayed at the station for six weeks before returning to Ireland, this time by steamship. In Melbourne, Tom Pearce received a hero's welcome. He was presented with the first gold medal of the Royal Humane Society of Victoria and a £1000 cheque from the Victorian Government. Concerts were performed to honour the young man's bravery and to raise money for those who lost family in the LOCH ARD disaster. Of the 54 crew members and passengers on board, only two survived: the apprentice, Tom Pearce and the young woman passenger, Eva Carmichael, who lost all of her family in the tragedy. Ten days after the LOCH ARD tragedy, salvage rights to the wreck were sold at auction for £2,120. Cargo valued at £3,000 was salvaged and placed on the beach, but most washed back into the sea when another storm developed. The wreck of LOCH ARD still lies at the base of Mutton Bird Island. Much of the cargo has now been salvaged and some was washed up into what is now known as LOCH ARD Gorge. Cargo and artefacts have also been illegally salvaged over many years before protective legislation was introduced. One of the most unlikely pieces of cargo to have survived the shipwreck was a Minton porcelain peacock - one of only seven in the world. The peacock was destined for the Melbourne International Exhibition in 1880. It had been well packed, which gave it adequate protection during the violent storm. Today, the Minton peacock can be seen at the Flagstaff Hill Maritime Museum in Warrnambool. From Australia's most dramatic shipwreck it has now become Australia's shipwreck artefact and is one of very few 'objects' on the Victorian State Heritage Register most valuable. The LOCH ARD shipwreck is of State significance – Victorian Heritage Register S 417. Flagstaff Hill’s collection of artefacts from LOCH ARD is significant for being one of the largest collections of artefacts from this shipwreck in Victoria. It is significant for its association with the shipwreck, which is on the Victorian Heritage Register (VHR S417). The collection is significant because of the relationship between the objects, as together they have a high potential to interpret the story of the LOCH ARD. The LOCH ARD collection is archaeologically significant as the remains of a large international passenger and cargo ship. The LOCH ARD collection is historically significant for representing aspects of Victoria’s shipping history and its potential to interpret sub-theme 1.5 of Victoria’s Framework of Historical Themes (living with natural processes). The collection is also historically significant for its association with the LOCH ARD, which was one of the worst and best known shipwrecks in Victoria’s history. Unrestored dessert spoon from the wreck of the LOCH ARD. The spoon design has a flattened fiddle-back handle, with a thin stem or shank, flared collar, and a shallow rounded bowl. The spoons metallic composition is a thin layer of brass alloy which has partially corroded back to a nickel-silver base metal. Attempt to polish remaining electroplate has smeared to turquoise-silver, which may reflect base metal rather than original plate. Some verdigris and a little encrustation on spoon. Spoon is in good condition in a structural sense. There is a plain heraldic shield on back of spoon collar.flagstaff hill, warrnambool, shipwrecked coast, flagstaff hill maritime museum, maritime museum, shipwreck coast, flagstaff hill maritime village, great ocean road, loch line, loch ard, captain gibbs, eva carmichael, tom pearce, glenample station, mutton bird island, loch ard gorge, loch ard shipwreck, william page and co, birmingham brass plating, dessert spoons -
 Flagstaff Hill Maritime Museum and Village
Spoon, circa 1878
This medium-sized dessert spoon is from the wreck of the LOCH ARD, a Loch Line ship of 1,693 tons which sailed from Gravesend, London, on 2 March 1878 with 17 passengers and a crew of 36 under Captain George Gibbs. “The intention was to discharge cargo in Melbourne, before returning to London via the Horn with wool and wheat”. Instead, on 1 June 1878, after 90 days at sea, she struck the sandstone cliffs of Mutton Bird Island on the south west coast of Victoria, and sank with the loss of 52 lives and all her cargo. The manifest of the LOCH ARD listed an array of manufactured goods and bulk metals being exported to the Colony of Victoria, with a declared value of £53,700. (202 bills of lading show an actual invoice value of £68, 456, with insurance underwriting to £30,000 of all cargo). Included in the manifest is the item of “Tin hardware & cutlery £7,530”. This dessert spoon is one of 482 similar items of electro-plated cutlery from the LOCH ARD site, comprising spoons and forks of various sizes but all sharing the same general shape or design and metallic composition. 49 of these pieces display a legible makers’ mark — the initials “W” and “P” placed within a raised diamond outline, which is in turn contained within a sunken crown shape — identifying the manufacturer as William Page & Co of Birmingham. An electroplater’s makers’ marks, unlike sterling silver hallmarks, are not consistent identifiers of quality or date and place of manufacture. A similar line of five impressions was usually made to impress the consumer with an implication of industry standards, but what each one actually signified was not regulated and so they varied according to the whim of the individual foundry. In this case, the maker’s marks are often obscured by sedimentary accretion or removed by corrosion after a century of submersion in the ocean. However sufficient detail has survived to indicate that these samples of electro-plated cutlery probably originated from the same consignment in the LOCH ARD’s cargo. The generally common range of marks are drawn from 255 tea spoons, 125 dessert spoons, and 99 table forks. These marks are clearly visible in 66 instances, while the same sequence of general outlines, or depression shapes, is discernible in another 166 examples. Suggested trade names for William Page & Co’s particular blend of brass plating are ‘roman silver’ or ‘silverite’. This copper alloy polishes to a lustrous gold when new, discolouring to a murky grey with greenish hue when neglected. HISTORY OF THE LOCH ARD The LOCH ARD belonged to the famous Loch Line which sailed many ships from England to Australia. Built in Glasgow by Barclay, Curdle and Co. in 1873, the LOCH ARD was a three-masted square rigged iron sailing ship. The ship measured 262ft 7" (79.87m) in length, 38ft (11.58m) in width, 23ft (7m) in depth and had a gross tonnage of 1693 tons. The LOCH ARD's main mast measured a massive 150ft (45.7m) in height. LOCH ARD made three trips to Australia and one trip to Calcutta before its final voyage. LOCH ARD left England on March 2, 1878, under the command of Captain Gibbs, a newly married, 29 year old. She was bound for Melbourne with a crew of 37, plus 17 passengers and a load of cargo. The general cargo reflected the affluence of Melbourne at the time. On board were straw hats, umbrella, perfumes, clay pipes, pianos, clocks, confectionary, linen and candles, as well as a heavier load of railway irons, cement, lead and copper. There were items included that intended for display in the Melbourne International Exhibition in 1880. The voyage to Port Phillip was long but uneventful. At 3am on June 1, 1878, Captain Gibbs was expecting to see land and the passengers were becoming excited as they prepared to view their new homeland in the early morning. But LOCH ARD was running into a fog which greatly reduced visibility. Captain Gibbs was becoming anxious as there was no sign of land or the Cape Otway lighthouse. At 4am the fog lifted. A man aloft announced that he could see breakers. The sheer cliffs of Victoria's west coast came into view, and Captain Gibbs realised that the ship was much closer to them than expected. He ordered as much sail to be set as time would permit and then attempted to steer the vessel out to sea. On coming head on into the wind, the ship lost momentum, the sails fell limp and LOCH ARD's bow swung back. Gibbs then ordered the anchors to be released in an attempt to hold its position. The anchors sank some 50 fathoms - but did not hold. By this time LOCH ARD was among the breakers and the tall cliffs of Mutton Bird Island rose behind the ship. Just half a mile from the coast, the ship's bow was suddenly pulled around by the anchor. The captain tried to tack out to sea, but the ship struck a reef at the base of Mutton Bird Island, near Port Campbell. Waves broke over the ship and the top deck was loosened from the hull. The masts and rigging came crashing down knocking passengers and crew overboard. When a lifeboat was finally launched, it crashed into the side of LOCH ARD and capsized. Tom Pearce, who had launched the boat, managed to cling to its overturned hull and shelter beneath it. He drifted out to sea and then on the flood tide came into what is now known as LOCH ARD Gorge. He swam to shore, bruised and dazed, and found a cave in which to shelter. Some of the crew stayed below deck to shelter from the falling rigging but drowned when the ship slipped off the reef into deeper water. Eva Carmichael had raced onto deck to find out what was happening only to be confronted by towering cliffs looming above the stricken ship. In all the chaos, Captain Gibbs grabbed Eva and said, "If you are saved Eva, let my dear wife know that I died like a sailor". That was the last Eva Carmichael saw of the captain. She was swept off the ship by a huge wave. Eva saw Tom Pearce on a small rocky beach and yelled to attract his attention. He dived in and swam to the exhausted woman and dragged her to shore. He took her to the cave and broke open case of brandy which had washed up on the beach. He opened a bottle to revive the unconscious woman. A few hours later Tom scaled a cliff in search of help. He followed hoof prints and came by chance upon two men from nearby Glenample Station three and a half miles away. In a state of exhaustion, he told the men of the tragedy. Tom returned to the gorge while the two men rode back to the station to get help. By the time they reached LOCH ARD Gorge, it was cold and dark. The two shipwreck survivors were taken to Glenample Station to recover. Eva stayed at the station for six weeks before returning to Ireland, this time by steamship. In Melbourne, Tom Pearce received a hero's welcome. He was presented with the first gold medal of the Royal Humane Society of Victoria and a £1000 cheque from the Victorian Government. Concerts were performed to honour the young man's bravery and to raise money for those who lost family in the LOCH ARD disaster. Of the 54 crew members and passengers on board, only two survived: the apprentice, Tom Pearce and the young woman passenger, Eva Carmichael, who lost all of her family in the tragedy. Ten days after the LOCH ARD tragedy, salvage rights to the wreck were sold at auction for £2,120. Cargo valued at £3,000 was salvaged and placed on the beach, but most washed back into the sea when another storm developed. The wreck of LOCH ARD still lies at the base of Mutton Bird Island. Much of the cargo has now been salvaged and some was washed up into what is now known as LOCH ARD Gorge. Cargo and artefacts have also been illegally salvaged over many years before protective legislation was introduced. One of the most unlikely pieces of cargo to have survived the shipwreck was a Minton porcelain peacock - one of only seven in the world. The peacock was destined for the Melbourne International Exhibition in 1880. It had been well packed, which gave it adequate protection during the violent storm. Today, the Minton peacock can be seen at the Flagstaff Hill Maritime Museum in Warrnambool. From Australia's most dramatic shipwreck it has now become Australia's shipwreck artefact and is one of very few 'objects' on the Victorian State Heritage Register most valuable. The LOCH ARD shipwreck is of State significance – Victorian Heritage Register S 417. Flagstaff Hill’s collection of artefacts from LOCH ARD is significant for being one of the largest collections of artefacts from this shipwreck in Victoria. It is significant for its association with the shipwreck, which is on the Victorian Heritage Register (VHR S417). The collection is significant because of the relationship between the objects, as together they have a high potential to interpret the story of the LOCH ARD. The LOCH ARD collection is archaeologically significant as the remains of a large international passenger and cargo ship. The LOCH ARD collection is historically significant for representing aspects of Victoria’s shipping history and its potential to interpret sub-theme 1.5 of Victoria’s Framework of Historical Themes (living with natural processes). The collection is also historically significant for its association with the LOCH ARD, which was one of the worst and best known shipwrecks in Victoria’s history. Unrestored dessert spoon from the wreck of the LOCH ARD. The spoon design has a flattened fiddle-back handle, with a thin stem or shank, flared collar, and a shallow rounded bowl. The spoons metallic composition is a thin layer of brass alloy which has partially corroded back to a nickel-silver base metal. Some verdigris and no encrustation on spoon. Spoon is in good condition, structurally sound and with 90% of original plate still intact. The back of the handle has been ground back to nickel-silver and five makers marks are clearly visible - WP&Co trademark, "B", Fleur de Lys, Crab design, "Rd". There is a plain heraldic shield on the upper rear side of the spoon bowl ('ratstail').flagstaff hill, warrnambool, shipwrecked coast, flagstaff hill maritime museum, maritime museum, shipwreck coast, flagstaff hill maritime village, great ocean road, loch line, loch ard, captain gibbs, eva carmichael, tom pearce, glenample station, mutton bird island, loch ard gorge, electroplated cutlery, loch ard shipwreck, william page and co, birmingham brass plating, dessert spoons -
 Flagstaff Hill Maritime Museum and Village
Spoon, circa 1878
This medium-sized dessert spoon is from the wreck of the LOCH ARD, a Loch Line ship of 1,693 tons which sailed from Gravesend, London, on 2 March 1878 with 17 passengers and a crew of 36 under Captain George Gibbs. “The intention was to discharge cargo in Melbourne, before returning to London via the Horn with wool and wheat”. Instead, on 1 June 1878, after 90 days at sea, she struck the sandstone cliffs of Mutton Bird Island on the south west coast of Victoria, and sank with the loss of 52 lives and all her cargo. The manifest of the LOCH ARD listed an array of manufactured goods and bulk metals being exported to the Colony of Victoria, with a declared value of £53,700. (202 bills of lading show an actual invoice value of £68, 456, with insurance underwriting to £30,000 of all cargo). Included in the manifest is the item of “Tin hardware & cutlery £7,530”. This dessert spoon is one of 482 similar items of electro-plated cutlery from the LOCH ARD site, comprising spoons and forks of various sizes but all sharing the same general shape or design and metallic composition. 49 of these pieces display a legible makers’ mark — the initials “W” and “P” placed within a raised diamond outline, which is in turn contained within a sunken crown shape — identifying the manufacturer as William Page & Co of Birmingham. An electroplater’s makers’ marks, unlike sterling silver hallmarks, are not consistent identifiers of quality or date and place of manufacture. A similar line of five impressions was usually made to impress the consumer with an implication of industry standards, but what each one actually signified was not regulated and so they varied according to the whim of the individual foundry. In this case, the maker’s marks are often obscured by sedimentary accretion or removed by corrosion after a century of submersion in the ocean. However sufficient detail has survived to indicate that these samples of electro-plated cutlery probably originated from the same consignment in the LOCH ARD’s cargo. The generally common range of marks are drawn from 255 tea spoons, 125 dessert spoons, and 99 table forks. These marks are clearly visible in 66 instances, while the same sequence of general outlines, or depression shapes, is discernible in another 166 examples. Suggested trade names for William Page & Co’s particular blend of brass plating are ‘roman silver’ or ‘silverite’. This copper alloy polishes to a lustrous gold when new, discolouring to a murky grey with greenish hue when neglected. HISTORY OF THE LOCH ARD The LOCH ARD belonged to the famous Loch Line which sailed many ships from England to Australia. Built in Glasgow by Barclay, Curdle and Co. in 1873, the LOCH ARD was a three-masted square rigged iron sailing ship. The ship measured 262ft 7" (79.87m) in length, 38ft (11.58m) in width, 23ft (7m) in depth and had a gross tonnage of 1693 tons. The LOCH ARD's main mast measured a massive 150ft (45.7m) in height. LOCH ARD made three trips to Australia and one trip to Calcutta before its final voyage. LOCH ARD left England on March 2, 1878, under the command of Captain Gibbs, a newly married, 29 year old. She was bound for Melbourne with a crew of 37, plus 17 passengers and a load of cargo. The general cargo reflected the affluence of Melbourne at the time. On board were straw hats, umbrella, perfumes, clay pipes, pianos, clocks, confectionary, linen and candles, as well as a heavier load of railway irons, cement, lead and copper. There were items included that intended for display in the Melbourne International Exhibition in 1880. The voyage to Port Phillip was long but uneventful. At 3am on June 1, 1878, Captain Gibbs was expecting to see land and the passengers were becoming excited as they prepared to view their new homeland in the early morning. But LOCH ARD was running into a fog which greatly reduced visibility. Captain Gibbs was becoming anxious as there was no sign of land or the Cape Otway lighthouse. At 4am the fog lifted. A man aloft announced that he could see breakers. The sheer cliffs of Victoria's west coast came into view, and Captain Gibbs realised that the ship was much closer to them than expected. He ordered as much sail to be set as time would permit and then attempted to steer the vessel out to sea. On coming head on into the wind, the ship lost momentum, the sails fell limp and LOCH ARD's bow swung back. Gibbs then ordered the anchors to be released in an attempt to hold its position. The anchors sank some 50 fathoms - but did not hold. By this time LOCH ARD was among the breakers and the tall cliffs of Mutton Bird Island rose behind the ship. Just half a mile from the coast, the ship's bow was suddenly pulled around by the anchor. The captain tried to tack out to sea, but the ship struck a reef at the base of Mutton Bird Island, near Port Campbell. Waves broke over the ship and the top deck was loosened from the hull. The masts and rigging came crashing down knocking passengers and crew overboard. When a lifeboat was finally launched, it crashed into the side of LOCH ARD and capsized. Tom Pearce, who had launched the boat, managed to cling to its overturned hull and shelter beneath it. He drifted out to sea and then on the flood tide came into what is now known as LOCH ARD Gorge. He swam to shore, bruised and dazed, and found a cave in which to shelter. Some of the crew stayed below deck to shelter from the falling rigging but drowned when the ship slipped off the reef into deeper water. Eva Carmichael had raced onto deck to find out what was happening only to be confronted by towering cliffs looming above the stricken ship. In all the chaos, Captain Gibbs grabbed Eva and said, "If you are saved Eva, let my dear wife know that I died like a sailor". That was the last Eva Carmichael saw of the captain. She was swept off the ship by a huge wave. Eva saw Tom Pearce on a small rocky beach and yelled to attract his attention. He dived in and swam to the exhausted woman and dragged her to shore. He took her to the cave and broke open case of brandy which had washed up on the beach. He opened a bottle to revive the unconscious woman. A few hours later Tom scaled a cliff in search of help. He followed hoof prints and came by chance upon two men from nearby Glenample Station three and a half miles away. In a state of exhaustion, he told the men of the tragedy. Tom returned to the gorge while the two men rode back to the station to get help. By the time they reached LOCH ARD Gorge, it was cold and dark. The two shipwreck survivors were taken to Glenample Station to recover. Eva stayed at the station for six weeks before returning to Ireland, this time by steamship. In Melbourne, Tom Pearce received a hero's welcome. He was presented with the first gold medal of the Royal Humane Society of Victoria and a £1000 cheque from the Victorian Government. Concerts were performed to honour the young man's bravery and to raise money for those who lost family in the LOCH ARD disaster. Of the 54 crew members and passengers on board, only two survived: the apprentice, Tom Pearce and the young woman passenger, Eva Carmichael, who lost all of her family in the tragedy. Ten days after the LOCH ARD tragedy, salvage rights to the wreck were sold at auction for £2,120. Cargo valued at £3,000 was salvaged and placed on the beach, but most washed back into the sea when another storm developed. The wreck of LOCH ARD still lies at the base of Mutton Bird Island. Much of the cargo has now been salvaged and some was washed up into what is now known as LOCH ARD Gorge. Cargo and artefacts have also been illegally salvaged over many years before protective legislation was introduced. One of the most unlikely pieces of cargo to have survived the shipwreck was a Minton porcelain peacock - one of only seven in the world. The peacock was destined for the Melbourne International Exhibition in 1880. It had been well packed, which gave it adequate protection during the violent storm. Today, the Minton peacock can be seen at the Flagstaff Hill Maritime Museum in Warrnambool. From Australia's most dramatic shipwreck it has now become Australia's shipwreck artefact and is one of very few 'objects' on the Victorian State Heritage Register most valuable. The LOCH ARD shipwreck is of State significance – Victorian Heritage Register S 417. Flagstaff Hill’s collection of artefacts from LOCH ARD is significant for being one of the largest collections of artefacts from this shipwreck in Victoria. It is significant for its association with the shipwreck, which is on the Victorian Heritage Register (VHR S417). The collection is significant because of the relationship between the objects, as together they have a high potential to interpret the story of the LOCH ARD. The LOCH ARD collection is archaeologically significant as the remains of a large international passenger and cargo ship. The LOCH ARD collection is historically significant for representing aspects of Victoria’s shipping history and its potential to interpret sub-theme 1.5 of Victoria’s Framework of Historical Themes (living with natural processes). The collection is also historically significant for its association with the LOCH ARD, which was one of the worst and best known shipwrecks in Victoria’s history. Unrestored dessert spoon from the wreck of the LOCH ARD. The spoon design has a flattened fiddle-back handle, with a thin stem or shank, flared collar, and a shallow rounded bowl. The spoons metallic composition is a thin layer of brass alloy which has partially corroded back to a nickel-silver base metal. Only 10% of original plate is visible, along with 10% verdigris and 60% concretion (lumps on spoon bowl). Outlines of four makers marks are evident but details are not discernible.flagstaff hill, warrnambool, shipwrecked coast, flagstaff hill maritime museum, maritime museum, shipwreck coast, flagstaff hill maritime village, great ocean road, loch line, loch ard, captain gibbs, eva carmichael, tom pearce, glenample station, mutton bird island, loch ard gorge, electroplated cutlery, loch ard shipwreck, william page and co, birmingham brass plating, dessert spoons -
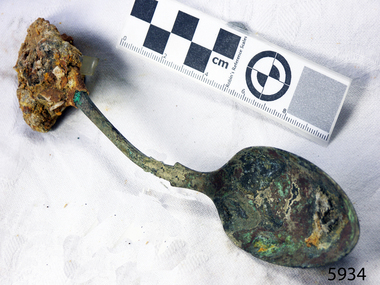 Flagstaff Hill Maritime Museum and Village
Spoon, circa 1878
This medium-sized dessert spoon is from the wreck of the LOCH ARD, a Loch Line ship of 1,693 tons which sailed from Gravesend, London, on 2 March 1878 with 17 passengers and a crew of 36 under Captain George Gibbs. “The intention was to discharge cargo in Melbourne, before returning to London via the Horn with wool and wheat”. Instead, on 1 June 1878, after 90 days at sea, she struck the sandstone cliffs of Mutton Bird Island on the south west coast of Victoria, and sank with the loss of 52 lives and all her cargo. The manifest of the LOCH ARD listed an array of manufactured goods and bulk metals being exported to the Colony of Victoria, with a declared value of £53,700. (202 bills of lading show an actual invoice value of £68, 456, with insurance underwriting to £30,000 of all cargo). Included in the manifest is the item of “Tin hardware & cutlery £7,530”. This dessert spoon is one of 482 similar items of electro-plated cutlery from the LOCH ARD site, comprising spoons and forks of various sizes but all sharing the same general shape or design and metallic composition. 49 of these pieces display a legible makers’ mark — the initials “W” and “P” placed within a raised diamond outline, which is in turn contained within a sunken crown shape — identifying the manufacturer as William Page & Co of Birmingham. An electroplater’s makers’ marks, unlike sterling silver hallmarks, are not consistent identifiers of quality or date and place of manufacture. A similar line of five impressions was usually made to impress the consumer with an implication of industry standards, but what each one actually signified was not regulated and so they varied according to the whim of the individual foundry. In this case, the maker’s marks are often obscured by sedimentary accretion or removed by corrosion after a century of submersion in the ocean. However sufficient detail has survived to indicate that these samples of electro-plated cutlery probably originated from the same consignment in the LOCH ARD’s cargo. The generally common range of marks are drawn from 255 tea spoons, 125 dessert spoons, and 99 table forks. These marks are clearly visible in 66 instances, while the same sequence of general outlines, or depression shapes, is discernible in another 166 examples. Suggested trade names for William Page & Co’s particular blend of brass plating are ‘roman silver’ or ‘silverite’. This copper alloy polishes to a lustrous gold when new, discolouring to a murky grey with greenish hue when neglected. HISTORY OF THE LOCH ARD The LOCH ARD belonged to the famous Loch Line which sailed many ships from England to Australia. Built in Glasgow by Barclay, Curdle and Co. in 1873, the LOCH ARD was a three-masted square rigged iron sailing ship. The ship measured 262ft 7" (79.87m) in length, 38ft (11.58m) in width, 23ft (7m) in depth and had a gross tonnage of 1693 tons. The LOCH ARD's main mast measured a massive 150ft (45.7m) in height. LOCH ARD made three trips to Australia and one trip to Calcutta before its final voyage. LOCH ARD left England on March 2, 1878, under the command of Captain Gibbs, a newly married, 29 year old. She was bound for Melbourne with a crew of 37, plus 17 passengers and a load of cargo. The general cargo reflected the affluence of Melbourne at the time. On board were straw hats, umbrella, perfumes, clay pipes, pianos, clocks, confectionary, linen and candles, as well as a heavier load of railway irons, cement, lead and copper. There were items included that intended for display in the Melbourne International Exhibition in 1880. The voyage to Port Phillip was long but uneventful. At 3am on June 1, 1878, Captain Gibbs was expecting to see land and the passengers were becoming excited as they prepared to view their new homeland in the early morning. But LOCH ARD was running into a fog which greatly reduced visibility. Captain Gibbs was becoming anxious as there was no sign of land or the Cape Otway lighthouse. At 4am the fog lifted. A man aloft announced that he could see breakers. The sheer cliffs of Victoria's west coast came into view, and Captain Gibbs realised that the ship was much closer to them than expected. He ordered as much sail to be set as time would permit and then attempted to steer the vessel out to sea. On coming head on into the wind, the ship lost momentum, the sails fell limp and LOCH ARD's bow swung back. Gibbs then ordered the anchors to be released in an attempt to hold its position. The anchors sank some 50 fathoms - but did not hold. By this time LOCH ARD was among the breakers and the tall cliffs of Mutton Bird Island rose behind the ship. Just half a mile from the coast, the ship's bow was suddenly pulled around by the anchor. The captain tried to tack out to sea, but the ship struck a reef at the base of Mutton Bird Island, near Port Campbell. Waves broke over the ship and the top deck was loosened from the hull. The masts and rigging came crashing down knocking passengers and crew overboard. When a lifeboat was finally launched, it crashed into the side of LOCH ARD and capsized. Tom Pearce, who had launched the boat, managed to cling to its overturned hull and shelter beneath it. He drifted out to sea and then on the flood tide came into what is now known as LOCH ARD Gorge. He swam to shore, bruised and dazed, and found a cave in which to shelter. Some of the crew stayed below deck to shelter from the falling rigging but drowned when the ship slipped off the reef into deeper water. Eva Carmichael had raced onto deck to find out what was happening only to be confronted by towering cliffs looming above the stricken ship. In all the chaos, Captain Gibbs grabbed Eva and said, "If you are saved Eva, let my dear wife know that I died like a sailor". That was the last Eva Carmichael saw of the captain. She was swept off the ship by a huge wave. Eva saw Tom Pearce on a small rocky beach and yelled to attract his attention. He dived in and swam to the exhausted woman and dragged her to shore. He took her to the cave and broke open case of brandy which had washed up on the beach. He opened a bottle to revive the unconscious woman. A few hours later Tom scaled a cliff in search of help. He followed hoof prints and came by chance upon two men from nearby Glenample Station three and a half miles away. In a state of exhaustion, he told the men of the tragedy. Tom returned to the gorge while the two men rode back to the station to get help. By the time they reached LOCH ARD Gorge, it was cold and dark. The two shipwreck survivors were taken to Glenample Station to recover. Eva stayed at the station for six weeks before returning to Ireland, this time by steamship. In Melbourne, Tom Pearce received a hero's welcome. He was presented with the first gold medal of the Royal Humane Society of Victoria and a £1000 cheque from the Victorian Government. Concerts were performed to honour the young man's bravery and to raise money for those who lost family in the LOCH ARD disaster. Of the 54 crew members and passengers on board, only two survived: the apprentice, Tom Pearce and the young woman passenger, Eva Carmichael, who lost all of her family in the tragedy. Ten days after the LOCH ARD tragedy, salvage rights to the wreck were sold at auction for £2,120. Cargo valued at £3,000 was salvaged and placed on the beach, but most washed back into the sea when another storm developed. The wreck of LOCH ARD still lies at the base of Mutton Bird Island. Much of the cargo has now been salvaged and some was washed up into what is now known as LOCH ARD Gorge. Cargo and artefacts have also been illegally salvaged over many years before protective legislation was introduced. One of the most unlikely pieces of cargo to have survived the shipwreck was a Minton porcelain peacock - one of only seven in the world. The peacock was destined for the Melbourne International Exhibition in 1880. It had been well packed, which gave it adequate protection during the violent storm. Today, the Minton peacock can be seen at the Flagstaff Hill Maritime Museum in Warrnambool. From Australia's most dramatic shipwreck it has now become Australia's shipwreck artefact and is one of very few 'objects' on the Victorian State Heritage Register most valuable. The LOCH ARD shipwreck is of State significance – Victorian Heritage Register S 417. Flagstaff Hill’s collection of artefacts from LOCH ARD is significant for being one of the largest collections of artefacts from this shipwreck in Victoria. It is significant for its association with the shipwreck, which is on the Victorian Heritage Register (VHR S417). The collection is significant because of the relationship between the objects, as together they have a high potential to interpret the story of the LOCH ARD. The LOCH ARD collection is archaeologically significant as the remains of a large international passenger and cargo ship. The LOCH ARD collection is historically significant for representing aspects of Victoria’s shipping history and its potential to interpret sub-theme 1.5 of Victoria’s Framework of Historical Themes (living with natural processes). The collection is also historically significant for its association with the LOCH ARD, which was one of the worst and best known shipwrecks in Victoria’s history. Unrestored dessert spoon from the wreck of the LOCH ARD. The spoon design has a flattened fiddle-back handle, with a thin stem or shank, flared collar, and a shallow rounded bowl. The spoons metallic composition is a thin layer of brass alloy which has partially corroded back to a nickel-silver base metal. 25% of original plate is visible, with 15% verdigris, and 20% clump of concretion on handle. There is a plain heraldic shield embossed on upper rear of bowl (ratstail). Spoon stem and handle is badly bent.flagstaff hill, warrnambool, shipwrecked coast, flagstaff hill maritime museum, maritime museum, shipwreck coast, flagstaff hill maritime village, great ocean road, loch line, loch ard, captain gibbs, eva carmichael, tom pearce, glenample station, mutton bird island, loch ard gorge, electroplated cutlery, loch ard shipwreck, william page and co, birmingham brass plating, dessert spoons -
 Flagstaff Hill Maritime Museum and Village
Spoon, circa 187855 Albion Street
This medium-sized dessert spoon is from the wreck of the LOCH ARD, a Loch Line ship of 1,693 tons which sailed from Gravesend, London, on 2 March 1878 with 17 passengers and a crew of 36 under Captain George Gibbs. “The intention was to discharge cargo in Melbourne, before returning to London via the Horn with wool and wheat”. Instead, on 1 June 1878, after 90 days at sea, she struck the sandstone cliffs of Mutton Bird Island on the south west coast of Victoria, and sank with the loss of 52 lives and all her cargo. The manifest of the LOCH ARD listed an array of manufactured goods and bulk metals being exported to the Colony of Victoria, with a declared value of £53,700. (202 bills of lading show an actual invoice value of £68, 456, with insurance underwriting to £30,000 of all cargo). Included in the manifest is the item of “Tin hardware & cutlery £7,530”. This dessert spoon is one of 482 similar items of electro-plated cutlery from the LOCH ARD site, comprising spoons and forks of various sizes but all sharing the same general shape or design and metallic composition. 49 of these pieces display a legible makers’ mark — the initials “W” and “P” placed within a raised diamond outline, which is in turn contained within a sunken crown shape — identifying the manufacturer as William Page & Co of Birmingham. An electroplater’s makers’ marks, unlike sterling silver hallmarks, are not consistent identifiers of quality or date and place of manufacture. A similar line of five impressions was usually made to impress the consumer with an implication of industry standards, but what each one actually signified was not regulated and so they varied according to the whim of the individual foundry. In this case, the maker’s marks are often obscured by sedimentary accretion or removed by corrosion after a century of submersion in the ocean. However sufficient detail has survived to indicate that these samples of electro-plated cutlery probably originated from the same consignment in the LOCH ARD’s cargo. The generally common range of marks are drawn from 255 tea spoons, 125 dessert spoons, and 99 table forks. These marks are clearly visible in 66 instances, while the same sequence of general outlines, or depression shapes, is discernible in another 166 examples. Suggested trade names for William Page & Co’s particular blend of brass plating are ‘roman silver’ or ‘silverite’. This copper alloy polishes to a lustrous gold when new, discolouring to a murky grey with greenish hue when neglected. HISTORY OF THE LOCH ARD The LOCH ARD belonged to the famous Loch Line which sailed many ships from England to Australia. Built in Glasgow by Barclay, Curdle and Co. in 1873, the LOCH ARD was a three-masted square rigged iron sailing ship. The ship measured 262ft 7" (79.87m) in length, 38ft (11.58m) in width, 23ft (7m) in depth and had a gross tonnage of 1693 tons. The LOCH ARD's main mast measured a massive 150ft (45.7m) in height. LOCH ARD made three trips to Australia and one trip to Calcutta before its final voyage. LOCH ARD left England on March 2, 1878, under the command of Captain Gibbs, a newly married, 29 year old. She was bound for Melbourne with a crew of 37, plus 17 passengers and a load of cargo. The general cargo reflected the affluence of Melbourne at the time. On board were straw hats, umbrella, perfumes, clay pipes, pianos, clocks, confectionary, linen and candles, as well as a heavier load of railway irons, cement, lead and copper. There were items included that intended for display in the Melbourne International Exhibition in 1880. The voyage to Port Phillip was long but uneventful. At 3am on June 1, 1878, Captain Gibbs was expecting to see land and the passengers were becoming excited as they prepared to view their new homeland in the early morning. But LOCH ARD was running into a fog which greatly reduced visibility. Captain Gibbs was becoming anxious as there was no sign of land or the Cape Otway lighthouse. At 4am the fog lifted. A man aloft announced that he could see breakers. The sheer cliffs of Victoria's west coast came into view, and Captain Gibbs realised that the ship was much closer to them than expected. He ordered as much sail to be set as time would permit and then attempted to steer the vessel out to sea. On coming head on into the wind, the ship lost momentum, the sails fell limp and LOCH ARD's bow swung back. Gibbs then ordered the anchors to be released in an attempt to hold its position. The anchors sank some 50 fathoms - but did not hold. By this time LOCH ARD was among the breakers and the tall cliffs of Mutton Bird Island rose behind the ship. Just half a mile from the coast, the ship's bow was suddenly pulled around by the anchor. The captain tried to tack out to sea, but the ship struck a reef at the base of Mutton Bird Island, near Port Campbell. Waves broke over the ship and the top deck was loosened from the hull. The masts and rigging came crashing down knocking passengers and crew overboard. When a lifeboat was finally launched, it crashed into the side of LOCH ARD and capsized. Tom Pearce, who had launched the boat, managed to cling to its overturned hull and shelter beneath it. He drifted out to sea and then on the flood tide came into what is now known as LOCH ARD Gorge. He swam to shore, bruised and dazed, and found a cave in which to shelter. Some of the crew stayed below deck to shelter from the falling rigging but drowned when the ship slipped off the reef into deeper water. Eva Carmichael had raced onto deck to find out what was happening only to be confronted by towering cliffs looming above the stricken ship. In all the chaos, Captain Gibbs grabbed Eva and said, "If you are saved Eva, let my dear wife know that I died like a sailor". That was the last Eva Carmichael saw of the captain. She was swept off the ship by a huge wave. Eva saw Tom Pearce on a small rocky beach and yelled to attract his attention. He dived in and swam to the exhausted woman and dragged her to shore. He took her to the cave and broke open case of brandy which had washed up on the beach. He opened a bottle to revive the unconscious woman. A few hours later Tom scaled a cliff in search of help. He followed hoof prints and came by chance upon two men from nearby Glenample Station three and a half miles away. In a state of exhaustion, he told the men of the tragedy. Tom returned to the gorge while the two men rode back to the station to get help. By the time they reached LOCH ARD Gorge, it was cold and dark. The two shipwreck survivors were taken to Glenample Station to recover. Eva stayed at the station for six weeks before returning to Ireland, this time by steamship. In Melbourne, Tom Pearce received a hero's welcome. He was presented with the first gold medal of the Royal Humane Society of Victoria and a £1000 cheque from the Victorian Government. Concerts were performed to honour the young man's bravery and to raise money for those who lost family in the LOCH ARD disaster. Of the 54 crew members and passengers on board, only two survived: the apprentice, Tom Pearce and the young woman passenger, Eva Carmichael, who lost all of her family in the tragedy. Ten days after the LOCH ARD tragedy, salvage rights to the wreck were sold at auction for £2,120. Cargo valued at £3,000 was salvaged and placed on the beach, but most washed back into the sea when another storm developed. The wreck of LOCH ARD still lies at the base of Mutton Bird Island. Much of the cargo has now been salvaged and some was washed up into what is now known as LOCH ARD Gorge. Cargo and artefacts have also been illegally salvaged over many years before protective legislation was introduced. One of the most unlikely pieces of cargo to have survived the shipwreck was a Minton porcelain peacock - one of only seven in the world. The peacock was destined for the Melbourne International Exhibition in 1880. It had been well packed, which gave it adequate protection during the violent storm. Today, the Minton peacock can be seen at the Flagstaff Hill Maritime Museum in Warrnambool. From Australia's most dramatic shipwreck it has now become Australia's shipwreck artefact and is one of very few 'objects' on the Victorian State Heritage Register most valuable. The LOCH ARD shipwreck is of State significance – Victorian Heritage Register S 417. Flagstaff Hill’s collection of artefacts from LOCH ARD is significant for being one of the largest collections of artefacts from this shipwreck in Victoria. It is significant for its association with the shipwreck, which is on the Victorian Heritage Register (VHR S417). The collection is significant because of the relationship between the objects, as together they have a high potential to interpret the story of the LOCH ARD. The LOCH ARD collection is archaeologically significant as the remains of a large international passenger and cargo ship. The LOCH ARD collection is historically significant for representing aspects of Victoria’s shipping history and its potential to interpret sub-theme 1.5 of Victoria’s Framework of Historical Themes (living with natural processes). The collection is also historically significant for its association with the LOCH ARD, which was one of the worst and best known shipwrecks in Victoria’s history. Unrestored dessert spoon from the wreck of the LOCH ARD. The spoon design has a flattened fiddle-back handle, with a thin stem or shank, flared collar, and a shallow rounded bowl. The spoons metallic composition is a thin layer of brass alloy which has partially corroded back to a nickel-silver base metal. The spoon is badly corroded and concreted, with reduction on bowl, stem and handle. Bowl is cracked and spoon is in generally poor condition.flagstaff hill, warrnambool, shipwrecked coast, flagstaff hill maritime museum, maritime museum, shipwreck coast, flagstaff hill maritime village, great ocean road, loch line, loch ard, captain gibbs, eva carmichael, tom pearce, glenample station, mutton bird island, loch ard gorge, electroplated cutlery, loch ard shipwreck, william page and co, birmingham brass plating, dessert spoons -
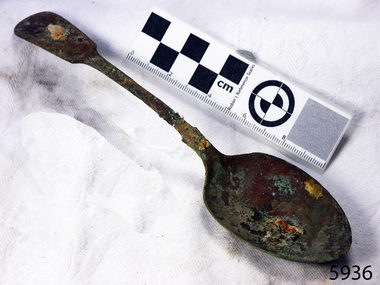 Flagstaff Hill Maritime Museum and Village
Spoon, circa 187855 Albion Street
This medium-sized dessert spoon is from the wreck of the LOCH ARD, a Loch Line ship of 1,693 tons which sailed from Gravesend, London, on 2 March 1878 with 17 passengers and a crew of 36 under Captain George Gibbs. “The intention was to discharge cargo in Melbourne, before returning to London via the Horn with wool and wheat”. Instead, on 1 June 1878, after 90 days at sea, she struck the sandstone cliffs of Mutton Bird Island on the south west coast of Victoria, and sank with the loss of 52 lives and all her cargo. The manifest of the LOCH ARD listed an array of manufactured goods and bulk metals being exported to the Colony of Victoria, with a declared value of £53,700. (202 bills of lading show an actual invoice value of £68, 456, with insurance underwriting to £30,000 of all cargo). Included in the manifest is the item of “Tin hardware & cutlery £7,530”. This dessert spoon is one of 482 similar items of electro-plated cutlery from the LOCH ARD site, comprising spoons and forks of various sizes but all sharing the same general shape or design and metallic composition. 49 of these pieces display a legible makers’ mark — the initials “W” and “P” placed within a raised diamond outline, which is in turn contained within a sunken crown shape — identifying the manufacturer as William Page & Co of Birmingham. An electroplater’s makers’ marks, unlike sterling silver hallmarks, are not consistent identifiers of quality or date and place of manufacture. A similar line of five impressions was usually made to impress the consumer with an implication of industry standards, but what each one actually signified was not regulated and so they varied according to the whim of the individual foundry. In this case, the maker’s marks are often obscured by sedimentary accretion or removed by corrosion after a century of submersion in the ocean. However sufficient detail has survived to indicate that these samples of electro-plated cutlery probably originated from the same consignment in the LOCH ARD’s cargo. The generally common range of marks are drawn from 255 tea spoons, 125 dessert spoons, and 99 table forks. These marks are clearly visible in 66 instances, while the same sequence of general outlines, or depression shapes, is discernible in another 166 examples. Suggested trade names for William Page & Co’s particular blend of brass plating are ‘roman silver’ or ‘silverite’. This copper alloy polishes to a lustrous gold when new, discolouring to a murky grey with greenish hue when neglected. HISTORY OF THE LOCH ARD The LOCH ARD belonged to the famous Loch Line which sailed many ships from England to Australia. Built in Glasgow by Barclay, Curdle and Co. in 1873, the LOCH ARD was a three-masted square rigged iron sailing ship. The ship measured 262ft 7" (79.87m) in length, 38ft (11.58m) in width, 23ft (7m) in depth and had a gross tonnage of 1693 tons. The LOCH ARD's main mast measured a massive 150ft (45.7m) in height. LOCH ARD made three trips to Australia and one trip to Calcutta before its final voyage. LOCH ARD left England on March 2, 1878, under the command of Captain Gibbs, a newly married, 29 year old. She was bound for Melbourne with a crew of 37, plus 17 passengers and a load of cargo. The general cargo reflected the affluence of Melbourne at the time. On board were straw hats, umbrella, perfumes, clay pipes, pianos, clocks, confectionary, linen and candles, as well as a heavier load of railway irons, cement, lead and copper. There were items included that intended for display in the Melbourne International Exhibition in 1880. The voyage to Port Phillip was long but uneventful. At 3am on June 1, 1878, Captain Gibbs was expecting to see land and the passengers were becoming excited as they prepared to view their new homeland in the early morning. But LOCH ARD was running into a fog which greatly reduced visibility. Captain Gibbs was becoming anxious as there was no sign of land or the Cape Otway lighthouse. At 4am the fog lifted. A man aloft announced that he could see breakers. The sheer cliffs of Victoria's west coast came into view, and Captain Gibbs realised that the ship was much closer to them than expected. He ordered as much sail to be set as time would permit and then attempted to steer the vessel out to sea. On coming head on into the wind, the ship lost momentum, the sails fell limp and LOCH ARD's bow swung back. Gibbs then ordered the anchors to be released in an attempt to hold its position. The anchors sank some 50 fathoms - but did not hold. By this time LOCH ARD was among the breakers and the tall cliffs of Mutton Bird Island rose behind the ship. Just half a mile from the coast, the ship's bow was suddenly pulled around by the anchor. The captain tried to tack out to sea, but the ship struck a reef at the base of Mutton Bird Island, near Port Campbell. Waves broke over the ship and the top deck was loosened from the hull. The masts and rigging came crashing down knocking passengers and crew overboard. When a lifeboat was finally launched, it crashed into the side of LOCH ARD and capsized. Tom Pearce, who had launched the boat, managed to cling to its overturned hull and shelter beneath it. He drifted out to sea and then on the flood tide came into what is now known as LOCH ARD Gorge. He swam to shore, bruised and dazed, and found a cave in which to shelter. Some of the crew stayed below deck to shelter from the falling rigging but drowned when the ship slipped off the reef into deeper water. Eva Carmichael had raced onto deck to find out what was happening only to be confronted by towering cliffs looming above the stricken ship. In all the chaos, Captain Gibbs grabbed Eva and said, "If you are saved Eva, let my dear wife know that I died like a sailor". That was the last Eva Carmichael saw of the captain. She was swept off the ship by a huge wave. Eva saw Tom Pearce on a small rocky beach and yelled to attract his attention. He dived in and swam to the exhausted woman and dragged her to shore. He took her to the cave and broke open case of brandy which had washed up on the beach. He opened a bottle to revive the unconscious woman. A few hours later Tom scaled a cliff in search of help. He followed hoof prints and came by chance upon two men from nearby Glenample Station three and a half miles away. In a state of exhaustion, he told the men of the tragedy. Tom returned to the gorge while the two men rode back to the station to get help. By the time they reached LOCH ARD Gorge, it was cold and dark. The two shipwreck survivors were taken to Glenample Station to recover. Eva stayed at the station for six weeks before returning to Ireland, this time by steamship. In Melbourne, Tom Pearce received a hero's welcome. He was presented with the first gold medal of the Royal Humane Society of Victoria and a £1000 cheque from the Victorian Government. Concerts were performed to honour the young man's bravery and to raise money for those who lost family in the LOCH ARD disaster. Of the 54 crew members and passengers on board, only two survived: the apprentice, Tom Pearce and the young woman passenger, Eva Carmichael, who lost all of her family in the tragedy. Ten days after the LOCH ARD tragedy, salvage rights to the wreck were sold at auction for £2,120. Cargo valued at £3,000 was salvaged and placed on the beach, but most washed back into the sea when another storm developed. The wreck of LOCH ARD still lies at the base of Mutton Bird Island. Much of the cargo has now been salvaged and some was washed up into what is now known as LOCH ARD Gorge. Cargo and artefacts have also been illegally salvaged over many years before protective legislation was introduced. One of the most unlikely pieces of cargo to have survived the shipwreck was a Minton porcelain peacock - one of only seven in the world. The peacock was destined for the Melbourne International Exhibition in 1880. It had been well packed, which gave it adequate protection during the violent storm. Today, the Minton peacock can be seen at the Flagstaff Hill Maritime Museum in Warrnambool. From Australia's most dramatic shipwreck it has now become Australia's shipwreck artefact and is one of very few 'objects' on the Victorian State Heritage Register most valuable. The LOCH ARD shipwreck is of State significance – Victorian Heritage Register S 417. Flagstaff Hill’s collection of artefacts from LOCH ARD is significant for being one of the largest collections of artefacts from this shipwreck in Victoria. It is significant for its association with the shipwreck, which is on the Victorian Heritage Register (VHR S417). The collection is significant because of the relationship between the objects, as together they have a high potential to interpret the story of the LOCH ARD. The LOCH ARD collection is archaeologically significant as the remains of a large international passenger and cargo ship. The LOCH ARD collection is historically significant for representing aspects of Victoria’s shipping history and its potential to interpret sub-theme 1.5 of Victoria’s Framework of Historical Themes (living with natural processes). The collection is also historically significant for its association with the LOCH ARD, which was one of the worst and best known shipwrecks in Victoria’s history. Unrestored dessert spoon from the wreck of the LOCH ARD. The spoon design has a flattened fiddle-back handle, with a thin stem or shank, flared collar, and a shallow rounded bowl. The spoons metallic composition is a thin layer of brass alloy which has partially corroded back to a nickel-silver base metal. There is some verdigris and a small amount of encrustation on spoon bowl and handle. The spoon stem is bent.flagstaff hill, warrnambool, shipwrecked coast, flagstaff hill maritime museum, maritime museum, shipwreck coast, flagstaff hill maritime village, great ocean road, loch line, loch ard, captain gibbs, eva carmichael, tom pearce, glenample station, mutton bird island, loch ard gorge, electroplated cutlery, william page and co, birmingham brass plating, dessert spoons -
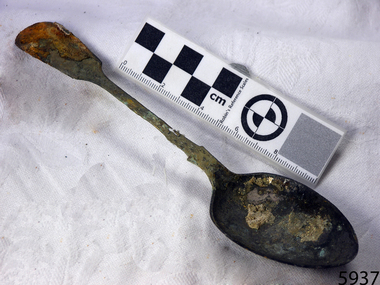 Flagstaff Hill Maritime Museum and Village
Spoon, circa 1878
This medium-sized dessert spoon is from the wreck of the LOCH ARD, a Loch Line ship of 1,693 tons which sailed from Gravesend, London, on 2 March 1878 with 17 passengers and a crew of 36 under Captain George Gibbs. “The intention was to discharge cargo in Melbourne, before returning to London via the Horn with wool and wheat”. Instead, on 1 June 1878, after 90 days at sea, she struck the sandstone cliffs of Mutton Bird Island on the south west coast of Victoria, and sank with the loss of 52 lives and all her cargo. The manifest of the LOCH ARD listed an array of manufactured goods and bulk metals being exported to the Colony of Victoria, with a declared value of £53,700. (202 bills of lading show an actual invoice value of £68, 456, with insurance underwriting to £30,000 of all cargo). Included in the manifest is the item of “Tin hardware & cutlery £7,530”. This dessert spoon is one of 482 similar items of electro-plated cutlery from the LOCH ARD site, comprising spoons and forks of various sizes but all sharing the same general shape or design and metallic composition. 49 of these pieces display a legible makers’ mark — the initials “W” and “P” placed within a raised diamond outline, which is in turn contained within a sunken crown shape — identifying the manufacturer as William Page & Co of Birmingham. An electroplater’s makers’ marks, unlike sterling silver hallmarks, are not consistent identifiers of quality or date and place of manufacture. A similar line of five impressions was usually made to impress the consumer with an implication of industry standards, but what each one actually signified was not regulated and so they varied according to the whim of the individual foundry. In this case, the maker’s marks are often obscured by sedimentary accretion or removed by corrosion after a century of submersion in the ocean. However sufficient detail has survived to indicate that these samples of electro-plated cutlery probably originated from the same consignment in the LOCH ARD’s cargo. The generally common range of marks are drawn from 255 tea spoons, 125 dessert spoons, and 99 table forks. These marks are clearly visible in 66 instances, while the same sequence of general outlines, or depression shapes, is discernible in another 166 examples. Suggested trade names for William Page & Co’s particular blend of brass plating are ‘roman silver’ or ‘silverite’. This copper alloy polishes to a lustrous gold when new, discolouring to a murky grey with greenish hue when neglected. HISTORY OF THE LOCH ARD The LOCH ARD belonged to the famous Loch Line which sailed many ships from England to Australia. Built in Glasgow by Barclay, Curdle and Co. in 1873, the LOCH ARD was a three-masted square rigged iron sailing ship. The ship measured 262ft 7" (79.87m) in length, 38ft (11.58m) in width, 23ft (7m) in depth and had a gross tonnage of 1693 tons. The LOCH ARD's main mast measured a massive 150ft (45.7m) in height. LOCH ARD made three trips to Australia and one trip to Calcutta before its final voyage. LOCH ARD left England on March 2, 1878, under the command of Captain Gibbs, a newly married, 29 year old. She was bound for Melbourne with a crew of 37, plus 17 passengers and a load of cargo. The general cargo reflected the affluence of Melbourne at the time. On board were straw hats, umbrella, perfumes, clay pipes, pianos, clocks, confectionary, linen and candles, as well as a heavier load of railway irons, cement, lead and copper. There were items included that intended for display in the Melbourne International Exhibition in 1880. The voyage to Port Phillip was long but uneventful. At 3am on June 1, 1878, Captain Gibbs was expecting to see land and the passengers were becoming excited as they prepared to view their new homeland in the early morning. But LOCH ARD was running into a fog which greatly reduced visibility. Captain Gibbs was becoming anxious as there was no sign of land or the Cape Otway lighthouse. At 4am the fog lifted. A man aloft announced that he could see breakers. The sheer cliffs of Victoria's west coast came into view, and Captain Gibbs realised that the ship was much closer to them than expected. He ordered as much sail to be set as time would permit and then attempted to steer the vessel out to sea. On coming head on into the wind, the ship lost momentum, the sails fell limp and LOCH ARD's bow swung back. Gibbs then ordered the anchors to be released in an attempt to hold its position. The anchors sank some 50 fathoms - but did not hold. By this time LOCH ARD was among the breakers and the tall cliffs of Mutton Bird Island rose behind the ship. Just half a mile from the coast, the ship's bow was suddenly pulled around by the anchor. The captain tried to tack out to sea, but the ship struck a reef at the base of Mutton Bird Island, near Port Campbell. Waves broke over the ship and the top deck was loosened from the hull. The masts and rigging came crashing down knocking passengers and crew overboard. When a lifeboat was finally launched, it crashed into the side of LOCH ARD and capsized. Tom Pearce, who had launched the boat, managed to cling to its overturned hull and shelter beneath it. He drifted out to sea and then on the flood tide came into what is now known as LOCH ARD Gorge. He swam to shore, bruised and dazed, and found a cave in which to shelter. Some of the crew stayed below deck to shelter from the falling rigging but drowned when the ship slipped off the reef into deeper water. Eva Carmichael had raced onto deck to find out what was happening only to be confronted by towering cliffs looming above the stricken ship. In all the chaos, Captain Gibbs grabbed Eva and said, "If you are saved Eva, let my dear wife know that I died like a sailor". That was the last Eva Carmichael saw of the captain. She was swept off the ship by a huge wave. Eva saw Tom Pearce on a small rocky beach and yelled to attract his attention. He dived in and swam to the exhausted woman and dragged her to shore. He took her to the cave and broke open case of brandy which had washed up on the beach. He opened a bottle to revive the unconscious woman. A few hours later Tom scaled a cliff in search of help. He followed hoof prints and came by chance upon two men from nearby Glenample Station three and a half miles away. In a state of exhaustion, he told the men of the tragedy. Tom returned to the gorge while the two men rode back to the station to get help. By the time they reached LOCH ARD Gorge, it was cold and dark. The two shipwreck survivors were taken to Glenample Station to recover. Eva stayed at the station for six weeks before returning to Ireland, this time by steamship. In Melbourne, Tom Pearce received a hero's welcome. He was presented with the first gold medal of the Royal Humane Society of Victoria and a £1000 cheque from the Victorian Government. Concerts were performed to honour the young man's bravery and to raise money for those who lost family in the LOCH ARD disaster. Of the 54 crew members and passengers on board, only two survived: the apprentice, Tom Pearce and the young woman passenger, Eva Carmichael, who lost all of her family in the tragedy. Ten days after the LOCH ARD tragedy, salvage rights to the wreck were sold at auction for £2,120. Cargo valued at £3,000 was salvaged and placed on the beach, but most washed back into the sea when another storm developed. The wreck of LOCH ARD still lies at the base of Mutton Bird Island. Much of the cargo has now been salvaged and some was washed up into what is now known as LOCH ARD Gorge. Cargo and artefacts have also been illegally salvaged over many years before protective legislation was introduced. One of the most unlikely pieces of cargo to have survived the shipwreck was a Minton porcelain peacock - one of only seven in the world. The peacock was destined for the Melbourne International Exhibition in 1880. It had been well packed, which gave it adequate protection during the violent storm. Today, the Minton peacock can be seen at the Flagstaff Hill Maritime Museum in Warrnambool. From Australia's most dramatic shipwreck it has now become Australia's shipwreck artefact and is one of very few 'objects' on the Victorian State Heritage Register most valuable. The LOCH ARD shipwreck is of State significance – Victorian Heritage Register S 417. Flagstaff Hill’s collection of artefacts from LOCH ARD is significant for being one of the largest collections of artefacts from this shipwreck in Victoria. It is significant for its association with the shipwreck, which is on the Victorian Heritage Register (VHR S417). The collection is significant because of the relationship between the objects, as together they have a high potential to interpret the story of the LOCH ARD. The LOCH ARD collection is archaeologically significant as the remains of a large international passenger and cargo ship. The LOCH ARD collection is historically significant for representing aspects of Victoria’s shipping history and its potential to interpret sub-theme 1.5 of Victoria’s Framework of Historical Themes (living with natural processes). The collection is also historically significant for its association with the LOCH ARD, which was one of the worst and best known shipwrecks in Victoria’s history. Unrestored dessert spoon from the wreck of the LOCH ARD. The spoon design has a flattened fiddle-back handle, with a thin stem or shank, flared collar, and a shallow rounded bowl. The spoons metallic composition is a thin layer of brass alloy which has partially corroded back to a nickel-silver base metal. Only 15% of original plate remains and 25% of spoon surface area is encrusted with red/white sediment. Some verdigris. Spoon is in fairly good condition and a plain heraldic shield is embossed on the upper rear of its bowl (ratstail).flagstaff hill, warrnambool, shipwrecked coast, flagstaff hill maritime museum, maritime museum, shipwreck coast, flagstaff hill maritime village, great ocean road, loch line, loch ard, captain gibbs, eva carmichael, tom pearce, glenample station, mutton bird island, loch ard gorge, electroplated cutlery, loch ard shipwreck, william page and co, birmingham brass plating, dessert spoons -
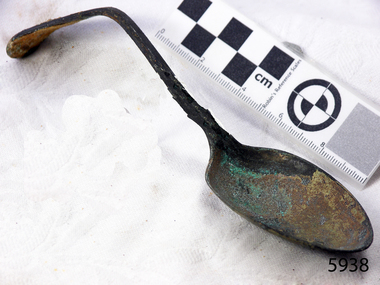 Flagstaff Hill Maritime Museum and Village
Domestic object - Spoon, c. 1878
This medium-sized dessert spoon is from the wreck of the LOCH ARD, a Loch Line ship of 1,693 tons which sailed from Gravesend, London, on 2 March 1878 with 17 passengers and a crew of 36 under Captain George Gibbs. “The intention was to discharge cargo in Melbourne, before returning to London via the Horn with wool and wheat”. Instead, on 1 June 1878, after 90 days at sea, she struck the sandstone cliffs of Mutton Bird Island on the south west coast of Victoria, and sank with the loss of 52 lives and all her cargo. The manifest of the LOCH ARD listed an array of manufactured goods and bulk metals being exported to the Colony of Victoria, with a declared value of £53,700. (202 bills of lading show an actual invoice value of £68, 456, with insurance underwriting to £30,000 of all cargo). Included in the manifest is the item of “Tin hardware & cutlery £7,530”. This dessert spoon is one of 482 similar items of electro-plated cutlery from the LOCH ARD site, comprising spoons and forks of various sizes but all sharing the same general shape or design and metallic composition. 49 of these pieces display a legible makers’ mark — the initials “W” and “P” placed within a raised diamond outline, which is in turn contained within a sunken crown shape — identifying the manufacturer as William Page & Co of Birmingham. An electroplater’s makers’ marks, unlike sterling silver hallmarks, are not consistent identifiers of quality or date and place of manufacture. A similar line of five impressions was usually made to impress the consumer with an implication of industry standards, but what each one actually signified was not regulated and so they varied according to the whim of the individual foundry. In this case, the maker’s marks are often obscured by sedimentary accretion or removed by corrosion after a century of submersion in the ocean. However sufficient detail has survived to indicate that these samples of electro-plated cutlery probably originated from the same consignment in the LOCH ARD’s cargo. The generally common range of marks are drawn from 255 tea spoons, 125 dessert spoons, and 99 table forks. These marks are clearly visible in 66 instances, while the same sequence of general outlines, or depression shapes, is discernible in another 166 examples. Suggested trade names for William Page & Co’s particular blend of brass plating are ‘roman silver’ or ‘silverite’. This copper alloy polishes to a lustrous gold when new, discolouring to a murky grey with greenish hue when neglected. HISTORY OF THE LOCH ARD The LOCH ARD belonged to the famous Loch Line which sailed many ships from England to Australia. Built in Glasgow by Barclay, Curdle and Co. in 1873, the LOCH ARD was a three-masted square rigged iron sailing ship. The ship measured 262ft 7" (79.87m) in length, 38ft (11.58m) in width, 23ft (7m) in depth and had a gross tonnage of 1693 tons. The LOCH ARD's main mast measured a massive 150ft (45.7m) in height. LOCH ARD made three trips to Australia and one trip to Calcutta before its final voyage. LOCH ARD left England on March 2, 1878, under the command of Captain Gibbs, a newly married, 29 year old. She was bound for Melbourne with a crew of 37, plus 17 passengers and a load of cargo. The general cargo reflected the affluence of Melbourne at the time. On board were straw hats, umbrella, perfumes, clay pipes, pianos, clocks, confectionary, linen and candles, as well as a heavier load of railway irons, cement, lead and copper. There were items included that intended for display in the Melbourne International Exhibition in 1880. The voyage to Port Phillip was long but uneventful. At 3am on June 1, 1878, Captain Gibbs was expecting to see land and the passengers were becoming excited as they prepared to view their new homeland in the early morning. But LOCH ARD was running into a fog which greatly reduced visibility. Captain Gibbs was becoming anxious as there was no sign of land or the Cape Otway lighthouse. At 4am the fog lifted. A man aloft announced that he could see breakers. The sheer cliffs of Victoria's west coast came into view, and Captain Gibbs realised that the ship was much closer to them than expected. He ordered as much sail to be set as time would permit and then attempted to steer the vessel out to sea. On coming head on into the wind, the ship lost momentum, the sails fell limp and LOCH ARD's bow swung back. Gibbs then ordered the anchors to be released in an attempt to hold its position. The anchors sank some 50 fathoms - but did not hold. By this time LOCH ARD was among the breakers and the tall cliffs of Mutton Bird Island rose behind the ship. Just half a mile from the coast, the ship's bow was suddenly pulled around by the anchor. The captain tried to tack out to sea, but the ship struck a reef at the base of Mutton Bird Island, near Port Campbell. Waves broke over the ship and the top deck was loosened from the hull. The masts and rigging came crashing down knocking passengers and crew overboard. When a lifeboat was finally launched, it crashed into the side of LOCH ARD and capsized. Tom Pearce, who had launched the boat, managed to cling to its overturned hull and shelter beneath it. He drifted out to sea and then on the flood tide came into what is now known as LOCH ARD Gorge. He swam to shore, bruised and dazed, and found a cave in which to shelter. Some of the crew stayed below deck to shelter from the falling rigging but drowned when the ship slipped off the reef into deeper water. Eva Carmichael had raced onto deck to find out what was happening only to be confronted by towering cliffs looming above the stricken ship. In all the chaos, Captain Gibbs grabbed Eva and said, "If you are saved Eva, let my dear wife know that I died like a sailor". That was the last Eva Carmichael saw of the captain. She was swept off the ship by a huge wave. Eva saw Tom Pearce on a small rocky beach and yelled to attract his attention. He dived in and swam to the exhausted woman and dragged her to shore. He took her to the cave and broke open case of brandy which had washed up on the beach. He opened a bottle to revive the unconscious woman. A few hours later Tom scaled a cliff in search of help. He followed hoof prints and came by chance upon two men from nearby Glenample Station three and a half miles away. In a state of exhaustion, he told the men of the tragedy. Tom returned to the gorge while the two men rode back to the station to get help. By the time they reached LOCH ARD Gorge, it was cold and dark. The two shipwreck survivors were taken to Glenample Station to recover. Eva stayed at the station for six weeks before returning to Ireland, this time by steamship. In Melbourne, Tom Pearce received a hero's welcome. He was presented with the first gold medal of the Royal Humane Society of Victoria and a £1000 cheque from the Victorian Government. Concerts were performed to honour the young man's bravery and to raise money for those who lost family in the LOCH ARD disaster. Of the 54 crew members and passengers on board, only two survived: the apprentice, Tom Pearce and the young woman passenger, Eva Carmichael, who lost all of her family in the tragedy. Ten days after the LOCH ARD tragedy, salvage rights to the wreck were sold at auction for £2,120. Cargo valued at £3,000 was salvaged and placed on the beach, but most washed back into the sea when another storm developed. The wreck of LOCH ARD still lies at the base of Mutton Bird Island. Much of the cargo has now been salvaged and some was washed up into what is now known as LOCH ARD Gorge. Cargo and artefacts have also been illegally salvaged over many years before protective legislation was introduced. One of the most unlikely pieces of cargo to have survived the shipwreck was a Minton porcelain peacock - one of only seven in the world. The peacock was destined for the Melbourne International Exhibition in 1880. It had been well packed, which gave it adequate protection during the violent storm. Today, the Minton peacock can be seen at the Flagstaff Hill Maritime Museum in Warrnambool. From Australia's most dramatic shipwreck it has now become Australia's shipwreck artefact and is one of very few 'objects' on the Victorian State Heritage Register most valuable. The LOCH ARD shipwreck is of State significance – Victorian Heritage Register S 417. Flagstaff Hill’s collection of artefacts from LOCH ARD is significant for being one of the largest collections of artefacts from this shipwreck in Victoria. It is significant for its association with the shipwreck, which is on the Victorian Heritage Register (VHR S417). The collection is significant because of the relationship between the objects, as together they have a high potential to interpret the story of the LOCH ARD. The LOCH ARD collection is archaeologically significant as the remains of a large international passenger and cargo ship. The LOCH ARD collection is historically significant for representing aspects of Victoria’s shipping history and its potential to interpret sub-theme 1.5 of Victoria’s Framework of Historical Themes (living with natural processes). The collection is also historically significant for its association with the LOCH ARD, which was one of the worst and best known shipwrecks in Victoria’s history. Unrestored dessert spoon from the wreck of the LOCH ARD. The spoon design has a flattened fiddle-back handle, with a thin stem or shank, flared collar, and a shallow rounded bowl. The spoons metallic composition is a thin layer of brass alloy which has partially corroded back to a nickel-silver base metal. 25% of original plate remains, with 10% verdigris and 15% encrustation on spoon handle. Spoon is in fairly good condition but the stem and handle is badly bent.flagstaff hill maritime museum, shipwreck coast, great ocean road, loch line, loch ard, mutton bird island, loch ard gorge, electroplated cutlery, loch ard shipwreck, william page and co, birmingham brass plating, dessert spoons -
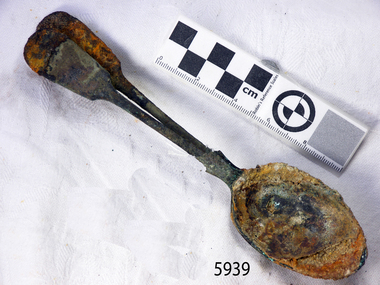 Flagstaff Hill Maritime Museum and Village
Domestic object - Spoons, circa 1878
These medium-sized dessert spoons are from the wreck of the LOCH ARD, a Loch Line ship of 1,693 tons which sailed from Gravesend, London, on 2 March 1878 with 17 passengers and a crew of 36 under Captain George Gibbs. “The intention was to discharge cargo in Melbourne, before returning to London via the Horn with wool and wheat”. Instead, on 1 June 1878, after 90 days at sea, she struck the sandstone cliffs of Mutton Bird Island on the south west coast of Victoria, and sank with the loss of 52 lives and all her cargo. The manifest of the LOCH ARD listed an array of manufactured goods and bulk metals being exported to the Colony of Victoria, with a declared value of £53,700. (202 bills of lading show an actual invoice value of £68, 456, with insurance underwriting to £30,000 of all cargo). Included in the manifest is the item of “Tin hardware & cutlery £7,530”. These dessert spoons are some of 482 similar items of electro-plated cutlery from the LOCH ARD site, comprising spoons and forks of various sizes but all sharing the same general shape or design and metallic composition. 49 of these pieces display a legible makers’ mark — the initials “W” and “P” placed within a raised diamond outline, which is in turn contained within a sunken crown shape — identifying the manufacturer as William Page & Co of Birmingham. An electroplater’s makers’ marks, unlike sterling silver hallmarks, are not consistent identifiers of quality or date and place of manufacture. A similar line of five impressions was usually made to impress the consumer with an implication of industry standards, but what each one actually signified was not regulated and so they varied according to the whim of the individual foundry. In this case, the maker’s marks are often obscured by sedimentary accretion or removed by corrosion after a century of submersion in the ocean. However sufficient detail has survived to indicate that these samples of electro-plated cutlery probably originated from the same consignment in the LOCH ARD’s cargo. The generally common range of marks are drawn from 255 tea spoons, 125 dessert spoons, and 99 table forks. These marks are clearly visible in 66 instances, while the same sequence of general outlines, or depression shapes, is discernible in another 166 examples. Suggested trade names for William Page & Co’s particular blend of brass plating are ‘roman silver’ or ‘silverite’. This copper alloy polishes to a lustrous gold when new, discolouring to a murky grey with greenish hue when neglected. HISTORY OF THE LOCH ARD The LOCH ARD belonged to the famous Loch Line which sailed many ships from England to Australia. Built in Glasgow by Barclay, Curdle and Co. in 1873, the LOCH ARD was a three-masted square rigged iron sailing ship. The ship measured 262ft 7" (79.87m) in length, 38ft (11.58m) in width, 23ft (7m) in depth and had a gross tonnage of 1693 tons. The LOCH ARD's main mast measured a massive 150ft (45.7m) in height. LOCH ARD made three trips to Australia and one trip to Calcutta before its final voyage. LOCH ARD left England on March 2, 1878, under the command of Captain Gibbs, a newly married, 29 year old. She was bound for Melbourne with a crew of 37, plus 17 passengers and a load of cargo. The general cargo reflected the affluence of Melbourne at the time. On board were straw hats, umbrella, perfumes, clay pipes, pianos, clocks, confectionary, linen and candles, as well as a heavier load of railway irons, cement, lead and copper. There were items included that intended for display in the Melbourne International Exhibition in 1880. The voyage to Port Phillip was long but uneventful. At 3am on June 1, 1878, Captain Gibbs was expecting to see land and the passengers were becoming excited as they prepared to view their new homeland in the early morning. But LOCH ARD was running into a fog which greatly reduced visibility. Captain Gibbs was becoming anxious as there was no sign of land or the Cape Otway lighthouse. At 4am the fog lifted. A man aloft announced that he could see breakers. The sheer cliffs of Victoria's west coast came into view, and Captain Gibbs realised that the ship was much closer to them than expected. He ordered as much sail to be set as time would permit and then attempted to steer the vessel out to sea. On coming head on into the wind, the ship lost momentum, the sails fell limp and LOCH ARD's bow swung back. Gibbs then ordered the anchors to be released in an attempt to hold its position. The anchors sank some 50 fathoms - but did not hold. By this time LOCH ARD was among the breakers and the tall cliffs of Mutton Bird Island rose behind the ship. Just half a mile from the coast, the ship's bow was suddenly pulled around by the anchor. The captain tried to tack out to sea, but the ship struck a reef at the base of Mutton Bird Island, near Port Campbell. Waves broke over the ship and the top deck was loosened from the hull. The masts and rigging came crashing down knocking passengers and crew overboard. When a lifeboat was finally launched, it crashed into the side of LOCH ARD and capsized. Tom Pearce, who had launched the boat, managed to cling to its overturned hull and shelter beneath it. He drifted out to sea and then on the flood tide came into what is now known as LOCH ARD Gorge. He swam to shore, bruised and dazed, and found a cave in which to shelter. Some of the crew stayed below deck to shelter from the falling rigging but drowned when the ship slipped off the reef into deeper water. Eva Carmichael had raced onto deck to find out what was happening only to be confronted by towering cliffs looming above the stricken ship. In all the chaos, Captain Gibbs grabbed Eva and said, "If you are saved Eva, let my dear wife know that I died like a sailor". That was the last Eva Carmichael saw of the captain. She was swept off the ship by a huge wave. Eva saw Tom Pearce on a small rocky beach and yelled to attract his attention. He dived in and swam to the exhausted woman and dragged her to shore. He took her to the cave and broke open case of brandy which had washed up on the beach. He opened a bottle to revive the unconscious woman. A few hours later Tom scaled a cliff in search of help. He followed hoof prints and came by chance upon two men from nearby Glenample Station three and a half miles away. In a state of exhaustion, he told the men of the tragedy. Tom returned to the gorge while the two men rode back to the station to get help. By the time they reached LOCH ARD Gorge, it was cold and dark. The two shipwreck survivors were taken to Glenample Station to recover. Eva stayed at the station for six weeks before returning to Ireland, this time by steamship. In Melbourne, Tom Pearce received a hero's welcome. He was presented with the first gold medal of the Royal Humane Society of Victoria and a £1000 cheque from the Victorian Government. Concerts were performed to honour the young man's bravery and to raise money for those who lost family in the LOCH ARD disaster. Of the 54 crew members and passengers on board, only two survived: the apprentice, Tom Pearce and the young woman passenger, Eva Carmichael, who lost all of her family in the tragedy. Ten days after the LOCH ARD tragedy, salvage rights to the wreck were sold at auction for £2,120. Cargo valued at £3,000 was salvaged and placed on the beach, but most washed back into the sea when another storm developed. The wreck of LOCH ARD still lies at the base of Mutton Bird Island. Much of the cargo has now been salvaged and some was washed up into what is now known as LOCH ARD Gorge. Cargo and artefacts have also been illegally salvaged over many years before protective legislation was introduced. One of the most unlikely pieces of cargo to have survived the shipwreck was a Minton porcelain peacock - one of only seven in the world. The peacock was destined for the Melbourne International Exhibition in 1880. It had been well packed, which gave it adequate protection during the violent storm. Today, the Minton peacock can be seen at the Flagstaff Hill Maritime Museum in Warrnambool. From Australia's most dramatic shipwreck it has now become Australia's shipwreck artefact and is one of very few 'objects' on the Victorian State Heritage Register most valuable. The LOCH ARD shipwreck is of State significance – Victorian Heritage Register S 417. Flagstaff Hill’s collection of artefacts from LOCH ARD is significant for being one of the largest collections of artefacts from this shipwreck in Victoria. It is significant for its association with the shipwreck, which is on the Victorian Heritage Register (VHR S417). The collection is significant because of the relationship between the objects, as together they have a high potential to interpret the story of the LOCH ARD. The LOCH ARD collection is archaeologically significant as the remains of a large international passenger and cargo ship. The LOCH ARD collection is historically significant for representing aspects of Victoria’s shipping history and its potential to interpret sub-theme 1.5 of Victoria’s Framework of Historical Themes (living with natural processes). The collection is also historically significant for its association with the LOCH ARD, which was one of the worst and best known shipwrecks in Victoria’s history. Unrestored dessert spoons from the wreck of the LOCH ARD. The spoon design has a flattened fiddle-back handle, with a thin stem or shank, flared collar, and a shallow rounded bowl. The spoons metallic composition is a thin layer of brass alloy which has partially corroded back to a nickel-silver base metal. Some verdigris and heavy concretion on spoon bowl and handle. Evidence of another spoon visible in bowl. 2 spoons in group.flagstaff hill maritime museum, shipwreck coast, great ocean road, loch line, loch ard, mutton bird island, loch ard gorge, electroplated cutlery, loch ard shipwreck, william page and co, birmingham brass plating, dessert spoons -
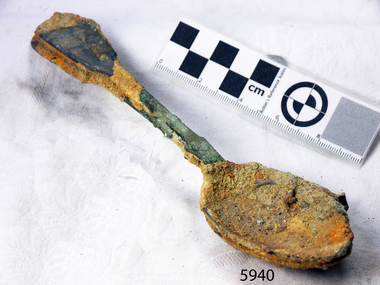 Flagstaff Hill Maritime Museum and Village
Spoon, circa 1878
These medium-sized dessert spoons are from the wreck of the LOCH ARD, a Loch Line ship of 1,693 tons which sailed from Gravesend, London, on 2 March 1878 with 17 passengers and a crew of 36 under Captain George Gibbs. “The intention was to discharge cargo in Melbourne, before returning to London via the Horn with wool and wheat”. Instead, on 1 June 1878, after 90 days at sea, she struck the sandstone cliffs of Mutton Bird Island on the south west coast of Victoria, and sank with the loss of 52 lives and all her cargo. The manifest of the LOCH ARD listed an array of manufactured goods and bulk metals being exported to the Colony of Victoria, with a declared value of £53,700. (202 bills of lading show an actual invoice value of £68, 456, with insurance underwriting to £30,000 of all cargo). Included in the manifest is the item of “Tin hardware & cutlery £7,530”. These dessert spoons are some of 482 similar items of electro-plated cutlery from the LOCH ARD site, comprising spoons and forks of various sizes but all sharing the same general shape or design and metallic composition. 49 of these pieces display a legible makers’ mark — the initials “W” and “P” placed within a raised diamond outline, which is in turn contained within a sunken crown shape — identifying the manufacturer as William Page & Co of Birmingham. An electroplater’s makers’ marks, unlike sterling silver hallmarks, are not consistent identifiers of quality or date and place of manufacture. A similar line of five impressions was usually made to impress the consumer with an implication of industry standards, but what each one actually signified was not regulated and so they varied according to the whim of the individual foundry. In this case, the maker’s marks are often obscured by sedimentary accretion or removed by corrosion after a century of submersion in the ocean. However sufficient detail has survived to indicate that these samples of electro-plated cutlery probably originated from the same consignment in the LOCH ARD’s cargo. The generally common range of marks are drawn from 255 tea spoons, 125 dessert spoons, and 99 table forks. These marks are clearly visible in 66 instances, while the same sequence of general outlines, or depression shapes, is discernible in another 166 examples. Suggested trade names for William Page & Co’s particular blend of brass plating are ‘roman silver’ or ‘silverite’. This copper alloy polishes to a lustrous gold when new, discolouring to a murky grey with greenish hue when neglected. HISTORY OF THE LOCH ARD The LOCH ARD belonged to the famous Loch Line which sailed many ships from England to Australia. Built in Glasgow by Barclay, Curdle and Co. in 1873, the LOCH ARD was a three-masted square rigged iron sailing ship. The ship measured 262ft 7" (79.87m) in length, 38ft (11.58m) in width, 23ft (7m) in depth and had a gross tonnage of 1693 tons. The LOCH ARD's main mast measured a massive 150ft (45.7m) in height. LOCH ARD made three trips to Australia and one trip to Calcutta before its final voyage. LOCH ARD left England on March 2, 1878, under the command of Captain Gibbs, a newly married, 29 year old. She was bound for Melbourne with a crew of 37, plus 17 passengers and a load of cargo. The general cargo reflected the affluence of Melbourne at the time. On board were straw hats, umbrella, perfumes, clay pipes, pianos, clocks, confectionary, linen and candles, as well as a heavier load of railway irons, cement, lead and copper. There were items included that intended for display in the Melbourne International Exhibition in 1880. The voyage to Port Phillip was long but uneventful. At 3am on June 1, 1878, Captain Gibbs was expecting to see land and the passengers were becoming excited as they prepared to view their new homeland in the early morning. But LOCH ARD was running into a fog which greatly reduced visibility. Captain Gibbs was becoming anxious as there was no sign of land or the Cape Otway lighthouse. At 4am the fog lifted. A man aloft announced that he could see breakers. The sheer cliffs of Victoria's west coast came into view, and Captain Gibbs realised that the ship was much closer to them than expected. He ordered as much sail to be set as time would permit and then attempted to steer the vessel out to sea. On coming head on into the wind, the ship lost momentum, the sails fell limp and LOCH ARD's bow swung back. Gibbs then ordered the anchors to be released in an attempt to hold its position. The anchors sank some 50 fathoms - but did not hold. By this time LOCH ARD was among the breakers and the tall cliffs of Mutton Bird Island rose behind the ship. Just half a mile from the coast, the ship's bow was suddenly pulled around by the anchor. The captain tried to tack out to sea, but the ship struck a reef at the base of Mutton Bird Island, near Port Campbell. Waves broke over the ship and the top deck was loosened from the hull. The masts and rigging came crashing down knocking passengers and crew overboard. When a lifeboat was finally launched, it crashed into the side of LOCH ARD and capsized. Tom Pearce, who had launched the boat, managed to cling to its overturned hull and shelter beneath it. He drifted out to sea and then on the flood tide came into what is now known as LOCH ARD Gorge. He swam to shore, bruised and dazed, and found a cave in which to shelter. Some of the crew stayed below deck to shelter from the falling rigging but drowned when the ship slipped off the reef into deeper water. Eva Carmichael had raced onto deck to find out what was happening only to be confronted by towering cliffs looming above the stricken ship. In all the chaos, Captain Gibbs grabbed Eva and said, "If you are saved Eva, let my dear wife know that I died like a sailor". That was the last Eva Carmichael saw of the captain. She was swept off the ship by a huge wave. Eva saw Tom Pearce on a small rocky beach and yelled to attract his attention. He dived in and swam to the exhausted woman and dragged her to shore. He took her to the cave and broke open case of brandy which had washed up on the beach. He opened a bottle to revive the unconscious woman. A few hours later Tom scaled a cliff in search of help. He followed hoof prints and came by chance upon two men from nearby Glenample Station three and a half miles away. In a state of exhaustion, he told the men of the tragedy. Tom returned to the gorge while the two men rode back to the station to get help. By the time they reached LOCH ARD Gorge, it was cold and dark. The two shipwreck survivors were taken to Glenample Station to recover. Eva stayed at the station for six weeks before returning to Ireland, this time by steamship. In Melbourne, Tom Pearce received a hero's welcome. He was presented with the first gold medal of the Royal Humane Society of Victoria and a £1000 cheque from the Victorian Government. Concerts were performed to honour the young man's bravery and to raise money for those who lost family in the LOCH ARD disaster. Of the 54 crew members and passengers on board, only two survived: the apprentice, Tom Pearce and the young woman passenger, Eva Carmichael, who lost all of her family in the tragedy. Ten days after the LOCH ARD tragedy, salvage rights to the wreck were sold at auction for £2,120. Cargo valued at £3,000 was salvaged and placed on the beach, but most washed back into the sea when another storm developed. The wreck of LOCH ARD still lies at the base of Mutton Bird Island. Much of the cargo has now been salvaged and some was washed up into what is now known as LOCH ARD Gorge. Cargo and artefacts have also been illegally salvaged over many years before protective legislation was introduced. One of the most unlikely pieces of cargo to have survived the shipwreck was a Minton porcelain peacock - one of only seven in the world. The peacock was destined for the Melbourne International Exhibition in 1880. It had been well packed, which gave it adequate protection during the violent storm. Today, the Minton peacock can be seen at the Flagstaff Hill Maritime Museum in Warrnambool. From Australia's most dramatic shipwreck it has now become Australia's shipwreck artefact and is one of very few 'objects' on the Victorian State Heritage Register most valuable. The LOCH ARD shipwreck is of State significance – Victorian Heritage Register S 417. Flagstaff Hill’s collection of artefacts from LOCH ARD is significant for being one of the largest collections of artefacts from this shipwreck in Victoria. It is significant for its association with the shipwreck, which is on the Victorian Heritage Register (VHR S417). The collection is significant because of the relationship between the objects, as together they have a high potential to interpret the story of the LOCH ARD. The LOCH ARD collection is archaeologically significant as the remains of a large international passenger and cargo ship. The LOCH ARD collection is historically significant for representing aspects of Victoria’s shipping history and its potential to interpret sub-theme 1.5 of Victoria’s Framework of Historical Themes (living with natural processes). The collection is also historically significant for its association with the LOCH ARD, which was one of the worst and best known shipwrecks in Victoria’s history. Unrestored dessert spoons from the wreck of the LOCH ARD. The spoon design has a flattened fiddle-back handle, with a thin stem or shank, flared collar, and a shallow rounded bowl. The spoons metallic composition is a thin layer of brass alloy which has partially corroded back to a nickel-silver base metal. A large amount of concretion joins the spoons at bowl and handle. 2 spoons in group.flagstaff hill, warrnambool, shipwrecked coast, flagstaff hill maritime museum, maritime museum, shipwreck coast, flagstaff hill maritime village, great ocean road, loch line, loch ard, captain gibbs, eva carmichael, tom pearce, glenample station, mutton bird island, loch ard gorge, electroplated cutlery, loch ard shipwreck, william page and co, birmingham brass plating, dessert spoons -
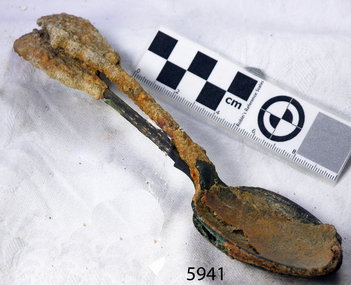 Flagstaff Hill Maritime Museum and Village
Spoon, circa 1878
These medium-sized dessert spoons are from the wreck of the LOCH ARD, a Loch Line ship of 1,693 tons which sailed from Gravesend, London, on 2 March 1878 with 17 passengers and a crew of 36 under Captain George Gibbs. “The intention was to discharge cargo in Melbourne, before returning to London via the Horn with wool and wheat”. Instead, on 1 June 1878, after 90 days at sea, she struck the sandstone cliffs of Mutton Bird Island on the south west coast of Victoria, and sank with the loss of 52 lives and all her cargo. The manifest of the LOCH ARD listed an array of manufactured goods and bulk metals being exported to the Colony of Victoria, with a declared value of £53,700. (202 bills of lading show an actual invoice value of £68, 456, with insurance underwriting to £30,000 of all cargo). Included in the manifest is the item of “Tin hardware & cutlery £7,530”. These dessert spoons are some of 482 similar items of electro-plated cutlery from the LOCH ARD site, comprising spoons and forks of various sizes but all sharing the same general shape or design and metallic composition. 49 of these pieces display a legible makers’ mark — the initials “W” and “P” placed within a raised diamond outline, which is in turn contained within a sunken crown shape — identifying the manufacturer as William Page & Co of Birmingham. An electroplater’s makers’ marks, unlike sterling silver hallmarks, are not consistent identifiers of quality or date and place of manufacture. A similar line of five impressions was usually made to impress the consumer with an implication of industry standards, but what each one actually signified was not regulated and so they varied according to the whim of the individual foundry. In this case, the maker’s marks are often obscured by sedimentary accretion or removed by corrosion after a century of submersion in the ocean. However sufficient detail has survived to indicate that these samples of electro-plated cutlery probably originated from the same consignment in the LOCH ARD’s cargo. The generally common range of marks are drawn from 255 tea spoons, 125 dessert spoons, and 99 table forks. These marks are clearly visible in 66 instances, while the same sequence of general outlines, or depression shapes, is discernible in another 166 examples. Suggested trade names for William Page & Co’s particular blend of brass plating are ‘roman silver’ or ‘silverite’. This copper alloy polishes to a lustrous gold when new, discolouring to a murky grey with greenish hue when neglected. HISTORY OF THE LOCH ARD The LOCH ARD belonged to the famous Loch Line which sailed many ships from England to Australia. Built in Glasgow by Barclay, Curdle and Co. in 1873, the LOCH ARD was a three-masted square rigged iron sailing ship. The ship measured 262ft 7" (79.87m) in length, 38ft (11.58m) in width, 23ft (7m) in depth and had a gross tonnage of 1693 tons. The LOCH ARD's main mast measured a massive 150ft (45.7m) in height. LOCH ARD made three trips to Australia and one trip to Calcutta before its final voyage. LOCH ARD left England on March 2, 1878, under the command of Captain Gibbs, a newly married, 29 year old. She was bound for Melbourne with a crew of 37, plus 17 passengers and a load of cargo. The general cargo reflected the affluence of Melbourne at the time. On board were straw hats, umbrella, perfumes, clay pipes, pianos, clocks, confectionary, linen and candles, as well as a heavier load of railway irons, cement, lead and copper. There were items included that intended for display in the Melbourne International Exhibition in 1880. The voyage to Port Phillip was long but uneventful. At 3am on June 1, 1878, Captain Gibbs was expecting to see land and the passengers were becoming excited as they prepared to view their new homeland in the early morning. But LOCH ARD was running into a fog which greatly reduced visibility. Captain Gibbs was becoming anxious as there was no sign of land or the Cape Otway lighthouse. At 4am the fog lifted. A man aloft announced that he could see breakers. The sheer cliffs of Victoria's west coast came into view, and Captain Gibbs realised that the ship was much closer to them than expected. He ordered as much sail to be set as time would permit and then attempted to steer the vessel out to sea. On coming head on into the wind, the ship lost momentum, the sails fell limp and LOCH ARD's bow swung back. Gibbs then ordered the anchors to be released in an attempt to hold its position. The anchors sank some 50 fathoms - but did not hold. By this time LOCH ARD was among the breakers and the tall cliffs of Mutton Bird Island rose behind the ship. Just half a mile from the coast, the ship's bow was suddenly pulled around by the anchor. The captain tried to tack out to sea, but the ship struck a reef at the base of Mutton Bird Island, near Port Campbell. Waves broke over the ship and the top deck was loosened from the hull. The masts and rigging came crashing down knocking passengers and crew overboard. When a lifeboat was finally launched, it crashed into the side of LOCH ARD and capsized. Tom Pearce, who had launched the boat, managed to cling to its overturned hull and shelter beneath it. He drifted out to sea and then on the flood tide came into what is now known as LOCH ARD Gorge. He swam to shore, bruised and dazed, and found a cave in which to shelter. Some of the crew stayed below deck to shelter from the falling rigging but drowned when the ship slipped off the reef into deeper water. Eva Carmichael had raced onto deck to find out what was happening only to be confronted by towering cliffs looming above the stricken ship. In all the chaos, Captain Gibbs grabbed Eva and said, "If you are saved Eva, let my dear wife know that I died like a sailor". That was the last Eva Carmichael saw of the captain. She was swept off the ship by a huge wave. Eva saw Tom Pearce on a small rocky beach and yelled to attract his attention. He dived in and swam to the exhausted woman and dragged her to shore. He took her to the cave and broke open case of brandy which had washed up on the beach. He opened a bottle to revive the unconscious woman. A few hours later Tom scaled a cliff in search of help. He followed hoof prints and came by chance upon two men from nearby Glenample Station three and a half miles away. In a state of exhaustion, he told the men of the tragedy. Tom returned to the gorge while the two men rode back to the station to get help. By the time they reached LOCH ARD Gorge, it was cold and dark. The two shipwreck survivors were taken to Glenample Station to recover. Eva stayed at the station for six weeks before returning to Ireland, this time by steamship. In Melbourne, Tom Pearce received a hero's welcome. He was presented with the first gold medal of the Royal Humane Society of Victoria and a £1000 cheque from the Victorian Government. Concerts were performed to honour the young man's bravery and to raise money for those who lost family in the LOCH ARD disaster. Of the 54 crew members and passengers on board, only two survived: the apprentice, Tom Pearce and the young woman passenger, Eva Carmichael, who lost all of her family in the tragedy. Ten days after the LOCH ARD tragedy, salvage rights to the wreck were sold at auction for £2,120. Cargo valued at £3,000 was salvaged and placed on the beach, but most washed back into the sea when another storm developed. The wreck of LOCH ARD still lies at the base of Mutton Bird Island. Much of the cargo has now been salvaged and some was washed up into what is now known as LOCH ARD Gorge. Cargo and artefacts have also been illegally salvaged over many years before protective legislation was introduced. One of the most unlikely pieces of cargo to have survived the shipwreck was a Minton porcelain peacock - one of only seven in the world. The peacock was destined for the Melbourne International Exhibition in 1880. It had been well packed, which gave it adequate protection during the violent storm. Today, the Minton peacock can be seen at the Flagstaff Hill Maritime Museum in Warrnambool. From Australia's most dramatic shipwreck it has now become Australia's shipwreck artefact and is one of very few 'objects' on the Victorian State Heritage Register most valuable. The LOCH ARD shipwreck is of State significance – Victorian Heritage Register S 417. Flagstaff Hill’s collection of artefacts from LOCH ARD is significant for being one of the largest collections of artefacts from this shipwreck in Victoria. It is significant for its association with the shipwreck, which is on the Victorian Heritage Register (VHR S417). The collection is significant because of the relationship between the objects, as together they have a high potential to interpret the story of the LOCH ARD. The LOCH ARD collection is archaeologically significant as the remains of a large international passenger and cargo ship. The LOCH ARD collection is historically significant for representing aspects of Victoria’s shipping history and its potential to interpret sub-theme 1.5 of Victoria’s Framework of Historical Themes (living with natural processes). The collection is also historically significant for its association with the LOCH ARD, which was one of the worst and best known shipwrecks in Victoria’s history. Unrestored dessert spoons from the wreck of the LOCH ARD. The spoon design has a flattened fiddle-back handle, with a thin stem or shank, flared collar, and a shallow rounded bowl. The spoons metallic composition is a thin layer of brass alloy which has partially corroded back to a nickel-silver base metal. Some verdigris and heavy concretion joins spoons along stem and handle. Evidence of another spoon visible in top bowl. Plain heraldic shield is visible on upper rear of bottom bowl. 2 spoons in group.flagstaff hill, warrnambool, shipwrecked coast, flagstaff hill maritime museum, maritime museum, shipwreck coast, flagstaff hill maritime village, great ocean road, loch line, loch ard, captain gibbs, eva carmichael, tom pearce, glenample station, mutton bird island, loch ard gorge, electroplated cutlery, loch ard shipwreck, william page and co, birmingham brass plating, dessert spoons -
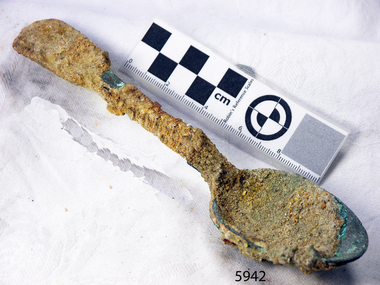 Flagstaff Hill Maritime Museum and Village
Spoon, circa 1878
These medium-sized dessert spoons are from the wreck of the LOCH ARD, a Loch Line ship of 1,693 tons which sailed from Gravesend, London, on 2 March 1878 with 17 passengers and a crew of 36 under Captain George Gibbs. “The intention was to discharge cargo in Melbourne, before returning to London via the Horn with wool and wheat”. Instead, on 1 June 1878, after 90 days at sea, she struck the sandstone cliffs of Mutton Bird Island on the south west coast of Victoria, and sank with the loss of 52 lives and all her cargo. The manifest of the LOCH ARD listed an array of manufactured goods and bulk metals being exported to the Colony of Victoria, with a declared value of £53,700. (202 bills of lading show an actual invoice value of £68, 456, with insurance underwriting to £30,000 of all cargo). Included in the manifest is the item of “Tin hardware & cutlery £7,530”. These dessert spoons are some of 482 similar items of electro-plated cutlery from the LOCH ARD site, comprising spoons and forks of various sizes but all sharing the same general shape or design and metallic composition. 49 of these pieces display a legible makers’ mark — the initials “W” and “P” placed within a raised diamond outline, which is in turn contained within a sunken crown shape — identifying the manufacturer as William Page & Co of Birmingham. An electroplater’s makers’ marks, unlike sterling silver hallmarks, are not consistent identifiers of quality or date and place of manufacture. A similar line of five impressions was usually made to impress the consumer with an implication of industry standards, but what each one actually signified was not regulated and so they varied according to the whim of the individual foundry. In this case, the maker’s marks are often obscured by sedimentary accretion or removed by corrosion after a century of submersion in the ocean. However sufficient detail has survived to indicate that these samples of electro-plated cutlery probably originated from the same consignment in the LOCH ARD’s cargo. The generally common range of marks are drawn from 255 tea spoons, 125 dessert spoons, and 99 table forks. These marks are clearly visible in 66 instances, while the same sequence of general outlines, or depression shapes, is discernible in another 166 examples. Suggested trade names for William Page & Co’s particular blend of brass plating are ‘roman silver’ or ‘silverite’. This copper alloy polishes to a lustrous gold when new, discolouring to a murky grey with greenish hue when neglected. HISTORY OF THE LOCH ARD The LOCH ARD belonged to the famous Loch Line which sailed many ships from England to Australia. Built in Glasgow by Barclay, Curdle and Co. in 1873, the LOCH ARD was a three-masted square rigged iron sailing ship. The ship measured 262ft 7" (79.87m) in length, 38ft (11.58m) in width, 23ft (7m) in depth and had a gross tonnage of 1693 tons. The LOCH ARD's main mast measured a massive 150ft (45.7m) in height. LOCH ARD made three trips to Australia and one trip to Calcutta before its final voyage. LOCH ARD left England on March 2, 1878, under the command of Captain Gibbs, a newly married, 29 year old. She was bound for Melbourne with a crew of 37, plus 17 passengers and a load of cargo. The general cargo reflected the affluence of Melbourne at the time. On board were straw hats, umbrella, perfumes, clay pipes, pianos, clocks, confectionary, linen and candles, as well as a heavier load of railway irons, cement, lead and copper. There were items included that intended for display in the Melbourne International Exhibition in 1880. The voyage to Port Phillip was long but uneventful. At 3am on June 1, 1878, Captain Gibbs was expecting to see land and the passengers were becoming excited as they prepared to view their new homeland in the early morning. But LOCH ARD was running into a fog which greatly reduced visibility. Captain Gibbs was becoming anxious as there was no sign of land or the Cape Otway lighthouse. At 4am the fog lifted. A man aloft announced that he could see breakers. The sheer cliffs of Victoria's west coast came into view, and Captain Gibbs realised that the ship was much closer to them than expected. He ordered as much sail to be set as time would permit and then attempted to steer the vessel out to sea. On coming head on into the wind, the ship lost momentum, the sails fell limp and LOCH ARD's bow swung back. Gibbs then ordered the anchors to be released in an attempt to hold its position. The anchors sank some 50 fathoms - but did not hold. By this time LOCH ARD was among the breakers and the tall cliffs of Mutton Bird Island rose behind the ship. Just half a mile from the coast, the ship's bow was suddenly pulled around by the anchor. The captain tried to tack out to sea, but the ship struck a reef at the base of Mutton Bird Island, near Port Campbell. Waves broke over the ship and the top deck was loosened from the hull. The masts and rigging came crashing down knocking passengers and crew overboard. When a lifeboat was finally launched, it crashed into the side of LOCH ARD and capsized. Tom Pearce, who had launched the boat, managed to cling to its overturned hull and shelter beneath it. He drifted out to sea and then on the flood tide came into what is now known as LOCH ARD Gorge. He swam to shore, bruised and dazed, and found a cave in which to shelter. Some of the crew stayed below deck to shelter from the falling rigging but drowned when the ship slipped off the reef into deeper water. Eva Carmichael had raced onto deck to find out what was happening only to be confronted by towering cliffs looming above the stricken ship. In all the chaos, Captain Gibbs grabbed Eva and said, "If you are saved Eva, let my dear wife know that I died like a sailor". That was the last Eva Carmichael saw of the captain. She was swept off the ship by a huge wave. Eva saw Tom Pearce on a small rocky beach and yelled to attract his attention. He dived in and swam to the exhausted woman and dragged her to shore. He took her to the cave and broke open case of brandy which had washed up on the beach. He opened a bottle to revive the unconscious woman. A few hours later Tom scaled a cliff in search of help. He followed hoof prints and came by chance upon two men from nearby Glenample Station three and a half miles away. In a state of exhaustion, he told the men of the tragedy. Tom returned to the gorge while the two men rode back to the station to get help. By the time they reached LOCH ARD Gorge, it was cold and dark. The two shipwreck survivors were taken to Glenample Station to recover. Eva stayed at the station for six weeks before returning to Ireland, this time by steamship. In Melbourne, Tom Pearce received a hero's welcome. He was presented with the first gold medal of the Royal Humane Society of Victoria and a £1000 cheque from the Victorian Government. Concerts were performed to honour the young man's bravery and to raise money for those who lost family in the LOCH ARD disaster. Of the 54 crew members and passengers on board, only two survived: the apprentice, Tom Pearce and the young woman passenger, Eva Carmichael, who lost all of her family in the tragedy. Ten days after the LOCH ARD tragedy, salvage rights to the wreck were sold at auction for £2,120. Cargo valued at £3,000 was salvaged and placed on the beach, but most washed back into the sea when another storm developed. The wreck of LOCH ARD still lies at the base of Mutton Bird Island. Much of the cargo has now been salvaged and some was washed up into what is now known as LOCH ARD Gorge. Cargo and artefacts have also been illegally salvaged over many years before protective legislation was introduced. One of the most unlikely pieces of cargo to have survived the shipwreck was a Minton porcelain peacock - one of only seven in the world. The peacock was destined for the Melbourne International Exhibition in 1880. It had been well packed, which gave it adequate protection during the violent storm. Today, the Minton peacock can be seen at the Flagstaff Hill Maritime Museum in Warrnambool. From Australia's most dramatic shipwreck it has now become Australia's shipwreck artefact and is one of very few 'objects' on the Victorian State Heritage Register most valuable. The LOCH ARD shipwreck is of State significance – Victorian Heritage Register S 417. Flagstaff Hill’s collection of artefacts from LOCH ARD is significant for being one of the largest collections of artefacts from this shipwreck in Victoria. It is significant for its association with the shipwreck, which is on the Victorian Heritage Register (VHR S417). The collection is significant because of the relationship between the objects, as together they have a high potential to interpret the story of the LOCH ARD. The LOCH ARD collection is archaeologically significant as the remains of a large international passenger and cargo ship. The LOCH ARD collection is historically significant for representing aspects of Victoria’s shipping history and its potential to interpret sub-theme 1.5 of Victoria’s Framework of Historical Themes (living with natural processes). The collection is also historically significant for its association with the LOCH ARD, which was one of the worst and best known shipwrecks in Victoria’s history. Unrestored dessert spoons from the wreck of the LOCH ARD. The spoon design has a flattened fiddle-back handle, with a thin stem or shank, flared collar, and a shallow rounded bowl. The spoons metallic composition is a thin layer of brass alloy which has partially corroded back to a nickel-silver base metal. Some verdigris and heavy concretion on spoon bowl and handle. 2 spoons in group.flagstaff hill, warrnambool, shipwrecked coast, flagstaff hill maritime museum, maritime museum, shipwreck coast, flagstaff hill maritime village, great ocean road, loch line, loch ard, captain gibbs, eva carmichael, tom pearce, glenample station, mutton bird island, loch ard gorge, electroplated cutlery, loch ard shipwreck, william page and co, birmingham brass plating, dessert spoons -
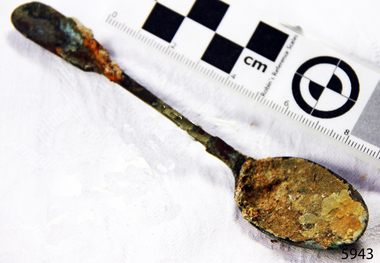 Flagstaff Hill Maritime Museum and Village
Spoon, circa 1878
This sugar spoon is from the wreck of the LOCH ARD, a Loch Line ship of 1,693 tons which sailed from Gravesend, London, on 2 March 1878 with 17 passengers and a crew of 36 under Captain George Gibbs. “The intention was to discharge cargo in Melbourne, before returning to London via the Horn with wool and wheat”. Instead, on 1 June 1878, after 90 days at sea, she struck the sandstone cliffs of Mutton Bird Island on the south west coast of Victoria, and sank with the loss of 52 lives and all her cargo. The manifest of the LOCH ARD listed an array of manufactured goods and bulk metals being exported to the Colony of Victoria, with a declared value of £53,700. (202 bills of lading show an actual invoice value of £68, 456, with insurance underwriting to £30,000 of all cargo). Included in the manifest is the item of “Tin hardware & cutlery £7,530”. This sugarspoon is one of 482 similar items of electro-plated cutlery from the LOCH ARD site, comprising spoons and forks of various sizes but all sharing the same general shape or design and metallic composition. 49 of these pieces display a legible makers’ mark — the initials “W” and “P” placed within a raised diamond outline, which is in turn contained within a sunken crown shape — identifying the manufacturer as William Page & Co of Birmingham. An electroplater’s makers’ marks, unlike sterling silver hallmarks, are not consistent identifiers of quality or date and place of manufacture. A similar line of five impressions was usually made to impress the consumer with an implication of industry standards, but what each one actually signified was not regulated and so they varied according to the whim of the individual foundry. In this case, the maker’s marks are often obscured by sedimentary accretion or removed by corrosion after a century of submersion in the ocean. However sufficient detail has survived to indicate that these samples of electro-plated cutlery probably originated from the same consignment in the LOCH ARD’s cargo. The generally common range of marks are drawn from 255 tea spoons, 125 dessert spoons, and 99 table forks. These marks are clearly visible in 66 instances, while the same sequence of general outlines, or depression shapes, is discernible in another 166 examples. Suggested trade names for William Page & Co’s particular blend of brass plating are ‘roman silver’ or ‘silverite’. This copper alloy polishes to a lustrous gold when new, discolouring to a murky grey with greenish hue when neglected. HISTORY OF THE LOCH ARD The LOCH ARD belonged to the famous Loch Line which sailed many ships from England to Australia. Built in Glasgow by Barclay, Curdle and Co. in 1873, the LOCH ARD was a three-masted square rigged iron sailing ship. The ship measured 262ft 7" (79.87m) in length, 38ft (11.58m) in width, 23ft (7m) in depth and had a gross tonnage of 1693 tons. The LOCH ARD's main mast measured a massive 150ft (45.7m) in height. LOCH ARD made three trips to Australia and one trip to Calcutta before its final voyage. LOCH ARD left England on March 2, 1878, under the command of Captain Gibbs, a newly married, 29 year old. She was bound for Melbourne with a crew of 37, plus 17 passengers and a load of cargo. The general cargo reflected the affluence of Melbourne at the time. On board were straw hats, umbrella, perfumes, clay pipes, pianos, clocks, confectionary, linen and candles, as well as a heavier load of railway irons, cement, lead and copper. There were items included that intended for display in the Melbourne International Exhibition in 1880. The voyage to Port Phillip was long but uneventful. At 3am on June 1, 1878, Captain Gibbs was expecting to see land and the passengers were becoming excited as they prepared to view their new homeland in the early morning. But LOCH ARD was running into a fog which greatly reduced visibility. Captain Gibbs was becoming anxious as there was no sign of land or the Cape Otway lighthouse. At 4am the fog lifted. A man aloft announced that he could see breakers. The sheer cliffs of Victoria's west coast came into view, and Captain Gibbs realised that the ship was much closer to them than expected. He ordered as much sail to be set as time would permit and then attempted to steer the vessel out to sea. On coming head on into the wind, the ship lost momentum, the sails fell limp and LOCH ARD's bow swung back. Gibbs then ordered the anchors to be released in an attempt to hold its position. The anchors sank some 50 fathoms - but did not hold. By this time LOCH ARD was among the breakers and the tall cliffs of Mutton Bird Island rose behind the ship. Just half a mile from the coast, the ship's bow was suddenly pulled around by the anchor. The captain tried to tack out to sea, but the ship struck a reef at the base of Mutton Bird Island, near Port Campbell. Waves broke over the ship and the top deck was loosened from the hull. The masts and rigging came crashing down knocking passengers and crew overboard. When a lifeboat was finally launched, it crashed into the side of LOCH ARD and capsized. Tom Pearce, who had launched the boat, managed to cling to its overturned hull and shelter beneath it. He drifted out to sea and then on the flood tide came into what is now known as LOCH ARD Gorge. He swam to shore, bruised and dazed, and found a cave in which to shelter. Some of the crew stayed below deck to shelter from the falling rigging but drowned when the ship slipped off the reef into deeper water. Eva Carmichael had raced onto deck to find out what was happening only to be confronted by towering cliffs looming above the stricken ship. In all the chaos, Captain Gibbs grabbed Eva and said, "If you are saved Eva, let my dear wife know that I died like a sailor". That was the last Eva Carmichael saw of the captain. She was swept off the ship by a huge wave. Eva saw Tom Pearce on a small rocky beach and yelled to attract his attention. He dived in and swam to the exhausted woman and dragged her to shore. He took her to the cave and broke open case of brandy which had washed up on the beach. He opened a bottle to revive the unconscious woman. A few hours later Tom scaled a cliff in search of help. He followed hoof prints and came by chance upon two men from nearby Glenample Station three and a half miles away. In a state of exhaustion, he told the men of the tragedy. Tom returned to the gorge while the two men rode back to the station to get help. By the time they reached LOCH ARD Gorge, it was cold and dark. The two shipwreck survivors were taken to Glenample Station to recover. Eva stayed at the station for six weeks before returning to Ireland, this time by steamship. In Melbourne, Tom Pearce received a hero's welcome. He was presented with the first gold medal of the Royal Humane Society of Victoria and a £1000 cheque from the Victorian Government. Concerts were performed to honour the young man's bravery and to raise money for those who lost family in the LOCH ARD disaster. Of the 54 crew members and passengers on board, only two survived: the apprentice, Tom Pearce and the young woman passenger, Eva Carmichael, who lost all of her family in the tragedy. Ten days after the LOCH ARD tragedy, salvage rights to the wreck were sold at auction for £2,120. Cargo valued at £3,000 was salvaged and placed on the beach, but most washed back into the sea when another storm developed. The wreck of LOCH ARD still lies at the base of Mutton Bird Island. Much of the cargo has now been salvaged and some was washed up into what is now known as LOCH ARD Gorge. Cargo and artefacts have also been illegally salvaged over many years before protective legislation was introduced. One of the most unlikely pieces of cargo to have survived the shipwreck was a Minton porcelain peacock - one of only seven in the world. The peacock was destined for the Melbourne International Exhibition in 1880. It had been well packed, which gave it adequate protection during the violent storm. Today, the Minton peacock can be seen at the Flagstaff Hill Maritime Museum in Warrnambool. From Australia's most dramatic shipwreck it has now become Australia's shipwreck artefact and is one of very few 'objects' on the Victorian State Heritage Register most valuable. The LOCH ARD shipwreck is of State significance – Victorian Heritage Register S 417. Flagstaff Hill’s collection of artefacts from LOCH ARD is significant for being one of the largest collections of artefacts from this shipwreck in Victoria. It is significant for its association with the shipwreck, which is on the Victorian Heritage Register (VHR S417). The collection is significant because of the relationship between the objects, as together they have a high potential to interpret the story of the LOCH ARD. The LOCH ARD collection is archaeologically significant as the remains of a large international passenger and cargo ship. The LOCH ARD collection is historically significant for representing aspects of Victoria’s shipping history and its potential to interpret sub-theme 1.5 of Victoria’s Framework of Historical Themes (living with natural processes). The collection is also historically significant for its association with the LOCH ARD, which was one of the worst and best known shipwrecks in Victoria’s history. Unrestored sugar spoon from the wreck of the LOCH ARD. The spoon design has a flattened fiddle-back handle, with a thin stem or shank, flared collar, and a shallow rounded bowl. The spoons metallic composition is a thin layer of brass alloy which has partially corroded back to a nickel-silver base metal. 40% concretion on spoon bowl and handle. Spoon is bent and only a small amount of the original plate remains. No visible makers marks.flagstaff hill, warrnambool, shipwrecked coast, flagstaff hill maritime museum, maritime museum, shipwreck coast, flagstaff hill maritime village, great ocean road, loch line, loch ard, captain gibbs, eva carmichael, tom pearce, glenample station, mutton bird island, loch ard gorge, electroplated cutlery, loch ard shipwreck, nickel silver, william page and co, birmingham brass plating, makers marks -
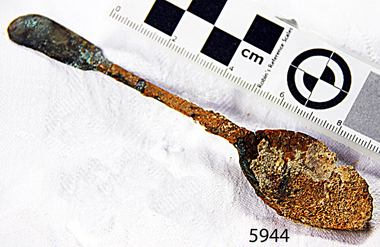 Flagstaff Hill Maritime Museum and Village
Spoon, circa 1878
This sugar spoon is from the wreck of the LOCH ARD, a Loch Line ship of 1,693 tons which sailed from Gravesend, London, on 2 March 1878 with 17 passengers and a crew of 36 under Captain George Gibbs. “The intention was to discharge cargo in Melbourne, before returning to London via the Horn with wool and wheat”. Instead, on 1 June 1878, after 90 days at sea, she struck the sandstone cliffs of Mutton Bird Island on the south west coast of Victoria, and sank with the loss of 52 lives and all her cargo. The manifest of the LOCH ARD listed an array of manufactured goods and bulk metals being exported to the Colony of Victoria, with a declared value of £53,700. (202 bills of lading show an actual invoice value of £68, 456, with insurance underwriting to £30,000 of all cargo). Included in the manifest is the item of “Tin hardware & cutlery £7,530”. This sugarspoon is one of 482 similar items of electro-plated cutlery from the LOCH ARD site, comprising spoons and forks of various sizes but all sharing the same general shape or design and metallic composition. 49 of these pieces display a legible makers’ mark — the initials “W” and “P” placed within a raised diamond outline, which is in turn contained within a sunken crown shape — identifying the manufacturer as William Page & Co of Birmingham. An electroplater’s makers’ marks, unlike sterling silver hallmarks, are not consistent identifiers of quality or date and place of manufacture. A similar line of five impressions was usually made to impress the consumer with an implication of industry standards, but what each one actually signified was not regulated and so they varied according to the whim of the individual foundry. In this case, the maker’s marks are often obscured by sedimentary accretion or removed by corrosion after a century of submersion in the ocean. However sufficient detail has survived to indicate that these samples of electro-plated cutlery probably originated from the same consignment in the LOCH ARD’s cargo. The generally common range of marks are drawn from 255 tea spoons, 125 dessert spoons, and 99 table forks. These marks are clearly visible in 66 instances, while the same sequence of general outlines, or depression shapes, is discernible in another 166 examples. Suggested trade names for William Page & Co’s particular blend of brass plating are ‘roman silver’ or ‘silverite’. This copper alloy polishes to a lustrous gold when new, discolouring to a murky grey with greenish hue when neglected. HISTORY OF THE LOCH ARD The LOCH ARD belonged to the famous Loch Line which sailed many ships from England to Australia. Built in Glasgow by Barclay, Curdle and Co. in 1873, the LOCH ARD was a three-masted square rigged iron sailing ship. The ship measured 262ft 7" (79.87m) in length, 38ft (11.58m) in width, 23ft (7m) in depth and had a gross tonnage of 1693 tons. The LOCH ARD's main mast measured a massive 150ft (45.7m) in height. LOCH ARD made three trips to Australia and one trip to Calcutta before its final voyage. LOCH ARD left England on March 2, 1878, under the command of Captain Gibbs, a newly married, 29 year old. She was bound for Melbourne with a crew of 37, plus 17 passengers and a load of cargo. The general cargo reflected the affluence of Melbourne at the time. On board were straw hats, umbrella, perfumes, clay pipes, pianos, clocks, confectionary, linen and candles, as well as a heavier load of railway irons, cement, lead and copper. There were items included that intended for display in the Melbourne International Exhibition in 1880. The voyage to Port Phillip was long but uneventful. At 3am on June 1, 1878, Captain Gibbs was expecting to see land and the passengers were becoming excited as they prepared to view their new homeland in the early morning. But LOCH ARD was running into a fog which greatly reduced visibility. Captain Gibbs was becoming anxious as there was no sign of land or the Cape Otway lighthouse. At 4am the fog lifted. A man aloft announced that he could see breakers. The sheer cliffs of Victoria's west coast came into view, and Captain Gibbs realised that the ship was much closer to them than expected. He ordered as much sail to be set as time would permit and then attempted to steer the vessel out to sea. On coming head on into the wind, the ship lost momentum, the sails fell limp and LOCH ARD's bow swung back. Gibbs then ordered the anchors to be released in an attempt to hold its position. The anchors sank some 50 fathoms - but did not hold. By this time LOCH ARD was among the breakers and the tall cliffs of Mutton Bird Island rose behind the ship. Just half a mile from the coast, the ship's bow was suddenly pulled around by the anchor. The captain tried to tack out to sea, but the ship struck a reef at the base of Mutton Bird Island, near Port Campbell. Waves broke over the ship and the top deck was loosened from the hull. The masts and rigging came crashing down knocking passengers and crew overboard. When a lifeboat was finally launched, it crashed into the side of LOCH ARD and capsized. Tom Pearce, who had launched the boat, managed to cling to its overturned hull and shelter beneath it. He drifted out to sea and then on the flood tide came into what is now known as LOCH ARD Gorge. He swam to shore, bruised and dazed, and found a cave in which to shelter. Some of the crew stayed below deck to shelter from the falling rigging but drowned when the ship slipped off the reef into deeper water. Eva Carmichael had raced onto deck to find out what was happening only to be confronted by towering cliffs looming above the stricken ship. In all the chaos, Captain Gibbs grabbed Eva and said, "If you are saved Eva, let my dear wife know that I died like a sailor". That was the last Eva Carmichael saw of the captain. She was swept off the ship by a huge wave. Eva saw Tom Pearce on a small rocky beach and yelled to attract his attention. He dived in and swam to the exhausted woman and dragged her to shore. He took her to the cave and broke open case of brandy which had washed up on the beach. He opened a bottle to revive the unconscious woman. A few hours later Tom scaled a cliff in search of help. He followed hoof prints and came by chance upon two men from nearby Glenample Station three and a half miles away. In a state of exhaustion, he told the men of the tragedy. Tom returned to the gorge while the two men rode back to the station to get help. By the time they reached LOCH ARD Gorge, it was cold and dark. The two shipwreck survivors were taken to Glenample Station to recover. Eva stayed at the station for six weeks before returning to Ireland, this time by steamship. In Melbourne, Tom Pearce received a hero's welcome. He was presented with the first gold medal of the Royal Humane Society of Victoria and a £1000 cheque from the Victorian Government. Concerts were performed to honour the young man's bravery and to raise money for those who lost family in the LOCH ARD disaster. Of the 54 crew members and passengers on board, only two survived: the apprentice, Tom Pearce and the young woman passenger, Eva Carmichael, who lost all of her family in the tragedy. Ten days after the LOCH ARD tragedy, salvage rights to the wreck were sold at auction for £2,120. Cargo valued at £3,000 was salvaged and placed on the beach, but most washed back into the sea when another storm developed. The wreck of LOCH ARD still lies at the base of Mutton Bird Island. Much of the cargo has now been salvaged and some was washed up into what is now known as LOCH ARD Gorge. Cargo and artefacts have also been illegally salvaged over many years before protective legislation was introduced. One of the most unlikely pieces of cargo to have survived the shipwreck was a Minton porcelain peacock - one of only seven in the world. The peacock was destined for the Melbourne International Exhibition in 1880. It had been well packed, which gave it adequate protection during the violent storm. Today, the Minton peacock can be seen at the Flagstaff Hill Maritime Museum in Warrnambool. From Australia's most dramatic shipwreck it has now become Australia's shipwreck artefact and is one of very few 'objects' on the Victorian State Heritage Register most valuable. The LOCH ARD shipwreck is of State significance – Victorian Heritage Register S 417. Flagstaff Hill’s collection of artefacts from LOCH ARD is significant for being one of the largest collections of artefacts from this shipwreck in Victoria. It is significant for its association with the shipwreck, which is on the Victorian Heritage Register (VHR S417). The collection is significant because of the relationship between the objects, as together they have a high potential to interpret the story of the LOCH ARD. The LOCH ARD collection is archaeologically significant as the remains of a large international passenger and cargo ship. The LOCH ARD collection is historically significant for representing aspects of Victoria’s shipping history and its potential to interpret sub-theme 1.5 of Victoria’s Framework of Historical Themes (living with natural processes). The collection is also historically significant for its association with the LOCH ARD, which was one of the worst and best known shipwrecks in Victoria’s history. Unrestored sugar spoon from the wreck of the LOCH ARD. The spoon design has a flattened fiddle-back handle, with a thin stem or shank, flared collar, and a shallow rounded bowl. The spoons metallic composition is a thin layer of brass alloy which has partially corroded back to a nickel-silver base metal. 80% of surface are is covered by sediment. Bowl is split and broken. Some verdigris on exposed portion of base metal. No makers marks are visible. flagstaff hill, warrnambool, shipwrecked coast, flagstaff hill maritime museum, maritime museum, shipwreck coast, flagstaff hill maritime village, great ocean road, loch line, loch ard, captain gibbs, eva carmichael, tom pearce, glenample station, mutton bird island, loch ard gorge, electroplated cutlery, loch ard shipwreck, nickel silver, william page and co, birmingham brass plating, makers marks -
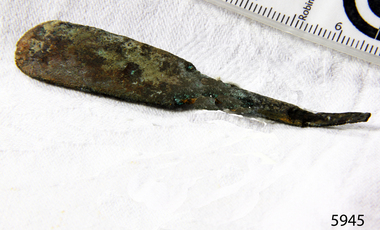 Flagstaff Hill Maritime Museum and Village
Spoon Handle
This upper portion of a brass plated spoon is from the wreck of the LOCH ARD, a Loch Line ship of 1,693 tons which sailed from Gravesend, London, on 2 March 1878 with 17 passengers and a crew of 36 under Captain George Gibbs. “The intention was to discharge cargo in Melbourne, before returning to London via the Horn with wool and wheat”. Instead, on 1 June 1878, after 90 days at sea, she struck the sandstone cliffs of Mutton Bird Island on the south west coast of Victoria, and sank with the loss of 52 lives and all her cargo. The manifest of the LOCH ARD listed an array of manufactured goods and bulk metals being exported to the Colony of Victoria, with a declared value of £53,700. (202 bills of lading show an actual invoice value of £68, 456, with insurance underwriting to £30,000 of all cargo). Included in the manifest is the item of “Tin hardware & cutlery £7,530”. This spoon handle is one of 482 similar items of electro-plated cutlery from the LOCH ARD site, comprising spoons and forks of various sizes but all sharing the same general shape or design and metallic composition. 49 of these pieces display a legible makers’ mark — the initials “W” and “P” placed within a raised diamond outline, which is in turn contained within a sunken crown shape — identifying the manufacturer as William Page & Co of Birmingham. An electroplater’s makers’ marks, unlike sterling silver hallmarks, are not consistent identifiers of quality or date and place of manufacture. A similar line of five impressions was usually made to impress the consumer with an implication of industry standards, but what each one actually signified was not regulated and so they varied according to the whim of the individual foundry. In this case, the maker’s marks are often obscured by sedimentary accretion or removed by corrosion after a century of submersion in the ocean. However sufficient detail has survived to indicate that these samples of electro-plated cutlery probably originated from the same consignment in the LOCH ARD’s cargo. The generally common range of marks are drawn from 255 tea spoons, 125 dessert spoons, and 99 table forks. These marks are clearly visible in 66 instances, while the same sequence of general outlines, or depression shapes, is discernible in another 166 examples. Suggested trade names for William Page & Co’s particular blend of brass plating are ‘roman silver’ or ‘silverite’. This copper alloy polishes to a lustrous gold when new, discolouring to a murky grey with greenish hue when neglected. HISTORY OF THE LOCH ARD The LOCH ARD belonged to the famous Loch Line which sailed many ships from England to Australia. Built in Glasgow by Barclay, Curdle and Co. in 1873, the LOCH ARD was a three-masted square rigged iron sailing ship. The ship measured 262ft 7" (79.87m) in length, 38ft (11.58m) in width, 23ft (7m) in depth and had a gross tonnage of 1693 tons. The LOCH ARD's main mast measured a massive 150ft (45.7m) in height. LOCH ARD made three trips to Australia and one trip to Calcutta before its final voyage. LOCH ARD left England on March 2, 1878, under the command of Captain Gibbs, a newly married, 29 year old. She was bound for Melbourne with a crew of 37, plus 17 passengers and a load of cargo. The general cargo reflected the affluence of Melbourne at the time. On board were straw hats, umbrella, perfumes, clay pipes, pianos, clocks, confectionary, linen and candles, as well as a heavier load of railway irons, cement, lead and copper. There were items included that intended for display in the Melbourne International Exhibition in 1880. The voyage to Port Phillip was long but uneventful. At 3am on June 1, 1878, Captain Gibbs was expecting to see land and the passengers were becoming excited as they prepared to view their new homeland in the early morning. But LOCH ARD was running into a fog which greatly reduced visibility. Captain Gibbs was becoming anxious as there was no sign of land or the Cape Otway lighthouse. At 4am the fog lifted. A man aloft announced that he could see breakers. The sheer cliffs of Victoria's west coast came into view, and Captain Gibbs realised that the ship was much closer to them than expected. He ordered as much sail to be set as time would permit and then attempted to steer the vessel out to sea. On coming head on into the wind, the ship lost momentum, the sails fell limp and LOCH ARD's bow swung back. Gibbs then ordered the anchors to be released in an attempt to hold its position. The anchors sank some 50 fathoms - but did not hold. By this time LOCH ARD was among the breakers and the tall cliffs of Mutton Bird Island rose behind the ship. Just half a mile from the coast, the ship's bow was suddenly pulled around by the anchor. The captain tried to tack out to sea, but the ship struck a reef at the base of Mutton Bird Island, near Port Campbell. Waves broke over the ship and the top deck was loosened from the hull. The masts and rigging came crashing down knocking passengers and crew overboard. When a lifeboat was finally launched, it crashed into the side of LOCH ARD and capsized. Tom Pearce, who had launched the boat, managed to cling to its overturned hull and shelter beneath it. He drifted out to sea and then on the flood tide came into what is now known as LOCH ARD Gorge. He swam to shore, bruised and dazed, and found a cave in which to shelter. Some of the crew stayed below deck to shelter from the falling rigging but drowned when the ship slipped off the reef into deeper water. Eva Carmichael had raced onto deck to find out what was happening only to be confronted by towering cliffs looming above the stricken ship. In all the chaos, Captain Gibbs grabbed Eva and said, "If you are saved Eva, let my dear wife know that I died like a sailor". That was the last Eva Carmichael saw of the captain. She was swept off the ship by a huge wave. Eva saw Tom Pearce on a small rocky beach and yelled to attract his attention. He dived in and swam to the exhausted woman and dragged her to shore. He took her to the cave and broke open case of brandy which had washed up on the beach. He opened a bottle to revive the unconscious woman. A few hours later Tom scaled a cliff in search of help. He followed hoof prints and came by chance upon two men from nearby Glenample Station three and a half miles away. In a state of exhaustion, he told the men of the tragedy. Tom returned to the gorge while the two men rode back to the station to get help. By the time they reached LOCH ARD Gorge, it was cold and dark. The two shipwreck survivors were taken to Glenample Station to recover. Eva stayed at the station for six weeks before returning to Ireland, this time by steamship. In Melbourne, Tom Pearce received a hero's welcome. He was presented with the first gold medal of the Royal Humane Society of Victoria and a £1000 cheque from the Victorian Government. Concerts were performed to honour the young man's bravery and to raise money for those who lost family in the LOCH ARD disaster. Of the 54 crew members and passengers on board, only two survived: the apprentice, Tom Pearce and the young woman passenger, Eva Carmichael, who lost all of her family in the tragedy. Ten days after the LOCH ARD tragedy, salvage rights to the wreck were sold at auction for £2,120. Cargo valued at £3,000 was salvaged and placed on the beach, but most washed back into the sea when another storm developed. The wreck of LOCH ARD still lies at the base of Mutton Bird Island. Much of the cargo has now been salvaged and some was washed up into what is now known as LOCH ARD Gorge. Cargo and artefacts have also been illegally salvaged over many years before protective legislation was introduced. One of the most unlikely pieces of cargo to have survived the shipwreck was a Minton porcelain peacock - one of only seven in the world. The peacock was destined for the Melbourne International Exhibition in 1880. It had been well packed, which gave it adequate protection during the violent storm. Today, the Minton peacock can be seen at the Flagstaff Hill Maritime Museum in Warrnambool. From Australia's most dramatic shipwreck it has now become Australia's shipwreck artefact and is one of very few 'objects' on the Victorian State Heritage Register most valuable. The LOCH ARD shipwreck is of State significance – Victorian Heritage Register S 417. Flagstaff Hill’s collection of artefacts from LOCH ARD is significant for being one of the largest collections of artefacts from this shipwreck in Victoria. It is significant for its association with the shipwreck, which is on the Victorian Heritage Register (VHR S417). The collection is significant because of the relationship between the objects, as together they have a high potential to interpret the story of the LOCH ARD. The LOCH ARD collection is archaeologically significant as the remains of a large international passenger and cargo ship. The LOCH ARD collection is historically significant for representing aspects of Victoria’s shipping history and its potential to interpret sub-theme 1.5 of Victoria’s Framework of Historical Themes (living with natural processes). The collection is also historically significant for its association with the LOCH ARD, which was one of the worst and best known shipwrecks in Victoria’s history. Spoon handle and bent part of stem. Some encrustation and Silver Oxide. Recovered from the Loch Ard wreck.flagstaff hill, warrnambool, shipwrecked coast, flagstaff hill maritime museum, maritime museum, shipwreck coast, flagstaff hill maritime village, great ocean road, loch line, loch ard, captain gibbs, eva carmichael, tom pearce, glenample station, mutton bird island, loch ard gorge, electroplated cutlery, handle, spoon, loch ard shipwreck -
 Bendigo Historical Society Inc.
Document - Arthur T. Pattinson, 1962
10570 South African (Boer) War Memorial Bendigo. The monument commemorates those who died in service or were killed in action while serving in the South African (Boer) War. It is a bronze statue of a soldier on a granite base. Leader (Melbourne), 19 November 1904. “There was a large assemblage on the afternoon of 11th November, when the ceremony of unveiling the soldiers' memorial statue was performed by Brigadier-General Gordon in the presence of a muster of branches of the defence forces. The statue, which is in bronze, is mounted on a massive granite base, on the foot of which is the following inscription: — "Bendigo's tribute to the memory of the Australian soldiers who, in the South African war of 1899 - 1902 gave their lives for Queen and Empire. The statue was modelled by Mr. J. Walker, a young Bendigonian, who has been studying for two or three years under Mr. A. T. Woodward art instructor at the local school of mines.“ Ola Cohn recalled in her autobiography meeting John Walker as a sculpture student at the Bendigo School of Mines and that he had later received the commission for the Boer War Memorial although she neglects to mention its location. John Walker was born in Bendigo and first studied sculpture at the Bendigo School of Art. Walker, then went to England to study at the Royal College of Art London, and in Paris at the Académie Colarossi and Julian Academy. John Walker worked as a sculptor in both Bendigo and West Brunswick before turning to chicken farming in the Bendigo suburb of White Hills. The photo of A. T. Pattinson was taken by George Leake Massingham, a professional photographer, who had seven children, one of whom died at birth. After arriving in Australia from England, he established himself as a travelling photographer, an occupation he continued after his marriage. He travelled throughout country Queensland, Victoria and New South Wales, setting up studios along the way. The family ended up moving with him, travelling to Sydney, Narrandera, Bendigo, Newtown, Geelong and Deniliquin. Correspondence re Boer War Memorial Bendigo Boer War Memorial Bendigo. Letters and photo from and to Mrs Wilson, eldest daughter of Mr Arthur T. Pattinson who was a model for the Boer War sculpture. 10570a A black and white photo of Trooper Arthur T. Pattinson restored by BHS Volunteers. 10570b The original photo as sent by Mrs Wilson to Harold Curnow (Bendigo Historical Society) in 1962. The photo is mounted on heavy brown cardboard and has an old catalogue number of "P680" inscribed on it. The cardboard is torn and held together with sticky tape. On the front in italics is printed G.L. Massingham, Bendigo. 10570c Notes on the rear of the photo from Mrs Wilson state that "the photo is of Arthur T. Pattinson (Rusty), an Australian Light Horse trooper who served in the Boer War. The Boer War Memorial in Pall Mall Bendigo represents a trooper on guard. The sculptor was Jack Walker who used Pattinson as a model, and it is regarded as an excellent likeness." 10570d A letter from Harold Curnow back to Mrs Wilson on Jan 4th, 1963, acknowledging receipt of the photo and a letter received, noting the significance of the historical information. 10570e Handwritten letter 29/11/1962 from Mrs Wilson to Mr Curnow introducing herself as Mr. Pattinson's eldest daughter and answering the letter he wrote to her father. She mentions the bad health of her parents. Arthur modelled for the statue at least two to three times per week in a studio on the top floor of a building in Bull St. He was the original model to the best of her knowledge. Another model possibly Mr P. Handmear may have sat as a model for renovations (*). The rifle was a light horse rifle issued to Pattinson as he was still serving in 1904. Arthur and Handmear were boys together and very close. * Note - the plaster model was repaired prior to casting in metal. 10570f An obituary notice: 18/11/64 "On Nov. 17 at Frankston, Emma, wife of the late A. T. Pattinson (Rusty), late of Bendigo. 10570g Letter Nov. 20th, 1962, from Harold Curnow to Mr Arthur T. Pattinson, Kent St., Mornington, Vic. "Dear Mr Pattinson, Last week your brother, Brit., whom I have known for many years, supplied the Bendigo Advertiser with some interesting information regarding your role as the model for the late Jack Walker when he was making the statue for the Boer War Memorial here. Yesterday however, another claimant to the distinction of being the model was advanced in the Bendigo Advertiser by Mr Richard Marshall, of Moran Street, Bendigo who said that the soldier's model was Phillip Handmear. I understand that your brother has sent the newspaper cuttings on to you. When he called to see me yesterday, he suggested that I write to you for further particulars. Can you recall the discussion you had with Jack Walker when he approached you about acting as the model and do you remember how many times you posed for him, and whether the work was done in the house, in the yard, or in one of the outbuildings at Moran Street? In short, any details at all. At this point in time we are considering an interesting facet in Bendigo's history, so any seemingly unimportant incidents could really be useful if we knew about them. Have you any old newspaper cuttings mentioning your name in connection with the memorial? Do you remember any remarks that passed between you and Jack Walker during the long sessions you must have put in on this work? This could be very important. And do you recall where the rifle came from? Did you or Jack Walker borrow it from the military authorities? Back in 1934 Jack Walker recalled having had to pull the plaster model down and remake it when he discovered it was slightly off-balance and was slowly toppling forward. He told me he had to get his model to pose again. Do you know anything about this? Could it have been that he got Mr. Handmear in for the final stage of the work? That, of course, would apply only if you were not available. Incidentally, I never heard of Mr Handmear until I saw his name in yesterday's "Advertiser". In any case I intended contacting your brother or you to enquire whether any member of your family has an old photograph of you in your Boer War uniform, that is, one taken about the time of or just after the Boer War. I am sure that members of the Bendigo Branch of the Royal Historical Society would be most interested to see it. I hope you will have the time and inclination to consider the many points I have raised in this letter because the subject has aroused a lot of interest in Bendigo. Hoping you are well and quite as active as you wish, I remain, with all good wishes, Yours sincerely, Harold Curnow". john walker, jack walker, boer war memorial bendigo, arthur pattinson, soldiers' memorial bendigo -
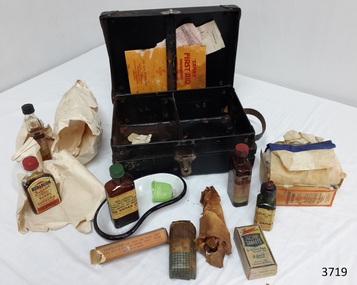 Flagstaff Hill Maritime Museum and Village
Equipment - First Aid Case, Thomas Urquhart & Son Pty Ltd (Thos. Urquhart), 1930-1939
This small, portable 1930s Sanax First Aid Case has been strongly constructed, with corners reinforced with metal to take knocks and bumps, so it could be quickly transported to the site of an emergency. Having these supplies organised into a kit made them easily accessible and reduces time to take them to the site of the accident. It was possibly designed for use in factories because the booklet in the case states that the kit complies with “Part 1, Victorian Factories Regulations”. The text of the printed brand “Sanax First Aid Case” is right-way up when the case stands vertically on its hinged side. In modern times people are well aware of the importance of quick treatment when accident and injury occur. However, before the first commercial First Aid Kit was made by Johnson & Johnson in 1888, people had little knowledge about treating injuries and lacked information about suitable supplies to keep on hand for emergencies. They were often unaware of how to help in that critical time before the doctor or other assistance arrived, a particularly important time for the many people living in remote areas. A quote from Johnson’s & Johnson’s 1888 price list explains “It is a fact, which is everywhere being recognized, that many lives are lost and much suffering entailed in such accidents on account of the lack of the simple but necessary articles required to afford prompt assistance to the wounded.” One example of the value of First Aid assistance to community groups is shown in an article from the Weekly Times, 29th November 1930. It records a report from the Annuello Branch of the Younger Set (a Country Women’s Organisation), telling that on Armistice Day their president Mrs Jamieson, presented the Annuello School with the gift of a Sanax Red Cross First Aid outfit, which was accepted as being “of great practical use to the scholars.” (Annuello is a remote wheat growing area in the Mallee region of North Western Victoria, which became a soldier settlement area after World War I. There is a strain of wheat named ‘Annuello’ due to its suitability for that area. ) The Sanax Case in our Collection contains instructions, equipment and medical items suitable for use in emergency situations. The Case was one of 42 patterns available from Sanax that conformed to ‘Part 1, Victorian Factories Regulations’. It includes items made by Sanax Company and by Burroughs Wellcome & Co. (Australia) Ltd., Sydney, NSW. A quote at the back of the First Aid Emergency Instructions booklet says: “Sanax products are made in Australia by or under the supervision of qualified chemists, from the highest quality materials. They are dependable for the purposes written on labels.” BOOKLET included in First Aid Case: “SANAX” First-Aid Emergency Instructions has orange cover and white pages, joined in the centre by two staples. Booklet contains First Aid Instructions for general events listed in alphabetical order. It also contains an indexed sections headed “Poisoning, and what to do” written by S.A. Burrows, Ph.C., Vuc and N.Z. There are instructions and diagrams on how to perform Artificial Respiration. There are advertisement for Sanax products throughout the booklet that include; - Sanax Ambulance Stretcher for timber mills, mines, ships and quarries - Saw dust masks (porous rubber) for workers in dust, paint or duco sprayers Inside cover lists Sanax’s Australian made products including - tablets and powders for headaches, neuralgia, influenza, colds - snuff for Catarrh that is “quite harmless” - First Aid Cases that come in a range of 42 patterns - sunburn preventatives and treatments - healing salve for carbuncles, pock, pimples, boils, varicose ulcers etc. - snake bite outfits and kits LEAFLETS included in First Aid Case: (1) Tannafax Tannic Acid Jelly. Tannafax should be kept at hand in every home. It should be applied direct from the tube and used with neither oil nor grease. Where a large area has to be covered the clamped end may be torn or cut off to give a wider mouth to the tube. Collapsible tubes of different sizes. Made in Australia. Burroughs Wellcome & Co. (Australia) Ltd. (Incorporated in England). Sydney, NSW. Assorted Houses, London, New York, Montreal, Cape Town, Milan, Bombay, Shanghai, Buenos Aires. Copyright A. 1817, J. 9463 (2) Tabloid. The strong thing is the just - - . Tabloid marks the wor - - Burroughs Wellcome & Comp. The use of the word is to enab – the prescriber, dispenser and patient to get the right thing with one short word, instead of the firm’s long name. If another maker apply the word to his product, the act is unlawful. Tabloid is our trade mark and brand. If a vendor disregard it in dispensing or selling, the act is unlawful for the same reason. We prosecute both offenders rigorously, in the interest of prescribers, dispensers, patients and the owners of the trade mark. Please inform us of any instance of either offence. Burroughs Wellcome & Co. (Australia) Ltd. (Incorporated in England). Telephone Number - M 4184 (4 lines) All communications to G.P.O. Box No. 1185 DD. Copyright Sy. 20. & J 9894. Medicines and Equipment included in First Aid Case: - Absorbent Cotton, Sanax, for absorbing blood or drying a wound. As a swab for washing wounds; to place above a compress to keep the heat in: or as a pad to protect wounds or fractures. The Sanax Co. Manuf. Chemists, Melbourne. Regd. Office: 5 Brunswick St, Fitzroy. N.6. - ACHE tablets, Sanax, for all aches, pains, fevers etc. Dose: 2 to 3 tablets with a draught of water, every 3 hours. Children in proportion. For influenza or colds, take the bedtime dose with a hot lemon drink or toddy. Recommended for Headaches, Colds, Influenza, Fevers, Neuralgia, Rheumatism, Nerve Pains, Sleeplessness, and Seasickness. Three Sanax Ache tablets equals one Sanax Ache powder. Each tablet contains 1.75grs. each Phenacotinum and Acety acSzilcyl, and .75grs Ammon Brom. Etc.. Sanax brand specialties are prepared by highly qualified pharmaceutical chemists and may be accepted as safe and effective for the purpose indicated on the label. The Sanax Co. Melbourne - Eye lotion, Sanax, “in eye bath full strength or diluted with equal parts of water. Sanax Co. Brunswich St, Fitzroy, Melbourne. - Iodine, Sanax, POISON, with instructions for what to do if swallowed. - Kuraburn, Sanax, Applied to the burn and allowed to dry, the pain and heat instantly disappear, and blistering is prevented. If necessary, apply again in an hours. To safeguard against burning when sunbathing, apply before exposure to the sun. If already sunburnet, use Kuraburn as directions above. Safe and harmless. Sole makers, The Sanax Co. Brunswick St. - - Vic. - Sal Volatile, Sanax, - - stimulant for - - nervous aches - - or as smelling salts Dose - - - - Solution of A- - - 5%, . The Sanax Co. Brunswick St, Melbourne. - Tannafax, Burroughs Wellcome & Co. Australia Ltd. Sydney, N.S.W., 20gm. Approx., Tannic Acid Jelly, (Tannic Acid with 0.5% Phenol in a water-soluble base) for burns and scalds. A.N. 15050, p188, logo of a unicorn. Apply lightly, allow to dry, and bandage loosely. Do not apply oil or grease. - bottle wrapped in brown paper, unknown contents, paper adhered to bottle. - dish, kidney shaped, metal, white enamel with black rim - eye bath, green, plastic or Bakelite SANAX COMPANY The Sanax Company was at the address of 5 Brunswick Street, Fitzroy [Melbourne] at least as early as November 1924, as shown by its advertisement of Ache Powder in the Weekly Times, 8th November 1924. It was still at this address in September 1951, when it advertised First Aid outfits and components in the Post Master General’s section of the Commonwealth of Australia Gazette. REFERENCES: Annuello, Victoria; Wikipedia, https://en.wikipedia.org/wiki/Annuello,_Victoria Annuello Younger Set, Branch Activities and Local Reports, Country Women’s Organisations, Weekly Times, 29 November 1930, Trove http://trove.nla.gov.au/newspaper/article/224921009?searchTerm=%22sanax%22%20and%20%22melbourne%22&searchLimits=# Commonwealth of Australia Gazette, Issue 32, 24th April 1915, https://www.legislation.gov.au/file/1915GN32 [Johnson & Johnson Price List, September 1, 1888, p. 20. From our archives], Celebrating the 125th Birthday of the First Aid Kit , The Story of Johnson & Johnson, , http://www.kilmerhouse.com/2013/06/from-1888-to-2013-celebrating-the-125th-birthday-of-the-first-aid-kit/ Post Master General’s section of the Commonwealth of Australia Gazette, Issue No. 73, Thursday 27th September 1951 http://trove.nla.gov.au/newspaper/article/232185299?searchTerm=%22sanax%22%20and%20%22fitzroy%22&searchLimits= Sanax First Aid Emergency Instructions, by S.A. Burrows, publisher Sanax Ltd. Fitzroy, Victoria, 1930-1939 English, book, Illustrated edition, Trove http://trove.nla.gov.au/version/40948895 Access to emergency medical help in early settlement days of Victoria could take quite some time, especially in remote areas. From 1888 First Aid Kits and instructions became available for work sites, offices, community groups and individuals, helping to bridge the gap between the accident and the arrival of medical assistance. This portable Sanax First Aid Case is an example of portable medical equipment made in Melbourne, Australia, in the 1930’s and available to the public. It contains a range of items plus information to be used in a variety of injuries and emergencies in in factories, households, businesses and local communities, and instructions on their use. First Aid Case, portable, Sanax First Aid Case. First Aid kit in strong black cardboard carry case with metal reinforced corners, metal hinges on lid, metal catch and leather carry handle. Inside lid is a vertical strap with narrow gap behind it. Base is divided into two compartments. Manufactured by Sanax, Fitzroy, Melbourne, C. 1930-1939 Contents include "Sanax" First Aid instructions booklet, 2 leaflets, metal kidney dish enamelled in white with black trim on edge, green plastic or Bakelite eye bath, eye lotion, Tannafax tannic acid jelly, Sal Volitile, Kuraburn, Iodine, Argyrol, ACHE tablets, absorbent cotton in cardboard box, gauze bandage, and UNKNOWN wrapped bottle. Printed in gold on lid of case “SANAX” FIRST AID CASE. Most of the contents, as well as the case, show the “SANAX” brand. Some contents are inscribed Burroughs Wellcome & Co. (Australia) Ltd., flagstaff hill, warrnambool, shipwrecked coast, flagstaff hill maritime museum, maritime museum, shipwreck coast, flagstaff hill maritime village, great ocean road, first aid items, first aid kit, emergency first aid, medical emergency kit, home emergency kit, industrial emergency kit, sanax company fitzroy melbourne, burroughs wellcome & co. (australia) ltd, thos. urquhart & son pty. ltd. melbourne, sanax first aid case, sanax first-aid emergency instructions, part 1 victorian factories regulations, tabloid medical supplies -
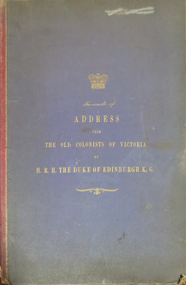 Old Colonists' Association of Ballarat Inc.
Book, Facsimile of Address From the Old Colonists of Victoria to H.R.H. The Duke of Edinburgh K.G, 1869
Blue hard covered 35 page book with an address, a reponse from Prince Alfred, and a number of signatures.To his Rotal highness Prince Alfred Ernest Albert Duke of Edinburgh K.G. &c &c &c May it please Your Royal Highness. We the undersigned, being Colonists of Victoria wirh expressions of a Century and upwards venture to approach you Royal Highness with expressions of unaltered loyalty to Her Majesty's throne and person, and our very sincere and heart congratulations to your Royal Highnedd on your auspicious visit to his distant dependency of the British Empire. We can confiently assure your Royal Highness that however attractive Republicans Institutions may be to many young communitites generally Victoria is in the main free from the taint of any such prediliction. The loyalty and attachment to Monarchial Government of those numbered amonst her older Colonists have been strenghtened bu their enlarged and by the deep connection ever increasing with their ripening years that their material interests will be best protected by the perpetuation of the intimate connexion with the Great Empire over which Her Majesty rules - an Empire the Language, Laws, Customs and Institutions of which it is their privelige to inherit. We may be allowed to esteem the visit of your Royal Highness to these shores as of teh utmost importance, regarded from the Imperial as well as from a Colonial point of view. Your Royal Highness has now had an opportunity of satisfying yourself, and may bear testimony on your return to Europe that the Colonists of Victoria, although they have left their Mother COuntry, have not lost the spirit of enterprise, the energy, the self-reliance, the love of law and order which distinguish the British Race - and that in common with their fellow countrymen at home they possess qualities, the possessoin of which by her peple has made England great and glorious amongst the nations - while your presence here proves to the Colony at large, be especially to our Colonial born youth that Her Majesty 's solicitude for our welfare is unabted. Wish a sincere hope that the visit of your Royal Highness to the other COlonies of the Australian Group may be gratifying to you, and your ultimate return to the Royal Circle safe and attended with every happiness. We beg leave to remain, With the greatest respect, Your Royal Highness' Most humble and most obedient servants, Signature Date of arrival in the Colony. Edward Henty Novr 19th 1834 Francis Henty Decr 9th 1834 John Pascoe Fawkner Oct 9th 1835 Many ignatures follow including John Wilson Novr 1841 Joseph Bickett 27 September 1842 Theophilis Dredge January 1839 Archibald Fisken August 1839 Samuel Legge April 1841 David Coghill March 1838 Joseph L'Estrange 1849 December Thomas W. Wills Dec 1839 James Cuthbert November 1840 John Lamb May 1838 John Hogan November 1839 William Higgenbotham Born Oct 19th 1840 Richard Winter January 1840 Alexander Aitken Born Melbourne June 30 1842 William Cross Yuille February 1837 George Black Decr 1840 Peter Scott Sept 1840 Robert Hoddle March 1837 Henry Darlot September 1839 W. Bacchus 1837 C.B. Hutton Feby 17th 1842 H. Gerrard Feby 1839 Thomas P. Scott 10 August 1838 William Rutledge 19th Decr 1829 in Sydney, at Melbourne in July 1838 Rodk Urquhart March 1842 Thomas Black Septr 1842 J.B. Were November 1839 Thomas Anderson 1839 John Bull June 1842old colonists, prince alfred, address, edward henty, francis henty -
 Eltham District Historical Society Inc
Archive Box, Shire of Eltham War Memorial
Material relating to the Shire of Eltham War Memorial located at Garden Hill, Kangaroo Ground. Also known as The Eltham Shire War Memorial Tower, Shire of Eltham Soldiers' Memorial and Kangaroo Ground War Memorial Park. Includes photocopies, newspaper clippings, correspondence and more beginning from early history 1919-2009. Contents: Archive Box 1 Folder 1 (Publication Proofs) The Tower of Remembrance and War Memorial Park On Garden Hill at Kangaroo Ground, Victoria 1919-2010 Folder 2 (Up to 1960) 1. Binder with plastic pockets. Photocopies. Minutes of the Kangaroo Ground War Memorial Bazaar Committee, 1922-1926 EDHS Newsletter No. 123 November 1998 PRESIDENT'S REPORT ACQUISITION FROM NILLUMBIK SHIRE'S MEMORABILIA Recently found in a storage box of old Shire of Eltham items was a school size, blue lined black covered writing book. It is recognized as the minute book and cash receipt book of the period 1922-1926 when the Memorial Park Committee, who it seems were part of the Shire of Eltham Soldier's Memorial League, was requested to raise funds for building the Shire of Eltham War Memorial Tower at Kangaroo Ground. History tells us that the tower, which is currently being refurbished, was officially opened by the Governor General of Australia, Lord Stonehaven on 11.11.26. The ladies invited to the first meeting at the Shire Hall did so on 21st September 1922. The minutes book reads: Present: Mesdames Bell, Bourchier, McMahon, Gosling, Cockcroft, Wraight, E Coutie, R Rogers, A Jones, AH White, Davies, Everitt and the Misses Lacey, Harris, N Weller, Gosling, Bell and D and G J Bourchier. These people became the Kangaroo Ground Memorial Bazaar Committee along with others named at further meetings. They conditionally accepted the role of raising funds, their condition being that the Bazaar Committee be given representation on any committee empowered to deal with the memorial in proportion to the amount of money raised by the bazaar'. The Andrew Ross Museum has the original book. We at Eltham District Historical Society have two photocopies for public perusal. 2. Transcriptions of newspaper articles 1919-1920. 6 pages. 3. Photocopy of program for thanksgiving service July 6th, 1919 held at Public Hall, Panton Hill. 4. Photocopies: a. Kangaroo Ground, The Advertiser, 17 Oct 1919 (working bee) b. The Advertiser August 1920 – advertisement for coach between Eltham and KG. c. Anzac Memorial Service, The Eltham & Whittlesea Shires Advertiser & Diamond Creek Advertiser, April 14, 1922 and April 28, 1922 d. Anzac Day services. April 27, 1923 e. Photocopy Anzac Commemoration, local newspaper, May 2, 1924 f. Shire of Eltham Memorial Service, The Advertiser April 23, 1926 g. Eltham Shire War Memorial Advertiser August 13,1926 h. Eltham Shire War Memorial The Advertiser October 26, 1926 i. Eltham The Advertiser, December 17, 1926 j. Kangaroo Ground April 26, 1929 5. Photocopy. Eltham War Memorial Tower article, The Advertiser, November 19, 1926 6. Typed transcription of parts of newspaper articles for three titles, November 1926 7. Transcription. Public Notice, October 16, 1926 8. Photocopy Kangaroo Ground Armistice Day local newspaper, November 25, 1927 9. Photocopy Kangaroo Ground Armistice Day local newspaper, November 16, 1928 10. Photocopy Kangaroo Ground, local newspaper, April 26 1929 11. 3 Original Copies. One Hardback. Dedication of memorial official brochure, 1951 original but damaged 12. Photocopy with notes from G.G. relating to the land transfer/acquisition/contract via White and Gepp. Folder 3 (1961-1970) 1. Original newspaper article: Place with a view at Kangaroo Ground, The Age, May 11, 1963, p18 Folder 4 (1981-1990) 1. Newspaper article, Memorial a fire watch. Diamond Valley News, March 16, 1982, 2 original copies. 2. Newspaper article. An Obvious Monument by Russell Yeoman article with photo: Network Nov/Dec 1984, p14. Folder 5 (1991-2000) 1. Original newspaper article: “Kangaroo Ground Tower is top spot”. Thought to be from a tourist information free newspaper, Mountain Country, Summer [1993] p39. 2. Newspaper article with reference to quoins – a contrasting edging or corner stone on the façade of a stone or brick house. Age August 2000 3. Program. Service program for Remembrance Day commemoration ceremony, 1996. 4. Speech by Harry Gilham for Remembrance Day commemoration ceremony, 1996 5. Newspaper article: Remembrance, Diamond Valley News, 20 November 1996 6. Word Document. A Tower of Strength by Dean Stewart April 1997 7. Newspaper articles: Tower group needed, Diamond Valley News, September 17, 1997, p3 and advertisement “Nillumbik, Nominations for Kangaroo Ground Memorial Tower and Grounds Advisory Committee”, Diamond Valley News, September 17, 1997 8. Newspaper article: Council apology; scaling new heights, 1997 about Aboriginal Reconciliation. Probably Diamond Valley News ca 1997. 9. Photocopy / Newspaper Article: Two newspaper clippings, “Memorial with a view” 30 April 1997 and “Funds boost to restore tower to its former glory”, Diamond Valley News, 3 December 1997. 10. Newspaper article: Kangaroo Ground Tower of Remembrance Nillumbik Mail, 9th August 2000 and Research notes (July 2000) by Harry Gilham pertaining to photo in August 2000 newspaper article. 11. Photocopy. Newspaper article: New lease of life for tower (Concept plan) Nillumbik Mail, September 27, 2000 12. Photocopy: 4 pages, War Memorials of Victoria; a pictorial record, c.1994 Folder 6 (2001-2010) 1. Newspaper article: $10,000 to start refurbishment, Nillumbik Mail, Feb 21, 2001 2. Circular. KG War Memorial Advisory committee circular August 2001 3. Newspaper article: Tower group retained 4. Program for re-dedication of the Kangaroo Ground War Memorial Tower 8th November 2001 with copies of pages 65-70 of from The Tower of Remembrance and War Memorial Park 1919-2001 (see Folder 1) - Speaking notes from the day from Nillumbik Shire Mayor, Cr. Sigmund Jorgensen and Harry Gilham and Speech by John Landy, Governor of Victoria 5. 2 pages of Harry Gilham notes – Draft of ‘book’ notes ‘Thank you’ for rededication ceremony to be held Thursday, Nov 8, 2001 - list of invitations, notifications and acknowledgements. 6. Proposed running sheet. Re-dedication of KGT. November 8, 2001 7. Newspaper article (2 copies) Century of war service, DVL November 14, 2001 page 6 8. Letter. Gov. John Landy to Harry Gilham. Thank you for visit. [2001] 9. Newsletter Clipping: Governor of Victoria re-dedicates KG War memorial Tower, Nillumbik News (NSC) Christmas 2001 10. Newspaper article: War Memorial to be restored: DVL November 19, 2003 11. Newspaper article: Memorial Facelift Sept 29 2004. 12. Folder. Collection of maps and context Yarra Water proposal to build water tanks 13. Newspaper clipping. Pressure on with new tank. Re installation of water tank near site. DVL March 2, 2005 14. Folder of emails and designs from Dennis Ward re poppies and prostrate rosemary for formal garden around base of tower April 2005 15. Folder. Letters and paperwork re the Victorian Government “Community Cabinet” and invitation for community groups to speak directly with a government minister. Actual submission not included in folder. 16. Newspaper clipping. Time to remember among the poppies, Diamond Valley Leader, 9 November 2005, p1 and 17. Newspaper clipping. Lone pine company for souls. DVL 9 November 2005 18. Folder. Restoring Community War Memorials Grants Program. Application and associated paperwork 2005/2006 January 2006 19. Newspaper article. Shared views. Valley Weekly, June 21 2006 20. Newspaper article: Kangaroo Ground, Restoration on schedule, DVL October 2006? 21. Newspaper article. Towering over the terrain. The Age August 8, 2009 22. Photocopy. Nillumbik Shire Council. Policy and service report re lease of land to Victoria Police for police radio communications and re-building of radio tower. December 9, 2009 23. Schematics: A3 photocopies, Kangaroo Ground memorial Tower, front and rear view, Tom Manley, 17 Apr 2001 Folder 7 (2011 on) 1. Magazine article and cover. Cover story – The Kangaroo Ground Memorial Tower, The Genealogist, March 2010 2. Newspaper article. (2 copies) Photo and caption. Diamond Valley Leader, July 14, 2010 3. Newspaper notice: Notice of application for a planning permit to construct radio communications tower, DVL, October 10, 2012 4. Copy. Reference enquiry to National Film and Sound Archive. 10 September 2012 5. Copy letter. Quotation/estimate for Shire of Nillumbik on renovation and underpinning of old care takers cottage, KG. 30 September, 2012 6. Story. The Kangaroo Ground Tower of Remembrance by Amy Shaw. Yarrambat Primary School Year 6 History speech, 2014. 7. Program: Remembrance Day service, 11th November 2014 8. Newspaper article. Tribute to bravery DVL, November 19, 2014. 9. Minutes. MAC meeting. 2 September 2016. Folder 8 (Interpretative Signs Grant 2000-2001) 1. Folder. Various including Letters. EDHS Grant project: Kangaroo Ground Park and Tower of Remembrance interpretative signage from Parks Victoria 2000-2001. Folder 9 (Miscellaneous) 1. Folder Gilham collection. Google earth images of Tower, Extract describing history of Tower, including honour roll for WW1 and WW2, 8 pages, Extract describing history of Tower, including honour roll for WW1 and WW2, 3 pages, 2002 and 2004; Kangaroo Ground Tower; Southwell-Keely M.; WAR MEMORIALS IN AUSTRALIA; 8 pages, https://web.archive.org/web/20080722161554/http://www.skp.com.au/memorials2/pages/30054.htm) 2. Letter. Undated, unsigned re application to council to proposed work to police radio masts behind caretaker’s cottage. 3. Brochure: Heritage Nillumbik. Includes cover photo and other information about site. Published by Nillumbik Shire Council. About 2006. 4. Folder of notes and photocopies of various Certificates of Title for property 5. Inward loan documents. Two. Andrew Ross Museum inward loan for collection items from “War Memorial Tower” 2003 6. Photocopies of postcards of Soldiers War Memorial: One taken c.1926 before completion around base, on colour print on paper (enlarged) of Soldiers War Memorial postcard c.1930s prior to gun placements with typed text pasted on and additional detail version mounted on card with handwritten explanatory notes by Harry Gilham. 7. Photocopy of photo of tower 1944 with guns in place from Gordon and explanatory notes plus A4 photo paper print of image (photoshopped cleaned up). 8. Miscellaneous photocopies of photos taken by Harry Gilham of Memorial Park entrance, model tower in font of tower entrance, caretaker’s cottage, spiral staircase, Menin Gate sign and possibly planting of Lone Pine. Folder 10 (Fire Spotting Operations) 1. Biographical notes on Herman Motschall 1969-1981 2. Newspaper article, Memorial Tower top site for fire spotter, Diamond Valley News, May 15, 1973. 3. Proper Officer's report on an addition to the Kangaroo Ground Memorial Tower for Fire Spotting purposes: "This report covers the history of the tower, its uses, and reasons why it should be put to greater use, benefiting the Shire Council and ratepayers" Includes detailed commentary around the proposal to use the Shire of Eltham War Memorial at Kangaroo Ground for fire spotting. From Shire of Eltham archives. H. J. Masefield Property Officer. 4. Eltham Shire Council meetings 14 and 24 September 1973 references to fire watching facilities. Summary of end of season reports from spotters 1965-1973. 5. Newspaper clipping; Memorial a fire watch by Marguerite Marshall Diamond Valley News 16 March 1982 6. Letter: Cover letter from Dennis Ward 20 Feb 2006 architect for CFA Cabin design and Proposal to upgrade the fire spotting cabin, 2007 including a cost and concept plan dated 7 February 2009. 7. Newspaper article. From that first puff of smoke – horror. Diamond Valley Leader, Feb 25, 2009, p. 7 8. Invitation: State Government announcement of refurbishment of KGWM Fire spotting tower 19 October 2009 9. Newspaper article. Tower– up, Black Saturday watch. Cover and page. Diamond Valley Leader, October 28, 2009 10. Invitation. Opening of newly upgraded fire spotting tower, 11 April 2010 11. Newspaper article. Incredible luxury at fire spotting tower, Diamond Valley Leader, April 21, 2010, p, 5 12. Printout of plan of base of tower including comms cabinet and ladder to CFA cabin. Dated 17/6/2010 Archive Box 2 Folder 11 (Moor-rul Viewing Platform) 1. Agenda. Planning and building committee 12 March 2003 Application for construction of a viewing platform and road entry refurbishment and coach parking bay. 2. Envelope. Letters, paperwork and emails, mainly from Dennis Ward re roof design for the viewing platform and order for poppy seeds. 2005 3. Newspaper article (enlarged and laminated). Stolen Red gum seats sap new project’s momentum. (Local paper), April 3, 2007 4. Convenor’s Notes – Opening of the Viewing Platform at Kangaroo Ground, Shire of Nillumbik 5. Folder. Nillumbik Reconciliation Charter. Opening of the Moor-rul viewing platform 17.4.2008. Compiled by Harry Gilham. Includes newspaper clipping, speech, photocopy of photos with captions. 6. Newspaper article. View from the hill is a thrill. Heidelberg and Diamond Valley Weekly, April 22, 2008 7. Newspaper article. A platform towards reconciliation. Diamond Valley Leader, 23 April 2008. 8. Newspaper article: 6 reasons to visit Hurstbridge, The Age, Jun 6 2012 9. Article: Aboriginal cultural values and heritage management issues 10. Folder: Material relating to design and construction of viewing platform Folder 12 - Shire of Nillumbik Advisory Committee 1. 2011 Diary, Harry Gilham, Kangaroo Ground Advisory Committee 2. Photocopy. Newspaper clipping. Nillumbik Council seeking nominations for new Kangaroo Ground Memorial Tower and grounds advisory committee. DVN 17 Sept 1997 3. Letter. From NSC to Dean Stewart re heritage listing status. 12 July 1998. 4. Business paper for NSC Council meeting: KG Memorial Tower and Grounds advisory committee, 12 March 2002. Includes Terms of Reference Folder 13 - Friends of Kangaroo Ground War Memorial Park Inc. 1. KG Tower and land occupational health & Safety (guidelines) for volunteers 2. Supplementary notes (not related to fire spotting) from Friends group or advisory group of Kangaroo Ground War Memorial Park including design of seating, proposed budget for works, hand written notes from meeting by H.G. about 1999. Folder 14 - Soldiers. 1. Folder of material pertaining to men from the Shire of Eltham who enlisted in WW1 and for whom the Shire of Eltham War Memorial was dedicated. 2. Folder on residents from Shire of Eltham who died in WW2 1939-1945 with listings of each from Commonwealth War Graves Commission, WW2 Nominal Roll for Eltham 3. Newspaper article: Mates join to recall past, Diamond Valley News, November 16, 1994 4. Newspaper article: Board replaced, Diamond Valley News, September 2, 1998 about Hurstbridge RSL Honour Roll Board 5. Newspaper article: Keeping the memories alive; VP Day honoured, Valley Weekly, August 17, 2005 6. Newspaper article: In our hearts; Tributes for war heroes, Diamond Valley Leader, November 9, 2005, p1 7. Newspaper article: Service honoured, Diamond Valley News, Leader, April 23, 2008 8. Newspaper article: Salute to last men standing, Diamond Valley Leader, April 20, 2011, p1 and Last of the world warriors, pp8-9 9. Newspaper article: We will remember, Diamond Valley Leader, April 25, 2012, p3 10. Newspaper article: Family legacy builds whole town, Diamond Valley Leader, Oct, 2013, p15 11. Photos and details of Honour Boards in the shire 12. Miscellaneous notes by Harry Gilham Folder 15 – Welcome Home Committee Meeting Minutes. 1. Extracts from Welcome Home Committee Meeting Minutes 18 August 1917 to 14 August 1919. Folder 16 – World War One Local Enlistments. 1. Lever arch binder containing records of local enlistments by name from the Diamond Valley including extracts from Commonwealth War Graves Commission records. Includes Newspaper article clipping "Digger's marker of respect: Temporary cross a poignant find after eight decades in dusty garage"; Sunday Herald Sun, November 10, 2024, p33 concerning Private Harry Conway who died April 1918 and whose tempory grave marker cros now housed at Montmorency-Eltham RSL. Archive Box with documentsharry gilham collection, fire spotting, kangaroo ground, shire of eltham war memorial, masefield h. j., cfa, kangaroo ground war memorial park, shire of eltham soldiers' memorial, eltham shire war memorial tower, harry conway, montmorency-eltham rsl sub-branch -
 Flagstaff Hill Maritime Museum and Village
Book, The Logbooks of The Lady Nelson, 1915
This hardcover book, The logbooks of the 'Lady Nelson' : with the journal of her first commander, Lieutenant James Grant, R.N., by Ida Lee (Mrs Charles Bruce Marriott) was published over 100 years after the Lady Nelson arrived in Australia to navigate and survey this ‘new colony’. Included in the book are sixteen charts and illustrations from the originals in the Admiralty Library, showing the surveyed land and water. The transcribed Contents, below, summarise the trips of the Lady Nelson during this time. Book’s Content PLUS text of the Chart of ‘Part of Bass Strait’ - Chapter 1: The Lady Nelson built with centreboards. Her voyage to Sydney under James Grant. The first ship to pass through Bass Strait. - Chapter 2: Returns to explore the Strait. Her visits to Jervis Bay and to Western Port in 1801 - Chapter 3: Colonel Paterson and Lieutenant Grant survey Hunter River - Chapter 4: Murray appointed commander of the Lady Nelson. His voyage to Norfolk Island. - Chapter 5: Murray’s exploration of Bass Strait. - Chapter 6: Discovery of Port Phillip. - Chapter 7: The Lady Nelson in company with HMS Investigator examines the North-Eastern shores of Australia. - Chapter 8: The French ships in Bass Strait. The founding of Hobart. - Chapter 9: Symons succeeds Curtoys as commander of the Lady Nelson. His voyages to Tasmania, Port Phillip and New Zealand. - Chapter 10: The Lady Nelson in Tasmania. The founding of Port Dalrymple. - Chapter 11: The Estramina is brought to Sydney. The Lady Nelson visits Norfolk Island and Port Dalrymple. - Chapter 12: Tippahee and his four sons are conveyed to New Zealand in the Lady Nelson. - Chapter 13: The Lady Nelson accompanies HMS Tamar to Melville Island. - Chapter 14: The loss of the Lady Nelson Text included with the ‘Chart of Bass Strait’ … “Part of Bass Strait, including the discoveries made by Acting Lieut. J. Murray, commander of His Majesty’s armed surveying vessel Lady Nelson, between November 1801 and March 1802. By command of His Excellency Governor King.” “This chart, which bears Murray’s autograph, shows his explorations of Western Port, Port Phillip and King Island. It should be noted that Flinders Island is named Grand Capuchin. This is one of the charts referred to as "unfortunately missing” in the Historical Records of N.S. Wales, vol. iv. P. 764” The story of the Lady Nelson In 1798 the British Admiralty ordered a cutter of 60 tons to be built along the design of the armed cutter Trial that was developed by Captain John Schanck, with three sliding keels or centreboards that could be individually raised and lowered, for use on the River Thames. The new cutter was to be named Lady Nelson. Philip Gidley King, prior to taking up his appointment as third Governor of the colony of New South Wales, was in England at the time of the Lady Nelson’s fit-out and was aware of the need for such a ship for survey work in the colony in New South Wales. He convinced Captain Schanck, the Commissioner of Transport in England, to construct and rig the Lady Nelson as a brig rather than a cutter, keeping the feature of the three sliding keels, which would be very useful for mapping in shallow waters. The new Lady Nelson was launched at Deptford, England on the River Thames in November 1798, with the official commission to discover and survey the unknown parts of the coast of New Holland (Australia) and establish British sovereignty over the continent. The Lady Nelson sailed from Portsmouth, England on March 1800 under the command of Lieutenant James Grant. She carried an armament of two original and four extra brass carronade carriage guns and set sail as part of a convoy heading to Port Jackson, in New South Wales, New Holland. After a while she continued to sail on her own. Her journey was troubled with problems at times; damaged and broken keels, troublesome crew and leaking topsides between the waterline and the deck due to poor seals. She arrived at the Cape of Good Hope in July and waited for the winter to pass to avoid the strong winds of the ‘Roaring Forties’. While at the Cape, Grant received a despatch to travel to Port Jackson via the newly discovered Bass Strait, rather than the usual route via the tip of Van Diemen’s Land (Tasmania). This also gave him the opportunity to survey the strait on the way. He departed the Cape in October and in December he made his first sighting of New Holland near Mount Gambier in what is now South Australia. A report by Ecclestone in 2012, ‘The Early Charting of Victoria’s Coastline’, mentions that Grant charted and named Capes Banks and Northumberland, and sighted inland hills that he named Mt Gambier and Mt Schanck, the latter after the designer of his ship. Grant then reached the south-western shores of what is now Victoria on 3-4 December 1800, and from Cape Bridgewater he examined the coast eastward to Cape Patton. Although he had not continuously sighted the coast in the vicinity of Port Fairy and Warrnambool, the western part of Victoria became known as Grant’s Land. The Lady Nelson continued eastward and passed through Bass Strait, becoming the first vessel to reach the east coast of New Holland from the west, and arrived at her destination of Port Jackson later in December 1800. Grant, in the Lady Nelson, then left Port Jackson and began survey work. He discovered Port Phillip on Victoria’s coast and explored King Island, he helped establish the first European settlement in Tasmania on the Derwent River, and Port Dalrymple, Newcastle and Port Macquarie. He made several trips from Norfolk Island to Hobart Town. Governor Macquarie sailed on with him to Van Diemen’s Land for a tour of inspection in 1811. Grant helped establish the first settlement on Melville Island in Northern Australia. The Lady Nelson was used to transport cargo, civilians and convicts and to source pigs from Timor. In February 1825 the Lady Nelson sailed again for Timor and never returned. One report said that “Every soul on board, we regret to state, was cruelly massacred, and the hull of the vessel was seen some time after with the name painted on her stern.” The hull was sighted on the island of Babar, which is almost 200 kilometres east of Timor. This particular copy of the book ... This item is from the ‘Pattison Collection’, a collection of books and records that was originally owned by the Warrnambool Mechanics’ Institute, which was founded in Warrnambool in 1853. By 1886 the Warrnambool Mechanics’ Institute (WMI) had grown to have a Library, Museum and Fine Arts Gallery, with a collection of “… choice productions of art, and valuable specimens in almost every branch and many wonderful national curiosities are now to be seen there, including historic relics of the town and district.” It later included a School of Design. Although it was very well patronised, the lack of financial support led the WMI in 1911 to ask the City Council to take it over. In 1935 Ralph Pattison was appointed as City Librarian to establish and organise the Warrnambool Library as it was then called. When the WMI building was pulled down in 1963 a new civic building was erected on the site and the new Warrnambool Library, on behalf of the City Council, took over all the holdings of the WMI. At this time some of the items were separated and identified as the ‘Pattison Collection’, named after Ralph Pattison. Eventually the components of the WMI were distributed from the Warrnambool Library to various places, including the Art Gallery, Historical Society and Flagstaff Hill. Later some were even distributed to other regional branches of Corangamite Regional Library and passed to and fro. It is difficult now to trace just where all of the items have ended up. The books at Flagstaff Hill Maritime Village generally display stamps and markings from Pattison as well as a variety of other institutions including the Mechanics’ Institute itself. RALPH ERIC PATTISON Ralph Eric Pattison was born in Rockhampton, Queensland, in 1891. He married Maude Swan from Warrnambool in 1920 and they set up home in Warrnambool. In 1935 Pattison accepted a position as City Librarian for the Warrnambool City Council. His huge challenge was to make a functional library within two rooms of the Mechanics’ Institute. He tirelessly cleaned, cleared and sorted a disarrayed collection of old books, jars of preserved specimens and other items reserved for exhibition in the city’s museum. He developed and updated the library with a wide variety of books for all tastes, including reference books for students; a difficult task to fulfil during the years following the Depression. He converted all of the lower area of the building into a library, reference room and reading room for members and the public. The books were sorted and stored using a cataloguing and card index system that he had developed himself. He also prepared the upper floor of the building and established the Art Gallery and later the Museum, a place to exhibit the many old relics that had been stored for years for this purpose. One of the treasures he found was a beautiful ancient clock, which he repaired, restored and enjoyed using in his office during the years of his service there. Ralph Pattison was described as “a meticulous gentleman whose punctuality, floorless courtesy and distinctive neat dress were hallmarks of his character, and ‘his’ clock controlled his daily routine, and his opening and closing of the library’s large heavy doors to the minute.” Pattison took leave during 1942 to 1945 to serve in the Royal Australian Navy, Volunteer Reserve as Lieutenant. A few years later he converted one of the Museum’s rooms into a Children’s Library, stocking it with suitable books for the younger generation. This was an instant success. In the 1950’s he had the honour of being appointed to the Victorian Library Board and received more inspiration from the monthly conferences in Melbourne. He was sadly retired in 1959 after over 23 years of service, due to the fact that he had gone over the working age of council officers. However he continued to take a very keen interest in the continual development of the Library until his death in 1969 This book about the logbooks of the Lady Nelson is locally significant for its association with the brig Lady Nelson, in which Lt. James Grant made the first documented European discovery of the area later known as Warrnambool in December 1800. This book is also nationally significant for its association with Grant in the Lady Nelson being the first to sail from west to east through Bass Strait, opening up a shorter, faster route to the colony of Port Jackson rather than going all the way south around Van Diemen’s Land. The book is nationally significant for its contents of the logbooks of the journeys of the Lady Nelson under various commanders and the copies of the charts created from the surveyed information and the new land of Australia was discovered. This book is also significant for its association with the full-size non-sailing replica of the Lady Nelson from Mount Gambier’s visitor centre, which was restored by Flagstaff Hill’s Master Boat Builder in Warrnambool in 2012, and with a ship mode of the Lady Nelson in our Collection The Pattison Collection, along with other items at Flagstaff Hill Maritime Village, was originally part of the Warrnambool Mechanics' Institute’s collection. The Warrnambool Mechanics’ Institute Collection is primarily significant in its totality, rather than for the individual objects it contains. Its contents are highly representative of the development of Mechanics' Institute libraries across Australia, particularly Victoria. A diversity of publications and themes has been amassed, and these provide clues to our understanding of the nature of and changes in the reading habits of Victorians from the 1850s to the middle of the 20th century. The collection also highlights the Warrnambool community’s commitment to the Mechanics’ Institute, reading, literacy and learning in the regions, and proves that access to knowledge was not impeded by distance. These items help to provide a more complete picture of our community’s ideals and aspirations. The Warrnambool Mechanics Institute book collection has historical and social significance for its strong association with the Mechanics Institute movement and the important role it played in the intellectual, cultural and social development of people throughout the latter part of the nineteenth century and the early twentieth century. The collection of books is a rare example of an early lending library and its significance is enhanced by the survival of an original collection of many volumes. The Warrnambool Mechanics' Institute’s publication collection is of both local and state significance. The Logbooks of The Lady Nelson Author: Ida Lee ( Mrs Charles Bruce Marriott) Publisher: Grafton & Co Date: 1915Label on spine with typed text RA 910.994 LEE Inside front cover has a sticker that reads Warrnambool Mechanics Institute and Free Library shipwrecked-coast, flagstaff-hill, warrnambool, flagstaff-hill-maritime-museum, maritime-museum, shipwreck-coast, flagstaff-hill-maritime-village, shipwrecked-artefact, book, warrnambool library, warrnambool mechanics’ institute, warrnambool city librarian, mechanics’ institute library, victorian library board, warrnambool books and records, warrnambool children’s library, great ocean road, the logbooks of the lady nelson, ida lee, mrs charles bruce marriott, captain john schanck, sliding keels or centreboards, lady nelson, british brig hms lady nelson, lieutennant james grant, bass strait discovery, surveying king island and port phillip bay, philip gidley king, survey map -
 Unions Ballarat
Ballarat Trades Hall Scrapbook: newspaper clippings 1988-1993, The Courier (newspaper), various
Newspaper clippings 1991-1993. 1. Teachers' strike: Major disruptions as 500 stop work [Ballarat] Paper: The Courier Date: 2 December 1992 2. Strikes in 3 sectors [Ballarat] Paper: The Courier Date: 3 December 1992 3. Letter to the editor: Change priorities for a better city [Ballarat] Paper: The Courier? Author: P. Murphy Date: n.d. 4. Traynor's comments criticised [regarding penalty rates] Paper: The Courier? Date: 27 July 1991 5. Trades Hall seeks urgent talks on health funding [Ballarat] Paper: The Courier? Date: 29 July 1991 6. Stewart condemns weekend shearing [Ballarat] Paper: The Courier Date: 1 August 1991 7. Working class poet [Geoff Goodfellow] recites with the power of language Paper: The Courier Date: 8 August 1991 8. Budget '91: Budget brings little local joy Paper: The Courier? Date: 21 August 1991 9. State Budget '91: Budget hits low income earners Paper: The Courier? Date: 28 August 1991 10. Job cuts face local bakery [Sunicrust, Ballarat] Paper: The Courier? Date: 29 August 1991 11. Factory closure will put 50 out of work [Vitclay, Ballarat] Paper: The Courier? Date: 3 September 1991 12. Protest for jobs urged [Ballarat] Paper: The Courier Date: 7 September 1991 13. Bank staff cuts 'astound' Trades Hall secretary [Ballarat] Paper: The Courier? Date: 12 September 1991 14. Pixelated black and white portrait photo of Graeme Shearer 15. Abattoirs picket line supported [Camperdown] Paper: The Courier Date: n.d. 16. Shearers to set up AWU committee [Ballarat} Paper: The Courier Date: 19 September 1991 17. Group fights for Ballarat national rail freight link Paper: The Courier Date: 1 October 1991 18. National jobless rate 10.2.% [Ballarat] Paper: The Courier? Date: 11 October 1991 19. Shearers establish committee [Ballarat] Paper: The Courier Date: 23 October 1991 20. Wage decision backed by employers, unions [Ballarat] Paper: The Courier Date: n.d. 21. Meeting to focus on aged care: QEGC budget cuts spark local concern [Central Highlands] Paper: The Courier Date: 4 December 1991 22. Mayor urges jobless to rally to the cause [Ballarat] Paper: The Courier? Date: 7 December 1991 23. New dole record: District's jobless queue lengthens again [Ballarat] Paper: The Courier? Date: 13 December 1991 24. Begonia bans: Unions act on retirement village [Ballarat] Paper: The Courier? Date: 24 December 1991 25. Another stoppage over WorkCare [Ballarat] Paper: The Courier? Date: 5 August 1990 26. BTHC hits anti-strike proposal Paper: The Courier Date: 16 November 1991 27. Businesses eager; unions more wary. Paper: The Courier? Date: 22 November 1991 28a. Project halted: review of $60m retirement village [Ballarat] 28b. Retirement Group 'too big, too fast' [Ballarat] 28c. Retirement village work halted [Ballarat] Paper: The Courier? Date: n.d. 29. QEGC managers criticised over budget cutbacks [Ballarat] Paper: The Courier? Date: n.d. 30. Unions' aid call [Ballarat] 30a. How unions want the $6 billion spent Paper: The Courier? Date: 11 February 1991 31. Threat to bread: Bunge strike action escalates [Ballarat] Paper: The Courier? Date: 27 February 1992 32. Bunge moves rye to Albury: Workers walk out [Ballarat] Paper: The Courier? Date: 26 February 1992 33. Merry makers' labours worry Trades Hall [Kryal Castle, Ballarat] Paper: The Courier? Date: 21 February 1992 34. Agreement will put end to retirement village dispute [Ballarat] Paper: The Courier Date: 22 February 1992 35. Mill strikers call for reinstatements [Ballarat] Paper: The Courier Date: 27 February 1992 36. No debate for BRB [Ballarat] Paper: The Courier? Date: n.d. 37. Statement will be our only hope [Ballarat] Paper: The Courier Date: 12 February 1992 38. Union hits catering [Ballarate & Victoria] Paper: The Courier? Date: ?? February 1992 39. Thanks - Bunge strikers thank you to Graeme Shearer et al Paper: The Courier? Date: n.d. 40. ANZ under fire from Trades Hall Secretary [Ballarat] Paper: The Courier Date: 19 March 1992 41. Assurance sought over Melb rail line [Ballarat] Paper: The Courier Date: 18 March 1992 42. In and out of town: Premier to visit [Ballarat] Paper: The Courier? Date: n.d. 43. Regional board wants to improve its image [Ballarat] Paper: The Courier? Date: n.d. 44. Time to amalgamate (letter to the editor) [Ballarat] Paper: The Courier Date: 13 May 1992 45. Another unemployment record for Ballarat Paper: The Courier? Date: 8 May 1992 46. Trouble brews in Ballarat (opinion) Paper: The Courier? Date: 9 May 1992 47. Trades Hall warns of student exploitation [Ballarat] Paper: The Courier Date: 29 February 1992 48. Bunge unions stay firm [Ballarat] Paper: The Courier? Date: 12 March 1992 49. Workers, Bunge settle dispute [Ballarat] Paper: The Courier? Date: 4 March 1992 50. Proposal could end Bunge strike [Ballarat] Paper: The Courier? Date: 3 March 1992 51. Village payment / payment at village Paper: The Courier? Date: 6 March 1992 52. Public outcry over hike in milk price [Ballarat] Paper: The Courier? Date: n.d. 53. Workers dig deep to help Somalia [Ballarat] Paper: The Courier? Date: 10 October 1992 54. 'Callous attack on the poor': union chief [Ballarat] Paper: The Courier? Date: 13 October 1992 55. No Labour swing, says Shearer [Ballarat] Paper: The Courier? Date: 6 October 1992 56. Ballarat joins strike Paper: The Courier Date: 24 October 1992 57. Workers would revolt against Libs: Shearer Paper: The Courier? Date: 28 September 1992 58. Wage rise disgraceful [Ballarat] Paper: The Courier? Date: 31 October 1992 59. Shearer seeks guarantees for rail link [Ballarat] Paper: The Courier? Date: 19 September 1992 60. Cleaners ready to tackle Coalition [Ballarat] Paper: The Courier? Date: 19 September 1992 61. The Ballarat strike (picture) Paper: The Courier? Date: 11 November 1992 62. Workers voice their concern [Daylesford] Paper: The Courier? Date: 11 November 1992 63. The Ballarat strike Paper: The Courier Date: 11 November 1992 64. 53 railway jobs to go: union chief [Ballarat] Paper: The Courier? Date: 23 November 1992 65. Trades Hall urges support for rally [Ballarat] Paper: The Courier? Date: 25 November 1992 66. Doubt cast on our unemployed rate [Ballarat] Paper: The Courier Date: 20 August 1992 67. Wage claim justified: Shearer Paper: The Courier? Date: 20 August 1992 68. Pool plan for jobs money attacked Paper: The Courier Date: 22 August 1992 69. Fight for rail link [Geelong-Ballarat] Paper: Geelong Advertiser Date: 18 September 1992 70. Rail pledge demand Paper: Geelong Advertiser Date: 1 October 1992 Condition: very poor 71. Union calls for railway guarantee [Ballarat] Paper: n.a. Date: 21 October 1992 72. A strike is the last thing Victoria needs Paper: The Courier Date: 27 ? 1992 73.Industry turmoil: Ford plant is up for sale [Ballarat] Paper: The Courier? Date: 20 August 1992 74. Regional Board retains job counsellor [Ballarat] Paper: The Courier Date: 20 August 1992 75. Jobless figures need special consideration [Ballarat] Paper: The Courier Date: 20 August 1992 76a. Local strike chaos: All services likely to be affected [Ballarat] 76b.Strike is an act of hypocrisy [Ballarat] Paper: The Courier Date: 10 November 1992 77. Ronaldson angered by union attack blunder [Ballarat] Paper: The Courier Date: 11 November 1992 78. Ballarat rally against Govt Paper: The Courier Date: 4 November 1992 79.Payouts a form of 'blackmail' [Ballarat] Paper: The Courier? Date: 27 November 1992 80. Union leader gives job loss breakdown [Ballarat] Paper: The Courier? Date: 27 November 1992 81. Deficit levy protest: Unions seize on wide discontent [Ballarat] Paper: The Courier? Date: 26 November 1992? 82. WorkCover under fire at city rally [Ballarat] Paper: The Courier Date: 26 November 1992 83. Coalition is 'cruel': Shearer Paper: The Courier? Date: 22 August 1992 84. Policy to 'decimate unions' Paper: The Courier? Date: 26th August 1992 85. Review immigration call Paper: The Courier? Date: 16 July 1992 86. Union boss blasts Libs' proposals [Ballarat] Paper: The Courier Date: n.d. 87. Both towns could win rail link: NRC [Geelong-Ballarat] Paper: The Courier? Date: n.d. 88. Teachers rally against cuts [Ballarat] Paper: The Courier? Date: 20 May 1993 89. Five workers die in 2 years Paper: The Courier Date: 14 October 1996Significant collection of press articles that include comment from Unions Ballarat Secretary, Graeme Shearer, around the period when Jeff Kennett (Liberal Party Victoria) became premier of Victoria. Focus upon a variety of social and industrial issues impacting the Ballarat region.Newspaper articles - scanned.btlc, ballarat trades and labour council, shearer graeme, kennett jeff, railway link geelong-ballarat, liberal party victoria, industrial action - rallies, workcover, various, ballarat trades and labour council - secretary -
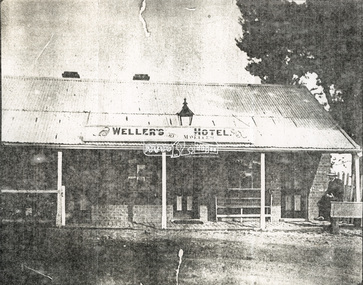 Eltham District Historical Society Inc
Document - Folder, Wellers of Kangaroo Ground, 1984-2017
Wellers of Kangaroo Ground Vertical File Contents: 1. Article: History of Wellers Restaurant by Sandra Cahir, revised 2017. 7 pages 2. Article: Weller’s Hotel of Kangaroo Ground (final draft) by Jim Allan, 1 June 2017, including feedback email from Sandra Cahir (7 May 2017). 3. Printout of online image - Kangaroo Ground landholders from 1841, Kangaroo Ground Presbyterian Church. (2022, June 29). Retrieved from https://kgpc.pcvic.org.au/images/history_images/Kangaroo-Ground-landholders.jpg 4. Folder of printouts of historical newspaper articles referencing the hotel 1866-1911 https://trove.nla.gov.au/list/163201 5. Printouts (various versions) from Victorian Heritage Database (National Trust and Nillumbik Shire) https://vhd.heritagecouncil.vic.gov.au/ 6. Collection of research notes, copies of records from various publications including EDHS Chronology of Events and Kangaroo Ground: The Highland Taken by Mick Woiwod, pp90, 180-181 (EDHS_01618). 7. Report: Request for ministerial amendment to use the property as a restaurant, includes existing conditions and plan for development, 1 November 1984 8. Papers donated by Diana and Peter Bassett-Smith including: a. Photocopy of Weller’s Hotel, Licensee M. Weller b. Letter: Shire of Eltham to Office of the Secretary for Planning and Environment, 23 Feb 1984 - Information regarding inclusion of Wellers Hotel into the Historic Buildings Register c. Letter: Historic Buildings Council letter to Peter Bassett-Smith seeking historical information on Wellers Hotel, 10 Jan 1985 d. Memo: Peter Bassett-Smith to Robert N. Hendrey on history of Wellers Hotel, 28 Jan 1985 - Includes extract of information about Mary Weller, Dept. of Crown Lands and Survey Map NILLUMBIK showing properties of John Weller and E. Weller and a Diamond Valley News article from 10 April 1973, p11, "Eltham on old coach route" 9. Information about the Weller family including family trees from various sources a. Edward Weller, Pioneer Families in Victoria, http://mepnab.netau.net/w/w09.html, 1 Jan 2017 (link broken) b. The WELLER family tree. (2017, January 1), 2 pages. Retrieved from https://www.weller.org.uk/cgi-bin/FamilyTree/ShowFamily.pl? and 27 pages Retrieved from https://www.weller.org.uk/cgi-bin/FamilyTree/ShowFamily.pl?ListAllPeople=A c. Edward WELLER on the WELLER family tree. (2017, January 1), 1 page. Retrieved from https://www.weller.org.uk/cgi-bin/FamilyTree/ShowFamily.pl?PersonID=516 d. Photograph (print copy), believed to be Edward Weller, 1836-1883 e. Photograph (print copy), Gravestone of Weller family at Kangaroo Cemetery f. Wellers of Kangaroo Ground, 1 page, possibly from History, http://www.wellers.com.au (broken) c.2016 g. Edward and Mary Weller miscellaneous biographical research notes (by Jim Allen?) including from Ancestry.com, and extracts from Chappel file (EDHS_04448) with relevant names highlighted h. Information about the Vernon Pitman family from Ancestry.com 10. Newspaper articles: a. Cobb & Co called here by Marguerite Marshall; Diamond Valley News, May 4, 1982, p2 b. Rich is history, 30 August 1983 (very similar to previous article) c. Weller’s Pub - restaurant, craft store or art gallery? Diamond Valley News, October 22, 1985, p3 d. Despite years of neglect a magical charm lies waiting, Diamond Valley News, October 29, 1985 e. Old pub fate still in doubt, Diamond Valley News, (?) 29 October 1985 f. Renovated Weller’s Pub to begin its new stage of life, DVN 26 January 1988 g. Wellers Restaurant, Lynne Hillier, Network, October 1988, p14 h. Revolution at Wellers, Nillumbik Mail, December 20, 2000 i. Wellers brings on good times, Valley Weekly, June 22, 2005 j. Dine in with ideal outlook, Valley News, 10 August 2005 k. Advertisement: Wellers of Kangaroo Ground, Enjoy lunch, afternoon tea and dinner at Wellers from Tuesday to Sunday, Valley Weekly, Wednesday, August 31, 2005 l. Advertisement: Wellers of Kangaroo Ground, Appearing live; Normie Rowe Fri 24 Feb, Diamond Valley Leader February 22, 2006, p11 m. Advertisement: Wellers of Kangaroo Ground, Lunch Special, Diamond Valley Leader March 27, 2010 n. Braithwaite abounds to Kangaroo Ground, Gig Guide, The Age, Friday, October 8, 2010, p14 o. History up for grabs, Diamond Valley Leader, March 28, 2012 p. Advertisement: Wellers Restaurant, Freehold only for sale, Morrison Kleeman, Diamond Valley Leader, March 28, 2012 q. Restaurant’s crash course, Megan Bailey, Diamond Valley Leader, January 1, 2014, p3. Also accessible online - Staff praised after car crashes through Kangaroo Ground eatery. (2022, June 29). Retrieved from https://www.heraldsun.com.au/leader/north/staff-praised-after-car-crashes-through-kangaroo-ground-eatery/news-story/021c896a1ab6d76bd6b73f2e57dc1854 r. Eatery set for revival, Brittany Shanahan, Diamond Valley Leader 15 February 2017; Also, online as Much-loved Wellers of Kangaroo Ground to be relaunched as Italian restaurant Fondata 1872. (2022, June 29). Retrieved from https://www.heraldsun.com.au/leader/north/muchloved-wellers-in-kangaroo-ground-to-be-relaunched-as-italian-restaurant-fondata-1872/news-story/665777fb347584ef483867ae2b536a8f s. Fondata 1872 proves a big hit with food, Diamond Valley Leader 3 May 2017, p3 11. Wellers of Kangaroo Restaurant Bar Entertainment Functions, tri-fold brochure promotional brochure 12. Website Printout: Wellers Restaurant, Live Guide, (2017, January 5). Retrieved from http://www.liveguide.com.au/Restaurants_Bars/VIC/Kangaroo_Ground/Food_Styles/3... 13. Website Printout: Wellers of Kangaroo Ground, Only Melbourne (2017, January 30). Retrieved from http://www.onlymelbourne.com.au/wellers-of-kangaroo-ground 14. Printouts from Fondata 1872 website and Facebook page including colour photograph of sign in front and business card (2017). Related EDHS Collection items • Wellers Hotel of Kangaroo Ground by Jim Allen, Part 1, Newsletter No. 235, Eltham District Historical Society, August 2017. Retrieved from https://elthamhistory.files.wordpress.com/2017/08/edhs-nl-235-aug-2017.pdf • Wellers Hotel of Kangaroo Ground by Jim Allen, Part 2, Newsletter No. 236, Eltham District Historical Society, October 2017. Retrieved from https://elthamhistory.files.wordpress.com/2017/10/edhs-nl-236-oct-2017.pdf • EDHS_03997 - Slide, Wellers Hotel, Pitmans Corner, Eltham-Yarra Glen Road, Kangaroo Ground, c.1975 https://victoriancollections.net.au/items/5e59e36221ea671798ac40eb • EDHS_03998 - Slide, Wellers Hotel, Pitmans Corner, Eltham-Yarra Glen Road, Kangaroo Ground, c.1975 https://victoriancollections.net.au/items/5e59e39e21ea671798ac9c27 • EDHS_03999 - Slide, Wellers Hotel, Pitmans Corner, Eltham-Yarra Glen Road, Kangaroo Ground, c.1975 https://victoriancollections.net.au/items/5e59e3c721ea671798acd2ef • EDHS_04000 - Slide, Wellers Hotel, Pitmans Corner, Eltham-Yarra Glen Road, Kangaroo Ground, c.1975 https://victoriancollections.net.au/items/5e59e3e021ea671798acfd68 • EDHS_04066-18 - Photograph, Wellers Restaurant, Eltham-Yarra Glen Road, Kangaroo Ground, c.Mar. 1989 https://victoriancollections.net.au/items/610f4dafa346aadcee7ac79c • EDHS_04041-26 - Photograph, Wellers Restaurant, 150 Eltham-Yarra Glen Road, Kangaroo Ground, c.May 1988 https://victoriancollections.net.au/items/610e2f4a7d65e7c945a35e69 • EDHS_04437 – Newsclipping, Renovated Weller's Pub to begin its new stage of life by Linley Hartley, Diamond Valley News, 26 January 1988 https://victoriancollections.net.au/items/5de4913921ea6710a46a85c7 • EDHS_04438 - Newsclipping, Wellers Restaurant by Lynne Hillier, Network, October 1988, p14 https://victoriancollections.net.au/items/5de4916f21ea6710a46aea0f • ArtStreams magazine (from Volume 9, 2004) ‘partnered' with Wellers in promoting and supporting the arts and culture. Various advertisements throughout, particular with live performance acts. Numerous references throughout to art and music performances on site. • Stephen Cummings and Joe Camilleri at Wellers Kangaroo Ground, ArtStreams, Vol. 9, No. 4, Sep/Oct 2004, p17 EDHS_04406 - Journal, ArtStreams: Whittlesea, Banyule, Darebin, Manningham, Nillumbik, Yarra; Vol. 9, No. 4, Sep-Oct 2004 https://victoriancollections.net.au/items/5bcc086021ea6804a82a92a9 • Daryl Braithwaite rocks up at Wellers, Fiona Sievers, ArtStreams, Vol.10 No.2, 2005, pp6-7 EDHS_04409 - Journal, ArtStreams: Vol. 10, No. 2, 2005 https://victoriancollections.net.au/items/60f5416ab06f0c13a9419541 • Ephemeral Sculpture by Peter Dougherty, ArtStreams, Vol.10 No.3, 2005, pp7-9. About sculptures created in or on the grounds of culinary establishments throughout the Shire. - Denise Keele-Bedford constructed ‘Ou Well’ at Wellers Restaurant and Vicky Shukuroglou, also at Wellers set up cotton banners printed and painted with natural dyes from onion skins, spinach, radish beetroot, turmeric and charcoal. EDHS_04410 - Journal, ArtStreams: Vol. 10, No. 3, 2005 https://victoriancollections.net.au/items/60f5436db06f0c13a941ae19 • Music at Wellers Restaurant, ArtStreams, Vol.10 No.4, 2005, p23 EDHS_04411 - Journal, ArtStreams: Vol. 10, No. 4, 2005 https://victoriancollections.net.au/items/60f543e4b06f0c13a941b059 • Weller’s Pub, Diamond Valley sketchbook / text by Brian McKinlay ; drawings by Graham Hawley, 1973, pp42-43 EDHS_00856 - https://victoriancollections.net.au/items/590852edd0ce7b14e8177da3 • Gold Field Coaches Stopped Here, Nillumbik now and then / Marguerite Marshall; photographs Alan King with Marguerite Marshall, 2008, pp86-87 EDHS_00977 - https://victoriancollections.net.au/items/5935f315d0cdd42c80f9cc52 External Links: • Historic Kangaroo Ground venue comes up for rare sale. (2022, June 29). Retrieved from https://www.smh.com.au/business/companies/historic-kangaroo-ground-venue-comes-up-for-rare-sale-20120325-1vshw.html • Wellers, Kangaroo Ground property sold with leaseback. (2022, June 29). Retrieved from https://www.urban.com.au/expert-insights/investing/37735-wellers-kangaroo-ground-property-sold-with-leaseback • Wellers, Kangaroo Ground | With Mark Seymour, at one of his …. (2022, June 29). Retrieved from https://www.flickr.com/photos/robertmilesdesign/4564390893/ • 2016 Notice of proposed deregistration - WELLERS OF KANGAROO GROUND PTY LTD 124 435 409. (2022, June 29). Retrieved from https://publishednotices.asic.gov.au/browsesearch-notices/notice-details/WELLERS-OF-KANGAROO-GROUND-PTY-LTD-124435409/35d43b89-159a-4435-963f-daec688a61ca • Search results for: Websites (archived). (2022, June 29). Retrieved from https://trove.nla.gov.au/search/category/websites?keyword=%22wellers%20restaurant%22 29 June 2022 edward weller, wellers of kangaroo ground, wellers hotel, wellers restaurant, mary weller, pittmans corner, fondata 1812 at wellers, historic buildings register, hotels, john weller, kangaroo ground, pitman's corner, bassett-smith collection -
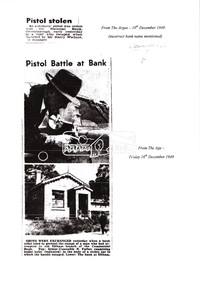 Eltham District Historical Society Inc
Folder, Commercial Bank of Australia Eltham Branch Hold-Up, 15 December 1949
Thursday, December 15, 1949, the quiet little bank was embroiled in an infamous wild shoot-out between a daring thief and two bank officers. Today, the building still carries the scars ; a bullet hole remains visible in a cedar bench testifying to the events that played out that day. 3.30 a.m., Friday, December 9. The manager of the Commercial Bank branch at Greensborough, Mr Harry Wallace and his wife are asleep in their bedroom of the little house behind the branch. Harry is awakened by a noise and sees an intruder in a corner of the bedroom. He calls out but the intruder who has switched off the power in anticipation flees through a side door and scarpers down Main Street. Harry summons the police but a search by First Constable Thomas of the Greensborough Police assisted by a wireless patrol car is unsuccessful. A report is filed noting the theft of a .25 calibre pistol from the wardrobe. Thursday, December 15th. It is 1pm and the Commercial Bank has just opened. The branch is only open Mondays and Thursdays from 1-3pm. The morning started off a little cool with some scattered showers but it has fined up and the temperature is now around 61 degrees (16 C). A new grey Singer sports car with soft-top pulls up on the opposite side of the road and a young man, neatly dressed in a dark blue suit, wearing a grey hat and carrying a brief case exits the vehicle. He looks around then crosses the road and walks up the steps and through the door into the bank. There are three people inside; Mr. Jack Burgoyne whose grocery store is situated just 50 yards up the road, Mr. Lindsay A. Spears, the Eltham Agency Receiving Officer and by chance, Mr Harry Wallace, manager of the Greensborough branch. Jack Burgoyne takes note of the young stranger; thinking to himself he appears nervous. The man approaches the counter and introduces himself as John Henderson of Greensborough and explains that he wishes to open a new account. He places his hat and £3 on the counter. Mr Spears attends to the paperwork. He asks the young man to sign two forms, which he does but then he withdraws from the counter and starts walking towards the door. Suddenly he spins around pulling an automatic pistol from his right-hand pocket. He exclaims forcefully; “The game’s on! I’ll take the lot!” Spears appears to comply by pretending to open a drawer. The man shouts loudly, “Keep your hand away from that drawer.” Spears instead reaches for a pistol in his pocket and challenges the man, “Here it is. Come and get it!” At the same time, Harry Wallace pulls a pistol from his pocket as well. The bandit fires a shot but misses, the bullet striking the counter. Both Spears and Wallace open fire and Jack Burgoyne ducks for cover. As the bandit turns and runs for the door leaving his £3 behind, he fires another shot, which strikes the ceiling. Spears fires back, and thinks he may have hit him in the foot. The bandit flees the bank and heads for the grey Singer car, registration NO-106, parked opposite. Wallace and Spears pursue him to the door and open fire again, striking the car three times around the driver’s door. Spears lets off eight shots and Wallace, seven before his gun jams. The getaway car initially heads slowly down Main Road towards Bridge Street. About 100 yards down the road, Dave Adams, a PMG employee, who has heard the shots, throws a steel manhole step at the driver. It hits the roof of the car nine inches above the driver’s head and tears the hood. Another witness claims to have seen the door blow open and the driver raise his hand. The car gathers speed and swings left into Bridge Street racing along at about 60 miles an hour careering recklessly past council employee, Mr. Percy Williams, who is driving a dray along Smarts Road [believed to be Bridge Street]. At the end of the road the Singer fails to get round the sharp turn and crashes into an embankment skidding to a stop outside the home of Mr John Clifford. One side of the car is wrecked. Mr Clifford, an aircraft engineer hears the fast travelling car bump heavily into the road bank at about 1.25 p.m. Hearing the whine of an engine he goes outside to find the grey Singer parked at the side of the road. Jack George also lives at the corner and hears the car crash. “The bandit opened the car door, ran 50 yards, and suddenly turned back,” exclaims Jack. “He took something from the car. It might have been a gun.” In his haste, the bandit drops his grey felt hat, size 6 7/8, on the road and dashes up Sherbourne Road for about 200 yards then disappears into the scrub carrying a brief case and a bundle in which a sailor’s cap can be seen. About 3 p.m., Mr H.D. Pettie of Mountain View Road, Montmorency is looking through his field glasses and notices a young man walking through thick scrub on private property some distance from his house. The man is wearing a sailor’s cap and disappears along the railway track toward Montmorency. As the day progresses, ten police cars, one motor cycle, and about 40 police led by Det. Sgt. McMennemin of Malvern CIB are searching for him. They believe he is hiding in thick scrub along the bank of the creek about half-a-mile outside Eltham township. Wireless patrol cars, four mobile traffic cars and the CIB area cars from Malvern and Kew are taking part. Police check the thief’s car and discover it was stolen from Helen Baxter, of Doncaster Road, North Balwyn from outside Victoria Barracks. Harry Wallace informs the police that he believes he recognised the bandit as the man who took his pistol from his bedroom the previous Friday morning. As night falls, armed police are posted at strategic points in the Eltham-Greensborough district. Police in cars are watching the roads. Others are searching the bush and checking passengers on trains. Little do they realise the young man has already slipped out of the net. SEQUEL YOUTH OF 19 CHARGED WITH ATTEMPTED ARMED ROBBERY OF BANK AT ELTHAM Weekly Times, Wednesday 15 February 1950, page 6 Detectives who raided a house in Bell St., Coburg, Melbourne, charged a 19-year-old youth, of South Yarra, with attempted armed robbery at the Commercial Bank’s Eltham (Vic.) receiving depot on Dec. 15. Police say they recovered a loaded automatic pistol, diamond and signet rings worth more than £200, a complete set of house-breaking instruments, a sailor’s uniform, and chloroform gauze in the raid. The youth was charged that while armed with an offensive weapon, he attempted to rob Lindsay George Spears of a sum of money. He was further charged on six counts of breaking, entering and stealing. Police allege that the person who tried to hold up Mr Spears in the Commercial Bank receiving depot at Eltham on December 15. escaped in a stolen car, after Mr Spears and Mr Henry Wallace, manager of the bank’s Greensborough branch, had fired at him. After the car crashed, he escaped into thick scrub and is alleged to have changed into a sailor’s uniform. On December 9 an automatic pistol was stolen from Mr Wallace’s bedroom at the Greensborough bank. The chloroform pad recovered is alleged to have been stolen from the Dental Supply Company, Plenty Road, Preston. The rings are alleged to have been taken in a £513 burglary from the shop of James Paton. Sydney Road, Coburg. Det. Sgt. H. McMennemin conducted the investigations with Senior Dets. R. Newton and M Downie, Detectives l. Dent, R. Rayner, P. Pedersen and M. Handley and First Constable A. Thomas. The youth will appear at Eltham Court on February 22. Manager’s Gun Used in Holdup at Bank The Age, Thursday 23 February 1950, page 4 It was stated in Eltham court yesterday that a youth who robbed a bank manager of his pistol, later used it in an attempt to hold-up the bank. Kay Arthur Morgan, 19, draftsman, of Castle-street, South Yarra, was committed for trial on charges of breaking and entering, and stealing a pistol and attempted robbery while armed with an offensive weapon. He pleaded guilty. The manager of Eltham branch of the Commercial Bank of Australia Ltd., Henry Clifton Cabot Wallace, said he disturbed someone in the bedroom, in which he and his wife were sleeping, at 3 a.m. on December. 9, 1949. Later he found that his automatic- pistol was missing. On December 15 a youth, who said his name was John Henderson, entered the bank and opened a new account. As the youth was leaving the bank he turned round with a pistol in his hand and said: — “I want the lot.” Spear indicated a drawer under the counter; and said.— “Here it is. Come and get it.” The youth said:— “Keep your hand away from that drawer.” Witness said Spear then drew his pistol from his hip pocket. The youth fired at them, and Spear returned the fire. “I pulled my pistol and fired, too” said witness. The youth fired again, ran out to a car and drove off. Witness and Spear fired several shots at the car. The youth was the accused Morgan, sitting in court, witness said. Evidence was given that one bullet was found in the celling and the other in the bank. Morgan was allowed £100 bail on each charge. Morgan ended up serving three years for the failed armed robbery and became a notorious criminal. He had twin sons, Peter and Doug and even though only ten years old, Morgan would get his sons to act as lookouts whilst he committed burglaries. The lads became building contractors but when the industry suffered a downturn in 1977 and they were short on cash, they returned to the family business. Over the following 23 months they undertook 24 raids on country and outer-suburban TABs and banks. Whilst robbing one country bank for the third time, just like their father, it all went wrong ending up with a police officer shot. They were nick-named the “After-dark” bandits and are considered to be Australia’s last bushrangers. They were convicted and served 17 years in prison.5 x A4 photocopied pagesbank hold-up, cba bank, det sgt mcmennemin, eltham, h.d. pettie, harry wallace, jack burgoyne, kay arthur morgan, lindsay a. spears, main road -
 Bendigo Historical Society Inc.
Document - BACK TO EAST SHELBOURNE SPORTS CARNIVAL, 8 October, 1927
Back To East Shelbourne Sports Carnival, Saturday, October 8, 1927. Programme. Refreshments on grounds, dance at night. 1/- Casamento's Buses. Executive Committee: President; W Harris. Vice-President; M De Araugo. Messrs. E Wright, A D Holden, W Hamilton, J Bartels, J Hinck, and H Hinck. Hon. Sec.; H M Burke. Asst. Hon. Sec.; G H Marshall. Ladies; Mesdames J Bartels, H Burke, G H Marshall, E Pocock, R Vines, and E Wright. General Committee; In addition to the above, Messrs. E Pocock, J De Araugo, F J Roberts, and W Marshall, Mesdames W Harris, A Holden, J De Araugo, F J Roberts, and Miss Pocock. Officials Judges: Messrs. T D Cairns, J Craven, and Geo. Hogben. Handicappers: Mr P Davidson (Northern District Walker's Assn.) Starter: Mr W Harris, M De Araugo, J Hinck, H Hovenden, E Pocock, W Hamilton, F J Roberts, A D Holden. Timekeeper: Mr H Hinck. Patrons: Cr, J Bartels, Nuttall & Clarke, Mrs D Punton, R S V Cocking, J Murray, and A Wells. Next 8 pages contain information on the history of East Shelbourne beginning with; This district is situated about ten miles west of south-west of Bendigo on Back Creek or Spring Creek, which received its names from the early diggers of Bendigo who, through shortage of water, were compelled to puddle at Bullock Creek or further 'back,' hence Back Creek; and because of the number of springs it contained - Spring Creek. Among the first to settle, in 1860, were Messrs. John Jenkinson, J Kilgour, T Connelly, G Nichols, R Fox, (who married Mrs James Jenkinson), Kenny, J Roberts, J Genders, J Curry, G Nevinson, Bartram, J Geary, A Nicholl, H Spencer, W Saunders, Mrs Prichard, and J Stansfield. History of East Shelbourne continues . . . Events held were Boy's (State School) Bicycle Race, Stepping the Distance (Gents), Stepping the Distance (Ladies), Bowling at the Stump, Kicking Football Through Hoop, Sheaf Toss, Bucket Ball, Sheffield, Children's Relay Race, Men's Potato Race, Tilting Rings, on Bikes, Walking Contest 1 mile, Car Race through pegs, Slow Bicycle Race 50 yards, Handicap Bicycle Race 2 miles, Tilting Rings in Cars, High Jump, Ladies' and Gent's Cigarette Race, Weight Guessing. Prizes were awarded for first and second placing of these events.In 1923, a Sports Carnival was held in the precincts of what was then a water reserve, situated south of the State School. The area was reserved for watering purposes on 1st May, 1894; and on July 15th, 1912, a small portion was excised. By 1923 its usefulness for water storage had disappeared, and being ideal for recreation purposes, it was decided, at the final meeting of the above sorts carnival, to apply for the area appointed, Mr W Harris (chairman), Messrs. G H Marshall, J Roberts, D Gill, M Connolly, R Vines, E Pocock, and H M Burke (secretary). The matter terminated in a Land Board, presided over by Mr McPherson, being held in Bendigo. The application was granted, but was not gazetted, until Messrs. W Harris and F J Roberts, with Messrs. A E Cook, MLA and Hon. H Keck, MLC interviewed the Minister for Lands. Soon afterwards, at a public meeting, the following members were elected to constitute the first Board of management, Messrs. W Harris (chairman), G H Marshall, A D Holden, F J Roberts (tres.), M D'Araugo, E Wright, and H M Burke (sec.). Since then the arena has been cleared and levelled by residents, and labor and material to the value of 150 pounds have been put into the reserve. At least 2/3rds of the program contain ads from business in Bendigo. Fordson Tractor - W Cowling, W Lewis William's Chymist, Collier footwear, William Wallace Land and Clearing Sales, Bain & Daws Groceries, Farmers & Citizens Trustees Company Bendigo Limited, Northern Seed Supply Co., Marong Bakery, Bennetts' Arcade Store, Marong Hotel, Warren's Drapery & Clothing, Jas. Friswell Butcher, Webster's Wireless, Baker & Woods Tennis Supplies, Hartleys Wireless, Cycle Hartleys, Bendigo Book & Stationery Centre Frank J Every's, T R Jones Chemist, Wool Skins & Hides F Ferguson, Furniture Carpets Linoleums Morley Johnsons, Jewellery & Silverware Prescott & Dawe, Drapers Honan & O'Toole, Stilwell's of Bendigo, Gents' & Ladies' Tailoring Hatters & Mercers Messrs. Denton Bros., Groceries Ales Wines & Spirits W Jeffrey, Ashman's Tailors Hatters Mercers, Myer's, Farmers' Grocery D Whyte & Co., Drapers & Furniture Stores The Beehive, Butcher les. Friswell, Tobacconist & Hairdresser W J Lenten, Timber Merchants & Ironmongers Hume & Iser, Stock E M Vains & Co., Ladies' & Gents' Tailors Clifford & Fulton, Printers & Stationers Bolton Bros. Pty Ltd, Bendigo Leather Shop, Everything Musical Suttons, Andrew's Auction Rooms Butter Eggs Poultry etc, Meats A C Petherick's, Albert Bush's Produce Stores & Chaff Mills, T D Cairns & Co., Jeweller C J Kirby, Casamento's Garage & Ballarat Motor Bus Service, Webster Bros. Sporting House Cycle Builders Motor Cycle & Car Agents, British Motors Bendigo, Webb's Bacon Depot. 20 pages plus coverBoltons Print, Bendigoevent, social, east shelbourne sports carnival -
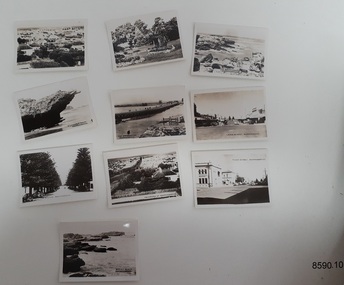 Flagstaff Hill Maritime Museum and Village
Photograph - Set of 10 Photographs & Envelope, The Rose Stereograph Company, 1940s
George Rose was born in Clunes, Victoria in 1861 and later worked in his father’s boot-making business in Prahran while studying photography. In 1880 he founded the Rose Stereograph Company and became famous for producing stereographs, or stereoviews, which gave the illusion of being in 3D when seen through a hand-held viewer. In 1913, after the world wide decline in popularity of stereographs he turned his attention to the production of postcards which had become very popular in Australia and overseas. He published postcards in Melbourne which included Tasmania views by S. Spurling. Suprlings negatives were acquired by Rose in 1937. The Rose Stereograph Company first started producing the ‘P Series’ postcards in 1913 and continued until 1967 at which time they switched to machine manufactured colour postcards printed by an outside firm. https://sparc.utas.edu.au/index.php/rose-stereograph-company These photographs were donated to Flagstaff Hill Maritime Village by the family of Doctor William Roy Angus, Surgeon and Oculist. They are part of the “W.R. Angus Collection” that includes historical medical equipment, surgical instruments and material once belonging to Dr Edward Ryan and Dr Thomas Francis Ryan, (both of Nhill, Victoria) as well as Dr Angus’ own belongings. The Collection’s history spans the medical practices of the two Doctors Ryan, from 1885-1926 plus that of Dr Angus, up until 1969. ABOUT THE “W.R.ANGUS COLLECTION” Doctor William Roy Angus M.B., B.S., Adel., 1923, F.R.C.S. Edin.,1928 (also known as Dr Roy Angus) was born in Murrumbeena, Victoria in 1901 and lived until 1970. He qualified as a doctor in 1923 at University of Adelaide, was Resident Medical Officer at the Royal Adelaide Hospital in 1924 and for a period was house surgeon to Sir (then Mr.) Henry Simpson Newland. Dr Angus was briefly an Assistant to Dr Riddell of Kapunda, then commenced private practice at Curramulka, Yorke Peninsula, SA, where he was physician, surgeon and chemist. In 1926, he was appointed as new Medical Assistant to Dr Thomas Francis Ryan (T.F. Ryan, or Tom), in Nhill, Victoria, where his experiences included radiology and pharmacy. In 1927 he was Acting House Surgeon in Dr Tom Ryan’s absence. Dr Angus had become engaged to Gladys Forsyth and they decided he would take time to further his studies overseas in the UK in 1927. He studied at London University College Hospital and at Edinburgh Royal Infirmary and in 1928, was awarded FRCS (Fellow from the Royal College of Surgeons), Edinburgh. He worked his passage back to Australia as a Ship’s Surgeon on the on the Australian Commonwealth Line’s T.S.S. Largs Bay. Dr Angus married Gladys in 1929, in Ballarat. (They went on to have one son (Graham 1932, born in SA) and two daughters (Helen (died 12/07/1996) and Berenice (Berry), both born at Mira, Nhill ) Dr Angus was a ‘flying doctor’ for the A.I.M. (Australian Inland Ministry) Aerial Medical Service in 1928 . The organisation began in South Australia through the Presbyterian Church in that year, with its first station being in the remote town of Oodnadatta, where Dr Angus was stationed. He was locum tenens there on North-South Railway at 21 Mile Camp. He took up this ‘flying doctor’ position in response to a call from Dr John Flynn; the organisation was later known as the Flying Doctor Service, then the Royal Flying Doctor Service. A lot of his work during this time involved dental surgery also. Between 1928-1932 he was surgeon at the Curramulka Hospital, Yorke Peninsula, South Australia. In 1933 Dr Angus returned to Nhill where he’d previously worked as Medical Assistant and purchased a share of the Nelson Street practice and Mira hospital from Dr Les Middleton one of the Middleton Brothers, the current owners of what was once Dr Tom Ryan’s practice. Dr L Middleton was House Surgeon to the Nhill Hospital 1926-1933, when he resigned. [Dr Tom Ryan’s practice had originally belonged to his older brother Dr Edward Ryan, who came to Nhill in 1885. Dr Edward saw patients at his rooms, firstly in Victoria Street and in 1886 in Nelson Street, until 1901. The Nelson Street practice also had a 2 bed ward, called Mira Private Hospital ). Dr Edward Ryan was House Surgeon at the Nhill Hospital 1884-1902 . He also had occasions where he successfully performed veterinary surgery for the local farmers too. Dr Tom Ryan then purchased the practice from his brother in 1901. Both Dr Edward and Dr Tom Ryan work as surgeons included eye surgery. Dr Tom Ryan performed many of his operations in the Mira private hospital on his premises. He too was House Surgeon at the Nhill Hospital 1902-1926. Dr Tom Ryan had one of the only two pieces of radiology equipment in Victoria during his practicing years – The Royal Melbourne Hospital had the other one. Over the years Dr Tom Ryan gradually set up what was effectively a training school for country general-practitioner-surgeons. Each patient was carefully examined, including using the X-ray machine, and any surgery was discussed and planned with Dr Ryan’s assistants several days in advance. Dr Angus gained experience in using the X-ray machine there during his time as assistant to Dr Ryan. Dr Tom Ryan moved from Nhill in 1926. He became a Fellow of the Royal Australasian College of Surgeons in 1927, soon after its formation, a rare accolade for a doctor outside any of the major cities. He remained a bachelor and died suddenly on 7th Dec 1955, aged 91, at his home in Ararat. Scholarships and prizes are still awarded to medical students in the honour of Dr T.F. Ryan and his father, Dr Michael Ryan, and brother, John Patrick Ryan. ] When Dr Angus bought into the Nelson Street premises in Nhill he was also appointed as the Nhill Hospital’s Honorary House Surgeon 1933-1938. His practitioner’s plate from his Nhill surgery states “HOURS Daily, except Tuesdays, Fridays and Saturday afternoons, 9-10am, 2-4pm, 7-8pm. Sundays by appointment”. This plate is now mounted on the doorway to the Port Medical Office at Flagstaff Hill Maritime Village, Warrnambool. Dr Edward Ryan and Dr Tom Ryan had an extensive collection of historical medical equipment and materials spanning 1884-1926 and when Dr Angus took up practice in their old premises he obtained this collection, a large part of which is now on display at the Port Medical Office at Flagstaff Hill Maritime Village in Warrnambool. During his time in Nhill Dr Angus was involved in the merging of the Mira Hospital and Nhill Public Hospital into one public hospital and the property titles passed on to Nhill Hospital in 1939. In 1939 Dr Angus and his family moved to Warrnambool where he purchased “Birchwood,” the 1852 home and medical practice of Dr John Hunter Henderson, at 214 Koroit Street. (This property was sold in1965 to the State Government and is now the site of the Warrnambool Police Station. ). The Angus family was able to afford gardeners, cooks and maids; their home was a popular place for visiting dignitaries to stay whilst visiting Warrnambool. Dr Angus had his own silk worm farm at home in a Mulberry tree. His young daughter used his centrifuge for spinning the silk. Dr Angus was appointed on a part-time basis as Port Medical Officer (Health Officer) in Warrnambool and held this position until the 1940’s when the government no longer required the service of a Port Medical Officer in Warrnambool; he was thus Warrnambool’s last serving Port Medical Officer. (The duties of a Port Medical Officer were outlined by the Colonial Secretary on 21st June, 1839 under the terms of the Quarantine Act. Masters of immigrant ships arriving in port reported incidents of diseases, illness and death and the Port Medical Officer made a decision on whether the ship required Quarantine and for how long, in this way preventing contagious illness from spreading from new immigrants to the residents already in the colony.) Dr Angus was a member of the Australian Medical Association, for 35 years and surgeon at the Warrnambool Base Hospital 1939-1942, He served as a Surgeon Captain during WWII1942-45, in Ballarat, Victoria, and in Bonegilla, N.S.W., completing his service just before the end of the war due to suffering from a heart attack. During his convalescence he carved an intricate and ‘most artistic’ chess set from the material that dentures were made from. He then studied ophthalmology at the Royal Melbourne Eye and Ear Hospital and created cosmetically superior artificial eyes by pioneering using the intrascleral cartilage. Angus received accolades from the Ophthalmological Society of Australasia for this work. He returned to Warrnambool to commence practice as an ophthalmologist, pioneering in artificial eye improvements. He was Honorary Consultant Ophthalmologist to Warrnambool Base Hospital for 31 years. He made monthly visits to Portland as a visiting surgeon, to perform eye surgery. He represented the Victorian South-West subdivision of the Australian Medical Association as its secretary between 1949 and 1956 and as chairman from 1956 to 1958. In 1968 Dr Angus was elected member of Spain’s Barraquer Institute of Barcelona after his research work in Intrasclearal cartilage grafting, becoming one of the few Australian ophthalmologists to receive this honour, and in the following year presented his final paper on Living Intrasclearal Cartilage Implants at the Inaugural Meeting of the Australian College of Ophthalmologists in Melbourne In his personal life Dr Angus was a Presbyterian and treated Sunday as a Sabbath, a day of rest. He would visit 3 or 4 country patients on a Sunday, taking his children along ‘for the ride’ and to visit with him. Sunday evenings he would play the pianola and sing Scottish songs to his family. One of Dr Angus’ patients was Margaret MacKenzie, author of a book on local shipwrecks that she’d seen as an eye witness from the late 1880’s in Peterborough, Victoria. In the early 1950’s Dr Angus, painted a picture of a shipwreck for the cover jacket of Margaret’s book, Shipwrecks and More Shipwrecks. She was blind in later life and her daughter wrote the actual book for her. Dr Angus and his wife Gladys were very involved in Warrnambool’s society with a strong interest in civic affairs. Their interests included organisations such as Red Cross, Rostrum, Warrnambool and District Historical Society (founding members), Wine and Food Society, Steering Committee for Tertiary Education in Warrnambool, Local National Trust, Good Neighbour Council, Housing Commission Advisory Board, United Services Institute, Legion of Ex-Servicemen, Olympic Pool Committee, Food for Britain Organisation, Warrnambool Hospital, Anti-Cancer Council, Boys’ Club, Charitable Council, National Fitness Council and Air Raid Precautions Group. He was also a member of the Steam Preservation Society and derived much pleasure from a steam traction engine on his farm. He had an interest in people and the community He and his wife Gladys were both involved in the creation of Flagstaff Hill, including the layout of the gardens. After his death (28th March 1970) his family requested his practitioner’s plate, medical instruments and some personal belongings be displayed in the Port Medical Office surgery at Flagstaff Hill Maritime Village, and be called the “W. R. Angus Collection”.The W.R. Angus Collection is significant for still being located at the site it is connected with, Doctor Angus being the last Port Medical Officer in Warrnambool. The collection of medical instruments and other items and equipment is culturally significant, being an historical example of medicine from late 19th to mid-20th century. Dr Angus assisted Dr Tom Ryan, a pioneer in the use of X-rays and in ocular surgery.10 black and white photographs of various places in Warrnambool, together with a buff envelope to contain them. The envelope states that there are 12 photographs, so two are missing. From the W.R. Angus Collection.'Gardens, Warrnambool'; 'Panorama of Warrnambool'; 'Shelly Beach, Warrnambool'; 'The Rocky Coast, Warrnambool'; 'Eagle Rock, Warrnambool'; 'Liebig Street, Warrnambool'; 'Panorama of Warrnambool' (2); 'The Breakwater, Warrnambool'; 'The Avenue, Warrnambool'; 'Timor Street, Warrnambool'. flagstaff hill maritime museum and village, great ocean road, shipwreck coast, warrnambool, photography, the rose stereograph company