Showing 7839 items
matching illustrations-reproductions
-
 Vision Australia
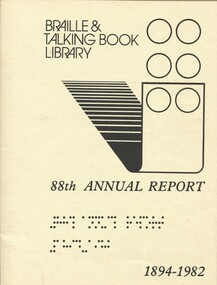
Administrative record - Text, 88th annual report 1894-1982 Braille and Talking Book Library, 1982
Annual report of the Braille & Talking Book Library including Minutes of the AGM, Board of Director's Report, President's report and financial statements. Items also included are: a rocking chair gifted to Alice McClelland on her 60th year of involvement, retirement of Merle Griffin, 'Please Touch' exhibition at National Gallery of Victoria, creation of the Benalla Studio - funded by the Benalla Auxiliary and able to accommodate 3-4 people in a session, Margaret Ingham appointed Children's Book Specialist, renaming of existing studios to R Graeme Orr Studios (to honour former President), Library Talk commended at Public Relations Awards given by Australian Library Promotions Council, visit by children's television character 'Norm the Kangaroo' who filmed a segment of 'Shirl's Neighbourhood' around the building, thanks for Joyce Nicholson, Barrett Reid and Dr Stephen Murray-Smith as Award Selection Panel for Braille Book of the Year, need for newer building as Commercial Road premises are expensive to heat and light and all available space is occupied, book bounty scheme available for braille and audio books, Louis Braille Productions Ltd set up as a subsidary company, book reading broadcasts by ABC shows will be donated free of charge, inaugural children's catalogue of Braille books produced, resignations of Dr Simon Haskell and David Hume, appointment of Elaine Leahy and Norm Fidge, and death of Maxene Hewitt and establishment of children's book collection known as 'The Maxene Hewett Collection for Children' in her honour. There is also a photograph and staff listing as part of the annual report.1 volume of text and illustrationsbraille & talking book library, hector bathurst, maxene hewitt, alice mcclelland, alison forbes, jan smark, norm the kangaroo, nick gleeson, john poliness, andrew turk, merle griffen, gladys fanning, e.e. haynes, janene morrison, beverley jackson, dianna martin, margaret komen, penny crawford, merrie handbury, shirley robinson, sue hanson, faye donnelly, jane grimwade, jennifer spry, iris whittaker, john cockayne, martin nicol, jan odle, peter sellars, paul korsten, blanche d'alpuget, luu ngac hua, sir brian murray, warren horton, robert miller, sydney alderson -
 Greensborough Historical Society
Magazine, Banyule City Council, Banyule Banner August/September 2024, 2024_08
The Banyule Banner is published by Banyule Council to advertise upcoming events in the City of Banyule and to report on past events. This edition contains reports on Council expenditure and projects for the coming year.A record of events within the City of Banyule.24 pages, colour illustrations. banyule banner, banyule council -
Greensborough Historical Society
Magazine, Banyule City Council, Banyule Banner July 2024, 2024_07
The Banyule Banner is published by Banyule Council to advertise upcoming events in the City of Banyule and to report on past events. This edition contains reports on local playgrounds, protection for trees on private property, Watsonia Town Square and the start of work on the new Rosanna Library.A record of events within the City of Banyule.24 pages, colour illustrations. banyule banner, banyule council -
Greensborough Historical Society
Magazine, Banyule City Council, Banyule Banner May/June 2013, 2013_05
The Banyule Banner is published quarterly by Banyule City Council to advertise upcoming events in the City of Banyule and to report on past events. This edition includes information on Hatch contemporary arts space. St Helena Bush Reserve, and several articles on tree protection.A record of events within the City of Banyule.20 pages, colour illustrations.banyule city council -
 Vision Australia
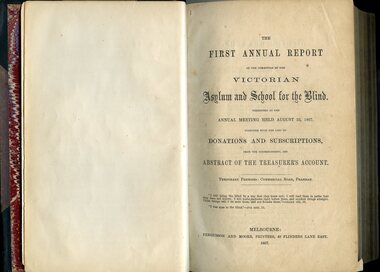
Administrative record - Text, Victorian asylum and school for the blind annual report 1867, 1867-1891
Annual reports were both a way of informing benefactors as well as generating new ones for charitable organisations. In 1867 an asylum and school for blind children began in Melbourne. Between that first intake and 1891, the asylum went through a great many changes, including the building of the St Kilda Road building, growing in size and developing a workshop for blind workers. A copy of the 1867 Annual Report was placed in the time capsule that was opened in 1993.1 bound volume with illustrations.victorian asylum and school for the blind, time capsule -
 Vision Australia
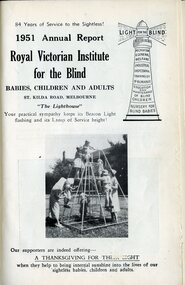
Administrative record - Text, Royal Victorian Institute for the Blind annual report 1951, 1940-1944
From it's beginning in 1867, the Royal Victorian Institute for the Blind grew in size and its number of employees and benefactors. These bound volumes of annual reports contain the information sent to subscribers of the Institute and outline the notable events and difficulties facing the blind and the RVIB.1 volume bound with illustrations.royal victorian institute for the blind, annual reports -
 Vision Australia
Administrative record - Text, Association for the Blind annual review 1997/1998, 1998
The annual report outlines the achievements of the year, financial position and client stories. Other articles outline the extensions at Elanora and Kelaston, the introduction of the first RPH service in Mildura and gaining funding to run Disability Information Victoria on behalf of the State Government.36 printed pages with illustrationsassociation for the blind, corporation records -
 Vision Australia
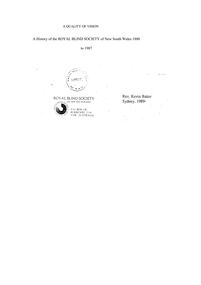
Book - Text, A Quality of Vision: a history of the Royal Blind Society of NSW 1880-1987 by Rev. Kevin Baker, 1989
Brief history of the Sydney Industrial Blind Institution, which later became the Royal Blind Society of New South Wales, under the leadership of Henry Hedger and Sir Paul Cullen.158 pages with illustrations on CDnon-fictionBrief history of the Sydney Industrial Blind Institution, which later became the Royal Blind Society of New South Wales, under the leadership of Henry Hedger and Sir Paul Cullen.sydney industrial blind institution, royal blind society of nsw -
 Vision Australia
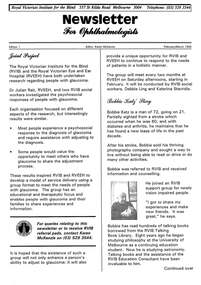
Booklet - Text, Newsletter for ophthalmologists, 1995-1999
As a way of increasing communication between opthalmologists and RVIB, a newsletter was developed the services and support that the RVIB delivered. 1 v. of text and illustrationsroyal victorian institute for the blind, newsletters -
Linton Mechanics Institute and Free Library Collection
Book - Novel, Shaw, Catharine, Cherry's choice, [n.d.] [late 19th/early 20th century?]
192 p. : frontiscpiece illustrationfictioncatherine shaw, children's fiction -
 Ballarat Tramway Museum
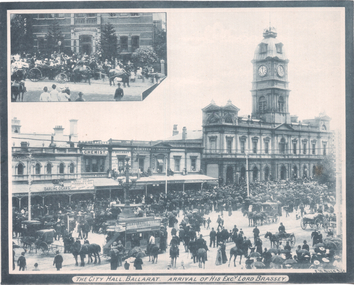
Photograph - Illustration, F W Niven & Co, "The City Hall, Ballarat - Arrival of his Excy Lord Brassey", 1896
The photo shows a large crowd with an inset photo of the visit of Lord Brassey, Governor of Victoria 1895 to 1900. The Leader (published by The Age) reported on his visit of 1/8/1896. There is a double deck horse tram in the foreground advertising "Confidence curls tobacco" In the background are shops for Darling Cigars, City Hall Book Depot, Corthoy's Chemist and dentist, Whyke Tailors, Levinson Watchmaker and J T Marsh Hatter and the Town Hall.Yields information about the visit of the Governor of Victoria to Ballarat 1896.Illustration cut from a journalOn rear in pencil "Ballarat Pictorial Guide (published by F W Niven & Co.)tramways, trams, sturt st, horse tram, lord brassey, town hall -
 Vision Australia
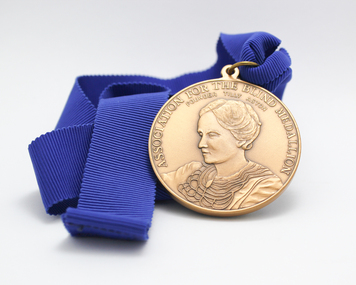
Medal - Object, Association for the Blind medallion, 199
To honour the service provided, a bronze coloured medallion was awarded to individuals. On the front is a cameo of a woman wearing a pendant and an old fashioned ruffled blouse. Around the outside is written 'Association for the Blind Medallion / Founder Tilly Aston'. On the reverse is 'Presented to' with a spray of laurel around the edge. The medallion hangs on a blue fabric band that goes around the neck. Bronze coloured medallion with illustrationsassociation for the blind, awards, medals -
 Bendigo Military Museum
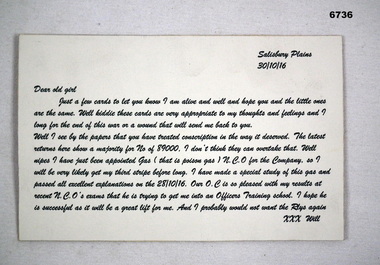
Letter - LETTER TO "Dear Old Girl" from soldier "Will", Oct 1916
This letter was written from Salisbury Plains, UK on 30 October 1916. It mentions the conscription vote. He has also passed his course for dealing with poison gas. He has been promoted to CPL. He hopes for promotion to Office. The soldier just signs as "Will".This letter is printed on cardboard. It is in italics. The colour of the ink is green. It is probably a modern day reproduction.passchendaele barracks trust, ww1, conscription, poison gas -
 Bendigo Military Museum
Painting - ILLUSTRATIONS WW1, post WW1
CF Reg No. 2539.3, 2540.9, 2541.2, 2542.8Reproductions of paintings held at the Australian War Memorial, Canberra depicting battle scenes of WWI.Individual descriptions of paintings handwritten on back.illustrations - reproductions, military history - army -
Glenelg Shire Council Cultural Collection
Photograph - Photograph - Steam Goods Train, 1920s
Black and white photo (reproduction). Steam goods train, stationary, several men examining it.Back: '839' in pencil -
Glenelg Shire Council Cultural Collection
Photograph - Photograph - Reproduction print, n.d
Possibly from Bowerbird MuseumBalck and white photo (reproduction for printing) of a group of 22 men in suits, rounded corners. -
4th/19th Prince of Wales's Light Horse Regiment Unit History Room
Aide-memoire, NBC Instructions 4/19 PWLH, Jan 1986
A poor quality photocopy reproduction giving information on various agents, their effects, decontamination etc.- Jun 1986nbc warfare -
 Eltham District Historical Society Inc
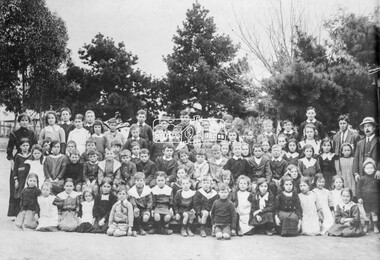
Photograph, School group (unidentified), c.1910
Whole school photo featuring 74 children and three teachers, possibly Kangaroo Ground State SchoolBlack and white photograph print (reproduction) 4x5 large format black and white negative Shire of Eltham stamp schools, school children, school groups -
 Eltham District Historical Society Inc
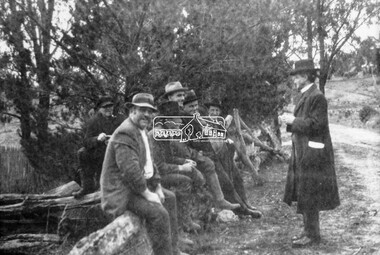
Photograph, Councillor Herbert Hewitt addressing a group men at the roadside, c.1910
Councillor Herbert Hewitt addressing a group of six men at the roadside who are sitting on a fence constructed of logs and stoneBlack and white photograph print (reproduction) 4x5 large format black and white negativecouncillors, herbert hewitt, cr. herbert hewit -
 Eltham District Historical Society Inc
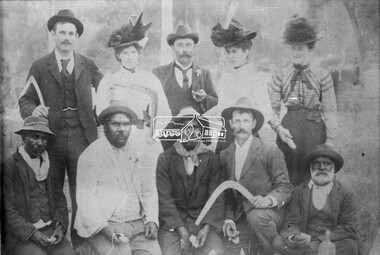
Photograph, Group of men and women, c.1910
A group of ten people pose for a formal photograph. It includes three women and four Aboriginal Australians, with two people holding boomerangs. There is little known about this orphan photograph in the EDHS collection other than it came to us via the Shire of Eltham. Ted Coutie is possibly identified in the centre back. Edwin (Ted) Coutie 1864-1927 of "Summer Hill", Panton Hill was an early pioneer.Black and white photograph print (reproduction) 4x5 large format black and white negativeShire of Eltham Centre back - Ted Coutie? ted coutie, aboriginal australians, boomerang, wurundjeri -
 Eltham District Historical Society Inc
Calendar, Eltham Main Road, looking south from Bridge Street, 1902, 1980c
Reproduction of a sketch by Bill Caldwell on a Neville Emerson Pty Ltd calendar for c.1980hotels, eltham, main road, pitt street -
 Eltham District Historical Society Inc
Photograph, Hurstbridge Railway Station Carpark c.1950, 1950c
Reproduction (Jul 1983) of a sepia photograph of Hurstbridge Railway Station Carpark c.1950.hurstbridge, railways, railway station, carparks, buses, motor vehicles -
Federation University Historical Collection
Book, The Banksias Volume 111: Watercolours by Celia Rosser, 2001
Green soft covered book with beautiful colour reproductions of banksias as painted by Celia Rosser. banksia, celia rosser, botany, painting -
 Flagstaff Hill Maritime Museum and Village
Print, Loch Ard
HISTORY OF THE LOCH ARD The LOCH ARD belonged to the famous Loch Line which sailed many ships from England to Australia. Built in Glasgow by Barclay, Curdle and Co. in 1873, the LOCH ARD was a three-masted square rigged iron sailing ship. The ship measured 262ft 7" (79.87m) in length, 38ft (11.58m) in width, 23ft (7m) in depth and had a gross tonnage of 1693 tons. The LOCH ARD's main mast measured a massive 150ft (45.7m) in height. LOCH ARD made three trips to Australia and one trip to Calcutta before its final voyage. LOCH ARD left England on March 2, 1878, under the command of Captain Gibbs, a newly married, 29 year old. She was bound for Melbourne with a crew of 37, plus 17 passengers and a load of cargo. The general cargo reflected the affluence of Melbourne at the time. On board were straw hats, umbrella, perfumes, clay pipes, pianos, clocks, confectionary, linen and candles, as well as a heavier load of railway irons, cement, lead and copper. There were items included that intended for display in the Melbourne International Exhibition in 1880. The voyage to Port Phillip was long but uneventful. At 3am on June 1, 1878, Captain Gibbs was expecting to see land and the passengers were becoming excited as they prepared to view their new homeland in the early morning. But LOCH ARD was running into a fog which greatly reduced visibility. Captain Gibbs was becoming anxious as there was no sign of land or the Cape Otway lighthouse. At 4am the fog lifted. A man aloft announced that he could see breakers. The sheer cliffs of Victoria's west coast came into view, and Captain Gibbs realised that the ship was much closer to them than expected. He ordered as much sail to be set as time would permit and then attempted to steer the vessel out to sea. On coming head on into the wind, the ship lost momentum, the sails fell limp and LOCH ARD's bow swung back. Gibbs then ordered the anchors to be released in an attempt to hold its position. The anchors sank some 50 fathoms - but did not hold. By this time LOCH ARD was among the breakers and the tall cliffs of Mutton Bird Island rose behind the ship. Just half a mile from the coast, the ship's bow was suddenly pulled around by the anchor. The captain tried to tack out to sea, but the ship struck a reef at the base of Mutton Bird Island, near Port Campbell. Waves broke over the ship and the top deck was loosened from the hull. The masts and rigging came crashing down knocking passengers and crew overboard. When a lifeboat was finally launched, it crashed into the side of LOCH ARD and capsized. Tom Pearce, who had launched the boat, managed to cling to its overturned hull and shelter beneath it. He drifted out to sea and then on the flood tide came into what is now known as LOCH ARD Gorge. He swam to shore, bruised and dazed, and found a cave in which to shelter. Some of the crew stayed below deck to shelter from the falling rigging but drowned when the ship slipped off the reef into deeper water. Eva Carmichael had raced onto deck to find out what was happening only to be confronted by towering cliffs looming above the stricken ship. In all the chaos, Captain Gibbs grabbed Eva and said, "If you are saved Eva, let my dear wife know that I died like a sailor". That was the last Eva Carmichael saw of the captain. She was swept off the ship by a huge wave. Eva saw Tom Pearce on a small rocky beach and yelled to attract his attention. He dived in and swam to the exhausted woman and dragged her to shore. He took her to the cave and broke open case of brandy which had washed up on the beach. He opened a bottle to revive the unconscious woman. A few hours later Tom scaled a cliff in search of help. He followed hoof prints and came by chance upon two men from nearby Glenample Station three and a half miles away. In a state of exhaustion, he told the men of the tragedy. Tom returned to the gorge while the two men rode back to the station to get help. By the time they reached LOCH ARD Gorge, it was cold and dark. The two shipwreck survivors were taken to Glenample Station to recover. Eva stayed at the station for six weeks before returning to Ireland, this time by steamship. In Melbourne, Tom Pearce received a hero's welcome. He was presented with the first gold medal of the Royal Humane Society of Victoria and a £1000 cheque from the Victorian Government. Concerts were performed to honour the young man's bravery and to raise money for those who lost family in the LOCH ARD disaster. Of the 54 crew members and passengers on board, only two survived: the apprentice, Tom Pearce and the young woman passenger, Eva Carmichael, who lost all of her family in the tragedy. Ten days after the LOCH ARD tragedy, salvage rights to the wreck were sold at auction for £2,120. Cargo valued at £3,000 was salvaged and placed on the beach, but most washed back into the sea when another storm developed. The wreck of LOCH ARD still lies at the base of Mutton Bird Island. Much of the cargo has now been salvaged and some was washed up into what is now known as LOCH ARD Gorge. Cargo and artefacts have also been illegally salvaged over many years before protective legislation was introduced. One of the most unlikely pieces of cargo to have survived the shipwreck was a Minton porcelain peacock - one of only nine in the world. The peacock was destined for the Melbourne International Exhibition in 1880. It had been well packed, which gave it adequate protection during the violent storm. Today, the Minton peacock can be seen at the Flagstaff Hill Maritime Museum in Warrnambool. From Australia's most dramatic shipwreck it has now become Australia's most valuable shipwreck artefact and is one of very few 'objects' on the Victorian State Heritage Register. Flagstaff Hill’s collection of artefacts from LOCH ARD is significant for being one of the largest collections of artefacts from this shipwreck in Victoria. It is significant for its association with the shipwreck, which is on the Victorian Heritage Register (VHR S417). The collection is significant because of the relationship between the objects, as together they have a high potential to interpret the story of the LOCH ARD. The LOCH ARD collection is archaeologically significant as the remains of a large international passenger and cargo ship. The LOCH ARD collection is historically significant for representing aspects of Victoria’s shipping history and its potential to interpret sub-theme 1.5 of Victoria’s Framework of Historical Themes (living with natural processes). The collection is also historically significant for its association with the LOCH ARD, which was one of the worst and best known shipwrecks in Victoria’s history. Reproduction 0620 of 1000 taken from the original painting of the Loch Ard by Neil Savage.flagstaff hill, warrnambool, shipwrecked coast, flagstaff hill maritime museum, maritime museum, shipwreck coast, flagstaff hill maritime village, great ocean road, loch line, loch ard, captain gibbs, eva carmichael, tom pearce, glenample station, mutton bird island, loch ard gorge, photograph, neil savage -
 St Kilda Historical Society
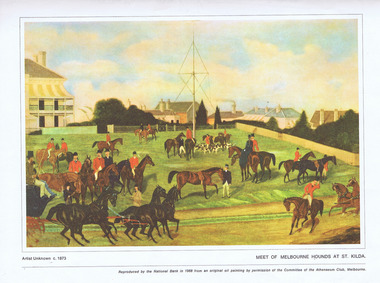
Postcard - Print colour, 1873
Early image of Alfred Square St Kilda with surrounding builldings. Reproduced from the original at the Athenaeum Clubcolour reproduction of original oil painting 1873. Meet of Melbourne hounds in Alfred Square. Meet of Melbourne Hounds at St Kilda painting by permission of the Committee on the Athenaeum club Melbourne -
 Chiltern Athenaeum Trust
Photograph, 1915-1920
WW1 soldier 1914-1918, Chiltern and Howlong Resident. WW1Sepia coloured reproduction photograph of Allan Newey WW1 Soldier and Howlong and Chiltern resident. ww1, soldier, allan newey -
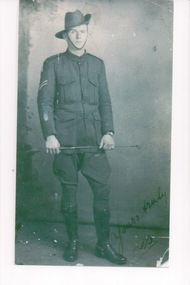 Chiltern Athenaeum Trust
Reproduction photograph of Leslie Norman Peel WW1 Soldier in the Great War 1914-1918
WW1 soldier in the Great War 1914-1918 Corporal Leslie Norman Peel. Chiltern Resident, WW1 The Great War 1914-1918reproduction photograph of WW1 soldier in the Great War 1914-1918 Leslie Norman Peel. ww1 soldier, leslie norman peel, chiltern resident, the great war 1914-1918, shire of chiltern roll of honour -
 Clunes Museum
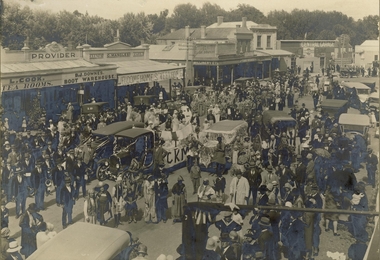
Photograph
ORIGINAL PHOTOGRAPH OWNED BY MR. MICHAEL KIRCE BACK TO CLUNES, 1925..REPRODUCTION SEPIA PHOTOGRAPH OF STREET PARADE IN FRASER STREET, CLUNES. BACK TO CLUNES 1927.On Front; Stamped Hornby's Studio Ballarat. Handwritten in black ink 18/11/27local history, photography, photographs, shops, l.cook, tea rooms, downes boot warehouse, g. mangles, central garage., events and celebrations, back to clunes -
Clunes Museum
Artwork, other - CALENDAR
THE ABOVE CALENDAR WAS PRODUCED BY A MEMBER OF THE WEICKHARDT FAMILY.A REPRODUCTION OF A PAINTING ON A CALENDAR FOR 1896 ADVERTISING WEICKHARDT & COMPANY OF NORTHAM AND SOUTHERN CROSS. W.A.GOVERNMENT CONTRACTORSlocal history, document, calendar, weickhardt family -
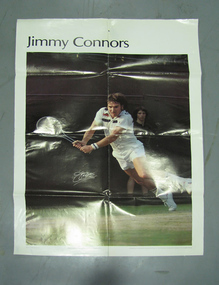 Tennis Australia
Poster, Advertisement, 1978
A large poster of Jimmy Connors, in action, with reproduction of his signature. Materials: Paper, Inktennis