Showing 1987 items matching "bagging"
-
 Orbost & District Historical Society
black and white photograph, early 20th century
This photograph shows Buchan marble being transported by horse and wagon to Nowa Nowa Railway Station. Lnidsay Cameron is the driver on the right. In the background is the Commercial Store of T. L. Sherrington, General Merchant, Bruthen. In the early 1900s black marble was being mined in the Bruthen district. Some was used for the Shrine of Remembrance in Melbourne and Australia House in London. 900 tonnes were shipped to London to be included in the construction of Australia House. Marble quarrying has been a significant part of the history of Buchan in East Gippsland. Its inclusion in the Shrine of Remembrance War Memorial and Australia House in London is noteworthy.A black / white photograph on a grey buff card. it is of four horse drawn wagons in front of a general store - "T L Sherrington General Merchant". There are five men standing on the trays and a man in a suit and hat holding a Gladstone bag is standing front left. a dog is lying on the ground between the wagons. The wagons are carrying large slabs of marble.on back - " Marble passing through Bruthen on way to railway"buchan-marble geology cameron-lindsay transport-rail transport-horse-drawn -
 Bendigo Military Museum
Photograph - BENDIGO RSL SHOW STALL, Possibly late 1970's
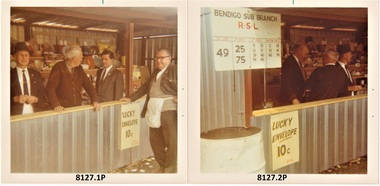
Bendigo RSL Sub Branch Show Stall fund raiser. .1) Photo, the man on the left is Jack Plant, centre is unknown, man on the right is believed to be Norm Smart. .2) Photo, On the left Norm Smart, unknown, Jack Barnes, unknown. .4) Photo, the man is unknown. Refer Cat No 8129P for Jack Plant. Refer Cat No 8040 for Jack Barnes Refer Cat No 8120.2P for Norm Smart.Four photographs colour square shape re the Bendigo RSL Sub Branch. .1) Shows the RSL sign, numbers and Lucky envelopes being "10 Cents" .2) Shows 3 men behind the counter and one outside with white waist bag on. .3) Shows the prizes in racks. .4) Shows one man behind the counter."Bendigo RSL Sub Branch", "Lucky Envelope 10c"brsl, smirsl, show stall -
 Warrnambool and District Historical Society Inc.
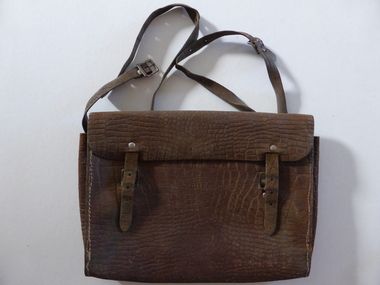
Artefact, School Satchel, Circa 1900
Satchels such as these were commonly used by young boys to carry their lunch and school items between school and home. They were used commonly in the days when much of the requirements such as slates and paper were used as class sets. They proved to be serviceable and required only the most basic of maintenace as in stitching, to be kept in good order. Being adjustable they would also serve a student for a number of years.No information is available on Henry Alexander Cain of Surrey Hills.A common item with which many people would identify.Brown leather rectanular satchel with gusset on either side . It is fastened on the front with two metal buckles and has four adjustable leather back straps attached to the bag with metal studs. These are adjustable through holes in the leather straps. Likewise the front straps can be fastened in a number of different holes. The leather has an overall snake skin pattern.Solid leather is stamped in the leather on the front. henry Alexander Cain ******Rd Surrey Hillswarrnambool, school history, boy's school bag -
 Kiewa Valley Historical Society
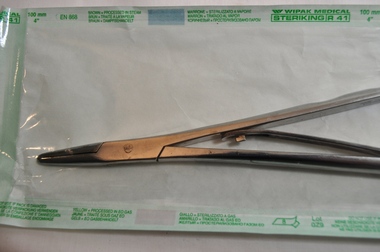
Mathieu's Needle Holder - long
This medical / hospital instrument was used in the Tawonga District General Hospital which was built in the 1950s specifically for the increase in population due to the Kiewa Hydro Scheme. Historical: Shows the development of scientific hospital equipment. Provenance: Used in the Tawonga District General Hospital which was remote and therefore required good equipment. Good condition and good interpretation capacity.In sterilised bag. Steel medical instrument used as scissors for holding needles. The handle section is very long with teeth at the end enabling that end to join. In between the two handles is a piece of steel running lengthwise and attached at the end to each handle (goes across). The scissor end is short and blunt. Used as a needle holder during operations. medical instrument. hospital instrument. mt beauty. tawonga. doctor. nurse. needle. -
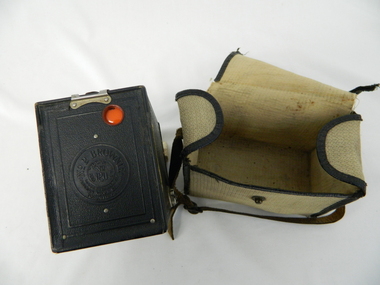 Kiewa Valley Historical Society
Bag Camera, circa 1920s
This item was manufactured in a period where the cheapest containers for portable equipment was canvas. The market place for cheap cameras was still restricted to European, England and its colonies. It was well before the post World War II explosion of the Asian manufacturing juggernaut.This item shows one of the most popular avenues of not only bringing new "modern" age equipment into the Kiewa Valley but also providing the local market with actual overseas inexpensive merchandise. It was a time when the new European fashion and "new age" equipment took years to permeate into regional Australia. The world, through Australia eyes, was still a very large planet and supply of "modern" lifestyle equipment emphasised the geographic isolation of Australia. Post World War II emigrants and an increasing flow of tourists to Australia provided the contact needed by rural settlements to open up not only their social contacts but lifestyle activities.Canvas, yellow, cream in color and with a weave pattern on the external side. It has stitched brown laminated fabric boarders containing all ends and corners. A flap opening top fastened on one side by a large press stud (15mm). A brown coloured leather carry strap (adjustable and 10mm wide) fasted at either of the longitudinal ends of the bag.camera, case photography, hobby, personal equipment -
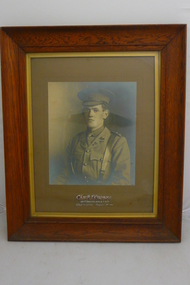 Bendigo Historical Society Inc.
Photograph - PHOTOGRAPH CAPTAIN H. F.CURNOW, 1916
Black and white photograph of man in army unifrom with caption reading Captain H.F.Curnow. 22nd Battalion A.I.E.F. Killed in action August 5th 1916. Framed in a wooden frame with gold border and under glass. Pencil number bottom right corner 9041. Backing paper is a brown paper supermarket bag Millers supermarkets Foodmaster.Darce 175 Collins St Melbournephotograph, portrait, capt h.f.curnow -
 Bendigo Historical Society Inc.
Ephemera - SHOWBAGS COLLECTION: ROWNTREE SHOWBAG
Rowntree showbag. The bag design is in yellow, red, blue, orange, black and white colours. On one side the words: Good show! there's nothing as nice as Crispin Rowntree, underneath a picture of the Rowntree's Crispin bar. On the other side the words: have a break, have a Kit Kat Rowntree, underneath a picture of the Kit Kat bar.business, retail, advertising, business advertising usually found at agricultural shows and other promotional activities. -
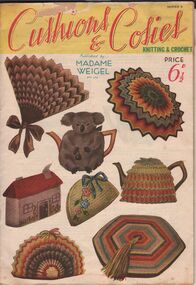 Bendigo Historical Society Inc.
Magazine - AILEEN AND JOHN ELLISON COLLECTION: CUSHIONS AND COSIES
Magazine: Cushions and cosies knitting and crochet published by Madame Weigel, series 6 price 6.5 pennies. The magazine has 20 pages. Inside the magazine 4 cuttings from newspapers another magazines all relating to knitting plus 3 cutting of brown paper with writing on them: pattern for dolly handkerchief or stocking bag.books, magazines, knitting -
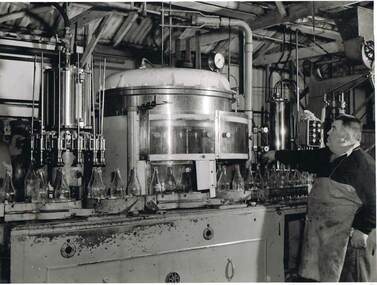 Bendigo Historical Society Inc.
Photograph - COHN BROTHERS COLLECTION: BOTTLE FILLING MACHINE
Photograph. Cohn Bros. Collection. Black & white photo of a man operating a bottle filling machine. The bottles travel on a conveyor to the filling point. They travel past a large container with a gauge on the top. There are other various pipes and pieces behind the man. He is wearing a bag apron tied up with string. ML45/3 (written on the back).organization, business, cohn bros, cohn bros. collection, bottle filling machine, brewers, cordial & aerated water manufacturers -
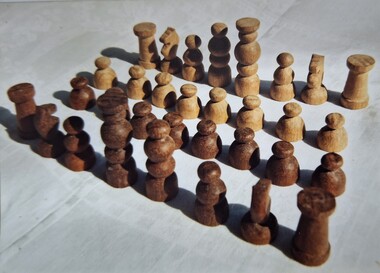 Tatura Irrigation & Wartime Camps Museum
Leisure object - Board game - chess, Alfred Jahn, Chess Set, 1940's
used by POW's at camp 13, made by Albert Jahn, an internee.Carved wooden miniature chess set (31 pieces). 2 kings, 2 queens, 4 bishops, 4 knights, 4 rooks, 15 pawns. A khaki bag with a draw string top for storage. 15 pieces made of dark coloured wood. 16 pieces made of light coloured wood. (1 piece missing)albert jahn, chess set, miniature chess set, pow games, internment camp board games -
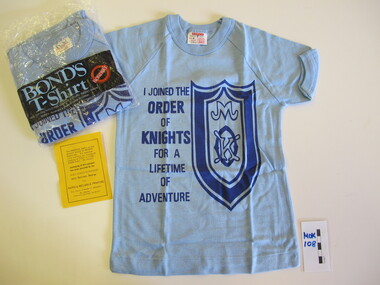 Uniting Church Archives - Synod of Victoria
T-shirt
New pale blue cotton T-shirts in orignal packaging. Screen printing in royal blue with Methodist Order Knights symbol and text. Slip of paper in bag regarding care instructions and packaging details. Packagaing: Sizes available on reverse. Slip of paper: "Packaging of this garment has been assisted by the SHELTERED WORKSHOP Adult Retarded Bendigo""I JOINED THE ORDER OF KNIGHTS FOR A LIFETIME OF ADVENTURE" -
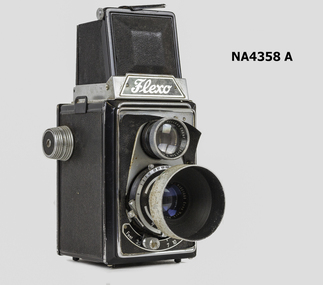 Whitehorse Historical Society Inc.
Equipment - Camera
Camera owned by Robert Gardiner in the 1950s. Purchased c 1954 at Michael's camera store, cnr Elizabeth and Bourke Street, Melbourne. Used during courtship with Barbara Hegarty Gardiner - Took sporting photos, family photos and Holiday trips.Twin Lens Reflex black camera in leather case - R (Flexo) with carrying strap. Strap holding a Weston light meter in zipped soft bag. Lens hood in leather case. Lens f 1.35 focal length 7.5cm. Film size 120|Cardboard Box. Hanimex - transparency mounts. A total of 9 items .Flexophotography, cameras, camera accessories -
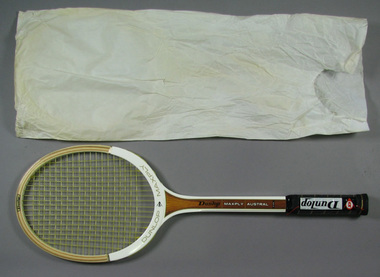 Tennis Australia
Racquet, Packing cover, Circa 1976
Multi-part object of 6 identical racquets (parts are numbered from 2008.986.1 to 2008.986.6). Each racquet is: a Dunlop 'Maxply Austral' model with yellow net strings and handle wrapped in Dunlop-branded plastic packaging. Racquet in white paper factory bag. Materials: Wood, Plastic, Adhesive tape, Paint, Leather, String, Nylon, Papertennis -
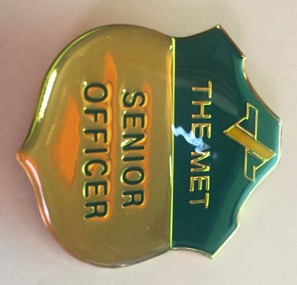 Melbourne Tram Museum
Functional object - Badge, Public Transport Corporation (PTC), c1980
Badge - Manufactured - brass? with gold plate finish on the rear and sides with a green and gold glazed paint finish with the Public Transport Corporation (PTC) logo and the "The Met" name and large vertical safety retained pin or clip attached to the rear. Has the words "Senior Officer" on the lower half of the badge. Badge contained within a plastic bag.trams, tramways, the met, badges, officers, ptc, public transport corporation -
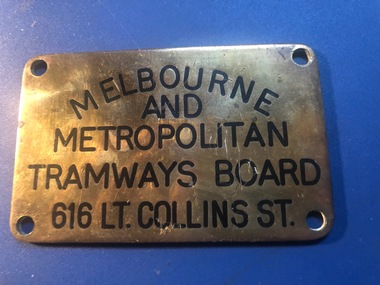 Melbourne Tram Museum
Functional object - Address Plate, Melbourne & Metropolitan Tramways Board (MMTB), 1950's?
Engraved brass address plate, with the words "Melbourne and Metropolitan Tramways Board 616 Lt. Collins St" in capital letters with the word "Melbourne" curved. Has four screw holes in the corner. Could have been used on a correspondence bag, eg for the Post Office or another Authority. Note the MMTB Head Office as at this address post 1938.trams, tramways, mmtb, head office, post office -
 Whitehorse Historical Society Inc.
Souvenir - Bag, Leather bag of buttons and badges collected in World War I
Collection by Charles Honybun during WW1Buttons and badges collected by Charles Honybun from German Uniforms 1916 -1918 1 Plastic/Bakelits 15 with shanks 2 Shirt Buttons 4 Trouser Buttons 1 Cap Badge 1 1o Pfenninf coin 1 2 pfenning coin all in drawstring leather pouch. A total of 25 items including the bag.uniforms, army, ww1, charles henry honybun -
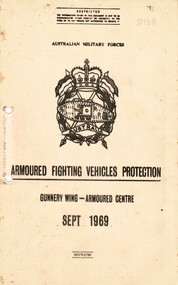 National Vietnam Veterans Museum (NVVM)
Manual, Australian Military Forces, Australian Military Forces: Armoured Fighting Vehicles Protection: Gunnery Wing - Armoured centre Sept 1969, 1969
A cream coloured cardboard cover with black information on the front. in black in reads Australian Military Forces and under this there is an insignia. Under the insignia reads Armoured Fighting Vehiches Protection (which is underlined) followed by Gunner Wing - Armoured Centre Sept 1969. There are two holes down the left hand side. The manual is loose and stored in a plastic bag.australia - armed forces - service manuals, tank warfare, gunnery wing, armoured fighting vehicles protection, armoured centre, australian military forces -
 Federation University Historical Collection
Book, Notebooks belionging to Richard Squire with mine notes
Richard Squire was a student at Ballarat School of Mines In 1905 Richard Squire was manager of the West Berry Consols at Allendale, and developed an improved system of mine ventilation, which was supported in "The Age."He was successful in combating and remedying the gas and ventilation troubles of the Deep Mines of Creswick and Allendale Districts after all had failed. MINE MANAGERS’ ASSOCIATION. Ballarat Branch. ... Mr R. B. Squire, manager of the West Berry Consols, at Allendale, submitted a paper detailing what he had done tor the betterment of ventilation in the alluvial mines of Smeaton and Mary borough districts- Members gave Mr Squire every credit for the results that he claimed to have effected; the adoption of his ideas had testified to their value to mine-owners. It was painted out, however, that for want of a thorough debate of the subject with experienced men the author had unwittingly included some general statements that required modifying in some points and extending in others, in justice to other workers among the earlier and the present day managers of mines. It was decided to invite the author to meet a sub-committee on this subject!Little black books with handwritten notes on the mines of Richard Squire .1 1916 Deliveries, Accounts, Invoices etc. .2 1911 & 1912 Notes to pay costs, equipment etc. .3 South Berry Coy. Notes from 1909 ( 2book stuck together) .4 Leigh River Time Book ( 2book stuck together) .5 Single page of Notes .6 Notes on supplies etc. 1919 .7 Leigh River Notes Dec 1920 to March 1921 ( 2book stuck together) .8 Hut Book .9 Notebook August 8th 1927 .10 6 Books stuck together various mine notes 1912 .11 Notebooks bagged because of potential mould .12 Notebooks bagged because of potential mould richard squire, notebooks, deliveries, leigh river time book, leigh river, supplies -
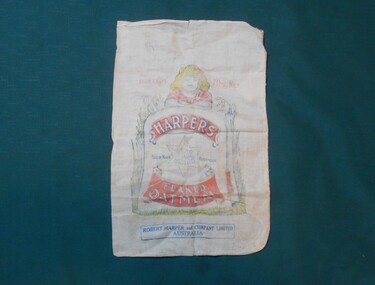 Bendigo Historical Society Inc.
Textile - FLOUR BAG COLLECTION: ROBERT HARPER AND COMPANY, 1900-1950
Textiles. Calico bag - ''Harpers Flaked Oatmeal'' Star brand, Trademark Registered ''My Brekfus'' 7 lbs Net. Robert Harper and Company Limited Australia. Head and shoulders drawing of a blonde haired girl surrounded by wheat.On the other side of the bag is a blue and white picture of a box of ''Silver Star Starch''. Robert Harper and Co Ltd. Slogan written on box, '' The best in the world. Won't sick to the Iron''. Robert Harper and Company (1842-1919), businessman and politician, was born in Scotland. He migrated to Melbourne with his family in August 1856. He worked for J.F.McKenzie & Co., roasting and grinding millers. In 1865 he established Robert Harper & Co., trading in tea, coffee and spices from the East Indies and later in oatmeal and flour.textiles, domestic, robert harper and co calico bag -
 Melbourne Tram Museum
Photograph, Cable tram 534 in Bourke Street outside the St. James Building, 1924
The photograph shows a cable tram set with trailer No. 534 east bound in Bourke St on its way to Nicholson St passing the St. James Building at William Street. The conductor standing at the back of the grip car is in MMTB uniform with his ticket wallet in his left hand and bag visible. The grip man appears to be ringing his bell. There is a side advertisement for the "All Australian Exhibition". A reference to the exhibition is in The Argus of 3/11/1924 - see reference.Yields information cable trams in Bourke St and their crews.Photograph, black and white, plain backtrams, tramways, cable tram, bourke st, conductors, tram crews, william st, tram 534 -
 Bendigo Historical Society Inc.
Clothing - MAGGIE BARBER COLLECTION: BLACK HAND BAG WITH SILVER INITIALS MAB
Clothing. Owners initials prominent on outside. Rectangular in shape, fine grained black leather. The leather forms an external shape, white inside a smaller watermark, black silk pouch has a silver frame and clasp to hold the required items. This is lined with a dark cream watermark silk, and has an outer section with side pocket, containing a mirror, and a smaller inner section divided into purse-like compartments. Each swection has a silver frame and clasp. A small piece of light card -red on one side, and possibly glued as a label on the otherside is the same shape as the handbag, and has printed in capital letters ''NOTE THE POINTS''. This may or may not relate to the bag. The outer leather section is slightly tapered-wider at the bottom, forming slight peaks. The top reflects these peaks, with a 3 cm wide band of leather, shaped wider at the top. 23 cm long at top, 21 cm long at lower edge. Silver metal, upper-case lettering:M-A-B, indicate the owners initials. .7 cm high, 7cm long. Two 1 cm wide, 28 cm long handles complete this stylish bag. Mirror has bevelled edges, and is backed with the same fabric, as the bag lining.costume accessories, female, black handbag with silver initials m-a-b -
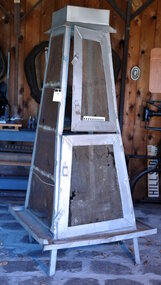 City of Moorabbin Historical Society (Operating the Box Cottage Museum)
Functional object - Kitchen Equipment, Coolgardie Safe, c1900
The invention of the Coolgardie Safe is credited to Arthur Patrick McCormick, a contractor in Coolgardie, and later the Mayor of Narrogin. Coolgardie is in the Eastern Goldfields region of Western Australia. Gold was first discovered there in 1892; the townsite became a municipality in 1894, and by 1898 its population of 15,000 made it the third largest town in Western Australia after Perth and Fremantle. In the last decade of the 19th century, Coolgardie was the capital of the West Australian goldfields. Being 180 kilometres from the nearest civilisation, food supplies were initially scarce and expensive. As fresh food was a valuable commodity there was incentive to preserve it, and keep it out of reach of scavengers such as birds, dingos, dogs, ants, and flies. It was in an effort to do this, in the extreme heat of the Australian Interior, that McCormick came up with his design for the Coolgardie Safe. McCormick noticed that a wet bag placed over a bottle cooled its contents. He further noted that if this bottle was placed in a breeze, the bag would dry out more quickly, but the bottle would get colder. What McCormick had discovered was the principle of evaporation: ‘to change any liquid into a gaseous state requires energy. This energy is taken in the form of heat from its surroundings.’ Employing this principle, McCormick made a box for his provisions which he covered with a wet hessian bag. He then placed a tray on top, into which he poured water twice daily. He hung strips of flannel from the tray so that water would drip down onto the hessian bag, keeping it damp. As the water evaporated, the heat dissipated, keeping the food stored inside cool and fresh. The success of McCormick’s invention would not have worked without a steady supply of water. Fresh water was scarce in the eastern goldfields at this time but the demand for water from a steadily growing population encouraged innovation. The solution was to condense salt water. Heating salt water in tanks produced steam that was condensed in tall cylinders, cooled and then collected in catchment trays. By 1898 there were six companies supplying condensed water to the goldfields, the largest company producing 100,000 gallons of water a day. In the early 20th century, Coolgardie Safes were also manufactured commercially. These safes incorporated shelving and a door, had metal or wooden frames and hessian bodies. The feet of the safe were usually placed in a tray of water to keep ants away. (MAV website) The early settlers of Moorabbin Shire depended on this type of Food Safe to protect their food from flies and vermin as they established market gardens in the fertile area around the notorious Elster Creek A metal framed, 4 sided structure standing on 4 legs with 2 hinged doors on one side, a metal tray at base of food safe and a metal cover over top. Ridges on which to rest trays carrying food are inside safe. The Safe is enclosed by fly-wire mesh.'...IN.....GEELONG' A manufacturer's oval metal plate is embossed on one side of Safe but it is illegible.elster creek, moorabbin, brighton, dendy's special survey 1841, market gardens, infant mortality, disease, cemeteries, fruit, vegetables, pioneers, coolgardie safe, mccormick arthur patrick, dendy henry, vaccination, jones martha, jones ethel may -
 Kiewa Valley Historical Society
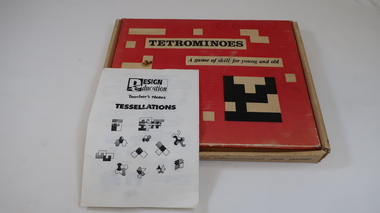
Educational Activity - Tetrominoes
Design Education - Patterns, Shapes. Tesalations. Geometry. Problem solvingMt Beauty Primary School mathematics and problem solvingCardboard box with red top cover surrounding black and beige shapes and 'Tetrominoes' / 'A game of skill for young and old'. Top cover lifts up. Inside: 2 plastic bags one with red, white and yellow plastic shapes with separate black base. Second bag: with 'Teachers Notes' leaflet and small booklet 'How to play / Tetrominois.' 1992mt beauty primary school, educational, mathematics, teaching aid -
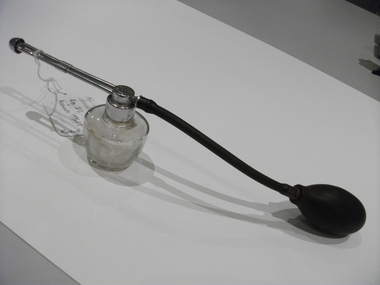 Royal Australian and New Zealand College of Obstetricians & Gynaecologists (RANZCOG)
'Atomist' atomiser associated with Dr Frank Forster
The all purpose 'Atomist' atomiser was used from the 1930s to the late 1960s. The atomiser had a detachable nasal mount, and a rubber bulb which was attached to a length of tubing. It also had an adjustable spray tip. It could be used as an anaesthetic cocaine or other spray. In the 1950s it was in extensive use as a laryngeal, nasal and throat spray. The spray nozzle could be turned upwards or downwards and was similar in appearance to the De Villiers Canadian spray. The atomiser could also be used as a vaginal douche with lotion for the treatment of vaginal infections. An atomizer spray consisting of a glass container with a hollow metal tube at front and long black rubber tubing attached to a rubber bulb at the rear. Glass container has residue of white liquid in it. WARNIING: dried white powdery substance may be arsenic. Contained in sealed bag. Handle wearing nitrile gloves and ensure examination is in open area, not enclosed space. -
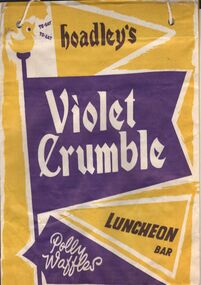 Bendigo Historical Society Inc.
Ephemera - SHOWBAGS COLLECTION: HOADLEY'S VIOLET CRUMBLE AND POLLY WAFFLES SHOWBAG
Hoadley's showbag. The bag is in yellow, purple, black and white. On one side from the top the words: to eat, to eat - Hoadley's. At centre in big lettering: Violet Crumble and underneath in smaller letters: luncheon Bar and Polly waffles. On the other side the top is the same, followed by Polly Waffles and under that luncheon bar and tex bar. There are 8 of these bags in different conditionsbusiness, retail, advertising, business advertising usually found at agricultural shows and other promotional activities. -
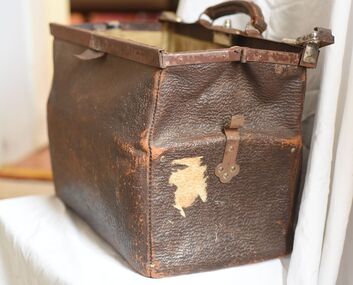 Stanley Athenaeum & Public Room
Functional object - Gladstone Bag
Brown grained leather - Animal hide. Metal attachments; one leather handle. 2x 90mm long metal straps- 15mm depth. Top opening. Bag folds in to middle . Central lock part broken & handle. Latch to fasten each end of metal trimming - broken. Fabric lining inside with cardboard backing - beige colour/ fair condition.No maker -
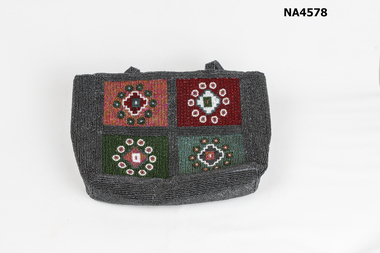 Whitehorse Historical Society Inc.
Accessory - Beaded Handbag, 1980s
Bought by Valda Arrowsmith during 1980sBeaded handbag. Background beading is in small grey beads. There are four square sections on each side with coloured beads forming geometric patterns in red, green, pink and white beads. There are two handles which are beaded in small grey beads with grey silk lining. The bag is lined with grey silk. There is a zipped compartment inside and a metal clip to close it.costume accessories, female -
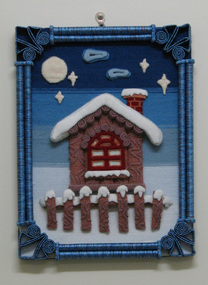 South Gippsland Shire Council
Frame, Woven, Chinese House in Snow, 1990s
Handmade three dimensional wool frame. Features a Chinese house in a winter night scene. Decorative raised parts include the frame edge, house, roof, fence, moon and stars. Each piece is bound in wool thread to create the woven effect. Colours of blue, white, brown and red. Sealed in a plastic bag. Manufacturer's label printed in Chinese on reverse. -
 Bendigo Historical Society Inc.
Photograph - Golden Square Secondary College Class and staff photographs
Plastic bag containing photographs of Golden Square Secondary College students. The year covered is 1993 classes 7B-7C-7D-7G-7H-7L-7R-7Y / 8A-8B-8C-8D-8E-8F-8G / 9A-9B-9C-9D-9F-9G Three photographs of teachers and staff, one photograph of the principal and vice principal.golden square secondary college, students' photographs -
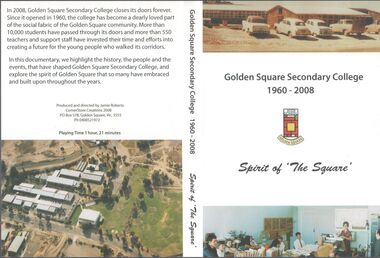 Bendigo Historical Society Inc.
Photograph - Golden Square Secondary College Class and staff photographs
Plastic bag containing photographs of Golden Square Secondary College students. The year covered is 1995 classes 7A-7B-7C-7D-7E-7F-7G / 9A-9B-9C-9D-9E-9F-9G / 10A-10B-10C-10D-10E-10F-10G Three photographs of teachers and staff, one photograph of the principal and vice principal.golden square secondary college, students' photographs